eternity user guide - ibuttonlock.com s/ikeypadlock_instruction.pdf · eternity user guide 3 ......
TRANSCRIPT
UCA, INC.
ACCESS CONTROL SOLUTION
ETERNITY
USER GUIDE
Version 2.1

Eternity User Guide
2
Table of Contents
Chapter 1 System Information
1.1 Installation Diagram
1.2 Important Information
Model Spec
Manufacture Settings
LED and Audio Indicator
1.3 System Requirement
1.4 Hardware Spec
1.5 Software Spec
1.6 Manually Setup iButton Keys and Keycode
Manually Setup iButton Keys
Manually Setup Keycode
Chapter 2 Getting Start the Software
2.1 Installing the Software
Operating System
Install 1-Wire USB Driver
Install the Eternity Software
2.2 Running the Software
Login
Set Lock System Password
1-Wire Connection Error
Set Lock Type
Chapter 3 Using Software
3.1 Adding Locks to the Database
3.2 Adding Keys to Database
3.3 Add / Delete Keys to Lock
Single-Lock Key Assignment
Multi-Lock Key Assignment
Permanent Code Setting
Temporary Code Setting
Terminated a lost Access Code

Eternity User Guide
3
3.4 Time Function Setting
Time Shift Setting
Timed Operation Setting
Activation / Expiration Date Setting
Exception Date Setting
3.5. Maintenance Mission
Get Audit Trail
Set Time Table
Lockout Key
Get Information Key
One Off Key
Set Parameter Key
Set Time Key
Chapter 4 Other Information
4.1 Audit History
4.2 System Configuration
4.3 Operator Information
Chapter 5 Case Study
Eternity User Guide
4
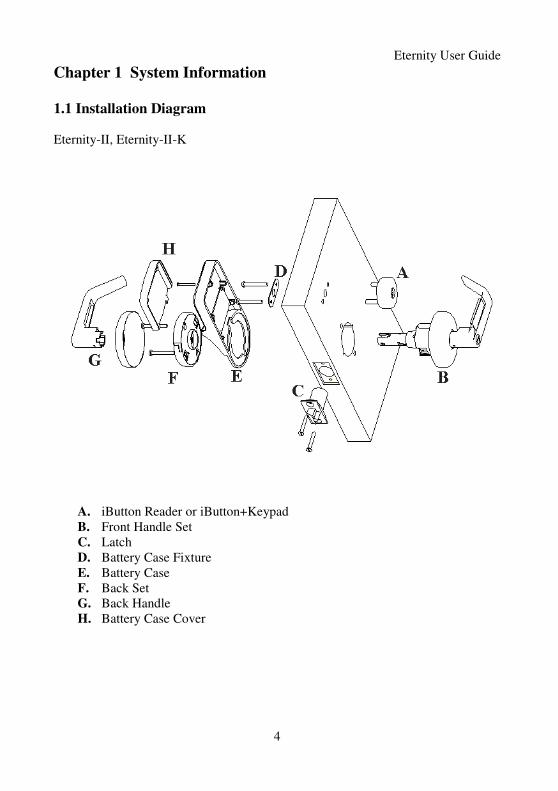
Chapter 1 System Information
1.1 Installation Diagram
Eternity-II, Eternity-II-K
A. iButton Reader or iButton+Keypad
B. Front Handle Set
C. Latch
D. Battery Case Fixture
E. Battery Case
F. Back Set
G. Back Handle
H. Battery Case Cover
Eternity User Guide
5
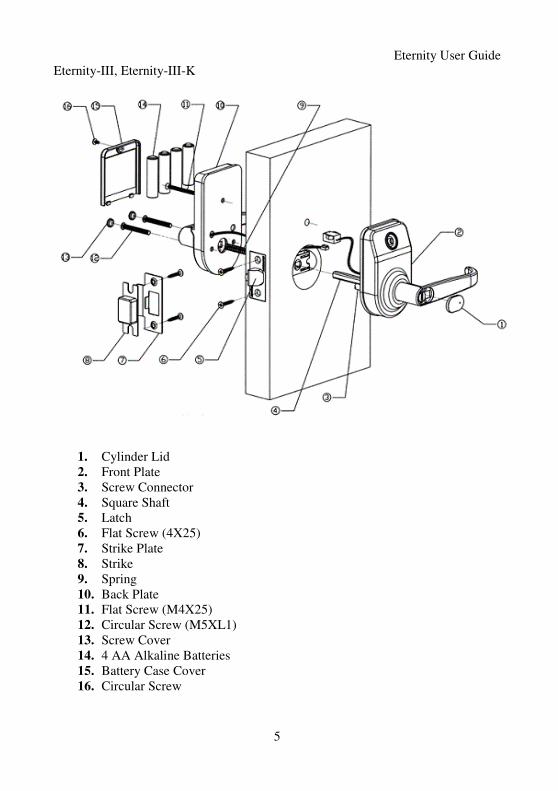
Eternity-III, Eternity-III-K
1. Cylinder Lid
2. Front Plate
3. Screw Connector
4. Square Shaft
5. Latch
6. Flat Screw (4X25)
7. Strike Plate
8. Strike
9. Spring
10. Back Plate
11. Flat Screw (M4X25)
12. Circular Screw (M5XL1)
13. Screw Cover
14. 4 AA Alkaline Batteries
15. Battery Case Cover
16. Circular Screw

Eternity User Guide
6
1.2 Important Information
Model Specifications
Model
Name
Eternity-
II -
Grade
One
iButton
Lock
Function:
1500 Users
4000 Audit Trail Records
Timed Lock / Key Operation
Grade1 heavy duty
UL Certified
Mechanic Key Override
Schlage C Keyway
(IC core available per
request)
Eternity-
III
Function:
1000 Users
4000 Audit Trail Records
Timed Lock / Key Operation
Grade1 heavy duty
UL Certified
Mechanic Key Override
Eternity-
III-K
Grade Three
iButton+Keypad
Lock
Function
500 iButton users
100 Permanent Codes
Or 10 temporary Codes
4000 Audit Trail Records
Timed Lock / Key Operation
Time Sharing Keypad
(Rental Home function)
Manufacture Settings
1. Default Login is: dallas / iButton
RESET
RESET

Eternity User Guide
7
2. Default Operator Password for each new account: 00000000 (8 Zeros)
3. Default System Password: 000000 (6 Zeros)
LED and Audio Indicator
MODE LED AUDIO RESULT
Programming Green Two Beeps Programming Successful
Programming Red One Beep Programming Fail
Key Access Green Two Beeps Valid Access
Key Access Red One Beep Invalid Access
Unlocking
Mode
Green Flash Lock is current in the unlocking
mode
Locking Mode Red Flash Lock in current in the locking
mode
1.3 System Requirement
• Lock (Eternity-II, Eternity-III, Eternity-II-K, Eternity-III-K)
• Programming Key – DS1977
• User Keys- DS1982 / DS1990
• Clock Key (Optional) – DS 1994
• USB 1-Wire Connectivity Encoder
• PC (with Software Installed)
Eternity User Guide
8
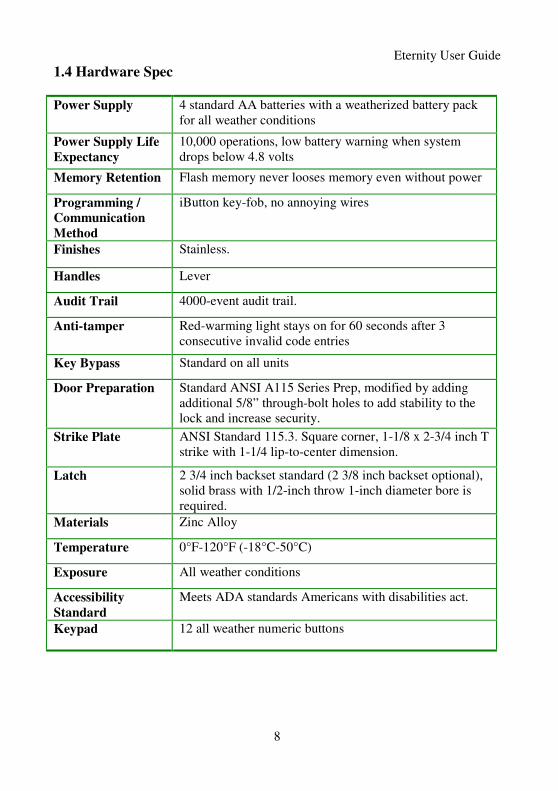
1.4 Hardware Spec
Power Supply 4 standard AA batteries with a weatherized battery pack
for all weather conditions
Power Supply Life
Expectancy
10,000 operations, low battery warning when system
drops below 4.8 volts
Memory Retention Flash memory never looses memory even without power
Programming /
Communication
Method
iButton key-fob, no annoying wires
Finishes Stainless.
Handles Lever
Audit Trail 4000-event audit trail.
Anti-tamper Red-warming light stays on for 60 seconds after 3
consecutive invalid code entries
Key Bypass Standard on all units
Door Preparation Standard ANSI A115 Series Prep, modified by adding
additional 5/8” through-bolt holes to add stability to the
lock and increase security.
Strike Plate ANSI Standard 115.3. Square corner, 1-1/8 x 2-3/4 inch T
strike with 1-1/4 lip-to-center dimension.
Latch 2 3/4 inch backset standard (2 3/8 inch backset optional),
solid brass with 1/2-inch throw 1-inch diameter bore is
required.
Materials Zinc Alloy
Temperature 0°F-120°F (-18°C-50°C)
Exposure All weather conditions
Accessibility
Standard
Meets ADA standards Americans with disabilities act.
Keypad 12 all weather numeric buttons

Eternity User Guide
9
1.5 Software Specifications
Monitoring Bi-Color LED and varied audible tones
Setup Both Manual or Software setup
Users Capacity
Eternity-II, III 1000 ibutton user
Eternity-II-K, III-K Basic: manually set up (no software involved)
Ibutton user: 100
Key code user: 10
Premium: software set up
Ibutton user: 500 user
Key code user:
Option1: Permanent Code: 100
Option2: Temporary Code: 10
iButton Functions
Time zones for lock function (automatically unlock or
lock), fully programmable exception dates (holidays),
temporary dates, and time zones for iButton key-fobs.
Keypad Functions
(For Keypad Lock)
Temporary codes, Permanent codes, Audit trail of
permanent codes used displaying: code, access time,
user name whether entering or leaving
Programming Key
To transfer information between lock and PC
Encoder system USB Encoder to make keys
Time Key (Optional)
A clock contains accurate time to update the lock with
no delay
PC PC Pentium II or higher, Window 98/CE/2000/XP
Eternity User Guide
10
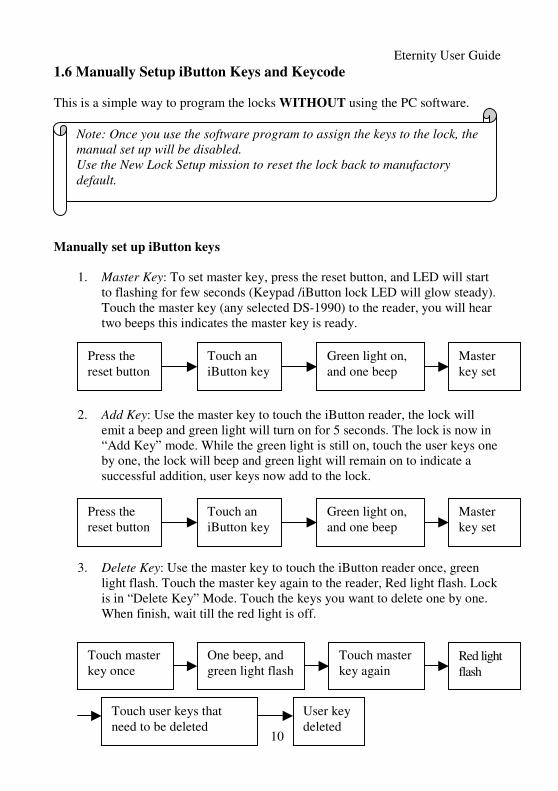
1.6 Manually Setup iButton Keys and Keycode
This is a simple way to program the locks WITHOUT using the PC software.
Manually set up iButton keys
1. Master Key: To set master key, press the reset button, and LED will start
to flashing for few seconds (Keypad /iButton lock LED will glow steady).
Touch the master key (any selected DS-1990) to the reader, you will hear
two beeps this indicates the master key is ready.
2. Add Key: Use the master key to touch the iButton reader, the lock will
emit a beep and green light will turn on for 5 seconds. The lock is now in
“Add Key” mode. While the green light is still on, touch the user keys one
by one, the lock will beep and green light will remain on to indicate a
successful addition, user keys now add to the lock.
3. Delete Key: Use the master key to touch the iButton reader once, green
light flash. Touch the master key again to the reader, Red light flash. Lock
is in “Delete Key” Mode. Touch the keys you want to delete one by one.
When finish, wait till the red light is off.
Note: Once you use the software program to assign the keys to the lock, the
manual set up will be disabled.
Use the New Lock Setup mission to reset the lock back to manufactory
default.
Press the
reset button
Touch an
iButton key
Green light on,
and one beep
Master
key set
Press the
reset button
Touch an
iButton key
Green light on,
and one beep
Master
key set
Touch master
key once
One beep, and
green light flash
Touch master
key again Red light
flash
Touch user keys that
need to be deleted
User key deleted

Eternity User Guide
11
4. Delete All: Use the master key to touch the iButton reader once, green
light flash. Touch the master key again to the reader, the red light flash.
Touch the master key 5 more times to the reader; audio with one long
beep, all the keys are deleted from the lock.
Manually set up key code (Set Master Key code, and Sub Key Code)
Set/Change Master Code
Set Sub Code
To change lock to the classroom mode, enter the sub code and “*3” followed by
“#” key. I.E., 111*3#. Enter 111# again to lock the door, and back to storehouse
mode.
Touch master
key once
One beep, and
green light flash
Touch master
key again Red light
flash
Touch master
key 5 times
One long
beep
All keys
deleted
Press * for 5
Second
Enter 123456 or current
master code followed by # key
Enter new master code
followed by # key
Press * for 5
Second
Enter 123456 or current
master code followed by # key
Enter current master code
again followed by # key
Enter Sub code
followed by # key

Eternity User Guide
12
Chapter 2 Getting Start the Software
2.1 Installing the Software
Operating System
Eternity software is compatible with Microsoft Windows OS.
Install 1-Wire USB Driver
1. 1Connect the USB Connectivity with PC
2. 2.Make sure no iButton attached to the blue dot reader
3. Select the 1-Wire USB Driver Installation link
4. Follow the instruction to complete the installation
5. USB device and port should be automatically selected at the of the
installation
Install the Eternity Software
Select Eternity Software 2.1 Installation. The Auto installer will guide you through
the steps and create the shortcut - Eternity Lock Management on you desktop.
2.2 Running the Software
Install the 1-Wire USB Drivers before install the Eternity Software
Check 1-Wire USB connection then start the software.
Eternity User Guide
13
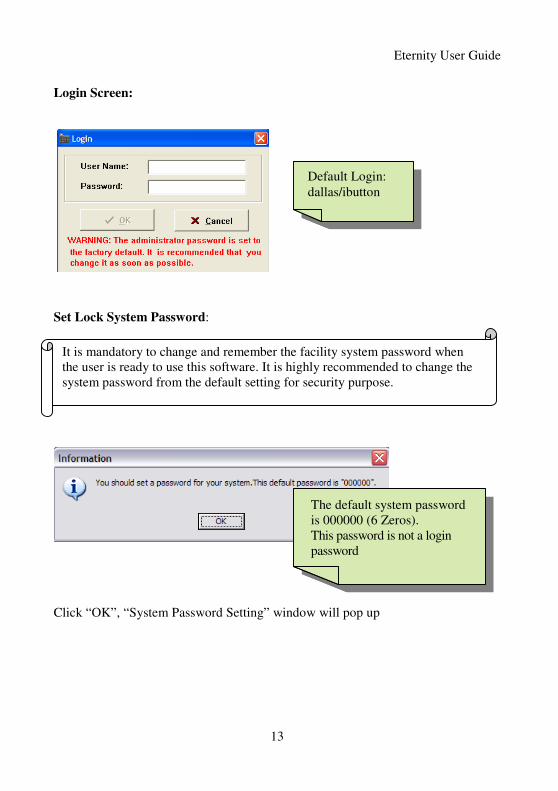
Login Screen:
Set Lock System Password:
Click “OK”, “System Password Setting” window will pop up
It is mandatory to change and remember the facility system password when
the user is ready to use this software. It is highly recommended to change the
system password from the default setting for security purpose.
Default Login:
dallas/ibutton
The default system password
is 000000 (6 Zeros).
This password is not a login
password

Eternity User Guide
14
1-Wire Connection Error:
Select Lock Type
Select Lock Type from System Configuration/User Type.
For ibutton only lock user, this is an optional selection. For iButton plus keypad
lock user, it’s necessary to select this option for properly setting.
• Use 6 digits only
• Click “Close” if you
decide to change the code
later on.
Always connect the USB
Connectivity before running
the software. If you see this
message when you start the
software, check USB
connection, and restart the
software.

Eternity User Guide
15
Chapter 3 Using Software
3.1 Adding Locks to the Database
Method 1: Using New Lock Setup Mission (Highly recommended)
Open “New Lock Setup Mission” window,
Steps to set up a new lock mission
1. Issue a DS 1977 Program Key.
2. Read the warning message. Using this mission will erase all the existing
information in the lock. Click ok to confirm.
3. Issue Key successful.
4. Go to each lock, push the Reset button, touch the program key to the
reader, and wait till the lock beeps twice.
5. Visit multiple lock as needed
6. Snap the program key back to the receptor, click Read Key button
7. Read Key window pops up. Click Read Key again to upload data to
software
8. Lock ID list will be shown in the next window. (It’s in the order of visiting
locks). If the lock name is not in the system, it shows False in the “In The
System” field. If it’s in the system already, no same lock can be added to
system. Go to Lock Setting if modifying an existing lock is needed.
9. Give each lock name, location, and type of the lock (ibutton, or
iButton+Keypad)
10. Save data
Feature
• Initialize the lock back to the
manufacture default setting
• Sets the system password,
and real time to the lock
• Set Lock to blink or not

Eternity User Guide
16
Method 2: Using Lock Setting to add, modify lock
This is an alternative way to add locks to the system, if the user has already known
the Lock ID.
Select “Lock Setting” from Setting/Lock Setting
By using the “Add”, “Delete”, “Modify” button, user can simply manage the locks.
Serial ID: The Serial ID is a unique serial number to identify the lock in database.
Issue a DS1977
program key
Push the lock Reset, touch the
program key to reader
Two
beeps
Press
Read Key
Press program key
back to encoder
Lock ID shown
in the field
Select the ID and
add to database
Fill in the lock property
information
Save
data
Import/Export
Lock List
Lock List
Associated keys to
selected lock

Eternity User Guide
17
Lock status: Manufacture default lock status is set to “No Limit Classroom Mode”.
To change the lock status, Click “Modify”, and then click on underlined “Lock
Status”, Time Operation Setting screen will open. Highlight the group number and
click “Select” button.
Importing/Exporting:
Exporting the lock list to excel file. Or importing an existing list to database. Only
Lock ID, Name and Location can be transferred.
Assigned Key-list shows the assigned key list in a highlighted lock.
3.2 Adding Keys to Database Select Settings / Key Setting
• Click “Add” button, touch an iButton key to the USB Connectivity Reader
• iButton ID automatically shown in the ID field. (If it is an existing
iButton, software will detect the ID owner information. No duplicate key
is allowed in the system.)
• Fill in user property: Required Fields: First name, last name,
Optional Fields: title, address, contact information.
• Status: There are two options, active and inactive. We suggest not deleting
any existing key for security reason. User can change the key status from
Active to Inactive for a lost key or left employee.
Import/Export
Key List
Existing Key
List
Associating Lock with
Highlighted Key
Eternity User Guide
18
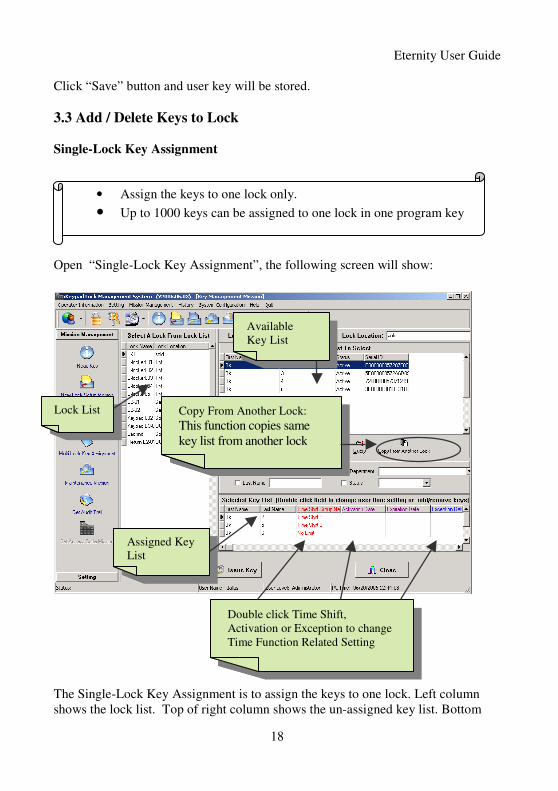
Click “Save” button and user key will be stored.
3.3 Add / Delete Keys to Lock
Single-Lock Key Assignment
Open “Single-Lock Key Assignment”, the following screen will show:
The Single-Lock Key Assignment is to assign the keys to one lock. Left column
shows the lock list. Top of right column shows the un-assigned key list. Bottom
• Assign the keys to one lock only.
• Up to 1000 keys can be assigned to one lock in one program key
Available
Key List
Lock List
Assigned Key
List
Copy From Another Lock:
This function copies same
key list from another lock
Double click Time Shift,
Activation or Exception to change
Time Function Related Setting

Eternity User Guide
19
Right column shows the keys that have been assigned or are going to be assigned to
the selected lock.
Steps to assign keys to a lock:
1. Select the lock from left column lock list.
2. Select the key(s) from upper window available key list and add to bottom
key list window: double click each key, or holding down the “Ctrl” key
and click to select multiple keys from un-assigned key list. Click “Add” to
add keys to assigned key list.
3. By using “Add”, “Add All”, “Remove”, “Remove All” to manipulate the
key assignments according to the user’s desire.
4. In the “Selected Key List” area, user can change “Time Shift Group
Name”; “Activation Date”; Expiration Date”; and “Exception Date” by
double click the selected field.
5. Snap the program key to the encoder, click “Issue Card” button, and wait
till the write mission is completed.
6. Take the program key and hold it to the lock reader, you will hear a series
of chirps followed by two beeps. Mission completed.
Multi-Lock Key Assignment
Select lock
from list Move the keys from upper
window to bottom to add
keys or from bottom to
upper window to delete
keys. Select Timed option
if needed
Issue
Program Key
Touch the key to
iButton reader
Two
beeps
This is an efficient way to assign the keys to multiple locks (up to
15 locks) per visit.
This mission is to add addition keys or delete existing keys. Up to
128 keys can be add or deleted from each lock.
For modifying an existing key time schedule, please use “Single
Key Assignment” mission. Or Delete key from lock first, finish a
mission, then add them back to the lock.

Eternity User Guide
20
Open the “ Multi-Lock Key Assignment” window
Steps to do Multiple Key Assignment
1. Click Lock1
2. Select a desire lock from Select Lock list
3. Move keys from upper window to bottom window to add keys. Or move
from bottom window to upper window to delete keys.
4. To modify a new added key’s time group, double click the Time Field to
select group name. (The existing key time group cannot be modified in
this window. To change an existing key time group, delete the key from
the lock first, complete a mission, and then add the key back to the lock.
Or use the single key assignment mission to make changes)
5. Repeat Step2 to choose the next lock.
6. When all the locks are selected, issue a Program Key.
7. Wait till the process is over (you might experience up to 2 minutes
waiting)
Multiple Lock Selection
Key List not in
Selected Lock
Assigned Key List
Modify Time Group only on Newly Added Keys; by
double click the time field.
To modify an existing key time group, delete it from
the key list, do a mission, then add them again

Eternity User Guide
21
8. Visit each lock (no need follow the lock order)
Code Setting (For Keypad Lock User Only)
Permanent Code Setting
Steps to set permanent code
1. Open “Set Access Code Mission”, and select permanent code.
How to switch code mode:
Select Maintenance mission/Set Parameter Key tab. Uncheck or Check
the “Temporary Code” and input the check out time. Issue programming
key and visit lock. After two beeps, the lock is in the desired mode.
Make sure the lock is in the correct code mode (Either Permanent or
Temporary).
Default setting for the lock mode is “Permanent Mode”.

Eternity User Guide
22
2. Select a destination lock from lock name list. (Only the keypad lock
shown in this list)
3. Click “Add” icon, fill the first and last name fields. (No duplicate name
allowed in the system). Give a 6-digit code. Click the save icon.
4. Repeat from Step 3 to add multiple users codes (up to 100 user codes).
(Use the delete button to delete the assigned key code).
5. Issue a DS1977 Programming Key
6. Visit desire lock Temporary Code Setting
Steps to generate a Master Code
1. Open the “Set Access Code Mission” window; select the temporary code
option.
2. Double click the lock name field to select a lock name from lock list
3. Fill in the first, and last name fields. (No duplicate name allowed in the
system). Select the starting date and ending date. (To reset the check out
time, please refer to Maintenance Mission/Set Parameter Key.)
4. Click on the “Create Code”. A 6 digits numerical Access Code will be
generated by the software. (This code is only for setting the sub user code,
not for opening the lock).
Eternity User Guide
23
5. Printout the Access Code to keep in record
Steps to set opening code
1. Press the “*” key for 5 second, till a solid green light appears.
2. Enter the Master Access Code followed by the # key. The green light
starts flashing.
3. While the light is flashing, punch in a desired code (up to 6 digits)
followed by the “#” key.
4. If more than one code is needed, repeat step 3 while the light is flashing,
up to 10 sub codes could be added to each keypad lock.
5. Wait till green light stop blinking, enter in the sub code then “#” key, to
access the door.
Terminated a lost Access Code
Steps to terminate a Master Code and Sub Code
1. Open the software, go to the temporary code setting window
2. Select the lock name from list, and fill in same starting date and ending
date
3. Create a new Master Code. At this time, Access Code Version shows “2”.
Up to 4 Access Code can be created on same desire starting and ending
date.
4. Repeat the Temporary Sub Code Setup; all the previous master code or
sub code will be invalid.
3.4 Time Function Setting
Time Shift Setting
This function is used to set the restriction time zones for user keys, which
preventing unauthorized or unwanted personnel enter the facility or area at off-
hours. The beginning time and ending time of each setting date can be added base
on users’ permission. There are 16 Time Shift Groups in total and up to 7 settings
in each group. The first group is No Limit. This is a default setting for each new
key and it cannot be modified.
If you want to keep the door stay open (classroom mode), enter your sub
code plus 3 followed by “#”. For example, “111*3#”

Eternity User Guide
24
To add or modify each time zone in a time group: Simply select the group number
from the left side window, and click on Add or Modify or Delete button to edit the
settings in the right side window.
Timed Operation Setting
This function is used to set the lock automatically unlocked, locked, storehouse
mode, or classroom mode at the setting time. There are 16 Timed Operation Groups
in total, and up to 16 settings in each group. The first setting by default is No Limit
Classroom Mode (The lock will stay at Passage mode all the time.) The second
setting by default is No Limit Storehouse Mode (the lock will stay locked mode all
the time).
Above screen shot is another common example for Timed operation setting. From
Monday to Friday, 8:00 am to 5:00 pm the lock will stay open when first valid
access granted, after 5:00 pm the lock will automatically locked, and will stay on
storehouse Mode.

Eternity User Guide
25
There are four lock statuses the user can choose:
• Storehouse Mode: The Lock will lock back in few seconds (0.1-25.5
seconds).
• Classroom Mode: The lock will be in the unlock mode until next valid key
touch the reader.
• Lock Mode: In this mode, the lock will automatically lock at the setting
time.
• Unlock Mode: In this mode, the lock will automatically unlock at the
setting time.
Activation / Expiration Date Setting
This function is used to set the activation date and expiration date of valid keys.
The first group is a default setting as permanent keys. The rest of groups can be set
an activation date and expiration date for the user keys.
(See figure below – on right.)

Eternity User Guide
26
Exception Date Setting
This function is used to set restrict access during periods such as holidays, facility
shutdowns, vacations. (See figure on the left - above.)
3.5. Maintenance Mission
Get Audit Trail
Open the “ Get Audit Trail” window
Steps to do audit trail:
Up to 63 locks audit trail can be downloaded from one
Programming Key one Visit
When download more than 2000 records from the lock,
two programming keys are required.

Eternity User Guide
27
1. Click on the “Number of Records From each Lock” drop down list
and select the number you want to retrieve from each lock. Number of
maxim visit locks will be automatically generated.
2. Issue a programming key
3. Visit each lock; you will hear a long series of chirps followed by two
beeps. Repeat Step 3 till you visit all the desire locks.
4. Snap the program key back to the encoder and click “Read Card”
button.
5. Click ‘Save Data” button, the audit trail records will be saved in
Database for future reference.
Audit trail result
Set Time Table
Steps to operate the mission:
1. Click “Mission Management” on the opening screen and choose
“Maintenance Mission,” and select “Set time Table Key” button.
2. Double click the “Lock Serial ID:” field, the locks list screen will pop up,
find the lock and click “select” button.
3. Change the Lock Status by click the “Lock Status” field
4. Snap the program key to the encoder and click “Issue Key”, wait till
message “Write set Time Table Key Mission ok” pop up.
5. Remove the program key and hold it to the lock reader, you’ll hear a series
chirps followed by two beeps. It indicates that the mission is completed.
This Mission will assign the specified timed operation, and load
timetable to the selected lock.
Audit Record
Save Data button to
save record to database
for future reference

Eternity User Guide
28
Lockout Key
Steps to operate:
1. Select a lock from lock list
2. Issue Program Key
3. Visit the desire lock, lock will be in Lock Out mode
Get Information Key
Set Lockout key to a specified lock, the lock will in Lockout mode
and forbid all the assigned keys to operate the lock. Apply the
Lockout key again to release the Lockout Mode.
Get Information mission is a useful tool to retrieve the existing lock information,
such as: Key list, Real time, Time Setting and lock ID, etc.
Data won’t be saved into the database
Lock Information Key list in the lock
Key list in the database
Software version

Eternity User Guide
29
One Off Key
Set Parameter Key
This mission will set the lock parameter, such as “LED Blink”; “Lock Back Delay
Time”; calibrate “PC Time”; set “Temporary Code”.
Set Time Key
This step is to use the DS1994 real time clock key to adjust the lock
internal real time.
If it takes you 5 minutes to get from the computer to the lock by using
the DS1977 program key, the lock time will be eclipsed 5 minutes.
Using the DS 1994 time key will makes the lock time accurate to
milliseconds.
This is to set a key to be used one time only. DS1977 key is required.
Select reader blink on or off
Set Storehouse mode auto lock back
time. No effective on Classroom mode.
Default Setting for Delay time is 5 sec.
Adjust lock time
Set Temporary Code.
When selected, Check Out
Time will show.
Eternity User Guide
30
Chapter 4 Other Information
4.1 Audit History Lock Audit History is to view the saved lock access record. User can query the
data to narrow down the search result.
Operator Log records each operator login / logout time.
4.2 System Configuration
System Password: No need change unless to reset the facility system.
Database Maintenance: Backup or Restore database to / from a local hard-driver.
Import Database from Mylocksmith: for the previous Mylocksmity user, iButton
key data can be restored to this software. Special instruction is required. Only the
key information can be restored.
4.3 Operator Information There are two types login: Operator or Administrator. Admin has the full authority,
Operator can only make new iButton key, and assign the keys to the lock.

Eternity User Guide
31
Chapter 5 Case Study
Case Study 1: University Park Business Center, Denton, TX
Problem: The Luxury Home Builders is one of the largest custom home / office
builders in north Taxes. One of the examples is the University Park Business
Center. Since the business center is designed for leasing to varied business owners,
contractors, and local churches, access control becomes a big issue for them.
Solution: iButton Lock and Door Controller. The Builder selected UCA iButton
lock for its versatility, increased security features, and ease of key management.
With addition of Eternity Lock Management system, security has vastly improved.
The inherent problems of maintaining a mechanical key system, including rekeying
and recoding, are tasks relegated to the past.
Base on the builder’s requirement, we divided the whole project into 5 different
applications:
Main Entry: Set Lock to Classroom mode at 8:00AM, Monday to Friday, and set
the lock back to storehouse mode, and lock the lock at 5:00PM, Monday to Friday.
Step 1: Time Setting, set the Timed Operation group 3 from Monday to Friday,
8:00am classroom mode. 4:59pm to Storehouse mode. 5:00pm, Lock mode. Here is
the timetable for the lock:
Begin
Time
Lock Status Sun Mon Tue Wed Thu Fri Sat
8:00:00
AM
Classroom
Mode
True True True True True
4:59:00
PM
Storehouse
Mode
True True True True True
5:00:00
PM
Lock Mode True True True True True
*Saturday and Sunday will stay on Storehouse Mode base on the last action of the
lock.
Step 2: Edit Lock property at Lock Setting. Change the Lock Status to Timed
Operation Group3.
Step 3: Select maintenance mission and Set Time Table Key and select the Entry
lock from field
Step 4: Issue Program Key.
Step 5: Take Program Key to the Entry lock. Touch and hold to the Reader. You
will hear a series of chirps followed by two beeps.
Eternity User Guide
32
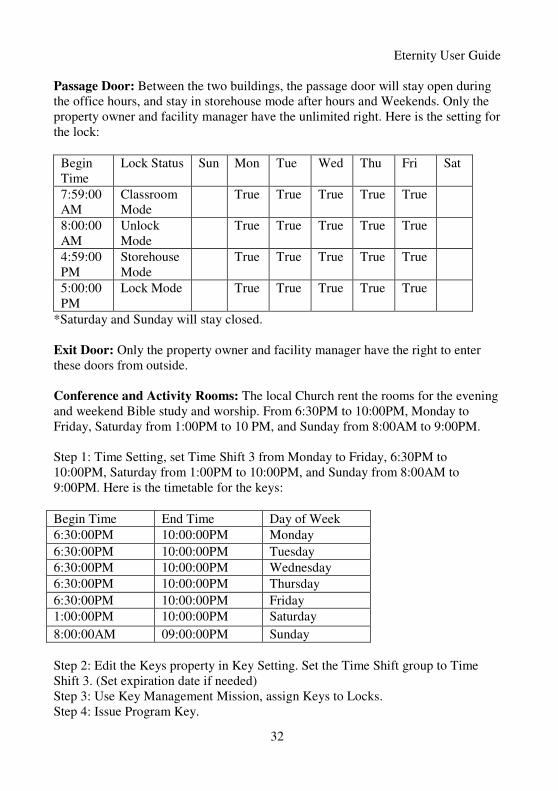
Passage Door: Between the two buildings, the passage door will stay open during
the office hours, and stay in storehouse mode after hours and Weekends. Only the
property owner and facility manager have the unlimited right. Here is the setting for
the lock:
Begin
Time
Lock Status Sun Mon Tue Wed Thu Fri Sat
7:59:00
AM
Classroom
Mode
True True True True True
8:00:00
AM
Unlock
Mode
True True True True True
4:59:00
PM
Storehouse
Mode
True True True True True
5:00:00
PM
Lock Mode True True True True True
*Saturday and Sunday will stay closed.
Exit Door: Only the property owner and facility manager have the right to enter
these doors from outside.
Conference and Activity Rooms: The local Church rent the rooms for the evening
and weekend Bible study and worship. From 6:30PM to 10:00PM, Monday to
Friday, Saturday from 1:00PM to 10 PM, and Sunday from 8:00AM to 9:00PM.
Step 1: Time Setting, set Time Shift 3 from Monday to Friday, 6:30PM to
10:00PM, Saturday from 1:00PM to 10:00PM, and Sunday from 8:00AM to
9:00PM. Here is the timetable for the keys:
Begin Time End Time Day of Week
6:30:00PM 10:00:00PM Monday
6:30:00PM 10:00:00PM Tuesday
6:30:00PM 10:00:00PM Wednesday
6:30:00PM 10:00:00PM Thursday
6:30:00PM 10:00:00PM Friday
1:00:00PM 10:00:00PM Saturday
8:00:00AM 09:00:00PM Sunday
Step 2: Edit the Keys property in Key Setting. Set the Time Shift group to Time
Shift 3. (Set expiration date if needed)
Step 3: Use Key Management Mission, assign Keys to Locks.
Step 4: Issue Program Key.

Eternity User Guide
33
Step 5: Take Program Key to the Lock. Touch and hold to the Reader. You will
hear a series of chirps followed by two beeps.
Office Rooms: Base on the usage of the offices, we set different time tables for
each individual office and time shift for the users, also we set Expiration Date to
the contractors’ keys.
Case Study 2: Time Shift changed, needs update to the lock1 Step 1, Modify the Time Shift group
Step 2, Select maintenance mission/Set Time Table Key, Select lock1 from field
Step 3, Issue Program Key.
Step 4, Take Program Key to Lock1. Touch and hold to the Reader. You will hear
two beeps. Mission success.
Case Study 3: Day Time Saving, needs to update all the locks Option1 - Have different location locks. Use DS1994 Clock Card
Step 1: Select maintenance mission/Set Time Key
Step 2: Issue a Clock Card
Step 3: Go to each lock. (DS1994 has internal clock running. No delay on update
time)
Option 2 - For fewer locks property, one location. No delay from lock1 to lock N.
Can use regular Program card. (DS1977)
Step 1: Select maintenance mission/Set Parameter Key.
Step 2: Check the Time-Key and adjust the time.
Step 3: Issue DS1977 card.
Step 4: Go to each lock. (DS1977 doesn’t have internal clock. It might cause some
time delay from lock 1 to lock N)
Case Study 4: Needs to know how many keys have been assigned to Lock1
Step 1: Select maintenance mission/Get Lock Information
Step 2: Issue a Program Card
Step 3: Take Program Key to Lock1. Touch and hold to the Reader. You will hear
two beeps. Mission success.
Step 4: Read Card. Program will upload all the information about this lock to
system.

Eternity User Guide
34
Trouble Shooting Guide
Problem Possible
Reason
Solution
IButton Key is
not working
It’s a time
restrict key
1.Check Time Shift setting
2. Use “Get Lock Information Key” to see if
this key is in the list, and if the internal clock is
correct
Red light is on,
and three beeps
Batteries low
1.Change Batteries and
2. Reset the lock time
Green light is on
and two beeps,
but motor is not
running
No power to
lock motor
Make sure the motor wire is firmly
connected to the PCB
Temporary Key
Code is not
working
Access code is
expired or
terminate
Check the expiration date on the access code
or reissue an access code to assign a sub
code
Lock doesn’t
accept any valid
ibutton key
Lock is in
Lockout Mode
Issue a new Lockout Key to release the
lockout mode
Will changing
battery erase the
key list
NO The key list and timetable are stored inside
the flash memory, disconnecting the
batteries can’t erase the non-volatile, solid-
state flash memory.
After changing
the battery.
Temporarty code
stop working
Internal Time
is lost
Do a Time Key to adjust internal time

Eternity User Guide
35
Thank you for your business
UCA, Inc.
610 Old Campbell Rd., Suite 100
Richardson, TX 75080
www.ibuttonlock.com