etwinning project – “sharing science experiments” e ... · etwinning project – “sharing...
TRANSCRIPT

eTwinning project – “Sharing Science Experiments”
Malta, Poland, Romania, Turkey 2011-2
1
e-Twinning Project “Sharing Science Experiments” October’s Experiments.
1. Poland. Aim : To calculate the density of material from which the object of regular shape is made of. Apparatus: bricks made of different material, a dynamometer, a ruler Method:
1. Weigh the brick (around 120g)
2. Measure the length, width and height of brick
3. Work out the volume of each block. 4. Calculate the density of the brick using the equation density = mass / volume. 5. Look for density of the material that was used. 6. Compare the answer you get to the density values you find in books and determine
what material your brick is made up of.

eTwinning project – “Sharing Science Experiments”
Malta, Poland, Romania, Turkey 2011-2
2
Results: Some students had bricks made up of different materials and they compared their values to values on books. Conclusions: Bricks of the same sizes but made up of different materials had different densities. Therefore a very compact material such as iron has a higher density than a lighter material such as cork. Other photos of students from Poland working on this experiment.
Malta’s October Experiments.
Experiment: Dataloggers Aim : To find the pH values of several chemicals that we use in our homes by using the dataloggers. Apparatus: datalogger, pH probe, several chemicals that we use at home like Dettol, Harpic WC, lemon, sauce, shampoo, dishwashing liquid, etc., boiling tubes, water, conical flask Method:
1. Switch on the datalogger
2. Double click on the “Multilab” icon on the desktop

eTwinning project – “Sharing Science Experiments”
Malta, Poland, Romania, Turkey 2011-2
3
3. Click on the graph view and pH value view
4. Prepare the substance you want to test
5. Insert the pH probe into the substance

eTwinning project – “Sharing Science Experiments”
Malta, Poland, Romania, Turkey 2011-2
4
6. Click “Run” on the Multilab 7. Read the pH value 8. Repeat with all the substances
9. Tabulate your results
Precautions:
1. Handle the datalogger and any glassware with care 2. Make sure not to fill the boiling tube too much as not to overflow 3. Make sure you don’t touch the datalogger or the upper part of the datalogger with
water or liquid. Results:
Solution pH value Acidic / neutral / alkaline Dishwashing liquid Harpic WC Dettol Shampoo Sauce Lemon Coffee etc

eTwinning project – “Sharing Science Experiments”
Malta, Poland, Romania, Turkey 2011-2
5
Malta did another experiment that was checking for acids and alkalis using indicators. We were so glad when Romania did this same experiment in April. Here we are comparing some photos of the same experiment that we did last year in the project “Caustic” so we didn’t include it in this book!
Romania
Malta

eTwinning project – “Sharing Science Experiments”
Malta, Poland, Romania, Turkey 2011-2
6
Romania’s October Experiment. Aim: To use several separation techniques. Apparatus: 2 beakers, funnel, filter paper, sand, water, copper sulphate solution, tripod, Bunsen burner, wire gauze, watch glass Method: Filtration.
1. Prepare some sand and water together. 2. Prepare the filter paper in the funnel and onto a beaker 3. Pour the sand and water mixture into the filter paper and let the water filter in the
beaker underneath. Crystallisation.
1. Mix together some copper sulphate and water. 2. Pour on a watch glass 3. Place over a lighted Bunsen burner 4. Allow water to evaporate.
Results: What did you observe in the two procedures? Conclusions: Did we manage to separate the water from the sand? Was it an effective procedure? Could it have been better? Did we manage to separate the copper sulphate from the water? What happened to the water? Could we have done something to collect the water too? Was it an effective procedure? Could it have been better?
November’s Experiments.
1. Romania. Aim : To produce oxygen from hydrogen peroxide and silica catalyst.

eTwinning project – “Sharing Science Experiments”
Malta, Poland, Romania, Turkey 2011-2
7
Apparatus: hydrogen peroxide, measuring cylinder, beaker, silica catalyst Method:
1. 50ml hydrogen peroxide were measured and poured in a beaker. 2. a few crystals of silica catalyst were added 3. The reaction was observed.
Precautions:
1. Handle glasswork with care. 2. Do not spill any materials on bare hands. 3. Wear protective labcoat and gloves.
Results: Observe what happens. Conclusions: Is oxygen produced? How slowly or vigorously? How can you test that the gas produced is oxygen?
2. Malta.
Aim: To decompose hydrogen peroxide using yeast. Apparatus: measuring cylinders, hydrogen peroxide, yeast, water, food colouring, dishwashing liquid. Spatula, beaker Method:
1. Mix some yeast with warm water in a beaker 2. Prepare some hydrogen peroxide, dish washing liquid and food colouring in a
measuring cylinder. 3. Pour the yeast solution into the measuring cylinder 4. Obseve.

eTwinning project – “Sharing Science Experiments”
Malta, Poland, Romania, Turkey 2011-2
8
Precautions:
1. Place the measuring cylinder in an empty container so that anything that overflows falls into this container.
2. Do not touch the hydrogen peroxide with bare hands 3. Wear lapcoat and safety glasses and gloves.
Results: Observe what happens Conclusions: What do you think that the yeast did to the hydrogen peroxide? How do you think that the hydrogen peroxide decompose? What was the role of the dishwashing liquid? Why do you think there was a lot of foam forming?
4. Turkey Aim: To create a model of a cell. Apparatus: The students can use any materials they want to create a model of a cell. Method: The students must create a model of a cell with nucleus, mitochondria, ribosomes, and other organelles. Results: The model Conclusion: What did you learn?
The Maltese students did the same experiment using a plastic bag to represent the cell membrane; the big ball to represent the nucleus, the water to represent the cytoplasm, the
small marbles to represent the organelles.

eTwinning project – “Sharing Science Experiments”
Malta, Poland, Romania, Turkey 2011-2
9
December
Malta’s Practical: Anaerobic Respiration. Aim : To observe that yeast performs anaerobic respiration: a. when added to warm water and some sugar. b. Covered with oil, therefore no oxygen can enter c. And carbon dioxide is produced as a result of respiration – that turns lime water milky d. We smell the alcohol produced as a product of anaerobic respiration. We will also use yeast to prepare some dough as to observe its use as anaerobic organism to release carbon dioxide and make the dough rise. Apparatus: 2 boiling tubes joined by a delivery tube; 2 rubber stoppers to close both boiling tubes; bowl, balloon. Materials used: sugar, yeast, warm water, oil, flour. Method: 1. A solution of yeast, sugar and warm water was prepared and poured in one boiling tube.
3. This solution was covered with a layer of oil. To one boiling tube with this solution
in it a balloon was attached to see if it inflates with carbon dioxide.
eTwinning project – “Sharing Science Experiments”
Malta, Poland, Romania, Turkey 2011-2
10
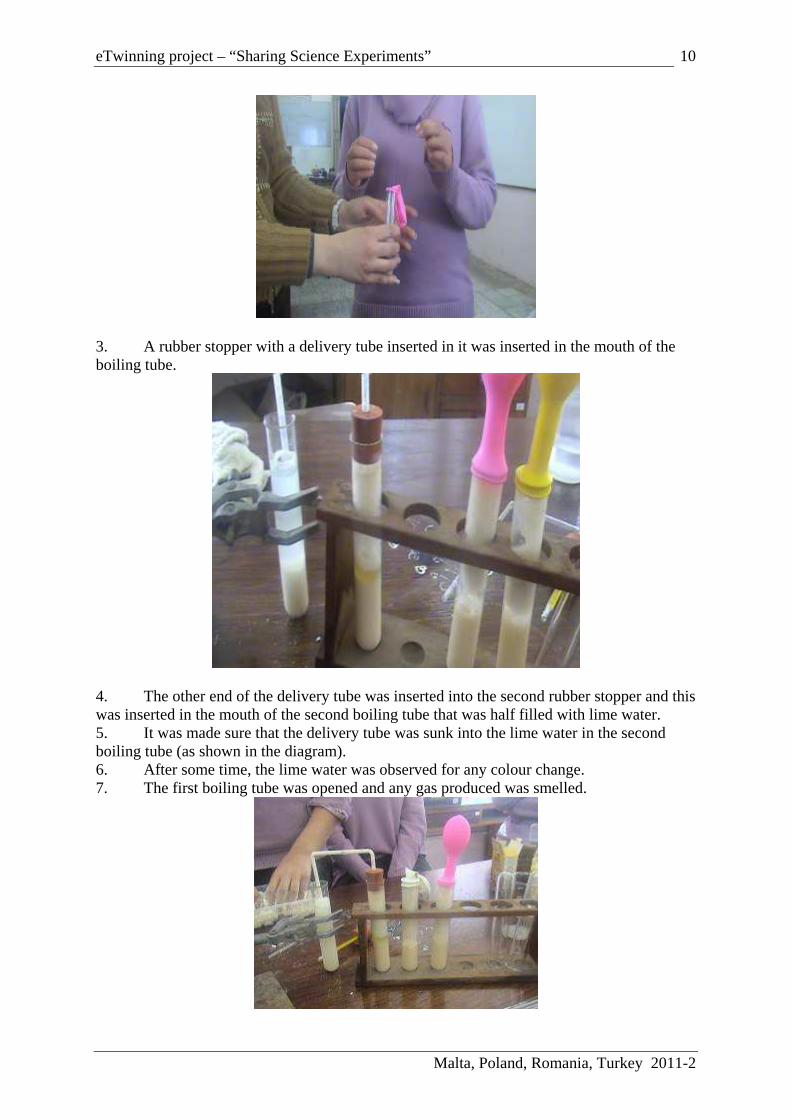
3. A rubber stopper with a delivery tube inserted in it was inserted in the mouth of the boiling tube.
4. The other end of the delivery tube was inserted into the second rubber stopper and this was inserted in the mouth of the second boiling tube that was half filled with lime water. 5. It was made sure that the delivery tube was sunk into the lime water in the second boiling tube (as shown in the diagram). 6. After some time, the lime water was observed for any colour change. 7. The first boiling tube was opened and any gas produced was smelled.

eTwinning project – “Sharing Science Experiments”
Malta, Poland, Romania, Turkey 2011-2
11
8. Another boiling tube was prepared with sugar, yeast and warm water in it. 9. A layer of oil was added on top of the solution. 10. A balloon was fixed at the mouth of the boiling tube. 11. The boiling tube was left for about an hour in a warm place. 12. Some flour, sugar, yeast and warm water were mixed in a bowl until dough was formed. 13. This was left for about half an hour. 14. The dough was observed for any change in size, smell and any other changes.
Precautions: 1. It was made sure that the water for the yeast was not boiling, but was warm enough to increase the rate of reaction of yeast. 2. It was made sure that the oil covered the layer of yeast, sugar and warm water solution to ensure that no oxygen was available for anaerobic respiration. 3. It was made sure that the boiling tubes were well sealed with the rubber stoppers and that the holes of the delivery tubing were not too big to allow any gases through. 4. It was made sure that the lime water was transparent at the beginning of the experiment. 5. It was made sure that the dough was left in a warm place during the 30 minutes standing time. 6. Care was taken while handling all apparatus. Results: 1. What did you observe about the colour of lime water? 2. What smell did you notice when you opened the boiling tube that contained the yeast solution? 3. Did you observe any bubbles during the process? 4. Did you observe any change in the size of balloon fixed to the other boiling tube in the second set-up? 5. Did you observe any change in size of the dough? 6. Did you notice any smell in the dough after the 30 minutes? Conclusions: 1. Write your own conclusions from this experiment. Do you think that aerobic or anaerobic respiration occurred? Why? What can you comment about the production of alcohol? What do you think happens to the alcohol produced in the dough when this is baked

eTwinning project – “Sharing Science Experiments”
Malta, Poland, Romania, Turkey 2011-2
12
in the oven? Did you ever eat bread or pizza that taste of alcohol? Where do you think that the alcohol went during baking? Why do you think that the dough increased in size? Why do you think that we use yeast when baking bread / pizza? What are your other conclusions about this experiment? 2. If you had to design a control for the first experiment, how would you do it? Why?
2. Malta’s Practical Work: Respiration. Aim : The aim of this experiment is to investigate: 1. what gas do germinating seeds use during respiration; 2. what gas they produce during respiration; 3. if energy in the form of heat is produced during respiration. Brainstorming before starting the experiment: 1. The first aim is to check what gas do germinating seeds use during respiration. a. What type of respiration do you think that germinating seeds perform? b. Write down the two equations of both respirations. c. If they perform aerobic respiration, what gas would they need? d. If they perform anaerobic respiration, what gas do you think they would need? e. How would you set up an experiment to test if germinating seeds perform aerobic respiration? f. How would you set up an experiment to test if germinating seeds perform anaerobic respiration? g. If they perform aerobic respiration, what gas would they release, and how would you test for this gas? h. If they perform anaerobic respiration, what gas would they release, and how would you test for this gas? i. Any respiration they perform, they would produce energy. How would you test if any of this produced energy is released as heat? j. Make a list of all the apparatus you would need to perform these experiments. Apparatus: 2 small empty water bottles – to use them as recipients for germinating seeds; cotton wool and aluminium foil – to create lagging around the bottles; some water for the seeds to start germinating in it; 2 thermometers – to measure any temperature changes during the experiment; syringe to collect the produced gas in it; some oil – to put some germinating seeds in it to see if they manage to germinate if they are in lack of oxygen; Method (write it in past impersonal): 1. Place some seeds in water for two nights so as to stimulate germination. 2. Place some seeds in oil for the same period of time to see if they would germinate in absence of oxygen (anaerobic respiration).

eTwinning project – “Sharing Science Experiments”
Malta, Poland, Romania, Turkey 2011-2
13
3. When you see that the seeds have increased in size and some of them are sprouting, you can start the other experiments. 4. Place some seeds in a clean small water bottle. Close it well with a rubber tubing and insert a thermometer on the seeds and an empty syringe.
5. Measure the temperature. 6. Provide insulation by covering the bottle with a layer of cotton wool and a layer of aluminium foil. 7. Set up a control to this experiment by doing a similar set up with boiled seeds instead of living seeds. 8. Leave the set ups for 3 days and measure the temperature again, and check if there’s any gas in the two syringes. 9. If there is any gas, bubble the gas in some lime water to check if it turns milky or not. Precautions: 1. We placed the seeds in water for two nights before the experiment so that we stimulate germination and don’t wait for too long to start seeing results. 2. We insulated the bottles to ensure that no heat was being lost to the environment. 3. We boiled some seeds in the control to make sure that the results were due to respiration and not by something else. Boiled seeds do not respire because they are dead. 4. We made sure that the bottles were well sealed as not to allow any gas produced to escape. 5. We made sure that the thermometers were well inserted in the seeds to measure any heat produced. Results: 1. Did the seeds in oil germinate? Why? What do seeds need to respire? What did the oil cut out from the seeds? What kind of respiration do seeds do while germinating? 2. Did the living germinating seeds produce any gas? How did it react with lime water? What gas is it? 3. Did the boiled seeds produce any gas? What does this show you? 4. Did you read different temperatures between the living seeds and the boiled seeds? Why? 5. Did you read different temperatures between the start of the experiment and the end of the experiment? Why? Conclusions: 1. What kind of respiration do germinating seeds perform? 2. Do you think that light or darkness would have effected this experiment? Why?

eTwinning project – “Sharing Science Experiments”
Malta, Poland, Romania, Turkey 2011-2
14
3. What can you conclude about the temperature?
Turkey Aim : To investigate how diapers work. Apparatus: • A baby diaper • Water • Scissors • A glass • A pot with a top Method: 1. First we cut the diaper with the scissors, we take out the cotton and the dust of sodium polyacrylate that the diaper contains.
2. Then, we put the cotton in a pot with a top and we shake it to separate the most part of sodium polyacrylate.
3. Finally, we add some water and we see that it becomes in something similar to gel or snow.

eTwinning project – “Sharing Science Experiments”
Malta, Poland, Romania, Turkey 2011-2
15
Explanation: The diapers are compounds of cotton and sodium polyacrylate that it can absorb a lot of water. When it absorbs the water, the polymer transforms in gel, that look like snow.
Romania Aim : To do a tackle experiment Apparatus: onion, apple, banana, hook and rope, 2 rods Method: 1. Tie the rope to the rod with hooks and hang the fruit as shown in the photo below.
2. Tie more rope to the other rod and balance everything as shown in the next photo
Results: The balanced set up Conclusion:

eTwinning project – “Sharing Science Experiments”
Malta, Poland, Romania, Turkey 2011-2
16
Weight 300 grams of orange. After the experiment, 75 grams landed. BECAUSE: Work by using simple machines to make a frofit . Measured with less force to tackle the heavy materials
Poland: Aim : To do different experiments with carbon and carbonates.

eTwinning project – “Sharing Science Experiments”
Malta, Poland, Romania, Turkey 2011-2
17
January’s Experiments.
Malta.
Aim: To see the effect of heating air, its pressure and its suction effect Apparatus: conical flask, hot water, hard boiled egg.
Method:
1. Prepare a hard boiled egg. 2. Pour hot water in a conical flask 3. Place the hard boiled egg on the mouth of the conical flask 4. Observe
Results: What happened? Conclusions:
1. How are the particles of hot water vibrating? Do they have a lot of energy? What do you think is the pressure if the particles are vibrating and colliding a lot – high pressure or low pressure?
2. What do you think happens to the energy of the particles when the water is cooling down – decreasing or increasing?
3. What do you think happens to the pressure if the particles move less? 4. Why do you think that the egg is sucked into the conical flask?

eTwinning project – “Sharing Science Experiments”
Malta, Poland, Romania, Turkey 2011-2
18
Romania.
Aim: To do experiments with copper Apparatus: test tubes, heat source, metal tongs, test tube racks, copper wire, copper filings, copper solid, sulphuric acid, nitric acid, silver nitrate, copper sulphate.
Turkey Rubber Bone (we couldn’t open file)
Februaray’s Experiments.
Malta Creating macromolecules (long chains) from simple molecules (small molecules). Aim : To create macromolecules from simple molecules.

eTwinning project – “Sharing Science Experiments”
Malta, Poland, Romania, Turkey 2011-2
19
Apparatus: beaker, Bunsen burner, tripod, wire gauze, tights, biscuits cutters, Materials used: matches, milk, food colouring, vinegar, glitters. Method: 1. Heat some milk over the Bunsen burner (do not boil).
2. Remove from the heat and add some drops of food colouring to the warm milk. 3. Add two tablespoons of vinegar.
4. Add some glitters. 5. Place a tights around the mouth of the beaker and secure it with a rubber band. 6. After 10 minutes pour the solidified milk from the tights and squeeze it as to remove extra liquid. 7. Place the solidified material in the biscuit cutters.
8. Remove from the biscuit cutters and allow to dry well for a few days.

eTwinning project – “Sharing Science Experiments”
Malta, Poland, Romania, Turkey 2011-2
20
Precautions: When heating the milk, make sure not to get burnt, and not to spill the milk. Make sure you don’t touch the warm beaker with bare hands as you may scald your skin. Handle glassware with care. Don’t smell the solutions. Don’t try to taste or eat any of the materials. Results: 1. The liquid milk starts becoming solid when the vinegar (acid) is added to it. 2. The solidified mixture continues drying after a few days and it becomes like plastic material. Conclusions: Milk contains the molecule casein. When vinegar, that is acid, is added, these molecules change their molecular shape and become large macromolecules. That’s why the liquid milk converts to plastic like material.
Turkey Aim : To see if oxygen is heavier than air. Apparatus: A big glass jar, three candles of different sizes, matches
Method:
1. Light up 3 candles of different sizes 2. Place a glass jar on them 3. Observe which one lights out first.

eTwinning project – “Sharing Science Experiments”
Malta, Poland, Romania, Turkey 2011-2
21
Results: Write down your observations. Conclusions:
1. Why do you think that the longest candles went off first? 2. Why do you think that the shortest candle went off last? 3. Where do you think that there is more oxygen up or down? 4. What can you conclude about the density of oxygen? Is it denser than air or less
dense than air? Why?
Malta:
Aim : To burn magnesium ribbon. Apparatus: magnesium ribbon, tongs, Bunsen burner, matches, safety glasses, watch glass. Method: 1. Cut a piece of magnesium ribbon and hold it in a tongs.

eTwinning project – “Sharing Science Experiments”
Malta, Poland, Romania, Turkey 2011-2
22
2. Observe its colour and shape 3. Burn over a lighted Bunsen burner 4. Observe the flame 5. Observe the reaction. Results: Initial colour _______________________________ Shape ____________________________________ Colour of flame _____________________________ Final colour ________________________________ Shape ____________________________________ Precautions: 1. Wear protective safety glasses to protect your eyes 2. wear a labcoat or apron to protect your uniform 3. do not touch the fire 4. do not smell the burning magnesium 5. do not bring the tongs towards your body while holding hot magnesium. Conclusion: Was there a complete change between the reactant and the product? ______________________________________________________ Do you think we can reverse the reaction? _______________________________________________________ Do you think this was a physical or a chemical reaction? Why? ______________________________________________________ Equation: magnesium + oxygen � magnesium oxide.
Romania Aim : To do several experiments with iron. Apparatus: Bunsen burner, tripod, filters asbestos, tubes, iron filings, iron nails, hydrochloric acid, dilute nitric acid, dilute sulphuric acid, copper sulphate, water.

eTwinning project – “Sharing Science Experiments”
Malta, Poland, Romania, Turkey 2011-2
23
Method:
Poland
Aim : To measure the volume of irregular shapes. Apparatus: measuring cylinder, keys, ball Method:
1. Fill the measuring cylinder with water. 2. Read the volume on the measuring cylinder 3. drop the ball in the water 4. read the volume again

eTwinning project – “Sharing Science Experiments”
Malta, Poland, Romania, Turkey 2011-2
24
Results: Volume of original water Volume of final water and ball Conclusion The volume of the ball is the V2 – V1.
March’s Experiments.
Malta
Investigation: Germination of Broad Bean.

eTwinning project – “Sharing Science Experiments”
Malta, Poland, Romania, Turkey 2011-2
25
Aim : What is the aim of this investigation? To observe germination of a broad bean. Preparations: We placed a broad bean in water for one day before we started the investigation.
Observations: The broad bean was dry, brown and hard before we placed it in water. It was covered in red powder that prevents organisms ruining it since it remains dormant for 1 year before germination. How to carry out the investigation? Since we want to observe all stages of germination, we thought of planting the broad bean in a glass beaker full of cotton wool with filter paper between the cotton wool and the glass. The broad bean is placed between them and water added to cover half the bean. This is done as we know that oxygen is vital for germination as well as water and temperature. So we place the beaker in a window where the sun can warm it and provide good temperature for the enzymes to start working.
Observations: After leaving the seed for one day in water, we observed that the bean increased in size. After ____________ days the seed sprouted.
We noticed that it sprouted from the micropyle from where the embryo started growing. First the radicle appeared to emerge out of the weakened testa. It appeared white, thin and fragile. Then the plumule emerged. After a few days the plumule started getting green.

eTwinning project – “Sharing Science Experiments”
Malta, Poland, Romania, Turkey 2011-2
26
We also noticed that the water was decreasing from the beaker and we needed to top it up every two days. After ____________ days, the plumule emerged from the beaker and the radicle became roots.
Interpretation : As the water entered from the micropyle into the seed, the cytoplasm of every cell, that had shrinked and hardened the year before after harvesting, starting absorbing water again. It had shrinked and hardened as to prepare itself for dormancy. The water had emerged from the vacuoles and cytoplasm of every cell, and hence the enzymes couldn’t work anymore. This led to dormancy. Now, when we placed the seed in water again, water entered every cell and the vacuoles and cytoplasms filled again. So the enzymes could start working again and dormancy stops. The enzymes start breaking down the starch of the cotyledons into sugars. This contributes to respiration that takes place in all mitochondria of all cells. Respiration provides enough energy for the embryo to continue growing. The embryo grows and cell specialisation occurs. Division of labour results in the formation of the radicle and the plumule. As the plumule grows, it is exposed to light and chlorophyll starts increasing. Therefore the plumule starts getting green. This helps the plant to photosynthesise and hence sugars are formed. This leads to the independency of the plant. Now the plant is no longer dependent on the stored starch of the cotyledons and the plant continues growing up. We had to add water every two days as this was evaporating and used up by the seed. If no water was added, the seed would have dried again and no growth would have occurred. But we made sure that the seed was not completely covered with water as not to cut off the supply of oxygen from the air. Room temperature of around 20oC also helped the enzymes as to perform well in their work.

eTwinning project – “Sharing Science Experiments”
Malta, Poland, Romania, Turkey 2011-2
27
This investigation shows that water, oxygen and temperature are necessary for germination to occur. We could observe germination well through glass. We also concluded that air, water and light are enough for a plant to grow, with no need of additional nutrients or chemicals. The cotton wool was used only as to provide some pressure between the filter paper and the glass of the beaker. The filter paper was used as not to let the radicle grow into the cotton wool and hide the process of growing. The kind of germination is hypogeal.
Malta. Dissection of a Kidney. Aim : To dissect a pig or cow’s kidney and observe the structures. Apparatus: kidney, scalpel or sharp knife, gloves Method: 1. Observe the whole kidney and identify the renal artery, renal vein and ureter.
2. Dissect the kidney.
Results:
1. What is the size of the kidney and from which animal was it taken? 2. What is the colour? 3. Does it have fat surrounding it? 4. Can you see the vessels coming out of it? 5. When you dissect it, could you feel it tough or soft?
6. What can you see inside? Can you see the pyramids? How many are there? 7. Can you spot the cortex and medulla?

eTwinning project – “Sharing Science Experiments”
Malta, Poland, Romania, Turkey 2011-2
28
8. Can you see other structures?
Conclusions: What are your conclusions about your experience dissecting the kidney? Romania. Aim : To study the properties of oxides. Apparatus: test tubes, test tube rack, spatulas, hydrochloric acid, calcium oxide, copper oxide, phenolphthalein, water,
Method: 1. Dissolve some calcium oxide in water. Calcium hydroxide (lime water) is produced.
This reaction is exothermic and gives out heat.

eTwinning project – “Sharing Science Experiments”
Malta, Poland, Romania, Turkey 2011-2
29
2. React some calcium oxide with hydrochloric acid. Calcium chloride is formed
April
Malta.
Alcoholic Fermentation. Aim : To observe that yeast performs alcoholic fermentation when in contact with warm water and sugar. Apparatus: beaker, boiling tube,

eTwinning project – “Sharing Science Experiments”
Malta, Poland, Romania, Turkey 2011-2
30
Materials: sugar, warm water, yeast Method:
1. Mix some yeast and sugar in a beaker / mug.
2. Pour some of this mixture into a test tube / boiling tube. 3. Add some warm water.
4. See the bubbles of carbon dioxide. 5. Smell the scent of alcohol
Precautions:
1. Do not warm the water too much as if it is too hot it would kill the yeast 2. Do not spill the mixtures.
Results:
1. Did you see the bubbles come out from the mixture? 2. Did yo smell the scent of alcohol?
Conclusion:
1. What test did you do to conclude that the gas was carbon dioxide? 2. Do you think this is aerobic or anaerobic respiration? 3. How would you write an equation for this reaction?

eTwinning project – “Sharing Science Experiments”
Malta, Poland, Romania, Turkey 2011-2
31
carbon dioxide turns lime water milky
Malta Experiment: Producing oxygen Aim : To produce oxygen. Apparatus: boiling tube, spatula, wooden splint, matches Materials used: hydrogen peroxide, manganese (IV) oxide Method:
1. Mix some manganese dioxide with hydrogen peroxide
manganese dioxide is the black powder
student adding the hydrogen peroxide
2. Close the mouth of the boiling tube not to let any gas escape 3. Test the gas with a glowing splint.

eTwinning project – “Sharing Science Experiments”
Malta, Poland, Romania, Turkey 2011-2
32
Results: Did you see any effervescence when you mixed the two reactants? What happened to the glowing splint after that you placed it near the gas? What is the gas produced?
BURNING CANDLES
1. What happens when a beaker is put over a burning candle? 2. Why?
This is the word equation: Candle wax + oxygen � carbon dioxide + water + energy
Malta Fieldwork
1. Map of Area: Sketch a map of area, round about 6m by 4m, using a tape measure. Key the main areas.
Example:

eTwinning project – “Sharing Science Experiments”
Malta, Poland, Romania, Turkey 2011-2
33
2. Insert a weather clip from a newspaper of the same day of the fieldwork performed or write the day’s weather report.
3. Line Transect: Tie a string from one tree to another, half a meter above the ground. At
every 30cm interval check the height and name of plant in (English, Latin and Maltese). Draw a two y-axis graph to represent the height to distance occurrence.
4. Quadrats: Throw four quadrats at random, in the original area. For each measure the: a. Soil Temperature: Insert a dowel in about 5cm depth and then replace by a thermometer. b. Soil Humidity: Use humidity device c. Soil pH: Insert device’s probe and spray some distilled water on the same spot. You must name all organisms in the quadrat flora and fauna in English, Latin and Maltese. Finally you must record the relative abundance of each plant in the quadrat. Example:

eTwinning project – “Sharing Science Experiments”
Malta, Poland, Romania, Turkey 2011-2
34
5. Check out the rubbish in your area and plot a pie chart of biodegradable and nonbiodegradable waste. 6. Stay 10 minutes in silence and record any natural and pollutant sounds that you hear. Romania. Aim : To test the chemical properties of acids. Apparatus: acids, phenolphthalein indicator, litmus indicator, zinc, Method:
1. Test acid with phenolphthalein indicator. 2. Test acid with litmus paper. 3. Test acid with a metal such as zinc 4. Testing for hydrogen using a lighted splint 5. Testing copper oxide with hydrochloric acid 6. Testing alkalis with phenolphthalein indicator 7. Testing silver nitrate with hydrochloric acid 8. Testing barium chloride with sulphuric acid
Results and Conclusions:

eTwinning project – “Sharing Science Experiments”
Malta, Poland, Romania, Turkey 2011-2
35

eTwinning project – “Sharing Science Experiments”
Malta, Poland, Romania, Turkey 2011-2
36