everest data manager users guide
TRANSCRIPT
Everest Data Manager User’s Guide
Product Version: 4.0 Document Version: 1.1 Date: 7 November 2003
100 Prospect Street, North Tower Stamford, Connecticut 06901 USA Telephone: (203) 964-3100 www.OutlookSoft.com ii
Document Summary
This document contains reference and procedures for using the Everest Data Manager. The Data Manager allows administrators to perform data maintenance on the Everest database.
OutlookSoft, the OutlookSoft logos, and Everest are trademarks or registered trademarks of OutlookSoft Corporation. All other trademarks and logos are the property of their respective owners.
© 2000 – 2003 OutlookSoft Corporation. All rights reserved.

Everest Data Manager User’s Guide Table of Contents
© 2000-2003 OutlookSoft Corporation. 3 All rights reserved.
Table of Contents
Data Manager Overview .......................................................................................1 A Complete Suite of Packages..........................................................................1
Transforming Data .........................................................................................1 Modifying Packages.......................................................................................1 Monitor Package Status.................................................................................2
Previewing Data....................................................................................................3 Data Manager Packages ......................................................................................5
Standard Data Management Packages:............................................................6 Financial Processes ..........................................................................................7 System Administration Packages ......................................................................8 Example Packages............................................................................................8
Organzing Packages...........................................................................................11 Adding or Editing Packages ............................................................................12 Moving or Copying Packages..........................................................................13 Removing Packages .......................................................................................14
Assigning Packages to Sites...............................................................................15 Running Data Manager Packages ......................................................................17
Run Package Task ..........................................................................................17 Running Packages ..........................................................................................18 Selecting Data.................................................................................................19
Selecting Dimension Members ....................................................................19 Saving and Loading Filters..............................................................................23
Reviewing Package Status .................................................................................25 Transferring Data Files .......................................................................................27
Uploading Files................................................................................................27 Downloading Files ...........................................................................................27
Defining Data Transformations ...........................................................................29 Defining Transformation Files..........................................................................29 Creating or editing Transformation Files .........................................................34 Copying Transformation Files..........................................................................34 Validating Transformation Files .......................................................................35 Defining Conversion Files ...............................................................................37 Creating or editing Conversion Files ...............................................................38 Copying Conversion Files ...............................................................................39 Validating Conversion Files.............................................................................39 Adding Conversion Sheets..............................................................................39
EvDTSModifyPkg Custom Task..........................................................................41 Key Terms.......................................................................................................41 EvDTSModifyPkg User Interface.....................................................................42 Syntax .............................................................................................................43 The Global() Instruction...................................................................................44 The INFO() Instruction.....................................................................................44 The GETINFO Instruction................................................................................45 The Prompt() Command..................................................................................47

Everest Data Manager User’s Guide Table of Contents
© 2000-2003 OutlookSoft Corporation. 4 All rights reserved.
The OLEDBCONN instruction .........................................................................51 The TASKCOPYCOLUMNS command ...........................................................52
Syntax..........................................................................................................52 Testing Packages ...............................................................................................53
The Debug Command .....................................................................................54 Registering Custom Tasks..................................................................................55 Custom DTS Tasks.............................................................................................57
EvDTSDumpLoad Custom DTS Task .............................................................57 EvDTSModifyPkg Custom Task ......................................................................62 K2DTSMakeDim Custom Task........................................................................62 K2DTSRunlogic Custom Task.........................................................................63
Index ...................................................................................................................67

Everest Data Manager User’s Guide Data Manager Overview
© 2000-2003 OutlookSoft Corporation. 1 All rights reserved.
Data Manager Overview
The Everest Data Manager (DM) is a powerful module that lets you move data into and out of an Application, as well as copy or move data within an Application and across Applications. In addition to allowing you to move and copy data, DM supports mapping and complex transformations of data. Depending on your desired outcome, you can define data transformations on Export, Import or Copying of data. DM is based on the powerful Microsoft Data Transformation Services (DTS). The is made up of packages, each package performs a set of specific tasks based on information you provide either by entering information in DM package prompts and/or by modifying the package directly through SQL Server.
Data Manager is supported for Excel 2000 and above clients.
A Complete Suite of Packages Everest is delivered with the a set of standard packages to meet your many data management needs. Click here for a detailed review of each package.
Transforming Data The Data Manager (DM) can perform data transformations and/or mapping using transformation and conversion files. For example, when performing a data import the source data may not be in the correct format. The dimension names may not match the dimension names in Everest, in this case, you would map, in the conversion file, the external dimensions to the internal dimensions. When the DM import package is run it reads the transformation file (which has a pointer to a conversion file) and correctly maps the data. This is just one example of what you can do with data transformations for more information see Defining data
transformations.
Attention users of Everest versions 3.0 and earlier. The DM module no longer requires the transformation of the Time dimension into the 'TimeID' format (ex. 20020100) on data imports. This functionality is
now built into the DM module.
Modifying Packages You may or may not have to modify DM packages to work within your company's requirements. The packages that come with Everest are designed to be dynamic in that you do not need to modify the packages in order for them to work with your applications and dimensions. But you may want to modify packages to behave differently or to perform additional tasks. You can make modifications to the packages supplied with Everest or use those packages as templates to build packages as per

Everest Data Manager User’s Guide Data Manager Overview
© 2000-2003 OutlookSoft Corporation. 2 All rights reserved.
your requirements. See the Modifying Packages chapter for more information.
Monitor Package Status The Data Manager Status task lets you view the status of packages that are currently running and packages that have been completed. See the Reviewing Package Status chapter for more information.

Everest Data Manager User’s Guide Previewing Data
© 2000-2003 OutlookSoft Corporation. 3 All rights reserved.
Previewing Data
You can preview your data files. This is useful when you want to see the way your data is laid out when creating a transformation file.
To preview data:
1. Select eData > Data Preview.
2. Select a data file, and then click OK.
3. Use the scroll bars to look at the data.
The preview window only loads the first 200 lines of your data.
4. If you want to open a different file, click the Open button, select another file, and then click OK.
5. Click the Cancel button when you are done previewing your data.


Everest Data Manager User’s Guide Data Manager Packages
© 2000-2003 OutlookSoft Corporation. 5 All rights reserved.
Data Manager Packages
Packages allow you to move data into, out of, and between your Everest databases. There are two broad types of packages you can use to move data depending on your needs:
• Standard Packages Standard packages perform their function while the system is live and users may be online. For example, you can use a standard package to load monthly data. It is recommended that you use standard packages whenever possible, because they work within the Everest user ID security framework and there is little risk of data integrity issues. Standard packages can be run by Appset administrators and Site administrators. Appset administrators assign which package can be run by which site administrators.
• Administrative Packages Administrative packages are designed for operational tasks on the database such as back end data manipulation where you are loading bulk data for the first time, exporting the entire database, or running default logic formulas on your data. Administrative packages take the system offline and can only be run by Appset administrators, and therefore do not follow Everest user ID security, since Appset administrators have access to all data.
You can also assign transformation files to packages to format your inbound and outbound data. You can define data transformation files, and then use them when you run packages.
To see your Data Manager packages:
1. From WebExcel, select eTools > Data Manager to load the eData menu.
2. Select eData > Run Package or eData > Organize Package List. For more information about running packages, see Running Data Manager Packages. For more information about organizing packages, see Organizing Packages. For information about assigning packages to sites, see Assigning Packages to Sites.
Your packages are organized into different groups, based on their site affiliation:

Everest Data Manager User’s Guide Data Manager Packages
© 2000-2003 OutlookSoft Corporation. 6 All rights reserved.
The Data Management, Data Modeling, and Financial Processes groups all contain Standard packages. The System Administration group contains Administrative packages. See the below tables for explanations of the packages supplied with Everest in each group.
Standard Data Management Packages: Package Description Transformation
file
Import Imports an ASCII file into the current application. You are prompted for an import file and a conversion file. The signs of the amounts are reversed based on the Account type.
import.xls
Export This package exports data from the Everest cube (including calculated values) into an ASCII file. You are prompted to enter a name for the export file and for a data selection to export.
export.xls
Move This package lets you move any selection of data within an application. You are prompted for source and destination data selections for all dimensions. The destination selection's fact table records are cleared before the source's records are moved. The source's fact table records are cleared after they are moved to the destination.
N/A

Everest Data Manager User’s Guide Data Manager Packages
© 2000-2003 OutlookSoft Corporation. 7 All rights reserved.
Package Description Transformation file
Copy This package copies data within an Everest application. You are prompted for source and destination data selections for all Dimensions in the application. The destination data selection's fact table records are cleared before the source records are copied.
When you run this package, the following checkbox prompt is displayed:
Run default formula after copy If you leave this box deselected, the package does a straight copy of the data. If you select this box, the copy package copies data then runs the default advanced formulas that apply to that data.
N/A
Clear This package clears any selection of data from an application.
You cannot select [All] for all dimensions. The package will not run.
import.xls
Financial Processes
Package Description Transformation file
FX Restatement
This package is used for currency translation. Please see Everest Administrator help for more information on setting up currency translation
N/A
IC Eliminations
This package is used to Perform Inter-Company eliminations. Please see Administrator help for more information on Inter-Company eliminations.
N/A

Everest Data Manager User’s Guide Data Manager Packages
© 2000-2003 OutlookSoft Corporation. 8 All rights reserved.
System Administration Packages Package Description Transformation File
Append into Fact Table
This package imports data into the database by appending the data to the fact table, processes the data into the Everest cube, and then runs Default logic against the imported data set.
import.xls
Import into Fact Table with Clear
This package clears the fact table, and then imports data into the database, processes the data into the Everest cube, and then runs Default logic against the imported data set.
import.xls
Export from Fact Table
This package exports input level data (but will include translated currency values) from the application FactTable into an ASCII file. You are prompted to enter a name for the export file, for a selection of data to export and for a conversion file to use
export.xls
Default Formulas
This package executes default formulas stored in your default.xls file.
N/A
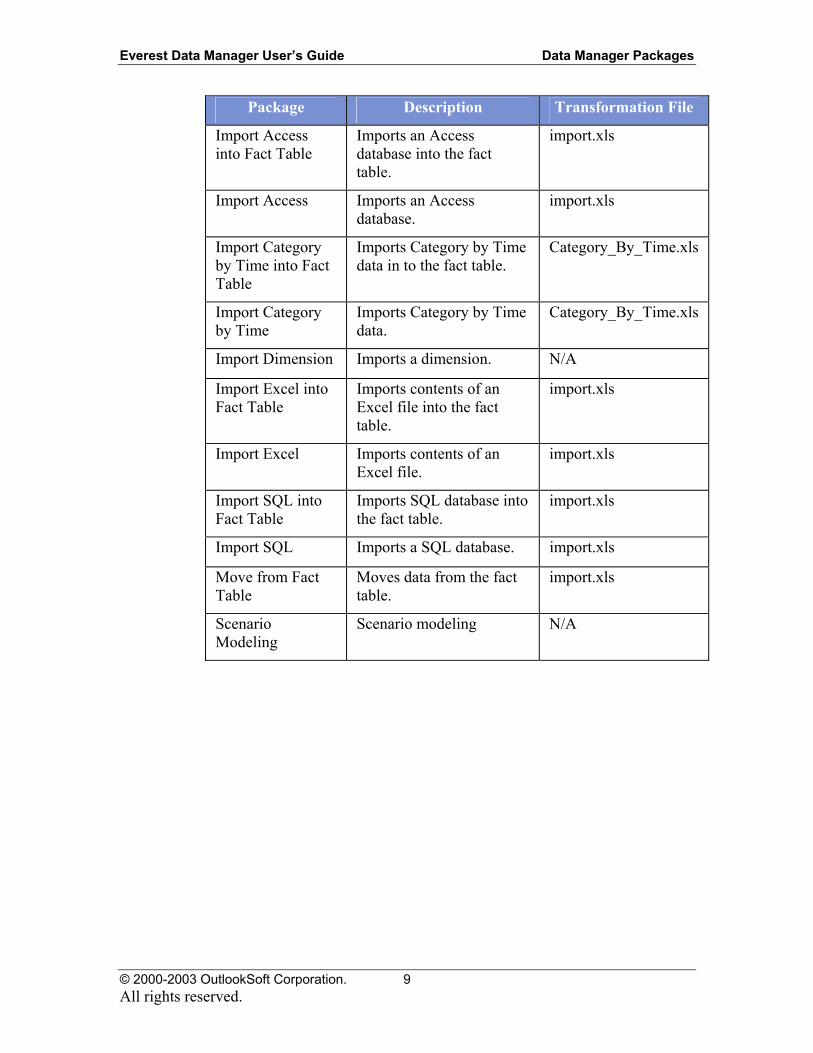
Example Packages There are a number of example packages that you can use or modify to suit your needs. These examples are not part of the default package configuration, but you can use Organize Packages to add them.
Package Description Transformation File
Clear from Fact Table
Clears the fact table. N/A
Copy Application Copies an application database.
N/A
Copy from Fact Table
Copies a fact table. import.xls
Everest Data Manager User’s Guide Data Manager Packages
© 2000-2003 OutlookSoft Corporation. 9 All rights reserved.
Package Description Transformation File
Import Access into Fact Table
Imports an Access database into the fact table.
import.xls
Import Access Imports an Access database.
import.xls
Import Category by Time into Fact Table
Imports Category by Time data in to the fact table.
Category_By_Time.xls
Import Category by Time
Imports Category by Time data.
Category_By_Time.xls
Import Dimension Imports a dimension. N/A
Import Excel into Fact Table
Imports contents of an Excel file into the fact table.
import.xls
Import Excel Imports contents of an Excel file.
import.xls
Import SQL into Fact Table
Imports SQL database into the fact table.
import.xls
Import SQL Imports a SQL database. import.xls
Move from Fact Table
Moves data from the fact table.
import.xls
Scenario Modeling
Scenario modeling N/A


Everest Data Manager User’s Guide Organzing Packages
© 2000-2003 OutlookSoft Corporation. 11 All rights reserved.
Organzing Packages
Package maintenance tasks are grouped into their own, separate interface.
To display the Package Maintenance tasks screen, select eData > Organize Package List:
You can perform the following package maintenance tasks:
Adding or editing packages
Moving or copying packages
Removing packages

Everest Data Manager User’s Guide Organzing Packages
© 2000-2003 OutlookSoft Corporation. 12 All rights reserved.
Adding or Editing Packages For each package, you must have the following fields completed. If any of these fields are incorrect or left blank the package will generate an error when the package is executed.
Field Description
PackageType SQL, FILE or Repository. See SQL server books online for more information.
File If the FILE package type is selected, a File text box is displayed so that you can specify the file that contains the package. You can browse for files using this icon: .
PackageName The name of the package - Use the View Package List button to see a list of available packages. If you select the File package type, then you must select a file containing packages in order to use the View Package List button.
Group The folder group to which the package will be added. You can define a new group by typing a new group name here.
Description A description of the package
User Group You can control who has access to run the package: A user or an Administrator.
To add or edit packages:
1. From WebExcel, select eData > Organize Package List.
2. Click the Add or Edit icon.
2. Complete the fields from the table above. If you want to create a new group, type the new group's name in the Group field.
3. When adding a new package, if you click the browse icon next to the File text box, the Add File dialog box is displayed:

Everest Data Manager User’s Guide Organzing Packages
© 2000-2003 OutlookSoft Corporation. 13 All rights reserved.
You can find example packages in the Examples folder. Example packages are documented in the Example Packages section. You can upload package files to the MyFiles or Examples group using the eData > Data Upload task. See Transferring Data Files for more information. The System Files group is read-only and contains packages that are maintained by OutlookSoft Corporation. You cannot upload files to this group.
4. If adding a package, click the Add button, or, if editing a package, click the Save button.
5. Click the package to select it, and then click the Save Package List button.
You must save the package before you can run it. Adding the package only adds it to the folder list. Saving it makes it available for use.
Moving or Copying Packages To move or copy packages between groups complete the following steps.
1. From WebExcel, select eData > Organize Package List.
2. Click the Move or Copy icon.
3. Select the Destination Group from the drop down list.
4. Click the Move or Copy button.
5. Click the package to select it, and then click the Save Package List button.
Everest Data Manager User’s Guide Organzing Packages
© 2000-2003 OutlookSoft Corporation. 14 All rights reserved.
Removing Packages To remove a package from the list:
1. From WebExcel, select eData > Organize Package List.
2. Highlight the package you want to remove.
3. Click the Remove icon.
4. Click the Save Package List button.
Everest Data Manager User’s Guide Assigning Packages to Sites
© 2000-2003 OutlookSoft Corporation. 15 All rights reserved.
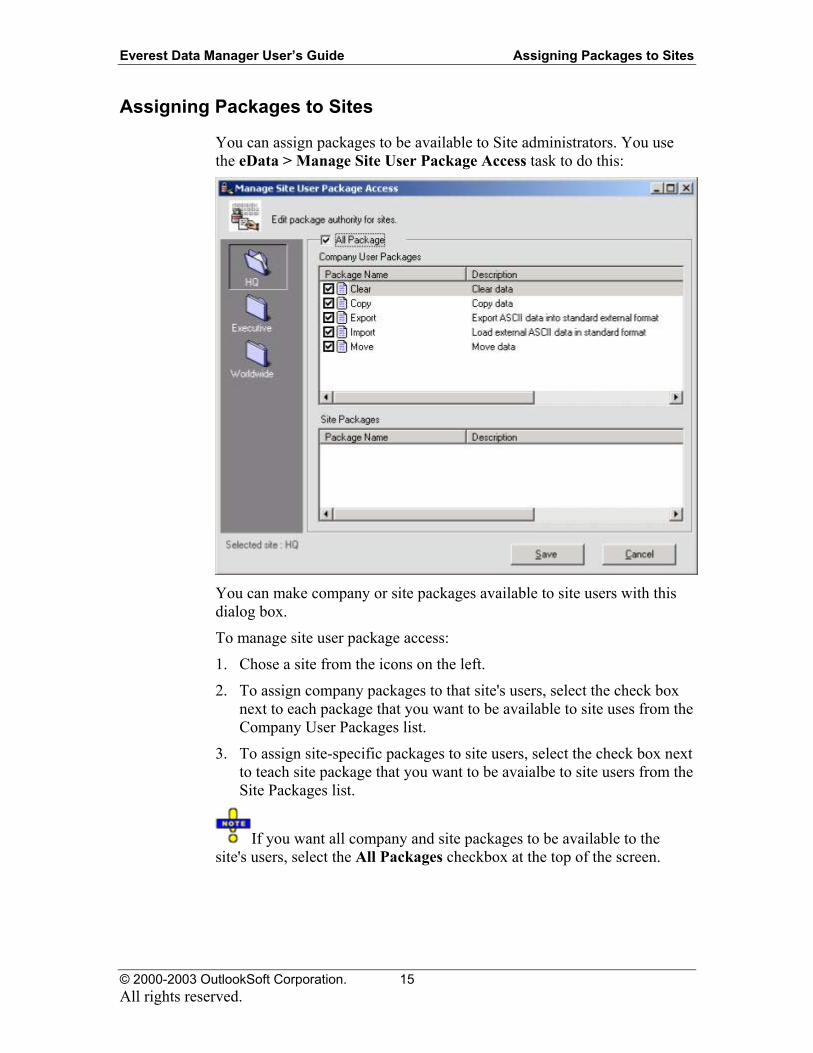
Assigning Packages to Sites
You can assign packages to be available to Site administrators. You use the eData > Manage Site User Package Access task to do this:
You can make company or site packages available to site users with this dialog box.
To manage site user package access:
1. Chose a site from the icons on the left.
2. To assign company packages to that site's users, select the check box next to each package that you want to be available to site uses from the Company User Packages list.
3. To assign site-specific packages to site users, select the check box next to teach site package that you want to be avaialbe to site users from the Site Packages list.
If you want all company and site packages to be available to the site's users, select the All Packages checkbox at the top of the screen.


Everest Data Manager User’s Guide Running Data Manager Packages
© 2000-2003 OutlookSoft Corporation. 17 All rights reserved.
Running Data Manager Packages
This section describes how to run Data Manager packages.
Access to a DM package is controlled by the Appset administrator. Those who have User security access, as defined in users and security, may not have access to some or all Data Manager packages.
After you have selected a package to run, provide the information needed for the execution of a particular package and executed the package the package status can be viewed via DM Status.
Run Package Task The following screen is displayed for Appset administrators when they choose to run packages:
Data Manager packages are organized by site and by application. Under each application they are further organized into folders that represent tasks. The screen displayed above shows the contents of the Data Management folder.
The following screen is displayed when a site administrator selects the Run Package task:

Everest Data Manager User’s Guide Running Data Manager Packages
© 2000-2003 OutlookSoft Corporation. 18 All rights reserved.
You can use the button to upload packages to the server. See Transferring Data Files for more information about uploading files
to the server. Also, you can use the to view package status. See the Reviewing Package Status section for more information about viewing your package status.
Running Packages 1. Select eData > Run Package.
2. For Appset administrators, do the following:
• Click a site on the left column of the dialog box, then click on a folder (group).
• Select the package you want to run from the list.
3. For Site Administrators, do the following:
• Click a site on the left column.
• Click a package icon on the right.
Everest Data Manager User’s Guide Running Data Manager Packages
© 2000-2003 OutlookSoft Corporation. 19 All rights reserved.
4. Click the Run button at the bottom of the dialog box.
5. The screens that follow differ depending on the package chosen. Follow the instructions on the screen.
6. After supplying the required information the package is sent to the server and executed. You can view the status of the package using DM Status.
There are also tasks on the Everest Process Manager pages that initiate the DM. These tasks will vary in name and location from page to page with a Process Manager.
Selecting Data As stated above, you will be prompted to enter information needed to complete the package. The information you are prompted for will vary from package to package. For example when running the Import package you will be prompted for a file to import and when running the Export package you will be prompted for a file to which to export the data and which data to export.
Selecting Dimension Members The example below shows the data selection screen for the Move package. You select the members for each dimension that you want to export by clicking on the Choose Members button . The default selection is all members. Note: If the To value is the same as the From value for any dimension you only need to specify the From value.

Everest Data Manager User’s Guide Running Data Manager Packages
© 2000-2003 OutlookSoft Corporation. 20 All rights reserved.
The example below shows the member selector that displays after clicking the Choose Members button :

Everest Data Manager User’s Guide Running Data Manager Packages
© 2000-2003 OutlookSoft Corporation. 21 All rights reserved.
There are two general steps to using the member selector:
• Setting up dimension member selection
• Selecting dimension members
Additionally, you can save and load filters that you set up. See the Saving and Loading filters section, below.
The following procedure steps through the entire member selection process.
To select members:
1. Start the Data Manager, double-click a package to open it, and then click on the Choose Members button next to the dimension whose members you want to select. The system displays the Choose Members screen, pictured above.
2. You can narrow the list of members on the left by choose to filter the list based on properties. If you would like to filter the member list, do the following:
a. Select the Use Filter checkbox.

Everest Data Manager User’s Guide Running Data Manager Packages
© 2000-2003 OutlookSoft Corporation. 22 All rights reserved.
b. Choose a value for each property that you want to filter by clicking a down arrow and selecting from the list.
c. Click the Refresh button to filter the member list on the left.
3. You can select one or more members from the list on the left.
. To select one member, click that member:
You can view the properties of the selected member by right-clicking the member and choosing Properties from the menu or by clicking the Properties button at the top of the screen. To select more than one member, you can use CTRL-click to select non-contiguous members, or you can use SHIFT-click to select a range of members. An example of CTRL-click is shown below:
4. You can show member descriptions in the member list by selecting the
View member with description checkbox:
5. You can copy the selected members. You might want to do this to
paste the list into an Excel spreadsheet. To copy selected members, right-click over one of the selected members, and then choose Copy from the menu.
6. When you are satisfied with your selection, click the Take selected button to return the selected members to the package dialog box.

Everest Data Manager User’s Guide Running Data Manager Packages
© 2000-2003 OutlookSoft Corporation. 23 All rights reserved.
You can also choose to ignore the members you have selected by clicking the Take all in list button. This option returns all the members in the list to the package. Note that if you used a filter to create the list, only the members that match the filter are returned.
Saving and Loading Filters When you create a filter by filling out the filter section of the member selector dialog box, you can save it and then reuse it later.
You can use the Manage Filter button to save the filter, and then you can choose that filter from the User filter list to load the filter.
To save and load a member selector filters, do the following:
1. Access the member selector. For example, run a package and then click the member selector button.
2. Chose the filter criteria from the filter lists.
3. Click the Manage Filter button, type the name of the filter, and then click the Save button.
4. To load the filter at a later time, choose it from the User Filter list at the top.
5. To delete a filter, choose it from the User Filter list, click the Manager Filter button, and then click the Remove button.


Everest Data Manager User’s Guide Reviewing Package Status
© 2000-2003 OutlookSoft Corporation. 25 All rights reserved.
Reviewing Package Status
After a Data Manager package is executed, the request to process the package is sent to the server and the package is executed. You can monitor the progress and/or view the results of packages in the Data Manager Status task.
The first screen shows the status of any packages that are currently running. Click the Log button to view all completed packages. To see the detailed results of a package, select the package and click the Details button.
You can access Data Manager Status from the Status menu.
Here is an example of the Data Manager Status views.
If the package you ran was a logic task, there are two logs available:
• Package Log
• Formula Log

Everest Data Manager User’s Guide Reviewing Package Status
© 2000-2003 OutlookSoft Corporation. 26 All rights reserved.
Select the radio button for the log you want to view at the bottom of the window. See the above image for an example.

Everest Data Manager User’s Guide Transferring Data Files
© 2000-2003 OutlookSoft Corporation. 27 All rights reserved.
Transferring Data Files
In order to import a file, the file must reside in the Data Manager Data Files folder on the server. The Upload function allows you to move files from your local machine to the Data Files folder on the server. The Download function allows you to move files from the data files folder on the server to your local hard drive.
Uploading Files
1. Open Data Manager.
2. Select eData > Data Upload icon.
3. Enter the path to the file you want to upload in the Source File text
box or click the browse files button to find the file on your hard drive.
4. After entering the file name, you can click the preview button to preview the file.
5. Enter the path to the destination folder in the Destination File text box
or click the browse files button to chose a location within the Data Files folder.
6. Click the Transfer button.
Downloading Files
1. Open Data Manager.
2. Select eData > Data Download icon.

Everest Data Manager User’s Guide Transferring Data Files
© 2000-2003 OutlookSoft Corporation. 28 All rights reserved.
3. Enter the path to the file you want to download in the Source File text
box or click the browse files button to find the file in your Data Files folder.
4. After entering the file name, you can click the preview button to preview the file.
5. Enter the path to the destination folder on your local hard drive in the
Destination File text box or click the browse files button to chose a location on your hard drive.
6. Click the Transfer button.

Everest Data Manager User’s Guide Defining Data Transformations
© 2000-2003 OutlookSoft Corporation. 29 All rights reserved.
Defining Data Transformations
Data Manager helps you set up data import and export into and out of your Everest applications.
Data transformation is done by setting up at least two excel files:
• Transformation file — Allows AppSet Administrators to set up the rules for reading data from an external source and putting it in the proper form for your Everest database.
• Conversion file — Allows AppSet or Site administrators to Map member names from external to internal dimension structures. You can set up multiple sheets in a conversion file so that many transformations can access the same conversion workbook. You can have one conversion file per dimension.
Defining Transformation Files Transformation files define how to change the data from an external source so that it works with your Everest data structure.
Appset Administrators can edit and create transformation files as well as conversion files. Site administrators can only edit conversion files. If you are not an Appset Administrator, this section does not
apply to you.
Transformation files are excel files that contain one worksheet, named Instructions:

Everest Data Manager User’s Guide Defining Data Transformations
© 2000-2003 OutlookSoft Corporation. 30 All rights reserved.
This worksheet has the following format:
*OPTIONS This section contains definitions for various options that you can set for your transformation. The options are:
Option Values (default is BOLD)
Description
FORMAT= DELIMITED FIXED CATEGORYBYTIME
The format of the data in the input or output file. You must enter a format type. Delimited means that there is a special character between each column of data, defined by the Delimiter option (below). Fixed means that the data is in a fixed field format. Use the FCOL mapping option, defined below. CategoryByTime means that the data is listed by categories that represent time periods.
HEADER=
YES NO
If YES, then your input file contains one header row that defines the fields. If you do have a header row, you can refer to a field by name in the MAPPING section.

Everest Data Manager User’s Guide Defining Data Transformations
© 2000-2003 OutlookSoft Corporation. 31 All rights reserved.
Option Values (default is BOLD)
Description
DELIMITER= , (comma) any single char SPACE TAB
If FORMAT is DELIMITED, defines the single character that is the delimiter between columns. use the keywords SPACE or TAB if space- or tab-delimited.
SKIP= 0 (zero), integer value
Number of lines to skip at the top of a data file. If your data file has a header, set this value so that those lines are skipped during transformation.
SKIPIF= <empty_string> <any string>
Skip a line in the data file if it begins with the specified string. Setting this option to an empty string means that no lines are skipped in the body of the data file. Header lines can still be skipped using the SKIP command, above.
VALIDATERECORDS=
NO YES
If YES, validate mapping and member existence, and map data in the proper order for Everest. For example, the Amount field is always moved to the end of the records even though it might be written in the first line of the mapping section.
If NO, will not validate mapping information and member existence in records. In this case, if the mapping section is out of order or just wrong, fields will be skipped.
MAXREJECTCOUNT=
<empty_string> -1 positive number
If validating records, the number of rejected records at which to stop processing. A value of -1 implies that DM should keep processing no matter how many rejected records exist. The default value is 500, which can be represented by an empty string.
CREDITPOSITIVE=
YES NO
If NO, all amounts referring to an ACCOUNT type (LEQ, INC) will have their signs reversed.

Everest Data Manager User’s Guide Defining Data Transformations
© 2000-2003 OutlookSoft Corporation. 32 All rights reserved.
Option Values (default is BOLD)
Description
CONVERTAMOUNTWDIM=
ACCOUNT <Dim name>
Specifies which dimension to look at for value calculations. The default for this field is Account. If there is no formula in the Formula column of the conversion sheet this parameter has no affect at all. For example, the Formula has the following formula Value*1.10. All accounts will be increased by 10% during the conversion.
ROUNDAMOUNT=
<no rounding> integer
Specifies the amount of decimal places to round values during the transformation.
*MAPPING
This section defines how data is mapped to your Everest database.
The following options are available:
Option Example Description
*COL(A) A = column index in the data file
Account =*COL(2) Defines a dimension for a field in the data file when the data file does not have a header row. See the note below about automatic field names when you do have a header row.
*COL(A,B:C) A = column index in the data file B:C = start/end position within the column
Account=*COL(3,1:4) Defines a dimension for a subset of a field in the data file.
*FCOL(A:B) A:B = start/end position within the data row
Account=*FCOL(4:7) When using Fixed format data files, this option allows you to define the start and end character columns for each field. In the example, the columns 4 through 7 represent the Account dimension.
Everest Data Manager User’s Guide Defining Data Transformations
© 2000-2003 OutlookSoft Corporation. 33 All rights reserved.
Option Example Description
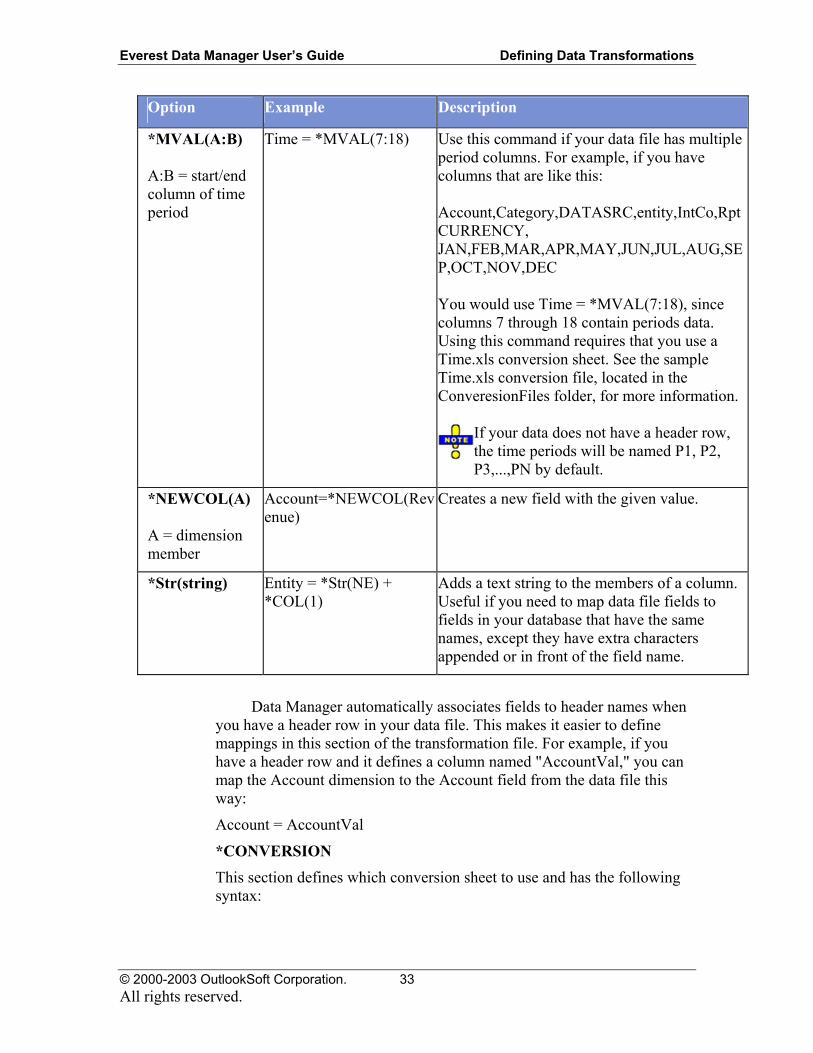
*MVAL(A:B) A:B = start/end column of time period
Time = *MVAL(7:18) Use this command if your data file has multiple period columns. For example, if you have columns that are like this: Account,Category,DATASRC,entity,IntCo,RptCURRENCY, JAN,FEB,MAR,APR,MAY,JUN,JUL,AUG,SEP,OCT,NOV,DEC You would use Time = *MVAL(7:18), since columns 7 through 18 contain periods data. Using this command requires that you use a Time.xls conversion sheet. See the sample Time.xls conversion file, located in the ConveresionFiles folder, for more information.
If your data does not have a header row, the time periods will be named P1, P2, P3,...,PN by default.
*NEWCOL(A) A = dimension member
Account=*NEWCOL(Revenue)
Creates a new field with the given value.
*Str(string) Entity = *Str(NE) + *COL(1)
Adds a text string to the members of a column. Useful if you need to map data file fields to fields in your database that have the same names, except they have extra characters appended or in front of the field name.
Data Manager automatically associates fields to header names when you have a header row in your data file. This makes it easier to define mappings in this section of the transformation file. For example, if you have a header row and it defines a column named "AccountVal," you can map the Account dimension to the Account field from the data file this way:
Account = AccountVal
*CONVERSION
This section defines which conversion sheet to use and has the following syntax:

Everest Data Manager User’s Guide Defining Data Transformations
© 2000-2003 OutlookSoft Corporation. 34 All rights reserved.
FieldName = [COMPANY]WorkbookName[!SheetName] (Items in brackets are optional)
FieldName is the destination header field name.
Workbookname is the name of the conversion file.
SheetName = is the name of the worksheet to use within the conversion file. If not specified, Data Manager assumes the sheet name is "Conversion."
If [COMPANY] is defined then DM will try to obtain the conversion file from the Main company Data Manager folder, otherwise Data Manager looks in the appropriate Site folder.
Examples: Account = Account.xls
Account = Account.xls!newaccount
Account = [COMPANY]Account.xls!newaccount
Creating or editing Transformation Files Appset Administrators can edit and create transformation files as well as conversion files. Site administrators can only edit conversion files. If you are not an Appset Administrator, this section does not
apply to you.
To create or edit transformation files:
1. Do one of the following:
a. To create a new Transformation file, select eData > New Transformation File.
b. To edit an existing Transformation file, select eData > Manage Transformation Files, choose a site in the left column of the dialog box, choose a folder, and then double-click an existing Transformation file name.
2. Fill out or define the options, mapping, and conversion file sections.
3. Save the Transformation file.
Copying Transformation Files You can save a copy of an open transformation file.
Appset Administrators can edit and create transformation files as well as conversion files. Site administrators can only edit conversion files. If you are not an Appset Administrator, this section does not
apply to you.
To copy transformation files:
Everest Data Manager User’s Guide Defining Data Transformations
© 2000-2003 OutlookSoft Corporation. 35 All rights reserved.
1. Open an existing transformation file using the eData > Manage Transformation Files task.
2. Select eData > Copy Transformation File.
3. Type a file name and click the Save button.
Validating Transformation Files After you define a transformation file, you can validate it. You can validate the transformation file by itself, or by supplying a live data file.
If you are a Site administrator, you cannot create Transformation files, but you can validate your conversion files against a transformation file, whose name is given to you by an AppSet administrator. See the procedure, below, for more information.
To Validate Transformation files:
1. If you are an Appset Administrator, create or edit a transformation file. See the Creating or Editing Transformation files section, above.
2. If you are an Appset Administrator, select eData > Validate & Process Transformation File.
3. If you are a Site Administrator, open a conversion file and then select eData >Test Transform & Conversion files with Data.
4. To validate against a data file, click the browse button , and then choose a data file.
5. If you are a Site Administrator, click the browse button next to the Transformation text box and choose a transformation file, and then click the OK button.

Everest Data Manager User’s Guide Defining Data Transformations
© 2000-2003 OutlookSoft Corporation. 36 All rights reserved.
6. Click the Save button.
7. This process validates and saves the transformation file.
8. If necessary, edit the transformation file to fix errors. For example, the above image shows a mistake in the *MAPPING section. After you edit, you can click the Revalidate button to run the validation again, using the same settings you used before. This is useful if you validated against a data file because you do not have to re-select the data file.
9. If the validation is successful, view the status log and then click the Cancel button. A successful status log looks something like this:

Everest Data Manager User’s Guide Defining Data Transformations
© 2000-2003 OutlookSoft Corporation. 37 All rights reserved.
Defining Conversion Files Conversion files define mappings by dimension from external members to internal member names. They also provide the ability to perform arithmetic and rounding on data as it is converted:
You create one conversion file per dimension. Each conversion file can contain one or more sheets for different types of data transformations. Conversion files must be named the same as the dimension for which they are being used.
If you are a Site Administrator, you should coordinate the conversion file name with your Appset Administrator.
If you want to ignore certain external data, you can place the keyword *skip in the Internal column. For example:
External Internal ACCPAY *SKIP
You can refer to individual sheets in your transformation files, as described above.

Everest Data Manager User’s Guide Defining Data Transformations
© 2000-2003 OutlookSoft Corporation. 38 All rights reserved.
In the formula column, you can use following options:
Formula Column Option
Description Example
basic arithmetic functions
You can use +,-,*, / to perform scaling and basic arithmetic.
value*3 value*0.5 + 2
Round(value, digits)
Use the Round function to round off values to the specified number of digits.
Round(value,2) Round(amount,2) Round(value*100,2)
You use the keywords amount or value to specify the target of the formula.
For example:
FORMULA value*0.5 Round(value,2) Round(amount,2) Round(value*100,2)
The default worksheet name is CONVERSION. If you want to refer to only a file name in your transformation files, then you must have a worksheet named CONVERSION in your conversion file.
Creating or editing Conversion Files To create or edit transformation files:
1. Do one of the following:
a. To create a new Transformation file, select eData > New Conversion File.
b. To edit an existing Transformation file, select eData > Manage Conversion Files, choose a site in the left column of the dialog box, choose a folder, and then double-click an existing Conversion file name.
2. Fill out the External, Internal, and Formula columns as appropriate.
3. Save the Conversion file.

Everest Data Manager User’s Guide Defining Data Transformations
© 2000-2003 OutlookSoft Corporation. 39 All rights reserved.
Copying Conversion Files You can save a copy of an open Conversion file.
To copy Conversion files:
1. Open an existing Conversion file using the eData > Manage Conversion Files task.
2. Select eData > Copy Conversion File.
3. Type a file name and click the Save button.
Validating Conversion Files After you define a Conversion file, you can validate it.
To Validate Conversion files:
1. Create or edit a Conversion file. See the Creating or Editing Conversion files section, above.
2. Select eData > Validate & Process Conversion File.
Adding Conversion Sheets You can add Conversion sheets. This is useful if you are preparing a multi-worksheet conversion file.
To add Coversion sheets:
1. Open an existing Conversion file using the eData > Manage Conversion Files task.
2. Select eData > Add Conversion Sheet.
3. Type the name of the new Conversion sheet, and then click OK.


Everest Data Manager User’s Guide EvDTSModifyPkg Custom Task
© 2000-2003 OutlookSoft Corporation. 41 All rights reserved.
EvDTSModifyPkg Custom Task
The Everest Data Manager (DM) custom task EvDTSModifyPkg is a task that can be inserted in any DM package to modify the package itself, when executed. When this task runs, it modifies the properties of objects contained in the package (like tasks and connections), according to some user-defined instructions specified in the task itself. In simple terms, EvDTSModifyPkg provides you with a single interface from which you can specify a modification for any property within the package.
This topic explains how to use EvDTSModifyPkg to modify the behavior of packages at run time. For help on building packages please see SQL Server Help.
In the sample packages included with Everest, the EvDTSModifyPkg task is called Assign Parameters. However, the underlying file is still named evDTSModifyPkg.
Some knowledge of Microsoft DTS packages is recommended for working with the EvDTSModifyPkg task.
Key Terms Before we discuss how to use EvDTSModifyPkg there are some key terms you should be familiar with.
• Package - A package defines one or more tasks to be executed in a coordinated sequence.
• Script - A set of instructions that EvDTSModifyPkg reads which indicates what objects need to be modified and how.
• Executable instructions that can be entered in the EvDTSModifyPkg task script
• TASK - A DTS package includes one or more tasks; each task defines a work item to be performed as part of the transformation process.
• CONNECTION - Establishes a connection to a data source
• STEP - Coordinates the flow of control and execution of tasks in a DTS package
• GLOBAL - Defines global variable(s) for package
• INFO Instruction - Defines and assigns a value to a script variable. Script variable are user-defined or system-reserved keywords that can be used anywhere in the instructions script in place of their value, to add flexibility to the script.

Everest Data Manager User’s Guide EvDTSModifyPkg Custom Task
© 2000-2003 OutlookSoft Corporation. 42 All rights reserved.
• PROMPT () command - Generates customized dialog boxes for users to enter information for package.
• Debug script - Used for testing packages from the SQL Server Enterprise Manager. After the package has been successfully tested you copy the Debug script to the Dynamic script. (for more information on the Debug Script see: Testing Packages)
• Dynamic script - Used for running packages from DM. Copy the Dynamic script into the Debug script for modifications and testing.
EvDTSModifyPkg User Interface
The screen shot above shows the EvDTSModifyPkg user interface. In this example we see that the Dynamic Script is displayed in the script area and that it contains some instructions for modifying the package. The Display Pkg button lets you view the objects of packages. You can view Tasks, Connections, OLEDBConn, Steps Globals or ALL for any package. To do this you enter the package name, location of the package and select an object and click GO. In the example below the user has select to view the Tasks of the current package (this is an Import package).

Everest Data Manager User’s Guide EvDTSModifyPkg Custom Task
© 2000-2003 OutlookSoft Corporation. 43 All rights reserved.
In this example the object Tasks has been selected, therefore all the tasks of the package are listed. You can review this list to determine what, if anything you need to modify in this package. If you find a task you want to modify you can simply copy the line from the Display Package Script window and paste it into the Debug and/or Dynamic script window above. Then modify its value.
The information displayed here is from the last time the package was saved. If you made changes to another object within the package since the last save it will not be displayed here.
Syntax The syntax for package objects (task, connection, step, global) is:
OBJECT(TASKNAME,PROPERTY,VALUE)
ex. TASK(EVIMPORT,FILENAME,IMPORT1.TXT)

Everest Data Manager User’s Guide EvDTSModifyPkg Custom Task
© 2000-2003 OutlookSoft Corporation. 44 All rights reserved.
The Global() Instruction You can use the Global instruction to create a global variable that can be used in any part of the DTS package.
The syntax for the Global instruction is:
Global ("variablename" , "value")
where "variable name" is the name of the variable and "value" is the text string the global variable represents.
The INFO() Instruction The INFO instruction is not an executable instruction, in the sense that it does not 'do' anything specific to the package. Its purpose, as stated earlier, is only to define and assign a value to a script variable.
The syntax for the INFO instruction is:
INFO("variablename","value")
where “variable name” is the name of the variable and “value” is the value of the variable.
Instead of assigning a value directly to a task, the value (or part of it) can be replaced with the name of a variable defined in an INFO( ) instruction. At run-time, the task will replace the name of all INFO variables found in all executable instructions with the current value of those variables, before executing the executable instructions.
The following example illustrates how to define a variable with an INFO( ) instruction, and how to use it in another instruction like TASK( ).
INFO(%FILE%,IMPORT.TXT)
TASK("EVIMPORT","FILENAME", %FILE%)
You can also "nest" one level of info variables inside other info variables as the example below depicts.
INFO(%PATH%,”C:\MyDir\”)
INFO(%FILE%,%PATH%IMPORT.TXT)
TASK("EVIMPORT","FILENAME", %FILE%)
The name assigned to the variable is entirely up to your discretion, however, it is highly recommended to use expressions enclosed between some easily identifiable characters, for example the percent character (%VARIABLE%), to make the script more readable and less subject to errors when the substitutions are performed. Note also that all system generated INFO( ) variables comply with this practice. Below is a list of system generated Info() instructions for your reference.
%OLAPSERVER% = The name of the OLAP server
%SQLSERVER% = The name of the SQL server

Everest Data Manager User’s Guide EvDTSModifyPkg Custom Task
© 2000-2003 OutlookSoft Corporation. 45 All rights reserved.
%SQLUSER% = The name of the SQL user
%SQLPASSWORD% = The password of the SQL user
%TRIMMEDUSER% = The name of the Everest user without domain name
%DIMS% = The list of all dimensions in the application
%FACTDIMS% = Same but with TIMEID as time dimension name
%APPPATH% = Webfolders path for the application
%DATAPATH% = Data Manager data files path
%SELECTIONPATH% = Data manager selection files path
%CONVERSIONPATH% = Data manager conversion files path
%TEMPPATH% = Path for temporary files for current user and app
The GETINFO Instruction A special case of INFO( ) instruction is the GETINFO( ) instruction. This instruction allows you to dynamically generate additional INFO( ) instructions using some specific parameters.
The syntax of the GETINFO( ) instruction is:
GETINFO([getinfoType], [parameters,…] )
Where:
[GETINFOType] is a reserved keyword indicating what info is going to be generated
[parameters,…] is a comma delimited list of required or optional parameters, specific to the selected GETINFO type.
The currently supported GETINFO types are:
SELECTION_FROM_FILE
and
FACTSELECTION_FROM_FILE
with the following parameters:
• variablename — the INFO variable where to store the result (the default variable name is %SELECTION%)
• file name — the name of the file to scan (required)
• dimensions — the dimensions to scan in the file (the default dimensions are “category,time and entity”)
These instructions scan a specified (with the file name parameter) ASCII file and build a SQL query based on all different combinations of certain dimensions found in the file.
Everest Data Manager User’s Guide EvDTSModifyPkg Custom Task
© 2000-2003 OutlookSoft Corporation. 46 All rights reserved.
Example:
GETINFO(SELECTION_FROM_FILE,%SELECTION%,MYFILE.TXT,”CATEGORY,TIME”)
Content of MYFILE.TXT:
CATEGORY, TIME, ENTITY, ACCOUNT, AMOUNT
ACTUAL,2000.JAN,ITALY,SALES,1234
ACTUAL,2000.FEB,ITALY,SALES,2345
ACTUAL,2000.JAN,FRANCE,SALES,3456
ACTUAL,2000.FEB,FRANCE,SALES,4567
BUDGET,2000.JAN,ITALY,SALES,5678
The result of the above instruction will be the generation of the following INFO( )
INFO(%SELECTION%,”( ([CATEGORY]=’ACTUAL’ and [TIME]=’2000.JAN’) or _
([CATEGORY]=’ACTUAL’ and [TIME]=’2000.FEB’) or _
([CATEGORY]=’BUDGET’ and [TIME]=’2000.JAN’))”)
This instruction is useful to dynamically decide what data to clear before importing a user-selected file of data. The following example of script comes from a real-life data import package. Note how the generated %SELECTION% variable is used 'get in some subsequent TASK( ) instruction.
the data range to clear from the converted file
GETINFO(FACTSELECTION_FROM_FILE, %SELECTION%, %TEMPPATH%%TEMPFILE%)
'Modify Clear fact and wb tables tasks
TASK(DELETEDESTFACT,SQLSTATEMENT,DELETE FROM TBLFACT%APP% where %SELECTION%)
TASK(DELETEDESTWB,SQLSTATEMENT,DELETE FROM TBLFACTWB%APP% where %SELECTION%)
The only difference between SELECTION_FROM_FILE and FACTSELECTION_FROM_FILE is that, when the dimensions to scan are taken by default, the name of the time dimension is left as is (by SELECTION_FROM_FILE ) or forced to be “TIMEID” (by FACTSELECTION_FROM_FILE).
Everest Data Manager User’s Guide EvDTSModifyPkg Custom Task
© 2000-2003 OutlookSoft Corporation. 47 All rights reserved.
The Prompt() Command This command will generate customized dialog boxes on the user’s screen, and, by answering the requests of these dialogs, the user will tell Everest things like: what file to load, what selections of data to export, in which application to copy the selected data, etc.
When multiple PROMPT( ) commands are entered in the same script, all prompts are combined in one single dialog box and presented to the user as such. This rule applies to all PROMPT( ) commands asking for the selection of a file, a delimiter or a text, but not to the COPYMOVE and SELECT prompts. The COPYMOVE and SELECT prompts are presented to the user individually, with as many dialog boxes as prompts are found in the script.
All file selection prompts return the name of the selected file with the complete path.
If the user leaves blank any selection field of a SELECT prompt (or BOTH source and destination fields for a given dimension in a COPYMOVE prompt), the system will assume ALL members for this dimension (and no range will be inserted for this dimension in the returned SQL statement).
The syntax for the PROMPT( ) command is:
PROMPT([prompt type], [variable name], [second variable name], [parameters,…])
The currently supported types of PROMPT( ) commands are described below:
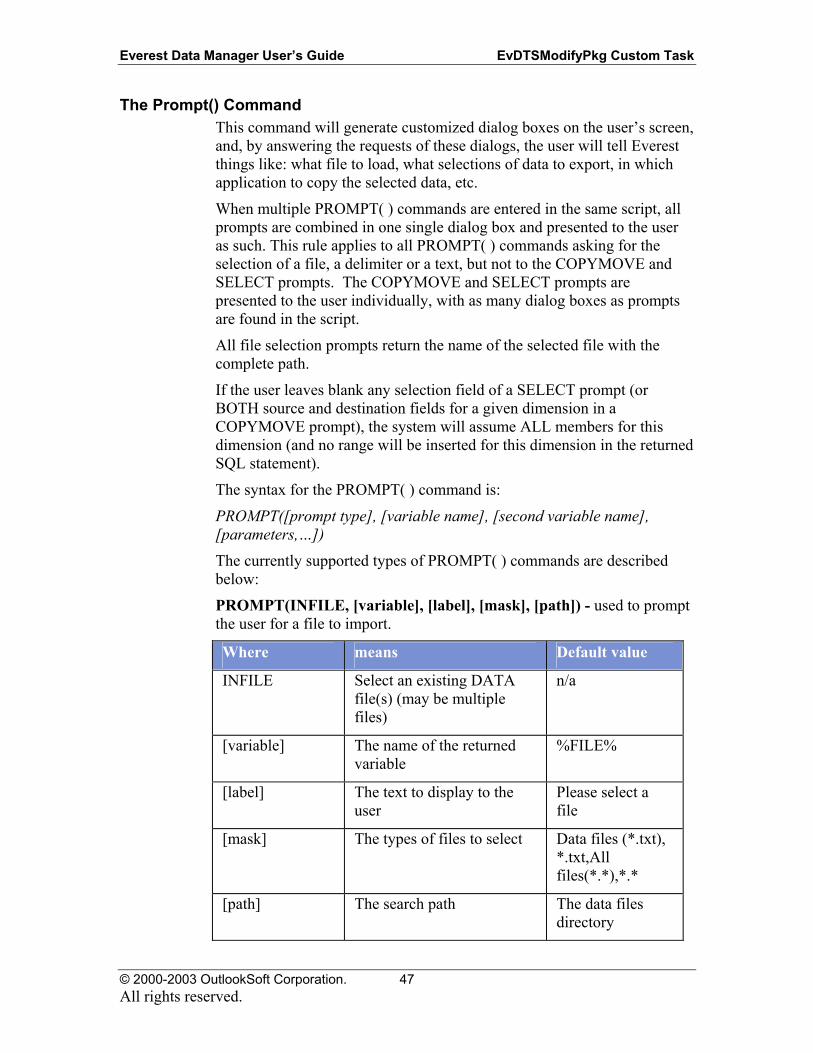
PROMPT(INFILE, [variable], [label], [mask], [path]) - used to prompt the user for a file to import.
Where means Default value
INFILE Select an existing DATA file(s) (may be multiple files)
n/a
[variable] The name of the returned variable
%FILE%
[label] The text to display to the user
Please select a file
[mask] The types of files to select Data files (*.txt), *.txt,All files(*.*),*.*
[path] The search path The data files directory

Everest Data Manager User’s Guide EvDTSModifyPkg Custom Task
© 2000-2003 OutlookSoft Corporation. 48 All rights reserved.
PROMPT(OUTFILE, [variable], [label], [mask], [path]) - used to prompt the user for the name of the export file.
Where means Default value
OUTFILE Select an existing DATA file
n/a
[variable] The name of the returned variable
%FILE%
[label] The text to display to the user
Please select a file
[mask] The types of files to select Data files (*.txt), *.txt,All files(*.*),*.*
[path] The search path The data files directory
PROMPT(SELECTION, [variable], [label], [mask], [path])
Where means Default value
SELECTION Select an existing data selection file
n/a
[variable] The name of the returned variable
%SELECTION%
[label] The text to display to the user
Please select a selection file
[mask] The types of files to select Data files (*.txt), *.txt,All files(*.*),*.*
[path] The search path The selection files directory

Everest Data Manager User’s Guide EvDTSModifyPkg Custom Task
© 2000-2003 OutlookSoft Corporation. 49 All rights reserved.
PROMPT(CONVERSION, [variable], [label], [mask], [path]) - used to prompt the user for a conversion file to use.
Where means Default value
SELECTION Select an existing data conversion file
n/a
[variable] The name of the returned variable
%CONVERSION%
[label] The text to display to the user
Please select a conversion file
[mask] The types of files to select Data files (*.txt), *.txt,All files(*.*),*.*
[path] The search path The conversion files directory
PROMPT(DELIMITER, [variable], [label]) - used to prompt the user for a delimiter to be used in the import or export file.
Where means Default value
DELIMITER Select a delimiter n/a
[variable] The name of the returned variable
%DELIMITER%
[label] The text to display to the user
Please select a delimiter
PROMPT(TEXT, [variable], [label]) - used to display a text message to the user.
Where means Default value
TEXT Enter any text n/a
[variable] The name of the returned variable
%TEXT%
[label] The text to display to the user
Enter your selection

Everest Data Manager User’s Guide EvDTSModifyPkg Custom Task
© 2000-2003 OutlookSoft Corporation. 50 All rights reserved.
PROMPT(COPYMOVE, [variable], [second variable], [label], [dimensions]) - used to prompt the user for a source and destination data range.
Where means Default value
COPYMOVE Select two data ranges n/a
[variable] The name of the returned variable
%SELECTION%
[second variable]
The name of the second returned variable
%TOSELECTION%
[label] The text to display to the user
Enter your selection
[dimensions] The dimensions to select from
Category, Time, Entity
PROMPT(SELECT, [variable], [second variable], [label], [dimensions]) - used to prompt the user for a data range, for export, for example.
Where means Default value
SELECT Select one data range n/a
[variable] The name of the returned variable
%SELECTION%
[label] The text to display to the user
Enter your selection
[dimensions] The dimensions to select from
Category, Time, Entity

Everest Data Manager User’s Guide EvDTSModifyPkg Custom Task
© 2000-2003 OutlookSoft Corporation. 51 All rights reserved.
PROMPT(SELECTINPUT, [variable], [second variable], [label], [dimensions]) - used to allow the user to select only non-calculated members, for export, for example.
Where means Default value
SELECTINPUT Select one non-calculated data range
n/a
[variable] The name of the returned variable
%SELECTION%
[label] The text to display to the user
Enter your selection
[dimensions] The dimensions to select from
Category, Time, Entity
PROMPT(COPYMOVEINPUT, [variable], [second variable], [label], [dimensions]) - used to allow the user to select two non-calculated data ranges. For copying data, for example.
Where means Default value
COPYMOVEINPUT Select non-calculated data ranges
n/a
[variable] The name of the returned variable
%SELECTION%
[label] The text to display to the user
Enter your selection
[dimensions] The dimensions to select from
Category, Time, Entity
The OLEDBCONN instruction This instruction allows you to modify the OLEDB properties of a package's connections. Connections have both 'regular' and OLEDB properties. The OLEDBProperties collection is a group of OLEDBProperty objects containing information about OLE DB service providers.
If you modify a Connection's regular properties you must also modify its OLEDB properties. To do this use the following instruction syntax:
OLEDBCONN("ConnectionName","OleDbPropertyName","PropertyValue")

Everest Data Manager User’s Guide EvDTSModifyPkg Custom Task
© 2000-2003 OutlookSoft Corporation. 52 All rights reserved.
To view the name and current value of the OLEDB properties of a connection by clicking the Display Package button, entering a package name and appset, and selecting the OleDBConn radio button.
The TASKCOPYCOLUMNS command The TASKCOPYCOLUMNS command is an executable command, just like a TASK. It is only used in EvDTSModifyPkg. This command allows you to dynamically copy column settings of a given transformation.
Syntax TASKCOPYCOLUMNS("TaskDescription","[source columns]","[destination columns]")
where:
TaskDescription — is the description property of the task that performs the column copy
[source columns] — is the comma delimited range of columns of the source connection
[destination columns] — is the comma delimited range of columns of the destination connection
Notes: The source columns find their corresponding columns in the destination columns on a positional basis. The ranges of the source and destination columns must have the same number of items.
Double quotes are required to mark the end of the source columns list and the beginning of the destination columns list.
This command is only found in EvModify task. It does not appear when displaying the task properties of a package.

Everest Data Manager User’s Guide Testing Packages
© 2000-2003 OutlookSoft Corporation. 53 All rights reserved.
Testing Packages
Before making packages available in Everest it is a good idea to test them. The Debug script in the Data Manager (DM) task EvDTSModifyPkg is used for testing packages. After successfully running the package in the Debug script it is copied into the Dynamic script for use in Everest.
To test a package:
1. In SQL Server Enterprise Manager expand the Everest server then expand the Data Transformation Services folder.
2. Click Local Packages.
3. In the Local Packages pane, double-click on the package you want to
modify.
4. Double-click on EvDTSModifyPkg (Assign Parameters in Everest sample packages) task.
5. With the Dynamic script button selected, copy (right click/select all, right click/copy within the script body) the script.
6. Select Debug script button and paste (right click/paste) the script into the Debug script.
7. You can now make any modifications to the script necessary. for more information
8. When you are ready to test the script click Ok.
9. Select Package/Execute.
10. If the package is successful and accomplishes the desired outcome, copy the modified script back into the Dynamic script. If the package

Everest Data Manager User’s Guide Testing Packages
© 2000-2003 OutlookSoft Corporation. 54 All rights reserved.
was not successful you can use the Debug command to troubleshoot the script.
11. Select Package/Save.
The modified package is now available in Everest.
The Debug Command When inserted in a script the debug command creates a log file (EvDTSModifyPkg.log) which lists the all the properties of a package along with their current values. Using this file you can check to see that all properties are being assigned the correct values.
Debug command syntax:
Debug(value)
where value can be one of the following:
On — Turn on the Debug feature
APPEND — Turn on the debug feature. Debug messages are appended to the debug file.
The debug file, named EvDTSModifyPkg.log, is created in the tempfiles directory of the current Everest application.
To use the debug command:
1. Insert the debug command in the Debug script of the EvDTSModifyPkg task.
2. Execute (Run) the package.
3. Review the EvDTSModifyPkg.log file for errors.

Everest Data Manager User’s Guide Registering Custom Tasks
© 2000-2003 OutlookSoft Corporation. 55 All rights reserved.
Registering Custom Tasks
When you create a new Data Transformation Service (DTS) package you have to register OutlookSoft's custom DTS tasks to the package in order to use them in that package.
OutlookSoft's custom DTS tasks:
• EvDTSModifyPkg — The DM custom task EvModifyPkg is a task that can be inserted in any DM package to modify the package itself, when executed.
• EvDTSConvert — The DM custom task EvDTSConvert is a task that uses transformation and conversion files to convert source data files to formatted output files.
• EvDTSDumpLoad — Allows you to perform the following tasks:
• Export data from the Analysis Services Cube, therefore allowing you to export calculated values
• Import a ready-to-load ASCII file directly into the fact table of an application
• Export data directly from the fact table in to an ASCII file
• Process the Everest Cube
• K2DTSRunLogic — This task invokes the logic module from any DM import tasks that import base level data directly into the fact table.
• K2DTSMakeDim — This task allows you to load dimension members directly into your application set. See Everest Administrator help for more information on this custom task.
To register a task follow these steps.
1. In SQL Server Data Transformation Services, create or open the package to which you want to add the task.
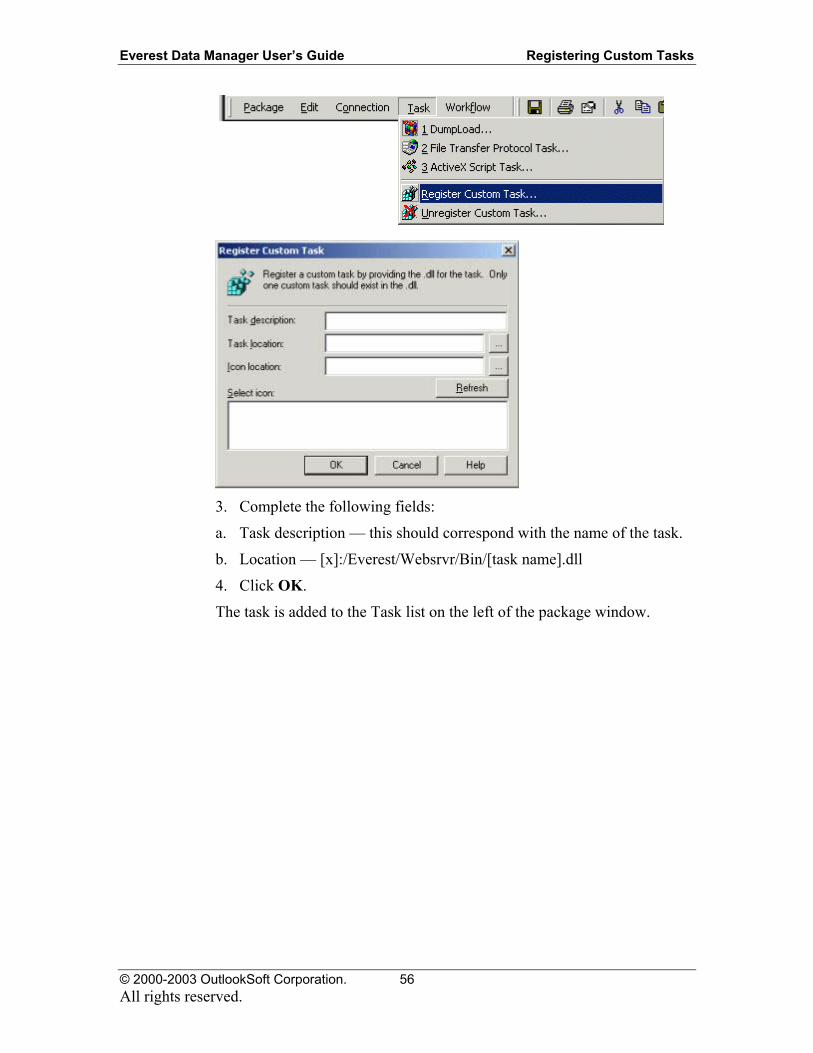
2. On the Task menu select Register Custom Task.
Everest Data Manager User’s Guide Registering Custom Tasks
© 2000-2003 OutlookSoft Corporation. 56 All rights reserved.
3. Complete the following fields:
a. Task description — this should correspond with the name of the task.
b. Location — [x]:/Everest/Websrvr/Bin/[task name].dll
4. Click OK.
The task is added to the Task list on the left of the package window.

Everest Data Manager User’s Guide Custom DTS Tasks
© 2000-2003 OutlookSoft Corporation. 57 All rights reserved.
Custom DTS Tasks
This chapter describes the Everest custom Data Transformations Services (DTS) tasks. DTS is part of the SQL Server Enterprise Manager.
To get to the Data Transformation Services, Open the Enterprise Manager, open the SQL Server Group and Server, and the click on the Data Transformation Services folder. This is demonstrated in the following screen:
EvDTSDumpLoad Custom DTS Task The custom task EvDumpLoad has many useful functions. As stated in the Data Manager Overview topic, you can Export data directly from the SQL fact table or the Analysis Services Cube, Import ready-to-load ASCII files directly into the fact table and perform processing tasks. This task can be added to any DTS package. You can complete the necessary fields directly in the EvDumpLoad Task or in EvModifyPkg.
Below is an example of the EVDumpLoad task. In this example we are performing an export from our Everest cube.

Everest Data Manager User’s Guide Custom DTS Tasks
© 2000-2003 OutlookSoft Corporation. 58 All rights reserved.
To export from the SQL fact table or the Everest (Analysis Services) cube you must specify the following:
• Application set
• Application
• UserID
• Select the source
• SQL — exports directly from the fact table
• Cube — exports from the Everest cube allowing the export of calculated values
• File — this is the file to which the data will be exported.
• MDX Statement or build from selection file - here you must specify, in the form of a SQL or MDX statement or Selection file, the data to export.
• Max Members — The Max Members adjusts query size. Selecting a large number of dimension members makes a large query; a large query results in faster execution. However, smaller query sizes may be desirable if a large query takes too much memory. The Max Members selection will have no impact on the results of the export data. Example: Category=1,Time=17,Entity=50,Account=100,RptCurrency=3

Everest Data Manager User’s Guide Custom DTS Tasks
© 2000-2003 OutlookSoft Corporation. 59 All rights reserved.
Below is an example of EvDumpLoad for an import.
To perform an import you must specify the following:
• Application set
• Application
• Select the Import radio button
• UserID
• File — this is the ASCII file to be imported
Note that you can also have this task process the Everest cube after the import of data.
It is possible to also set the EvDumpLoad parameters using EvModifyPkg, using the parameters below to indicate the mode. However, it is a better practice to set these parameters in the EvDumpLoad task itself, using the dialog box shown above.
None = 0 Import to SQL = 1 Import to Cube = 4 Export from SQL = 2 Export from Cube = 3
Below is an example of EvDumpLoad for Clear Data from SQL.

Everest Data Manager User’s Guide Custom DTS Tasks
© 2000-2003 OutlookSoft Corporation. 60 All rights reserved.
You need to specify the region of clear data on Selection windows.
— You should select Process Cube with one of the process modes (Full Process, Refresh data, Update cache).
You can set the Dumpload parameters using Modify Package task, using the parameters below to indicate the mode.
DataTransfer Mode Value
None 0
Import into SQL 1
Export from SQL 2
Export from Cube 3
Import into Cube 4
Clear Data from SQL 5
The following is an example of Modify Package:
TASK(LOAD AND PROCESS,APPSET,%APPSET%)
TASK(LOAD AND PROCESS,APP,%APP%)
TASK(LOAD AND PROCESS,USER,%USER%)
TASK(LOAD AND PROCESS,DATATRANSFERMODE,5) 'Clear data from SQL
TASK(LOAD AND PROCESS,SELECTION,%SELECTION%)

Everest Data Manager User’s Guide Custom DTS Tasks
© 2000-2003 OutlookSoft Corporation. 61 All rights reserved.
TASK(LOAD AND PROCESS,PROCESSCUBE,1) 'Process cube
TASK(LOAD AND PROCESS,PROCESSMODE,2) 'Mode refresh
:
Below is an example of EvDTSDumpLoad for Export from SQL.
The property box is unchecked by default. If you export data from SQL with the box checked, the data is exported in TimeID format.
You can set the parameters using the Modify Package task, using the parameters below as an example:
:
TASK(Dump Data,APPSET,%APPSET%)
TASK(Dump Data,APP,%APP%)
TASK(Dump Data,USER,%USER%)
TASK(Dump Data,DATATRANSFERMODE, 2) 'export from SQL
TASK(Dump Data,TIMEIDFORMAT,1) 'Exported data with TimeID format
:
Below is an example of EvDumpLoad for Import into SQL.

Everest Data Manager User’s Guide Custom DTS Tasks
© 2000-2003 OutlookSoft Corporation. 62 All rights reserved.
You can set the parameters using the Modify Package task, using the parameters below as an example:
:
TASK(LOAD AND PROCESS,APPSET,%APPSET%)
TASK(LOAD AND PROCESS,APP,%APP%)
TASK(LOAD AND PROCESS,USER,%USER%)
TASK(LOAD AND PROCESS,DATATRANSFERMODE,1) 'import into SQL
TASK(LOAD AND PROCESS,CLEARDATA,%CLEARDATA%) 'Clear data from SQL or not
TASK(LOAD AND PROCESS,SELECTION,%SELECTION%) 'Clear data region
TASK(LOAD AND PROCESS,PROCESSCUBE,1) 'Process Cube
TASK(LOAD AND PROCESS,PROCESSMODE,2) 'Mode refresh
:
EvDTSModifyPkg Custom Task Click here for information on EvDTSModifyPkg.
K2DTSMakeDim Custom Task Please see Everest administrator help for information on this task.

Everest Data Manager User’s Guide Custom DTS Tasks
© 2000-2003 OutlookSoft Corporation. 63 All rights reserved.
K2DTSRunlogic Custom Task The K2DTSRunlogic custom task is a version of Everest's logic functionality created for use in DM packages. This is especially useful for users of Everest and FPA (earlier versions of Everest ) who have existing DM packages. Anyone who wants to perform logic as a last step in a package can add this custom task to their existing packages.
Why add this task to a package? When the execution of the default logic is required at the end of each data import, you must add K2DTSRunLogic as last step after the cube has been processed, to perform the correct calculations.
Each section of the K2DTSRunlogic user interface is described below.
Description, Appset, App and User
• Description — will always be K2Runlogic
• Appset,App and User — Required in order to be able to login into one of our applications.
Execution Mode The K2DTSRunlogic module can be run against
• A selected region — In the case where you choose the option for running against a region, the text box to enter the desired data selection is displayed, as in the above example.
A region (selection) of data must be entered in the following format:
DIMENSION: {dimensionname}
{members set}
The member set in this case can also be represented by an MDX expression like:
DIMENSION: entity
[SalesEurope].children
You can also use the name of a file containing the text of the selection. For example:C:\Everest\Webfolders\NEWSHELL2\Main\DataManager\SelectionFiles\MySelection.ESF This syntax can be used in packages which use the reserved keyword %SELECTIONFILE%.
• A selected data file — In case the data file mode is selected, you can specify the name of a data file to scan, in order to build the correct query. When this mode is selected, the main screen will look as follows:

Everest Data Manager User’s Guide Custom DTS Tasks
© 2000-2003 OutlookSoft Corporation. 64 All rights reserved.
The data load file the Logic Module will scan in order to decide where to execute the logic must be in the following format:
A first record with the dimension names followed by one record per cell, like in this example:
CATEGORY,TIME,PRODUCT,ACCOUNT,ENTITY,RPTCURRENCY,AMOUNT
ACTUAL,2000.JAN,OTHER,ACCPAY,SALESJAPAN,LC,-807.990550994873
ACTUAL,2000.JAN,OTHER,ACCPAY,SALESJAPAN,LC,-865.849018096924
ACTUAL,2000.JAN,OTHER,ACCPAY,SALESJAPAN,USD,-807.990550994873
Dimensions to limit formula region In data file mode, another field is shown. This field can be used to control the criteria the Logic Module should use to restrict the scope of the generated query. If for example, you enter “CATEGORY,TIME” in this field , the logic will be executed only for all different category-time combinations found in the load file (in the above example only for actual-2000.jan).
If the field is left blank, the Logic Module will default to:
“CATEGORY,TIME,ENTITY”.
Use default formulas or override formulas These options allow you to specify the logic to run. “Use default formula” will default to the logic DEFAULT.LGX. In case “override formulas” is selected, you can enter the name of another logic file.
Simulation Mode When this check box is activated, the logic will be executed but the resulting values will not be posted to the cube. This mode can be used to debug the logic without impacting the stored values.
Delimiter In “data file” mode, this parameter can be used to specify the delimiter used in the file to scan. Both in “data file” and in “region” mode, the field is used internally by the module to delimit the generated records.
Its default value is comma.
Advanced query tuning parameters These radio buttons can be used to control the size and the format of the generated queries.

Everest Data Manager User’s Guide Custom DTS Tasks
© 2000-2003 OutlookSoft Corporation. 65 All rights reserved.
The size of the query is only relevant in case the “data file” mode is selected, and should be kept to “large” for a faster execution. Smaller sizes could be selected only if the large queries take too much memory. The selection of the size of the query will (should) have no impact on the results of the logic calculations.
The type of query can also have a beneficial (or negative) impact on performance, with the exception of the Non-Empty-CrossJoin mode, that should only be used in special cases as already above described.
Debug File In case a valid debug file name is entered in this field, the module will save in such file an audit of its execution, showing the details of all the generated queries and the resulting calculated values. In case the file cannot be created (because invalid or in use by another user) the logic will run normally, but no debug file will be created.


Everest Data Manager User’s Guide Index
© 2000-2003 OutlookSoft Corporation. 67 All rights reserved.
Index
A Accessing Data Manager ...................... 1 Adding Conversion Sheets.................. 29 Assigning Packages to Sites................ 15
C Copying Conversion Files................... 29 Copying Transformation Files ............ 29 Creating or editing Conversion Files .. 29 Creating or editing Transformation Files
......................................................... 29
D Data Preview......................................... 3 Default logic........................................ 57 Default.lgx .......................................... 57 Defining Conversion Files .................. 29 Defining Transformation Files............ 29 DTS packages ..................................... 57
E EvConvert ........................................... 57 EvDumpLoad...................................... 57 EvModifyPkg...................................... 57
G GETINFO Instruction ......................... 41 Global Instruction ............................... 41
I Import.................................................. 57
INFO Instruction................................. 41
K K2DTSRunlogic ................................. 57 K2DTSRunlogic custom task ............. 57 K2MakeDim custom task ................... 57 K2Runlogic ......................................... 57 K2Runlogic module ............................ 57
M MDX ................................................... 57
N Non-Empty-CrossJoin mode............... 57
O OLEDBCONN instruction.................. 41 Override formulas ............................... 57
P Previewing Data.................................... 3 Prompt Command ............................... 41
S SQL..................................................... 57
T TASKCOPYCOLUMNS command ... 41
V Validating Conversion Files ............... 29 Validating Transformation Files ......... 29