everythingattachments compact & field plows · everythingattachments compact & field plows...
TRANSCRIPT
EverythingAttachments
Compact & Field Plows OWNER AND OPERATOR’S MANUAL
CAUTION
SAFETY FIRST
READ ALL PAGES
BEFORE USING
Seller or Owner Should Pass
On This Manual to User
T.C. Corriher Implement Co. Inc. DBA: Everythingattachments.com
12 South Avenue
Newton, NC 28658

Everything Attachments Compact & Field Plows
T.C. Corriher Implement Company Inc. DBA:Everythingattachments.com
2
ADDITIONAL COPIES AVAILABLE
MACHINERY CAN HURT YOU WARNINGS
DO NOT PERMIT RIDERS ON MACHINERY MACHINERY, IN A LIFT POSTION, CAN FALL
WHILE OPERATING OR WHEN SITTING STILL
DISC HARROW BLADES AND MOWER BLADES CAN CUT YOU
STAY AWAY FROM OPERATING MACHINERY - KEEP OTHERS AWAY
* Observe and follow instructions in this manual.
* Make certain that everyone is clear of the machine before
starting power unit or activating any drive mechanism.
* Keep hands, feet, and clothing away from moving parts of the
machine. Do not wear loose clothing.
* Keep children off, and away, from all machinery.
* Be sure that all shields or guards are in place before any
machine is started.
* Replace any damaged or misplaced guards or shields.
* Keep all machinery free of excessive accumulation of crop
material or other debris.
* Stay alert from obstructions, ditches and other hazards when
operating machinery.
* Operate machinery at a speed to match the field and crop
condition and/or operator proficiency.
* Shut off the tractor engine or power unit before attempting to
refuel. DO NOT SMOKE! Refuel in a well-ventilated area and avoid
spilling fuel.
* Always shut off the engine before leaving the operator’s

Everything Attachments Compact & Field Plows
T.C. Corriher Implement Company Inc. DBA:Everythingattachments.com
3
platform to adjust, lubricate, clean or unclog a machine, unless
otherwise specified in the operator’s manual.
* Wait until all power driven parts have stopped moving before
attempting to perform any inspection or servicing of the machine.
* After servicing equipment, be sure all tools, parts, or
servicing equipment are moved before
starting the machine.
* Before restarting operation, replace or secure all safety
shields that you have removed or opened for access when making field
repairs.
Courtesy of: T.C. Corriher Implement Co. Inc.
DBA:Everythingattachments.com
12 South Avenue
Newton, NC 28658

Everything Attachments Compact & Field Plows
T.C. Corriher Implement Company Inc. DBA:Everythingattachments.com
4
Everything Attachments Compact & Field Plows
Operator’s Manual and Safety Warning Message
1. GENERAL INFORMATION
Your Everything Attachments plow has been manufactured of quality
materials and components. Care has been taken to make this implement to
operate as safe as possible; HOWEVER, any machine can present a hazard if
the operator does not follow common sense rules of safety while operating
the machine.
The purpose of this manual is to help you understand the
instructions of how to use the equipment safely. To familiarize you with
the safety warning message in order to minimize risks that may occur if
the machine is not used properly and if the minimum precautions or
attentions are not paid.
The manual will assist you in setting up, operating, and maintaining
your plow. Read it carefully and thoroughly; it furnishes information and
instruction that will help you achieve many years of dependable
performance. These instructions have been compiled from extensive field
experience. Some information may be general in nature due to unknown and
varying conditions. However, through experience and these instructions,
you should be able to develop procedures suitable to your particular
situation. The illustrations and data used in this manual were current at
the time of printing, but due to possible in-line production changes; your
machine may vary slightly in detail. If you have an older machine that
does not have current standard safety equipment, please contact
EverythingAttachments.com about bringing your machine up to the current
level of safety. We reserve the right to redesign and change the machines
as may be necessary without notification
Plow Preparation
Make sure the plow is completely assembled and all bolts tightened.
Be sure the bottom or bottoms have been mounted using all three bolts
supplied with each. Prepare the plow for use by oiling the moldboard
surfaces with a cloth soaked in light oil. This will prevent soil from
sticking to the moldboard.

Everything Attachments Compact & Field Plows
T.C. Corriher Implement Company Inc. DBA:Everythingattachments.com
5
Tractor Preparation
Illustration 1
Adjust the right tractor tire so that the inside of both right side
tires are the same distance from the tractor centerline as shown in
illustration 1.
Plow Mounting and Alignment
Mount the plow on the three-point hitch. Adjust the stabilizer
chains so that the “A” frame is centered between the rear tractor tires.
This will make the plow centerline parallel with the tractor centerline.
Then adjust the plow main frame right or left on the “A” frame using the
“U” bolts. The main frame should be set at dimension “Y” (12 inch with 12
inch bottom) (14 inch with 14 inch bottom)(16 inch with 16 inch bottom) as
shown in illustration 2.
Illustration 2
Pitch and Depth Adjustment The 3-point hitch top link controls the suction and pitch of the
plow bottom. Shorten the top link when soil is dry to increase suction and
draw plow into ground. Lengthen the top link when soil is wet to reduce
suction.
If your tractor does not have hydraulic depth control, a gauge wheel
should be used to maintain a constant depth of plowing and should be set
1” less than desired depth. Measure depth from the bottom of gauge wheel
to the bottom of share point. This applies when right tires of tractor are
in previously plowed furrow.

Everything Attachments Compact & Field Plows
T.C. Corriher Implement Company Inc. DBA:Everythingattachments.com
6
Leveling Adjustment After two passes have been made and the right tires of tractor are
in previously plowed furrow, the plow frame and share should be level with
the ground. This is accomplished by adjusting tractor side links for left
to right leveling. Front to rear leveling should be done with the top link
so the rear of the landside runs from level to ¼” up from the bottom of
the furrow.
Coulter Adjustment When using a coulter, adjust it to slice 1 to 1&½ inches into soil.
On adjustable coulter model (not straight shank models), side adjustment
should be set approximately 1/2” to the left of the share point. Effective
coulter operation is governed by soil conditions. If soil is excessively
compacted or contains an excess of rocks, the coulter may prevent plow
from cutting at desired depth. If the soil is excessively wet or sticky,
mud may collect on coulter blade and prevent proper penetration. Should
these conditions be encountered, it is recommended the coulter be removed.
Plowing Conditions It is important to plow during proper conditions. Do not plow when
soil is too wet as the soil will stick to the moldboard. If the soil is
dry, extra weight may be required to increase penetration in the soil (See
pitch and depth adjustment). If possible, avoid places where the soil is
overly packed, i.e. Roadways, paths, etc. A thick sod or extremely rocky
soil that has not been plowed for several years can be difficult to plow
which is not the fault of the plow. However, with slow speeds and proper
set-up of the plow, these conditions can usually be plowed satisfactorily.
High weeds or grass may need to be cut down before plowing.
Not: A ¼ x 3-inch shear bolt of mild steel only is provided at the
shank mount point. This bolt will shear if the bottom hooks on anything
solid and will prevent plow frame damage.
USE ONLY MILD STEEL SHEAR BOLTS GRADE 2!!

Everything Attachments Compact & Field Plows
T.C. Corriher Implement Company Inc. DBA:Everythingattachments.com
7
Plowing When possible, lay out a rectangular shaped field that is several
times longer than it is wide. The longer your furrows are, the easier it
is to plow. Leave enough room to turn your tractor around at each end of
the field. Always lift plow before attempting sharp turns. To begin
plowing, lower plow into the ground with hydraulic lift lever. In some
soils it may be necessary to shorten the top link to get satisfactory
penetration on first and second plowing passes. Lay out a dead furrow as
illustrated. Be sure lift lever is in float position or set to proper
depth on draft control equipped tractor.
Illustration 3
Begin at point “X” and plow furrow to the end plot. Fix your eye on
a tree or some distant object in line with the middle of the plow so that
you can guide your tractor and plow a straight first furrow to point “A”.
Note: Always lift plow before turning; at point “B”, lower it again, and
plow a back furrow. When you return to point “X” start plowing with both
of the tractor’s right wheels in a furrow at point “C”. Level the plow.
(See leveling adjustment). Plow in a clockwise direction, always lifting
your plow at the end of the furrow before turning (Illustration 3). After
the back furrow has been made, the plow should be level when running the
right tractor wheels in previously plowed furrows. After making the first
two plowing passes, adjust the plow to 4 inch up from the bottom of the
furrow. Variation in plow depth will affect levelness of the plow. (See
leveling adjustments). Do not plow too fast. Move steadily along so that
the soil will turn over and not fall back into the furrow. By plowing too
fast, you will get an uneven plowing job and the dirt is apt to be thrown
instead of rolled over. After plowing a few rounds, it is suggested that
you check and tighten all bolted connections on the plow, coulter and
frame.

Everything Attachments Compact & Field Plows
T.C. Corriher Implement Company Inc. DBA:Everythingattachments.com
8
Maintenance Grease coulter and gauge wheel at least twice daily. Keep moldboards
clean so they will scour evenly. When putting plow away, always wipe
polished moldboard surface and coulter blade with grease or oil to prevent
rust. Replace badly worn shares.
!!!!! DANGER SAFETY FIRST READ ALL PAGES!!!!!
SAFETY RECOMMENDATIONS
1. Be sure to read set-up and operating manual.
2. Never stand with feet under the plow while tractor lift is
in the up position.
3. Do not stand between the implement and tractor.
4. Do not ride on the implement.
5. Observe a 15 mph speed limit or slower when transporting
implement on roadways.
6. Have slow moving vehicle sign on rear of implement while
traveling on roadways.
7. Never try to adjust or clean an implement while in motion.
8. Do not alter design of the implement.
9. Always lower implement to the ground when not in use.
10. Apply ballast according to your tractor manual to ensure
front-end stability.

Everything Attachments Compact & Field Plows
T.C. Corriher Implement Company Inc. DBA:Everythingattachments.com
9
Plowing Problems and Troubleshooting (Improper adjustments account for most plowing difficulties)
Possible
Cause
FAULT REMEDY
Poor
Penetration
Insufficient suck Shorten tractor
top link
Worn share Sharpen
Dull coulters Sharpen
Position of
tractor selector
levers
Refer to tractor
owner’s manual
for proper
setting
Ground hard and
dry Increase depth of
headland starting
furrow
Plow Crowding
Plow running on
nose Lengthen tractor
top link
Plow crowding to
the left
Front bottom too
deep. Shorten
right leveling
screw or lengthen
tractor top link
Continued On Next Page

Everything Attachments Compact & Field Plows
T.C. Corriher Implement Company Inc. DBA:Everythingattachments.com
10
Possible
Cause
FAULT REMEDY
Plow crowding to
the right
Front bottom too
shallow. Lengthen
right leveling screw
or shorten top link.
Plow goes to deep.
Lengthen top link to
reduce suck. On plows
using
a gauge wheel, the
wheel should not
carry too much of the
weight. Check and
adjust tractor
hydraulic select
lever
Plow won’t stay
down
Shorten top link to
give more suck. Be
sure coulters are
sharp and not to
forward
Improper wheel
and cross shaft
setting Set wheels and cross
shaft properly
Ragged
Furrow Wall
Rear coulter
adjustment
Set coulters to run
more toward land and
deeper if in loose
soil. Be sure coulter
pivot is free
Continued On Next Page

Everything Attachments Compact & Field Plows
T.C. Corriher Implement Company Inc. DBA:Everythingattachments.com
11
Possible
Cause
FAULT REMEDY
Plow Pulls
Heavy
Plow running on
nose
Lengthen top link
Excessive
landside pressure
Incorrect tractor
wheel or cross
shaft setting.
Rear landside
should run
approximately ¼”
to ½” from furrow
wall
Excessive tractor
wheel slippage Refer to tractor
manual for
correct operation
of depth control
or tractor
control. Then
add weight to
tractor if
necessary Furrows Rolling
Back
Furrows too deep
for watch of
bottoms
Reduce depth of
plowing.
Continued On Next Page

Everything Attachments Compact & Field Plows
T.C. Corriher Implement Company Inc. DBA:Everythingattachments.com
12
Possible
Cause
FAULT REMEDY
Broken or
Misplaced
Furrows (Cork Screwing)
Plowing speed too
high
Reduce tractor
speed
Broken Furrow
Walls
Coulter disc set
too close to plow
bottom
Reset coulters
Step In Furrow
Walls
Coulter disc set
too far away from
bottom
Reset coulters
Plow Crowding
Coulter
adjustment
Be sure coulters
swing free and
run straight
Worn share Replace
Plow Ridging
Front bottom too
deep
Lengthen top link
or shorten right
leveling screw
Front bottom too
shallow
Shorten top link
or lengthen right
leveling screw
Front bottom
cutting edge too
wide or too
narrow
Adjust plow
properly by
correcting wheel
and cross shaft
setting
Continued On Next Page

Everything Attachments Compact & Field Plows
T.C. Corriher Implement Company Inc. DBA:Everythingattachments.com
13
Coulter
adjustment
Set rear coulter
to leave furrow
clean. Set all
other coulters
exactly the same.
(See page 5)
Distance between
all coulters
slices must be
the same as the
plow frame size.

Everything Attachments Compact & Field Plows
T.C. Corriher Implement Company Inc. DBA:Everythingattachments.com
14
Parts List-DB & SB Frame
Ref # Part # Quan Description 1 ETA-01 1 Cross brace (DB-12” & SB plows)
ETA-01A 1 Cross brace (DB-14” plow)
2 ETA-02 Shank plate (4 on two bottom)
3 ETA-03 Shank (2 on two bottom)
4 ETA-04 1 Left hand beam (DB plows)
5 ETA-05 1 Right hand beam (SB & DB-14” plows)
ETA-05A 1 Right hand beam ( DB-12” plow)
6 ETA-06 1 Brace for A-frame
7 ETA-07 1 Spacer
8 ETA-08 2 5/8” U-bolt (grade5) w/lock washer & nut
9 ETA-09 1 A-frame
10 ETA-10 1 Drawbar
11 Cat-1 2 Category 1 pull pin
12 ETA-12 2 Angle bracket
13 ETA-20 1 Spacer (SB & DB-14” plows)
ETA-20A 1 Spacer (DB-12” plow)
Continued On Next Page

Everything Attachments Compact & Field Plows
T.C. Corriher Implement Company Inc. DBA:Everythingattachments.com
15
Ref # Pate # Quan Description
Bolts: *Buy local
* 2 3/4” x 3” bolt w/lock washer & nut
* 1 5/8” x 16-1/2” bolt (SB-14” & DB-14” plows) w/lock
washer & nut
* 1 5/8” x 14-1/2” bolt(DB-12” plow) w/lock washer & nut
* 4 5/8” x 4” USS bolt w/lock washer & nut
* 1 5/8” x 4-1/2” USS bolt w/lock washer & nut
* 2 ½” x 3” shear bolt (grade 2) w/lock washer & nut

Everything Attachments Compact & Field Plows
T.C. Corriher Implement Company Inc. DBA:Everythingattachments.com
16
Parts List-DB & SB Bottom
Ref # Part # Quan Description per each bottom
1 ETAW-F-12 1 12” Share (Model Sb & HB)
ETAW-F-14 1 14” Share (Model SB & HB)
ETAW-F-16 1 16” Share (Model SB only)
2 ETAWF-3S 1 Shin
3 P2 Clip (Not used on compact tractor plow)
4 ETA-12 1 12” moldboard (Model SB & HB)
ETA-14 1 14” moldboard (Model SB & HB)
ETA-16 1 16” moldboard (Model SB only)
5 P1 1 Frog (welded one piece unit)
6 ETA980W 1 Short landside
7 ETA982W 1 Long landside
8 P3 1 Brace for moldboard
9 P4 1 Brace (used on long landside only)

Everything Attachments Compact & Field Plows
T.C. Corriher Implement Company Inc. DBA:Everythingattachments.com
17
Parts List-DB & HB Gauge Wheel & Coulter
Ref # Part # Quan Description
1 GWC-12 3 Shank clamp 4-3/4” x 4”
2 GWC-13 1 Shank, gauge wheel or coulter
3 GWC-14 1 Axle cap for disk mount
4 GWC-15 1 Blade 13” flat
5 GWC-16 1 Flange for axle
6 * 1* Flat washer ¾”
7 * 1* Nylon lock nut ¾”
10 * 2* Flat washer ¾”
11 GWC-17 1 Tire 10” w/3/4” hub
12 * 1* ¼” grease fitting
13 * 1* Cotter pin ¼” x 2”
*Buy Local

Everything Attachments Compact & Field Plows
T.C. Corriher Implement Company Inc. DBA:Everythingattachments.com
18
Parts List-SB Gauge Wheel & Coulter
Ref # Part # Quan Description
1 GWC-01 1 Bracket clamp
2 GWC-02 1 Standard 1” round
3 GWC-03 1 U-bolt 5/8” w/lock washer & nut
4 GWC-04 1 Nut ¾” w/lock washer
5 GWC-05 1 16” disc blade flat
6 GWC-06 1 Disc hub
7 GWC-07 1 Center hub bushing ¾” x 3-7/8”
8 GWC-08 1 Axle bolt ¾” x 5-1/2” Grade 2
9 GWC-09 1 Standard lock fork disk mount
10 GWC-10 1 Lock collar stop
11 GWC-11 1 Square head set screw/nut 5/8”
12 * 1* ¼” grease fitting
13 ETA-25 3 Shank clamp flat 4” x 6”
14 ETA-26 1 Mounting bracket
15 ETA-27 1 Shank w/welded axle 1”
16 GWC-7 1 Tire 16” w/rim 1” axle
17 * 1* Flat washer 1”
18 * 1* Cotter pin ¼” x 2”
*Buy Local
Everything Attachments Compact & Field Plows
T.C. Corriher Implement Company Inc. DBA:Everythingattachments.com
19
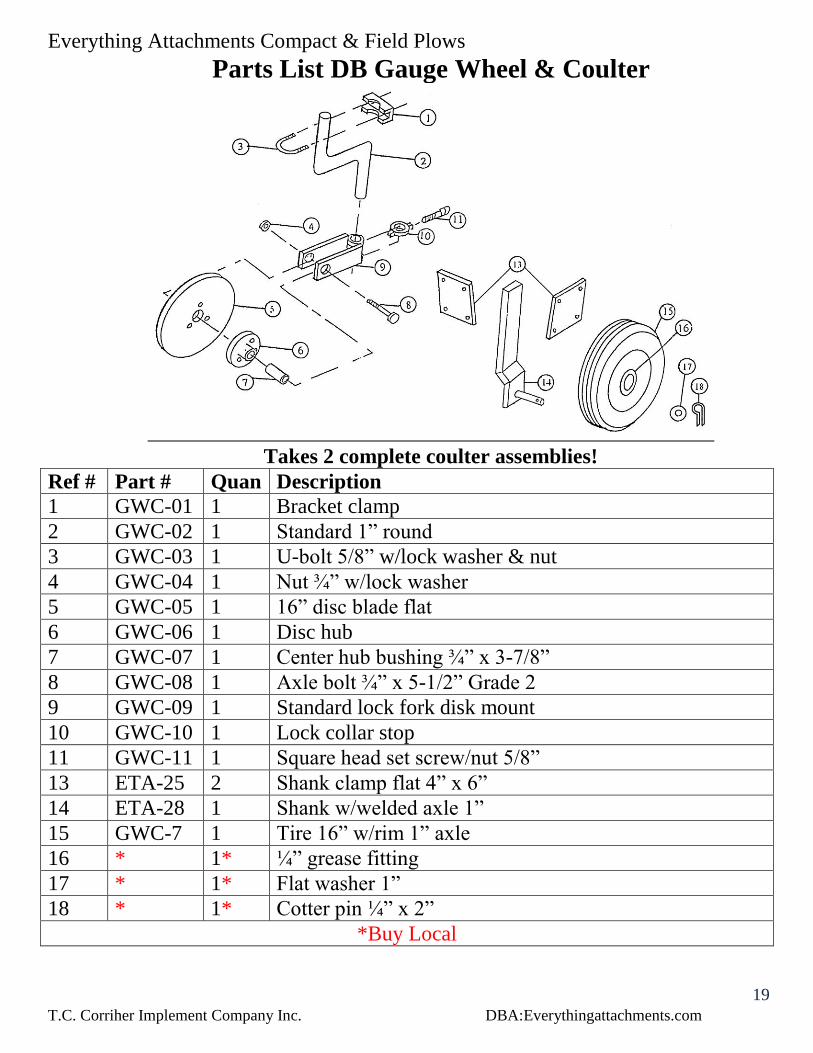
Parts List DB Gauge Wheel & Coulter
Takes 2 complete coulter assemblies!
Ref # Part # Quan Description
1 GWC-01 1 Bracket clamp
2 GWC-02 1 Standard 1” round
3 GWC-03 1 U-bolt 5/8” w/lock washer & nut
4 GWC-04 1 Nut ¾” w/lock washer
5 GWC-05 1 16” disc blade flat
6 GWC-06 1 Disc hub
7 GWC-07 1 Center hub bushing ¾” x 3-7/8”
8 GWC-08 1 Axle bolt ¾” x 5-1/2” Grade 2
9 GWC-09 1 Standard lock fork disk mount
10 GWC-10 1 Lock collar stop
11 GWC-11 1 Square head set screw/nut 5/8”
13 ETA-25 2 Shank clamp flat 4” x 6”
14 ETA-28 1 Shank w/welded axle 1”
15 GWC-7 1 Tire 16” w/rim 1” axle
16 * 1* ¼” grease fitting
17 * 1* Flat washer 1”
18 * 1* Cotter pin ¼” x 2”
*Buy Local

Everything Attachments Compact & Field Plows
T.C. Corriher Implement Company Inc. DBA:Everythingattachments.com
20
WARRANTY AND DISCLAIMER
Everything Attachments (hereafter the “Company”) and sellers of its products warrant
products and parts of products it manufactures to be free from defects in material and
workmanship for a period of (90) days from date of purchase when such products and parts of
products are maintained and used in a customary and ordinary manner.
No warranty is made by the Company either expressed or implied on products
manufactured by others.
THIS WARRANTY IS THE SOLE
WARRANTYAND IS IN LIEU OF ALL
OTHER WARRANTIES,EXPRESSED OR
IMPLIED, INCLUDING ANY IMPLIED
WARRANTY OF MERCHANTABILITY
OR WARRANTY OF FITNESS
FOR A PARTICULAR PURPOSE.
The exclusive remedy for breach of this Warranty is repair or replacement of parts
upon delivery, postage and freight prepaid to the Company at:
12 South Ashe Avenue
Newton, NC 28658 U.S.A.
or refund of purchase price if repair or replacement cannot be practically provided.
In no event shall the Company or the Sellers be liable for consequential or incidental
damages, direct or indirect (including but not limited to loss of crops or livestock), due to
defects in workmanship or defects in products
manufactured by it.
This is the only warranty of the Company. No Seller or any other person has authority
to alter or waive any provision of this Warranty as it applies to the Company or to make or add
warranties on behalf of the Company. The Company expressly disclaims all liability due to the
use or resale of its products or parts of products manufactured by it whether based on contract,
negligence, strict liability in tort or otherwise except as expressly provided for in this Warranty
as set forth above.