exercises for archery - wordpress.com
TRANSCRIPT
Tim Goodwin
Edinburgh University
11/1/2014
Exercises For Archery
EXERCISES
Pick a few from the shoulder /upper back exercises: Vertical wood chop Diagonal wood chop Torso rotation Flutters SA OH press Push up YTWL
Incline fly Reverse fly Stretch band draws Traffic cop rotations Side laying external rotation Internal rotation Scapular wall stretches
And add in a few core exercises: Russian twist Plank Side plank lifts Then stretch – ideally when you shoot as well as gym! EXAMPLES OF SESSIONS – one of each per week Session A Vertical wood chop Incline Fly YTWL Torso rotation Scapular wall stretches Stretch band draws Traffic cop rotations Plank Side plank lifts Stretch
Session B Diagonal wood chop Flutters Reverse fly Push ups SA OH press Side laying external rotation Internal rotation Russian twists Stretch

EXERCISES
VERTICAL WOOD CHOP
1. Start Position: Hold a medicine ball or light dumbbell with your arms extended
overhead. 2. In one continuous motion bring the ball down in front of you like you are chopping
wood. 3. You will have to bend at your knees to complete this.
4. Return to starting position and repeat.
DIAGONAL WOOD CHOP
1. Start by holding a medicine ball at knee level in a semi-squat position. 2. Rotate your trunk and extend your knees while raising the ball up towards the
opposite shoulder. Keep your arms fairly straight during this movement. 3. Return to the starting position and repeat for prescribed repetitions. 4. Repeat with the other side.
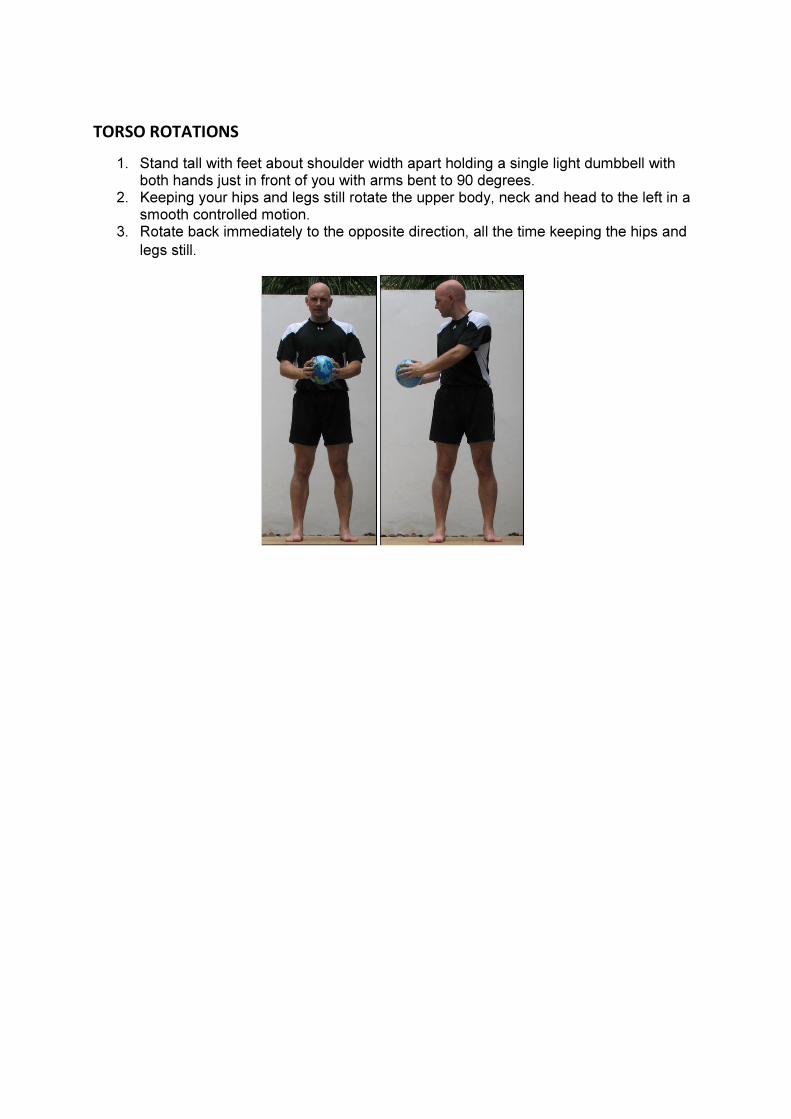
TORSO ROTATIONS
1. Stand tall with feet about shoulder width apart holding a single light dumbbell with both hands just in front of you with arms bent to 90 degrees.
2. Keeping your hips and legs still rotate the upper body, neck and head to the left in a smooth controlled motion.
3. Rotate back immediately to the opposite direction, all the time keeping the hips and
legs still.

FLUTTERS
1. This can be performed laying over a stability ball flat on the floor, or standing with your upper body bent forward.
2. The key here is to activate the muscles between the shoulder blades... The rhomboids.
3. Start with your arms straight out in front of you, your hands in a fist with your thumbs sticking out. Rotate your whole arm so your thumbs are pointing backwards.
4. Lift your whole arm so you squeeze your shoulders together at the top of the movement
5. Slowly lower to start position. 6. Ensure you just move your arms and NOT to use your body to help with the lift.
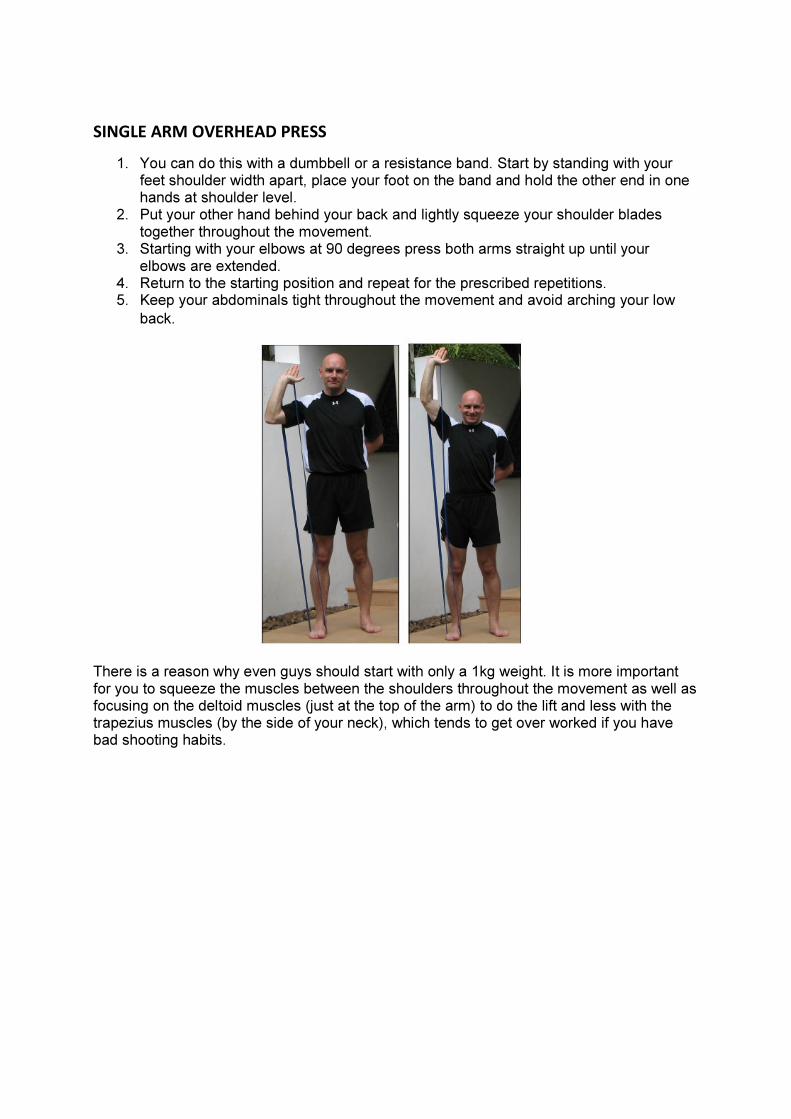
SINGLE ARM OVERHEAD PRESS
1. You can do this with a dumbbell or a resistance band. Start by standing with your feet shoulder width apart, place your foot on the band and hold the other end in one hands at shoulder level.
2. Put your other hand behind your back and lightly squeeze your shoulder blades together throughout the movement.
3. Starting with your elbows at 90 degrees press both arms straight up until your elbows are extended.
4. Return to the starting position and repeat for the prescribed repetitions. 5. Keep your abdominals tight throughout the movement and avoid arching your low
back.
There is a reason why even guys should start with only a 1kg weight. It is more important for you to squeeze the muscles between the shoulders throughout the movement as well as focusing on the deltoid muscles (just at the top of the arm) to do the lift and less with the trapezius muscles (by the side of your neck), which tends to get over worked if you have bad shooting habits.

INCLINE PUSH OR STABILITY BALL PUSH UP
1. Normally the incline push up can be performed on a Smith Machine or squat rack, where you can adjust the height of a fixed bar.
2. Place your hands on the bar wider than shoulder width apart. Your body should be flat, do not let your butt lift.
3. Lower yourself by bending at the elbows, the right position will mean that the bar is between your chin and chest at the bottom of the movement.
4. To lift yourself back to the start, instead of thinking to lift, try pushing the bar away from you for proper muscle activation
5. Ensure your body remains flat throughout the entire movement. Optional Stability Ball Version
1. The correct position to start the stability ball push up is to kneel behind a stability ball, then push your upper body over the ball and walk your hands forward, so your thighs are resting on the ball and you are in a push up posture.
2. With your hands a little wider than shoulder width apart and your fingers facing forwards, you should have your shoulders directly over your hands.
3. Brace your midsection as you drop your upper body, bending at the elbows to 90 degrees and your head dropping between your hands.
4. Push through the hands back to the start position.
Obvious exercise but the purpose is to utilize the muscles of the shoulder blades and upper back to control the movement. Think as you drop down to let the shoulder blades sink together, opening up the chest region as much as possible. You’ll get both a good stretch as well as develop shoulder stability with this excellent exercise.

YTWL
This exercise can be performed over a stability ball or on an incline bench. Start with really very light weights or zero weights, 0.5 - 1.0kg is normally enough to start for most people.
• Lay over the ball, with your stomach resting on the ball and your feet on the floor providing the balance. Hold a light dumbbell in each hand
• Y position: Lift the weights in front of you, with your arms straight, your upper body
forming a Y shape.
• Don't force the lift, keep the body and head still throughout the movement, lower the weight under control to the start position which is with the weights almost touching the floor.
• T position: Lift the weights perpendicular to the body, squeezing your shoulder
blades together at the top of the movement, again keep the rest of the body still throughout the movement.
• W position: Push your hands forward to 45 degrees, near to the start position of the
Y. Draw your hands back, bending at the elbow, squeezing the bottom of the shoulder blades together at the top of the movement.
• L position: Start with your arms bent to 90 degrees and your fists pointing at the
floor. Push your elbows forward too. Simply rotate your arms keeping the elbow at 90 degrees. This one feels awkward for many people
• Repeat each position for the required repetitions, without stopping between each
position.
The YTWL exercise is probably one of the most useful shoulder mobilization exercises you will master. It incorporates all the movements of the shoulder complex, assisting in increasing your flexibility around this joint where many people are severely restricted. Keep the weights light, even now after a number of years performing this particular exercise, only use a couple of kilos in each hand. You’ll not get any prizes for having the biggest rotator cuff muscles, however not injuring this sensitive area will certainly help you win a few tournaments instead.


INCLINE FLY
1. Lie back onto a ball with your body at an incline (45° or less) with a DB in each hand. (You may rest each DB on the corresponding thigh.)
2. Start position: Lie onto your back and bring the DB’s to your shoulders. Press the DB’s up above the chest with the DB’s almost touching and palms facing each other (neutral grip).
3. Keeping the elbows slightly bent, lower the DB’s out and away from each other in an arcing motion with hands aligned with the upper chest region.
4. Let your upper arm go parallel to slightly past parallel to the ground before returning to the start position.
5. To end the exercise, place the DB’s on shoulders, then onto thighs or at sides. 6. Remember to keep both feet flat on the floor at all times and keep the lower back in
a neutral position.
STANDING REVERSE FLYS
1. Start position: Hold DB in each hand with neutral grip (palms facing each other) and let arms straight down (perpendicular to floor). Bend forward at about a 45 degree angle.
2. With elbows slightly bent and facing the ceiling, raise DB’s to shoulder level in semi-circular motion and squeeze shoulder blades together at top of movement.
3. Return to start position. 4. Remember to keep head in a neutral position.
For this exercise concentrate on moving the shoulder blades together and not swinging the arms back from the shoulder joint.

STRETCH BAND DRAWS
1. Hold the ends of a stretch band. And stand in the same posture you adopt for shooting. 2. Draw like you would for shooting in to your anchor position. But squeezing the shoulder blades together 3. Then straighten the back arm to straight so your arms are in a T position. 4. Finally extend as far as you can leaving your arms at shoulder height, squeezing the shoulder blades together. 5. Return to the start position by way of reversing the movement. 6. Repeat for both arms for the required repetitions
Focus on minimizing how much the tops of the shoulders and the trapezius are working, ideally they should remain relaxed as you draw the band back.
TRAFFIC COP ROTATIONS
1. Start in a standing position with your elbows elevated to shoulder height and bent to 90 degrees. One hand should be directly up, and the other pointing to the ground.
2. Start slowly by rotating at the shoulder, swapping the hands from high to low and low to high.
3. As you feel the shoulder get warmer gradually increase the speed of the movement, but only go as far as your shoulder will comfortably go.

SIDE LAYING EXTERNAL ROTATION
1. Lie on side opposite of working arm. 2. Start position: Grasp dumbbell and flex elbow at 90° keeping elbow in at side.
Forearm should be slightly below parallel to floor. 3. Rotate arm outward keeping elbow at 90°. 4. Return to start position. 5. Remember to keep elbow firmly secured to side. You may put a rolled towel between
the elbow and side to facilitate rotation and secure form.
You’ll be surprised how quickly your shoulders will start to fatigue on this exercise showing you how small these muscles are and how tight underused they become. Stick with having little or no extra weight to start with to get the number of repetitions in.

INTERNAL ROTATION EXERCISE
1. Sit on a ball or bench and pin your elbow at your side. 2. Rotate your hand out away from the body and grab your band. 3. Rotate your hand back in holding the band and keeping your elbow pinned at your
side. 4. Repeat for the desired repetitions and make sure that your elbow does not move
during the movement.
It is easy to start using the wrong muscles with this particular exercise, keeping the elbow tight in to your side will eliminate most of this. It is normal for the muscles to fatigue quickly on this exercise, given the nature of the muscles involved.

SCAPULAR WALL SLIDES
1. Start by standing flat against a wall with your arms against the wall at shoulder level. 2. Proceed to slide your arms up and towards the ceiling. Maintain contact with the wall
at all times. 3. If your arms start to pull away from the wall then that is the end of your range of
motion for now. 4. Keep your back flat against the wall during this movement and work on increasing
your range of motion.
It WILL feel awkward to start, but as you do more it does get easier.

RUSSIAN TWISTS
1. You’ll need a light dumbbell or medicine ball for this movement. Sit on the floor with your knees bent to 90 degrees and your heels resting on the floor.
2. Squeeze your abs slightly, and gently lean the whole upper torso backwards, doing so may mean your heels lift off the floor slightly.
3. Keeping the abs tense, twist the upper body, imagining you are going to place the weight behind you. Go as far as your flexibility allows.
4. Return to the starting position and immediately twist in the opposite direction. 5. Repeat the movement, keeping the abs tensed and back in a neutral posture.
Try to maintain a flat back posture and push your belly button up and out rather than sucked in. It is normal to feel discomfort in the hips during this movement, if you feel it in the lower back, sit up reset your position and start again.

PLANK
1. Lay on a mat with your elbows bent to 90 degrees underneath your shoulders. 2. Dig your toes on to the floor, and lift your body off your knees so that your body is in
a flat position between your shoulders and your heels. 3. Squeeze your abs and butt to maintain the good position. 4. Hold for the allotted time, or split the time in to two attempts resting briefly.
The plank is all about developing good core stability and strength. Being able to perform a perfect plank without feeling any lower back pain will develop your ability to remain in a strong shooting position on any terrain. Field archers or if you regularly shoot in the wind, this one is for you!
SIDE PLANK LIFTS
1. Lay on the ground on one side. Raise your body using one forearm and support it in this raised position.
2. Lower your body and repeat for 10 repetitions on the other side. 3. Remember to keep your head, neck and body in a straight line.
STRETCHES
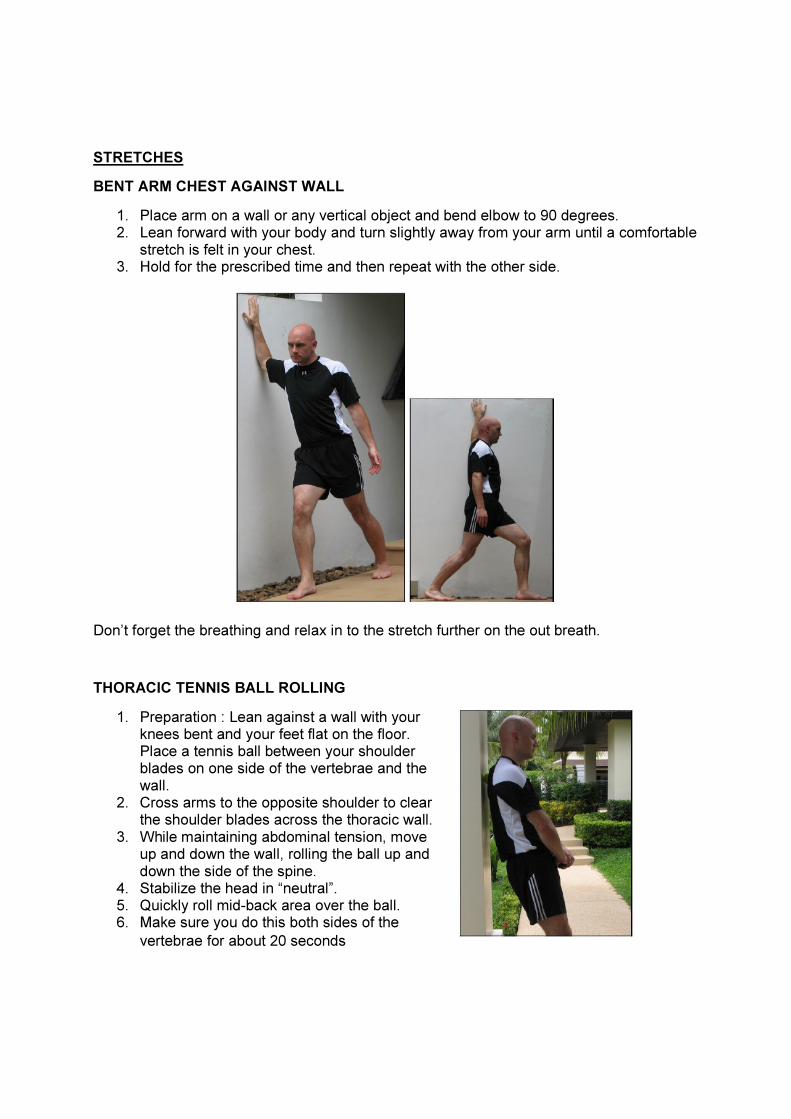
BENT ARM CHEST AGAINST WALL
1. Place arm on a wall or any vertical object and bend elbow to 90 degrees. 2. Lean forward with your body and turn slightly away from your arm until a comfortable
stretch is felt in your chest. 3. Hold for the prescribed time and then repeat with the other side.
Don’t forget the breathing and relax in to the stretch further on the out breath.
THORACIC TENNIS BALL ROLLING
1. Preparation : Lean against a wall with your knees bent and your feet flat on the floor. Place a tennis ball between your shoulder blades on one side of the vertebrae and the wall.
2. Cross arms to the opposite shoulder to clear the shoulder blades across the thoracic wall.
3. While maintaining abdominal tension, move up and down the wall, rolling the ball up and down the side of the spine.
4. Stabilize the head in “neutral”. 5. Quickly roll mid-back area over the ball. 6. Make sure you do this both sides of the
vertebrae for about 20 seconds