field guide for maintaining rural roadside ditches · field guide for maintaining rural roadside...
TRANSCRIPT
Field Guide for Maintaining Rural Roadside Ditches
––––––––––––––––– Funded by ––––––––––––––––– –––––––––––––––––– Created by –––––––––––––––––––
Protecting Lakes and Streams through Proper Ditch Maintenance

Field Guide for Maintaining Rural Roadside Ditches
Protecting Lakes and Streams through Proper Ditch Maintenance
By Fortin Consulting, Inc.; University of Minnesota Sea Grant Program;
and the Natural Resources Research Institute, University of Minnesota Duluth
Electronic copies of this document are available at www.seagrant.umn.edu.
©2014 Regents of the University of Minnesota
All rights reserved.
e University of Minnesota is an equal opportunity employer and educator.
Printed in the United States of America
3

is field guide is dedicated to the professionals, contractors, local government employees, and state road crews who performroutine ditch maintenance throughout northeastern Minnesota.
AcknowledgmentsSpecial thanks to the state, city, township and county employees, along with private contractors, who contributed commentsand shared their insights on ditch challenges. is information helped shape the contents of this field guide.
is field guide was created by the following people and groups:
Project Management and Editing• Dr. Valerie Brady, University of Minnesota Duluth’s Natural Resources Research Institute (NRRI) • Dr. Richard Axler, NRRI • Jesse Schomberg, University of Minnesota Sea Grant Program
Project Leader and Writers: Fortin Consulting, Inc. • Connie Fortin• Carolyn Dindorf• Katie Farber• Nancy Mulhern• Lauren Tjaden
Engineering and Hydrology Consultant• Ali Durgunoglu, P.E., Ph.D. Engineering
Northeast Minnesota Ditch Maintenance Technical Expert Committee• Ryan Hughes, Board of Water and Soil Resources • Tom Johnson, City of Duluth • Cliff Bentley, Minnesota Department of Natural Resources• Shelly Micke, Minnesota Department of Transportation • Tom Schaub, Minnesota Pollution Control Agency
4
• Kelly Smith, Carlton County Soil and Water Conservation District (SWCD) • Keith Anderson, SWCD Technical Services Area 3, Northeastern Minnesota• St. Louis County Public Works Department Staff• Marty Rye, United States Forest Service
Reviewers• Caitlin Fortin, Fortin Consulting, Inc.• Meredith Moore, Fortin Consulting, Inc.• Joan Weyandt, Board of Water and Soil Resources• Dwayne Stenlund, Minnesota Department of Transportation• Vicky Dosdall, Lawn and Driveway Service, Inc.
Editors and Editorial Assistance: University of Minnesota Sea Grant Program• Sharon Moen• Russell Habermann• Garrett Kunz
Production: University of Minnesota Sea Grant Program
Photographs: Provided by Fortin Consulting, Inc., unless noted
Diagrams: Ideas by Fortin Consulting, Inc., or Ali Durgunoglu unless noted; illustrations by Karen Hoeft, Hoeft Design,
Field Guide for Maintaining Rural Roadside Ditches was made possible by a grant funded under the Great LakesRestoration Initiative administered by the United States Environmental Protection Agency’s Great Lakes National ProgramOffice and the Minnesota Pollution Control Agency (project #: GL00E00557-0) to the University of Minnesota Duluth’sNatural Resources Research Institute (contribution number 573) and Minnesota Sea Grant (publication number SH 14).
Minnesota Sea Grant is funded by the National Oceanic and Atmospheric Administration and the University of Minnesota.
5
Contents INTRODUCTION ............................................................................................................................................................. 11
• Why Ditch Maintenance? ............................................................................................................................................... 13• Why Are Road Ditches Important? ................................................................................................................................. 13
IDENTIFYING DITCH PROBLEMS ............................................................................................................................... 15
DITCH MAINTENANCE CATEGORIES ........................................................................................................................ 16• Maintenance vs. Redesign ............................................................................................................................................... 17
ROUTINE MAINTENANCE• Correcting Sediment Buildup ........................................................................................................................................ 27• Disposing of Ditch Spoils .............................................................................................................................................. 27• Unblocking Blocked Culverts ........................................................................................................................................ 28• Battling Beavers ............................................................................................................................................................. 28• Replacing Damaged Culverts: Same Size, Same Type ..................................................................................................... 29• Controlling Minor Erosion at Culvert Ends ................................................................................................................... 29• What to do About Water Moving Alongside Culverts .................................................................................................... 31• Stabilizing Ditch Banks .................................................................................................................................................. 31• Setting Seed ................................................................................................................................................................... 32• Preventing Erosion After Seeding ................................................................................................................................... 36• Installing Erosion Control Blankets ............................................................................................................................... 39• Other Ideas to Keep ings in Place .............................................................................................................................. 41• Installing Check Dams .................................................................................................................................................. 42• Managing Vegetation ..................................................................................................................................................... 44• Working with Protected Plants, Invasive Species, and Noxious Weeds ........................................................................... 45• Best Management Practices to Control Invasive Plants and Noxious Weeds ................................................................... 46
6
• Inspecting and Recording Your Work ............................................................................................................................. 47• Cleaning up the Site ...................................................................................................................................................... 47
NON-ROUTINE MAINTENANCE• Perennially Flowing Ditches, Streams and Wetlands ....................................................................................................... 49• When to Involve an Engineer ....................................................................................................................................... 49• Major Side Slope Erosion ............................................................................................................................................... 50• Excavation that Changes Ditch Shape ............................................................................................................................ 50• Replacing a Stream-crossing Culvert .............................................................................................................................. 51• Replacing Damaged Culverts: Different Size or Type ..................................................................................................... 51• When to Change Culvert Size......................................................................................................................................... 52• Installing Riprap ............................................................................................................................................................ 52• Heading Off Headcuts ................................................................................................................................................... 54• Check on Channel Incisions .......................................................................................................................................... 55
REGULATIONS AFFECTING DITCH MAINTENANCE .............................................................................................. 57MAINTENANCE CHECKLISTS ...................................................................................................................................... 60
• Pre-maintenance Checklist ............................................................................................................................................. 61• Ditch Maintenance Packing Checklist ........................................................................................................................... 62• Excavation Checklist for Ditch Maintenance ................................................................................................................. 63• Mowing, Trimming and Cleaning Ditches Checklist ..................................................................................................... 64
CONTACTS• Permits and Agencies ..................................................................................................................................................... 65• Erosion Control and Seeding Supplies ........................................................................................................................... 65
REFERENCES .................................................................................................................................................................... 66
RESOURCES ...................................................................................................................................................................... 67
DEFINITIONS ................................................................................................................................................................... 697
APPENDIX A: DITCH BASICS• Clues for Determining the Original Bottom ................................................................................................................. 72• Ditch Shape ................................................................................................................................................................... 73• How Flat Should Side Slopes Be? ................................................................................................................................... 74• How To Measure Side Slopes ......................................................................................................................................... 75
APPENDIX B: APPLICATION AND CHARACTERISTICS OF EROSION CONTROL BLANKETS ....................... 79
APPENDIX C: NOXIOUS AND INVASIVE WEEDS ...................................................................................................... 80
FiguresFigure 1: Roadside Rural Ditch Issues Covered in is Field Guide ...................................................................................... 12Figure 2: Stable Ditch ........................................................................................................................................................... 13Figure 3: Unstable Ditch ...................................................................................................................................................... 14Figure 4: Debris Blocking Culvert ........................................................................................................................................ 28Figure 5: Culvert Alignment for Reduced Erosion ................................................................................................................ 30Figure 6: Minor Erosion Around Culvert ............................................................................................................................. 30Figure 7: More Efficient, Mitered Cut .................................................................................................................................. 31Figure 8: Most Efficient, Apron Inlet .................................................................................................................................... 31Figure 9: Most Efficient, Apron Outlet ................................................................................................................................. 31Figure 10: Ditch Tracking ..................................................................................................................................................... 33Figure 11: Jute Blanket ......................................................................................................................................................... 38Figure 12: Soil Adhering to BFM ......................................................................................................................................... 38Figure 13: Wood Fiber Blankets .......................................................................................................................................... 38
8
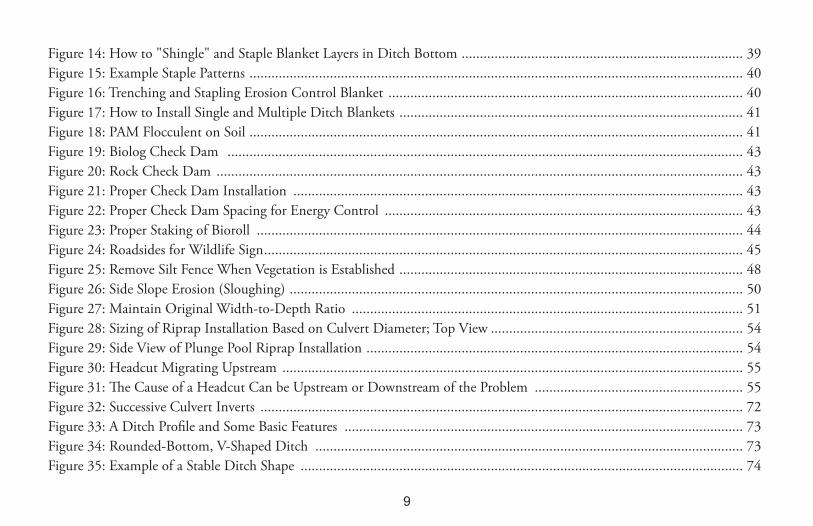
Figure 14: How to "Shingle" and Staple Blanket Layers in Ditch Bottom ............................................................................. 39Figure 15: Example Staple Patterns ....................................................................................................................................... 40Figure 16: Trenching and Stapling Erosion Control Blanket ................................................................................................. 40Figure 17: How to Install Single and Multiple Ditch Blankets .............................................................................................. 41Figure 18: PAM Flocculent on Soil ....................................................................................................................................... 41Figure 19: Biolog Check Dam ............................................................................................................................................. 43Figure 20: Rock Check Dam ................................................................................................................................................ 43Figure 21: Proper Check Dam Installation ........................................................................................................................... 43Figure 22: Proper Check Dam Spacing for Energy Control .................................................................................................. 43Figure 23: Proper Staking of Bioroll ..................................................................................................................................... 44Figure 24: Roadsides for Wildlife Sign................................................................................................................................... 45Figure 25: Remove Silt Fence When Vegetation is Established .............................................................................................. 48Figure 26: Side Slope Erosion (Sloughing) ............................................................................................................................ 50Figure 27: Maintain Original Width-to-Depth Ratio ........................................................................................................... 51Figure 28: Sizing of Riprap Installation Based on Culvert Diameter; Top View ..................................................................... 54Figure 29: Side View of Plunge Pool Riprap Installation ....................................................................................................... 54Figure 30: Headcut Migrating Upstream .............................................................................................................................. 55Figure 31: e Cause of a Headcut Can be Upstream or Downstream of the Problem ......................................................... 55Figure 32: Successive Culvert Inverts .................................................................................................................................... 72Figure 33: A Ditch Profile and Some Basic Features ............................................................................................................. 73Figure 34: Rounded-Bottom, V-Shaped Ditch ..................................................................................................................... 73Figure 35: Example of a Stable Ditch Shape ......................................................................................................................... 74
9
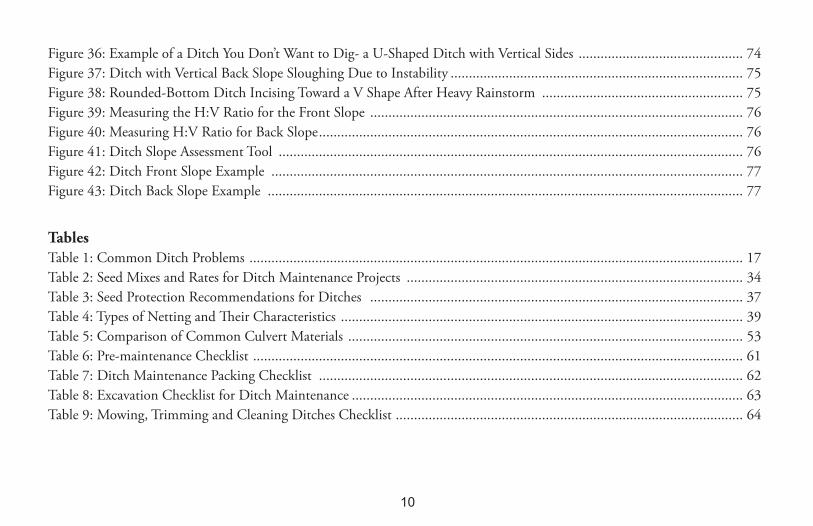
Figure 36: Example of a Ditch You Don’t Want to Dig- a U-Shaped Ditch with Vertical Sides ............................................. 74Figure 37: Ditch with Vertical Back Slope Sloughing Due to Instability ................................................................................ 75Figure 38: Rounded-Bottom Ditch Incising Toward a V Shape After Heavy Rainstorm ....................................................... 75Figure 39: Measuring the H:V Ratio for the Front Slope ...................................................................................................... 76Figure 40: Measuring H:V Ratio for Back Slope.................................................................................................................... 76Figure 41: Ditch Slope Assessment Tool ............................................................................................................................... 76 Figure 42: Ditch Front Slope Example ................................................................................................................................. 77Figure 43: Ditch Back Slope Example .................................................................................................................................. 77
TablesTable 1: Common Ditch Problems ....................................................................................................................................... 17Table 2: Seed Mixes and Rates for Ditch Maintenance Projects ............................................................................................ 34Table 3: Seed Protection Recommendations for Ditches ...................................................................................................... 37Table 4: Types of Netting and eir Characteristics .............................................................................................................. 39Table 5: Comparison of Common Culvert Materials ............................................................................................................ 53Table 6: Pre-maintenance Checklist ...................................................................................................................................... 61Table 7: Ditch Maintenance Packing Checklist .................................................................................................................... 62Table 8: Excavation Checklist for Ditch Maintenance ........................................................................................................... 63Table 9: Mowing, Trimming and Cleaning Ditches Checklist ............................................................................................... 64
10
INTRODUCTIONe purpose of this Field Guide is to provide guidelines for maintaining upland roadside ditches in rural northeasternMinnesota in a way that reduces sediment and pollutant loads to waterways. Using the information will also help you preventerosion and maintain good water conveyance. is guide offers practical advice and illustrations to hands-on maintenanceworkers, ditch maintenance contractors and local (township) road supervisors who maintain ditches. ese pages containtechnical guidance for routine work in the field when there is limited access to survey equipment and other sophisticated tools.e guide will also help you determine when maintenance is beyond routine and additional help and advice should be sought.
is Field Guide was written for the northeast region of Minnesota; however, it may be useful for other regions and otherstates. Northeastern Minnesota is often called the Arrowhead. Approximately 250,000-300,000 people live in the Arrowhead,which is also home to some of the state’s most beautiful natural resources, including Voyageurs National Park, the BoundaryWaters Canoe Area Wilderness, the Sawtooth Mountains and the Superior Hiking Trail. e Arrowhead’s watersheds form theheadwaters of Lake Superior, the largest freshwater lake in the world by surface area and the deepest and most pristine of theLaurentian Great Lakes. Lake Superior alone contains 10% of the fresh surface water on Earth and more than the four lowerGreat Lakes combined.
e soil, water and vegetation characteristics of the Arrowhead influence ditch maintenance. is region and nearby parts ofwestern Wisconsin contain sand plains in flatter areas and heavy red clay or thin rocky soil in hillier ones. (Sometimes the flatareas are also thick with clay or are rocky). Each soil type and terrain possesses unique challenges for creating and maintainingditches.
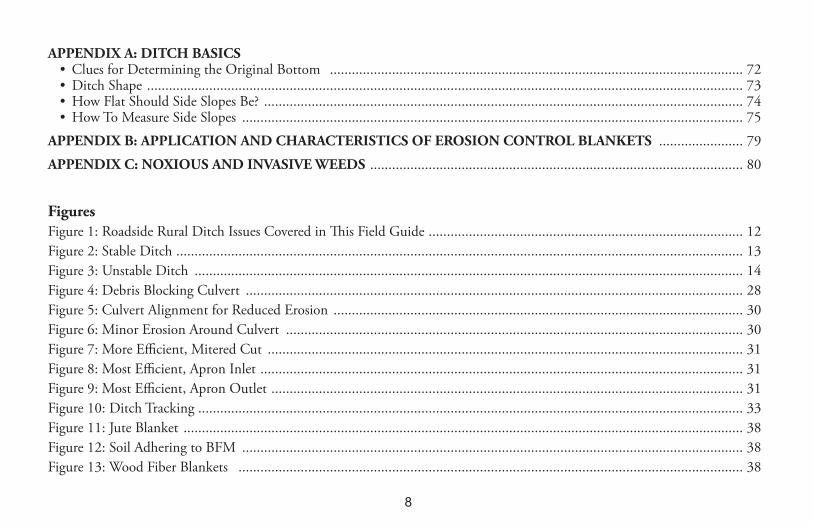
is field guide covers routine and some non-routine maintenance of upland ditches that carry stormwater runoff (Fig. 1).
is guide does not provide technical guidance for the design, reconstruction, or replacement of road or stream crossingculverts, ditches with constant flow, ditches that look like streams or wetlands, or the redesign of failing ditches (Fig. 1). is field guide is not written for engineers, nor is it a replacement for engineering or legal advice. Maintenance professionalsshould seek engineering advice whenever they are uncertain of a ditch maintenance activity and how it could affect the ditchsystem; they should seek legal advice whenever there is a question of jurisdiction or permitted work.
11
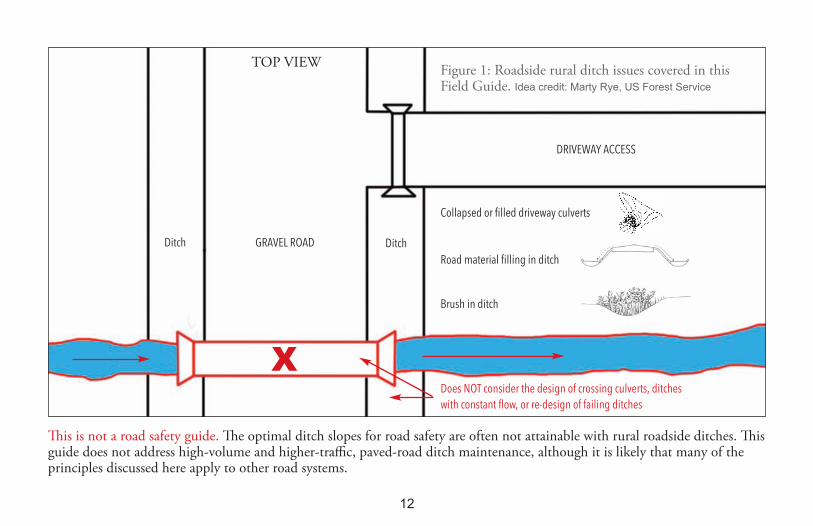
is is not a road safety guide. e optimal ditch slopes for road safety are often not attainable with rural roadside ditches. isguide does not address high-volume and higher-traffic, paved-road ditch maintenance, although it is likely that many of theprinciples discussed here apply to other road systems.
12
DRiveway aCCess
Collapsed or filled driveway culverts
GRavel ROaDDitch
Road material filling in ditch
Brush in ditch
Does NOT consider the design of crossing culverts, ditches
with constant flow, or re-design of failing ditches
Figure 1: Roadside rural ditch issues covered in thisField Guide. Idea credit: Marty Rye, US Forest Service
X
Ditch
TOP VIEW
Why Ditch Maintenance?Road systems in the Arrowhead region of Minnesota are dominated by rural (ditched) sections. A large percentage of the roadsare unpaved. Out of 3,004 miles of road maintained by St. Louis County, 1,546 miles are unpaved (St. Louis County, MNwebsite), and Carlton County maintains 452 miles of unpaved roads out of 785 total miles (Carlton County, MN website).
Material from gravel roads, including sediment from winter sanding, moves from the roadbed to the ditches as a result ofgrading, traffic, rainfall runoff, snowmelt runoff, plowing, erosion, and potentially other activities.
Over time as a result of this movement, roadside ditches and culverts fill in with gravel and sediment. e periodic removal ofthis material is required to maintain the hydraulic capacity of the ditches and protect the roadway and travelling public.
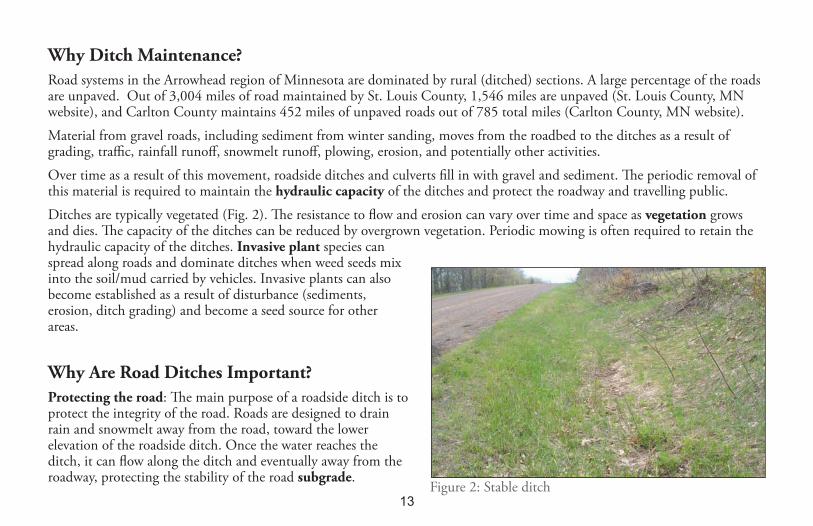
Ditches are typically vegetated (Fig. 2). e resistance to flow and erosion can vary over time and space as vegetation growsand dies. e capacity of the ditches can be reduced by overgrown vegetation. Periodic mowing is often required to retain thehydraulic capacity of the ditches. Invasive plant species canspread along roads and dominate ditches when weed seeds mixinto the soil/mud carried by vehicles. Invasive plants can alsobecome established as a result of disturbance (sediments,erosion, ditch grading) and become a seed source for otherareas.
Why Are Road Ditches Important?Protecting the road: e main purpose of a roadside ditch is toprotect the integrity of the road. Roads are designed to drainrain and snowmelt away from the road, toward the lowerelevation of the roadside ditch. Once the water reaches theditch, it can flow along the ditch and eventually away from theroadway, protecting the stability of the road subgrade.
13Figure 2: Stable ditch
A ditch may respond to changes such as:• Increased water flow • Blocked channels• Removed vegetation • Increased sediment load
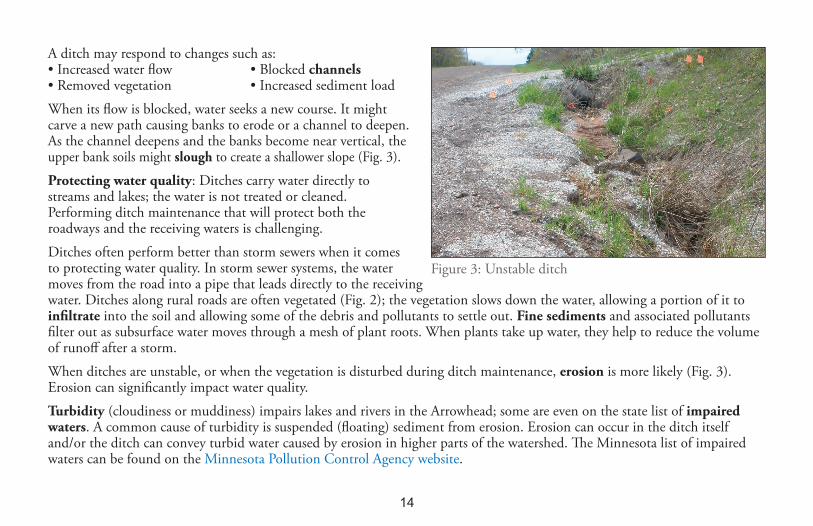
When its flow is blocked, water seeks a new course. It mightcarve a new path causing banks to erode or a channel to deepen.As the channel deepens and the banks become near vertical, theupper bank soils might slough to create a shallower slope (Fig. 3).
Protecting water quality: Ditches carry water directly tostreams and lakes; the water is not treated or cleaned.Performing ditch maintenance that will protect both theroadways and the receiving waters is challenging.
Ditches often perform better than storm sewers when it comesto protecting water quality. In storm sewer systems, the watermoves from the road into a pipe that leads directly to the receivingwater. Ditches along rural roads are often vegetated (Fig. 2); the vegetation slows down the water, allowing a portion of it toinfiltrate into the soil and allowing some of the debris and pollutants to settle out. Fine sediments and associated pollutantsfilter out as subsurface water moves through a mesh of plant roots. When plants take up water, they help to reduce the volumeof runoff after a storm.
When ditches are unstable, or when the vegetation is disturbed during ditch maintenance, erosion is more likely (Fig. 3).Erosion can significantly impact water quality.
Turbidity (cloudiness or muddiness) impairs lakes and rivers in the Arrowhead; some are even on the state list of impaired waters. A common cause of turbidity is suspended (floating) sediment from erosion. Erosion can occur in the ditch itselfand/or the ditch can convey turbid water caused by erosion in higher parts of the watershed. e Minnesota list of impairedwaters can be found on the Minnesota Pollution Control Agency website.
Figure 3: Unstable ditch
14
IDENTIFYING DITCH PROBLEMSTo keep up with ditch maintenance, it might be helpful to create a ditch management plan that includes a ditch inventory andrating system. e rating system could be based on a combination of vehicle safety, potential for flooding, environmentalimpacts, customer complaints, etc., but ultimately the rating system should help to prioritize where maintenance time andmoney are best spent. Drive the routes and record ditch function as you develop a ditch maintenance schedule that keepsahead of major problems. e best way to know if ditch systems are functioning properly is to observe and inspect them,especially during and immediately after rain or snowmelt events1 when higher flows put more stress on them.2
Especially note these three conditions when rating ditches:
1) Road appearance: Potholes, degradation, cracking, rutting, road edge erosion/“breaking off”, and suspicious wear and tearmay indicate a ditch in need of maintenance. Roads also deteriorate because of undersized or clogged culverts or when thesubgrade becomes saturated.3
2) Ditch erosion or soil instability: Look for un-vegetated banks, sediment deposits in the ditch, unstable or eroding slopes,incision (channel deepening) and headcuts. Is the riprap in place or has it been undercut or washed away? Check culvert endsfor signs of scour.
3) Water flow: How frequently does the ditch vegetation need to be mowed or otherwise reduced to provide adequate flowrates? Pools of standing water in a ditch or water ponding between culverts over long periods indicate either a drainage problemor that the ditch may be a wetland or stream. Are blockages or flood problems diverting the flow? Are the culverts adequatelysized to carry the flow? Inspect culverts for signs of corrosion, separated joints, sagging bottoms, blockage, piping, fill settling,and sediment buildup.4
1 Local Roads Maintenance Workers’ Manual, 2006. Iowa State University 2 Lake Superior Streams Website3 Forest Road Construction and Maintenance. U.S. Forest Service 4 Recommended Practices Manual: A Guidance for Maintenance
and Service of Unpaved Roads, 2000. Choctawhatchee, Pea and
Yellow Rivers Watershed Management Authority
15
Indicate the roadside ditches and culverts you need to maintain on a map. Use this map as you drive the roads. As you recordditch conditions, link your field notes to a particular location on the map to jog your memory later. Take a GPS location atproblem sites and those needing analysis. Photographs of problem areas will also be helpful as you try to remember eachsituation and explain it to others. Some smart phone Apps give latitude and longitude coordinates and tag photos with them.
DITCH MAINTENANCE CATEGORIESis guide is divided into two maintenance sections: Routine and Non-routine.Routine Maintenance: Work can generally be completed by maintenance staff in the field without major analysis orengineering. It includes work such as removing sediment that has filled in the ditch, replacing a damaged or corroded culvert ofthe same size and type under driveways or small roads, seeding a side slope, clearing brush, removing invasive species ornoxious weeds, and mowing. Basic field measurements often precede routine maintenance (see App. A).
Non-routine Maintenance: Work requires professional analysis or engineering and possibly one or more permits. Non-routinemaintenance often involves fixing headcuts, altering channel water carrying capacity, replacing culverts with different sizes ortypes, working in ditches that double as a stream or wetland, and combating major erosion.
Is the ditch just a ditch or is it also a public watercourse (stream or wetland)? Caution: If it is perennially wet, flows through awetland or seems different than a typical upland dry ditch, state and federal permits and other requirements may apply. eDNR Public Waters Work Permit Program applies to those lakes, wetlands, and streams identified on DNR Public WaterInventory (PWI) maps. Proposed projects affecting the course, flow or cross-section of these water bodies may require a PublicWaters Work Permit from the DNR and permits from the Army Corps of Engineers and other agencies. e PWI maps can beaccessed through the Minnesota DNR website. See the Regulations section for more information.
Use Table 1 below to identify common ditch problems and determine whether they are routine or non-routine. Non-routinemaintenance requires additional analysis and/or engineering and/or permits. Engineering may be required for more seriousproblems or changes, and a civil engineer should be involved to determine the best solution.
16
Maintenance vs. RedesignDitch design is an essential step in protecting roads and waters. Many rural roadside ditches were merely excavated rather thandesigned, making them prone to problems. Changes in flow volume or velocity, or road traffic may necessitate redesigning aditch. Proper design influences the type and frequency of maintenance work that is required to keep the ditch functional.
If the ditch was not designed properly or is not adequately carrying the stormwater runoff it receives, a redesign may be neededto reduce repeated maintenance issues. Redesign needs to take place within the framework of regulations that apply to theparticular ditch.
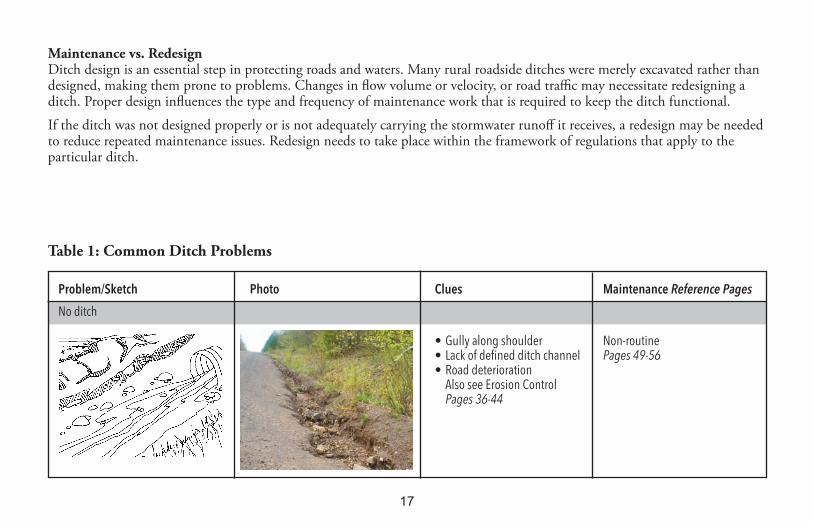
Table 1: Common Ditch Problems
17
Problem/Sketch Photo Clues Maintenance Reference Pages
No ditch
• Gully along shoulder Non-routine• lack of defined ditch channel Pages 49-56• Road deterioration
also see erosion ControlPages 36-44
18
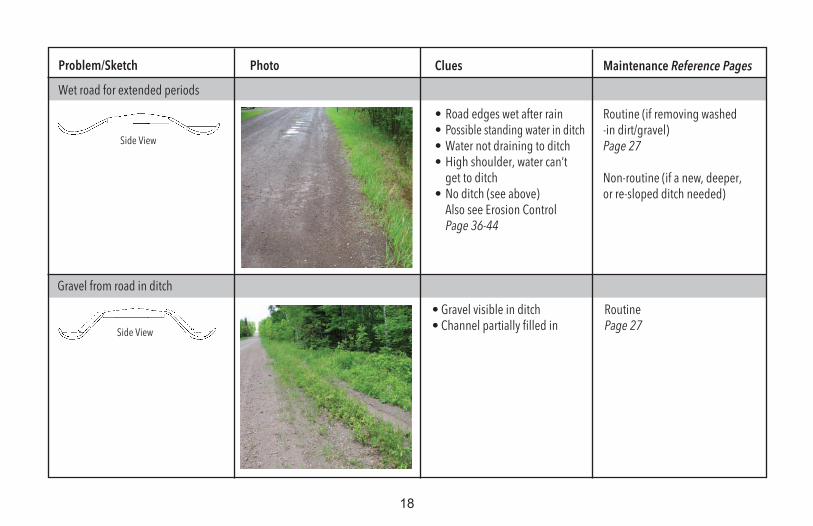
Problem/Sketch Photo Clues Maintenance Reference Pages
wet road for extended periods
• Road edges wet after rain Routine (if removing washed• Possible standing water in ditch -in dirt/gravel)• water not draining to ditch Page 27• High shoulder, water can’t
get to ditch Non-routine (if a new, deeper,• No ditch (see above) or re-sloped ditch needed)
also see erosion ControlPage 36-44
Gravel from road in ditch
• Gravel visible in ditch Routine • Channel partially filled in Page 27
side view
side view
19
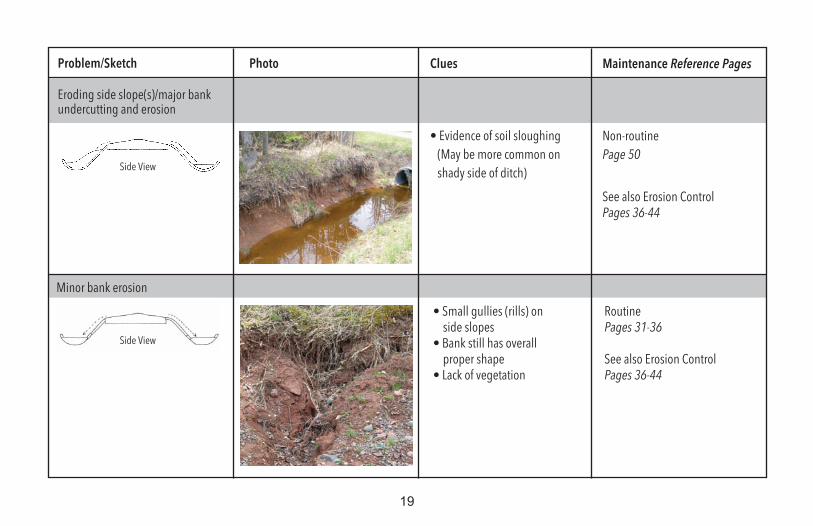
Problem/Sketch Photo Clues Maintenance Reference Pages
eroding side slope(s)/major bank undercutting and erosion
• evidence of soil sloughing Non-routine
(May be more common on Page 50
shady side of ditch)
see also erosion ControlPages 36-44
Minor bank erosion
• small gullies (rills) on Routineside slopes Pages 31-36
• Bank still has overall proper shape see also erosion Control
• lack of vegetation Pages 36-44
side view
side view

Problem/Sketch Photo Clues Maintenance Reference Pages
Headcut
• eroded deep channel Non-routine • abrupt (vertical) drop in Pages 54-55
channel bottom• sediment moved downstream see also erosion Control• Perched culverts or tile outlets Pages 36-44• small waterfalls in ditch
incision (channel deepening)
• Channel cut deeper Non-routine• steep side slopes Pages 55-56
see also erosion ControlPages 36-44
20
side view
Cross section
water Flow
Road
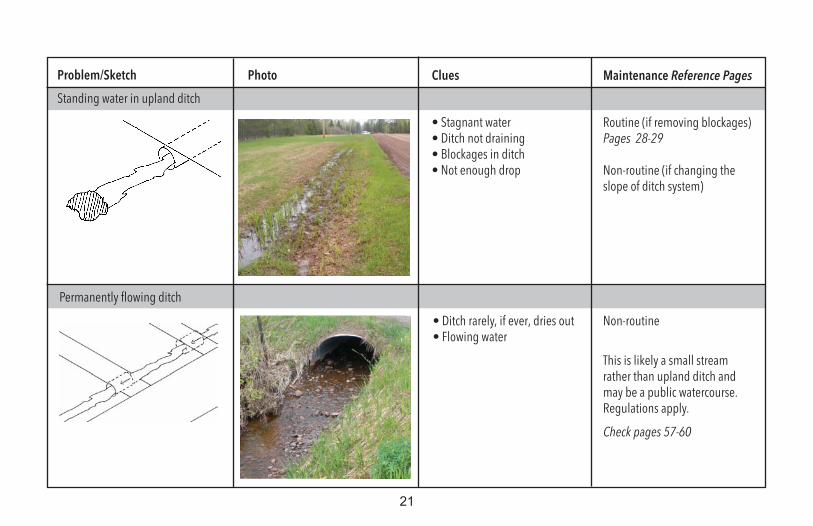
Permanently flowing ditch
• Ditch rarely, if ever, dries out Non-routine• Flowing water
This is likely a small stream rather than upland ditch and may be a public watercourse. Regulations apply.
Check pages 57-60
Problem/Sketch Photo Clues Maintenance Reference Pages
standing water in upland ditch
• stagnant water Routine (if removing blockages)• Ditch not draining Pages 28-29• Blockages in ditch• Not enough drop Non-routine (if changing the
slope of ditch system)
21
Problem/Sketch Photo Clues Maintenance Reference Pages
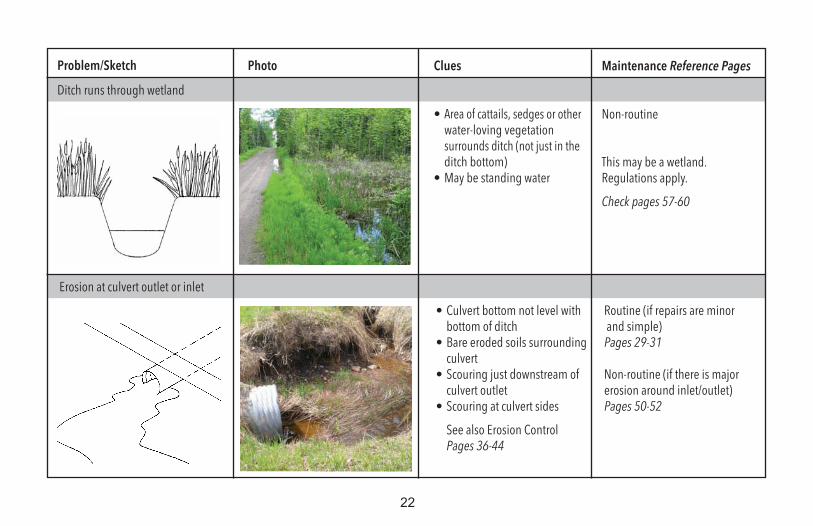
Ditch runs through wetland
• area of cattails, sedges or other Non-routinewater-loving vegetationsurrounds ditch (not just in theditch bottom) This may be a wetland.
• May be standing water Regulations apply.
Check pages 57-60
erosion at culvert outlet or inlet
• Culvert bottom not level with Routine (if repairs are minorbottom of ditch and simple)
• Bare eroded soils surrounding Pages 29-31culvert
• scouring just downstream of Non-routine (if there is major culvert outlet erosion around inlet/outlet)
• scouring at culvert sides Pages 50-52
see also erosion ControlPages 36-44
22
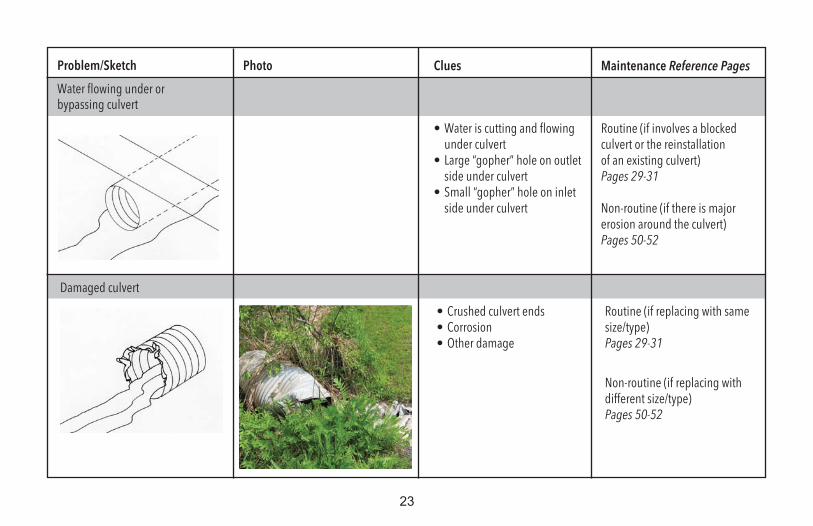
Damaged culvert
• Crushed culvert ends Routine (if replacing with same• Corrosion size/type)• Other damage Pages 29-31
Non-routine (if replacing with different size/type)Pages 50-52
Problem/Sketch Photo Clues Maintenance Reference Pages
water flowing under orbypassing culvert
• water is cutting and flowing Routine (if involves a blockedunder culvert culvert or the reinstallation
• large “gopher” hole on outlet of an existing culvert) side under culvert Pages 29-31
• small “gopher” hole on inlet side under culvert Non-routine (if there is major
erosion around the culvert) Pages 50-52
23
Problem/Sketch Photo Clues Maintenance Reference Pages
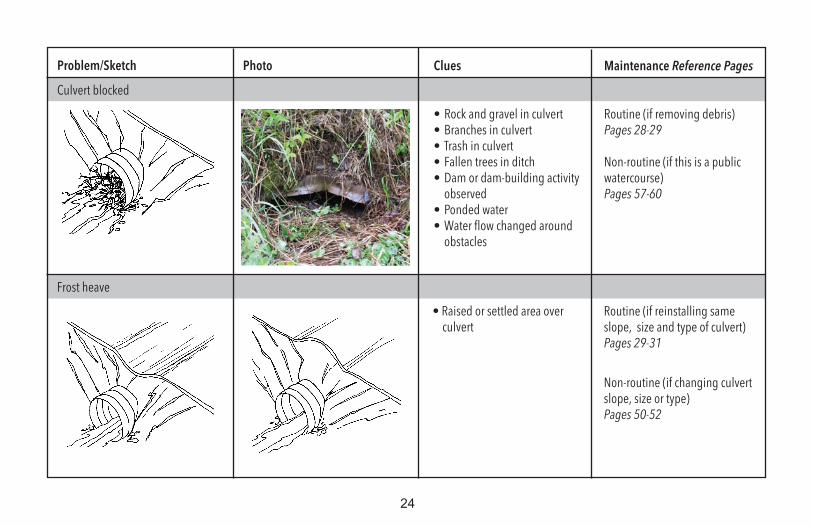
Culvert blocked
• Rock and gravel in culvert Routine (if removing debris)• Branches in culvert Pages 28-29• Trash in culvert• Fallen trees in ditch Non-routine (if this is a public • Dam or dam-building activity watercourse)
observed Pages 57-60• Ponded water• water flow changed around
obstacles
24
Frost heave
• Raised or settled area over Routine (if reinstalling same culvert slope, size and type of culvert)
Pages 29-31
Non-routine (if changing culvert slope, size or type)Pages 50-52
25
Problem/Sketch Photo Clues Maintenance Reference Pages
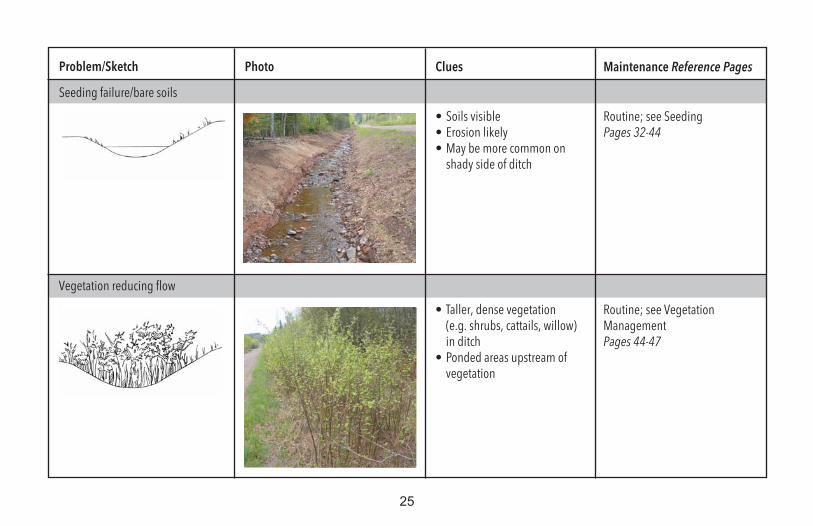
seeding failure/bare soils
• soils visible Routine; see seeding• erosion likely Pages 32-44• May be more common on
shady side of ditch
vegetation reducing flow
• Taller, dense vegetation Routine; see vegetation(e.g. shrubs, cattails, willow) Management in ditch Pages 44-47
• Ponded areas upstream of vegetation
26
Problem/Sketch Photo Clues Maintenance Reference Pages
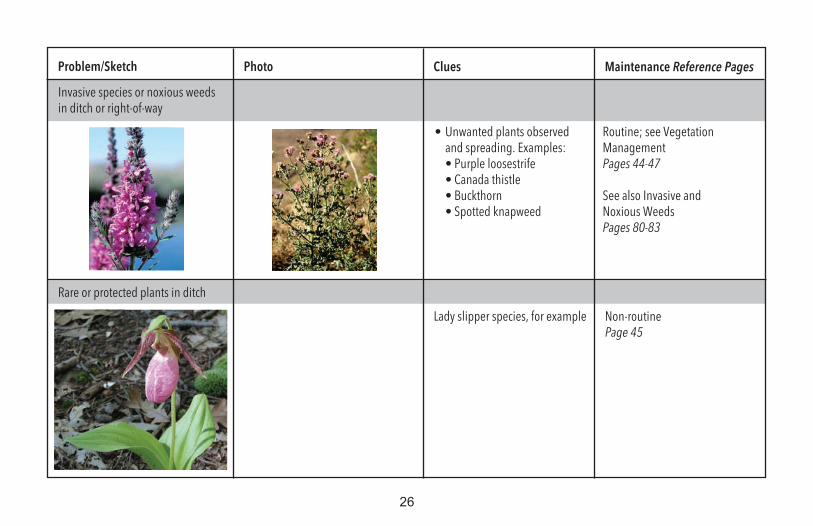
invasive species or noxious weedsin ditch or right-of-way
• Unwanted plants observed Routine; see vegetationand spreading. examples: Management• Purple loosestrife Pages 44-47• Canada thistle• Buckthorn see also invasive and• spotted knapweed Noxious weeds
Pages 80-83
Rare or protected plants in ditch
lady slipper species, for example Non-routinePage 45
ROUTINE MAINTENANCEBefore excavating make sure underground utilities are marked. Appendix A contains important information about the shapeand slope of ditch excavation. Take time to review it before excavating. If done right, routine ditch maintenance can fixcommon ditch problems while ensuring that high-performance ditches protect the road and waterways.
Correcting Sediment Buildupe longitudinal profile of a ditch (the slope along the length of the bottom; see Figure 36 foran example) plays a major role in its stability. Over time certain reaches of a ditch can fill in,which alters the flow of the water. Ditches partially filled with sediment, rock or other debrisshould be cleaned out to regain the original ditch flow capacity. Careful excavation can correctthis problem without significantly changing the longitudinal profile of the ditch. If slopes arechanged significantly during excavation, a new cycle of sedimentation or erosion may occur inadjacent segments of the ditch. Use the best practices described below for seeding and erosionand sediment control during and following excavation to keep sediment from washingdownstream. Limit excavation to removing accumulated sediment. In most cases, removingsediment without altering the original shape of the ditch would not require a permit.
Changing the shape (depth and/or width) of the ditch is non-routine maintenance and may require permits; see the Regulations section for more information.
Disposing of Ditch SpoilsCall the local weed inspector or inspect ditches yourself for problem plants before excavating.When excavating, haul the excavated soil and vegetation (spoils) offsite to a local gravel pit orother designated disposal area as soon as possible. If possible, load them directly into the truckfrom the excavator. Spoils left onsite are likely to erode back into the ditch and washdownstream. Spoils should not be placed in wetlands or floodplains and special care must betaken if the site has invasive species or noxious weeds on it. Use sediment control structuresaround temporary spoil piles (see Erosion Control section).
27
Make sure to haveunderground
utilities markedwhen doing anyexcavation work.
Remove ditchspoils from thesite as soon as
possible.
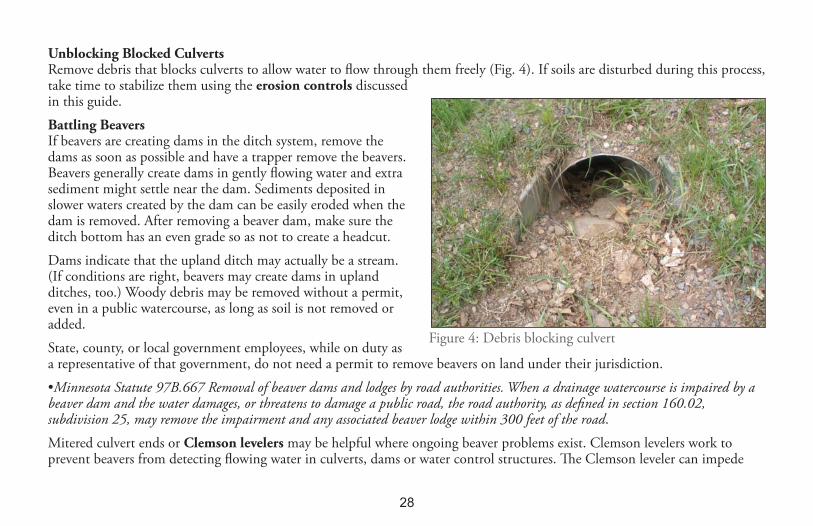
Unblocking Blocked CulvertsRemove debris that blocks culverts to allow water to flow through them freely (Fig. 4). If soils are disturbed during this process,take time to stabilize them using the erosion controls discussedin this guide.
Battling BeaversIf beavers are creating dams in the ditch system, remove thedams as soon as possible and have a trapper remove the beavers.Beavers generally create dams in gently flowing water and extrasediment might settle near the dam. Sediments deposited inslower waters created by the dam can be easily eroded when thedam is removed. After removing a beaver dam, make sure theditch bottom has an even grade so as not to create a headcut.
Dams indicate that the upland ditch may actually be a stream.(If conditions are right, beavers may create dams in uplandditches, too.) Woody debris may be removed without a permit,even in a public watercourse, as long as soil is not removed oradded.
State, county, or local government employees, while on duty asa representative of that government, do not need a permit to remove beavers on land under their jurisdiction.
•Minnesota Statute 97B.667 Removal of beaver dams and lodges by road authorities. When a drainage watercourse is impaired by abeaver dam and the water damages, or threatens to damage a public road, the road authority, as defined in section 160.02,subdivision 25, may remove the impairment and any associated beaver lodge within 300 feet of the road.
Mitered culvert ends or Clemson levelers may be helpful where ongoing beaver problems exist. Clemson levelers work toprevent beavers from detecting flowing water in culverts, dams or water control structures. e Clemson leveler can impede
28
Figure 4: Debris blocking culvert
fish migration and should not be used in situations where aquatic organisms need access to water on both sides of the culvert.See the Resources section for information on how to construct or purchase and use Clemson levelers as well as otheralternatives for preventing beaver activity from plugging culverts.
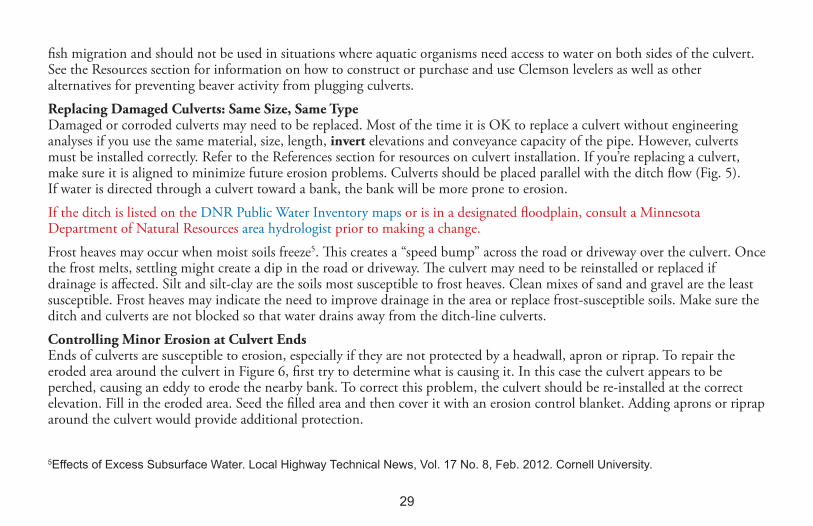
Replacing Damaged Culverts: Same Size, Same TypeDamaged or corroded culverts may need to be replaced. Most of the time it is OK to replace a culvert without engineeringanalyses if you use the same material, size, length, invert elevations and conveyance capacity of the pipe. However, culvertsmust be installed correctly. Refer to the References section for resources on culvert installation. If you’re replacing a culvert,make sure it is aligned to minimize future erosion problems. Culverts should be placed parallel with the ditch flow (Fig. 5). If water is directed through a culvert toward a bank, the bank will be more prone to erosion.
If the ditch is listed on the DNR Public Water Inventory maps or is in a designated floodplain, consult a MinnesotaDepartment of Natural Resources area hydrologist prior to making a change.
Frost heaves may occur when moist soils freeze5. is creates a “speed bump” across the road or driveway over the culvert. Oncethe frost melts, settling might create a dip in the road or driveway. e culvert may need to be reinstalled or replaced ifdrainage is affected. Silt and silt-clay are the soils most susceptible to frost heaves. Clean mixes of sand and gravel are the leastsusceptible. Frost heaves may indicate the need to improve drainage in the area or replace frost-susceptible soils. Make sure theditch and culverts are not blocked so that water drains away from the ditch-line culverts.
Controlling Minor Erosion at Culvert EndsEnds of culverts are susceptible to erosion, especially if they are not protected by a headwall, apron or riprap. To repair theeroded area around the culvert in Figure 6, first try to determine what is causing it. In this case the culvert appears to beperched, causing an eddy to erode the nearby bank. To correct this problem, the culvert should be re-installed at the correctelevation. Fill in the eroded area. Seed the filled area and then cover it with an erosion control blanket. Adding aprons or ripraparound the culvert would provide additional protection.
29
5Effects of Excess Subsurface Water. Local Highway Technical News, Vol. 17 No. 8, Feb. 2012. Cornell University.

A Word About Culvert Inlets and Outlets: A straight cut (see Fig. 6), which can be easily clogged or damaged, is the leastefficient way to begin and end a culvert. A mitered cut (Fig. 7) allows a culvert to handle 10% more water than a similarculvert with a straight end. Mitered culverts are also less likely to be plugged by beaver activity or debris6. For higher velocityditches or steeper gradients, install flare ends, otherwise known as aprons (see Fig. 8 and 9). e apron acts as a funneldirecting water through the culvert and protecting the outflow from erosion.
Common Problem: Scouring at culvert outlet. If erosion is occurring at the culvert outlet, additional protection is likelyneeded. Aprons, riprap and/or rock plunge pools may help. Scouring may also be a sign of an undersized culvert. See the Non-routine Maintenance section.
Common Problem: Erosion around culvert outlet riprap: e riprap may have been installed too high, diverting the water
30
Figure 5: Culvert alignment for reduced erosion Figure 6: Minor erosion around culvert
6Wisconsin Transportation Bulletin No 15, revised September 2004. Page 5
incorrect
Correct
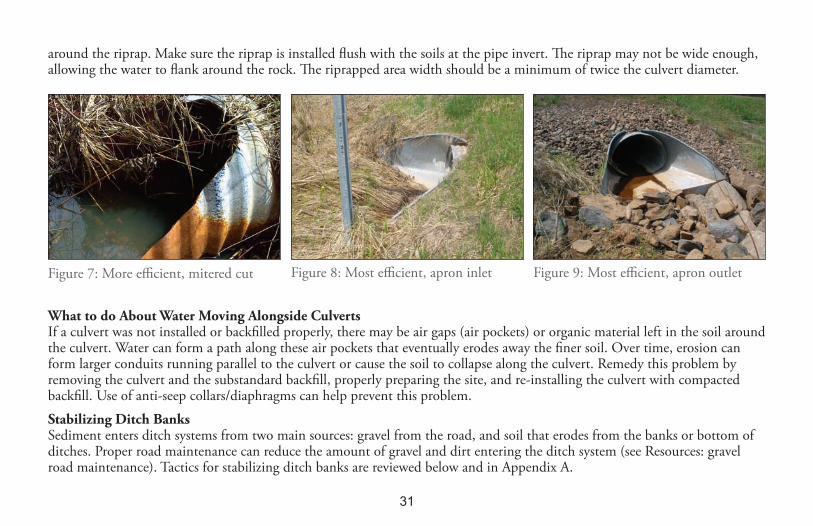
around the riprap. Make sure the riprap is installed flush with the soils at the pipe invert. e riprap may not be wide enough,allowing the water to flank around the rock. e riprapped area width should be a minimum of twice the culvert diameter.
What to do About Water Moving Alongside CulvertsIf a culvert was not installed or backfilled properly, there may be air gaps (air pockets) or organic material left in the soil aroundthe culvert. Water can form a path along these air pockets that eventually erodes away the finer soil. Over time, erosion canform larger conduits running parallel to the culvert or cause the soil to collapse along the culvert. Remedy this problem byremoving the culvert and the substandard backfill, properly preparing the site, and re-installing the culvert with compactedbackfill. Use of anti-seep collars/diaphragms can help prevent this problem.
Stabilizing Ditch BanksSediment enters ditch systems from two main sources: gravel from the road, and soil that erodes from the banks or bottom ofditches. Proper road maintenance can reduce the amount of gravel and dirt entering the ditch system (see Resources: gravelroad maintenance). Tactics for stabilizing ditch banks are reviewed below and in Appendix A.
31
Figure 7: More efficient, mitered cut Figure 8: Most efficient, apron inlet Figure 9: Most efficient, apron outlet
Soils: Some soils are more likely to erode than others. In general, soils containing a lot of silt and sand are the most erodible.Sand is gritty; silt is smooth; clay is sticky. Most soils are a combination of silt, sand, and clay. Clay helps bind soil particlestogether, making them less likely to erode. To get a rough idea about how erodible the soil type is, take a handful of moist soiland squeeze it into a ribbon. If it crumbles, it is mostly silt or sand and prone to erosion; if you can form a nice ribbon, it ismostly clay. Clay soils are less permeable and produce more runoff. ey are also more difficult to stabilize with vegetation.
Timing: If possible, excavate when erosion potential is low, in drier periods after snowmelt and spring rains and during thegrowing season when vegetation can be quickly established. Stage your project so that exposed areas can be stabilized quickly,ideally within 24 hours. Look for ways to phase the cleanout so that vegetated strips in the downstream part of each ditch areleft intact. e vegetation left in place will help stabilize the ditch and trap pollutants.7 You may have to come back after theupstream area is stabilized to cleanout downstream areas.
Minimize Disturbance: Vegetation is the best protection against erosion. Minimize disturbance as much as possible. Whenexcavating is necessary, try to remove only the deposited materials, leaving the more intact original soils in place.
Setting SeedShaping and Seedbed Preparation: One of the most important erosion prevention techniques is proper shaping and/orcontouring. Round the bottom of the ditch and blend in the grading or excavating so it is relatively smooth. Sharp edgessometimes left after maintenance are prone to erosion and the large clods of soil left behind will make it difficult to installerosion control blankets tightly against the soil surface. Gently smooth out the graded areas to prepare the site for seed andblanket, but take care to not compact or glaze the banks during excavation or shaping. Once the proper shape is obtained,gently roughen or rake the soils on the slopes in a direction parallel to the ditch bottom (the long way) to allow spots for goodseed/soil contact. Ideally excavator tracks will be angled to slow the flow of water into the ditch bottom, not usher it in. SeeFigure 10.
e most important step in successful seeding is good seedbed preparation. e soil should be graded smooth, but loose.
32
7Vegetated Stormwater Facility Maintenance Report WA-RD 495.1, Dec. 2000. Washington State Transportation Center.
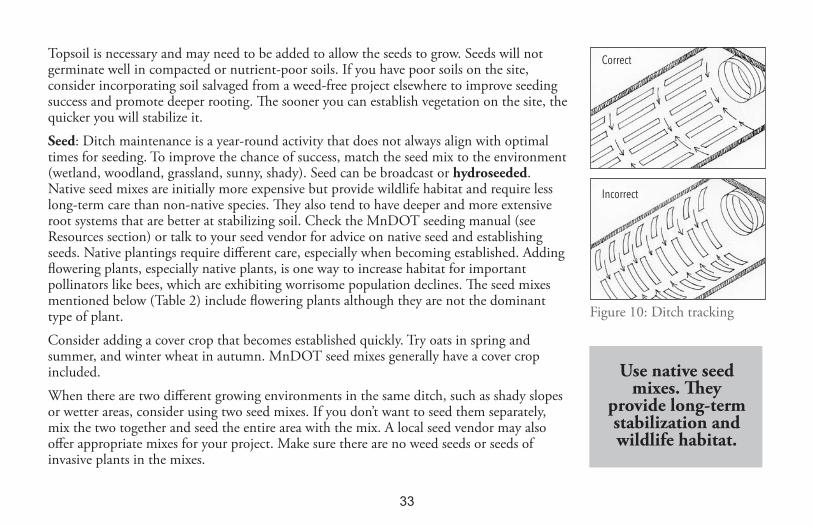
Topsoil is necessary and may need to be added to allow the seeds to grow. Seeds will notgerminate well in compacted or nutrient-poor soils. If you have poor soils on the site,consider incorporating soil salvaged from a weed-free project elsewhere to improve seedingsuccess and promote deeper rooting. e sooner you can establish vegetation on the site, thequicker you will stabilize it.
Seed: Ditch maintenance is a year-round activity that does not always align with optimaltimes for seeding. To improve the chance of success, match the seed mix to the environment(wetland, woodland, grassland, sunny, shady). Seed can be broadcast or hydroseeded.Native seed mixes are initially more expensive but provide wildlife habitat and require lesslong-term care than non-native species. ey also tend to have deeper and more extensiveroot systems that are better at stabilizing soil. Check the MnDOT seeding manual (seeResources section) or talk to your seed vendor for advice on native seed and establishingseeds. Native plantings require different care, especially when becoming established. Addingflowering plants, especially native plants, is one way to increase habitat for importantpollinators like bees, which are exhibiting worrisome population declines. e seed mixesmentioned below (Table 2) include flowering plants although they are not the dominanttype of plant.
Consider adding a cover crop that becomes established quickly. Try oats in spring andsummer, and winter wheat in autumn. MnDOT seed mixes generally have a cover cropincluded.
When there are two different growing environments in the same ditch, such as shady slopesor wetter areas, consider using two seed mixes. If you don’t want to seed them separately,mix the two together and seed the entire area with the mix. A local seed vendor may alsooffer appropriate mixes for your project. Make sure there are no weed seeds or seeds ofinvasive plants in the mixes.
33
Use native seedmixes. ey
provide long-termstabilization andwildlife habitat.
Correct
incorrect
Figure 10: Ditch tracking
34
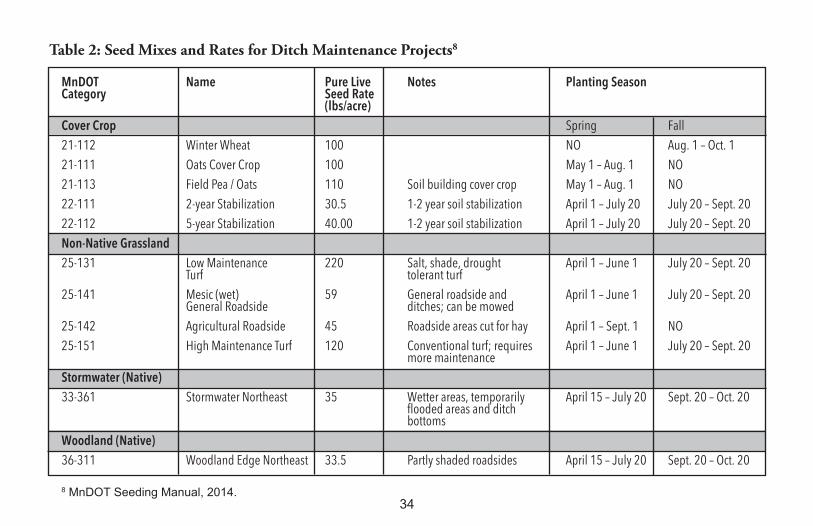
MnDOT Name Pure Live Notes Planting SeasonCategory Seed Rate
(lbs/acre)
Cover Crop spring Fall
21-112 winter wheat 100 NO aug. 1 – Oct. 1
21-111 Oats Cover Crop 100 May 1 – aug. 1 NO
21-113 Field Pea / Oats 110 soil building cover crop May 1 – aug. 1 NO
22-111 2-year stabilization 30.5 1-2 year soil stabilization april 1 – July 20 July 20 – sept. 20
22-112 5-year stabilization 40.00 1-2 year soil stabilization april 1 – July 20 July 20 – sept. 20
Non-Native Grassland
25-131 low Maintenance 220 salt, shade, drought april 1 – June 1 July 20 – sept. 20Turf tolerant turf
25-141 Mesic (wet) 59 General roadside and april 1 – June 1 July 20 – sept. 20General Roadside ditches; can be mowed
25-142 agricultural Roadside 45 Roadside areas cut for hay april 1 – sept. 1 NO
25-151 High Maintenance Turf 120 Conventional turf; requires april 1 – June 1 July 20 – sept. 20more maintenance
Stormwater (Native)
33-361 stormwater Northeast 35 wetter areas, temporarily april 15 – July 20 sept. 20 – Oct. 20flooded areas and ditch bottoms
Woodland (Native)
36-311 woodland edge Northeast 33.5 Partly shaded roadsides april 15 – July 20 sept. 20 – Oct. 20
8 MnDOT Seeding Manual, 2014.
Table 2: Seed Mixes and Rates for Ditch Maintenance Projects8
When to Seed: e season is generally from spring to early summer and from fall until the ground freezes. Datesrecommended by local native seed suppliers may differ slightly from those listed and will vary depending on weather patterns.Once vegetation starts growing, periodic mowing will help control weeds. A link to the MnDOT seeding manual is includedin the Resources section.
Dormant Seeding: Did you know that dormant seeding works better north of Trunk Highway 2 than anywhere inMinnesota?9 If your maintenance project is completed in the fall, beyond the recommended seeding dates, try dormantseeding. Dormant seeding should occur after the seed is likely to germinate and before the snow falls. e seed will sprout andgrow the next year. After seeding, blanket the area. Try to avoid excavating after the ground freezes, but if faced with frozen-ground conditions, use nails and washers rather than staples to anchor the blanket. Dormant seeding is often not as effective asplanting within the designated season, so plan to monitor your site and reseed if necessary.
Fertilizer: A soil test is recommended to help you determine whether or not you need to fertilize, and to select the proper typeof fertilizer. Without a soil test, use a 22-5-10 fertilizer with a slow release nitrogen source at a rate of 100 lbs/acre.10 Fertilizermay not be needed with native seed plantings if the soil test confirms high phosphorus levels and the soil is prepared properlywith a layer of topsoil, or topsoil with a compost mix.11
Fertilizer will improve the success of plantings but must be used cautiously in a ditch situation. Try to fertilize when a relativelydry period is forecasted to prevent the fertilizer from being washed downstream and polluting streams and lakes. For the samereason, do not fertilize in a ditch where water is flowing. Take time to calibrate the fertilizer spreader and do not over-fertilize.Make sure to mix the fertilizer into the soil.
Slow-release nitrogen is harder to find and more expensive but it nourishes the plants longer and protects the water from excessnutrients. Use the highest percentage of slow-release nitrogen you can find. Slow-release nitrogen may be labeled “waterinsoluble nitrogen” or “coated nitrogen.”
35
9,10 Personal communication, Dwayne Stenlund, MnDOT, April 28, 201411 Personal communication, Doug Mensing, Applied Ecological Services, April 26, 2014
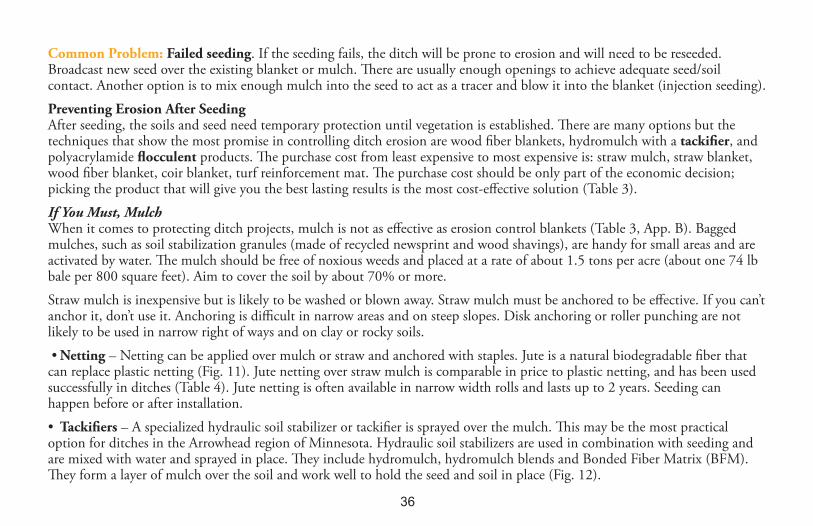
Common Problem: Failed seeding. If the seeding fails, the ditch will be prone to erosion and will need to be reseeded.Broadcast new seed over the existing blanket or mulch. ere are usually enough openings to achieve adequate seed/soilcontact. Another option is to mix enough mulch into the seed to act as a tracer and blow it into the blanket (injection seeding).
Preventing Erosion After SeedingAfter seeding, the soils and seed need temporary protection until vegetation is established. ere are many options but thetechniques that show the most promise in controlling ditch erosion are wood fiber blankets, hydromulch with a tackifier, andpolyacrylamide flocculent products. e purchase cost from least expensive to most expensive is: straw mulch, straw blanket,wood fiber blanket, coir blanket, turf reinforcement mat. e purchase cost should be only part of the economic decision;picking the product that will give you the best lasting results is the most cost-effective solution (Table 3).
If You Must, MulchWhen it comes to protecting ditch projects, mulch is not as effective as erosion control blankets (Table 3, App. B). Baggedmulches, such as soil stabilization granules (made of recycled newsprint and wood shavings), are handy for small areas and areactivated by water. e mulch should be free of noxious weeds and placed at a rate of about 1.5 tons per acre (about one 74 lbbale per 800 square feet). Aim to cover the soil by about 70% or more.
Straw mulch is inexpensive but is likely to be washed or blown away. Straw mulch must be anchored to be effective. If you can’tanchor it, don’t use it. Anchoring is difficult in narrow areas and on steep slopes. Disk anchoring or roller punching are notlikely to be used in narrow right of ways and on clay or rocky soils.
• Netting – Netting can be applied over mulch or straw and anchored with staples. Jute is a natural biodegradable fiber thatcan replace plastic netting (Fig. 11). Jute netting over straw mulch is comparable in price to plastic netting, and has been usedsuccessfully in ditches (Table 4). Jute netting is often available in narrow width rolls and lasts up to 2 years. Seeding canhappen before or after installation.
• Tackifiers – A specialized hydraulic soil stabilizer or tackifier is sprayed over the mulch. is may be the most practicaloption for ditches in the Arrowhead region of Minnesota. Hydraulic soil stabilizers are used in combination with seeding andare mixed with water and sprayed in place. ey include hydromulch, hydromulch blends and Bonded Fiber Matrix (BFM).ey form a layer of mulch over the soil and work well to hold the seed and soil in place (Fig. 12).
36

Other methods of securing mulch include:
• Hand punching – If the soils allow, a square-blade spade or shovel can be used to embed the straw at least 4 inches into theground about every 12 inches. e punched straw should stand perpendicular to the slope.
Tough situations call for TRMsFor highly erosive situations, turf reinforcement mats (TRMs) may be used. TRMs are permanent rolled erosion controlproducts made of non-degradable synthetic fibers (Table 3).
37
Protection Type Side Slope NotesHorizontal:vertical
Mulch 3:1 or flatter Must be anchored in place; hydromulch with a tackifier is best.
straw erosion control blanket, netting 3:1 to 2:1 Most common temporary stabilization method for ditch bottoms. Foron 1 or 2 sides blanketed areas next to DNR protected waters and certain other streams,
use a natural netting and stitching. 2-sided netting recommended for slopes longer than 50 ft.
wood fiber blanket, netting on 1 or 2 sides 3:1 or steeper 2-sided netting recommended for moderate slopes (between 3:1 and 2:1) longer than 50 ft or slopes steeper than 2:1
Turf reinforcement mats 2:1 to 1:1 Permanent surface stabilization. synthetic (polypropylene) fibers. For higher velocity flows or areas prone to erosion.
Table 3. Seed Protection Recommendations for Ditches12
12Erosion and Sediment Control Design Guidance, MnDOT 2010. MnDOT Turf Establishment Recommendations for Projects in District 1,
June 15, 2012. MnDOT Standard Specifications Regarding Erosion Control.
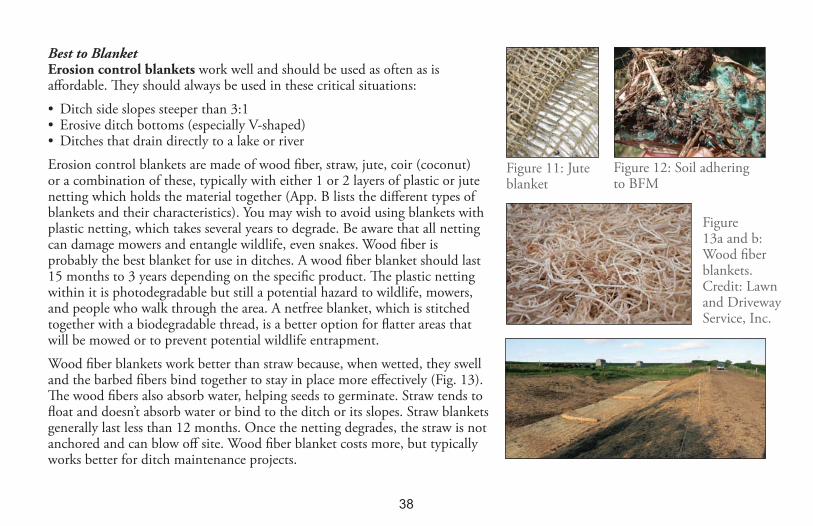
Best to Blanket Erosion control blankets work well and should be used as often as isaffordable. ey should always be used in these critical situations:
• Ditch side slopes steeper than 3:1• Erosive ditch bottoms (especially V-shaped)• Ditches that drain directly to a lake or river
Erosion control blankets are made of wood fiber, straw, jute, coir (coconut)or a combination of these, typically with either 1 or 2 layers of plastic or jutenetting which holds the material together (App. B lists the different types ofblankets and their characteristics). You may wish to avoid using blankets withplastic netting, which takes several years to degrade. Be aware that all nettingcan damage mowers and entangle wildlife, even snakes. Wood fiber isprobably the best blanket for use in ditches. A wood fiber blanket should last15 months to 3 years depending on the specific product. e plastic nettingwithin it is photodegradable but still a potential hazard to wildlife, mowers,and people who walk through the area. A netfree blanket, which is stitchedtogether with a biodegradable thread, is a better option for flatter areas thatwill be mowed or to prevent potential wildlife entrapment.
Wood fiber blankets work better than straw because, when wetted, they swelland the barbed fibers bind together to stay in place more effectively (Fig. 13).e wood fibers also absorb water, helping seeds to germinate. Straw tends tofloat and doesn’t absorb water or bind to the ditch or its slopes. Straw blanketsgenerally last less than 12 months. Once the netting degrades, the straw is notanchored and can blow off site. Wood fiber blanket costs more, but typicallyworks better for ditch maintenance projects.
38
Figure 11: Juteblanket
Figure 12: Soil adheringto BFM
Figure 13a and b:Wood fiberblankets.Credit: Lawnand DrivewayService, Inc.
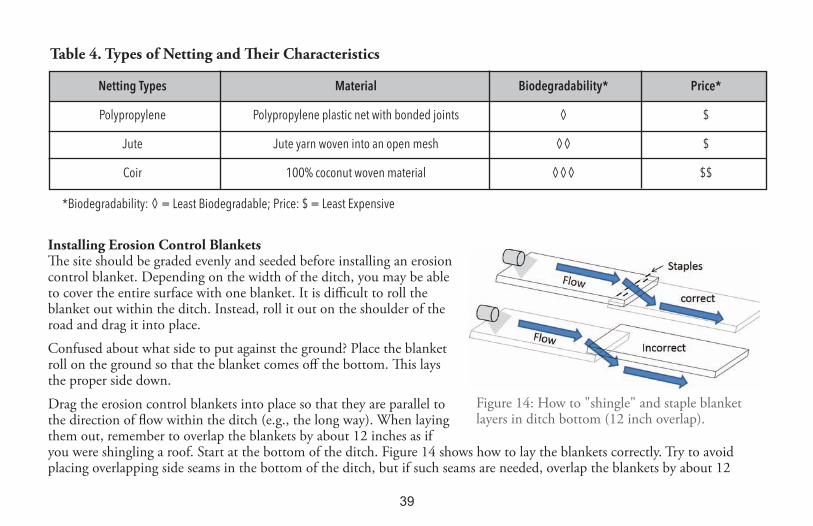
Installing Erosion Control Blanketse site should be graded evenly and seeded before installing an erosioncontrol blanket. Depending on the width of the ditch, you may be ableto cover the entire surface with one blanket. It is difficult to roll theblanket out within the ditch. Instead, roll it out on the shoulder of theroad and drag it into place.
Confused about what side to put against the ground? Place the blanketroll on the ground so that the blanket comes off the bottom. is laysthe proper side down.
Drag the erosion control blankets into place so that they are parallel tothe direction of flow within the ditch (e.g., the long way). When layingthem out, remember to overlap the blankets by about 12 inches as ifyou were shingling a roof. Start at the bottom of the ditch. Figure 14 shows how to lay the blankets correctly. Try to avoidplacing overlapping side seams in the bottom of the ditch, but if such seams are needed, overlap the blankets by about 12
39
Netting Types Material Biodegradability* Price*
Polypropylene Polypropylene plastic net with bonded joints ◊ $
Jute Jute yarn woven into an open mesh ◊◊ $
Coir 100% coconut woven material ◊◊◊ $$
*Biodegradability: ◊ = least Biodegradable; Price: $ = least expensive
Table 4. Types of Netting and eir Characteristics
Figure 14: How to "shingle" and staple blanketlayers in ditch bottom (12 inch overlap).
inches so that they do not separate. Make sure you have good soil contact with the blanket.
Staple the blankets every 1.5 feet at the overlap and add a second row of staples staggered to the first. If the blanket is notoverlapped and stapled, water may flow under the blanket and erode the soils. Overlap the blankets along the length of theditch side slopes, too.
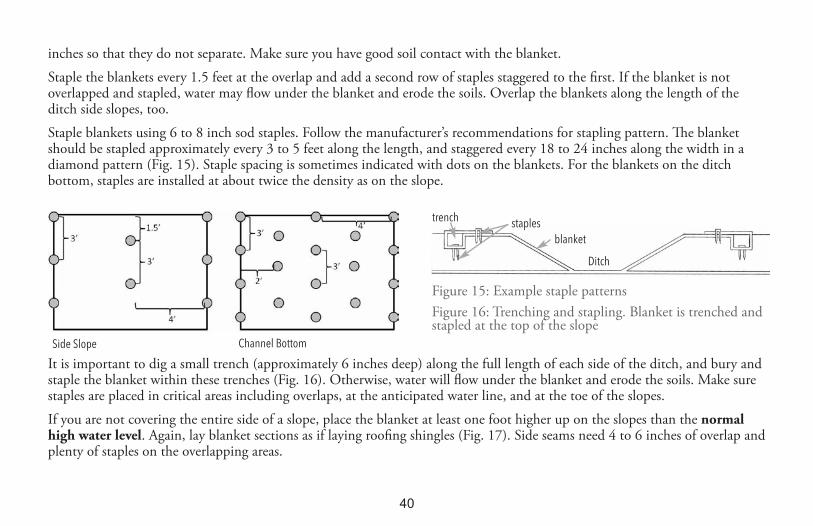
Staple blankets using 6 to 8 inch sod staples. Follow the manufacturer’s recommendations for stapling pattern. e blanketshould be stapled approximately every 3 to 5 feet along the length, and staggered every 18 to 24 inches along the width in adiamond pattern (Fig. 15). Staple spacing is sometimes indicated with dots on the blankets. For the blankets on the ditchbottom, staples are installed at about twice the density as on the slope.
It is important to dig a small trench (approximately 6 inches deep) along the full length of each side of the ditch, and bury andstaple the blanket within these trenches (Fig. 16). Otherwise, water will flow under the blanket and erode the soils. Make surestaples are placed in critical areas including overlaps, at the anticipated water line, and at the toe of the slopes.
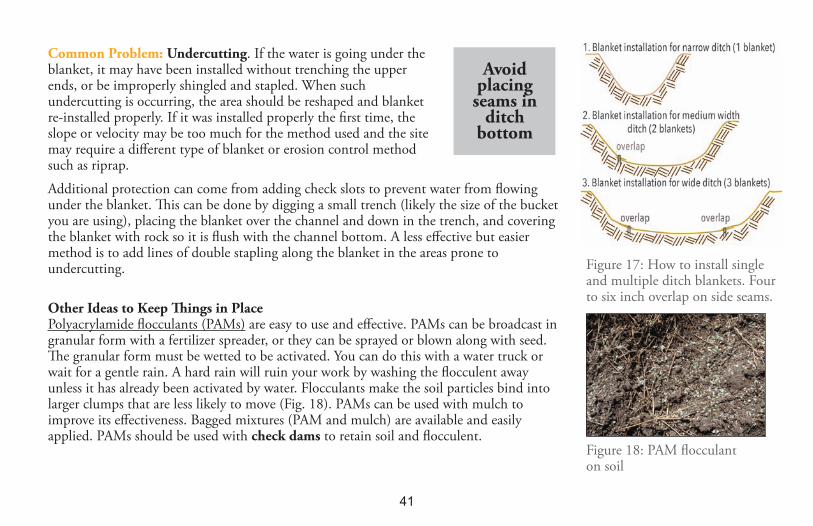
If you are not covering the entire side of a slope, place the blanket at least one foot higher up on the slopes than the normalhigh water level. Again, lay blanket sections as if laying roofing shingles (Fig. 17). Side seams need 4 to 6 inches of overlap andplenty of staples on the overlapping areas.
40
Figure 15: Example staple patternsFigure 16: Trenching and stapling. Blanket is trenched andstapled at the top of the slope
Ditch
trench staples
blanket
side slope Channel Bottom
Common Problem: Undercutting. If the water is going under theblanket, it may have been installed without trenching the upperends, or be improperly shingled and stapled. When suchundercutting is occurring, the area should be reshaped and blanketre-installed properly. If it was installed properly the first time, theslope or velocity may be too much for the method used and the sitemay require a different type of blanket or erosion control methodsuch as riprap.
Additional protection can come from adding check slots to prevent water from flowingunder the blanket. is can be done by digging a small trench (likely the size of the bucketyou are using), placing the blanket over the channel and down in the trench, and coveringthe blanket with rock so it is flush with the channel bottom. A less effective but easiermethod is to add lines of double stapling along the blanket in the areas prone toundercutting.
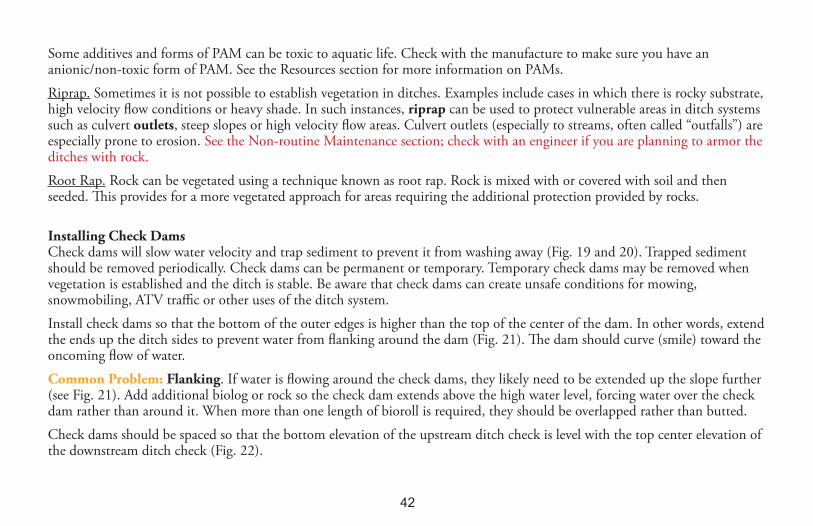
Other Ideas to Keep ings in PlacePolyacrylamide flocculants (PAMs) are easy to use and effective. PAMs can be broadcast ingranular form with a fertilizer spreader, or they can be sprayed or blown along with seed.e granular form must be wetted to be activated. You can do this with a water truck orwait for a gentle rain. A hard rain will ruin your work by washing the flocculent awayunless it has already been activated by water. Flocculants make the soil particles bind intolarger clumps that are less likely to move (Fig. 18). PAMs can be used with mulch toimprove its effectiveness. Bagged mixtures (PAM and mulch) are available and easilyapplied. PAMs should be used with check dams to retain soil and flocculent.
Figure 17: How to install singleand multiple ditch blankets. Fourto six inch overlap on side seams.
Figure 18: PAM flocculant on soil
41
Avoidplacingseams in
ditchbottom
Some additives and forms of PAM can be toxic to aquatic life. Check with the manufacture to make sure you have ananionic/non-toxic form of PAM. See the Resources section for more information on PAMs.
Riprap. Sometimes it is not possible to establish vegetation in ditches. Examples include cases in which there is rocky substrate,high velocity flow conditions or heavy shade. In such instances, riprap can be used to protect vulnerable areas in ditch systemssuch as culvert outlets, steep slopes or high velocity flow areas. Culvert outlets (especially to streams, often called “outfalls”) areespecially prone to erosion. See the Non-routine Maintenance section; check with an engineer if you are planning to armor theditches with rock.
Root Rap. Rock can be vegetated using a technique known as root rap. Rock is mixed with or covered with soil and thenseeded. is provides for a more vegetated approach for areas requiring the additional protection provided by rocks.
Installing Check Dams Check dams will slow water velocity and trap sediment to prevent it from washing away (Fig. 19 and 20). Trapped sedimentshould be removed periodically. Check dams can be permanent or temporary. Temporary check dams may be removed whenvegetation is established and the ditch is stable. Be aware that check dams can create unsafe conditions for mowing,snowmobiling, ATV traffic or other uses of the ditch system.
Install check dams so that the bottom of the outer edges is higher than the top of the center of the dam. In other words, extendthe ends up the ditch sides to prevent water from flanking around the dam (Fig. 21). e dam should curve (smile) toward theoncoming flow of water.
Common Problem: Flanking. If water is flowing around the check dams, they likely need to be extended up the slope further(see Fig. 21). Add additional biolog or rock so the check dam extends above the high water level, forcing water over the checkdam rather than around it. When more than one length of bioroll is required, they should be overlapped rather than butted.
Check dams should be spaced so that the bottom elevation of the upstream ditch check is level with the top center elevation ofthe downstream ditch check (Fig. 22).
42
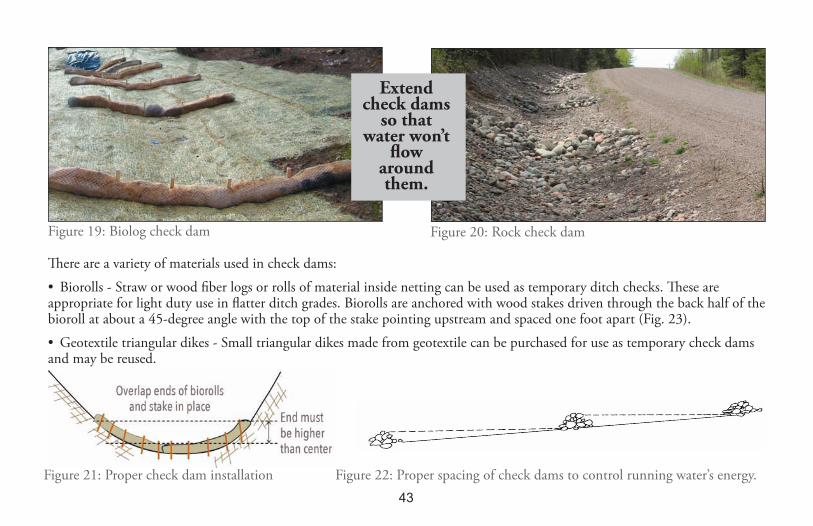
ere are a variety of materials used in check dams:
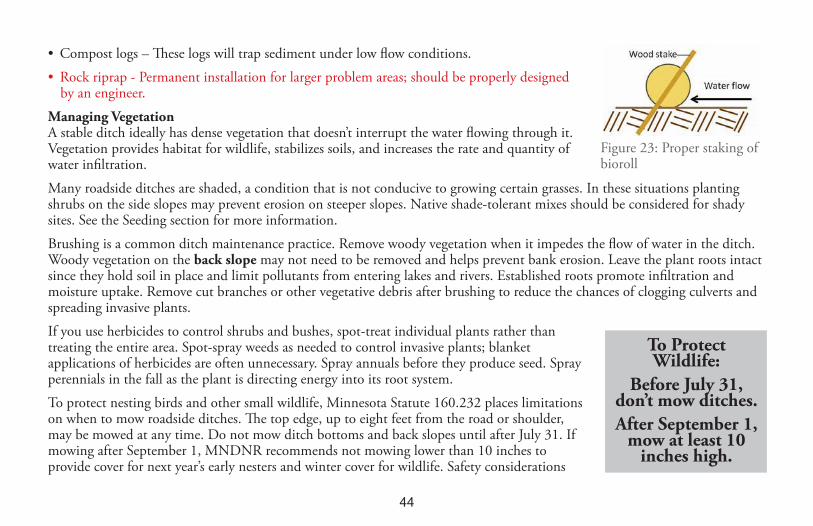
• Biorolls - Straw or wood fiber logs or rolls of material inside netting can be used as temporary ditch checks. ese areappropriate for light duty use in flatter ditch grades. Biorolls are anchored with wood stakes driven through the back half of thebioroll at about a 45-degree angle with the top of the stake pointing upstream and spaced one foot apart (Fig. 23).
• Geotextile triangular dikes - Small triangular dikes made from geotextile can be purchased for use as temporary check damsand may be reused.
Figure 19: Biolog check dam Figure 20: Rock check dam
Extendcheck dams
so thatwater won’t
flowaroundthem.
Figure 21: Proper check dam installation Figure 22: Proper spacing of check dams to control running water’s energy. 43
• Compost logs – ese logs will trap sediment under low flow conditions.
• Rock riprap - Permanent installation for larger problem areas; should be properly designed by an engineer.
Managing Vegetation A stable ditch ideally has dense vegetation that doesn’t interrupt the water flowing through it.Vegetation provides habitat for wildlife, stabilizes soils, and increases the rate and quantity ofwater infiltration.
Many roadside ditches are shaded, a condition that is not conducive to growing certain grasses. In these situations plantingshrubs on the side slopes may prevent erosion on steeper slopes. Native shade-tolerant mixes should be considered for shadysites. See the Seeding section for more information.
Brushing is a common ditch maintenance practice. Remove woody vegetation when it impedes the flow of water in the ditch.Woody vegetation on the back slope may not need to be removed and helps prevent bank erosion. Leave the plant roots intactsince they hold soil in place and limit pollutants from entering lakes and rivers. Established roots promote infiltration andmoisture uptake. Remove cut branches or other vegetative debris after brushing to reduce the chances of clogging culverts andspreading invasive plants.
If you use herbicides to control shrubs and bushes, spot-treat individual plants rather thantreating the entire area. Spot-spray weeds as needed to control invasive plants; blanketapplications of herbicides are often unnecessary. Spray annuals before they produce seed. Sprayperennials in the fall as the plant is directing energy into its root system.
To protect nesting birds and other small wildlife, Minnesota Statute 160.232 places limitationson when to mow roadside ditches. e top edge, up to eight feet from the road or shoulder,may be mowed at any time. Do not mow ditch bottoms and back slopes until after July 31. Ifmowing after September 1, MNDNR recommends not mowing lower than 10 inches toprovide cover for next year’s early nesters and winter cover for wildlife. Safety considerations
Figure 23: Proper staking ofbioroll
To ProtectWildlife:
Before July 31,don’t mow ditches.After September 1,
mow at least 10inches high.
44
allow mowing at other times, but only at a height greater than 12 inches. is limitation does notapply when establishing permanent vegetation. is statute does not apply to property owners.
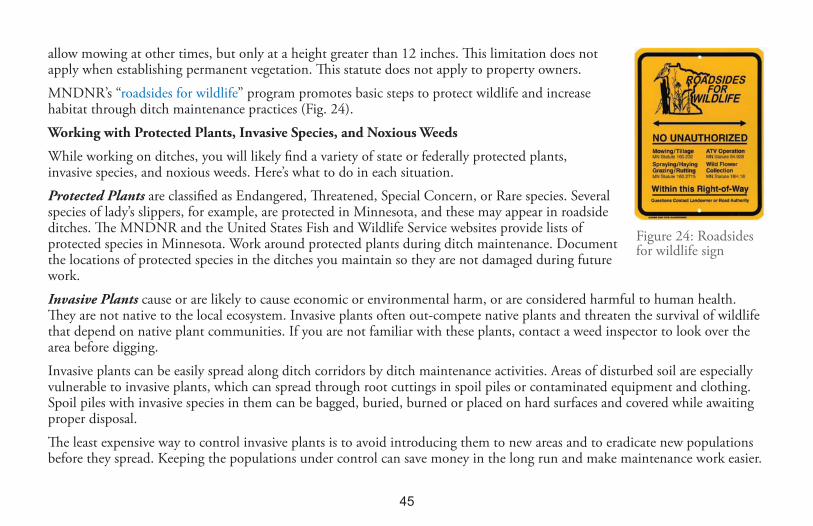
MNDNR’s “roadsides for wildlife” program promotes basic steps to protect wildlife and increasehabitat through ditch maintenance practices (Fig. 24).
Working with Protected Plants, Invasive Species, and Noxious Weeds
While working on ditches, you will likely find a variety of state or federally protected plants,invasive species, and noxious weeds. Here’s what to do in each situation.
Protected Plants are classified as Endangered, reatened, Special Concern, or Rare species. Severalspecies of lady’s slippers, for example, are protected in Minnesota, and these may appear in roadsideditches. e MNDNR and the United States Fish and Wildlife Service websites provide lists ofprotected species in Minnesota. Work around protected plants during ditch maintenance. Documentthe locations of protected species in the ditches you maintain so they are not damaged during futurework.
Invasive Plants cause or are likely to cause economic or environmental harm, or are considered harmful to human health.ey are not native to the local ecosystem. Invasive plants often out-compete native plants and threaten the survival of wildlifethat depend on native plant communities. If you are not familiar with these plants, contact a weed inspector to look over thearea before digging.
Invasive plants can be easily spread along ditch corridors by ditch maintenance activities. Areas of disturbed soil are especiallyvulnerable to invasive plants, which can spread through root cuttings in spoil piles or contaminated equipment and clothing.Spoil piles with invasive species in them can be bagged, buried, burned or placed on hard surfaces and covered while awaitingproper disposal.
e least expensive way to control invasive plants is to avoid introducing them to new areas and to eradicate new populationsbefore they spread. Keeping the populations under control can save money in the long run and make maintenance work easier.
45
Figure 24: Roadsidesfor wildlife sign

Noxious Weeds: As of 2014, the Minnesota Department of Agriculture (MDA) listed 19 species as prohibited noxious weeds(11 are on the eradicate list). e MDA oversees the management of these aggressively invasive plants in Minnesota. SeeAppendix C and the MDA website for a list of these species and for more information.
Take note of where noxious weeds are present in your ditches and use appropriate measures to manage them. Minnesota StateStatutes, Sections 18.75 to 18.91, and Minnesota Rules, Chapter 1505, require public road authorities to control noxiousweeds on public land such as roadside ditches. Several counties in the Arrowhead region require the control of additionalnoxious weeds. Contact the county agricultural inspector for a list of these plants and advice on how to control them.
Best Management Practices to Control Invasive Plants and Noxious Weeds
• Document the location of significant infestations.
• Schedule maintenance to control infestations at the times most likely to be effective.
• Minimize soil disturbance. Disturbing soils will allow invasive plants to invade. If you use mulch, make sure it is weed-free.
• Try to schedule soil disturbance work when seeds or plant propagules are least likelyto be viable and spread.
• Plan it out. Work in weed-free areas first, then in areas with invasive plants.
• Stage your equipment in areas free of problem plants.
• oroughly clean all tools, machinery, equipment, shoes and clothing before leavingworksites and disposal sites.
• Make areas with invasive plants priority areas so that they are mowed before going to seed. Highest priority should be given to ditches adjacent to sensitive areas where it is important not to spread invasive plants. Note that mowing will not
46
Learn how a plant spreadsand you can better control
it. Reed canary grassspreads by rhizomes as
well as seed. Mowing willnot control it, and spoils
from excavation willspread it. Canada thistlespreads by seed. Mowingprior to the seeding stagecould greatly reduce its
spread.
kill purple loosestrife, Japanese knotweed, reed canary grass or giant reed grass. ese plants are able to sprout from stems and root fragments.
• When using herbicides, follow the label directions for where they can be used, types of plants controlled, concentration to use, application rate, application method, and frequency of use, as well as safety precautions and environmental hazards. Do not apply in water unless using an herbicide labeled for aquatic use.
• Spot treat with herbicide. Avoid blanket treatments.
• Be patient when using herbicide. Wait the recommended time interval for the herbicide to work before continuing maintenance in the treated areas.
• Dispose of soils contaminated with weed species by spreading them out and stabilizing them on site, or by hauling them to a contained area.
• Cover plant material or contaminated soils during transport. Note: Transport of infested materials may require a permit from the county weed inspector.
• Monitor work areas for several years for new invasive species infestations.
Inspecting and Recording Your WorkAlways inspect your work sites and take time to record your findings. If you replaced a culvert or re-graded a ditch, check itafter several storms and again the following year.
If your work created a headcut or other problems, or you have an area that keeps eroding, consult an engineer for solutions tothe problem.
Cleaning up the SiteWhen a ditch project is finished, clean up the job site. It shows the public that you and your organization take pride in yourwork and the community. Leaving debris can also undermine ditch maintenance efforts and lead to other problems.
47

Silt fencing is often over-used and frequently left on thelandscape beyond its usefulness (Fig. 25). It should be installedalong the slope contours to act as a temporary sediment trapduring construction. e longer it is left in place, the moredifficult it is to remove. When silt fencing is left, it continues toimpede wildlife movement (on some construction sites, siltfencing is used as an intentional barrier for snakes, turtles, andmigratory animals) and it is ugly. If ditch maintenance is goingto be contracted out, consider withholding the final paymentuntil the silt fence has been removed. Remove silt fence oncepermanent vegetation is established and the site is stable.
Spoil piles, tree trimming debris or other unattractive remindersof ditch maintenance should be cleared. Keep the work areaneat with a new sign, a properly blanketed ditch, spoilsremoved, and/or riprap in its proper place.
48
Figure 25: Remove silt fence when vegetation is established
NON-ROUTINE MAINTENANCEUse the information provided to help identify when maintenance goes beyond routine and requires additional analysis,engineering and/or permits.
Perennially Flowing Ditches, Streams and WetlandsIf the ditch contains water that flows most of the time, it may be considered a stream and its maintenance is not covered in thisguide. Additional permitting and analysis are needed to maintain or alter these waterways/ditches. If the ditch flows throughlarger wet areas with plants such as cattails and willows, there are likely wetlands involved. e Wetland Conservation Actrequirements and other regulations may apply. Not all wetlands are obvious. For example, there are wooded areas with cedarand black ash that may be wetlands. For any wet areas or areas considered public waters, consult with others such as engineers,MNDNR, and your local Soil and Water Conservation District.
When to Involve an EngineerEach ditch segment and culvert is a part of a system; altering any part will affect other sections. Consult with an engineer if you want to:
• Create a new ditch
• Change the size of the culvert
• Change the size of the original ditch
• Change the shape of the original ditch
• Change the slope(s) for the culvert or the ditch
• Change culvert inverts
• Change the drainage pattern (lateral ditches, turn-outs)
• Work in ditches with perennial flow
49
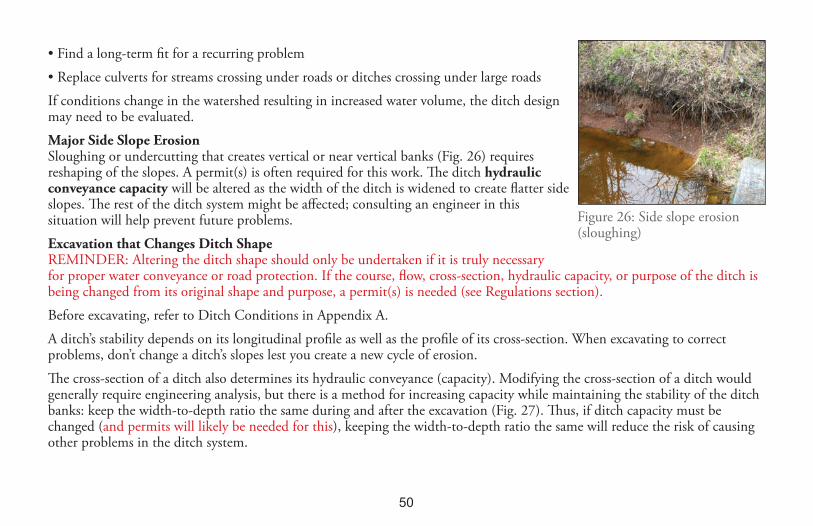
• Find a long-term fit for a recurring problem
• Replace culverts for streams crossing under roads or ditches crossing under large roads
If conditions change in the watershed resulting in increased water volume, the ditch designmay need to be evaluated.
Major Side Slope ErosionSloughing or undercutting that creates vertical or near vertical banks (Fig. 26) requiresreshaping of the slopes. A permit(s) is often required for this work. e ditch hydraulicconveyance capacity will be altered as the width of the ditch is widened to create flatter sideslopes. e rest of the ditch system might be affected; consulting an engineer in thissituation will help prevent future problems.
Excavation that Changes Ditch ShapeREMINDER: Altering the ditch shape should only be undertaken if it is truly necessaryfor proper water conveyance or road protection. If the course, flow, cross-section, hydraulic capacity, or purpose of the ditch isbeing changed from its original shape and purpose, a permit(s) is needed (see Regulations section).
Before excavating, refer to Ditch Conditions in Appendix A.
A ditch’s stability depends on its longitudinal profile as well as the profile of its cross-section. When excavating to correctproblems, don’t change a ditch’s slopes lest you create a new cycle of erosion.
e cross-section of a ditch also determines its hydraulic conveyance (capacity). Modifying the cross-section of a ditch wouldgenerally require engineering analysis, but there is a method for increasing capacity while maintaining the stability of the ditchbanks: keep the width-to-depth ratio the same during and after the excavation (Fig. 27). us, if ditch capacity must bechanged (and permits will likely be needed for this), keeping the width-to-depth ratio the same will reduce the risk of causingother problems in the ditch system.
50
Figure 26: Side slope erosion(sloughing)
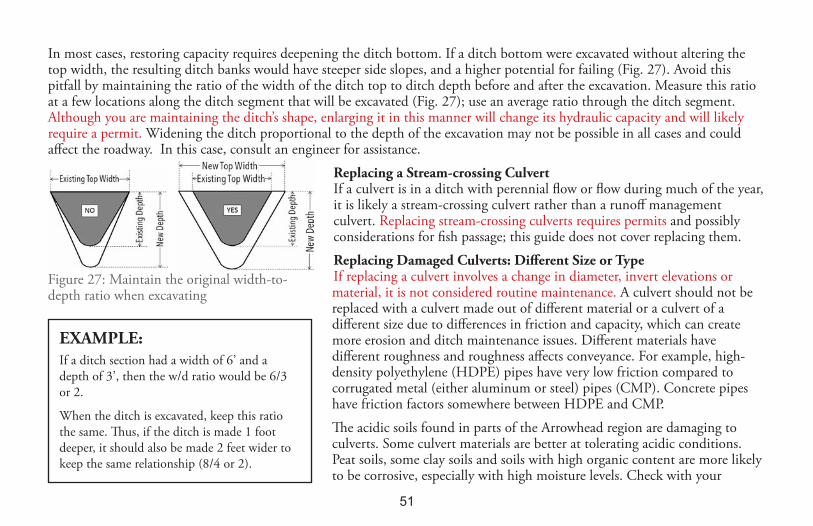
In most cases, restoring capacity requires deepening the ditch bottom. If a ditch bottom were excavated without altering thetop width, the resulting ditch banks would have steeper side slopes, and a higher potential for failing (Fig. 27). Avoid thispitfall by maintaining the ratio of the width of the ditch top to ditch depth before and after the excavation. Measure this ratioat a few locations along the ditch segment that will be excavated (Fig. 27); use an average ratio through the ditch segment.Although you are maintaining the ditch’s shape, enlarging it in this manner will change its hydraulic capacity and will likelyrequire a permit. Widening the ditch proportional to the depth of the excavation may not be possible in all cases and couldaffect the roadway. In this case, consult an engineer for assistance.
Replacing a Stream-crossing CulvertIf a culvert is in a ditch with perennial flow or flow during much of the year,it is likely a stream-crossing culvert rather than a runoff managementculvert. Replacing stream-crossing culverts requires permits and possiblyconsiderations for fish passage; this guide does not cover replacing them.
Replacing Damaged Culverts: Different Size or TypeIf replacing a culvert involves a change in diameter, invert elevations ormaterial, it is not considered routine maintenance. A culvert should not bereplaced with a culvert made out of different material or a culvert of adifferent size due to differences in friction and capacity, which can createmore erosion and ditch maintenance issues. Different materials havedifferent roughness and roughness affects conveyance. For example, high-density polyethylene (HDPE) pipes have very low friction compared tocorrugated metal (either aluminum or steel) pipes (CMP). Concrete pipeshave friction factors somewhere between HDPE and CMP.
e acidic soils found in parts of the Arrowhead region are damaging toculverts. Some culvert materials are better at tolerating acidic conditions.Peat soils, some clay soils and soils with high organic content are more likelyto be corrosive, especially with high moisture levels. Check with your
51
EXAMPLE:If a ditch section had a width of 6’ and adepth of 3’, then the w/d ratio would be 6/3or 2.
When the ditch is excavated, keep this ratiothe same. us, if the ditch is made 1 footdeeper, it should also be made 2 feet wider tokeep the same relationship (8/4 or 2).
Figure 27: Maintain the original width-to-depth ratio when excavating
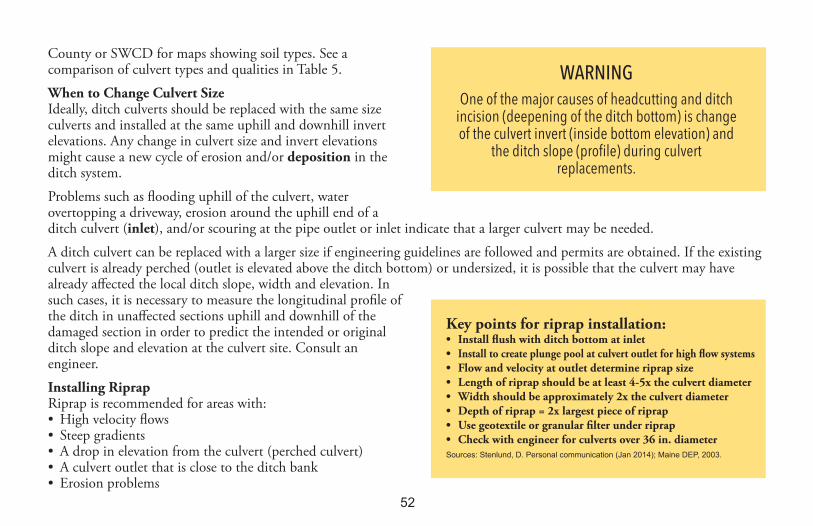
County or SWCD for maps showing soil types. See acomparison of culvert types and qualities in Table 5.
When to Change Culvert SizeIdeally, ditch culverts should be replaced with the same sizeculverts and installed at the same uphill and downhill invertelevations. Any change in culvert size and invert elevationsmight cause a new cycle of erosion and/or deposition in theditch system.
Problems such as flooding uphill of the culvert, waterovertopping a driveway, erosion around the uphill end of aditch culvert (inlet), and/or scouring at the pipe outlet or inlet indicate that a larger culvert may be needed.
A ditch culvert can be replaced with a larger size if engineering guidelines are followed and permits are obtained. If the existingculvert is already perched (outlet is elevated above the ditch bottom) or undersized, it is possible that the culvert may havealready affected the local ditch slope, width and elevation. Insuch cases, it is necessary to measure the longitudinal profile ofthe ditch in unaffected sections uphill and downhill of thedamaged section in order to predict the intended or originalditch slope and elevation at the culvert site. Consult anengineer.
Installing RiprapRiprap is recommended for areas with:• High velocity flows• Steep gradients• A drop in elevation from the culvert (perched culvert)• A culvert outlet that is close to the ditch bank • Erosion problems
52
WARNINGOne of the major causes of headcutting and ditch
incision (deepening of the ditch bottom) is changeof the culvert invert (inside bottom elevation) and
the ditch slope (profile) during culvertreplacements.
Key points for riprap installation:• Install flush with ditch bottom at inlet• Install to create plunge pool at culvert outlet for high flow systems• Flow and velocity at outlet determine riprap size• Length of riprap should be at least 4-5x the culvert diameter• Width should be approximately 2x the culvert diameter• Depth of riprap = 2x largest piece of riprap• Use geotextile or granular filter under riprap• Check with engineer for culverts over 36 in. diameterSources: Stenlund, D. Personal communication (Jan 2014); Maine DEP, 2003.
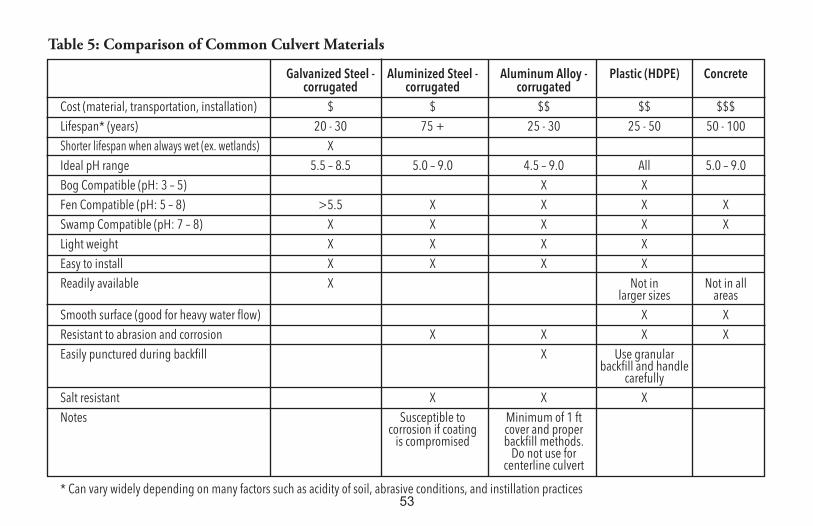
53
Galvanized Steel - Aluminized Steel - Aluminum Alloy - Plastic (HDPE) Concretecorrugated corrugated corrugated
Cost (material, transportation, installation) $ $ $$ $$ $$$
lifespan* (years) 20 - 30 75 + 25 - 30 25 - 50 50 - 100
shorter lifespan when always wet (ex. wetlands) X
ideal pH range 5.5 – 8.5 5.0 – 9.0 4.5 – 9.0 all 5.0 – 9.0
Bog Compatible (pH: 3 – 5) X X
Fen Compatible (pH: 5 – 8) >5.5 X X X X
swamp Compatible (pH: 7 – 8) X X X X X
light weight X X X X
easy to install X X X X
Readily available X Not in Not in all larger sizes areas
smooth surface (good for heavy water flow) X X
Resistant to abrasion and corrosion X X X X
easily punctured during backfill X Use granular backfill and handle
carefully
salt resistant X X X
Notes susceptible to Minimum of 1 ftcorrosion if coating cover and proper
is compromised backfill methods. Do not use for
centerline culvert
* Can vary widely depending on many factors such as acidity of soil, abrasive conditions, and instillation practices
Table 5: Comparison of Common Culvert Materials
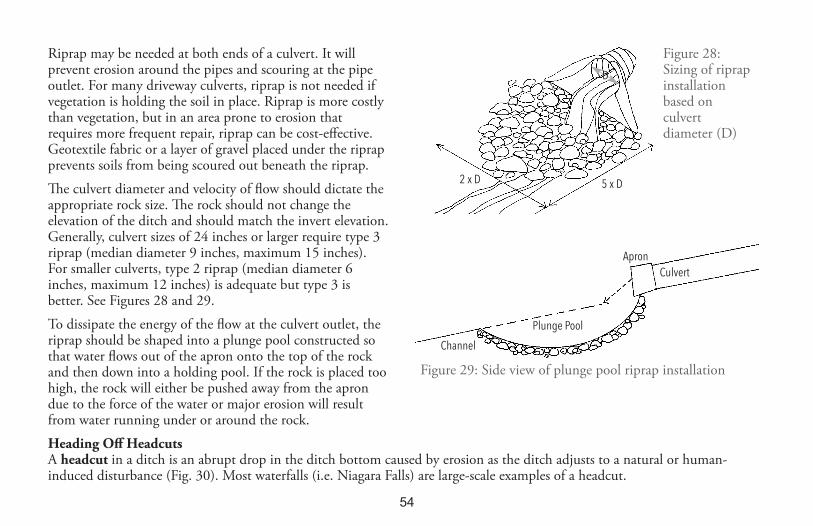
Riprap may be needed at both ends of a culvert. It willprevent erosion around the pipes and scouring at the pipeoutlet. For many driveway culverts, riprap is not needed ifvegetation is holding the soil in place. Riprap is more costlythan vegetation, but in an area prone to erosion thatrequires more frequent repair, riprap can be cost-effective.Geotextile fabric or a layer of gravel placed under the riprapprevents soils from being scoured out beneath the riprap.
e culvert diameter and velocity of flow should dictate theappropriate rock size. e rock should not change theelevation of the ditch and should match the invert elevation.Generally, culvert sizes of 24 inches or larger require type 3riprap (median diameter 9 inches, maximum 15 inches).For smaller culverts, type 2 riprap (median diameter 6inches, maximum 12 inches) is adequate but type 3 isbetter. See Figures 28 and 29.
To dissipate the energy of the flow at the culvert outlet, theriprap should be shaped into a plunge pool constructed sothat water flows out of the apron onto the top of the rockand then down into a holding pool. If the rock is placed toohigh, the rock will either be pushed away from the aprondue to the force of the water or major erosion will resultfrom water running under or around the rock.
Heading Off HeadcutsA headcut in a ditch is an abrupt drop in the ditch bottom caused by erosion as the ditch adjusts to a natural or human-induced disturbance (Fig. 30). Most waterfalls (i.e. Niagara Falls) are large-scale examples of a headcut.
Figure 28: Sizing of riprapinstallationbased onculvertdiameter (D)
Figure 29: Side view of plunge pool riprap installation
2 x D 5 x D
Channel
Plunge Pool
Culvert
apron
54
D
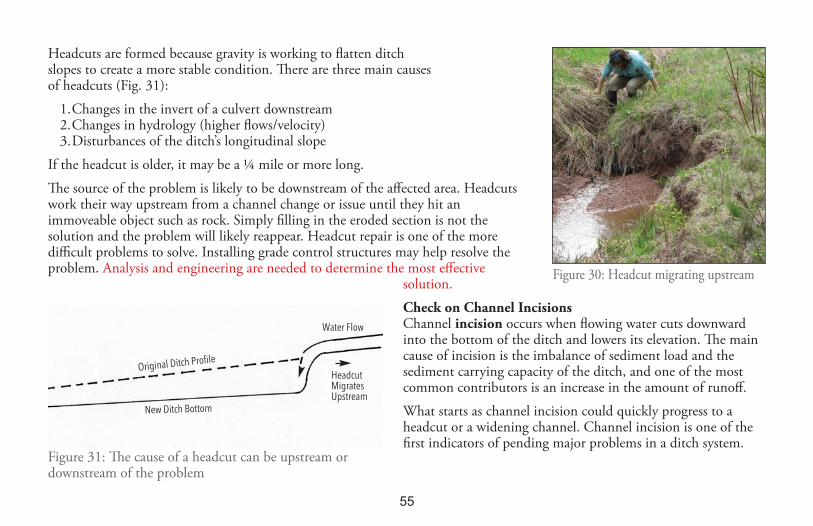
Headcuts are formed because gravity is working to flatten ditch slopes to create a more stable condition. ere are three main causes of headcuts (Fig. 31):
1.Changes in the invert of a culvert downstream2.Changes in hydrology (higher flows/velocity)3.Disturbances of the ditch’s longitudinal slope
If the headcut is older, it may be a ¼ mile or more long.
e source of the problem is likely to be downstream of the affected area. Headcutswork their way upstream from a channel change or issue until they hit animmoveable object such as rock. Simply filling in the eroded section is not thesolution and the problem will likely reappear. Headcut repair is one of the moredifficult problems to solve. Installing grade control structures may help resolve theproblem. Analysis and engineering are needed to determine the most effective
solution.
Check on Channel IncisionsChannel incision occurs when flowing water cuts downwardinto the bottom of the ditch and lowers its elevation. e maincause of incision is the imbalance of sediment load and thesediment carrying capacity of the ditch, and one of the mostcommon contributors is an increase in the amount of runoff.
What starts as channel incision could quickly progress to aheadcut or a widening channel. Channel incision is one of thefirst indicators of pending major problems in a ditch system.
Figure 30: Headcut migrating upstream
Figure 31: e cause of a headcut can be upstream ordownstream of the problem
55
Original Ditch Profile
New Ditch Bottom
water Flow
HeadcutMigratesUpstream
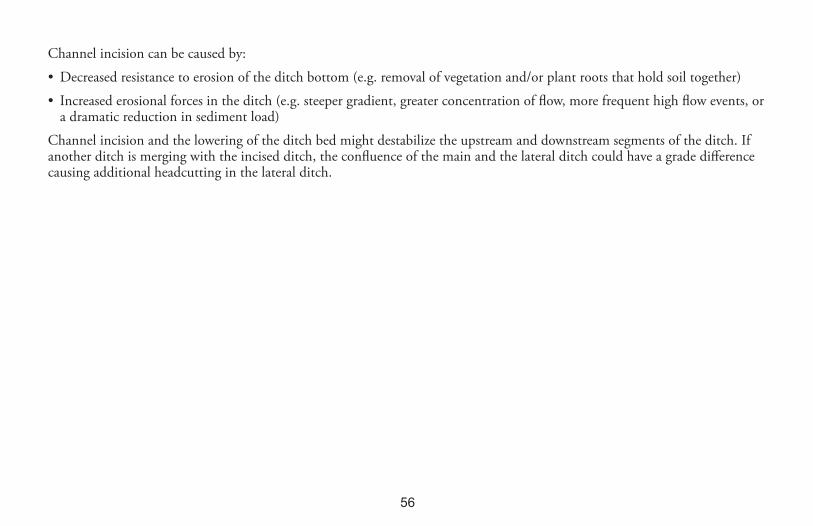
Channel incision can be caused by:
• Decreased resistance to erosion of the ditch bottom (e.g. removal of vegetation and/or plant roots that hold soil together)
• Increased erosional forces in the ditch (e.g. steeper gradient, greater concentration of flow, more frequent high flow events, ora dramatic reduction in sediment load)
Channel incision and the lowering of the ditch bed might destabilize the upstream and downstream segments of the ditch. Ifanother ditch is merging with the incised ditch, the confluence of the main and the lateral ditch could have a grade differencecausing additional headcutting in the lateral ditch.
56
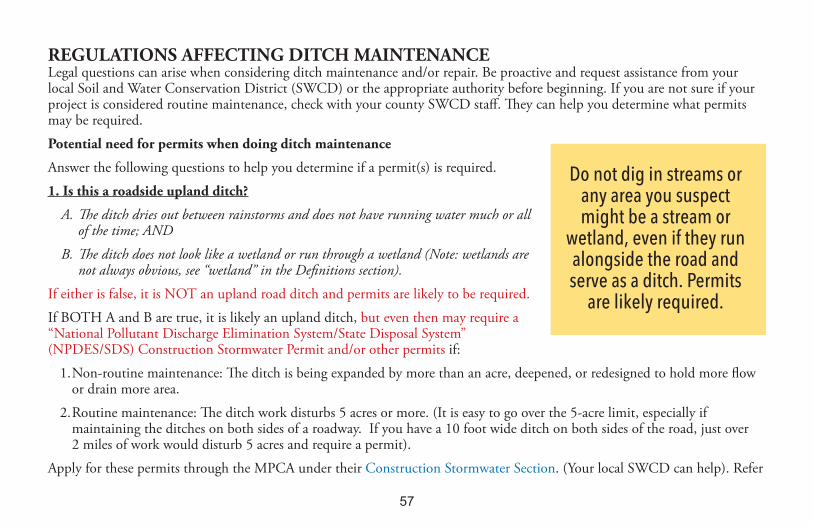
57
REGULATIONS AFFECTING DITCH MAINTENANCELegal questions can arise when considering ditch maintenance and/or repair. Be proactive and request assistance from yourlocal Soil and Water Conservation District (SWCD) or the appropriate authority before beginning. If you are not sure if yourproject is considered routine maintenance, check with your county SWCD staff. ey can help you determine what permitsmay be required.
Potential need for permits when doing ditch maintenance
Answer the following questions to help you determine if a permit(s) is required.
1. Is this a roadside upland ditch?
A. e ditch dries out between rainstorms and does not have running water much or allof the time; AND
B. e ditch does not look like a wetland or run through a wetland (Note: wetlands arenot always obvious, see “wetland” in the Definitions section).
If either is false, it is NOT an upland road ditch and permits are likely to be required.
If BOTH A and B are true, it is likely an upland ditch, but even then may require a“National Pollutant Discharge Elimination System/State Disposal System”(NPDES/SDS) Construction Stormwater Permit and/or other permits if:
1.Non-routine maintenance: e ditch is being expanded by more than an acre, deepened, or redesigned to hold more flow or drain more area.
2.Routine maintenance: e ditch work disturbs 5 acres or more. (It is easy to go over the 5-acre limit, especially if maintaining the ditches on both sides of a roadway. If you have a 10 foot wide ditch on both sides of the road, just over 2 miles of work would disturb 5 acres and require a permit).
Apply for these permits through the MPCA under their Construction Stormwater Section. (Your local SWCD can help). Refer
Do not dig in streams orany area you suspectmight be a stream or
wetland, even if they runalongside the road andserve as a ditch. Permits
are likely required.
58
to the MPCA’s Drainage Ditch Guidance document for more information on NPDES/SDS permit requirements.
A public or private ditch clean out project can qualify as routine maintenance and not require an NPDES/SDS ConstructionStormwater Permit if you determine that ALL of the following apply:
• e project will disturb less than five acres of land; AND
• Clean-out of a ditch will return the affected area to the original line and grade, hydraulic capacity, and original purpose of the ditch; AND
• Maintenance of the ditch is in compliance with state and federal wetland regulations, including the MN Wetland Conservation Act and Section 404 of the Clean Water Act, as applicable (NOTE: this will be true if it is an upland ditch); AND
• Appropriate best management practices (BMPs) are used to prevent erosion and control sediment and associated contaminants that would violate water quality standards downstream during maintenance and re-stabilization of the drainage ditch.
2. Does the ditch discharge to a special or impaired water?
ere are many special or impaired waters in the Arrowhead region. NPDES/SDS permits for construction sites with adischarge point that flows towards, and is within one mile (aerial radius measurement) of specially protected and impairedwaters, require additional controls, conditions or an individual permit. If your project requires an NPDES/SDS ConstructionStormwater Permit, use MPCA’s Special and Impaired Waters Search to identify whether the lake or stream to which yourditch drains is listed as a special or impaired water. e online mapping tool also lists the additional requirements, such asBMPs. If the ditch falls within the radius of one of these waters and the work requires an NPDES/SDS permit, contact yourlocal SWCD for additional permit instructions.
3. Does the ditch look like a wetland (e.g., cattails, etc.), run through a wetland, or often hold water even during dryperiods between rainstorms?
59
Working in “wet” ditches is much more likely to require a permit of some kind, although many maintenance activities qualifyfor exemptions. In addition to the NPDES permit listed above, work in a wet ditch may require a permit because of theWetland Conservation Act, Section 404 of the Clean Water Act, or because of DNR Protected Waters.
e Wetland Conservation Act (WCA) allows control of noxious weeds within wetlands if the control activity does not drain,fill or excavate the protected area. is leaves open the possibility of spraying to control invasive plants in a ditch associatedwith a wetland. A DNR aquatic vegetation management permit would be required if the ditch is designated (all or in part) as apublic water.
For assistance determining whether or not you need permits, contact your county SWCD. eir staff is familiar with federaland state requirements.
For all maintenance work, be aware of MN Rule 7050.0210 Subp. 2. General Standards for Waters of the State. Nuisanceconditions prohibited:
No sewage, industrial waste, or other wastes shall be discharged from either point or nonpoint sources into any waters of the state so as to cause any nuisance conditions, such as the presence of significant amounts of floating solids, scum, visible oil film, excessive suspended solids, material discoloration, obnoxious odors, gas ebullition, deleterious sludge deposits, undesirable slimes or fungus growths, aquatic habitat degradation, excessive growths of aquatic plants, or other offensive or harmful effects.
(Potential nuisance pollutant problem from ditch work: suspended solids are often clay particles in the water due to erosion;this can result from poorly-managed ditch maintenance projects.)
Other Permits and ConsiderationsBe aware that there are additional permits that may be needed if you are working in a non-upland ditch (stream or wetland).e MNDNR Public Waters Work Permit Program applies to those lakes, wetlands, and streams identified on DNR PublicWater Inventory (PWI) maps. Some streams and wetlands may not be obvious; they may be dry during the summer. Proposedprojects affecting the course, flow, or cross-section of these water bodies may require a Public Waters Work Permit from theDNR and permits from other agencies.

60
Consult the PWI map before doing any excavation or work that alters ditch dimensions to verify if the ditch is a Public Water.Contact your local SWCD or the MNDNR for assistance. Work in “Waters of the U.S.” (which includes some wetlands) mayrequire a permit from the U.S. Army Corps of Engineers if it is not routine maintenance.
Remember that ditch maintenance work is not allowed to impact private property unless proper easements are obtained. Roadditches and culverts are mostly located within easements. Care should be taken when mowing or doing other ditch work whenthe width of the right-of-way is in question. e roadway should not be assumed to have a 33-foot right-of-way from thecenterline. e right-of-way is either defined by an easement or a road order, or it is the width that has been maintained for thepast six consecutive years. Whatever the legal situation, it is still important to communicate with property owners about thework that is being planned. Water should not be diverted onto private property from either the road itself or the ditch.
If the ditch maintenance qualifies for exemptions, take the time to document how you determined this in case the decisions arequestioned. Even if a permit is not needed, you must and should follow BMPs to protect water resources.
MAINTENANCE CHECKLISTSe following checklists will help you prepare for maintenance activities and/or remind you of steps that you might haveoverlooked. Add to these lists and customize them to your operation.
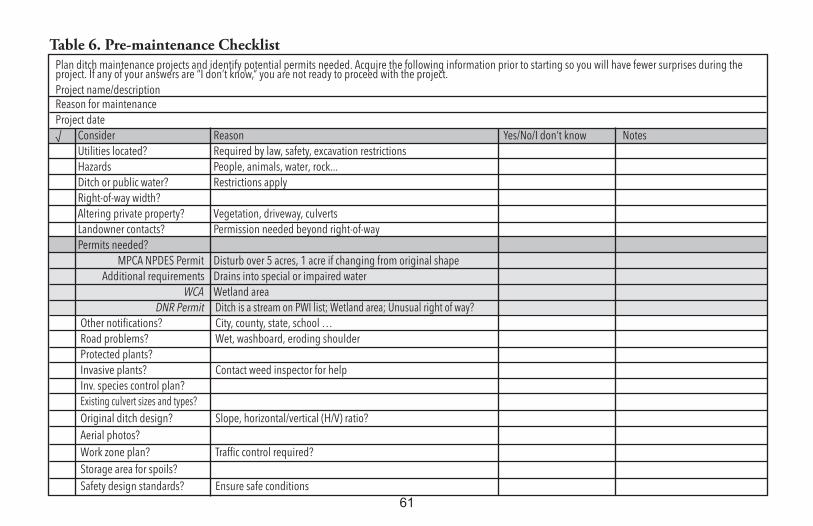
Table 6. Pre-maintenance Checklist
61
Plan ditch maintenance projects and identify potential permits needed. acquire the following information prior to starting so you will have fewer surprises during theproject. if any of your answers are “i don’t know,” you are not ready to proceed with the project.
Project name/descriptionReason for maintenance
Project date
√ Consider Reason yes/No/i don’t know Notes
Utilities located? Required by law, safety, excavation restrictions
Hazards People, animals, water, rock...
Ditch or public water? Restrictions apply
Right-of-way width?
altering private property? vegetation, driveway, culverts
landowner contacts? Permission needed beyond right-of-way
Permits needed?
MPCa NPDes Permit Disturb over 5 acres, 1 acre if changing from original shape
additional requirements Drains into special or impaired water
WCA wetland area
DNR Permit Ditch is a stream on Pwi list; wetland area; Unusual right of way?
Other notifications? City, county, state, school …
Road problems? wet, washboard, eroding shoulder
Protected plants?
invasive plants? Contact weed inspector for help
inv. species control plan?
existing culvert sizes and types?
Original ditch design? slope, horizontal/vertical (H/v) ratio?
aerial photos?
work zone plan? Traffic control required?
storage area for spoils?
safety design standards? ensure safe conditions
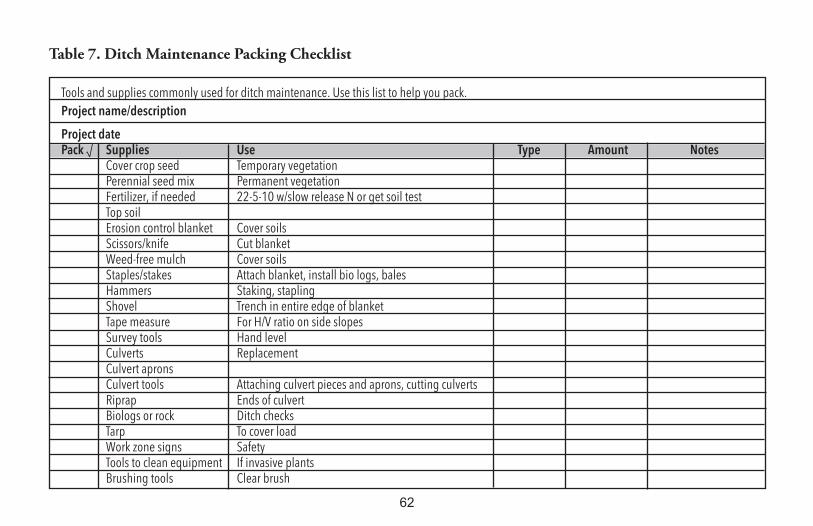
62
Tools and supplies commonly used for ditch maintenance. Use this list to help you pack.
Project name/description
Project datePack √ Supplies Use Type Amount Notes
Cover crop seed Temporary vegetation Perennial seed mix Permanent vegetation Fertilizer, if needed 22-5-10 w/slow release N or get soil testTop soilerosion control blanket Cover soilsscissors/knife Cut blanketweed-free mulch Cover soilsstaples/stakes attach blanket, install bio logs, balesHammers staking, staplingshovel Trench in entire edge of blanketTape measure For H/v ratio on side slopessurvey tools Hand levelCulverts ReplacementCulvert apronsCulvert tools attaching culvert pieces and aprons, cutting culvertsRiprap ends of culvertBiologs or rock Ditch checksTarp To cover loadwork zone signs safetyTools to clean equipment if invasive plants Brushing tools Clear brush
Table 7. Ditch Maintenance Packing Checklist

63
Use this checklist prior to leaving the excavation site.
Project name/description
Project date
√ activity Reason Notes
Removed spoils Prevent from entering ditch
Tarped load Prevent spills
Ditch bottom and slopes are rounded No vertical slopes or sharp edges
Front slope flatter than back slope safety
same H/v ratio as original ditch design same carrying capacity of water
Culvert inverts the same as pre-maintenance Reduce chance of head cut
Riprap at culvert ends erosion control
excavated to original depth will match with culvert inverts
slopes graded smooth, not compacted Good seedbed preparation
seeded, and seed has good soil contact establish vegetation for erosion control
Ditch blanketed or mulched erosion control
Blanket trenched at top of slope and stapled tightly water flows over top and doesn’t erode soils under blanket
Blanket shingled in direction of water flow Prevent water from flowing under blanket and eroding soils
No objects at toe of slope Driving hazard
Reported problems if needed
Cleaned equipment if invasive plant concern
Picked up tools/supplies
Prepare reminder note to remove silt fence if used Proper cleanup, remove potential hazard to wildlife
Table 8. Excavation Checklist for Ditch Maintenance
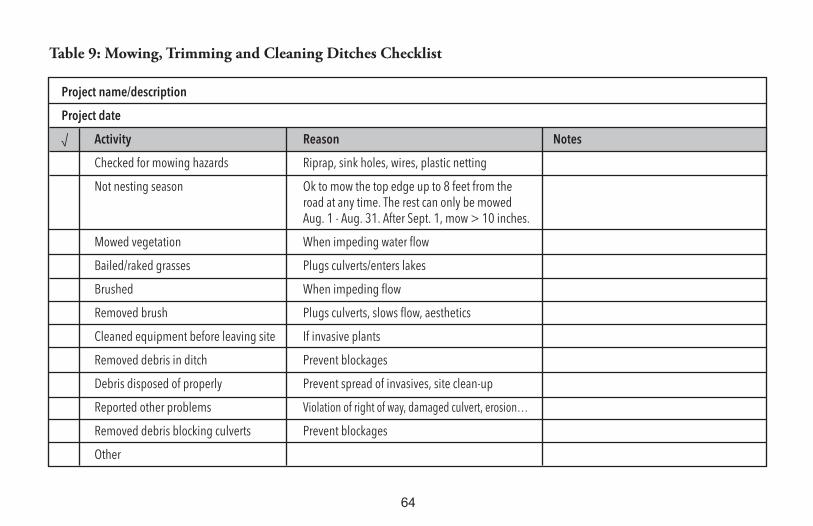
64
Project name/description
Project date
√ Activity Reason Notes
Checked for mowing hazards Riprap, sink holes, wires, plastic netting
Not nesting season Ok to mow the top edge up to 8 feet from the road at any time. The rest can only be mowed aug. 1 - aug. 31. after sept. 1, mow > 10 inches.
Mowed vegetation when impeding water flow
Bailed/raked grasses Plugs culverts/enters lakes
Brushed when impeding flow
Removed brush Plugs culverts, slows flow, aesthetics
Cleaned equipment before leaving site if invasive plants
Removed debris in ditch Prevent blockages
Debris disposed of properly Prevent spread of invasives, site clean-up
Reported other problems violation of right of way, damaged culvert, erosion…
Removed debris blocking culverts Prevent blockages
Other
Table 9: Mowing, Trimming and Cleaning Ditches Checklist

65
CONTACTSPermits and Agencies Aitkin County Highway Dept. ................................... (218) 927-3741
Carlton County Highway Dept. ................................. (218) 384-9150
Cook County Highway Dept. ..................................... (218) 387-3014
Itasca County Highway Dept. ..................................... (218) 327-2853
Koochiching County Highway Dept. ......................... (218) 283-1186
Lake County Highway Dept. ...................................... (218) 834-8380
St. Louis County Public Works Dept. ......................... (218) 625-3830
Board of Water & Soil Resources (BWSR) Duluth Office .... (218) 723-4752
Minnesota Department of Natural Resources (MNDNR) area hydrologists
Minnesota Department of Transportation (MnDOT) (651) 296-3000
Minnesota Pollution Control Agency (MPCA) Duluth Office (218) 723-4460Soil and Water Conservation District (SWCD) offices in the Arrowhead:
• Aitkin County SWCD ....................................... (218) 927-6565
• Carlton County SWCD ..................................... (218) 384-3891
• Cook County SWCD ......................................... (218) 387-3647
• Itasca County SWCD ......................................... (218) 326-0017
• Koochiching County SWCD ............................. (218) 283-1174
• Lake County SWCD .......................................... (218) 834-8372
• North St. Louis County SWCD ......................... (218) 749-2000
• South St. Louis County SWCD ......................... (218) 723-4867
Minnesota Erosion Control Association ...................... (320) 685-5444
Erosion Control Technology Council .......................... (651) 554-1895
Erosion Control and Seeding SuppliesASDCO ...................................................................... (218) 628-10274631 Mike Colalillo Drive, Duluth, MN 55807
American Peat Technology, LLC ................................. (218) 927-188836203 350th Ave, Aitkin, MN 56431
Brock White Company ............................................... (218) 628-22314231 W 1st St, Duluth, MN 55807
Prairie Restorations, Inc. (Boreal Natives) ................... (218) 729-70013943 Munger Shaw Road, Cloquet, MN 55720-9254
RLP Services, LLC ...................................................... (218) 262-17172115 E 31st Street, Hibbing, MN 55746
Sunshine Gardens Nursery & Landscaping Inc. .......... (218) 947-31541286 Shadywood Shores Drive, Pine River, MN 56474
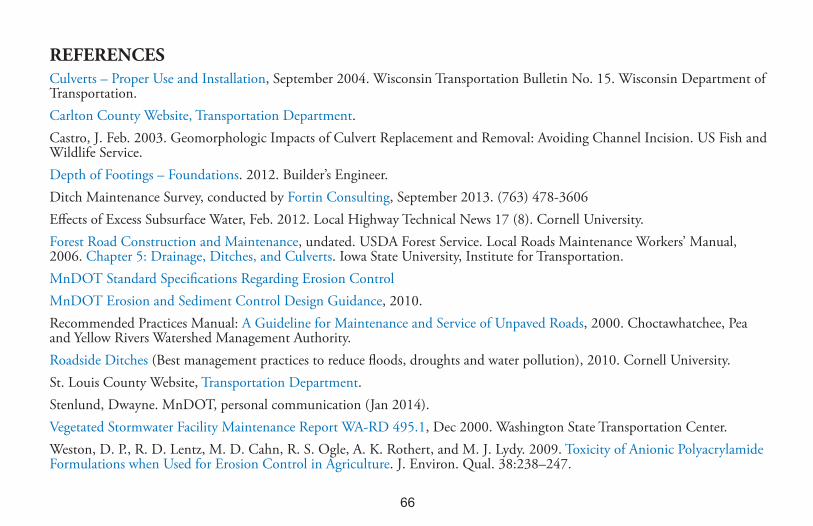
REFERENCESCulverts – Proper Use and Installation, September 2004. Wisconsin Transportation Bulletin No. 15. Wisconsin Department ofTransportation. Carlton County Website, Transportation Department. Castro, J. Feb. 2003. Geomorphologic Impacts of Culvert Replacement and Removal: Avoiding Channel Incision. US Fish andWildlife Service.Depth of Footings – Foundations. 2012. Builder’s Engineer. Ditch Maintenance Survey, conducted by Fortin Consulting, September 2013. (763) 478-3606Effects of Excess Subsurface Water, Feb. 2012. Local Highway Technical News 17 (8). Cornell University. Forest Road Construction and Maintenance, undated. USDA Forest Service. Local Roads Maintenance Workers’ Manual,2006. Chapter 5: Drainage, Ditches, and Culverts. Iowa State University, Institute for Transportation. MnDOT Standard Specifications Regarding Erosion ControlMnDOT Erosion and Sediment Control Design Guidance, 2010. Recommended Practices Manual: A Guideline for Maintenance and Service of Unpaved Roads, 2000. Choctawhatchee, Peaand Yellow Rivers Watershed Management Authority. Roadside Ditches (Best management practices to reduce floods, droughts and water pollution), 2010. Cornell University. St. Louis County Website, Transportation Department. Stenlund, Dwayne. MnDOT, personal communication (Jan 2014).Vegetated Stormwater Facility Maintenance Report WA-RD 495.1, Dec 2000. Washington State Transportation Center. Weston, D. P., R. D. Lentz, M. D. Cahn, R. S. Ogle, A. K. Rothert, and M. J. Lydy. 2009. Toxicity of Anionic PolyacrylamideFormulations when Used for Erosion Control in Agriculture. J. Environ. Qual. 38:238–247.
66
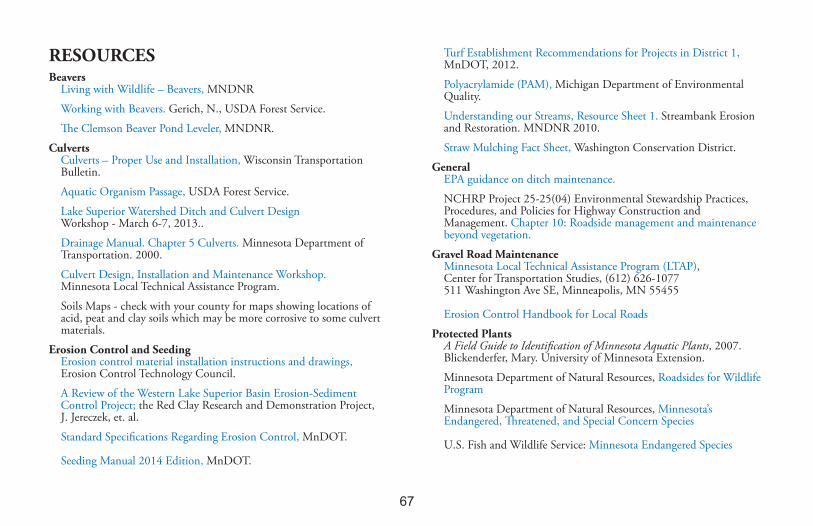
67
RESOURCESBeavers
Living with Wildlife – Beavers, MNDNR
Working with Beavers. Gerich, N., USDA Forest Service.
e Clemson Beaver Pond Leveler, MNDNR.
CulvertsCulverts – Proper Use and Installation, Wisconsin Transportation Bulletin.
Aquatic Organism Passage, USDA Forest Service.
Lake Superior Watershed Ditch and Culvert DesignWorkshop - March 6-7, 2013..
Drainage Manual. Chapter 5 Culverts. Minnesota Department of Transportation. 2000.
Culvert Design, Installation and Maintenance Workshop.Minnesota Local Technical Assistance Program.
Soils Maps - check with your county for maps showing locations of acid, peat and clay soils which may be more corrosive to some culvert materials.
Erosion Control and SeedingErosion control material installation instructions and drawings,Erosion Control Technology Council.
A Review of the Western Lake Superior Basin Erosion-Sediment Control Project; the Red Clay Research and Demonstration Project, J. Jereczek, et. al.
Standard Specifications Regarding Erosion Control, MnDOT.
Seeding Manual 2014 Edition, MnDOT.
Turf Establishment Recommendations for Projects in District 1,MnDOT, 2012.
Polyacrylamide (PAM), Michigan Department of Environmental Quality.
Understanding our Streams, Resource Sheet 1. Streambank Erosion and Restoration. MNDNR 2010.
Straw Mulching Fact Sheet, Washington Conservation District.
GeneralEPA guidance on ditch maintenance.
NCHRP Project 25-25(04) Environmental Stewardship Practices, Procedures, and Policies for Highway Construction and Management. Chapter 10: Roadside management and maintenance beyond vegetation.
Gravel Road MaintenanceMinnesota Local Technical Assistance Program (LTAP),Center for Transportation Studies, (612) 626-1077 511 Washington Ave SE, Minneapolis, MN 55455
Erosion Control Handbook for Local Roads
Protected PlantsA Field Guide to Identification of Minnesota Aquatic Plants, 2007. Blickenderfer, Mary. University of Minnesota Extension.
Minnesota Department of Natural Resources, Roadsides for Wildlife Program
Minnesota Department of Natural Resources, Minnesota’s Endangered, reatened, and Special Concern Species
U.S. Fish and Wildlife Service: Minnesota Endangered Species

68
Invasive Plants and Noxious WeedsSee Appendix C
WaterMinnesota Pollution Control Agency (MPCA) Special and Impaired Waters Search.
MPCA NPDES Construction Stormwater Permit Program.
Drainage Ditch Projects: Guidance Regarding NPDES/SDS Construction. Stormwater Permit Requirements. February 2009.
Public Waters Inventory, MNDNR.
Lake Superior Streams. Natural Resources Research Institute, UMD.

69
DEFINITIONSe Arrowhead: A region in northeastern Minnesota consisting of Carlton, Cook, Lake and Saint Louis counties (sometimesAitkin, Itasca and Koochiching counties are included). e name comes from the shape formed by the counties. Depending onhow it is defined, the Arrowhead ranges from 10,635 square miles to 18,222 square miles.
Back slope (outslope): Slope from the bottom of the ditch to the interior of the property, away from the road.
Channel: e bed or deeper portion of a waterway, such as a ditch.
Channel freeboard: e higher portions of a ditch that are not normally subjected to flowing water.
Check dam: A small dam, temporary or permanent, built across a ditch. It slows the speed of the water, reducing erosion andallowing sediment to settle behind the dam.
Clemson levelers: Culvert extension device used to deter beaver activity by making it difficult for beavers to detect currentsflowing through a culvert.
Culvert: A pipe crossing under a road or embankment.
Deposition: e settling out of sediment and material carried in water.
Ditch: A manmade trough in the ground for carrying stormwater runoff away from roads, fields or constructed facilities.Typically they run adjacent to a road or parking lot and are not channelized streams.
Erosion: e process of dislodging soil by action of water or wind.
Erosion control: Prevention of soil loss, principally from water action. ere are a variety of methods used to control erosion.
Erosion control blankets: Products used to prevent the movement of soil off the site. Erosion control blankets are eitherbiodegradable (straw, coconut, wood fiber, jute) or synthetic (TRMs).
Fine sediment: Sand, silt, and clay particles. ese are the particles that build up in ditches. Clay particles create turbidity inwater.
70
Flocculant: An additive that causes soils to clump. ey are useful to keep soil from moving off a site, or to create heavierclumps that settle out of water.
Front slope (inslope or foreslope): Slope of the ditch angling toward the road.
GPS: Global Positioning System. GPS receivers use satellite information to determine latitude and longitude.
Headcut: An abrupt drop in the elevation of the channel bottom.
Hydraulic capacity or conveyance: Water carrying capacity of a channel.
Hydroseeding: Also known as hydromulching; a planting process which utilizes a slurry of seed and mulch to cover an area.
Impaired waters: Streams or lakes not meeting state or federal pollutant standards and officially designated as impaired.
Incision: Downward erosion (deepening) of the channel bed.
Infiltrate: e movement of water downward into the soil toward groundwater.
Inlet: Where water enters a culvert, ditch or waterway.
Invasive plant: Aggressive undesirable plant. (Often not a native plant).
Invert: e elevation of the inside bottom of the culvert.
Longitudinal profile: Elevations along the length of the ditch.
Normal high water level: e high water levels that occur in a typical spring.
Outlet: Where water leaves a culvert, ditch or other waterway.
Phosphorus: A nutrient found in plants, leaves, grass clippings, many fertilizers and soils; when added to a lake or wetland itwill promote algae and plant growth.
Public Water Inventory: A map and list of Minnesota waters that are considered public waters.
Riprap: Rock used for stabilizing soils.
71
Runoff: e water that flows off of a site after a rainfall or snowmelt.
Sediment: Mineral material that is in suspension, is being transported, or has been moved from its site of origin.
Sediment control: A practice or device designed to trap eroded soil so that it does not wash off and cause pollution of waterbodies downstream.
Sloughing: Cutting away of the banks.
Spoils: Material excavated from ditches.
Stream: A channel that is usually flowing but can be dry. It may or may not be in its natural course, and can be parallel orperpendicular to the road.
Subgrade: e native material underneath a constructed road.
Tackifier: A substance added to increase stickiness.
Toe: Location at the bottom of a slope where the slope changes from vertical to horizontal.
TRM: Turf Reinforcement Mat. Permanent erosion control blankets made of non-degradable synthetic fibers.
Turbidity: Cloudiness or muddiness of the water mostly due to suspended sediment (often clay) or organic matter.
Vegetation: Living plants of any type, rooted in the soil.
Water conveyance capacity: See Hydraulic capacity.
Waters of the State: Surface or underground waters, except surface waters that are not confined but are spread and diffusedover the land. Waters of the state includes boundary and inland waters.
Wetland: Areas that are inundated or saturated by surface or groundwater at a frequency and duration sufficient to supportvegetation typically adapted for life in saturated soil. Wetlands do not always have open water and may contain primarilywoody vegetation (such as willows, black ash, and cedar). ey may dry out on occasion. Wet or dry, the wetland plants arevery good indicators of a wetland.
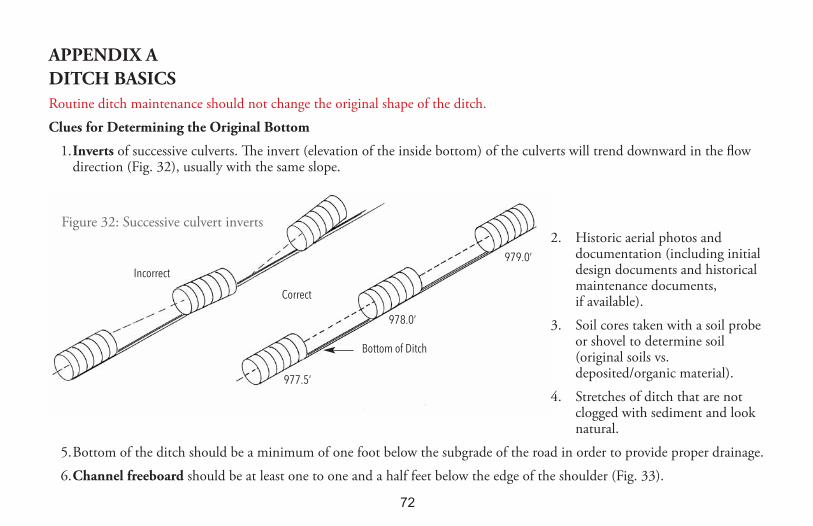
72
APPENDIX ADITCH BASICSRoutine ditch maintenance should not change the original shape of the ditch.
Clues for Determining the Original Bottom
1.Inverts of successive culverts. e invert (elevation of the inside bottom) of the culverts will trend downward in the flow direction (Fig. 32), usually with the same slope.
2. Historic aerial photos and documentation (including initial design documents and historical maintenance documents, if available).
3. Soil cores taken with a soil probe or shovel to determine soil (original soils vs. deposited/organic material).
4. Stretches of ditch that are not clogged with sediment and look natural.
5.Bottom of the ditch should be a minimum of one foot below the subgrade of the road in order to provide proper drainage.
6.Channel freeboard should be at least one to one and a half feet below the edge of the shoulder (Fig. 33).
Figure 32: Successive culvert inverts
Bottom of Ditch
977.5’
978.0’
979.0’
incorrect
Correct
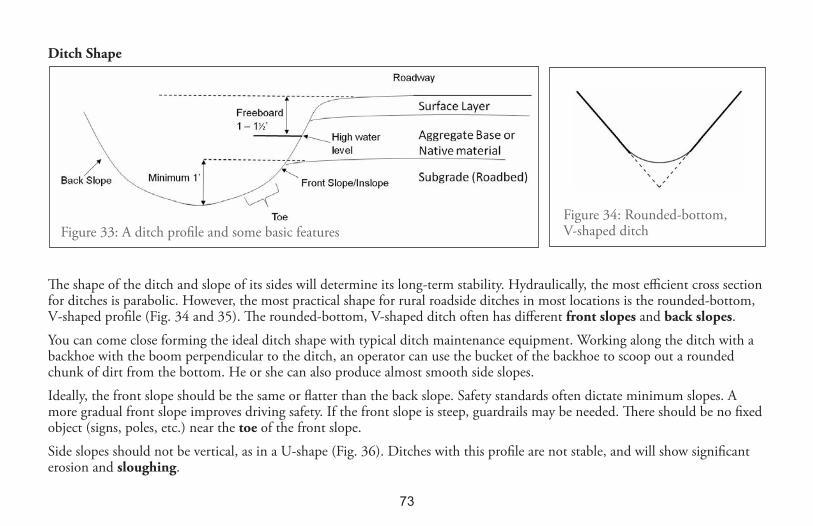
73
Ditch Shape
e shape of the ditch and slope of its sides will determine its long-term stability. Hydraulically, the most efficient cross sectionfor ditches is parabolic. However, the most practical shape for rural roadside ditches in most locations is the rounded‐bottom,V‐shaped profile (Fig. 34 and 35). e rounded-bottom, V-shaped ditch often has different front slopes and back slopes.
You can come close forming the ideal ditch shape with typical ditch maintenance equipment. Working along the ditch with abackhoe with the boom perpendicular to the ditch, an operator can use the bucket of the backhoe to scoop out a roundedchunk of dirt from the bottom. He or she can also produce almost smooth side slopes.
Ideally, the front slope should be the same or flatter than the back slope. Safety standards often dictate minimum slopes. Amore gradual front slope improves driving safety. If the front slope is steep, guardrails may be needed. ere should be no fixedobject (signs, poles, etc.) near the toe of the front slope.
Side slopes should not be vertical, as in a U-shape (Fig. 36). Ditches with this profile are not stable, and will show significanterosion and sloughing.
Figure 33: A ditch profile and some basic featuresFigure 34: Rounded-bottom,V-shaped ditch
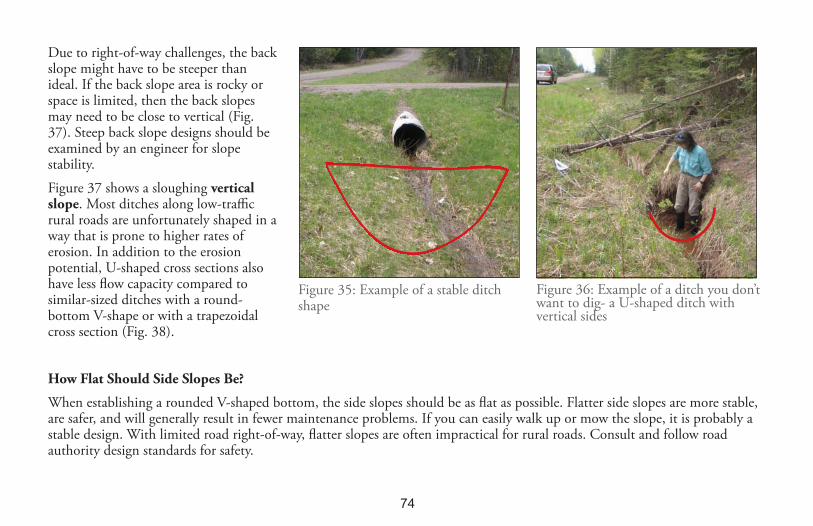
74
Due to right-of-way challenges, the backslope might have to be steeper thanideal. If the back slope area is rocky orspace is limited, then the back slopesmay need to be close to vertical (Fig.37). Steep back slope designs should beexamined by an engineer for slopestability.
Figure 37 shows a sloughing verticalslope. Most ditches along low-trafficrural roads are unfortunately shaped in away that is prone to higher rates oferosion. In addition to the erosionpotential, U-shaped cross sections alsohave less flow capacity compared tosimilar-sized ditches with a round-bottom V-shape or with a trapezoidalcross section (Fig. 38).
How Flat Should Side Slopes Be?
When establishing a rounded V-shaped bottom, the side slopes should be as flat as possible. Flatter side slopes are more stable,are safer, and will generally result in fewer maintenance problems. If you can easily walk up or mow the slope, it is probably astable design. With limited road right-of-way, flatter slopes are often impractical for rural roads. Consult and follow roadauthority design standards for safety.
Figure 35: Example of a stable ditchshape
Figure 36: Example of a ditch you don’twant to dig- a U-shaped ditch withvertical sides
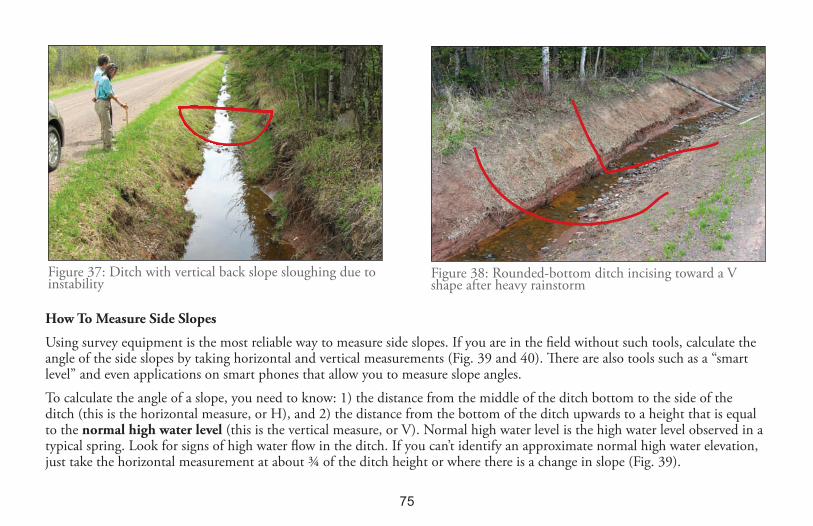
75
How To Measure Side Slopes
Using survey equipment is the most reliable way to measure side slopes. If you are in the field without such tools, calculate theangle of the side slopes by taking horizontal and vertical measurements (Fig. 39 and 40). ere are also tools such as a “smartlevel” and even applications on smart phones that allow you to measure slope angles.
To calculate the angle of a slope, you need to know: 1) the distance from the middle of the ditch bottom to the side of theditch (this is the horizontal measure, or H), and 2) the distance from the bottom of the ditch upwards to a height that is equalto the normal high water level (this is the vertical measure, or V). Normal high water level is the high water level observed in atypical spring. Look for signs of high water flow in the ditch. If you can’t identify an approximate normal high water elevation,just take the horizontal measurement at about ¾ of the ditch height or where there is a change in slope (Fig. 39).
Figure 37: Ditch with vertical back slope sloughing due toinstability
Figure 38: Rounded-bottom ditch incising toward a Vshape after heavy rainstorm
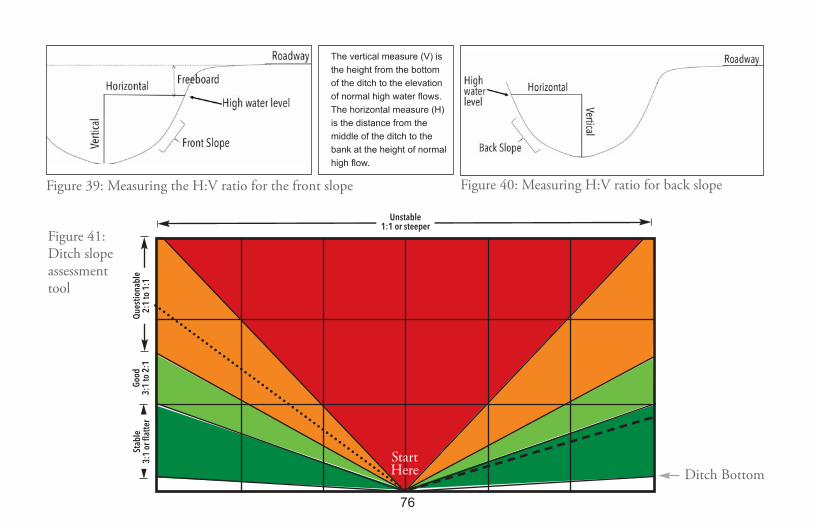
76
Figure 39: Measuring the H:V ratio for the front slope Figure 40: Measuring H:V ratio for back slope
The vertical measure (V) is
the height from the bottom
of the ditch to the elevation
of normal high water flows.
The horizontal measure (H)
is the distance from the
middle of the ditch to the
bank at the height of normal
high flow.
Goo
d3:
1 to
2:1
Que
stio
nabl
e2:
1 to
1:1
Stab
le3:
1 or
flat
ter
Unstable1:1 or steeper
Ditch Bottom
Figure 41:Ditch slopeassessmenttool
Start Here

77
Looking at the H:V ratio, is the slope stable when compared to the Ditch SlopeAssessment Tool (Fig. 41)? e Ditch Slope Assessment Tool will help youinterpret the stability of a ditch slope relative to its horizontal (H) and vertical(V) measurements. Measurement units can be whatever you want them to be:feet, yards, an arm’s length, etc.
Convert your H and V measurements to the simplest ratio possible; forexample, 45:15 reduces to 3:1. Start at the bottom center of the SlopeAssessment Tool (Fig. 41), move across and count out the number of squaresthat represent the horizontal units. en move up the number of squaresrepresenting the vertical units. When you connect your starting point bottomcenter to the top corner of the number of squares that reflect the Vmeasurement, you will produce an angled line showing that ditch’s side slope.
To evaluate a ditch, look at both slopes and perhaps measure them at differentpoints if their shape varies greatly over the ditch’s course. In the ditch in Figure42, the front slope (dashed line) turned out to be flatter than 3:1, which isstable.
In this example, the horizontal (width) measurement was 45 inches and thevertical (depth) was 15 inches. is provides a 45:15 ratio, which simplifies to3:1 (black dashed line in Figure 41).
In this same ditch, the back slope (dashed line on Figure 43) was found to havea H:V ratio of 1.5:1 (black dotted line in Figure 41). e horizontal distancewas 42 inches and the vertical was 30 inches. Such a slope falls into thequestionable range of stability and is likely to develop erosion problems. Youcan see in the photo that small erosion channels have already formed.
Figure 42: Ditch front slope example
Figure 43: Ditch back slope example
horizontalvertical
horizontal
vertical
78
By measuring the slopes and comparing them to the stability ranges on the Ditch Slope Assessment Tool, you can predict thestability of the ditch system. To increase the chances of successfully restoring the ditch to a stable profile, work to find ways toestablish flatter side slopes. Flattening the side slopes without changing the original bottom elevation for maintenance purposesis generally allowable through various exemptions.

79
Use/Slope Material Service Life Bio-degradability* Wildlife Friendly* Price* Specifications*
Flat, mowed areas (less than 3:1) wood Cellulose 6-8 wks ◊◊◊◊◊ ◊◊◊◊◊ $ 1s, NT, RD
Flat, mowed areas (less than 3:1) wood Fiber 6-8 wks ◊◊◊◊◊ ◊◊◊◊◊ $ RD, 0s
Flat areas (less than 3:1), shoulder straw or wood Fiber 1-3 mo ◊◊◊◊◊ ◊◊◊◊◊ $$ RD, 1sdrain outlets, roadway shoulders
side slopes from 3:1 to 2:1 and straw or wood Fiber 6-9 mo ◊◊◊ ◊◊◊◊ $$ 1sless than 50 ft long; ditch bottoms with up to 2% grade
side slopes from 3:1 to 2:1 and straw or wood Fiber 6-9 mo ◊◊◊ ◊◊◊◊ $$ 2sgreater than 50 ft long; ditch bottoms with up to 3% grade
side slopes 2:1 & steeper; ditch 70% straw-30% 24-36 mo ◊◊ ◊◊◊ $$$ straw-Coco – 2sbottoms with up to 4% grade Coconut or wood – Hv, 2s
wood Fiber
Ditch bottoms with up to 5% grade 70% Coconut- 24-36 mo ◊◊ ◊◊ $$$$$ 2s30% straw
Ditch bottoms with up to 6% grade 70% straw-30% > 36 mo ◊ ◊ $$$ 3sCoconut or wood Fiber
Ditch bottoms with up to 7% grade Coconut or wood Fiber > 36 mo ◊ ◊ $$$$ 3s
* Biodegradability: ◊ = slow; Wildlife Friendly: ◊ = less Friendly; Price: $ = least expensive Specification codes: 0S – No Net, stitch Only; 1S – 1 side Netting;2S – 2 side Netting; 3S – More than 2 nets (3-D Matrix) RD – Rapidly Degradable net & stitch; HV – High velocity; NT – No thread/stitching
Relative prices based on on-line review of product costs and do not include installation costs. Using the wrong product, or applying it incorrectly, may result in failure andrequire re-application. source: http://www.dot.state.mn.us/environment/erosion/specs.html
APPENDIX BAPPLICATION AND CHARACTERISTICS OF EROSION CONTROL BLANKETS
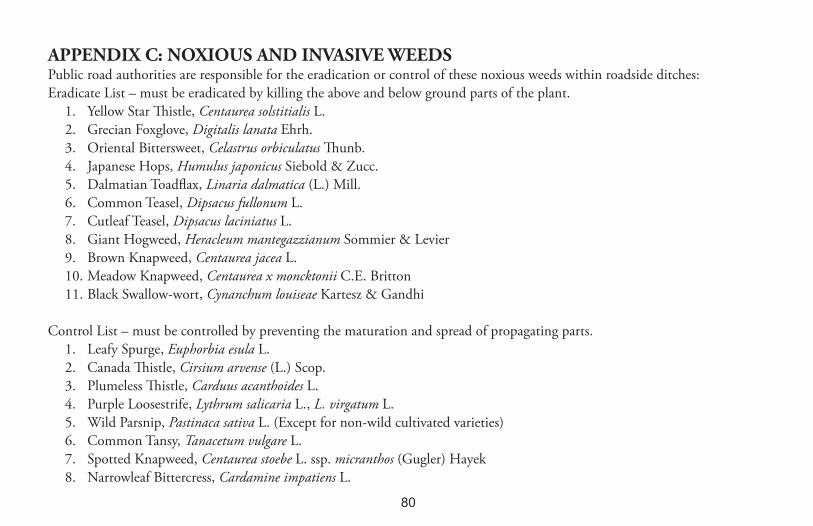
80
APPENDIX C: NOXIOUS AND INVASIVE WEEDSPublic road authorities are responsible for the eradication or control of these noxious weeds within roadside ditches:Eradicate List – must be eradicated by killing the above and below ground parts of the plant.
1. Yellow Star istle, Centaurea solstitialis L. 2. Grecian Foxglove, Digitalis lanata Ehrh. 3. Oriental Bittersweet, Celastrus orbiculatus unb.4. Japanese Hops, Humulus japonicus Siebold & Zucc. 5. Dalmatian Toadflax, Linaria dalmatica (L.) Mill. 6. Common Teasel, Dipsacus fullonum L. 7. Cutleaf Teasel, Dipsacus laciniatus L.8. Giant Hogweed, Heracleum mantegazzianum Sommier & Levier9. Brown Knapweed, Centaurea jacea L. 10. Meadow Knapweed, Centaurea x moncktonii C.E. Britton11. Black Swallow-wort, Cynanchum louiseae Kartesz & Gandhi
Control List – must be controlled by preventing the maturation and spread of propagating parts. 1. Leafy Spurge, Euphorbia esula L. 2. Canada istle, Cirsium arvense (L.) Scop. 3. Plumeless istle, Carduus acanthoides L. 4. Purple Loosestrife, Lythrum salicaria L., L. virgatum L.5. Wild Parsnip, Pastinaca sativa L. (Except for non-wild cultivated varieties) 6. Common Tansy, Tanacetum vulgare L.7. Spotted Knapweed, Centaurea stoebe L. ssp. micranthos (Gugler) Hayek 8. Narrowleaf Bittercress, Cardamine impatiens L.
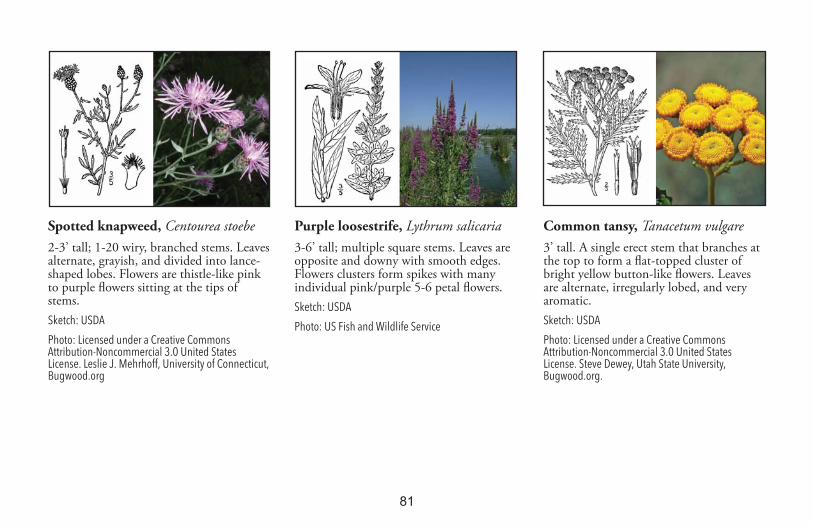
81
Spotted knapweed, Centourea stoebe2-3’ tall; 1-20 wiry, branched stems. Leavesalternate, grayish, and divided into lance-shaped lobes. Flowers are thistle-like pinkto purple flowers sitting at the tips ofstems.sketch: UsDa
Photo: licensed under a Creative Commonsattribution-Noncommercial 3.0 United stateslicense. leslie J. Mehrhoff, University of Connecticut,Bugwood.org
Purple loosestrife, Lythrum salicaria3-6’ tall; multiple square stems. Leaves areopposite and downy with smooth edges.Flowers clusters form spikes with manyindividual pink/purple 5-6 petal flowers.sketch: UsDa
Photo: Us Fish and wildlife service
Common tansy, Tanacetum vulgare3’ tall. A single erect stem that branches atthe top to form a flat-topped cluster ofbright yellow button-like flowers. Leavesare alternate, irregularly lobed, and veryaromatic.sketch: UsDa
Photo: licensed under a Creative Commonsattribution-Noncommercial 3.0 United stateslicense. steve Dewey, Utah state University,Bugwood.org.
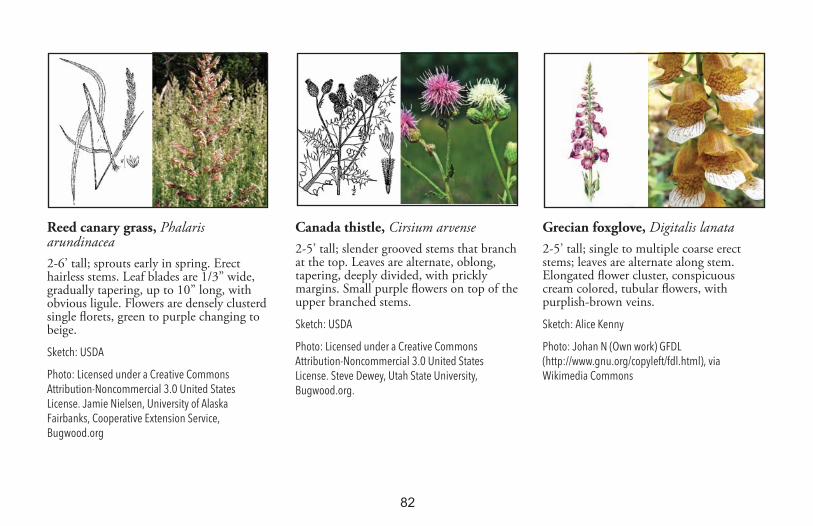
82
Reed canary grass, Phalarisarundinacea2-6’ tall; sprouts early in spring. Erecthairless stems. Leaf blades are 1/3” wide,gradually tapering, up to 10” long, withobvious ligule. Flowers are densely clusterdsingle florets, green to purple changing tobeige.
sketch: UsDa
Photo: licensed under a Creative Commonsattribution-Noncommercial 3.0 United stateslicense. Jamie Nielsen, University of alaskaFairbanks, Cooperative extension service,Bugwood.org
Canada thistle, Cirsium arvense2-5’ tall; slender grooved stems that branchat the top. Leaves are alternate, oblong,tapering, deeply divided, with pricklymargins. Small purple flowers on top of theupper branched stems.
sketch: UsDa
Photo: licensed under a Creative Commonsattribution-Noncommercial 3.0 United stateslicense. steve Dewey, Utah state University,Bugwood.org.
Grecian foxglove, Digitalis lanata2-5’ tall; single to multiple coarse erectstems; leaves are alternate along stem.Elongated flower cluster, conspicuouscream colored, tubular flowers, withpurplish-brown veins.
sketch: alice Kenny
Photo: Johan N (Own work) GFDl(http://www.gnu.org/copyleft/fdl.html), viawikimedia Commons

83
For more information, see:Minnesota Department of Agriculture (MDA), (651) 201-6000
Noxious and Invasive Weed ProgramMinnesota Noxious WeedsCounty Agricultural Inspectors - contact for county-designated noxious weeds
Minnesota Department of Natural Resources, (651) 296-6157Invasive PlantsMinnesota and Federal Prohibited and Noxious Plants List
Preventing the Spread of Invasive Plants: Best Management Practices for Transportation and Utility Corridors, January 2012.Cal-IPC Publication. BMPs for Roadside Invasives, 2008. Perron, Christine. New Hampshire Department of TransportationWeeds! May 2013. Sironen, Mary Ann. Duluth Township Newsletter.
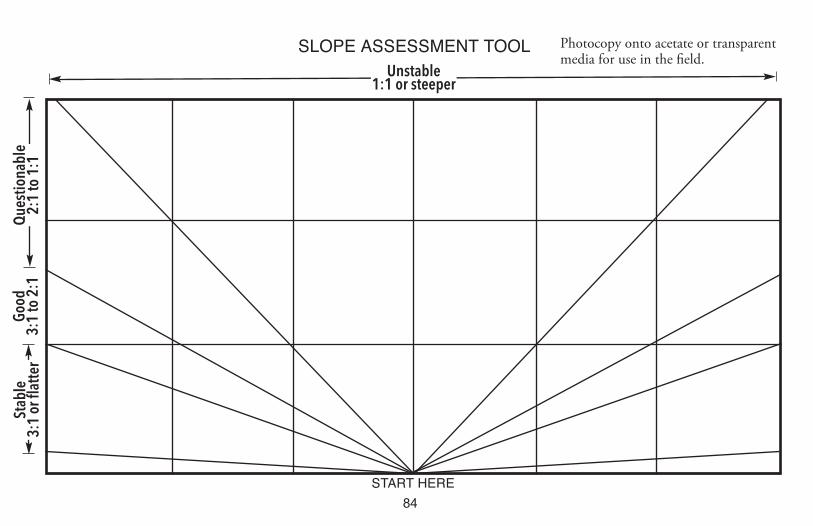
84
Goo
d3:
1 to
2:1
Que
stio
nabl
e2:
1 to
1:1
Stab
le3:
1 or
flat
ter
Unstable1:1 or steeper
SLOPE ASSESSMENT TOOL
START HERE
Photocopy onto acetate or transparentmedia for use in the field.