fig. 1 fig. 2 fig. 3 fig. 4 fig. 5 fig. 6 fig. 7
TRANSCRIPT
Version 1.0
code: ZB101
QUICK REFERENCE GUIDE
eng fra ita de es Your Zigboat™
ZigBoat™ is the innovative wireless system for monitoring and interacting with your boat either remotely or while on board ensuring safety and peace of mind. The Zigboat™ box contains a core module (Gateway) and three sensors that come a step closer to increasing the potential and functionality of your smart boat system. Please note that Glomex offers you several additional sensors and features that can be added to your ZigBoat™ system to fit your specific needs. Thanks to ZigBee® and its Wi-Fi wireless technologies, which have direct communication with onboard sensors without the need for a cloud, ZigBoat™ sends real-time push notifications when critical events occur. While using the Zigboat app, you can check boat information monitored by the system.
Il tuo Zigboat™
ZigBoat™ è l’innovativo sistema wireless per il monitoraggio e
l’interazione con la tua imbarcazione, sia da remoto che a bordo,
garantendoti sicurezza e tranquillità. Il kit ZigBoat™ è composto da una
unità principale (Gateway) e tre sensori. Glomex offre ulteriori sensori
e funzionalità che possono essere integrati al sistema ZigBoat™ per
soddisfare le tue esigenze specifiche. Grazie alle tecnologie senza fili
ZigBee® e Wi-Fi, e alla comunicazione diretta con i sensori di bordo
senza la necessità di un cloud, ZigBoat™ invia notifiche push in tempo
reale quando si verificano eventi critici. Utilizzando l’app ZigBoat™, è
possibile controllare le informazioni sulla barca monitorate dal sistema.
Votre Zigboat™
ZigBoat™ est le nouveau système sans fil pour le monitorage et
l’interaction avec votre embarcation, aussi bien à distance qu’à bord,
qui garantit sécurité et tranquillité. Le kit ZigBoat™ est composé
d’un module principal (passerelle) et de trois capteurs. Glomex offre
d’autres capteurs et fonctions à intégrer au système ZigBoat™ pour
satisfaire toutes les exigences, mêmes les plus spécifiques. Grâce
aux technologies sans fil ZigBee® et Wi-Fi, qui communiquent
directement avec les capteurs de bord, sans passer par un cloud,
ZigBoat™ envoie des notifications push en temps réel en cas
de problèmes. L’application ZigBoatTM permet de controler les
informations gérées par le système sur le bateau.
Ihr Zigboat™
ZigBoat™ ist das innovative kabellose System zur Überwachung von und Interaktion mit Ihrem Boot, sowohl aus der Ferne als auch direkt an Bord. Dieses System garantiert Sicherheit und Ruhe. Das Paket ZigBoat™ besteht aus einem Hauptmodul (Gateway) und drei Sensoren. Glomex bietet weitere Sensoren und Funktionen an, die in das System ZigBoat™ integriert werden können, um Ihren besonderen Bedürfnissen gerecht zu werden. Dank der kabellosen Technologie ZigBee® und WLAN, die ohne Cloud direkt mit den Bordsensoren kommunizieren, sendet ZigBoat™ im Fall von kritischen Situationen Push-Nachrichten in Echtzeit. Durch die Verwendung der App ZigBoat™ können die vom System ermittelten
Informationen über das Boot kontrolliert werden.
Tu Zigboat™
ZigBoat™ es el innovador sistema wireless para controlar e interactuar
con tu embarcación, sea a distancia que a bordo, garantizando
seguridad y tranquilidad. El paquete ZigBoat™ está compuesto por
un módulo principal (Gateway) y tres sensores. Glomex ofrece otros
sensores y funcionalidades que pueden ser integrados al sistema
ZigBoat™ para satisfacer tus específicas exigencias. Gracias a las
tecnologías wireless ZigBee® y Wi-Fi, que tienen comunicación
directa con los sensores de bordo sin requerir una cloud, ZigBoat™
envía notificaciones push en tiempo real cuando se verifican eventos
críticos. Utilizando la Aplicación ZigBoat™, es posible controlar la
información sobre la barca controlada por el sistema.
Step 1
Download the ZigBoat™ App to your device from App Store (for iOS devices) or from Google Play (for Android devices). For Android version only: download the “Barcode Scanner” App.
Punto 1
Scarica l’app ZigBoat™ sul tuo dispositivo da App Store (per dispositivi iOS) o da Google Play (per dispositivi Android). Solo per versione Android: scaricare l’applicazione “Barcode Scanner”.
Etape 1
Télécharger l’application ZigBoat™ sur le dispositif sur App Store (pour les dispositifs iOS) ou sur Google Play (pour les dispositifs Android). Pour la version Android uniquement: téléchargez l’application “Barcode Scanner”.
Schritt 1
Laden Sie die App ZigBoat™ aus dem App Store (iOS-Geräte) oder von Google Play (Android-Geräte) auf Ihr Gerät herunter. Nur für Android Version: Laden Sie die Anwendung “Barcode Scanner” herunter.
Punto 1
Descarga la Aplicación ZigBoat™ en tu dispositivo desde App Store (para dispositivos iOS) o desde Google Play (para dispositivos Android). Solo para dispositivos Android: descargue la aplicación “Barcode Scanner”.
Step 2
CONNECTING THE ZIGBOAT™ GATEWAY
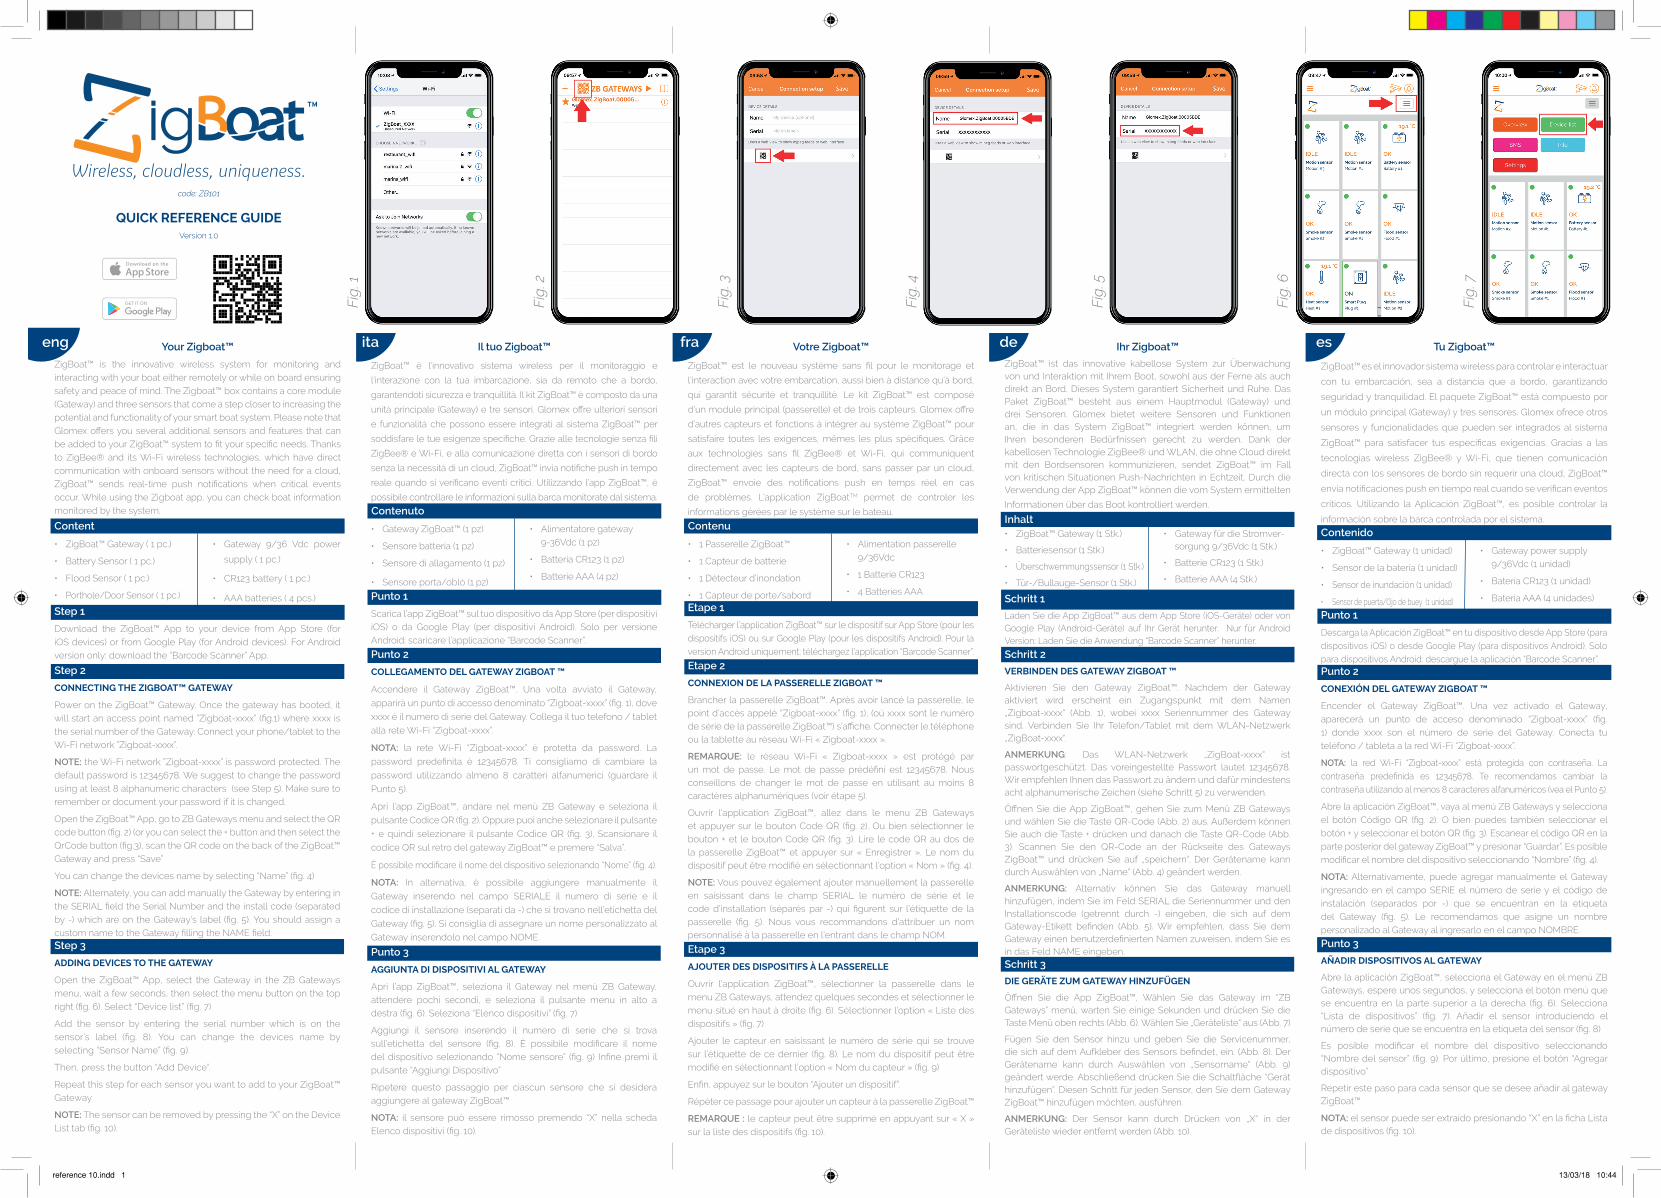
Power on the ZigBoat™ Gateway. Once the gateway has booted, it will start an access point named ”Zigboat-xxxx” (fig.1) where xxxx is the serial number of the Gateway. Connect your phone/tablet to the Wi-Fi network ”Zigboat-xxxx”.
NOTE: the Wi-Fi network ”Zigboat-xxxx” is password protected. The default password is 12345678. We suggest to change the password using at least 8 alphanumeric characters (see Step 5). Make sure to remember or document your password if it is changed.
Open the ZigBoat™ App, go to ZB Gateways menu and select the QR code button (fig. 2) (or you can select the + button and then select the QrCode button (fig.3), scan the QR code on the back of the ZigBoat™ Gateway and press “Save”
You can change the devices name by selecting “Name” (fig. 4)
NOTE: Alternately, you can add manually the Gateway by entering in the SERIAL field the Serial Number and the install code (separated by -) which are on the Gateway’s label (fig. 5). You should assign a custom name to the Gateway filling the NAME field.
Punto 2
COLLEGAMENTO DEL GATEWAY ZIGBOAT ™
Accendere il Gateway ZigBoat™. Una volta avviato il Gateway,
apparirà un punto di accesso denominato “Zigboat-xxxx” (fig. 1), dove
xxxx è il numero di serie del Gateway. Collega il tuo telefono / tablet
alla rete Wi-Fi “Zigboat-xxxx”.
NOTA: la rete Wi-Fi “Zigboat-xxxx” è protetta da password. La
password predefinita è 12345678. Ti consigliamo di cambiare la
password utilizzando almeno 8 caratteri alfanumerici (guardare il
Punto 5).
Apri l’app ZigBoat™, andare nel menù ZB Gateway e seleziona il
pulsante Codice QR (fig. 2). Oppure puoi anche selezionare il pulsante
+ e quindi selezionare il pulsante Codice QR (fig. 3). Scansionare il
codice QR sul retro del gateway ZigBoat™ e premere “Salva”.
È possibile modificare il nome del dispositivo selezionando “Nome” (fig. 4).
NOTA: In alternativa, è possibile aggiungere manualmente il
Gateway inserendo nel campo SERIALE il numero di serie e il
codice di installazione (separati da -) che si trovano nell’etichetta del
Gateway (fig. 5). Si consiglia di assegnare un nome personalizzato al
Gateway inserendolo nel campo NOME.
Etape 2
CONNEXION DE LA PASSERELLE ZIGBOAT ™
Brancher la passerelle ZigBoat™. Après avoir lancé la passerelle, le point d’accès appelé “Zigboat-xxxx” (fig. 1), (où xxxx sont le numéro de série de la passerelle ZigBoat™) s’affiche. Connecter le téléphone ou la tablette au réseau Wi-Fi « Zigboat-xxxx ».
REMARQUE: le réseau Wi-Fi « Zigboat-xxxx » est protégé par un mot de passe. Le mot de passe prédéfini est 12345678. Nous conseillons de changer le mot de passe en utilisant au moins 8 caractères alphanumériques (voir étape 5).
Ouvrir l’application ZigBoat™, allez dans le menu ZB Gateways et appuyer sur le bouton Code QR (fig. 2). Ou bien sélectionner le bouton + et le bouton Code QR (fig. 3). Lire le code QR au dos de la passerelle ZigBoat™ et appuyer sur « Enregistrer ». Le nom du dispositif peut être modifié en sélectionnant l’option « Nom » (fig. 4).
NOTE: Vous pouvez également ajouter manuellement la passerelle en saisissant dans le champ SERIAL le numéro de série et le code d’installation (séparés par -) qui figurent sur l’étiquette de la passerelle (fig. 5). Nous vous recommandons d’attribuer un nom personnalisé à la passerelle en l’entrant dans le champ NOM.
Schritt 2
VERBINDEN DES GATEWAY ZIGBOAT ™
Aktivieren Sie den Gateway ZigBoat™. Nachdem der Gateway aktiviert wird erscheint ein Zugangspunkt mit dem Namen „Zigboat-xxxx“ (Abb. 1), wobei xxxx Seriennummer des Gateway sind. Verbinden Sie Ihr Telefon/Tablet mit dem WLAN-Netzwerk „ZigBoat-xxxx“.
ANMERKUNG: Das WLAN-Netzwerk „ZigBoat-xxxx“ ist passwortgeschützt. Das voreingestellte Passwort lautet 12345678. Wir empfehlen Ihnen das Passwort zu ändern und dafür mindestens acht alphanumerische Zeichen (siehe Schritt 5) zu verwenden.
Öffnen Sie die App ZigBoat™, gehen Sie zum Menü ZB Gateways und wählen Sie die Taste QR-Code (Abb. 2) aus. Außerdem können Sie auch die Taste + drücken und danach die Taste QR-Code (Abb. 3). Scannen Sie den QR-Code an der Rückseite des Gateways ZigBoat™ und drücken Sie auf „speichern“. Der Gerätename kann durch Auswählen von „Name“ (Abb. 4) geändert werden.
ANMERKUNG: Alternativ können Sie das Gateway manuell hinzufügen, indem Sie im Feld SERIAL die Seriennummer und den Installationscode (getrennt durch -) eingeben, die sich auf dem Gateway-Etikett befinden (Abb. 5). Wir empfehlen, dass Sie dem Gateway einen benutzerdefinierten Namen zuweisen, indem Sie es in das Feld NAME eingeben.
Punto 2
CONEXIÓN DEL GATEWAY ZIGBOAT ™
Encender el Gateway ZigBoat™. Una vez activado el Gateway, aparecerá un punto de acceso denominado “Zigboat-xxxx” (fig. 1) donde xxxx son el número de serie del Gateway. Conecta tu teléfono / tableta a la red Wi-Fi “Zigboat-xxxx”.
NOTA: la red Wi-Fi “Zigboat-xxxx” está protegida con contraseña. La contraseña predefinida es 12345678. Te recomendamos cambiar la contraseña utilizando al menos 8 caracteres alfanuméricos (vea el Punto 5).
Abre la aplicación ZigBoat™, vaya al menú ZB Gateways y selecciona el botón Código QR (fig. 2). O bien puedes también seleccionar el botón + y seleccionar el botón QR (fig. 3). Escanear el código QR en la parte posterior del gateway ZigBoat™ y presionar “Guardar”. Es posible modificar el nombre del dispositivo seleccionando “Nombre” (fig. 4).
NOTA: Alternativamente, puede agregar manualmente el Gateway ingresando en el campo SERIE el número de serie y el código de instalación (separados por -) que se encuentran en la etiqueta del Gateway (fig. 5). Le recomendamos que asigne un nombre personalizado al Gateway al ingresarlo en el campo NOMBRE.
Step 3
ADDING DEVICES TO THE GATEWAY
Open the ZigBoat™ App, select the Gateway in the ZB Gateways menu, wait a few seconds, then select the menu button on the top right (fig. 6). Select “Device list” (fig. 7)
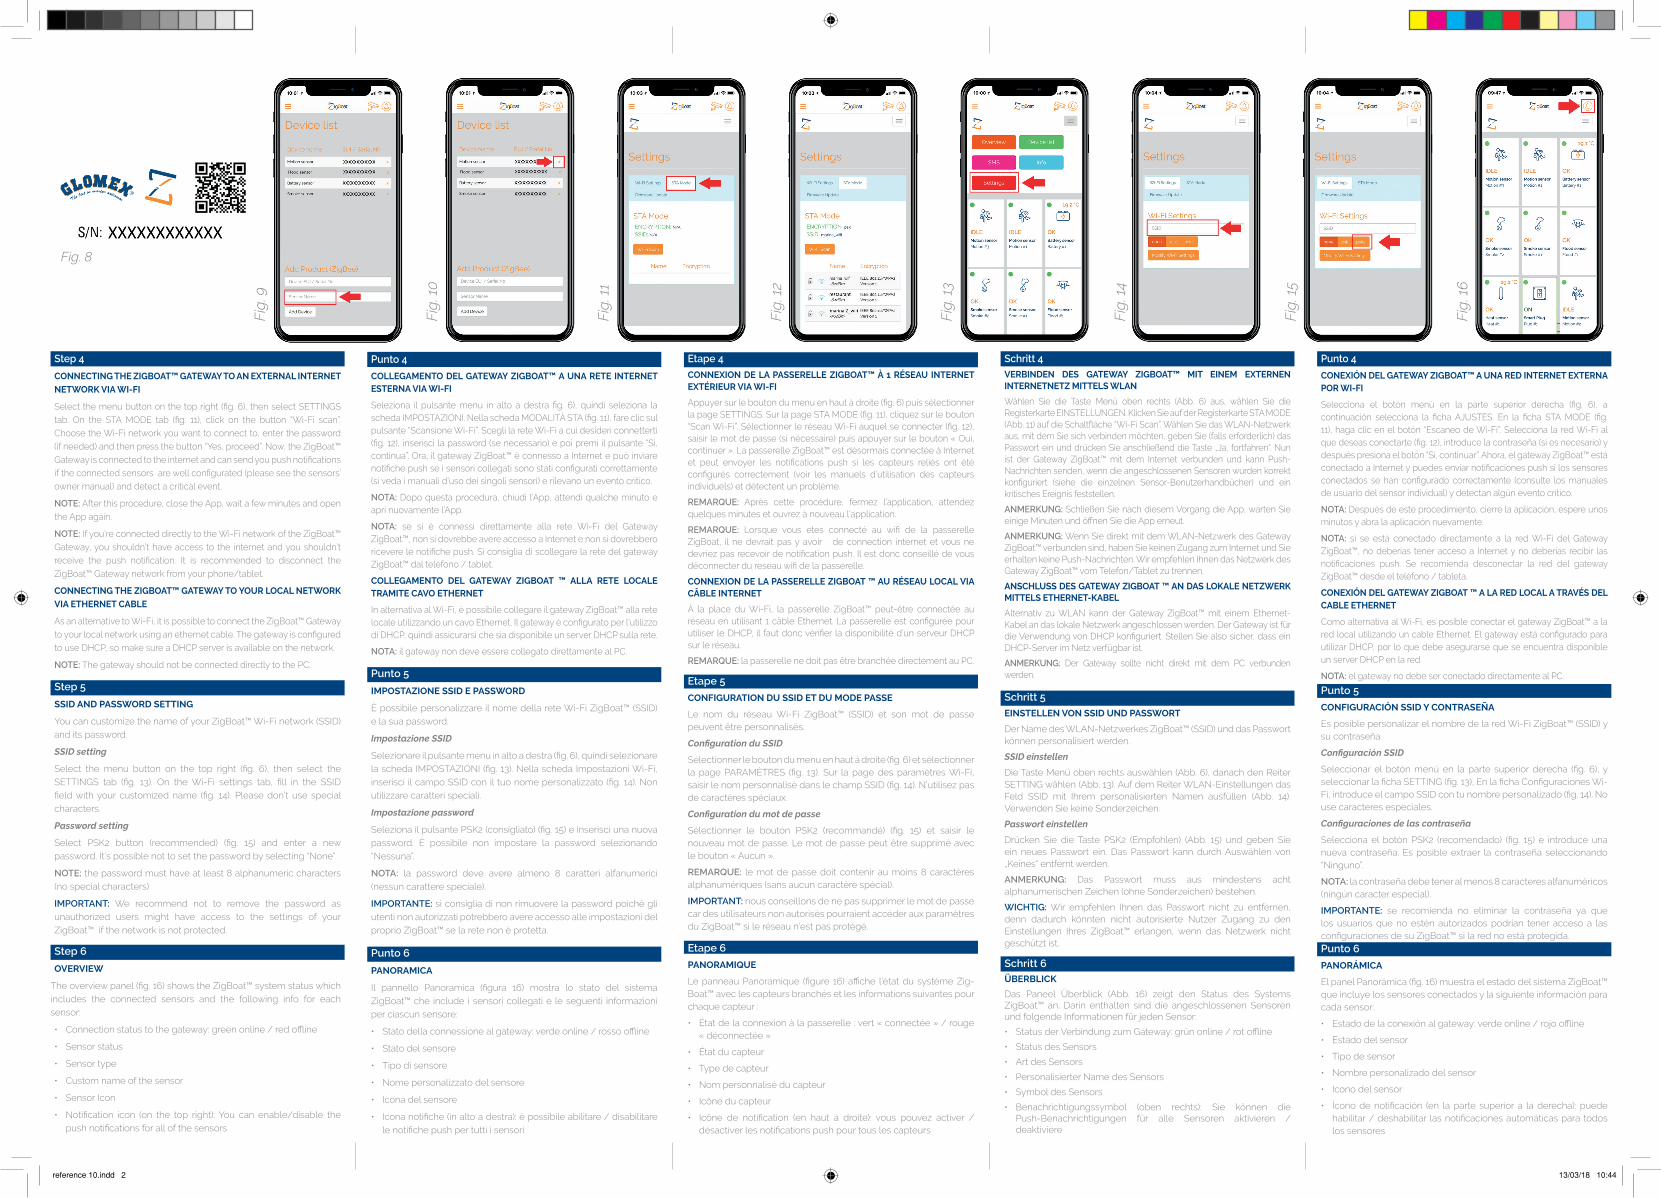
Add the sensor by entering the serial number which is on the sensor’s label (fig. 8). You can change the devices name by selecting “Sensor Name” (fig. 9).
Then, press the button “Add Device”.
Repeat this step for each sensor you want to add to your ZigBoat™ Gateway
NOTE: The sensor can be removed by pressing the “X” on the Device List tab (fig. 10).
Punto 3
AGGIUNTA DI DISPOSITIVI AL GATEWAY
Apri l’app ZigBoat™, seleziona il Gateway nel menù ZB Gateway, attendere pochi secondi, e seleziona il pulsante menu in alto a destra (fig. 6). Seleziona “Elenco dispositivi” (fig. 7)
Aggiungi il sensore inserendo il numero di serie che si trova sull’etichetta del sensore (fig. 8). È possibile modificare il nome del dispositivo selezionando “Nome sensore” (fig. 9) Infine premi il pulsante “Aggiungi Dispositivo”
Ripetere questo passaggio per ciascun sensore che si desidera aggiungere al gateway ZigBoat™
NOTA: il sensore può essere rimosso premendo “X” nella scheda Elenco dispositivi (fig. 10).
Etape 3
AJOUTER DES DISPOSITIFS À LA PASSERELLE
Ouvrir l’application ZigBoat™, sélectionner la passerelle dans le menu ZB Gateways, attendez quelques secondes et sélectionner le menu situé en haut à droite (fig. 6). Sélectionner l’option « Liste des dispositifs » (fig. 7)
Ajouter le capteur en saisissant le numéro de série qui se trouve sur l’étiquette de ce dernier (fig. 8). Le nom du dispositif peut être modifié en sélectionnant l’option « Nom du capteur » (fig. 9)
Enfin, appuyez sur le bouton “Ajouter un dispositif”.
Répéter ce passage pour ajouter un capteur à la passerelle ZigBoat™
REMARQUE : le capteur peut être supprimé en appuyant sur « X » sur la liste des dispositifs (fig. 10).
Schritt 3
DIE GERÄTE ZUM GATEWAY HINZUFÜGEN
Öffnen Sie die App ZigBoat™, Wählen Sie das Gateway im “ZB Gateways” menü, warten Sie einige Sekunden und drücken Sie die Taste Menü oben rechts (Abb. 6). Wählen Sie „Geräteliste“ aus (Abb. 7)
Fügen Sie den Sensor hinzu und geben Sie die Servicenummer, die sich auf dem Aufkleber des Sensors befindet, ein. (Abb. 8). Der Gerätename kann durch Auswählen von „Sensorname“ (Abb. 9) geändert werde. Abschließend drücken Sie die Schaltfläche “Gerät hinzufügen”. Diesen Schritt für jeden Sensor, den Sie dem Gateway ZigBoat™ hinzufügen möchten, ausführen.
ANMERKUNG: Der Sensor kann durch Drücken von „X“ in der Geräteliste wieder entfernt werden (Abb. 10).
Punto 3
AÑADIR DISPOSITIVOS AL GATEWAY
Abre la aplicación ZigBoat™, selecciona el Gateway en el menú ZB Gateways, espere unos segundos, y selecciona el botón menú que se encuentra en la parte superior a la derecha (fig. 6). Selecciona “Lista de dispositivos” (fig. 7). Añadir el sensor introduciendo el número de serie que se encuentra en la etiqueta del sensor (fig. 8)
Es posible modificar el nombre del dispositivo seleccionando “Nombre del sensor” (fig. 9). Por último, presione el botón “Agregar dispositivo”
Repetir este paso para cada sensor que se desee añadir al gateway ZigBoat™
NOTA: el sensor puede ser extraído presionando “X” en la ficha Lista de dispositivos (fig. 10).
Content
• ZigBoat™ Gateway ( 1 pc.)
• Battery Sensor ( 1 pc.)
• Flood Sensor ( 1 pc.)
• Porthole/Door Sensor ( 1 pc.)
• Gateway 9/36 Vdc power
supply ( 1 pc.)
• CR123 battery ( 1 pc.)
• AAA batteries ( 4 pcs.)
Contenuto
• Alimentatore gateway 9-36Vdc (1 pz)
• Batteria CR123 (1 pz)
• Batterie AAA (4 pz)
• Gateway ZigBoat™ (1 pz)
• Sensore batteria (1 pz)
• Sensore di allagamento (1 pz)
• Sensore porta/oblò (1 pz)
Contenu
• 1 Passerelle ZigBoat™
• 1 Capteur de batterie
• 1 Détecteur d’inondation
• 1 Capteur de porte/sabord
• Alimentation passerelle 9/36Vdc
• 1 Batterie CR123
• 4 Batteries AAA
Inhalt• ZigBoat™ Gateway (1 Stk.)
• Batteriesensor (1 Stk.)
• Überschwemmungssensor (1 Stk.)
• Tür-/Bullauge-Sensor (1 Stk.)
• Gateway für die Stromver-sorgung 9/36Vdc (1 Stk.)
• Batterie CR123 (1 Stk.)
• Batterie AAA (4 Stk.)
Contenido
• ZigBoat™ Gateway (1 unidad)
• Sensor de la batería (1 unidad)
• Sensor de inundación (1 unidad)
• Sensor de puerta/Ojo de buey (1 unidad)
• Gateway power supply 9/36Vdc (1 unidad)
• Batería CR123 (1 unidad)
• Batería AAA (4 unidades)
Fig
. 1
Fig
. 2
Fig
. 3
Fig
. 4
Fig
. 5
Fig
. 6
Fig
. 7
reference 10.indd 1 13/03/18 10:44
Step 4
CONNECTING THE ZIGBOAT™ GATEWAY TO AN EXTERNAL INTERNET NETWORK VIA WI-FI
Select the menu button on the top right (fig. 6), then select SETTINGS tab. On the STA MODE tab (fig. 11), click on the button “Wi-Fi scan”. Choose the Wi-Fi network you want to connect to, enter the password (if needed) and then press the button “Yes, proceed”. Now, the ZigBoat™ Gateway is connected to the internet and can send you push notifications if the connected sensors are well configurated (please see the sensors’ owner manual) and detect a critical event.
NOTE: After this procedure, close the App, wait a few minutes and open the App again.
NOTE: If you’re connected directly to the Wi-Fi network of the ZigBoat™ Gateway, you shouldn’t have access to the internet and you shouldn’t receive the push notification. It is recommended to disconnect the ZigBoat™ Gateway network from your phone/tablet.
CONNECTING THE ZIGBOAT™ GATEWAY TO YOUR LOCAL NETWORK VIA ETHERNET CABLE
As an alternative to Wi-Fi, it is possible to connect the ZigBoat™ Gateway to your local network using an ethernet cable. The gateway is configured to use DHCP, so make sure a DHCP server is available on the network.
NOTE: The gateway should not be connected directly to the PC.
Step 5
SSID AND PASSWORD SETTING
You can customize the name of your ZigBoat™ Wi-Fi network (SSID) and its password.
SSID setting
Select the menu button on the top right (fig. 6), then select the SETTINGS tab (fig. 13). On the Wi-Fi settings tab, fill in the SSID field with your customized name (fig. 14). Please don’t use special characters.
Password setting
Select PSK2 button (recommended) (fig. 15) and enter a new password. It’s possible not to set the password by selecting “None”
NOTE: the password must have at least 8 alphanumeric characters (no special characters)
IMPORTANT: We recommend not to remove the password as unauthorized users might have access to the settings of your ZigBoat™ if the network is not protected.
Step 6
OVERVIEW
The overview panel (fig. 16) shows the ZigBoat™ system status which includes the connected sensors and the following info for each sensor:
• Connection status to the gateway: green online / red offline
• Sensor status
• Sensor type
• Custom name of the sensor
• Sensor Icon
• Notification icon (on the top right): You can enable/disable the push notifications for all of the sensors
Punto 4
COLLEGAMENTO DEL GATEWAY ZIGBOAT™ A UNA RETE INTERNET ESTERNA VIA WI-FI
Seleziona il pulsante menu in alto a destra fig. 6), quindi seleziona la scheda IMPOSTAZIONI. Nella scheda MODALITÀ STA (fig. 11), fare clic sul pulsante “Scansione Wi-Fi”. Scegli la rete Wi-Fi a cui desideri connetterti (fig. 12), inserisci la password (se necessario) e poi premi il pulsante “Sì, continua”. Ora, il gateway ZigBoat™ è connesso a Internet e può inviare notifiche push se i sensori collegati sono stati configurati correttamente (si veda i manuali d’uso dei singoli sensori) e rilevano un evento critico.
NOTA: Dopo questa procedura, chiudi l’App, attendi qualche minuto e apri nuovamente l’App.
NOTA: se si è connessi direttamente alla rete Wi-Fi del Gateway ZigBoat™, non si dovrebbe avere accesso a Internet e non si dovrebbero ricevere le notifiche push. Si consiglia di scollegare la rete del gateway ZigBoat™ dal telefono / tablet.
COLLEGAMENTO DEL GATEWAY ZIGBOAT ™ ALLA RETE LOCALE TRAMITE CAVO ETHERNET
In alternativa al Wi-Fi, è possibile collegare il gateway ZigBoat™ alla rete locale utilizzando un cavo Ethernet. Il gateway è configurato per l’utilizzo di DHCP, quindi assicurarsi che sia disponibile un server DHCP sulla rete.
NOTA: il gateway non deve essere collegato direttamente al PC.
Punto 5
IMPOSTAZIONE SSID E PASSWORD
È possibile personalizzare il nome della rete Wi-Fi ZigBoat™ (SSID) e la sua password.
Impostazione SSID
Selezionare il pulsante menu in alto a destra (fig. 6), quindi selezionare la scheda IMPOSTAZIONI (fig. 13). Nella scheda Impostazioni Wi-Fi, inserisci il campo SSID con il tuo nome personalizzato (fig. 14). Non utilizzare caratteri speciali.
Impostazione password
Seleziona il pulsante PSK2 (consigliato) (fig. 15) e inserisci una nuova password. È possibile non impostare la password selezionando “Nessuna”.
NOTA: la password deve avere almeno 8 caratteri alfanumerici (nessun carattere speciale).
IMPORTANTE: si consiglia di non rimuovere la password poiché gli utenti non autorizzati potrebbero avere accesso alle impostazioni del proprio ZigBoat™ se la rete non è protetta.
Punto 6
PANORAMICA
Il pannello Panoramica (figura 16) mostra lo stato del sistema ZigBoat™ che include i sensori collegati e le seguenti informazioni per ciascun sensore:
• Stato della connessione al gateway: verde online / rosso offline
• Stato del sensore
• Tipo di sensore
• Nome personalizzato del sensore
• Icona del sensore
• Icona notifiche (in alto a destra): è possibile abilitare / disabilitare le notifiche push per tutti i sensori
Etape 4
CONNEXION DE LA PASSERELLE ZIGBOAT™ À 1 RÉSEAU INTERNET EXTÉRIEUR VIA WI-FI
Appuyer sur le bouton du menu en haut à droite (fig. 6) puis sélectionner la page SETTINGS. Sur la page STA MODE (fig. 11), cliquez sur le bouton “Scan Wi-Fi”. Sélectionner le réseau Wi-Fi auquel se connecter (fig. 12), saisir le mot de passe (si nécessaire) puis appuyer sur le bouton « Oui, continuer ». La passerelle ZigBoat™ est désormais connectée à Internet et peut envoyer les notifications push si les capteurs reliés ont été configurés correctement (voir les manuels d’utilisation des capteurs individuels) et détectent un problème.
REMARQUE: Après cette procédure, fermez l’application, attendez quelques minutes et ouvrez à nouveau l’application.
REMARQUE: Lorsque vous etes connecté au wifi de la passerelle ZigBoat, il ne devrait pas y avoir de connection internet et vous ne devriez pas recevoir de notification push. Il est donc conseillé de vous déconnecter du reseau wifi de la passerelle.
CONNEXION DE LA PASSERELLE ZIGBOAT ™ AU RÉSEAU LOCAL VIA CÂBLE INTERNET
À la place du Wi-Fi, la passerelle ZigBoat™ peut-être connectée au réseau en utilisant 1 câble Ethernet. La passerelle est configurée pour utiliser le DHCP, il faut donc vérifier la disponibilité d’un serveur DHCP sur le réseau.
REMARQUE: la passerelle ne doit pas être branchée directement au PC.
Etape 5
CONFIGURATION DU SSID ET DU MODE PASSE
Le nom du réseau Wi-Fi ZigBoat™ (SSID) et son mot de passe peuvent être personnalisés.
Configuration du SSID
Sélectionner le bouton du menu en haut à droite (fig. 6) et sélectionner la page PARAMÈTRES (fig. 13). Sur la page des paramètres Wi-Fi, saisir le nom personnalisé dans le champ SSID (fig. 14). N’utilisez pas de caractères spéciaux.
Configuration du mot de passe
Sélectionner le bouton PSK2 (recommandé) (fig. 15) et saisir le nouveau mot de passe. Le mot de passe peut être supprimé avec le bouton « Aucun ».
REMARQUE: le mot de passe doit contenir au moins 8 caractères alphanumériques (sans aucun caractère spécial).
IMPORTANT: nous conseillons de ne pas supprimer le mot de passe car des utilisateurs non autorisés pourraient accéder aux paramètres du ZigBoat™ si le réseau n’est pas protégé.
Etape 6
PANORAMIQUE
Le panneau Panoramique (figure 16) affiche l’état du système Zig-Boat™ avec les capteurs branchés et les informations suivantes pour chaque capteur :
• État de la connexion à la passerelle : vert « connectée » / rouge « déconnectée »
• État du capteur
• Type de capteur
• Nom personnalisé du capteur
• Icône du capteur
• Icône de notification (en haut à droite): vous pouvez activer / désactiver les notifications push pour tous les capteurs
Schritt 4VERBINDEN DES GATEWAY ZIGBOAT™ MIT EINEM EXTERNEN INTERNETNETZ MITTELS WLAN
Wählen Sie die Taste Menü oben rechts (Abb. 6) aus, wählen Sie die Registerkarte EINSTELLUNGEN. Klicken Sie auf der Registerkarte STA MODE (Abb. 11) auf die Schaltfläche “Wi-Fi Scan”. Wählen Sie das WLAN-Netzwerk aus, mit dem Sie sich verbinden möchten, geben Sie (falls erforderlich) das Passwort ein und drücken Sie anschließend die Taste „Ja, fortfahren“. Nun ist der Gateway ZigBoat™ mit dem Internet verbunden und kann Push-Nachrichten senden, wenn die angeschlossenen Sensoren wurden korrekt konfiguriert (siehe die einzelnen Sensor-Benutzerhandbücher) und ein kritisches Ereignis feststellen.
ANMERKUNG: Schließen Sie nach diesem Vorgang die App, warten Sie einige Minuten und öffnen Sie die App erneut.
ANMERKUNG: Wenn Sie direkt mit dem WLAN-Netzwerk des Gateway ZigBoat™ verbunden sind, haben Sie keinen Zugang zum Internet und Sie erhalten keine Push-Nachrichten. Wir empfehlen Ihnen das Netzwerk des Gateway ZigBoat™ vom Telefon/Tablet zu trennen.
ANSCHLUSS DES GATEWAY ZIGBOAT ™ AN DAS LOKALE NETZWERK MITTELS ETHERNET-KABEL
Alternativ zu WLAN kann der Gateway ZigBoat™ mit einem Ethernet-Kabel an das lokale Netzwerk angeschlossen werden. Der Gateway ist für die Verwendung von DHCP konfiguriert. Stellen Sie also sicher, dass ein DHCP-Server im Netz verfügbar ist.
ANMERKUNG: Der Gateway sollte nicht direkt mit dem PC verbunden werden.
Schritt 5
EINSTELLEN VON SSID UND PASSWORT
Der Name des WLAN-Netzwerkes ZigBoat™ (SSID) und das Passwort können personalisiert werden.
SSID einstellen
Die Taste Menü oben rechts auswählen (Abb. 6), danach den Reiter SETTING wählen (Abb. 13). Auf dem Reiter WLAN-Einstellungen das Feld SSID mit Ihrem personalisierten Namen ausfüllen (Abb. 14). Verwenden Sie keine Sonderzeichen.
Passwort einstellen
Drücken Sie die Taste PSK2 (Empfohlen) (Abb. 15) und geben Sie ein neues Passwort ein. Das Passwort kann durch Auswählen von „Keines“ entfernt werden.
ANMERKUNG: Das Passwort muss aus mindestens acht alphanumerischen Zeichen (ohne Sonderzeichen) bestehen.
WICHTIG: Wir empfehlen Ihnen das Passwort nicht zu entfernen, denn dadurch könnten nicht autorisierte Nutzer Zugang zu den Einstellungen Ihres ZigBoat™ erlangen, wenn das Netzwerk nicht geschützt ist.
Schritt 6ÜBERBLICK
Das Paneel Überblick (Abb. 16) zeigt den Status des Systems ZigBoat™ an. Darin enthalten sind die angeschlossenen Sensoren und folgende Informationen für jeden Sensor:
• Status der Verbindung zum Gateway: grün online / rot offline
• Status des Sensors
• Art des Sensors
• Personalisierter Name des Sensors
• Symbol des Sensors
• Benachrichtigungssymbol (oben rechts): Sie können die Push-Benachrichtigungen für alle Sensoren aktivieren / deaktiviere
Punto 4
CONEXIÓN DEL GATEWAY ZIGBOAT™ A UNA RED INTERNET EXTERNA POR WI-FI
Selecciona el botón menú en la parte superior derecha (fig. 6), a continuación selecciona la ficha AJUSTES. En la ficha STA MODE (fig. 11), haga clic en el botón “Escaneo de Wi-Fi”. Selecciona la red Wi-Fi al que deseas conectarte (fig. 12), introduce la contraseña (si es necesario) y después presiona el botón “Sí, continuar”. Ahora, el gateway ZigBoat™ está conectado a Internet y puedes enviar notificaciones push si los sensores conectados se han configurado correctamente (consulte los manuales de usuario del sensor individual) y detectan algún evento crítico.
NOTA: Después de este procedimiento, cierre la aplicación, espere unos minutos y abra la aplicación nuevamente.
NOTA: si se está conectado directamente a la red Wi-Fi del Gateway ZigBoat™, no deberías tener acceso a Internet y no deberías recibir las notificaciones push. Se recomienda desconectar la red del gateway ZigBoat™ desde el teléfono / tableta.
CONEXIÓN DEL GATEWAY ZIGBOAT ™ A LA RED LOCAL A TRAVÉS DEL CABLE ETHERNET
Como alternativa al Wi-Fi, es posible conectar el gateway ZigBoat™ a la red local utilizando un cable Ethernet. El gateway está configurado para utilizar DHCP, por lo que debe asegurarse que se encuentra disponible un server DHCP en la red.
NOTA: el gateway no debe ser conectado directamente al PC.
Punto 5
CONFIGURACIÓN SSID Y CONTRASEÑA
Es posible personalizar el nombre de la red Wi-Fi ZigBoat™ (SSID) y su contraseña.
Configuración SSID
Seleccionar el botón menú en la parte superior derecha (fig. 6), y seleccionar la ficha SETTING (fig. 13), En la ficha Configuraciones Wi-Fi, introduce el campo SSID con tu nombre personalizado (fig. 14). No use caracteres especiales.
Configuraciones de las contraseña
Selecciona el botón PSK2 (recomendado) (fig. 15) e introduce una nueva contraseña. Es posible extraer la contraseña seleccionando “Ninguno”.
NOTA: la contraseña debe tener al menos 8 caracteres alfanuméricos (ningún caracter especial).
IMPORTANTE: se recomienda no eliminar la contraseña ya que los usuarios que no estén autorizados podrían tener acceso a las configuraciones de su ZigBoat™ si la red no está protegida.Punto 6
PANORÁMICA
El panel Panorámica (fig. 16) muestra el estado del sistema ZigBoat™ que incluye los sensores conectados y la siguiente información para cada sensor:
• Estado de la conexión al gateway: verde online / rojo offline
• Estado del sensor
• Tipo de sensor
• Nombre personalizado del sensor
• Icono del sensor
• Ícono de notificación (en la parte superior a la derecha): puede habilitar / deshabilitar las notificaciones automáticas para todos los sensores
Fig. 8Fi
g. 9
Fig
. 10
Fig
. 11
Fig
. 12
Fig
. 13
Fig
. 14
Fig
. 15
Fig
. 16
reference 10.indd 2 13/03/18 10:44