finishing veneer plaster systems 6 - usg.com · finished to a truer plane than one-coat...
TRANSCRIPT

197
6Finishing Veneer Plaster Systems

Advances of Veneer PlasterVeneer plaster has been growing in popularity as a wall finishing sys-tem. The speed of application for one-coat systems make it cost com-petitive with drywall, and the added smoothness of two-coat veneerprovides a look of luxury and adds ease to decorating. With either sys-tem, the toughness of veneer plaster makes walls more durable andresistant to scuffs, gouges and impact damage.
Note that various organizations provide information about recommend-ed standards or tolerances for finishing of veneer plaster systems. Seepages 435 and 442 in the Appendix for information about standardsand tolerances.
For instructions on the safe use of veneer plaster and related products,see Chapter 13, Safety Considerations, Material Handling.
Veneer Plaster FinishesVeneer plaster finishes can be used in one or two-coat applicationsand can be given smooth or textured surfaces. Each method has itsparticular advantage. There is only one gypsum panel designed for usewith DIAMOND and IMPERIAL veneer plasters: GRAND PRIX Plasterbase.
GRAND PRIX Plasterbase has a gypsum core faced with specially treat-ed, multi-layered paper (blue) designed to provide a maximum bond toveneer plaster finishes. The paper’s absorbent outer layers quickly anduniformly draw moisture from the veneer plaster finish for proper appli-cation and finishing; the moisture-resistant inner layers keep the coredry and rigid to resist sagging. Note: Gypsum base that has faded fromthe original light blue colour due to exposure to sunlight should betreated with either a plaster bonding agent or spray-applied alum solu-tion before DIAMOND Interior Finish Plaster is applied.
198

Plaster DryingConditions
Two-Coat Veneer Finish Compared to many other finishes, two-coatveneer provides a more durable, abrasion-resistant surface and can befinished to a truer plane than one-coat applications. These finishes canbe used with steel or wood framing wherever the ultimate in appear-ance is desired. Ready for next-day decorating, provided complete drynesshas been reached. Assemblies with these monolithic gypsum surfacesoffer excellent fire and sound ratings.
One-Coat Veneer Finish Provides a hard monolithic surface at lowcost. Complete application–from bare studs to decorated walls andceilings–takes no more than 48 to 72 hr., provided complete drynesshas been reached. Assemblies with one-coat veneer plaster applica-tion meet fire and sound requirements, and shorten constructionschedules for added profit.
Job Environment Maintain building temperature in comfortable working range, above 13°C (55°F). Keep air circulation at minimum level prior to, during andfollowing application until finish is dry.
If possible, maintain building temperature-humidity combination in the“normal drying” area of the graph. When dry conditions exist, relativehumidity often can be increased by wetting down the floor periodically.During these periods, make every effort to reduce air movement by
199Finishing Veneer Plaster Systems
6
90%
80%
70%
60%
50%
40%
30%
20%
10%
minimum temp.for plastering
normal drying
no air movement
detectable airmovement
rapid drying
40 50 60 70 80 90 100 110°F4 10 16 21 27 32 38 43°C
Rela
tive
Hum
idity
Temperature

closing windows and deflecting heater blower and duct output away fromthe surfaces being plastered. If building temperature-humidity combina-tion is in the “rapid drying” area of the graph, special joint treatment mea-sures must be taken. These include the use of DURABOND 45 or 90 JointCompounds which are faster-setting and CGC Drywall Paper Tape.
Grounds Correct thickness of veneer plaster finish is one of the most important factors in obtaining good results. To insure proper thickness, all cornerbeads, trim and expansion joints must be of the recommended typeand be properly set.
Accessories must provide grounds for the following minimum plasterthicknesses:
1. Over veneer gypsum base, one coat... 1.6 mm (1/16 in.)
2. Over veneer gypsum base, two coats... 2.4 mm (3/32 in.)
Selection of Joint Under normal working conditions, joints of veneer plaster systems mayTreatment System be treated by applying IMPERIAL Brand Type P (pressure-sensitive) or
Type S (staple) to the joints and then applying the veneer plaster basecoator finish to preset the tape. However, there are a number of special situ-ations that require the use of DURABOND Setting-Type Drywall Compoundand CGC Drywall Paper Tape.
Note: Under the following conditions DURABOND Drywall Compound andCGC Drywall Paper Tape must be used:
1. where two-coat finish is applied over 12.7 mm (1/2�) or 15.9 mm(5/8�) base on 600 mm (24�) o.c. framing;
2. where one-coat DIAMOND Interior Finish Plaster or IMPERIAL Finish isapplied over 15.9 mm (5/8�) base on 600 mm (24�) o.c. framing;
3. where GRAND PRIX Gypsum Base and veneer plaster is used over steelframing.
Trim Accessory ApplicationTrim accessories simplify and enhance the finishing of veneer plasterassemblies. The accessories are low in cost, easily applied anddesigned to work together for long-lasting, trouble-free construction.All are suitable for steel-frame and wood-frame construction.
Corner Bead SHEETROCK Brand Corner Reinforcements provide strong, durable Application protection for outside angle corners, uncased openings, pilasters,
beams and soffits. The exposed nose of the bead resists impact andforms a screed for finishing. Corner bead should be installed in onepiece unless length of corner exceeds stock bead lengths. Install asnoted for each product following.
SHEETROCK Brand No. 800 and No. 900 Corner Beads are galvanizedfine-mesh, expanded-flange corner beads especially designed forveneer plaster construction. Apply No. 800 or No. 900 Corner Beadwith nails through the board into wood framing or to board alone inwood or steel-framed assemblies with 14 mm (9/16�) galvanizedstaples spaced 300 mm (12�) o.c. through both flanges. Fasteners
200

should be placed opposite one another in both flanges. Both beadsprovide superior reinforcement with veneer plaster finishes throughapproximately 300 keys per metre.
Use No. 800 for one-coat applications. It provides the proper 1.6 mm(1/16�) ground height for one-coat finishing.
Use No. 900 for two-coat applications. It provides the 2.4 mm (3/32�)ground height needed for two-coat applications.
On masonry corners, hold bead firmly against the corner and groutboth flanges with IMPERIAL Brand Plaster Finish. On monolithic concreteapply a high-grade bonding agent, such as CGC Plaster Bonder, overthe corner before placing the bead and grouting. Preset all beads witha veneer finish.
Metal Trim SHEETROCK Brand Metal Trim serves to protect and finish gypsum baseApplication at window framing and door jambs; also used at ceiling-wall
intersections and partition perimeters to form a recess for acousticalsealant. Also serves as a relief joint at the intersection of dissimilarconstructions, such as gypsum board to concrete.
Metal trims provide maximum pro-tection and neat finished edges togypsum bases at window and doorjambs, at internal angles and at inter-sections where panels abut othermaterials. They are easily installed bynailing or screwing through the prop-er leg of trim. Various configurationsare available depending on therequired application.
Control Joint Proper installation of control joints in wall and ceiling membranes Application should include breaking the gypsum base behind the control joint. In
ceiling construction, the framing should also be broken, and in partitions, separate studs should be used on each side of the controljoints. Control joints should be positioned to intersect light fixtures, airdiffusers, door openings and other areas of stress concentration.
Gypsum construction should be isolated with control joints where (a)partitions or ceilings of dissimilar construction meet and remain in the
201Finishing Veneer Plaster Systems
6
Stapling is the standard way to attach No. 800 Corner Bead.For wood studs, nails in both bead flanges are also satisfactory.Fasteners to be corrosion-resistant.
No. 800 & 900 Corner Bead.
same plane; (b) wings of “L”, “U” and “T” shaped ceiling areas arejoined; and (c) expansion or control joints occur in the base wallconstruction and/or building structure. Just as important, control jointsshould be used in the face of gypsum partitions and ceilings when thesize of the surface exceeds the following control-joint spacings;Partitions, 9 m (30 ft.) maximum in either direction; Interior Ceilings(with perimeter relief), 15 m (50 ft.) maximum in either direction; InteriorCeilings (without perimeter relief), 9 m (30 ft.) maximum in either direc-tion; and Exterior Ceilings, 9 m (30 ft.) maximum in either direction.
Ceiling-height door frames may be used as vertical control joints forpartitions; however, door frames of lesser height may only be used ascontrol joints if standard control joints extend to the ceiling from bothcorners of the top of the door frame. When planning locations for control joints in the ceiling, it is recommended that they be located tointersect column penetrations, since movement of columns canimpose stresses on the ceiling membrane.
Control Joints, when properly insulated and backed by gypsum basepanels, have been fire-endurance tested and are certified for use inone- and two-hour-rated walls.
Installation At control joint locations:1. Leave a 13 mm (1/2�) continuous opening between gypsum boards for
insertion of surface-mounted joint.
2. Interrupt wood floor and ceiling plates with a 13 mm (1/2�) gap, whereverthere is a control joint in the structure.
3. Provide separate supports for each control joint flange.
4. Provide an adequate seal or safing insulation behind control jointswhere sound and/or fire ratings are prime considerations.
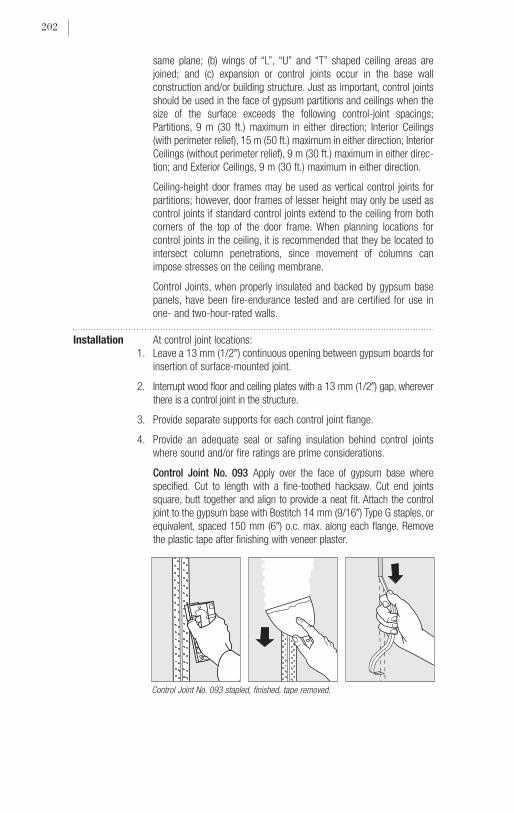
Control Joint No. 093 Apply over the face of gypsum base where specified. Cut to length with a fine-toothed hacksaw. Cut end jointssquare, butt together and align to provide a neat fit. Attach the controljoint to the gypsum base with Bostitch 14 mm (9/16�) Type G staples, orequivalent, spaced 150 mm (6�) o.c. max. along each flange. Removethe plastic tape after finishing with veneer plaster.
202
Control Joint No. 093 stapled, finished, tape removed.

Fire-Rated Control Joints-Gypsum Drywall/Steel Stud Partition
47 STC(SA-860302);2-hr. Fire Rating
1-hr. Fire Rating
Maximum Spacing-Control Joints
Max. Single Dimension
Construction & Location m ft.
Partition-interior 9 30
Ceiling-interior
with perimeter relief 15 50
without perimeter relief 9 30
Ceiling-exterior gypsum 9 30
13 mm (1/2") max.control joint (both sides)
16 mm (5/8")
48 mm (17/8") 79 mm (31/8")
15.9 mm (5/8") GRAND PRIXBrand Plaster Base,FIRECODE core
veneer plaster
control joint (both sides)
veneer plaster
13 mm (1/2") max.
16 mm (5/8")
48 mm (17/8") 79 mm (31/8")
15.9 mm (5/8") GRAND PRIXBrand Plaster Base, FIRECODE core
203Finishing Veneer Plaster Systems
6
Control Joint No. 093

Joint Treatment and Surface Preparation for Veneer Plaster Construction
For Wood-Framed Assemblies and Normal Drying ConditionsAlign IMPERIAL Brand Type P (pressure-sensitive) Tape over joint and pressinto place over entire length. Eliminate wrinkles and assure maximumadhesive bond by pressing entire length of tape with steel finishing knifeor trowel. Press tape into corners with corner tool; do not overlap.
Embed tape and fill beads with a coat of veneer plaster being used,and allow to set–but not dry–prior to veneer plaster application. Slightlyunderfill in the bead by screeding along the bead with edge of trowelafter setting the bead. (Best results are obtained by planning thefinishing to permit continuous application from angle to angle.)
For Steel-Framed Assemblies and Rapid Drying Conditions Withsteel framing and/or when building temperature-humidity conditionsfall in the ‘rapid drying’ area of the graph for steel or wood framing (seepage 199), use CGC Drywall Paper Tape embedded with DURABOND 45or 90 Joint Compound.
Mix the compound in a clean 20 L container (plastic is preferred forsetting type compounds). Use a commercial handmixer (commonlycalled a potato masher) or a 13 mm (1/2�) heavy-duty 200 to 300-rpmelectric drill with a drywall blade-type mixing paddle. Drill speed mustnot exceed 400 rpm. Use the amount of water shown on the bag andalways sift the powder into the water to ensure complete wetting. Stiraccording to directions on bag.
Note: Do not contaminate compound with other materials, dirty wateror previous batches. Do not retemper batches.
Butter joints with compound using a trowel or steel finishing knife to forcecompound into the joints. Center CGC Drywall Paper Tape over joint andpress it into the fresh compound with trowel held at a 45° angle. Drawtrowel along joint with sufficient pressure to remove excess compound.
204
Simplified, wrinkle-freeattachment of self-stick TypeP IMPERIAL Brand Tape speedsjoint reinforcing, boosts production.

After tape is embedded, apply a thin coat of joint compound to reducepossibility of edge wrinkling or curling. Allow thin coat to harden, thenapply a fill coat completely covering the tape and feathering 75 mm (3�)to 100 mm (4�) beyond edges of tape. Allow to harden before finishing.Plaster prefill is not required over DURABOND compound.
Note: Under the following conditions DURABOND Drywall Compound andCGC Drywall Paper Tape must be used:
1. where two-coat finish is applied over 12.7 mm (1/2�) or 15.9 mm(5/8�) base on 600 mm (24�) o.c. framing;
2. where one-coat DIAMOND Brand Interior Finish Plaster or IMPERIAL BrandFinish Plaster is applied over 15.9 mm (5/8�) base on 600 mm (24�)o.c. framing;
3. where IMPERIAL Brand Gypsum Base and veneer plaster is used oversteel framing.
For Cement Board Substrate Prior to treatment of DUROCK BrandCement Board panel joints, apply CGC Plaster Bonder in a continuousfilm to the joint area according to application directions. Joints shouldthen be treated with CGC Drywall Paper Tape and DURABOND com-pound. Mix and apply following directions on the bag. When the jointsare completely dry, treat the entire wall surface with CGC PlasterBonder according to application directions. Then apply DIAMOND BrandVeneer Basecoat Plaster and IMPERIAL Brand Finish Plaster in a two-coat application.
For Gypsum Fiber Bases This assembly provides added abuse-resis-tant characteristics when completed. Joints of FIBEROCK Brand GypsumPanels must be treated with CGC Drywall Paper Tape and DURABOND com-pound following directions on the bag. When the joints are completelydry, treat the entire wall surface with CGC Plaster Bonder according toapplication directions. Then apply DIAMOND Brand Veneer BasecoatPlaster and IMPERIAL Brand Finish Plaster in a two-coat application.
For Improved Bond Several products are available to help setting-type joint compounds and veneer plasters work better. CGC PlasterBonder, used on concrete, cement board, gypsum fiber panels and drysetting-type joint compound surfaces, enhances the plaster’s ability tobond to those surfaces. CGC Plaster Accelerator-Alum Catalyst alsocan be used in a solution applied to the substrate surface to help lime-containing veneer plaster adhere to sun-faded plaster base surfaces orsetting-type compound at joints (see page 360).
For Changing Working Time To alter the setting time of DURABOND
compound CGC High Strength Accelerator also may be used as a mixadditive to reduce the setting time, or CGC High Strength Retarder toextend the setting and working time.
205Finishing Veneer Plaster Systems
6

206
Veneer Plaster Finish ApplicationsVeneer Plaster Systems Veneer plaster can be applied over a variety of substrates in both one- and two-coat systems.
Product Substrate Finish Plaster
CompatibilitySelector
GRAND PRIX DIAMOND
Basecoat Mono Veneer Gauging/ Gauging/ IMPERIAL Veneer FIBEROCK BrandPlaster CMU Concrete(1) DUROCK(3) Plaster Base Lime Lime/Sand Finish Plaster Gypsum Panels(3)
IMPERIAL Veneer Basecoat � � � � � � � � �
DIAMOND Veneer Basecoat � � � � � � � � � �
IMPERIAL Veneer Plaster �
DIAMOND Veneer Plaster �(2) �
Notes: (1) A bonding agent must first be applied. (2) Job sanded. (3) CGC Plaster Bonder must first be applied. �= Acceptable
Mixing and All veneer finishes require the addition of water on the job. Water Proportioning should be clean, fresh, suitable for human consumption, and free from
mineral and organic substances that affect the plaster set. Water usedfor rinsing or cleaning is not suitable for mixing because it acceleratesthe plaster set.
Mechanical mixing is mandatory for veneer finish plasters. Mix no morematerial than can be applied before set begins. Since veneer finishesset more rapidly than most conventional plasters, always consult bagdirections for specific setting times.
Veneer plasters will produce mortar of maximum performance andworkability when the correct equipment is used and mixing directionscarefully followed. Proper mixing is one of the most important factorsin producing mortar of maximum workability.
Use a cage-type mixer paddle driven by heavy-duty 13 mm (1/2�) electricdrill with a no-load rating of 900 to 1,000 rpm. Do not use propeller-typepaddle or conventional mortar mixer. (For details of the cage-type mixingpaddle and available electrical drills, see pages 400-401 and PM19,Mixing Equipment for Veneer Plasters).
Mix plaster in 60 or 115 L smooth-sided container strong enough towithstand impacts that could cause gouging. Do not use brittle con-tainers for mixing.
Correct mixing–rapid and with high shear action–is essential for prop-er dispersion of plaster ingredients. Slow mixing can reduce plasticityof material. Overmixing can shorten working time. Operated at correctspeed, the cage-type design paddle mixes thoroughly without intro-ducing excess air into the mix.
Mixing Water requirements for IMPERIAL Brand Veneer Plasters:IMPERIAL Brand IMPERIAL Brand Basecoat Plaster–5 to 6 L/22.5 kg (50 lb.) bag.Plasters IMPERIAL Brand Finish Plaster–6.5 to 7.5 L/22.5 kg (50 lb.) bag.
Place water in a 45 to 60 L smooth-sided container. Start mixer, slowlyadd plaster and mix at least 2 min. to disperse lumps completely. Do notmix more than 5 min.
Cage-type mixing paddle is designed to draw materialinto and through paddleblades to disperse andblend ingredients by shearaction rather than foldingaction of conventional mixers.

207Finishing Veneer Plaster Systems
6
For sand float finish, add up to 5.5 kg (12.5 lb.) clean silica sand per22.5 kg (50-lb.) bag of IMPERIAL Brand Plaster to achieve desired texture.The use of more than 5.5 kg (12.5 lb.) of sand per bag will decreasehardness of surface. (Apply plaster in normal manner but omit finaltroweling. After surface has become firm, float to desired texture, usingsponge, carpet or other float. Use water sparingly.)
Mixing DIAMOND Water requirements for DIAMOND Brand Veneer Plasters:Brand Plasters DIAMOND Brand Veneer Basecoat–5.5 to 6.5 L/22.5 kg (50 lb.) bag.
DIAMOND Brand Interior Finish Plaster–11 to 14 L/22.5 kg (50 lb.) bag.
Place all but (1 or 2 L) of water into mixing container; then with mixeroperating, slowly add one bag of material. If a texture finish is desired,up to 23 kg (50 lb.) clean silica sand may be added per 22.5 kg (50 lb.)bag of DIAMOND Brand Interior Finish Plaster. For electric cable heat sys-tems, clean, sharp, fine silica sand must be added as follows: fill coat,23 kg (50 lb.) but no less than 11 kg (25 lb.) per 22.5 kg (50 lb.) bagDIAMOND Brand Interior Finish Plaster; finish coat, at least 6 kg (12-1/2 lb.) per 22.5 kg (50 lb.) bag plaster. When material is wetted,add more water (1 or 2 L) to obtain desired consistency. Mix for mini-mum of two minutes, but no longer than five minutes.
When DIAMOND Brand Finish Plaster is job-aggregated, 15 ml (one tablespoon) Cream of Tartar or 1 to 2 ml (1/4 to 1/2 teaspoon) of CGCRetarder for Lime Containing Plaster Products should be added foreach bag of plaster to retard set and allow sufficient working time.
Application Maintain temperature in all work areas at min. 13 to 16°C (55 to 60°F). Keep air circulation at minimum level during and after application until finish is dry.
IMPERIAL Brand Hand Application–Embed IMPERIAL Brand Tape, Type P and fill beads with Plasters a tight, thin coat of IMPERIAL Brand Plaster; allow to set, then plaster (See
“Selection of Joint Treatment System” on page 200.)
Plaster IMPERIAL Brand Plasters offer a wide range of finish options with threeFinishing distinct systems:
1. IMPERIAL Brand Finish Plaster (one-coat)
2. IMPERIAL Brand Basecoat Plaster with selected hand-applied or sprayfinish (two-coat).
IMPERIAL Brand Finish Plaster (one-coat) Scratch in a tight, thin coat ofIMPERIAL Brand Finish Plaster over entire area, immediately doubling backwith plaster from same batch to full thickness of 1.6 to 2.4 mm (1/16� to3/32�). Fill all voids and imperfections. Final trowel after surface has becomefirm, holding trowel flat and using water sparingly. Do not overtrowel.
For texture finished surfaces, with or without the addition of job-addedsand, final troweling is omitted. The surface is textured naturally as thematerial firms and water is removed into the base.
Best results are obtained by planning the plastering to permit continu-ous application from angle to angle. Where joining is unavoidable, usetrowel to terminate unset plaster in sharp clean edge–do not featherout. Bring adjacent plaster up to terminated edge and leave level. Do

208
not overlap. During finish troweling, use excess material to fill andbridge joining.
IMPERIAL Brand Basecoat Plaster (two-coat) Scratch in a tight, thincoat of IMPERIAL Brand Basecoat Plaster over entire area, immediatelydoubling back with plaster from same batch to full thickness of 1.6 to2.4 mm (1/16� to 3/32�). Fill all voids and imperfections. Leave thesurface rough and open by cross-raking with a fine-wire rake or broomto provide proper bond of the finish coat. Allow the basecoat to set andpartially dry to provide proper suction for the finish coat. If basecoathas dried, you may dampen (not saturate) the surface with water bymeans of a tank sprayer to control suction.
Finish coat materials are applied by scratching in and doubling back withselected finish–IMPERIAL Brand Finish Plaster, DIAMOND Brand InteriorFinish Plaster, gauged lime-putty, to achieve a smooth, dense surface fordecoration, free of surface blemishes. For textured finishes, floating ontextures with additional material is conducted once the surface hasbecome firm, using water sparingly.
Other IMPERIAL Concrete Block Surface must be porous for proper suction or be Brand Basecoat roughened/face-scored to provide adequate mechanical bond. LightlyApplications spray walls with water to provide uniform suction. Fill and level all
voids, depressions and joints with IMPERIAL Brand Basecoat Plaster andallow to set; then apply a subsequent coat, as with gypsum baseapplication, leaving final surface rough and open to provide properbonding of the finish coat.
Monolithic Concrete Prepare surface with CGC Plaster Bonderapplied according to application directions. Fill all voids and depres-sions with IMPERIAL Brand Basecoat Plaster and allow to set and partiallydry. Then apply IMPERIAL Brand Basecoat Plaster as with gypsum baseor concrete block. Important: It is essential that the applied basecoat sur-face be raked or broomed once the material has become firm for a roughand open surface in order to provide for proper suction for the finish mate-rial. Failure to do this may result in delamination of the finish material.
Integral Plaster Plaster chalkboards offer maximum freedom in design. There is noChalkboards limiting sheet size as is the case with fabricated boards; therefore,
entire walls can be utilized as chalkboards. Maintenance is accom-plished as easily as with conventional fabricated chalkboards.(Requirements for control joints in chalkboard surfaces are the sameas for other gypsum surfaces.)
Chalkboard Follow directions for system construction. Locate floor and ceiling runnerswith Steel-Stud and position studs 406 mm (16�) o.c. Attach IMPERIAL Brand Gypsum BaseIMPERIAL Brand using 25 mm (1�) TYPE S Screws spaced 16� o.c. When chalkboard area Gypsum Base does not extend from floor to ceiling, use plaster “J” or “L”Trim to Partitions frame the GRAND PRIX Brand Gypsum Base face layers that will be used as
chalkboard. (All chalkboard surfaces must have two layers of GRAND PRIX
Brand Gypsum Base.) Miter corners of the metal trim to form a neatjoint. Attach chalkboard using 41 mm (1-5/8�) TYPE S Screws, driventhrough GRAND PRIX Brand Gypsum Base layer into the studs.

209Finishing Veneer Plaster Systems
6
Veneer Plaster Application: use one or two-coat plaster for chalk-board surface. With one-coat work, apply IMPERIAL Brand Finish Plasterto 1.6 to 2.4 mm (1/16� to 3/32�) thickness. Cover entire area with atight, thin coat, then double back to full thickness. After surface hasbecome firm, final-trowel to a smooth surface, using water sparingly.
For two-coat application, apply IMPERIAL Brand Basecoat Plaster to 1.6 to2.4 mm (1/16� to 3/32�) thickness as described for single-coatapplication. Allow basecoat to set and partially dry; then apply IMPERIAL
Brand Finish Plaster. Leave surface very hard and polished.
When dry, paint chalkboard with one coat primer-sealer and two coatschalkboard paint.
Install chalk trough with 33 mm (1-5/16�) TYPE S Screws, driven throughthe two layers of IMPERIAL Brand Gypsum Base and into the steel studs.
DIAMOND Brand Plasters
DIAMOND Brand All finish materials and finish surfaces must be protected from contactInterior Finish with DIAMOND Brand Interior Finish Plaster. This includes glass,Plaster ceramic materials, metal and wood. Apply wood, plastic or other
exposed trim after plaster application.
DIAMOND Brand Interior Finish Plaster should be applied to GRAND PRIX
Plaster Base having unfaded blue face paper. However, under abnormalconditions where there is no alternative to using GRAND PRIX PlasterBase faded from excessive exposure to sunlight or ultra-violet radiation,precautions should be taken to prevent delamination. Degraded GRAND
PRIX Plaster Base is indicated if face paper is not blue or grayish blue.When face paper color has become gray to tan (or if questionable), treatpaper with a solution of CGC Accelerator—Alum Catalyst or CGCPlaster Bonder.
Plaster chalkboard

210
Degrading may occur when GRAND PRIX Plaster Base has been installedlong before the finish is applied.
When used with lime-containing plaster, such as DIAMOND BrandInterior Finish Plaster, sunfaded GRAND PRIX Brand Gypsum Base facepaper should be treated with an Alum Solution or CGC Plaster Bonder.
For alum catalyst solution treatment, pour 1.4 kg (3 pounds) of alumcatalyst slowly into 3.78 L (one gallon) of water and mix thoroughly.Allow the solution to stand until any undissolved material has settled,then strain the solution into tank-type sprayer (such as a gardensprayer). Spray the solution onto the faded GRAND PRIX Brand Base facepaper so that it is wet but not soaked. 4 L of solution should treat 70 m2 (750 sq. ft.) of GRAND PRIX Gypsum Base. Begin finish plasterapplication before face paper treated with alum solution is completelydry. Caution: Alum treatment shortens the setting time of DIAMOND BrandInterior Finish Plaster.
Begin application only after joints have been reinforced with glass fibertape and preset with an application of DIAMOND Brand Interior FinishPlaster or treated with CGC Brand Paper Joint Tape and DURABOND
Setting Joint Compound. Apply a thin, tight scratch coat of this finishover entire working area. Immediately double back with material fromsame batch to a full 1.6 to 2.4 mm (1/16� to 3/32�) thickness.
Start the finish troweling as soon as material has become sufficientlyfirm to achieve a smooth trowel finish free from trowel marks, voidsand other blemishes. Smooth and level the surface with trowel heldflat; use water sparingly to lubricate. Final hard troweling should beaccomplished prior to set as indicated by darkening of the surface.
A variety of textures ranging from sand float to heavy Spanish can beachieved with DIAMOND Brand Interior Finish Plaster when job-aggre-gated with silica sand. Application is the same as for neat DIAMOND
Brand Interior Finish Plaster except that once the surface has been lev-eled and sufficient take-up has occurred, begin floating material fromthe same batch with trowel, float, sponge or by other accepted localtechniques.
DIAMOND Brand Interior Finish Plaster also may be textured by skip-troweling. When applying in this manner, eliminate final troweling.When surface has become sufficiently firm, texture with material fromsame batch prior to set.
Painting or further decoration of DIAMOND Brand Interior Finish Plasteris recommended and should be specified. However, in many residen-tial applications, DIAMOND Brand Interior Finish Plaster provides a uni-form white color and may satisfy a job’s specific acceptance criteria ifskip-trowel and float-finish textured finishes are utilized. DIAMOND
Brand Interior Finish Plaster is formulated to allow quick drying and canbe decorated when thoroughly dry using a latex base or breather-typepaint. Under ideal conditions, painting can take place in as little as 24hours, which minimizes costly delays and speeds occupancy.

211Finishing Veneer Plaster Systems
6
DIAMOND Brand DIAMOND Brand Veneer Basecoat Plaster provides quality walls andVeneer Basecoat ceilings for residential construction where the superior strength ofPlaster IMPERIAL Brand Basecoat Plaster is not essential. DIAMOND Brand Veneer
Basecoat Plaster produces a base that esthetically enhances the finish byproviding regulated suction, resulting in exceptional integral bond. Oncebasecoat is applied and has become firm, surface is raked or broomed toprovide a rough and open surface for the finish coat. Be certain that thebasecoat is not completely dry. The basecoat should be set and allowedto dry only partially to provide proper suction for the finish coat. If thebasecoat has dried, you may dampen (not saturate) the surface with waterby means of a tank sprayer to control suction.
Over Gypsum Base Apply DIAMOND Brand Veneer Basecoat Plasterfrom 1.6 to 2.4 mm (1-16� to 3/32�) thickness. When GRAND PRIX
Gypsum Base is used, reinforce all joints and interior angles withIMPERIAL Brand Type P Tape. Embed tape and fill beads with DIAMOND
Brand Veneer Basecoat Plaster and allow to set, but not dry. Afterbeads and joints have been properly prepared (rough and open), applya tight, thin coat of DIAMOND Brand Veneer Basecoat Plaster over theentire area, immediately doubling back with plaster from the samebatch to full thickness. Fill all voids and imperfections. Leave surfacerough and open by cross raking with a fine wire rake, sponge or finebroom once the surface has become somewhat firm. Allow basecoatto set to provide proper suction for finish coat.
Over Concrete Block Surface must be porous and develop propersuction to provide adequate mechanical bond. Lightly spray walls withwater to provide uniform suction. Fill and level all voids, depressionsand joints with DIAMOND Brand Veneer Basecoat Plaster and allow toset; then apply subsequent coats as with gypsum base application,leaving final surface rough and open to provide proper bonding of thefinish coat.
Over Monolithic Concrete Prepare surface with CGC Plaster Bonderapplied according to application directions. Fill all voids and depressionswith DIAMOND Brand Veneer Basecoat Plaster and allow to set and partiallydry. Then apply DIAMOND Brand Veneer Basecoat Plaster as with gypsumbase or concrete block. Important: It is essential that the applied basecoatsurface be raked or broomed once the material has become firm for arough and open surface to provide proper suction for the finish coat.Failure to do so may result in delamination of the finish material.
Graceful, wavelike swirltexture
Light to medium skiptrowel texture
Sand-aggregated float finish
Heavy texture finish (Spanish)

212
Painting of Veneer PlasterNo matter what paint or decoration is used, it is essential that the plas-ter be completely dry. Typically, veneer plasters may be dry in as littleas 24 hours. Use a high-quality, undiluted acrylic latex, vinyl or alkali-resistant alkyd paint. Prior to the installation of an applied finish, suchas epoxy-based finish systems, the veneer plaster must be properlysealed. Quick-drying vinyl acrylic latex or alkali-resistant alkyd primer-sealers are recommended. Polyvinyl acetate (PVA) based primersshould not be used over wet plaster of any kind, including lime-con-taining plasters. The PVA film is subject to rewetting and will almostcertainly cause bond loss and subsequent paint delamination.
Radiant Heat Plaster System–DIAMOND BrandInterior Finish Plaster
Application-Radiant Heat Cable After GRAND PRIX Gypsum Base andjoint reinforcement tape have been applied, install electric radiantheating cable in accordance with design requirements and cable man-ufacturer’s specifications. Attach cable to ceiling in such a manner thatit is kept taut and does not sag away from the base. All cableconnectors and non-heating leads should be embedded (countersunk) into, but not through, the gypsum base so they do notproject below the heating wire.
Fill Coat Application Apply job-sanded DIAMOND Brand Interior FinishPlaster in sufficient thickness to completely cover cable. Trowel plasterparallel to direction of cable but do not use cable as a screed. Levelwith a trowel, rod or darby to fill any low spots or to remove any highridges, etc. Use a serrated darby or lightly broom the plaster surfaceprior to set to provide a key for the finish coat. Average thickness of fillcoat should be 4.8 mm (3/16�).
Finish Coat Application Apply finish coat after fill coat has developedsufficient suction–in good drying weather, about two hours after the fillcoat has set; in damp or cold weather usually overnight unless goodsupplementary heat and ventilation are provided. Use job-sandedDIAMOND Brand Interior Finish Plaster 1.6 to 2.4 mm (1/16� to 3/32�)thick, to bring total plaster thickness to 6.4 mm (1/4�).
Trowel job-sandedDIAMOND Brand InteriorFinish Plaster over electric cable.

213Finishing Veneer Plaster Systems
6
Scratch in a tight thin coat over the entire area, immediately doublingback to full thickness. Fill all voids and imperfections. Scratch and dou-ble-back with the same mix of DIAMOND Brand Interior Finish Plaster.When surface has become firm, hold trowel flat and final-trowel usingwater sparingly. Best results are obtained by continuous application ofan entire ceiling. Always work to a wet edge to avoid dry joinings.
Texture Finish When finish coat has become sufficiently firm, but notset, float surface to desired texture using a sponge, carpet, or otherfloat. Use water sparingly. For heavier texture, additional material fromthe same batch may be applied to the firm surface to achieve a skip-trowel, Spanish, or other texture.
Radiant Heat Surface Preparation Concrete surface must be structurally sound Systems to and clean, free of dirt, dust, grease, wax, oil or other unsoundMonolithic conditions. Treat exposed metal with a rustproof primer. WhenConcrete corrosion due to high humidity and/or saline content of sand is
possible, the use of zinc alloy accessories is recommended.
Remove form ridges to make surfaces reasonably uniform and level.Locate uneven ceiling areas and bad gravel pockets, which require fill-ing prior to installing electric cable and filler.
After treating entire surface with CGC Plaster Bonder, according toapplication directions, leveling may be done with fill-coat mix of jobsanded DIAMOND Brand Interior Finish Plaster. Minor leveling may bedone with a DURABOND Setting-Type Joint Compound.
Caution: Temperature of concrete ceiling with bonding agent appliedmust be above 0°C (32°F) before filler and finish applications arestarted, with air temperature above 13°C (55°F).
Radiant Heat Cable Application After ceiling surface has been lev-eled, apply electric radiant heating cable according to design require-ments and cable manufacturer’s specifications. Attach cable to theceiling so that it is kept taut and does not sag away from the ceiling.All cable connectors and non-heating leads must be securely attachedto concrete ceiling.
Finishing Mix and apply job-sanded fill coat DIAMOND Brand InteriorFinish Plaster according to directions in previous section. Apply 8 mm(5/16�) basecoat parallel to direction of cable, completely coveringcable and anchor devices.
bridging tape
cableanchorstrip
finishdecoration
electric cable
DIAMOND Brandinterior finish
plaster

214
Mix and apply finish coat after fill coat has developed sufficient suction.Use job-sanded DIAMOND Brand Interior Finish Plaster 1.6 to 2.4 mm(1/16� to 3/32�) thick, to bring total plaster thickness to 10 mm (3/8�).Apply finish coat in same manner described in previous section.
Do not energize heating cable until plaster is thoroughly dry. Wheneither or both the completed radiant heat ceiling and room temperatureare below 13°C (55°F), the temperature should be increased in 3°C(5°F) increments for each 24-hr. period until a room temperature of13°C (55°F) is attained.
If completed radiant heat ceiling and room temperature are 13°C(55°F) or higher, thermostat may be set at desired temperature.
Special Abuse Resistant SystemsVeneer Plaster For improved impact strength and abrasion resistance, a two-coatOver DUROCK Brand veneer plaster system consisting of DIAMOND Brand Veneer BasecoatCement Board Plaster and IMPERIAL Brand Finish Plaster is applied over DUROCK Brand
Cement Board attached to framing. This construction is particularlyuseful for commercial and institutional applications such as schoolsand high-traffic retail locations.
Space wood or steel framing 400 mm (16�) o.c. and install DUROCK
Brand Cement Board with long edges either parallel or perpendicularto the framing and with the rough side of panels exposed. Fastenersare spaced a maximum of 200 mm (8�) o.c.
Prior to treatment of panel joints, apply CGC Plaster Bonder in a con-tinuous film to the joint areas according to application directions. Jointsshould then be treated with CGC Brand Paper Joint Tape and DURABOND
Setting-Type Joint Compound. Joint surfaces must be treated with aseparate coat of joint compound to fully conceal the paper tape.
When the joint is completely dry, treat the entire wall surface with CGCPlaster Bonder. Then apply DIAMOND Brand Veneer Basecoat Plaster from1.6 to 2.4 mm (1/16� to 3/32�) thickness using a scratch and double-backtechnique. When basecoat plaster is firm, broom the surface to leave itrough and open for a finish application.With basecoat set and partially dry,apply IMPERIAL Brand Finish Plaster using a scratch and double-backtechnique. Complete finishing when material is firm. Leave finished surfacesmooth and dense for decorating.
Veneer Plaster The abuse resistant characteristics of already tough FIBEROCK BrandOver FIBEROCK Brand Abuse-Resistant Panels are enhanced with the application of a two-Abuse-Resistant coat veneer plaster system. Panels are applied in the same fashion as Panels for cement board above, then joints are treated using SHEETROCK
Brand Paper Joint Tape and DURABOND Setting-Type Joint Compound.When the joints are completely dry, treat the entire wall surface withCGC Plaster Bonder according to the application directions. Then applyDIAMOND Brand Veneer Basecoat Plaster and IMPERIAL Brand FinishPlaster as described above for cement board.

215Finishing Veneer Plaster Systems
6
Resurfacing Walls and CeilingsVeneer plasters may be used to resurface walls that are damaged orwalls that can benefit from a more abuse-resistant surface. However,care must be taken to prepare the wall surface for plaster application.
Make sure old wall coverings and their adhesives have been removed.Wash surface thoroughly. Scrape away any loose paint and remove andrepair any damaged drywall or plaster surface with appropriate patch-ing material. (See patch and repair products, page 55.) Fill all cracksor holes with DURABOND Setting-Type Joint Compound and SHEETROCK
Brand Paper Joint Tape if necessary.
Once joint compound has set and dried, apply CGC Plaster Bonder overentire wall and ceiling area to be resurfaced.
Mix DIAMOND Brand Veneer Basecoat and Interior Finish Plaster asdescribed on pages 206-207 and trowel-apply over surface using ascratch and double-back technique with each coat. Do not overtrowel.
Decorating with Pigmented Finish PlasterDecorative Interior The CGC Decorative Interior Finish System is applied to GRAND PRIX
Finish System Gypsum Base. If SHEETROCK Brand Gypsum Panels or other approved substrate are used, the surface must be prepared with SHEETROCK
Brand Wallcovering Primer and then with CGC Plaster Bonder to assurea consistent bond.
CGC Decorative Interior Finish consists of DIAMOND Brand Interior FinishPlaster mixed with pigments that will not affect plaster set. The systemmust be sealed upon completion.

216
Color is thoroughly mixed into the finish, providing a deep tinted layerthat effectively hides mars, chips and scratches from appearing. High-quality colorants are used to assure color consistency and UV resis-tance. System identifies 12 basic colors that can be mixed using astandard tint machine and COLORTREND 888 Universal MachineColorants. CGC recommends using only COLORTREND 888 UniversalMachine Colorants. Colorants from other manufacturers are not rec-ommended since they may not be compatible with CGC materials, theymay cause color variations and they may interfere with the intendedproduct application. We recommend only the use of COLORTREND 888Universal Machine Colorants, the basic CGC color formulas with thesecolorants and custom colors created using the COLORTREND AMBIANCE�Fan Deck Selector.
For standard colors using COLORTREND 888 Universal MachineColorants, the formula selected will produce a 19 L batch size. To cre-ate a custom color, select a color and formula from the fan deck andcolor formula book that represents a color somewhat darker than thecolor you desire as the finished, dried, surface color. Note that theshade of finished colors is dependent on many factors. Each color for-mula yields a slightly different degree of color lightness compared tothe color swatch depicted in the fan deck selector. The texture appliedand the consistency of the mixed mortar also effect the appearance ofthe finished surface, and therefore the color. Even the plaster productchosen (DIAMOND Brand Interior Finish, IMPERIAL Brand Basecoat Plaster,DIAMOND Brand Veneer Basecoat Plaster or IMPERIAL Brand FinishPlaster) for the mix can vary the resulting shade. Depending on thesefactors, the final dried finish can be up to several shades lighter thanthe color swatch depicted in the fan deck selector. Note also that whenwet, the wet mixed mortar appears darker than the selected colorswatch, but will lighten in color when set and dry.
Mixing CGC Decorative Interior Finish usually consists of DIAMOND BrandInterior Finish mixed with colorants and water, but IMPERIAL Brand BasecoatPlaster, DIAMOND Brand Veneer Basecoat Plaster or IMPERIAL Brand FinishPlaster also may be used. Mix in 19 L pail (356 mm (14�) high, 260 mm(10-1/4�) bottom, 286 mm (11-1/4�) top). Use 165 mm (6-1/2�) of waterper batch for DIAMOND Brand Interior Finish, 114 mm (4-1/2�) for DIAMOND
Brand Veneer Basecoat Plaster, 102 mm (4�) for IMPERIAL Brand BasecoatPlaster, and 127 mm (5�) for IMPERIAL Brand Finish Plaster. Add the prede-termined amount of colorant (COLORTREND Formula) to the water.
The plaster is added to the water in three stages. First, fill the bucketwith plaster and stir lightly with an on-and-off action using a 450 RPM13 mm (1/2�) drill and blade-type (joint compound) mixing paddle. Addplaster to the top of the bucket and repeat stirring with on-and-offaction. Add plaster a third time and mix completely, ensuring that nocolored water splashes out of mixing container.
Mix approximately 18-20 kg (40-45 lbs.) of DIAMOND Brand InteriorFinish with the water, or 27 kg (60 lbs.) of DIAMOND Brand VeneerBasecoat Plaster or IMPERIAL Brand Basecoat Plaster, or 23 kg (50 lbs.)of IMPERIAL Brand Finish Plaster. These quantities should fill thecontainer to about 25 to 38 mm (1 to 1-1/2 inches) from its top. Finish

217Finishing Veneer Plaster Systems
6
should be slightly thicker than normal. To ensure color uniformity, eachbatch must be mixed exactly the same way, by volume and to the samefluidity in a volume-specific container. Note that graded white silicasand may be used for float finishing.
Application Each wall or ceiling must be covered in a continuousapplication, always continuing joinings of separate mixes prior to eithermix setting. Work walls and vaulted ceilings from top to bottom; ceilingsfrom angle to angle. For one-coat semi-smooth texture, apply plaster inrandom, 300 to 600 mm (1� to 2�) strokes at a nominal 1.6 to 3 mm(1/16� to 1/8�) thickness, leaving lap marks as desired. After approx.20 min. from initial application, draw a trowel, held almost flat, lightlyover the surface with short strokes in various directions. Trowel again asinitial set begins (approx. 45 min.). For two-coat heavy texture, applyfirst coat to a nominal thickness of approx. 3 mm (1/8�), covering theentire surface. When surface has firmed slightly, apply second coat inshort strokes as described above. Two-coat thickness should vary from3 to 6.4 mm (1/8� to 1/4�). Additional troweling of second coat shouldbe as described above for one-coat finish.
Sealing After finish has set and dried (approx. 24 hr.), apply CGCDecorative Finish Sealer and maintain min. 13°C (55°F) temperature.Do not shake or box-mix sealer. Apply using brush, roller or sprayerwith 0.4 to 0.6 mm (0.015� to 0.023�) tip. Initially, sealer will appearmilky, but will dry clear and colorless. When appearance changes toclear, wipe or roll drips and puddles, then recoat.

218