fire range installation instructions · 4 | instruction manual 2.1 cable duct through wall 05 •...
TRANSCRIPT

www.soudal.com
Fire range
Installation Instructions in accordance with EN 1366-3 and EN 1366-4

2 | Instruction manual
Table of Content
1. Soudal products 03
2. Trough walls 04
2.1 cable duct 04
2.2 pipes 06
2.3 cable duct & pipes 08
2.4 cable in PVC pipes 10
3. Trough ceilings 12
3.1 cable duct 12
3.2 pipes 14
3.3 cable duct & pipes 16
3.4 cable in PVC pipes 18
4. joints 20
The openings around metal pipes and cables, but even blank seals can allow a fire to penetrate. For this reason, these openings must be sealed against fire. For the above-mentioned types of openings, Soudal offers fire-resistant solutions tested in accordance with European standards (EN 1366-3).
These installation instructions are drawn up to guide the installer through the correct process of sealing openings against fire. The correct execution of these instructions ensures that the products are installed in accordance with the test certificates. Only then is it possible to guarantee the fire-resistant capacity of the products in accordance with EN 1366-3. Always ask for the test certificates before starting any work.
Introduction

Instruction manual | 3
1. Soudal products
High quality fire rated PU foam with CE mark. For the installation of fire doors and joint sea-ling. Up to 240 minutes of Fire resistance. Excellent acoustic rating.
Hand held
Art. nr.: 108289 Pink 5411183036079 750ml 12/box
Gun
Art. nr.: 123233 Pink 5411183109322 750ml 12/box
Soudafoam FRFire resistant silicone sealant up to 4 hours of fire resistance (EN 1366 Part 4 - NBN 713.020 - BS 476/20
Cartridges
Art. nr.: 108998 white 5411183037687 310ml 15/box
Art. nr.: 102530 grey 5411183017603 310ml 15/box
Foilpack 600ml
Art. nr.: 109952 grey 5411183039070 600ml 12/box
Fire Silicone B1 FR
Fire retardant paintable acrylic up to 4 hours of fire resistance. intumescent at 120°C.
Cartridges
Art. nr.: 106329 white 5411183009448 310ml 15/box
Art. nr.: 107433 grey 5411183027558 310ml 15/box
Foilpack 600ml
Art. nr.: 105229 white 5411183037175 600ml 12/box
Art. nr.: 110947 grey 5411183042476 600ml 12/box
Firecryl FRFast-curing, high density fire resistant foam. Applicable for penetration seals according to EN 1366-3.
Hand held
Art. nr.: 108061 purple 5411183029415 400ml 12/karton
Soudafoam 2K B2
Fire retardant Hybrid polymer. Up to 4 hours of fire resistance in joints. (EN 1366 Part 4 - NBN 713.020 - BS 476/20)
Foilpack 600ml
Art. nr.: 113628 grey 5411183102330 600ml 12/box
Soudaseal FR
Powerfull quick-drying cleaner and degreaser for various maintenance and assembly jobs. Excellent for most surfaces
Spray
Art. nr.: 119708 5411183090682 400ml 6/Karton
Cleaner & Degreaser
Flexible and paintable. intumescent at 120°C. Sticky back side, straps might be necessary.
Roll
Art. nr.: 126933 1,8m x 0,3m 1/karton
Fire Blanket
Ronde PU voegvulling met open cellen. (1m)
RodsArt. nr.: 110283 grey 5411183024755 15mm x 1m 250m/box
Art. nr.: 110284 grey 5411183024915 20mm x 1m 200m/box
Art. nr.: 110285 grey 5411183025066 25mm x 1m 100m/box
Art. nr.: 110286 grey 5411183025219 30mm x 1m 100m/box
Art. nr.: 110287 grey 5411183022324 40mm x 1m 50m/box
Art. nr.: 110288 grey 5411183023376 50mm x 1m 50m/box
PU backing rods
International approvals (available on request)• RUG 9279C, WFRC C113610, BWA 45716-01, BWA 45717-01 (1)• Warrington WFRG 13492B, EFECTIS PV n°09-A-276,
Afiti n°1882T09, EFECTIS 2009-R0703, BWA 23751-00 (2)• ITB LP-02491.1/09 (3)• ITB LP-02491.2/09 (4)• PV13-A-061
TESTED ACCORDING TO
TESTED ACCORDING TO
EN 1366-3
TESTED ACCORDING TO
TESTED ACCORDING TO
EN 1366-4

4 | Instruction manual
2.1 cable duct through wall
05• After filling the opening, wait approx. 30 minutes for the
foam to fully harden.
06• Cut any excess foam away. Cut the foam away up to a depth
of 4mm across the whole surface along both sides of the opening. Use a sturdy knife.
01• Note: The opening should not be more than 700cm2.• Ensure the openings are free from dust and grease to achieve
an optimum adherence between the products and substrate. • Degreasing a cable duct can be done with Cleaner and De-
greaser.
02• Put the cables in the cable duct.
03• Apply a layer of Fire Blanket covering the cables for a length
of 23cm from the wall, on both sides of the wall.
04• Activate the canister of Soudafoam FR 2K B2 by turning the
black ring on the bottom 5 times in the direction indicated with arrows and shake the canister well 20 times. If the foam leaving the canister is homogenously purple, the canister is shaken thoroughly and ready for use.
• Fill the opening.• Note: The canister will feel warm due to the chemical reac-
tion between the components. The foam will increase up to 3 times in volume.

Instruction manual | 5
2.1 cable duct through wall (continued)
07• Remove all foam residue.
08• Apply a layer of Firecryl FR of 4mm on both sides of the open-
ing.
Classification:
• Up to EI 120• In accordance with EN 1366-3• Concrete, aerated concrete,
brickwork• At least 150mm wall thickness
09• When the entire surface of the opening is covered with a
layer of Firecryl FR, a damp spatula can be used to smoothen the surface. Do this on both sides of the opening.
• Once the Firecryl FR has hardened, fire-resistance is guaran-teed. The area can now be painted.
Used products:
• Fire Blanket• Soudafoam FR 2K B2• Firecryl FR• Cleaner & Degreaser

6 | Instruction manual
2.2 pipes through wall
03• Apply a layer of Fire Blanket covering the cables for a length
of 23cm from the wall, on both sides of the wall.
04• Activate the canister of Soudafoam FR 2K B2 by turning the
black ring on the bottom 5 times in the direction indicated with arrows and shake the canister well 20 times. If the foam leaving the canister is homogenously purple, the canister is shaken thoroughly and ready for use.
• Fill the opening.• Note: The canister will feel warm due to the chemical reac-
tion between the components. The foam will increase up to 3 times in volume.
05• After filling the opening, wait approx. 30 minutes for the
foam to fully harden.
06• Cut any excess foam away. Cut the foam away up to a depth
of 4mm across the whole surface along both sides of the opening. Use a sturdy knife.
02• Put the cables in the cable duct.
01• Note: The opening should not be more than 700cm2.• Ensure the openings are free from dust and grease to achieve
an optimum adherence between the products and substrate. • Degreasing a cable duct can be done with Cleaner and De-
greaser.

Instruction manual | 7
2.2 pipes through wall (continued)
Material Pipe diameter(min - max)
Pipe wall(min - max)
Transit(max. diameter)
EI(minutes)
Copper 8 -59,5 mm 1,7 - 14,2 mm 136 mm 120C/U*
27,4 - 41,7 mm 1,3 - 14,2 mm 71 mm 120C/U*
Steel 33,5 - 86,0 mm 1,9 - 14,2 mm 136 mm 120C/U*
Stainless steel 34 - 89 mm 2,8 - 14,2 mm 136 mm 120C/U*
34 - 116 mm 2,8 - 14,2 mm 151 mm 30C/U*
* The metal tube may not have an opening on both sides.
Classification
07• Remove all foam residue.
08• Apply a layer of Firecryl FR of 4mm on both sides of the open-
ing.
Used products:
• Fire Blanket• Soudafoam FR 2K B2• Firecryl FR• Cleaner & Degreaser
• Concrete, aerated concrete, brickwork• At least 150mm wall thickness
8 | Instruction manual
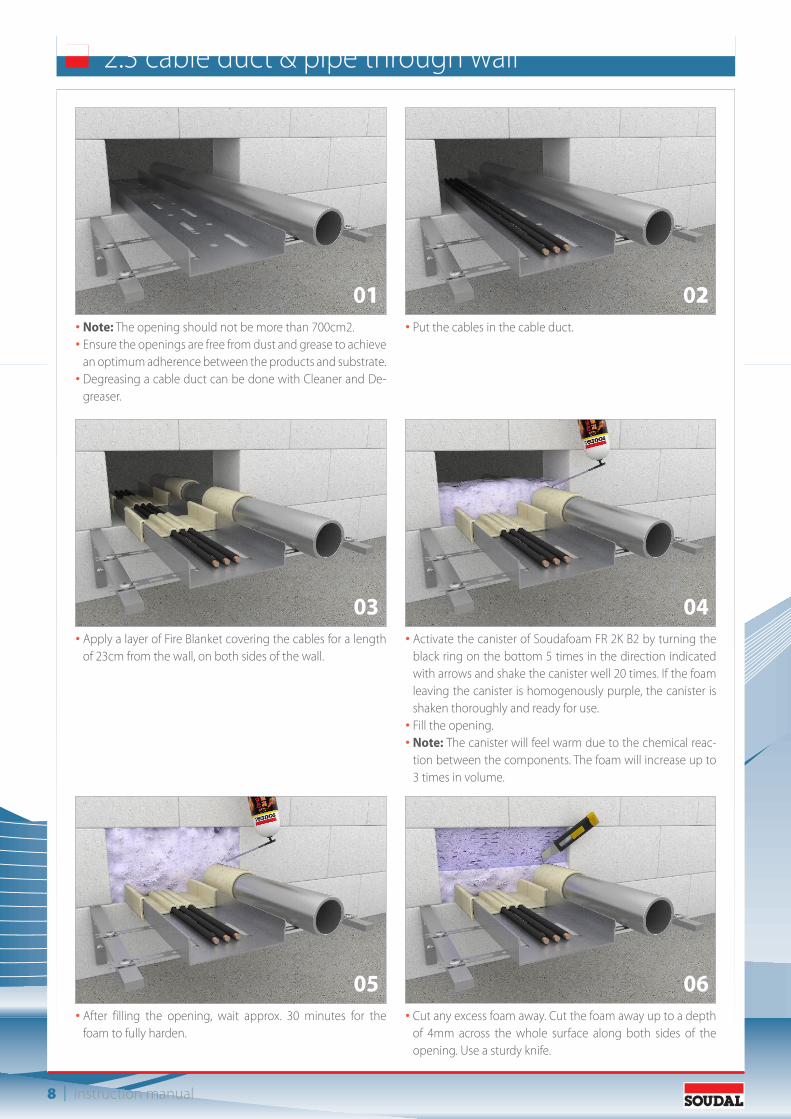
2.3 cable duct & pipe through wall
05• After filling the opening, wait approx. 30 minutes for the
foam to fully harden.
06• Cut any excess foam away. Cut the foam away up to a depth
of 4mm across the whole surface along both sides of the opening. Use a sturdy knife.
01• Note: The opening should not be more than 700cm2.• Ensure the openings are free from dust and grease to achieve
an optimum adherence between the products and substrate. • Degreasing a cable duct can be done with Cleaner and De-
greaser.
02• Put the cables in the cable duct.
03• Apply a layer of Fire Blanket covering the cables for a length
of 23cm from the wall, on both sides of the wall.
04• Activate the canister of Soudafoam FR 2K B2 by turning the
black ring on the bottom 5 times in the direction indicated with arrows and shake the canister well 20 times. If the foam leaving the canister is homogenously purple, the canister is shaken thoroughly and ready for use.
• Fill the opening.• Note: The canister will feel warm due to the chemical reac-
tion between the components. The foam will increase up to 3 times in volume.

Instruction manual | 9
2.3 cable duct & pipe through wall (continued)
07• Remove all foam residue.
08• Apply a layer of Firecryl FR of 4mm on both sides of the open-
ing.
09• Als de volledige oppervlakte van de doorvoer bedekt is met
een laag Firecryl FR, Strijk dan de Firecryl FR glad met een vochtige spatel. Doe dit aan beide zijde van de doorvoer.
• Wanneer de Firecryl FR uitgehard is, dan is de brandweer-stand gegarandeerd. Daarna kan de doorvoer overschilderd worden.
Used products:
• Fire Blanket• Soudafoam FR 2K B2• Firecryl FR• Cleaner & Degreaser
Classification:
• Up to EI 120• In accordance with EN 1366-3• Concrete, aerated concrete,
brickwork• At least 150mm wall thickness

10 | Instruction manual
2.4 cables in PVC pipes through a wall
02• Apply a PU joint filler around the PVC pipe for half the thick-
ness of the wall.
01• Install a PVC pipe of up to 50mm diameter in the opening
(maximum diameter 111mm). • The pipe must protrude for a minimum of 70mm and a maxi-
mum of 150mm on both sides.
03• Apply Firecryl FR around the pipe on both sides of the open-
ing.
04• Pull the cables through the pipe.
05• Apply Soudafoam FR between the cables in the PVC pipe.
06• Cut any excess foam away.

Instruction manual | 11
07• Apply a layer of Firecryl on the foam.
2.4 cables in PVC pipes through a wall (continued)
Used products:
• PU Joint Filler• Firecryl FR• Soudafoam FR
Classification:
• Up to EI 120• In accordance with EN 1366-3• Concrete, aerated concrete,
brickwork• At least 150mm wall thickness
12 | Instruction manual
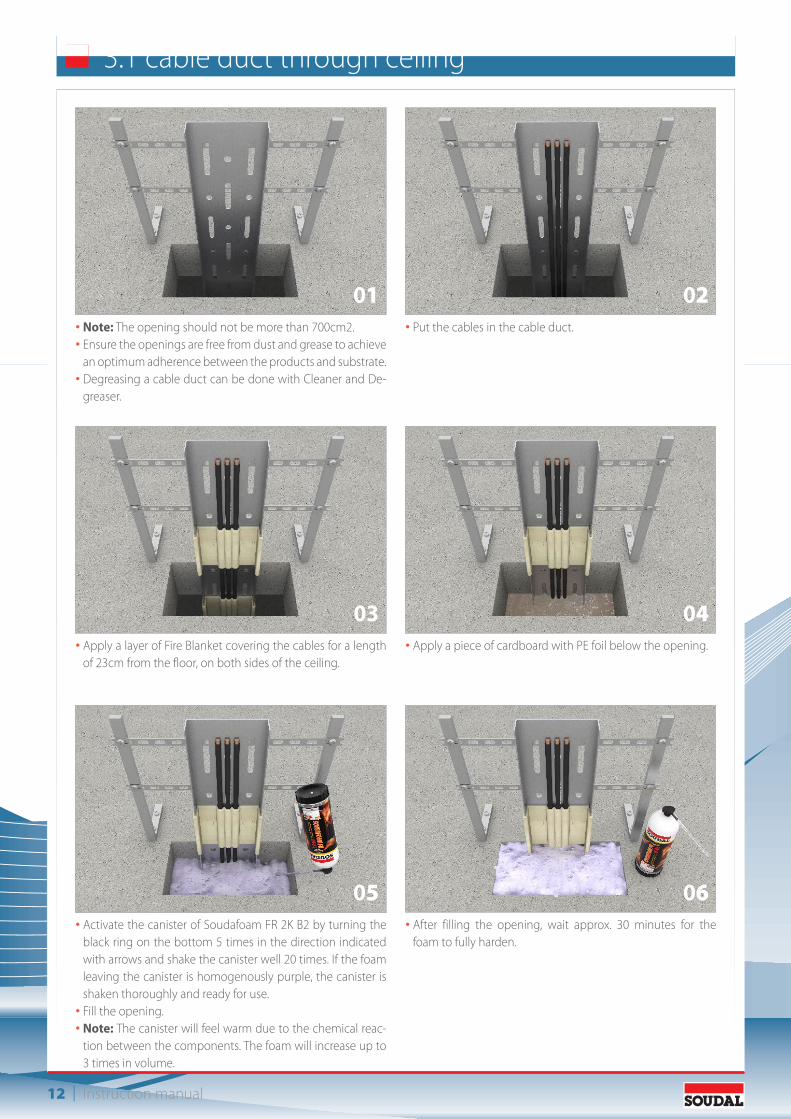
3.1 cable duct through ceiling
02• Put the cables in the cable duct.
01• Note: The opening should not be more than 700cm2.• Ensure the openings are free from dust and grease to achieve
an optimum adherence between the products and substrate. • Degreasing a cable duct can be done with Cleaner and De-
greaser.
03• Apply a layer of Fire Blanket covering the cables for a length
of 23cm from the floor, on both sides of the ceiling.
04• Apply a piece of cardboard with PE foil below the opening.
05• Activate the canister of Soudafoam FR 2K B2 by turning the
black ring on the bottom 5 times in the direction indicated with arrows and shake the canister well 20 times. If the foam leaving the canister is homogenously purple, the canister is shaken thoroughly and ready for use.
• Fill the opening.• Note: The canister will feel warm due to the chemical reac-
tion between the components. The foam will increase up to 3 times in volume.
06• After filling the opening, wait approx. 30 minutes for the
foam to fully harden.

Instruction manual | 13
3.1 cable duct through ceiling (continued)
07• Cut any excess foam away. Cut the foam away up to a depth
of 4mm across the whole surface along both sides of the opening. Use a sturdy knife.
08• Remove all foam residue.
09• Apply a layer of Firecryl FR of 4mm on both sides of the open-
ing.
10• Apply a layer of Firecryl FR of 4mm on both sides of the open-
ing.
Used products:
• Fire Blanket• Soudafoam FR 2K B2• Firecryl FR• Cleaner & Degreaser
Classification:
• Up to EI 120• In accordance with EN 1366-3• Concrete, aerated concrete,
brickwork• At least 150mm wall thickness

14 | Instruction manual
3.2 tubes through ceiling
05• After filling the opening, wait approx. 30 minutes for the
foam to fully harden.
06• Cut any excess foam away. Cut the foam away up to a depth
of 4mm across the whole surface along both sides of the opening. Use a sturdy knife.
02• Put the cables in the cable duct.
01• Note: The opening should not be more than 700cm2.• Ensure the openings are free from dust and grease to achieve
an optimum adherence between the products and substrate. • Degreasing a cable duct can be done with Cleaner and De-
greaser.
03• Apply a layer of Fire Blanket covering the cables for a length
of 23cm from the wall, on both sides of the ceiling.
04• Activate the canister of Soudafoam FR 2K B2 by turning the
black ring on the bottom 5 times in the direction indicated with arrows and shake the canister well 20 times. If the foam leaving the canister is homogenously purple, the canister is shaken thoroughly and ready for use.
• Fill the opening.• Note: The canister will feel warm due to the chemical reac-
tion between the components. The foam will increase up to 3 times in volume.

Instruction manual | 15
3.2 tubes through ceiling (continued)
07• Remove all foam residue.
08• Apply a layer of Firecryl FR of 4mm on both sides of the open-
ing.
09• Apply a layer of Firecryl FR of 4mm on both sides of the open-
ing.
Used products:
• Fire Blanket• Soudafoam FR 2K B2• Firecryl FR• Cleaner & Degreaser
Classification:
• Up to EI 120• In accordance with EN 1366-3• Concrete, aerated concrete,
brickwork• At least 150mm wall thickness

16 | Instruction manual
3.3 cable duct and pipe trough ceiling
04• Activate the canister of Soudafoam FR 2K B2 by turning the
black ring on the bottom 5 times in the direction indicated with arrows and shake the canister well 20 times. If the foam leaving the canister is homogenously purple, the canister is shaken thoroughly and ready for use.
• Fill the opening.• Note: The canister will feel warm due to the chemical reac-
tion between the components. The foam will increase up to 3 times in volume.
06• After filling the opening, wait approx. 30 minutes for the
foam to fully harden.
01• Note: The opening should not be more than 700cm2.• Ensure the openings are free from dust and grease to achieve
an optimum adherence between the products and substrate. • Degreasing a cable duct can be done with Cleaner and De-
greaser.
02• Put the cables in the cable duct.
03• Apply a layer of Fire Blanket covering the cables for a length
of 23cm from the wall, on both sides of the ceiling.
04• Apply a PU joint filler around the PVC pipe for half the thick-
ness of the floor.
Instruction manual | 17
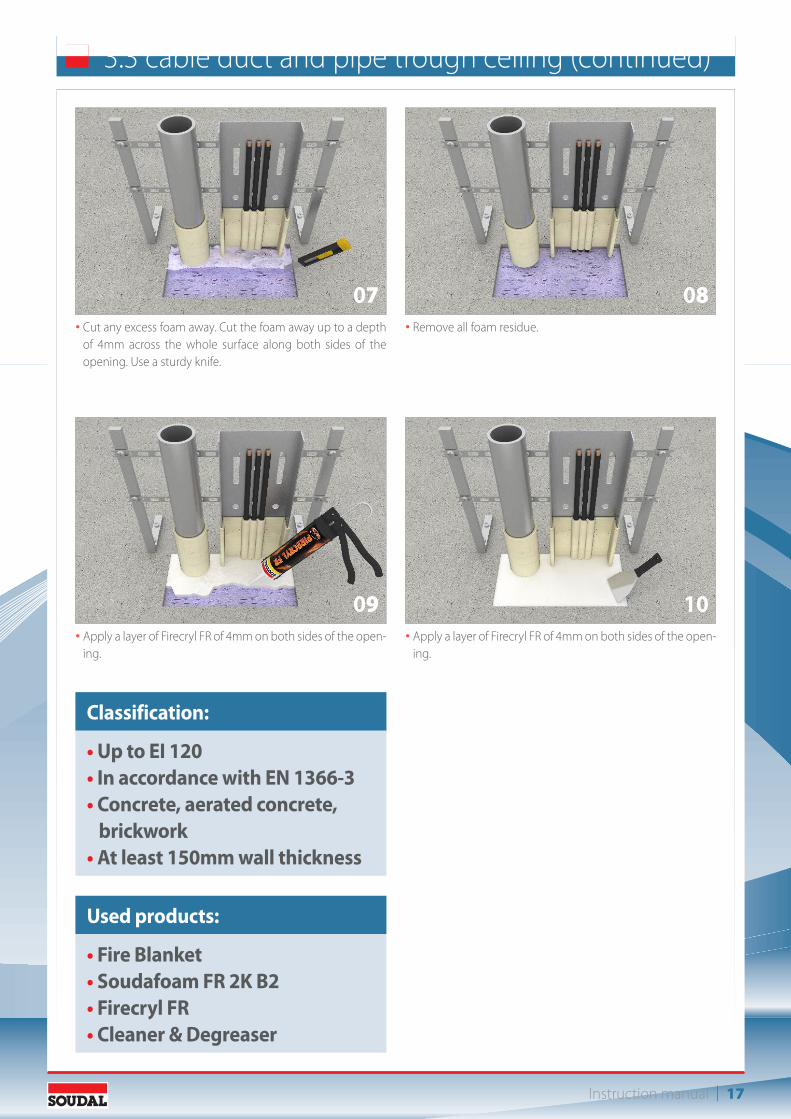
3.3 cable duct and pipe trough ceiling (continued)
07• Cut any excess foam away. Cut the foam away up to a depth
of 4mm across the whole surface along both sides of the opening. Use a sturdy knife.
08• Remove all foam residue.
09• Apply a layer of Firecryl FR of 4mm on both sides of the open-
ing.
10• Apply a layer of Firecryl FR of 4mm on both sides of the open-
ing.
Used products:
• Fire Blanket• Soudafoam FR 2K B2• Firecryl FR• Cleaner & Degreaser
Classification:
• Up to EI 120• In accordance with EN 1366-3• Concrete, aerated concrete,
brickwork• At least 150mm wall thickness

18 | Instruction manual
3.4 cables in PVC pipes through ceiling
03• Apply Firecryl FR around the pipe on both sides of the open-
ing.
04• Pull the cables through the pipe.
05• Apply Soudafoam FR between the cables in the PVC pipe.
06• Cut any excess foam away.
02• Apply a PU joint filler around the PVC pipe for half the thick-
ness of the ceiling.
01• Install a PVC pipe of up to 50mm diameter in the opening
(maximum diameter 111mm). • The pipe must protrude for a minimum of 70mm and a maxi-
mum of 150mm on both sides.

Instruction manual | 19
07• Apply a layer of Firecryl on the foam.
3.4 cables in PVC pipes through ceiling (continued)
Classification:
• Up to EI 120• In accordance with EN 1366-3• Concrete, aerated concrete,
brickwork• At least 150mm wall thickness
Used products:
• PU Joint Filler• Firecryl FR• Soudafoam FR

20 | Instruction manual
4. Joints step 1
Three steps to the right solution
Soudafoam FR hand heldfoilpack soudaseal FR
* The test results are valid in cellular concrete, concrete and brick. All systems can also be used for joints with smoke and gas tightness requirements. The solutions applicable for 100mm are also applicable for wall thickness of 115 mm and 200mm. The solutions applicable for 115 mm are also applicable for 200mm but not for 100 mm.
Fire
step 1 Decision treeBuilding element Joint Minimum wall/ceiling thickness* Table
Wall
Vertical
Min. 200 mm Tabel 1
Min. 115 mm Tabel 2
Min. 100 mm Tabel 3
Horizontal
Min. 200 mm Tabel 4
Min. 115 mm Tabel 5
Ceiling Min. 150 mm Tabel 6
Step 1: Follow the decision tree below and find the correct table
Step 2: Find the fitting solution by consulting the table found in step 1
Step 3: Apply the Soudal solution

Instruction manual | 21
Joint width in mm*: 60 50 40 30 25 20 15 10
Fire
resi
stan
ce
EI 240 / / / I / E1 ß ß / J1 ß / B1/C1 ß / A/ K1 / D1
EI 180 / / / á / K2 ßá ßá ßá ßá
EI 120 / / G ß / á / A ßá ßá ßá ßá
EI 90 / / á / A ßá ßá ßá ßá ßá
EI 60 M ß / L ßá ßá ßá ßá ßá ßá
Table 1: Wall, vertical joint, Wall thickness: min. 200 mm (The solutions given in table 2 and 3 are also applicable).
Joint width in mm*: 30 25 20 15 10
Fire
resi
stan
ce
EI 240 / / / / J2
EI 180 / / J1 ß ßá
EI 120 / / á ßá ß / á / K1
EI 90 K2 ß ßá ßá ß / á / A
EI 45 á / A ßá ßá ßá ßá
Table 3: Wall, vertical joint, Wall thickness: min. 100 mm
Joint width in mm*: 50 40 30 25 20 15 10
Fire
resi
stan
ce
EI 240 / / / E1 / F1 ß ß ß
EI 120 L ß ß ßá ßá ßá ßá
EI 90 á ßá ßá ßá ßá ßá ßá
EI 60 á ßá ßá ßá ßá ßá ßá
Table 4: Wall, horizontal joint, Wall thickness: min. 200 mm
Joint width in mm*: 100 60 50 40 30 25 20 15 10
Fire
resi
stan
ce EI 120 H ß ß ß / G ß / L / F1 / I ß / E1 ß / F2 ß ß
EI 90 á ßá ßá ßá ßá ßá ßá ßá ßá
EI 60 á ß / á / M ß / á / L ßá ßá ß / á / D2 ß / á / B1/C2 ßá ßá
Table 2: Wall, vertical joint, Wall thickness: min. 115 mm (The solutions given in table 3 are also applicable).
Joint width in mm*: 50 40 30 25 20 15 10
Fire
resi
stan
ce EI 120 L ß ß ß ß ß ß
EI90 á ßá ßá ßá ßá ßá ßá
EI 60 á ßá ßá ßá ßá ßá ßá
Table 5: Wall, horizontal joint, Wall thickness: min. 115 mm
Joint width in mm*: 100 60 50 40 30 25 20 15 10
Fire
resi
stan
ce EI 120 H ß / M ß / L G / E2 ß / I / F1 ß / D2 ß / A / B1 / C2 ß ß
EI 90 á ßá ßá ßá ß / á / A / B2 ßá ßá ßá ßá
EI 60 á ßá ßá ßá ßá ßá ßá ßá ßá
Table 6: Ceiling: min. 150 mm
4. Joints step 2
step 2 Find the fitting solution* Round up the joint width (b.e. 16 mm becomes 20 mm)
Solutions above also applicable
Solutions left also applicable

22 | Instruction manual
4. Joints step 3
A. Fill the entire joint with Soudafoam FR
B1. Place the PU backing in the joint at the non-exposed side and finish off with 15 mm Soudaseal FRB2. Place the PU backing in the joint at the non-exposed side and finish off with 20 mm Soudaseal FR
C1. Place the PU backing in the joint at the non-exposed side and finish off with 15 mm Firecryl FRC2. Place the PU backing in the joint at the non-exposed side and finish off with 20 mm Firecryl FR
D1. Place the PU backing in the joint at the non-exposed side and finish off with 10mm Firesilicone B1 FRD2. Place the PU backing in the joint at the non-exposed side and finish off with 15 mm Firesilicone B1 FR
E1. Fill the joint with Soudafoam FR and finish off with 20 mm Soudaseal FR at the non exposed side E2. Fill the joint with Soudafoam FR and finish off with 25 mm Soudaseal FR at the non exposed side
F1. Fill the joint with Soudafoam FR and finish off with 25 mm Firecryl FR at the non exposed sideF2. Fill the joint with Soudafoam FR and finish off with 20 mm Firecryl FR at the non exposed side
G. Fill the joint with Soudafoam FR and finish of with 20 mm Firesilicone B1 FR at the non exposed side
H. Fill the joint with mineral wool (>80kg/ m3) and finish off with 30 mm Firesilicone B1 FR at the non exposed side
I. Place the PU backing at both sides and finish of with 20mm Soudaseal FR at both sides
J1. Place the PU backing at both sides and finish of with 20 mm Firecryl FR at both sidesJ2. Place the PU backing at both sides and finish of with 10 mm Firecryl FR at both sides
K1. Place the PU backing at both sides and finish of with 10 mm Firesilicone B1 FR at both sidesK2. Place the PU backing at both sides and finish of with 20 mm Firecryl FR at both sides
L. Fill the joint with Soudafoam Fr end finish off with 3 mm Firecryl FR at both sides
M. Fill the joint with Soudafoam FR and finish off with 20 mm Firesilicone B1 FR at both sides
A, B, C, D, E, F, G, H: These solutions are one sided applicationsI, J, K, L, M: These solutions are two sided applications
Soudaseal FR Firecryl FR Firesilicone B1 FR Soudafoam FR
Legende
De oplossingen
step 3 Apply the Soudal solution

Instruction manual | 23
Notes

Your distributor
Soudal NVEverdongenlaan 18-20B-2300 TurnhoutTel.: +32 (0)14 42 42 31Fax: +32 (0)14 42 65 14email: [email protected]
Soudal Ltd.Unit A, Tame ParkVanguardUK- Tamworth B77 5DYUnited KingdomTel.: +44 1827 261 092www.soudal.com
128773-FOL