first steps - snp easyinput | snp poland€¦ · execute the \user\setup.exe file to start the...
TRANSCRIPT

First Steps
EasyInput – First Steps 2
Solution Summary
EasyInput allows performing SAP transactions / functions on the base of data
stored in MS Excel files.
With one button click one can migrate from Excel to SAP thousands of
master data records, postings or purchase order documents.
EasyInput has also the functionality to read data from SAP transactions /
functions.
EasyInput can replace the standard SAP migration framework (LSMW) and
sometimes replace the SAP GUI itself.

EasyInput – First Steps 3
Installation
User installation (on the user’s workstation, version 3.XX)Get the installation files from BCC, unzip it and put it into any installation directory (for large deployments it is recommended to put it into network share so that later auto-update via update of the installation files was possible).
Execute the \user\Setup.exe file to start the EasyInput installation **
After successful installation:EasyInput desktop icon appears. It can be used to start EasyInput.
New ribbon menu EasyInput appears inside MS Excel (after starting Excel, EasyInput addin is inactive, pressing Start buton on EasyInput ribbon activates the product)
EasyInput example files are put into \Documents\Custom Office Templates folder\EasyInput_ExampleFiles\
If this is trial installation, then on first EasyInput script run, EasyInput will apply to get trial license keys via Internet
If this is a full installation, then either internet license keys upload or uploading from given license file (usually ”EasyInput.lic”) should be done during first script run or via ribbon menu EasyInput Info> Settings> License.
After installation, it is recommended to adjust EasyInput regional settings (Ribbon menu: EasyInput Info> Settings> Regional)
* Additional steps on the SAP system side (assigning authorizations, allowing SAP Scripting or eCATT) may be required to start testing
** If the MS Office is 64bit version than one should use the appropriate setup.exe file from \User_64bit_Office\Setup.exe

EasyInput – First Steps 4
Installation
SAP Administrator Installation (on the SAP system side)
Required: Check/ add the required authorizations on the system SAP side to the users using EasyInput (see User’s manual section Authorizations). The user’s manual can be also found within the installation files.
Required: Make sure that port 33XX (used for RFC, where XX is the SAP system number) between user workstation and SAP application server is not closed by firewalls (SAP GUI uses 32XX, but for RFC connection 33XX is used).
Optional (only for full installations): Import the BCC transport request. The request contains only objects in BCC owned namespace.
EasyInput – First Steps 5
Testing one of EasyInput example workbooks - 1/5
To open one of the example EasyInput workbooks the user first has to start
EasyInput (via desktop EasyInput icon or just by running Excel and opening empty
workbook)
From EasyInput (EI) ribbon menu one has to click Open EI Template button.
After choosing and opening an EasyInput template (example workbook) one has to
adjust it to its SAP system before use (e.g. system connection parameters and data
exchanged with the system)
EasyInput example workbooks should be tested on test / sandbox SAP systems
EasyInput – First Steps 6
Testing one of EasyInput example workbooks - 2/5
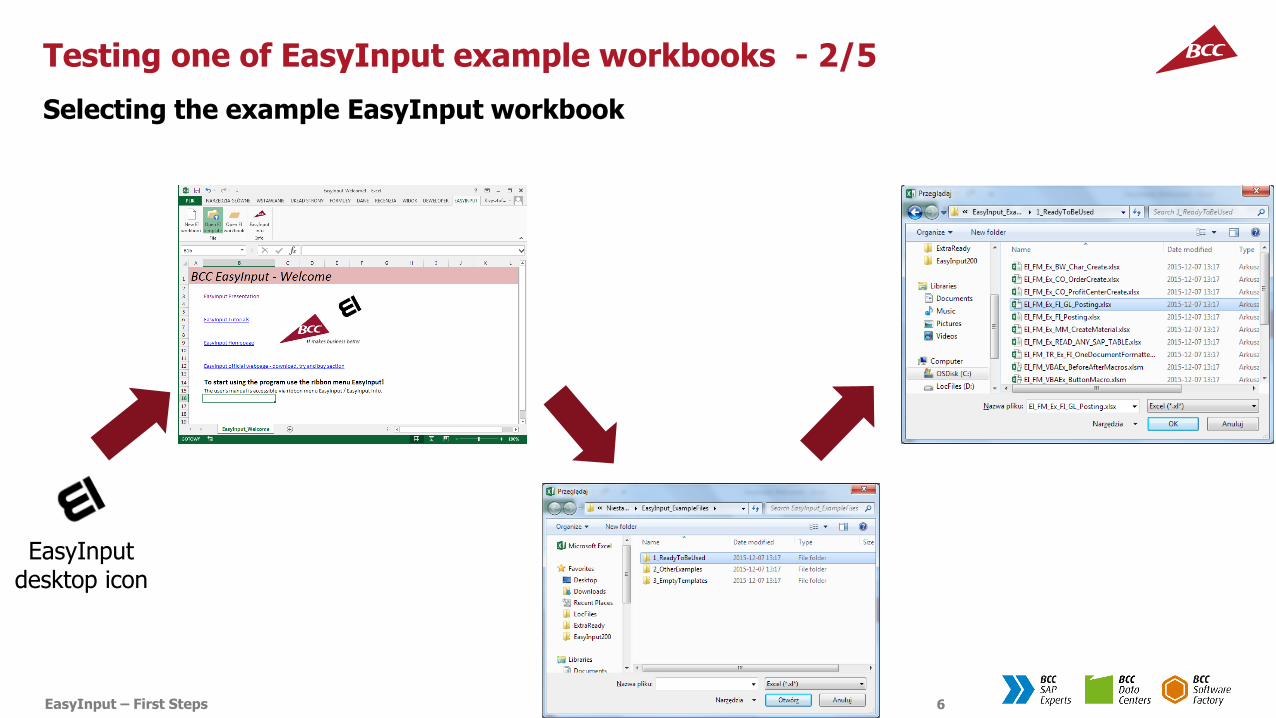
Selecting the example EasyInput workbook
EasyInputdesktop icon

EasyInput – First Steps 7
Testing one of EasyInput example workbooks - 3/5
Adjusting the example EasyInput workbook - EI_Logon worksheet
Put your SAP system username
here
This worksheet is informational it
does not have to be adjusted
The EI_logon worksheet needs to be adjusted for
EasyInput to connect to the SAP system
If you use connection via specific application server fill this part in. See SAP
logon entries or ask your SAP administrator to check what should be put here.
If you use connection via application server group fillthis part in. See SAP logon
entries or ask your SAP
administrator to check what
should be put here.
The client is not taken from the SAP Logon. It is taken from the
first screen when logging in manually.
EasyInput – First Steps 8
Testing one of EasyInput example workbooks - 4/5
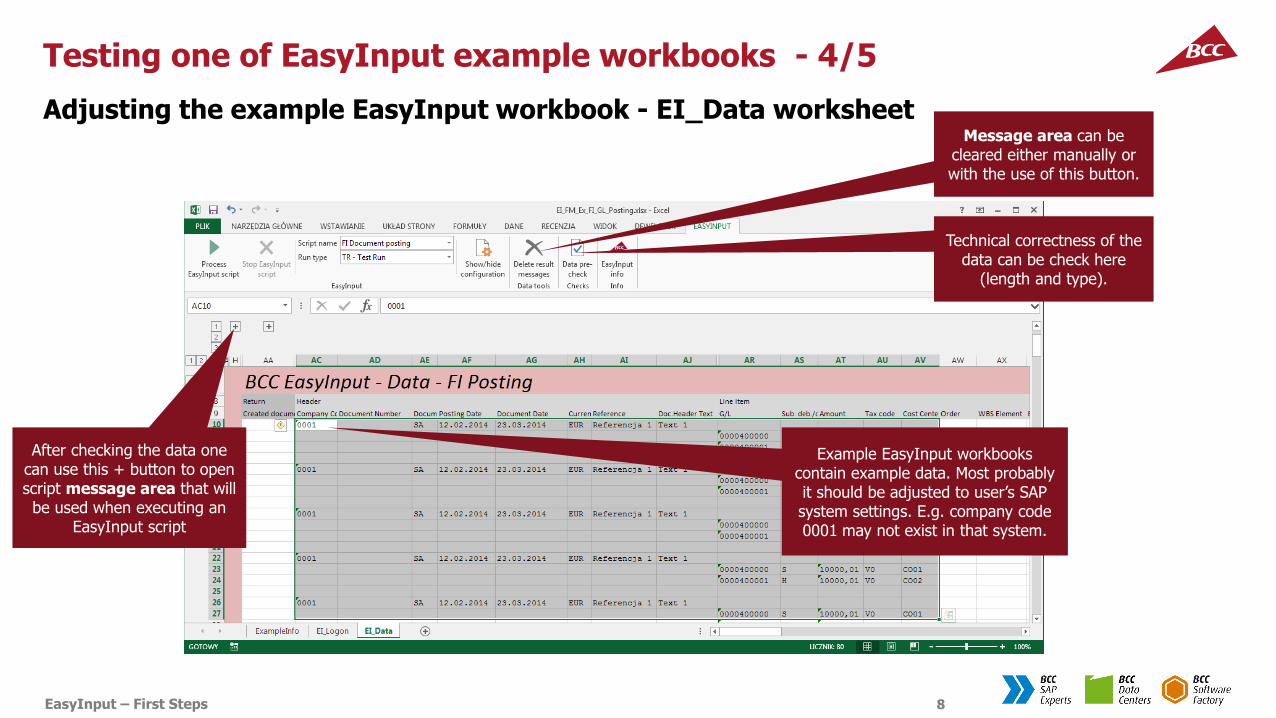
Adjusting the example EasyInput workbook - EI_Data worksheet
Example EasyInput workbooks contain example data. Most probablyit should be adjusted to user’s SAP system settings. E.g. company code 0001 may not exist in that system.
After checking the data one can use this + button to open script message area that will be used when executing an
EasyInput script
Message area can be cleared either manually or with the use of this button.
Technical correctness of the data can be check here
(length and type).
EasyInput – First Steps 9
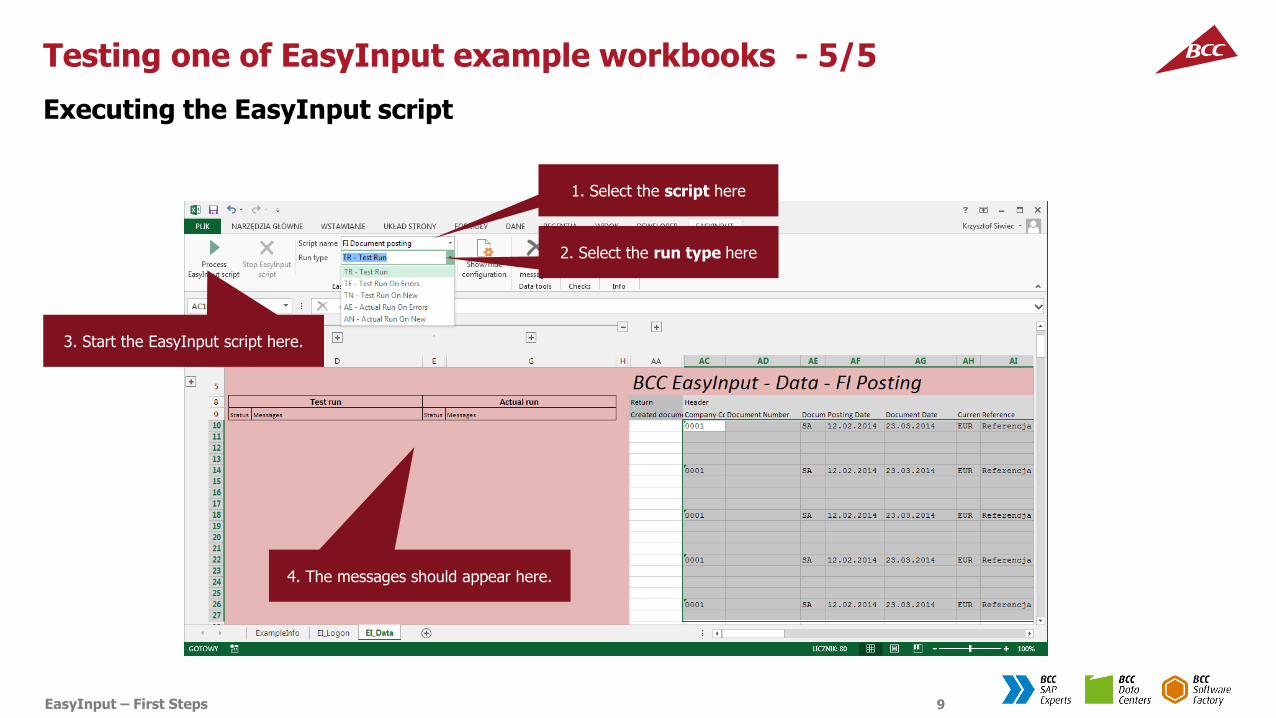
Testing one of EasyInput example workbooks - 5/5
Executing the EasyInput script
4. The messages should appear here.
2. Select the run type here
1. Select the script here
3. Start the EasyInput script here.
EasyInput – First Steps 10
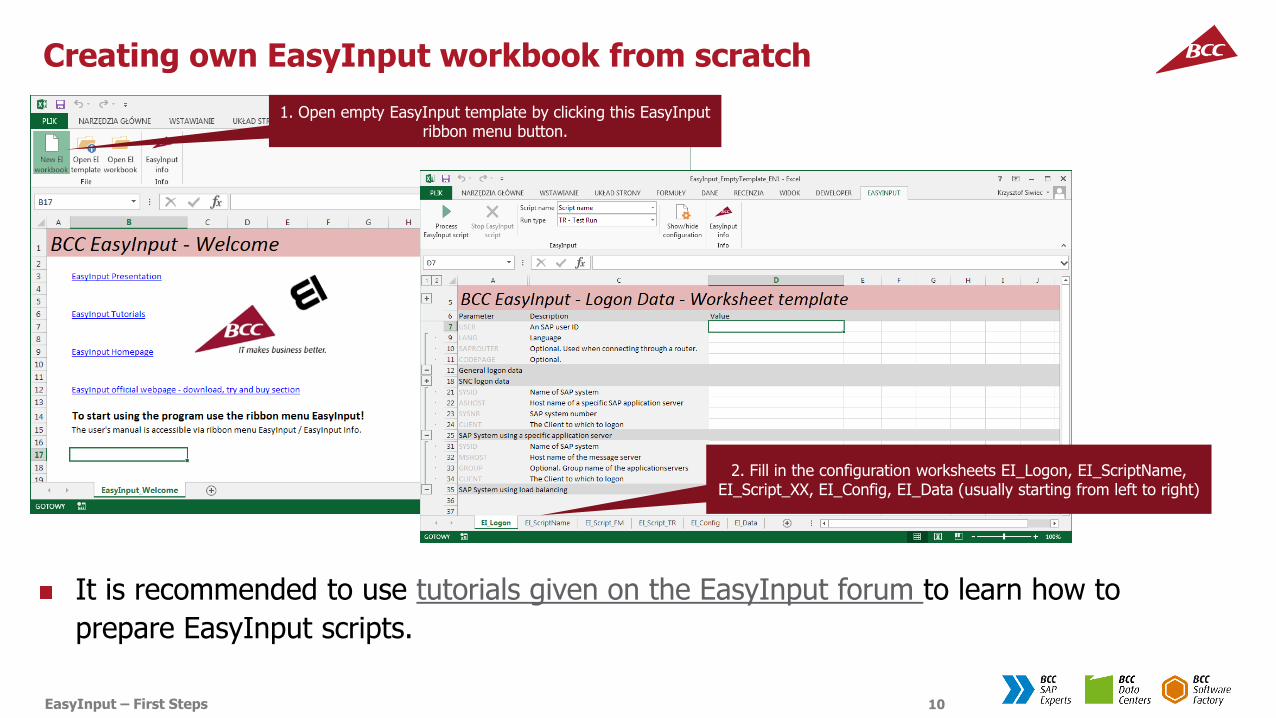
Creating own EasyInput workbook from scratch
It is recommended to use tutorials given on the EasyInput forum to learn how to
prepare EasyInput scripts.
1. Open empty EasyInput template by clicking this EasyInput ribbon menu button.
2. Fill in the configuration worksheets EI_Logon, EI_ScriptName, EI_Script_XX, EI_Config, EI_Data (usually starting from left to right)

EasyInput – First Steps 11
Using EasyInput Help
The product is delivered with embedded user’s manual. One can access this user manual
from MS Excel EasyInput ribbon menu: EasyInput Help

EasyInput – First Steps 12
Using EasyInput Forum
One can access EasyInput forum via EasyInput Website https://easyinput.net
FAQs
Release notes
Tutorials & demonstrations
Other
Users with maintenance support service can post their tickets in specially designated
for them service subforums.

EasyInput – First Steps 13
www.bccgroup.eu/extra
Free trial versionOrder online
Other BCC EXTRA products
easyinput.net bccgroup.eu