fixed asset general exercise crystal reports xi crystal reports xi...eburke fixed asset general...
TRANSCRIPT

Page 1 of 24
Process: Crystal Reports
Fixed Asset General Exercise Crystal Reports XI
Objective This document provides step-by-step instructions on how to build a basic report in Crystal Reports XI. The exercise will cover logging on, selecting data, section expert, field objects, text objects, field formatting, sorting, grouping, selection criteria, parameters, inserting totals and addling additional data sources to your report.
Prerequisites Before you can successfully retrieve data in this report, you must ensure that the necessary permissions are set up in the Crystal Admin program. If these permissions are not set up, or not set up correctly, you may need to contact your MUNIS System Administrator [Earl Burke] to have them updated or added into the MUNIS system.
Procedure Logging On and Data Selection
Click on the Crystal Report icon corresponding to the report you want to run.
Or
Open Crystal Reports XI using the Crystal Reports XI icon or by going to Start > Programs >Crystal Reports XI Release 2. When you open the program you will see the Start Page:

EBurke
Fixed Asset General Exercise Crystal Reports XI
Page 2 of 24
Click on Blank Report under New Reports. You will then see the Database Expert screen. Click on the plus sign next to Create New Connection. Once you have clicked on the plus sign you will see the following screen:
Double click on ODBC (RDO).
EBurke
Fixed Asset General Exercise Crystal Reports XI
Page 3 of 24
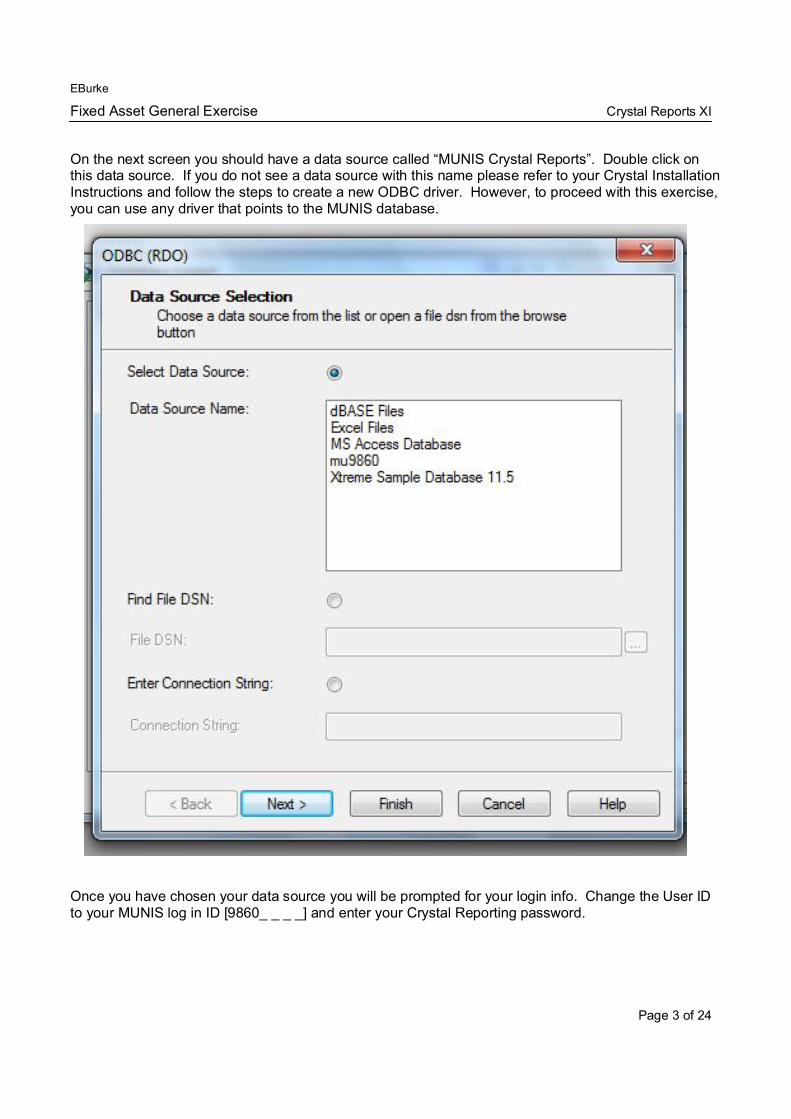
On the next screen you should have a data source called “MUNIS Crystal Reports”. Double click on this data source. If you do not see a data source with this name please refer to your Crystal Installation Instructions and follow the steps to create a new ODBC driver. However, to proceed with this exercise, you can use any driver that points to the MUNIS database.
Once you have chosen your data source you will be prompted for your login info. Change the User ID to your MUNIS log in ID [9860_ _ _ _] and enter your Crystal Reporting password.

EBurke
Fixed Asset General Exercise Crystal Reports XI
Page 4 of 24
Once you have successfully logged in, you will see a screen similar to the one below. The database name used in this sample exercise is mu9860.

EBurke
Fixed Asset General Exercise Crystal Reports XI
Page 5 of 24
To navigate to the database views do the following: Click on the plus sign next to database mu9860 >>> Under mu9860, click on the plus sign next to database dbo >>> click on the plus sign next to Views.

EBurke
Fixed Asset General Exercise Crystal Reports XI
Page 6 of 24
Scroll down the list of database views and double click on the database view named fa_master. Note: If you do not see a list similar to the one below contact – Earl Burke.

EBurke
Fixed Asset General Exercise Crystal Reports XI
Page 7 of 24
All views that have been selected to be used in the report will appear on the right hand side of the screen under Selected Tables.
Once done selecting views to be used click OK.
You will now see the Design Tab in Crystal Reports.
EBurke
Fixed Asset General Exercise Crystal Reports XI
Page 8 of 24
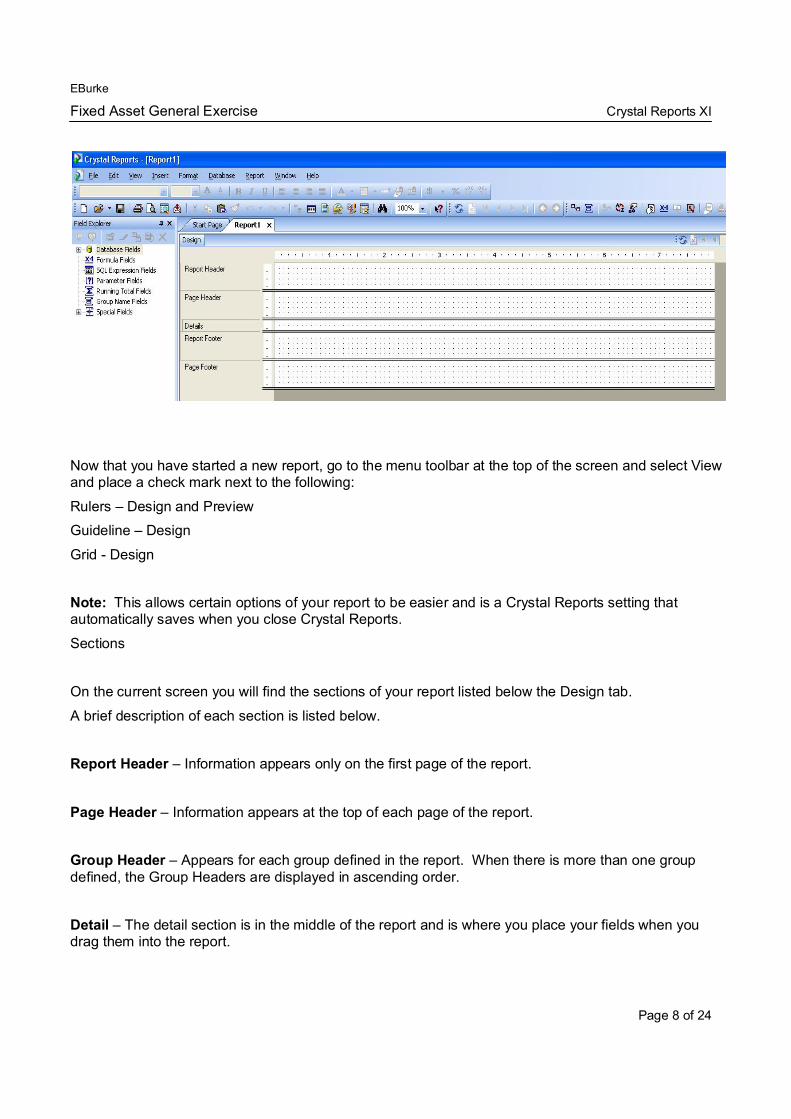
Now that you have started a new report, go to the menu toolbar at the top of the screen and select View and place a check mark next to the following:
Rulers – Design and Preview
Guideline – Design
Grid - Design
Note: This allows certain options of your report to be easier and is a Crystal Reports setting that automatically saves when you close Crystal Reports.
Sections
On the current screen you will find the sections of your report listed below the Design tab.
A brief description of each section is listed below.
Report Header – Information appears only on the first page of the report.
Page Header – Information appears at the top of each page of the report.
Group Header – Appears for each group defined in the report. When there is more than one group defined, the Group Headers are displayed in ascending order.
Detail – The detail section is in the middle of the report and is where you place your fields when you drag them into the report.

EBurke
Fixed Asset General Exercise Crystal Reports XI
Page 9 of 24
Group Footer – Appears for each group defined in the report. Group Footers are displayed in descending order when more than one group is defined.
Report Footer – Appears at the bottom of the last page in the report.
Page Footer – Appears at the bottom of every page of the report. It will appear below the report footer on the last page of the report.
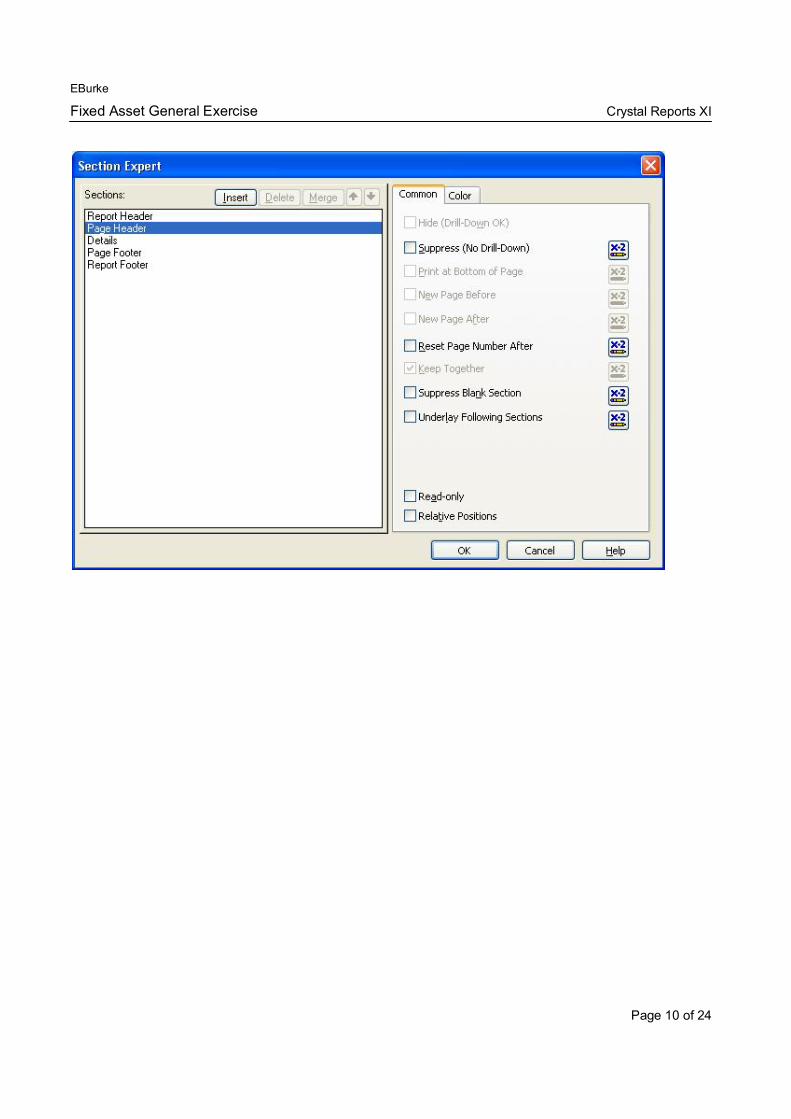
Section Expert
The section expert is used to set the characteristics of each section. To open the Section Expert, go to the menu toolbar and under Report, choose Select Expert or by click on the Section Expert icon
.
Note: Each section may not have the same common characteristics to choose from. You must click on each section to see that section’s characteristics. The characteristics available for each section are those with white boxes and black wording.
The screen shots below are two sections in the Section Expert, where the characteristics are different. The top screen shot is for the Page Header section of the report and the bottom screen shot is for the Details section of the report.
EBurke
Fixed Asset General Exercise Crystal Reports XI
Page 10 of 24

EBurke
Fixed Asset General Exercise Crystal Reports XI
Page 11 of 24
Field Objects
On the design screen you should see the Field Explorer (Sample below ). If not choose View on the menu toolbar and select Field Explorer. Double click on Database Fields and then double click on fa_master to see a list of available fields to use in the report.

EBurke
Fixed Asset General Exercise Crystal Reports XI
Page 12 of 24
Note: If the fields in the Field Explorer are not in alphabetical order, take a moment and change the order. To do this go to File > Options> click on the Database tab and under sorting place a check mark in the box next to Sort Table Alphabetically and Sort Fields Alphabetically. Click OK and repeat previous step.
Database fields can be numeric, strings (alphanumeric) or dates. To see the field type right click on any of the fields and choose to “Show Field Type”.
Click and drag the following fields into the detail section of your report:
fa_fiscal_year,
fa_tag_number
a_asset_desc
a_location a_location_short
fa_acquire_date
a_department_code
fa_serial_number
fa_purchase_cost
You will see that each field appears with a corresponding column heading in the page header section.
If only one object appears on the report, click on the “undo” button and bring the field in again.
You should also see a “guideline” that connects the field in the Detail Section to its corresponding column heading. The guideline can be used to drag the fields from side to side. If you do not see a
EBurke
Fixed Asset General Exercise Crystal Reports XI
Page 13 of 24
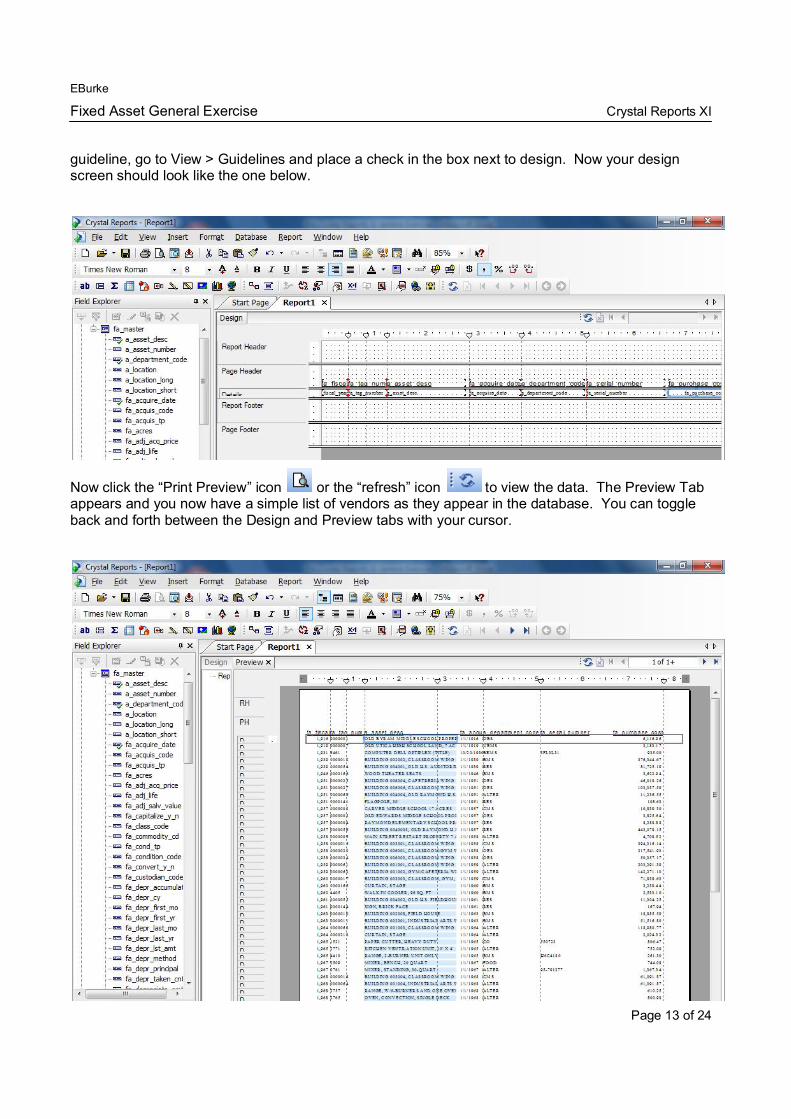
guideline, go to View > Guidelines and place a check in the box next to design. Now your design screen should look like the one below.
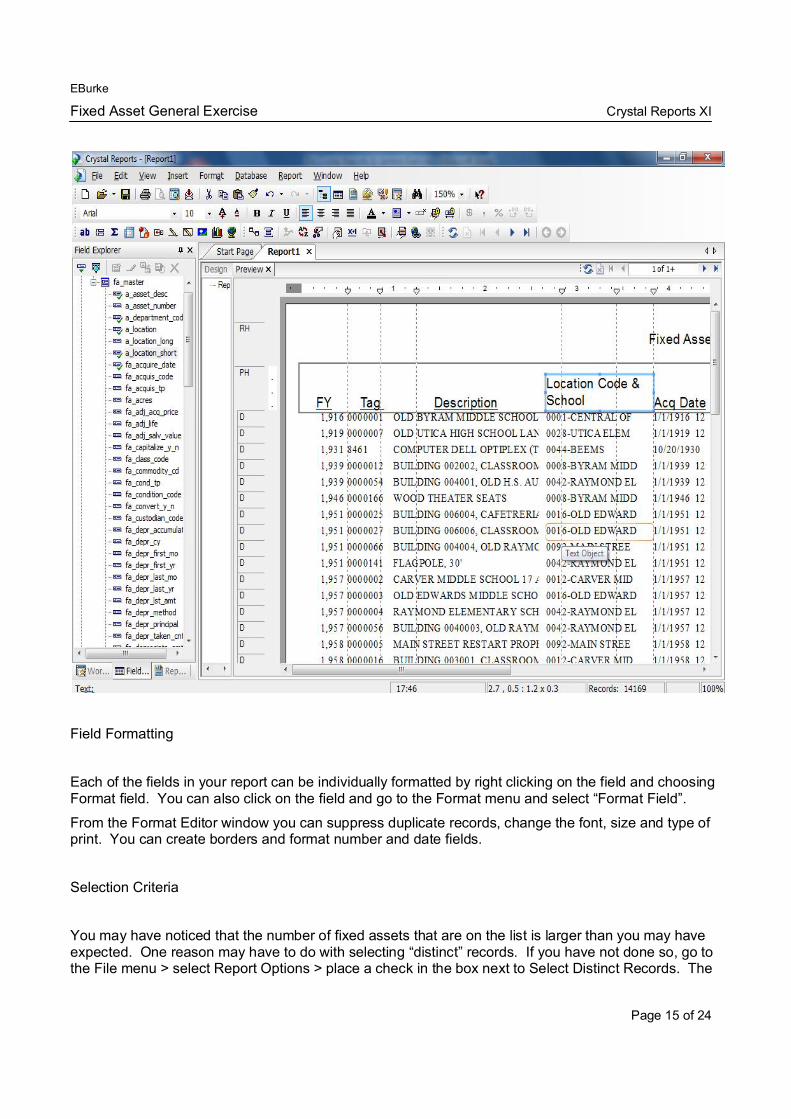
Now click the “Print Preview” icon or the “refresh” icon to view the data. The Preview Tab appears and you now have a simple list of vendors as they appear in the database. You can toggle back and forth between the Design and Preview tabs with your cursor.
EBurke
Fixed Asset General Exercise Crystal Reports XI
Page 14 of 24
Select Distinct Records
If you notice that MUNIS has duplicate records. To eliminate the duplicate records, go to File > Report Options > place a check in the box next to Select Distinct Records. When you have selected distinct records, the report will show only one distinct (unique) record based on the fields you have selected.
Text Object
Go to the Insert menu and choose the Text Object option, or use the test object icon on the toolbar. Your cursor will immediately appear over a “floating” text object. Click once and the text box will attach itself to the Report Header section and be ready for you to type in text. Type in the title of the report you are building, “Fixed Asset List”. Increase the font size of the text and center the text box in the Report Header section.
To edit text in the text box, click on the text box and you can either go to the Format menu and choose the Format Text option or use the icons on your toolbar.
Text boxes can be used to combine database fields. To do this, click on the design tab, place a text box in the detail section, click and drag the first database field, a_location, from the Detail section into the text box when you have the field in the box. Type a “-“after the database field and then select and drag the a_location_short field from the Detail section into the text box. Below is an example of adding fields into a text box to combine data fields.
EBurke
Fixed Asset General Exercise Crystal Reports XI
Page 15 of 24
Field Formatting
Each of the fields in your report can be individually formatted by right clicking on the field and choosing Format field. You can also click on the field and go to the Format menu and select “Format Field”.
From the Format Editor window you can suppress duplicate records, change the font, size and type of print. You can create borders and format number and date fields.
Selection Criteria
You may have noticed that the number of fixed assets that are on the list is larger than you may have expected. One reason may have to do with selecting “distinct” records. If you have not done so, go to the File menu > select Report Options > place a check in the box next to Select Distinct Records. The

EBurke
Fixed Asset General Exercise Crystal Reports XI
Page 16 of 24
other reason is likely that the report is returning fixed assets for all locations. We will now define the selection criteria of the report.
Go to the Report menu and choose Select Expert or use the toolbar icon, . Select <New> and scroll down to find the field a_location and choose OK.
Fill out the box as displayed below. Select your school location number. Notice in this report the location code is four (4) digits.
The report will now limit the data in the report to those records where the location is equal to your location code.
Click OK and refresh the report.
Sorting
The database query returns data in what seems to be no particular order (unless you have “Select
Distinct Records” checked). You can use the sort function in Crystal to sort data in the order you

EBurke
Fixed Asset General Exercise Crystal Reports XI
Page 17 of 24
choose. To In this case, we can sort by vendor name by double clicking on a_vendor_name and then click OK.
Your list will now be in order based on the tag number.
Groups
Next we are going to insert a group. Go back to the Design Tab. Go to the Insert menu and choose Group. Scroll down the list and highlight the field “fa_location_room”.

EBurke
Fixed Asset General Exercise Crystal Reports XI
Page 18 of 24
Click OK. You will now see that a Group Header and Group Footer section were created above and below the Detail section of the report.
Hit the preview or refresh icon to view the new list grouped by location room number.

EBurke
Fixed Asset General Exercise Crystal Reports XI
Page 19 of 24
Note: Sorting is defined by the “Groups” you use in the report. So, if you group by Location room number, the order will be by room number. If you group by fiscal year the report will be in order by Fiscal Year first.
Parameters
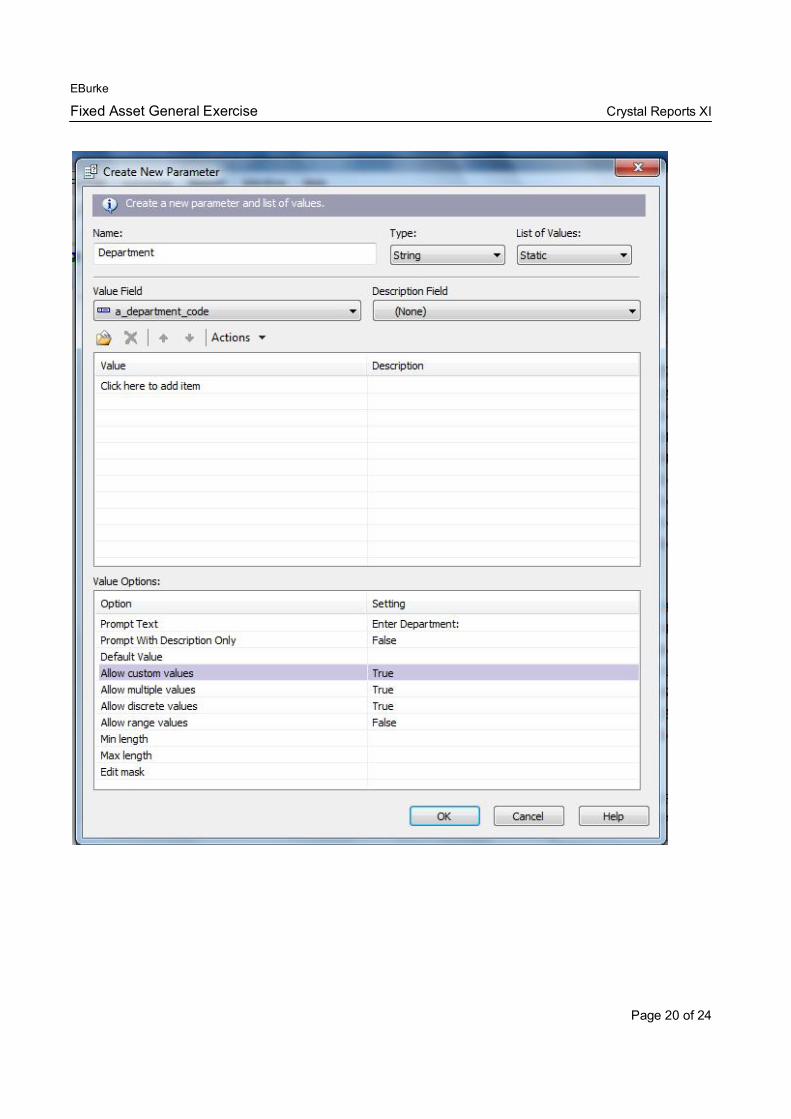
You can set up parameters so that your report will prompt you with some defining questions prior to running the report. In this report, we want to run this report for a specific department or several departments. To do this, go to the Field Explorer and right click on Parameter Fields and select New.
The information you enter when creating the parameter field will determine how the prompt works later. By setting value to True for Allow Custom, Multiple, Discrete and Range Values we increase the number of ways the report can be run.
EBurke
Fixed Asset General Exercise Crystal Reports XI
Page 20 of 24

EBurke
Fixed Asset General Exercise Crystal Reports XI
Page 21 of 24
Once the parameter has been created, go back to the Select Expert and select <New>.
Scroll down and select fa_master.a_department_code.
Select is equal to and then click on the down arrow in the right hand box. You will now see a distinct list of values from your database and the parameter created.
If you choose to use a parameter, each time you run the report the data returned in the report will be based on your answer to the prompt(s).
Once you have selected the prompt and clicked on OK, the following screen will appear.
EBurke
Fixed Asset General Exercise Crystal Reports XI
Page 22 of 24
Depending on how you set up the parameter, will determine how many options you have for entering your selection.
Note: To bring in all records you will enter a zero in the start of range and place a check mark in the box next to No upper value under End of Range.
Always remember to click on the Add button once you have entered all your answers to a prompt.
Totals
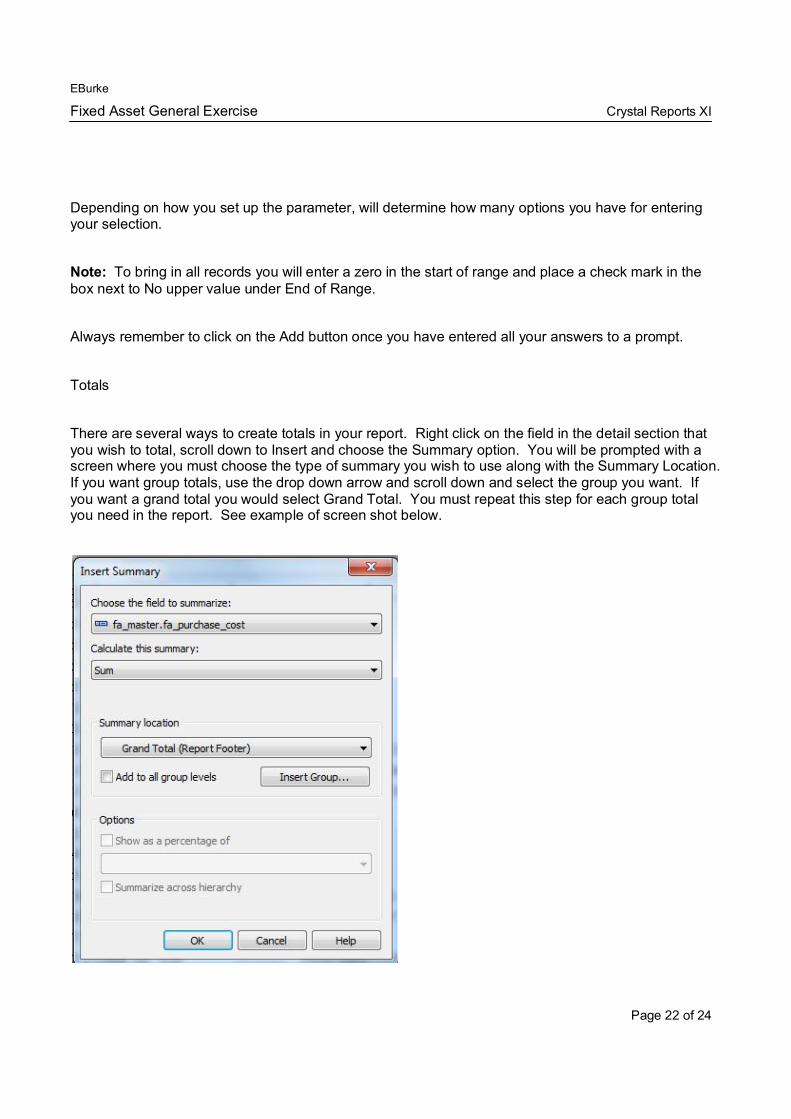
There are several ways to create totals in your report. Right click on the field in the detail section that you wish to total, scroll down to Insert and choose the Summary option. You will be prompted with a screen where you must choose the type of summary you wish to use along with the Summary Location. If you want group totals, use the drop down arrow and scroll down and select the group you want. If you want a grand total you would select Grand Total. You must repeat this step for each group total you need in the report. See example of screen shot below.

EBurke
Fixed Asset General Exercise Crystal Reports XI
Page 23 of 24
Adding a New Data Source
The report you have created up to this point uses one data source, fa_master. You can use more than one data source to build your reports. In this example, we are going to add fixed asset general ledger information to the report.
To do this, go to the Database menu and select Database Expert. When the Database Expert appears, double click on the database owner (dbo), if you see views click on it, then scroll down and double click on fa_gl_information. Click OK. The Database Expert link screen will appear as seen below.
The Database Expert shows the new view added (fa_gl_information) next to the original view (fa_master). The two views are connected by a line from the same field that exists in each view. If the views do not link automatically, make sure Auto-Link is set to “By Name” and click on Link.
Click Ok and you will be prompted with the Refresh Report Data Screen. If you want to use your current parameter values click OK.

EBurke
Fixed Asset General Exercise Crystal Reports XI
Page 24 of 24
If you want to change them, click on the circle next to “prompt for new parameter values” and then click OK.
If you prompt for new, make your entries, click add if needed and then click OK.
Click on the Design Tab.
Double click on Database Fields under your Field Explorer.
Double click on fa_gl_information. Find and drag the a_org field into your report. Refresh the report.
Results You have now created a very basic Crystal Report that has showed you how to navigate around in Crystal Reports and introduced you to the basic concepts of building a report.