floating away: connecting autocad® civil 3d® with...
TRANSCRIPT

Floating Away: Connecting AutoCAD® Civil 3D® with
HEC-RAS for Floodplain Mapping Andy Carter, PE – Halff Associates, Inc.
CI4043 Intended for intermediate to advanced AutoCAD Civil 3D users, this class is designed to show
land development professionals techniques and nuances for extracting detailed hydraulic floodplain models from a LiDAR terrain. Leveraging the "Export to DEM" method for surface export, this class will explore performing quick and accurate floodplain delineations on detailed Civil 3D surfaces by interacting with the newly released and publicly available RAS Mapper in Hydrologic Engineering Centers River Analysis System (HEC-RAS) version 4.1.0 from the U.S. Army Corps of Engineers.
Utilizing only Civil 3D and open-source programs, this class will demonstrate creating detailed hydraulic workmaps from Civil 3D surface, then to HEC-RAS model, then to floodplain delineation imported to Civil 3D. This class will further explore the use of grading objects for developing quick and iterative floodplain analysis to determine the comparative impacts of proposed grading in the floodplain.
Learning Objectives At the end of this class, you will be able to:
Develop an existing and proposed HEC-RAS hydraulic model from a LiDAR surface
Use Civil 3D® surfaces with HEC-RAS Mapper to create accurate floodplain delineations
Connect HEC-RAS and Civil 3D® as a full floodplain mapping solution
Use grading objects to create quick and accurate floodplain reclamation analysis
About the Speaker
Mr. Carter—a project manager in the Halff Associates, Inc., Austin, Texas Water
Resources Department— has more than 14 years of experience in the design of
drainage, stream reclamation, and restoration projects. He was awarded "Young
Engineer of the Year" by the Dallas Mid-Cities Chapter of TSPE in 2007. His
experience includes hydrologic and hydraulic analysis, and the design of
drainage facilities within FEMA floodplains. Mr. Carter's experience has
concentrated on evaluating and designing drainage facilities necessary to
protect infrastructure from flooding and erosion.

Floating Away: Connecting AutoCAD® Civil 3D® with HEC-RAS for Floodplain Mapping
2
NOTE:
This class handout provides a sequence of the workflow (pics and clicks) presented at the AU2011 class. It is
intended to serve as desktop reference for replicating these procedures on your own future projects.
Step 1: Building an Existing Ground Terrain Model from LiDAR
To get the most accurate floodplain model and delineation, it is necessary to produce the most
accurate surface model possible. For this tutorial, we will create an existing ground surface
from a LiDAR terrain model.
1. Open a new drawing in AutoCAD Civil 3D and define the zone in the "Units and Zone" tab of
the "Drawing Settings" as TX83-CF (NAD83 Texas State Planes, Central Zone, US Foot).
2. From the toolspace prospector, create an
EG point cloud from the LAS file.
3. Name the cloud "Point Cloud EG" and
set the style as "LIDAR Point
Classification" and select Next

Floating Away: Connecting AutoCAD® Civil 3D® with HEC-RAS for Floodplain Mapping
3
4. Add the tutorial source data LAS point cloud file "BUDA-SWC4.las" downloaded for this
tutorial and click finish. Make sure that you select an appropriate directory for the point
cloud database.
_______________________
Processing will be performed in
the background and will take
between 3 and 8 minutes,
depending on the speed of your
machine.
_______________________
5. Once the LiDAR processing is complete, perform a
"Zoom extents" to see the LiDAR data.
6. On the classification tab of the Point Cloud
Style, Select only the "2 Ground" Classification.
Select apply and OK.
7. Create a surface from the LiDAR ground data by
selecting "Add points to Surface …"

Floating Away: Connecting AutoCAD® Civil 3D® with HEC-RAS for Floodplain Mapping
4
8. In the "Add Points to Surface Window", name the surface EG and select Next.
9. Select the "Window" option and click the "Define Region in Drawing.." button. Draw a
rectangle at 3081892, 9975587 to 3084430, 9977755 and select finish. You should see a
surface similar to the one shown below.
Step 2: Export a HEC-RAS Model
With a detailed existing ground surface created from LiDAR, now we will export a detailed HEC-
RAS model from Civil 3D® by defining an alignment and cross sections.
10. From downstream to upstream,
draft a polyline along the center of the
creek.

Floating Away: Connecting AutoCAD® Civil 3D® with HEC-RAS for Floodplain Mapping
5
11. Define stream centerline as a Civil3D alignment.
Name it "RiverCL" and make sure the "Add
curves between tangents" is unchecked.
12. Select "Sample Lines" button from the Home tab of the ribbon. Click on the RiverCL
alignment. Name the sample line group RiverXS. Click OK.
13. Draw your desired cross sections with
the polyline tool. Make sure that
a. The cross sections cross the
RiverCL alignment once and
only once.
b. No cross section crosses any
other cross sections
c. The entire cross section is
contained within the "EG"
surface.
Floating Away: Connecting AutoCAD® Civil 3D® with HEC-RAS for Floodplain Mapping
6
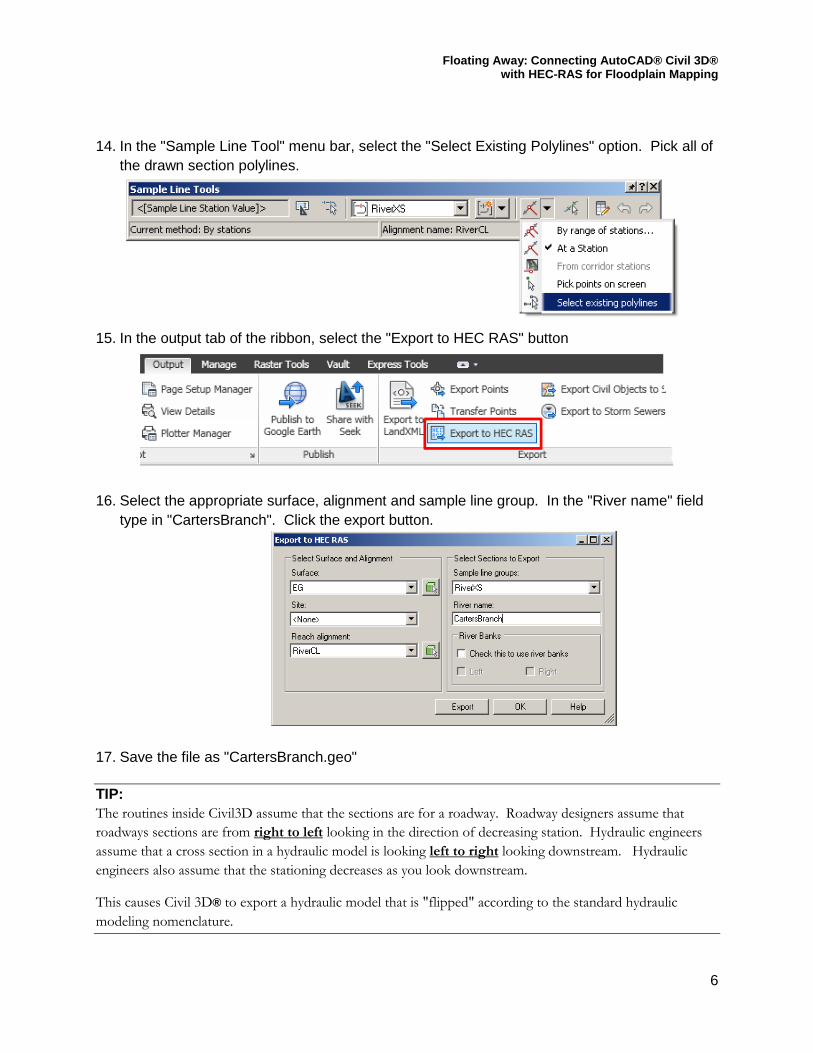
14. In the "Sample Line Tool" menu bar, select the "Select Existing Polylines" option. Pick all of
the drawn section polylines.
15. In the output tab of the ribbon, select the "Export to HEC RAS" button
16. Select the appropriate surface, alignment and sample line group. In the "River name" field
type in "CartersBranch". Click the export button.
17. Save the file as "CartersBranch.geo"
TIP:
The routines inside Civil3D assume that the sections are for a roadway. Roadway designers assume that
roadways sections are from right to left looking in the direction of decreasing station. Hydraulic engineers
assume that a cross section in a hydraulic model is looking left to right looking downstream. Hydraulic
engineers also assume that the stationing decreases as you look downstream.
This causes Civil 3D® to export a hydraulic model that is "flipped" according to the standard hydraulic
modeling nomenclature.

Floating Away: Connecting AutoCAD® Civil 3D® with HEC-RAS for Floodplain Mapping
7
18. To correct and "flip" the exported HEC-RAS file, run the Halff Associates’ Civil3D RAS
Flipper. Select the ―GEO‖ file and process. The amended file will have a*_mod.geo file
name saved in the same directory.
Step 3: Creating a Hydraulic Model in HEC-RAS With the exported and reversed channel geometry file, the geo file will be imported into HEC-
RAS 4.1.0, so that a floodplain can be computed. Download HEC-RAS at
http://www.hec.usace.army.mil/software/hec-ras/
19. Open HEC-RAS and select File and then New Project. Save the project as "CartersBranch"
20. From the main HEC-RAS window, select the Geometry button.
21. In the Geometric Data window, Select File
Import Geometry Data GIS Format…
Floating Away: Connecting AutoCAD® Civil 3D® with HEC-RAS for Floodplain Mapping
8
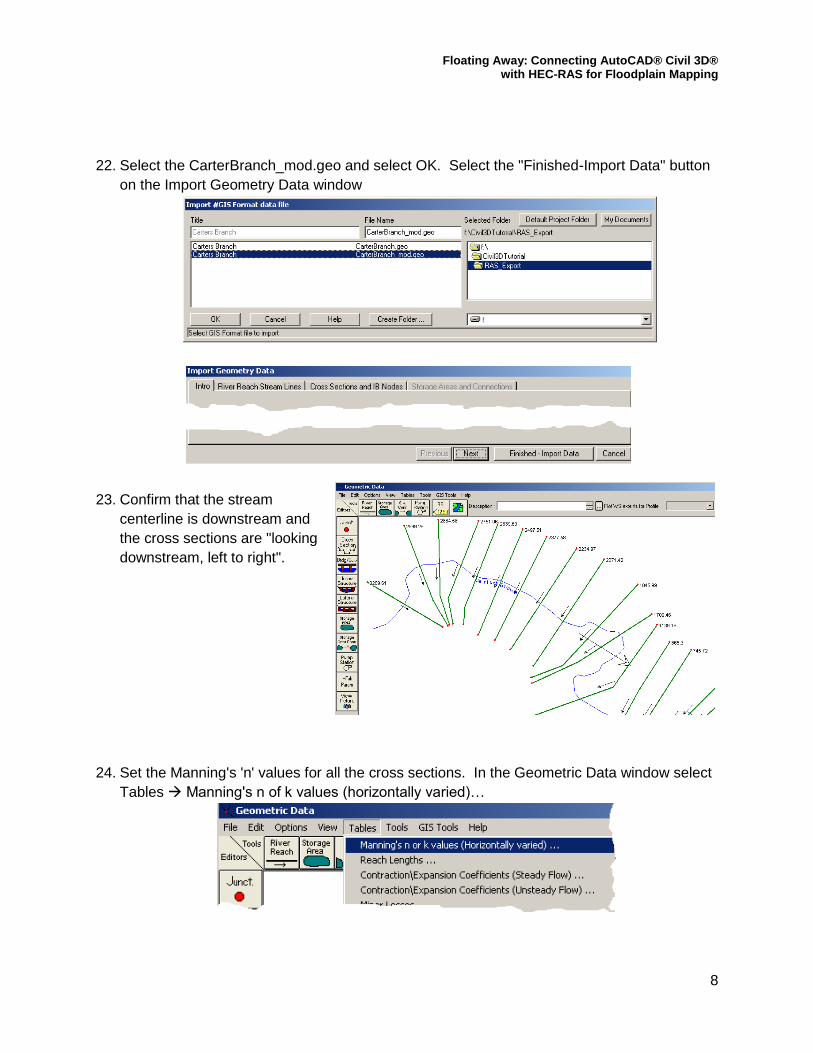
22. Select the CarterBranch_mod.geo and select OK. Select the "Finished-Import Data" button
on the Import Geometry Data window
23. Confirm that the stream
centerline is downstream and
the cross sections are "looking
downstream, left to right".
24. Set the Manning's 'n' values for all the cross sections. In the Geometric Data window select
Tables Manning's n of k values (horizontally varied)…

Floating Away: Connecting AutoCAD® Civil 3D® with HEC-RAS for Floodplain Mapping
9
25. The Highlight all of the "n rows" an select the "Set Values" button.
26. In the "Enter a amount to set entries in the selected range" form, type
in the value of 0.040 and select OK. Select the OK button on the "Edit
Manning's n or k values" form.
27. In the geometric data window, select the
File Save Geometry Data As…
Save the geometry data as "ExCartersBranch"
28. In the geometric data window, select the
File Save Geometry Data As…
Save the geometry data as "ExCartersBranch"
Create a Flow file
29. Select the "Edit /enter steady flow data" button on the
main HEC-RAS window.

Floating Away: Connecting AutoCAD® Civil 3D® with HEC-RAS for Floodplain Mapping
10
30. In the steady flow window, select
File Save Flow Data AS…
Save the flow as "ExistingConditions".
31. In the steady flow window, select
Options Edit Profile Names
Rename the first profile from "PF 1" to "100Yr" and
select the OK button.
32. In the steady flow window, set the 100yr flow
value to 1,500
33. In the steady flow window, select the "Reach Boundary Conditions.." button. In the "Steady
Flow Boundary Conditions" form select the "Normal Depth" button and enter a value of
0.005 in the field. Select OK and OK to return to the Steady Flow Data form.

Floating Away: Connecting AutoCAD® Civil 3D® with HEC-RAS for Floodplain Mapping
11
34. In the steady flow window, select
File Exit Flow data editor
Creating and Executing a Plan
35. Select the "Perform a Steady Flow Simulation"
from the main HEC-RAS window.
36. In the steady flow analysis window, select
File Save Plan As..
Save the plan as ExPlan
For the short plan identifier enter "ExPlan"
37. Select the "Compute" button on the
Steady Flow Analysis form.

Floating Away: Connecting AutoCAD® Civil 3D® with HEC-RAS for Floodplain Mapping
12
Step 4: Export surface from Civil3D and convert to FLT for use with HEC-RAS
Mapper to delineate the floodplain.
With the flood profile computed with HEC-RAS, we now need to get the existing ground surface
from Civil3D to the HEC-RAS Mapper to perform the floodplain delineation. To do this, we will
export the existing ground from Civil3D as a GeoTIFF and convert the GeoTIFF to the HEC-
RAS native ESRI FLT format. This conversion will require SAGA GIS. Once converted, the
surface DEM will be used to perform floodplain delineations.
38. In the Civil3D toolspace, right click on the EG surface and
select Export to DEM
39. Export the DEM with a grid spacing
of 1.0. Under the "Dem file name"
select the file icon and save the file
as EG.tif (make sure the GeoTIFF
option is selected.)
40. Select OK to begin the exporting of the surface.

Floating Away: Connecting AutoCAD® Civil 3D® with HEC-RAS for Floodplain Mapping
13
Convert the Civil3D GeoTiff to a HEC-RAS native ESRI FLT.
TIP:
To convert the GeoTIFF to an ESRI FLT, conversion through a GIS package will be necessary. It is
important to note that HEC-RAS is particular with the input format of the header (hdr) file that is paired with
the converted FLT. HEC-RAS assumes that the FLT was generated from ESRI's ARC-GIS which writes
these files in a very particular way. Manual revision of the hdr file will be necessary.
Download the SAGA software for grid conversion at:
http://sourceforge.net/projects/saga-gis/files/
41. Open SAGA GIS and import the GeoTIFF by selecting
Import/Export – GDAL/OGR GDAL: Import Raster
42. Navigate to the exported "EG.tif" and select Okay.
43. Export the GeoTIF to a ESRI FLT by selecting
Import/Export - Grids Export ESRI Arc/Info Grids
44. Select the Grid system and under the "Grid" select 01.EG. Select binary as the format.
Floating Away: Connecting AutoCAD® Civil 3D® with HEC-RAS for Floodplain Mapping
14
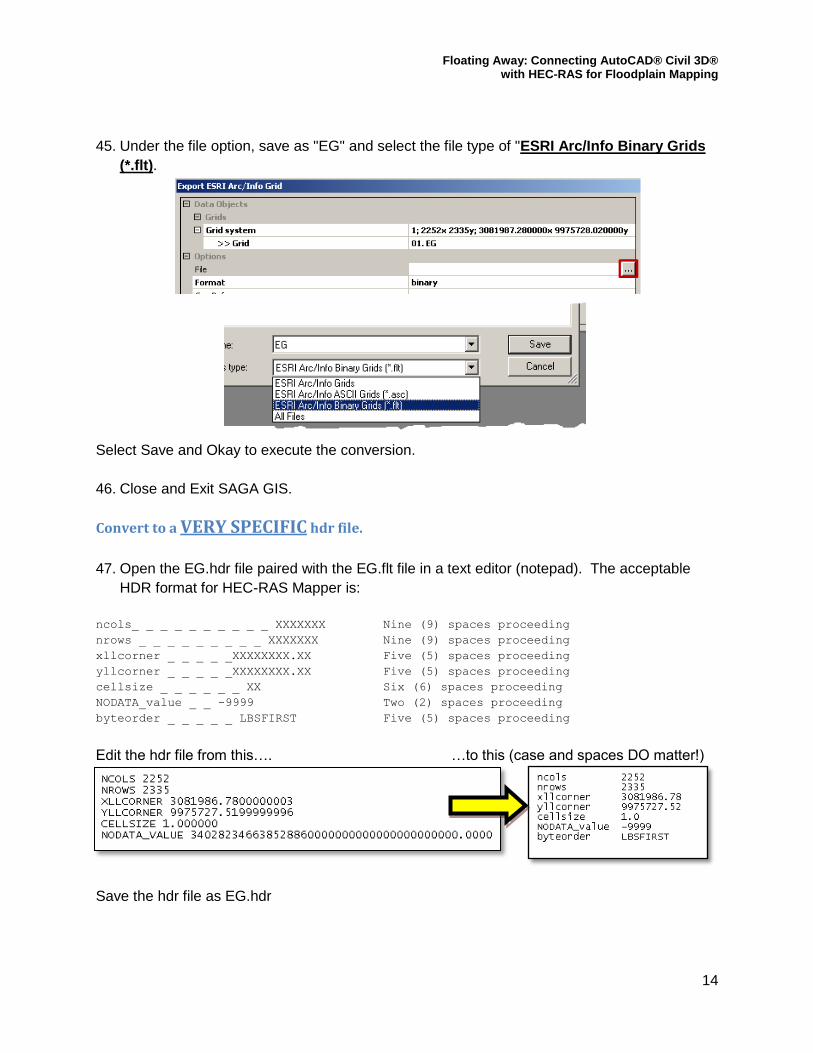
45. Under the file option, save as "EG" and select the file type of "ESRI Arc/Info Binary Grids
(*.flt).
Select Save and Okay to execute the conversion.
46. Close and Exit SAGA GIS.
Convert to a VERY SPECIFIC hdr file.
47. Open the EG.hdr file paired with the EG.flt file in a text editor (notepad). The acceptable
HDR format for HEC-RAS Mapper is:
ncols_ _ _ _ _ _ _ _ _ _ XXXXXXX Nine (9) spaces proceeding
nrows _ _ _ _ _ _ _ _ _ XXXXXXX Nine (9) spaces proceeding
xllcorner _ _ _ _ _XXXXXXXX.XX Five (5) spaces proceeding
yllcorner _ _ _ _ _XXXXXXXX.XX Five (5) spaces proceeding
cellsize _ _ _ _ _ _ XX Six (6) spaces proceeding
NODATA_value _ _ -9999 Two (2) spaces proceeding
byteorder _ _ _ _ _ LBSFIRST Five (5) spaces proceeding
Edit the hdr file from this…. …to this (case and spaces DO matter!)
Save the hdr file as EG.hdr

Floating Away: Connecting AutoCAD® Civil 3D® with HEC-RAS for Floodplain Mapping
15
Step 5: Delineating a Floodplain in RAS Mapper
48. With HEC-RAS 4.1.0, ensure that the
CartersBranch project is open an select from
the main RAS menu,
GIS Tools RAS Mapper…
49. In the RAS Mapper window, select Tools Floodplain Mapping.
50. In the Floodplain Mapping window, select the "New Terrain … " button. Select the EG.flt file.
Name the terrain layer "EG"

Floating Away: Connecting AutoCAD® Civil 3D® with HEC-RAS for Floodplain Mapping
16
51. In the Floodplain Mapping window, under the Layers to generate section, check the 100Yr
profile and the Water Surface Elevation check boxes. Note the output directory. Select
the Generate Layers button.
52. Review the floodplain results in the RAS Mapper window. Save the HEC-RAS project and
close HEC-RAS
Floating Away: Connecting AutoCAD® Civil 3D® with HEC-RAS for Floodplain Mapping
17
Step 6: Import the floodplain to Civil 3D® Utilizing the MAP tools in Civil 3D®, we will import the floodplain limits delineated by RAS
Mapper.
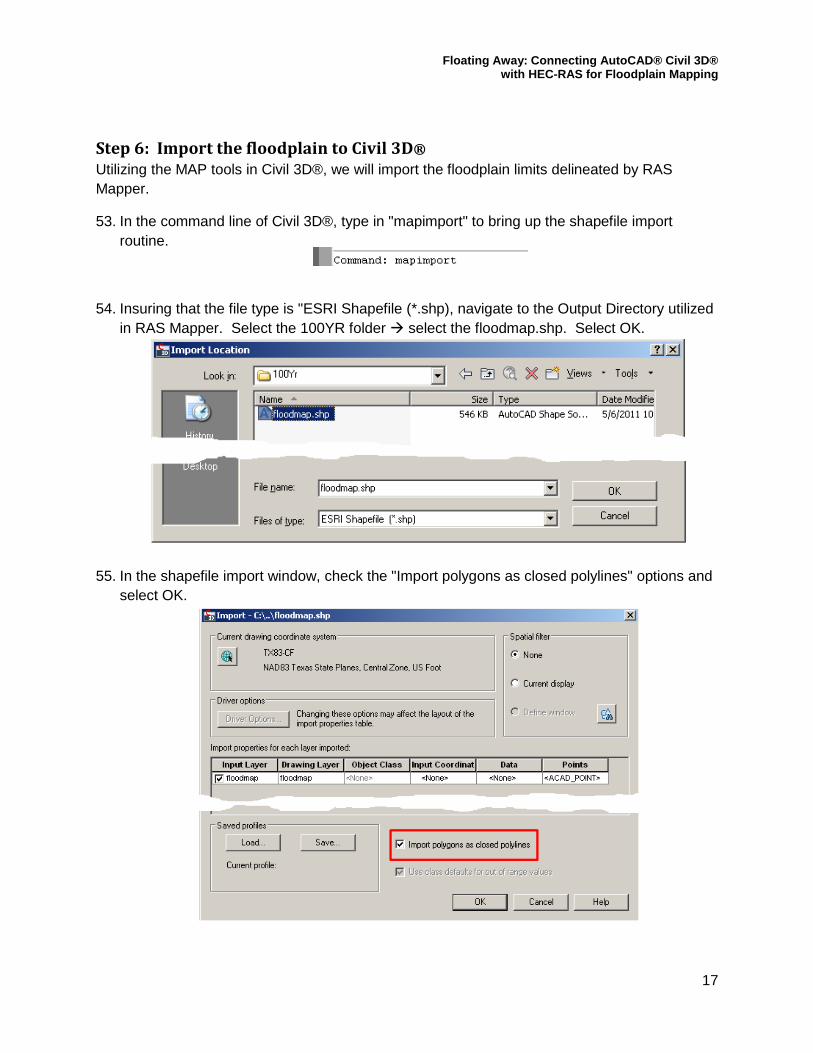
53. In the command line of Civil 3D®, type in "mapimport" to bring up the shapefile import
routine.
54. Insuring that the file type is "ESRI Shapefile (*.shp), navigate to the Output Directory utilized
in RAS Mapper. Select the 100YR folder select the floodmap.shp. Select OK.
55. In the shapefile import window, check the "Import polygons as closed polylines" options and
select OK.
Floating Away: Connecting AutoCAD® Civil 3D® with HEC-RAS for Floodplain Mapping
18
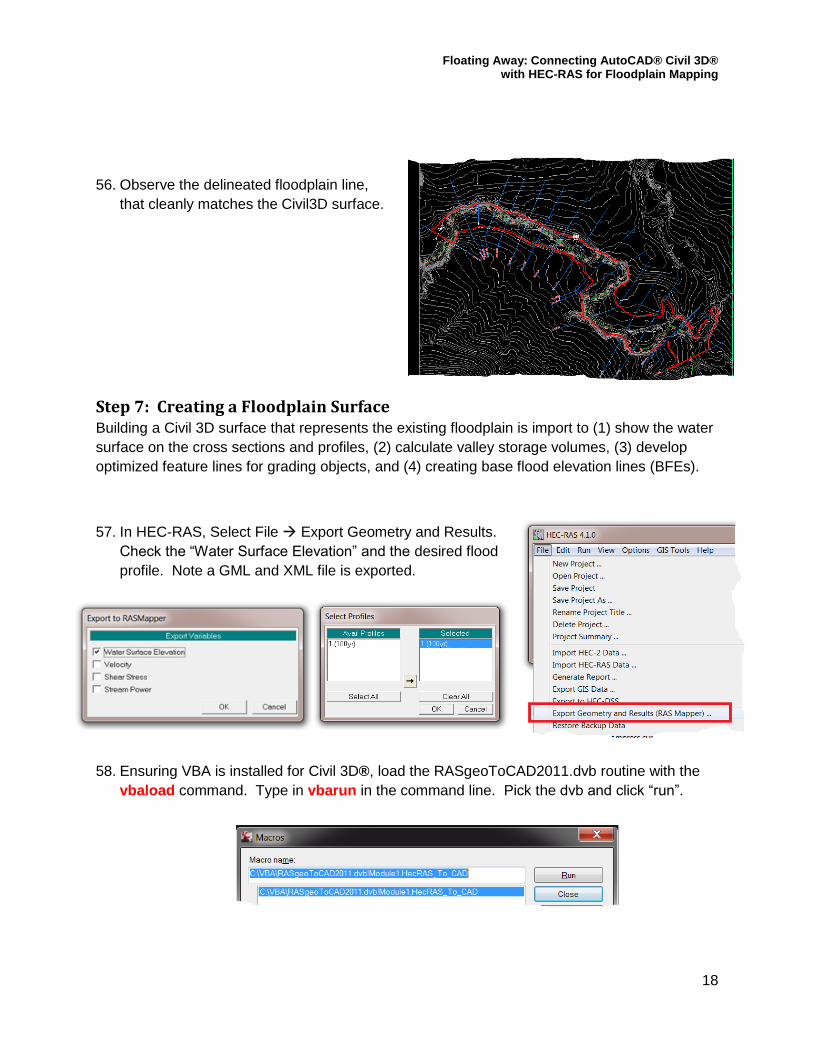
56. Observe the delineated floodplain line,
that cleanly matches the Civil3D surface.
Step 7: Creating a Floodplain Surface Building a Civil 3D surface that represents the existing floodplain is import to (1) show the water
surface on the cross sections and profiles, (2) calculate valley storage volumes, (3) develop
optimized feature lines for grading objects, and (4) creating base flood elevation lines (BFEs).
57. In HEC-RAS, Select File Export Geometry and Results.
Check the ―Water Surface Elevation‖ and the desired flood
profile. Note a GML and XML file is exported.
58. Ensuring VBA is installed for Civil 3D®, load the RASgeoToCAD2011.dvb routine with the
vbaload command. Type in vbarun in the command line. Pick the dvb and click ―run‖.

Floating Away: Connecting AutoCAD® Civil 3D® with HEC-RAS for Floodplain Mapping
19
59. Load the GML and XML files
exported from HEC-RAS.
This routine will draw polylines for
the cross section at an elevation
equal to the selected flood profile.
These polylines will be used as
breaklines to produce a ―Water
Surface‖
60. From the prospector, create a new surface. Add the imported and elevated polylines to the
surface as ―standard breaklines‖ If desired, apply the floodplain limits as the outer boundary.
_____________________
The image to the left shows the constructed
AutoCAD® Civil 3D® “Water Surface” of the
100-Yr flood event from the HEC-RAS analysis.
For clarity, this image shows base flood
elevation lines (water surface contours) at a 0.1
foot interval. Typical floodplain workmaps would
show a water surface a 1 foot interval.
_______________________

Floating Away: Connecting AutoCAD® Civil 3D® with HEC-RAS for Floodplain Mapping
20
Step 8: Developing a proposed grading plan for a Post-Project HEC-RAS model Using the constructed ―Water Surface‖, we will use feature lines and grading objects to develop
a proposed floodplain reclamation grading plan. Pasting the proposed surface to the existing
ground, a Post-Project hydraulic model can be exported and evaluated relative to the existing
conditions.
61. Within the limits of the ―Water surface‖, draw a polyline along the limits of the proposed
reclamation. From the Home tab of the Ribbon, select Feature Line Create Feature Line
from Objects. Create a new site titled ―ProposedGrade‖ and add the feature line. Assign
elevations from the ―Water Surface‖.
62. To provide freeboard, the feature line needs to be elevated two feet above the existing water
surface. Select the feature line. In the Ribbon, select ―Edit Elevations‖ and pick the
―Raise/Lower‖ button. Raise the feature line by two (2.0’) feet.
Floating Away: Connecting AutoCAD® Civil 3D® with HEC-RAS for Floodplain Mapping
21
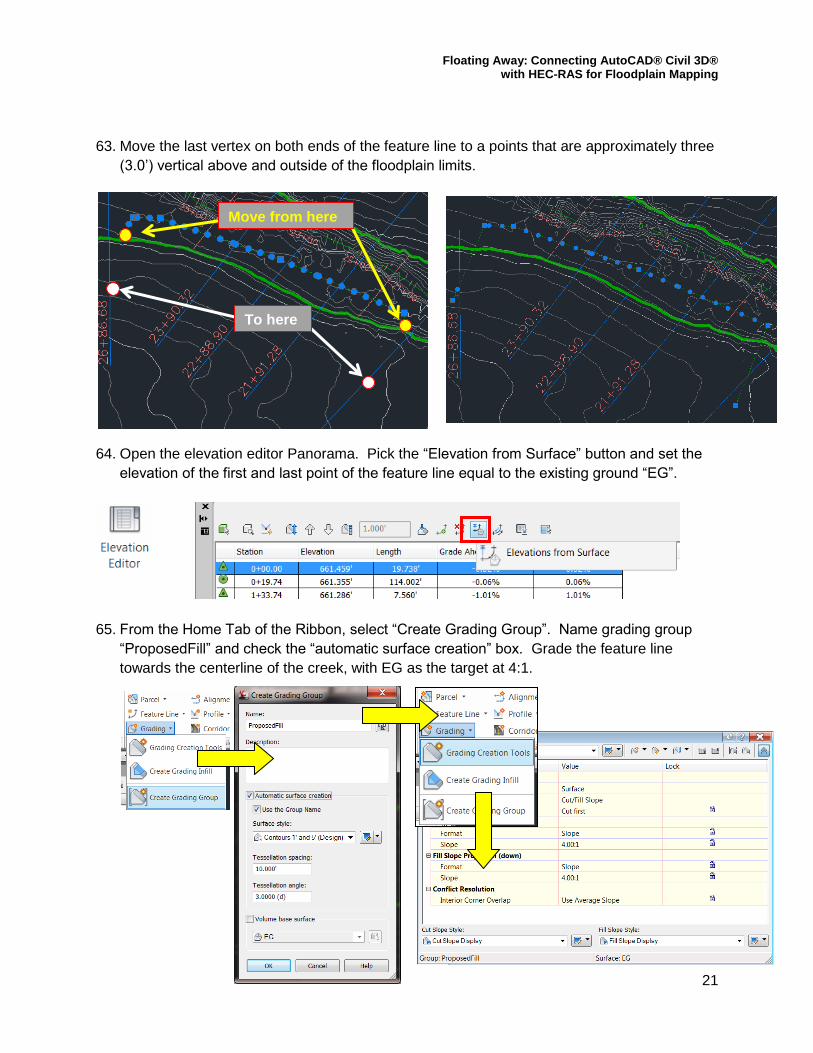
63. Move the last vertex on both ends of the feature line to a points that are approximately three
(3.0’) vertical above and outside of the floodplain limits.
64. Open the elevation editor Panorama. Pick the ―Elevation from Surface‖ button and set the
elevation of the first and last point of the feature line equal to the existing ground ―EG‖.
65. From the Home Tab of the Ribbon, select ―Create Grading Group‖. Name grading group
―ProposedFill‖ and check the ―automatic surface creation‖ box. Grade the feature line
towards the centerline of the creek, with EG as the target at 4:1.
Move from here
To here
Floating Away: Connecting AutoCAD® Civil 3D® with HEC-RAS for Floodplain Mapping
22
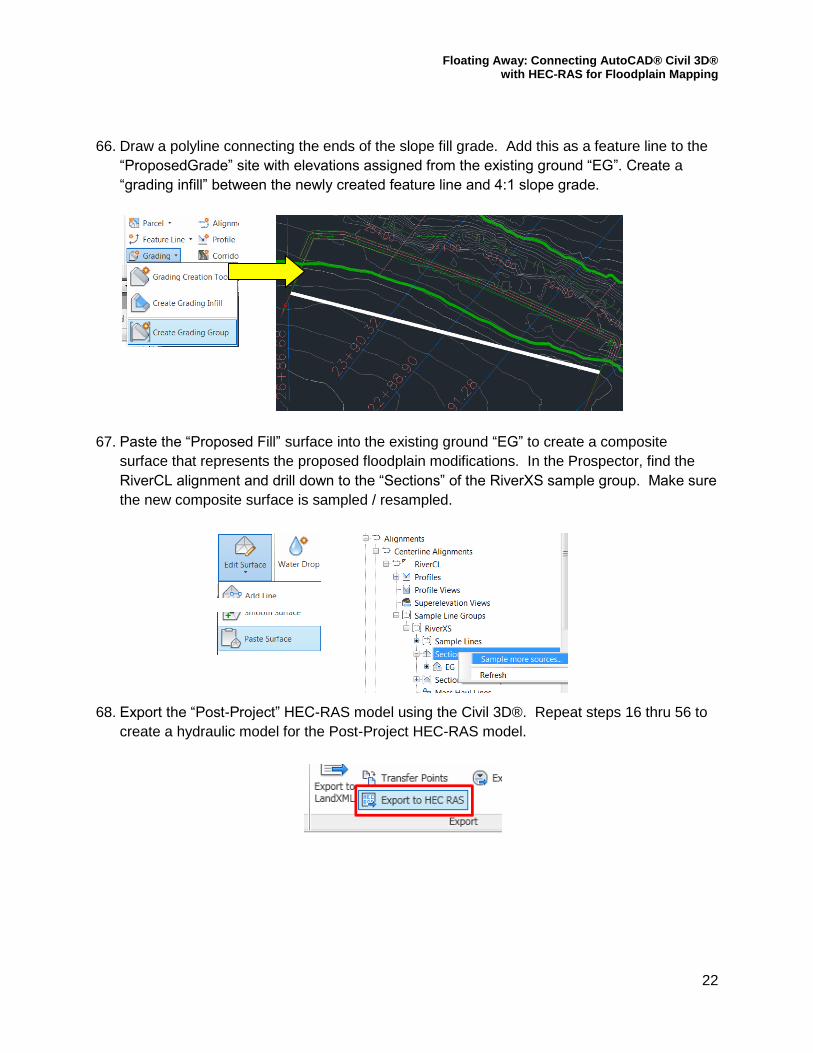
66. Draw a polyline connecting the ends of the slope fill grade. Add this as a feature line to the
―ProposedGrade‖ site with elevations assigned from the existing ground ―EG‖. Create a
―grading infill‖ between the newly created feature line and 4:1 slope grade.
67. Paste the ―Proposed Fill‖ surface into the existing ground ―EG‖ to create a composite
surface that represents the proposed floodplain modifications. In the Prospector, find the
RiverCL alignment and drill down to the ―Sections‖ of the RiverXS sample group. Make sure
the new composite surface is sampled / resampled.
68. Export the ―Post-Project‖ HEC-RAS model using the Civil 3D®. Repeat steps 16 thru 56 to
create a hydraulic model for the Post-Project HEC-RAS model.

Floating Away: Connecting AutoCAD® Civil 3D® with HEC-RAS for Floodplain Mapping
23
The goal: HEC-RAS comparison of Pre- vs. Post-project model reflecting our work in
AutoCAD® Civil 3D®
SUMMARY:
Running this tutorial to conclusion, you will have produced a Pre- and Post-project HEC-RAS hydraulic
model from LiDAR terrain data.
Surfaces for the (1) existing ground, (2) existing water surface, (3) composite surface with proposed grading
and (4) post-project water surface will allow you to leverage Civil 3D®’s tools to create profiles and cross
sections showing the impact the proposed grading has. Additionally, from these four surfaces you will be
able to calculate the proposed earthwork numbers and flood valley storage reduction.
Surfaces, alignments and sample line can be stylized to quickly produce FEMA compliant floodplain
workmaps.
Leveraging grading objects and/or corridors allows for the quick iterations of proposed grading scenarios
allows the designer to find the optimum solution that minimizes costs and adverse flooding impacts.
**Visit the Autodesk University web site for class CI4043 to find the supporting files, custom programs and
VBA’s utilized in this tutorial. Additional resources can be located at
http://sites.google.com/site/hecrasflipper/