flues, chimneys and combustion air...
TRANSCRIPT

Technician’s guide to best practice FINAL Draft v October 2016
Flues, chimneys and
combustion air
ventilators.

Flues chimneys & combustion air ventilators is published by the Cavity Insulation
Guarantee Agency (CIGA). It is one of a series of technician’s guides, intended to
contribute to best practice in cavity wall insulation.
Whilst every care has been taken in its preparation, CIGA and its authors specifically
exclude any liability for errors and omissions or otherwise arising from the contents of
this guide. Readers must understand the principles and practices described in relation
to any particular application and, where necessary, take professional advice.
The information contained in this guide is not exhaustive. Further details on flues,
chimneys, and combustion air supply can be obtained from the following publications.
Gas Appliances
BS5440 – Fleeing and Ventilation for Gas Appliances not exceeding 70kW
Part 1 2008: Specification for the Installation and maintenance provision for gas appliances
Part 2 2009: Specification for the Installation of gas appliances to chimneys and maintenance of chimneys
BS 5871 Specification for the installation and maintenance of gas fires, convector heaters, fire/back boilers and decorative fuel effect appliances –
Part 4 2007: Independent gas-fired flueless fires, convector heaters and heating stoves of nominal heat input not exceeding 6 kW (2nd and 3rd family gases).
Further Technical information should be sought / obtained from the relevant fuel supplier;
Natural Gas
Gas Safe
Oil Appliances
(Oil Firing Technical Association for the Petroleum Industry: OFTEC)
Solid Fuel
Solid Fuel Appliances The Building Regulations 2010 Part J Appendix F
www.planningportal.gov.uk
© . . .All rights reserved. No part of this publication may be reproduced, stored in a retrieval system or transmitted in any form or by any means electronic, mechanical recording or otherwise without the prior written permission of the copyright holder.

LEGAL REQIREMENTS
The main legal requirements for protection of the public and employees are the general
provisions of Health and Safety at Work act 1974, and related legislation, including the
Management of Health and Safety at Work Regulations 1999.
These require the drawing up of a ‘risk assessment’ plan of protective measures, as well as
the appointment of competent persons to ensure that safety requirements are met
effectively. An example of a risk assessment for Flues, Chimneys and Combustion Air
Ventilators is given on page 20.
In addition, for gas installations, there is a requirement to comply with the current
edition of the Gas Safety (Installation and Use) Regulations, and in particular Regulation
8. This covers alterations and modifications to buildings in which gas appliances are
installed and this would include cavity wall insulation.

PREFACE
“The Technician’s guide to best practice provides technicians with a simple, but
detailed manual. It covers best practice for dealing with flues, chimneys and
combustion air ventilators during the installation of Cavity Wall Insulation (CWI). It
clearly sets out the responsibilities of the CWI installer companies, with practical
examples and illustrations of procedures to be carried out by the competent technician.
The guide should be followed by all CWI installer companies and used in conjunction
with recommended training programs.

INTRODUCTION
This guide has been written for the CWI Company and technician, to ensure that the performance of fossil fuel-burning appliances is not adversely affected by the installation of Cavity Wall Insulation (CWI). CWI should not be installed unless you can gain entry to the property, and are able to complete all of the necessary pre and post installation checks.
Installation is a relatively simple operation, but you must carry out your pre- and post- installation checks correctly, or you put the occupants in real danger. If you block any combustion air ventilators or flues of fuel-burning appliances, there is a high risk of someone becoming seriously ill or dying of carbon monoxide poisoning.
All fuel-burning appliances need an adequate air supply and need a clear chimney /flue to operate correctly and safely. With an appliance in good working order the main products of complete combustion are Carbon Dioxide and Water Vapor. Both of these gases are non-toxic, however if the air supply becomes impaired or violated highly toxic carbon monoxide is produced. This is known as incomplete combustion. Where the products of combustion are unable to pass through a flue to outside atmosphere, or they re-enter the premises through either a blocked or defective flue or chimney it is referred to as ‘spillage’.
Carbon monoxide poisoning You cannot see, smell or taste carbon monoxide, but it is an extremely toxic gas. It is absorbed by the red blood cells via the lungs, resulting in illness or death. Exposure to high levels of carbon monoxide can lead to death in as little as 1-3 minutes. The symptoms of carbon monoxide poisoning can be confused with those of other illnesses, such as colds and flu. Someone exposed to the gas may complain of: Unexplained headaches. Chest pains or muscular weakness, General lethargy or fatigue
Sickness, diarrhea or stomach pains, Sudden dizziness when standing up, convulsions
If carbon monoxide poisoning is suspected, all appliances must be switched off immediately and not used again until the cause has been fully established and rectified.
Where carbon monoxide poisoning is confirmed the installation must not be disturbed (other than making safe) and the incident reported to the HSE under RIDDOR.
Technician’s competence
To attain a level of competence, technicians must have successfully completed an
approved / registered Combustible Fuels Awareness training course covering all
checks and inspections referred to in this guide.

CONTENTS
YOUR RESPONSIBILITIES 1 - 2
Carbon monoxide (CO) analyzers Carbon monoxide (CO)
alarms Glass fronted fires
Pre-installation checks Installation checks, Post-installation
checks
IDENTIFYING APPLIANCES, VENTS AND FLUES 3 - 4 -5
Typical fuel – burning appliances
Air bricks and ventilators
Combustion air ventilators
Other ventilators
Common air bricks
Maintaining air supply
COMBUSTION AIR & VENTILATION REQUIREMENTS
VENTILATOR REQUIREMENTS 7 - 8
VENTILATION REQUIREMENTS FOR OPEN-FLUED GAS APPLIANCES 8
FLUES 9
FLUELESS GAS FIRES 10
CHIMNEYS 11 - 12
CHECKING FLUES AND APPLIANCES 13
PRE-INSTALLATION CHECKS 13
POST INSTALLATION CHECKS 14 - 15 -16
Solid fuel appliances
Glass fronted fires / boilers and floor mounted, free standing boilers
Gas fired appliances
Room sealed appliances (balanced flue)
Oil fired appliances
Testing for carbon monoxide (CO) CO readings
WARNING NOTICE 18 / 19
EXAMPLE OF RISK ASSESSMENT 20
TECHNICIAN’S SAFETY CHECKS 21
TECHNICIANS SAFETY CHECK SHEET 22
6 – 6a
7a-7b-7c
8
9
10
11
12
13
14 – 15 – 16 -
17 – 18
19
20
21

YOU’RE RESPONIBILITIES
You must leave flues, chimneys and
combustion air ventilators in the same or in
better condition than before cavity wall
insulation took place.
When you identify that a fault could harm
the occupants or yourself, remember that
people’s health & well-being must be
safeguarded. You should take appropriate
action and or issue a Warning Notice.
You must ensure that the installation vehicle
is equipped with:
Smoke pellets and holder
Smoke matches and holder
Warning notices.
General.
The normal procedure of installing cavity wall
insulation should not affect the operation of
fuel – burning appliances, flues or chimneys.
The appropriate checks must be carried out at
all stages of the works:
Pre installation
Installation
Post installation.
When you leave the installation, make certain
that you have not blocked or compromised
any chimney, flue or combustion air
ventilators with insulation materials.
If for any reason a smoke / spillage test
cannot be carried out by the cavity wall
insulation installing technician, an approved
appliance maintenance contractor must carry
out the appropriate checks. (I.e. Gas Safe –
registered installer for gas appliances HETAS
or Solid Fuel approved engineer installer for
all solid fuel appliances – OFTEC registered
engineer for Oil appliances)
CARBON MONXIDE (CO) ALARMS
The Health & Safety Executive in its
discussion documents Gas Safety Review:
options for changes states: HSE recommends
the use of CO alarms meeting all current
British Standards as a second line of defence.
It is emphasised by the HSE that alarms must
not be seen as a substitute for proper
regulatory installation maintenance and safety
checks on Gas appliances and flues.
This view is endorsed by CIGA.
GLASS FRONTED FIRES
Some manufacturers state that decorative
canopies or fronts of fires should be removed
from gas fires in order to carry out spillage
tests. Where these parts are to be removed by
the householder and are not designed for the
safe use of the appliance, then this can be
carried out by the installation technician.
Where removing the part would affect the safe
operation of the appliance then this work must
only be carried out by a Gas Safe registered
installer.
PRE- INSTALLATON CHECKS
Fuel burning appliances, combustion air
ventilators, and the routes of all flues on
chimneys on external walls must be located
and identified. Ventilators should be checked
to ensure that they are compliant with the
regulatory standards and that chimneys are
not capped.
Appliances must be run and the flame
observed, especially with glass – fronted gas
fires. Confirm exit of combustion gases by
carrying out a flue, or spillage test. Should any
of the checks prove unsatisfactory report them
to your supervisor and do not proceed with the
installation until the problem(s) have been
fully resolved 1

LOCATE and NOTE
Each Appliance Type:
o Boiler
o Space Heater (fire)
o Other
Fuel Type Used
o Gas
o Oil
o SmokelessOvoids, Briquettes,
Wood, Bio Fuel, bituminous coal
Combustion air ventilators for each
appliance
o Location
o Type
o Compliant / None Compliant
Carry out a spillage test’s where applicable
You must be satisfied that the ventilator’s
supplying combustion air for the fuel –
burning appliances meets the current
standards and requirements.
INSTALLATION CHECKS.
Installation procedures are fully detailed in
the Technicians Guide: Installing Cavity Wall
Insulation
Particular care is needed during;
DRILLING.
When drilling holes, do not drill directly in
line with a chimney of flue.
INJECTION.
When installing cavity wall insulation near a
chimney or flue, check that no insulation
material is visible within the flue. Care and
attention should always be applied.
POST – INSTALLATION CHECKS.
Ensure that: a) All combustion air ventilators are clear
and functioning correctly b) All flues on external walls are clear and
not compromised. Go inside the property and check for any visible evidence of insulation material in or around fuel-burning appliances. Ask the customer / occupant to run each
appliance. Check the appearance of the flame.
For wood burners and Solid Fuel Fires you
should observe flues and chimneys from
outside of the property, to ensure that
combustion gases are being exhausted.
Carry out Smoke / Spillage tests for all fuel
burning appliances on external walls and
compare them with your pre-installation
safety checks.
You could be held personally responsible and
face prosecution if occupants subsequently
become ill or die from carbon monoxide
poisoning due to careless work on your part. ADVICE TO CUSTOMER’S. If you are unsure about the operation of an
appliance or the effectiveness of the flues,
chimneys and combustion air vents you must
issue a warning notice (see pages 18/19)
Explain to the customer that the appliance
must not be used / operated until the appliance
and or its flueing system has been thoroughly
check by a registered and approved
maintenance contractor.
Should you believe that a Gas appliance is
dangerous it must be turned off and the Gas
Emergency Service or Gas Safe registered
contacted and immediately notified.
For liquid petroleum gas – Contact the
Supplier.
The information provide here does not cover
every eventuality. If you in any doubt, seek
further informed advice
2

IDENTIFYING APPLIANCES, VENTS & FLUES. TYPICAL FUEL – BURNING APPLIANCES
Coal Fire Gas Appliance Flueless Gas Appliance
Gas Appliance Gas Fire Back Boiler Solid Fuel Stove
Always see the appliance’s in use before
installing cavity wall insulation to compare
its performance following the installation.
The appearance of the flame should be
noted in this respect
(see page 10): checking flues & appliances)
Scorch marks or staining in or around the
appliance casing or other signs of distress
may indicate existing problems.
It is important to establish what fuel type
is used by each appliance. Different fuels
and appliances will have different flues,
chimneys and combustion air ventilation
requirements.
3

If there is not enough air, carbon
monoxide may be produced which could
build up and cause serious illness to the
occupants. In severe cases it may kill.
SAFEGUARDING THE
COMBUSTION AIR SUPPLY
The combustion air supply to each
appliance must be isolated from the cavity
to guarantee an un-obstructed supply of air
to the appliance(s)
It is essential that the air ventilator is
continuously sleeved across the cavity.
Incorrect air Incorrect Correct supply - Must not be drawn from the wall cavities
Combustion air ventilators must not draw air from the wall cavities; they need to be none-
closable, kept free from obstruction.
Combustion air ventilators must not be closable or incorporate fly screens or mesh
It is of the utmost importance that combustion air ventilator ‘new fits’ are sold specifically
as combustion air vents e: g Stadium, Ryton, Permalli – this means that they will be
stamped with the free air and be unobstructed
It is your responsibility to ensure that there is sufficient combustion air
available to the appliance following the installation of cavity wall
insulation
AIR BRICKS & VENTILATORS
There are many air bricks and ventilators
in external walls. Where air bricks
continue to have a purpose, they must be
sleeved continuously with a proprietary
duct from the cavity, and not blocked by
the insulation material.
TYPICAL COMBUSTION AIR
VENTILATORS
Initially you must locate, identify and
note the position of combustion air
ventilators for all fuel – burning
appliances within the property. It is
vital that these are thoroughly checked
4

COMMON AIR BRICK TYPES
Due to the tapered design of their vent
holes, “Terracotta” air bricks only provide
limited free air flow and will not normally
Provide sufficient combustion air.
225mm x 150mm
Terracotta Louvre
225mm x
150mm plastic
They should be replaced with a
regulatory combustion air vent.
Combustion air ventilators with fly
screens must be removed / replaced
225mm x 150mm
terracotta louvre
Terracotta air vents
– reduced ventilation
Other ventilators include those
providing under floor (to
suspended floors)
Cavity wall & roof ventilators
Room vents (kitchen / bathroom
Extractor fans
Air vents to larder / food storage.
All operational ventilators must be sleeved and protected and maintained (Kitchen / bathroom vents must be maintained) Bedroom ventilators should be maintained; however, should the client request that these are sealed over, record ventilator location and its use on the work records. Be careful not to confuse cavity vents with others – such as under floor vents.
OBSOLETE CAVITY VENTILATOR'S. These must be sealed with an appropriate material to prevent
Material loss water ingress infestation
OTHER VENTILATORS
Bedroom
ventilator
bathroom,
kitchen,
larder
vents
Under
floor
ventilator
5
Maintaining air supply

COMBUSTION AIR & VENTILATION
REQUIREMENTS If a combustion air ventilator is required,
one must be fitted before you proceed with
cavity wall insulation.
The nominal size and the free air area of
combustion air ventilators vary from
manufacturer to manufacturer. Dimensions
referred to in this guide are the nominal
sizes used by the trade, but the key
consideration is the free air area that the vent
provides.
A number of different terms are used by
vent manufacturers to describe the free air
area, including: ‘air flow rating,’ ‘free air
opening,’ ‘available air opening,’ and ‘vent
free area.’
Gas appliances must be provided with at
least 500mm2 of free air per kW - above a
7kW net input rating†. Oil and solid fuel
appliances require 550mm2 of free air per
kW - above a 5kW rating.
A table showing the vent free areas required
for any open flued gas appliance, up to a
70kW Nett rating is shown on page 8
(excluding DFE gas fires). However, most
fuel-burning appliances found in domestic
CWI installations, are covered by two sizes
of standard plastic air vents:
A typical 225mm x 150mm plastic air vent
(the old 9” x 6,” or ‘two brick’ size),
provides up to 15,600 mm2 of free air, which
is sufficient for:
• Gas-fired appliances‡ w i t h a
n e t he a t i n p u t up to 37kW
(126,000 Btu).
• Oil-fired and solid fuel appliances w i t h a
heat input up to 30kW (102,000 Btu)
A typical 225mm x 225mm plastic air vent
(the old 9” x 9,” or ‘three brick’ size),
provides up to 23,400mm2 of free air,
which is sufficient for:
• Gas-fired appliances w i t h a
net h e at i n p u t up to 53kW
(180,000 Btu)
• Oil-fired and solid fuel appliances w i t h
a heat input up to 45kW (153,000 Btu)
Open-flued, solid fuel fires
A permanent air vent must be fitted in any
room or space containing a working solid
fuel open fire. The CWI installer is not
required to fit an air vent when the
installation is obsolete: e.g. when the
appliance has been removed, or the flue and
fireplace recess is permanently blocked.
With these appliances, the combustion air
requirement is calculated as at least
14,500mm2 unless otherwise specified in
the manufacturer’s instructions. The
standard 225mm x 150mm plastic vent, or a
125mm dia circular hole core ventilator, will
usually provide 10,000mm2. Always check
the vent size before fitting.
Solid Fuel Stoves, Closed Appliances
(boilers and cookers).
Approved document J requires ventilation for
any appliance with a rated output above 5kW
or every kW where the fire is fitted to a
property built since 2008
6

6a
† Information regarding the input rating of a gas appliance can be found on the
appliance data badge. This is normally fixed on the appliance casing.
‡ Ventilation provided for gas appliances should not be over-sized, as this can have
a detrimental effect on the energy-efficiency of the appliance. In turn, this may
encourage customers to block the vent off.
Note: For all gas appliances ventilation requirements are calculated from net values.
If the manufacturer specifies gross values divide by 1.11
Where it is not clear, take value as a net value to err on the side of safety.

Combustion Air Ventilation Requirements for Solid Mineral
Fuel & Wood Burning Appliances
Does the room contain a Solid Mineral Fuel or
Wood Burning Appliance?
Does the room contain a Closed appliance?
Approved document J requires:
Ventilation for any appliance with or
without a draught stabilizer fitted?
Ventilation required for any appliance for
every kW into a property built from 2008
Extract from -: Approved Document J Combustion Air Ventilation
Open Fire The size of an air vent is subject to the throat area or cross sectional area
of the flue-: [50%]
Closed Appliance Free air of 550mm2 x kW rating applies to appliances above 5kW
Free air of 555mm2 x kW for homes built from 2008
Table: ADJ Air Supply to Solid Fuel Appliances
Type of Appliance Type and Amount of Ventilation
Open appliance Permanently open vent with a total equivalent area of at least 50% of
the cross sectional area of the flue
Open appliance, such
as an open fire with a
throat.
Permanently open vent with a total equivalent area of at least 50% of
the throat opening area
Open Appliance, such
as a stove, cooker or
boiler with a draught
stabiliser
Properties built before 2008:
300mm2/kW for the first 5kW of the appliance rated output
850mm2/kW for the balance of the rated output
Equivalent area is measured -:
divide the area given in mm by 100 to find the corresponding area in cm2
Nominal fire size
(fireplace opening size) 350mm 400mm 450mm 500mm
Total equivalent area of
permanently open vent’s 14,500mm2 16,500mm2 18,500mm2 20,500mm2
Example: an appliance with a flue draught stabiliser and a rated output of 7kW would require an equivalent
area of [5 x 300] + [2 x 850] = 3200mm2
It is unlikely that a dwelling constructed prior to 2008 will have an air permeability of less than 5.0m2unless
the dwelling has received extensive measures to improve the air permeability.
7a

Combustion Air Ventilation Requirements for
Gas Appliances
Does the room contain a DFE fire in
an open flue? Yes
Where a design plate or Appliance
Manual is Not available:
seek Technical Advice
7b
Does the room contain a
fuel burning appliance? Yes
Is it a balanced
flue or room sealed
appliance?
Is it a gas
appliance of 7kW
or under?
Is it a flueless gas
appliance?
Yes Yes No Yes
Is it a Gas Appliance
from
7kW up to 37kW Free Air area =
10,000mm2
Free air area
= 15,600mm2
Free air area
= 23,400mm2
No Yes
Is it a Gas Appliance
from
37kW up to 53kW?
No Yes
For appliances above these kW
ratings contact a registered Gas
Safe Engineer for Technical
Advice

Combustion Air Ventilation for Oil Fired Appliances
7c
Does the room contain a fuel
burning appliance?
No
Yes
Is it an oil fired appliance of
5kW or under?
No Yes
Is it an Oil Fired appliance
from 5kW up to 30kW?
Yes No
Free air area =
55mm2 x kW
rating
For oil fired appliances above these kW
ratings, seek technical advice from an
approved OFTEC engineer

VENTILATION REQUIREMENTS FOR OPEN FLUED- GAS APPLIANCES 7kW and under heat input (net) does not require additional ventilation.
The combustion air requirements for an open flued gas appliance can be determined using the following:
Heat input greater than 7kW (net) requires an additional 5 0 0 m m 2 of ventilation per kW e.g. an appliance with 15kW input requires:
15kW - 7kW = 8kW
8 x 500mm2 = 4,000mm2 of
ventilation required.
Heat input kW net
Room vent free area
(mm2)
Heat input kW net
Room vent free area (mm2)
1 0 36
14,500
2 0 37
15,000
3 0 38
15,500
4 0 39
16,000
5 0 40
16,500
6 0 41
17,000
7 0 42
17,500
8 500 43
18,000
9 1,000 44
18,500
10
1,500 45
19,000
11 2,000 46
19,500
12
2,500 47
20,000
13
3,000 48
20,500
14
3,500 49
21,000
15
4,000 50
21,500
16
4,500 51
22,000
17
5,000 52
22,500
18
5,500 53
23,000
19
6,000 54
23,500
20
6,500 55
24,000
21
7,000 56
24,500
22
7,500 57
25,000
23
8,000 58
25,500
24
8,500 59
26,000
25
9,000 60
26,500
26
9,500 61
27,000
27
10,000 62
27,500
28
10,500 63
28,000
29
11,000 64
28,500
30
11,500 65
29,000
31
12,000 66
29,500
32
12,500 67
30,000
33
13,000 68
30,500
34
13,500 69
31,000
35
14,000 70
31,500
Gas Appliances in compartments
Open flued gas appliances located in compartments
which are ventilated directly
to outside require ventilators fitted at high and low
level. The ventilators should be sized as follows:
High Level Ventilator - 500mm2/ kW heat input
Low level ventilator – 1000mm2/ total kW heat
Input Example: 20kw boiler + High Level 500 x 20
= 10,000mm2
Low Level 1000x20 = 20,000mm2
8
2. A gas range rated appliance with a heat input from 20kW to 25 kW (net) the maximum heat input must be used to determine the ventilation required.
25kW – 7kW = 18 kW
18 x 500mm2 = 9,000mm2 of ventilation required.
Note: There are different ventilation requirements for a single gas appliance or groups of appliances with a total input rating over 70kW (net). Advice regarding these appliances should be sought from a registered gas safe or solid fuel engineer

FLUES
To work properly and safely, fuel burning appliances need a continuous
supply of air. Some draw air from within the room (open flues) and others from
from outside.
Gas fire 7kw and under Combustion air vent normally not required
X
X
Oil cooker & boiler (lined flue) Combustion air vent required
Room sealed (balanced flue or oil-fired) No combustion air vent required
Solid fuel boiler (lined flue)
combustion air vent required
Free standing, oil-
fired boiler
Combustion air
vent required
Gas fired back boiler free standing oil-fired boiler Inset Flueless gas fire
Combustion air vent required combustion air vent required Seek Technical Advice
9
Example of a Free standing
stove flue arrangement.

FLUELESS GAS FIRES Until recently, all fixed gas fires in the UK
have been fitted with a flue to discharge the
combustion gases to the outside air. Where
these appliances are only for room heating,
and with the exception of the fuel effect type,
they have generally been exempt from the
requirement to have a permanent vent to
provide combustion air.
However, gas fires that do not have a flue,
have been introduced into the UK to be used
for background heating. ‘In all cases you
must seek technical advice to confirm the
ventilation requirements on these appliance
types.
In place of a flue, these fires use burner technology or have a catalytic element that ensures that only minimal non harmful levels of carbon are produced. In addition, they have built-in oxygen depletion sensor that will shut down the fire if oxygen levels become depleted
Considerations Several important facts must be borne in mind
by all CWI personnel involved in the
installation process, and [particularly by the
CWI technicians
All flueless fires require a minimum permanent
combustion air vent of 10,000mm2. Further
additional ventilation will be required for
appliances with a rated input above 2.7kw net
within a room, or 5.4kw net within another
internal space (i.e. hallway). The vent must
lead directly outside and must not be
compromised by the CWI see manufacturers
data for specific ventilation requirements
Flueless fires can be positioned on internal
walls, and an external survey of the building
cannot provide safe information on the fuel
burning appliances that may be inside. This
emphasizes the importance of a careful internal
survey to note the appliance type and
location. Where flueless appliances are located
on external walls, then safety checks must be
carried on each appliance before and following
Comment
Flueless fire or stove (Secondary Heating
Only)
Highly efficient energy using appliance.
No flue or chimney or outside wall
required.
Supplementary ventilation required,
(e.g. a small air vent, as per manufactur-
er's instructions) through outside wall
directly into the room
Supplementary to primary heating.
Room size restrictions apply.
10
Where flueless appliances are located on
external walls, then safety checks must be
carried on each appliance before and
following the installation of cavity wall
insulation.
There are insert type fires on the
market that are designed specifically
to replace the internal leaf and the
cavity itself.
When installed in an occupied room the
minimum room volume is 1 m3 for every
0.045 kW net or when in other internal
spaces such as hallways 0.09 kW net. For
example, a 1.8 kW appliance installed in a
lounge area must have a MINIMUM room
volume of 40 m3 where the room volume is
smaller it must not be installed. It should
be noted that most main rooms in terraced
houses, and many in semi-detached
properties, do not meet this minimum
volume
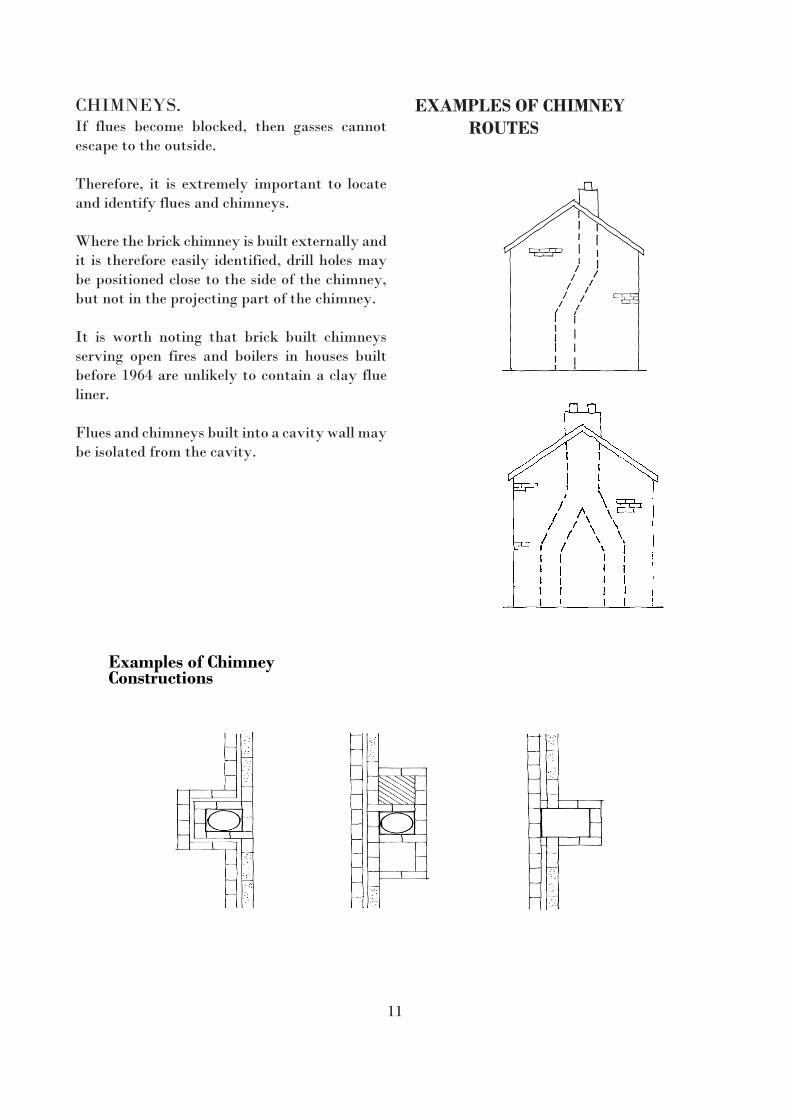
CHIMNEYS. If flues become blocked, then gasses cannot
escape to the outside.
Therefore, it is extremely important to locate
and identify flues and chimneys.
Where the brick chimney is built externally and
it is therefore easily identified, drill holes may
be positioned close to the side of the chimney,
but not in the projecting part of the chimney.
It is worth noting that brick built chimneys
serving open fires and boilers in houses built
before 1964 are unlikely to contain a clay flue
liner.
Flues and chimneys built into a cavity wall may
be isolated from the cavity.
EXAMPLES OF CHIMNEY
ROUTES
11
Examples of Chimney Constructions

During the pre-installation check, the line of the flue must be identified by noting the position of
the appliance and its terminal as shown below, the route often includes offsets that are not
obvious, either internally or externally.
You must know which type you are dealing with to ensure
that no drilling takes place on the line of the flue.
Drilling a hole into a flue could dislodge a piece of masonry
or flue liner that may impede the flue gases - whether
or not the hole is injected with insulation.
In some properties, flues may be formed from hollow
blocks or interlocking liner pots built into the cavity.
Pre-cast flues serving gas appliances are particularly
difficult to trace since both the internal and external walls
show a flush face.
Since the pre-cast blocks can be in contact with the external leaf, it is very easy to drill into the
flue, even if a depth stop is fitted to the drill.
Pre-cast flues can also incorporate offsets that traverse the wall. The pre-installation inspection
of the loft space will help to show the line of the flue above first floor ceiling level.
Pre Cast Flue
12
Internal /
External
Chimney Routes

CHECKING FLUES AND APPLIANCES
Testing appliances
With the exception of decorative fuel effect gas fires, flames in gas appliances must be clear and
well defined, not yellow or orange in appearance. The appearance of the flame will vary
depending on the fuel used. You should check the operation of all appliances before CWI
installation.
With other types of fuel types, the appearance of the flame may vary depending on the fuel
used.
Appliances must be operated at maximum output for at least 5 minutes with all doors and
windows shut to ensure stable operation under worst case conditions. A smoke/spillage test
must be carried out in accordance with the appliance manufacturer’s instructions.
General
Every flue system on an external wall must be checked before and after installation. It is
essential that these flues remain clear and that the combustion products are completely
discharged to the outside air.
Appropriate methods of inspection and testing for various types of flue system are described
below.
Because of the variety of fuel-burning appliance designs, it is sometimes difficult to establish
whether the flue performance is satisfactory. If it is not possible to confirm this performance, the
fuel appliance, maintenance contractor must carry out the appropriate tests.
PRE-INSTALLATION CHECKS Each appliance should be ignited and operated prior to CWI installation to observe that the
flue is functioning correctly. This allows you to compare the performance of the appliance
during, and on completion of the works.
Flame appearance is of particular importance with glass-fronted gas fires. With radiant and
convector-type gas fires, check that there are no scorch or soot marks on the outer casing just
above the flame enclosure, which would indicate flue problems.
Where a flue is found faulty, CWI installation should be delayed until the appropriate remedial
action has been taken.
13
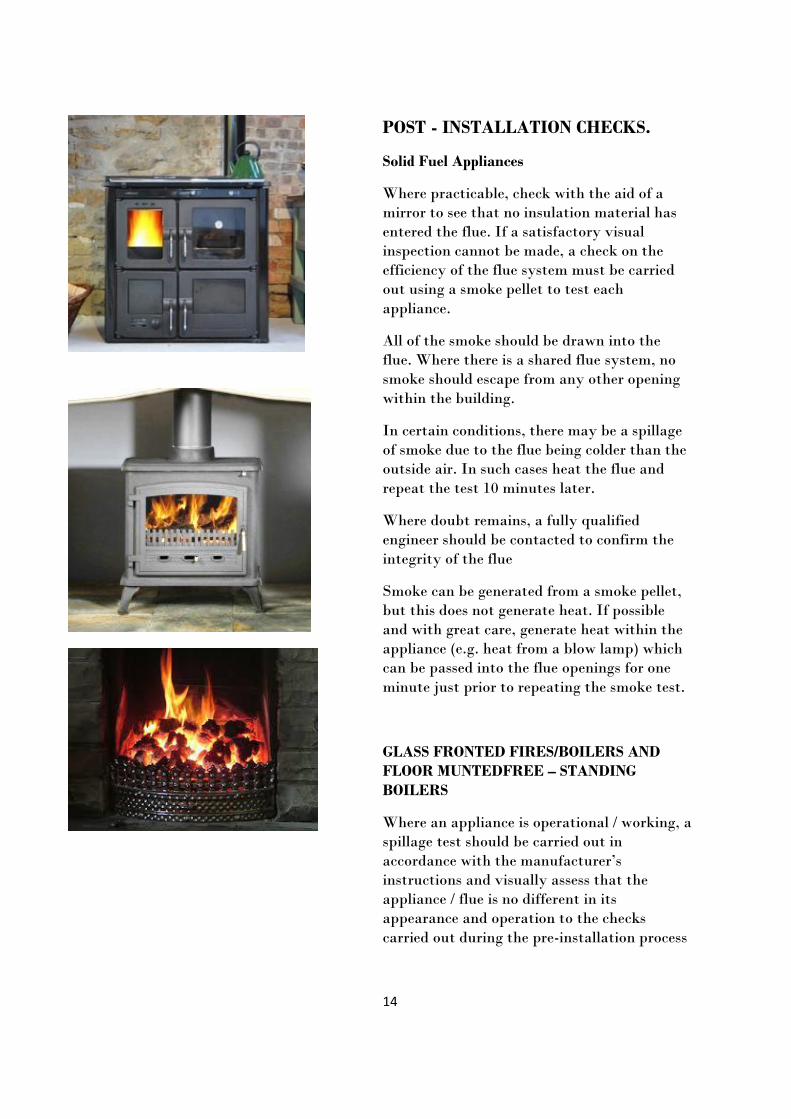
POST - INSTALLATION CHECKS.
Solid Fuel Appliances
Where practicable, check with the aid of a
mirror to see that no insulation material has
entered the flue. If a satisfactory visual
inspection cannot be made, a check on the
efficiency of the flue system must be carried
out using a smoke pellet to test each
appliance.
All of the smoke should be drawn into the
flue. Where there is a shared flue system, no
smoke should escape from any other opening
within the building.
In certain conditions, there may be a spillage
of smoke due to the flue being colder than the
outside air. In such cases heat the flue and
repeat the test 10 minutes later.
Where doubt remains, a fully qualified
engineer should be contacted to confirm the
integrity of the flue
Smoke can be generated from a smoke pellet,
but this does not generate heat. If possible
and with great care, generate heat within the
appliance (e.g. heat from a blow lamp) which
can be passed into the flue openings for one
minute just prior to repeating the smoke test.
GLASS FRONTED FIRES/BOILERS AND
FLOOR MUNTEDFREE – STANDING
BOILERS
Where an appliance is operational / working, a
spillage test should be carried out in
accordance with the manufacturer’s
instructions and visually assess that the
appliance / flue is no different in its
appearance and operation to the checks
carried out during the pre-installation process
14
Gas-fired appliances
Under the Gas Safety (Installation and Use) Regulations, only r e g i s t e r e d a n d approved Gas
Safe registered engineers are permitted to carry out work, such as removing any integral part of
a boiler or gas fire. “Work” is defined as:
a) Installing or reconnecting the fitting.
b) Maintaining, servicing, permanently adjusting, disconnecting, repairing altering or
renewing the fitting, or purging it of air or gas.
c) Where the fitting is not readily moveable, changing its position and
d) Removing the fitting (but the expression does not include the connection or disconnection
of a bayonet fitting or self-sealing connection.
e) The following procedures must be adhered to
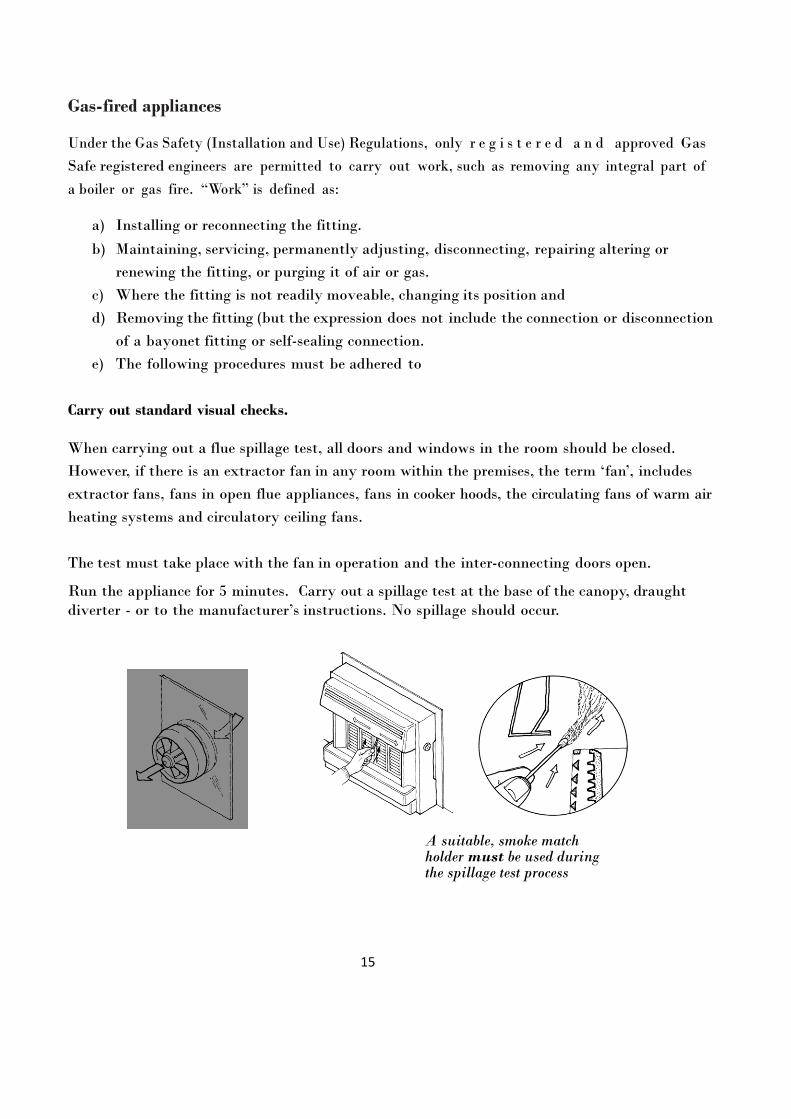
Carry out standard visual checks.
When carrying out a flue spillage test, all doors and windows in the room should be closed.
However, if there is an extractor fan in any room within the premises, the term ‘fan’, includes
extractor fans, fans in open flue appliances, fans in cooker hoods, the circulating fans of warm air
heating systems and circulatory ceiling fans.
The test must take place with the fan in operation and the inter-connecting doors open.
Run the appliance for 5 minutes. Carry out a spillage test at the base of the canopy, draught
diverter - or to the manufacturer’s instructions. No spillage should occur.
A suitable, smoke match holder must be used during the spillage test process
15
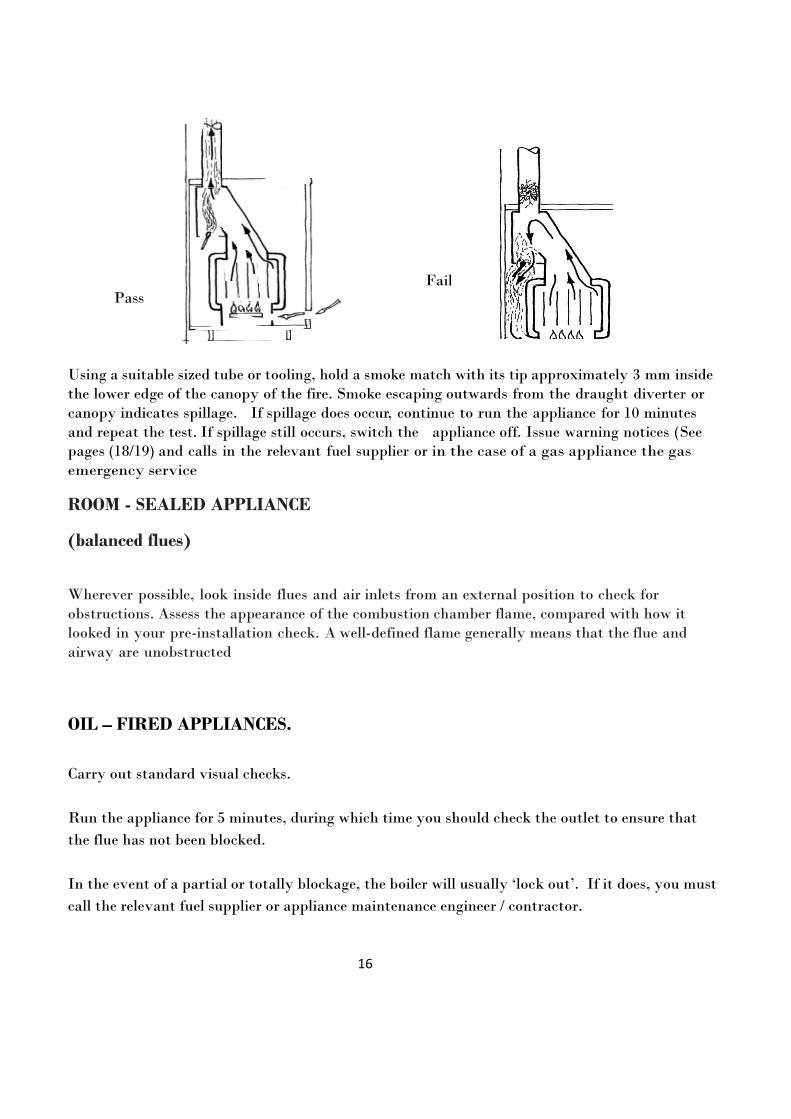
Pass
Using a suitable sized tube or tooling, hold a smoke match with its tip approximately 3 mm inside
the lower edge of the canopy of the fire. Smoke escaping outwards from the draught diverter or
canopy indicates spillage. If spillage does occur, continue to run the appliance for 10 minutes
and repeat the test. If spillage still occurs, switch the appliance off. Issue warning notices (See
pages (18/19) and calls in the relevant fuel supplier or in the case of a gas appliance the gas
emergency service
ROOM - SEALED APPLIANCE
(balanced flues)
Wherever possible, look inside flues and air inlets from an external position to check for
obstructions. Assess the appearance of the combustion chamber flame, compared with how it
looked in your pre-installation check. A well-defined flame generally means that the flue and
airway are unobstructed
OIL – FIRED APPLIANCES.
Carry out standard visual checks.
Run the appliance for 5 minutes, during which time you should check the outlet to ensure that
the flue has not been blocked.
In the event of a partial or totally blockage, the boiler will usually ‘lock out’. If it does, you must
call the relevant fuel supplier or appliance maintenance engineer / contractor.
16
Fail

Installing Firm’s Name, Address and Contact Details
(or Letterhead)
In our opinion, this appliance should not be used until such time that a fully
qualified / registered person or company has checked the appliance, open fire,
flue, boiler, and that the appropriate certification has been provided following
investigation and resulting remedial / corrective works to ensure that it is safe
to use.
Please refer to the ‘Warning Notice’ issue to you
Contact points:
Gas:
Oil
Solid Fuel
17

Installing Firm’s Name, Address and Contact Details
(Or Letterhead)
In accordance with current Gas Safety (Installation and Use) Regulations
IMPORTANT – This notice concerns your safety
Issued by;(print) Company:
Technician’s signature: Date and time of issue:
Occupiers name:
Address:
Post code: Telephone number
The appliance make: Model Appliance type
Location of the appliance:
It is unsafe to use, because:
In the interest of safety and to comply with current Gas Safety (installation and use) Regulations, the following action has been taken:
The appliance has been turned off and labelled
The occupier has been informed, and the appliance left connected:
The appliance has been turned off and the emergency service notified: ref no:
The occupier was not present and this Notice has been left on the premises.
The occupier to sign:
I have received a copy of this Warning Notice and confirm that I understand that the use of the installation could present a hazard and could place me in breach of the current Gas Safety (installation and use) Regulations,
Signed: Print Name Date
18

EXAMPLE OF A RISK ASSESSMENT
RISK ASSESSMENT RELATING TO FLUES, CHIMNEYS AND COMBUSTION AIR
VENTILATORS:
Activity The installation of Cavity Wall Insulation (CWI) within the external walls of
existing buildings.
Potential The ingress of insulation material into existing combustion air ventilators, flues
Hazard or chimneys during the CWI installation, can result in the impairment of
Combustion air flow and / or the escape of combustion air gases produced by an
existing fuel – burning appliance into the dwelling
Risk: The risk arising from the hazard is that carbon monoxide produced by fuel –
burning appliances will be unable to escape to outside atmosphere.
Carbon monoxide is an extremely toxic gas and its presence is difficult to detect.
Anyone exposed to carbon monoxide is likely to suffer fatal or very serious illness.
Those at risk: The occupants within a building.
ELIMINATION OF HAZARD (Control of Risk)
Cavity wall insulation installers must carry out their duties in accordance with:
Current regulations governing the identified fuel types.
Technicians guide to best practice: ‘Flues, chimneys and combustion air ventilators’
published by the Cavity Insulation Guarantee Agency (CIGA)
This guide sets out the appropriate checks, procedures and actions that must be carried out
during survey, pre – installation and post installation of cavity wall insulation to buildings
containing fuel – burning appliances.
THE RISK ASSESSMENT MUST INCLUDE:
SURVEY, IDENTIFY and RECORD
Primary Air Type.
Appliance Type.
Chimney / Flue Location.
Combustion Air Supply.
Secondary Fuel Type.
Appliance Type.
Combustion Air Supply Location.
19

TECNICIANS SAFTY CHECKS
PRE-INSTALLATION CHECKS
• Identify appliance, flue/chimney routes, internal & externally.
Carry out a spillage test to unlit open flues
Gas.
• Run appliance
• View and note flame color.
Check for staining to fires appliances and surrounding decoration.
• Check combustion gases externally
• Appliance check (Smoke test / Spillage test)
• Identify combustion air supply
INSTALLATION - VISUALLY CHECK
• Chimney/flue routes to avoid drilling into them
• Chimney/flue routes for ingress of material
• Combustion air ventilator is unobstructed
POST INSTALLATION CHECKS
• Visually check appliances for insulation ingress into the appliance and or chimney flues
Carry out a spillage test.
Gas.
• Run appliances at maximum for at least 5 minutes
• Visually check that flame compares with pre-installation checks
• Appliance check (Smoke test/Spillage test)
• If results are unclear, retest after a further 10 minutes
IF THERE IS ANY DOUBT:
1. Switch off the appliance’s (Gas) or Ensure where practical that the solid fuel appliance
must not be used
2. Issue Warning Notice
3. Advise occupants and / or owner.
4. Call in the relevant fuel supplier or registered maintenance contractor / engineer
TRAINING
All CWI installers will receive appropriate combustible fuels awareness training to enable
them to discharge their responsibilities relating to the prevention of insulation ingress into
appliances, flues, chimneys and combustion air ventilators, and to undertake the simple
safety checks referred to within the CIGA guide.
NOTE: All installing companies must ensure that their technicians have successfully
attended a (STGW -: Standard Training in Gas Work, HETAS / OFTEC Awareness course)
to enable them to discharge their responsibilities. This course should include solid fuel
flues and chimney awareness.
20

/
Technician’s safety check sheet – flues, chimneys and combustion air ventilators.
This sheet specifies the minimum checks, and actions that must be carried out during the installation
of CWI to buildings containing fuel – burning appliances.
It must be read in association with “ Technicians guide to best practice – Flues, chimneys and
combustion air ventilators”
Survey – identify and record
Fuel type(s)
Appliance type(s)
Flue, chimney location(s)
Location of combustion air
Ventilator(s)
Pre – Installation
Appliance identified, flue / chimney routes internally,
externally.
Appliance run
View and note appearance and flame colour.
Combustion gases checked externally.
Appliance checked for staining and general visual
condition (smoke / spillage test)
Smoke / spillage tests satisfactory.
Combustion air supply compliant.
Signs of spillage / distress to open flues, chimneys.
Installation – Visually check
Flue / chimney routes to avoid drilling into them.
Flue / chimney routes to avoid ingress of material
Combustion air ventilator(s) unobstructed.
Post - Installation
Visible signs of spillage of the cavity wall insulation
within the fire, appliance, flue.
Appliance run at maximum for a minimum of
five minutes
Visual check that the flame compares with
pre – installation inspections.
Smoke / spillage test satisfactory.
If results were unclear, re- test after a further
ten minutes.
Re – test satisfactory.
If there is any doubt or questions answered “N“ then :– 1. SWITCH OFF THE APPLIANCE – OR ENSURE THAT THE SOLID FUEL APLIANCE CANNOT BE USED 2. ISSUE A WARNING NOTICE.
3. ADVISE OCCUPANTS AND OWNER. 4. CALL OUT a competent body or person such as a registered qualified supplier or maintenance
contractor (e.g. Gas Safe, Hetas, Solid Fuel, Oftec) Installation address: Name of Technician:
Signature:
Date: / / 20
Important -: It is the installing firm’s responsibility to ensure that the Technician is able to discharge
these responsibilities. Failure to carry out visual inspections or safety checks could lead to the death of an occupant and prosecution.
Gas Oil Coal Wood
Boiler Gas fire Open fire Balanced flue
Internal wall Front elevation Side elevation Rear elevation
External wall Front elevation Side elevation Rear elevation
Comments
Comments Y N
Y N
Y N
Y N
Y N
Y N
Y N
Y N
Y N
Y N
Y N
Y N
Y N
Y N
Y N
Y N
Y N
21