fode distance learning - education.gov.pg
TRANSCRIPT

DEPARTMENT OF EDUCATION
GRADE 11
INFORMATION COMMUNICATION TECHNOLOGY
MODULE 3 – DESKTOP PUBLISHING
FODE DISTANCE LEARNING

GR 11 ICT M3 DESKTOP PUBLISHING
1
Writers and Editors
Caroline G. Ebio
Writer
Dr. Janet S. Marcelo
Cleofe Dagale
Diana Akis
Judy Mirou
Martha Pitpit
Editors

GR 11 ICT M3 DESKTOP PUBLISHING
2
GRADE 11
INFORMATION COMMUNICATION TECHNOLOGY
UNIT MODULE 3
DESKTOP PUBLISHING
TOPIC 1: WORKING WITH MS PUBLISHER
TOPIC 2: WORKING WITH TEXT
TOPIC 3: WORKING WITH SHAPES AND OBJECTS
TOPIC 4: WORKING WITH TABLES

GR 11 ICT M3 DESKTOP PUBLISHING
3
Flexible Open and Distance Education Papua New Guinea
Published in 2017
Copyright 2017, Department of Education Papua New Guinea All rights reserved. No part of this publication may be reproduced, stored in a retrieval system, or transmitted in any form or by any means electronic, mechanical, photocopying, recording or any other form of reproduction by any process is allowed without the prior permission of the publisher. ISBN: 978-9980-89-673-5 National Library Services of Papua New Guinea Compiled and finalised by: Information Communication Technology Department-FODE Printed by the Flexible, Open and Distance Education
Acknowledgements We acknowledge the contribution of all Secondary and Upper Primary teachers who in one way or another helped to develop this Course.
Our profound gratitude goes to the former Principal of FODE, Mr. Demas Tongogo for leading FODE team towards this great achievement. Special thanks are given to the staff of the Information Communication Technology Department- FODE who played active role in coordinating writing workshops, outsourcing of lesson writing and editing processes involving selected teachers in NCD. We also acknowledge the professional guidance and services provided through-out the processes of writing by the members of:
Information Communication Technology Subject Review Committee-FODE Academic Advisory Committee-FODE Information Communication Technology Department- CDAD
. This book was developed with the invaluable support and co-funding of the GO-PNG and World Bank.
DIANA TEIT AKIS Principal-FODE
.

GR 11 ICT M3 DESKTOP PUBLISHING
4
CONTENTS
Contents…………………………………………………………………………………………………….…………. 4
Secretary’s Message……………………………………………………………………………………………… 6
Course Introduction………………………………………………………………………………................. 7
11.3.1: WORKING WITH MS PUBLISHER
11.3.1.1: Starting Publication …………………………………………….……………………. 9
11.3.1.2: Creating Blank Publications ……………………………………………….…….. 12
11.3.1.3: Creating a New Publication from a Template ……………………………. 13
11.3.1.4: Exploring MS Publisher …………………………………………………………………… 18
11.3.1.5: Customising Publication Layout ………………………………………………… 22
11.3.1.6: Printing and Publishing ……………………………………………………………… 24
Summative Activity 12.3.1 …..……………………………………..……………………. 26
Answers to Learning Activities ……………………………………..……………………. 27
11.3.2: WORKING WITH TEXT
11.3.2.1: Inserting Text Box ……………………………………………………………………. . 36
11.3.2.2: Wrapping Text ………………………………………………………………………….. 38
11.3.2.3: Hyphenation ……………..……………………………………………………………… 40
11.3.2.4: Connecting Text Boxes …………………………………………………………..... 41
11.3.2.5: Modifying Text Boxes ……………………………………………………………….. 44
11.3.2.6: Formatting Text ……………………………………………………………………….. 46
Summative Activity 12.3.2 …..……………………………………..……………………. 48
Answers to Learning Activities ……………………………………..……………………. 49
11.3.3 : WORKING WITH SHAPES AND OBJECTS
11.3.3.1: Inserting and Resizing Shapes …………………………………………………... 62
11.3.3.2: Grouping and Moving Objects …………………………………………………... 65
11.3.3.3: Inserting Clip Arts and Pictures from a File ……………………………….. 68
11.3.3.4: Resizing and Cropping Pictures …………………………………………………. 70
11.3.3.5: Arranging and Adding Captions to Pictures ………………………………. 72

GR 11 ICT M3 DESKTOP PUBLISHING
5
11.3.3.6: Editing and Compressing Pictures ……………………………………………. 75
Summative Activity 12.3.3 …..……………………………………..……………………. 78
Answers to Learning Activities ……………………………………..……………………. 81
11.3.4 : WORKING WITH TABLES
11.3.4.1: Inserting and Resizing Tables ………………………………………………… 91
11.3.4.2: Adding and Deleting Rows and Columns…………………………………… 94
11.3.4.3: Merging and Splitting Cells ………………………………………………………… 96
11.3.4.4: Modifying Text Alignment …………………………………………………………. 98
11.3.4.5: Modifying Cell Margins …………………………………………………………….. 99
11.3.4.6: Applying Table Styles ……………………………………………………………….. 101
Summative Activity 12.3.4 …..……………………………………..……………………. 103
Answers to Learning Activities ……………………………………..……………………. 104
SUMMARY ………………………………………………………………………………………………. 114
REFERENCE ………………………………………………………………………………………………. 115
BIBILIOGRAPHY ………………………………………………………………………………………. 116

GR 11 ICT M3 DESKTOP PUBLISHING
6
SECRETARY’S MESSAGE
Achieving a better future by individual students, their families, communities or the nation as a whole, depends on the curriculum and the way it is delivered.
This course is part and parcel of the new reformed curriculum – the Outcome Base Education (OBE). Its learning outcomes are student centred and written in terms that allow them to be demonstrated, assessed and measured.
It maintains the rationale, goals, aims and principles of the National OBE Curriculum and identifies the knowledge, skills, attitudes and values that students should achieve.
This is a provision of Flexible, Open and Distance Education as an alternative pathway of formal education.
The Course promotes Papua New Guinea values and beliefs which are found in our constitution, Government policies and reports. It is developed in line with the National Education Plan (2005 – 2014) and addresses an increase in the number of school leavers which has been coupled with a limited access to secondary and higher educational institutions.
Flexible, Open and Distance Education is guided by the Department of Education’s Mission which is fivefold;
to facilitate and promote integral development of every individual
to develop and encourage an education system which satisfies the requirements of Papua New Guinea and its people
to establish, preserve, and improve standards of education throughout Papua New Guinea
to make the benefits of such education available as widely as possible to all of the people
to make education accessible to the physically, mentally and socially handicapped as well as to those who are educationally disadvantaged
The College is enhanced to provide alternative and comparable path ways for students and adults to complete their education, through one system, many path ways and same learning outcomes.
It is our vision that Papua New Guineans harness all appropriate and affordable technologies to pursue this program.
I commend all those teachers, curriculum writers, university lecturers and many others who
have contributed in developing this course.
UKE KOMBRA, PhD Secretary for Education

GR 11 ICT M3 DESKTOP PUBLISHING
7
UNIT 3: DESKTOP PUBLISHING
Introduction
Previously, creating a professional publication can only be done by the professionals with sophisticated equipment and knowledge in graphic design. This problem is easily solved with the use of Microsoft Publisher.
MS Publisher is a desktop publishing program you can use to design and produce a variety of publications. You can create anything from a simple business card to a complex brochure.
You can use MS Publisher to create all kinds of publications like brochures, flyers, newsletters, calendars, resumes, posters and the likes. These may seem hard to do but templates are available that provides you with readymade publication.
You can write directly in MS Publisher or create your text in MS Word which you can later copy and paste into MS Publisher.
The following icons are used in this module:
Student Aims Student Activity
Time Frame Note
Objectives or aims
On successful completion of this module, students will be able to:
apply advanced skill and concepts to create flyers, brochures, information leaflets, banners and newsletters that suit the needs of the end user.
Practical Student Activity Answers to Learning Activity

GR 11 ICT M3 DESKTOP PUBLISHING
8
Time Frame
This Unit should be completed within 10 weeks.
If you set an average of 3 hours per day, you should be able to complete the unit comfortably by the end of the assigned week.
Try to do all the learning activities and compare your answers with the ones provided at the end of the unit. If you do not get a particular exercise right in the first attempt, you should not get discouraged but instead, go back and attempt it again. If you still do not get it right after several attempts, then you should seek help from your friend, or even your tutor. Do not pass any question without solving it first.

GR 11 ICT M3 DESKTOP PUBLISHING
9
11.3.1 WORKING WITH MS PUBLISHER
MS Publisher is desktop publishing program you can use, to design and produce different publication. It has built-in templates which you can change to make each document suit your own design and needs.
MS Publisher shares similarity with MS Word, however it is geared to creating specialized type of publication like the examples given below.
11.3.1.1 Starting a Publication
There are various ways you can open MS Publisher which we will discuss in the lesson. As you get used to using the programme, you may choose any of the steps, which you are comfortable using.
A. Opening MS Publisher Using the Start button
Follow the steps below to open a publication.
1. Click Start button.
2. Choose All Program. Menus and options will appear on the screen.
3. Click the Scroll button until you see MS Office folder.
4. Choose Microsoft Publisher 2010.
Business Card
Calendars
Greeting Card
Labels
Newsletter
Postcards
Advertisements
Award Certificates
Banners
Business Form
Catalogues
Brochures
Envelopes
Flyers
Gift Certificate
Invitation Card
Paper Folding Project
Programs
Resumes
With Complements Card
Letterheads
Menus
Quick Publication
Signs

GR 11 ICT M3 DESKTOP PUBLISHING
10
B. Opening MS Publisher Using the Desktop Shortcuts Icons are shortcut commands used in all Office programs. Program icons like the example MS Publisher icon here, can be found on the desktop or the start menu. Follow the steps below to open a publication.
1. Double click Microsoft Publisher on your desktop screen.
C. Opening MS Publisher Using the Taskbar Task bar usually contains programs that are already opened, but not active or in use however, it can also display commonly used programs in your computer. Follow the steps below to open MS Publisher using the taskbar. 1. Click the MS Publisher icon located in the taskbar.
MS Publisher icon
3
4
Start
button
2
The desktop showing the taskbar containing the icon of MS Publisher

GR 11 ICT M3 DESKTOP PUBLISHING
11
Student Activity 11.3.1.1
Perform the activity below to test your skill in opening MS Publisher. Revise Lesson 11.3.1.1 Starting a Publication if you are unsure of how to proceed with this activity.
1. Open MS Publisher. Identify the type of template presented below.
A. ____________________ F. ____________________
B. ____________________ G. ____________________
C. ____________________ H. ____________________
D. ____________________ I. ____________________
E. ____________________ J. ____________________
A B C D E
F G H I J

GR 11 ICT M3 DESKTOP PUBLISHING
12
11.3.1.2 Creating a Blank Publication
A blank publication allows you to design your project from scratch. You could create your own publication and customise it by adding different features like text boxes and objects.
Perform the following task to create your own customized publication.
1. Click the File tab.
2. Click New.
3. You can change the orientation your publication to Landscape or Portrait.
4. Click More Blank Page Size.
5. Click a page size. You can use the scroll bar to scroll through the available page size.
6. MS Publisher will display the size you selected.
7. You can customise the colour scheme or font scheme to customise your publication.
8. Click Create. MS Publisher creates a blank publication.
1
2
3
4
6 5
7
8

GR 11 ICT M3 DESKTOP PUBLISHING
13
Student Activity 11.3.1.2
Perform the activity below to test your skill in opening a publication and saving. Revise Lesson 11.3.1.2 Creating a Blank Publication and Saving if you are unsure of how to proceed with this activity.
1. Open a blank publication and click Greeting Card.
2. Choose any from the different type of templates available.
3. Save your work. Use the filename My Greeting Card.
11.3.1.3 Creating New Publication From Template
Designing and creating a publication from scratch is not easy. Creating a professional looking publication is now possible by using templates. All you have to do is choose a template, choose a design and change the publication to suit your needs. Follow the steps below to create a publication using templates.
A. Using a Template
Templates are pre-designed formats that you can use as guide when creating your publication. Follow the steps below to create publication using a template.
1. Click the File tab.
2. Click New.
3. Click a publication category from the list of available templates. You can use the scroll bar to scroll through the available publications in the category you choose.
4. Choose a publication design from the variety of available templates.
5. Preview the selected design you selected from the available templates.
6. Customise your publication by changing the Colour scheme and Font scheme. You can skip this part and later modify your colour and font scheme, while doing your publication.
7. Click Create.

GR 11 ICT M3 DESKTOP PUBLISHING
14
7
4
5
6
B. Choosing a Different Template
If you are not satisfied with the template you chose when you created your publication, you can change it to a different template by doing the following:
1
3
2

GR 11 ICT M3 DESKTOP PUBLISHING
15
1. Make sure that the publication is still open.
2. Click the Page Design tab.
3. Click Change Template button.
4. You will return to the Available Templates window, where you can select a different template.
5. Choose your new template and click OK.
C. Choosing a Font Scheme
Changing font format in MS Publisher is much the same as in MS Word. However, changing formats of each text is time consuming. Using Font scheme saves you the trouble of individually changing the heading, and body of text in your publication.
Perform the following steps to change the font scheme.
1. After selecting the new template, locate Customise.
5
4
3
2

GR 11 ICT M3 DESKTOP PUBLISHING
16
2. Click the drop-down arrow in the Font scheme display box.
3. Use the scroll button to display the font scheme available, and choose the font formats you want to use.
4. Click to select the font scheme you chose. Observe how the available templates immediately change to the font scheme you have chosen.
D. Choosing a Colour Scheme
Not all people have the knowledge of using the colour wheel to make sure that the colours you choose will not clash with each other. Colour scheme option allows you to automatically change colours of your publication, without the fear of choosing the wrong colour. Perform the following steps to change the colour scheme of your publication.
1. Click the drop-down arrow in the Colour scheme display box.
2. Use the scroll button to display the different colour scheme available, and choose from the colour combinations available.
3. Click OK to apply your changes.
Choose from the available templates here
1
2

GR 11 ICT M3 DESKTOP PUBLISHING
17
Student Activity 11.3.1.3
Perform the activity below to test your skill with using templates and customizing templates. Revise Lesson 11.3.1.3 Creating New Publication From Template if you are unsure of how to proceed with this activity.
1. Open My Greeting Card publication.
2. Customise your template, by changing the Colour Scheme and Font Scheme. You are not required to change the content of your publication. However, you may attempt to test your skills in publisher by changing its content.
3. Save your work. Use the filename My Greeting Card.
Choose from the available templates here
2
3

GR 11 ICT M3 DESKTOP PUBLISHING
18
11.3.1.4 Exploring MS Publisher
When you create a new publication, it appears in the MS Publisher workspace. There are similarities between MS Publisher, and the other Office software which functions more or less the same way. A. The MS Publisher Workspace
Though, similar in feature with other Office program, MS Publisher offers unique features of its own. Open MS Publisher and explore the workspace area discussed here.
1. Ribbon – although quite similar in appearance to other Office programs, MS Publishers’ ribbon contain some features that cannot be found anywhere else. These will be discussed in the course of this lesson.
2. Rulers – The horizontal and vertical ruler can be used as guide when making specific sizes for the text and object boxes you are creating.
3. Navigation pane – displays the pages within you publications. This makes it easier to move page to page within the publication.
Publisher Workspace
Ribbon
Rulers
Navigation pane

GR 11 ICT M3 DESKTOP PUBLISHING
19
B. Viewing the Page
Creating a publication involves getting a detailed picture of your work. This may involve magnifying parts of your publication, or looking your publication in its entire format.
C. Zooming In and Out
You have used zoom in and out control found in some Office programs, located at the lower right corner of the screen. MS Publisher has the Zoom feature to control the magnification of your publication.
1. 100% - View the publication at its actual size they will print.
2. Whole Page - Make the page fit in the window.
3. Zoom - Specify the magnification.
4. Page Width - Make the width of the page fit in the window.
5. Selected Objects - Focus on objects. This can only be used by selecting an object (text or graphic) before using this feature.
D. Viewing One Page and Two Page Spreads
This option is commonly used for publications with more than one page, like newsletter and brochures.
1. Single Page – displays only one page of a two page spread.
1 4
2
5
3
Zoom controls
Viewing single and
two page publication

GR 11 ICT M3 DESKTOP PUBLISHING
20
2. Two-Page Spread –displays what the readers will see when viewing facing pages.
E. Moving From Page To Page
Scrolling through the different pages of the publication is time consuming, especially if you have multiple pages. You can move from page to page by using the:
1. Page navigation pane – use the scroll bar to display the different pages of your publication. Click the page you want to fully display the content of that page.
2. The Go To Page dialogue box - this can be found in the Home ribbon. Click the Go To Page button and enter the page number you want to go to.
Student Activity 11.3.1.4
Perform the activity below to test your skill in identifying parts of MS Publisher. Revise Lesson 11.3.1.4 Exploring MS Publisher, if you are unsure of how to proceed with this activity.
Identify the words or words that best describes the given statement.
____________________ 1. It views the publication as the actual size for printing.
____________________ 2. It is used as guides when making specific sizes for the text and object box.
____________________ 3. It displays the pages within the publication.
____________________ 4. It displays the page to fit in the window.
____________________ 5. It displays only a page of a two page spread.
____________________ 6. It specify the magnification of your workspace.
Click here
Type the page you want to display

GR 11 ICT M3 DESKTOP PUBLISHING
21
____________________ 7. Contains icon and groups similar in appearance to other office programme.
____________________ 8. Displays one page of a two page spread.
____________________ 9. It uses a scroll bar to display different pages of your publication.
____________________10. It displays specific pages by entering the page number you want to go to.

GR 11 ICT M3 DESKTOP PUBLISHING
22
11.3.1.5 Customising Publication Layout
You can customise the layout of your publication, by changing the paper size, margins and orientation. Changing the Page Setup of your publication is similar to other MS Office program. It is important to customize your layout , to suit the various types of publication you can create using MS Publisher.
A. Page Setup
Changing the Page Setup depends on the type of publication you are using. A page layout can either be portrait or landscape. A business card might require a different paper size as well as a Newsletter will require narrow margins. Follow the steps given to change the Page Setup of your publication.
1. Click the Page Design tab.
2. Click Margins from the ribbon and choose from the pre-set margins. Or you can also customize your own margins.
3. Click Orientation and choose Portrait or Landscape.
4. Click Size and select the size of the paper you will use for your publication.
4
2 3

GR 11 ICT M3 DESKTOP PUBLISHING
23
Use option for customized page
layout
B. Options
There are other types of publication that requires specific layout for its pages. You can modify layout by choosing from the different Options given for different types of publication.
1. Using a template create a greeting card.
2. Change the Page Size and Layout of the greeting card publication.
3. Choose from the different options given.
4. Click OK.
Student Activity 11.3.1.5
Perform the activity below to test your skill in customizing the layout of your publication. Revise Lesson 11.3.1.5 Customising Publication Layout if you are unsure of how to proceed with this activity.
1. Open My Greeting Card publication.
2. Change the Page size of your publication to Side fold, half sheet.
3. Save changes to your publication.

GR 11 ICT M3 DESKTOP PUBLISHING
24
11.3.1.6 Printing and Publishing
Printing refers to creating a physical copy of your work for viewing, editing and correction. This process is important to see what your actual work will look like on print. Saving on printing is one advantage of printing your own publication.
Publishing on the other requires advance techniques in layout, printing and software. However, because of MS Publisher, ordinary people like you and me can now create professional looking publication, using a desktop computer or laptop.
MS Publisher has feature that prepares your work for publishing using commercial printer. You can choose to print your work, or use a commercial printer. Consider the following factors, before you start printing your published work.
Type of printer.
Intended readers.
Purpose of publishing your work.
Number of copies.
Printing your publication is almost the same way as printing in other Office program. Select File Print Select a printer Adjust Settings Print.
However, there are certain types of publication that requires changes to the printer settings. Below, are things you must consider when printing in MS Publisher.
A. Printing all or selected pages – change the settings depending on the pages you want to print.
B. Pages – type the pages or selected page you want to print.
A
B

GR 11 ICT M3 DESKTOP PUBLISHING
25
C. Page per sheet – only change this setting depending on the type of printer you have. Some printers accept A3 size paper which makes printing of multiple copies per sheet.
D. Paper Size – check your printer for what paper size it can use.
E. Printing – your default printer automatically picks up the paper in the paper tray when printing. If you are printing back to back, then you have to choose Manual to pause printing to give you time to turn the page. Check your printer. Some printers automatically flips the page for double sided printing.
F. Colour Type – If your printer is using one colour (black ink or toner) then, there is no need to change this setting, for it will automatically print your work in grayscale, even if your publication is in colour. You can change between colour or grayscale, if you have a colour printer.
C
D
E
F

GR 11 ICT M3 DESKTOP PUBLISHING
26
Student Activity 11.3.1.6
Perform the activity below to test your skill printing your own publication. Revise Lesson 11.3.1.6 Printing and Publishing, if you are unsure of how to proceed with this activity.
1. Using a template, create a Business Card publication. Choose a font and colour scheme.
2. Fill-in the text boxes with your personal information. Delete objects that you do not need.
3. Click File Print.
4. Print a draft of the business card, by printing only one business card in a page. Continue printing this way, until you are fully satisfied with your publication.
5. Print a final copy. Use A4 size paper, Landscape, Multiple copies of your business card.
6. Save your work as Business Card 1.
Summative Activity 11.3.1
Perform the summative activity below to test your knowledge and skills in using MS Publisher. Revise Topic 11.3.1 WORKNG WITH PUBLISHER, if you are unsure of how to proceed with this activity.
1. Create a Publication
a. Create this month’s calendar. Your choice will depend on the available templates in your computer.
b. Customise your publication
i. Change the Colour scheme
ii. Change the Font Scheme
c. Change the Page Setup
i. Margins
ii. Orientation
GR 11 ICT M3 DESKTOP PUBLISHING
27
iii. Size
d. Save your work. Use the filename Calendar 1.
2. Use Change Template to select another calendar design. Use the same colour and font scheme.
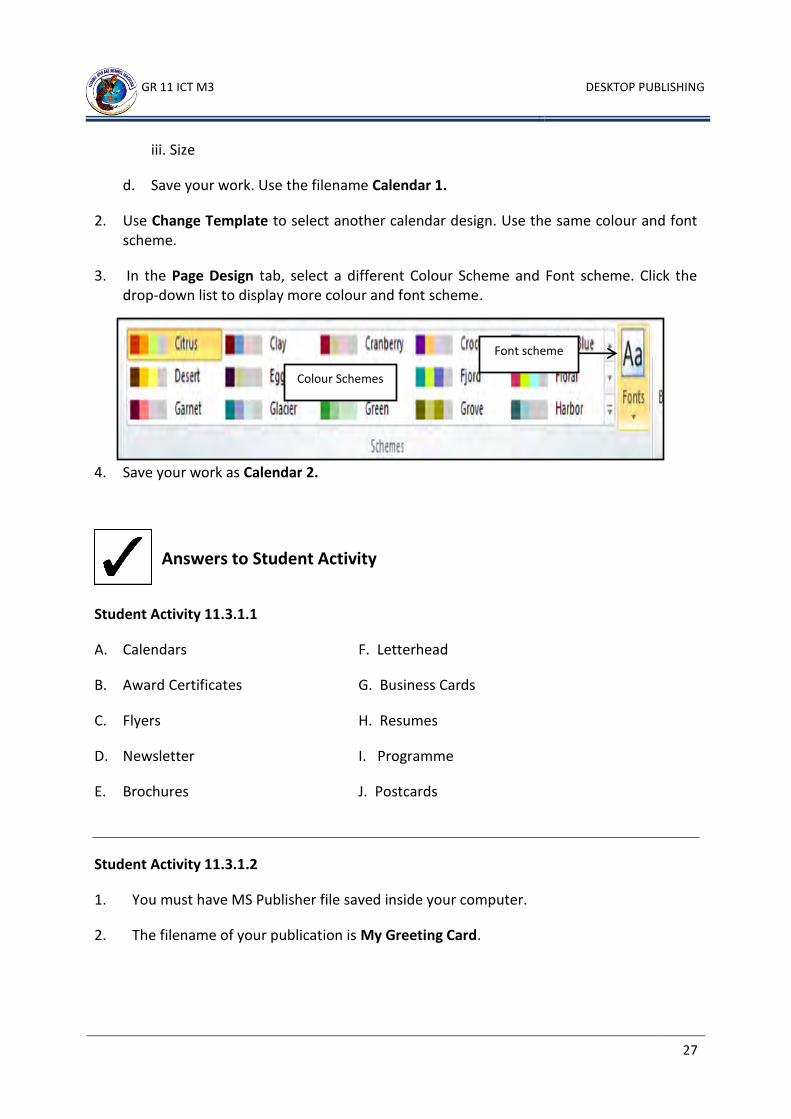
3. In the Page Design tab, select a different Colour Scheme and Font scheme. Click the drop-down list to display more colour and font scheme.
4. Save your work as Calendar 2.
Student Activity 11.3.1.1
A. Calendars F. Letterhead
B. Award Certificates G. Business Cards
C. Flyers H. Resumes
D. Newsletter I. Programme
E. Brochures J. Postcards
Student Activity 11.3.1.2
1. You must have MS Publisher file saved inside your computer.
2. The filename of your publication is My Greeting Card.
Colour Schemes
Font scheme
Answers to Student Activity

GR 11 ICT M3 DESKTOP PUBLISHING
28
Student Activity 11.3.1.3
Below, is a sample of a greeting card publication. Your work may look different from the example given below.
The following steps were done to perform the activity.
Step 1: Open MS Publisher.
Step 2: Choose a Greeting Card Template.
Step 3: Choose a greeting card design.
2

GR 11 ICT M3 DESKTOP PUBLISHING
29
Step 4: Choose a Colour Scheme.
Step 5: Choose a Font Scheme.
Step 6: Click Create.
Step 7: Save your work. Use the filename My Greeting Card.
Student Activity 11.3.1.4
1. 100% View 6. Zoom
2. Rulers 7. Ribbon
3. Navigation Pane 8. Single Page
4. Whole Page View 9. Navigation Page / Page Navigation Pane
5. Two-page spread 10. Go To Page
4
5
3
6

GR 11 ICT M3 DESKTOP PUBLISHING
30
Student Activity 11.3.1.5
Below, is a sample of a greeting card publication for printing. Your work may look different from the example given below.
The following steps were done to perform the activity.
Step 1: Open My Greeting Card publication.
Step 2: Click File Print.
Step 3: Change the Page size of your publication to Side fold, Half Sheet.
Page 2 Page 1 Page 2
GR 11 ICT M3 DESKTOP PUBLISHING
31
Step 4: Save changes to your work.
Student Activity 11.3.1.6
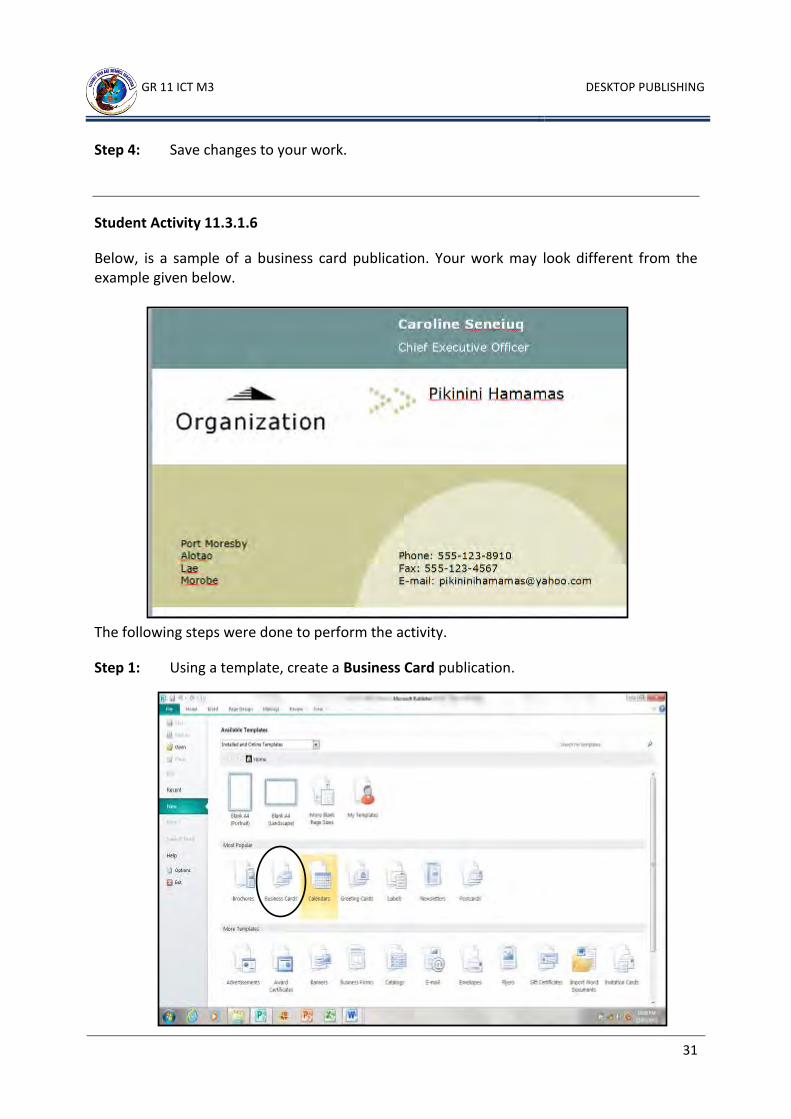
Below, is a sample of a business card publication. Your work may look different from the example given below.
The following steps were done to perform the activity.
Step 1: Using a template, create a Business Card publication.
GR 11 ICT M3 DESKTOP PUBLISHING
32
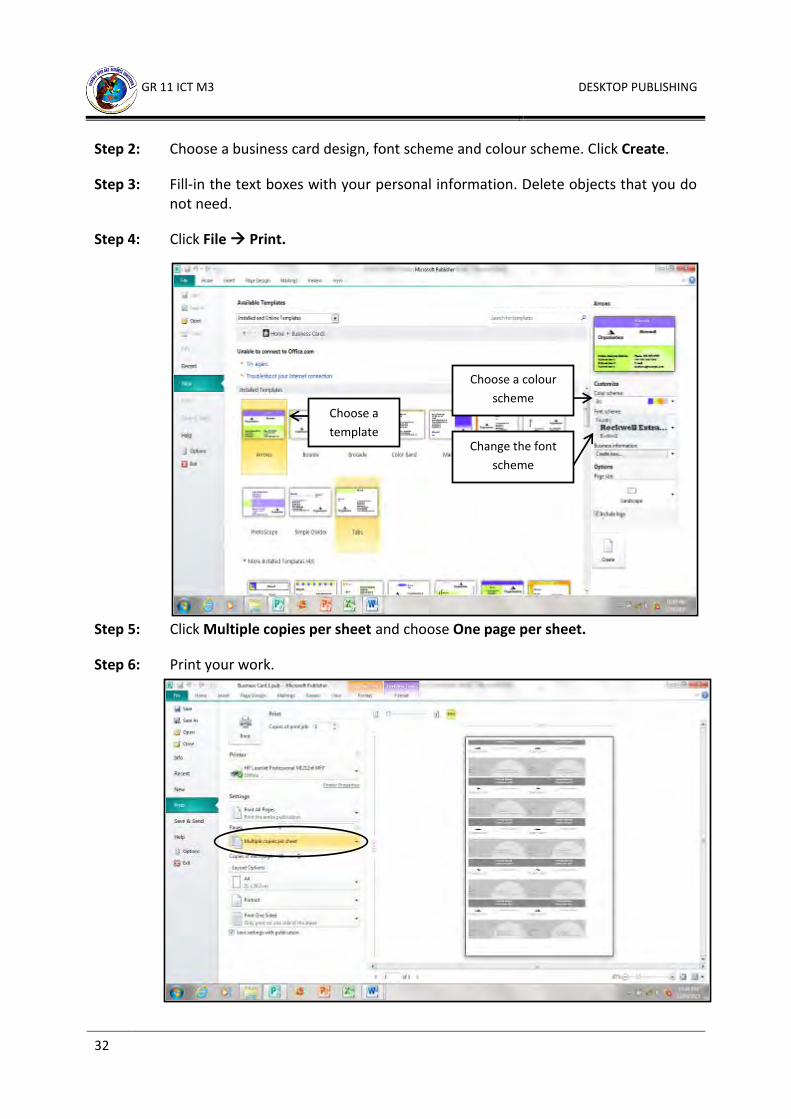
Step 2: Choose a business card design, font scheme and colour scheme. Click Create.
Step 3: Fill-in the text boxes with your personal information. Delete objects that you do not need.
Step 4: Click File Print.
Step 5: Click Multiple copies per sheet and choose One page per sheet.
Step 6: Print your work.
Choose a
template
Choose a colour
scheme
Change the font
scheme

GR 11 ICT M3 DESKTOP PUBLISHING
33
Step 7: Print a final copy. Use A4 size paper, Landscape, Multiple copies of your business card.
Use the following guidelines to check your work:
Step 1: Open MS Publisher
Start MS Publisher
Step 2: Create Publication
File New Calendar Choose Template Customise Create.
1
2
3
Answer to Summative Activity 11.3.1

GR 11 ICT M3 DESKTOP PUBLISHING
34
Step 3: Change the Page Setup
Page Design Margins Orientation Size.
Step 4: Save your work
File Save As File Name Save.
4. Choose from available templates
6
5
2 4
3
1
1
2

GR 11 ICT M3 DESKTOP PUBLISHING
35
Step 5: Change Template
Change Template Select New Publication OK.
Step 6: Customise
Page Design tab Colour Schemes Font Schemes.
Step 7: Save
Calendar 1 and Calendar 2 must be saved in your Documents Library.
3
4
1
2
3
These two files must be present in the Documents Library
GR 11 ICT M3 DESKTOP PUBLISHING
36
11.3.2 WORKING WITH TEXT
When you create a new publication based on a design template, MS Publisher inserts a layout for the text and displays placeholder text in the text boxes (also called objects or frames). Text boxes hold the words you add to a page.
11.3.2.1 Inserting Text Box
A. To Add Text Inside Text Boxes In a Template
Text can be added to your publication by using the existing text boxes already in place in the template you selected, or create your own text box. To add text box to your text:
1. Make sure that a template is open.
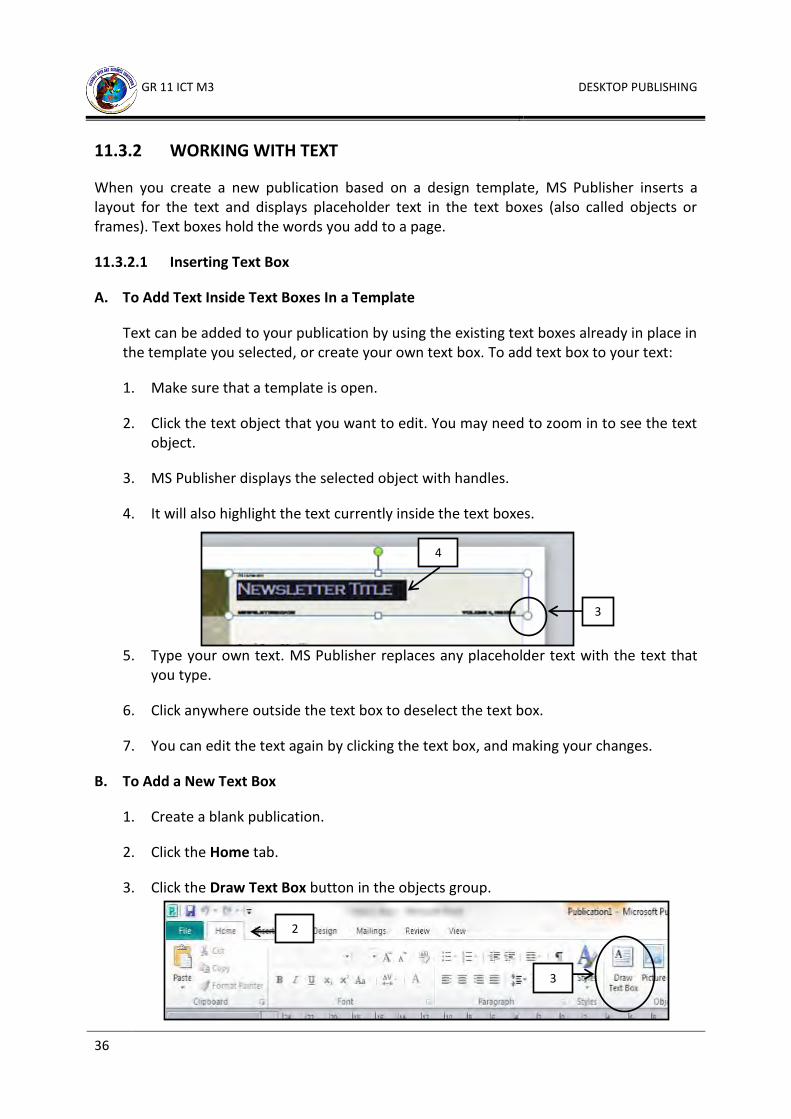
2. Click the text object that you want to edit. You may need to zoom in to see the text object.
3. MS Publisher displays the selected object with handles.
4. It will also highlight the text currently inside the text boxes.
5. Type your own text. MS Publisher replaces any placeholder text with the text that you type.
6. Click anywhere outside the text box to deselect the text box.
7. You can edit the text again by clicking the text box, and making your changes.
B. To Add a New Text Box
1. Create a blank publication.
2. Click the Home tab.
3. Click the Draw Text Box button in the objects group.
3
4
3
2

GR 11 ICT M3 DESKTOP PUBLISHING
37
4. Click and drag the text box to the size you want to insert.
5. Type the text that you want to insert in the text box.
6. Click anywhere outside the text object, to deselect the text box.
Student Activity 11.3.2.1
Perform the activity below to test your skill in identifying parts of MS Publisher. Revise Lesson 11.3.1.4 Exploring MS Publisher if you are unsure of how to proceed with this activity.
1. Open My Greeting Card publication.
2. In Page 2, insert a Text box. The text box should fill the entire page.
3. Type a message inside your text box.
4. Save your work as My Greeting Card 1.
Type your text inside the text box

GR 11 ICT M3 DESKTOP PUBLISHING
38
11.3.2.2 Wrapping Text
Wrap text refers to how the text will react to any object, frame, clip-art image, picture or Word Art image. The Wrap Text commands are identical in Word and MS Publisher, so this will be easy for you. Perform the following step to apply Wrap Text.
1. Create big text box and type “Flexible Open and Distance Education”.
2. Copy and paste the word until it fills up the text frame.
3. In the Insert tab, click Clip Art.
4. Type any category to search. Click to insert any object available in your computer.
5. Move the object to the upper left side of the text frame.
6. Make sure that the object is still selected. In the Pictures Tools Format tab, choose Wrap Text.
7. Scroll through the Wrap Text options, and observe how the text reacts to the object. Choose Edit Text Points. This will remove the square box surrounding the object.
8. Clip Wrap Text, and choose Tight to make the text wrap around the object.
6
A text box containing the words Flexible Open and Distance Education

GR 11 ICT M3 DESKTOP PUBLISHING
39
Student Activity 11.3.2.2
Perform the activity below to test your skill wrapping text around objects. Revise Lesson 11.3.2.2 Wrapping Text, if you are unsure of how to proceed with this activity.
1. Open My Greeting Card 1.
2. Insert a picture inside the text box.
3. Change the Wrap Text format to make the text move at the top and bottom of the object.
4. Save your work as My Greeting Card 2.
GR 11 ICT M3 DESKTOP PUBLISHING
40
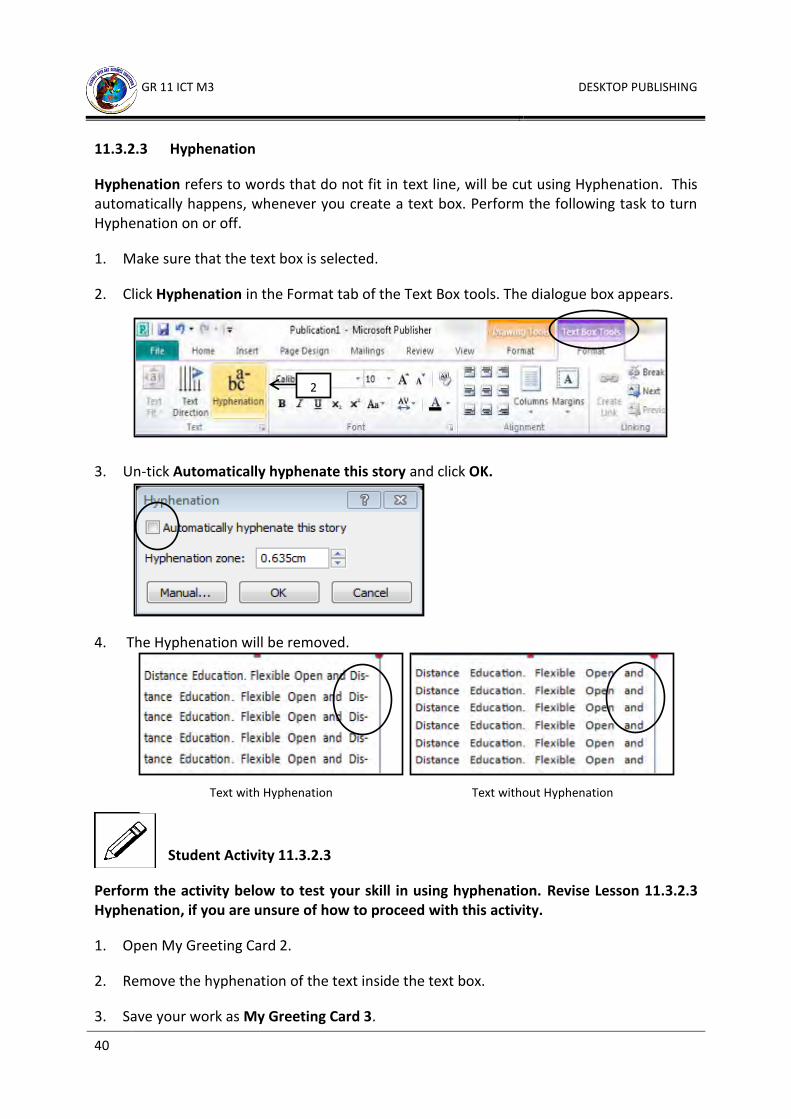
11.3.2.3 Hyphenation
Hyphenation refers to words that do not fit in text line, will be cut using Hyphenation. This automatically happens, whenever you create a text box. Perform the following task to turn Hyphenation on or off.
1. Make sure that the text box is selected.
2. Click Hyphenation in the Format tab of the Text Box tools. The dialogue box appears.
3. Un-tick Automatically hyphenate this story and click OK.
4. The Hyphenation will be removed.
Student Activity 11.3.2.3
Perform the activity below to test your skill in using hyphenation. Revise Lesson 11.3.2.3 Hyphenation, if you are unsure of how to proceed with this activity.
1. Open My Greeting Card 2.
2. Remove the hyphenation of the text inside the text box.
3. Save your work as My Greeting Card 3.
2
Text with Hyphenation Text without Hyphenation

GR 11 ICT M3 DESKTOP PUBLISHING
41
11.3.2.4 Connecting Text Boxes
You have learned in the previous lesson how to place/replace text inside text boxes. However, there are things to consider when you are working with text boxes such as editing text, and make text flow from frame to frame.
You will know that your text does not fit the text frame when you see the Text in Overflow icon and the handles are colour red.
Text that is too long will not fit inside the text box. You can make the text boxes bigger to fit all the words , but it might not be enough, if you are writing an essay. You can create two text boxes. Paragraphs that will not fit inside the first text box can be placed in the next text box as Text Overflow.
A. Creating a Link
Linking allows two or more text boxes to move text inside the box automatically. Perform the following task to create a link between two text boxes.
1. Make the text frame you created smaller. The text box will now display the Text in Overflow icon.
2. Draw a new text box. Make it identical in size as the first text frame.
3. Select the text frame that has overflowing text.
4. On the Text Box Tools, click Create Link button.
5. Move your pointer to the text box that you want the text to flow into. Observe how your mouse pointer, changes into an image of a pitcher.
6. Click the text box, where you want to make the text overflow. The last part of the paragraph immediately flowed to the next text box.
Text in Overflow icon
Text handles are colour red
4

GR 11 ICT M3 DESKTOP PUBLISHING
42
7. Observe how an arrow at the side of the text box appears indicating the direction of the text overflow.
8. The second text box is still displaying a text overflow. Create another text frame and repeat steps 2 - 6.
9. Delete some of the text in the first text box. Observe how the texts from all the text boxes move.
B. Breaking the Link
Linked text boxes can be removed. Note however, that the links are from text box to another text box and not to all the text boxes that you have linked. Follow the steps below to remove links between text boxes.
1. Select the first text frame and in the Format tab.
2. Click the Break button. This will remove the link you made between two text frames.
Indicates a text
overflow
Click to break the link between linked text boxes.

GR 11 ICT M3 DESKTOP PUBLISHING
43
Student Activity 11.3.2.4
Perform the activity below to test your skills in creating and breaking links between text boxes. Revise Lesson 11.3.2.4 Connecting Text Boxes if you are unsure of how to proceed with this activity.
1. Open My Greeting Card 3.
2. In Page 2, copy the message inside the text and paste it inside the same text box. The symbol (…) will appear at the lower right side of the text box, indicating that texts are not displayed in the text box.
3. Create a vertical text box at the left side of Page 3.
4. Overflow the text from Page 2 to the vertical text box.
5. Create another vertical text box at the right side of Page 3, and overflow the text to the text box at the right.
6. Use the example on the next page as guide.
7. Save your work as My Greeting Card 4.

GR 11 ICT M3 DESKTOP PUBLISHING
44
11.3.2.5 Modifying Text Boxes
By default, text box frames you created in MS Publisher do not have any visible frames. Depending on its purpose, text frames can be made visible, and can be formatted just like any object.
A. Apply Shape Styles
Shape Styles is applied to the frames surrounding the text box. You can use Shape Fill, Shape Outline and Change Shape to change the appearance of the text box. Perform the following task to apply Shape Styles to your text boxes.
1. Make sure that the text box is selected.
2. Click the More button in the Shape Style ribbon.
3. Choose from the different shape or line, and apply to your text frame.
4. You can also use Shape Fill and change the fill colour, gradient, texture and pattern.
5. Change the colour, weight, dashes and pattern of your Shape Outline.
6. Use Change Shape and change the shape of the text frame.
B. Apply Shadow Effects
Shadow Effects provides an outline or shadow to the text box. You can choose to apply shadow effect in any of the four sides of your text boxes. To apply shadow effects:
1. Click the drop down arrow in the Shadow Effects group.
2. Click to apply any of the different shadow effects available.
3. You can also move the shadow in the direction, where you want it to be visible.
4
5
6
Shadow Effects
Group

GR 11 ICT M3 DESKTOP PUBLISHING
45
C. Apply 3D Effects
3D or 3 Dimensional makes a more concrete appearance of your text boxes. 3D Effects can be used to make the shadow more prominent.
1. Click the drop down arrow in the 3D Effects group.
2. Click to apply any of the different 3D effects available.
3. You can also tilt the shadow in the direction, where you want it to be visible.
Student Activity 11.3.2.5
Perform the activity below to test your skill in changing the appearance of your text boxes. Revise Lesson 11.3.2.5 Modifying Text Boxes, if you are unsure of how to proceed with this activity.
1. Open My Greeting Card 4.
2. Apply shape style, shadow effects and 3D effects to the text boxes in Page 3.
3. Save your work as My Greeting Card 5.
3D Effects Group
Note: In MS Publisher, 3D Effect can only be applied to text boxes
if a Shape Outline has been applied to the text box.

GR 11 ICT M3 DESKTOP PUBLISHING
46
11.3.2.6 Formatting Text
At the start of this module, you have learned to select and change Font scheme. By default, when a font scheme is selected, font and font size are already set. However, you may need to change the font and font size depending on your needs. Changing the font, font size and colour in MS Publisher is the same in Word.
There are various ways you can use to format your text. It has similarities with other Office, so you can apply the skills you have learned in this lesson. The only difference is that in MS Publisher, your text is in text boxes.
A. Change the Font, Size and Colour
Make sure that the text is highlighted, before you change the font, size and colour of the text inside the text box.
1. Draw a text box and type the following text “What others think about you is not important. What you think about yourself means everything.”
2. In the Home tab, change the font, size, style and colour of your text.
B. Text Effect
Perform the following task to apply text effect to your text boxes.
1. Make sure that the text is still highlighted.
2. Click the Format tab in the Text Box Tools.
3. Choose any of the options given in the Effects group. The effects will be immediately applied to the text.
Font
Font style
Font size
Colour
Effects Group
Note: Observe that as you tick though the different effects, notice that
some effects can be applied together with other effects and some can
be used only on its own.

GR 11 ICT M3 DESKTOP PUBLISHING
47
C. Text Alignment
Perform the following task to apply text alignment to your text boxes.
1. Make sure that the text is still selected.
2. Click the Format tab in the Text Box Tools.
3. Click the button in the Alignment group. Observe how the text is displayed in the text box.
4. The text will be aligned inside the text boxes.
D. Drop Cap
1. Make sure that the text is still selected.
2. Click the Format tab in the Text Box Tools.
3. Click Drop Cap. The effect is immediately applied.
4. Click Custom Drop Cap to edit and customise the text format and position of the drop cap.
Student Activity 11.3.2.6
Perform the activity below to test your skill wrapping text around objects. Revise Lesson 11.3.2.2 Wrapping Text, if you are unsure of how to proceed with this activity.
1. Open My Greeting Card 5.
2. Increase the font size of the text inside Page 2. Apply style and colour.
3. Apply Effects or place a Drop Cap to the text box in Page 2.
4. Save your work as My Greeting Card 6.
Note: Do not use text effect to paragraph text. It is best applied to text
with large font size like title and sub-title.
Alignment Group
Note: The alignment will be visible depending on the text inside the
text box and the size of the text box.

GR 11 ICT M3 DESKTOP PUBLISHING
48
Summative Activity 11.3.2
Perform the summative activity below to test your knowledge and skills in using MS Publisher. Revise Topic 11.3.2 WORKNG WITH TEXT, if you are unsure of how to proceed with this activity.
Follow the instructions below to create your own Newsletter.
1. Open a blank publication. Use the following specifications.
a. Page Setup:
Margins - Narrow
Paper Size - A4
Orientation - Landscape
2. Create a Newsletter. The parts will be broken as follows:
a. Header
b. Text box 1
c. Text box 2
d. Index 1
e. Index 2
f. Contact
g. Object
3. The Newsletter you created will be printed.
4. Do not forget to type your Name.
5. Save your work as Newsletter 1.
6. All Text frames must be visible. Use any Weight for the lines.
7. The Header, Index 1 and Contact must use a text box that is formatted, using all or any of the following:

GR 11 ICT M3 DESKTOP PUBLISHING
49
Shape Style (Shape Fill, Shape Outline, Change Shape).
Shadow Effects or 3D Effects.
Text Effect (Shadow, Outline, Engrave, Emboss).
Alignment.
Font Format (Font, Size, Style, Colour, etc.)
8. For Text Box 1, use any text that will fit the text boxes. You can repeat the same sentence continuously, to simulate a sentence. Format font (Font, Size, Style, Colour etc) for the paragraph.
9. Text box 1 must have a different paragraph, using different font, size and style to the text that will overflow to Text box 2.
10. An Object must be inserted in Text box 2. With the text wrapping around the object.
11. Index 2 will not have any text border. Fonts will be formatted to any format you selected.
Student Activity 11.3.2.1
The next page contains a sample of a greeting card publication. Your work may look different
Answers to Student Activity

GR 11 ICT M3 DESKTOP PUBLISHING
50
from the example given.
The following steps were done to perform the activity.
Step 1: Open My Greeting Card publication.
Step 2: Select Page 2 and 3 in the Navigation Page. This will display the pages on the MS Publisher workspace.
Step 3: In the Insert tab, click Draw Text Box.
Step 4: Your mouse pointer will change shape. In Page 2 click, hold and drag the mouse to create the text box.
Step 5: Type your message. You can also write random text like the example below. The font formats inside the text box will depend on the font scheme you previously set.
Click to display
the content
Draw Tex Box Icon
GR 11 ICT M3 DESKTOP PUBLISHING
51
Step 3
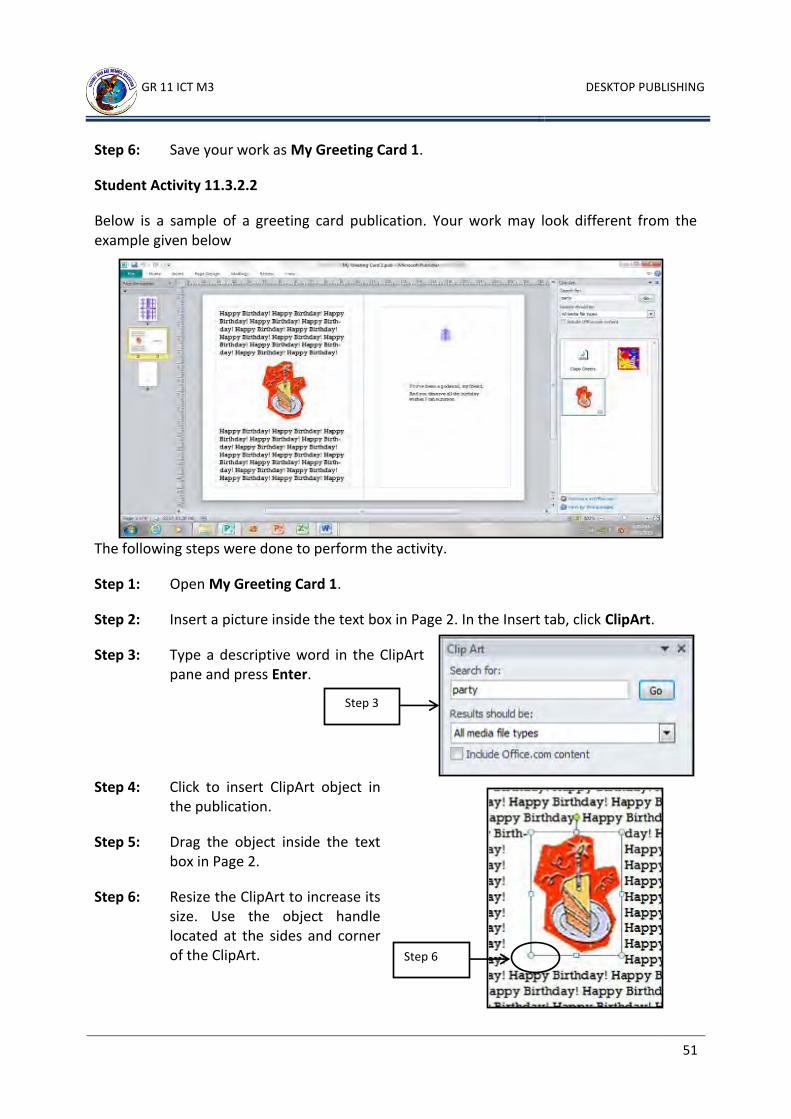
Step 6: Save your work as My Greeting Card 1.
Student Activity 11.3.2.2
Below is a sample of a greeting card publication. Your work may look different from the example given below
The following steps were done to perform the activity.
Step 1: Open My Greeting Card 1.
Step 2: Insert a picture inside the text box in Page 2. In the Insert tab, click ClipArt.
Step 3: Type a descriptive word in the ClipArt pane and press Enter.
Step 4: Click to insert ClipArt object in the publication.
Step 5: Drag the object inside the text box in Page 2.
Step 6: Resize the ClipArt to increase its size. Use the object handle located at the sides and corner of the ClipArt.
Step 6

GR 11 ICT M3 DESKTOP PUBLISHING
52
Step 7
Step 7: Right-click the object. Click the Wrap
Text drop down list and choose Top and Bottom. The text surrounding the ClipArt is now moved at the top and bottom of the object.
Step 8: Save your work as My Greeting Card 2.
Student Activity 11.3.2.3
The next page shows an example of a greeting card publication. Your work may look different from the example given.
The following steps were done to perform the activity.
Step 1: Open My Greeting Card 2.
Step 2: Click the text box in Page 2.
Step 3: In the Format tab of the Text Box tools, click Hyphenation. A dialogue box appears.

GR 11 ICT M3 DESKTOP PUBLISHING
53
Step 4: Un-tick, Automatically hyphenate this story and click OK.
Step 5: How your text will appear in the text box will depend on the font scheme you
previously selected.
Step 6: Save your work as My Greeting Card 3.
Student Activity 11.3.2.4
Below, is a sample of a greeting card publication. Your work may look different from the example given below:
The following steps were done to perform the activity.
Step 1: Open My Greeting Card 3.
3

GR 11 ICT M3 DESKTOP PUBLISHING
54
Step 2: In the Insert tab of the Ribbon, click Draw Text Box.
Step 3: Move your mouse pointer to page 3. Click hold and drag the mouse to create a vertical text box.
Step 4: Click to select the text box in Page 2.
Step 5: Click Create Link located in the Format tab of the Text Box Tools.
Step 6: Your mouse pointer will change shape to a text overflow icon that looks like a pitcher. Move your mouse to the vertical text box and click the mouse. This will overflow the text from page 2 to page 3.
Step 7: Create vertical text box at the right side of page 3.
Step 8: Click to select the vertical text box at the left side of page 3.
Step 9: Repeat steps 5 and overflow your text to the new text box you created.
Step 10: Save your work as My Greeting Card 4.
Activity 11.3.2.5
Below, is a sample of a greeting card publication. Your work may look different from the example given here.

GR 11 ICT M3 DESKTOP PUBLISHING
55
The following steps were done to perform the activity:
Step 1: Open My Greeting Card 4.
Step 2: Click to select any text box in page 3.
Step 3: In the Formats tab of the Drawing Tools, choose from the different styles you can apply to your text boxes.
Step 4: Apply shape style, shadow effects or 3D effects to the text boxes.
Step 5: Save your work as My Greeting Card 5.
Student Activity 11.3.2.6
Below, is a sample of a greeting card publication. Your work may look different from the example given below:

GR 11 ICT M3 DESKTOP PUBLISHING
56
The following steps were done to perform the activity.
Step 1: Open My Greeting Card 5.
Step 2: Click the mouse inside the text box locate in Page 2.
Step 3: Click the Format tab located in the Text Box Tool.
Step 4: Change the font size, style and colour. Notice that changing the font size will affect the content of the text box. Do not worry if the text from the text boxes in page 3 moved to page 2 or vise-versa. This is due to the link you created between text boxes.
Step 5: Apply Effect to the text. Choose from the different effects available.
Step 6: Apply Drop Cap to your text box. Choose from different styles available.
Step 7: Place a Drop Cap to the text box in Page 2.

GR 11 ICT M3 DESKTOP PUBLISHING
57
Step 8: Save your work as My Greeting Card 6.
A sample Newsletter is given on the next page. Your work might look different from the example given.
Answer to Summative Activity 11.2.1
a
b
c
d
e
f
g
GR 11 ICT M3 DESKTOP PUBLISHING
58
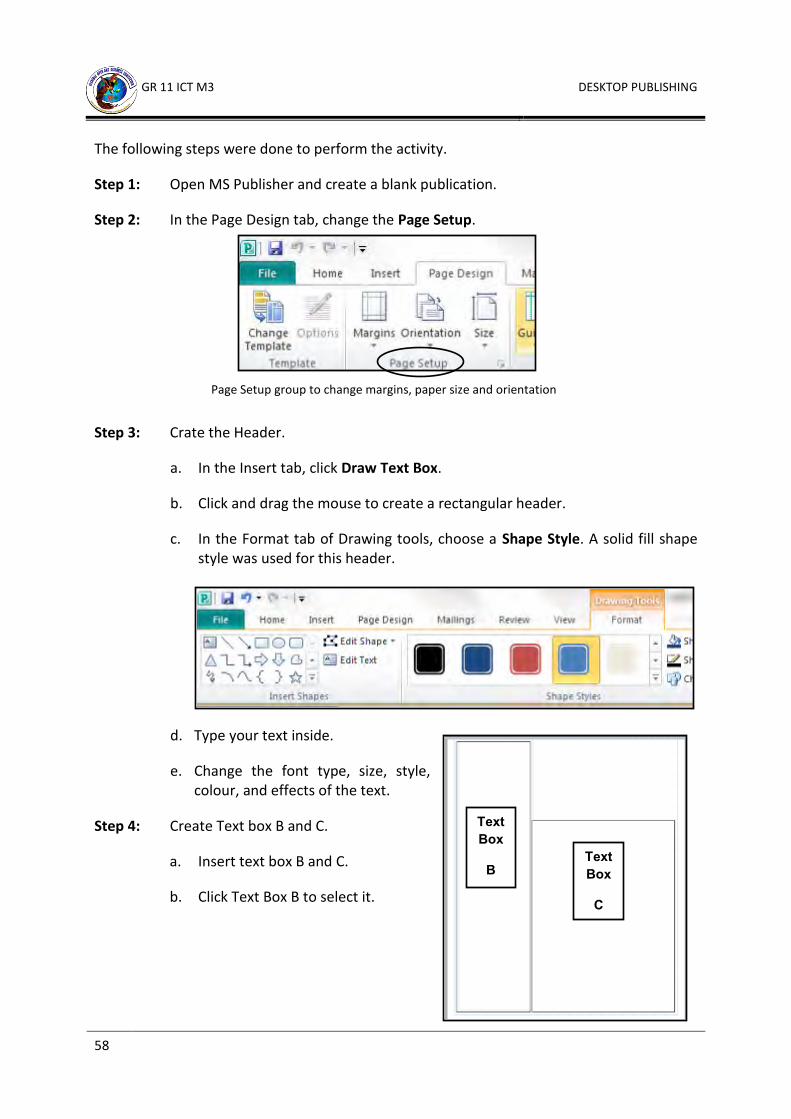
The following steps were done to perform the activity.
Step 1: Open MS Publisher and create a blank publication.
Step 2: In the Page Design tab, change the Page Setup.
Step 3: Crate the Header.
a. In the Insert tab, click Draw Text Box.
b. Click and drag the mouse to create a rectangular header.
c. In the Format tab of Drawing tools, choose a Shape Style. A solid fill shape style was used for this header.
d. Type your text inside.
e. Change the font type, size, style, colour, and effects of the text.
Step 4: Create Text box B and C.
a. Insert text box B and C.
b. Click Text Box B to select it.
Text Box
B Text Box
C
Page Setup group to change margins, paper size and orientation

GR 11 ICT M3 DESKTOP PUBLISHING
59
c. In the Format tab of Text Box tools, Click Create Link.
d. When your mouse pointer changes, move your mouse to Text Box C and click the mouse. A link is now created between the two boxes.
e. Type the word “Flexible Open and Distance Education”. Copy and paste the text to fill in Text Box B. Create two paragraphs.
f. For the third paragraph type, “Link this text box to another one so that the
text flows between them”. Copy and paste the same text multiple times,
until if fills Text Box B. Your text will automatically overflows to text box C.
g. Create a new paragraph in text box C. You can type your own text inside, or
copy and paste the same sentence to create a paragraph.
h. Change the font type, size, style of the paragraph from text box B that
overflows to text box C.
i. Type your name.
Step 5: Create the Index 1 & 2
a. Create a text box for the Index 1.
b. Change the font, size, style and colour.
c. A Shape style and Shadow Effect were used to format the text box.
Step 6: Create Table of Content.
a. Create a text box for the Table of Content.
b. In the Format tab of Drawing Tools, click Shape Outline.

GR 11 ICT M3 DESKTOP PUBLISHING
60
c. Choose No Outline.
d. Change the font, size, style and colour.
Step 7: Create Contact text box.
a. Create a text box for the Index 1.
b. Change the font, size, style and colour.
c. 3D effects were used to create this object.
Step 8: Insert an Object
a. In the Insert Tab, click ClipArt.
b. Type a keyword of the image you want to insert and press Enter.
c. Click the ClipArt. This will insert the object in the publication.
d. Click the object to select it.
e. In the Format tab of Picture Tool, click Wrap Text.

GR 11 ICT M3 DESKTOP PUBLISHING
61
f. A Tight format was used for this object. You can also right-click the mouse and click Wrap Text.
Step 9: Save your work as Newsletter.

GR 11 ICT M3 DESKTOP PUBLISHING
62
11.3.3 WORKING WITH SHAPES AND OBJECTS
11.3.3.1 Inserting and Resizing Shape
Text boxes, pictures, shapes, and Word Art are referred to as objects in MS Publisher. You have learned from the previous lesson all about text boxes. This lesson will teach you how to insert and modify non-text objects that you can use in your publication. Depending on the purpose, you can add pictures, shapes and/or Word Art objects, which give life to your publication.
A. Insert Shape
Inserting non-text object like Shapes follow the same process as other Office program. Shapes cover different geometric pattern like triangle, square, and oval. It also covers arrows, lines, callouts and flowchart symbol commonly used in publication. Perform the following task to insert and resize shape to your publication.
1. Click Insert tab.
2. Choose Shapes.
3. Click any object and move your mouse to the document. Observe how your mouse pointer changes shape
4. Click, hold and drag the mouse. An outline of the shape you chose will be created in your document.
5. Release the mouse button. The object is now inserted.
B. Resize Shape
Resizing shapes is the same as resizing any objects. Perform the task below to resize shape objects.
1. Make sure that the object is still selected. The object is selected if the object handle is visible.
2. Position your mouse pointer in any part of the handle. Observe how your mouse pointer changes its shape.
3. Click, hold and drag the mouse. This will resize the shape of the object.
4. Move your mouse pointer to the rotation handle (coloured green). This will rotate the object to
2
An object displaying handles for
resizing
GR 11 ICT M3 DESKTOP PUBLISHING
63
varying degree.
5. Click and hold the mouse. Observe the mouse pointer changes its shape. Drag the mouse to rotate the object.
C. Delete Shape
Deleting shapes object can also be applied to any object. Perform the task below to resize shape objects.
1. Click to select the Object.
2. Click Delete from the keyboard. Your object is now deleted.
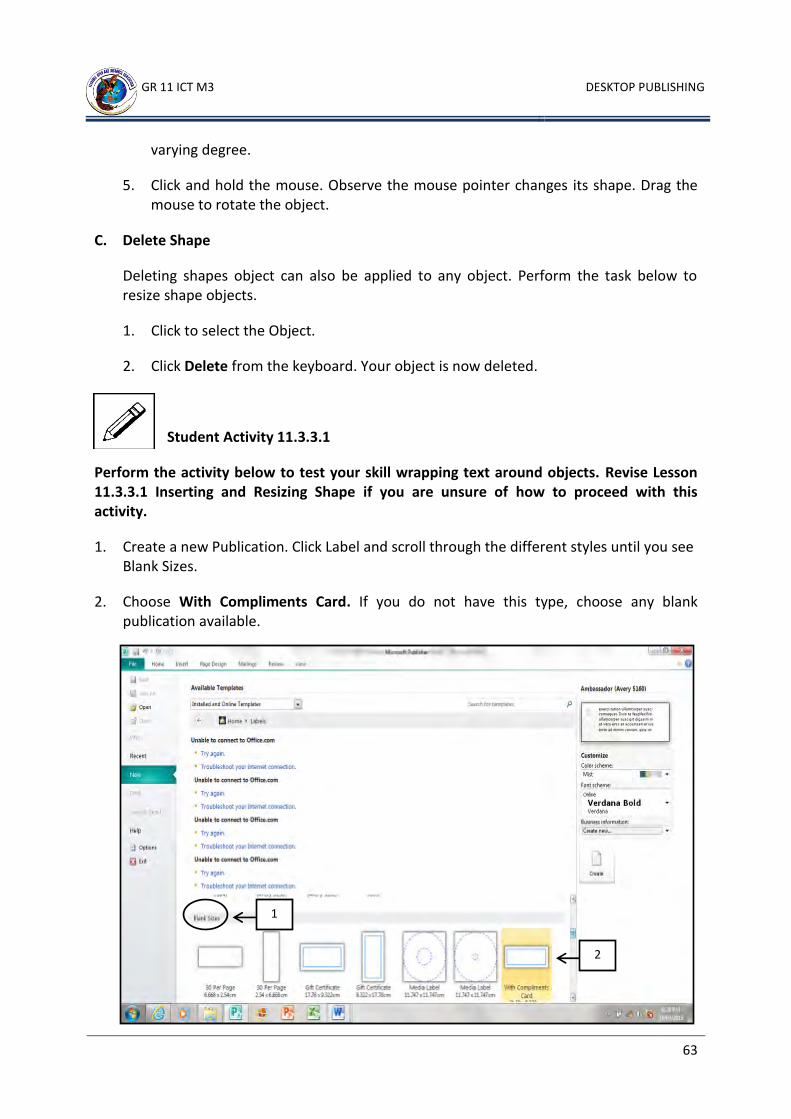
Student Activity 11.3.3.1
Perform the activity below to test your skill wrapping text around objects. Revise Lesson 11.3.3.1 Inserting and Resizing Shape if you are unsure of how to proceed with this activity.
1. Create a new Publication. Click Label and scroll through the different styles until you see Blank Sizes.
2. Choose With Compliments Card. If you do not have this type, choose any blank publication available.
1
2

GR 11 ICT M3 DESKTOP PUBLISHING
64
3. The example at the next page comes from a sample template in MS Publisher. You shall try to replicate this template using. Your work does not have to look exactly like example on the next page.
4. Use shapes and text boxes to create this format.
5. Save your work as Label

GR 11 ICT M3 DESKTOP PUBLISHING
65
11.3.3.2 Grouping and Moving Objects
Objects can be moved in any part of the publication for a better layout. You can also create different object grouped together, to create a better presentation. Objects must be grouped to ease the task of moving it. Perform the following task to group and move objects.
A. Move Object
Perform the following task to move objects.
1. Insert a Heart Shape object in your publication.
2. Position your cursor to your object (the heart shape) and click, hold and drag the mouse to any part of your publication.
3. Release. This will move your object.
4. Move your object to the grey area of your publication. The object still exists however, anything that is in the grey area, will not be included in the printing.
B. Group Object
Perform the following task to move objects.
1. Move the Heart shape back to the publication. Create an arrow shape. Resize, rotate and move the arrow shape to make it run across the heart.
Objects can be moved in the grey area of MS Publisher
1

GR 11 ICT M3 DESKTOP PUBLISHING
66
2. Move the Heart shape object. You still need to move the Arrow shape object to the new position of the heart. Moving the two objects is easier, if you grouped the objects together.
3. Click the Undo button. This will return the Heart shape to its original position.
4. Press the Ctrl key from the keyboard and hold. Do not release.
5. Click the Heart shape object and the Arrow shape. This will select the two object.
6. In the Format tab, click Group. Observe how the object is now grouped together.
7. Click, hold and drag the object to any part of your publication. Your object will now move together.
8. Select the object and click Ungroup. This will deselect the objects you grouped together.
9. You can also right-click the mouse after you have selected your objects. Choose Group or Ungroup from the options given.

GR 11 ICT M3 DESKTOP PUBLISHING
67
Student Activity 11.3.3.2
Perform the activity below to test your skill in moving and grouping object. Revise Lesson 11.3.3.2 Grouping and Moving Objects, if you are unsure of how to proceed with this activity.
1. Open My Label 1.
2. Group the object according to the following:
a. Two rectangle shape.
b. Oval shape and the text box inside.
c. The diamond shape and your name.
3. Group the shapes again as one.
4. Save your work as My Label 2.
GR 11 ICT M3 DESKTOP PUBLISHING
68
11.3.3.3 Inserting Clip Art and Picture from File
Any publication will not be complete without a Picture or Clip Art. Pictures are any image that was taken using a camera while Clip Art image are pre-drawn artwork stored inside your computer. You can look for more Clip Art from the web. Both non-text objects work almost the same as any Office programs. This means that you can move, resize and delete the same way as any object.
A. Inserting Clip Art
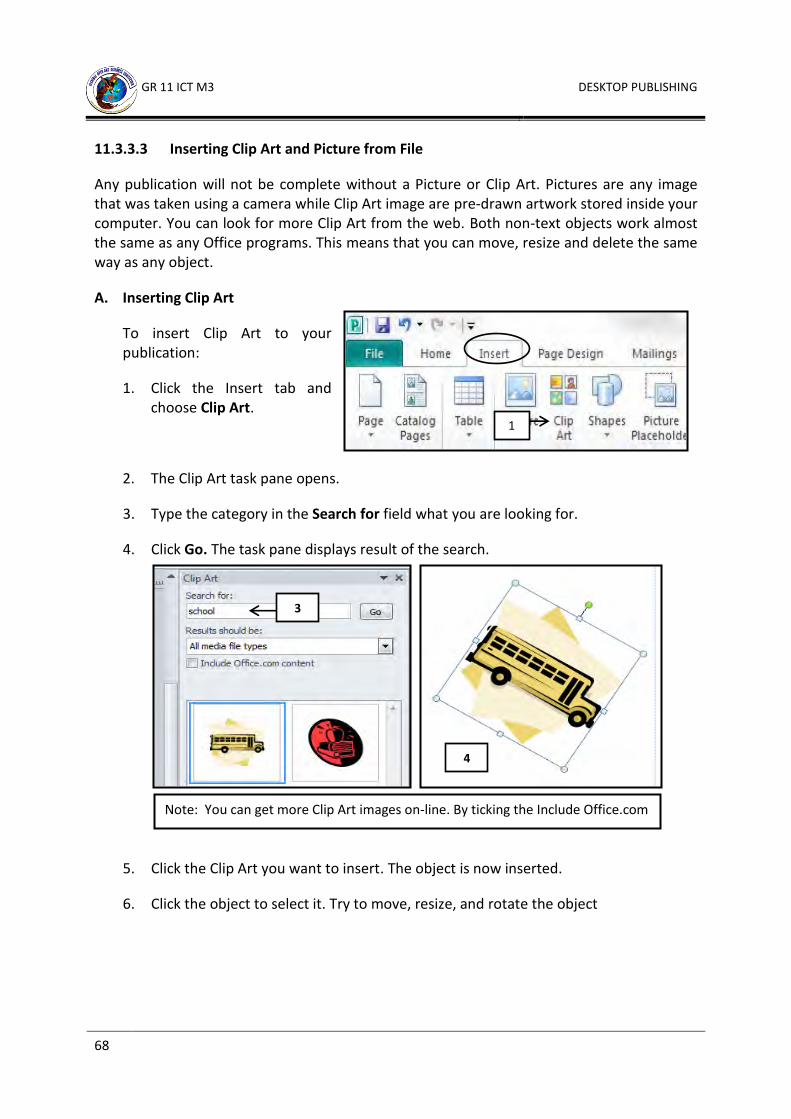
To insert Clip Art to your publication:
1. Click the Insert tab and choose Clip Art.
2. The Clip Art task pane opens.
3. Type the category in the Search for field what you are looking for.
4. Click Go. The task pane displays result of the search.
5. Click the Clip Art you want to insert. The object is now inserted.
6. Click the object to select it. Try to move, resize, and rotate the object
1
3
4
Note: You can get more Clip Art images on-line. By ticking the Include Office.com
content.

GR 11 ICT M3 DESKTOP PUBLISHING
69
B. Inserting Picture From File
1. Make sure that the pictures you want to insert should already be saved in a file. This is commonly stored in Pictures Library.
2. In the Insert tab, choose Picture. The picture dialogue box appears.
3. Locate and click the picture you want to insert.
4. Click Insert. The picture is now inserted in your publication
Activity 11.3.3.3
Perform the steps below.
1. Open My Label 2.
2. Insert a picture of yourself inside the publication. Insert a ClipArt if a picture is unavailable.
3. Save your work My Label 3.
4
3

GR 11 ICT M3 DESKTOP PUBLISHING
70
11.3.3.4 Resizing and Cropping Pictures
After inserting a Clip Art and/or Picture, observe that the photo you inserted is not too big, or too small for your publication. You can solve this problem by resizing or cropping the object. Resizing and Cropping pictures are similar to other Office program. You can also use this technique to Clip Art and Picture object.
A. Resizing Object
Resizing means physically reducing or increasing the size of an object. You can use these techniques to any object that you want to resize.
1. Insert a picture.
2. Click the picture to make it active. The object handles appears.
3. Position the cursor on the square handle. The mouse pointer changes to a double-headed arrow.
4. Click, hold and drag the mouse. This resizes the object horizontally or vertically, depending on what direction the arrow is pointing.
5. Position the cursor on the round handle. The mouse pointer changes to a double-headed arrow.
6. Click, hold and drag the mouse. This resizes the object inward or outward to resize the object.
7.
B. Cropping
Sometimes you need only certain parts of the pictures, which you want to include in your publication. You can do this by cropping. Cropping refers to removing parts of the objects that will be displayed.
You can select certain parts of the picture or Clip Art, by cropping the object. You can also crop the object using Picture Shape. Follow the steps below to Crop an object.
1. Click the picture that you want to crop.
2. Locate the Formats tab in the Pictures tools and click Crop.
Note: Pressing the Shift key while dragging the mouse inward or outward
will balance the shape of your object.
Crop Icon
GR 11 ICT M3 DESKTOP PUBLISHING
71
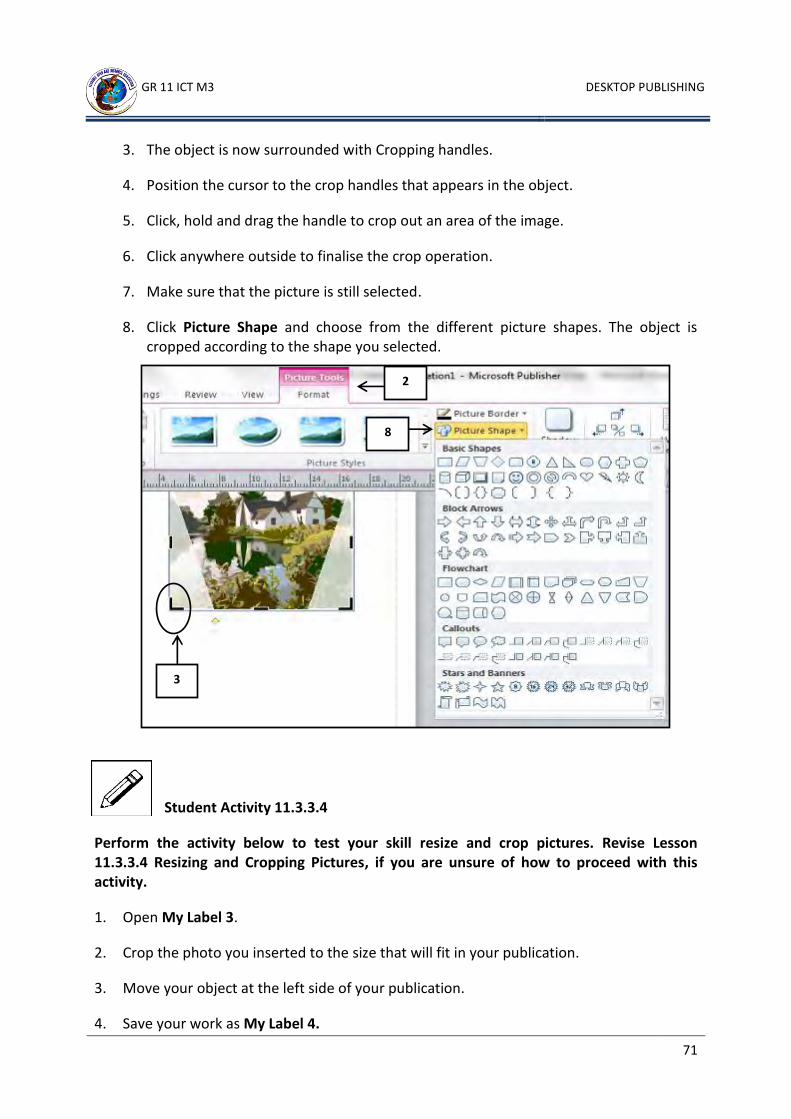
3. The object is now surrounded with Cropping handles.
4. Position the cursor to the crop handles that appears in the object.
5. Click, hold and drag the handle to crop out an area of the image.
6. Click anywhere outside to finalise the crop operation.
7. Make sure that the picture is still selected.
8. Click Picture Shape and choose from the different picture shapes. The object is cropped according to the shape you selected.
Student Activity 11.3.3.4
Perform the activity below to test your skill resize and crop pictures. Revise Lesson 11.3.3.4 Resizing and Cropping Pictures, if you are unsure of how to proceed with this activity.
1. Open My Label 3.
2. Crop the photo you inserted to the size that will fit in your publication.
3. Move your object at the left side of your publication.
4. Save your work as My Label 4.
3
2
8

GR 11 ICT M3 DESKTOP PUBLISHING
72
11.3.3.5 Arranging and Adding Captions to Pictures
Captions are text object that you use to describe the image. You can add caption using the available caption layout, or create your own. You can also insert caption to Pictures or ClipArt.
Creating your own caption involves stacking or arranging a text object on top of other objects. When stacking and/or arranging objects, the earliest order you create goes on the bottom, and the later objects gets stacked on top. You can place the arrangement of an object as you want. Stacking or arranging objects can also be used on other text object and non-text object.
A. Inserting Captions to Pictures
Caption gives your readers of an idea what the image or picture is all about. Follow the steps below to insert captions to pictures and images.
1. Make sure that the object is selected.
2. In the Picture Tools options, click the Format tab.
3. Click Caption and choose a Caption that will best suit the picture you selected
4. Click the text box containing the caption and erase the text inside.
5. Type the caption for your picture.
3
5

GR 11 ICT M3 DESKTOP PUBLISHING
73
B. Un-Grouping Objects
After placing your caption, observe that the object contains holders covering the picture and caption. These are objects grouped together as one. Grouping makes MS Publisher treat the objects as one. Perform the task below to group objects together.
1. Click the caption frame. Observe how another type of handle surrounds the object. The handles indicate that the object is grouped with another object.
2. Click the object/objects. A place holder covers both the caption and the picture.
3. Position your cursor on the object and right-click the mouse.
4. Click Ungroup. The objects are now separated.
C. Stacking Objects
Stacking objects on top of each other, allows you to create your own graphics using different objects in MS Publisher. The objects are stacked, based on the order they were placed in publication. Perform the task below to stack objects together.
1. Create an object using shapes or text boxes. This will be your first object.
2. Insert a Shape style to publication, and format the object as you want it to appear on your publication. This will be your second object.
3. Click and drag the second object on top of the first object. Observe how the second object stacks up on-top of the first object.
4. In the Format tab of the Text Box Tools, click Bring Forward. Your caption will now move on top of the Shape style.
Handles indicating that the two objects
are grouped together
Object 1
Object 2
3

GR 11 ICT M3 DESKTOP PUBLISHING
74
5. Click Bring Forward or Send Backward icon. Observe how your objects moves forward or backward
Student Activity 11.3.3.5
Perform the activity below to test your skill in arranging and addition captions to pictures. Revise Lesson 11.3.3.5 Arranging and Adding Captions to Pictures, if you are unsure of how to proceed with this activity.
1. Open My Label 4.
2. Insert caption to your picture.
3. Choose from different layouts available.
4. Type “Student” inside caption.
5. Save your work as My Label 5.
4

GR 11 ICT M3 DESKTOP PUBLISHING
75
11.3.3.6 Editing and Compressing Pictures
Changing the appearance of objects in MS Publisher is similar to other Office program. When you add an object, a toolbar appears that allows you to edit the appearance of the pictures.
A. Picture Border
Perform the following task to add borders to pictures and images.
1. Insert a picture and click the picture you want to edit. You can also insert a border to a Clip Art image.
2. The Format tab appears on the Ribbon with the Picture tools.
3. Click the Picture Border button in the picture Styles group.
4. Click to choose a border colour, thickness and style of the border.
5. You can also select preset border from the Picture Style group.
6. Select No Outline to remove the borders you added to the picture.
B. Shadow Effect
Follow the steps below to add shadow effect to pictures and images.
5
2 3
4

GR 11 ICT M3 DESKTOP PUBLISHING
76
1. Click the picture that you want to edit.
2. Click the Shadow Effect located in the Picture Styles group.
3. Choose a shadow effect and the colour of the shadow.
4. Use Nudge Shadow to increase or decrease the width of the shadow you want to use.
C. Adjust Picture
You can adjust and make corrections to pictures and clip art images, using the tools in the Adjust group. Use it to adjust the brightness, contrast and/or recolour an image. Perform the following task when adjusting and making corrections to your pictures.
1. Insert a picture in your publication. Make sure that the image is selected.
2. Adjust the Brightness of the image. You can lighten or darken the image.
3. Change the Contrast of the picture.
4. Or use Recolour to change the colour of your image.
5. Click More Variations for more Recolour options.
6. Click Restore Original Colours to reset the image to its original colour.
7. Click OK when finished.
2
3
4
Use Adjust group to edit your picture and image.
6

GR 11 ICT M3 DESKTOP PUBLISHING
77
D. Compress Picture
Images that are placed in your publication are sometimes cropped and resized. The image sometime loses its picture quality when you resize or crop the image.
MS Publisher solves this problem, by using Compress Picture. Using this option will put the best quality of the photo(s) in your publication. Perform the following step to Compress Picture.
1. Make sure that the picture is selected.
2. In the Pictures tool option, click the Format tab.
3. Click Compress Picture located in the Adjust group. The Compress Picture dialogue box appears.
4. It displays the total file size of the pictures in your publication.
5. Compression options and Target Output are pre-ticked.
6. You can tick Apply to selected pictures, only if you wish to compress only a certain picture.
7. Click Compress. The dialogue box appears.
8. Click Yes.
Tick and un-tick options in the dialogue box to
compress pictures

GR 11 ICT M3 DESKTOP PUBLISHING
78
Student Activity 11.3.3.6
Perform the activity below to test your skill in editing and compressing pictures and images. Revise Lesson 11.3.3.6 Editing and Compressing Pictures, if you are unsure of how to proceed with this activity.
1. Open My Label 5.
2. Add a border to your picture.
3. Adjust the picture brightness and contrast.
4. Save your work as My Label 6.
Summative Activity 11.3.3
Perform the summative activity below to test your knowledge and skills in using MS Publisher. Revise on topic 11.3.3 WORKNG WITH SHAPES AND OBJECTS if you are unsure of how to proceed with this activity.
The next page contains a December catalogue of RH Hypermarket. You will use this as a pattern to create your object. You can substitute the objects, text, formats, and Word Art to any theme you want. For example, you can substitute the pictures of toys with that of a clothes, food, or tools, depending on the availability of pictures and images that you have.

GR 11 ICT M3 DESKTOP PUBLISHING
79

GR 11 ICT M3 DESKTOP PUBLISHING
80
Take note that you cannot actually replicate the actual example. Below is an example of what you can do with your publication.
GR 11 ICT M3 DESKTOP PUBLISHING
81
Student Activity 11.3.3.1
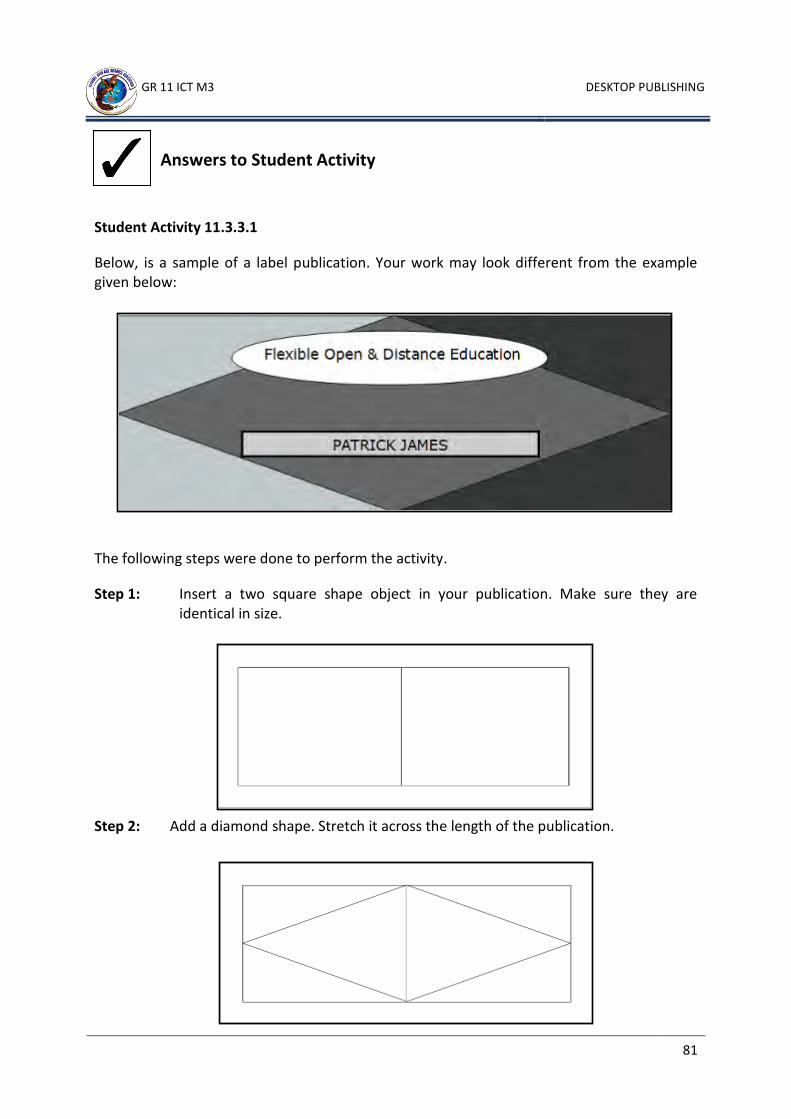
Below, is a sample of a label publication. Your work may look different from the example given below:
The following steps were done to perform the activity.
Step 1: Insert a two square shape object in your publication. Make sure they are identical in size.
Step 2: Add a diamond shape. Stretch it across the length of the publication.
Answers to Student Activity

GR 11 ICT M3 DESKTOP PUBLISHING
82
Step 3: Insert an oval shape in your publication.
Step 4: Use Shape Style and Effects to your objects.
Step 5: Insert Text boxes in your publication.
Step 6: Save your work as My Label 1.
Student Activity 11.3.2
The following steps were done to perform the activity.
Step 1: Open My Label 1.
Step 2: Press Ctrl from the keyboard and click the two rectangle shapes to select it.
Step 3: Right click the mouse and choose Group.

GR 11 ICT M3 DESKTOP PUBLISHING
83
Step 4: Press Ctrl from the keyboard and Oval shape and the text box. Repeat Steps 3.
Step 5: Press Ctrl from the keyboard and click the diamond shape and the other text box.
Step 6: Press Ctrl from the keyboard and Oval shape and the text box. Repeat Steps 3.
Step 7: Press Ctrl from the keyboard and click all the grouped objects and repeat Steps 3. This will group the object as one.
Step 8: Save your work as My Label 2.
Student Activity 11.3.3.3
Below, is a sample of a Label publication. Your work may look different from the example given.
The following steps were done to perform the activity:
Step 1: Open My Label 2.
Step 2: In the Insert tab, click Pictures.

GR 11 ICT M3 DESKTOP PUBLISHING
84
Step 3: Browse to locate the picture file saved in your computer or USB. You may also insert ClipArt if a picture file is not available.
Step 4: Save your work as My Label 3.
Student Activity 11.3.3.4
Below, is a sample of a Label publication. Your work may look different from the example given below:
The following steps were done to perform the activity:
Step 1: Open My Label 3.
Step 2: Click the object to select it.
Step 3: In the Format tab of the Pictures Tool, click Crop.Step 4: Position your cursor at the handles of the picture. Click, hold and drag the mouse to crop the picture.

GR 11 ICT M3 DESKTOP PUBLISHING
85
Step 5: Move your object at the left side of your publication.
Step 6: Save your work as My Label 4.
Student Activity 11.3.3.5
Below , is a sample of a Label publication. Your work may look different from the example given below:
The following steps were done to perform the activity.
Step 1: Open My Label 4.
Step 2: In the Format tab of Pictures Tool, click Caption.
Step 3: Choose from the different caption layout available.

GR 11 ICT M3 DESKTOP PUBLISHING
86
Step 4: Click the caption to type your text.
Step 5: Save your work as My Label 5.
Student Activity 11.3.3.6
Below, is a sample of a Label publication. Your work may look different from the example given below:
The following steps were done to perform the activity:
Step 1: Open My Label 5.
Step 2: Click the picture to select it.
Step 3: Click Format in the Picture Tools tab and choose Picture Border.
Step 4: Choose from the different options given to modify your picture.

GR 11 ICT M3 DESKTOP PUBLISHING
87
Step 5: Adjust the picture brightness and contrast as needed.
Step 6: Save your work as My Label 6.
The following were performed to create the catalogue. You can follow the steps to recreate the example given or as guide to create your own publication.
A. Letter Head
The above illustration was created using the following steps.
1. Click Insert > Word Art and choose from the different formats available. Type your text.
2. Click Insert > Clip Art and choose an object. You can also click Insert > Picture from the saved files. Refer to Lesson 11.3.3.3 of Grade 11 ICT Unit 3 Module.
3. Double click the object, the Format tab will appear.
4. Click Crop to resize and crop the object. Refer to Lesson 11.3.3.4 of Grade 11 ICT Unit 3 Module.
5. Right-click the object and select Insert Caption. Type your text. Refer to Lesson 11.3.3.5 of Grade 11 ICT Unit 3 Module.
6. Press and hold the Shift key while clicking the object, caption, and the Word Art. Right-click the mouse.
Answer to Summative Activity 11.3.3
The Letter head design used in the activity

GR 11 ICT M3 DESKTOP PUBLISHING
88
7. Make sure that the objects are still selected and group the object. Refer to Lesson 11.3.3.2 of Grade 11 ICT Unit 3 Module.
B. 60% OFF
The above illustration was created using the following steps.
1. Click Insert > Shapes and select any object. Draw, resize, reshape, rotate and change shape style of your object. Refer to Lesson 11.3.3.1 of Grade 11 ICT Unit 3 Module.
2. Create a Text box and type “Up to” and press enter. On the next line, type “60%”. Use a different font size for the word “60%”
3. Click and drag the text box and drop on top of the shape you created. Resize, reshape, rotate and change shape style of your text box to follow the rotation of your Shape.
4. Create a Text box and type “OFF”. Resize, reshape, rotate and change shape style of your text box to follow the rotation of your Shape.
6
7

GR 11 ICT M3 DESKTOP PUBLISHING
89
5. Group the object. Refer to Lesson 11.3.3.2 of Grade 11 ICT Unit 3 Module.
6. Position the grouped object in your publication.
C. Text Box
The text box was created using the following steps.
1. Create a text box and type the following text exactly as it is set.
2. Highlight the text. In the Home tab, click the Paragraph dialogue box and change the Spacing Before and After to “0” and the Line Spacing to “Single”.
3. Double click the text box. Remove outline of the text box by clicking No Outline from the Shape Outline option.
4. Change the font, font style and size of your text. Use a small font size for the word “MASSIVE” and the same font size for the word “CAR and SALE”.
5. Your text box may not look like the example given.
6. To achieve this effect, highlight the word “CAR”.
7. Display the Font Dialogue box and click the Advance tab.
8. Choose Expanded from the Spacing drop-down list, and adjust the point in the By: list box. Click OK.
9. Repeat Step 6 – 8 to re-adjust the spacing between characters, until the letters reach the word “MASSIVE”. Do the same to the word “SALE”.

GR 11 ICT M3 DESKTOP PUBLISHING
90
D. Car Advertisement
1. Insert a Shape. A square shape was used in this example. Make the object uniform in size.
2. Remove the fill and changed the outline. You can achieve this by double-clicking the shape and use the Shape Fill to “No Fill” and choosing Dashes from Shape Outline.
3. You can add one or more text box depending on the style you want to achieve.
4. Click and drag the text box and move it to your Square shape box. Change the font, font style and size of the text as needed.
5. Insert a Clip Art or Picture file. Refer to Lesson 11.3.3.1 of Grade 11 ICT Unit 3 Module.
6. Drag the Clip Art to your square shape object. Change the Wrap Text of your image so that you can drag it inside the square box. Refer to Lesson 11.3.3.3 of Grade 11 ICT Unit 3 Module.
7. Resize and reshape your object to fit the square shape box. Refer to Lesson 11.3.3.4 of Grade 11 ICT Unit 3 Module.
8. Group the object. Refer to Lesson 11.3.3.2 of Grade 11 ICT Unit 3 Module.
E. Saving
1. Save your work. Use your own filename.
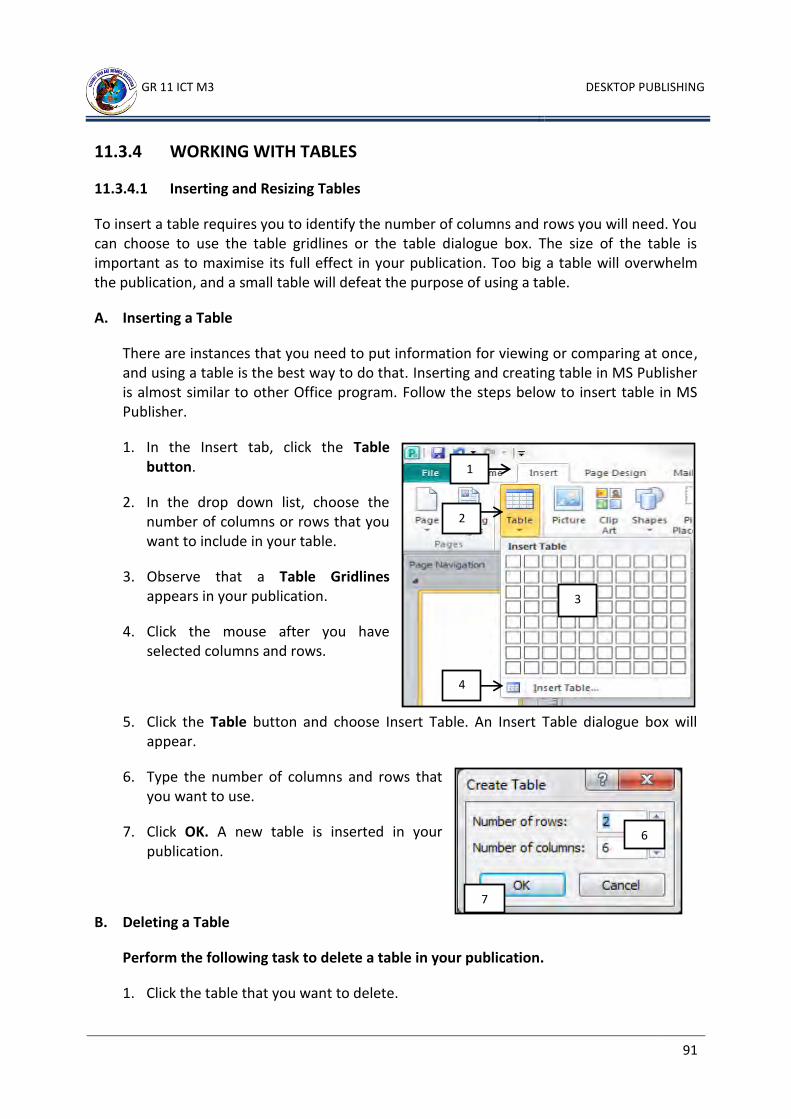
GR 11 ICT M3 DESKTOP PUBLISHING
91
11.3.4 WORKING WITH TABLES
11.3.4.1 Inserting and Resizing Tables
To insert a table requires you to identify the number of columns and rows you will need. You can choose to use the table gridlines or the table dialogue box. The size of the table is important as to maximise its full effect in your publication. Too big a table will overwhelm the publication, and a small table will defeat the purpose of using a table.
A. Inserting a Table
There are instances that you need to put information for viewing or comparing at once, and using a table is the best way to do that. Inserting and creating table in MS Publisher is almost similar to other Office program. Follow the steps below to insert table in MS Publisher.
1. In the Insert tab, click the Table button.
2. In the drop down list, choose the number of columns or rows that you want to include in your table.
3. Observe that a Table Gridlines appears in your publication.
4. Click the mouse after you have selected columns and rows.
5. Click the Table button and choose Insert Table. An Insert Table dialogue box will appear.
6. Type the number of columns and rows that you want to use.
7. Click OK. A new table is inserted in your publication.
B. Deleting a Table
Perform the following task to delete a table in your publication.
1. Click the table that you want to delete.
3
1
2
4
6
7

GR 11 ICT M3 DESKTOP PUBLISHING
92
2. Right-click the mouse and choose Delete Object.
3. The table will now be deleted.
C. Resizing Table
Perform the following task to apply resize your table.
1. Position your cursor at any corner of your table. Your mouse pointer changes shape.
2. Click, hold and drag the mouse. This will resize your table.
3. Position your cursor at any of the four sides of the table. Your mouse pointer changes shape.
4. Click, hold and drag the mouse. This will move the table to another part of the publication.
5. You can also control the size of the table by adjusting its Height and Width.
6. In the Design tab of the Table Tools, adjust the Height and Width of the table. The size of your table adjusts, depending on the height and width you set.
7. Tick the Grow to Fit Text. This will automatically adjust the height and width of the table depending on the size of the text written inside.
7
6
3
1
3

GR 11 ICT M3 DESKTOP PUBLISHING
93
Student Activity 11.3.4.1
Perform the activity below to test your skills in inserting and resizing tables. Revise Lesson 11.3.4.1 Inserting and Resizing Tables, if you are unsure of how to proceed with this activity.
1. Open a Blank Landscape Publication.
2. Insert a table with 6 columns and 15 rows.
3. Adjust the column height and width. Use the example at the next page as guide
4. Resize your table to fit the whole page.
5. Type the text inside your table.
6. Save your work as My Table 1.
Date Description Transportation/ Mileage
Lodging Others Total

GR 11 ICT M3 DESKTOP PUBLISHING
94
11.3.4.2 Adding and Deleting Rows and Columns
You might need to delete or add columns and rows, while working with your table. You can add a column or row at a time, or insert more than one column or row.
A. Add Rows and Columns
Adding columns and rows in MS Publisher is similar to that of other MS Office programs. Perform the steps below to insert columns and rows.
1. Position the cursor in any part of the table.
2. In the Layout tab of the Table Tools, choose an option from the Rows and Columns group.
3. Insert a column or row. A new column or row will be inserted depending on where the cursor is currently located.
4. Right-click the mouse in any cell of your table.
5. Click Insert and choose from the drop-down options.
6. Highlight two or more columns or rows in your table.
7. Insert a column or row using the Rows & Columns group or use the mouse shortcut.
8. New columns or rows will be inserted, depending on the number of cells you highlighted.
B. Delete Column and Rows
Adding columns and rows in MS Publisher is similar to that of other MS Office programs. Perform the steps below to insert columns and rows.
2
3
5
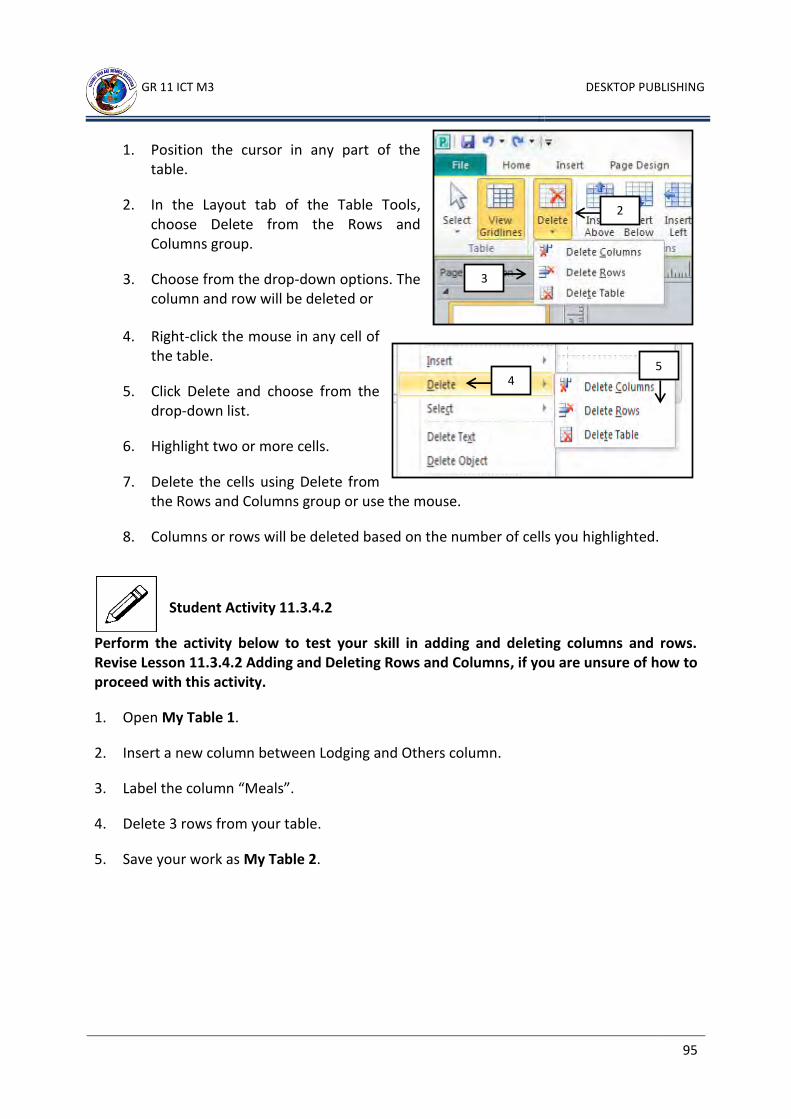
GR 11 ICT M3 DESKTOP PUBLISHING
95
2
3
4 5
1. Position the cursor in any part of the table.
2. In the Layout tab of the Table Tools, choose Delete from the Rows and Columns group.
3. Choose from the drop-down options. The column and row will be deleted or
4. Right-click the mouse in any cell of the table.
5. Click Delete and choose from the drop-down list.
6. Highlight two or more cells.
7. Delete the cells using Delete from the Rows and Columns group or use the mouse.
8. Columns or rows will be deleted based on the number of cells you highlighted.
Student Activity 11.3.4.2
Perform the activity below to test your skill in adding and deleting columns and rows. Revise Lesson 11.3.4.2 Adding and Deleting Rows and Columns, if you are unsure of how to proceed with this activity.
1. Open My Table 1.
2. Insert a new column between Lodging and Others column.
3. Label the column “Meals”.
4. Delete 3 rows from your table.
5. Save your work as My Table 2.

GR 11 ICT M3 DESKTOP PUBLISHING
96
11.3.4.3 Merging and Splitting Cell
A table is composed of cells. Cell refers to the intersection created where the column and row intersects. Merging and Splitting cells gives your table an extra appeal which a normal table does not contain.
A. Merging Cell
Merging cells involves removing the border between two or more cells and combining it as one. Follow the steps below to merge two or more cells.
1. Select the cells you want to merge.
2. Click Merge Cells located in the Layout tab of the Table Tools. The cells are now merged and combined.
B. Splitting Cell
Merged cells can be split into any number of cells you want. You can also split single cells into a number of cells. Perform the steps below to split cells.
1. Position the cursor in the cells you want to split.
2. Click Split Cells located in the Layout tab of the Table Tools.
3. The cells are now divided into the number of cells, depending on the number of cells that were merged.
2

GR 11 ICT M3 DESKTOP PUBLISHING
97
Student Activity 11.3.4.3
Perform the activity below to test your skill in merging and splitting cells. Revise Lesson 11.3.4.3 Merging and Splitting Cell, if you are unsure of how to proceed with this activity.
1. Open My Table 2.
2. Merge all the columns in Row 1.
3. Merge Columns 1 – 5 in Row 12. 13, 14 and 15. Use the example on the next page as guide.
4. Save your work as My Table 3.

GR 11 ICT M3 DESKTOP PUBLISHING
98
11.3.4.4 Modifying Text Alignment
Aligning text in column and rows refers to how the text is lined up in horizontally and/or vertically inside the cell. Aligning text in MS Publisher shares similarities with other Office program. Below, are the steps you can follow to modify text alignment.
1. Position your cursor inside the cell.
2. Click the Layout tab located in the Table Tools option.
3. Choose from the different types of alignment located in the Alignment group.
4. The text will be aligned horizontally and/or vertically across the cell.
5. You can also highlight two or more cells before changing the alignment. This will simultaneously change the alignment of all the cells at the same time.
6. Use Text Direction to change the direction of the text, as it is written inside the cell.
Student Activity 11.3.4.4
Perform the activity below to test your skill in changing text alignment. Revise Lesson 11.3.4.4 Modifying Text Alignment, if you are unsure of how to proceed with this activity.
1. Open My Table 3.
2. In Row 1, type “EXPENSE REPORT”.
3. Align the text centre horizontally and vertically across the cell.
4. Change the font format of the text in row 1.
2
6

GR 11 ICT M3 DESKTOP PUBLISHING
99
5. Add Colour Fill to your cell.
6. Save your work as My Table 4.
11.3.4.5 Modifying Cell Margins
Margins in relation to cells refer to the distance between the cell border, and the text inside the cell. You can apply cell margins to specific cell or margins of the entire table, using the steps below.
1. Highlight the entire row of your table.
2. Click Cell Margins located in the Layout Tab of the Table Tools option.
3. Choose from the different options available.
4. You can also set your own margin using the Custom Margins. The Format table dialogue box appears.
5. In the Cell Properties tab, set your margins at the Left, Right, Top and Bottom of the cells.
6. Click OK.
3
3 3
2
3
4
5
6
GR 11 ICT M3 DESKTOP PUBLISHING
100
Student Activity 11.3.4.5
Perform the activity below to test your skill in changing cells margins. Revise Lesson 11.3.4.5Modifying Cell Margins, if you are unsure of how to proceed with this activity.
1. Open My Table 4.
2. Use a Wide cell margin to Row 1.
3. Use a None for the cell margin to the rest of the rows.
4. Type a sample text inside Row 2 to see the difference.
5. Save your work as My Table 5.

GR 11 ICT M3 DESKTOP PUBLISHING
101
11.3.4.6 Applying Table Styles
After creating the table, changing the size and inserting text, the next step is to apply styles to your table. Adding borders and shading to your table adds visual appeal to your publication.
A. Table Style
MS Publisher offers readymade styles and colour to your table. Using table styles saves you the trouble of modifying your table by using the pre-set styles available. Below, are the steps to change your table styles.
1. Position your cursor in any cell of the table to make it active.
2. Click the Design tab of the Table Tools options.
3. Choose from the different table styles in the Table Formats. Click More button to display other table styles.
4. Click to select a Table Style.
B. Table Auto Format
This option displays the perfect format as well as the ideal content of the table.
1. Position your cursor in any part of the table.
2. Click the More button located in the Table Format.
3. Click Table Auto Format. A dialogue box appears.
3
3

GR 11 ICT M3 DESKTOP PUBLISHING
102
4. Choose from the Table Format available. Take time to look at the sample and the description of each table.
5. Click OK.
C. Remove Table Style Format
Removing table styles, returns the table to its original appearance. Follow the steps below to remove table style format.
1. Repeat steps 1 to 4 on using Table Auto Format.
2. Scroll up through the option and click None.
3. The table styles are now removed.
Student Activity 11.3.4.6
Perform the activity below to test your skill applying and removing table styles. Revise Lesson 11.3.4.6 Applying Table Styles, if you are unsure of how to proceed with this activity.
1. Open My Table 5.
2. Apply Table Format to your table.
3. Save your work as My Table 6.

GR 11 ICT M3 DESKTOP PUBLISHING
103
Summative Activity 11.3.4
Perform the summative activity below to test your knowledge and skills in using MS Publisher. Revise Topic 11.3.4 WORKNG WITH TABLES, if you are unsure of how to proceed with this activity.
1. Create a Multiplication and Addition Table. You normally see this at the back of your exercise books.
2. Make the table fit side by side to a blank landscape publication.
3. The first row must contain the name of the table (eg. Addition Table & Multiplication Table).
4. Fill-in the details of your tables. Change the font type, size, style and colour.
5. Modify cell margins to fit the text inside the cells.
6. Apply a table styles that best applies to the two tables.
7. Save your work as “Calculation Table”.
8. Use the sample below, as guide when creating your table.

GR 11 ICT M3 DESKTOP PUBLISHING
104
Student Activity 11.3.4.1
Below, is a sample of a table created in MS Publisher. Your work may look different from the example given below:
The following steps were done to perform the activity:
Step 1: Open a blank Landscape Publication.
Step 2: In the Insert tab, click Table. Use the Table Grid to insert rows and column. Or
Step 3: Click Insert Table. The dialogue box appears
Answers to Student Activity
2
3

GR 11 ICT M3 DESKTOP PUBLISHING
105
Step 4: Type the number of column and rows your need in the dialogue box that will appear.
Step 5: Position your mouse at the borders separating the columns and rows. Your mouse changes with an arrow pointing left and right (for adjusting column width), and arrow pointing up and down (for adjusting row height). Click, and drag the mouse to the size that you want.
Step 6: Move your mouse pointer to any corner of your table. Your mouse changes, with an arrow pointing at the direction where the table will be resized. Click, and drag the mouse to the size you want.
Step 7: Type the text inside.
Step 8: Save your work as My Table 1.
Student Activity 11.3.4.2
Below, is a sample of a table created in MS Publisher. Your work may look different from the example given below:
Adjust row height Adjust column width
3 additional rows were added
New
Column
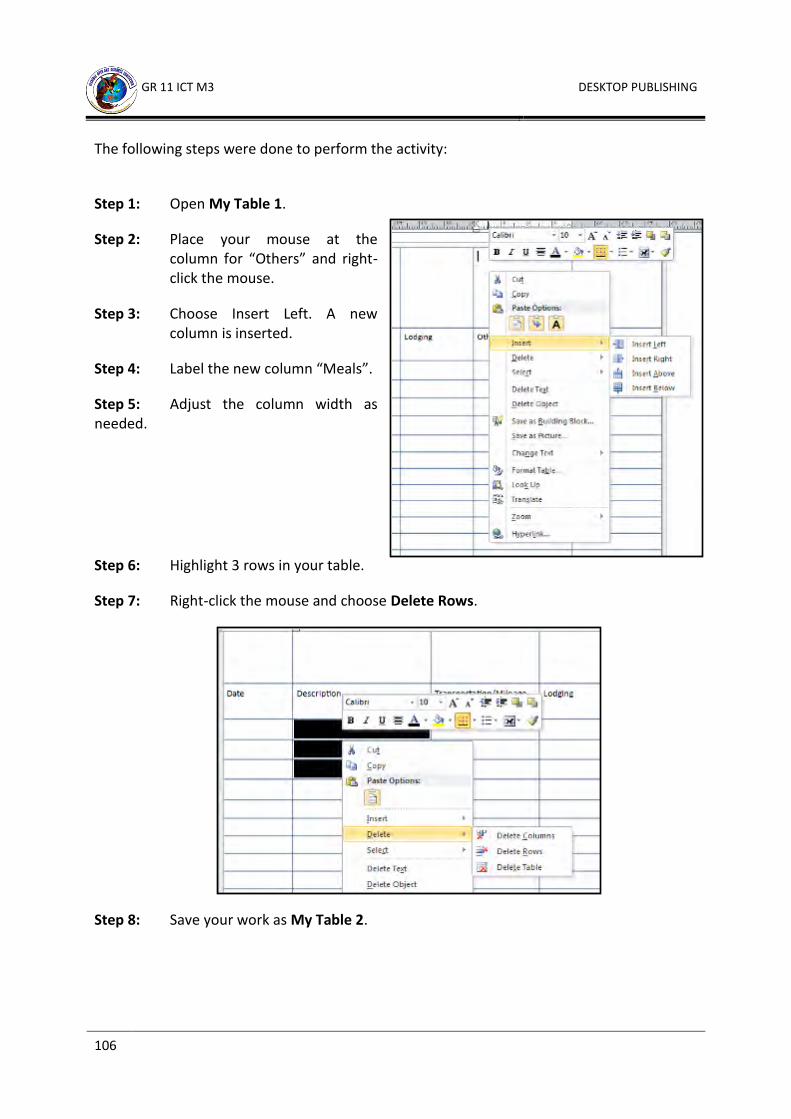
GR 11 ICT M3 DESKTOP PUBLISHING
106
The following steps were done to perform the activity:
Step 1: Open My Table 1.
Step 2: Place your mouse at the column for “Others” and right-click the mouse.
Step 3: Choose Insert Left. A new column is inserted.
Step 4: Label the new column “Meals”.
Step 5: Adjust the column width as needed.
Step 6: Highlight 3 rows in your table.
Step 7: Right-click the mouse and choose Delete Rows.
Step 8: Save your work as My Table 2.

GR 11 ICT M3 DESKTOP PUBLISHING
107
Student Activity 11.3.4.3
Below, is a sample of a table created in MS Publisher. Your work may look different from the example given below:
The following steps were done to perform the activity: Step 1: Open My Table 2.
Step 2: Highlight all the columns in Row 1.
Step 3: In the Layout tab of Table tools, click Merge Cells. The cells will be merged as one.
Step 4: Highlight columns 1 to 5 in row 12 and repeat Step 3.
Step 5: Repeat Steps 4 and 3 for row 13, 14 and 14.
Step 6: Save your work as My Table 3.

GR 11 ICT M3 DESKTOP PUBLISHING
108
Student Activity 11.3.4.4
Below, is a sample of a table created in MS Publisher. Your work may look different from the example given below:
The following steps were done to perform the activity:
Step 1: Open My Table 3.
Step 2: In Row 1, type “EXPENSE REPORT”.
Step 3: Highlight the text.
Step 4: In the Layout tab of the Table Tools, click Align Centre.

GR 11 ICT M3 DESKTOP PUBLISHING
109
Step 5: Make sure that the text is still selected. Change the font format of the text in Row 1.
Step 6: In the Design tab of Table Tool, click Fill. Choose from the available any colour.
Step 7: Save your work as My Table 4.
Student Activity 11.3.4.5
Next page is a sample of a publication containing table. Your work may look different from the example on the next page:

GR 11 ICT M3 DESKTOP PUBLISHING
110
The following steps were done to perform the activity:
Step 1: Open My Table 4.
Step 2: Highlight Row 1.
Step 2: In the Layout tab of Table tools, click Cell Margin.
Step 3: Choose Wide.
Step 4: Highlight Row 2 to 15 and repeat step 2.
Step 5: Choose None.
Step 6: Save your work as My Table 5.
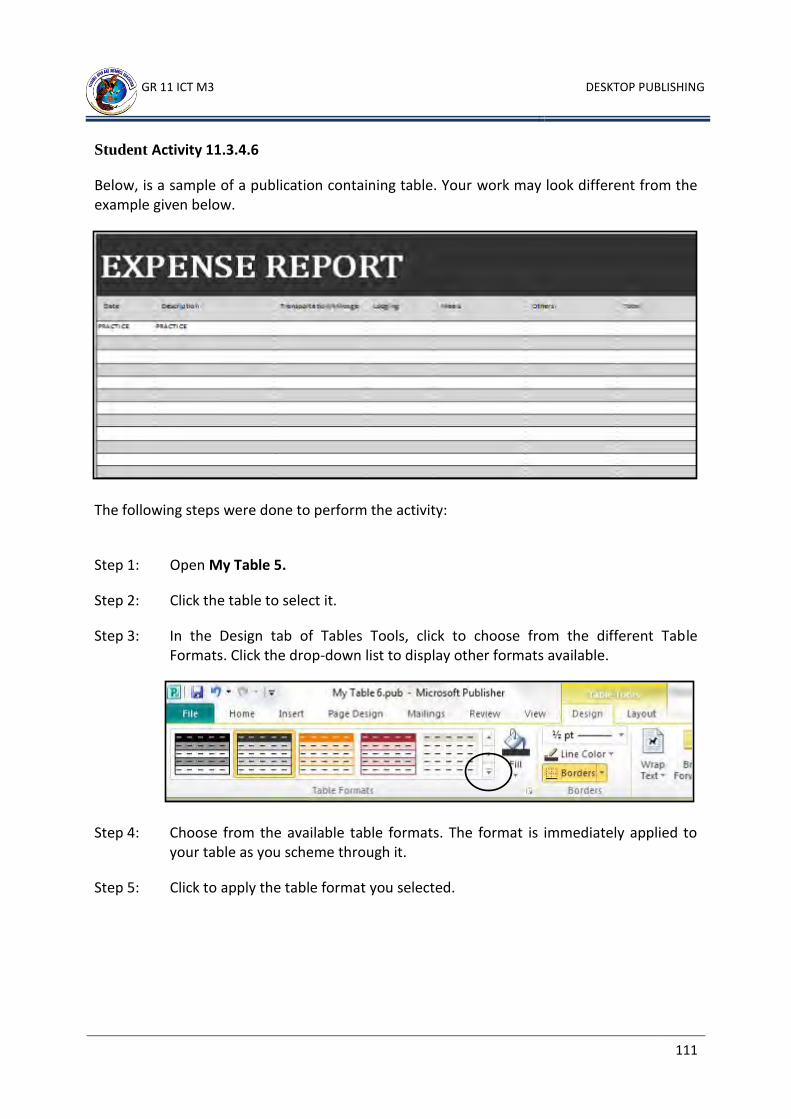
GR 11 ICT M3 DESKTOP PUBLISHING
111
Student Activity 11.3.4.6
Below, is a sample of a publication containing table. Your work may look different from the example given below.
The following steps were done to perform the activity:
Step 1: Open My Table 5.
Step 2: Click the table to select it.
Step 3: In the Design tab of Tables Tools, click to choose from the different Table Formats. Click the drop-down list to display other formats available.
Step 4: Choose from the available table formats. The format is immediately applied to your table as you scheme through it.
Step 5: Click to apply the table format you selected.

GR 11 ICT M3 DESKTOP PUBLISHING
112
Below is a sample of a publication containing table. Your work may look different from the example below:
The following steps were done to perform the activity:
Step 1: Open MS Publisher and choose a Blank Landscape Template.
Step 2: In the Insert tab, click Table.
Step 3: Use the Table Gridlines. You can also click Insert Table and type the number or columns and rows that you need.
Answer to Summative Activity 11.3.4

GR 11 ICT M3 DESKTOP PUBLISHING
113
Step 4: Highlight the cells in the table.
Step 5: Move your mouse pointer between cell border. Your mouse pointer changes shape.
Step 6: Click, hold and drag the mouse to resize the column width and row height.
Step 7: Highlight the cells in Row 1.
Step 8: In the Layout tab of Table Tools click Merge Cells.
Step 9: Type the name of the table, the text inside the cells.
Step 10: Change the font format and alignment of the text inside.
Step 11: In the Design Tab of Table Tools, choose Table Format.
Step 12: Move your mouse pointer across the options and choose a format.
Step 13: Repeat Steps 1 to 12 to create the second table.
Step 14: Save your work as Calculation Table.
GR 11 ICT M3 DESKTOP PUBLISHING
114
SUMMARY
In the world of computing, equipping oneself with the basic skills is more than necessary. The activities of today’s world are governed by computers. The ability and capability to be at par with knowledge and skills is, but then vital to be able to compete and be productive.
Desktop Publishing or MS Publisher is one of the many software applications that require attention for training. Its applications range from many uses in school, office, home and even to businesses. A know how on this application software will put a user ahead of the many, who are not capable to manipulate word processor for a beneficial result.
In Topic 1, you have learned how to open and save a new publication and a MS Publisher template. You have also become familiar with the features of MS Publisher and how it differs from other Office program. You have learned how to change the page setup of your work in preparation for printing.
Topic 2 has covered things you need to manipulate text boxes. Inserting, wrapping and using hyphenation to your text inside the text boxes were also discussed. You have also connected text boxes and made use of its text overflow features. Changing the appearance of text boxes and formatting text inside the text box were also discussed in this Topic.
Topic 3 is all about shapes and objects. You have observed similarities between text boxes and objects yet you have also seen the difference. Here you learned how to insert, resize, move and group objects. Part of the Lesson involves inserting pictures and images in your publication. You can resize, crop, insert captions, arrange captions to pictures and compress picture images.
Topic 4 is all about tables. You have inserted and resize table, as well as add and delete columns and rows. Merge and splitting cells were also part of the discussion. You have also learned to apply text alignment, apply cell margins and styles to your table.

GR 11 ICT M3 DESKTOP PUBLISHING
115
REFERENCES
Office 2010 All-In-One for Dummies, Peter Weverka. Wiley Publishing Inc. 2010
Office 2010 The Missing Manual, Nancy Conner and Matthew MacDonald, O’Reilly Press, 2010
http://techterms.com
http://dictionary.factmonster.com
http://cheyney.edu
http://desktopput.about.com
http://graphics.wikia.com

GR 11 ICT M3 DESKTOP PUBLISHING
116
GLOSSARY
Balloon A graphic device seen in comic books for showing character speech and thoughts.
Border Decorative frame that surrounds a page or objects within the page.
Call Out Are labels and could be extracted text into.
Caption Descriptive words used to describe the object.
Character Spacing Adjusts the overall spacing between character and words.
Clip Art A collection of pictures or images that can be imported into a document or another program.
Colour Scheme An arrangement or pattern of colours which are specifically designed to blend together.
Compression Used to reduce the size of one or more files.
Crop Cut out or trim unwanted portion of an image. Cropping an object means removing part of the image from the top, bottom, left and right.
Dash A short line that serves as a punctuation mark, and often represented by one or more hyphens.
Desktop Publishing A system that processes the text and graphics. It produces high-quality pages suitable for printing or in-house reproduction, using page layout software.
Drag and Drop Uses the mouse to grab and move objects such as graphics and blocks of text from one location to another on a computer.
Dropped Caps Decorative capital letters at the start of a paragraph that drops into a space created within the first few lines of the text.
Font A specific typeface of a certain size and style.
Font Scheme Defined set of fonts associated with a publication. It defines the appearance and shape of the letters, numbers or special character.
GR 11 ICT M3 DESKTOP PUBLISHING
117
Frame Rectangular areas meant for inserting graphics and text. It allows users to place objects, wherever they want to, on the page.
Graphics Anything visually displayed on a computer that is not text.
Hyphenation The ability of program to automatically hyphenate and divide words that do not fit at the end of the link.
Kerning The adjustment of space between pairs of letters to make them more visually appealing.
Mail Merge The process of taking information from a database (or a table containing information) and inserting it into a form letter.
Merge A command to create one file by combining information stored in two different locations.
Table Is a data structure that organises information into rows and columns.
Task bar It is a bar located at the bottom of the screen and contains the Start button. It usually contains shortcuts to open windows and programs.
Template A file that serves as a starting point for a new file. It is preformatted, so you can use it to create similar documents over and over again.
Text Box Is a rectangular area on the screen where you can enter text.
WordArt Is a text modifying feature such as shadows, outlines, colours, gradients, 3D that can be added to a word or phrase.

FODE SUBJECTS AND COURSE PROGRAMMES
GRADE LEVELS SUBJECTS/COURSES
Grades 7 and 8
1. English
2. Mathematics
3. Personal Development
4. Social Science
5. Science
6. Making a Living
Grades 9 and 10
1. English
2. Mathematics
3. Personal Development
4. Science
5. Social Science
6. Business Studies
7. Design and Technology- Computing
Grades 11 and 12
1. English – Applied English/Language& Literature
2. Mathematics - Mathematics A / Mathematics B
3. Science – Biology/Chemistry/Physics
4. Social Science – History/Geography/Economics
5. Personal Development
6. Business Studies
7. Information & Communication Technology
GRADES 11 & 12 COURSE PROGRAMMES
Notes: You must seek advice from your Provincial Coordinator regarding the recommended courses in each stream. Options should be discussed carefully before choosing the stream when enrolling into Grade 11. FODE will certify for the successful completion of seven subjects in Grade 12.
No Science Humanities Business
1 Applied English Language & Literature Language & Literature/Applied English
2 Mathematics A/B Mathematics A/B Mathematics A/B
3 Personal Development Personal Development Personal Development
4 Biology Biology/Physics/Chemistry Biology/Physics/Chemistry
5 Chemistry/ Physics Geography Economics/Geography/History
6 Geography/History/Economics History / Economics Business Studies
7 ICT ICT ICT
CERTIFICATE IN MATRICULATION STUDIES
No Compulsory Courses Optional Courses
1 English 1 Science Stream: Biology, Chemistry, Physics
2 English 2 Social Science Stream: Geography, Intro to Economics and Asia and the Modern World
3 Mathematics 1
4 Mathematics 2
5 History of Science & Technology
REMEMBER:
For Grades 7 and 8, you are required to do all six (6) subjects.
For Grades 9 and 10, you must complete five (5) subjects and one (1) optional to be certified. Business Studies and Design & Technology – Computing are optional.
For Grades 11 and 12, you are required to complete seven (7) out of thirteen (13) subjects to be certified. Your Provincial Coordinator or Supervisor will give you more information regarding each subject and course.
REMEMBER: You must successfully complete 8 courses: 5 compulsory and 3 optional.


FODE PROVINCIAL CENTRES CONTACTS
PC
NO.
FODE
PROVINCIAL
CENTRE
ADDRESS
PHONE/FAX
CUG
PHONES
CONTACT PERSON
CUG
PHONE
1 DARU P. O. Box 68, Daru 6459033 72228146 The Coordinator
Senior Clerk
72229047
2 KEREMA P. O. Box 86, Kerema 6481303 72228124 The Coordinator
Senior Clerk
72229049
3 CENTRAL C/- FODE HQ 3419228 72228110 The Coordinator
Senior Clerk
72229050
4 ALOTAU P. O. Box 822, Alotau 6411343 / 6419195 72228130 The Coordinator
Senior Clerk
72229051
5 POPONDETTA P. O. Box 71, Popondetta
6297160 / 6297678 72228138 The Coordinator
Senior Clerk
72229052
6 MENDI P. O. Box 237, Mendi 5491264 / 72895095
72228142 The Coordinator
Senior Clerk
72229053
7 GOROKA P. O. Box 990, Goroka 5322085 / 5322321 72228116 The Coordinator
Senior Clerk
72229054
8 KUNDIAWA P. O. Box 95, Kundiawa
5351612 72228144 The Coordinator
Senior Clerk
72229056
9 MT HAGEN P. O. Box 418, Mt. Hagen
5421194 / 5423332 72228148 The Coordinator
Senior Clerk
72229057
10 VANIMO P. O. Box 38, Vanimo 4571175 / 4571438 72228140 The Coordinator
Senior Clerk
72229060
11 WEWAK P. O. Box 583, Wewak 4562231/ 4561114 72228122 The Coordinator
Senior Clerk
72229062
12 MADANG P. O. Box 2071, Madang
4222418 72228126 The Coordinator
Senior Clerk
72229063
13 LAE P. O. Box 4969, Lae 4725508 / 4721162 72228132 The Coordinator
Senior Clerk
72229064
14 KIMBE P. O. Box 328, Kimbe 9835110 72228150 The Coordinator
Senior Clerk
72229065
15 RABAUL P. O. Box 83, Kokopo 9400314 72228118 The Coordinator
Senior Clerk
72229067
16 KAVIENG P. O. Box 284, Kavieng 9842183 72228136 The Coordinator
Senior Clerk
72229069
17 BUKA P. O. Box 154, Buka 9739838 72228108 The Coordinator
Senior Clerk
72229073
18 MANUS P. O. Box 41, Lorengau
9709251 72228128 The Coordinator
Senior Clerk
72229080
19 NCD C/- FODE HQ 3230299 Ext 26 72228134 The Coordinator
Senior Clerk
72229081
20 WABAG P. O. Box 259, Wabag 5471114 72228120 The Coordinator
Senior Clerk
72229082
21 HELA P. O. Box 63, Tari 73197115 72228141 The Coordinator
Senior Clerk
72229083
22 JIWAKA c/- FODE Hagen 72228143 The Coordinator
Senior Clerk
72229085