foot & ankle positioning
DESCRIPTION
Radiology positioning of foot & ankleTRANSCRIPT

Posi%oning of the Lower Extremi%es
p. 242-‐289

On CR/DR-‐ high kVp has no effect on contrast/brightness
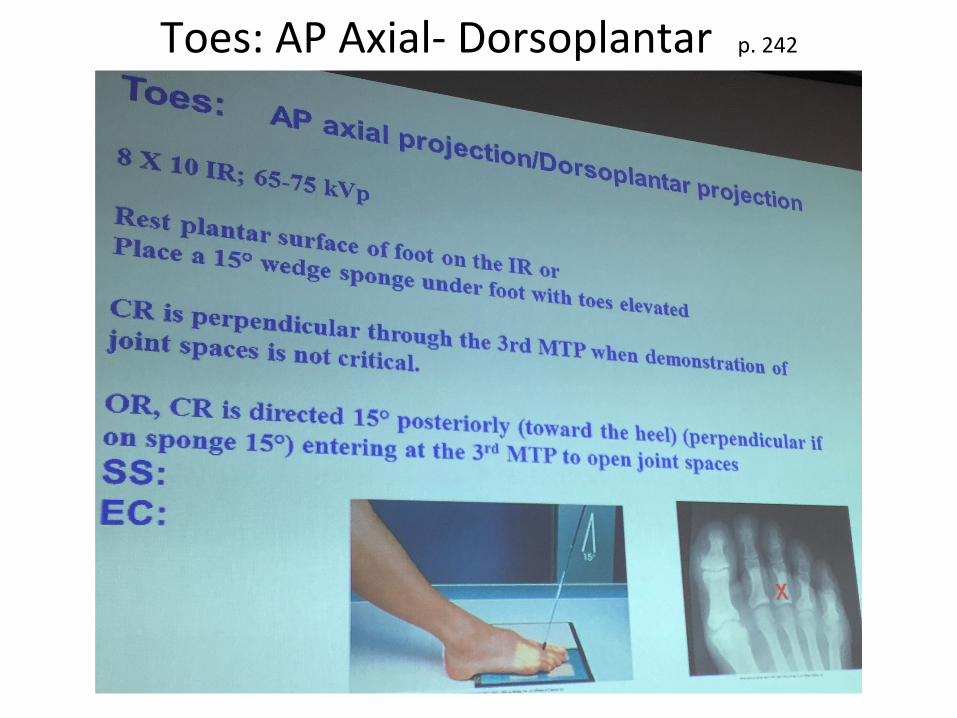
Toes: AP Axial-‐ Dorsoplantar p. 242
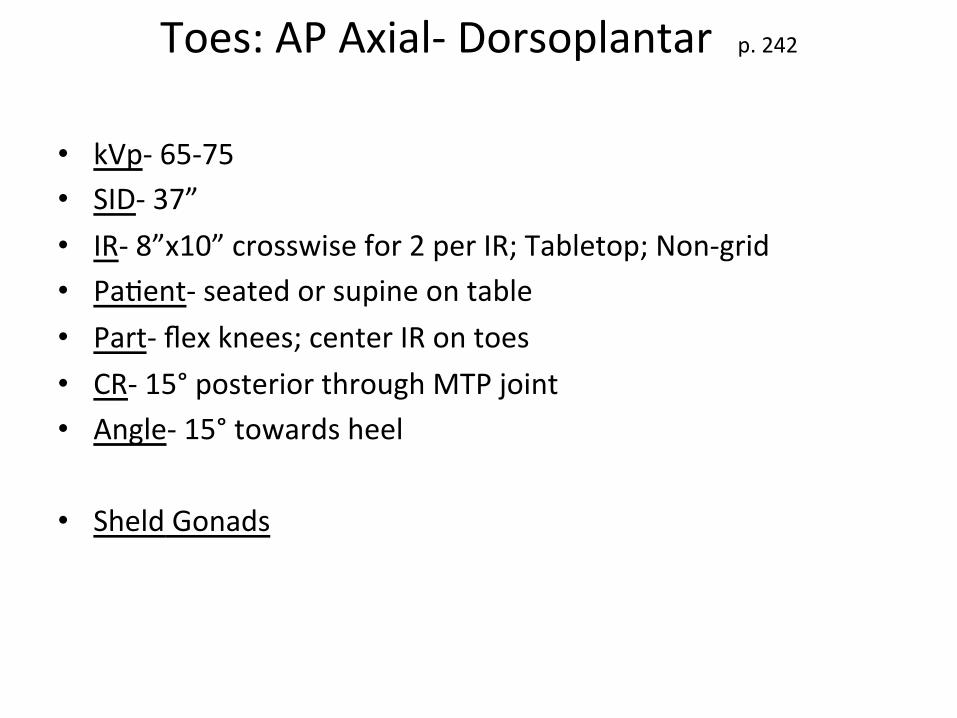
Toes: AP Axial-‐ Dorsoplantar p. 242
• kVp-‐ 65-‐75 • SID-‐ 37” • IR-‐ 8”x10” crosswise for 2 per IR; Tabletop; Non-‐grid • Pa%ent-‐ seated or supine on table • Part-‐ flex knees; center IR on toes • CR-‐ 15° posterior through MTP joint • Angle-‐ 15° towards heel • Sheld Gonads
Toes: AP Axial-‐ Dorsoplantar p. 242
Structures Shown • 14 phalanges of toes • Distal por%ons of metatarsals • IP joints
Toes: AP Axial-‐ Dorsoplantar p. 242
Evalua%on Criteria • Proper collima%on • No rota%on of phalanges; so\ %ssue width & midsha\
concavity equal on both sides • Open IP & MTP joint spaces • Toes separated • Distal ends of metatarsals • So\ %ssues & bony trabecular detail

Toes: AP Oblique-‐ Medial Rota%on p. 245

Toes: AP Oblique-‐ Medial Rota%on p. 245
• kVp-‐ 65-‐75 • SID-‐ 40” • IR-‐ 8”x10” crosswise for 2 images; Tabletop; Non-‐grid • Pa%ent-‐ supine or seated on table; flex knee; sole of foot
res%ng on table • Part-‐ medially rotate lower leg & foot; plantar surface at
30°-‐45° from IR • CR-‐ perpendicular; enter 3rd MTP joint • Sheld Gonads
Toes: AP Oblique-‐ Medial Rota%on p. 245
Structures Shown • Toes • Distal por%on of metatarsals rotated medially

Toes: AP Oblique-‐ Medial Rota%on p. 245
Evalua%on Criteria • Proper collima%on • All phalanges • Oblique toes; more so\ %ssue width & midsha\ concavity on
side away from IR • Open IP & 2nd-‐5th MTP joint spaces • 1st MTP joint (not always opened) • Toes separated • Distal ends of metatarsals • So\ %ssue & bony trabecular detail

Toes: Lateral (Mediolateral/Lateromedial) p. 246-‐249
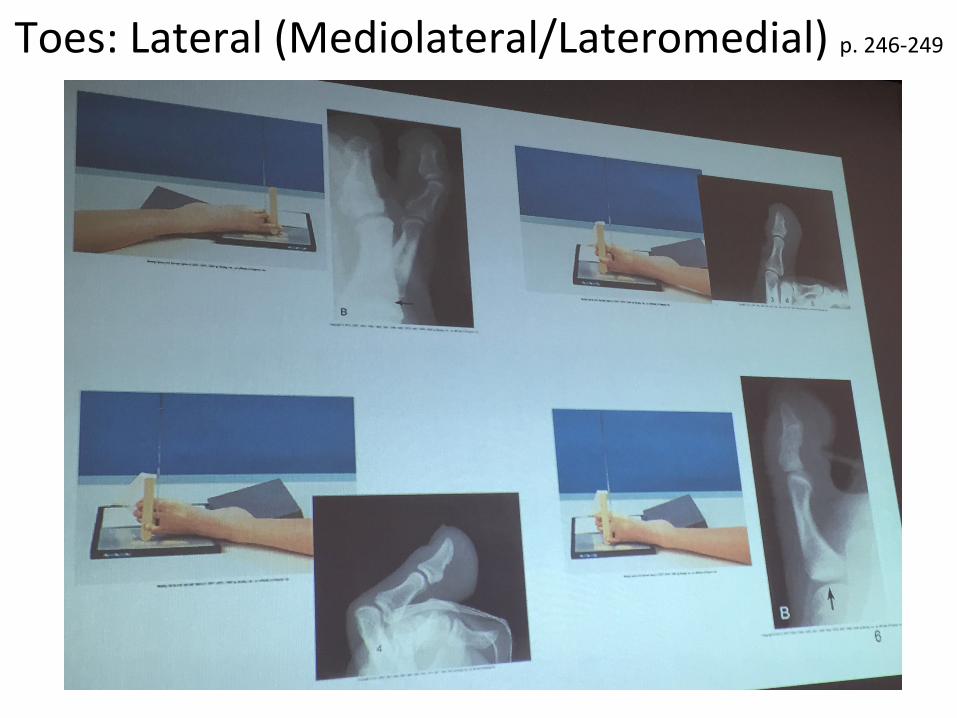
Toes: Lateral (Mediolateral/Lateromedial) p. 246-‐249
Toes: Lateral (Mediolateral/Lateromedial) p. 246-‐249
• kVp-‐ 65-‐75 • SID-‐ 40” • IR-‐ 8”x10” crosswise; Tabletop; Non-‐grid • Pa%ent-‐ lateral recumbent; separate affected toe • Part-‐ (1st-‐2nd digits) place on unaffected side; toe in true
lateral; (3rd-‐5th digits) place on affected side; toes in true lateral; support heel
• Manipulate toes only if no deformity is apparent • CR-‐ center through IP joint of hallux or PIP joints • Sheld Gonads
Toes: Lateral (Mediolateral/Lateromedial) p. 246-‐249
Structures Shown • Lateral projec%on of the phalanges • IP ar%cula%ons projected free of other toes
Toes: Lateral (Mediolateral/Lateromedial) p. 246-‐249
Evalua%on Criteria • Proper collima%on • Phalanges in profile (toenails lateral) • Phalanx without superimposi%on of toes (at least show
proximal phalanx) • Open IP joint spaces; MTP joints overlap • So\ %ssue & bony trabecular detail

Sesamoids: Tangen%al-‐ Lewis Method p. 250-‐251

Sesamoids: Tangen%al-‐ Lewis Method p. 250-‐251
• kVp-‐ 65-‐75 • SID-‐ 40” • IR-‐ 8”x10” crosswise; Tabletop; Non-‐grid • Pa%ent-‐ prone on table; elevate ankle for stability • Part-‐ dorsiflex foot & rest toe on table; ball of foot
perpendicular to horizontal plane; center IR to 2nd metatarsal • CR-‐ perpendicular & tangen%al to 1st MTP • Sheld Gonads

Sesamoids: Tangen%al-‐ Lewis Method p. 250-‐251
Structures Shown • Tangen%al projec%on of metatarsal head in profile • Sesamoid bones
Sesamoids: Tangen%al-‐ Lewis Method p. 250-‐251
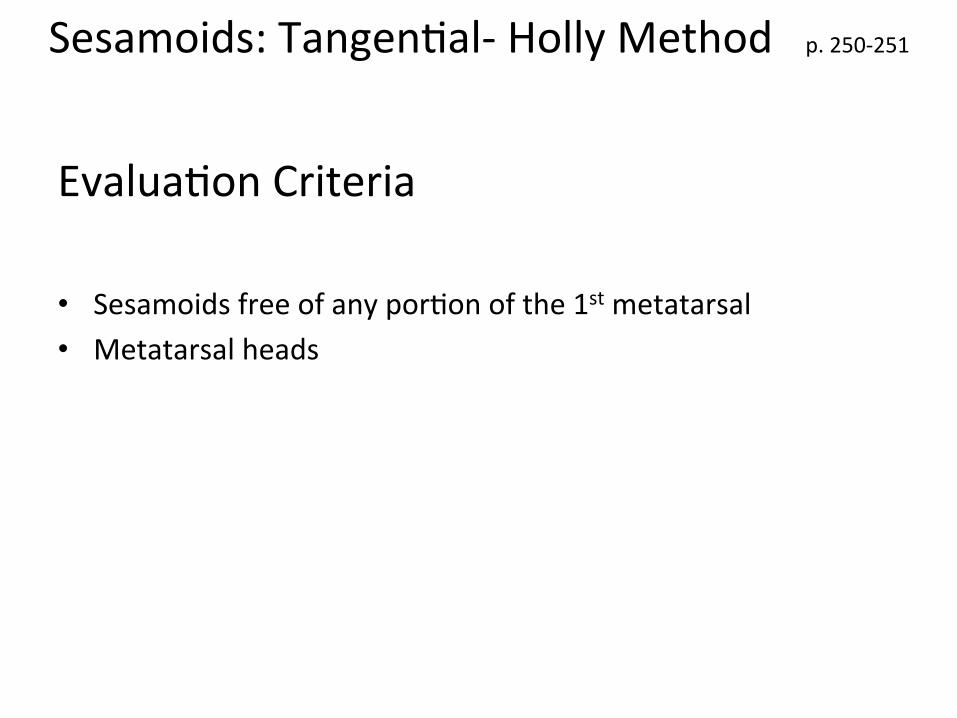
Evalua%on Criteria • Sesamoids free of any por%on of the 1st metatarsal • Metatarsal heads
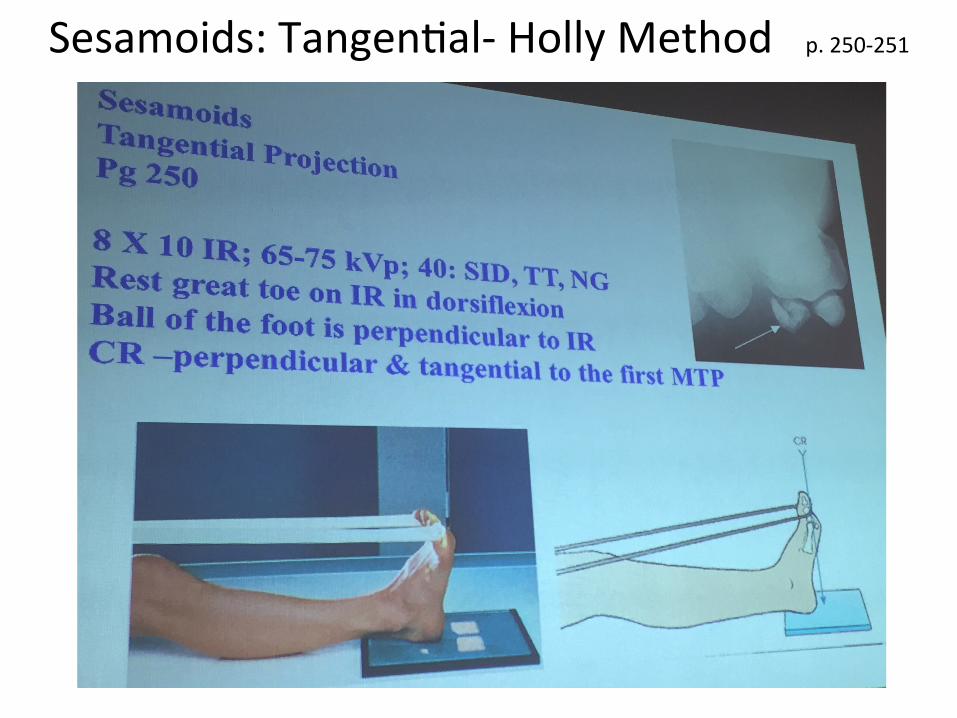
Sesamoids: Tangen%al-‐ Holly Method p. 250-‐251

Sesamoids: Tangen%al-‐ Holly Method p. 250-‐251
• kVp-‐ 65-‐75 • SID-‐ 40” • IR-‐ 8”x10” crosswise; Tabletop; Non-‐grid • Pa%ent-‐ seated on table; foot dorsiflexed • Part-‐ medial border is ver%cal; plantar surface at 75° of IR;
hold toes in flexed posi%on with gauze • CR-‐ perpendicular to head of 1st metatarsal • Sheld Gonads
Sesamoids: Tangen%al-‐ Holly Method p. 250-‐251
Structures Shown • Tangen%al projec%on of metatarsal head in profile • Sesamoid bones
Sesamoids: Tangen%al-‐ Holly Method p. 250-‐251
Evalua%on Criteria • Sesamoids free of any por%on of the 1st metatarsal • Metatarsal heads
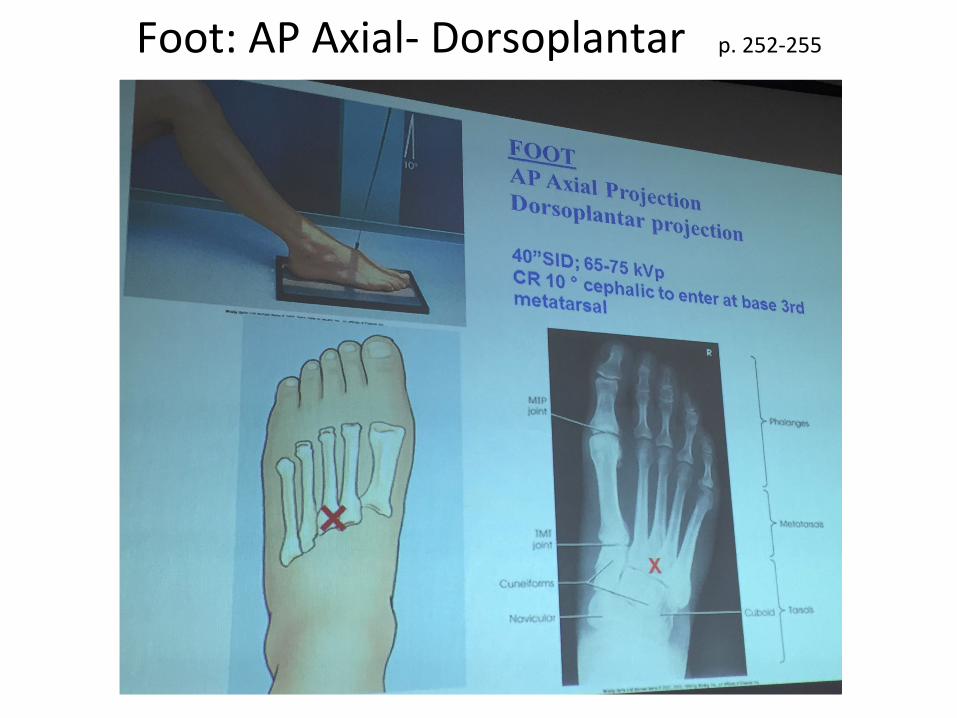
Foot: AP Axial-‐ Dorsoplantar p. 252-‐255
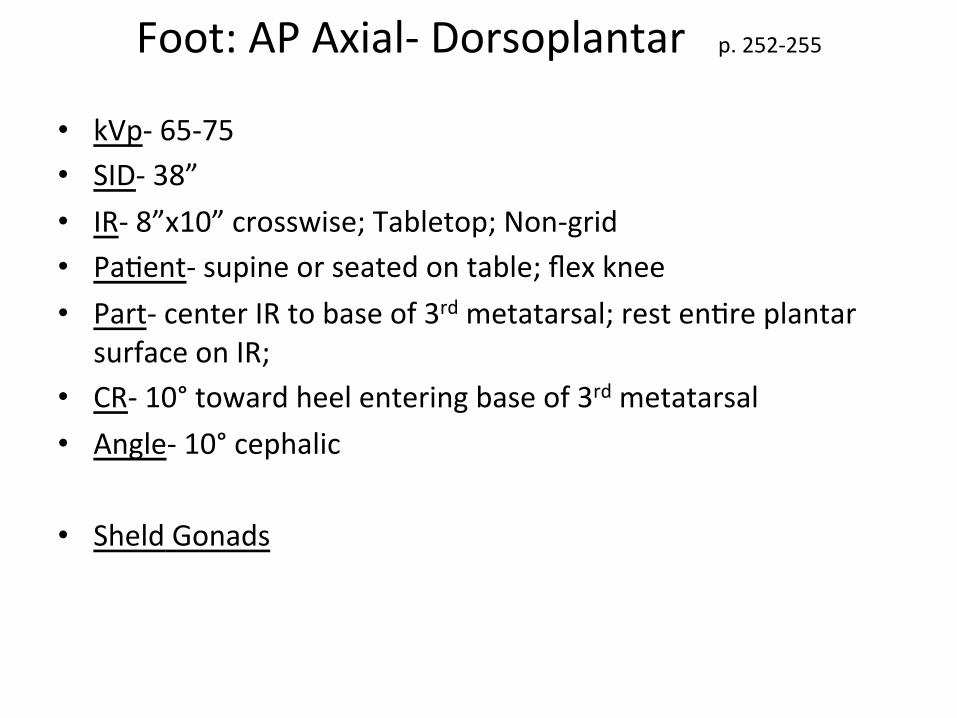
Foot: AP Axial-‐ Dorsoplantar p. 252-‐255
• kVp-‐ 65-‐75 • SID-‐ 38” • IR-‐ 8”x10” crosswise; Tabletop; Non-‐grid • Pa%ent-‐ supine or seated on table; flex knee • Part-‐ center IR to base of 3rd metatarsal; rest en%re plantar
surface on IR; • CR-‐ 10° toward heel entering base of 3rd metatarsal • Angle-‐ 10° cephalic • Sheld Gonads

Foot: AP Axial-‐ Dorsoplantar p. 252-‐255
Structures Shown • AP projec%on of tarsals anterior to talus, metatarsals, &
phalanges • Used for localizing foreign bodies & determine the loca%on of
fragments in fractures of the metatarsals & anterior tarsals, & for performing general surveys of the bones of the foot
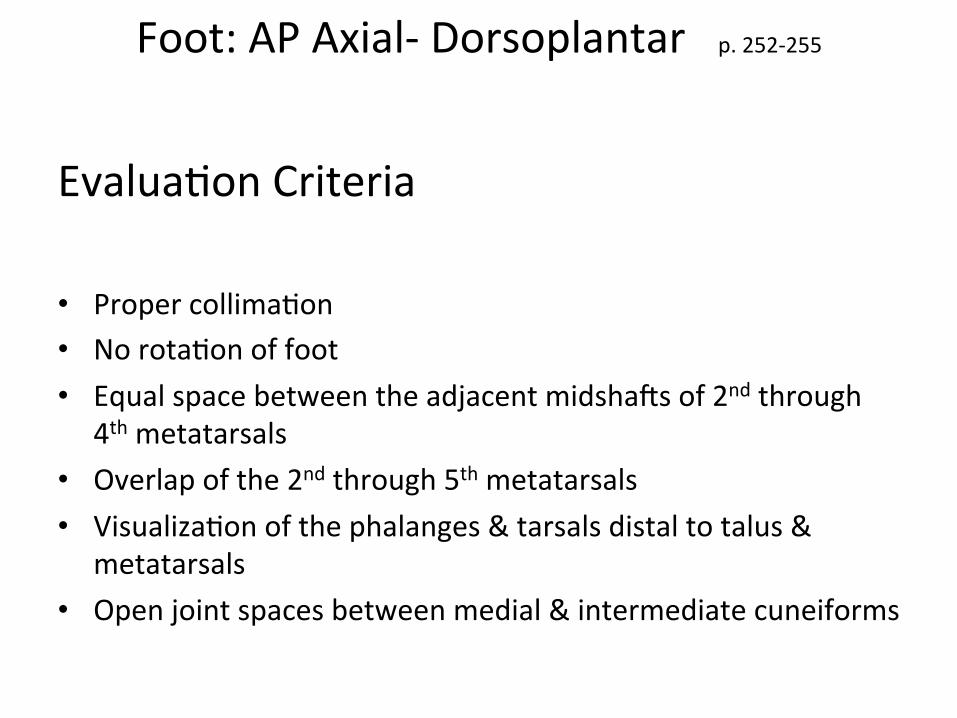
Foot: AP Axial-‐ Dorsoplantar p. 252-‐255
Evalua%on Criteria • Proper collima%on • No rota%on of foot • Equal space between the adjacent midsha\s of 2nd through
4th metatarsals • Overlap of the 2nd through 5th metatarsals • Visualiza%on of the phalanges & tarsals distal to talus &
metatarsals • Open joint spaces between medial & intermediate cuneiforms

Foot: AP Oblique-‐ Medial Rota%on p. 256-‐257
Foot: AP Oblique-‐ Medial Rota%on p. 256-‐257
• kVp-‐ 65-‐75 • SID-‐ 40” • IR-‐ 10”x12” lengthwise; Tabletop; Non-‐grid • Pa%ent-‐ supine or seated on table; flex knee • Part-‐ IR under foot; rotate leg medially; plantar surface 30°
from IR (or lateral cuneiform is thrown over other cuneiforms)
• CR-‐ perpendicular to base of 3rd metatarsal • Sheld Gonads
Foot: AP Oblique-‐ Medial Rota%on p. 256-‐257
Structures Shown • Shows interspaces between: cuboid & calcaneus, cuboid &
4th/5th metatarsals, cuboid & lateral cuneiform, & talus & navicular
• Cuboid in profile • Sinus tarsi

Foot: AP Oblique-‐ Medial Rota%on p. 256-‐257
Evalua%on Criteria • Proper collima%on • 3rd-‐5th metatarsals free of superimposi%on • Lateral tarsals with less superimposi%on than AP • Lateral TMT & intertarsal joints • Sinus tarsi • Tuberosity of 5th metatarsal • Bases of 1st & 2nd metatarsals superimposed on medial &
intermediate cuneiforms • Equal space between sha\s of 2nd-‐5th metatarsals • Sufficient density to show phalanges, metatarsals, & tarsals
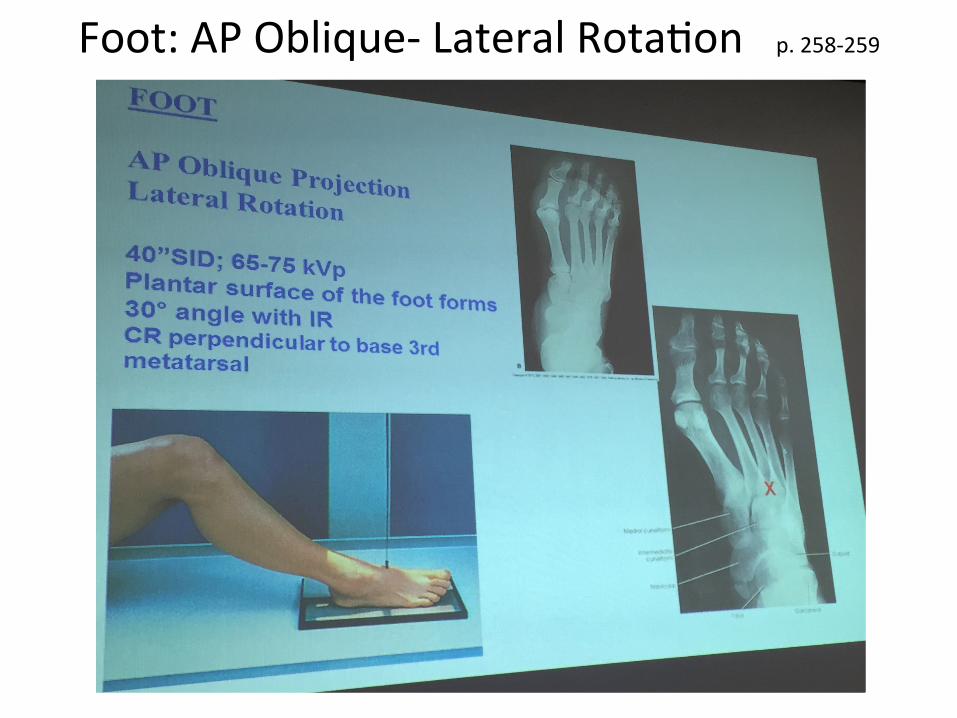
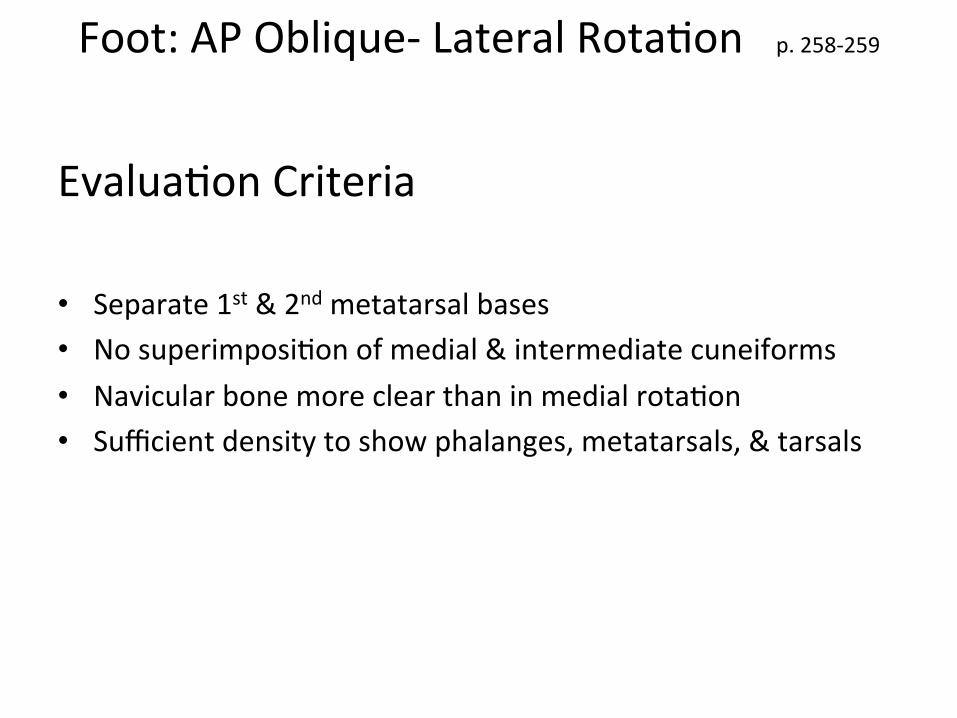
Foot: AP Oblique-‐ Lateral Rota%on p. 258-‐259
Foot: AP Oblique-‐ Lateral Rota%on p. 258-‐259
• kVp-‐ 65-‐75 • SID-‐ 40” • IR-‐ 10”x12” lengthwise; Tabletop; Non-‐grid • Pa%ent-‐ supine on table; flex knee • Part-‐ IR under foot; rotate leg lateral so plantar surface is 30°
from IR • CR-‐ perpendicular to base of 3rd metatarsal • Sheld Gonads

Foot: AP Oblique-‐ Lateral Rota%on p. 258-‐259
Structures Shown • Interspaces between the 1st & 2nd metatarsals • Space between the medial & intermediate cuneiforms
Foot: AP Oblique-‐ Lateral Rota%on p. 258-‐259
Evalua%on Criteria • Separate 1st & 2nd metatarsal bases • No superimposi%on of medial & intermediate cuneiforms • Navicular bone more clear than in medial rota%on • Sufficient density to show phalanges, metatarsals, & tarsals

Foot: Mediolateral p. 260
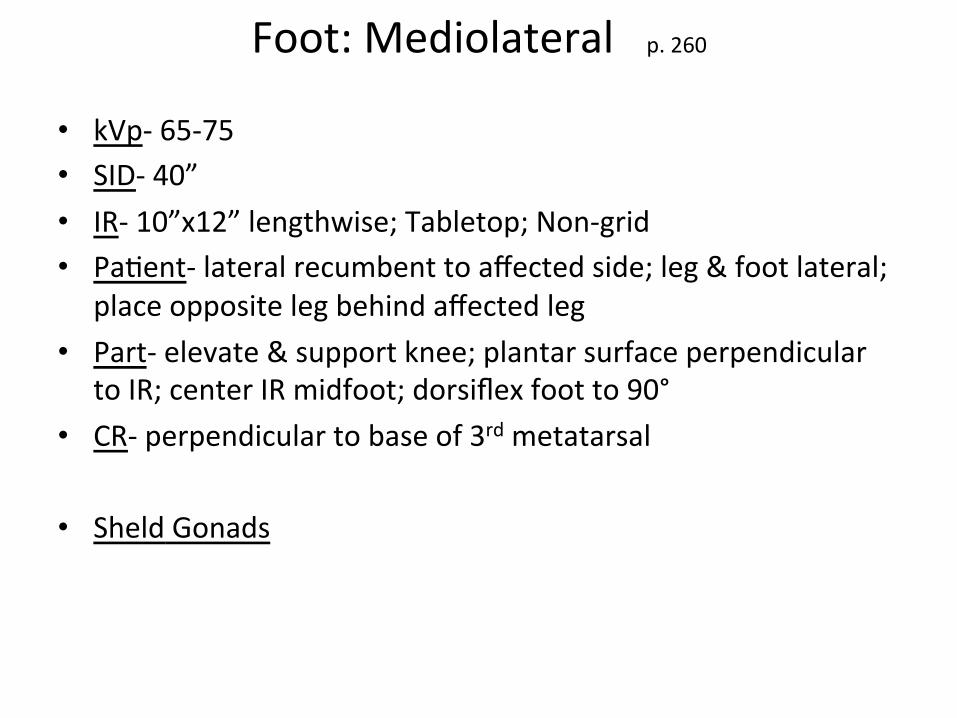
Foot: Mediolateral p. 260
• kVp-‐ 65-‐75 • SID-‐ 40” • IR-‐ 10”x12” lengthwise; Tabletop; Non-‐grid • Pa%ent-‐ lateral recumbent to affected side; leg & foot lateral;
place opposite leg behind affected leg • Part-‐ elevate & support knee; plantar surface perpendicular
to IR; center IR midfoot; dorsiflex foot to 90° • CR-‐ perpendicular to base of 3rd metatarsal • Sheld Gonads
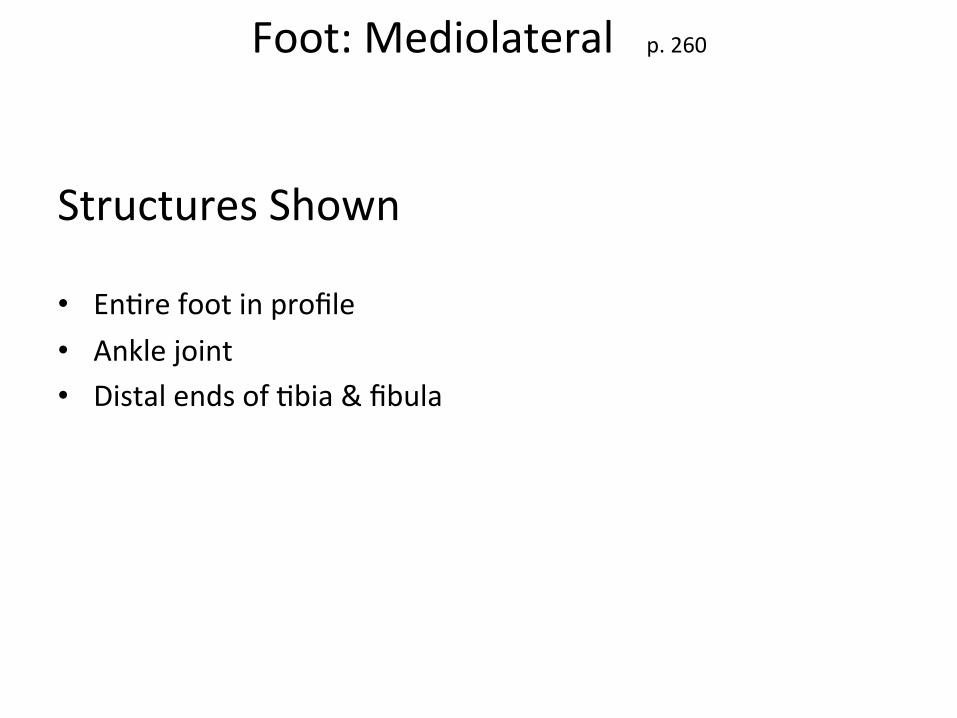
Foot: Mediolateral p. 260
Structures Shown • En%re foot in profile • Ankle joint • Distal ends of %bia & fibula
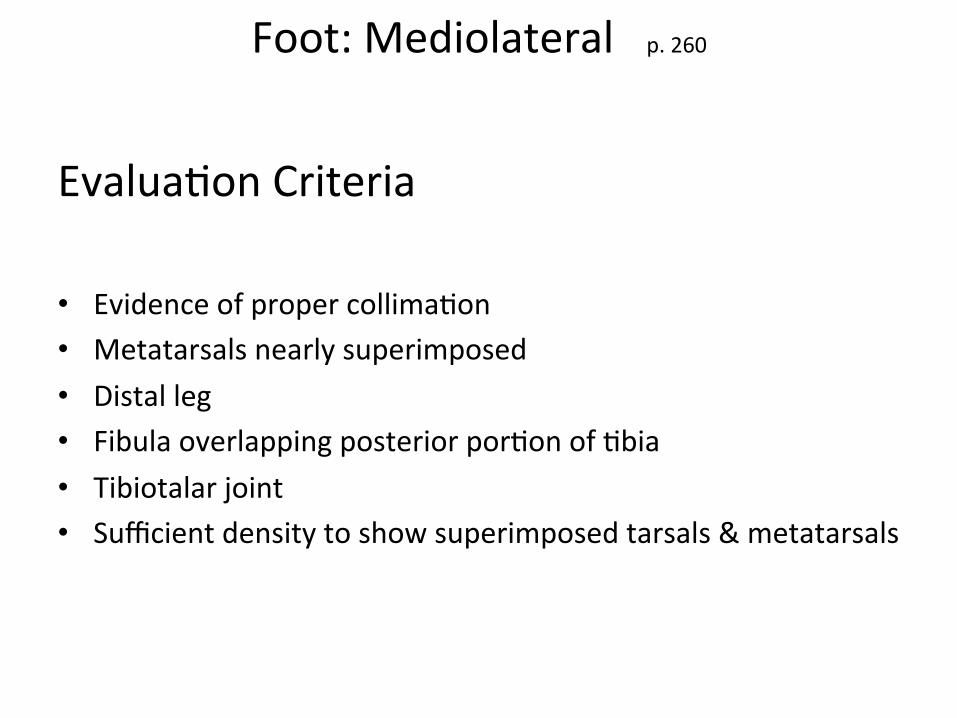
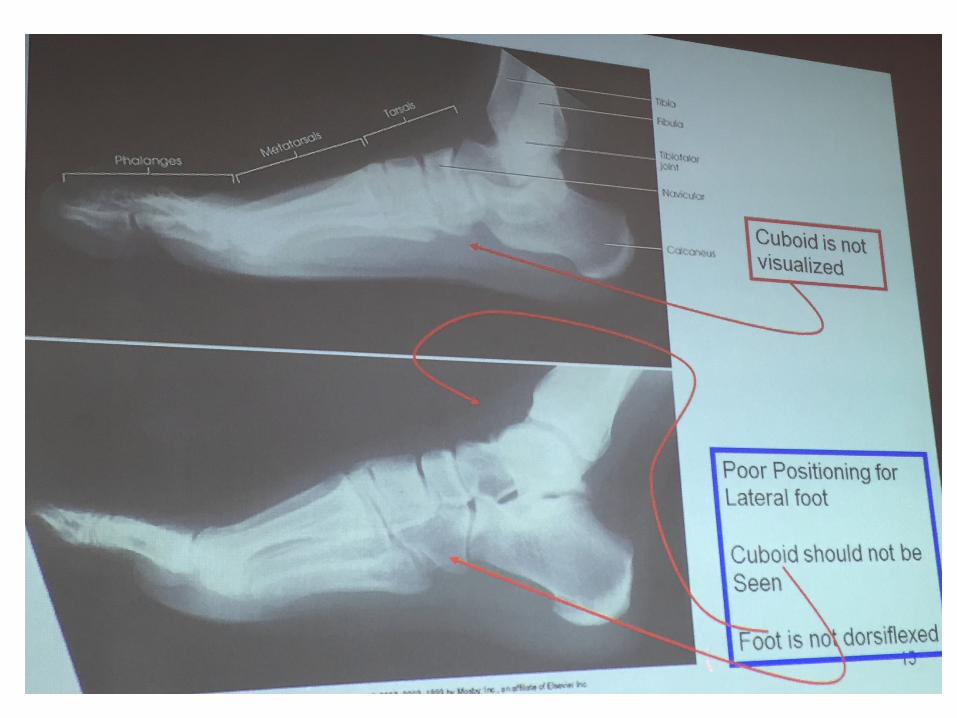
Foot: Mediolateral p. 260
Evalua%on Criteria • Evidence of proper collima%on • Metatarsals nearly superimposed • Distal leg • Fibula overlapping posterior por%on of %bia • Tibiotalar joint • Sufficient density to show superimposed tarsals & metatarsals
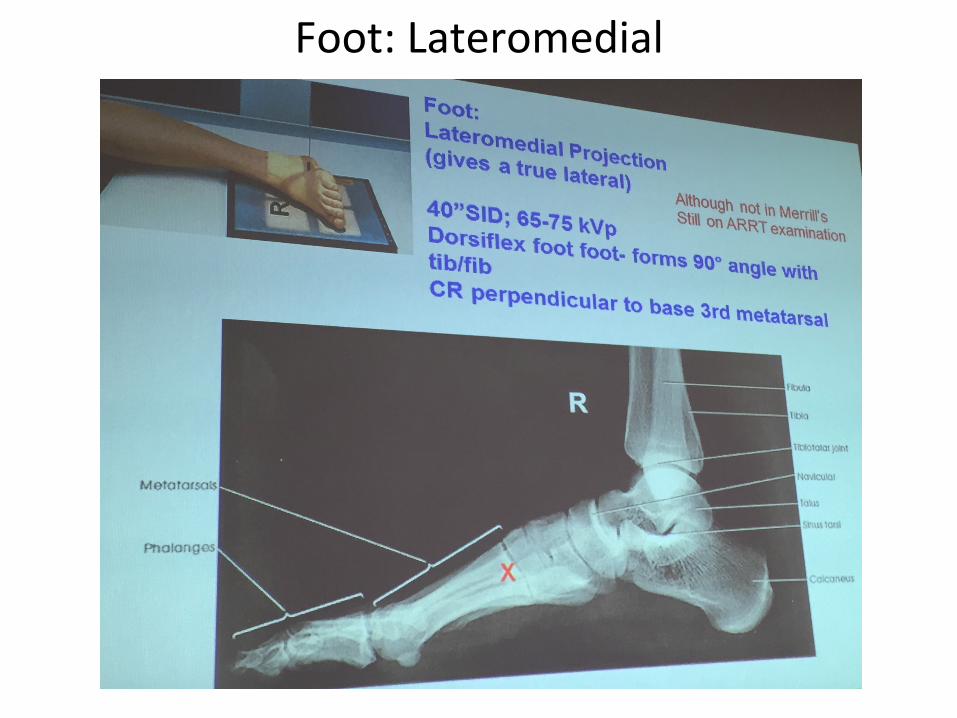
Foot: Lateromedial

Foot: Lateromedial
• kVp-‐ 65-‐75 • SID-‐ 40” • IR-‐ 10”x12” lengthwise; Tabletop; Non-‐grid • Pa%ent-‐ lateral recumbent on unaffected side • Part-‐ dorsiflex foot to 90°; support knee; • CR-‐ perpendicular to base of 3rd metatarsal • Gives true lateral • Sheld Gonads
Foot: Lateromedial
Structures Shown • En%re foot in profile • Ankle joint • Distal ends of %bia & fibula
Foot: Lateromedial
Evalua%on Criteria • Evidence of proper collima%on • Metatarsals superimposed • Distal leg • Fibula overlapping posterior por%on of %bia • Sufficient density to show superimposed tarsals & metatarsals

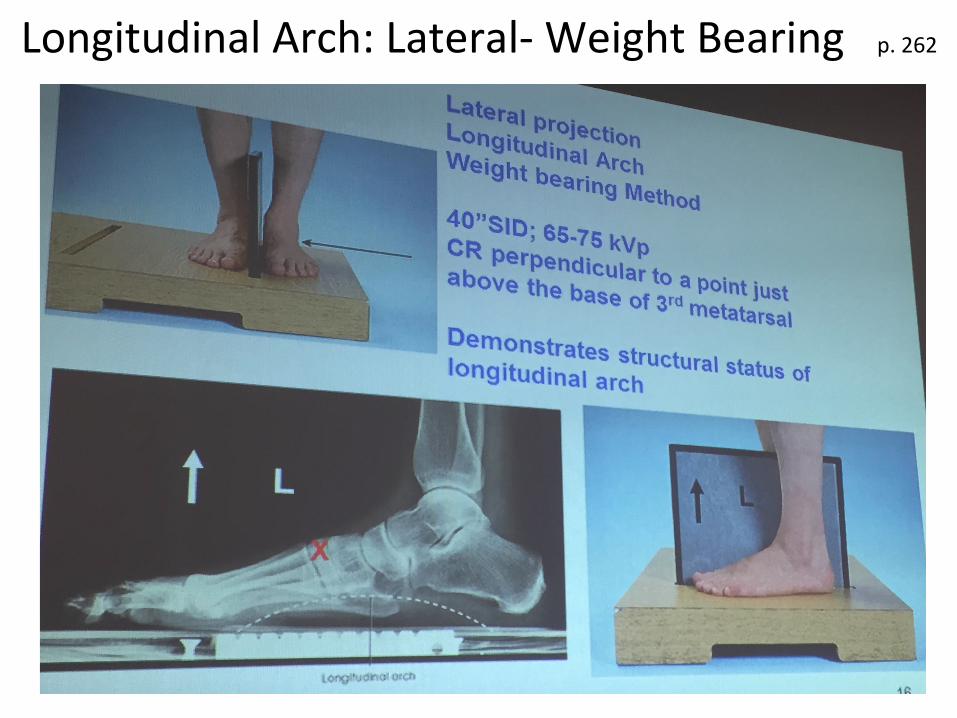
Longitudinal Arch: Lateral-‐ Weight Bearing p. 262
Longitudinal Arch: Lateral-‐ Weight Bearing p. 262
• kVp-‐ 65-‐75 • SID-‐ 40” • IR-‐ 10”x12” lengthwise; Tabletop; Non-‐grid • Pa%ent-‐ upright in natural posi%on; elevate feet to level of
tube; may need to use mobile unit • Part-‐ place IR in groove or between blocks; one foot on either
side of IR; weight distributed equally; center IR to base of 3rd metatarsal; a\er exposure replace IR to do other foot
• CR-‐ perpendicular to point just above base of 3rd metatarsal • Sheld Gonads
Longitudinal Arch: Lateral-‐ Weight Bearing p. 262
Structures Shown • Lateromedial projec%on of bones of foot with weight-‐bearing • Used to show structural status of the longitudinal arch • Right & le\ sides are examined for comparison

Longitudinal Arch: Lateral-‐ Weight Bearing p. 262
Evalua%on Criteria • Superimposed plantar surfaces of metatarsal heads • En%re foot & distal leg • Fibula overlapping the posterior por%on of %bia • Sufficient density to visualize superimposed tarsals &
metatarsals

Longitudinal Arch: AP Axial-‐ Weight Bearing p. 264
Longitudinal Arch: AP Axial-‐ Weight Bearing p. 264
• kVp-‐ 65-‐75 • SID-‐ 38” • IR-‐ 10”x12” lengthwise; Tabletop; Non-‐grid • Pa%ent-‐ standing-‐upright posi%on • Part-‐ stand with both feet on IR; mark both sides; weight
distributed evenly; may hold tube for stability • CR-‐ 10° toward heel; posi%oned between feet at level of base
of 3rd metatarsal • Angle-‐ 10° towards heel • Sheld Gonads

Longitudinal Arch: AP Axial-‐ Weight Bearing p. 264
Structures Shown • Weight-‐bearing AP axial of both feet to permit accurate
evalua%on/comparison of the tarsals & metatarsals
Longitudinal Arch: AP Axial-‐ Weight Bearing p. 264
Evalua%on Criteria • Both feet centered on one image • Phalanges, metatarsals, & distal tarsals • Correct right & le\ marker placement & weight-‐bearing
marker • Correct exposure technique to visualize all components
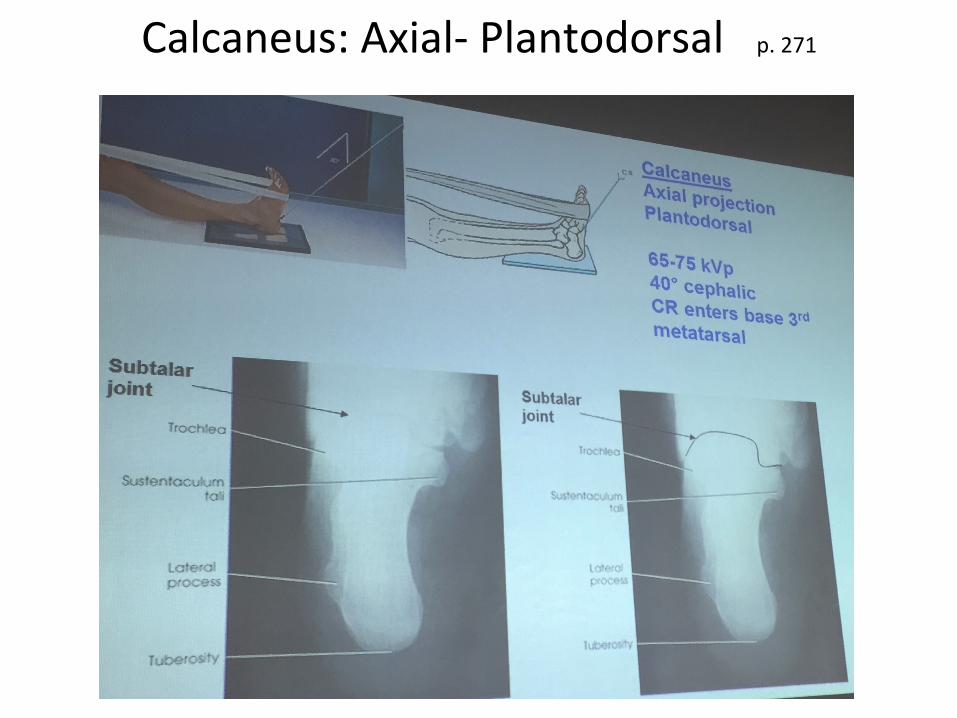
Calcaneus: Axial-‐ Plantodorsal p. 271

Calcaneus: Axial-‐ Plantodorsal p. 271
• kVp-‐ 65-‐75 • SID-‐ 32” • IR-‐ 8”x10”; Tabletop; Non-‐grid • Pa%ent-‐ supine or seated on table; legs fully extended • Part-‐ center IR to midline of ankle; hold foot dorsiflexed with
gauze; if ankle can’t be dorsiflexed enough: elevate foot • CR-‐ enters base of 3rd metatarsal; directed to midpoint of IR
at cephalic 40° angle • Angle-‐ 40° cephalic • Sheld Gonads

Calcaneus: Axial-‐ Plantodorsal p. 271
Structures Shown • Axial projec%on of calcaneus

Calcaneus: Axial-‐ Plantodorsal p. 271
Evalua%on Criteria • Proper collima%on • Calcaneus & subtalar joint • No rota%on of calcaneus-‐ 1st & 5th metatarsals not projected
to sides of foot • Anterior por%on of calcaneus without excessive density over
posterior por%on, or 2 images may be needed for 2 regions of thickness

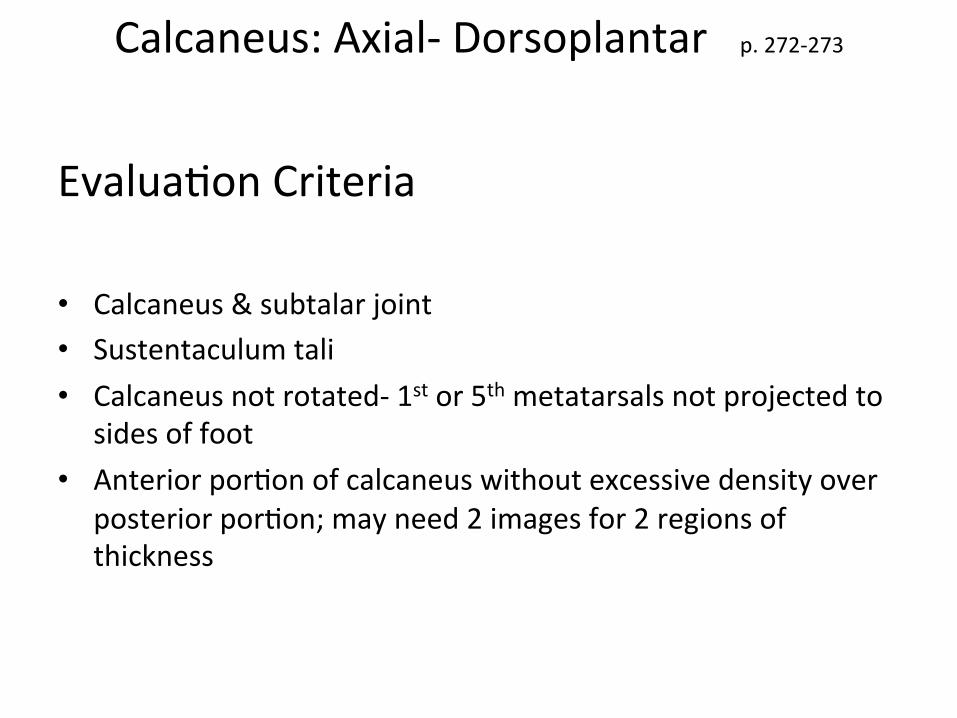
Calcaneus: Axial-‐ Dorsoplantar p. 272-‐273
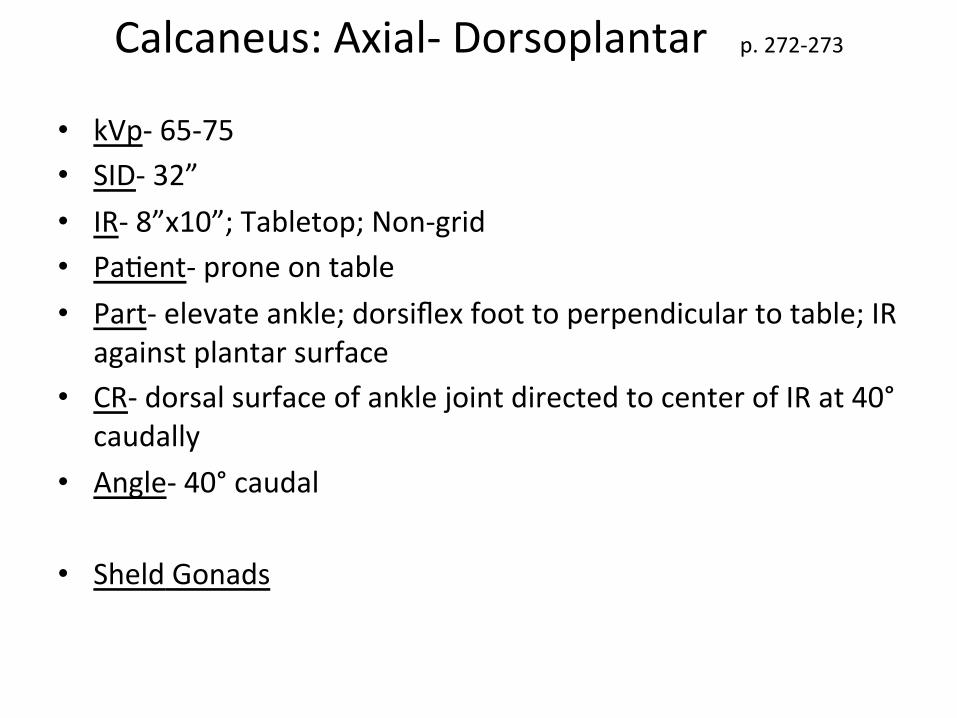
Calcaneus: Axial-‐ Dorsoplantar p. 272-‐273
• kVp-‐ 65-‐75 • SID-‐ 32” • IR-‐ 8”x10”; Tabletop; Non-‐grid • Pa%ent-‐ prone on table • Part-‐ elevate ankle; dorsiflex foot to perpendicular to table; IR
against plantar surface • CR-‐ dorsal surface of ankle joint directed to center of IR at 40°
caudally • Angle-‐ 40° caudal • Sheld Gonads

Calcaneus: Axial-‐ Dorsoplantar p. 272-‐273
Structures Shown • Axial projec%on of calcaneus & subtalar joint • CT is o\en used
Calcaneus: Axial-‐ Dorsoplantar p. 272-‐273
Evalua%on Criteria • Calcaneus & subtalar joint • Sustentaculum tali • Calcaneus not rotated-‐ 1st or 5th metatarsals not projected to
sides of foot • Anterior por%on of calcaneus without excessive density over
posterior por%on; may need 2 images for 2 regions of thickness
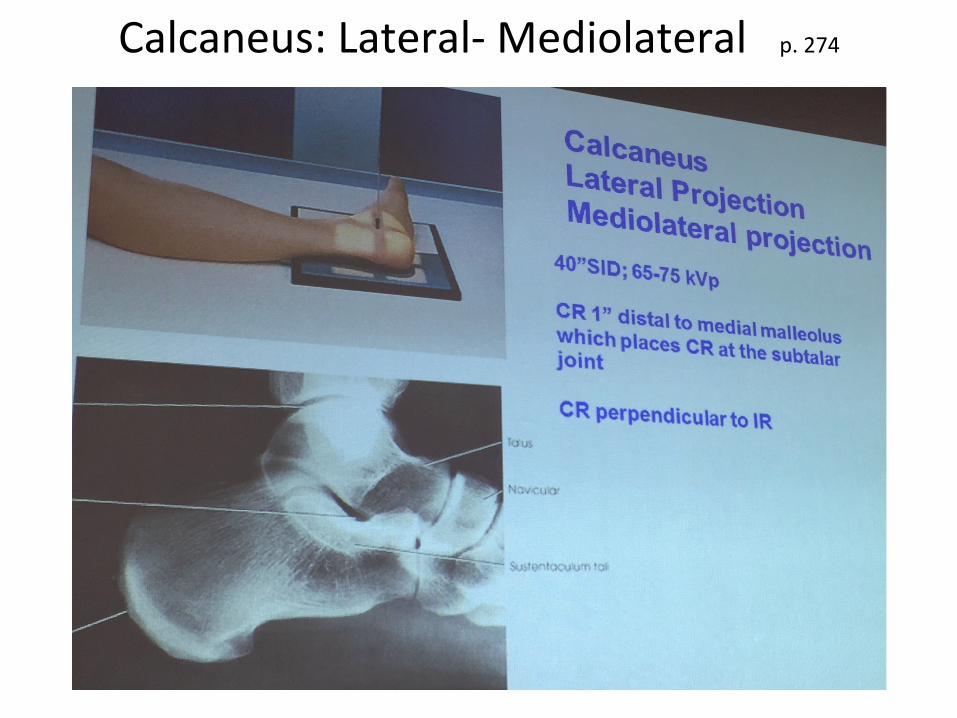
Calcaneus: Lateral-‐ Mediolateral p. 274
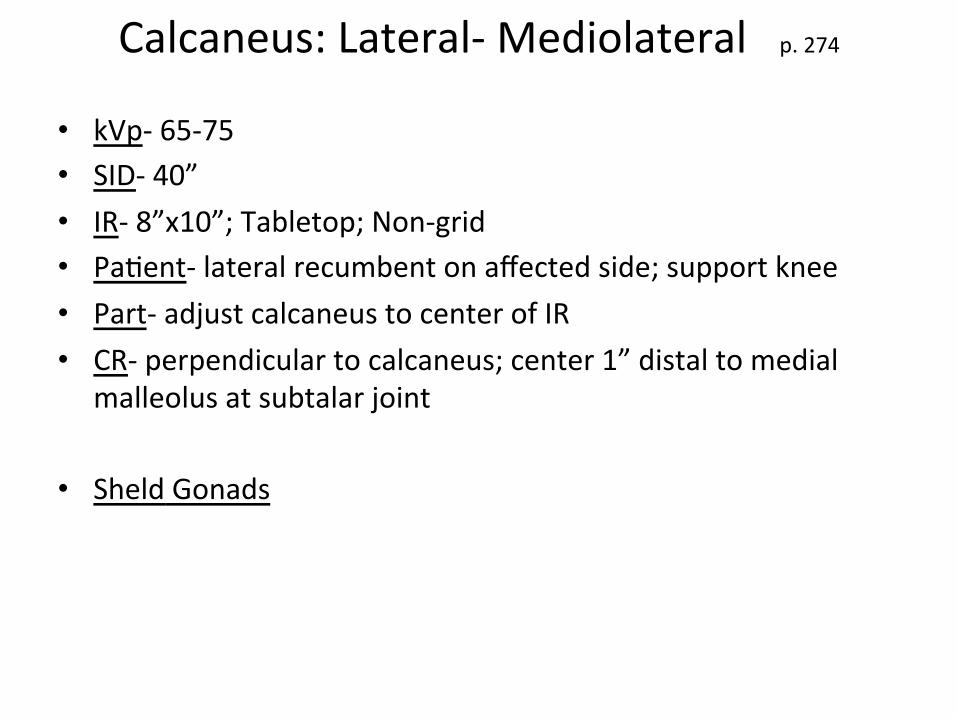
Calcaneus: Lateral-‐ Mediolateral p. 274
• kVp-‐ 65-‐75 • SID-‐ 40” • IR-‐ 8”x10”; Tabletop; Non-‐grid • Pa%ent-‐ lateral recumbent on affected side; support knee • Part-‐ adjust calcaneus to center of IR • CR-‐ perpendicular to calcaneus; center 1” distal to medial
malleolus at subtalar joint • Sheld Gonads
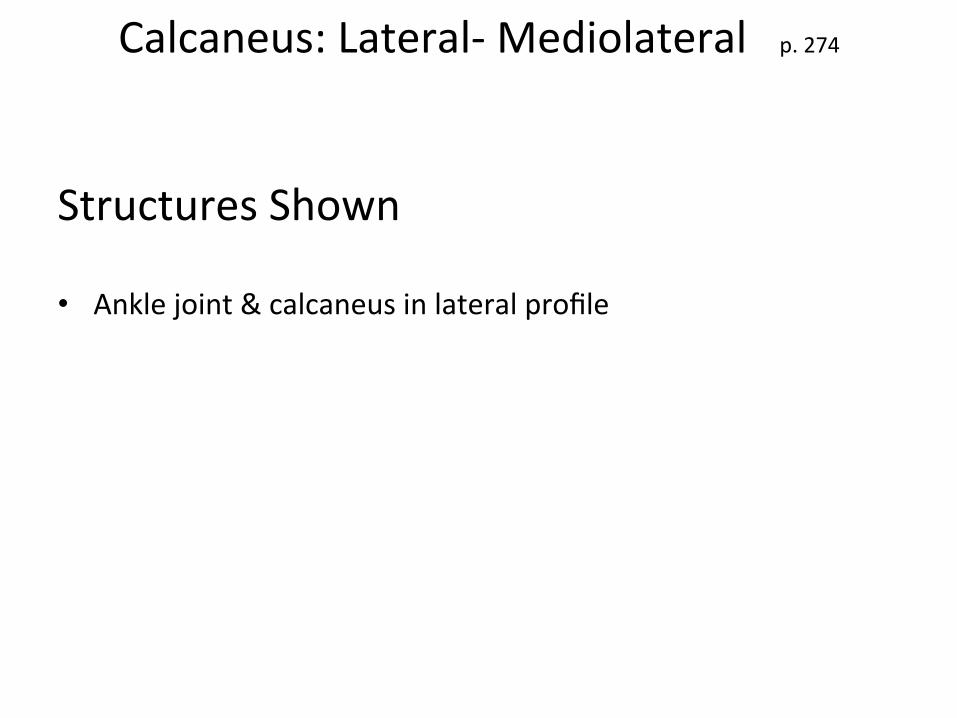
Calcaneus: Lateral-‐ Mediolateral p. 274
Structures Shown • Ankle joint & calcaneus in lateral profile

Calcaneus: Lateral-‐ Mediolateral p. 274
Evalua%on Criteria • Proper collima%on • No rota%on of calcaneus • Density of sustentaculum tali, lateral tuberosity, & so\ %ssue • Sinus tarsi • Ankle joint & adjacent tarsals

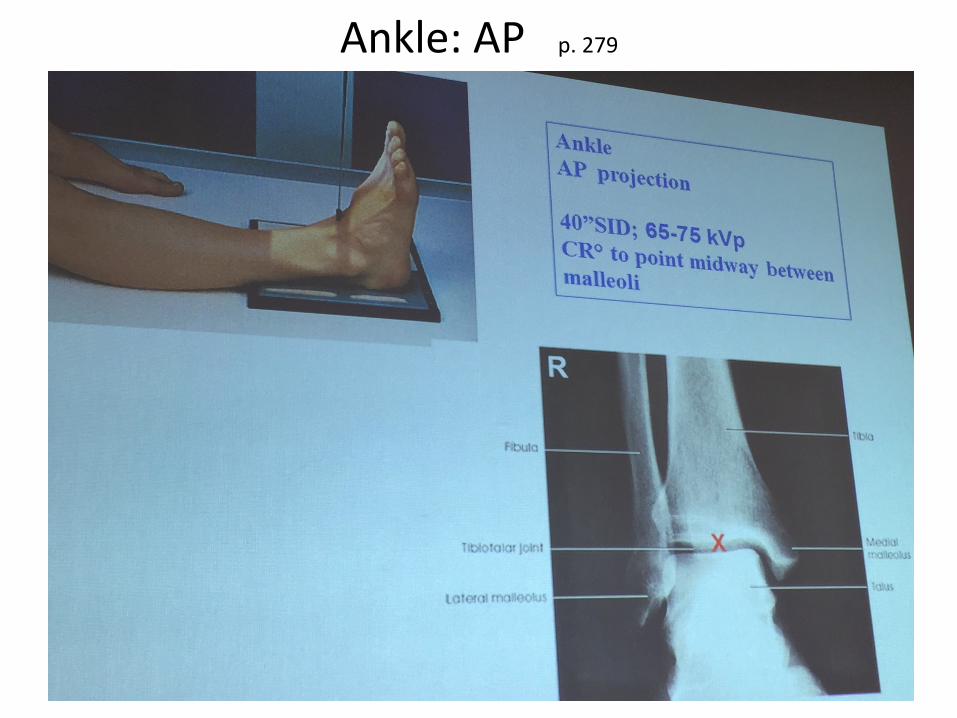
Ankle: AP p. 279
Ankle: AP p. 279
• kVp-‐ 65-‐75 • SID-‐ 40” • IR-‐ 8”x10” or 10”x12” for bilateral; Tabletop; Non-‐grid • Pa%ent-‐ supine or seated with affected limb extended • Part-‐ flex ankle & foot in ver%cal posi%on • CR-‐ perpendicular though ankle joint midway between
malleoli • Sheld Gonads

Ankle: AP p. 279
Structures Shown • AP projec%on of ankle joint • Distal ends of %bia & fibula • Proximal por%on of talus

Ankle: AP p. 279
Evalua%on Criteria • Proper collima%on • Tibiotalar joint space • Ankle joint centered to exposure area • Normal overlap of %biofibular joint with anterior tubercle
slightly superimposed over fibula • Talus slightly overlapping distal fibula • No overlapping of medial talomalleolar ar%cula%on • Medial & lateral malleoli • Talus with proper density • So\ %ssue

Ankle: Lateral-‐ Mediolateral p. 280

Ankle: Lateral-‐ Mediolateral p. 280
• kVp-‐ 65-‐75 • SID-‐ 40” • IR-‐ 8”x10”; Tabletop; Non-‐grid • Pa%ent-‐ lateral recumbent on affected side un%l ankle is
lateral • Part-‐ center IR to ankle joint; lateral surface touching IR;
dorsiflex foot to prevent lateral rota%on of ankle • CR-‐ perpendicular to ankle joint entering medial malleolus • Sheld Gonads
Ankle: Lateral-‐ Mediolateral p. 280
Structures Shown • True lateral projec%on of lower 3rd of %bia & fibula • Ankle joint • Tarsals-‐ including base of 5th metatarsal
Ankle: Lateral-‐ Mediolateral p. 280
Evalua%on Criteria • Proper collima%on • Ankle joint centered to exposure area • Tibiotalar joint well visualized with medial & lateral talar
domes superimposed • Fibula over posterior ½ of %bia • Distal %bia & fibula, talus, & adjacent tarsals • 5th metatarsal seen to check for Jones fracture • Density sufficient to see outline of distal por%on of fibula
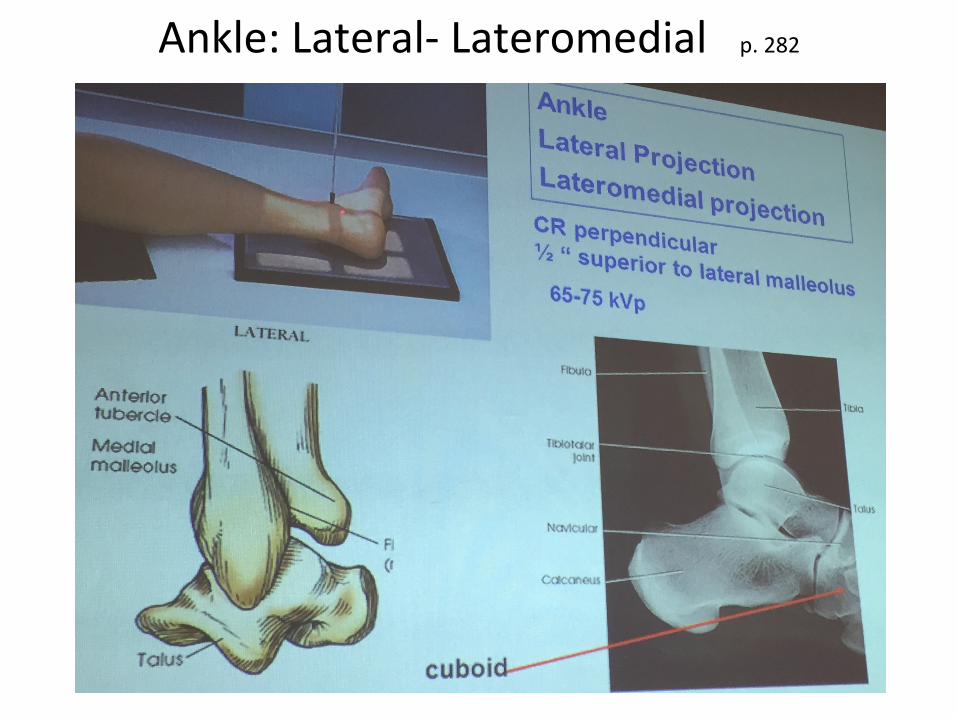
Ankle: Lateral-‐ Lateromedial p. 282

Ankle: Lateral-‐ Lateromedial p. 282
• kVp-‐ 65-‐75 • SID-‐ 40” • IR-‐ 8”x10”; Tabletop; Non-‐grid • Pa%ent-‐ lateral recumbent on affected side; extended leg
placed laterally • Part-‐ center IR to ankle; foot in lateral posi%on; patella
perpendicular to table; support knee if needed • CR-‐ perpendicular through ankle joint entering ½” superior to
lateral malleolus • Sheld Gonads
Ankle: Lateral-‐ Lateromedial p. 282
Structures Shown • Lateral projec%on of lower 3rd of %bia & fibula, ankle joint, &
tarsals

Ankle: Lateral-‐ Lateromedial p. 282
Evalua%on Criteria • Ankle joint centered to exposure area • Tibiotalar joint well visualized with medial & lateral talar
domes superimposed • Fibula over posterior ½ of %bia • Distal %bia & fibula, talus, & adjacent tarsals • Density sufficient to see outline of distal por%on of fibula

Ankle: AP Oblique-‐ Medial p. 283

Ankle: AP Oblique-‐ Medial p. 283
• kVp-‐ 65-‐75 • SID-‐ 40” • IR-‐ 8”x10” or 10”x12” for bilateral; Tabletop; Non-‐grid • Pa%ent-‐ supine or seated with leg extended • Part-‐ center IR to ankle between malleoli; dorsiflex foot to
90°; rotate leg & foot 45° • CR-‐ perpendicular to ankle joint entering midway between
malleoli • Sheld Gonads
Ankle: AP Oblique-‐ Medial p. 283
Structures Shown • Distal ends of %bia & fibula-‐ o\en superimposed over talus • Tibiofibular ar%cula%on

Ankle: AP Oblique-‐ Medial p. 283
Evalua%on Criteria • Proper collima%on • Distal %bia, fibula, & talus • Distal %bia & fibula overlap some of talus • Talus & distal %bia & fibula adequately penetrated • Tibiofibular ar%cula%on

Ankle Mor%se: AP Oblique-‐ Medial p. 284-‐285

Ankle Mor%se: AP Oblique-‐ Medial p. 284-‐285
• kVp-‐ 65-‐75 • SID-‐ 40” • IR-‐ 8”x10” or 10”x12” for bilateral; Tabletop; Non-‐grid • Pa%ent-‐ supine or seated on table • Part-‐ center ankle joint to IR; rotate leg & foot 15°-‐20°
internally un%l intermalleolar plane is parallel with IR; plantar surface at right angle to leg
• CR-‐ perpendicular entering ankle joint midway between malleoli
• Sheld Gonads
Ankle Mor%se: AP Oblique-‐ Medial p. 284-‐285
Structures Shown • En%re ankle mor%se joint in profile • All 3 sides of mor%se joint should be visualized
Ankle Mor%se: AP Oblique-‐ Medial p. 284-‐285
Evalua%on Criteria • Proper collima%on • En%re ankle mor%se joint • No overlap of anterior tubercle of %bia & superolateral
por%on of talus with fibula • Talofibular joint space in profile • Talus shown with proper density
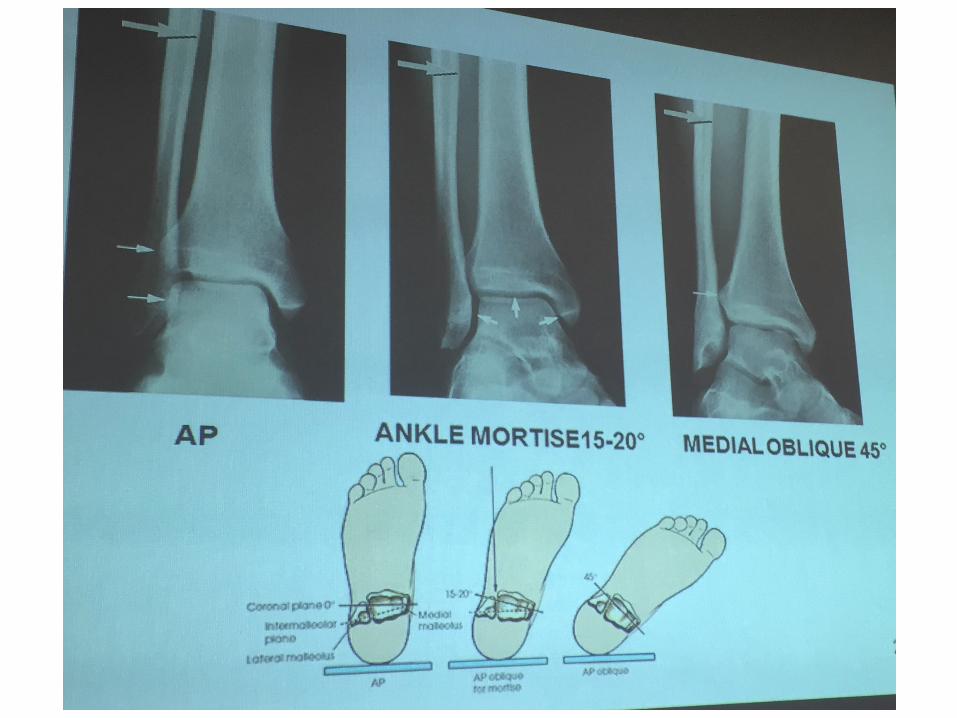

Ankle: AP Oblique-‐ Lateral p. 286

Ankle: AP Oblique-‐ Lateral p. 286
• kVp-‐ 65-‐75 • SID-‐ 40” • IR-‐ 8”x10”; Tabletop; Non-‐grid • Pa%ent-‐ seated on table with leg extended • Part-‐ plantar surface in ver%cal posi%on; laterally rotate leg &
foot 45°; center ankle joint to IR • CR-‐ enter ankle joint midway between malleoli • Sheld Gonads

Ankle: AP Oblique-‐ Lateral p. 286
Structures Shown • Useful for determining fractures & showing superior aspect of
calcaneus
Ankle: AP Oblique-‐ Lateral p. 286
Evalua%on Criteria • Subtalar joint • Calcaneal sulcus (superior por%on of calcaneus)
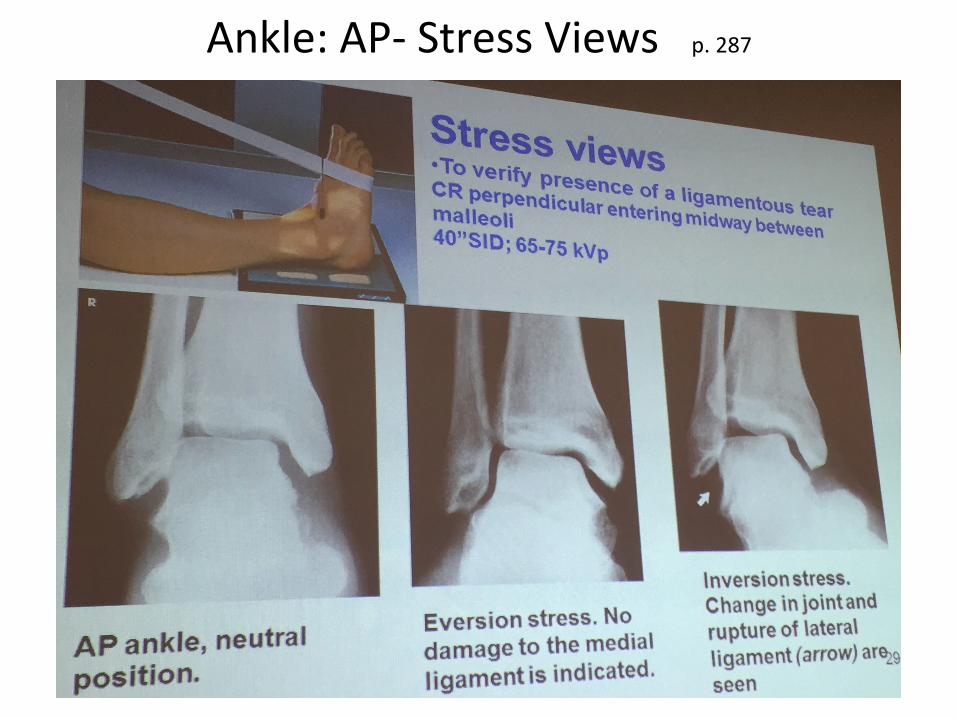
Ankle: AP-‐ Stress Views p. 287

Ankle: AP-‐ Stress Views p. 287
• kVp-‐ 65-‐75 • SID-‐ 40” • IR-‐ 8”x10”; Tabletop; Non-‐grid • Pa%ent-‐ supine or seated on table with leg extended • Part-‐ hold foot in extreme stress with strap; turn foot forcibly
toward opposite side • CR-‐ perpendicular to ankle; enters midway between malleoli • Sheld Gonads