for microsoft windows user's guide - myphotoserver
TRANSCRIPT
For Microsoft Windows
User's Guide
Version 2.0
Copyright ©2003. All Rights Reserved

MyPhotoServer User Guide Version 2.0
www.MyPhotoServer.com Page i
Information in this document is subject to change without notice and does not represent a commitment on the part of MyPhotoServer or CanWeb Internet Services Ltd. The information described in this document may be used for reference purposes only and may not be modified or redistributed. No parts of this publication may be copied, transmitted, stored in a retrieval system, translated into any human or computer language without the express written consent of:
MyPhotoServer, a division of CanWeb Internet Services Ltd. 265 N. Front Street, Suite 204 Sarnia, Ontario, Canada N7T 7X1. This User Guide is subject to the terms of the CanWeb End-User License Agreement, including without limitation the limitation of liability provisions therein, and is intended for use only by MyPhotoServer subscribers.
MyPhotoServer, a division of CanWeb Internet Services Ltd. Copyright ©2003. All Rights Reserved. Windows, Windows 98/ME/XP and Windows NT/2000 are trademarks of Microsoft Corporation. InstallShield is a trademark of InstallShield Software Corporation. Manual Rev 1.0 2004 01 22
MyPhotoServer User Guide Version 2.0
www.MyPhotoServer.com Page ii
Table of Contents 1. INTRODUCTION ............................................................................................1
1.1. CREATIVE USES FOR MYPHOTOSERVER .................................................................. 1
2. GETTING STARTED ......................................................................................2
2.1. DOWNLOAD AND INSTALL ........................................................................................... 2
2.2. CREATE AN ALBUM ....................................................................................................... 2
2.3. PREVIEW YOUR GALLERY............................................................................................ 2
2.4. CHOOSE A WEB ADDRESS........................................................................................... 2
2.5. SHARE YOUR GALLERY................................................................................................ 2
3. MAIN SOFTWARE COMPONENTS...............................................................3
4. PHOTO GALLERY EDITOR...........................................................................4
4.1. OVERVIEW....................................................................................................................... 4
4.2. CREATE AND MANAGE YOUR GALLERY.................................................................... 6 4.2.1. ADD A PHOTO ALBUM ................................................................................................... 6 4.2.2. EDITING AN ALBUM NAME OR ALBUM TITLE.................................................................... 6 4.2.3. MOVE A PHOTO ALBUM ................................................................................................ 7 4.2.4. DELETE A PHOTO ALBUM.............................................................................................. 7
4.3. SELECT AND MANAGE IMAGES................................................................................... 8 4.3.1. ADD AN IMAGE ............................................................................................................. 8 4.3.2. MOVE AN IMAGE........................................................................................................... 8 4.3.3. COPY AN IMAGE ........................................................................................................... 9 4.3.4. DELETE AN IMAGE ........................................................................................................ 9
4.4. BASIC PHOTO EDITING ............................................................................................... 10 4.4.1. ROTATE AN IMAGE...................................................................................................... 10 4.4.2. HORIZONTAL FLIP....................................................................................................... 11 4.4.3. VERTICAL FLIP ........................................................................................................... 11 4.4.4. PREVIEW IMAGE ......................................................................................................... 11 4.4.5. AUTO FIT ................................................................................................................... 11 4.4.6. RESIZE AN IMAGE ....................................................................................................... 12 4.4.7. REMOVE CORRUPTED IMAGES .................................................................................... 12 4.4.8. REDUCE COLORS....................................................................................................... 12
4.5. IMAGE PROPERTIES .................................................................................................... 13
4.6. ALBUM OPTIONS.......................................................................................................... 14 4.6.1. OVERVIEW ................................................................................................................. 14
MyPhotoServer User Guide Version 2.0
www.MyPhotoServer.com Page iii
4.7. ALBUM ACCESS ........................................................................................................... 15
4.7.1. PRIVATE AND PUBLIC ALBUMS .................................................................................... 15 4.7.2. ADD A USER .............................................................................................................. 15 4.7.3. REMOVE A USER........................................................................................................ 16 4.7.4. MANAGE USERS......................................................................................................... 16
4.8. TEMPLATE MANAGER ................................................................................................. 17 4.8.1. SELECT A TEMPLATE................................................................................................... 17
4.9. FILE MENU..................................................................................................................... 18 4.9.1. START SERVER .......................................................................................................... 18 4.9.2. STOP SERVER............................................................................................................ 18 4.9.3. WEBSITE PREVIEW..................................................................................................... 18 4.9.4. LOG VIEWER.............................................................................................................. 18 4.9.5. SAVE IMAGE............................................................................................................... 18 4.9.6. REBUILD THUMBNAILS ................................................................................................ 18 4.9.7. SCAN FOR FOLDERS................................................................................................... 19 4.9.8. SEARCH FOR IMAGES/ALBUMS..................................................................................... 20
5. WEB SERVER OPTIONS.............................................................................21
5.1. OVERVIEW..................................................................................................................... 21
5.2. ADVANCED SETTINGS................................................................................................. 22
5.3. PHOTO GALLERY ......................................................................................................... 23
5.4. USERS ACCOUNT ACCESS......................................................................................... 24 5.4.1. ADD USER ACCOUNT ACCESS .................................................................................... 24 5.4.2. DELETE USER ACCOUNT ACCESS ............................................................................... 24 5.4.3. EDIT USER ACCOUNT ACCESS.................................................................................... 25
5.5. START UP ...................................................................................................................... 25
5.6. WEBSITE ADDRESS ..................................................................................................... 26 5.6.1. OVERVIEW ................................................................................................................. 26 5.6.2. INTERNET NAME......................................................................................................... 26 5.6.3. CONNECTION ............................................................................................................. 28
6. SHARE YOUR PHOTOS..............................................................................30
7. ADVANCED FEATURES .............................................................................30
7.1. ROUTERS AND FIREWALLS........................................................................................ 30
8. REFERENCE................................................................................................31
8.1. KEYBOARD SHORTCUTS............................................................................................ 31
8.2. PHOTO DOWNLOAD TIMES......................................................................................... 31
MyPhotoServer User Guide Version 2.0
www.MyPhotoServer.com Page iv
9. GETTING HELP ...........................................................................................32
9.1. SYSTEM REQUIREMENTS AND RECOMMENDATIONS ........................................... 32
9.2. IMAGE FORMATS.......................................................................................................... 32
9.3. UNINSTALLING MYPHOTOSERVER ........................................................................... 33

MyPhotoServer User Guide Version 2.0
www.MyPhotoServer.com Page v
(this page left blank intentionally)
MyPhotoServer User Guide Version 2.0
www.MyPhotoServer.com Page 1
1. Introduction MyPhotoServer is an easy-to-use program to instantly create professional looking online photo galleries and share them with family and friends over the Internet. Whether you want to share photos of a new baby or share your travel adventures and memories with friends you met along the way, MyPhotoServer software is just the beginning to creating and sharing your photo memories over the Internet. Avoid sending images as an email attachment or uploading them to some other service. Make viewing your pictures an interactive experience that everyone can enjoy. Now you can
• create your own personal online photo gallery using your photos on your own PC • organize your photos into albums • personalize your images with captions, comments and templates • share them with the world and/or only with authorized users anywhere on the internet • Your albums/images will be presented in ready-to-use web pages including thumbnails
and slideshows. It’s an easy and fun way to help you manage your digital media.
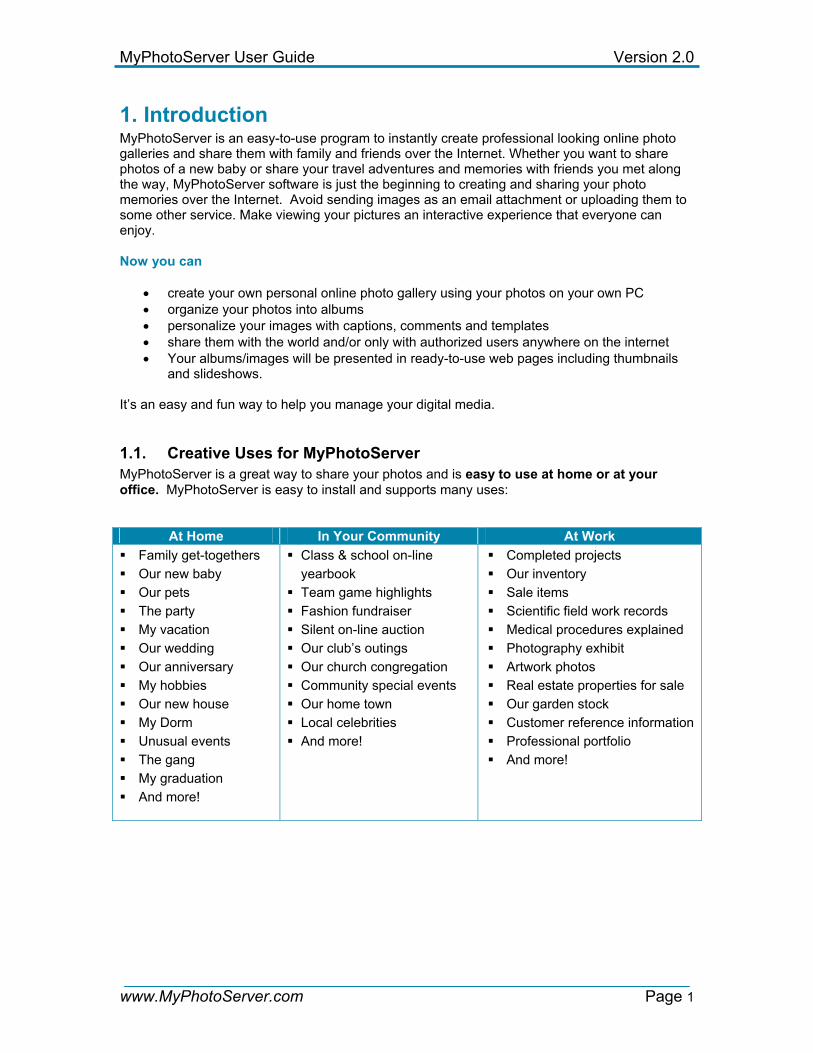
1.1. Creative Uses for MyPhotoServer MyPhotoServer is a great way to share your photos and is easy to use at home or at your office. MyPhotoServer is easy to install and supports many uses:
At Home In Your Community At Work Family get-togethers Our new baby Our pets The party My vacation Our wedding Our anniversary My hobbies Our new house My Dorm Unusual events The gang My graduation And more!
Class & school on-line yearbook
Team game highlights Fashion fundraiser Silent on-line auction Our club’s outings Our church congregation Community special events Our home town Local celebrities And more!
Completed projects Our inventory Sale items Scientific field work records Medical procedures explained Photography exhibit Artwork photos Real estate properties for sale Our garden stock Customer reference information Professional portfolio And more!
MyPhotoServer User Guide Version 2.0
www.MyPhotoServer.com Page 2
2. Getting Started
2.1. Download and Install 1. Download MyPhotoServer software from the Download section of our web site
(www.myphotoserver.com) and run the package. 2. The installation program will launch automatically to guide you through the installation
process. 3. Follow the on-screen instructions to complete the installation. 4. After installation the Photo Gallery Editor opens.
If the default options are used, MyPhotoServer is installed as a service. This automatically starts MyPhotoServer each time your computer starts. If you need to start MyPhotoServer, select Start > Programs > MyPhotoServer. Free Trial Period During the free 10 day trial you will have access to all of the features in MyPhotoServer.
2.2. Create an Album Now that you have the MyPhotoServer installed on your computer, you probably want to take a little test drive to see just what kinds of cool things you can do. So let’s get started….
1. Select Add Album from the Gallery Menu or select the Add Album icon . A dialog box will appear with your folder list on your computer.
2. Navigate to a folder where you have photos you wish to add to the album and press OK.
2.3. Preview Your Gallery Select File > Website Preview from the Gallery Menu. MyPhotoServer will open a web browser on your PC so you can preview the gallery before you share it with others.
2.4. Choose a Web Address 1. Create a personalized web address by click (in the Photo Gallery Editor) Options > Web
Server and select Website Address. 2. Enter your contact information and choose a personal web address for your photos. 3. Press Register to see if the name is available. 4. When you’re done press OK as required.
2.5. Share your Gallery Now tell your friends where they can visit your Photo Gallery To Share your Gallery:
1. Access your photo gallery in a web browser using your gallery name you created in section 2.3 above. (smithfamily.myphotoserver.com).
2. Select the Email a Friend button. 3. Enter your name and email address along with the names and email addresses of the
recipients. 4. Select the Submit button. 5. An email message will automatically be distributed to your friends and will include the link
to your online photo gallery.

MyPhotoServer User Guide Version 2.0
www.MyPhotoServer.com Page 3
3. Main Software Components The MyPhotoServer software includes several software components that provide all the tools that you need to organize, edit, and share your photos. The following identifies the primary components of MyPhotoServer and their uses.
Component Its Use
Photo Gallery Editor • access the settings and controls of the MyPhotoServer software • manage and organize your photos into albums • displays your images by list or small thumbnails • supports drag-and-drop of image files • customize your photos with titles and captions • set album options including slideshows using the
template manager • set privacy and security levels for each album • basic image editing including image rotation and
resizing • search for photos by tag (album, date, caption, location,
photographer etc) to instantly find the photos you want • scan for folders in your directory tree, drive or network
drives to locate image files • monitor photo gallery visitors using the log viewer
Web Server Options • share your favorite photos with others over the internet from your own PC
• manage thumbnail size settings and properties for album index generation
• automatically create your photo gallery web site • manage user accounts • select a web site address • select the port number
Now, that you have completed the overview, you are ready to share your images in new and exciting ways. This guide provides you with complete information about MyPhotoServer features and provides simple procedures to help you get started using the program.
MyPhotoServer User Guide Version 2.0
www.MyPhotoServer.com Page 4
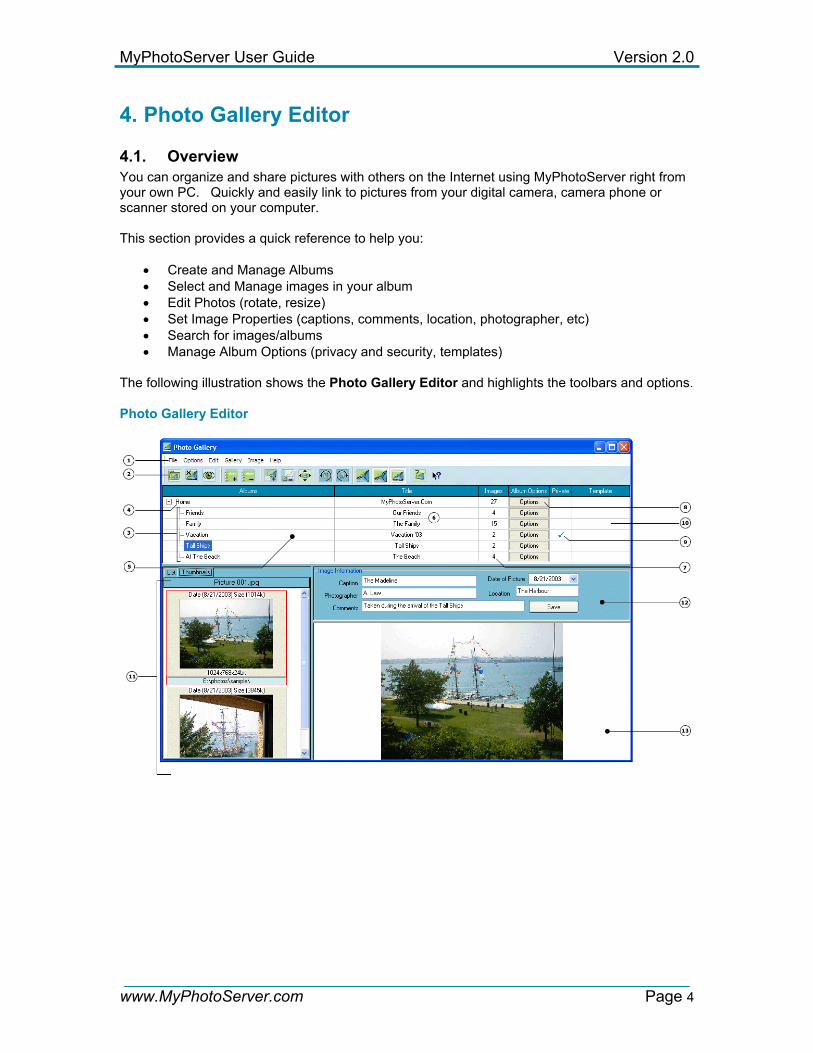
4. Photo Gallery Editor
4.1. Overview You can organize and share pictures with others on the Internet using MyPhotoServer right from your own PC. Quickly and easily link to pictures from your digital camera, camera phone or scanner stored on your computer. This section provides a quick reference to help you:
• Create and Manage Albums • Select and Manage images in your album • Edit Photos (rotate, resize) • Set Image Properties (captions, comments, location, photographer, etc) • Search for images/albums • Manage Album Options (privacy and security, templates)
The following illustration shows the Photo Gallery Editor and highlights the toolbars and options. Photo Gallery Editor
MyPhotoServer User Guide Version 2.0
www.MyPhotoServer.com Page 5
Feature Purpose
1 Gallery Menu: Use this to gain access to main menu options such as File, Options, Edit, Gallery, Image and Help.
2 Main Toolbar: Use this to gain access to add/remove albums and images, rotate and preview images or access Help.
3 Album Tree Pane: Choose this pane to select the albums that contain your image files.
4 Home: is the main album that contains all albums and sub-albums.
5 Album Name: is the name of the album folder or directory.
6 Album Title: will be displayed on the screen when you view your album in an Internet Browser.
7 Images: displays the number of images in the album.
8 Album Options: Use this to gain access to album options such as Private vs Public Albums, Users Access and the Template Manager.
9 Private: Checkmark indicates if an album is private. (See Album Options for setting Privacy levels)
10 Template Name: Indicates the name of the template that is selected for this album.
11 List/Thumbnail Pane: Preview images as thumbnails or a detailed view that shows a list of image file names and location.
12 Image Information: Tag images with keywords, names of the people and places in the picture. Any detail you add to the image can be used to find them again quickly using the built-in search feature.
13 Image Preview: Preview images you have added to your album.

MyPhotoServer User Guide Version 2.0
www.MyPhotoServer.com Page 6
4.2. Create and Manage Your Gallery The first step to any great photo album is organizing your photos. The Photo Gallery Editor will help you organize the images and photo albums you wish to share with friends and family. You can create individual photo albums (or sub-albums) for grouping a smaller number of related photos. For example, you may want to keep pictures of special events or pictures that you need for a specific purpose separate from your other pictures. The Photo Gallery Editor allows you to manage albums and images, add detail image information and assign the privacy level required to access your albums online. There is no limit to the number of albums or sub-albums you can create. You can also include as many images as you like in each album.
4.2.1. Add a Photo Album
The Add Album icon allows you to create a new album or sub-album in your Photo Gallery or you can access the Add Album option from the Menu Bar.
1. Select Add Album from the Gallery Menu or select the Add Album icon . 2. A dialog box will appear with your folder list on your computer. You can select one of
the following options:
Select a directory of pictures you wish to import as an album. Click on the OK button. Your folder name will appear in the Album list.
OR Select the Add Empty Album button to add an empty album. Enter the Album
Name in the empty album field (i.e. Family, Friends, My Vacation). Select the OK button. Click on the plus sign by the HOME album to open your album tree. Your album will now appear in the Album list.
3. You may add an Album Title to your album. The album title is the title you would like to
display when you view your album in an Internet browser. This can be any title that is meaningful for the contents of your album and can be more descriptive than the Album Name. If no Album Title is specified the album name will be used. Click on the title field and enter an Album Title.
4.2.2. Editing an Album Name or Album Title As you work with albums you may find it necessary to edit the Album Name or Title. The Album Name is the name of the album folder or directory. The Album Title is the title you would like to display when you view your album in an Internet browser. The Album Name and Title fields DO NOT change the names of the directory (folder) used to store the image files on your PC.
To Rename an Album:
1. Select the Album you wish to rename. 2. Double-click on the Album Name to open the New Album Name dialog box. 3. Enter a name in the New Album Name field. 4. Select the OK button.
To Edit an Album Title:
1. Select the Album Title you wish to rename. 2. Double-click in the Album Title to enter a new title.
MyPhotoServer User Guide Version 2.0
www.MyPhotoServer.com Page 7
4.2.3. Move a Photo Album You can move a photo album at any time. The album and images properties will follow the album. To move an album:
1. Right-mouse click on the album name. 2. Select Move Album to. 3. Select the name of the album from your album list that you wish to move the album to.
Note: You can also drag and drop an album to a new album by holding down the right mouse button and dragging the album to a new location.
4.2.4. Delete a Photo Album You can remove any of the albums in your photo gallery at any time. If you delete an entire album that you previously shared it will no longer be available in the online gallery. Removing an album from MyPhotoServer DOES NOT delete the photo files contained in the album from your hard drive. It DOES NOT delete the images from your PC. You cannot delete an album if it has sub-albums. To remove an album with sub-albums you need to first delete or move the sub-albums. To remove an album:
1. Right-mouse click on the album name or select the Delete Album icon . 2. You will see a confirmation message Are you sure you want to delete this Album? 3. Select the Yes button to delete the album.

MyPhotoServer User Guide Version 2.0
www.MyPhotoServer.com Page 8
4.3. Select and Manage Images Once you have finished creating the albums you would like in your online photo gallery you can begin to add images to your albums.
4.3.1. Add an Image
The Add Image icon allows you to find and select photos stored on your PC and add them to an album. The fastest way to access your photos is to drag and drop the image(s) into an album of your choice.
1. Select the Album you would like to add the image to.
2. From the Gallery Menu select Image > Add Image or select the Add Image icon . 3. From the file browser window locate the image(s) that you wish to add to the album.
To select one image click the image. To select multiple images press and hold the CTRL key and click the images. To select multiple images in a sequence, press and hold the SHIFT key and click
the first image in the sequence and then click the last image in the sequence. 4. Select Open to add the image(s) to your album. 5. Enter some or all of the Image Information fields (Caption, Photographer, Location,
Comments) for each image if desired. The Image Information fields can be displayed with the album online and are also used to quickly search and find images in your album.
The List/Thumbnail Pane will let you view the images contained in an album.
4.3.2. Move an Image When you move photos, you're transferring them from an existing album to a new or different album. This allows you to organize your photos into albums however you choose. You can move photos between any of your albums. Keep in mind that if you move photos into an album marked private, only your friends with album access will see the updated version of the album. If you move an image from a private album to a public album all visitors can view it. To Move Photos between Albums:
1. From the Photo Gallery Editor select the images in the List/Thumbnail Pane that you wish to move.
To select one image click the image. To select multiple images press and hold the CTRL key and click the images. To select multiple images in a sequence, press and hold the SHIFT key and click
the first image in the sequence and then click the last image in the sequence. 2. Right-mouse click on the image(s) and select Move Image to or select the Move Image
to icon . 3. A dialog-box will appear with the list of your existing albums. 4. Select the album you wish to move the image to. 5. Select the OK button.

MyPhotoServer User Guide Version 2.0
www.MyPhotoServer.com Page 9
4.3.3. Copy an Image You can copy photos from one album to another so that the same photo appears in more than one album. To Copy Photos between Albums:
1. From the Photo Gallery Editor select the images in the List/Thumbnail Pane that you wish to copy.
To select one image click the image. To select multiple images press and hold the CTRL key and click the images. To select multiple images in a sequence, press and hold the SHIFT key and click
the first image in the sequence and then click the last image in the sequence. 2. Right-mouse click on the image(s) and select Copy Image to. 3. A dialog-box will appear with the list of your existing albums. 4. Select the album you wish to copy the image to. 5. Select the OK button.
4.3.4. Delete an Image You can remove any of the photos in your photo gallery at any time. If you delete a photo that you previously shared it will no longer be available in the online gallery. Removing an image from MyPhotoServer DOES NOT delete the photo files from your hard drive. To delete a photo
1. From the Photo Gallery Editor click on the picture in the List/Thumbnail Pane that you wish to remove.
To select one image click the image. To select multiple images press and hold the CTRL key and click the images. To select multiple images in a sequence, press and hold the SHIFT key and click
the first image in the sequence and then click the last image in the sequence. 2. Right Click in the List/Thumbnail pane.
3. Select the delete image option or select the Remove Image icon . 4. A small window will pop up asking, "Are you sure you want to delete this image?" Click
'Yes' to confirm that you want it to be deleted, or 'No' if you've changed your mind. 5. Click on the 'cancel' button to return to your photo without deleting it.
MyPhotoServer User Guide Version 2.0
www.MyPhotoServer.com Page 10
4.4. Basic Photo Editing We recommend that you work on a copy of the file, not the original. Think of your original picture as your "digital negative", the negative you can always go back to in case anything goes wrong with the copy you're working on. If you are not satisfied with the results, you can always start again by making another copy from the original. NOTE: EDITING AN IMAGE WILL CHANGE THE IMAGE FILE STORED ON YOUR COMPUTER. If there is something that needs correction on the image, such as tint, brightness or red eye, use image editing software to touch-up features on the image. In some cases, image editing tools may be included with your digital camera, scanner and/or photo printer.
4.4.1. Rotate an Image Rotating an image can be useful when some of your images have vertical orientation and others have horizontal. If you want to create a nice looking album you'll want them all to have the same orientation. So simply rotate images that have different orientation until they are positioned the correct way. MyPhotoServer allows you to choose the appropriate rotation option (right. left or custom). EDITING AN IMAGE WILL CHANGE THE IMAGE FILE STORED ON YOUR COMPUTER. WE RECOMMEND THAT YOU WORK ON A COPY OF THE FILE, NOT THE ORIGINAL. Rotate Right
1. Select an Image. 2. Choose the Image > Rotate Right option from the Gallery menu or select the Rotate
Right icon to rotate the image 90 degrees clockwise. Each time you select Rotate Right the image is rotated 90 degrees clockwise.
3. Select File > Save Image to save the rotation. Rotate Left
1. Select an Image. 2. Choose the Image > Rotate Left option from the Gallery Menu or select the Rotate Left
icon to rotate the image 90 degrees counterclockwise. Each time you select Rotate Left the image is rotated 90 degrees counterclockwise.
3. Select File > Save Image to save the rotation.

MyPhotoServer User Guide Version 2.0
www.MyPhotoServer.com Page 11
Custom Rotate You may also custom rotate an image to any angle. When custom rotating an image you may want to select the antialiasing checkbox. Antialiasing is a technique for reducing jagged lines and curves by using shades of gray and color to smooth out the contrast between neighboring pixels. While this technique may result in a loss of overall image clarity, it greatly reduces the appearance of jagged edges.
1. Choose the Image > Rotate option from the Gallery Menu. The Rotate Image dialog box will open.
2. Enter a number in degrees to rotate the image. Positive numbers rotate the image clockwise, and negative numbers rotate the image counter clockwise. You can reverse the last adjustments made by selecting the Undo option from the Edit menu.
3. Select the Apply button to save your changes.
4.4.2. Horizontal Flip The horizontal flip option will create a mirror of the image (flip image left to right). Editing an image will change the image file stored on your computer. We recommend that you work on a copy of the file, not the original.
1. Select the image from the List/Thumbnail Pane. The image will appear in the Image Preview window.
2. Select Image > Horizontal Flip from the Gallery Menu. 3. Select the Save button to save this attribute.
4.4.3. Vertical Flip The vertical flip option will flip the image from top to bottom. Editing an image will change the image file stored on your computer. We recommend that you work on a copy of the file, not the original.
1. Open the image in the Image Preview window. 2. Select Image > Vertical Flip from the Gallery Menu. 3. Select the Save button to save this attribute.
4.4.4. Preview Image The Preview Image pane is a convenient way to view a picture selected in the List/Thumbnail Pane. This option can be turned on or off. Turning off the Preview Image option will allow you to quickly browse thumbnails in the List/Thumbnail pane. To activate the Image Preview:
1. Select Image > Preview Image from the Gallery Menu or select the Preview Image icon
.
4.4.5. Auto Fit
The Auto Fit icon resizes the image to fit within the preview window.

MyPhotoServer User Guide Version 2.0
www.MyPhotoServer.com Page 12
4.4.6. Resize an Image Resizing images may reduce the sharpness of an image, so it’s a good idea to keep a back-up copy of the original image. Resizing an image to a smaller size will allow for a faster download in the web photo gallery. To Resize an Image:
1. Select Image > Resize from the Gallery Menu to open the Image Resize dialog. 2. Enter a new width and height (in pixels) for the image. 3. Select the Maintain Aspect Ratio checkbox. This preserves the relationship of width
and height for the resized image. To distort the image horizontally or vertically leave the aspect ratio unselected.
4. Click the OK button.
4.4.7. Remove Corrupted Images Corrupt image files may be caused by an interruption when scanning, transferring or downloading an image. If you have images that are corrupt, MyPhotoServer will display them as a question mark. If you run the Remove Corrupt Images option it will remove the image from the album only. It does not delete the image file from your PC.
4.4.8. Reduce Colors Reducing the colors in an image should create an image file that is smaller than the original image (and thus takes less download time) when viewing the image in your online gallery. EDITING AN IMAGE WILL CHANGE THE IMAGE FILE STORED ON YOUR COMPUTER. WE RECOMMEND THAT YOU WORK ON A COPY OF THE FILE, NOT THE ORIGINAL. To Reduce Color
1. Select Image > Reduce Color from the Gallery Menu to open the Reduce Color dialog. 2. Select the one of the following color options from the pull-down menu:
4 bit (16 colors) 8 bit (256 colors) 16 bit (65 thousand colors) 24 bit (16 million colors)
3. Click the Apply button.

MyPhotoServer User Guide Version 2.0
www.MyPhotoServer.com Page 13
4.5. Image Properties The Photo Gallery Editor allows you to customize your album collection. Adding details to your images including location, date, photographer, captions and comments will add meaning to your photographs. Tagging your photos shouldn’t be a chore so keep it simple. Remember any detail you add to the image can be used to find them again quickly using the built-in search feature. The following ideas may help you get started to creating a truly unique online album. Caption
• Include the full names of the people that appear in the album at least once so your viewers can easily identify them in subsequent photos.
• Describe what is happening in the photograph. Share your story with your audience. • What are some things you want to remember about the photo in 5 years, 10 years or 20
years from now? • Running short of ideas - include inspirational quotes!
Photographer
• Enter the name of the photographer to credit them. Date of Picture
• Identify when the photo was taken (year, date). The default date of the photo is the actual date stored on the image file. It can be changed to reflect a date of your choice.
Location
• Identify where the photo was taken (city or event) Comments
• Include additional comments or just a note to yourself about the image. You may also enter keywords that may help you search for the images quickly.
Try to be consistent when entering your information. It will improve the appearance of your online gallery. Once you have added your image details press the Save button.

MyPhotoServer User Guide Version 2.0
www.MyPhotoServer.com Page 14
4.6. Album Options
4.6.1. Overview Album options display the properties currently set for this album (private vs. public, template and user access). With MyPhotoServer your photos remain stored on your PC. You control all critical factors, including viewer access and maximum storage capacity. You can create a private album and designate which users you want to share your photos with. If an album is marked private the viewer must sign in with a username and password before they can view the album. This section provides a quick reference to help you:
Manage Security Access to your Albums (private vs. public albums, thumbnail only) Manage Templates
MyPhotoServer User Guide Version 2.0
www.MyPhotoServer.com Page 15
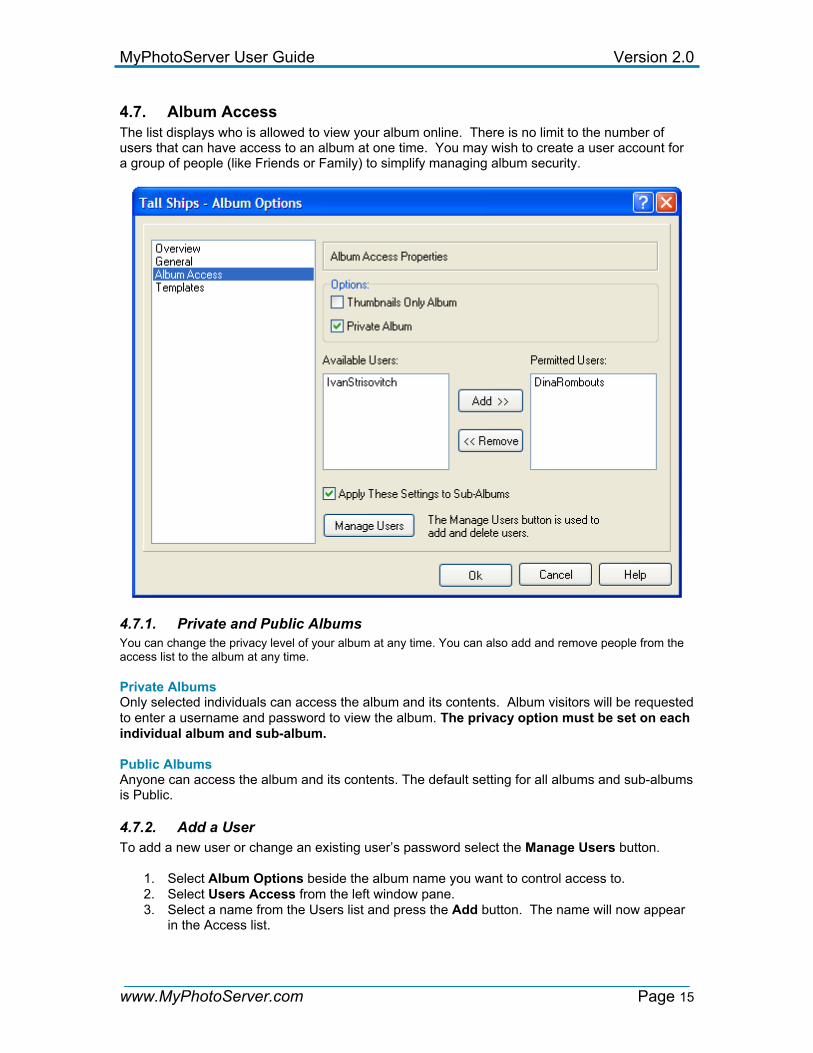
4.7. Album Access The list displays who is allowed to view your album online. There is no limit to the number of users that can have access to an album at one time. You may wish to create a user account for a group of people (like Friends or Family) to simplify managing album security.
4.7.1. Private and Public Albums You can change the privacy level of your album at any time. You can also add and remove people from the access list to the album at any time. Private Albums Only selected individuals can access the album and its contents. Album visitors will be requested to enter a username and password to view the album. The privacy option must be set on each individual album and sub-album. Public Albums Anyone can access the album and its contents. The default setting for all albums and sub-albums is Public.
4.7.2. Add a User To add a new user or change an existing user’s password select the Manage Users button.
1. Select Album Options beside the album name you want to control access to. 2. Select Users Access from the left window pane. 3. Select a name from the Users list and press the Add button. The name will now appear
in the Access list.
MyPhotoServer User Guide Version 2.0
www.MyPhotoServer.com Page 16
4.7.3. Remove a User 1. Select Album Options beside the album name you want to control access to. 2. Select Users Access from the left window pane. 3. Select a name from the Access list and press the Remove button. The name will no
longer appear in the Access list.
4.7.4. Manage Users 1. Select Album Options > Users Access from the left window pane. 2. Select the Manage Users button to add, delete or edit User Account settings. 3. Refer to section 5.4 for additional instructions.
MyPhotoServer User Guide Version 2.0
www.MyPhotoServer.com Page 17
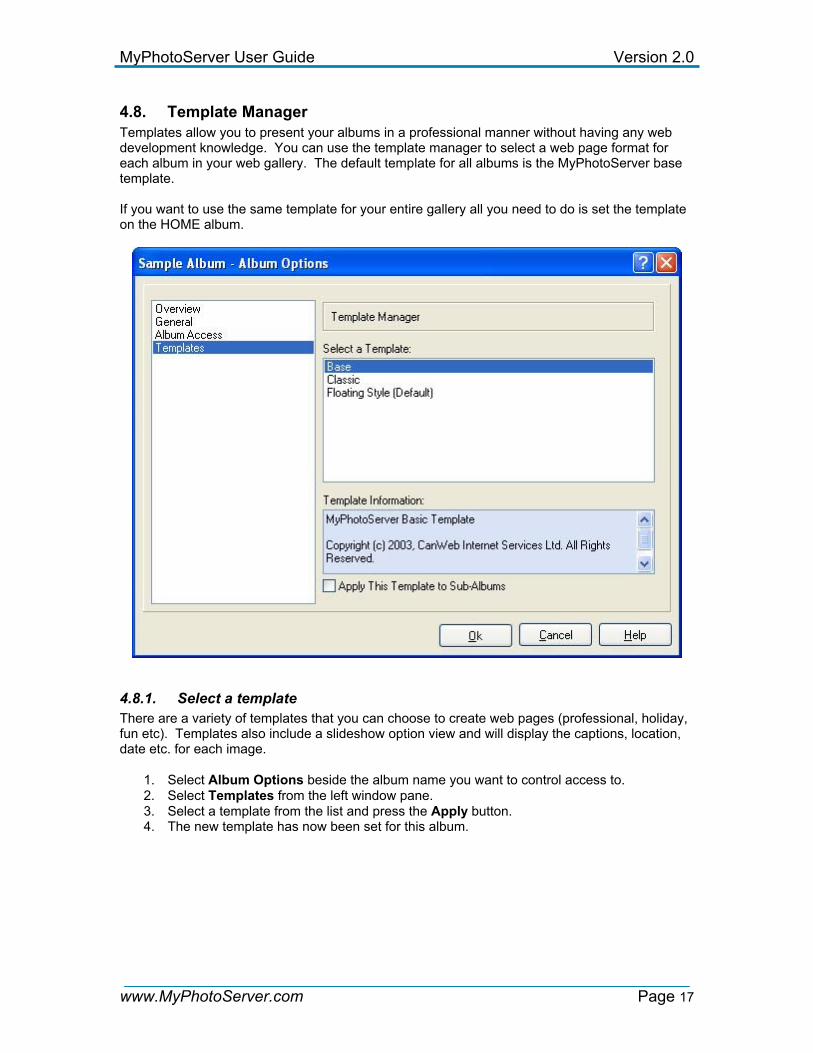
4.8. Template Manager Templates allow you to present your albums in a professional manner without having any web development knowledge. You can use the template manager to select a web page format for each album in your web gallery. The default template for all albums is the MyPhotoServer base template. If you want to use the same template for your entire gallery all you need to do is set the template on the HOME album.
4.8.1. Select a template There are a variety of templates that you can choose to create web pages (professional, holiday, fun etc). Templates also include a slideshow option view and will display the captions, location, date etc. for each image.
1. Select Album Options beside the album name you want to control access to. 2. Select Templates from the left window pane. 3. Select a template from the list and press the Apply button. 4. The new template has now been set for this album.
MyPhotoServer User Guide Version 2.0
www.MyPhotoServer.com Page 18
4.9. File Menu The File Menu includes the main program functions available.
4.9.1. Start Server
1. Select Start Server from the File Menu or select the start server icon . 2. The web server is now turned on and will display your photo web site.
4.9.2. Stop Server
1. Select Stop Server from the File Menu or select the stop server icon . 2. The web server is now turned off and will not display your photo web site to the internet.
4.9.3. Website Preview
1. Select File > Website Preview from the Gallery Menu. 2. MyPhotoServer will open a web browser on your PC so you can preview the gallery
before your share it with others.
4.9.4. Log Viewer The log file displays the web server status while the server is running and includes the date, time, IP address and server message. The log file is based on popular web server log formats and is compatible with most web statistics programs (e.g. AWStats). To manage your log file please refer to the Web Server > Advanced Settings option.
4.9.5. Save Image We recommend that you work on a copy of the file, not the original. Think of your original picture as your "digital negative", the negative you can always go back to in case anything goes wrong with the copy you're working on. If you are not satisfied with the results, you can always start again by making another copy from the original. Note: The Save Image option will change the image file stored on your computer.
4.9.6. Rebuild Thumbnails When you finish saving images/albums in the Photo Gallery Editor the software automatically rebuilds the thumbnails for your online gallery. In the event the Photo Gallery Editor does not rebuild the thumbnails you can manually force this option by selecting File > Rebuild Thumbnails from the Gallery Menu.
MyPhotoServer User Guide Version 2.0
www.MyPhotoServer.com Page 19
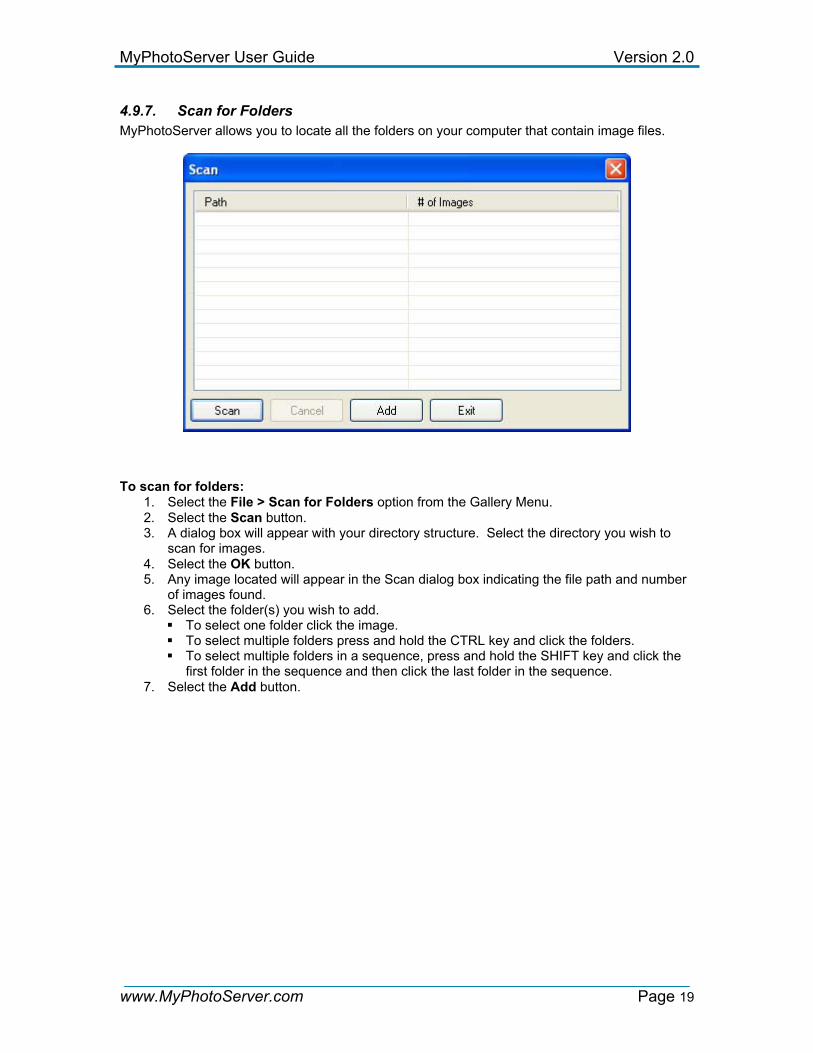
4.9.7. Scan for Folders MyPhotoServer allows you to locate all the folders on your computer that contain image files.
To scan for folders:
1. Select the File > Scan for Folders option from the Gallery Menu. 2. Select the Scan button. 3. A dialog box will appear with your directory structure. Select the directory you wish to
scan for images. 4. Select the OK button. 5. Any image located will appear in the Scan dialog box indicating the file path and number
of images found. 6. Select the folder(s) you wish to add.
To select one folder click the image. To select multiple folders press and hold the CTRL key and click the folders. To select multiple folders in a sequence, press and hold the SHIFT key and click the
first folder in the sequence and then click the last folder in the sequence. 7. Select the Add button.

MyPhotoServer User Guide Version 2.0
www.MyPhotoServer.com Page 20
4.9.8. Search for images/albums MyPhotoServer includes the ability to locate specific images in your growing album collection.
You can quickly search for an image in your photo gallery:
1. Select File > Search from the Gallery Menu. 2. In the Text to Find field enter the text that you want to search for. 3. Select a filter(s) from the Search Field list. You can use multiple filters for your search. 4. Click Search. 5. The Search Results are displayed in the Items Found list in the lower portion of the
window. You can preview an individual image by clicking it once. You can also jump to the photo in the actual album by double clicking the image.
6. To start over or search for a different image, click Clear. If you get too many results, try using additional search filters to make your search more specific.
MyPhotoServer User Guide Version 2.0
www.MyPhotoServer.com Page 21
5. Web Server Options
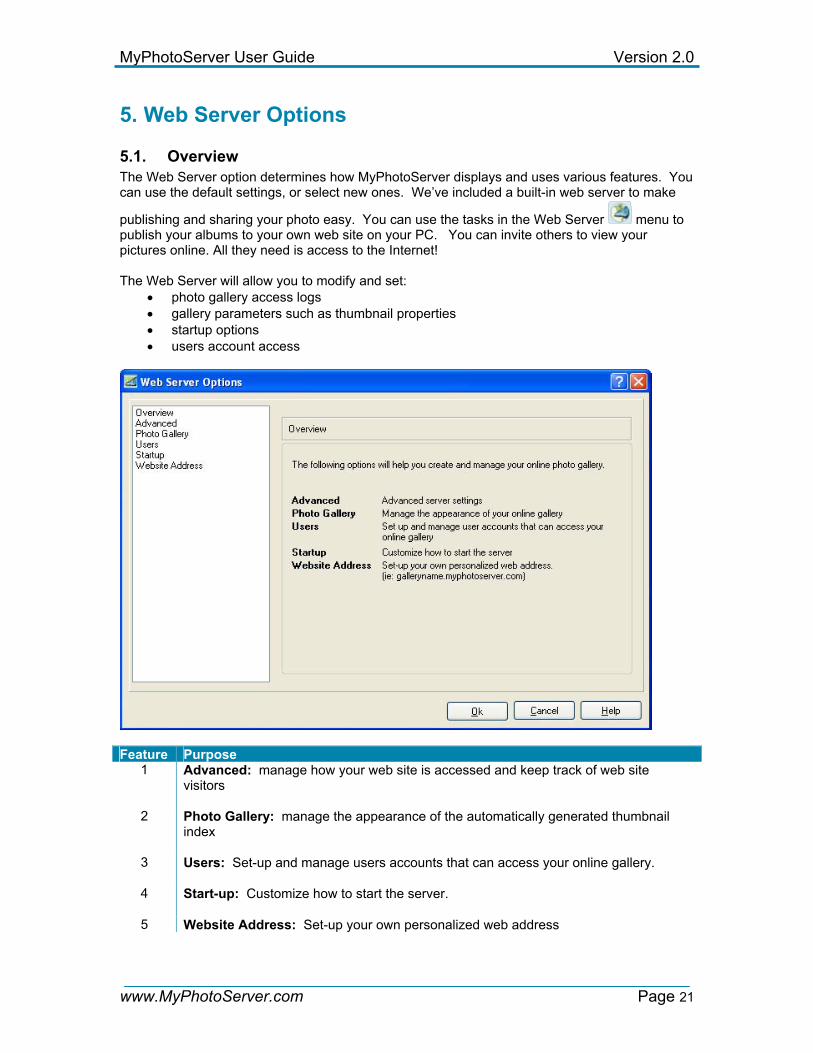
5.1. Overview The Web Server option determines how MyPhotoServer displays and uses various features. You can use the default settings, or select new ones. We’ve included a built-in web server to make
publishing and sharing your photo easy. You can use the tasks in the Web Server menu to publish your albums to your own web site on your PC. You can invite others to view your pictures online. All they need is access to the Internet! The Web Server will allow you to modify and set:
• photo gallery access logs • gallery parameters such as thumbnail properties • startup options • users account access
Feature Purpose
1 Advanced: manage how your web site is accessed and keep track of web site visitors
2 Photo Gallery: manage the appearance of the automatically generated thumbnail index
3 Users: Set-up and manage users accounts that can access your online gallery.
4 Start-up: Customize how to start the server.
5 Website Address: Set-up your own personalized web address

MyPhotoServer User Guide Version 2.0
www.MyPhotoServer.com Page 22
5.2. Advanced Settings The Advanced Settings will allow you to manage how your web site is accessed and keep track of web site visitors in a log file.
Port If you already have a service running using port 80 you can select an alternate port for your photo gallery. Normal web requests are sent to port 80, the standard HTTP port. The MyPhotoServer web gallery is set to port 80 by default. If you change the port to a non-standard port like 81 or 8080 you will need to add the port number to your web address like this: http:///www.photogalleryname.com:81/ Web Site Caption The default web site caption is MyPhotoServer.com. This caption will appear on the opening page or home page of your online gallery. The caption can be modified to text of your choice. Access to Log File To keep track of your photo gallery traffic you can activate the Access to Log File option:
1. Select the checkbox beside the Save to File option. 2. Select the Location to save the log file on your computer. 3. Specify the maximum size (in KB) of log file you want to keep. Entering a “0” means log
until the hard drive is full.

MyPhotoServer User Guide Version 2.0
www.MyPhotoServer.com Page 23
Log Window The log file content can be viewed in the MyPhotoServer console. You can specify the number of lines to display in the window. The lines will scroll off the top of the console but can still be viewed with the log viewer.
5.3. Photo Gallery The Photo Gallery Properties will allow you to manage the appearance of the automatic online album index. MyPhotoServer automatically creates a thumbnail for each photo in your gallery and generates the online album index based on the settings you specify.
To Configure Thumbnail Size:
1. Choose Options>Web Server>Photo Gallery to open the Photo Gallery Properties. 2. In the Thumbnail Size box, choose one of the following thumbnail options:
Thumbnail Width and Height – can be set by pixel Select Thumbnail Size drop-down list, choose the display size of the thumbnails
(Small, Medium, or Large). 3. Click the Apply button to update any changes.
To Configure the Thumbnail Display Properties:
1. Choose Options>Web Server>Photo Gallery to open the Photo Gallery Properties. 2. In the Thumbnail Display Properties set the number of rows and columns to display. 3. Click the Apply button to update any changes.

MyPhotoServer User Guide Version 2.0
www.MyPhotoServer.com Page 24
5.4. Users Account Access This list displays all the User Accounts that you have created. This section will help you add, delete and modify user account settings.
5.4.1. Add User Account Access
1 Select Users from the Web Server Options menu. 2. Assign a user ID (i.e. john). 3. Type the full name of the person in the User Name Field. (i.e. John Smith) 4. Enter a password in the Password field 5. Re-enter the password in the Confirm Password field. 6. Click the Add/Modify button. 7. Select the Apply button.
5.4.2. Delete User Account Access 1. Select Users from the Web Server Options menu. 2. Select a User from the list. 3. Click the Delete button. 4. Select the Apply button.

MyPhotoServer User Guide Version 2.0
www.MyPhotoServer.com Page 25
5.4.3. Edit User Account Access
1. Select Users from the Web Server Options menu 2. Select a User from the list 3. Assign a new username and password 4. Edit the name of the person in the username field. 5. Edit the login name for the person in the User ID field. 6. Type a new password: first in the Password field, then in the Confirm Password field. 7. Click the Add/Modify button. 8. Select the Apply button.
5.5. Start up Uncheck this box if you do not want MyPhotoServer to make your web site available to the Internet automatically each time you restart the computer.
MyPhotoServer User Guide Version 2.0
www.MyPhotoServer.com Page 26
5.6. Website Address
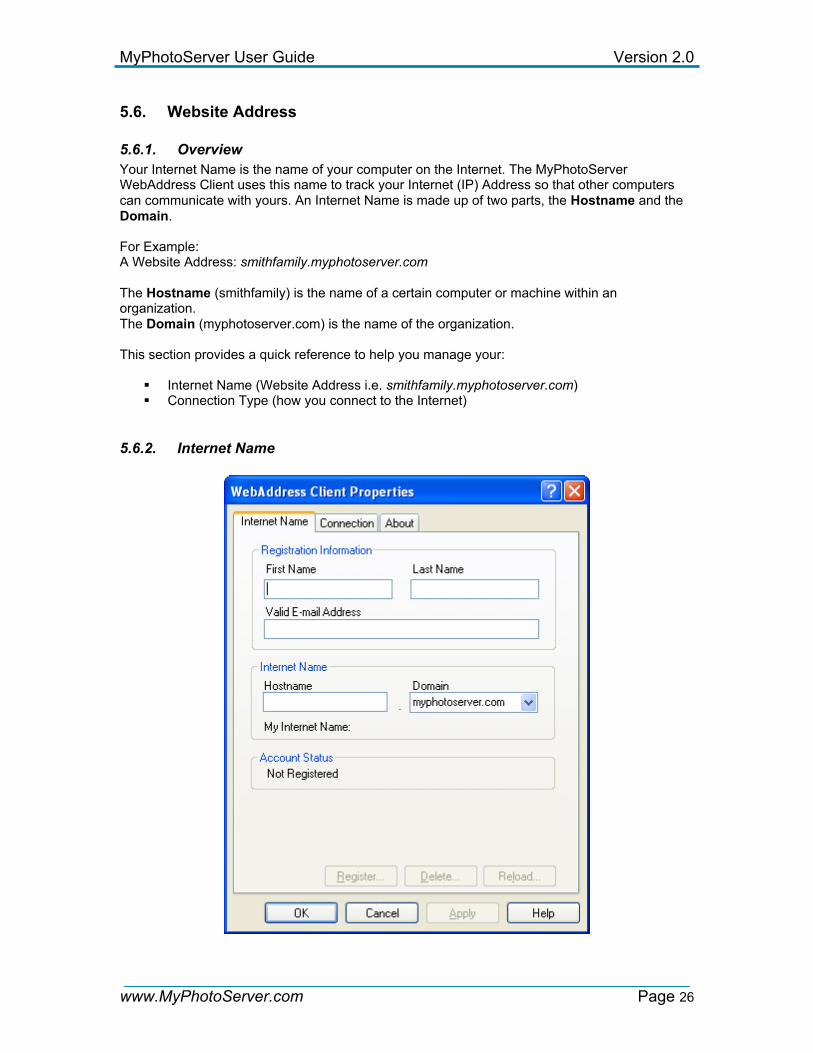
5.6.1. Overview Your Internet Name is the name of your computer on the Internet. The MyPhotoServer WebAddress Client uses this name to track your Internet (IP) Address so that other computers can communicate with yours. An Internet Name is made up of two parts, the Hostname and the Domain. For Example: A Website Address: smithfamily.myphotoserver.com The Hostname (smithfamily) is the name of a certain computer or machine within an organization. The Domain (myphotoserver.com) is the name of the organization. This section provides a quick reference to help you manage your:
Internet Name (Website Address i.e. smithfamily.myphotoserver.com) Connection Type (how you connect to the Internet)
5.6.2. Internet Name

MyPhotoServer User Guide Version 2.0
www.MyPhotoServer.com Page 27
Registration Enter your name, in the First Name and Last Name boxes, respectively. You must enter a valid e-mail address in the E-mail Address field. MyPhotoServer will e-mail you important information once your web address has been successfully registered. Registrations that have an invalid e-mail address will automatically be removed. The Hostname and Domain fields form the complete web address for your online photo gallery. A valid hostname is between 2 and 63 characters long. You can use numbers as long as the hostname starts with a letter. Offensive hostnames are not permitted. Enter your name in the Hostname field. In the Domain menu, the default setting is myphotoserver.com. To re-submit your web address registration, select Modify (if this is the first registration select Register). If the registration is successful, you can immediately start using your new web address to refer to your online photo gallery. If an error occurs during the registration, you should select the Cancel Button and make the necessary changes, then re-submit your registration by pressing the Modify Button. Your account status will be displayed at the bottom of the Internet Name tab. The following are the account status messages:
Registered (registration key) - Your web address is currently registered. No Internet Name (registration key) - Indicates you do not have a web address
registered. Expired (registration key) - Your MyPhotoServer web address service has expired.
Modifying Your Web Address or Registration Information To modify your existing web address Registration you can change any of the fields in the Internet Name tab. Once you finish making changes, press the Modify Button. Press the OK Button when the change is complete. Deleting Your Web Address To delete your existing web address registration, press the Delete Button in the Internet Name tab. Once your Internet Name has been deleted, it is resubmitted to the name pool where it is available for others to register. Now you can now register a new web address. Retrieving Your Registration Information Updates To update your WebAddress Client with the current account information from MyPhotoServer Registration Servers, press the Reload Button. This is necessary if payment has been applied to your account after it has expired, or if you have purchased an upgraded service level. It is not necessary to use the Reload Button under normal circumstances. The Reload Button does not update your IP Address; the WebAddress Client does this automatically!

MyPhotoServer User Guide Version 2.0
www.MyPhotoServer.com Page 28
5.6.3. Connection Your connection type identifies how your computer is connected to the Internet. You can test your connection and specify the address to use when your computer is not connected as well.
Dial-up Modem Select this option if you use a modem and telephone line to connect to your Internet Service Provider (ISP). Cable / DSL / ISDN / Home Network Select this option if you use a cable modem or ISDN router to connect to the Internet. If you have a Local Area Network running DHCP or if you are using ADSL, you should also select this option. Update Packets (any connection type) The default way to send update packets to MyPhotoServer's name servers is Type 1. If your WebAddress Client is active (red ball) and you are still showing offline, then you should change the Update Packet type as directed by MyPhotoServer Technical Support. Note to AOL Customers The WebAddress Client looks for a Microsoft dialer. AOL does not use a standard dialer so the WebAddress Client does not detect that you are connected to the Internet. To activate the WebAddress Client change your connection type to Cable Modem.

MyPhotoServer User Guide Version 2.0
www.MyPhotoServer.com Page 29
Testing Your WebAddress To test the IP Address that the MyPhotoServer is supplying for your web address, press the Test Button. If your WebAddress Client is working normally, your own address, or that of your cable modem or ISDN router is displayed. If the Client is shutdown, your offline address should be displayed. The following are the status messages you may receive:
You are online at (IP Address) -MyPhotoServer is receiving updates from your computers (or cable modem or ISDN routers) IP Address.
You are offline at (IP Address) -MyPhotoServer is not receiving updates and returned the offline IP Address.
Changes may take up to two minutes before they are visible. NOTE: If your WebAddress Client displays offline you may need to change the Update Packet Type in the Connection tab. Type 1 is the default setting and works in most cases. If your computer continually shows offline select Update Packet Type 3 and repeat the test. You must retest after 15 minutes to verify that everything is functioning properly. If the retest fails you can repeat this step with each of the other Update Packet Types. For additional resources please visit the Support section of our web site (www.myphotoserver.com).

MyPhotoServer User Guide Version 2.0
www.MyPhotoServer.com Page 30
6. Share your Photos With MyPhotoServer your pictures remain on your computer. You can share your photos with family and friends simply by sending someone an e-mail with the link to your photo website. To Share your Gallery
1. Access your photo gallery in a web browser using your gallery name (smithfamily.myphotoserver.com).
2. Select the Email a Friend button. 3. Enter your name and email address along with the names and email addresses of the
recipients. 4. Select the Submit button. 5. An email message will automatically be distributed to your friends and will include the link
to your online photo gallery.
7. Advanced Features
7.1. Routers and Firewalls Getting Started
1. Install and configure your router per the Manufacturer’s installation instructions. 2. Configure the router for port or network address translation (NAT), IP forwarding and port
mapping (virtual server mapping). 3. Set the router to IP forward incoming requests on specific ports to the static IP address of
the internal machine running the server software. Example: IP forward incoming requests on port 80 to the static IP address of the internal machine running the web server (e.g. 192.168.0.4:80). Note: Please refer to the router manufacturer’s web site for specific set-up instructions for your router. Using MyPhotoServer Website Address
1. Connect your computer to the Internet. 2. Make sure the WebAddress Client is active (red ball in your task bar). 3. Test your photo gallery. For example, to test your photo gallery, open a web browser and
type in your Web Address Name (http://smithfamily.myphotoserver.com). Note: If your WebAddress Client displays offline you may need to change the Update Packet Type in the Connection tab. Type 1 is the default setting and works in most cases. If your computer continually shows offline select Update Packet Type 3 and repeat the test. You must retest after 15 minutes to verify that everything is functioning properly. If the retest fails you can repeat this step with each of the other Update Packet Types. For additional resources please visit the Support section of our web site (www.myphotoserver.com).
MyPhotoServer User Guide Version 2.0
www.MyPhotoServer.com Page 31
8. Reference
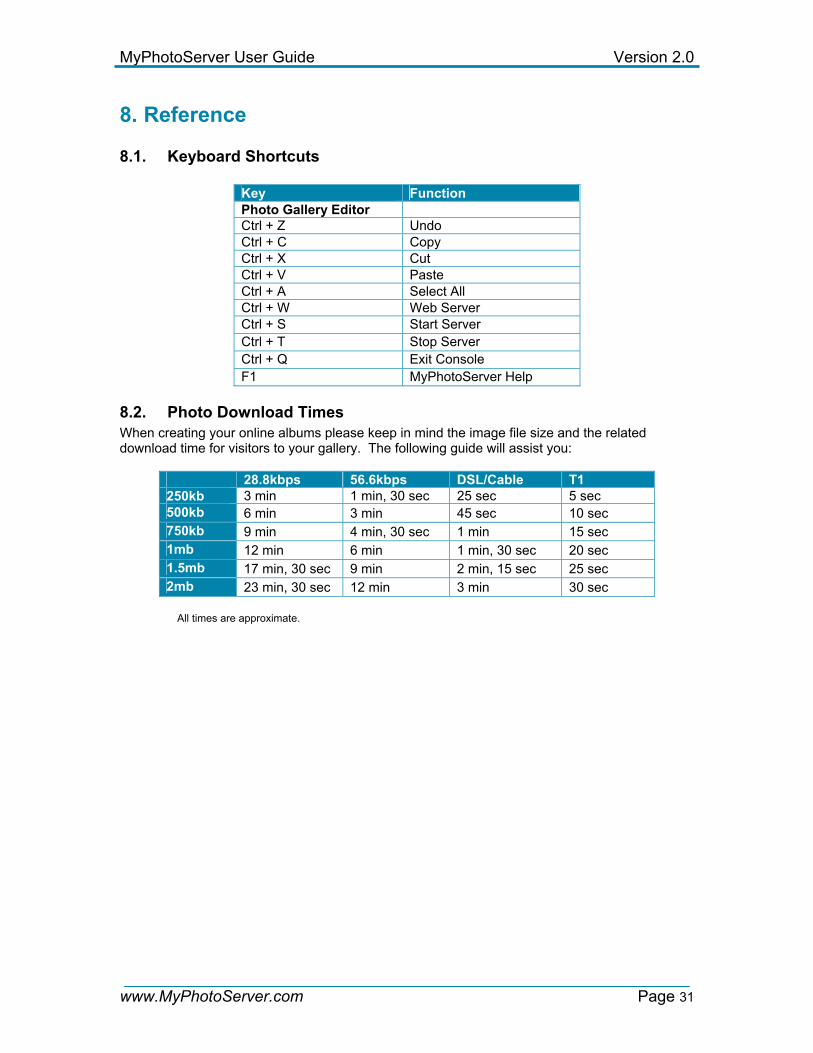
8.1. Keyboard Shortcuts
Key Function Photo Gallery Editor Ctrl + Z Undo Ctrl + C Copy Ctrl + X Cut Ctrl + V Paste Ctrl + A Select All Ctrl + W Web Server Ctrl + S Start Server Ctrl + T Stop Server Ctrl + Q Exit Console F1 MyPhotoServer Help
8.2. Photo Download Times When creating your online albums please keep in mind the image file size and the related download time for visitors to your gallery. The following guide will assist you:
28.8kbps 56.6kbps DSL/Cable T1 250kb 3 min 1 min, 30 sec 25 sec 5 sec 500kb 6 min 3 min 45 sec 10 sec 750kb 9 min 4 min, 30 sec 1 min 15 sec 1mb 12 min 6 min 1 min, 30 sec 20 sec 1.5mb 17 min, 30 sec 9 min 2 min, 15 sec 25 sec 2mb 23 min, 30 sec 12 min 3 min 30 sec
All times are approximate.
MyPhotoServer User Guide Version 2.0
www.MyPhotoServer.com Page 32
9. Getting Help Now that you have the ability to produce online photo galleries, we want to make sure it stays that way. There are multiple ways that you can learn more about using MyPhotoServer. The following will help you find the resources to update MyPhotoServer, make sure you have compatible equipment and show you how to get help should you ever need it. Accessing Help in the Software Use context sensitive help to quickly find help about the active window or dialog box. Open the Help Window to Search for Help from the Contents and Index. Accessing Help Online You can always find the most-up-to-date help information online at www.myphotoserver.com. Customer Service and Support Please contact our Customer Care Department by email for additional assistance:
Department Email Address Customer Service / Sales Questions [email protected] Product / Technical Support Questions [email protected] Business Development [email protected]
9.1. System Requirements and Recommendations
• PC with a Pentium III 500 MHz or faster processor • Microsoft Windows 98, ME, 2000, XP or Server 2003 • Microsoft Internet Explorer 6.0 or higher • 128 MB of RAM (minimum), 265 MB or RAM Recommended • 10 MB of hard-disk space with extra space for user images • 256 Color (8-bit) Display Adapter (24-bit recommended)
9.2. Image Formats MyPhotoServer supports the following types of photo files that are compatible with most web browsers: JPEG, GIF (including animated GIFs) BMP and PNG images. You will be able to create album using images of the following formats:
• GIF - Graphic Interchange Format, a bit-mapped graphics file format used by World Wide Web;
• JPG, JPEG - Joint Photographic Expert Group format, refers to a file format that is widely used by digital cameras (and by web sites that display pictures on their pages), a lossy compression technique for color images. JPEGs are most popular because they hold a lot of image detail in a relatively small file size.
• BMP - Windows bit-mapped graphics format; • PNG – Portable Network Graphic

MyPhotoServer User Guide Version 2.0
www.MyPhotoServer.com Page 33
9.3. Uninstalling MyPhotoServer The InstallShield program will automatically guide you through the uninstall process. You have the option of removing all of the albums associated with MyPhotoServer, this includes all captions and comments. You may not wish to remove these files if you are reinstalling the application after this uninstall. Thumbnails that are automatically created by MyPhotoServer for the Thumbnail index pages are always erased when uninstalling.