for windows and mac filemaker · pdf filefor windows and mac filemaker pro 6 user’s...
TRANSCRIPT

For Windows and Mac FileMakerPro 6
User’s Guide
©1995, 1997-2002 FileMaker, Inc. All Rights Reserved. FileMaker, Inc.5201 Patrick Henry DriveSanta Clara, California 95054www.filemaker.comFileMaker documentation is copyrighted. You are not authorized to make additional copies or distribute this documentation without written permission from FileMaker. You may use this documentation solely with a valid licensed copy of FileMaker software.FileMaker is a trademark of FileMaker, Inc., registered in the U.S. and other countries, and ScriptMaker and the file folder logo are trademarks of FileMaker, Inc. All other trademarks are the property of their respective owners.This software is based in part on the work of the Independent JPEG group. This product includes software developed by the Apache Software Foundation (http://www.apache.org/). Portions of this software are © 1991-2002 DataDirect Technologies. All rights reserved.All persons and companies listed in the examples are purely fictitious and any resemblance to existing persons and companies ispurely coincidental.Mention of third party companies and products is for informational purposes only and does not constitute an endorsement. FileMaker assumes no responsibility with regard to the selection, performance, or use of these products. All understandings, agreements or warranties, if any, take place directly between the vendor and prospective users.


Contents
Preface Learning how to use FileMaker Pro
Registration and customer support xi
Using the FileMaker Pro documentation xi
How this guide is organized xii
A note about the illustrations xii
Using FileMaker Pro Help xiii
Starting FileMaker Pro Help xiii
About the Help topic window xiii
Finding a topic using the Help Contents xiii
Finding a topic using the Help Index xiv
Finding a topic using specific words xv
Finding information on specific items in FileMaker Pro xvi
Getting additional Help xvi
Using other tools xvii
Chapter 1FileMaker Pro basics
About databases 1-1
About FileMaker Pro files 1-2
About fields and records 1-2
About layouts 1-3
About modes 1-3
About sharing data 1-4
Performing menu commands 1-4
Using toolbars 1-5
Using context menus 1-5
Managing files 1-6
Starting FileMaker Pro 1-6
Opening files 1-6
Closing files 1-7
Saving files 1-7
Quitting FileMaker Pro 1-8
Chapter 2Adding and viewing data
About working with records in Browse mode 2-1
Viewing records 2-2
Viewing records in a table 2-2
Selecting the current record 2-3
Moving through records 2-4
Adding and duplicating records 2-4
Adding and duplicating related records 2-5
Deleting records 2-5
About entering data in records 2-6
Selecting a field 2-6
Entering and changing data in fields 2-7
Copying and moving data in records 2-8
Entering preset data from a value list 2-8
Moving data with drag and drop 2-9
Inserting the current date or other variable into fields 2-10
Replacing data in fields 2-10
About working with graphics, sounds, and movies 2-11
Inserting graphics into fields 2-11
Inserting movies and QuickTime multimedia into fields 2-12
Pasting graphics, movies, and sounds from the Clipboard 2-12
Playing movies in fields 2-12
Recording and playing sounds in fields 2-13
Deleting graphics, movies, or sounds from fields 2-13

iv FileMaker Pro User’s Guide
About working with text 2-13
Selecting text 2-13
Editing text 2-14
Formatting text in Browse mode 2-14
Checking spelling 2-14
Checking spelling as you type 2-15
Working with OLE objects 2-15
Chapter 3 Finding and sorting information
Finding records 3-1
Finding text and characters 3-2
Finding exact matches in text fields 3-3
Finding numbers, dates, and times 3-3
Finding ranges of information 3-4
Finding data in related fields 3-4
Finding records that match multiple criteria 3-5
Finding empty or non-empty fields 3-6
Finding duplicates 3-6
Finding all records except those matching criteria 3-6
Hiding records from a found set and viewing hidden records 3-7
Viewing, repeating, or changing the last find 3-7
Sorting records 3-8
Chapter 4 Previewing and printing information
About printing information in a database 4-1
Preparing to print 4-2
Specifying a printer (Windows) 4-2
Specifying a printer (Mac OS) 4-2
Preparing to print wide layouts 4-2
Preparing to print layouts with subsummaries 4-3
Preparing to print envelopes and labels 4-3
Previewing data on a layout 4-3
Printing 4-4
Chapter 5 Creating a database
Planning a database file 5-1
Creating a FileMaker Pro file 5-2
About defining database fields 5-3
About naming fields 5-3
About choosing a field type 5-4
Defining text, number, date, time, or container fields 5-5
Defining calculation fields 5-5
Defining summary fields 5-6
Defining global fields 5-8
Setting options for fields 5-8
Defining automatic data entry 5-8
Defining field validation 5-9
About repeating fields 5-11
About storage and indexing options 5-11
Changing field definitions 5-11
Deleting field definitions and data 5-12
Chapter 6 Creating and managing layouts and reports
About layouts and reports 6-1
Creating layouts and reports 6-2
About layout types 6-3
Considerations when you create a Columnar list/report layout 6-5
Considerations when you create a Labels layout 6-6
Considerations when you create an Envelope layout 6-7
Working with, duplicating, deleting, or renaming layouts 6-8
Setting up to print records in columns 6-8
Setting up View as Form, View as List, and View as Table 6-10

Contents v
About working with objects on a layout 6-11
Working with the layout tools 6-11
Selecting objects 6-12
Copying, duplicating, and deleting objects 6-13
Moving objects on a layout 6-14
Changing an object’s shape and size 6-14
Protecting objects from change 6-15
About working with fields on a layout 6-15
Placing and removing fields on a layout 6-15
Deciding where to place related fields 6-18
Formatting field data on a layout 6-21
About layout parts 6-25
About layout part types 6-25
Adding or changing layout parts 6-26
Defining page breaks and numbering 6-29
Reordering layout parts 6-29
Resizing layout parts 6-30
Deleting layout parts 6-30
Chapter 7Customizing layouts
Customizing fields on a layout 7-1
Adding borders, fill, and baselines to fields 7-1
Adding scroll bars to fields 7-2
Defining a list of values for data entry 7-3
Formatting repeating fields 7-7
Allowing or preventing entry into fields 7-8
Setting the tab order for data entry 7-8
Customizing the appearance of a layout 7-10
Adding text to a layout 7-10
Formatting text 7-12
Drawing lines and shapes 7-14
Setting color, pattern, line width, and object effects 7-14
Inserting graphics onto a layout 7-16
Formatting graphics on a layout 7-17
Showing text, field, or button boundaries 7-17
Arranging objects 7-17
Grouping and ungrouping objects 7-17
Moving objects forward or backward on a layout 7-18
Rotating objects 7-18
Aligning objects to each other 7-18
Using tools to precisely position objects 7-19
Using the Size palette with objects 7-19
Using graphic rulers and ruler gridlines 7-20
Aligning objects with the T-squares 7-20
Using the object grids 7-21
Controlling how things print 7-21
Specifying page margins 7-21
Showing page margins 7-22
About removing blank space from printed data 7-22
Keeping objects from printing 7-25
Chapter 8Working with related files
Displaying data from related files 8-1
Relational database terminology 8-2
About relational databases 8-2
When to create relationships between files 8-4
About match fields for relationships 8-5
About lookups 8-6
Relational databases and lookups: a comparison 8-7
Working with relational databases 8-7
Planning a relational database 8-7
Creating relational databases: an overview 8-9
Defining relationships for relational databases and lookups 8-10
Changing relationships 8-12
Choosing a different relationship for a portal 8-12

vi FileMaker Pro User’s Guide
Summarizing data in portals 8-12
Defining lookups between files 8-13
Defining lookups 8-13
Accessing related data from a third file 8-14
Creating many-to-many relationships 8-15
Chapter 9Protecting databases with passwords and groups
Defining passwords 9-1
Deleting or changing passwords 9-3
Defining groups 9-3
Deleting or changing groups 9-5
Passwords and groups: a comparison 9-6
Chapter 10Creating scripts to automate tasks
About scripts 10-1
Creating scripts: an overview 10-3
Planning scripts 10-3
Storing settings before creating a script 10-4
Defining scripts 10-4
About ScriptMaker steps 10-6
Control script steps 10-6
Navigation script steps 10-6
Sort, find, and print script steps 10-7
Editing script steps 10-7
Fields script steps 10-7
Records script steps 10-8
Windows script steps 10-8
Files script steps 10-8
Spelling script steps 10-9
Open Menu Item script steps 10-9
Miscellaneous script steps 10-9
Changing scripts 10-10
Duplicating, renaming, or deleting scripts 10-10
Deleting scripts 10-10
Importing scripts 10-11
To import a script 10-11
Listing scripts in the Scripts menu 10-11
Using buttons with scripts 10-12
Defining buttons 10-12
Copying, changing, or deleting buttons 10-13
Example of a ScriptMaker script 10-13
Finding duplicate records 10-13
Chapter 11Using formulas and functions
About formulas 11-1
Expressions 11-2
Constants 11-2
Field references 11-2
Operators 11-3
About functions 11-5
Text functions 11-5
Number functions 11-6
Date functions 11-7
Time functions 11-7
Aggregate functions 11-7
Summary functions 11-8
Repeating functions 11-9
Financial functions 11-9
Trigonometric functions 11-10
Logical functions 11-10
Status functions 11-10
Design functions 11-12
External functions 11-13

Contents vii
Chapter 12Importing and exporting data
About import and export 12-1
About file formats 12-1
Importing data into FileMaker Pro 12-2
Importing data into an existing file 12-2
Converting a data file into a new FileMaker Pro file 12-6
Exporting data from FileMaker Pro 12-6
Exporting subsummary data 12-8
Chapter 13Sharing databases on a network
About sharing files on a network 13-1
Working with shared files 13-2
About hosting files 13-3
Opening files as the host 13-3
Closing shared files 13-4
Opening files as a guest 13-5
Chapter 14Publishing databases on the Web
About publishing databases on the Web 14-1
Web terminology 14-1
About FileMaker Pro Web Companion 14-2
About Instant Web Publishing 14-2
How users work with databases on the Web 14-3
What you need to publish databases on the Web 14-4
Connecting to the Internet or an intranet 14-4
Protecting published databases 14-5
Security considerations for published databases 14-5
Creating a custom home page 14-6
Publishing databases on the Web: an overview 14-6
Enabling FileMaker Pro Web Companion 14-7
Configuring FileMaker Pro Web Companion 14-7
Enabling Instant Web Publishing 14-8
Choosing a home page for web publishing 14-8
Choosing a language for Instant Web Publishing 14-8
Tracking web activity in log files 14-8
Enabling remote administration for web publishing 14-8
Selecting a security method for web publishing 14-9
Specifying a port number for web publishing 14-9
Enabling Web Companion sharing 14-10
Setting up browser views 14-10
Choosing a web style 14-11
Choosing layouts for web publishing 14-12
Setting sort options for web publishing 14-13
Testing your published database 14-13
About browser views for web publishing 14-14
Browsing records in Form View 14-14
Browsing records in Table View 14-15
Searching for records 14-15
Sorting records 14-16
Creating records 14-16
Editing records 14-17
Chapter 15Using ODBC with FileMaker Pro
About ODBC 15-1
ODBC terminology 15-1
ODBC support in FileMaker Pro 15-2
Sharing FileMaker Pro data via ODBC 15-2
Sharing data via ODBC: an overview 15-2
Enabling the Data Access Companions 15-2
Security issues 15-3
Accessing FileMaker Pro data from an ODBC client application 15-3
Configuring the ODBC control panel 15-3
Importing data from other data sources 15-5

viii FileMaker Pro User’s Guide
Importing data from an ODBC data source: an overview 15-5
Configuring the ODBC control panel 15-5
Connecting to an ODBC data source from FileMaker Pro 15-6
Building a SQL query in FileMaker Pro 15-7
Importing the results of the query into FileMaker Pro 15-8
An ODBC import example 15-8
Configuring the ODBC control panel for the Text driver 15-9
Connecting to the ODBC Demo data source 15-10
Specifying the SQL query in FileMaker Pro 15-11
Importing ODBC data with a join 15-11
Specifying a SQL join 15-11
Automating ODBC connections 15-13
Appendix A Customizing FileMaker Pro
Setting application preferences A-1
Setting general application preferences A-1
Setting layout preferences A-2
Setting memory preferences A-2
Setting preferences for dialing phone numbers A-3
Setting up plug-ins A-4
Setting document preferences A-5
Setting general document preferences A-5
Setting document spelling preferences A-6
Appendix B Backing up and recovering files
Backing up files B-1
Using a backup script B-1
Maintaining files B-2
Saving a compressed copy B-2
Understanding file damage B-2
Recovering damaged files B-3
When to recover B-3
Appendix C FileMaker Pro Quick Reference (Windows)
Keyboard and mouse shortcuts C-1
Working with layout objects C-1
Formatting text (Layout and Browse) C-1
Selecting text (Layout and Browse) C-1
Editing C-2
Working with files C-2
Switching between modes C-2
Controlling windows C-2
Miscellaneous actions C-3
Status area C-3
Appendix D FileMaker Pro Quick Reference (Mac OS)
Keyboard and mouse shortcuts D-1
Working with layout objects D-1
Formatting text (Layout and Browse) D-1
Selecting text (Layout and Browse) D-1
Editing D-2
Working with files D-2
Controlling windows D-2
Switching between modes D-2
Miscellaneous actions D-3
Status area D-3
Index I-1

Preface Learning how to use FileMaker Pro
The documentation for the FileMaker® Pro software provides information, illustrations, and step-by-step instructions to help you learn the most about FileMaker Pro.
This preface explains how to:
• register your copy of FileMaker Pro and access customer support
• use the FileMaker Pro documentation and other tools to help you work with the product
• use FileMaker Pro Help
Windows: If you’re new to Microsoft Windows, you need to know about Windows conventions and using the mouse and keyboard. See the documentation that came with your computer.
Mac OS: If you’re new to the Mac OS, you need to know about using the mouse, working with disks, and other Mac OS conventions. See the documentation that came with your computer.
Registration and customer support Please take the time to register your product during installation, through the FileMaker web site at www.filemaker.com/register, or by choosing Help menu > Register Now in FileMaker Pro.
For information about technical support and customer service, see:
www.filemaker.com (North American customers)
www.filemaker.com/intl (customers outside North America)
or choose Help menu > FileMaker on the Web. At the web site, you will find the FileMaker Service Directory, which details the service options available to North American customers, as well as links to FileMaker worldwide sites, answers to frequently asked questions,
and access to the TechInfo Knowledge Base used by Technical Support. If you do not have access to the Web, please refer to the FileMaker Service Directory included in the software box. North America customers can also call 1-800-965-9090 to learn about the service options available.
Using the FileMaker Pro documentation This guide and the other documentation in the set give you the information that you need to know about installing and using FileMaker Pro.
The FileMaker Pro documentation includes:
• this book, the FileMaker Pro User’s Guide
• FileMaker Pro Help, a comprehensive onscreen help system
• the FileMaker Pro Getting Started Guide, containing installation and new features information and a tutorial
In addition, FileMaker Pro includes database template files, and references and examples to help you with specific tasks. You can also find more information, tips, and database ideas on the FileMaker, Inc. web site at www.filemaker.com.
The FileMaker Pro documentation is written for users of either Windows or the Mac OS. In most instances, information and instructions are the same for both operating systems. Where they differ, you see the information for Windows first. In onscreen Help, you may see separate topics for Windows and the Mac OS.
Note The examples in this documentation show dates and numbers in U.S. format, such as November 30, 2001 and $1,234.50.

x FileMaker Pro User’s Guide
How this guide is organized This FileMaker Pro User’s Guide describes how to use the most common features in FileMaker Pro. For details about some advanced features, as well as new features added in FileMaker Pro 5.5 and FileMaker Pro 6, see FileMaker Pro Help.
The FileMaker Pro User’s Guide is divided into three parts.
Part 1: Using a database The first part of this book gives you the information you need for using existing databases that have been created in FileMaker Pro.
Part 2: Designing and creating a database The second part of this book provides detailed instructions for creating and designing databases.
Part 3: Sharing and exchanging data The third part of this book explores the various ways that you can exchange and share data from your database; for example, importing and exporting data, sharing your database over a network or the World Wide Web, or how to share FileMaker Pro data with other ODBC-compliant applications.
Note A FileMaker Pro database can have restricted access to certain menus and database operations. For passwords and access information, see your database administrator or the person who designed the database that you’re using.
Special information in this user’s guide looks like this:
Note or Tip messages give extra or helpful information about a subject.
Important messages alert you to situations that require attention, such as an action you can’t undo.
Glossary terms are defined in FileMaker Pro Help. Glossary terms are italicized in the user’s guide and underlined with a dotted line in Help.
A note about the illustrations This user’s guide is a cross-platform book for users of either FileMaker Pro for Windows or FileMaker Pro for the Mac OS. Illustrations throughout the book are mixed, depicting situations for both platforms. Windows and Mac OS systems are used for the illustrations. What you see on your screen may vary from the instructions in this book depending on the platform and the operating system that your computer is using.
If you’re using Mac OS X or a Windows operating system other than Windows 98 (such as Windows Me or Windows XP), what you see on your screen might not match the illustrations in the documentation.

Learning how to use FileMaker Pro xi
Using FileMaker Pro Help FileMaker Pro onscreen Help is available whenever FileMaker Pro is running. It contains some information not in the printed documentation, such as troubleshooting tips or alternative ways of performing an action.
Starting FileMaker Pro Help Whenever you open FileMaker Pro Help, you start the Windows Help application (Windows) or the FileMaker Help Viewer application (Mac OS). The help applications run independently of FileMaker Pro.
To start FileMaker Pro Help while FileMaker Pro is running, do one of the following:
• Choose Help menu > then a menu command
• Windows: Press F1
• Mac OS: Press the Help key or press 2-?
Depending on the window or dialog box that’s open when you press F1 or the Help key, the associated Help topic appears in the Help topic window.
Note For the version, copyright information, and other details about this release of FileMaker Pro, choose Help menu > About FileMaker Pro.
About the Help topic window To navigate to other topics in FileMaker Pro Help, you click buttons and underlined text in the Help topic window.
Click to return to the last topic viewed Click to print the topic Click to move to the next or previous topic
Click to see the Help Contents
Title of the Click to see a current topic
subject overview for this topic
Click dotted underlined text to
see a glossary definition
Click solid underlined text to
jump to a topicrelated to the current topic
For specific information on using FileMaker Pro Help—such as printing a Help topic—choose Help menu > Contents and Index, click the Index tab, and type onscreen Help.
Finding a topic using the Help Contents In FileMaker Pro, choose Help menu > Contents and Index, or click the Help Topics button in any FileMaker Pro Help topic window to display the Help Contents. When you open the FileMaker Pro Help Contents, you see a list of Help subjects, arranged like the table of contents in a book.
To display a list of topics for each subject, double-click (Windows) or click (Mac OS) a book icon. Then double-click (Windows) or click (Mac OS) a topic to display the Help topic window.

xii FileMaker Pro User’s Guide
Help Contents in FileMaker Pro Help for Windows
Help Contents in FileMaker Pro Help for the Mac OS
Finding a topic using the Help Index FileMaker Pro Help includes an alphabetical list of index entries, or keywords—significant words and phrases—to help you find the topics containing the information you want. Each index entry is associated with one or more topics.
Throughout this guide, certain index entries are referenced to assist you in finding more detailed information on a topic in FileMaker Pro Help.
To use the Help Index:
1. In FileMaker Pro, choose Help menu > Contents and Index, then click the Index tab. Or click the Help Topics button in any Help topic window, then click the Index tab.
2. In the Index window, type all or part of an index entry that you want to find.
The Help Index displays a list of entries beginning with the characters you typed. Under some index entries is a list of more than one Help topic.
To browse the index, scroll through the
alphabetical list or type the first few letters of the
entry you’re looking for
Help Index
3. Double-click an entry or a topic listed under the entry to display the Help topic window.

Learning how to use FileMaker Pro xiii
Finding a topic using specific words If you can’t find the information you’re looking for in the Help Contents or in the Index, you can specify your own significant word or combination of words to search for within all of the Help topics. FileMaker Pro Help displays a list of all topics containing the word(s) you specify and the total number of topics found. To narrow the search, you can specify a combination of words. For example, you can search for all topics containing both the word “defining” and the word “script.”
To find a topic based on a specific word or group of words:
1. In FileMaker Pro, choose Help menu > Contents and Index, then click the Find tab. Or click the Help Topics button in any Help topic window, then click the Find tab.
Windows: The first time you click Find in FileMaker Pro Help, the Find Setup Wizard dialog box appears. Follow the instructions it provides to set up FileMaker Pro Help for finding words. This setup procedure needs to be done only once.
2. In the Find window, type the word that you want to search for.
3. To narrow the search, do one of the following:
Windows: Type more words in the line. Then click Options, select All the words you typed in any order, select Immediately after each keystroke to begin the search, and click OK. You can also select multiple words to search for by Ctrl-clicking them in the matching word list.
Mac OS: Click More Choices, then type a second word in the new row below the first word. Then click Search. You can add multiple rows and choose different parameters from the pop-up menus for each word.
Click to find a specific word
Type the word or words to search for Select one or more
matching words if you want
Double-click the topic you want to see
This shows the total number of topics found
Finding words in FileMaker Pro Help for Windows
Type the word you want to search for
Choose options from the pop-up menus to specify
search parameters
Click to add another word to the search
Select a topicfrom the list
Finding words in FileMaker Pro Help for Mac OS
4. In the topics list, select a topic and click Display.
In the Help topic window, FileMaker Pro Help shows each occurrence of the word or words you searched for.

xiv FileMaker Pro User’s Guide
Finding information on specific items in FileMaker Pro As you’re working in your database, you can find information about a dialog box that’s open or certain items your mouse is pointing to, depending on the platform you’re using.
If you’re using FileMaker Pro for Windows, you can do any of the following:
• Open a dialog box and press F1. The Help topic for that dialog box opens.
• When you’re using the New Layout/Report assistant, click the Help button in any panel. The Help topic for that panel opens.
• Point to a tool or item in a window and read its description in a pop-up window or in the status bar at the bottom of the window.
• Find out about individual items in a dialog box by clicking the ? button in the upper-right corner of the dialog box (in dialog boxes that have a ? button) or pressing Shift+F1, then clicking an item inside a dialog box. You can also right-click an item inside a dialog box and choose What’s This? from the context menu. (To close a What’s This? window, click anywhere in the Help window.)
A What’s This? Help window
If you’re using FileMaker Pro for the Mac OS, you can do any of the following:
• Choose Help menu > FileMaker Pro Help or press 2-? to find out about an open dialog box.
• Open the dialog box and press the Help key. The Help topic for that dialog box opens.
• When you’re using the New Layout/Report assistant, click the Help button in any panel. The Help topic for that panel opens.
• Choose Help menu > Show Balloons, then point to a control in the database window or select a command from a menu to find out about it.
A Balloon Help topic
Getting additional Help Use Help to get information on these additional tasks:
Choose Help menu > Contents and For information on Index, click the Index tab, then type
Printing a Help topic Help, printing
Adding notes or instructions to Annotating onscreen Helpa topic (annotations)
Creating bookmarks to quickly Bookmarksaccess topics you use often
Copying all or part of a topic to Copying Helpan application that supports text, to compile help information you use often
Setting Help preferences to Help, customizingcustomize the way you use Help

Learning how to use FileMaker Pro xv
Using other tools Use the following additional tools to help you with FileMaker Pro.
Use To
FileMaker Pro Install FileMaker Pro on your hard disk. Also, use the Getting Started Guide tutorial to get an overview of how to use and design a
FileMaker Pro database. If you’ve used previous versions of FileMaker Pro, you can read about features new to this version.
FileMaker Pro template files
See and work with database files created with FileMaker Pro. You can use the templates for your business or personal work—as they are, or change them to suit your needs. Available in the Templates folder. The Templates folder also contains other helpful information.
Web browser Help Get help while working with a database in a browser. Available by clicking the help button in the Instant Web Publishing interface.


Part 1Using a database


Chapter 1 FileMaker Pro basics
This chapter presents basic information about databases and using FileMaker Pro. You’ll learn about:
• working with fields and records
• using FileMaker Pro modes
• performing menu commands
• managing files
If you’re new to FileMaker Pro, start by reviewing the tutorial, included in the FileMaker Pro Getting Started Guide.
About databases A database is a collection of information, or data, that you can organize, update, sort, search through, and print as needed. Your own address book or filing cabinet might be an example of a database. With the address book and filing cabinet, you store similar pieces of information organized for easy retrieval.
With a filing cabinet, you must choose a way to sort your data, for example, alphabetically by last name or by region. By storing contacts and addresses in FileMaker Pro, you can organize your information in many ways. You can sort your information by country, city, last name, or even sort by all three of these fields!
You can also view a subset of your data, for example only contacts in a particular city. A database doesn’t just hold information—you use a database to organize and analyze information so that you understand its significance.
M
Michelle Cannon
123 4th St. SW
Edmonton
(717) 555-0011
CA N4V 1LN
Records N
Fields
Your address book is like a database
A database can be one file, which might hold the names, addresses, and telephone and fax numbers of all your clients.
A database can also be many files that, together, contain all the information about a particular topic, or related topics (sometimes called a database system). Using the relational capabilities of FileMaker Pro, you can join information between files to create a relational database. For example, one file can show you which clients went on a particular tour and a related file can show how much they paid. (For more information about relational databases, see chapter 8, “Working with related files.”)

1-2 FileMaker Pro User’s Guide
Clients file Products file
Invoice file
002 Client ID
Andre Common Client Name
818-555-1234 Phone
Prod ID Product ET3
Price Travel bag $29
ET4 Travel book $32
12345 Invoice ID
ET3 Prod ID
Travel bag Product
$29.00 Price
002 Client ID
Andre Common Name
818-555-1234 Phone
34 Stock
FileMaker Pro includes template files that you can use to get started right away. To open one of the template files, choose File menu > New Database, and choose a file that best suits your needs.
About FileMaker Pro files Before you begin to work with FileMaker Pro, you should be familiar with the basics of a FileMaker Pro file and some simple database concepts.
About fields and records Fields are the basis of a database file. Fields are used to store, calculate, and display the data you enter into a record. Each piece of information in a record—like name, ID number, and telephone number—is stored in a field.
A record in the Clients database
In the Clients example above, the fields track name and address information. For example, you type a client’s first name into the First Name field, their last name into the Last Name field, and so on. Use a field for each unique piece of information you are storing.
A database file contains one or more records. Each record contains fields that hold similar information about one subject or activity. For example, the fields on a record in the Clients file contain address information for one client.
To enter data in a database file, you make a new record and enter data into the fields that belong to that record. After you create records in a file, you can work with them in various ways: you can edit them, sort them, find a group of records that contains particular data, or share the data across a network.
The information you enter into a field is its value. Field values can be typed into a field, imported from another application or entered in a number of other ways. They must be in one of the following formats:
• text
• number

• date
• time
• graphic, sound, movie, or, for Windows only, OLE
• the result of a formula that calculates the field’s value
• a summary of the values in the field for a group of records
About layouts FileMaker Pro layouts determine how information is organized for viewing, printing, reporting, finding, and entering data. Layouts do not store your data—they just display it.
Database files can have many different layouts, which display data in a variety of ways. Within one database file, you can design separate layouts for entering data, reporting summaries, printing mailing labels, publishing a database on the Web, and so on. You can change a layout’s design without affecting the data or other layouts for the file. When you change the data in a field, the changes are reflected in the same field on all the layouts in the database.
Steve Williams 789 Ninth Avenue New York, NY 10001
Juanita Alvarez 555-1234 Michelle Cannon 555-1234 Andre Common 555-1234 Marie Durand 555-1234 Jean Durand 555-1234 William Johnson 555-1234 John Lee 555-1234 Patrick Murphy 555-1234 Le Nguyen 555-1234 Kentaro Ogawa 555-1234 Mary Smith 555-1234 John Smith 555-1234 Sophie Tang 555-1234 Steve Williams 555-1234 Betty Wilson 555-1234
Phone List
Dear Sophie,
Thank you for reserving a cruise with us. We value your business and appreciate the opportunity to serve you.
If you have any questions about your reservations, please call us—we want you to be satisfied with your cruise.
Sincerely, John Lee
The same data can be arranged differently with multiple layouts
FileMaker Pro basics 1-3
In a layout, you:
• choose which fields to display
• arrange and format fields
• add or modify field labels
• create reports, for example, to group or summarize data
• add buttons, which make your file easier to use
• specify how records are printed
• add graphics and text to add emphasis and interest
About modes You work with data in FileMaker Pro using four modes.
Mode pop-up menu
Switch modes by using the mode pop-up menu in the lower left corner of the window or by choosing a mode from the View menu.
In this mode You do this
Browse Work with the data in a file. You can add, view, change, sort, omit (hide), and delete records. Browse mode is where you’ll do much of your work, such as data entry.
Find Search for particular records that match a set of criteria. You can then work with this subset of your records, called the found set. After you find a group of records, FileMaker Pro returns to Browse mode so you can begin working with them.
Layout Determine how information is presented on your screen or in printed reports, labels, and forms. You design layouts for specific tasks, like data entry or printing invoices or envelopes. Select and arrange fields and other objects to modify an existing layout or create new layouts.

1-4 FileMaker Pro User’s Guide
In this mode You do this
Preview See how data in forms or reports will look before you print. Preview mode is especially useful for layouts with multiple columns (like mailing labels) and grouped reports with summaries.
Browse mode
Layout mode
Find mode
Preview mode
About sharing data A benefit of storing data in FileMaker Pro is sharing your data with others. You can share your data with other FileMaker Pro users on a network, or use a FileMaker Pro companion to share data over the Web or with ODBC.
• If you’re sharing data using FileMaker Pro networking on a network and have more than ten guests, you must host the files using FileMaker Server. For information, see chapter 13, “Sharing databases on a network.”
• For information on publishing FileMaker Pro data on the Web, see chapter 14, “Publishing databases on the Web.” For information about the number of IP addresses that can access a database, see FileMaker Pro Help. Choose Help menu > Contents and Index, click the Index tab, and type guests.
• For information on sharing data via ODBC, see chapter 15, “Using ODBC with FileMaker Pro.”
Performing menu commands There are a variety of ways to access menu commands in FileMaker Pro.
You can access a menu command by:
• choosing it from a menu
• pressing a keyboard shortcut
• clicking a tool on a toolbar
• choosing it from a context menu
• activating it from an Apple event
For a list of often-used keyboard shortcuts, see appendix C, “FileMaker Pro Quick Reference (Windows),” and appendix D, “FileMaker Pro Quick Reference (Mac OS).”
Important Menu choices might be dimmed if you do not have full access to a file. For example, if you open a file and don’t have access to create records, the New Record menu command and toolbar button are dimmed.

FileMaker Pro basics 1-5
Using toolbars Toolbars provide quick access to many FileMaker Pro menu commands.
Hold the cursor over a button to see its description.
Tooltips describe eachbutton in the toolbar
Toolbar buttons vary depending on which mode you’re using. For example, the standard toolbar in Browse mode contains buttons that help you create or delete records. In Find mode, the buttons help you create or delete find requests.
Drag a toolbar by the handle to reposition it
The standard toolbar in Browse mode
The standard toolbar in Find mode
Also, different menu commands are available with each set of toolbars:
Choose this In this toolbar mode To access these types of commands
Standard all modes Operating system commands like New Database, Copy, and Paste, as well as menu commands for each mode (for example, New Record in Browse mode or New Layout/Report in Layout mode)
Text Formatting Browse and Text formatting menu commands to change the Layout font, text size, style, and color
Choose this In this toolbar mode To access these types of commands
Arrange Layout Move or rearrange objects (group, lock, move from front to back, rotate, and align)
Tools Layout Access editing tools in the status panel, like the text tool, rectangle tool, field tool, and so on
You can change the location and position of toolbars by moving and resizing them.
To Do this
Show a toolbar Choose View menu > Toolbars, then the specific toolbar you want to work with.
Hide a toolbar Choose View menu > Toolbars, then the specific toolbar you want to disable. If the toolbar is floating, you can also click the close box.
Move a toolbar Click the handle on the left side of the toolbar and drag it to a new location.
Resize a toolbar Move the toolbar away from the menu bar. Then, in Windows drag the left, right, or bottom side of the toolbar. (The cursor changes to a double-headed arrow). In the Mac OS, drag the lower right corner of the toolbar.
Using context menus You can quickly edit an object or data by choosing editing commands directly from a context menu (“contextual menus” in the Mac OS).
Context menu commands will vary based on the mode you’re using, the item the cursor is over, and whether an item is selected. For example, when text is selected in Browse mode, you see commands like Cut, Copy, Paste, and text formatting commands. When a field is selected in Layout mode, you have access to a different set of commands.

1-6 FileMaker Pro User’s Guide
Context menu in Browse mode
Context menu in Layout mode
To display a context menu in Windows, hold down the right mouse button while the pointer is over an object or data. In the Mac OS, hold down the Control key, then click the mouse button over an object or data.
In this mode Access context menus in these areas
Browse Toolbar, text ruler, in a field, or outside a field
Find Toolbar, in a field, or outside a field
Preview Toolbar or anywhere in the document
Layout Toolbar, text ruler, a field, an object or group of objects, selected text, a layout part, or elsewhere on a layout
Managing files In FileMaker Pro, you can either work with existing database files or start new files. The following sections tell you how to work with existing FileMaker Pro files. For information on creating database files, see chapter 5, “Creating a database.”
Starting FileMaker Pro There are several ways to start the FileMaker Pro application:
• Double-click the FileMaker Pro application icon
• Double-click a FileMaker Pro file
• Drag a FileMaker Pro file on top of the FileMaker Pro icon
• Windows: click the Start button, and choose FileMaker Pro from the Programs menu.
Opening files To open a file if FileMaker Pro is already running:
1. Choose File menu > Open.
2. Double-click the name of the file to open.
If you’re asked for a password, type the password, then click OK.
To open a file if FileMaker Pro isn’t running, choose one of the following methods:
• Double-click the file icon
• Drag the file onto the FileMaker Pro application icon
• Double-click the FileMaker Pro application icon. In the New Database dialog box, select Open an existing file, then click OK, then double-click the filename.
You can open a FileMaker Pro for Windows file on the Mac OS, and vice versa. If you intend to move files across platforms, it’s best to include the .fp5 extension in the filename. If you add or remove filename extensions, you must re-specify the file locations for related files and files with external scripts.
For information on opening a file that’s hosted by another computer, see “Opening files as a guest” on page 13-5.
Tip You can display recently opened filenames under the File menu. See “Setting general application preferences” on page A-1.
FileMaker Pro basics 1-7
Keep these points in mind:
• When you open a file created with an earlier version of FileMaker Pro (version 4.1 and earlier), you must convert it to the current FileMaker Pro file format. Upon conversion, date fields that were previously storing and displaying two-digit years (for example, 92) will now display four-digit years (for example, 1992). You might have to resize the date fields to display four digits or format the date field to display two digits. For more information on opening files from previous versions, choose Help menu > Contents and Index, click the Index tab, and type converting files.
Important To avoid confusion when using dates, always use four-digit years. For more information about how FileMaker Pro handles Year 2000 issues, see www.filemaker.com.
• When you open a file saved with date, time, and number formats that are different from the system formats set on your computer, you might see an alert message.Working with international files is documented in Help. Choose Help menu > Contents and Index, click the Index tab, and type International formats.
• You may open a file with limited access if the database administrator has assigned a default password. For information, see “Defining passwords” on page 9-1 and refer to the administrator.
• You can open a file created in another application, like many versions of Microsoft Excel, directly in FileMaker Pro. See “Importing data into FileMaker Pro” on page 12-2.
Closing files You can close a file and leave FileMaker Pro running or you can quit FileMaker Pro, which closes all FileMaker Pro files.
Important FileMaker Pro saves changes you make to a file as you work and whenever you close a file or quit the application.
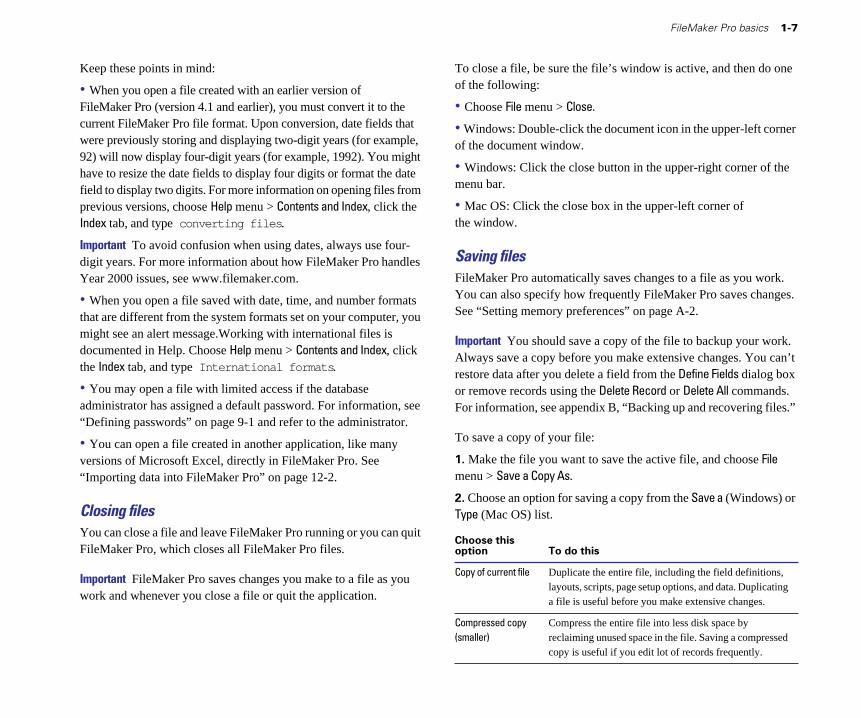
To close a file, be sure the file’s window is active, and then do one of the following:
• Choose File menu > Close.
• Windows: Double-click the document icon in the upper-left corner of the document window.
• Windows: Click the close button in the upper-right corner of the menu bar.
• Mac OS: Click the close box in the upper-left corner of the window.
Saving files FileMaker Pro automatically saves changes to a file as you work. You can also specify how frequently FileMaker Pro saves changes. See “Setting memory preferences” on page A-2.
Important You should save a copy of the file to backup your work. Always save a copy before you make extensive changes. You can’t restore data after you delete a field from the Define Fields dialog box or remove records using the Delete Record or Delete All commands. For information, see appendix B, “Backing up and recovering files.”
To save a copy of your file:
1. Make the file you want to save the active file, and choose File menu > Save a Copy As.
2. Choose an option for saving a copy from the Save a (Windows) or Type (Mac OS) list.
Choose this option To do this
Copy of current file Duplicate the entire file, including the field definitions, layouts, scripts, page setup options, and data. Duplicating a file is useful before you make extensive changes.
Compressed copy Compress the entire file into less disk space by (smaller)
copy is useful if you edit lot of records frequently. reclaiming unused space in the file. Saving a compressed

1-8 FileMaker Pro User’s Guide
Choose this option To do this
Clone (no records) Make a copy that contains all the field definitions, layouts, scripts, and page setup options, but no data. Make a clone when you want a template of the file.
3. Type a new name to rename the file.
Name of the new file Filename extension
Options for saving a copy
Save a Copy As dialog box (Windows)
Name of the new file
Options forsaving a copy
Save a Copy As dialog box (Mac OS)
4. Click Save.
Quitting FileMaker Pro When you’re finished working in FileMaker Pro, choose File menu > Exit (Windows) or File menu > Quit (Mac OS). FileMaker Pro saves changes to your file whenever you quit the application.
Important Always quit FileMaker Pro before you turn off your computer.

Chapter 2 Adding and viewing data
There are many ways to view and work with data in a FileMaker Pro database. This chapter explains how to:
• view records in a database
• add, duplicate, and delete records
• add and edit data in fields
• work with text in fields
• check the spelling of your data
For an introduction to fields and records, see “About fields and records” on page 1-2.
About working with records in Browse mode In Browse mode, you can enter, view, change, and delete data in your database. FileMaker Pro saves the changes you make to your file as you work.
In Browse mode, you can work with all the records in a file, or a group of records (called the found set). You can display records in sorted order or the order in which you added them to the file.
If you’re working in another mode, you can switch to Browse mode by choosing View menu > Browse Mode.
Products file in Browse mode Status area
Layout
Zoom controls
Status area control
Mode pop-up menu
pop-up Standard menu toolbar
Book icon Number of records in
the file Current sort
status of records
Your database contains one or more layouts that display your data in different ways. If your database has several layouts, you can choose a different one from the layout pop-up menu at the top of the status area.
For more information, see “Saving files” on page 1-7, “Finding records” on page 3-1, “Sorting records” on page 3-8, and “About layouts and reports” on page 6-1.

2-2 FileMaker Pro User’s Guide
Viewing records FileMaker Pro provides three views of each layout: form, list and table. When you change views, you temporarily change the way records display or print.
Do this in Browse mode, Find mode, To view or Preview mode
Individual records Choose View menu > View as Form.
Records in a list Choose View menu > View as List.
Records in a table Choose View menu > View as Table. (See the next section, “Viewing records in a table.”)
The following illustration shows the same layout in three views.
View as Form
Field labels Field data
View as List
When you’re viewing recordsin a list or table,
View as Table you see as many records as fit on one screen
Keep these points in mind:
• If you have layout design privileges, you can specify the views that are available for each layout. See “Setting up View as Form, View as List, and View as Table” on page 6-10.
For more control over the appearance of your data, you can create layouts that are designed to show records in a list or table. See “Columnar list/report” on page 6-3 and “Table view” on page 6-4.
• View as Form, View as List, and View as Table do not affect databases published on the Web using FileMaker Pro Instant Web Publishing. To set up views for web publishing, see “Setting up browser views” on page 14-10.
Viewing records in a table 1. To view records in a table, choose View menu > View as Table.
To Do this
Reorder columns Click a column heading and drag it to a new location.
Resize a column Move the pointer to the edge of the column heading. When the pointer changes to a double arrow ( ), drag it to the desired size.
To set a precise width, select one or more columns, then right-click (Windows) or Control+click (Mac OS). Choose Set Column Width from the context menu. In the dialog box, type a width, choose units from the list, then click OK.
Sort records 1 Click a column heading. 1 Select one or more columns, right-click (Windows)
or Control+click (Mac OS), then choose a sort order from the context menu. If you select multiple columns, the order of the columns (left to right) determines the sort order. For more information, see “Sorting records” on page 3-8.
Note You can sort records if Sort data when selecting column is selected in the Table View Properties dialog box. See “Setting up View as Form, View as List, and View as Table” on page 6-10.

2. If FileMaker Pro prompts you to save your changes to the layout, you can choose how the layout is displayed the next time you open the file.
To Click
See your layout changes Yes
See the layout as it looked before your changes No
Column headings. Each column displays one field from the current layout
Current record bar indicates the selected record
View as Table Values in a repeating field display horizontally
Keep these points in mind:
• If you have layout design privileges, you can set options to customize the way a layout displays and functions in View as Table. (See“Setting up View as Form, View as List, and View as Table” on page 6-10.)
• You can select multiple columns to reorder, resize, or sort data, but you can’t select multiple cells in a table.
• If a layout contains a portal, View as Table displays the data from the first related record (the first row of the portal). See “About relational databases” on page 8-2.
Adding and viewing data 2-3
• For more information about View as Table, choose Help menu > Contents and Index, click the Index tab, and type View as Table command.
Selecting the current record In Browse mode, a database has one current (selected) record at a time.
In this view The current record is
View as Form The record that you’re displaying.
View as List The record that’s marked with a solid bar along the or left side. To work with another record, click in the View as Table record to make it current.
Current record bar in View as List
For information about views, see “Viewing records” on page 2-2.
To select a related record in a portal, select the portal row (click inside the row but outside any fields in the row). For information about related records and portals, see “About relational databases” on page 8-2.

2-4 FileMaker Pro User’s Guide
Portal
Click inside the portal row to select a related record
Moving through records To move from one record to another, use the book icon in the status area.
Book icon Bookmark
Current record number Number of records
in the database
To move Do this
One record at a time Click the bottom page of the book icon. forward
One record at a time Click the top page of the book icon. backward
Quickly to a specific 1 Click the current record number at the bottom of record the book icon, type the record number you want,
then press Enter (Windows) or Return (Mac OS). 1 Press Esc, type the record number, then press Enter
or Return.
To move Do this
Quickly through Drag the bookmark down or up to move forward or records backward.
Through records in Use the scroll bar on the right side of the window.View as List or View as Table
To a record with a See “Finding records” on page 3-1.unique value that you know
Adding and duplicating records When you add or duplicate records, FileMaker Pro stores new records at the end of the file. In Browse mode, you see the new record after the current record, or after the last record in the found set:
• If records are sorted or semi-sorted, the new record appears immediately after the current record, and the sort status changes to Semi-sorted.
• If records are unsorted, the new record appears after the last record in the found set. For more information, see “Sorting records” on page 3-8.
Note If a file is locked or write-protected, or you don’t have access privileges to create records, FileMaker Pro doesn’t add new records. See “Defining passwords” on page 9-1.
To Do this in Browse mode
Add a new blank record Choose Records menu > New Record. You see a blank record with one field selected.
Quickly add a record Select the record to duplicate. Then, choose Records with the same or similar menu > Duplicate Record. (See “Selecting the current data as an existing record record” on page 2-3.)
Add or duplicate related See the next section. records

Adding and viewing data 2-5
If the field is defined to enter field values automatically, you see those values entered in the new record. See “Defining automatic data entry” on page 5-8.
To enter or change values in the new record, see “About entering data in records” on page 2-6.
Adding and duplicating related records If you’re working with related files, you can add records to the related file as you enter data in a record in the master file.
Note You can only add related records from the master file if the relationship is defined to allow the creation of related records. (See “Defining relationships for relational databases and lookups” on page 8-10.)
To Do this in Browse mode
Create a record in the Choose Records menu > New Record. master file
Add a record to a 1 If the related field is in a portal, type data into the field related file in the last (empty) row of the portal, then press Tab.
1 If the related field isn’t in a portal, type data into the field, then press Tab.
Duplicate a master Be sure no records in a portal are selected, then choose record (and display Records menu > Duplicate Record.related data)
Duplicate a related Select the record in the portal, then choose Records menu record in a portal > Duplicate Record.
Master file
related records fromPortal displaying Type in the last row of the
portal to add a related the Line Items file record to the Line Items file
For more information about related files, see “Displaying data from related files” on page 8-1.
Deleting records When you delete a record, you permanently discard the data in all the fields in that record.
Important You can’t retrieve deleted data, and you can’t undo the action of deleting records. Before you delete records, consider making a backup copy of your file.

2-6 FileMaker Pro User’s Guide
If you’re working in a relational database and the option to delete related records is selected in the Edit Relationship dialog box, FileMaker Pro deletes related records when you delete a master record. For more information, see “Defining relationships for relational databases and lookups” on page 8-10.
To delete Do this
One record In Browse mode, select the record to delete. (If you’re deleting a master record in a relational database, select anything other than a portal row in the master record.) Choose Records menu > Delete Record, then click Delete.
A related record Select a portal row in the master file by clicking inside the row but outside any fields in the row. Choose Records menu > Delete Record, then click Delete.
Note To delete related records, Allow deletion of portal records must be selected in the Portal Setup dialog box. (See “Creating and formatting portals to hold related fields” on page 6-19.)
A group of records Make sure the found set contains only the records you want to delete. (See “Finding records” on page 3-1.) In Browse mode, choose Records menu > Delete All Records, then click Delete.
All records in a 1 In Browse mode, choose Records menu > Show All database Records, then choose Records menu > Delete All
Records. 1 Create a clone of the database with no records. See
“Saving files” on page 1-7.)
Keep these points in mind:
• To permanently delete a field definition and all the data in the field in all records, see “Deleting field definitions and data” on page 5-12.
• To temporarily omit records from the found set without deleting them from the database, see “Hiding records from a found set and viewing hidden records” on page 3-7.
About entering data in records The following sections describe how to add or change data in a FileMaker Pro database.
If you’re working with a database that doesn’t have any records, you must create a record before entering data. See “Adding and duplicating records” on page 2-4.
Note If a file is locked or write-protected, or you don’t have access privileges to edit records, you can’t modify data. See “Defining passwords” on page 9-1.
Selecting a field
To Do this in Browse or Find mode
Select a field Click in the field.
Select the contents of Select the field, then choose Edit menu > Select All. a field
Move to the next field Press Tab (or click in the field). in the field order
Move to the previous Press Shift+Tab (or click in the field). field in the field order
Move to items in a Press the arrow keys. See “Entering preset data from a value list value list” on page 2-8.
Mac OS: You can’t use arrow keys to move to items in pop-up menus. (You must use the mouse.)
For more information about selecting a field in Browse mode or Find mode, see FileMaker Pro Help. Choose Help menu > Contents and Index, click the Index tab, and type fields,current.

Adding and viewing data 2-7
Entering and changing data in fields You can enter data up to the character limit for the field type (for example, 255 characters in a number field). You can view and print only the data that fits within the field boundaries.
To Do this in Browse mode
Enter data in a text field Click in the field, then type the text (up to approximately 64,000 characters).
Enter data in a number field Click in the field, then type up to 255 characters.
Enter data in a date field Click in the field, then type one date on one line in the field. Type the day, month, and year as numbers (for example, 2/3/2002), separated by a nonnumeric character like – (minus) or / (forward slash).
Important To avoid confusion when using dates, always use four-digit years.
Enter data in a time field Click in the field, then type the time of day (or a time duration) as:
1 hours1 hours and minutes1 hours, minutes, and secondsSeparate hours, minutes, and seconds by a nonnumeric character like : (colon).
Type the time of day in 24- or 12-hour format, with or without AM or PM. (AM is assumed for a time less than 12:00.)
Add data to a container field See “About working with graphics, sounds, and movies” on page 2-11 and “Working with OLE objects” on page 2-15.
Insert a tab character in a field Click where you want to insert the tab. Press Ctrl+Tab (Windows) or Option+Tab (Mac OS).
Add data to fields formatted as See “Entering preset data from a value list” on
checkboxes, lists, or menus radio or option buttons, page 2-8.
To Do this in Browse mode
Delete data from a field Select the data, then press Backspace or Delete.
Edit, format, or check the See “About working with text” on page 2-13. spelling of text in a field
Change data quickly, using See “Using context menus” on page 1-5. commands in a pop-up menu
Keep these points in mind:
• A field can be defined to make sure you enter data in a specific format, or within a certain range. See “Defining automatic data entry” on page 5-8 and “Defining field validation” on page 5-9.
• You may not be able to enter or change data in some fields (for example, calculation or summary fields, or fields that are formatted to prevent entry). You can copy the contents of calculation and summary fields to other fields. See “About choosing a field type” on page 5-4 and “Allowing or preventing entry into fields” on page 7-8.
• If you don’t type a year in a date field, and haven’t typed a separator character for a year, FileMaker Pro enters the current year for you. (This can’t be done if 4-Digit Year Date validation is defined for the field options. See “Defining field validation” on page 5-9.)
• For more information on how FileMaker Pro handles Year 2000 issues, see www.filemaker.com.
• To return the current record to the way it was before you added or changed data, choose Records menu > Revert Record before you select a different record or leave the current one.
• You can paste a value from the field index, which contains all the values in the selected field. Field indexes are documented in Help. Choose Help menu > Contents and Index, click the Index tab, and type index.

2-8 FileMaker Pro User’s Guide
• There are other ways to enter data in a field besides typing, like importing or copying it from another source, using a related file, or having FileMaker Pro automatically enter the data when you create a record. See “About import and export” on page 12-1,“Displaying data from related files” on page 8-1, and “Defining automatic data entry” on page 5-8.
• For more information about entering and changing data, see FileMaker Pro Help. Choose Help menu > Contents and Index, click the Index tab, and type entering data.
Using URLs in a field If you have a valid URL (web address) in a field, you can open the URL in an application that you specify:
1. Click the field to select it.
2. Right-click (Windows) or Control+click (Mac OS) any part of the URL.
3. Choose Open <URL> from the context menu.
Note On Mac OS 9.x or earlier, this feature requires the Internet control panel, which is usually available as part of a normal system software installation. Make sure the Internet control panel is turned on in the Extensions Manager control panel.
Copying and moving data in records You can copy values from any field type, including fields that are formatted as radio or option buttons, checkboxes, lists, or menus.
To Do this in Browse mode
Copy or move a value from Select the contents of the field, then choose one field to another Edit menu > Copy or Cut. Display another record,
if needed. (See “Moving through records” on page 2-4). Select the field to hold the data, then choose Edit menu > Paste.
To Do this in Browse mode
Copy a value from a field in Click the field that you want to hold the data. the last record that you Choose Insert menu > From Last Record.accessed (by clicking or pressing Tab)
Copy values in a record to With no field selected, choose Edit menu > Copy. another application, like a In the other application, paste the values that are word processor in the Clipboard.
Copy data in a master record With no fields and no records in a portal selected, and in all related records in a choose Edit menu > Copy.portal
Copy one related record in a Select a related record, then choose Edit menu > portal Copy.
Copy the found set of With no fields selected, press Shift (Windows) or records to the Clipboard Option (Mac OS) while choosing Edit menu >
Copy.
Duplicate data from another See “Adding and duplicating records” on record into the current record page 2-4.
Keep these points in mind:
• When you copy a record, everything is copied except data in container fields. Data is copied in tab-delimited format, in the order the fields appear on the layout. Text styles, like bold or italics, aren’t copied.
• You can drag and drop information between fields, records, and applications. See “Moving data with drag and drop” on page 2-9.
• For more information about copying and moving data, see FileMaker Pro Help. Choose Help menu > Contents and Index, click the Index tab, and type data,moving.
Entering preset data from a value list A field can display values as radio or option buttons, checkboxes, pop-up or drop-down lists, or pop-up menus. You can use these options to quickly enter preset data. The data is defined in value lists.

Pop-up menu Pop-up list
Choose to edit values in the list
Radio buttons
Checkboxes
Click to enter a value that isn’t included in the list
To Do this in Browse mode
Choose preset value from Click the field, then choose the value from the pop-a pop-up (drop-down) list up list or menu.or menu
Deselect a list Press Esc, or click the field again.
Type a value that isn’t Click the field again, then type the value. included in a pop-up list Note You must type a value that’s in the list if the
Member of value list validation option is selected for the field. See “Defining field validation” on page 5-9.
Select or clear a radio Click the button to select a value. (option) button To clear a button, Shift+click it.
Select or clear a checkbox Click a checkbox to select or clear a value.
Enter a value that isn’t Choose or click Other. Type a value in the dialog included in a value list box, then click OK.
Clear an Other item Choose or click Other, then delete the associated value (and its carriage returns) in the dialog box. Click OK. (This action clears the field.)
Edit a value list Choose Edit, then change the values in the dialog box. Click OK.
Adding and viewing data 2-9
Note If you have layout design privileges, you can set field format options to determine how fields appear on a layout. For example, the format determines whether the Other or Edit items appear in radio buttons, checkboxes, and pop-up lists or menus. See “Formatting fields to use a pop-up list, pop-up menu, checkboxes, or radio buttons to display a value list” on page 7-6.
Moving data with drag and drop You can use drag and drop to transfer information within a FileMaker Pro file, or between FileMaker Pro and other applications that support drag and drop.
For example, you can drag a number from one field and drop it in another field in the same database. Or, you can drag an object from a FileMaker Pro layout and drop it into a Microsoft Word document.
In FileMaker Pro, you can use drag and drop in Browse mode, Find mode, or Layout mode. To enable or disable the drag and drop feature for text in Browse mode or Find mode, select or clear Enable drag and drop text selection in the General area of the Application Preferences dialog box. See “Setting general application preferences” on page A-1.
For more information about drag and drop, choose Help menu > Contents and Index, click the Index tab, and type drag and drop.

2-10 FileMaker Pro User’s Guide
Inserting the current date or other variable into fields To insert the current date, time, or user name into a field in Browse mode or Find mode:
1. Click the field.
2. Choose Insert menu > Current Date, Current Time, or Current User Name.
To insert the current As specified in Choose
Date in a date, number, or text field Your operating Current Date system settings
Time in a time, number, or text field Your operating Current Time system settings
User name in a text or number field FileMaker Pro Current User Application Name preferences
Important To avoid confusion when using dates, always use four-digit years. For more information on how FileMaker Pro handles Year 2000 issues, see www.filemaker.com.
After you insert the date, time, or user name into a field, that value doesn’t change. To display a value that updates, place a date, time, or user name symbol on the layout. See “Inserting the page number, date, or other variable onto a layout” on page 7-11.
Replacing data in fields You can replace the contents of a field in all records, or in a set of records, with:
• a different value (for example, replace the value Green with Blue)
• a new series of serial numbers (for example, when records have become disordered)
• a calculation. You can also modify a field’s existing values by using a calculation that includes the field (for example, change the value Gross Pay to the result of the calculation Gross Pay + 1000).
Before you begin, keep these points in mind:
• Important You can’t undo replacing field values. Before you begin, consider making a copy of the file.
• You can’t replace data in calculation, summary, or global fields.
• You can’t reserialize calculation, summary, global, or container fields.
• You can sort records before you reserialize them. For example, you can sort suppliers by how frequently you use them, then reserialize the records.
• To replace field values in only a few records, go to each record and change the value by selecting the contents of the field, then entering the information you want.
To replace field values in the found set:
1. If necessary, find, omit, or sort the records in the database.
See chapter 3, “Finding and sorting information.”
2. In Browse mode, in the current record, select the contents of the field whose values you want to replace.
3. If you’re replacing data with a constant value (instead of serial numbers or a calculated value), type the constant value.
4. Choose Records menu > Replace Contents.
5. In the Replace dialog box, select how to replace field values.
To replace eachfield with Select
The value in the Replace with <value>. FileMaker Pro replaces the currently selected field contents of the field for the entire found set of records.

Adding and viewing data 2-11
To replace eachfield with Select
A serial number Replace with serial numbers. Type the starting value for the serial numbers in Initial value, and the incremental value in Increment by. (FileMaker Pro enters serial numbers starting with the first record in the found set).
If the field is defined to automatically enter a serial number, you can:
1 Select Update serial number in Entry Options to reset the next value in the Options for Field dialog box. The next automatically-entered value for this field (after the replace is performed) follows in sequence.
1 Clear Update serial number in Entry Options to leave the next value in the Options for Field dialog box unchanged. The next automatically-entered value is based on the current settings (not in sequence with records reserialized by this replace task).
For information about the Options for Field dialog box, see “Defining automatic data entry” on page 5-8.
A calculated value Replace with calculated result, then click Specify. In the Specify Calculation dialog box, define the calculation. The result must match the field type of the replaced field. Click OK.
For information about the Specify Calculation dialog box, see “Defining calculation fields” on page 5-5.
6. Click Replace.
Note If the field that contains the replaced data is validated, FileMaker Pro doesn’t validate the new data. See “Defining field validation” on page 5-9.
To add a prefix or suffix to values in a field, see FileMaker Pro help. Choose Help menu > Contents and Index, click the Index tab, and type prefixes.
About working with graphics, sounds, and movies You can use container fields to store multimedia, like graphics, sounds, or movies. In Windows, you can also store Object Linking and Embedding (OLE) objects in container fields. See “Working with OLE objects” on page 2-15.
Keep these points in mind:
• To create a container field, see “Defining text, number, date, time, or container fields” on page 5-5.
• Windows: If you’re inserting or pasting graphics into a database that you share with FileMaker Pro for Macintosh users (for example, if you’re sharing the database on a cross-platform network), make sure Store compatible graphics is selected in the General tab of Document preferences. See“Setting general application preferences” on page A-1.
• To control how graphics display in a container field, see “Formatting graphics on a layout” on page 7-17.
• For more information, see FileMaker Pro Help. Choose Help menu > Contents and Index, click the Index tab, and type container fields.
Inserting graphics into fields 1. In Browse mode, click a container field.
2. Choose Insert menu > Picture.
3. In the dialog box, choose a file type for Files of type (Windows) or Show (Mac OS).
Tip You can use the Insert QuickTime command for file types supported by QuickTime 3.0 or later. See the following section if you can’t find the file type you want.
4. Select the graphic file (change folders, if needed).
5. Choose a storage option, then click Open.

2-12 FileMaker Pro User’s Guide
To reduce the database file size, select Store only a reference to the file (Windows) or Store file reference (Mac OS). However, if the file is moved or deleted, FileMaker Pro can’t display the graphic. To store the graphic in the file, clear the option.
6. Windows: For file types .CGM, .PCX, .DRW, or .PIC, you see another dialog box. Select the applicable options, then click OK.
The options for inserting graphics into fields are documented in Help. Choose Help menu > Contents and Index, click the Index tab, and type graphics.
Inserting movies and QuickTime multimedia into fields QuickTime is an application that compresses, stores, and plays multimedia files, like sound, animation, and movies. QuickTime supports many file types, including Audio Video Interleave (.AVI) and wave sound (.WAV).
Use the Insert QuickTime command to insert any file type supported by QuickTime. For information about the file types, refer to the Apple QuickTime web site at www.quicktime.com.
To insert movies and QuickTime multimedia into a field:
1. In Browse mode, click a container field.
2. Choose Insert menu > QuickTime.
3. In the dialog box, select the filename (change folders, if needed), then click Open.
Mac OS: Select Show Preview to see a frame of the movie.
Keep these points in mind:
• If you’re inserting a MIDI file format, like .RMI, .MID, or .KAR, you must save a converted version of the file. Instructions for converting MIDI files are documented in Help. Choose Help menu > Contents and Index, click the Index tab, and type MIDI files.
• The multimedia displayed in a container field is a reference to a multimedia file. If you move the database to a different computer, move the multimedia file as well (unless you have access to it through an AppleShare network server for Mac OS).
• For information about how web users work with graphics, sound, and movies in published databases, see FileMaker Pro Help. Choose Help menu > Contents and Index, click the Index tab, and type container fields.
• You can crop or scale the first frame of a movie. See “Formatting graphics on a layout” on page 7-17.
Pasting graphics, movies, and sounds from the Clipboard You can copy a graphic, movie, or sound from a different application to the Clipboard, then paste it into a FileMaker Pro container field.
1. Cut or copy the graphic, movie, or sound to the Clipboard.
2. In the FileMaker Pro file, switch to Browse mode and view the record to paste into.
3. Click the container field, then choose Edit menu > Paste.
Playing movies in fields To view a QuickTime or QuickTime VR movie, click the field containing the movie, then use the movie controls.
QuickTime 3.0 movie controls
Click, then drag the slider to adjust the volume
Click to start or pause the movie
Drag the slider to go to a specific frame of the movie
Click to step backward or forward through the frames

Adding and viewing data 2-13
QuickTime VR 3.0 movie controls
Click and drag across the movie to change the view
Click to return to the previous view after Zoom in or out, then clicking a hot spot click and drag an
object to move itZoom in or out
Click to show hot spots. Click a hot spotto trigger an action
Note The controls you see depend on the movie. Some features may not be available. For more information about QuickTime, refer to the Apple Computer web site at www.quicktime.com.
Recording and playing sounds in fields With the proper software and hardware, you can play and record sound.
To Do this
Play a sound Double-click the field where the sound is stored.
Record a sound Click an empty container field, then double-click the field or choose Insert menu > Sound. In the Sound Record dialog box, click Record.
Stop or pause recording In the Sound Record dialog box, click Stop or Pause.
Play back a recording In the Sound Record dialog box, click Play.
The requirements for playing sounds are documented in Help. Choose Help menu > Contents and Index, click the Index tab, and type sounds.
Deleting graphics, movies, or sounds from fields To delete graphics, movies, or sounds, click the container field, then press Backspace or Delete.
About working with text In Browse mode and Find mode, you can work with text data in fields. In Layout mode, you can work with the text that displays on a layout.
Note To learn how to use the Find/Replace command to find and replace text, see FileMaker Pro Help.
Keep these points in mind:
• You can use drag and drop, toolbars, or context menus to edit text. See “Moving data with drag and drop” on page 2-9 and “Performing menu commands” on page 1-4.
• For more information about working with data in Browse mode, see “About entering data in records” on page 2-6.
Selecting text To select text in a field (in Browse mode or Find mode) or in a text object (in Layout mode):
1. Click a field in Browse mode or Find mode. In Layout mode, select the text tool from the tool panel.
2. Do the following:
To select Do this with the I-beam pointer
Individual characters With the pointer, drag through the characters.
A word Double-click the word.
A line of text (the first character in the Triple-click anywhere in the line.field or object to the last character in the field or object on the same line)
A paragraph of text Click the block of text four times.
All text in a field or text object Click the field or object five times.

2-14 FileMaker Pro User’s Guide
Tip In Layout mode, use the selection tool to manipulate a block of text as if it were an object (for example, to change fonts). When a text block is selected with the selection tool, typing replaces the text in the text block. For more information, see “Selecting objects” on page 6-12.
Editing text 1. Select the text you want to edit. (See the previous section.)
2. Type new text or make changes.
To Do this
Replace text Select the text, then type the new text.
Put selected text on the Select the text, then choose Edit menu > Copy (to Clipboard duplicate the text) or Cut (to remove the text).
Insert the contents of Click where you want the text to appear, then choose the Clipboard at the Edit menu > Paste.insertion point
Delete text permanently Select the text, then press Backspace or Delete.
Note FileMaker Pro doesn’t place your selection on the Clipboard, and you can’t paste it anywhere.
Insert a tab character in Press Ctrl+Tab (Windows) or Option+Tab (Mac OS). a field
Keep these points in mind:
• To restore text you deleted, choose Edit menu > Undo before you do anything else in FileMaker Pro.
• Text you cut or copy stays on the Clipboard until the next time you use Cut or Copy.
Formatting text in Browse mode You can change the text attributes (like font, size, and style) for data in text fields, and in global fields defined as the text data type. You can also change the paragraph alignment, margins, and line spacing.
Important You can change text attributes for data in Browse mode. Unlike text formatting specified in Layout mode, this formatting is stored with the data. The formatting you set in Browse mode appears in any layout that displays the field.
To change text attributes in Browse mode, select the text in a field, then choose a command from the Format menu. You can also format text using the Text Formatting toolbar. For more information, see “Formatting text” on page 7-12.
Checking spelling You can check the spelling of text in a selected field, in the current record or layout, or in a group of records (the found set). You can also set FileMaker Pro to check spelling as you type (see the next section).
When you check spelling, FileMaker Pro compares your text with the installed main dictionary and a user dictionary. Each database can have its own user dictionary. This is useful when, for example, you have databases that contain unique terms (like medical or legal terms).
Before you begin, be sure the selected dictionaries are the ones you want to use. For more information about spelling dictionaries, including steps for importing or exporting dictionaries, see FileMaker Pro Help. Choose Help menu > Contents and Index, click the Index tab, and type dictionaries.
To check spelling in a field, one or more records, or a layout:
1. Display the record or layout, find the set of records, or select the text to check.
2. Choose Edit menu > Spelling, then choose a spelling command.
To check the spelling of Choose
A selected word or passage Check Selection
Text in the current record Check Record

Adding and viewing data 2-15
To check the spelling of Choose
Text on the current layout (in Layout mode) Check Layout
Text in the found set of records Check All
3. In the Spelling dialog box, choose an option if a questionable word appears in the Word box.
To Do this when you see a questionable word
Replace a misspelled word Select a word from the list of suggestions, then with one in the dictionary click Replace.
Revise a misspelled word For Word, retype the word or the characters you that isn’t in the dictionaries want to change. Then, click Check. When the by retyping it word is spelled as you want, click Replace.
Leave the word as it is Click Skip. FileMaker Pro skips every occurrence of the word.
Leave the word as it is, and Click Learn. add it to the user dictionary
Show (or hide) the word in Windows: Click Context. question in context Mac OS: Click the triangle in the lower right side
of the dialog box.
Note You can’t change a misspelled word in a restricted or password-protected file or field. In that case, click Next.
You can retype the word if the correct word isn’t in the list
Word with questionable spelling
Suggestions for replacement
Mac OS: Click to see the questionable word in context
For more information about adding or removing words from a dictionary, see FileMaker Pro Help. Choose Help menu > Contents and Index, click the Index tab, and type dictionaries.
Checking spelling as you type You can set FileMaker Pro to alert you to spelling errors as you type, but this option is much slower than the other spelling options. When you’re alerted to a spelling error, you can:
• Correct the last word typed.
• Choose Edit menu > Spelling, then choose Correct Word before you press Tab or Enter. Use the Spelling dialog box to correct the word. (See the previous section.)
To check your spelling as you type, see “Setting document spelling preferences” on page A-6.
Working with OLE objects With Object Linking and Embedding (OLE), you can combine information from other applications with information in FileMaker Pro. You include OLE objects—like graphics, spreadsheets, sounds, or text created in other applications—in container fields or layouts in FileMaker Pro files.
In Windows, you can embed, link to, and edit OLE objects. In the Mac OS, OLE objects appear in container fields as graphics.You can cut, copy, and paste OLE objects as graphics, but you can’t edit the objects.
If you publish your database using FileMaker Pro Web Companion Instant Web Publishing, OLE objects appear as static graphics in a web browser.
OLE is documented in Help. Choose Help menu > Contents and Index, click the Index tab, and type OLE.
4. When the spelling check is complete, click Done.

Chapter 3 Finding and sorting information
This chapter shows you how to:
• find records in your database using many different criteria
• omit records from the found set
• sort records
Note To learn about the Find/Replace command, the Constrain Found Set command, and the Extend Found Set command, see FileMaker Pro Help.
Finding records To find records, work in Find mode. You type criteria (the value or values to find) into fields in a find request, which looks like a blank record. When you perform the find, FileMaker Pro searches through all the records, comparing the criteria with the data in the file. Records with data matching the criteria are added to the found set, which is the subset of records being browsed.
The number of records in the current found set
You can then work with just the records in the found set. For example, you can view, edit, calculate summaries for, sort, print, delete, export, or replace data in these records.
To define a find request:
1. Go to a layout that has fields you want to enter criteria in.
You can change layouts and enter criteria on more than one layout.
2. Choose View menu > Find Mode.
3. In the find request, select a text, number, date, time, or calculation field to use for finding, then type a value in the field.
See the following sections for how to enter special criteria. For example, you can search for:
• text, symbols, numbers, dates, or times
• exact matches
• ranges of information
• invalid dates or times
• data in related fields
• records that match multiple criteria
• empty or non-empty fields
• duplicate values
• all records except those matching criteria you specify
You can use the Symbols pop-up menu to help you enter criteria that include operators.

3-2 FileMaker Pro User’s Guide
Choose a Type Find criteria in fieldslayout with
fields you want to search on
Click the down arrow
to see the operators
Click to begin searching
4. Click Find in the status area, or choose Requests menu > Perform Find.
To cancel before searching is finished and leave the previous found set unchanged, press Esc (Windows) or Command+period (Mac OS).
After performing a Find, you can change or refine the criteria. See “Viewing, repeating, or changing the last find” on page 3-7.
To show all the records again:
• In Browse mode: choose Records menu > Show All Records.
• In Find mode, choose Requests menu > Show All Records.
You don’t need to choose Show All Records before performing finds. FileMaker Pro always searches the entire database.
Keep these points in mind:
• You can’t enter search criteria in container fields, summary fields, or global fields. To find data in container fields, create a text or number field that describes or identifies the contents of the container field. Then find the value in the text or number field.
• Finds on unindexed fields (for example, calculation fields referencing related fields) can take longer than finds on indexed fields.
• If a field’s values are indexed, you can use the index to enter values in find requests. Using the index is documented in Help. Choose Help menu > Contents and Index, click the Index tab, and type storage.
Finding text and characters Search for text in text fields, or in calculation fields that return a text result.
Except as noted, when you search for text, the field can contain other values in addition to the one(s) you specify, and the values can be in any order. For example, typing hotel in the Accommodation field finds records for Hotel, Discount Hotel, and Hotel, Luxury.
To find Type this in the field Example
Words that start with The characters. Chris Smith finds specific characters Chris Smith, Smith Chris,
Chris Smithson, and Smith Christenson
A phrase or sequence of The text, including "Marten and Jones
characters spaces and punctuation, Interiors" finds between the double Marten and Jones quotation marks ("). Interiors but not Jones
and Marten Interiors
", Ltd." finds all companies with ", Ltd." in the name, but not those without the comma.
Words with one or more One wildcard character Gr@y finds Gray and Grey unknown or variable (@) for each unknown @on finds Don and Ron characters character. but not Bron
Words with zero or more * for all unknown unknown or variable text characters. J*r finds Jr. and Juniorcharacters in a row
Jo*n finds Jon and John

Finding and sorting information 3-3
To find Type this in the field Example
Symbols or other non- The characters, "@" finds @ (or an email alphanumeric characters, including spaces and address, for example) such as punctuation or punctuation, between the "," finds records spaces double quotation marks containing a comma
("). " " finds three spaces in a row
Words with letters from The text, including "òpera" finds òpera but other languages spaces and punctuation, not opera
between the double (òpera without quotes quotation marks ("). finds both òpera and
opera)
Partial phrases (a Characters, punctuation, *"son & Phillips"sequence of words or and spaces between finds characters) quotation marks (""). Johnson & Phillips and
Use * to find this text in Paulson & Phillipsthe middle of a longer text string.
Case-sensitive text (Use ASCII as the fred finds fred language for indexing but not Fred the field. This procedure is documented in Help. Choose Help menu > Contents and Index, click the Index tab, and type text, finding.
Exact matches See the next section,“Finding exact matches in text fields.”
Ranges of information See page 3-4.
Note Finds using quotes (“ ”) are called literal text searches. These searches take longer than non-literal text searches.
Finding exact matches in text fields
To find values that are Use Example
Exactly as you specify, in the == (two equal ==John finds John but order you specify. The field signs) not John Smith contains no other values. ==John Smith finds
John Smith but not Smith, John or John Smithers
Whole words you specify. = =Market finds Market, Market Services, and Ongoing Market Research but not Marketing or Supermarket
=Chris =Smith finds Chris Smith or Smith Chris but not Chris or Christopher Smithson
Finding numbers, dates, and times Numbers, dates, and times should be entered in the corresponding field types (or calculation fields returning the corresponding field type) to ensure correct behavior when finding them. See “About choosing a field type” on page 5-4. You cannot find text in number fields, except certain letters representing Boolean (True/ False) values; see table below.
Important To avoid confusion when using dates, always use four-digit years. For more information on how FileMaker Pro handles Year 2000 issues, see www.filemaker.com.
To find Type this in the field Example
A number in a number The number, in the .50 finds .5, .50, and $.50field or in a calculation format used when the file field that produces a was created (unless Use numeric result System Formats is
chosen)

3-4 FileMaker Pro User’s Guide
To find Type this in the field Example Finding ranges of information
Use this Example To find values that are operator
Less than a specified value. < <40
<9/7/1999
<M
Less than or equal to a specified <= <=95129
value. or ≤ (Mac OS) ≤05:00:00
<=M
Greater than a specified value. > >95129
>9/7/1999
>M
Greater than or equal to a specified >= >=100
value. or ≥ (Mac OS) >=9/7/1999
≥8:00
≥M
Within the range you specify. A .. or ... 12:30...17:30range is first to last character in the (two or three 1/1/1999..6/6/alphabet for text; least to greatest for periods) 2000numbers; and earliest to latest for A...Mdate and time.
Finding data in related fields You can enter Find criteria in related fields that are displayed in a portal or directly on a layout.
When you perform a Find in a related field, FileMaker Pro displays all records in the master file that have a related record matching the criteria entered in the related field.
For example, suppose you have an invoice file with a portal displaying line items. To find all invoices listing a Computer, type Computer in the Item field in the portal. For more information about related fields, see chapter 8, “Working with related files.”
A Boolean number in a True, Yes, Y, y, T, T finds True, Yes, Y, y, T, t, number field or in a t, or 1 to find True and 1 calculation field that values 0 finds False, No, N, n, F, f, produces a Boolean False, No, N, n, F, and 0 result f, or 0 to find False
values
A date in a date field or in a calculation field that produces a date result
The date as digits, separated by a nonnumeric character, in the format used when the file was created (unless Use System Formats is chosen)
3/3/2000 finds3/3/2000, March 3, 2000, and3-3-2000
Today’s date in a date // field or in a calculation field that produces a date result
// finds April 4, 2000 (when the current date is 4/4/2000)
A time in a time field or The time as digits, 12:53:09 finds 12:53:09in a calculation field that separated by colons, in produces a time result the format used when the
file was created (unless Use System Formats is chosen)
Invalid dates, times, or calculated date or time results
? ? finds:
Next Tuesday or 2/33/2000 in a date field, or midnight in a time field
Ranges of information See the next section.
Note System formats is documented in Help. Choose Help menu > Contents and Index, click the Index tab, and type system formats.

For information about omitting related records, see “Finding all records except those matching criteria” on page 3-6.
Find request
E154 Invoice ID
Alvarez Name
Item ID Item I100 Computer I202 Desk I153 Lamp I229 Bookcase I448 Chair
E153 Invoice ID
Tang Name
Item ID Item I202 Desk I443 Long table I153 Lamp I288 Round table I100 Computer
Invoice ID
Name
Item ID Item
E152 Invoice ID
Durand Name
Item ID Item I384 Swivel chair I554 Panels I288 Round table I100 Computer I448 Chair
Records in master file
Finding records that match multiple criteria You can narrow or widen your search by using more than one criterion.
Records matching all criteria specified (logical AND search) To narrow your search, enter criteria in as many fields as needed to make your request specific, then click Find.
Computer
Finding and sorting information 3-5
Example: to find all people named Smith who work in Sales, type Smith in the LastName field and Sales in the Department field.
Records that match at least one of the sets of criteria, but not necessarily all (logical OR search) To widen your search, enter criteria in the first request. Choose Requests menu > Add New Request. Enter the second (set of) criteria. Continue adding requests for each (set of) criteria, then click Find.
Examples:
• To include customers in New York and customers in Paris in the found set, type New York in the City field in the first request, then type Paris in the City field in the second request.
• To include companies with more than 100 employees and companies with more than $100 million in assets, type >100 in Number of Employees in the first request, then type >100,000,000 in Capitalization in the second request.
• To include 6th grade students who are in Honors Algebra and 7th grade students who are in Honors Geometry, type 6 in Level and Honors Algebra in Course in the first request, then type 7 in Level and Honors Geometry in Course in the second request.
Records that match one set of criteria but not another To narrow your search by excluding records that meet specified criteria (for example, to find vendors in New York state that are not in New York City), see “Finding some records while omitting others” on page 3-7.
Deleting and reverting requests To delete a request, go to the request you want to delete, then choose Requests menu > Delete Request.

3-6 FileMaker Pro User’s Guide
To restore a request to the way it was when you last committed it, choose Requests menu > Revert Request. Requests are committed, for example, when you click out of all fields, go to a different layout or request, or perform a Find.
Click a page of the book to see another find request
Number of the current request Number of existing requests
Finding empty or non-empty fields
To find fields that are Enter this in the field
Not empty (i.e., fields that have data) *
Empty =
Finding duplicates If you perform a find for duplicate records, the found set of records depends on the method you use to find them:
• You can find only the “extra” instances of duplicated records. For example, you have two records for each customer and you want to find only the second record for each customer.
• To do this, choose Help menu > Contents and Index, click the Index tab, and type Duplicate values.
• You can find all records that are not unique, not just the “extra” records. For example, you might want to find all records that aren’t unique, then examine them to decide which records to use or delete.
• To do this, choose View menu > Find Mode and type ! in the field.
You determine the field on which uniqueness is based. If several fields taken together determine uniqueness, you can create a calculation field (returning a text result) that concatenates the values. An example formula is First Name & Last Name & Phone Number.
Keep these points in mind:
• Values are duplicates only if word order is the same.
• When determining uniqueness in text fields, FileMaker Pro looks at the first 20 alphanumeric characters of each word, up to a total of 60 characters (including spaces).
• You cannot find duplicate values in unindexed fields. Indexing is documented in Help. Choose Help menu > Contents and Index, click the Index tab, and type storage.
Finding all records except those matching criteria You can exclude records while performing a find. For example, you can find all invoices except those created in the past 30 days.
Finding records that don’t match criteria For example, to find all sales records except those for the city of London:
1. In Find mode, type criteria for the records to omit.
2. Select Omit.
Select Omit to exclude records that
match the request
3. Click Find.

Finding and sorting information 3-7
Finding some records while omitting others For example, to find vendors in the state of New York, except those in New York City:
1. In Find mode, type the criteria for the records to find (type New York in the State field.)
2. Choose Requests menu > Add New Request.
3. Type criteria for the records to exclude (type New York in the City field.)
4. Select Omit.
5. Click Find.
Keep these points in mind:
• You can have Omit criteria in more than one request.
• FileMaker Pro works through the requests in the order you create them. For example, in a Clients database with clients in the US and France:
• If the first request finds all clients in Paris and the second request omits all clients in the USA, the found set contains all clients in Paris, France but none in Paris, Texas or anywhere else in the USA.
• If the order of the requests is reversed (the first request omits all clients in the USA and the second request finds all clients in Paris), the found set includes all clients in Paris, France and in Paris, Texas, but no records for clients elsewhere in the USA.
• To omit a related record from a portal row (or set of related records), you must change the relationship or the value in at least one of the match fields so that the match field of the related record no longer matches the match field of the master record. For more information about related fields, see chapter 8, “Working with related files.”
• To omit records from a found set after performing a find, see the next section.
Hiding records from a found set and viewing hidden records All records that are not in the found set are omitted, or hidden. You can omit additional records from the found set without doing a new find.
Note Omitted records are temporarily excluded from the found set. They still exist in the database.
To Do this
Omit a specific record Display or select the record to omit, then choose Records menu > Omit Record.
Omit a series of records Display or select the first record in a number of consecutive records to omit, then choose Records menu > Omit Multiple. In the Omit Multiple dialog box, type the number of records to omit, then click Omit.
View the omitted set Choose Records menu > Show Omitted.
Bring back all the records Choose Records menu (Browse mode) or Requests in the file menu (Find mode) > Show All Records.
Viewing, repeating, or changing the last find To view the most recent find criteria, choose Records menu >Modify Last Find. Then, to return to the found set, choose View menu > Browse Mode. To repeat the find, click Find. Or you can modify the find criteria, then click Find.

3-8 FileMaker Pro User’s Guide
Sorting records FileMaker Pro stores records in the order they were added to the file. Sorting temporarily rearranges records, so you can view, update, or print them in a different sequence.
You choose the fields whose contents you want to sort by. The first sort field arranges the records based on the field’s contents. The second sort field arranges records when two or more records have the same value in the first sort field, and so on. You can sort records in ascending order, descending order, or in a custom order.
The records remain sorted until you perform a find, add new records, or sort the records again.
To sort the records in the current found set:
1. In Browse mode, choose Records menu > Sort.
2. In the Sort Records dialog box, choose fields for sorting, in the order you want them sorted by. For options, see the table below.
Relationship list
Select fields to sort
Select the sorting orderfor the selected field
3. Click Sort.
To cancel before sorting is finished, press Esc (Windows) or Command+period (Mac OS.)
To Do this
Choose a sort field and sort it In the fields list, double-click a field. according to the selected order
Assign different sort orders to fields as you add them to the Sort Order list
For each sort field, in the fields list, select a field, select a sort order, then click Move.
Ascending order is first to last character in the alphabet for text, lowest to highest for numbers, and earliest to latest for dates and times. Descending order is last to first character in the alphabet for text, highest to lowest for numbers, and latest to earliest for dates and times.
Change the sort order of a field In the Sort Order list, select a field, then select in the Sort Order list (for a sort order for that field.example, ascending or descending order)
Sort in a custom order, In the fields list, select a field, select Custom according to the order of values order based on value list, then choose or define in a value list (for example, in a value list. (See “Defining a list of values for the order months are arranged) data entry” on page 7-3.)
Records with values not in the specified value list will be sorted alphabetically at the end.
Change the order of the sort In the Sort Order list, click the double-arrow (to criteria (for example, to sort the left of the field name) and drag the field to first by Region, then by City) a new position.

To Do this
Include related fields anywhere Choose a relationship from the relationship in the sort order list, then double-click a related field in the list.
You can place a related field anywhere in the Sort Order list—before, after, or between fields in the master file.
If more than one record in the related file matches a record in the master file, the sort will use the value in the first matching record in the related file, according to the sort order defined in the relationship. See “Defining relationships for relational databases and lookups” on page 8-10.)
Sort related records (rows) in a If your access privileges allow, specify a sort portal order in Define Relationships. See “Defining
relationships for relational databases and lookups” on page 8-10.
Remove a field from the Sort In the Sort Order list, double-click the field.Order list
Remove all fields from the Sort Click Clear All.Order list
Sort by summary fields See the next section.
For example, to sort sales regions in order from highest to lowest total sales.
Unsort the records (return them Click Unsort.to creation order)
Sort records according to a Select Override field’s language for sort, then different language than the one choose a language.used for indexing
Close the Sort Records dialog Click Done.box without sorting
Finding and sorting information 3-9
Keep these points in mind:
• Data sorts differently in different field types:
This field type Sorts records in this order
Text Alphabetically. Numbers sort by character position. (Example of an ascending sort: 1, 11, 2.) Numbers sort before letters. Non-alphanumeric values are ignored (unless you change the sort language to ASCII).
Number Numerically. Non-numeric characters are ignored.
Date Chronologically. To avoid confusion when using dates, always use four-digit years. For more information about how FileMaker Pro handles Year 2000 issues, see www.filemaker.com.
Time Numerically. Times using AM/PM are sorted according to their 24-hour-clock equivalent (for example, 8:00 PM is 20:00).
• Records in a sorted portal are re-sorted whenever the relationship is re-established. (For example, when you browse out of and then back into the record, or change the value in the match field.) See “Defining relationships for relational databases and lookups” on page 8-10.
• Repeating fields sort by the value in the first repetition.
• If you add records after sorting, the status area shows Semi-sorted. Sort again to incorporate new records in the sort order.
• System formats affect the way numbers, dates, and times sort. System formats is documented in Help. Choose Help menu > Contents and Index, click the Index tab, and type system formats.

3-10 FileMaker Pro User’s Guide
• When you define a text field, the default language for indexing and sorting text is determined by the operating system on which FileMaker Pro is running. If you want to override the default language for a sort, select Override field’s language for sort in the Sort Records dialog box. (If you want to permanently change the field’s default language, select the field in the Define Fields dialog box, click Options, then click the Storage tab and select the default language from the pop-up menu.)
Sorting records by subsummary values If you have a subsummary report (a report with grouped data and totals), the report is sorted by the category that produced the totals. For example, if you have a report that subtotals sales by region, the report is sorted by region (Example 1). You can also sort records by subsummary values. For example, you can sort the sales regions by their sales totals (Example 2).
In both examples, Total Sales is a summary field that gives regional totals when grouped by Region.
Example 1:
Regions are sorted in ascending order
Report with grouped data and subtotals
Example 2:
Regions are sorted in descending order by Total Sales
Report with grouped data and subtotals, sorted by subsummary values
This procedure is documented in Help. Choose Help menu > Contents and Index, click the Index tab, and type sorting records.
For more information on reports with grouped data, see “Creating layouts and reports” on page 6-2.

Chapter 4 Previewing and printing information
This chapter describes how to:
• set up a printer and print options
• preview before you print
• print one or more records, a blank record, field definitions, or script steps
The procedures in the chapter assume that you already have a layout to print. If you don’t, see chapter 6, “Creating and managing layouts and reports,” and chapter 7, “Customizing layouts.”
Note The information in this chapter does not apply to users working with databases on the Web. When users work with databases on the Web, the web browser software governs printing.
About printing information in a database With FileMaker Pro, you can print:
• all the records in the database, a subset of the records, or only the current record
• a blank record to create a paper form
• definitions of fields or scripts to see the structure of your database
FileMaker Pro prints records using the current layout. You can create layouts to print the same data in different ways. For example, you can print records one by one, in a columnar list, or in a complex sorted report with totals, headers, and footers. You can also create layouts for mailing labels or envelopes.
The New Layout/Report assistant (in Layout mode) makes it easy to create such layouts and reports. See “Creating layouts and reports” on page 6-2.
You can print data based on the current layout or information about the structure of the database
Name Phone
Juanita Alvarez 408-555-1234 Michelle Cannon 213-555-2345 Andre Common 714-555-3456 Marie Durand 619-555-4567 Jean Durand 408-555-5678 William Johnson 408-555-6789
Phone List
Records being browsed
Name Phone
Juanita Alvarez 408-555-1234
Phone List
Current record
Name Phone
Phone List
Blank record
Print Phone List
Go to Layout [Phone List] Sort [Sort Order: Last name (Ascending) ]
[Restore sort order, No Dialog] Enter Preview Mode
[Pause] Print
[no dialog] Enter Browse Mode
Field Name Field Type Formula/Entry Options
First Name Text Last Name Text Address1 Text Address 2 Text City Text State Text Postal Code Number Phone Text
Script
Field definition
You can control page margins, remove blank space, and keep specified objects from printing. See “Controlling how things print” on page 7-21.

4-2 FileMaker Pro User’s Guide
Preparing to print Note Printer and print setup options depend on the printer and system software you’re using. Refer to your printer and system documentation for more information.
Specifying a printer (Windows) You can specify a default printer to be used when you print in FileMaker Pro. You can also specify a different printer each time you print.
To specify a default printer for FileMaker Pro:
1. Choose File menu > Print Setup.
2. In the Print Setup dialog box, for Name, choose a printer.
3. Click OK.
Keep these points in mind:
• When you start FileMaker Pro for the first time, it uses the Windows default printer as its default printer. If you specify a different printer in the Print Setup dialog box, it becomes the default printer for FileMaker Pro.
• You specify the default printer for Windows and FileMaker Pro independently. If you change one default, it doesn’t affect the other.
Specifying a printer (Mac OS) To specify a different printer:
1. Choose Apple menu > Chooser.
2. In the Chooser dialog box, select a printer, respond to any messages, and then click the close box.
Because different printers have different margin capabilities, if you’ve changed to a different type of printer, you are prompted to verify page setup options.
Note With newer system software, you can specify a different printer within the Print dialog box or with a control strip module (as long as you’re choosing the same type of printer, for example, a different LaserWriter printer on the network).
Preparing to print wide layouts If you’re printing a layout with data that extends beyond the right margin, choose File menu > Print Setup (Windows) or Page Setup (Mac OS), select the horizontal (landscape) orientation, then click OK.
Information to the right of this line won’t print All columns print
Vertical setting Horizontal setting
Tip In the Print Setup dialog box (Windows) or Page Setup dialog box (Mac OS), try reducing the size of the printed area by typing a value of less than 100% for scaling. FileMaker Pro adjusts the display of page boundaries in Layout and Preview modes.

Previewing and printing information 4-3
Preparing to print layouts with subsummaries If you’re printing a layout with one or more subsummary parts, sort the records by the break field (the field that groups the records) associated with each subsummary part. See “Viewing or printing subsummary or grand summary data” on page 6-28 and “Sorting records” on page 3-8. Then switch to Preview mode. FileMaker Pro displays subsummary parts and calculates subsummary data correctly only in Preview mode or in a printed report (see “Previewing data on a layout” on page 4-3).
Tip If you use the New Layout/Report assistant to create a Report with grouped data, you can create a script that automatically sorts the report and then switches to Preview mode. See “Creating layouts and reports” on page 6-2.
Preparing to print envelopes and labels For information about setting up an Envelope or Labels layout, see “Considerations when you create an Envelope layout” on page 6-7 and “Considerations when you create a Labels layout” on page 6-6.
Many laser and ink jet printers cannot print within 0.25 inches of the top of the paper. FileMaker Pro tries to compensate for this when creating a Labels layout by including an empty header part to compensate for this unusable margin. You may need to adjust or delete the header depending on your printer (see “Resizing layout parts” on page 6-30 and “Deleting layout parts” on page 6-30).
You may also need to adjust page margins (see “Specifying page margins” on page 7-21), or paper size (see your system documentation). Also, see the troubleshooting section in the FileMaker Pro onscreen Help. Choose Help menu > Contents and Index, click the Index tab and type printing,troubleshooting.
Tip Print envelopes or the first page of your labels on plain paper to check alignment before you print on the envelope or label stock.
When you’re using individual sheets of labels:
1. Measure the distance from the top of the label paper to the top of the first row of labels.
2. If the distance is less than the minimum margin your printer requires, in Layout mode, increase the height of the header part to include the first row of labels, so that printing starts at the top of the second row.
FileMaker Pro won’t print on the first row of labels, but it prints in the correct position on subsequent labels.
When using continuous-feed label paper, if there’s a header, delete it by clicking the part label in Layout mode to select it, then press Backspace or Delete.
Previewing data on a layout When you switch to Preview mode, you see the layout as it appears on the printed page. You can’t enter or edit information in fields in Preview mode.
In Preview mode, you see:
• how many records fit on a printed page
• how the pagination settings you choose affect page breaks (see “Defining page breaks and numbering” on page 6-29)
• subsummary parts with calculated summary fields (see “Viewing or printing subsummary or grand summary data” on page 6-28)
• variable information supplied by FileMaker Pro, like page numbers, the current date, and so on (see “Inserting the page number, date, or other variable onto a layout” on page 7-11)
• the page margins you define (see “Specifying page margins” on page 7-21)
• how fields set with sliding options close up blank space (see “About removing blank space from printed data” on page 7-22)

4-4 FileMaker Pro User’s Guide
• records arranged in columns if the Layout Setup is defined to print in columns (see “Setting up to print records in columns” on page 6-8)
To preview data on a layout, you follow the same preliminary steps that you perform when you print, including specifying a printer and printing options and verifying that the found set contains the records you want to preview (see steps 1 through 4 in the next section, “Printing”). Then, choose View menu > Preview Mode.
Choose a different layout from the layout pop-up menu Margin
Click the top page to move to the next page or Drag the bookmark up orthe bottom page to move down to move through pages
to the previous page Current page number
Total number of pages
Switch modes with the mode pop-up menu
Note You can’t use Preview mode to see how your database looks when published on the Web. You must use a web browser.
Printing You can print information from your database, or you can print information about your database (for example, field definitions or script steps). See “About printing information in a database” on page 4-1.
Note If you’re printing a layout with subsummaries, see “Preparing to print layouts with subsummaries” on page 4-3. If you’re printing labels or envelopes, “Preparing to print envelopes and labels” on page 4-3.
To print:
1. If you have more than one printer, specify which one you want to use.
See “Specifying a printer (Windows)” on page 4-2, or “Specifying a printer (Mac OS)” on page 4-2.
2. Confirm printing options (for example, page orientation, and scaling) by choosing File menu > Print Setup (Windows) or File menu > Page Setup (Mac OS), then click OK.
For information about printer options, refer to your printer and system documentation.
3. If you’re printing records, use the layout pop-up menu to switch to the layout you want to use.
4. Make sure the found set is the way you want it by:
• using Find mode and commands on the Records menu to change the found set (see “Finding records” on page 3-1 and “Hiding records from a found set and viewing hidden records” on page 3-7)
• sorting the records (see “Sorting records” on page 3-8)
5. Choose View menu > Preview Mode to see exactly how your paper copy will look. Some things, like summary fields, subsummary parts, sliding objects, records arranged in columns, and variable information like page numbers, appear correctly only in Preview mode.
6. Choose File menu > Print.
7. In the Print dialog box, for Print, choose an option.
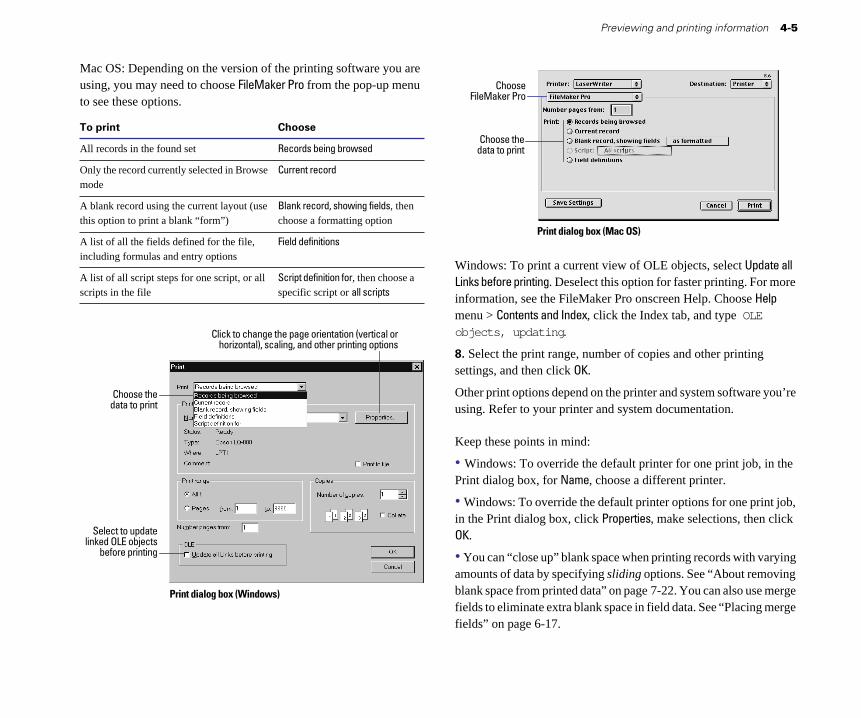
Mac OS: Depending on the version of the printing software you are using, you may need to choose FileMaker Pro from the pop-up menu to see these options.
To print Choose
All records in the found set Records being browsed
Only the record currently selected in Browse Current record mode
A blank record using the current layout (use Blank record, showing fields, then this option to print a blank “form”) choose a formatting option
A list of all the fields defined for the file, Field definitions including formulas and entry options
A list of all script steps for one script, or all Script definition for, then choose a scripts in the file specific script or all scripts
Click to change the page orientation (vertical or horizontal), scaling, and other printing options
Choose the data to print
Select to updatelinked OLE objects
before printing
Print dialog box (Windows)
Previewing and printing information 4-5
Choose the data to print
Choose FileMaker Pro
Print dialog box (Mac OS)
Windows: To print a current view of OLE objects, select Update all Links before printing. Deselect this option for faster printing. For more information, see the FileMaker Pro onscreen Help. Choose Help menu > Contents and Index, click the Index tab, and type OLE objects, updating.
8. Select the print range, number of copies and other printing settings, and then click OK.
Other print options depend on the printer and system software you’re using. Refer to your printer and system documentation.
Keep these points in mind:
• Windows: To override the default printer for one print job, in the Print dialog box, for Name, choose a different printer.
• Windows: To override the default printer options for one print job, in the Print dialog box, click Properties, make selections, then click OK.
• You can “close up” blank space when printing records with varying amounts of data by specifying sliding options. See “About removing blank space from printed data” on page 7-22. You can also use merge fields to eliminate extra blank space in field data. See “Placing merge fields” on page 6-17.

4-6 FileMaker Pro User’s Guide
• When you print a field or a portal with a scroll bar, FileMaker Pro prints only the data visible without scrolling. To print all the data, duplicate the layout and enlarge the field or portal, then specify sliding options to remove the extra blank space when you print. See “About removing blank space from printed data” on page 7-22.
• To keep any object on a layout from printing, select it in Layout mode, and choose Format menu > Sliding/Printing. Click Do not print selected objects, then click OK. See “Keeping objects from printing” on page 7-25.
• If you’re having trouble printing, see the troubleshooting section in the FileMaker Pro onscreen Help. Choose Help menu > Contents and Index, click the Index tab and type printing, troubleshooting. For customer support information on printing, choose Help menu > FileMaker on the Web.

Part 2Designing and creating a database


Chapter 5 Creating a database
This chapter explains how to:
• plan a database
• create a FileMaker Pro database file
• define, modify, or delete fields in your database
Planning a database file Plan a database before you create it to save time and effort later on. Although you can change the design later, the more you plan ahead, the fewer changes you’ll need to make. Start with a simple design, use it for a while, then change it as needed.
Follow these general steps to plan a database:
1. Determine the problem you want to solve, or the reason for creating a database.
If other people will use the database, be sure to talk with them about the data they need.
2. Decide which categories of information you work with, and plan a separate database file for each major category.
For example, for a small business, you might need one database file for products, one for customers, and another for employees.
3. Analyze your current information management system to determine the tasks you perform.
For example, do you print mailing labels and invoices? What reports do you produce? Are there new tasks you want to do?
4. Decide what data you want the file to contain, and plan the fields to hold the data.
For example, to print invoices, you need fields for a billing address, shipping address, quantity, product code, and so on. You also need calculated fields for subtotal, sales tax, shipping charge, and invoice total.
To make it easy to search and sort records, create separate fields for first and last name, titles such as Mr. or Dr., and items in addresses (city, state, province, country, and postal code).
5. Determine relationships between your file and other files whose data you can use.
For example, if data you want already exists in another FileMaker Pro file, you can use it in the current file.
6. Decide what layouts you need, and plan a separate layout for each task.
For example, plan layouts for data entry, order entry, printing mailing labels, printing form letters, and for each type of report you produce.
7. Determine whether you need to share your database with other users, and how they will access the file.
You can design layouts that work well in FileMaker Pro for Windows or for Mac OS, or when viewed in a web browser.
8. If others will use your database, think about who can use the file and which tasks they can perform.
If security is important to your data, you can restrict who can do which tasks by assigning passwords and access privileges to the file.
9. Put your ideas on paper, listing the files you need and the fields for each file. Also list the forms and reports (layouts) you will generate from each file. Start with a simple design and use it for a while. You can change it as needed.

5-2 FileMaker Pro User’s Guide
Sample Database Design Form Project Name Purpose of this database File name for this database
Fields Name Type Comments
Layouts Name Purpose Screen Print Web
For information about entering data into a database, see “About entering data in records” on page 2-6. For more information about creating a relational database, see chapter 8, “Working with related files.”
Creating a FileMaker Pro file You can create a file from a template—a predefined database file that you can modify to suit your needs. Or, you can create a file without using a template.
Tip You can also create a file by making a copy of an existing FileMaker Pro file, or by importing data from another application. See “Saving files” on page 1-7 or “Converting a data file into a new FileMaker Pro file” on page 12-6.
If you didn’t install templates and want to use them, see the FileMaker Pro Getting Started Guide.
1. In FileMaker Pro, choose File menu > New Database.
2. In the New Database dialog box, do the following:
To Do this
Create a file using a Select Create a new file using a template, then double-template click the name of a template.
Create a file without Select Create a new empty file, then click OK. using a template
Open an existing file See “Opening files” on page 1-6.
If Templates in New Database dialog isn’t selected in the General tab of the Application Preferences dialog (or if the templates aren’t installed), the New Database dialog box doesn’t appear. Skip to the next step. To select the preferences option, see “Setting general application preferences” on page A-1.
Choose a template category fromthe list
Choose a
Select an option for
creating a file
Select template fromto stop the list
showing this dialog box
3. In the dialog box that appears, type a name for the file (choose a different folder, if needed), then click Save.
Windows: For Save as type, select FileMaker Pro Files. If you don’t type a file extension, FileMaker Pro adds .fp5 to the filename. (To view file extensions in Windows, see the Windows operating system Help.)
4. Click Save.

About defining database fields To define a new field, you give it a name. Then you select options that determine how the field interprets, enters, calculates, stores, and displays data. These characteristics make up the field definition.
This field stores only numbers
This field calculates a value based on another value in the record
This field stores multiple values
ET14 Product ID
Jacket Product Name
Clothing Category
Blue Colors
$52.50 Unit Price
$5.25 Discount
Black
These fields store text
(“Discount” is 10% of “Unit Price”)
The following sections describe how to define fields using the Define Fields dialog box.
Click to sort byfield name or type
Field names and definitions
Type a namefor a new field
Select a field type
Click after you type a field
Choose the way fields are listed in the dialog box
name and select a field type
Creating a database 5-3
Keep these points in mind:
• You can duplicate a field definition to define a new field that’s similar to an existing field. See “Changing field definitions” on page 5-11.
• After you define fields, you can add them to any layout. If you define a field in an existing file, and you don’t see it on the current layout, be sure Add newly defined fields to current layout is selected in Application Preferences. See“Placing and removing fields on a layout” on page 6-15 and “Setting layout preferences” on page A-2.
• To print field definitions, see chapter 4, “Previewing and printing information.”
About naming fields Keep the following in mind when naming fields:
• Field names must be unique. They can contain up to 60 characters.
• Use descriptive names that clearly identify the contents of the field. Avoid abbreviations, acronyms, or other terms that may cause confusion.
• Don’t use the following symbols or words: , (comma) + – * / ^ & = ≠ > < ( ) " ; (semicolon) : (colon) :: AND, OR, XOR, NOT, or a FileMaker Pro function name. Don’t begin a field name to be used in a calculation formula with a space, period (.), or number.
• Use _ (underscore) in place of a space to avoid restrictions in ODBC (Open Database Connectivity), exporting, web publishing, and other operations.
• If you’re exchanging data with another application, check the field naming restrictions in the file formats supported by the other application.
• If you’re using ODBC to share FileMaker data, avoid using SQL keywords in field names. For information about ODBC, see “About ODBC” on page 15-1.

5-4 FileMaker Pro User’s Guide
About choosing a field type When you define a field, you must select the appropriate field type. FileMaker Pro uses the field type to interpret the data for tasks like sorting and performing calculations.
Select this field type If the field data will be
Text Up to approximately 64,000 letters, symbols, or numbers used as text. Text fields may contain carriage returns.
Number Up to 255 numbers or other characters. (In most cases, only the numbers are treated as numeric.) Number fields can also contain Boolean values, to indicate, for example, true, false, yes, and no. Unlike other text values in a number field, you can perform a search on Boolean values.
Date Dates only.
Time Times only.
Container A picture, or a multimedia file (like a movie or sound). You can reference container fields in calculations and summary fields. Windows: A container field can store OLE objects.
Calculation The result of a calculation formula that uses field values from the current record or related records. The formula can use values of all field types. The result can be one of these types of data: text, number, date, time, or container.
Summary A value that’s produced by summarizing field values from more than one record in the same file.
Global One value to be used in all records of the file. A global field can contain text, number, date, time, or container data. Use the value of a global field in calculations and scripts. You can’t use a global field to find records.
Agent Item Qty Amount
David Michaels ET3 1 $29.95 David Michaels ET4 1 $32.25 David Michaels ET1 2 $73.90 David Michaels ET5 3 $98.85
Total $234.95
Sophie Tang ET6 2 $64.50 Sophie Tang ET7 5 $12.50 Sophie Tang ET2 2 $25.00 Sophie Tang
Total $102.00
Grand Total $336.95
Sales Report
Summary fields produce results from values in multiple records
Calculation fields produce results from valuesin the current record or related records
Keep these points in mind:
• Use text fields instead of number fields to store postal codes, phone numbers, and other values with leading zeroes or characters like hyphens or parentheses.
• Be sure to use a Date field (instead of a text or number field) to store dates. To avoid confusion when using dates, always use four-digit years. For more information on how FileMaker Pro handles Year 2000 issues, see www.filemaker.com.
• You can’t find or sort records based on a container field, but you can define a text field to describe or identify the contents of the container. Then, you can find or sort records based on the data in the text field.
• To change the way data is displayed in text, number, date, and time fields, see “Formatting field data on a layout” on page 6-21.

Creating a database 5-5
• For information about working with data in fields, see “About entering data in records” on page 2-6. For more information about field types, choose Help menu > Contents and Index, click the Index tab, and type field types.
Defining text, number, date, time, or container fields 1. Choose File menu > Define Fields.
2. In the Define Fields dialog box, for Field Name, type a unique name for the field.
See “About naming fields” on page 5-3.
3. For Type, select a field type, then click Create.
See “About choosing a field type” on page 5-4.
4. To define options for the field, click Options.
To Do this in the Options for Field dialog box
Automatically Click the Auto-Enter tab, select the options, then click OK. enter values into See “Defining automatic data entry” on page 5-8. the field
Make sure data is Click the Validation tab, select the options, then click OK. entered into the See “Defining field validation” on page 5-9. field correctly
Make the field Click the Storage tab, then select Repeating field with a repeating maximum of n repetitions. Type the number of repetitions,
then click OK. See “About repeating fields” on page 5-11.
Select options for Click the Storage tab, select the options, then click OK. See indexing the field “About storage and indexing options” on page 5-11.
5. Continue defining fields, or click Done.
Important To avoid confusion when using dates in FileMaker Pro, set field validation options to make sure dates are always entered with four-digit years. (See “Defining field validation” on page 5-9.) For more information on how FileMaker Pro handles Year 2000 issues, see www.filemaker.com.
For more information about defining fields, choose Help menu > Contents and Index, click the Index tab, and type defining fields.
Defining calculation fields 1. Choose File menu > Define Fields.
2. In the Define Fields dialog box, for Field Name, type a unique name for the field.
See “About naming fields” on page 5-3.
3. For Type, select Calculation, then click Create.
4. In the Specify Calculation dialog box, build a formula.
Click where you want the item to appear in the formula box, then do the following:
To add a Do this
Reference to a field In the field list, double-click a field name.
To display field names from related fields, choose a relationship from the relationship list. (See “When to create relationships between files” on page 8-4.)
Mathematical or In the keypad, click an operator. (Quotation marks and text operator parentheses are copied to the formula as a pair, with the
insertion point blinking in the middle).
Comparison or For Operators, choose an operator from the list. logical operator
Constant value Type the value. See “Constants” on page 11-2.
Function In the functions list, double-click a function. In the formula box, replace the placeholder parameter with a value or expression.
Tip You can also type the formula directly into the box. For more information, see chapter 11, “Using formulas and functions.”

5-6 FileMaker Pro User’s Guide
Select comparison and logical operators
Choose a relationship from the list
Choose field references
Choose indexing and Calculate only if at least one
Select mathematical and text operators
Choose the way functions are listed in the dialog box
Select functions
Formula box
Choose a formula
result type
Make the calculated
field repeating
field in the formula has a value storage options
5. Select calculation options for the field.
To Do this
Select the data type of Choose a data type for Calculation result is <value>. Be the result sure to choose the correct type for the result you want.
See “About choosing a field type” on page 5-4.
Make the calculated Select Repeating field with a maximum of n values, type field repeating the number of repetitions, then click OK. See “About
repeating fields” on page 5-11.
Perform the calculation Select Do not evaluate if all referenced fields are empty. only when all Clear this option if you always want FileMaker Pro to referenced fields have calculate a result, even if a referenced field is empty or a value (so you don’t has never been modified. display zero as a result)
6. To select indexing and storage options for the field, click Storage Options, select options, then click OK.
See “About storage and indexing options” on page 5-11.
7. Click OK to close the Specify Calculation dialog box.
8. Continue defining fields, or click Done.
For more information about defining calculation fields, see FileMaker Pro Help. Choose Help menu > Contents and Index, click the Index tab, and type calculation fields.
Defining summary fields Use summary fields to calculate values across multiple records, like subtotals, averages, and grand totals. For example, a summary field can display the grand total of all sales in the month of May in a report.
Tip Use the New Layout/Report assistant to quickly create a report with grouped data (data in a summary field). See “About layouts and reports” on page 6-1.
The value in a summary field can change depending on where you place the field on a layout, how many records are in the found set, whether the records are sorted, and which mode you are using.
If you’re modifying a layout that contains a summary field, you must know about layout parts to get the results you want (see “About layout parts” on page 6-25). For information about summarizing related fields in portals, see “Summarizing data in portals” on page 8-12.
1. Choose File menu > Define Fields.
2. In the Define Fields dialog box, for Field Name, type a unique name for the field.
See “About naming fields” on page 5-3.
3. For Type, select Summary, then click Create.
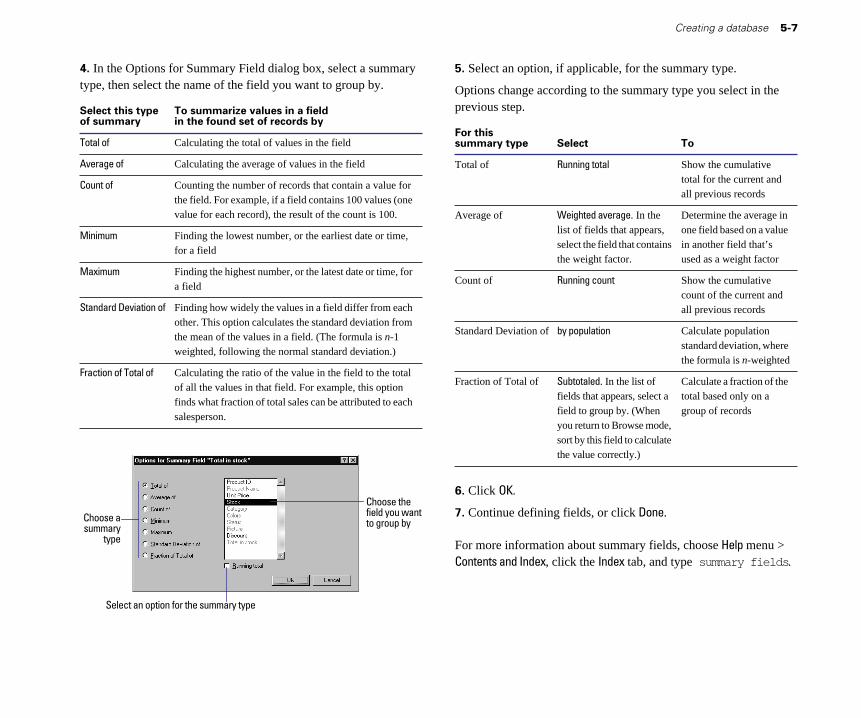
Creating a database 5-7
4. In the Options for Summary Field dialog box, select a summary type, then select the name of the field you want to group by.
Select this type To summarize values in a field of summary in the found set of records by
Total of Calculating the total of values in the field
Average of Calculating the average of values in the field
Count of Counting the number of records that contain a value for the field. For example, if a field contains 100 values (one value for each record), the result of the count is 100.
Minimum Finding the lowest number, or the earliest date or time, for a field
Maximum Finding the highest number, or the latest date or time, for a field
Standard Deviation of Finding how widely the values in a field differ from each other. This option calculates the standard deviation from the mean of the values in a field. (The formula is n-1 weighted, following the normal standard deviation.)
Fraction of Total of Calculating the ratio of the value in the field to the total of all the values in that field. For example, this option finds what fraction of total sales can be attributed to each salesperson.
Choose the field you want to group byChoose a
summary type
Select an option for the summary type
5. Select an option, if applicable, for the summary type.
Options change according to the summary type you select in the previous step.
For this summary type Select To
Total of Running total Show the cumulative total for the current and all previous records
Average of Weighted average. In the Determine the average in list of fields that appears, one field based on a value select the field that contains in another field that’s the weight factor. used as a weight factor
Count of Running count Show the cumulative count of the current and all previous records
Standard Deviation of by population Calculate population standard deviation, where the formula is n-weighted
Fraction of Total of Subtotaled. In the list of Calculate a fraction of the fields that appears, select a total based only on a field to group by. (When group of records you return to Browse mode, sort by this field to calculate the value correctly.)
6. Click OK.
7. Continue defining fields, or click Done.
For more information about summary fields, choose Help menu > Contents and Index, click the Index tab, and type summary fields.

5-8 FileMaker Pro User’s Guide
Defining global fields A global field contains one value that’s used for all records in a file. (You can’t use a global field for finding data.) Use the value of a global field:
• as a fixed value to be used in calculations in all records in a file
• to declare variables in If, Else, End If, Loop, End Loop, and Exit Loop If script steps
• for fields that rarely need to be updated. For example, use a global field to put your company logo and address on several layouts. You can quickly update a global field without having to update each layout.
To define global fields:
1. Choose File menu > Define Fields.
2. In the Define Fields dialog box, for Field Name, type a unique name for the field.
See “About naming fields” on page 5-3.
3. For Type, select Global, then click Create.
4. In the Options for Global Field dialog box, select options.
To Do this
Choose a data type for For Data type, choose a type from the list. See “About the field choosing a field type” on page 5-4.
Make the field Click the Storage tab, then select Repeating field with a repeating maximum of n repetitions. Type the number of
repetitions, then click OK. See “About repeating fields” on page 5-11.
Choose a data type for the field
Select to make the field repeating
5. Click OK.
6. Continue defining fields, or click Done.
If you’re working with global fields in a shared file, see “Working with shared files” on page 13-2. For more information about global fields, choose Help menu > Contents and Index, click the Index tab, and type global fields.
Setting options for fields You can set options for:
• entering default data into a text, number, date, time, or container field
• checking data against validation requirements
• making a repeating field
• creating an index
• indexing and storing data
Some field options help ensure the accuracy of your data. For example, if you type Frnc instead of France into the Country field, you won’t find that record when you later search for all customers from France. To be sure that all country names are entered correctly, you can define a value list containing the names, then select the Member of value list validation option for the Country field. When you enter data into the field, the data must match a value in the list. See “Defining a list of values for data entry” on page 7-3.
To set options for summary fields, see “Defining summary fields” on page 5-6.
Defining automatic data entry To automatically enter a default value into a field for each record:
1. Choose File menu > Define Fields.
2. In the Define Fields dialog box, double-click a field name.

Creating a database 5-9
3. In the Options for Field dialog box, click the Auto-Enter tab and select options. (The available options depend on the field type.)
Important To avoid confusion when using dates in FileMaker Pro, set field validation options to make sure dates are always entered with four-digit years. (See the next section.)
To Do this
Enter the date, time, or Select the first checkbox (the), then choose an user name when the record option from the list.is created or modified
Assign a sequential Select Serial number. For next value, type a starting number to the field in each value (for example, 1001), then type the number to record increment by.
Enter the value from the Select Value from previous record.previously accessed record
Enter data you specify Select Data, then type up to 255 characters.
Enter the result of a Select Calculated value, define the formula in the calculation in the field Specify Calculation dialog box, then click OK.
For information about the Specify Calculation dialog box, see “Defining calculation fields” on page 5-5.
Enter a value that’s copied Select Looked-up value, define the lookup, then from a field in the same or click OK. See “Defining lookups between files” on a different file page 8-13.
Prevent users from Select Prohibit modification of value.changing an automatically entered value
Turn off automatically Clear all selected checkboxes.entered data
Click Auto-Enter
Select options forentering default data in the field
4. Click OK to close the Options for Field dialog box, then click Done.
For more information about automatically entering data, see FileMaker Pro Help. Choose Help menu > Contents and Index, click the Index tab, and type automatic data entry.
Defining field validation You can select field validation options to ensure that data is entered into the field correctly. FileMaker Pro displays a message if you enter data incorrectly.
Important To avoid confusion when using dates in FileMaker Pro, set field validation options to make sure dates are always entered with four-digit years. For more information on how FileMaker Pro handles Year 2000 issues, see www.filemaker.com.
1. Choose File menu > Define Fields.
2. In the Define Fields dialog box, double-click a field name.

5-10 FileMaker Pro User’s Guide
3. In the Options for Field dialog box, click the Validation tab and select options.
To verify that the entered value Do this
Contains only numbers Select Strict data type, then choose Numeric Only from the list.
Is a date containing numeric values Select Strict data type, then choose for the month and day, and four digits 4-Digit Year Date from the list.for the year (for example, 5/12/2004)
Is a time containing numeric values Select Strict data type, then choose Time for hours and minutes between 00:00 of Day from the list.and 23:59 (seconds are optional)
Is not empty, or that the value is Select Not empty, Unique, or Existing.unique or already existing in the file(FileMaker Pro ignores capitalization and punctuation)
Matches a value in a specified value Select Member of value list, then choose list an existing value list or define a new
one. (See “Defining a list of values for data entry” on page 7-3.)
Falls within the range you specify Select In range, then type a starting value and ending value.
Matches the result of a calculation Select Validation by calculation, define a formula in the Specify Calculation dialog box, then click OK.
The result must be Boolean—“true” or “false,” “yes” or “no,” and so on. The result is false when the result is 0 or null (empty); otherwise the result is true.
For information about the Specify Calculation dialog box, see “Defining calculation fields” on page 5-5.
Click Validation
Select validation options for the field
4. Specify how FileMaker Pro handles an invalid entry.
To Select
Prevent users from entering invalid data Strict: Do not allow user to override (users must correct the data before moving validationout of the record)
Display a custom message when the data Display custom message if validation doesn’t meet the validation requirements fails, then type up to 255 characters
5. Click OK to close the Options for Field dialog box, then click Done.
For more information about validating fields, choose Help menu > Contents and Index, click the Index tab, and type validating data.

About repeating fields A repeating field holds more than one value (up to 1000), each in a separate repetition of a field. Any field type, except summary, can be a repeating field.
Each value in the repeating field“Colors” is a single, separate value
Tip If you’re planning to sort, summarize, or insert data in a repeating field, it’s often easier to use related fields in a portal. See “About relational databases” on page 8-2.
To change the number of repetitions visible on a layout, see “Formatting repeating fields” on page 7-7.
For more information about defining and working with repeating fields, see FileMaker Pro Help. Choose Help menu > Contents and Index, click the Index tab, and type repeating fields.
About storage and indexing options FileMaker Pro provides options for indexing fields and for storing the results of calculations. You can:
• Create an index, which is a list of the values stored in a field. An index greatly speeds searches, but takes up space on your disk. You can index text, number, date, and time fields. You can also index calculation fields if the results are text, numbers, dates or times.
• Store the result of a calculation in your database, or you can tell FileMaker Pro to perform the calculation only when needed (unstored). Storing the result is faster but takes up more space on the disk. You can specify storage options for text, number, date, time, and calculation fields.
Storage and indexing options are documented in Help. Choose Help menu > Contents and Index, click the Index tab, and type storage options.
Creating a database 5-11
Changing field definitions Important When you change the definition of a field that contains data, the data in that field could be affected. For more information about the effects of changing fields, choose Help menu > Contents and Index, click the Index tab, and type field definitions.
1. Choose File menu > Define Fields.
2. In the Define Fields dialog box, make your changes.
To Do this
Change a field In the field list, select the field to change. For Field Name, name type or paste the new name, then click Save.
FileMaker Pro also changes the field name in layouts and field references in formulas. See “About naming fields” on page 5-3.
Duplicate a field In the field list, select one or more fields, then click definition Duplicate. The new fields appear at the end of the list with
Copy added to the name. You can change the field names.
Change the field In the field list, select the field, select a field type, then type click Save. See “About choosing a field type” on
page 5-4.
Important Changing the field type can permanently and irretrievably erase data.
Change options for In the field list, double-click the field. Change the options, text, number, date, then click OK. See “Setting options for fields” on time, container, or page 5-8. global fields
Change a In the field list, double-click the calculation field. calculation field • To change storage and indexing options, click Storage
Options in the Specify Calculation dialog box. Make your changes, then click OK.
• To change other options, make your changes in the Specify Calculation dialog box.
Then, click OK in the Specify Calculations dialog box. See “Defining calculation fields” on page 5-5.

5-12 FileMaker Pro User’s Guide
To Do this
Change a summary In the field list, double-click the summary field, then field make your changes in the Options for Summary Field
dialog box. Click OK. See “Defining summary fields” on page 5-6.
Reorder field See FileMaker Pro Help. Choose Help menu > Contents names in dialog and Index, click the Index tab, and type reordering.boxes that list fields
3. Click Done.
Keep these points in mind:
• If you change a calculation formula or summary type, FileMaker Pro recalculates the value for every record in the database when you exit the Define Fields dialog box.
• To change the definitions of related fields, make the changes in the related file.
Deleting field definitions and data Important Deleting a field in the Define Fields dialog box permanently and irretrievably deletes the field definition and all the data in that field in all your records. Before you delete a field from a file, be sure you don’t need any data the field contains.
1. Choose File menu > Define Fields.
2. In the Define Fields dialog box, select one or more fields, then click Delete.
3. Click Delete again, or click Cancel to leave the fields unchanged.
4. Click Done.
Keep these points in mind:
• To remove fields from a layout, but leave them available in the database, see “Placing and removing fields on a layout” on page 6-15.
• For more information about deleting field definitions, choose Help menu > Contents and Index, click the Index tab, and type field definitions.

Chapter 6 Creating and managing layouts and reports
This chapter describes how to manage layouts to present data for onscreen display or printing. You’ll learn about:
• creating, modifying, and deleting layouts
• working with different layout types
• working with fields and objects on a layout
• adding layout parts, such as a header or footer
The next chapter, “Customizing layouts,” explains customizing the way fields and layouts look, adding objects to layouts, defining value lists, and controlling how things print.
You create and work with layouts in Layout mode. To switch to Layout mode from another mode, choose View menu > Layout Mode. Or, choose Layout from the mode pop-up menu at the bottom of the document window.
Text: Use for titles, column headings, field labels, instructions, and form letters
About layouts and reports A FileMaker Pro layout displays the data in a database. The data you see depends on the fields on the layout. Layouts are sometimes called reports, especially when printed. Layouts determine the appearance of data. They also organize your information for viewing or data entry, reporting, or finding.
Use a layout to choose which fields to include on each screen or report. You can have as many layouts as you need for a file (for example, layouts for entering data, summary reporting, or printing mailing labels). You can change a layout’s design without affecting the data or other layouts for the file. When you change data in a field (in Browse mode), the changes are reflected in that field if it’s on other layouts of the database, since the data is the same no matter where it’s displayed.
Buttons: Use to automate frequent tasks
Layout pop-up menu
Fields: Use for entering and displaying data
Parts: Use headers, footers, the body, and summaries to divide a
layout into special purpose areas
The page: The printer, print or page setup, and layout determine how information looks on the printed page
Mode pop-up menu

6-2 FileMaker Pro User’s Guide
For more information about setting up layouts for web publishing, see “Setting up browser views” on page 12-10.
Creating layouts and reports Whenever you create a database file (without using one of the template files shipped with FileMaker Pro), FileMaker Pro automatically creates a Standard form layout and displays it in Browse mode, ready for you to enter data.
You create additional layouts using the New Layout/Report assistant, a wizard that guides you through creating the layout according to options you choose. In addition to Standard form, there are four other types of layouts and one view (Table view). Use these different types for various purposes, like displaying a data entry screen or printing a totaled sales report or mailing labels.
Important FileMaker Pro considers the selected printer, and print or page setup information when it calculates margins and other measurements on the layout. When you need to print something on the page in a particular way, like a report that is wider than it is tall, labels, envelopes, or data on preprinted forms, make sure you have set these up before creating the layout. Printer and print settings depend on the printer and system software you’re using. Refer to your printer and system documentation for more information. Also see the considerations sections starting on page 6-6.
Note You must have created the fields to include on a layout before you begin the New Layout/Report assistant. See “About defining database fields” on page 5-3.
To create a layout:
1. Choose View menu > Layout Mode.
2. Choose Layouts menu > New Layout/Report.
You see the New Layout/Report assistant, a series of dialog boxes, or panels, that assist you with creating the type of layout you choose in the first panel.
3. In each assistant panel, follow the instructions to create the type of layout you chose in the first panel.
For a description of each of the layout types you can create with the assistant, see the next section, “About layout types.”
Type a descriptive name
Click a layout type,then click Next to proceed with the
assistant
The descriptive text and graphic change when you click different layout types
To Do this
Accept the settings in the panel and Click Next continue to the next panel
Accept the settings in the panel but go Click Back back to the previous panel
See an onscreen Help topic that Click Help or press F1 (Windows) or explains the choices in the current click (Mac OS) or press 2-? or panel the Help key on your keyboard
Windows: See pop-up Help about a Click the ? button in the upper-right specific control in the current panel corner of the panel; then, with the ?
cursor, click the control
Close the assistant without saving any Cancel of your choices

4. When you have completed the series of panels, click Finish to create the layout.
You can use the new layout right away, or further customize it using the tools and commands in Layout mode (see “About working with objects on a layout” on page 6-11, “About working with fields on a layout” on page 6-15, and the next chapter, “Customizing layouts”).
Tip You can also duplicate an existing layout and customize the new one to fit your needs.
About layout types The following sections describe each of the layouts that you can create with the New Layout/Report assistant.
Standard form A Standard form layout is a good choice for data entry or onscreen browsing. It contains the fields you select, each on a separate line, in the order you specify, with field labels to the left of the fields. In Browse mode, you see one record, or form, at a time (unless you have switched from View as Form).
Field labels
Fields you defined, in the order they appear in the Define Fields dialog box
Creating and managing layouts and reports 6-3
Columnar list/report Use a Columnar list/report layout when you want to view or print multiple records in rows (a list of records). You can define many variations of a Columnar list/report with the New Layout/Report assistant. You can create a layout with simple rows and columns of data or a complex report with data grouped by specified values with subtotals and grand totals.
A Columnar list/report layout contains the fields you select, in the order you specify from left to right across the page, with field names as column headings.
Simple columnar report layout
Columnar report with grouped data
In the New Layout/Report assistant, you can choose to:
• Limit the number of fields across the layout to the width of the page (defined by the page margins, page orientation, and printer). Fields wrap to multiple lines.
• Group records by sorting. You can then subtotal, or subsummarize, data in the groups (for example, group sales data by region, then group subtotal sales for each region).

6-4 FileMaker Pro User’s Guide
• Add header and footer parts with static text (like your company’s name), dynamic text (like the page number or current date), or a graphic (like your company logo).
• Save information in a script to re-run the report (for example, switch to the report layout, sort the data, and pause to let you preview the report).
You can modify any of these options after you complete the assistant.
Table view Table view is not a type of layout; it’s a view of your data in a spreadsheet-like grid format where you can quickly rearrange fields in Browse mode. For example, you can quickly reorder, resize, or sort columns (fields) with just a mouse click (if those options are set). Table view is one of three views available for any layout in FileMaker Pro. For more information, see “Viewing records” on page 2-2 and “Setting up View as Form, View as List, and View as Table” on page 6-10.
As with a Columnar list/report layout, a Table view contains the fields you select, in the order you specify from left to right, with field names as column headings.
Note Table view is similar to a simple Columnar list/report layout, but there are differences. Table view is a more flexible arrangement of the data because it can be enabled or disabled in Browse mode. It’s useful when you want to let users make simple changes to how data is displayed in Browse mode, or when you want to provide a familiar, spreadsheet-like appearance to your data.
Labels Use a Labels layout to arrange fields you select to print on one of the predefined standard label sizes. (FileMaker Pro includes the dimensions of a large number of standard label types.) If the label type you want isn’t available, you can specify custom label dimensions.

Creating and managing layouts and reports 6-5
Envelope Use an Envelope layout to print the fields you select, arranged to print on a standard “Number 10” business envelope.
Blank layout Use a Blank layout as the starting point for a layout that you create entirely from scratch, for example, a complex data entry screen. You add the fields you want on the layout in Layout mode.
Keep these points in mind:
• FileMaker Pro layouts are divided into layout parts, which are areas on the layout that control how to display and print data, text, and graphics. FileMaker Pro includes the body, header, and footer parts as needed on a layout depending on the choices you make in the New Layout/Report assistant. Columnar reports with grouped and totaled data also have either subsummary or grand summary parts or both. You have complete control over adding, removing, or modifying layout parts after you complete the assistant. See “About layout parts” on page 6-25.
• If your layout doesn’t turn out the way you expect it to, you can go through the assistant again. Remember to delete the layout that you no longer need (see “Working with, duplicating, deleting, or renaming layouts” on page 6-8).
• In the New Layout/Report assistant, you can apply FileMaker Pro layout themes to enhance the appearance of a layout or report and to give all your layouts a consistent look. A theme affects characteristics of the layout, including the background color, field borders and fill, and text attributes in and outside of fields. A theme does not control the placement or behavior of fields or objects. You can apply themes only in the assistant.
• If you include a field on the layout from another database (a related field), you should understand the concepts in chapter 12, “Working with related files.” Also, see “Deciding where to place related fields” on page 6-19.
• When you create a Table view and switch to Layout mode, you see a Standard form layout. Table view is not a layout type, it’s an arrangement of data, like View as Form or View as List (on the View menu in Browse mode). You can choose to view any layout in Table view by choosing View menu > View as Table.
• If you’re designing a layout to be viewed on the Web using the FileMaker Pro Web Companion, see “Setting up browser views” on page 12-10.
Considerations when you create a Columnar list/ report layout • If you are creating a report with grouped data, you should think about how you want the report to look so you can more easily proceed through the assistant. The assistant asks you to specify the field or fields that you want to group the data by. If you are including subtotals or grand totals, you should also think about what fields you want to summarize and define those summary fields before you begin the assistant. See “About defining database fields” on page 5-3. (If necessary, you can also define the summary fields within the assistant.)

6-6 FileMaker Pro User’s Guide
• In order to view a report with grouped data and totals, you must sort by the break field and go to Preview mode. The New Layout/Report assistant lets you create a script to do this.
• When you create a Columnar list/report layout, you have the choice of saving a script that switches to the layout, sorts the records (if specified), and pauses in Preview mode. The script is added to the Scripts menu, where you can choose it to run the report in the future. Verify that you’re viewing the found set that you want before running the script. You can view or edit the script (for example, you can add a Find script step) by choosing Scripts menu > ScriptMaker (see “Changing scripts” on page 12-10).
• A Columnar list/report layout arranges fields in columns. (For information on arranging records in columns, for example, to print a directory of names and addresses, see “Setting up to print records in columns” on page 6-9.)
• If you plan on printing a Columnar list/report and the columns extend beyond the width of a page, try one or more of the following:
• Reduce the field size or the font size for data in fields.
• Change the page orientation to horizontal (landscape). Or reduce the scale at which you print to less than 100%. See “Preparing to print wide layouts” on page 4-2.
• Create several layouts that show fewer columns, and then print each layout separately.
• If you’re having trouble getting the results you want for a report with grouped data, refer to the onscreen Help available for each panel of the assistant. Also, see the troubleshooting section in the FileMaker Pro onscreen Help: choose Help menu > Contents and Index, click the Index tab, and type subsummary reports.
Considerations when you create a Labels layout When printing labels, you usually use either individual sheets of labels, or a continuous-feed roll of labels (for dot matrix printers).
Because FileMaker Pro considers the selected printer and print or page setup information when it calculates margins and other measurements on the layout, you must verify these settings before you create a Labels layout.
1. Choose the printer. See “Specifying a printer (Windows)” on page 4-2 or “Specifying a printer (Mac OS)” on page 4-2.
2. Choose File menu > Print Setup (Windows), or File menu > Page Setup (Mac OS).
3. In the setup dialog box:
• For individual sheets of labels, select the size of the label sheets (usually US Letter in the U.S. and A4 elsewhere), then click OK.

• For continuous-feed label paper, create a custom paper size equal to the height of one label. (Use a custom paper size to minimize the back-and-forth movement of the printer platen and to save label paper.) Specific instructions vary depending on the type of printer:
Windows: Click Properties. If your printer supports creating a custom paper size, you see in the Properties dialog box Paper tab, a Custom icon for Paper size. Click Custom, and in the User-Defined Size dialog box, type information from the following table, then click OK. In the Properties dialog box, for Paper source, choose Tractor, then click OK. In the Print Setup dialog box, click OK.
Mac OS: If the printer supports it, redefine a rarely used paper size. First, for Paper, select a size. Then, in the Edit Paper Sizes area, type information from the following table, then click Save. Select No Gaps Between Pages, then click OK.
For Type
Name A descriptive name
Width The width of the label stock
Length (Windows) The height of one label Height (Mac OS)
Note If you define a custom paper size for printing labels on a dot matrix printer, this changes your default print or page setup information. Make sure you reset these options before you print other layouts. See “Preparing to print” on page 4-2.
Keep this point in mind:
• FileMaker Pro uses merge fields when you create a Labels layout. You can’t enter or edit data using merge fields. Switch to Table view (in Browse mode, choose View menu > View as Table) or use another layout for that purpose. For more information about working with merge fields, see “Placing merge fields” on page 6-18. For more information about different views, see “Viewing records” on page 2-2.
Creating and managing layouts and reports 6-7
Considerations when you create an Envelope layout Because FileMaker Pro considers the selected printer and print or page setup information when it calculates margins and other measurements on the layout, you must verify these settings before you create an Envelope layout.
1. Choose the printer. See “Specifying a printer (Windows)” on page 4-2 or “Specifying a printer (Mac OS)” on page 4-2.
2. Choose File menu > Print Setup (Windows), or File menu > Page Setup (Mac OS).
3. In the setup dialog box, choose a letter size. Also, if you feed the envelopes into the printer short-side first, choose a landscape (horizontal) paper orientation.
4. Click OK.
After you create the layout, you might need to adjust the layout depending on the way you insert envelopes into your printer (see “Resizing layout parts” on page 6-30 and “Deleting layout parts” on page 6-30).
If you Do this
Manually feed envelopes Keep the header and adjust it, as necessary, to into a center-feed printer match the printing to the envelope size.
Manually feed envelopes Keep the header and adjust it, as necessary, to into a left edge-feed printer match the printing to the envelope size. (A good
rule of thumb for the header size is to subtract the envelope height from 8.5 inches.)
Manually feed envelopes Delete the header, and insert a footer. Adjust the into a right edge-feed printer footer, as necessary, to match the printing to the
envelope size.

6-8 FileMaker Pro User’s Guide
Note FileMaker Pro uses merge fields when you create an Envelope layout. You can’t enter or edit data using merge fields. Switch to Table view (in Browse mode, choose View menu > View as Table) or use another layout for that purpose. For more information about working with merge fields, see “Placing merge fields” on page 6-18. For more information about different views, see “Viewing records” on page 2-2.
Working with, duplicating, deleting, or renaming layouts Once you’ve created more than one layout, use the layout pop-up menu, or, in Layout mode, the book to easily switch between layouts.
To In Layout mode, do this
Duplicate a layout From the layout pop-up menu, choose the layout to duplicate, then choose Layouts menu > Duplicate Layout. You see the duplicated layout, and FileMaker Pro adds its name—with Copy appended—as the last choice in the layout pop-up menu.
Delete a layout From the layout pop-up menu, choose the layout to delete. Choose Layouts menu > Delete Layout, then click Delete in the alert message. You can’t undo deleting a layout.
Rename a layout From the layout pop-up menu, choose the layout to rename. Choose Layouts menu > Layout Setup and for Layout Name, type a descriptive name, then click OK.
Reorder layouts in Choose Layouts menu > Set Layout Order. Position the the layout pop-up pointer over the layout name and drag the layout name to menu a new position, then click OK.
To In Layout mode, do this
Include or exclude Choose Layouts menu > Set Layout Order, then click a a layout in the layout name. To include the layout, select Include in layouts layout pop-up menu. To exclude the layout, clear this option. (You can menu in Browse, also click to the left of the layout name to select or clear Find, and Preview this option.) modes You see a checkmark next to the name of a layout that’s
included in the layout pop-up menu.
Keep these points in mind:
• It’s good practice to duplicate a complex layout before you modify it, because you can’t undo major changes or revert to a previously saved version.
• A database must have at least one layout, so you can’t delete the last one.
• Layout names do not have to be unique.
• In a multiuser database, only the host can reorder layouts, and only when the database isn’t being shared (see “About sharing files on a network” on page 12-1).
• You can create, duplicate, or delete layouts using buttons on the Standard toolbar (choose View menu > Toolbars > Standard). See “Using toolbars” on page 1-5.
• You can’t copy an entire layout to another FileMaker Pro file, but you can accomplish the same thing by saving a clone of the file. (See “Saving files” on page 1-7.) You can also copy and paste fields and layout objects to another file. (See “Copying, duplicating, and deleting objects” on page 6-13.)
• All layouts are displayed in the layout pop-up menu in Layout mode, whether Include in layouts menu is selected or not.
Setting up to print records in columns You can choose to print (or preview) records in columns, for example, for a directory of names and addresses. This is in contrast to a Columnar list/report layout, which arranges fields in columns.

When you set up records to print in columns, all the field values (and labels, if specified) for one record are printed together in a block (much like on a label), then all the values for the next record are printed together, and so on. You see multiple columns only in Layout and Preview modes and when you print (not in Browse mode or Find mode).
You can choose to arrange columns across the page or down the page.
1
2
3
4
5
6
7
8
1
3
5
7
2
4
6
8
Down first Across first
To set up columns in a layout:
1. Choose a printer and print or page setup options.
FileMaker Pro considers the selected printer, and print or page setup information when it calculates margins and other measurements on the layout. See “Specifying a printer (Windows)” on page 4-2 or “Specifying a printer (Mac OS)” on page 4-2.
2. In Layout mode, create a layout or choose a layout from the layout pop-up menu.
It’s easiest to start with a Blank layout or a layout with no objects in the body part.
3. Choose Layouts menu > Layout Setup.
Creating and managing layouts and reports 6-9
4. In the Layout Setup dialog box, General tab, select Print in <value> columns, select options for the columns, then click OK.
To Do this
Specify the number of For Print in <value> columns, type a number columns between 1 and 99.
Arrange records to flow Select Across first. across the page first (left to Use this option for reports like labels, to use the right a row at a time) fewest number of rows and preserve label stock.
Arrange records to flow Select Down first. down the page first (top to Use this option for reports like directories, where bottom a column at a time) you read from top to bottom, column by column.
5. On the layout, you see vertical lines indicating columns. Arrange fields and other layout objects so they are contained in the sample column on the left.
Manually resize column
Sample column
widths by dragging
To Do this
Interactively adjust the Drag the right column boundary (the vertical dashed width of the columns line at the right edge of the sample column). If you
widen the column, you see a medium-gray area that indicates a “gutter” area that won’t print.
Precisely measure and Choose View menu > Object Size. Position the pointer adjust the width of the over the right column boundary and hold down the columns mouse button (be careful not to drag the column
width). The column width is the second-to-last field in the Size palette.

6-10 FileMaker Pro User’s Guide
Note Use merge fields or fields or objects with sliding enabled to fit more data into the width of a column. With either of these two features, fields can extend into the gray area of the second column, and blank space in fields is eliminated when you view or print data. See “Placing merge fields” on page 6-18 and “About removing blank space from printed data” on page 7-22.
If you change the number of columns, FileMaker Pro adjusts the width of the columns to fit within the width of the paper size you have defined, not including fixed margins. You may need to readjust fields to fit within the sample column.
Keep these points in mind:
• When you select Down first, FileMaker Pro prints subsummary parts the width of the column. If you’ve specified that a page break comes after the subsummary part, FileMaker Pro starts a new column (not a new page). With Across first, subsummary parts print the width of the page, and the specified page break starts a new page. (See “Defining page breaks and numbering” on page 6-29.)
• For information about other options in the Layout Setup dialog box, see the next section and “Specifying page margins” on page 7-21.
Setting up View as Form, View as List, and View as Table FileMaker Pro provides three different views of each layout: form, list, and table. When you change views, you change the way records display or print. For more information about the differences between views and how to use them, see “Viewing records” on page 2-2.
In Layout mode, you can specify which views are available in other modes.
1. Choose the layout you want to work with from the layout pop-up menu.
2. Choose Layouts menu > Layout Setup.
3. In the Layout Setup dialog box, click the Views tab, then select one or more views.
When This menu command is enabled you select in Browse and Find modes
Form View View menu > View as Form
List View View menu > View as List
Table View View menu > View as Table
Unless you change the default settings, FileMaker Pro enables all views.
4. Select Table View to see the Table View Properties dialog box.
Specify table grid settings
Specify whether FileMaker Prodisplays the header or footer part
Specify whether FileMaker Pro displays column headers and
how they behave
Specify a custom row height(all rows are the same height)
For more complete information about table view properties, see the FileMaker Pro onscreen Help. Choose Help menu > Contents and Index, click the Index tab, and type View as Table command.
5. Click OK.

Creating and managing layouts and reports 6-11
Keep these points in mind:
• FileMaker Pro doesn’t display subsummary layout parts when you specify View as List in Browse mode or Find mode. You see subsummary parts and subsummary data calculated correctly only in Preview mode or in a printed report (see “Viewing or printing subsummary or grand summary data” on page 6-28). FileMaker Pro also doesn’t display or print subsummary or grand summary parts when you specify View as Table in any mode.
• To change the background color or pattern of the table, make sure the fields are transparent, then change the color or pattern of the body part (see “Adding or changing layout parts” on page 6-27). The column headers pick up their font attributes (except the font color, which is always black) from the first field in the tab order (see “Setting the tab order for data entry” on page 7-8). You can’t modify the background of the column headers.
• If Include column headers is selected, users can resize columns or sort by a column’s values (as long as they have the appropriate access privileges) even if Resizable columns and Sort data when selecting column are cleared by right-clicking (Windows) or Control-clicking (Mac OS) the column header and choosing the appropriate command from the context menu. See “Viewing records” on page 2-2.
About working with objects on a layout An object is a discrete element—a field, text, a graphic object (such as an oval or imported picture), a button, or a portal (for displaying rows of related records)—that you can select, move, resize, delete, copy, format, and otherwise change. Place objects on a layout to enhance its design.
For example, add the Client name and Line Item fields to a layout to display data from those fields. Add the title “Invoice,” or emphasize a group of fields by enclosing them in a rectangle to make the layout easier to understand.
In Browse mode, objects look the same from record to record, while field data changes to show the data in your database.
Working with the layout tools For each type of object you work with, you use specific tools from the tool panel or one of the toolbars (choose View menu > Toolbars).
Toolbars
Selection tool
Tool panel in Layout mode
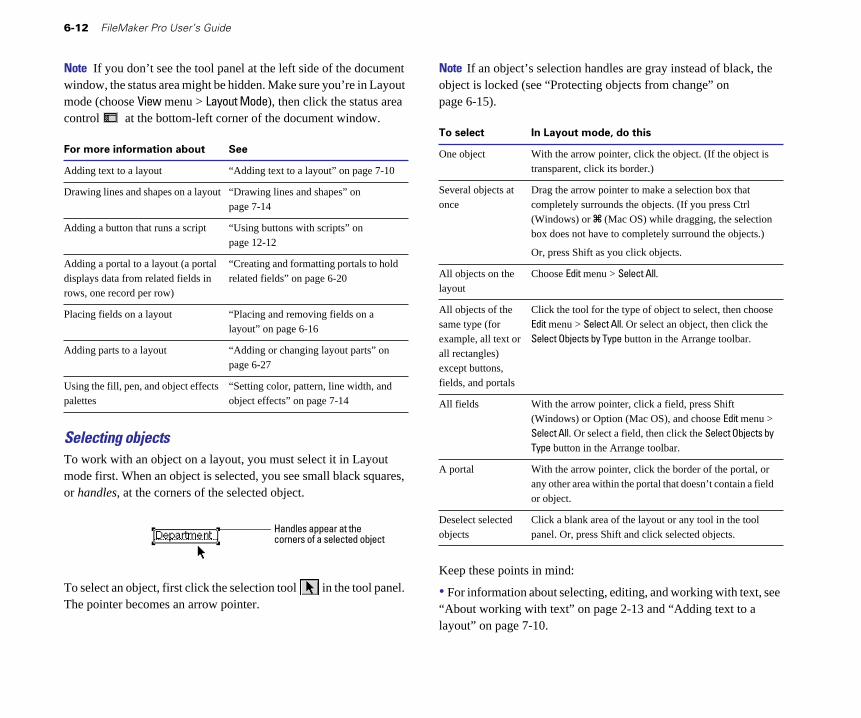
6-12 FileMaker Pro User’s Guide
Note If you don’t see the tool panel at the left side of the document window, the status area might be hidden. Make sure you’re in Layout mode (choose View menu > Layout Mode), then click the status area control at the bottom-left corner of the document window.
For more information about See
Adding text to a layout “Adding text to a layout” on page 7-10
Drawing lines and shapes on a layout “Drawing lines and shapes” on page 7-14
Adding a button that runs a script “Using buttons with scripts” on page 12-12
Adding a portal to a layout (a portal “Creating and formatting portals to hold displays data from related fields in related fields” on page 6-20rows, one record per row)
Placing fields on a layout “Placing and removing fields on a layout” on page 6-16
Adding parts to a layout “Adding or changing layout parts” on page 6-27
Using the fill, pen, and object effects “Setting color, pattern, line width, and palettes object effects” on page 7-14
Selecting objects To work with an object on a layout, you must select it in Layout mode first. When an object is selected, you see small black squares, or handles, at the corners of the selected object.
Handles appear at thecorners of a selected object
To select an object, first click the selection tool in the tool panel. The pointer becomes an arrow pointer.
Note If an object’s selection handles are gray instead of black, the object is locked (see “Protecting objects from change” on page 6-15).
To select In Layout mode, do this
One object With the arrow pointer, click the object. (If the object is transparent, click its border.)
Several objects at Drag the arrow pointer to make a selection box that once completely surrounds the objects. (If you press Ctrl
(Windows) or 2 (Mac OS) while dragging, the selection box does not have to completely surround the objects.)
Or, press Shift as you click objects.
All objects on the Choose Edit menu > Select All.layout
All objects of the Click the tool for the type of object to select, then choose same type (for Edit menu > Select All. Or select an object, then click the example, all text or Select Objects by Type button in the Arrange toolbar. all rectangles) except buttons, fields, and portals
All fields With the arrow pointer, click a field, press Shift (Windows) or Option (Mac OS), and choose Edit menu > Select All. Or select a field, then click the Select Objects by Type button in the Arrange toolbar.
A portal With the arrow pointer, click the border of the portal, or any other area within the portal that doesn’t contain a field or object.
Deselect selected Click a blank area of the layout or any tool in the tool objects panel. Or, press Shift and click selected objects.
Keep these points in mind:
• For information about selecting, editing, and working with text, see “About working with text” on page 2-13 and “Adding text to a layout” on page 7-10.

• If multiple objects are grouped, you can’t move an individual object within the group until you ungroup the objects. Select the grouped object, then choose Arrange menu > Ungroup (see “Grouping and ungrouping objects” on page 7-17).
• You can layer objects on a layout. If you can’t see an object on a layout, you might need to send other objects backwards in the stacking order. Select the object or objects in front, then choose Arrange menu > Send to Back (see “Moving objects forward or backward on a layout” on page 7-18).
• You can use buttons on the Arrange toolbar to work with objects (choose View menu > Toolbars > Arrange). See “Using toolbars” on page 1-5.
• To switch between the selection tool and another tool, press Ctrl + Enter or Enter on the numeric keypad (Windows) or press Enter (Mac OS).
Copying, duplicating, and deleting objects In Layout mode, you can cut or copy and then paste graphic objects and text, fields (including related fields), buttons, and portals. You can also cut, copy, and paste field data in Browse and Find modes (see “Copying and moving data in records” on page 2-8).
To Select the object, then do this
Copy (or cut) an object, Choose Edit menu > Copy (or Cut). Click with the then paste it onto the arrow pointer where you want the object centered, same or another layout, then choose Edit menu > Paste. or into another database See the following notes for more complete file information.
Duplicate an object Choose Edit menu > Duplicate.
Or, press Ctrl (Windows) or Option (Mac OS) as you drag.
Delete an object without Choose Edit menu > Clear. replacing what’s on the Or, press Backspace or Delete. Clipboard
Creating and managing layouts and reports 6-13
Keep these points in mind:
• If the other application supports it, you can quickly bring objects from that application into FileMaker Pro by dragging the object from the other application’s window onto the FileMaker Pro layout. You can also drag objects from a layout to another application or to the Windows or Finder desktop. For more information about enabling and using drag and drop, see the FileMaker Pro onscreen Help. Choose Help menu > Contents and Index, click the Index tab, and type drag and drop.
• You can copy and duplicate locked objects, but you can’t cut or delete them.
• When copying a field to another layout in the same database file, FileMaker Pro copies the field characteristics (like size, borders, and text styles) and the field definition (like type, field options, and, if the field is a related field, relationship). When copying a field to a layout in a different database file, FileMaker Pro looks for a matching field name in the file that you’re copying to. If a matching name is found, the pasted field adopts the matching field’s definition. If a match is not found, only the field characteristics are pasted. See “About defining database fields” on page 5-3.
• When copying a portal to another layout in the same database file, FileMaker Pro copies the portal characteristics (like size, borders, and fill styles) and the relationship. When copying a portal to a layout in a different database file, FileMaker Pro looks for a matching relationship in the file that you’re copying to. If a matching relationship is found, the pasted portal adopts the relationship’s definition. If a match is not found, only the portal characteristics are pasted and the relationship is undefined. FileMaker Pro doesn’t copy and paste fields and objects within a portal unless you select them as well as the portal. See “Creating and formatting portals to hold related fields” on page 6-20.
• For complete information about copying and pasting OLE objects, see the FileMaker Pro onscreen Help. Choose Help menu > Contents and Index, click the Index tab, and type OLE objects,editing. Then double-click Copying and pasting OLE objects.

6-14 FileMaker Pro User’s Guide
• Use the Duplicate command to create a series of equally spaced identical objects. After choosing Edit menu > Duplicate, immediately drag the new object to the position you want (without deselecting it). Choose Duplicate again: the new copy appears in the same position relative to the first copy as the first copy is to the original object.
• For information about selecting, editing, and working with text, see “About working with text” on page 2-13.
Moving objects on a layout To move objects, in Layout mode, click the selection tool in the tool panel, select one or more objects, and drag them to the new position. When you move fields or text, text baselines extend horizontally from the object to help you align it with other objects.
To Do this
Move the selection one pixel Press Right Arrow, Left Arrow, Up Arrow, or Down Arrow.
Limit movement to either a Press Shift as you drag the selection. horizontal or vertical direction
Precisely move the selection Use the graphic rulers, T-squares, object grids, and Size palette (see “Using tools to precisely position objects” on page 7-19).
Override the Object Grids when Press Alt (Windows) or 2 (Mac OS) as you moving a selection drag the selection.
Position the selection beyond the Drag the object to the edge of the document boundaries of the document window. FileMaker Pro scrolls in that window direction.
Keep these points in mind:
• For more information about selecting one or more objects, see “Selecting objects” on page 6-12.
• To more easily move multiple objects, group them first. (See “Grouping and ungrouping objects” on page 7-17.)
• To move a portal and the related fields and objects within it, select the portal by clicking its border and the objects within it.
• Fields and portals behave differently depending on whether they’re in the body part, a subsummary part, or a header or footer part. See “About layout types” on page 6-3.
• When you’re moving objects, remember that you can group, layer, and align objects to help you achieve the results you want. You can also rotate objects. See “Arranging objects” on page 7-17.
Changing an object’s shape and size Once you’ve drawn a line or a shape on a layout, you can reshape or resize it. You can also reshape or resize fields, portals, graphics, movies, and text blocks.
1. In Layout mode, click the selection tool in the tool panel, and then select one or more objects.
See “Selecting objects” on page 6-12.
2. Drag one of the selection handles to change the object’s shape and size.
To Do this
1 Change only the height or width of a two- Press Shift as you drag a dimensional object (for example, fields, handle. rectangles, ovals, fields, or imported graphics)
1 Constrain a line to horizontal or vertical
1 Force the height and width of a two- Press Ctrl (Windows) or dimensional object to be equal (for Option (Mac OS) as you drag aexample, a rectangle becomes a square, or handle.an oval becomes a circle)
1 Constrain the direction you drag to 45-degree increments when you resize a line
Precisely resize the selection Use the graphic rulers, T-squares, object grids, and Size palette (see “Using tools to precisely position objects” on page 7-19).

Creating and managing layouts and reports 6-15
To Do this
Override the object grids when dragging a Press Alt (Windows) or handle 2 (Mac OS) as you drag a
handle.
Keep these points in mind:
• Resizing the first repetition of a repeating field resizes all repetitions.
• Resizing a grouped object resizes all the objects in the group. See “Grouping and ungrouping objects” on page 7-17.
Protecting objects from change Prevent objects from being changed, edited, moved, or deleted from the layout by locking them. Locking a field in Layout mode does not prevent changes to the information in Browse mode.
To lock objects on a layout, in Layout mode, select the objects, then choose Arrange menu > Lock. A locked object’s handles are gray instead of black.
To unlock objects, select the locked objects, and then choose Arrange menu > Unlock.
Note When you copy or duplicate a locked object, the copy isn’t locked. When you group objects that include a locked object, the grouped object is locked. Locking doesn’t prevent changes to the stacking order.
About working with fields on a layout After you create a layout, you can place new fields on it, remove fields you don’t want displayed, and determine the format in which you want data displayed. (To prevent fields that you define from being automatically placed on the current layout, see “Setting layout preferences” on page 12-2.)
Fields on a layout are objects, which you can select, move, resize, and reshape (see the previous sections). In Layout mode, each field displays its field name, formatted with its attributes for font, size, style, alignment, line spacing, and color. All fields except container fields display text baselines to indicate where the data appears in Browse mode and to help you align fields with each other.
Field label Text baseline
Fields display field names
Field tool
Keep these points in mind:
• A field that doesn’t appear on a layout still exists in the database, and its data can be used in calculations and summaries.
• To control the formatting for data in a field (text formatting, formats for number, date, time, and container fields) as well as how the field looks (fill and border settings, scroll bars, and so on), choose field formatting options with no fields selected. FileMaker Pro applies these formats to all fields added later. You can also specify formatting options individually for each field. See “Formatting field data on a layout” on page 6-21 and “Customizing fields on a layout” on page 7-1.
Placing and removing fields on a layout You can place a field anywhere on any layout, as many times as you want. (You can place only fields that you’ve defined. See “About defining database fields” on page 5-3).

6-16 FileMaker Pro User’s Guide
You get different results by placing the same field in different locations on the layout. For example:
• Add the same summary field to a subsummary part to calculate totals for each group of sorted records, and to a grand summary part to get totals for all the records in the database.
• Add a field to the header or footer part to repeat data from the first record or the last record on the page as a header or footer. (For example, add a Last Name field to the header in a directory.)
• Add the same related field directly on a layout to see the field’s value in the first related record, or inside a portal to see values from more than one related record. (For more information about setting up a relational database and definitions of relational database terminology, see chapter 12, “Working with related files.”)
Note If you are working with multiple related database files (a relational database), you can display related fields on the layout. You can place related fields directly on the layout or in a portal (a layout object that displays data from all related records in the related file that match the criteria of the relationship). Before you place a related field on your layout, see “Deciding where to place related fields” on page 6-19 and “Creating and formatting portals to hold related fields” on page 6-20.
To place a field on a layout:
1. In Layout mode, choose the layout you want to work on from the layout pop-up menu.
2. Drag a field from the Field tool to the position you want on the layout.
As you drag the field onto the layout, you see a border and text baselines to help you align the field with other objects on the layout. Release the mouse button when the field is where you want it.
Note If you’re placing a related field in a portal, position it in the first row of the portal. Make sure all the related fields use the same relationship as the portal. (A related field that uses a different relationship displays only one occurrence of the data.)
Field tool The field’s border and baselines appear as you drag the fields onto the layout
3. In the Specify Field dialog box, select the field to place.
To place a related field,choose a relationship name,
then choose a related field
Select the field to add
Select to use the field name as the field label
To choose a related field, choose the relationship to use from the relationship list above the list of fields. Or choose Define Relationships to create a relationship (see “Defining relationships for relational databases and lookups” on page 12-10). Then select a related field from the field list.
4. Select Create field label to include the field name as text on the layout.
5. Click OK.
You see the field name in the field on the layout unless you have chosen to display sample data (View menu > Show > Sample Data).
To replace a field with another, in Layout mode, double-click the field, then select another field name in the Specify Field dialog box and click OK. If you created a field label when you placed the original field, that text must be changed to reflect the new field name.

To remove a field from a layout, in Layout mode, click the field to select it, then press Backspace or Delete, or choose Edit menu > Clear. Removing a field from a layout does not delete the field or its data from your database. (To delete a field and its data, see “Deleting field definitions and data” on page 5-12.)
Keep these points in mind:
• If you include field labels when you place a field and you then rename the field in the Define Fields dialog box, the field label changes to match the new field name on each layout where the field label appears.
• You can make data entry for a field easier and more consistent by defining a value list, associating it with the field, then formatting the field as a pop-up menu, pop-up list, checkboxes, or radio buttons. See “Defining a list of values for data entry” on page 7-3.
• To have FileMaker Pro insert field data into a line or block of text, use merge fields (see the next section, “Placing merge fields”).
• To “close up” space between fields and other layout objects, omit empty repetitions of repeating fields or empty portal rows, or reduce the size of an enclosing layout part, specify sliding options. (See “About removing blank space from printed data” on page 7-22.)
• To put a static image (like a logo or graphic embellishment) on a layout so it appears in every record, create, paste, or import the graphic directly onto the layout instead of using a container field. See “Inserting graphics onto a layout” on page 7-16.
• Instead of placing fields, you can copy fields from other layouts and other databases. See “Copying, duplicating, and deleting objects” on page 6-13.
Keep these points about related fields in mind:
• Before placing related fields on a layout, you should understand the concepts in chapter 12, “Working with related files.”
Creating and managing layouts and reports 6-17
• In general, you work with related fields (for example, selecting, resizing, formatting, customizing, and removing) in the same way that you work with non-related fields. When you place a related field on a layout, you need to know whether it should be located on the layout or in a portal (see “Deciding where to place related fields” on page 6-19).
• In Layout mode, the field name displayed within the field on the layout appears as ::Field Name for related fields.
• When you include a related field on a layout (not in a portal) and there is more than one related record, you see only the value from the first related record. (The order of the related records depends on whether a sort order was specified when the relationship was created.) See “Deciding where to place related fields” on page 6-19 and “Defining relationships for relational databases and lookups” on page 12-10.
Placing merge fields Use a merge field—placeholder text in Layout mode that is replaced by the field’s value when you browse, preview, or print the layout— for documents like form letters, labels, envelopes, or contracts. Merge fields shrink or expand to fit the amount of text in the field for each record. (This behavior includes collapsing an entire line, such as an empty Address Line 2 field, if the field is by itself on a line and the field contains no data.)
For example, when the merge field <<First Name>> is between the text Dear and :, (in other words, Dear <<First Name>>:) FileMaker Pro displays Dear Charles: in Browse mode or Preview mode if the First Name field contains Charles.
FileMaker Pro uses merge fields to create Labels and Envelope layouts.
Note You can’t edit or enter values into a merge field.
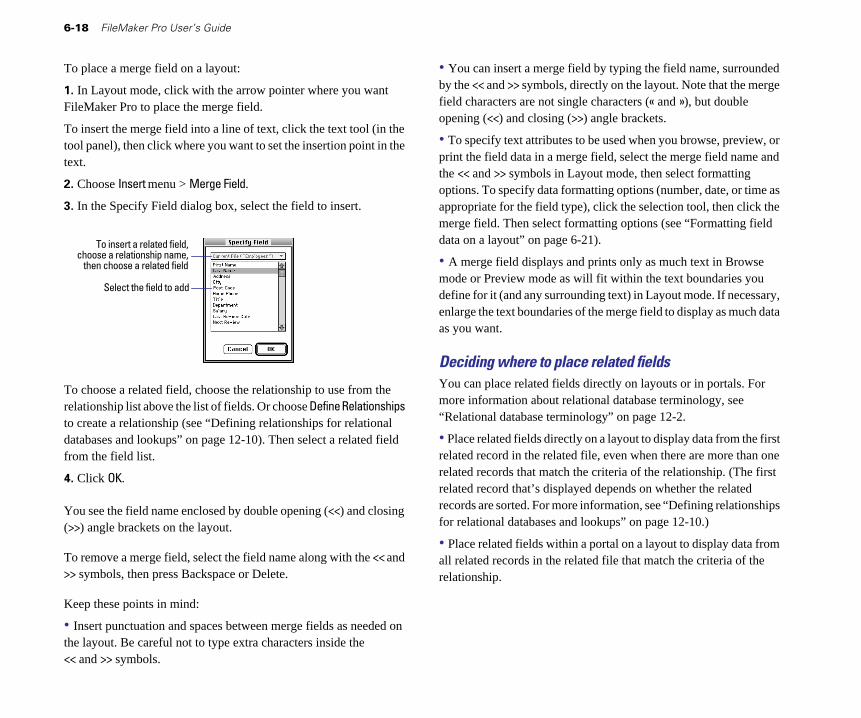
6-18 FileMaker Pro User’s Guide
To place a merge field on a layout:
1. In Layout mode, click with the arrow pointer where you want FileMaker Pro to place the merge field.
To insert the merge field into a line of text, click the text tool (in the tool panel), then click where you want to set the insertion point in the text.
2. Choose Insert menu > Merge Field.
3. In the Specify Field dialog box, select the field to insert.
To insert a related field, choose a relationship name,
then choose a related field
Select the field to add
To choose a related field, choose the relationship to use from the relationship list above the list of fields. Or choose Define Relationships to create a relationship (see “Defining relationships for relational databases and lookups” on page 12-10). Then select a related field from the field list.
4. Click OK.
You see the field name enclosed by double opening (<<) and closing (>>) angle brackets on the layout.
To remove a merge field, select the field name along with the << and >> symbols, then press Backspace or Delete.
Keep these points in mind:
• Insert punctuation and spaces between merge fields as needed on the layout. Be careful not to type extra characters inside the << and >> symbols.
• You can insert a merge field by typing the field name, surrounded by the << and >> symbols, directly on the layout. Note that the merge field characters are not single characters (« and »), but double opening (<<) and closing (>>) angle brackets.
• To specify text attributes to be used when you browse, preview, or print the field data in a merge field, select the merge field name and the << and >> symbols in Layout mode, then select formatting options. To specify data formatting options (number, date, or time as appropriate for the field type), click the selection tool, then click the merge field. Then select formatting options (see “Formatting field data on a layout” on page 6-21).
• A merge field displays and prints only as much text in Browse mode or Preview mode as will fit within the text boundaries you define for it (and any surrounding text) in Layout mode. If necessary, enlarge the text boundaries of the merge field to display as much data as you want.
Deciding where to place related fields You can place related fields directly on layouts or in portals. For more information about relational database terminology, see “Relational database terminology” on page 12-2.
• Place related fields directly on a layout to display data from the first related record in the related file, even when there are more than one related records that match the criteria of the relationship. (The first related record that’s displayed depends on whether the related records are sorted. For more information, see “Defining relationships for relational databases and lookups” on page 12-10.)
• Place related fields within a portal on a layout to display data from all related records in the related file that match the criteria of the relationship.

For example, you might do the following on an Invoice layout in an Invoices database:
• Place related fields on the invoice that displays data from the Clients database, such as the client’s identification number and contact information. (The match field is Client ID.) There is only one record in the Clients database for each Client ID, so each related field on the invoice displays the data for that client.
• Place a related field on the invoice that displays the most recent value from the Order Date field in the Order History database. (Again, the match field is Client ID.) If the client has placed more than one order, there are multiple records in Order History that match this client’s Client ID. By defining a sort order on the Order Date field when you define the relationship, the most recent date displays in the related field when it’s placed directly on the layout (not in a portal).
• Place related fields on the invoice that display data about each ordered item, such as Product ID, Product Name, Unit Price, and so on. (The match field is Order ID.) Since in most cases there is more than one product on the invoice (you’re displaying more than one related record), you create a portal to hold the related fields. Each row of the portal displays one related record with the related fields you select from the Line Item database.
Creating and managing layouts and reports 6-19
Related fields directly on a layout
Related fields in a portal
Related fields in Layout mode
Data from one related record
Data from all related records
Related fields in Browse mode
Creating and formatting portals to hold related fields Note Before you begin, be sure you want to place related fields in a portal (see the previous section, “Deciding where to place related fields”).
1. In Layout mode, select the Portal tool in the tool panel.
Tool panel Portal tool

6-20 FileMaker Pro User’s Guide
2. Position the crosshair pointer on the layout where you want the portal to begin, then drag the pointer diagonally until the portal is the size you want.
3. In the Portal Setup dialog box, for Show records from, choose the relationship to use. Or choose Define Relationships to create a relationship (see “Defining relationships for relational databases and lookups” on page 12-10).
4. Select options for the portal.
Select to allow related Select the relationship to records to be deleted use, or define a new one
(from the related file) in Browse mode
Select portal options
For more complete information about portal options, see the FileMaker Pro onscreen Help. Choose Help menu > Contents and Index, click the Index tab, and type portals,formatting.
First portal row Portal
Relationship for the portal
5. Click OK.
6. Place related fields in the portal. (See “Placing and removing fields on a layout” on page 6-16.)
To select a portal, with the arrow pointer, click the border of the portal, or any other area within the portal that doesn’t contain a field or object.
To delete a portal, with the arrow pointer, select the portal, then press Backspace or Delete, or choose Edit menu > Clear. If the portal contains related fields or objects, deleting the portal doesn’t remove the contained objects. Nor does deleting the portal delete the relationship defined for the portal.
To resize a portal row:
1. Select the portal.
You see selection handles at each corner of the first portal row.
2. Drag a selection handle.
The first row resizes and each other row resizes to match the first row.
Keep these points in mind:
• To sort the related records in a portal, you must specify a sort order in the relationship definition. See “Defining relationships for relational databases and lookups” on page 12-10.
• In most cases, you should enable Show vertical scroll bar in the Portal Setup dialog box. If you don’t and there are more related records than will fit in the number of portal rows you’ve defined, you won’t be able to see all the related records or enter new related records.
• For information about creating new related records from the current file or deleting related records when you delete a record in the current file, see “Defining relationships for relational databases and lookups” on page 12-10.
• You can display objects other than fields in portals. An object is in a portal if its upper-left corner is inside the portal. An object placed in the first row of a portal is displayed once for each related record.
• A portal can’t contain another portal. If you place a portal in a portal, the portals overlap.

• To change the number of rows, the color or pattern of alternating rows, or whether a scroll bar appears in a portal, double-click the portal. In the Portal Setup dialog box, change formatting options, then click OK.
• For information about working with portals in databases published on the Web using the FileMaker Pro Web Companion, choose Help menu > Contents and Index, click the Index tab, and type layouts,on Web.
Formatting field data on a layout Use FileMaker Pro field formats to control how data appears on a layout. The formats you specify don’t change the data as it’s stored in the database, and you can specify different formats each time you place a field on a layout (whether it’s on the same layout or a different layout). For example, if you enter –5123 into a number field, you can format it in one place to display as –$5,123.00 and in another place as <5123>.
FileMaker Pro applies field formatting in the following precedence:
• If you don’t specify formats, FileMaker Pro displays numbers, dates, and times based on the system formats set in Regional Settings in the Control Panel (Windows) or Numbers and Date & Time control panels (Mac OS) when the file was created.
• In FileMaker Pro, you can specify display formats for text, number, date, time, or container fields with no objects selected. FileMaker Pro applies these default formats to fields you place on layouts later. For number, date, and time fields, these display formats override the system formats.
• Once you place fields, you can select one or more fields and specify formats.
See the following sections for information on setting default and individual field formats.
Creating and managing layouts and reports 6-21
Note You can work with files that are created with different system formats for numbers, dates, and times (for example, if you’re in the United States and you’re opening a database created in Australia). You have the choice of viewing and entering data either in the formats that the database was created with, or with your current system settings. To use the current system settings, in Browse mode, verify that Use System Formats is checked in the Format menu. (You see this command only if you’re working in a database that was created with different system formats.) This change in format affects how data is displayed in number, date, or time fields when users edit the data in Browse mode or Find mode, or when you select Leave data formatted as entered in Layout mode. For more information, see the FileMaker Pro Help. Choose Help menu > Contents and Index, click the Index tab, and type system formats.
Keep these points in mind:
• You can set specific formats for number, date, and time fields, but users can still enter data with extraneous characters (like “per pound”). To explicitly control the type of data users enter in a field, specify validation options (see “About defining database fields” on page 5-3).
• If no fields are selected and you specify field formatting (text, number, date, time, or graphic), you set default field formats for that field and all fields of that type that you add later. Similarly, if you’ve just created a field and it’s still selected, and you specify field formatting, you set default field formats. If you change these default formats later, FileMaker Pro does not retroactively change previously applied formats.
• To quickly display the format dialog box for the type of field you’re working with, press Alt (Windows) or Option (Mac OS) as you double-click the field. Or, right-click (Windows) or Control-click (Mac OS) the field and choose a command from the context menu.
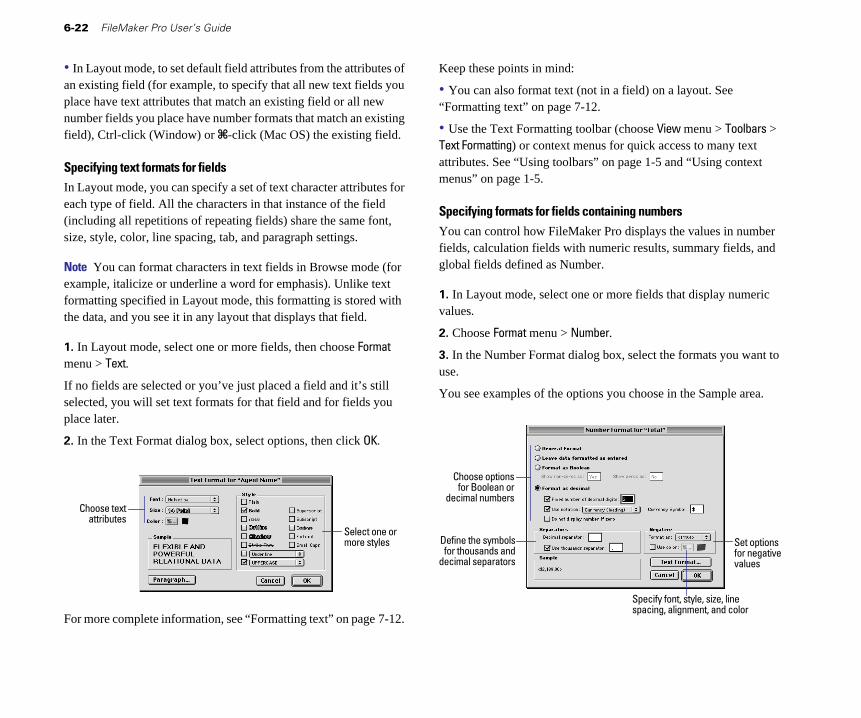
6-22 FileMaker Pro User’s Guide
• In Layout mode, to set default field attributes from the attributes of an existing field (for example, to specify that all new text fields you place have text attributes that match an existing field or all new number fields you place have number formats that match an existing field), Ctrl-click (Window) or 2-click (Mac OS) the existing field.
Specifying text formats for fields In Layout mode, you can specify a set of text character attributes for each type of field. All the characters in that instance of the field (including all repetitions of repeating fields) share the same font, size, style, color, line spacing, tab, and paragraph settings.
Note You can format characters in text fields in Browse mode (for example, italicize or underline a word for emphasis). Unlike text formatting specified in Layout mode, this formatting is stored with the data, and you see it in any layout that displays that field.
1. In Layout mode, select one or more fields, then choose Format menu > Text.
If no fields are selected or you’ve just placed a field and it’s still selected, you will set text formats for that field and for fields you place later.
2. In the Text Format dialog box, select options, then click OK.
Choose text attributes
Select one or more styles
For more complete information, see “Formatting text” on page 7-12.
Keep these points in mind:
• You can also format text (not in a field) on a layout. See “Formatting text” on page 7-12.
• Use the Text Formatting toolbar (choose View menu > Toolbars > Text Formatting) or context menus for quick access to many text attributes. See “Using toolbars” on page 1-5 and “Using context menus” on page 1-5.
Specifying formats for fields containing numbers You can control how FileMaker Pro displays the values in number fields, calculation fields with numeric results, summary fields, and global fields defined as Number.
1. In Layout mode, select one or more fields that display numeric values.
2. Choose Format menu > Number.
3. In the Number Format dialog box, select the formats you want to use.
You see examples of the options you choose in the Sample area.
Choose options for Boolean or
decimal numbers
Define the symbols
Specify font, style, size, line
Set optionsfor thousands and for negative
decimal separators values
spacing, alignment, and color

For more complete information about specifying number formats, see the FileMaker Pro onscreen Help. Choose Help menu > Contents and Index, click the Index tab, and type number fields.
4. Click OK.
Keep these points in mind:
• If you specify General format and the field value is a number with 10 or more digits, FileMaker Pro displays the number using scientific notation, or rounds the number, or both, if necessary, to fit within the 10-character maximum for the default field boundaries. When a number is expressed in scientific notation, you see a decimal number expressed as a power of 10, for example, 123,456,789,000 would be displayed as 1.2346E+11 (or 1.2346 x 10¹¹). If the field value is a number of fewer than 10 digits, specifying General format produces the same result as specifying Leave data formatted as entered.
• If FileMaker Pro displays a number in a field as a ? try enlarging the field boundaries in Layout mode to see the entire value. (When you print a layout with a field that is displaying a ?, FileMaker Pro prints as many digits as will fit within the field boundaries and truncates the other digits.)
• Numbers formatted as decimals are rounded when the number of decimal digits exceeds the specified fixed number of decimal digits. (For example, if you enter 789.78 and you specify 3 fixed digits, you see 789.780 in the field; if you specify 0 fixed digits, you see 790; if you specify -2 fixed digits, you see 800.) However, FileMaker Pro stores and uses the unrounded number (up to 15 digits) for calculations and summaries.
• Only numbers are displayed and printed in a number field formatted as decimal (except for separators and notations specified in the Number Format dialog box). To display text and symbols (for example, @1.98 per pound) in a number field, select Leave data formatted as entered. If you use the field in a calculation or summary, only the numeric value is used.
Creating and managing layouts and reports 6-23
Specifying formats for date fields You can control how FileMaker Pro displays the values in date fields, calculation fields with date results, and global fields defined as Date.
Note To avoid confusion when using dates in fields, always use four-digit years. For more information on how FileMaker Pro handles Year 2000 issues, see www.filemaker.com.
1. In Layout mode, select one or more date fields, calculation fields with a date result, or global fields defined as Date.
2. Choose Format menu > Date.
3. In the Date Format dialog box, select the formats you want to use.
You see examples of the options you choose in the Sample area.
Choose to display Choose optionsnumbers either as entered, for day, month,in a predetermined format, date, year, and
or in a format you specify separator characters
Set font, style, size,color, line spacing,
and alignment
For more complete information about specifying date formats, see the FileMaker Pro onscreen Help. Choose Help menu > Contents and Index, click the Index tab, and type date fields.
4. Click OK.
Keep these points in mind:
• No matter how you format a date field in Layout mode, whenever you click or tab into the field in Browse mode, FileMaker Pro displays the date with a 4-digit year.

6-24 FileMaker Pro User’s Guide
• If you specify Leave date formatted as entered but a year is entered with only two digits, FileMaker Pro stores, displays, and prints the year with four digits to include the century.
• Be sure to size the date field on the layout according to the format you choose. For example, the date Wednesday, May 5, 2002 needs more room than 5/5/02.
• Use any of the date formatting options to format the date symbol, “//” (two slashes), which displays the current date. In Layout mode, select the symbol, then choose Format menu > Date. See “Inserting the page number, date, or other variable onto a layout” on page 7-11.
Specifying formats for time fields You can control how FileMaker Pro displays time values in fields.
1. In Layout mode, select one or more time fields, calculation fields with a time result, or global fields defined as Time.
2. Choose Format menu > Time.
3. In the Time Format dialog box, select the formats you want to use.
You see examples of the options you choose in the Sample area.
Choose to display timeseither as entered or in a
format you specify
Set font, style, size, color,line spacing, and alignment
For more complete information about specifying time formats, see the FileMaker Pro onscreen Help. Choose Help menu > Contents and Index, click the Index tab, and type time fields.
4. Click OK.
Note Use any of the time formatting options to format the time symbol, “::” (two colons), which displays the current time. In Layout mode, select the symbol, then choose Format menu > Time. See “Inserting the page number, date, or other variable onto a layout” on page 7-11.
Specifying formats for fields containing graphics You can control how FileMaker Pro displays images in container fields.
Note The following instructions also apply to formatting graphic objects that you insert onto a layout. (See “Inserting graphics onto a layout” on page 7-16.)
1. In Layout mode, select one or more container fields or inserted graphics.
2. Choose Format menu > Graphic.
3. In the Graphic Format dialog box, select the formats you want to use.
You see examples of the options you choose in the Sample area.
Choose how to fit the graphic in the frame
Choose how to align Choose how to alignthe graphic horizontally the graphic vertically
For more complete information about specifying graphic formats, see the FileMaker Pro onscreen Help. Choose Help menu > Contents and Index, click the Index tab, and type graphics.
4. Click OK.
Note The formatting options you choose do not affect the original graphic.

About layout parts FileMaker Pro layouts are divided into layout parts, sections of the layout that determine how data in a field is treated and displayed. By using parts, you can control how FileMaker Pro prints data, for example:
• once for each record
• only at the top of each page
• only before or after groups of sorted records (for example, to include a subtotal for each group of records)
Layout parts can contain fields, portals, buttons, text, and other objects. In Layout mode, dotted horizontal lines mark the division between layout parts, and the part label appears at the left end of the bottom dividing line.
Header Body
Subsummary Trailing
Grand Summary
Footer
Agent Name Product ID Qty Amount
David Michaels ET3 1 $29.95 David Michaels ET4 1 $32.25 David Michaels ET1 2 $73.90 David Michaels ET5 3 $98.85
Total $234.95
Sophie Tang ET6 2 $64.50 Sophie Tang ET7 5 $12.50 Sophie Tang ET2 2 $25.00
Total $102.00
Grand Total $336.95
Sales Report
A subsummary below the bodysummarizes data for each
group of records sorted on the break field (Agent Name)
Trailing grand summary
Footer EveryWhere Travel Confidential June 1999
Creating and managing layouts and reports 6-25
About layout part types Each layout must have at least one part.
Note The New Layout/Report assistant automatically creates the appropriate layout parts depending on the choice you make. You can add, change, or delete layout parts after you finish the assistant as needed. (See “Creating layouts and reports” on page 6-2.)
Layout part Description
Title header Appears only once at the top of the first screen or page and replaces the normal header (if one is specified). In reports, can be used to print a separate title page. You can have only one title header in a layout.
A field in the title header displays data from the first record in the found set.
Header Appears at the top of every screen or page (unless you add a title header, which supersedes the header on the first page). Use for titles or column headings (in columnar reports). You can have only one header in a layout.
A field in the header displays data from the first record on that page.
Body Each object you put in the body, including fields, text objects, and graphics, appears once for each record in the found set. You can have only one body in a layout.
Footer Appears at the bottom of every screen or page (unless you add a title footer). You can have only one footer in a layout.
A field in the footer displays data from the last record on that page.
Title footer Appears only once at the bottom of the first screen or page and replaces the normal footer (if one is specified). You can have only one title footer in a layout.
A field in the title footer displays data from the last record on the first page.

6-26 FileMaker Pro User’s Guide
To include summary data on a layout (for example, subtotals, grand totals, averages, counts, and so on), you place summary fields in summary layout parts (see “Defining summary fields” on page 5-6). Summary parts include grand summary and subsummary parts.
• A grand summary part usually contains one or more summary fields that display summary information (like totals) about all records being browsed.
• A subsummary part usually contains one or more summary fields that display “subsummary” information (like subtotals) for a subset of records. The records are grouped (sorted) by values in another field, the break field. Whenever the value of the break field changes, the report “breaks” and FileMaker Pro inserts the subsummary part.
Layout part Description
Grand When you place a summary field in this part, the summary summary field displays summary information for all records in the (leading or found set. The grand summary part can be at the beginning trailing) (leading) or end (trailing) of the report, depending on its
placement on the layout. You can have only one leading grand summary and one trailing grand summary in a layout.
If you put another type of field in this part, FileMaker Pro displays data from the first record (leading) or last record (trailing) being browsed.
Subsummary When you place a summary field in this part, the summary (leading or field displays “subsummary” information for each subset of trailing) records sorted by the specified break field. The subsummary
part can be before or after the body part, depending on the placement on the layout. You can have multiple subsummary parts in a layout.
If you put another type of field here, FileMaker Pro displays data from the first record (leading) or last record (trailing) in the group. Put the break field here to identify what subset of records the summary is for.
For example, to summarize each salesperson’s sales figures in a database recording sales transactions, define a summary field totaling the Sales field, and then create a subsummary part and place that summary field in it (the break field is the salesperson’s name). If you also want a count of that salesperson’s transactions, create a second summary field counting the transactions, and also place it on the same subsummary part. To get a grand total of all transactions, place the sales summary field in a grand summary part.
Adding or changing layout parts To add a layout part to a layout, first decide what kind of part you need and where it should go. If you’re defining a subsummary part that summarizes a set of records, you also choose what field to group or sort the layout by (the break field). Finally, define how the part affects page breaks and page numbering.
Part label
Part tool
A part includes the area between the dotted lines that separate parts
To add a layout part:
1. In Layout mode, choose Layouts menu > Part Setup.
2. In the Part Setup dialog box, click Create.
3. In the Part Definition dialog box, select the type of layout part you want. See the previous section, “About layout part types,” for a description of each part type.

Creating and managing layouts and reports 6-27
3. In the Part Definition dialog box, make your changes.
Select the type of part to create
Select options for page numbering
and breaks
Part types that are already on the layout are dimmed (only subsummary parts can exist more than once on a layout).
4. If you’re adding a subsummary part, after you click Sub-summary when sorted by, select the name of the field that you want to group the records by (the break field).
When the records are sorted by the break field, all records with the same value in that field are grouped so that FileMaker Pro can calculate subsummary data. (For example, if you wanted to subtotal sales figures for each region, the break field would be Region.) For more information, see the next section, “Viewing or printing subsummary or grand summary data.”
5. If desired, select page break and page numbering options.
See “Defining page breaks and numbering” on page 6-29.
6. Click OK, then click Done.
After you define a part, you can change its type, break field (if it’s a subsummary part), and pagination options:
1. In Layout mode, choose Layouts menu > Part Setup.
2. In the Part Setup dialog box, select the part, then click Change.
To change Do this
From one type of Select a different part type. Changes you can make part to another depend on the part’s location and function.
The break field In the fields list, select a different field name.
Page breaks and See “Defining page breaks and numbering” on page 6-29. numbering
Dimmed types are not available because either:
• that part type already exists (only subsummary parts can exist more than once on a layout)
• the part you’re changing is not in the right place on the layout (for example, a title header must be at the top of the layout)
4. Click OK.
Keep these points in mind:
• To quickly add a layout part, you can drag a part from the Part tool on the status area to the position you want it on the layout. Or, you can use the Insert Part button on the Tools toolbar (choose View menu > Toolbars > Tools). After you place the part, you see the Part Definition dialog box. Some parts must go in specific places (for example, trailing subsummary parts must go beneath the body), so if the type you want is dimmed in the Part Definition dialog box, click Cancel and try again.
Part tool and boundary appear as you drag thePart tool part onto the layout
• You can add fields, portals, graphic objects, and text to any layout part. FileMaker Pro considers an object to be in a part when the top of the object is in or just touching the part. For example, if the top of a field touches the bottom division line of the header part, the field displays and prints only in the header and not in the body.

6-28 FileMaker Pro User’s Guide
• For more information about setting up layouts for web publishing, see “Setting up browser views” on page 12-10.
• To apply a color or pattern to a layout part, click the part label, then, in the status area, choose from the fill color palette, fill pattern palette, or both. (The color you specify for the body part also affects the background of the table in View as Table.)
• FileMaker Pro doesn’t display subsummary layout parts when you specify View as List in Browse mode or Find mode. You only see subsummary parts and subsummary data calculated correctly in Preview mode or in a printed report (see the next section, “Viewing or printing subsummary or grand summary data”). FileMaker Pro also doesn’t display or print subsummary or grand summary parts when you specify View as Table in any mode.
• When viewing or moving objects on a layout, you might want to move the part labels if they’re in your way. To flip part labels up or down, in Layout mode, click the part label control at the bottom of the window.
• You can eliminate blank spaces in fields or parts when printing. See “About removing blank space from printed data” on page 7-22.
Place a subsummary part, containing only the Agent
Name field, above the body toplace the agent name in front
of that group of records
Place a subsummary part, which totals the sales for
each agent, below the body
Use a grand summary to view the total sales for all agents in the company
Viewing or printing subsummary or grand summary data FileMaker Pro displays subsummary parts and calculates subsummary data correctly only in Preview mode or in a printed report (see “Previewing data on a layout” on page 4-3).
Note You must define a summary field for each field you want summarized. You then place these summary fields in the summary layout part. To define a summary field, see “Defining summary fields” on page 5-6.
After you have added a grand summary or subsummary part:
1. On the layout, drag the summary field into the grand summary or subsummary part.
See “Placing and removing fields on a layout” on page 6-16.
2. If you have a subsummary part, sort the found set by the break field you specified when you created the part (see “Sorting records” on page 3-8).
3. Choose View menu > Preview Mode.
Keep these points in mind:
• When you use the New Layout/Report assistant to create a layout, you can choose to create a ScriptMaker script to perform the specified sort on the break field and then switch to Preview mode. You can also define a script yourself to automate this (see “Creating scripts: an overview” on page 12-3).
• Use the script generated by the New Report/Layout assistant to view or print a subsummary report (report with grouped data and totals).
• When you view records as a list in Browse mode (View menu > View as List), subsummary parts aren’t displayed. To see subsummary parts when viewing a layout as a list, switch to Preview mode or print the list.
• You can have only one leading and one trailing subsummary part based on the same field.
• If you’re having trouble getting summary information to display or print, see the troubleshooting section in the FileMaker Pro onscreen Help. Choose Help menu > Contents and Index, click the Index tab and type subsummary reports.

Creating and managing layouts and reports 6-29
Defining page breaks and numbering You can set options for page breaks and page numbering when you add a layout part or change a part definition. (When you add a part, you automatically see the Part Definition dialog box.) To change options for an existing part:
1. In Layout mode, choose Layouts menu > Part Setup.
2. In the Part Setup dialog box, select the part, then click Change.
You can also double-click the part label on the layout.
3. In the Part Definition dialog box, specify pagination options.
Dimmed options are not available for the selected part type.
To Select
Start a new page before printing the Page break before each occurrence.contents of the selected part (for example, print a trailing grand summary on a new page)
Start a new page after printing the contents Page break after every <value> of the selected part the specified number occurrences (replace the default of times (for example, print five records in value 1 if you want more than one the body, then start a new page) occurrence per page).
Reset the page number to 1 after the Restart page numbers after each selected part prints (for example, start occurrence.page numbering after a title header if you want it to serve as a cover page)
Print part of the contents of the layout part Allow part to break across page at the bottom of the page and the rest on the boundaries.next page (FileMaker Pro won’t split the To keep the portion of the part that contents of a part across two pages unless will not fit on the bottom of the you specify this option, or the height of the page from printing at the top of the part won’t fit on a single page) next page, also select Discard
remainder of part before new page.
4. Click OK, then click Done.
Keep these points in mind:
• If your layout is set up to print records in columns and you’ve specified to print records down the page, choose Page break after every <value> occurrences to start a new column (not a new page) after the part. If the column setup is to print records across the page, the specified page break starts a new page. (See “Setting up to print records in columns” on page 6-9.)
• If the body or other layout part is too large to fit on the printed page, FileMaker Pro displays a page break as a heavy, dashed line on the layout to show where it will divide the part when you print. To fit more on the page, you can set sliding options to dynamically shrink fields and the enclosing part if the fields contain variable amounts of information. See “About removing blank space from printed data” on page 7-22.
Reordering layout parts You can change the order of only the body and subsummary parts; other parts, like the header and footer, must appear in a specific order, so they can’t be moved. For example, move a subsummary part above the body to see subtotals first.
1. In Layout mode, choose Layouts menu > Part Setup.
2. In the Part Setup dialog box, drag the name of the part to the new location.
This symbol indicates that you can’t change
the part’s positionrelative to other parts
Use the double-arrow pointer to drag a part
A part that can’t be moved has a lock icon to the left of its name.

6-30 FileMaker Pro User’s Guide
3. Click Done.
FileMaker Pro moves all the fields and objects in the part and maintains its proportions.
Note To quickly move a part directly on the layout, Shift-drag the part label (or the dotted line that marks the bottom of the part).
Resizing layout parts In Layout mode, use the arrow pointer to drag the part label (or the dotted line that marks the bottom of the part) until the part is the height you want.
Keep these points in mind:
• When you resize a layout part, FileMaker Pro maintains the size of the other parts. For example, you can increase the height of the header part, but this won’t affect the size of the part directly following the header part.
• Alternately, if you want to maintain the height of the entire layout while changing the size of one layout part, Alt-drag (Windows) or Option-drag (Mac OS) the part boundary. (This causes the size of the layout part immediately below the part you’re changing to also change.)
• You can’t make a part smaller than the objects that it holds (in other words, you can’t shrink a part by dragging its boundary across an object) unless you press Alt (Windows) or Option (Mac OS) as you drag the part boundary.
• If you reduce a layout part to nothing by dragging it under the part above it, FileMaker Pro deletes the part from the layout.
Deleting layout parts You can delete all but the last part that remains on a layout. Deleting a part doesn’t affect your data. Before you delete a layout part, drag any objects you want to keep to another part on the same layout.
Important Deleting a part using the Part Setup dialog box can’t be undone.
1. In Layout mode, choose Layouts menu > Part Setup.
2. In the Part Setup dialog box, select the part to delete, then click Delete.
If the part contains objects, FileMaker Pro displays a dialog box asking you to confirm the deletion.
3. Click Done.

Chapter 7 Customizing layouts
After creating a layout, you can change its appearance or the way the layout works. This chapter explains how to:
• customize how fields or other objects on a layout look
• change how users interact with fields on a layout, for example, by adding scroll bars or changing the order fields are tabbed through
• define a list of values that can be used for data entry in one or more fields on a layout
• add text or graphics to a layout, like titles or a logo
• use tools available in FileMaker Pro to help you position and work with objects on a layout
• change the way data on a layout prints
For information on creating a layout, placing or removing fields on a layout, controlling how data is formatted in a field, or adding layout parts, see the previous chapter, “Creating and managing layouts and reports.”
Customizing fields on a layout You have a variety of options for controlling how fields look and how users interact with fields. In most cases, if you specify these options with no fields selected or if you’ve just placed a field and it’s still selected, you set behavior for fields you place on the layout later. If you select one or more fields before you set options, you format the selected fields.
For information about selecting fields and other objects, see “Selecting objects” on page 6-12.
Tip Choose the Field Borders or Field Format command by right-clicking (Windows) or Control-clicking (Mac OS) a field or fields.
Adding borders, fill, and baselines to fields To enhance the appearance and usability of your layout, you can add or customize:
• borders around fields
• the background color and pattern, or fill, of fields
• the dotted guidelines, or text baselines, that appear in a field at the base of the text to help you align it with other objects
1. If you’re not already in Layout mode, choose View menu > Layout Mode.
2. Select one or more fields.
Or, to specify attributes for fields you add later, start with no fields selected.
3. Choose Format menu > Field Borders.
4. In the Field Borders dialog box, select the formats you want to use.
You see examples of the options you choose in the Sample area.
Choose which
Choose a color, You see a representation
portion of the field to assign attributes to
Choose Borders, Baselines, or Fill
pattern, and line width of the choices you make

7-2 FileMaker Pro User’s Guide
To Do this
Add borders to fields Select any combination of Top, Bottom, Left, or Right. and set their attributes From the format list, choose Borders and choose a
color, pattern, and line width from the pop-up palettes.
Add text baselines and Select Text baselines. From the format list, choose set their attributes Baselines, then choose a color, pattern, and line width
from the pop-up palettes.
Add a fill color, From the format list, choose Fill, then choose a color, pattern, or both to pattern, or both from the pop-up palettes. (The fields checkboxes have no effect on fill attributes.)
Add borders between Select Between repeating values. From the format list, repetitions in repeating choose Borders, then choose a color, pattern, and fields width from the pop-up palettes.
This option inserts lines between occurrences of repeating fields. To also include borders around repeating fields, select any combination of Top, Bottom, Left, or Right.
5. Click OK.
Keep these points in mind:
• The settings you choose in the Field Borders dialog box affect the appearance of the field in all modes. If you just want to see field boundaries in Layout mode to, for example, align fields, choose View menu > Show > Field Boundaries. On the other hand, if you want to see the effects of Field Border settings while in Layout mode, hide Field Boundaries.
• You can also change a field’s fill and border formats using the fill and pen pop-up palettes in the status area. (You must have already specified borders in the Field Borders dialog box.) Changes made in the status area to the fill and pen settings replace settings in the Field Borders dialog box, and vice versa. See “Setting color, pattern, line width, and object effects” on page 7-14.
• You can also specify an effect (Embossed, Engraved, or Drop Shadow) for fields with the effect pop-up palette in the status area. See “About object effects” on page 7-15.
Adding scroll bars to fields Add a vertical scroll bar to a field to see more data than fits in the field’s boundaries in Browse mode. (You can’t add scroll bars to container, summary, or repeating fields, or fields formatted to use a value list.)
1. In Layout mode, select one or more fields.
Or, to specify attributes for fields you add later, start with no fields selected.
2. Choose Format menu > Field Format.
Click to add a vertical scroll bar
3. In the Field Format dialog box, for Style, select Standard field, then click Include vertical scroll bar.
4. Click OK.

Customizing layouts 7-3
Keep these points in mind:
• Scroll bars are always displayed if you set the field borders option for the right side of the field. Otherwise, they display only when you tab into the field. See “Adding borders, fill, and baselines to fields” on page 7-1.
• When you print a field or a portal with a scroll bar, FileMaker Pro prints only the data visible without scrolling. To print all the data, duplicate the layout and enlarge the field or portal, then specify sliding options to remove the extra blank space when you print. See “About removing blank space from printed data” on page 7-22.
Defining a list of values for data entry If a field uses the same set of values for many or all records, you can have users choose values from a value list. A value list lets you define frequently used text, number, date, or time values and then format the field to display the values in a pop-up menu, a pop-up list, or as series of checkboxes or radio buttons. This provides a fast, accurate way to enter or validate data in fields.
Choose from a list of values during data entry
Value list attached to the Category field
You can define a value list in a number of ways. The most general, least restrictive way is to define the value list first and then assign it to one or more fields. You can also define the value list when you’re specifying formatting options in Layout mode.
To define a value list:
1. Choose File menu > Define Value Lists.
2. In the Define Value Lists dialog box, click New.
Click to sort by a heading ordrag column
boundaries
Value lists defined in
the file
Drag to resize dialog box
3. In the Edit Value List dialog box, for Value List Name, type a name.
Type a name for the value list
Choose a method to create the values
for the value list

7-4 FileMaker Pro User’s Guide
4. Define the value list:
To Do this
To Do this
Also display associated values from a second field
Follow the instructions in one of the previous two table rows. Then, click Also display values from and select a field name. Select this option to display the values from a corresponding field next to the values in your value list. For example, to help with data entry, you could display part names next to part numbers.
You can also choose which field to sort the value list by if you’re not using Only related values. To display both values sorted by the values in the first field, select first field for Sort value list by. To base the sort on the values in the second field, select second field. If you choose first field, duplicate values will not display for the first field; if you choose second field, duplicate values will not display for the second field.
Click OK.
Define static values for the value list
Select Use custom values, then type each value on a separate line, in the order you want them to appear. Press Enter (Windows) or Return (Mac OS) to separate each value.
Create values dynamically from all the values in another field in the current file or in another file
Select Use values from field. In the Specify Fields for Value List dialog box: 1 To use a field from the current file, make sure All
values is selected, then in Use values from this field, select the field name.
1 To use a field from a different file, click Specify File, then choose a filename and click Open. Make sure All values is selected, then in Use values from this field, select the field name.
If you want to display values from a second field, see “Also display associated values from a second field,” later in this table. Otherwise, click OK. Use a value list Select Use values from another file. In the Specify
defined in another External Value List dialog box, click Specify File, then FileMaker Pro file select a filename and click Open. For Value List, choose
or define a value list, then click OK. In the Edit Value List dialog box, click OK.
Use all field values Display only related
field values Select a field to
use its values
Select a second field to display values from
Create values Select Use values from field. In the Specify Field for dynamically from a Value list dialog box, select Only related values and subset of values in choose or define a relationship from the relationship another field (the list. Then, in Use values from this field, select the field subset is determined name.by a relationship) If you want to display values from a second field, see For more information, “Also display associated values from a second field,” see “About displaying next in this table. Otherwise, click OK.only a subset of field values in a value list” on page 7-5.
5. In the Define Value Lists dialog box, click Done.

Customizing layouts 7-5
To change, duplicate, or delete a value list:
1. Choose File menu > Define Value Lists.
2. In the Define Value Lists dialog box:
To Do this
Change the values in a value list In the list of value list names, select the value or how the values in a dynamic list, then click Edit. In the Edit Value List value list are generated dialog box, make changes.Then, click OK.
Duplicate a value list In the list of names, select the value list, then click Duplicate.
Delete a value list In the list of names, select the value list, then click Delete. In the confirmation dialog box, click Delete again.
3. In the Define Value Lists dialog box, click Done.
Keep these points in mind:
• You can also use a value list to validate the values entered for any field. This keeps data accurate by preventing users from entering values that aren’t in the value list. (See “Defining field validation” on page 5-9.) And, you can sort records in the order of a value list, for example, sort by month or region. (See “Sorting records” on page 3-8.)
• FileMaker Pro sorts value list items created from values in a field alphabetically, and duplicate values are not displayed.
• Redefining a value list item after data has been entered might cause unexpected results. For example, if you change a value list item from Accessory to Accessories, the field will appear to be empty on layouts where the field is formatted as a checkbox or radio button. Also, you will not find the existing records if you search for Accessories. For information on replacing values in fields, see “Replacing data in fields” on page 2-10.
• If you have chosen to generate a value list from values in a field (Use values from field) and you’re also displaying associated values from a second field, when a user chooses a value for this field in Browse mode, the value from the second, associated field is not stored in the field—only the first field is captured.
About displaying only a subset of field values in a value list If you are generating the values in a value list from a field, you can have FileMaker Pro dynamically change the value list’s values based on the values in a second field. In other words, the value list will only display values in the first field from related records where the relationship definition is met by a value entered into the second field.
For example, imagine you have a database called Product that tracked a large number of inventory items. You could define a value list and assign it to the Product Name field to display only a subset of those items based on values in a second field, Category. During data entry, when you specify the value of the Category field (for example, Accessory), only the Product Name values where the Category equals Accessory show up in the value list. Similarly, if the value of Category changes to Clothing, the values for Product Name change to those records where Category matched Clothing.
Value list based on key field value “Accessory”
Value list based on key field value “Clothing”

7-6 FileMaker Pro User’s Guide
In the above example, you would perform the following basic steps:
1. Define a value list for Product Name with the Use values from field and Only related values options.
2. Define a relationship to the same database file (a self-join) and specify Category as the match field. (See “Defining relationships for relational databases and lookups” on page 12-10.)
3. Specify that the value list use values from the related field Product Name.
When you enter a value for Category, FileMaker Pro retrieves the related records where Category matches the value you entered, and displays the corresponding Product Name values in the value list.
Note Both the field with the value list values and the match field for the relationship must reside in the same file, for example, Category and Product Name from the example above.
Formatting fields to use a pop-up list, pop-up menu, checkboxes, or radio buttons to display a value list Once you have defined a value list, you assign it to the field on each layout where you want to use it.
To assign a value list to a field and determine how it’s displayed:
1. In Layout mode, select the field.
2. Choose Format menu > Field Format.
Name of field selected on a layout
Choose how to Select or define display the value list a value list
Assigning a value list to a field
3. In the Style area of the Field Format dialog box, select the second radio button, then choose how you want FileMaker Pro to display the value list.
To Do this
Select a format for the value list
Choose the format you want from the list to the left of using value list: 1 Choose Pop-up list to display value list items in a list.
Users can use the arrow keys or “type ahead” to select a value.
1 Choose Pop-up menu to display value list items as a pop-up menu. Users must select items by using the mouse.
1 Choose Check boxes to display value list items next to a series of checkboxes.
1 Choose Radio buttons to display value list items next to a series of radio buttons.
To allow the user to enter values other than those defined by the value list
Select Include “Other…” item to allow entry of other values. (This option is not available for Pop-up list because users can always type any value into the list.)
To allow the user to Select Include “Edit…” item to allow editing of value list. edit the values defined This option is not available for fields formatted as by the value list checkboxes, radio buttons, or for value lists based on
another field’s values.

Customizing layouts 7-7
Checkboxes Radio buttons
Pop-up menu
Pop-up list
4. Choose the name of the value list to assign to the field from the list to the right of using value list.
Or, choose Define Value Lists to create a value list (see “Defining a list of values for data entry” on page 7-3). If you define a value list here, you can still use it for other fields.
5. Click OK.
Keep these points in mind:
• Formatting a field with a checkbox allows users to enter more than one value for a field. If more than one value is entered for a record, FileMaker Pro displays only the first of those values on a layout where the field is not formatted with a checkbox (for example, a columnar report).
• Change the arrangement of value list items in checkboxes and radio buttons by resizing the field. A field that is taller than it is wide displays items stacked vertically. A field that is wider than it is tall displays items side-by-side horizontally.
• For more information about setting up layouts for web publishing, see “Setting up browser views” on page 12-10.
Formatting repeating fields If you define a field as a repeating field, you can format the field to display only a certain number of the repetitions, even though the information for all the repetitions is stored in the database. See “About repeating fields” on page 5-11.
1. In Layout mode, select one or more repeating fields, then choose Format menu > Field Format.
In the Field Format dialog box, for Repetitions, select options.
Specify the number of repetitions visible in a
repeating field, andtheir orientation
To Do this
Specify the number of For Show <value> of field’s n defined repetitions, repetitions visible on type a number (the n represents the maximum the layout number of repetitions specified when the field
was defined).
Choose an orientation For Use <value> orientation, choose vertical to stack for displaying field the repetitions in a column or horizontal to position repetitions the repetitions side-by-side in a row.
2. Click OK.
Keep these points in mind:
• To reshape or resize all visible occurrences of a repeating field, use the handles that appear around the first occurrence.
• FileMaker Pro stores the data in all repetitions of a repeating field even if you change the formatting of the field so that not all of the repetitions are visible.

7-8 FileMaker Pro User’s Guide
Allowing or preventing entry into fields You can allow or prevent entry into a field in Browse and Find modes. For example, you can restrict entry into a field containing a serialized number, like an invoice number, so the field can’t be modified.
If you allow entry into a field, you can control whether the entire contents of the field is selected when you click or tab into the field in Browse mode or Find mode (otherwise, FileMaker Pro places the insertion point after the last character in the field).
To customize entry into a field:
1. In Layout mode, select one or more fields.
Or, to specify attributes for fields you add later, start with no fields selected.
2. Choose Format menu > Field Format.
In the Field Format dialog box, for Behavior, select options.
To Do this
Prevent entry into a field Clear Allow entry into field.
Select the entire field’s contents Select Select entire contents of field on entry when the field is entered (Allow entry into field must also be selected).
3. Click OK.
Note Clearing Allow entry into field for a field only affects the field on that layout. To always restrict access to a field on any layout of the database, define “read only” access privileges for that field. See “Defining groups” on page 12-3. You can also limit a user’s ability to edit a field’s value if, when defining the field, you specify an auto-entered value and select Prohibit modification of value. See “Defining automatic data entry” on page 5-8. You may want to allow entry into fields set to prohibit modification so values can be copied to the Clipboard or values can be entered and searched for in Find mode.
Setting the tab order for data entry When you press Tab in Browse mode or Find mode, the default FileMaker Pro behavior is to make fields active from left to right and top to bottom. You can change this default tab order in a number of ways.
1. In Layout mode, choose Layouts menu > Set Tab Order.
FileMaker Pro displays numbered arrows pointing to each of the fields on your layout, along with the Set Tab Order dialog box.
Each arrow indicates the field’s position in the tab order

Fi li k
Customizing layouts 7-9
2. In the Set Tab Order dialog box, specify the options you want to use:
To Do this
Reorder the tab order Select Edit tab order. Click the field whose order you for individual fields want to change and type a new number for the arrow.
The number you replace is swapped with the number you type.
Define a new tab order Select Create new tab order and click the fields in the for all fields new order. FileMaker Pro inserts numbers in that order
in the arrows.
Omit fields from the As you set a new tab order, don’t click the fields you tab order want to omit. For fields that already display a number,
select the number and press Backspace or Delete.
Restore the default tab Click Revert to Default. order
3. Click OK.
If there are some fields on the layout that you have not included in the tab order, you see a dialog box that asks if you want to make those fields available when tabbing. If you do not want to include them, click Omit; otherwise, click Add (they will be added at the end of the tab order).
Keep these points in mind:
• A blank arrow indicates a field that is omitted from the tab order.
• For multiple repeating fields, you can specify whether to tab through the first repetition of each different field first (the default) or down within the same field first.
First click Second click Third click
Fourth click
Horizontal tab order for repeating fields (left to right)
Second First double-click
Second double-click
Second Third double-click
Vertical tab order (top to bottom down each field)
• To set the tab order to tab through the first repetition of each different repeating field, click in the upper-left field. The arrow blinks as you select the order to tab through the first repetitions of the other fields. Click the upper-left field again and FileMaker Pro completes the tab order for the remaining repetitions of the repeating fields using the same pattern you used.
• To set the tab order to first include all of the (visible) repetitions of the first repeating field, double-click the first occurrence of the repeating field. FileMaker Pro fills in the numbers for all the repetitions. Then, double-click the first occurrence of the next repeating field to get the next series of tab-order numbers, and so on.
• Summary fields can’t be included in the tab order. Calculation fields can be included in the tab order, but you can’t tab into them in Browse mode (only in Find mode). Fields that are formatted to prevent entry can’t be tabbed into in Browse mode or Find mode.
• Setting a tab order has no effect on data entry when you are working with data published on the Web using the FileMaker Pro Web Companion. For more information about setting up layouts for web publishing, see “Setting up browser views” on page 12-10.

7-10 FileMaker Pro User’s Guide
Customizing the appearance of a layout You can enhance the design of a layout in a number of ways, including:
• adding text outside of fields
• using the drawing tools to add lines, rectangles, or other shapes
• adding a graphic or QuickTime movie
See “Working with the layout tools” on page 6-11 for more information about layout tools.
Tools toolbar
Tool panel
Status area control
For more information about setting up layouts for web publishing, see “Setting up browser views” on page 12-10.
Adding text to a layout Adding text to a layout makes the layout easier to use and understand. Use text for:
• field labels (field names; you have the option of creating a field label when you place a field on a layout)
• column headings in columnar reports
• instructions on a form
• a form letter, with merge fields displaying data
• the current date, page number, or record number
Add text anywhere on a layout. Text typed or pasted onto a layout is an object, which you can manipulate in the same way as any other object. For example, you can assign a background color or rotate a text object.
Note To add or change text in your database fields, switch to Browse mode.
To type text on a layout:
1. In Layout mode, select the text tool in the tool panel or Tools toolbar (choose View menu > Toolbars > Tools).
2. With the I-beam pointer, click where you want to add text or drag the pointer to define the maximum line length for the text.
Clicking on the layout creates a small text block that enlarges when you type text in it.
You see a blinking insertion point surrounded by a temporary dotted frame.
3. Type the text.
For more complete information about working with text, see the FileMaker Pro onscreen Help. Choose Help menu > Contents and Index, click the Index tab, and type text, entering.
4. Set font and other text attributes.
The text is formatted with the default font, style, line spacing, color, and alignment. To specify text attributes, see “Formatting text” on page 7-12.
Keep these points in mind:
• For more information about selecting and editing text, see “About working with text” on page 2-13.

Customizing layouts 7-11
• Depending on what layout part the text is in, it appears in different places on your layout in Browse mode or Preview mode (for example, once for each record, only at the top of the report, and so on). See “About layout parts” on page 6-25.
• To eliminate blank spaces when printing, see “About removing blank space from printed data” on page 7-22.
Inserting the page number, date, or other variable onto a layout You can display or print fixed information (like the date as it was when entered) or variable information (like today’s date) when you print or preview records. For example, display the current time in a report footer each time you print the report. You can also display the date, time, or user name as it is when you place it on the layout. This information stays the same whenever you display, print, or preview records. (You can also insert the current date, time, or user name into a field in Browse mode. See “Inserting the current date or other variable into fields” on page 2-10.)
1. In Layout mode, click the selection tool in the tool panel, and click where you want the information to appear.
If you want the information inserted into a line of text, double-click where you want the insertion point.
2. Choose Insert menu, then choose a command:
You see this on To insert Choose the layout
A fixed date (taken from your Current Date The current date computer’s calendar). This date is static and doesn’t change.
A fixed time (taken from your Current Time The current time computer’s clock). This time is static and doesn’t change.
You see this on To insert Choose the layout
A fixed user name (taken from the Current User Name The user’s nameUser Name specified in Application Preferences). This name is static and doesn’t change.
A variable date. This date changes to Date Symbol Two slashes(//)show the current date taken from your computer’s calendar.
A variable time. This time changes to Time Symbol Two colons (::)show the current time taken from your computer’s clock.
A variable user name. This name User Name Symbol Two vertical lines changes to show the User Name (||)specified in Application Preferences.
A page number. (Page numbers only Page Number Two number appear in Preview mode or on a Symbol symbols (##)printed report.)
A record number Record Number Two at symbols Symbol (@@)
3. The symbol displays only as much text as fits within its boundaries. Use the selection tool to enlarge the text object to display as much of the variable as you want.
4. Set font and other text attributes as you would for other text.
Keep these points in mind:
• If you insert variable information, only the variable’s symbol appears in Layout mode. You see the variable information in Browse, Find, and Preview modes, and when you print the layout.
• You can type the characters listed for the symbol instead of using the commands on the Insert menu.

7-12 FileMaker Pro User’s Guide
Formatting text You can specify how text (both in and outside of fields) appears on your layout. You control:
• the character attributes of the text, including font, font size, style, and color
• the paragraph alignment, margins, and line spacing
• tab settings
If you specify text formatting with no text or fields selected, you set default text formats for fields and text that you add later. Similarly, if you’ve just created a field or typed text and it’s still selected, and you specify text formatting, you set default text formats. If you change these default text formats later, FileMaker Pro does not retroactively change previously applied formats.
Important You can format characters in text fields in Browse mode (for example, italicize or underline a word for emphasis). Unlike text formatting specified in Layout mode, this formatting is stored with the data, and you see it in any layout that displays that field. Text that is formatted in Browse mode takes precedence over text formatted in Layout mode. For example, if you format text as bold in Browse mode, then switch to Layout mode and format the same field as italic, the text will continue to display as bold. To eliminate formatting applied in Browse mode, reformat the text in Browse mode or export and re-import the data (see “Exporting data from FileMaker Pro” on page 12-6).
Tip You can use the Text Formatting toolbar (choose View menu > Toolbars > Text Formatting), the text ruler (choose View menu > Text Ruler), or context menus for quick access to many text attributes. See “Using toolbars” on page 1-5 and “Using context menus” on page 1-5. The text ruler is documented in the FileMaker Pro onscreen Help. Choose Help menu > Contents and Index, click the Index tab, and type text, formatting.
Making text bold, italic, or setting other styles There are several ways to format text. Select the text you want to format, then:
• Choose text formatting (like a Font or Style) from a submenu on the Format menu.
• Choose text formatting options from the Text Formatting toolbar.
• Right-click (Windows) or Control-click (Mac OS) and choose text formatting commands from the context menu.
• Choose Format menu > Text to select several text formatting options at once.
To specify several text attributes at once:
1. Select the text you want to change.
For complete information about selecting text, see “Selecting text” on page 2-13.
To Do this
Format text in a field in In Browse mode, select text and choose Format Browse mode menu > Text. This formatting is stored with the data,
and you see it in any layout.
Specify text formatting In Layout mode, select one or more fields, then choose for fields in Layout Format menu > Text. Or press Alt (Windows) or mode Option (Mac OS) while double-clicking a field.
Format text on a layout In Layout mode, select text and choose Format menu > Text.
2. In the Text Format dialog box, select the attributes you want to use.
In the Sample area, FileMaker Pro displays text formatted with the attributes you select.

Choose text attributes
Select one or more styles
Specify paragraph and tabsettings (see the next section)
3. Click OK.
For more information about setting up layouts for web publishing, see “Setting up browser views” on page 12-10.
Note Windows: To see all the available fonts, choose Format menu > Font > Configure/More Fonts. In the Configure Font Menu dialog box, select a font on the left and click Move to add it to the Font menu, or double-click the font on the left to move it to the Menu list. Make sure Show Fonts in Typeface is enabled to activate this option.
Specifying paragraph attributes and tab settings In Browse mode, you can format individual paragraphs (including setting tabs) for text in a field. In Layout mode, you can specify paragraph attributes for fields that hold text and for text that’s not in a field.
1. In Browse mode, select the text you want to format. Or, in Layout mode, select the text or field you want to format.
See “Formatting text” on page 7-12 for more information about the differences between formatting text in Browse and Layout modes.
2. Choose Format menu > Text.
3. In the Text Format dialog box, click Paragraph.
4. In the Paragraph dialog box, specify spacing and alignment.
Customizing layouts 7-13
Set line spacing and changeIndent text the units of measure
Align text
Set tabs
5. To specify tab settings for the paragraph, click Tabs.
6. In the Tabs dialog box, specify tab settings.
Current tab settings Set alignment for a tab
Specify the tab’s position Specify a fill character
7. Click OK.
Keep these points in mind:
• You can specify vertical text alignment for text and fields. In Layout mode, choose Format menu > Align Text, then choose Top, Center, or Bottom.
• You can use the text ruler to set margins or tabs for text data in Browse mode or for text objects in Layout mode. You can’t use the text ruler to format fields in Layout mode, you must use the Paragraph and Tabs dialog boxes. The text ruler is documented in the FileMaker Pro onscreen Help. Choose Help menu > Contents and Index, click the Index tab, and type text ruler.
• For more complete information about specifying paragraph and tab settings, see the FileMaker Pro onscreen Help. Choose Help menu > Contents and Index, click the Index tab, and type formatting text.

7-14 FileMaker Pro User’s Guide
Drawing lines and shapes Use the drawing tools in the tool panel or Tools toolbar (choose View menu > Toolbars > Tools) to draw lines and shapes to emphasize parts of your layout.
1. In Layout mode, select the tool you want to use in the tool panel or Tools toolbar.
Oval tool
Rectangle tool Rounded rectangle tool
Line tool
2. Position the crosshair pointer on the layout where you want the line or object to begin.
• For a line, drag the pointer until the line is the length you want.
• For a rectangle, square, rounded rectangle, oval, or circle, drag the pointer diagonally until the object is the size you want.
With this tool These options are available
Line tool For a horizontal or vertical line, press Shift as you drag the pointer. For a diagonal line (at 45 degrees), press Ctrl (Windows) or Option (Mac OS) as you drag the pointer.
To create a vertical line that continues across more than one layout part, draw overlapping lines in each part.
Rectangle tool For a square, press Ctrl (Windows) or Option (Mac OS) as you drag the pointer.
Rounded For a rounded square, press Ctrl (Windows) or Option rectangle tool (Mac OS) as you drag the pointer.
Oval tool For a circle, press Ctrl (Windows) or Option (Mac OS) as you drag the pointer.
FileMaker Pro draws the object with the default line width, pen color, and pattern, and it fills the object with the current fill color and pattern (for all objects except lines). You can change these attributes before or after you draw the object. (See “Setting color, pattern, line width, and object effects” in the next section.)
Keep these points in mind:
• Use the following techniques to work with the tools:
To Do this
Use a tool once Click a tool to select it. (The tool becomes gray.)
Keep a tool selected, or locked
Double-click a tool. (The tool becomes black to indicate it remains selected until you select a different tool.) To specify a preference to keep layout tools locked, see “Setting layout preferences” on page 12-2.
Switch between the tool Press Ctrl+Enter or Enter on the numeric keypad last used and the (Windows) or press Enter (Mac OS).selection tool
• All objects have a border. (The border of a line is the line itself.) All objects except lines have a fill, the area within the border.
• You can also change the appearance of a field, a text object, or an inserted graphic, for example by changing its size, border width, or fill pattern.
• Windows: You can also link to or embed an OLE object. For more information about how FileMaker Pro treats OLE objects, see the FileMaker Pro onscreen Help. Choose Help menu > Contents and Index, click the Index tab, and type OLE objects,editing.
Setting color, pattern, line width, and object effects Use the fill, pen, line width, and object effects palettes in the status area to change the appearance of objects, including fields, buttons, and portals, on the layout.
1. In Layout mode, select one or more objects to change.

Customizing layouts 7-15
Or, to specify attributes for objects you add later, start with no objects selected.
2. Choose colors, patterns, line or border widths, and object effects from the palettes in the status area.
palette Fill pattern Pen pattern
Line width Fill color Object Pen color
palette
Pen sample
palette palette effects palette
Current linepalette width
Fill sample
To change Use the
The width of a line, or the width of a border Line width palettearound a shape, text object, field, or portal
The color or pattern of a line, or the color or Pen color and pen pattern palettespattern of a border around a shape, text object, field, or portal
The color or pattern of an object, including Fill color and fill pattern palettesthe backgrounds of text objects, fields, and portals
The effect with which FileMaker Pro draws Object effects palette, then choose an object (except lines) Embossed, Engraved, or
Drop Shadow (see the next section, “About object effects”)
If an object is selected, the sample boxes next to the palettes show the attributes for that object. If nothing is selected, the sample boxes show the default attributes.
Keep these points in mind:
• To make an object transparent, choose the transparent pattern from the pattern palette. An object with a transparent pattern is “hollow.” Other objects are visible beneath it, and it can only be selected by clicking its border.
• To copy the attributes of one object to other objects, use the Format Painter tool. For more information, see FileMaker Pro Help.
• For fields, palette settings replace Field Border dialog box settings. See “Adding borders, fill, and baselines to fields” on page 7-1.
• To apply a color or pattern to a layout part, see “Adding or changing layout parts” on page 6-26.
About object effects Use commands from the object effects palette to give your layouts a 3-dimensional appearance. You can assign object effects to objects you draw (except lines), fields, and portals.
Apply effects to layout objects
Choose To
Embossed Make the selected object appear to be raised above the background
Engraved Make the selected object appear to be depressed into the background
Drop Shadow Make the selected object appear to cast a shadow below and to the right.
Embossed Engraved Drop shadow
Keep these points in mind:
• Object effects look best when you specify a transparent pen pattern (in other words, an invisible border) and a pen width of at least 2 points. Also, try changing the background color of the enclosing part to a color similar in shade to the object’s fill color. (See “Adding or changing layout parts” on page 6-26.)

7-16 FileMaker Pro User’s Guide
• If you want to use an object effect on a field, try selecting the effect before placing the field on the layout. Otherwise, the effect might clip part of the text in the field.
• The width of the effect depends on the width of the object’s border as specified by the pen width (unless the object has no border, in which case the object effect is drawn with a 1 point line). The effect’s color and pattern depend on the fill color and pattern of the selected object or field.
• When you apply an effect to an existing object, the total size of the object along with the effect does not change, but the object itself shrinks to accommodate the effect. Therefore, when you apply an effect to an existing field, the field dimensions might need to be enlarged so that the data is readable.
• If you assign an object effect to a transparent object, FileMaker Pro assigns the object the default fill and then draws the effect. If you change the fill color, FileMaker Pro adjusts the colors of the effect to complement the new color. If you change an object’s fill to transparent after you assign an effect, FileMaker Pro makes the effect transparent, too.
• Buttons always have an Embossed effect. You can change this by selecting the button and choosing another effect from the object effects palette. See “Using buttons with scripts” on page 12-12.
Inserting graphics onto a layout You can add graphics anywhere on a layout. Use a graphic on a layout instead of a container field whenever you want the same image (like a company logo) on every record or report.
1. In Layout mode, choose Insert menu > Picture.
2. In the dialog box, for Files of type (Windows) or Show (Mac OS), choose a graphic file type.
3. Navigate to the graphic file.
If you select Store only a reference to the file, FileMaker Pro doesn’t import the graphic file, it only keeps track of where it is on your hard disk. This option may reduce the size of your FileMaker Pro file, but if you move or delete the file, FileMaker Pro won’t be able to display it.
4. Select the file and click Open, or double-click the filename.
For some file formats, you see a dialog box with options for customizing how the graphic is inserted. The graphics options are documented in the FileMaker Pro onscreen Help. Choose Help menu > Contents and Index, click the Index tab, and type Insert Picture command.
5. Position and size the graphic on the layout as needed.
See “Moving objects on a layout” on page 6-14 and “Changing an object’s shape and size” on page 6-14.
Keep these points in mind:
• To display a different graphic in each record, paste or insert the graphic into a container field in Browse mode. For more information, see “Inserting graphics into fields” on page 2-11.
• You can also paste a graphic that you copied from another application onto a layout. See “Copying, duplicating, and deleting objects” on page 6-13.
• If your system and other applications support it, you can quickly bring a graphic or movie from another application into FileMaker Pro by dragging the object from the other application’s window onto the FileMaker Pro layout. You can also drag objects from a layout to another application or to the Windows or Mac OS desktop.
• Windows: You can insert OLE objects onto a layout by choosing Insert menu > Object and specifying the type of object to import. In FileMaker Pro for the Mac OS, OLE objects appear as graphics. For more information about how FileMaker Pro treats OLE objects, see the FileMaker Pro onscreen Help. Choose Help menu > Contents and Index, click the Index tab, and type OLE objects,editing.

Customizing layouts 7-17
Formatting graphics on a layout In Layout mode, you can format graphics you’ve pasted or imported onto a layout in the same way you format graphic data in a container field. For more information, see “Specifying formats for fields containing graphics” on page 6-24.
Showing text, field, or button boundaries You can show boundaries on a layout for text, fields, and buttons to help you easily identify, position, and align these objects.
To show boundaries around Do this in Layout mode
All text (not in a field) Choose View menu > Show > Text Boundaries.
You see the boundaries as thin black boxes around all layout text.
All fields Choose View menu > Show > Field Boundaries.
You see the boundaries as thin black boxes around all fields.
All buttons on the layout Choose View menu > Show > Buttons.
You see the boundaries as gray boxes around all buttons you’ve defined.
To hide text, field, or button boundaries, choose the corresponding command from the Show submenu again.
Note Boundaries only appear in Layout mode. If you want to see borders around these objects in Browse mode or when you print the layout, define a border with the pen and line width palettes in the status area.
Arranging objects In Layout mode, you can:
• group any combination of objects so you can edit or move them together
• change the stacking order of objects to get different effects when the objects overlap
• rotate an object or group of objects in 90-degree increments
• align or distribute objects precisely
Note Use the Arrange toolbar (choose View menu > Toolbars > Arrange) or context menus for quick access to many commands for arranging objects. See “Using toolbars” on page 1-5 and “Using context menus” on page 1-5.
Grouping and ungrouping objects Group objects so you can work on the grouped object as if it were a single object. You can:
• copy and paste grouped objects, maintaining the arrangement of the objects within the group
• assign attributes (like a font or a fill color) to items in the group, even if the attribute isn’t appropriate for all the items in the group. (For example, assigning a new font to a group that contains text, a field, and a graphic changes the text and the field, but leaves the graphic alone.)
• more easily work with stacking order, because grouped objects all exist on the same layer
• align an individual object to a grouped object
To group objects, in Layout mode, select the objects, then choose Arrange menu > Group.
To ungroup a grouped object, select the group, then choose Arrange menu > Ungroup.
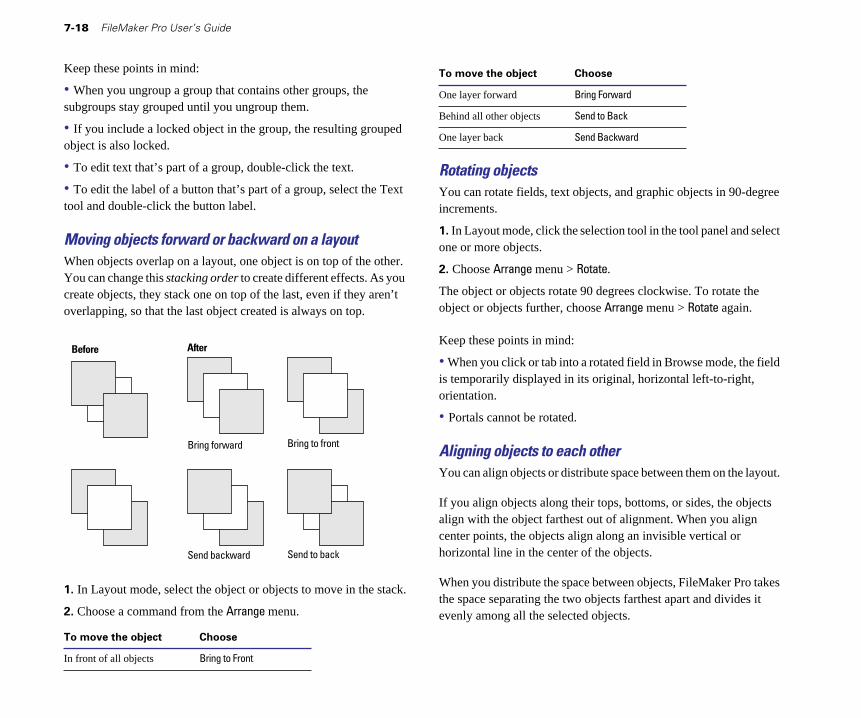
7-18 FileMaker Pro User’s Guide
Keep these points in mind:
• When you ungroup a group that contains other groups, the subgroups stay grouped until you ungroup them.
• If you include a locked object in the group, the resulting grouped object is also locked.
• To edit text that’s part of a group, double-click the text.
• To edit the label of a button that’s part of a group, select the Text tool and double-click the button label.
Moving objects forward or backward on a layout When objects overlap on a layout, one object is on top of the other. You can change this stacking order to create different effects. As you create objects, they stack one on top of the last, even if they aren’t overlapping, so that the last object created is always on top.
Before After
Bring forward Bring to front
Send backward Send to back
1. In Layout mode, select the object or objects to move in the stack.
2. Choose a command from the Arrange menu.
To move the object Choose
One layer forward Bring Forward
Behind all other objects Send to Back
One layer back Send Backward
Rotating objects You can rotate fields, text objects, and graphic objects in 90-degree increments.
1. In Layout mode, click the selection tool in the tool panel and select one or more objects.
2. Choose Arrange menu > Rotate.
The object or objects rotate 90 degrees clockwise. To rotate the object or objects further, choose Arrange menu > Rotate again.
Keep these points in mind:
• When you click or tab into a rotated field in Browse mode, the field is temporarily displayed in its original, horizontal left-to-right, orientation.
• Portals cannot be rotated.
Aligning objects to each other You can align objects or distribute space between them on the layout.
If you align objects along their tops, bottoms, or sides, the objects align with the object farthest out of alignment. When you align center points, the objects align along an invisible vertical or horizontal line in the center of the objects.
When you distribute the space between objects, FileMaker Pro takes the space separating the two objects farthest apart and divides it evenly among all the selected objects.
To move the object Choose
In front of all objects Bring to Front

Objects before distributing space Objects after distributing space vertically and aligning left sides
1. In Layout mode, select the objects to align, then choose Arrange menu > Set Alignment.
2. In the Set Alignment dialog box, select options in the Top to Bottom area or Left to Right area or both areas.
You see an illustration of your choices in the Sample area.
Select the way you Select the way you want objects want objects aligned
aligned vertically horizontally
See the results of your choices
3. Click OK.
Keep these points in mind:
• To align new objects according to the current settings, select the objects to align, then choose Arrange menu > Align. (If the settings in the Set Alignment dialog box are both None, the command is unavailable.)
• To force the alignment to a specific object, lock that object before you set the alignment. (For information on locking objects, see “Protecting objects from change” on page 6-15.)
Customizing layouts 7-19
Using tools to precisely position objects Use the Size palette, graphic rulers, ruler grid lines, T-squares, and object grids to precisely size, reshape, position, and align objects. (For more information about moving objects on a layout, see “Moving objects on a layout” on page 6-14.)
Text ruler
Graphic ruler
T-squares Ruler lines Size palette
Using the Size palette with objects Use the Size palette to precisely position and size objects on a layout.
1. In Layout mode, choose View menu > Object Size.
2. Select one or more objects.
3. In the Size palette, type a new value into the field next to an icon.
Type the desired distance from the left, top, right, or bottom of the page
Type values to changeobject width or object height
Using the Size palette to move or resize an object

7-20 FileMaker Pro User’s Guide
If you can’t type a value, that field doesn’t make sense for the selection (for example, a line doesn’t have a height), or the selection is locked.
4. Press Enter, or to move to another field in the Size palette, press Tab or Return (Mac OS).
The Size palette floats above the window, so you can leave it open as you work.
Using graphic rulers and ruler gridlines Use graphic rulers and ruler gridlines—a dotted-line grid that appears on your layout but doesn’t print—to help you align and position objects precisely. The ruler gridlines adjust when you change the unit of measure.
To show the graphic rulers, in Layout mode, choose View menu > Graphic Rulers. To hide them, choose Graphic Rulers again.
As you move the cursor on the layout, you see guide lines tracking the position of the cursor in the graphic rulers.
To show ruler gridlines, in Layout mode, choose View menu > Ruler Lines. To hide them, choose Ruler Lines again.
Note Ruler gridlines have no snap-to properties.
With this unit of measure Each ruler increment measures
Inch (in) 1/8 inch
Centimeter (cm) .25 centimeters
Pixel (px) 10 pixels
Click to change the unit of measure
Ruler lines
To change the unit of measure used for the graphic ruler text ruler, ruler gridlines, and Size palette:
1. In Layout mode, choose Layouts menu > Set Rulers.
2. In the Set Rulers dialog box, for Units, choose a unit of measure.
3. Click OK.
Aligning objects with the T-squares Use the T-squares—moveable horizontal and vertical guide lines— to help you align objects in Layout mode. An object’s left or right boundary, top or bottom boundary, or center “snaps to” the T-square lines as you drag the object.
To In Layout mode, do this
Show or hide the T-squares Choose View menu > T-Squares. To hide it, choose T-Squares again.
Reposition the T-squares Using the arrow pointer, move either the horizontal or vertical T-square line
Override the T-squares’ snap-to effect
Press Alt (Windows) or 2 (Mac OS) as you drag an object
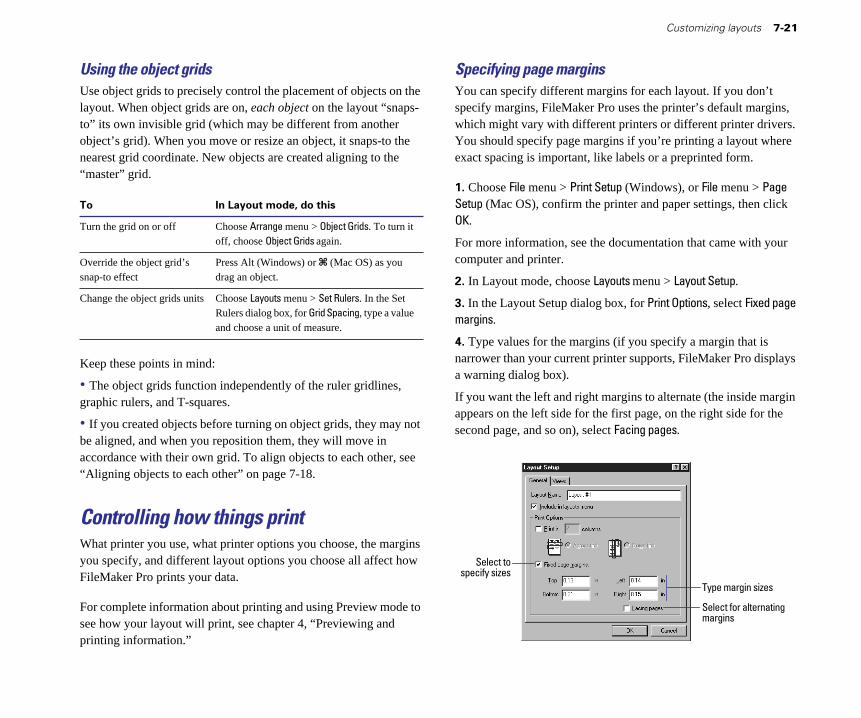
Customizing layouts 7-21
Using the object grids Use object grids to precisely control the placement of objects on the layout. When object grids are on, each object on the layout “snaps-to” its own invisible grid (which may be different from another object’s grid). When you move or resize an object, it snaps-to the nearest grid coordinate. New objects are created aligning to the “master” grid.
To In Layout mode, do this
Turn the grid on or off Choose Arrange menu > Object Grids. To turn it off, choose Object Grids again.
Override the object grid’s Press Alt (Windows) or 2 (Mac OS) as you snap-to effect drag an object.
Change the object grids units Choose Layouts menu > Set Rulers. In the Set Rulers dialog box, for Grid Spacing, type a value and choose a unit of measure.
Keep these points in mind:
• The object grids function independently of the ruler gridlines, graphic rulers, and T-squares.
• If you created objects before turning on object grids, they may not be aligned, and when you reposition them, they will move in accordance with their own grid. To align objects to each other, see “Aligning objects to each other” on page 7-18.
Controlling how things print What printer you use, what printer options you choose, the margins you specify, and different layout options you choose all affect how FileMaker Pro prints your data.
For complete information about printing and using Preview mode to see how your layout will print, see chapter 4, “Previewing and printing information.”
Specifying page margins You can specify different margins for each layout. If you don’t specify margins, FileMaker Pro uses the printer’s default margins, which might vary with different printers or different printer drivers. You should specify page margins if you’re printing a layout where exact spacing is important, like labels or a preprinted form.
1. Choose File menu > Print Setup (Windows), or File menu > Page Setup (Mac OS), confirm the printer and paper settings, then click OK.
For more information, see the documentation that came with your computer and printer.
2. In Layout mode, choose Layouts menu > Layout Setup.
3. In the Layout Setup dialog box, for Print Options, select Fixed page margins.
4. Type values for the margins (if you specify a margin that is narrower than your current printer supports, FileMaker Pro displays a warning dialog box).
If you want the left and right margins to alternate (the inside margin appears on the left side for the first page, on the right side for the second page, and so on), select Facing pages.
Select to specify sizes
Type margin sizes
Select for alternating margins

7-22 FileMaker Pro User’s Guide
5. Click OK.
6. Choose View menu > Preview Mode to check the margins.
Keep these points in mind:
• In Layout mode, choose Layouts menu > Set Rulers to change the unit of measure for margins. See “Using graphic rulers and ruler gridlines” on page 7-20.
• If you select Print in <value> columns for a layout and then specify page margins, the columns resize to fit within the new margins. See “Setting up to print records in columns” on page 6-8.
Showing page margins You can display the margins in Layout mode exactly as they will print. (Page margins always show in Preview mode.)
To display the page margins, in Layout mode, choose View menu > Page Margins. The margins show up as a thin, dotted line around the edges of the layout “page.” Page breaks appear as heavy, dashed horizontal and vertical lines.
To hide the margins, choose View menu > Page Margins again.
Most printers can’t print to the edge of the paper. If you place objects in the margins or outside the area the selected printer can print to, you see them in Browse and Find modes, but don’t see the objects when you preview or print.
Margins—objects in this
area won’t print
Layout showing margins
print objects outside this lineThe selected printer can’t
Layout not showing margins
About removing blank space from printed data Often, the amount of information in the fields in your database varies. When you print, FileMaker Pro can shrink field boundaries and shift objects to the left or up on your layout to close up the blank space caused when the information in a field doesn’t fill the field boundary.
For example, in a catalog, a description for one item may be longer than for another. If you use the sliding feature of FileMaker Pro, you can close up the space between items and print more items per page.

Printing without sliding objects
Ship/Destination Grand Monarch Alaska Tour length 7 nights
Wholesale price $795 Season Spring
Notes Glacier route between Vancouver and Anchorage. Includes Columbia Glacier, College Fjord, Ketchikan, Juneau, Skagway, Sitka, and Valdez. Optional tour to Denali Park.
Ship/Destination Royal Cavalier Scandinavia Tour length 7 nights
Wholesale price $749 Season Spring
Notes Includes air fair from New York. 4 nights in Helsinki, 2 nights in Stockholm, 1 day in Copenhagen.
Ship/Destination Grand Bordeaux Caribbean Tour length 11 nights
Wholesale price $1524 to $3694 Season Spring
Notes San Juan, St. Thomas, Curacao, Cartagena, and Cozumel. Luxury accommodations. No tipping policy.
Tour Catalog
All year Winter Autumn Summer
All year Winter Autumn Summer
All year Winter Autumn Summer
Printing with sliding objects
Slide objects left to removespace at the right edge of fields
Slide parts up to get different sizedbodies for different amounts of data
Slide objects up to keep extra space from printing
Slide objects and parts up to fit more records on a page
Ship/Destination Grand Monarch Tour length 7 nights
Wholesale price $795 Season Spring
Notes Glacier route between Vancouver and Anchorage. Includes Columbia Glacier, College Fjord, Ketchikan, Juneau, Skagway, Sitka, and Valdez. Optional tour to Denali Park.
Ship/Destination Royal Cavalier Tour length 7 nights
Wholesale price $749 Season Spring
Notes Includes air fair from New York. 4 nights in Helsinki, 2 nights in Stockholm, 1 day in Copenhagen.
Ship/Destination Grand Bordeaux Tour length 11 nights
Wholesale price $1524 to $3694 Season Spring
Notes San Juan, St. Thomas, Curacao, Cartagena, and Cozumel. Luxury accommodations. No tipping policy.
Ship/Destination Explorer Tour length 21 nights
Wholesale price $3,995 to $9,550 Season Spring
Notes Includes New Zealand, Australia, Tonga, and Fiji.
Tour Catalog
Alaska
All year Winter Autumn Summer
Scandinavia
All year Winter Autumn Summer
Caribbean
All year Winter Autumn Summer
South Pacific
All year Winter Autumn Summer
You can slide fields, portals, other objects, and even layout parts. When objects slide:
• Fields shrink to eliminate empty space within field boundaries, but sliding does not remove empty space you leave between fields. For example, if you create a body part with one inch of space below the lowest object, and set all the objects to slide and the part to shrink, FileMaker Pro leaves one inch below the lowest object when you print.
• Non-field objects, like a line or text, move if you place a sliding field to the left of (or above) the objects.
Customizing layouts 7-23
• Objects—including fields—slide left (or up) corresponding to the amount of space that the fields to the left of (or above) the objects shrink.
• Portals slide like any other object, but objects within a portal can’t slide. If you specify that a portal slides up and the enclosing part shrink, FileMaker Pro omits empty portal rows.
You can set layout parts to shrink when the fields in them slide up. Headers, footers, title headers, and title footers never shrink or slide up. Don’t set a part to shrink on a layout that requires fixed vertical spacing, like labels.
The following layout shows how fields are set to slide for the previous illustration.
The body, Notes field, and horizontal line slide up
These fields slide left
Arrows show how objects are set to slide
Keep these points in mind:
• You see the effects of setting sliding options only in Preview mode.
• You can slide any object. Non-field objects, like the horizontal line in the previous example, can slide if you place a sliding field above or to the left of the objects. When a non-field object slides, it moves to another place on the layout but doesn’t shrink. When a field slides, it moves to another place on the layout and shrinks if the data doesn’t fill the field boundaries.
• In Layout mode, choose View menu > Show > Sliding Objects to see which objects slide and in which directions.

7-24 FileMaker Pro User’s Guide
• When you slide objects or parts, FileMaker Pro prints the objects relative to each other, not precisely as you placed them on your layout.
• If you leave blank space on a layout, FileMaker Pro keeps that space. For example, if you create a body with one inch of space below the lowest object, FileMaker Pro leaves one inch below the lowest object when it shrinks the body.
• You can get the same effect, but only between a field and layout text, or adjacent fields in a continuous block of text, by using merge fields (see “Placing merge fields” on page 6-17). Use sliding instead of merge fields when you want to:
• align non-text objects, like graphics
• shrink a layout part to fit more on a page
• align formatted fields, like value lists and repeating fields
• use a layout for data entry (you can’t enter data into a field formatted as a merge field)
Setting sliding options 1. In Layout mode, select the objects you want to slide. Also select the left-most (or top-most) field that you want the other objects to slide into so it can shrink.
To allow fields to shrink when you specify sliding left, align their top edges and choose Format menu > Align Text > Left. To allow fields to shrink when you specify sliding up, choose Format menu > Align Text > Top.
See “Aligning objects to each other” on page 7-18 and “Specifying paragraph attributes and tab settings” on page 7-13.
2. In Layout mode, select the objects to slide, then choose Format menu > Sliding/Printing.
3. In the Set Sliding/Printing dialog box, select the sliding options you want.
Select this option To
Sliding left Reduce the width of the selected fields to the minimum needed for their data, and then slide all selected objects left based on the amount of space the fields shrink.
Sliding up based Reduce the height of the selected fields to the minimum on: then click needed for their data, and then slide all selected objects up All above based on the field above that shrinks the least.
This option maintains consistent vertical spacing among columns and repeating fields.
Sliding up based Reduce the height of the selected fields to the minimum on: then click needed for their data, and then slide all selected objects up Only directly based on the amount of space the fields directly above shrink. above This option allows the spacing in a column to adjust
independently of other columns and repeating fields.
Also reduce Close up the space in the layout part that contains the selected the size of the fields. To slide the part up relative to all objects, set this option enclosing part for all the objects that are sliding up. To slide the part up
relative to a single object, set this option for that object only.
4. Click OK.
5. Choose View menu > Preview Mode to see the effects of the sliding options.

Customizing layouts 7-25
Keeping objects from printing You can keep objects on a layout from printing. For example:
• Prevent buttons on a report layout from printing when you print the report.
• Place instructions on a layout to be read during data entry, but not printed when that layout is printed.
To keep objects from printing:
1. In Layout mode, select the object or objects that you don’t want to print.
2. Choose Format menu > Sliding/Printing.
3. In the Set Sliding/Printing dialog box, select Do not print the selected objects.
4. Click OK.
Keep these points in mind:
• You see nonprinting objects in Browse and Layout modes, but not in Preview mode or when you print. In Layout mode, choose View menu > Show > Non-Printing Objects to display nonprinting objects with a gray border.
• To close up the blank space taken by a nonprinting object, set sliding options for that object and objects below it on the layout. See “About removing blank space from printed data” on page 7-22.


Chapter 8 Working with related files
There are times when one database file doesn’t suit all your data management needs. Perhaps you have data in one file that you want to use in another file. Or you’ve tried to expand a file by adding several fields to it, and now the file’s subject has become unclear. Or you have the same values in several files, and you’re constantly updating them to keep them all the same. You can access data from other database files by using relational databases and lookups.
This chapter explains how to:
• create relational databases and lookups
• define and change relationships between database files
• set up advanced relational database structures, such as many-to-many relationships
Displaying data from related files When you have data in another file that you want to use in the current file, you can access, display, and work with that data in two ways:
• A relational database allows data from another file (or the same file) to be displayed, edited, and used in the current file, without having it copied to the current file. The data is always part of the other file only. Data displayed in the current file changes whenever the data in the other file changes.
• A lookup copies data from another file into a field in the current file. After the data is copied, it becomes part of the current file (and remains in the file it was copied from). Data copied to the current file doesn’t automatically change when the data in the other file changes.
To establish a connection between files for relational databases and lookups, you first define a relationship, an expression that tells FileMaker Pro how to match records in one file with records in another file. Then you choose the fields that contain the data you want to work with.
R20 Client ID
NY-Paris Route
R20 Client ID
NY-Paris Route
In relational databases, data from another file is displayed in the current file, in fields that belong only to the other file
R20 Client ID
NY-Paris Route
R20 Client ID
NY-Paris Route
Lookups copy data from another file into the current file, in fields that belong to the current file
Note All files involved with relational databases and lookups must be in the current FileMaker Pro file format. (Files created with earlier versions of FileMaker Pro may be used, but the files must be converted to the current file format first.)

8-2 FileMaker Pro User’s Guide
Relational database terminology Before you begin, you should understand the following terms for relational databases and lookups. These terms are illustrated in the sections that follow.
This term Means
Master file For relational databases, the file that accesses and displays data from another file.
For lookups, the file that contains the copied data. It’s the file the lookup originates from and the file the data is copied to.
Related file For relational databases, the file that contains the data you want to access and work with in the master file.
For lookups, the file that contains the data to copy. It’s the file the lookup goes to and the file the data is copied from.
A related file and the master file can be the same file. (This is called a self-join.)
Match field A field in the master file and a field in the related file that each contains values used to access matching records. (A match field is sometimes called a key field or primary key.) For each relationship, you select one match field in each file.
For relational databases, values in match fields must match each other in some way for a relationship to be established between the two files. (See “About match fields for relationships” on page 12-5.)
For lookups, values in match fields don’t have to be equal to each other. For example, you can set an option to copy the next lower value when the match fields aren’t equal. (See “Defining lookups between files” on page 12-13.)
Relationship An expression you define that contains requirements which, when met, establish a relationship between values in the match fields. (A relationship is sometimes called a link or a join expression.)
You define a relationship in the file you want data displayed in, not the file you want data displayed from.
Related record A record in the related file whose match field contains a value that matches the value in the match field of the master file, according to the requirements of the relationship.
This term Means
Related field A field in the related file that contains data you want to access and work with in the master file. After a relationship has been established between data in the match fields, the data in related fields can be used in the master file.
You place related fields on a layout of the master file, either by themselves or in a portal. You can then work with data that’s in related fields in all modes.
In the master file, a related field name appears as Relationship name::Related field name or as ::Related field name
Portal An object on a layout of the master file in which you can place related fields. Use portals only when you want to work with data from more than one related record for each record in the master file.
Portals display data from related fields in rows, one record in each row.
Lookup source A field in the related file that contains the data you want to field (for lookups copy. It’s the field the data is copied from.only)
Lookup A field in the master file that you want to contain the copied destination field data. It’s the field the data is copied to.(for lookups only)
About relational databases A relational database is one or more discrete database files (or database tables) that, when used together, contain all the data you need for your work. In relational databases, each occurrence of data is stored in only one file at a time, but you can access and work with that data from any file. Because data from a related file is only displayed in—and not copied into—the master file, you always see the data in its current state.
Working with related data promotes consistent data entry and retrieval, and reduces the existence of duplicate data among the database files.

For example, a travel agency might store trip information in a Trip file, then use it with client information that’s in a Client file and with billing information that’s in an Invoice file.
Trip file
T10 Trip ID
NY-Roma Trip Name
Route ID Origin R200
Destination NY Paris
R42 Paris Roma
Invoice file
Client file
A-200-61 Invoice No
6-Oct-2001 Date
C100 Client ID
Trip ID Trip Name T10
Cost $ NY-Roma 550.00
T20 Roma-Istan 700.00
Williams Name
1,250.00 Total
C100 Client ID
Williams Client Name
408-555-3456 Phone
Trip ID Trip Name
You create a relational database by first defining a relationship in the master file. Then you add the fields to display the data from the related file on a layout of the master file. You can then work with the data in the related fields in all modes when you work with records in the master file.
When you enter a value in the match field of a record in the master file, FileMaker Pro uses the relationship to access all the records in the related file whose match field contains a value that satisfies the requirements of the relationship. Then it displays data from the fields of the related file in the current record of the master file.
When the related field is in a portal on the layout, values from all related records are displayed.
T10 NY-Roma T20 Roma-Istan
Working with related files 8-3
Master file
C200 Client ID
Smith Client Name
408-555-1234 Phone
Route ID Origin R20
Destination NY Paris
R42 Paris Roma
T10 Trip ID
T10 Trip ID
R20 Route ID
Origin
Destination
T10 Trip ID
R42 Route ID
Paris Origin
Roma Destination
Related file
Relationship
All records in the related file are displayedin a portal
When the related field is placed directly on the layout, the value from the first (or only) related record is displayed in the field. (The first related record that’s accessed depends on whether the related records are sorted. See “Defining relationships for relational databases and lookups” on page 12-10.)
Master file
Related fields not in a portal–onlythe first record in the related file is displayed
C200Client ID
SmithClient Name
408-555-1234Phone
Route ID Origin R42
Destination Paris Roma
T10Trip ID
T10Trip ID
R20Route ID
Origin
Destination
T10Trip ID
R42Route ID
ParisOrigin
RomaDestination
Related file
Relationship

8-4 FileMaker Pro User’s Guide
When the related file contains one matching record for each record in the master file, place related fields directly on the layout and not in a portal. Also place related fields directly on the layout when you want to work with only the first matching record that’s accessed (in sorted or unsorted order).
Keep these points in mind:
• For information about creating portals, placing related fields on layouts and in portals, and changing portals and related fields, see “Deciding where to place related fields” on page 6-18.
• You can also define relationships for use with value lists, to access and display particular related values. (See “About displaying only a subset of field values in a value list” on page 7-5.)
• You can summarize data that’s in a portal. (See “Summarizing data in portals” on page 12-12.)
When to create relationships between files Whenever you want to use data from another file—either in a relational database or for a lookup—you must first define and name a relationship from the master file to the related file.
Client ID
Name
Client ID
Name
Phone
City
Relationship
Match fields
Master file Related file
A relationship is an expression that includes the name of the match field in the master file, the related filename, and the name of the match field in the related file.
Define Relationship dialog boxRelationship names in the
After you define a relationship, you can choose its name from the relationship list as you work in the master file. The relationship list is in all dialog boxes where you can select field names, such as the dialog box for exporting FileMaker Pro data. (You can also use the relationship list to define relationships.)
Relationship list with Products relationship
selected
Field names associated with the selected relationship
Once a connection is established between two files, you have access to data that’s in the related file in any of the following ways:
• Place one or more related fields directly on a layout of the master file to display data from one related record for each record in the master file (a one-to-one correspondence). For example, use a related field to display the most recent check-out date for a piece of equipment. (Related data displayed in the master file changes as the data in the related file changes.)
• Place a portal on a layout of the master file, then place one or more related fields in the portal to display data from more than one related record for each record in the master file (a one-to-many correspondence). For example, use a portal in an Invoice file to display all the products ordered by the same client. (Related data displayed in the master file changes as the data in the related file changes.)

Working with related files 8-5
• Define a lookup, to copy data from one related record for each record in the master file (a one-to-one correspondence). For example, use a lookup to copy the current price of a product into a Line Items file. (Data copied to the master file doesn’t automatically change when the data in the related file changes.)
Keep these points in mind:
• Each relationship involves only one master file and one related file; however, you can define many relationships from a master file and many relationships to a related file.
• The master file for one relationship can be a related file for another, and a related file of one relationship can be a master file for another.
• You can define many relationships between the same two database files. For example, the relationships can refer to different match fields.
• You can define a relationship from one file to the same file (a self-join). For example, use a self-join in a portal to display a subset of data in the current file, such as all the employees of each manager. For more information about self-joins, choose Help menu > Contents and Index, click the Index tab, and type self-joins.
• If the master file is protected with passwords, you must have the master password to define relationships. In addition, when you type data in the match field of the master file, you might be asked to type a password for the related file when the related file is protected with passwords. (See “Defining passwords” on page 12-1.)
• You can create a many-to-many correspondence between database files. (See “Creating many-to-many relationships” on page 12-15.)
About match fields for relationships As you define and select the match fields for relationships, keep these points in mind:
• In most cases, the match fields used in a relationship contain equal, stored values. For example, when one record in the match field of the master file contains 009-845 and one record in the match field of the related file also contains 009-845, a relationship is established between those two records.
• The match fields used in a relationship can have different names; what establishes a relationship is that the match fields contain matching values.
• The match field in the master file can be any type except Container. The match field in the related file can be any type except Container, Global, or Summary.
• The match field in the related file must be a field that can be indexed.
• If match fields are text fields, FileMaker Pro looks at the first 20 characters of each word in the field, up to 60 characters (including spaces).
• Make sure the match fields used in a relationship are the same data type.
• The match field in either (or both) the master file or related file can contain a calculation formula. For example, the formula Unit Price in the match field of the master file establishes a relationship to a record (or records) in the related file whose match field contains the value of the Unit Price field in the master file. You can also design a calculation formula for the match field to match multiple records. For example, the formula Unit Price < 100.00 in the match field of the master file establishes a relationship to all records in the related file whose match field contains a value less than 100.00.

8-6 FileMaker Pro User’s Guide
• You can increase the number of possible matching records in either the master file or related file by entering all possible matching values in the match field (sometimes called a multi-key field or complex key field). Suppose you want to display all the sales contracts obtained by each employee, including those obtained by teams of employees, in a portal in the master file. To do this, in the match field of the related file, enter the name of each employee who worked on the contract that’s entered in the Contract Name field in the same record. Place each name on a separate line in the match field, and end each line with a carriage return. When the match field in a record of the master file contains any of those names, the associated contract displays in the portal of that record. (When you design a multi-key field to hold identification numbers, remember that each FileMaker Pro file has a limit of 64,000 characters in text fields.)
• Match fields can contain non-alphanumeric characters. To do so, choose File menu > Define Fields. Select the match field in the list, click Options, then click the Storage tab. For Default language for indexing and sorting text, choose ASCII.
• A match field used for a relational database can be a lookup destination field, as long as the lookup isn’t based on a relationship that involves the match field. (For an example of this use of a match field, see “Accessing related data from a third file” on page 12-14.)
About lookups You look up data by first defining a relationship between matching data in the master file and a related file. Then you define a lookup for a field in the master file, which copies data from a field in the related file into a field in the master file.
When you enter a value in the match field of the master file, FileMaker Pro uses the relationship to access the first record in the related file whose match field contains a matching value. Next, it copies the value from the lookup source field in that related record into the lookup destination field in the master file record, where the value is stored. Data that’s copied into the master file doesn’t change when the value in the related file changes, unless the data in the match field in the master file changes. In that case, FileMaker Pro performs the lookup again.
C235 Client ID
42.83.91.04 C100 Client ID
555-3849
Vancouver
Master file
C200 Client ID
Smith Name
Related file
Relationship
Lookup destination field Lookup source field
C200 Client ID
Smith Name
555-1234 Phone
New York City
After data is copied into the lookup destination field, you can edit, replace, or delete it like any other data (because the lookup value belongs to the master file). You can also update data in the master file to match data that changed in the related file. (See “Defining lookups” on page 12-13.)
Important When the same value exists in the match field in more than one record of the related file, FileMaker Pro copies the value from only the first related record. (The first related record that’s accessed depends on whether the related records are sorted. For more information, see “Defining relationships for relational databases and lookups” on page 12-10.)
Keep these points in mind:
• Values in match fields used for lookups do not have to be equal to match. (See “About match fields for relationships” on page 12-5 and “Defining lookups between files” on page 12-13.)

• To copy data into a second field that uses the same match fields— for example, to copy a name and telephone number based on a matching client identification number—define a lookup for the second field, and use the same relationship as for the first field.
C235 Client ID
42.83.91.04 C100 Client ID
555-3849
Vancouver
Related file
C200 Client ID
Smith Name
555-1234Phone
New York City
Master file
C200 Client ID
Smith Name
Relationship
555-1234 Phone
Lookup source Lookup sourceLookup Lookup destination destination field field for first field for field for first for second lookup second lookuplookup lookup
Relational databases and lookups: a comparison Whether you create a relational database or define a lookup depends on how you plan to use the data from another file. Use the following information to help you decide.
Use relational databases to:
• See and work with data from a related file (which can be the same file) in its most up-to-date state. For example, display data in related fields when you need the current price of an item. As data changes in the related records, you see those changes in the master file.
• Set up and manage data efficiently and with flexibility. Instead of creating many database files that together store multiple occurrences of data, you store single occurrences of values in smaller files. You can then work with the data in many ways. You make changes to data in only one place, which eliminates data duplication and promotes data accuracy.
• Save disk space, because data is stored in only one place.
Working with related files 8-7
Use lookups to:
• Copy data from a related file (which can be the same file) and keep it as copied, even when the data in the related file changes. For example, use a lookup to copy the price of an item at the time of purchase into an Invoice file. Even if the price in the related file changes, the price in the Invoice file stays the same.
• Maintain files that already contain lookups, when you don’t want to change the files to a relational database.
Note A complex relational database or a complex set of lookups may require an administrator who understands the design and how to maintain it. The administrator might also train others to use the database.
Working with relational databases Important Before you begin, be sure you understand the information in the previous section, “Relational databases and lookups: a comparison.”
Planning a relational database It’s a good idea to plan a database on paper first. Use the following general steps to plan a relational database.
Note The files in this section are for example only.
1. Begin by asking questions, such as these:
• What information will the database hold?
• What database files are needed?
• What fields will each database file contain?
• What common data exists among the database files?
For example, for a travel agency, you might want a group of files that holds all the information about your clients, the trips your company offers, and invoicing data.

8-8 FileMaker Pro User’s Guide
2. Determine the database files and the data they will include, and decide which fields will contain common data among the files. Write the names of the files and fields on paper.
Each file has only one subject, and all fields in a file describe only that subject. Based on a file’s subject, you can see where it makes sense to store the data and where to use data from a related file.
For example, a Route file might have fields for a route identification number, the departure city, and the destination city. A Trip file might have fields for a trip identification number and trip name.
Client ID
Street
Postal Code
Client Name
City
Trip ID
Client file Route file
Trip Name
Phone
Route ID
Destination
Origin Trip ID
Route ID
Destination
Trip Name
Origin
- Information to hold?
- Database files?
- Fields?
- Common data?
3. Determine the match field or fields for each file, and circle each one.
Each relationship uses one match field in the master file and one match field in the related file. Match fields are also used to determine whether a new record should be added to the file. In an efficient database system, this field often (but not always) contains a value unique to each record.
For example, in the Client file you might want to assign each client a unique, identifying number. You wouldn’t enter a client identification number into the file unless you had a new client to add, so the existence of a client number determines the existence of a record.
Trip file
Client ID
Street
Postal Code
Client Name
City
Trip ID
Client file Route file
Trip Name
Phone
Route ID
Destination
Origin Trip ID
Route ID
Destination
Trip Name
Origin
4. For each file, decide which fields will store data, and which ones will use data from other (related) files. In your plan, cross out the duplicate fields in the master files. These fields will be related fields in your database.
The fields in each database file should all store a single occurrence of the subject of the database file. For example, the fields in one record of the Client file (client identification number, name, address, and phone number) together store all the information about one client.
Trip file

Client ID
Street
Postal Code
Client Name
City
Trip ID
Client file
Trip Name
Phone
Route ID
Destination
Origin Trip ID
Route ID
Destination
Trip Name
Origin
Route file Trip file
5. Determine the relationships between the files. Draw a line from each match field in the master file to the corresponding match field in the related file.
What defines a relationship between database files is that their match fields contain matching data.
Client ID
Street
Postal Code
Client Name
City
Trip ID
Client file
Route file
Trip Name
Phone
Route ID
Destination
Origin Trip ID
Route ID
Destination
Trip Name
Origin
Working with related files 8-9
Determining relationships between database files shows you where you can use data that’s stored in one file in another file.
6. Consider who will use the database and whether you want to restrict access to some files or fields.
For information about setting up passwords and access privileges, see chapter 12, “Protecting databases with passwords and groups.”
Tip When you use fields that contain identification numbers, plan the field formats when you plan the database files. For example, client identification numbers can be telephone numbers, serial numbers, or a combination of a telephone number and first name.
Creating relational databases: an overview After you’ve planned your relational database, use these general instructions to create it. (For detailed instructions, see the next section, “Defining relationships for relational databases and lookups” on page 12-10.)
1. Create the database files and define the fields.
2. Define the relationships to use.
3. Depending on whether you want to work with data from one or more than one related record in each record in the master file, place one or more related fields directly on the layout or in a portal on the layout.
• For a related field by itself, place the related field directly on the layout.
• For a related field in a portal, create the portal on the layout, then place the related field in the portal.
You place related fields and portals in Layout mode, then work with data from related records in all modes.
Trip file

8-10 FileMaker Pro User’s Guide
Important After you create the files for a relational database or a lookup, be sure there are no other files with the same filenames on your computer or network. To duplicate the files or create similar filenames, duplicate each file separately (which creates a unique name for each copy). Store backup files on a removable disk, and remove the disk. Use a compression or archiving utility to make the files unavailable as FileMaker Pro files.
Defining relationships for relational databases and lookups You can define a relationship for a relational database or a lookup wherever you see the relationship list. For example, define a relationship when you create a file or layout, define a lookup, add a related field, or create a portal on a layout. (For a description of the relationship list, see “When to create relationships between files” on page 12-4.)
When you define a relationship, you can also define a sort order for the related fields. Do so to access and display the first related record that’s in a particular sort order (such as the lowest or highest value) when you have one related field placed directly on the layout. For example, display the most recent check-out date for a particular piece of equipment. Also sort related records to access and display multiple records in a particular sort order in a portal.
To define relationships between files:
1. In the master file, choose File menu > Define Relationships. Or, choose Define Relationships from the relationship list.
2. In the Define Relationships dialog box, click New.
Relationships currently defined in the master file
3. In the dialog box that appears, double-click the name of the related file (the file to define a relationship to).
4. In the Edit Relationship dialog box, for Relationship Name, type a unique name for the relationship, or keep the default that FileMaker Pro provides.
Don’t include colons (:) in the name. FileMaker Pro ignores any spaces at the end of names.
To change the related file, click Specify File, then choose a different filename. (See “Changing relationships” on page 12-12.)
5. Select a match field for the master (current) file in the left list, and a match field for the related file in the right list. Click each field name once to select it.

Working with related files 8-11
Type a relationship name
Select a Select amatch field match field
in the in themaster file related file
For more information about match fields, see “About match fields for relationships” on page 12-5.
6. To have related records sorted, select Sort related records. Then, in the Specify Sort dialog box, specify sort instructions for the related fields. (See “Sorting records” on page 3-8.)
Selecting this option does not affect the sort order in the related file.
7. Depending on whether you’re defining a relationship for a lookup or a relational database, do one of the following:
• If you’re defining a relationship for a lookup, click OK, then click Done.
• If you’re defining a relationship for a relational database, you can select additional options. When you’re finished, click OK, then click Done.
To Select
Delete matching records in the related file When deleting a record in this file, whenever you delete a record in the master file. also delete related records(See “Deleting records” on page 2-5.) Related records may not be visible on the current layout.
To Select
Add records to the related file by entering data Allow creation of related recordsinto related fields in the master file. (See “Adding and duplicating records” on page 2-4.)
If the related file is locked or write-protected, or users don’t have access privileges to create records, records are not added to the related file.
Keep these points in mind:
• For information on creating portals and related fields, see “Creating and formatting portals to hold related fields” on page 6-19.
• When Sort related records is selected and data in a related field in a portal changes, the portal records are re-sorted whenever the relationship is re-established. (For example, when you browse out of and then back into the record, or change the value in the match field.)
• You can change the order of relationships in the Define Relationships dialog box by the relationship name, relationship, related filename, creation order, or a custom order. Click the column header you want to reorder by, or choose from View by. When you reorder by the relationship or related filename, the definitions are subsorted by the relationship name. Each time you open the dialog box, the definitions appear in the last order used. The default order is the creation order.
Click column headings to sort relationships
Choose the way you want relationships sorted
8-12 FileMaker Pro User’s Guide
Changing relationships When you change a relationship, your changes affect which records are accessed in the related file and displayed in records of the master file.
When you delete or change a relationship, all records involved in that relationship (in the master file and related file) are affected by your changes.
To change relationships:
1. In the master file, choose File menu > Define Relationships. Or, choose the relationship name or Define Relationships from the relationship list.
Relationship list
2. In the Define Relationships dialog box, select the relationship to change, then select an option.
To Click
Delete the relationship Delete, click Delete in the confirmation message, then click Done. You should also delete all references to the relationship in the master file.
Quickly create a Duplicate. To make changes, with the duplicate similar relationship relationship selected, click Edit. Then see step 3.
Change the relationship Edit, then see step 3.
3. To edit the relationship, make your changes in the Edit Relationship dialog box, click OK, then click Done.
To Do this
Rename a relationship For Relationship Name, type a new name.
Choose a different Click Specify File. In the dialog box, double-click the related file name of the related file to use. In the Edit
Relationship dialog box, select the match fields for the relationship.
Change match fields Select a new match field in the master file, the related file, or both.
Change other options Select or clear the options you want. (See “Defining for the relationship relationships for relational databases and lookups”
on page 12-10.)
Choosing a different relationship for a portal Important To display the data you expect in the portal, make sure all fields use the same relationship as the portal. (A related field that uses a different relationship displays only one occurrence of data.)
1. In Layout mode, double-click the portal.
2. In the Portal Setup dialog box, for Show records from, choose a relationship, then click OK.
3. If necessary, remove the existing related fields from the portal, then place new related fields that use the new relationship in the portal.
Summarizing data in portals You can summarize data that’s in portal rows. The portal can contain records from a different related file or from the same file, using a relationship defined from and to the current file (a self-join).
1. In Layout mode, create a calculation field in the master file. (See “Defining calculation fields” on page 5-5 and “About formulas” on page 12-1.)
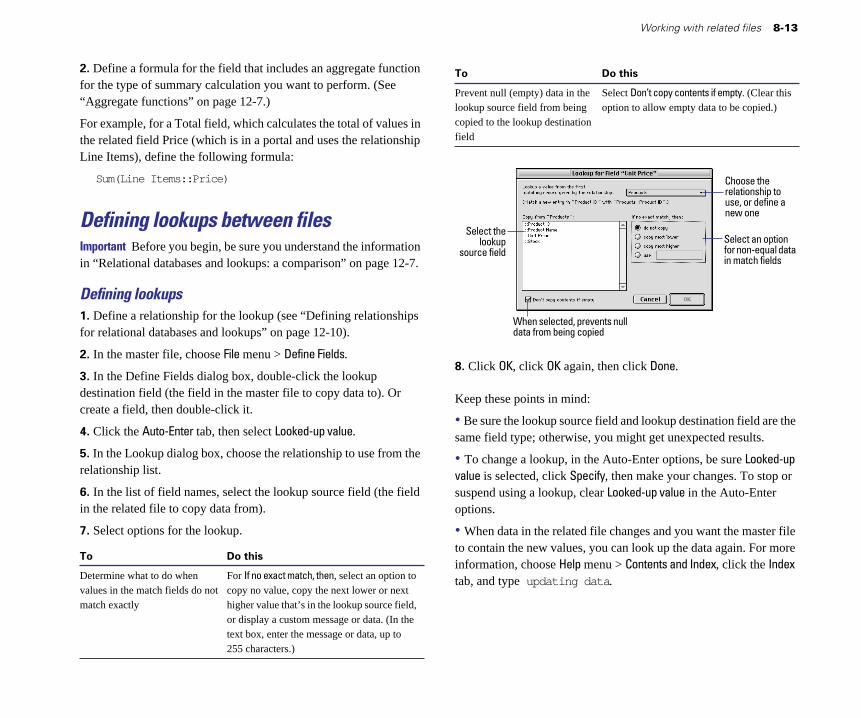
Working with related files 8-13
2. Define a formula for the field that includes an aggregate function To Do this for the type of summary calculation you want to perform. (See “Aggregate functions” on page 12-7.)
For example, for a Total field, which calculates the total of values in the related field Price (which is in a portal and uses the relationship Line Items), define the following formula:
Sum(Line Items::Price)
Defining lookups between files Important Before you begin, be sure you understand the information in “Relational databases and lookups: a comparison” on page 12-7.
Defining lookups 1. Define a relationship for the lookup (see “Defining relationships for relational databases and lookups” on page 12-10).
2. In the master file, choose File menu > Define Fields.
3. In the Define Fields dialog box, double-click the lookup destination field (the field in the master file to copy data to). Or create a field, then double-click it.
4. Click the Auto-Enter tab, then select Looked-up value.
5. In the Lookup dialog box, choose the relationship to use from the relationship list.
6. In the list of field names, select the lookup source field (the field in the related file to copy data from).
7. Select options for the lookup.
To Do this
Determine what to do when For If no exact match, then, select an option to values in the match fields do not copy no value, copy the next lower or next match exactly higher value that’s in the lookup source field,
or display a custom message or data. (In the text box, enter the message or data, up to 255 characters.)
Prevent null (empty) data in the Select Don’t copy contents if empty. (Clear this lookup source field from being option to allow empty data to be copied.)copied to the lookup destination field
Choose the relationship to use, or define a new one
Select the lookup
When selected, prevents null
Select an option source field for non-equal data
in match fields
data from being copied
8. Click OK, click OK again, then click Done.
Keep these points in mind:
• Be sure the lookup source field and lookup destination field are the same field type; otherwise, you might get unexpected results.
• To change a lookup, in the Auto-Enter options, be sure Looked-up value is selected, click Specify, then make your changes. To stop or suspend using a lookup, clear Looked-up value in the Auto-Enter options.
• When data in the related file changes and you want the master file to contain the new values, you can look up the data again. For more information, choose Help menu > Contents and Index, click the Index tab, and type updating data.

8-14 FileMaker Pro User’s Guide
Accessing related data from a third file There may be times when you need to access values from a field whose values are accessed from another file. You can’t directly access a field in a file several relationships away that’s already used as a related field in another file. However, you can define intermediate calculation fields to access those fields that are more than one relationship away.
Suppose you want data from a Part Name field (which is in a Parts file) in an Invoices file. The Invoices file uses related data from a Line Items file, and the Line Items file uses related data from the Parts file. However, the Line Items file doesn’t use the Part Name field from the Parts file. (The Invoices file uses other values from the Line Items file, and the Line Items file contains some fields that the Parts and Invoice files do not.)
Invoices
Invoice ID relationship
Customer ID
Agent Name
Invoice ID
Order Date
Part ID relationship
Invoice ID
Part ID
Unit Price
Quantity
Extended Price
Part Name
Line Items
Part ID
Unit Price
Part Name
Parts
Calculated field
Using a calculation field in this way ensures that data in that field (Part Name in the Line Items file) changes as the value in the Part Name field in the Parts file changes, and prevents data duplication errors from occurring.
To access data from a third file:
1. In the intermediate file, create a new field, and make the field a calculation field.
In the example, create a Part Name field in the Line Items file.
2. Define a formula for the new field using the syntax:
Relationship name::Related field name
Relationship name is the relationship defined from the intermediate file (in the example, Line Items file) to the first file (Parts file). Related field name is the name of the field in the first file whose data you want calculated (Part Name field in the Parts file) in the intermediate file (Line Items file).
3. Use the new calculation field as a related field in the third file.
In the example, place the related field Part Name from the Line Items file on a layout of the Invoices file.
Note You can also define a lookup in a field in an intermediate file to copy data from a field in a third file, when you want the data to remain unchanged in the intermediate file. You can then use that field as a related field in a third file. In the example, the Unit Price field in the Line Items file is a lookup to the Unit Price field in the Parts file. The lookup uses the Part ID relationship.

Working with related files 8-15
Creating many-to-many relationships In a one-to-one relationship, one record in the master file is related to one record in the related file. In a one-to-many relationship, one record in the master file is related to more than one record in the related file. In FileMaker Pro, you can also create a many-to-many relationship, in which more than one record in one database file is related to more than one record in another database file, and more than one record in that file is related to more than one record in the first file. (In the example in the previous section, the Invoices file and the Parts file have a many-to-many correspondence, because a particular invoice may contain many products, and a particular product may appear on many invoices.)
To create a many-to-many relationship between database files, create a separate join file (or join table), which is related to the other two files. A join file allows common data to be shared between the two files.
Suppose you have two files, Employees and Classes. You want to know which employees attend which training classes, and which classes are attended by which employees. Before you create the join file and define the relationships, the database files look like this:
Employees Classes
Employee ID
Name
Department
Class ID
Title
Date
After you create a join file and define the relationships for the many-to-many correspondence, the database files look like this:
EmpClass (Join file)
Employee ID
Name
Department
Employees
Class ID
Title
Date
Classes Employee ID
Class ID
Employees In
Classes In
Title Name
Calculated fields
Relationships Relationships
For more information about creating many-to-many relationships between database files, choose Help menu > Contents and Index, click the Index tab, and type many-to-many correspondence.


Chapter 9 Protecting databases with passwords and groups
When you store confidential information in your database files or want to restrict users from modifying layouts or other database elements, you need a security system to protect your file. This helps ensure that records, fields, layouts, or scripts aren’t inadvertently deleted or changed.
This chapter explains how to protect your FileMaker Pro files by setting access privileges for passwords and groups. You’ll learn about:
• setting passwords to limit access to all aspects of a file
• setting groups to limit access to specific elements within a file (like fields and layouts)
When you protect your database by preventing or limiting entry with access privileges, users must enter a password in order to access your database anywhere: on your computer, across a network, on the Web, or from an ODBC client application.
Defining passwords When you define passwords for a file, you specify what data can be accessed and what tasks can be performed. When a user opens the file with a password, FileMaker Pro disables commands that aren’t available for that password.
To define passwords:
1. Open the file.
2. Choose File menu > Access Privileges > Passwords.
If you don’t see the Access Privileges command under the File menu, you have opened the file with limited access, which changes the menu command to Change Password. See the database administrator for the master password.
3. In the Define Passwords dialog box, type the password that you or others will use to access the file.
• Passwords can be up to 31 characters long and are not case sensitive.
• Store your password in a safe place so you can retrieve it.
• You can limit access to a file but not require users to enter a password by leaving the password area blank.
4. Select the activities that users with this password can perform.
Select To let users with this password
Access the entire file Perform any task with records, layouts, and scripts. This privilege creates a master password, and provides access to all activities in a file.
Browse records See data in records. (This option is always enabled.) Define groups to limit which fields end users can view.
Print records Print one or more records.
Export records Export one or more records or access FileMaker Pro sharing options, which allows users to share FileMaker Pro data over a network, on the web, via ODBC, or copy the found set.
Override data entry Enter data that doesn’t match the validations set for a warnings field. (See “Defining field validation” on page 5-9.)
Design layouts Create or change all layouts. Define groups to control access to individual layouts.
Edit scripts Create or change scripts. (Scripts can still be executed by any user, although some script steps may be skipped if a user has limited access).
Define value lists from Browse mode, a user must have Create records or Edit records access).
Create or change value lists. (To modify a value list

9-2 FileMaker Pro User’s Guide
Select To let users with this password
Create records Create records and enter data in them. This also enables users to modify value lists in Browse mode if the Include Edit item... option is enabled.
Edit records Change the information in (all) records. This also enables users to modify value lists in Browse mode if the Include Edit item... option is enabled. Define groups to control access to specific fields or layouts.
Delete records Delete one or more records.
5. Choose a category for the menu commands that users with this password can access, then click Create.
Deselect to limit access
Blank password
Choose the menu commands
Select the access
Passwords privileges fordefined in users of this
the file password
Click to associate passwords with existing groups Click to define groups
for users of this password
Choose To
Normal Enable all menu commands associated with the privileges you selected in the previous step.
Editing Only Enable commands that allow only basic data entry activities. This menu set disables finding, sorting, access to layout mode, and other options. Available menu commands also depend on the level of access you selected in the previous step.
Choose To
None Disable all menu commands for the current file (except common system commands and executing scripts).
All three options let users switch between database windows, perform scripts on the Script menu, click buttons on layouts, open FileMaker Pro Help, change application preference options, and open, create, or close FileMaker Pro files.
6. Repeat steps 3 through 5 for additional passwords.
7. If you wish to limit access to specific fields or layouts, click Groups and follow the steps in the next section, “Defining groups.”
8. Click Done.
Important After you define a master password, write it down and store it in a secure place. If you forget it, you can’t regain full access to the file. Also, you can define more than one master password.
Keep these points in mind:
• Even if you’re the only intended database user, it’s often a good idea to protect a database with a password. This helps prevent others from accessing your data or modifying the database structure.
• Make passwords easy to remember, but not so easy that someone can guess them. If you write down passwords, store them in a secure place away from your computer.
• FileMaker Pro access privileges work independently of operating system access privileges—protect your files by using FileMaker Pro passwords.
• You must have the appropriate access privileges to access data from related files. For example, to add data to a related field, you must have the privilege to edit or create records in the related file. If related files or files with external scripts use the same password, FileMaker Pro will re-use the password without prompting you.

Protecting databases with passwords and groups 9-3
• You can define a blank password that gives all users limited access To Do this to a file. When the file is opened, anyone can press Enter or Return to access the file. This option can be used to allow limited access to the file without needing to know or enter a password. When accessing a file with a blank password on the Web, the blank password is automatically used. This means all web users have access to the privileges assigned to the Blank password.
When a blank password is defined, users can open the file without specifying any password.
• You can set a default password that is automatically used when the file is open. This provides access to anyone who opens the database file by bypassing the password dialog box. To set a default password, choose Edit menu > Preferences > Document. Enable Try default password, then type a password that you already defined. Users will have the level of access that is attached to that password. To temporarily bypass the default password and enter a different one, press Shift (Windows) or Option (Mac OS) while opening the file.
• In the Define Passwords dialog box, you can use the Browse records, Edit records, and Delete records options to protect certain records within a file, based on a calculation. For more information, choose Help menu > Contents and Index, click the Index tab, and type record-level security.
Deleting or changing passwords To Do this
Delete a password Choose File menu > Access Privileges > Passwords. Select the password in the Define Passwords dialog box, then click Delete. In the confirmation dialog box, click Delete, then click Done. When prompted, type the master password, then click OK.
Change a password if Choose File menu > Access Privileges > Passwords. you know the master Select the password in the Define Passwords dialog password box. Edit the password, revise the privileges, then
click Change. Click Done. When prompted, type the master password, then click OK.
Change your own Choose File menu > Change Password. Type the old password if you don’t password. Type the new password, type it again to know a master password confirm it, then click OK.
Important If you are not the only user of a file, do not modify a password until you notify other users.
Defining groups After you define passwords, define groups to restrict access to specific fields and layouts. For example, if you want end users to enter and edit data in some (but not all) of the fields, use groups to specify which fields can be accessed.
To define a group:
1. Open the file using the master password.
• If you haven’t defined passwords, follow the steps in “Defining passwords” on page 12-1, then click Groups in the Define Passwords dialog box.
• You must be the only one accessing the file when defining groups.
2. Choose File menu > Access Privileges > Groups.
3. In the Define Groups dialog box, type a name for the group, then click Create.
4. Click Access to assign privileges to groups.
To add multiple groups, specify additional group names before clicking Access.

9-4 FileMaker Pro User’s Guide
Click to associate passwords with
Groups a groupdefined in
the file Click to define or change passwords
Type a new group name
5. In the Access Privileges dialog box, select the group to set additional privileges.
Selected group
Key
Master password
Access privileges overview for the Marketing group
6. Assign passwords for the group by clicking the bullet next to each password.
Click the bullets, not the name of the password. A solid bullet indicates that the group is using the password. A gray bullet indicates that the password is not used by the selected group. In the example above, the Marketing group uses the Car password. The master password, Train, is displayed in bold text.
7. Set the access privileges for specific layouts and fields by clicking the bullets next to them.
To make a field or layout Do this
Accessible (available for editing) Click the bullet next to the field or layout until it is black ( ).
Read only (can be viewed but Click the bullet next to the field or layout not edited) until it is clear ( ).
Not accessible (cannot be viewed Click the bullet next to the field or layout or edited) until it is gray ( ).
8. Click Save to save the current settings or click Revert to return the settings to the way they were last saved.
9. Click Done to return to the Define Groups dialog box, then click Done again to close the dialog box.
To modify privileges for groups, return to the overview (choose File menu > Access Privileges > Overview). The overview shows what passwords are associated with each group, and the what fields and layouts each group can access.
In the example on the next page, when the Sales group is selected in the overview, you see:
• Users who enter the password Airplane are associated with the Sales group. This is evident because the bullet next to the password is Accessible (black).
• Users in the Sales group can view, but not edit the field contents regardless of which layout they’re on. This is because all fields for the Sales group are set to Read only. They cannot view any data on the Margin Report or Advertising Costs layouts because the privileges are set to Not accessible.

• In the previous example (the Access privileges overview for the Marketing group), users who enter the Car password can view and edit the records using the Product List, Price List, and Advertising Cost layouts. They can view, but not edit data on the Current Inventory layout and cannot view or edit records using the Margin Report layout. Additionally, they can’t view or edit the Cost and No. in stock fields, and can only view data in the Status field, regardless of which layout the fields are on.
Access privileges overview for the Sales group
Keep these points in mind:
• Groups give database administrators a way to manage access to specific layouts or fields. If you don’t need to restrict access to specific layouts or fields, simplify your access privileges by using only passwords.
• Master passwords provide access to the entire file.
• You can associate the same password with more than one group. For example, to give an accountant access to the layouts and fields for both the Sales and Inventory groups, associate the accountant’s password with both groups.
Protecting databases with passwords and groups 9-5
• You can associate a group with more than one password. For example, you can assign separate passwords for each person in an accounting group. All users have access to the same layouts and fields (determined by the group), but only the managers can make changes to the file (determined by their passwords).
• Users don’t need to know about groups. They enter the password that is associated with their group.
Tip To see the associations between layouts and fields, choose File menu > Access Privileges > Overview. You must be the only person using the file to access the overview. For example, if you want to delete a field but aren’t sure which layouts will be affected, select the field in the Access Privileges dialog box. Layouts with solid bullets contain the selected field.
Deleting or changing groups To delete or change groups, you must use the master password to open the file and be the only person using the file.
To Do this
Delete a group Choose File menu > Access Privileges > Groups. Select the group name, then click Delete. In the confirmation dialog box, click Delete, then click Done.
Change password Choose File menu > Access Privileges > Overview. associations or access Select a group, then click the bullets next to the privileges for a group passwords, layouts, and fields you want to change.
Click Save, then Done.

9-6 FileMaker Pro User’s Guide
Passwords and groups: a comparison Passwords and groups are related. Passwords limit what users can do and groups limit the layouts and fields they can see. You specify access privileges for both passwords and groups.
• For passwords, specify access privileges that limit a user’s activities with the entire file (all the records, fields, layouts, etc.). For example, one password might let users create and edit records, but another might only let them browse records.
• For groups, specify privileges that limit access to specific layouts and fields. For example, you can give the Sales group access to one set of layouts and fields and the Marketing group access to a different set. This keeps each group’s information private within the same database.
• Group access privileges may take precedence over password access privileges. For example, if a password allows users to edit all fields in all records, but a group only gives those users read-only access to fields, they cannot edit the data in the fields, regardless of the password privileges. However, a group cannot provide additional access over passwords. For example, if a password only permits users to browse records, the group cannot provide full access to a field or layout.

Chapter 10 Creating scripts to automate tasks
FileMaker Pro includes the ScriptMaker™ feature, which you can use to automate many tasks, including switching to another layout, switching to another mode, and finding, sorting, and printing records.
This chapter tells you how to use ScriptMaker to:
• plan scripts
• define scripts
• define buttons to perform script commands
Note Some FileMaker Pro script steps are available when you publish a database on the Web using FileMaker Pro Web Companion Instant Web Publishing. For details, choose Help menu > Contents and Index, click the Index tab, and type instant web publishing, scripts.
FileMaker Pro has limited support for the ActiveX Automation (Windows) and AppleScript (Mac OS) and Apple events external scripting protocols.
Support for ActiveX Automation, Apple events, and AppleScript is documented in Help. Choose Help menu > Contents and Index, click the Index tab, and type ActiveX Automation, Apple events, or AppleScript.
About scripts A script is a command that tells FileMaker Pro to carry out one action or a sequence of actions. You perform a script to carry out its actions. You can choose a script from the Scripts menu or attach a script to a button.
For example, when you click the Letter button on the Client Entry layout, a script displays the Letter layout. Then the script switches to Preview mode and pauses so you can see what the letter looks like when it prints.
When you click the Letter
Buttons on a layout
button, FileMaker Pro performs the Print Letter script
Click to continue the script—FileMaker Pro
prints the letter, and then returns to the Client Entry
layout in Browse mode
Scripts help you do a job the same way every time. They carry out simple steps, like changing the printing orientation for envelopes, or complex tasks, like preparing a large mailing.
Use scripts to combine and automate tasks like:
• switching to another layout or mode
• finding, sorting, and printing records

10-2 FileMaker Pro User’s Guide
• importing data from the same source
• dialing phone numbers
You can perform additional scripts, called subscripts, within a script. Subscripts make it easy to break a complex task into small tasks. For example, you can find customers with a balance due with one script, and then print form letters requesting payment with another script. The first script contains a command that performs the second script (the subscript). If a subscript is in a different file, it’s called an external script.
With FileMaker Pro, you can:
• define a script that pauses to let you do unscripted tasks, like entering data. When you resume the script, FileMaker Pro performs the remaining script commands.
• save settings, like find requests and sort orders, in a script.
• print the commands and settings that make up a script. (See chapter 4, “Previewing and printing information,” for additional information on printing from FileMaker Pro.)
• define passwords that prevent other users from defining or changing scripts. (See “Defining passwords,” on page 9-1.)
• perform a startup script, a script that runs when you open a FileMaker Pro file. For example, a startup script can switch to a data entry layout whenever you open a customer order database. FileMaker Pro can also perform a shutdown script every time you close a file. (See “Setting document preferences,” on page 12-5.)
• send Internet mail using a separate email client (this requires an email account).
• launch Web browser software and have it display a specified URL (Web address—this requires an account with an Internet service provider).
The files you work with may already have scripts and buttons that you can use. For example, the template files included with FileMaker Pro have buttons that make using the file easier.
To Do this
Perform a script from the Choose the script name from the Script menu. Script menu
Perform a script from the Choose Script menu > ScriptMaker. Select the script Define Scripts dialog box name, and then click Perform.
Perform a script using a Type the keyboard shortcut that’s listed next to the keyboard shortcut script in the Script menu. (See “Listing scripts in
the Scripts menu,” on page 12-11.)
Perform a script from a Switch to a layout that contains a button for the button script. In Browse or Find mode, click the button.
Perform a script when In the Document Preferences dialog box, set the opening or closing a option to perform a startup or shutdown script. See FileMaker Pro file “Setting document preferences,” on page 12-5.
Continue a script after it Click Continue in the status area, or press Enter or pauses Return. If you switch layouts while a script is
paused and then continue the script, the remaining script steps occur in the new layout.
Stop a paused script Click Cancel in the status area, switch to another mode, close the active window, or quit FileMaker Pro.
Stop a script (except when Press Esc (Windows) or Command+Period it is paused) (Mac OS), hide or close the active window, or exit
out of FileMaker Pro. If the script contains a Close or Toggle Window step that hides the active window, FileMaker Pro stops the current script and returns to the script that called it (if there is one).
Note You can’t stop a script that contains the Allow User Abort [Off] step.
For a description of the various types of scripts you can perform, see “About ScriptMaker steps,” on page 12-6.

Creating scripts to automate tasks 10-3
Creating scripts: an overview Whether your FileMaker Pro scripts are simple or complex, you will find that it is easier to create them if you:
• plan the script before you define it.
• perform certain operations, like Find requests and Sort order, before you open ScriptMaker, thus making it easier to store the parameters for these requests. See “Storing settings before creating a script” on page 12-4 for more information.
Once you have a clear idea of how your script will be constructed and have stored any necessary settings, you are ready to define the script.
Planning scripts Just as you wouldn’t attempt to write a report without an outline, you shouldn’t attempt to write a script without some forethought and planning. Consider these points before defining a script:
• What do you want to accomplish? Can you separate the job into smaller tasks? If so, define a subscript for each small task, and then define a script that performs the subscripts. It’s usually easier to design and test several small subscripts than one complex script. This modular approach also lets you reuse your subscripts in other scripts.
• Is all the data you need in one file, or will the script operate on more than one file? If you’re using multiple files, which ones should the script open? Where should you define the script?
• How will users perform the script? (See “Using buttons with scripts,” on page 12-12.)
• Will the script contain steps for print setup (Windows), page setup (Mac OS), printing, importing, finding, sorting, or exporting? If so, what settings should you store before defining the script? (See “Storing settings before creating a script,” on page 12-4.)
• Which fields and layouts will the script need? Some steps require a field to be on the current layout (like Go to Field, Insert Text, Insert Calculated Result, and Replace), while others, such as Set Field, don’t. Use Go to Layout to switch to a layout that has the fields your script requires.
• Should the script switch among modes? For example, use Enter Browse Mode before modifying data in fields and records, and use Enter Find Mode before setting up a find request or finding data.
• Should the script work on all records in the database, the current found set, or a specific set of records? What if no records are found? Use one of the find or omit steps to set up the correct records.
• Which record should the script start with? For example, when using the Loop step, decide whether the loop starts at the first or last record, a specific record, or the current record in a found set. Use Go to Record/Request/Page to select a starting record.
• How should the script advance through multiple fields and records? Use navigation steps to move through a found set.
• Should the records be sorted before the script processes them? If you use the Loop step, use Sort or Unsort before the loop to order your records properly.
• When should the script finish? After all records have been processed? After a specified condition has been met? Use the If step to perform a task when the script reaches a specified condition.
• How will you document your script design? Use the Comment step to make your scripts readable and understandable. This is especially important if others will be maintaining a database that you create.
• How will you test your script? Use the Pause/Resume Script step to pause at specific points in your script. For example, if you are testing a script with a Loop step, placing a Pause/Resume Script step in the middle of the loop may allow you to see if your loop is working as intended. You can remove the Pause/Resume script step when your script is working properly.

10-4 FileMaker Pro User’s Guide
Tip Save a clone (or copy) of your database, and then define and test your script in it to preserve the original data. After testing the script, import data from the original file into the clone, or use the Import Script feature to import this script into your database. See “Importing scripts” on page 12-11, for more information on this feature.
Storing settings before creating a script When you define a script, FileMaker Pro saves the current settings for importing, exporting, finding, sorting, and print setup (Windows) or page setup Mac OS). When these script steps are placed in your script, FileMaker Pro can restore settings for these actions when you perform the script.
To store settings for a script, specify them before adding Print or Page Setup, Print, Import Records, Perform Find, Sort, or Export Records steps to a script.
To specify Do this
Print setup (Windows) Choose File menu > Print Setup or Page Setup. Select the Page setup (Mac OS) settings you want, then click OK. See “Preparing to
print,” on page 4-2.
Import order Import records using the field order you want to store. See “Importing data into FileMaker Pro,” on page 12-2.
Find requests In Find mode, create the find requests. You don’t have to click Find to perform the requests. See “Finding records,” on page 3-1.
Sort order In Browse mode, choose Sort from the Mode menu, and then choose the fields you want to sort by and the sort order. Click Done. You don’t have to actually perform the sort. See “Sorting records,” on page 3-8.
Export order Export records using the field order you want to store. See “Exporting data from FileMaker Pro,” on page 12-6.
Keep these points in mind:
• To use the settings when you perform the script, select the Restore option for the Print Setup (Windows) or Page Setup (Mac OS), Import Records, Perform Find, Sort, or Export Records steps.
• A script can store only one of each type of setting, for example, one set of find requests and one sort order. If you need more than one, define a subscript that stores different settings.
• To see the settings you stored with a script, print the script definition. You can print the definition for a single script or all scripts by clicking the Print button in the Define Scripts dialog box.
• You can enter settings when you perform a script instead of using stored settings by specifying that FileMaker Pro display a dialog when the script step is executed.
For example, if you add a Sort step and deselect the Restore sort order and Perform without dialog options, the Sort dialog box appears when you perform the script and displays the last sort used in the file. If you select Restore sort order and deselect Perform without dialog, the dialog box displays default settings that the user can perform or modify.
Defining scripts Define scripts in ScriptMaker by choosing steps and arranging them in the order you want FileMaker Pro to perform them. If you’re using a subscript, define it first, and then define the script that calls (uses) it.
1. If you’re defining a script that uses Print Setup (Windows) or Page Setup (Mac OS), Import, Export, Find, or Sort, first store the settings for the script.
2. Choose Scripts menu > ScriptMaker.
3. In the Define Scripts dialog box, type the name of the new script, then click Create.
4. In the Script Definition dialog box, choose steps for the script.

Creating scripts to automate tasks 10-5
To Do thisThe options in this dialog box are described in more detail in the following sections.
Scripts withcheckmarks
appear in the Script menu
Drag the double arrow to reorder the script in the
Script menu
Type the name of a new script
Scripts defined in the file
Click to add a new script Select to include the selected script in the Script menu
FileMaker Pro includes default steps when you create a script. You can change or delete these steps.
To Do this
Add steps Select one or more steps from the list of available steps, and then click Move. Select options for the step, if they’re available.
Delete steps Select one or more steps in the script, and then click Clear or press the Delete key
Delete all steps Click Clear All
Duplicate steps Select one or more steps in the script, and then click Duplicate.
Change step options Select a step in the script, and then change the options.
Change step order Drag the double arrow to move a step.
Add a subscript Select Perform Script in the Available Steps list, and then click Move. Select the Perform sub-scripts option, and then choose the subscript from the pop-up menu. Choose External Script if the subscript is in a different file.
Add a pause in the Select Pause/Resume Script in the Available Steps list, script click Move, and then specify the options. Or add a step
with the Pause option and set the option.
Choose steps from this list Steps in the script Display steps by category
Options for a step appear inside brackets
Drag the double arrow to reorder the step
Set options for the selected step
5. Click OK.
6. To list the script in the Script menu, select Include in menu in the Define Scripts dialog box.
7. Click Done.

10-6 FileMaker Pro User’s Guide
About ScriptMaker steps A step is a FileMaker Pro command that you use in a script. Steps are similar to the commands you access through FileMaker Pro menus. For example, you can create a record by choosing New Record from the Records menu, or you can perform a script that contains the New Record/Request step.
Keep these points in mind:
• Some newer steps such as Perform Find/Replace and Open Find/ Replace are documented only in Help.
• Many steps have options that you specify when you define a script. For example, you can specify a field name in the Go to Field step. FileMaker Pro Help contains detailed information about steps and options.
• Some steps, like Paste and Insert Text, can only be performed in certain modes or when a specified field is on the current layout.
• Some steps can display a dialog box when you perform a script. For example, a script with the Sort step can display the Sort dialog box so you can enter a sort order.
• To specify a related field in a step, choose a relationship from the relationship list at the top of the Specify Field dialog box. Then select a related field.
• You can use status functions in steps to monitor the state of your database. For example, a script can check whether a file is sorted. Or it can display a customized message that tells users what to do when a found set is empty.
For a list of status functions and some examples of their usage, see chapter 11 and FileMaker Pro Help.
• For information about using script steps with OLE objects, see FileMaker Pro Help. Choose Help menu > Contents and Index, click the Index tab, and type OLE objects,scripting.
Control script steps Use this step To
Perform Script Perform another script
Pause/Resume Script Pause a script, or resume a paused script
Exit Script Exit the current script
Halt Script Stop performing all scripts
If Perform steps if a calculation is True (not zero)
Else Perform another set of steps if a calculation is False (zero)
End If Mark the end of an If statement
Loop Repeatedly perform a set of steps
Exit Loop If Exit a loop if a calculation is True (not zero)
End Loop Mark the end of a loop
Allow User Abort Allow or prevent users from stopping a script
Set Error Capture Allow or prevent error messages from displaying. Use this step to change the way FileMaker Pro handles error messages.
Navigation script steps Use this step To
Go to Layout View the specified layout
Go to Record/Request/Page Move to a record in the found set in Browse mode, a find request in Find mode, or a page in Preview mode
Go to Related Record Move to the current related record in a related file
Go to Portal Row Move to a portal row
Go to Field Move to a field on the current layout
Go to Next Field Move to the next field on the current layout

Creating scripts to automate tasks 10-7
Use this step To
Go to Previous Field Move to the previous field on the current layout
Enter Browse Mode Switch to Browse mode
Enter Find Mode Switch to Find mode
Enter Preview Mode Switch to Preview mode
Sort, find, and print script steps Use this step To
Sort Order records in the found set
Unsort Restore records to the order in which they were created
Show All Records Show all records in the file
Show Omitted Show records that aren’t in the found set
Omit Record Leave the current record out of the found set
Omit Multiple Leave a number of records, starting from the current record, out of the found set
Perform Find Find records that match the current find request(s)
Modify Last Find Change the last find request(s)
Print Setup (Windows) Set Print Setup (Windows)or Page Setup (Mac OS)
Page Setup (Mac OS) options for printing, like horizontal or vertical orientation
Print Print information from the current file
Editing script steps Use this step To
Undo Undo the last action
Cut Delete the contents of a field and put them in the Clipboard
Copy Copy the contents of a field, or a page in Preview mode, to the Clipboard
Use this step To
Paste Paste the contents of the Clipboard into a field
Clear Delete the contents of a field without copying the contents to the Clipboard
Select All Select the entire contents of a field
Fields script steps Use this step To
Set Field Replace the contents of a field with the result of a calculation. The field doesn’t have to appear on the current layout.
Insert Text Insert a text string into a field
Insert Calculated Insert the results of a calculation into another field on the Result current layout
Insert from Index Insert a value from the index into a field
Insert from Last Insert data from a field in the last active record into the Record same field in the current record or find request. (The last
record to contain an insertion point in a field is the active record.)
Insert Current Date Insert the current system date into a field
Insert Current Time Insert the current system time into a field
Insert Current User Insert the name of the current user into a field. (The user Name name is specified in the application’s general
preferences.)
Insert Picture Insert a picture into a container field. (To insert the picture the container field must be active when the step is executed.)
Insert QuickTime Insert a QuickTime movie into a container field. (To (Windows) insert the movie the container field must be active when
Insert Movie the step is executed.)
(Mac OS)

10-8 FileMaker Pro User’s Guide
Use this step To
Insert Object Insert an embedded or linked object into a container
(Windows) field
Update Link Update an OLE link in a container field (Windows)
Records script steps Use this step To
New Record/Request Add a record or find request
Duplicate Record/Request Duplicate a record or find request
Delete Record/Request Permanently delete the current record or find request
Delete Portal Row Permanently delete the current portal row. Use Go to Portal Row to specify which is the current row.
Revert Record/Request Return the current record or find request to the way it was before you added or changed its data
Exit Record/Request Exit the current record or find request to update the field data and make no field active
Copy Record Copy the contents of the current record to the Clipboard
Copy All Records Copy the contents of the found set to the Clipboard
Delete All Records Permanently delete all records in the current found set
Replace Contents Change the contents of a field in all records in the found set
Relookup Contents Update a lookup value in records in the found set
Import Records Bring data from another file into the current file
Export Records Save data in a format you can open in another application
Windows script steps Use this step To
Freeze Window Stop updating the window (hide actions from users)
Refresh Window Redraw the screen, or resume updating after Freeze Window
Scroll Window Scroll the window up, down, or to the current selection
Toggle Window Hide (Mac OS) or change the size of the window
Toggle Status Area Show, hide, or lock the status area
Toggle Text Ruler Show or hide the text ruler
Set Zoom Level Reduce, enlarge, or lock the contents of a window
View As View records individually, in a list, or as a table
Files script steps Use this step To
New Create a file
Open Open a file. Subsequent steps operate in the file that contains the script, not the file just opened.
Close Close a file
Change Password Modify the password utilized by the current user
Set Multi-User Set network access for the current file to On, On (Hidden), or Off
Set Use System Use date, time, and number formats saved with the Formats current file, or use the system formats
Save a Copy as Save a copy of the current file
Recover Recover a file
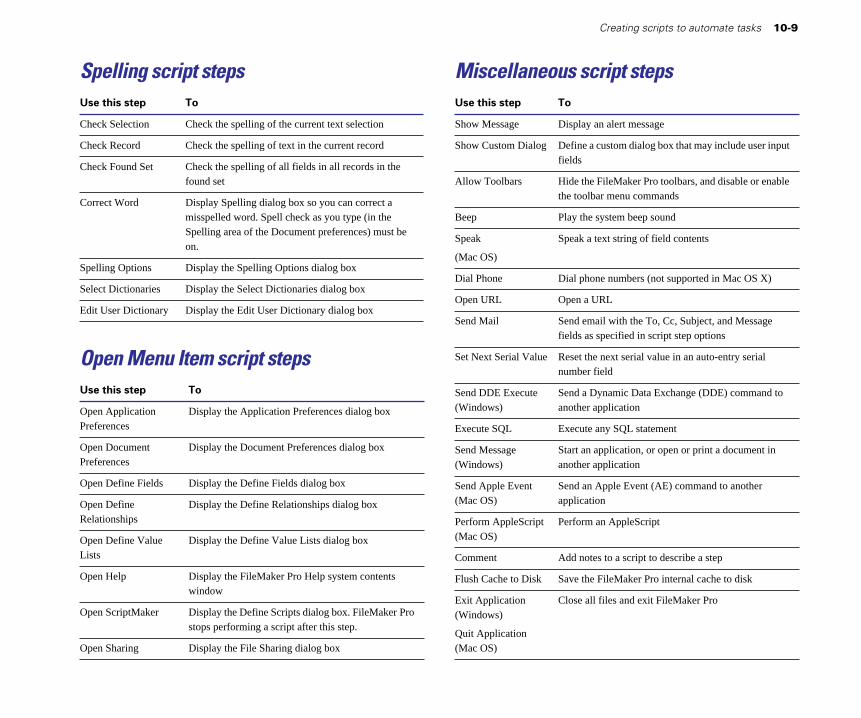
Creating scripts to automate tasks 10-9
Spelling script steps Use this step To
Check Selection Check the spelling of the current text selection
Check Record Check the spelling of text in the current record
Check Found Set Check the spelling of all fields in all records in the found set
Correct Word Display Spelling dialog box so you can correct a misspelled word. Spell check as you type (in the Spelling area of the Document preferences) must be on.
Spelling Options Display the Spelling Options dialog box
Select Dictionaries Display the Select Dictionaries dialog box
Edit User Dictionary Display the Edit User Dictionary dialog box
Open Menu Item script steps Use this step To
Open Application Display the Application Preferences dialog box Preferences
Open Document Display the Document Preferences dialog box Preferences
Open Define Fields Display the Define Fields dialog box
Open Define Display the Define Relationships dialog box Relationships
Open Define Value Display the Define Value Lists dialog box Lists
Open Help Display the FileMaker Pro Help system contents window
Open ScriptMaker Display the Define Scripts dialog box. FileMaker Pro stops performing a script after this step.
Open Sharing Display the File Sharing dialog box
Miscellaneous script steps Use this step To
Show Message Display an alert message
Show Custom Dialog Define a custom dialog box that may include user input fields
Allow Toolbars Hide the FileMaker Pro toolbars, and disable or enable the toolbar menu commands
Beep Play the system beep sound
Speak Speak a text string of field contents
(Mac OS)
Dial Phone Dial phone numbers (not supported in Mac OS X)
Open URL Open a URL
Send Mail Send email with the To, Cc, Subject, and Message fields as specified in script step options
Set Next Serial Value Reset the next serial value in an auto-entry serial number field
Send DDE Execute Send a Dynamic Data Exchange (DDE) command to (Windows) another application
Execute SQL Execute any SQL statement
Send Message Start an application, or open or print a document in (Windows) another application
Send Apple Event Send an Apple Event (AE) command to another (Mac OS) application
Perform AppleScript Perform an AppleScript (Mac OS)
Comment Add notes to a script to describe a step
Flush Cache to Disk Save the FileMaker Pro internal cache to disk
Exit Application Close all files and exit FileMaker Pro (Windows)
Quit Application (Mac OS)

10-10 FileMaker Pro User’s Guide
Changing scripts 1. Choose Scripts menu > ScriptMaker.
2. In the Define Scripts dialog box, select a script name.
3. In the Script Definition dialog box, change the script steps, and then click OK.
To Do this
Add steps Select the steps in the Available Steps list, and then click Move. Select options for the step, if they’re available.
Delete steps Select one or more steps in the script, and then click Clear or press the Delete key
Change step options Select a step in the script, and then change the options.
Change the order of Drag the double arrow to move a step. steps
If your script contains steps that allow you to store FileMaker Pro settings, like Page or Print Setup, Import Order, Find Requests, Sort Order, and Export Order, you will see the Script Settings dialog box. Specify whether to keep the settings you have previously stored for these steps or replace them with the settings that were in use prior to opening the script. Click OK after you have made your changes.
Dimmed options aren’t available in the current script
Select an option to keep or replace all occurrences of that setting type (for example, all sort orders) stored with the script
Note If you’re changing a script that was created with FileMaker Pro for Windows, steps that work only in Windows are displayed in italics. If you’re changing a script that was created with FileMaker Pro for the Mac OS, steps that work only on a Mac OS–based computer are displayed in italics. Options that are displayed in italics may only be changed on the platform on which they were created.
Duplicating, renaming, or deleting scripts To Do this
Quickly create a similar script or Select the script or scripts and click scripts Duplicate.
Change the name of the script Edit the name in the Script Name box, and then click Rename.
Add the script to the Script menu Select Include in menu.
Remove the script from the Scripts Deselect Include in menu. menu
Click Done to finish, or click Edit to change the steps in the script.
Deleting scripts 1. Choose Scripts menu > ScriptMaker.
2. In the Define Scripts dialog box, select the name(s) of the script or scripts, then click Delete.
3. Click Delete again, then click Done.
Important When you delete a script, change scripts and buttons that refer to the deleted script.

Creating scripts to automate tasks 10-11
Importing scripts FileMaker Pro allows you to import scripts from other FileMaker Pro databases.
Many scripts reference fields (local and related), layouts, records, and other scripts (local and in external files). In addition, some script steps, such as Set Field, Insert Calculated Result, Replace, etc., may have field references embedded in calculations. While these references may be valid in the original file, it is possible that they will be invalid in the file into which they are being imported.
To minimize the loss of information, FileMaker Pro attempts to map field, relationships, scripts, and layout references based on their names. Fields, relationships, scripts and layouts that cannot be mapped are marked as unknown, and should be edited and corrected before the script is performed.
When you import a script, you might need to edit the script to make sure that all references are valid and appear as intended. Always review your imported script prior to performing it for the first time.
To import a script 1. Open the file into which the script will be imported.
2. Choose Scripts menu > ScriptMaker.
3. Click the Import button.
4. Open the file that contains the script(s) you want to import.
5. In the Import Scripts dialog box, place a check mark next to the script(s) you want to import.
6. Click OK, then click OK again.
Keep these points in mind:
• During script import, the match for field and relationship names is not case sensitive.
• When importing a script that references a relationship:
• There must be an identically named relationship in the source and destination file.
• The field names and types must be the same.
If all of these conditions are not met, the unmatched items will have the word <unknown> appended to them within the script.
• When importing script steps that contain calculations (for example, If, Set Field, and Insert Calculated Result), FileMaker Pro matches field name and field type. If a match is not found, the word <unknown> will appear in place of the missing field.
• Information stored in scripts (for example, Find requests, Sort order, Import field order, and Export field order) will attempt to be mapped to original fields using the above rules. If no original matching field can be found, the unmapped fields will be replaced with the word <unknown>.
• When importing scripts that contain the Perform Script step, the link between scripts will be retained only if the linked scripts are imported at the same time. If a script with the same name is already present in the target file, no attempt will be made to link between the two scripts. If the Perform Script step references an external script, the imported script will also reference the external script.
Listing scripts in the Scripts menu FileMaker Pro lists scripts in the Script menu and assigns keyboard shortcuts, like Ctrl+1 (Windows) or Command+1 (Mac OS), to the first ten scripts.
To change the order of scripts in the Scripts menu:
1. Choose Scripts menu > ScriptMaker.
2. In the Define Scripts dialog box, drag the double arrow to the left of the script name to a new position.

10-12 FileMaker Pro User’s Guide
3. To add or delete a script from the menu, select the script, then select or deselect Include in menu.
Scripts with checkmarks will appear in the Scripts menu.
4. Click Done.
Using buttons with scripts A button is an object on a layout that you can click to perform one script step or an entire script.
Buttons
When you click the Letter button, FileMaker Pro performs the Print Letter script
Defining buttons Use the following steps to create a button labeled with text.
Note To create another type of button (for example, a circle with a graphic), see FileMaker Pro Help.
1. If you’re defining a button that performs an entire script, create the script.
See “Defining scripts,” on page 12-4.
2. In Layout mode, choose a layout, then click the button tool.
Button tool Button border
If tools don’t appear on the layout, click the status area control
3. Drag the crosshair pointer on the layout to draw the button.
4. In the Specify Button dialog box, select a step, set step options (if they’re available), select a button style, and choose whether the pointer will change to a hand cursor when it is over the button. Then click OK.
See “About ScriptMaker steps,” on page 12-6.

Creating scripts to automate tasks 10-13
To Do this in Layout mode
Set options for the step
Select a button style
Select a step
5. At the insertion point, type a label for the button, and then press Enter on the numeric keypad.
6. Switch to Browse or Find mode to use the button.
Keep these points in mind:
• To show borders around buttons in Layout mode, choose View menu > Show > Buttons. See “Setting color, pattern, line width, and object effects,” on page 7-14.
• To set buttons so they don’t print, see “Keeping objects from printing,” on page 7-25.
• FileMaker Pro doesn’t store settings (like find requests) with a button, but you can define a script that stores the settings and then define a button to perform it. See “Storing settings before creating a script,” on page 12-4.
Copying, changing, or deleting buttons
To Do this in Layout mode
Select a button Use the selection tool. See “Selecting objects,” on page 6-12.
Move a button Using the selection tool, drag the button. See “Moving objects on a layout,” on page 6-14.
Change the See “Setting color, pattern, line width, and object effects,” appearance of a on page 7-14.button
Change a button See “Formatting text,” on page 7-12.label
Copy a button When you copy a button, you copy the object and the button definition. If you copy a button from another file, change the button definition if fields, layouts, or scripts don’t match. See “Copying, duplicating, and deleting objects,” on page 6-13.
Change a button Double-click the button. In the Specify Button dialog box, definition select a step and options, then click OK.
Delete a button Select the button, then press Delete or Backspace.
Example of a ScriptMaker script The following script shows one way to find duplicate records in your database. It demonstrates the use of a global field, a stored Find Request, a stored Sort order, and the If and Loop script steps.
Finding duplicate records In this example, a travel agency uses a registration database to track clients who sign up for a cruise seminar. The database contains duplicate records because some clients called the travel agency to sign up and also mailed in a registration form for the same seminar.
The following sections explain how to set up a database and define a script to find duplicate records.
Note For this example, you should understand global fields and know how to define fields. See “Defining global fields,” on page 5-8.
1. Create a unique value for each record.

10-14 FileMaker Pro User’s Guide
The Seminar file contains records of clients who register for a seminar. Each client has a unique identification code, the Client ID field, which is a concatenation of the clients’ last name and phone number. Some records contain the same identification number— these are the duplicate records you want to find.
Tip If your database doesn’t have a unique identification field, define a calculation field to create one from existing fields. For example, combine first name, last name, and birthday to create a unique identification for each client.
2. Add two fields.
Define these fields in the Seminar file:
• A text field, called Mark. When the script finds a duplicate record, it places an x in this field to mark the record.
• A global field, called Global, to store the unique identification while comparing records. Global should be the same data type as the Client ID field.
3. Display the Mark field.
Create a layout that displays the Mark field, or add the field to an existing layout. You’ll use this layout to store Find settings in the following step.
4. Store settings.
Store Sort and Find settings for the script.
To store this setting Do this
Sort In Browse mode, choose Sort from the Mode menu. If fields appear in the Sort Order list, click Clear All. Click ClientID, choose Ascending order, click Move, and then click Done.
Find Choose a layout that displays the Mark field. In Find mode, type x into the Mark field, and then switch to Browse mode. (You don’t have to perform the find request.)
5. Define the script.
In ScriptMaker, define the Find Duplicates script.
When you perform the Find Duplicates script:
1. It finds all records, and then sorts them by the ClientID field so that records with the same ClientID are grouped together.
2. Starting with the first record, the script copies the value from the ClientID field into the Global field.
Record 5
Mark
aaa Global
Record 4
Mark
aaa Global
Record 3
Mark
aaa Global
Record 2
Mark
aaa Global aaa
Client ID
Record 1
Client ID Mark
aaa Global
3. The script goes to the next record and compares the value in ClientID with the value in Global.
• If the values match, the record is a duplicate and the script puts an x in the Mark field.

Creating scripts to automate tasks 10-15
Record 5
Mark
aaa Global
Record 4
Mark
aaa Global
Record 3
Mark
aaa Globalaaa
Client ID
Record 2
Client ID X Mark
aaa Global
aaa Client ID
Record 1
Client ID Mark
aaa Global
• If the values don’t match, FileMaker Pro copies the ClientID value into Global. It doesn’t change the Mark field.
4. The script repeats step 3 until it reaches the last record in the file.
Record 5
Mark
bbb Global
Record 4
Mark
bbb Global
Record 3
Mark
bbb Global bbb
Client ID
Record 2
Client ID X Mark
aaa Global
aaa Client ID
Record 1
Client ID Mark
aaa Global
5. The script finds all records with an x in the Mark field, and then displays the found set of duplicate records.


Chapter 11 Using formulas and functions
This chapter:
• introduces formulas and functions
• lists the places you can use formulas and functions
• shows the components of formulas
• describes operators you can use in formulas
• gives a brief description of all functions
See Help for more detail and examples for each function, and for information on some newer logical, design, and status functions.
About formulas A formula is a specific operation on one or more values in the database. For example, suppose your file contains two number fields, Unit Price and Quantity, and one calculation field, Extended Price. You want to calculate a value for Extended Price in each record, so you define a calculation field with the formula:
Unit Price * Quantity
for the Extended Price field. Then, each time you type values in Unit Price and Quantity, the formula multiplies those values and displays the result in Extended Price.
You create formulas in the Specify Calculation dialog box (see“Defining calculation fields” on page 5-5.) You can use calculations in several areas of FileMaker Pro.
To use formulas See also
When defining “Defining calculation fields” on page 5-5 calculation fields
In certain script Help topics for the If, Exit Loop If, Set Field, steps Insert Calculated Result, and Replace script
steps. Choose Help menu > Contents and Index, click the Index tab, and type the name of the script step.
To auto-enter “Defining automatic data entry” on page 5-8calculated values
For data validation “Defining field validation” on page 5-9
When using “Replacing data in fields” on page 2-10Replace with calculated results
Formulas can include any combination of constants, field references, operators, and functions. (See “About functions” on page 12-5.) These elements are arranged in a particular order, or syntax, to produce expressions giving the result you want. The following sections explain each formula part and its syntax.
Important The data type (Text, Number, Date, Time, or Container) of fields and expressions referenced in a formula, and the result returned, are important. For example, if a date calculation is set to return a number result, the calculation does not return a date.
When you mix data types in calculations, use the data type conversion functions (TextToDate, TextToTime, TextToNum, DateToText, TimeToText, NumToText) to convert data and expressions to the correct type. These functions are documented in the Text, Number, Date, and Time function tables below.

11-2 FileMaker Pro User’s Guide
Expressions A formula contains one or more expressions. An expression is a value or any computation that produces a value. Expressions can be combined to produce other expressions.
Type of expression Example
Text constant "London"
Number constant 2.15
Field reference TaxRate
Function Length(ShipToAddress)
Combination of expressions ((Total–Discount)*TaxRate)/100
Constants A constant is a fixed value that’s part of the formula and doesn’t change from record to record. A constant can be text, number, date, or time, like the text value “Europe” or the numeric value 0.05. Text constants in formulas can be up to 253 characters long.
Important When you use a constant in a formula, use the correct format.
For this type of data When you type a constant Examples
Text Enclose the text in quotation "Montréal"
marks (") "514 555 1212"
Number Don’t include thousand separators 123
or currency symbols. 1234.56
Date Use the value as a parameter of Date(2,2,2001)
the Date function or TextToDate TextToDate("04/04/ function. See “Date functions” on 2000") page 12-7, “Text functions” on page 12-5.
For this type of data When you type a constant Examples
Time Use the value as a parameter of Time(4,14,32)
the Time function or TextToTime TextToTime("02:47:35") function. See “Time functions” on page 12-7, “Text functions” on page 12-5.
Field references A field reference is a field name that acts as a placeholder for the field’s value. When FileMaker Pro evaluates the formula in the current record, the value in the field represented by the field reference is used in the calculation.
To define a formula that references a related field, “Defining calculation fields” on page 5-5. The syntax is Relationship name::Field name. For more information about related fields, see chapter 8, “Working with related files.”
Note References to related fields can become invalid when you move or rename a related file, or delete a field in that file. Also, changing the field type or number of repetitions of a related field can cause unexpected behavior.
This expression Returns
Invoice Total*0.075 7.5 when the value in the Invoice Total field is 100
First Name & " " & John Jones when the value in the First Name Last Name field is John and the value in the Last Name
field is Jones
Invoices:: 7.5 when the value in the Invoice Total field is Invoice Total*0.075
related database. 100. The Invoice Total field is located in a

Using formulas and functions 11-3
Operators You combine expressions using operators, symbols that determine which operation to perform on the expressions. You place operators between the expressions you want to perform the operation on.
Each operator has a precedence, which determines the order in which calculations are performed in a formula containing more than one operator. FileMaker Pro evaluates operators from left to right and performs multiplication and division before addition and subtraction. You can change the precedence by enclosing the expression you want calculated first in parentheses.
This expression Returns
2+3*2 8
(2+3)*2 10
Mathematical operators Use the following mathematical operators with numeric expressions.
Operator Definition Examples
+ Adds two values 2+2
(Addition) Subtotal+Sales Tax
– Subtracts the second 2–2
(Subtraction or value from the first, or InvoiceTotal–Discount
Negation) changes the sign to + or – –2
* Multiplies each value Subtotal*Sales Tax
(Multiplication) DaysLate*.01*
LeasePayment
/ Divides the first value by Kilometers Driven/Liters
(Division) the second Inches/12
^ Raises the first value to A^2+B^2 returns (A2+ B2)
(Power of, or the power of the second Radius^3 returns (Radius3) Exponentiation) value
Comparison operators Comparison operators compare two expressions and return either true or false. (True and False are Boolean results.) Arithmetically, a result of true equals 1 and a result of false equals 0.
Operator Definition Examples
= True when both items are 38=39 returns false
(Equal to) equal 38=38 returns true
<> True when the items are not 38<>39 returns true
or ≠ (Mac OS) equal 38<>38 returns false
(Not equal to)
> True when the value on the 5>6 returns false
(Greater than) left exceeds the value on 19>1 returns true the right
< True when the value on the 5<6 returns true
(Less than) left is less than the value on 19<1 returns false the right
>= True when the value on the 5>=6 returns false
or ≥ (Mac OS) left is greater than or equal 5>=5 returns true to the value on the right
(Greater than or equal to)
<= True when the value on the 5<=6 returns true
or ≤ (Mac OS) left is less than or equal to 19<=18 returns false the value on the right
(Less than or equal to)

11-4 FileMaker Pro User’s Guide
Logical operators Use logical operators to include conditions in a calculation.
Operator Definition Example
AND True only when both of two ApplicationReceived=
values are true. ”Y” AND FeePaid>0
OR True when either of two values is CurrentBalance <= 0 OR
true. CreditApproved=”Y”
XOR True when either, but not both, of FeePaid>0 XOR
two values is true. The result is: FreeGift= “Y”
1 false when true AND true 1 true when false AND true 1 false when false AND false
Text operators Use the following text operators with text expressions. (Double quotation marks enclose text constants.)
Symbol Definition Examples
& Appends the text string on "XXX" & "ZZZZZ" returns
(Concatenation) the right to the end of the "XXXZZZZZ" text string on the left. Text strings can be constants (in quotes), field references, or some functions.
NOT Changes a value within parentheses from false to true or from true to false. The result is:
1 false when NOT true 1 true when NOT false
NOT IsEmpty(FieldName)
" "
(Text constant)
Marks the beginning and "Sydney, NSW" returns the end of a text constant. Sydney, NSW Quotation marks without "" returns an empty (null) value text between them indicate
FirstName & " " &no text. If you enter text
LastName returns John Smith ifinto a formula without
the fields referenced hold Johnquotation marks,
and SmithFileMaker Pro interprets the text as a field name or "The report said
function name. To put a ""Confidential"" on the
quotation mark in a text top" returns The report said
constant, precede it with "Confidential" on the top
another quotation mark.
¶ Inserts a paragraph return
(Return marker) in a text constant. (The ¶ symbol must be enclosed within the quotation marks of the text constant.)
"M.T.N.Trek¶Sporting
Equipment" returns
M.T.N. Trek Sporting Equipment
City & "¶" & State returns city and state on separate lines.

Using formulas and functions 11-5
About functions A function is a predefined, named formula that performs a specific calculation and returns a single, specific value. You type the function, and FileMaker Pro performs the calculation it represents.
Here are some examples of functions:
This function Returns
Average (Score1, Score2, The average of the three scores Score3)
Round(SalesTax,2) The amount of sales tax rounded to two decimal places
Length("John") 4 (the number of characters in the text "John")
Position(Name,"Mc",1,1) The position of the first occurrence of "Mc" in the Name field
Most FileMaker Pro functions use the following syntax: Function name (parameter)
This part Represents
Function name The calculation to perform.
parameter The value or expression on which the calculation is performed. Most functions require one or more parameters. A parameter can be a constant, a field name, another function, an expression, or a database structure or situation.
( ) The beginning and end of the parameter.
Some functions require two or more parameters, as in this example:
Position(LastName,"Mc",1, 1)
You can use functions by themselves or combine them with other functions or expressions. For example, you can nest one function within another:
If(IsEmpty(LastName), “Warning!”, “OK”)
For more examples, open the Calculations and Scripts file, which is located in the Tips from Tech Support folder inside the Examples folder where FileMaker Pro is installed.
Note In the United States, commas act as list separators in functions, formulas, and calculations. In other countries, semicolons might be used as list separators. The separator depends on the operating system your computer uses, as well as the one used when the file was created.
The following sections summarize the FileMaker Pro functions by category. For detailed information about each function, and examples, choose Help menu > Contents and Index, click the Index tab, and type the name of the function.
Text functions Text functions manipulate text. Use text functions to combine, isolate, compare, quantify, change, or convert data of type text.
The parameter text can be a text expression (in quotes if it is a constant) or the name of a Text field. To use a space as a text expression, type a quote, then a space, then a quote (" ").
Example: RightWords(Name, 1) returns Jones when the Name field holds William R. Jones.
Syntax Definition
Exact (original text, comparison Compares original text and comparison text. text) Returns "1" if they match exactly, "0"
otherwise. Exact is case-sensitive.
Exact (original container, Compares original container and
comparison container) comparison container for exact match. Returns "1" for a match, "0" for no match.
Left (text, number) number, counting from the left. Returns the character(s) in text specified by
LeftWords (text, number of words)
Returns the word(s) in text specified by number of words, counting from the left.
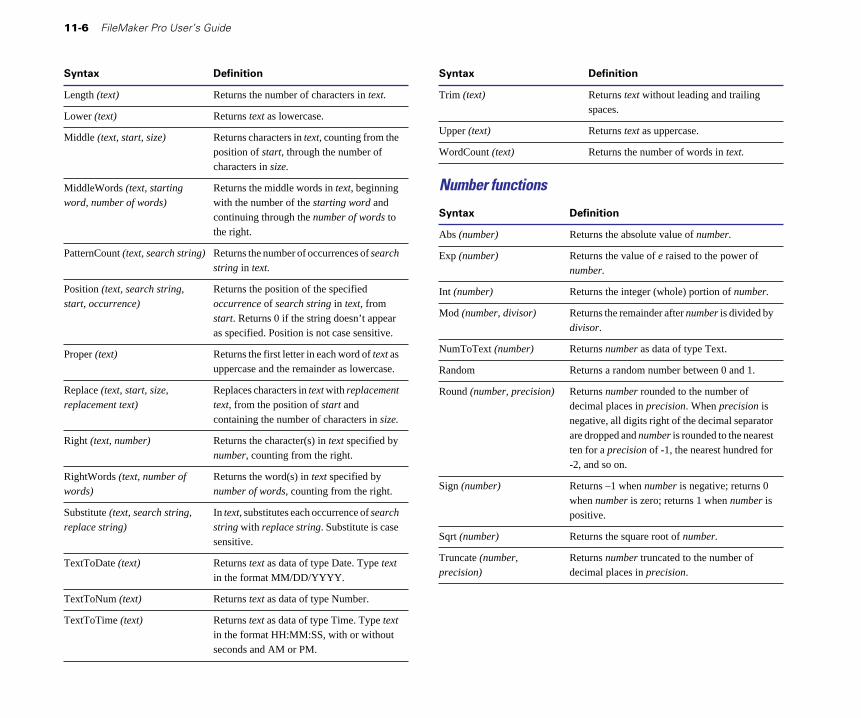
11-6 FileMaker Pro User’s Guide
Syntax Definition
Length (text) Returns the number of characters in text.
Lower (text) Returns text as lowercase.
Middle (text, start, size) Returns characters in text, counting from the position of start, through the number of characters in size.
MiddleWords (text, starting Returns the middle words in text, beginning word, number of words) with the number of the starting word and
continuing through the number of words to the right.
PatternCount (text, search string) Returns the number of occurrences of search string in text.
Position (text, search string, Returns the position of the specified start, occurrence) occurrence of search string in text, from
start. Returns 0 if the string doesn’t appear as specified. Position is not case sensitive.
Proper (text) Returns the first letter in each word of text as uppercase and the remainder as lowercase.
Replace (text, start, size, Replaces characters in text with replacement replacement text) text, from the position of start and
containing the number of characters in size.
Right (text, number) Returns the character(s) in text specified by number, counting from the right.
RightWords (text, number of Returns the word(s) in text specified by words) number of words, counting from the right.
Substitute (text, search string, In text, substitutes each occurrence of search replace string) string with replace string. Substitute is case
sensitive.
TextToDate (text) Returns text as data of type Date. Type text in the format MM/DD/YYYY.
TextToNum (text) Returns text as data of type Number.
TextToTime (text) Returns text as data of type Time. Type text in the format HH:MM:SS, with or without seconds and AM or PM.
Syntax Definition
Trim (text) Returns text without leading and trailing spaces.
Upper (text) Returns text as uppercase.
WordCount (text) Returns the number of words in text.
Number functions
Syntax Definition
Abs (number) Returns the absolute value of number.
Exp (number) Returns the value of e raised to the power of number.
Int (number) Returns the integer (whole) portion of number.
Mod (number, divisor) Returns the remainder after number is divided by divisor.
NumToText (number) Returns number as data of type Text.
Random Returns a random number between 0 and 1.
Round (number, precision) Returns number rounded to the number of decimal places in precision. When precision is negative, all digits right of the decimal separator are dropped and number is rounded to the nearest ten for a precision of -1, the nearest hundred for -2, and so on.
Sign (number) Returns –1 when number is negative; returns 0 when number is zero; returns 1 when number is positive.
Sqrt (number) Returns the square root of number.
Truncate (number, Returns number truncated to the number of precision) decimal places in precision.

Using formulas and functions 11-7
Date functions Use these functions when date is a date field holding a date, or a calculation or expression with a date result.
Example: Year (Date Of Birth) returns 1962 when the Date of Birth field holds 1/1/1962.
Important To avoid confusion when using dates, always use four-digit years. For more information on how FileMaker Pro handles Year 2000 issues, see www.filemaker.com.
Syntax Definition
Date (month, day, year) Returns the calendar date of month, day, year (in digits), from January 1, 0001. Year must be four digits.
DateToText (date) Returns date as data of type Text.
Day (date) Returns a number representing the day portion of date.
DayName (date) Returns the weekday name of date.
DayofWeek (date) Returns the weekday position of date, from Sunday (1) through Saturday (7).
DayofYear (date) Returns the number of days elapsed after January 1 of the year in date.
Month (date) Returns a number representing the month portion of date.
MonthName (date) Returns the month name based on the date given.
Today Returns the current date.
WeekofYear (date) Returns the number of weeks elapsed after January 1 of the year in date, counting fractions of weeks as whole weeks.
WeekofYearFiscal Returns the number of weeks elapsed after the first (date, starting day) week of the year of date, using starting day (a number
from 1-7, where 1 is Sunday) as the first day of the week. The first week of the year is a week that contains four or more days of that year.
Year (date) Returns a number representing the year portion of date.
Note System formats affect the way dates are displayed. For information, choose Help menu > Contents and Index, click the Index tab, and type System formats.
Time functions
Syntax Definition
Hour (time) Returns the hour portion of time
Minute (time) Returns the minutes portion of time
Seconds (time) Returns the seconds portion of time
Time (hours, minutes, seconds) Returns hours, minutes, seconds (as digits) as a time, in the current time field format
TimeToText (time) Returns time as data of type Text
Aggregate functions Use aggregate functions to calculate statistical data for several or many fields, field repetitions, or related records.
Aggregate functions operate on (field...) parameters. Depending on the (field...) parameter or parameters you specify, you can aggregate data for all non-blank values in:
• several non-repeating fields in a record (field1, field2, field3...)
• a field in matching related records specified by (relationship::relatedfield), whether or not these records appear in a portal.
• all repetitions in a repeating field (repeatingfield)
• corresponding repetitions of repeating fields in a record (repeatingfield1, repeatingfield2, repeatingfield3), if the result is returned in a repeating field with at least the same number of repetitions.
• several fields in the first matching record specified by (relationship ::relatedfield1, relationship::relatedfield2,...). You can name a different relationship for each related field (relationship1::relatedfield x, relationship2::relatedfield y...).

11-8 FileMaker Pro User’s Guide
See below for examples of each of these situations.
This function Does this
Average (field...) Averages the numbers, dates, or times in the (field...) parameter(s) you specify
Count (field...) Returns the number of items [the (field...) parameter(s) you specify], which are not empty
Max (field...) Returns the largest number or time or the latest date in the (field...) parameter(s) you specify
Min (field...) Returns the smallest number or time or the earliest date in the (field...) parameter(s) you specify
StDev (field...) Returns the standard deviation of the sample represented by a series of values in the (field...) parameter(s) you specify
StDevP (field...) Returns the standard deviation of a population represented by a series of values in the (field...) parameter(s) you specify
Sum (field...) Adds the numbers or times in the (field...) parameter(s) you specify.
The following examples show how the Sum function works, depending on the number of parameters, whether the calculations involve related, repeating, or non-repeating fields, and whether results are returned in a repeating or non-repeating field. In these examples, the numbers in the boxes represent values in fields.
Example 1 Example 2
1 Field 1 1
2
3
4
Related field 2 Field 2
+ 3 Field 3 Portal
6 Sum (Field 1, Field 2, Field 3)
+
10 Sum (Relationship name::Related field)
Example 3 Repeating field
+
10 Sum (Repeating field)
Example 4 1 2 3 4
+
1 2 3 4
=
2 4 6 8
Repeating Repeating Sum (Repeating field 1, Repeating field 2)field 1 field 2
Example 5
1 + 4 = 5
Related Related Sum (Relationship name::Related field 1, field 1 field 2 Relationship name::Related field 2)
Note You can use aggregate functions to summarize data in a file, as an alternative to Summary fields. See “Summarizing data in portals” on page 8-12.
Summary functions Summary fields generate grand totals or subtotals of data from many records. For more information, see “Defining summary fields” on page 5-6, and “About layouts and reports” on page 6-1.
Use the GetSummary function with a summary field when you want to:
• display subsummary values in Browse mode or in a body part
• perform mathematical calculations on a summary field
1 2 3 4

Important To generate subsummary values, you must sort the database by the break field.
Syntax Definition
GetSummary (summary field, Returns the subsummary value of summary break field) field for the current group of records when
records are sorted by break field; otherwise, returns an empty result.
GetSummary (summary field, summary field) Returns the grand summary value of summary
field for the current found set of records.
Note An alternate way to summarize data with calculations is to create a self-join relationship. Use the break field as the match field on both sides of the relationship (to group related records), then use aggregate functions to summarize data within each “group.” See “Summarizing data in portals” on page 8-12.
Repeating functions Use repeating functions in calculations referencing repeating fields.
Syntax Definition
Extend (non-repeating field) Allows the value in a non-repeating field to be used in a calculation involving repeating fields. (See the example below.)
GetRepetition (repeating Returns the contents of the repetition number of field, number) repeating field.
Last (repeating field) Returns the last valid, non-blank value in repeating field.
This example shows how the Extend function ensures accurate results in calculations involving both repeating and non-repeating fields.
Using formulas and functions 11-9
Item Total Tax Rate Item Tax Without Extend, a calculation includes a non-repeating value
5.00 .07 .35 0 0
in the result for only the first17.00 repetition of the calculated field 82.79
=Item Total * Tax Rate
Item Total Tax Rate Item Tax Using Extend, a calculationincludes a non-repeating value
5.00 .07 .35 in the result for all repetitions of17.00 1.19 the calculated field 82.79 5.79
=Item Total * Extend (Tax Rate)
Financial functions
Syntax Definition
FV (payment, interest Returns the future value of an investment based on rate, periods) interest rate and payment for periods.
NPV (payment, interest Returns net present value of a series of unequal rate) payments (in a repeating field) made at regular
intervals using a fixed interest rate (in a number field) per interval. (When payment contains equal values in each repetition, use the PV function.)
PMT (principal, interest Returns the payment needed to meet the rate, term) requirements of principal, interest rate, term.
PV (payment, interest Returns the present value of equal payments made rate, periods) at regular periods, assuming a fixed interest rate
per payment.
Note
• Term is expressed in months
• Interest rate is a value from 0.0 to 1.0, divided by 12 (months).

11-10 FileMaker Pro User’s Guide
Trigonometric functions
Syntax Definition
Atan (number) Returns the trigonometric arc (inverse) tangent of number. The arc tangent is the angle, in radians, whose tangent equals number.
Cos (number) Returns the cosine of the angle (in radians) of number.
Degrees (number) Converts number from radians to degrees (π/180 radians).
Ln (number) Returns the base-e (natural) logarithm of number.
Log (number) Returns the common logarithm (base 10) of number, which is any positive value.
PI Returns the value of pi (π), approximately 3.14159.
Radians (number) Converts degrees (π/180 radians) in number to radians. Parameters for trigonometric functions must be in radians—use this function to convert values from degrees to radians within a formula.
Sin (number) Returns the sine of an angle expressed in radians.
Tan (number) Returns the tangent of the angle (in radians) in number. Tangents for values of 90 degrees (π/2 radians) or multiples are undefined (infinite).
Logical functions Use logical functions to return a different result depending on the value in a field or fields.
Example with two possible results:
If(Percent > 50,“Acceptable”,”Not Acceptable”)
Example with more than two possible results:
Case (Percent >90, “Excellent”, Percent > 70, “Adequate”, “Poor”)
Syntax Definition
Case (test1, result1 [, test2, Evaluates test(s) to produce a result. When test1 is result2, default result]...) true (a nonzero value), returns result1; when test1
is false, evaluates test2. When test2 is true, returns result 2, and so on. When no test is true, returns an empty (null) value, or the default result you supply.
Choose (test, result0 [, Evaluates test to produce an index number used to result1, result2]...) choose a result. When index is 0, returns result0;
when index is 1, returns result1, and so on. When there’s no corresponding result, returns an empty (null) result.
If (test, result one, result Evaluates test to return a true or false result. When two) test is true (a nonzero value), returns result one;
when test is false (0), returns result two. Test must return either a numeric or Boolean result. If you have more than two possible results, consider using the Case function.
IsEmpty (field) Returns true (1) when field is empty (null); otherwise returns false (0).
IsValid (field) Returns false (0) when field is missing from the file or when field contains an invalid value; otherwise returns true (1). For example, if a field in a related file is deleted, references to that field in the master file are invalid.
Status functions Use status functions in ScriptMaker scripts to monitor the state of your database. For information about scripting, see chapter 10, “Creating scripts to automate tasks.” For an example script using status functions, choose Help menu > Contents and Index, click the Index tab, and type status functions.
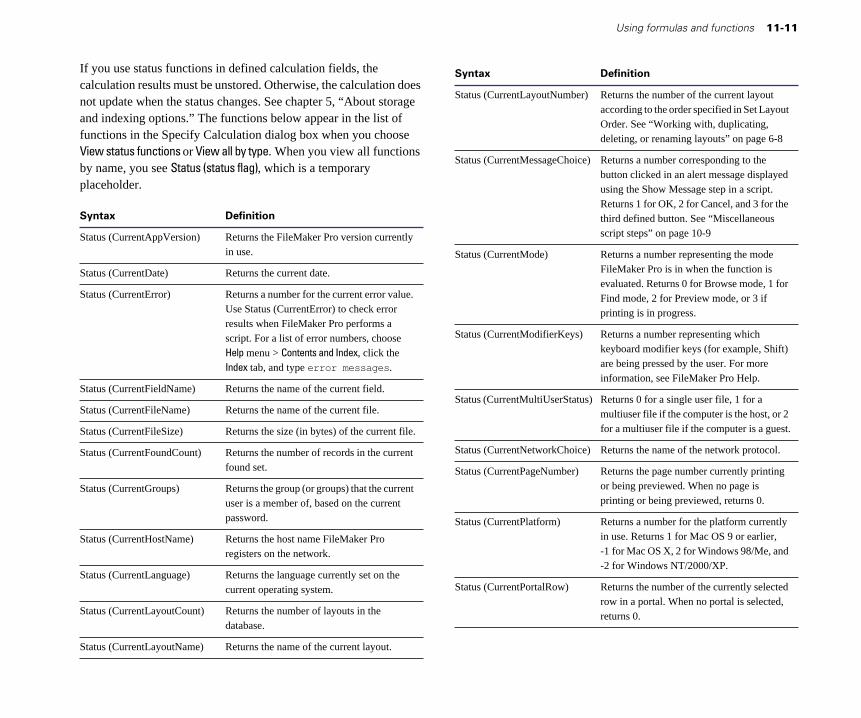
Using formulas and functions 11-11
Syntax DefinitionIf you use status functions in defined calculation fields, the calculation results must be unstored. Otherwise, the calculation does not update when the status changes. See chapter 5, “About storage and indexing options.” The functions below appear in the list of functions in the Specify Calculation dialog box when you choose View status functions or View all by type. When you view all functions by name, you see Status (status flag), which is a temporary placeholder.
Syntax Definition
Status (CurrentAppVersion) Returns the FileMaker Pro version currently in use.
Status (CurrentDate) Returns the current date.
Status (CurrentError) Returns a number for the current error value. Use Status (CurrentError) to check error results when FileMaker Pro performs a script. For a list of error numbers, choose Help menu > Contents and Index, click the Index tab, and type error messages.
Status (CurrentFieldName) Returns the name of the current field.
Status (CurrentFileName) Returns the name of the current file.
Status (CurrentFileSize) Returns the size (in bytes) of the current file.
Status (CurrentFoundCount) Returns the number of records in the current found set.
Status (CurrentGroups) Returns the group (or groups) that the current user is a member of, based on the current password.
Status (CurrentHostName) Returns the host name FileMaker Pro registers on the network.
Status (CurrentLanguage) Returns the language currently set on the current operating system.
Status (CurrentLayoutCount) Returns the number of layouts in the database.
Status (CurrentLayoutName) Returns the name of the current layout.
Status (CurrentLayoutNumber) Returns the number of the current layout according to the order specified in Set Layout Order. See “Working with, duplicating, deleting, or renaming layouts” on page 6-8
Status (CurrentMessageChoice) Returns a number corresponding to the button clicked in an alert message displayed using the Show Message step in a script. Returns 1 for OK, 2 for Cancel, and 3 for the third defined button. See “Miscellaneous script steps” on page 10-9
Status (CurrentMode) Returns a number representing the mode FileMaker Pro is in when the function is evaluated. Returns 0 for Browse mode, 1 for Find mode, 2 for Preview mode, or 3 if printing is in progress.
Status (CurrentModifierKeys) Returns a number representing which keyboard modifier keys (for example, Shift) are being pressed by the user. For more information, see FileMaker Pro Help.
Status (CurrentMultiUserStatus) Returns 0 for a single user file, 1 for a multiuser file if the computer is the host, or 2 for a multiuser file if the computer is a guest.
Status (CurrentNetworkChoice) Returns the name of the network protocol.
Status (CurrentPageNumber) Returns the page number currently printing or being previewed. When no page is printing or being previewed, returns 0.
Status (CurrentPlatform) Returns a number for the platform currently in use. Returns 1 for Mac OS 9 or earlier, -1 for Mac OS X, 2 for Windows 98/Me, and -2 for Windows NT/2000/XP.
Status (CurrentPortalRow) Returns the number of the currently selected row in a portal. When no portal is selected, returns 0.

11-12 FileMaker Pro User’s Guide
Syntax Definition
Status (CurrentPrinterName) Returns the identification of the current default printer, the driver name, and the name of the printer port (Windows) or printer (Mac OS 9 or earlier). Not supported on Mac OS X.
Status (CurrentRecordCount) Returns the number of records in a file.
Status (CurrentRecordID) Returns the unique ID of the current record. For more information, see FileMaker Pro Help.
Status Returns the number of times changes have (CurrentRecordModificationCo been saved for the current record since this unt) record was created.
Status (CurrentRecordNumber) Returns the number of the current record in the current found set.
Status Returns the current repetition number (CurrentRepetitionNumber) (counting the first repetition as 1) of the
current repeating field. When the current field is non-repeating, returns 1.
Status (CurrentRequestCount) Returns the number of find requests defined in the database.
Status (CurrentScreenDepth) Returns the number of bits needed to represent the color of a pixel on the main computer screen.
Status (CurrentScreenHeight) Returns the number of pixels displayed vertically on the screen on which the current file is open.
When the window spans more than one screen, uses the screen that contains the largest percentage of the FileMaker Pro window.
Syntax Definition
Status (CurrentScreenWidth) Returns the number of pixels displayed horizontally on the screen on which the current file is open.
When the window spans more than one screen, uses the screen that contains the largest percentage of the FileMaker Pro window.
Status (CurrentScriptName) Returns the name of the script currently running or paused.
Status (CurrentSortStatus) Returns a number representing the current sort status. Returns 0 for unsorted, 1 for sorted, or 2 for semi-sorted.
Status (CurrentSystemVersion) Returns the system version currently in use.
Status (CurrentTime) Returns the current time.
Status (CurrentUserCount) Returns the number of users accessing the file. Returns 1 for a single user, or 1 plus the number of guests for multiple users using FileMaker Pro networking. (Web and Data Access Companion users are not counted.)
Status (CurrentUserName) Returns the identification of the current FileMaker Pro user, as specified in Application preferences.
Design functions Design functions return information about the structure of any specified database that is currently open on your computer. For example, you could determine the names of all the layouts or fields in an open database.
Important Parameters should be in quotes (" "), or you can specify a field name for any parameter and return information about the item typed in that field. In this case, do not put the fieldname parameter in quotes.

For example, LayoutNames (“Clients”) always returns the names of the layouts in the Clients file. If you have a field named File, LayoutNames (File) returns the names of the layouts in the Clients file when you type Clients in the File field.
Syntax Definition
DatabaseNames Returns the names of the currently opened databases. (Uses no parameters.)
FieldBounds (database name, Returns the location and size of a specified layout name, field name) field.
FieldNames (database name, Returns the names of fields in the database layout name) and layout you specify. Or, type two quotes
("") in place of a layout name to return the names of all fields in the specified database.
FieldRepetitions (database Returns the number of repetitions and name, layout name, field name) orientation of a specified repeating field.
FieldStyle (database name, Returns: layout name, field name) 1 how a specified field is formatted on a
layout (for example, as radio buttons) 1 whether a value list is associated with the
field.
FieldType (database name, Returns the field definition for a specified field name) field.
LayoutNames (database name) Returns the names of layouts in a specified database file.
RelationInfo (database name, Returns the name of the related file for a relationship name) specified relationship.
RelationNames (database Returns the relationships defined in a name) specified database file.
ScriptNames (database name) Returns the scripts defined in a specified database file.
ValueListItems (database Returns the values defined for a specified name, value list name) value list.
ValueListNames (database Returns the value lists defined in a specified name) database file.
Using formulas and functions 11-13
External functions Use external functions to access FileMaker Pro plug-ins such as FileMaker Pro Web Companion. Plug-ins add features to FileMaker Pro. For more information, see “Setting up plug-ins” on page 12-4.
Enabled plug-ins that support external functions appear in the list of functions in the Specify Calculation dialog box (when you choose View External functions or View all by type from the list). If there are no plug-ins enabled, or the ones enabled do not support external functions, you see only the generic external function definition: External (name, parameter).
FileMaker Pro Web Companion external functions When you publish a database using FileMaker Pro Web Companion, use FileMaker Pro Web Companion external functions to:
• check the version of the Web companion
• capture information about visitors to your database
• translate information in your database to HTML or HTTP
Note The following functions are only available if FileMaker Pro Web Companion is installed and enabled on your computer. See chapter 14 for more information about the Web Companion.
If third-party plug-ins are enabled, other external functions might also appear.
Syntax Definition
External ("Web-Version", 0) Returns the version of FileMaker Pro Web Companion that loads when you open FileMaker Pro
External ("Web- Returns the domain name (for example, ClientAddress", 0) www.filemaker.com) of a Web user whose HTTP
request is currently being processed by FileMaker Pro Web Companion. Returns the Web user’s IP address if the domain name is not available.

11-14 FileMaker Pro User’s Guide
Syntax Definition
External ("Web-ClientIP", 0) Returns the IP (Internet protocol) address of the Web user whose HTTP request is currently being processed by FileMaker Pro Web Companion
External ("Web- Returns the value that the Web user types for ClientName", 0) user name in the Web browser password dialog
box
External ("Web- Returns the name and version of the Web ClientType", 0) browser being used by the Web user
External ("Web-ToHTML", Returns the contents of the specified field or of field name) the text value encoded in HTMLExternal ("Web-ToHTML", text value)
External ("Web-ToHTTP", Returns the contents of the specified field or of field name) the text value encoded in HTTPExternal ("Web-ToHTTP", text value)

Part 3Sharing and exchanging data

Chapter 12 Importing and exporting data
You can exchange information with FileMaker Pro files or with files created in other applications. This chapter shows you how to:
• import data into a file
• replace records in a file with records in another file
• update records in a file with records in another file
• convert documents from other applications to FileMaker Pro files
• export data for use with other applications
To exchange data via ODBC, see chapter 12, “Using ODBC with FileMaker Pro.”
To import photos from a digital camera, import a folder of files, import and export XML, or use OLE (Object Linking and Embedding), see FileMaker Pro Help.
To move scripts between FileMaker Pro files, see “Importing scripts” on page 10-11.
To copy field definitions to a new empty file, save a clone of the file. See “Saving files” on page 1-7.
About import and export With FileMaker Pro, you can:
• import — bring data from another file into a FileMaker Pro file
• export — save FileMaker Pro data for use in another application
Note You do not need to import or export to access data cross-platform on Windows and Mac OS systems. Simply open the file as you ordinarily would. See “Opening files” on page 1-6.
Keep these points in mind:
• You can exchange data with shared FileMaker Pro files. To access shared files, see “Opening files as a guest” on page 12-5.
• To exchange small amounts of data between files (for example, a few records), use Copy and Paste, or drag and drop. See “About entering data in records” on page 2-6.
• When you exchange information between FileMaker Pro files on a Windows–based computer and a Mac OS–based computer, you might see differences in filenames and character set mapping.
• Most file formats don’t support importing or exporting text attributes (font, size, style, or color).
• You can define FileMaker Pro scripts to automate the exchange of information with other files. See chapter 10, “Creating scripts to automate tasks.”
Note You cannot import or export data when you access a database using a Web browser.
About file formats Every application stores its data files in its own file type or file format. Most applications can also exchange information in certain other formats.
FileMaker Pro can import and/ or export files in these formats: Microsoft Excel, DBF, DIF, tab-separated text, comma-separated values, BASIC, FileMaker Pro, HTML Table, Merge, SYLK, Lotus 1-2-3 (WKS, WK1), XML, and Edition file (Mac OS only). For important information about each file format and the versions FileMaker Pro can import and/ or export, choose Help menu > Contents and Index, click the Index tab, and type file formats.

12-2 FileMaker Pro User’s Guide
Importing data into FileMaker Pro You can import data into an existing FileMaker Pro file from another FileMaker Pro file, or from documents created in another application (See “Importing data into an existing file” on page 12-2.) You can also convert documents from another application into a new FileMaker Pro file. (See page 12-6.)
The file or document you import records from is the source file. The file you import records to is the destination file.
Keep these points in mind:
• The file you’re importing or converting from must be in one of the formats listed in “About file formats,” above.
• To insert graphics, sounds, or QuickTime or AVI movies into your file, see “About working with graphics, sounds, and movies” on page 2-11.
• FileMaker Pro imports records in the order they appear in the file you’re importing from, unless you are updating records. See “About updating records with information from another document” later in this section.
• You can import data from any field type into any compatible field except container, calculation, summary, and global fields. You can import container fields if you’re importing from another FileMaker Pro file.
• You can’t import data into or from related fields. Import data directly into or from the related file.
• For more information about how FileMaker Pro handles Year 2000 issues, see www.filemaker.com.
Importing data into an existing file When you import into an existing file, you can add, replace, or update data.
About adding records When you add records, you import all records from the source file to the destination file. If the source file is a FileMaker Pro file, you can import just the records in a found set. You choose the fields you want to import.
About replacing data With this option, you replace data in your file with data from the source file. For each field you import into, data from the first record (or row of data) in the source file overwrites data in the first record in the destination file. Data from the second record (or line of data) in the source file overwrites data in the second record in the destination file, and so on. When you replace data, FileMaker Pro doesn’t examine or compare the data in the files.
Records in the destination file are replaced with the same number of records from the source file. If there are more records in (the found set of) the source file, data from the extra records in the source file will not be imported. If there are more records in the found set of the destination file, data in the extra records in the destination file will not be replaced.
About updating records with information from another document You can update records and fields in your file with data from another file using the import update option. For example, you might have a copy of a database on your desktop computer and another copy on your laptop computer. You can update the file in your office with the changes you make on the road.
You determine which records in the source file update which records in the destination file by choosing one or more match fields in each file. If data in the match field(s) of a record in the destination file matches data in the match field(s) of a record in the source file, the record in the destination file will be updated with data from the source file.

Match fields must uniquely identify each entity in your database. For example, in a database of people, you could use Social Security Number, or Last Name, First Name, and Phone Number. Last Name alone might identify more than one person, so it isn’t a good match field.
You also specify the fields you want to import. The contents of all fields you select to import, in all matching records in the found set, will overwrite data in the existing file, even if the field in the source file is blank.
Only records in the found set in each file are involved in the import update.
Important When you do an import update, data from matching records in the source file overwrite existing data in the corresponding record in the destination file. Make sure every field you import, in every record you import, has data that you want to import.
This example shows which data imports for this pair of matching records:
Before import update After import update
Source file Destination file Destination file 123-456-7890 John Q Smith 456 New Rd. Newtown USA
123-456-7890 John
Smith 123 Main St. Anytown USA 3/3/1960 (408) 555-6789
123-456-7890 John Q Smith 456 New Rd. Newtown USA 3/3/1960
ø
ø
ø
Match fields are Fields that don’t import indicated by are indicated by a null double arrows symbol (ø)
Importing and exporting data 12-3
Keep these points in mind:
• Match fields in the destination file cannot be container, summary, unstored calculation, or global fields. The field type of match fields should correspond to the type of data in the matching field. For example, number fields should not be matched to fields or data containing text.
• If all specified match fields in a record are empty, that record will not be updated.
• If a record in the found set of the source file matches more than one record in the found set of the destination file, all matching records in the found set of the destination file will be updated.
• If more than one record in the found set of the source file matches a record in the found set of the destination file, the destination file will be updated with the last matching record in the source file.
• The found set after an update contains the records that were updated (those that matched) and any new records added, regardless of the found set before update.
Adding, replacing, or updating records in an existing file 1. If you’re replacing or updating records, make a backup copy of the file you’re importing into.
Replacing and updating records overwrite data in your file and cannot be undone.
2. If you’re replacing or updating records, make sure you’ve read “About replacing data” on page 12-2 or “About updating records with information from another document” on page 12-2.
3. If you’re importing records from a FileMaker Pro file, make sure the found set in that file contains only the records you want to add, replace, or update with.
4. Open the FileMaker Pro file you want to import records into.
• If you’re replacing records in the file, make sure the found set contains only the records you want to change. Sort the records so that data from the correct record in the source file replaces data in each record in the destination file.

12-4 FileMaker Pro User’s Guide
• If you’re updating records, make sure the found set contains only the records you want to update. Records outside the found set will not be updated, even if match field data matches.
5. In Browse mode, choose File menu > Import Records > File.
6. In the Open File dialog box, to see all the files in the current folder that you can import: for Files of type (Windows) or Show (Mac OS), choose All Files. To narrow the choices, choose a file type from the list.
7. Select the name of the file to import, then click Open.
8. If you’re importing a Microsoft Excel file that contains multiple worksheets or named ranges, select the worksheet or range that you want to import in the Specify Excel Data dialog box and click OK.
9. If you’re importing a Microsoft Excel file, you see the First Row Option dialog box. Choose whether the first row of data in the file is field names or data.
Double-headed arrows indicate
Data or fields in the source file
Null symbols show data
match fields for import update Arrows show that data will import into the field at right
Choose an
Re-order all fields
Fields in the destination file
import action that won’t be imported
10. In the Import Field Mapping dialog box, perform the next three steps before you click Import.
You can also perform either of these actions at any time before you click Import:
To Do this
View the data in the file Click the Scan Data arrows to see the data in each �you’re importing from record.�(Optional)�
Create, change, or Click Define Fields. In the Define Fields dialog box, �delete a field in the file make your changes, then click Done. (For more �you’re importing into information about defining, changing, and deleting �(Optional) fields, see chapter 5, “Creating a database.”) If you’re �
importing into a shared file, only the host can create fields. If the button is dimmed, your access privileges don’t allow you to define fields.
11. In the Import Field Mapping dialog box, choose the type of import you want to perform.
Choose To
Add new records. Add new records to the end of the file you’re importing into
Replace data in current found set. Replace data in this file with data from the source file, in order, starting with the first record in each file
Update matching records in current found set. Update data in the found set of
To add records in the found set of the source this file with data in matching �
file that do not have matching records in the records in the file you are �
destination database, also select Add importing from�
remaining records.
12. In the Import Field Mapping dialog box, line up each field in the Fields in list with the data or field you want to import into it or match for import update.

Data on the left that is not aligned with a field on the right will not import. If a field name on the right is dimmed, it’s a calculation, summary, or global field that can’t accept imported data.
To Do this
Re-order all fields Choose an option from the View By list. To list the fields by: in the Fields in list at 1 names that match, choose matching names. (If once� importing from a file format that stores field names,
like Microsoft Excel, DIF, DBF, Merge, or FileMaker Pro)
1 the order used the last time FileMaker Pro imported data into this file, choose last order
1 the order the fields were created, choose creation order 1 name in alphabetical order, choose field names 1 the types of fields, choose field types 1 a custom order (created by dragging field names),
choose custom import order
Move one field up Move the pointer over a field name in the Fields in list. or down in the When the pointer changes to a double arrow, drag the Fields in list name to a new location.
13. In the Import Field Mapping dialog box, set each pair of fields (from the previous step) to import, not import, or use as match fields for import update.
If the symbol between the fields in each pair is not the one you want, click it once or twice until it becomes the correct symbol.
To The symbol should be
Import data on the left into the field on the right An arrow
Prevent data on the left from being imported A null symbol (Ø)
Specify match fields for import update A double-headed arrow
14. Click Import.
15. If you see the Import Options dialog box, select options, then click OK.
FileMaker Pro displays this dialog box if:
Importing and exporting data 12-5
• your file has fields that automatically enter data, or if
• you are adding records and you’re importing data from a FileMaker Pro file with repeating fields. See “Defining automatic data entry” on page 5-8 and “About repeating fields” on page 5-11.
To: Do this
Auto-enter new data Select Perform auto-enter options while importing. in fields defined with If you select this option and you import into fields set to auto-enter options� auto enter modifier name, modification date or time, or
looked-up values, the auto entered data overwrites data from the source file in these fields.
Specify how data is 1 Select Keeping them in the original record to maintain imported from the field(s) as repeating fields.
repeating fields 1 Select Splitting them into separate records to import each repeating value into a separate record. For example, if a record in the source file has values in three repetitions, you import three records, each identical except for the values in the repeating field. Use this option to work with individual values in repeating fields (for example, to sort or summarize them).
To stop importing, press Esc (Windows) or 2+period (Mac OS.) To delete the records already imported, choose Records menu > Delete All Records.
Keep these points in mind:
• The records you import become the found set. After importing, check the data in the found set.

12-6 FileMaker Pro User’s Guide
• If you replace or update records, be sure your records are correct before discarding the backup copy of the file.
• FileMaker Pro doesn’t validate imported data.
Converting a data file into a new FileMaker Pro file You can convert data from another application into a new FileMaker Pro file. The data must be in one of the importable file types listed in “About file formats” on page 12-1.
The new file has all of the original data, one standard form layout, and one columnar list layout. Except as noted in the table below, field names in the new file are generic (f1, f2, f3, etc.) and fields are of type Text.
To obtain Use one of these file types
Field names� Microsoft Excel, DIF, DBF, Merge, FileMaker Pro
Number, Date, Time, and Text Microsoft Excel, DBF, FileMaker Pro field types where appropriate
1. In the other application, save the data you want to import in a file type supported by FileMaker Pro.
2. In FileMaker Pro, choose File menu > Open.
3. In the Open File dialog box, select the type of file you want to import, select the file, then click Open.
4. If you’re converting a Microsoft Excel spreadsheet, select a worksheet or a named range, then click OK.
5. If you see the First Row Option dialog box, choose an option.
6. In the next dialog box, type a name for the new file, select a location, then click Save.
If you’re converting a Microsoft Excel spreadsheet, FileMaker Pro scans the incoming data to assign an appropriate field type to each column.
Mac OS: If the spreadsheet is large, you might see a progress dialog box. To stop the scan, click Skip to assign field types based on the records already processed. Number, Date, and Time fields can hold only 255 characters, so long text in these fields might be truncated.
Exporting data from FileMaker Pro You can export FileMaker Pro data to a new file, then open it in another application.
You can exchange FileMaker Pro data with ODBC compliant applications. For example, you can chart FileMaker Pro data in Microsoft Excel. See chapter 12, “Using ODBC with FileMaker Pro.”
To export data:
1. Open the FileMaker Pro file and find the set of records you want to export.
2. Sort the records in the order you want them exported (optional).
3. Choose File menu > Export Records.
4. In the dialog box, type a name, then select a location for the file.
Important If another file with the same name already exists in this location, this new file replaces the existing file.

Importing and exporting data 12-7
Relationship list
Type a name for the Choose a file
exported file type that the target application supports
5. Choose a file type from the Save as type list (Windows) or Type list (Mac OS), then click Save.
6. In the Specify Field Order For Export dialog box, set the field order as needed.
To Do this
Export fields� Double-click a field to move it to the Field Order list. To export all fields, click Move All.
Export fields from Choose a relationship from the Relationship list (see a related file� illustration on page 12-7), then move fields to the Field
order list. You can include related fields before, after, or between fields in the master file.
Prevent data from Select a field in the Field Order list, then click Clear. To being exported move all fields out of the list, click Clear All.
Change the export In the Field Order list, point to the double arrow for the order of the fields field name and drag it up or down.
Export a grand Include the summary field in the Field Order list. Each summary value � record will include the grand summary amount. If you
export subsummary values (page 12-8), the grand summary amount is only in the first record exported.
Export subsummary See page 12-8. values
FileMaker Pro Select fields exports these from this list fields
Choose a character set
Choose a formatting
option
7. Windows: Choose an appropriate Character Set for the platform or application the exported file will be used with.
For example, if you’re exporting data to a Windows application, choose Windows (ANSI).
8. Select a format option for the fields.
Suppose the current layout has a number field that’s formatted to display two decimal digits and a currency symbol ($). When you enter 3.7 into the field, FileMaker Pro displays $3.70 in Browse mode. You can export the value with or without the formatting.
To export Select this option
Unformatted values (for example, 3.7) Don’t format output.
Values with the number, date, and time Format output using current layout. formats from the current layout (for Symbols and other non-numeric values example, $3.70) are exported as text. You can’t select this
option for SYLK, DBF, or DIF formats.
9. Click Export.
Keep these points in mind:
• To use an exported file, open an application that can read the file format, then open the file. See “About file formats” on page 12-1 for more information.

12-8 FileMaker Pro User’s Guide
• You can export data in container fields to FileMaker Pro format.
• Exporting repeating field values to SYLK, WKS, or DBF formats is documented in Help. Choose Help menu > Contents and Index, click the Index tab, and type exporting,data.
Exporting subsummary data You can export subsummary values like the subtotals generated by a report with grouped data and subtotals. This process exports one record for each category.
For example, if you have a report that totals sales by region, you can export one value for each region. A report based on many records might look like this:
The exported file might look like this:
For more information on generating reports with grouped data and subtotals, see “Creating layouts and reports” on page 6-2.
Note To export grand summary data, see the previous section.
To export subsummary data:
1. Run the report that generates the subsummary values you want to export, or find the records you want to include and sort them on the break field (the grouping field used to categorize the records).
2. Choose File menu > Export Records.
3. In the Export Records to File dialog box, type a name, then choose a location for the file you’re exporting to.
4. Choose a file type from the Save as type list (Windows) or Type list (Mac OS), then click Save.
5. In the Specify Field Order for Export dialog box, select the fields to export, including a summary field.
For more information about this dialog box, see step 6 in “Exporting data from FileMaker Pro” on page 12-7.
6. Click Summarize by.
7. In the Summarize by dialog box, select one or more fields to summarize by.
Click a field to select it The file is
sorted by fieldsA checkmark shows listed here
the field is selected
8. Click OK.
Clear this field if you don’t want to include a grand summary value in the first record
Subsummary values for total sales by region will export
9. If you don’t want to include a grand summary amount with the first record exported, click the non-italicized summary field, then click Clear to remove that field from the Field Order list.
10. Click Export.

Chapter 13 Sharing databases on a network
FileMaker Pro contains built-in support to allow you to share files over a network. By sharing files, you can work simultaneously with others in your work group, and save disk space by keeping files in a central location. FileMaker Pro supports sharing of up to 10 files with up to 10 concurrent users. In certain instances, you can share a single FileMaker Pro file with up to 25 other concurrent users, with this number dropping as you share more files. For greater networking performance and capacity, FileMaker, Inc. recommends the use of FileMaker Server if you need to share files with more than 10 concurrent users on a network.
You can also share your FileMaker Pro files on the Web using FileMaker Pro Web Companion. For more information, see “Publishing databases on the Web” on page 12-1.
This chapter describes how to:
• set up FileMaker Pro databases for sharing on a network
• be the host of shared FileMaker Pro databases
• be a guest of shared FileMaker Pro databases
About sharing files on a network Users who intend to share your files will need the same version of the FileMaker Pro application as used to host the files, as well as access to the network on which the files are hosted.
For enhanced file sharing capabilities, use the FileMaker Server application to host files.
Important Your FileMaker Pro licensing agreement requires that you pay for a license for each separate client or computer on which the FileMaker Pro application is installed or run. The software license may not be shared or used concurrently on different clients or computers.
The first person to open a shared file is the host. Any user who opens a shared file after the host is a guest.
The host opens the file
Guests open connections to the file
Keep these points in mind:
• You can share FileMaker Pro files between a computer running Windows and a computer running the Mac OS just as you share files among networked computers on the same platform. For example, you can host a file on a Windows computer, and then guests on Windows computers or Mac OS–based computers can connect to the same file.

13-2 FileMaker Pro User’s Guide
When you share files between platforms, you may see differences in font mapping, alignment of layout objects, and character set mapping.
• (Mac OS) You don’t have to turn on File Sharing (in the Sharing �Setup control panel) to share FileMaker Pro files from a �Mac OS-based computer.�
• (Mac OS) MacIPX is no longer supported as a networking protocol �by FileMaker Pro.�
• To change network connections, see appendix 12, “Customizing �FileMaker Pro.”�
Working with shared files When a shared file is open, the host and guests have access to the same information. FileMaker Pro saves a shared file on the disk where the file resides. It saves changes that the host and guests make to the file, including changes to records, layouts, and scripts.
FileMaker Pro limits access to some commands and records to keep users from interfering with each other.
This user Can perform these tasks
Host and all guests 1 Find, sort, or browse records (every user) 1 Specify a print setup (Windows) or page setup
(Mac OS) and print 1 Switch layouts or modes 1 Import or export data 1 Check the spelling of a found set 1 Perform a script by choosing it from the Script menu
or clicking a button defined for the script 1 Change global values. Only the host’s changes are
saved with the file. When guests open a file with global fields, they see the current values. If the host changes a global value, guests don’t see the change until they close the file and then reopen it.
This user Can perform these tasks
Host or one guest 1 Open the ScriptMaker dialog box (only one user at 1 Define or change relationships a time) 1 Define or change passwords
1 Define or change value lists 1 Edit a record or layout. Others can view the record,
but no one can modify it until the current user moves to another record or presses Enter in Browse mode. In Layout mode, the current user must move to another layout or switch to another mode.
Host only (all guests 1 Define fields or change field definitions must close their 1 Reorder layouts connections to 1 Define, delete, or change groups and access the file) privileges
1 Save copies of a file with the Save a Copy As command
1 Switch the file status between multi-user and single user
1 Close a shared file
While you are working with a shared file, you might see the pointer change.
This pointer Means FileMaker Pro is
Waiting to receive data from the network
Waiting for the host to finish processing a request from another user
Keep these points in mind:
• Sorting, replacing data, viewing and printing summary report layouts, and other calculation-intensive tasks performed on many records affect the performance of the host and guest computers. Perform these tasks on a small found set, or schedule tasks so they’re performed during low usage periods.

• FileMaker Pro saves the host’s sort order, find requests, and print setup (Windows) or page setup (Mac OS). If you’re a guest, you can save your settings by defining a script. See “Creating scripts to automate tasks” on page 10-1.
• When you share a file with system formats that are different from the settings on your computer, you can choose which formats to use. See FileMaker Pro Help.
• With FileMaker Pro for Windows, you can include information from other applications using Object Linking and Embedding (OLE). When you share FileMaker Pro for Windows files, users of computers running the Mac OS can cut, copy, and paste OLE objects as graphics, but can’t edit them.
• When you share related files, FileMaker Pro limits access to some commands and records to keep users from interfering with each other.
• When you make changes to a master record, FileMaker Pro prevents other users from changing the same record.
• When you make changes to a related field, FileMaker Pro prevents other users from changing the associated related record and master record.
• Other users can access the record after you select a field in a different record, select a different record in the same file, or leave the master record.
About hosting files Because many FileMaker Pro commands are processed on the host machine, you will see better performance if you host your shared files from the fastest available computer.
You must keep your shared file(s) open to make them available to guests.
Sharing databases on a network 13-3
For the best performance when hosting a file, open it first on the computer that is directly connected to the hard disk on which the file is stored. Remotely hosting a file stored on another computer is not supported, as it might compromise data integrity and will result in poor performance. Examples of remote hosting include opening a Multi-User-enabled file via the built-in file sharing in Windows, over Mac OS personal file sharing or AppleShare, or from a file server.
If you need to contact or alert the guests who are using your database, you can broadcast messages to them. In the File Sharing dialog box, click Send Message. Type the message, then click OK. Your guest(s) see the message in a dialog box. They can dismiss the dialog box by clicking Cancel—or the dialog box dismisses itself 30 seconds after appearing.
Opening files as the host To host a file, you must be the first user to open it.
1. Choose File menu > Open.
2. In the Open File dialog box, select a file, then click Open.
3. Choose File menu > Sharing.
To open the File Sharing dialog box, you must open the file using a password that provides the Export records access privilege.
Warning Anyone who opens a database file with the Export records access privilege, including FileMaker Pro guests, can then publish the database on the Web by enabling FileMaker Pro Web Companion. In this case, your database is protected over the Web by any FileMaker Pro access privileges. However, you should exercise caution when granting access privileges. For more information, see “Protecting published databases” on page 12-5.

13-4 FileMaker Pro User’s Guide
4. In the File Sharing dialog box, select either Multi-User or Multi-User (Hidden).
Note If Multi-User and Multi-User (Hidden) are dimmed in the File Sharing dialog box, FileMaker Pro is unable to access the network. An explanation appears below the Multi-User button. You can also get an explanation by choosing Open from the File menu, then clicking Hosts.
Use the Multi-User option to host a file and make its name display in the Hosts dialog box on guests’ computers. This option is appropriate for most file sharing situations.
Use the Multi-User (Hidden) feature to host a file while preventing its display in the Hosts dialog box on guests’ computers. This option is appropriate for related files that would be opened as a matter of course when a visible shared file is opened by networked guests. For example, if you have two related files that you intend to share over the network, and you want to ensure that your guests open the first file, you would set the first file to share as Multi-User, while you would set the second file to be shared as Multi-User (Hidden). Guests will see the first file in their Hosts dialog box, although both files will be shared.
If the file uses information from other FileMaker Pro files (like related databases, external scripts, or value lists), repeat these steps to open the files and set them to Multi-User.
See “Protecting published databases” on page 12-5 for information on hiding files shared via FileMaker Pro Instant Web Publishing.
Tip Group the files in a single folder to make it easy to locate them.
Note In FileMaker Pro 4.1 and earlier, you could prevent a file from appearing in the Hosts dialog box by adding an underscore character to the end of its name. Now this can only be accomplished by using the Multi-User (Hidden) sharing option. When converting version 4.1 or earlier files to the current version, FileMaker Pro will set the sharing option to Multi-User (Hidden) when it encounters filenames that end in an underscore. This preserves the relationships and scripts in these files.
Closing shared files If you’re a host, you can close the files you’re hosting. If you’re a guest, you can close your connections to shared files.
Important Leave FileMaker Pro by choosing Exit (Windows) or Quit (Mac OS) from the File menu. If you turn off your computer without exiting or quitting the program, you can damage open files and lose your changes.
1. Choose File menu > Close.
2. If you’re a host and guests are connected, click Ask in the Ask dialog box.
Note You see this dialog box whenever you perform a task that requires all guests to close their connections to the file. See “Working with shared files” on page 12-2.
Guests currently using the file

Guests see a message asking them to close the file. If guests click Close Now, FileMaker Pro closes the file. If the guests don’t respond to the message and the file can be closed safely, FileMaker Pro closes it in 30 seconds.
If a guest clicks Cancel,FileMaker Pro doesn’t close the connection to the file
Opening files as a guest After the host opens a shared file, guests can connect to the file.
1. Choose File menu > Open.
2. In the Open File dialog box, click Hosts.
3. In the Hosts dialog box, do the following.
For this protocol Do this
IPX/SPX Continue with step 4.
TCP/IP� To specify a local TCP/IP host, click Local Hosts in the lower list. FileMaker Pro displays local hosts on the network in the upper list.
To specify a host outside your local TCP/IP area, click Specify Host in the lower list. In the Specify Host dialog box, type a host name or IP address. (To add this host to the list, click Permanently add entry to Hosts list.) Click OK.
AppleTalk with Select the host’s zone in the lower list. zones
AppleTalk without Continue with step 4. zones
Sharing databases on a network 13-5
FileMaker Server host Select from the
Windows computer host list of shared files available
Mac OS computer host on the host
Hosts dialog box for an IPX network
FileMaker Server host
Windows computer host Select from the
Mac OS list of shared computer host files available on
the host
Zones
Hosts dialog box for an AppleTalk network with zones
4. Select a file, and then click Open.
If the network is very busy, the file might not be listed. To check the network for a longer period of time, use one of the following procedures.
For this type of network Do this
1 TCP/IP Hold down the Ctrl key (Windows) or Option 1 AppleTalk with zones key (Mac OS) as you click an item in the lower
(Mac OS) list
1 IPX/SPX (Windows) Click Cancel to return to the Open File dialog 1 AppleTalk without zones box. Hold down the Ctrl key (Windows) or
(Mac OS) Option key (Mac OS) as you click Hosts.

13-6 FileMaker Pro User’s Guide
If you select a FileMaker Server host (instead of a shared file), you �will be able to remotely administer the Server. See the �FileMaker Server documentation for information.�
Keep these points in mind:�
• Close your connection to a shared file if the host asks, or if you aren’t using the file.
• If some menu commands, layouts, or fields are dimmed, you may have limited access to the file. See “Protecting databases with passwords and groups” on page 9-1.
• For information on sharing your file over the Web, see “Publishing databases on the Web” on page 12-1.

Chapter 14 Publishing databases on the Web
With FileMaker Pro, you can make your data available on the Web. For example, you can publish an events calendar, so that customers can access the information using a web browser.
This chapter explains:
• how web users can access and work with your data on the Internet or an intranet
• what web users need to access databases
• what you need to publish databases
• how to publish your databases using FileMaker Pro Instant Web Publishing
About publishing databases on the Web With FileMaker Pro, you can publish your databases on the World Wide Web (or an intranet) using FileMaker Pro Web Companion. You don’t need any additional software—anyone with web browser software and access to the Internet or an intranet can view, edit, sort, or search your database, if you give them access privileges.
Note FileMaker Pro documentation uses the term publishing on the Web to refer to databases that users can access on the Internet or on an intranet.
You can publish a database on the Web to:
• make your data available to many people, using almost any kind of computer, anywhere in the world. (You can, however, restrict access to the file.)
• access your data from many locations, for example, while traveling or working at home.
Web terminology Before publishing your database, you should understand the following concepts.
This term Means
Internet� A network of computers joined by data lines that communicate using common software standards. The World Wide Web is part of the Internet.
Intranet� A network of computers used to share information within one company or workgroup. For example, a corporate intranet can connect world-wide sales offices. Intranets can be linked to the Internet.
World Wide Web� A large collection of documents, or pages, stored on computers called web servers.
Web server A computer that is connected to the Internet or an intranet, and has a web server application installed on it. Web server applications deliver web pages and associated files to web browsers. The FileMaker Pro Web Companion is a web server application.
Web page� A document that resides on a web server. Web pages contain HTML.
Hypertext Markup A system of codes or tags that define how a web browser Language (HTML) displays information in a web page.
Web site� A group of web pages that are linked together on a web server.
Home page� The first web page that users see when they connect to a web site.
Web browser Explorer and Netscape Navigator are browsers. A software application that displays web pages. Internet

14-2 FileMaker Pro User’s Guide
This term Means Publishing a database with FileMaker Pro Web Companion
Host computer� In FileMaker Pro web publishing, a web server running FileMaker Pro with the Web Companion enabled. Your published databases must be open on the host computer.
Internet Protocol (IP) address
A unique address for each computer connecting to the Internet or an intranet. Web pages are sent from one IP address to another—first a web browser requests specific pages, then the server application delivers the requested page to the browser.
Internet service A company that provides Internet connections. An ISP provider (ISP) may also provide services for hosting FileMaker Pro
databases on the Web.
Cascading style A language that provides more control over the layout and sheets (CSS) appearance of web pages than HTML. Cascading style
sheets work like templates for web pages. If web pages contain CSS, users must view the pages in a browser that supports CSS.
About FileMaker Pro Web Companion FileMaker Pro Web Companion is a plug-in component of FileMaker Pro. The Web Companion functions as a web server application, communicating with web browsers that request data from (or submit data to) a FileMaker Pro database.
Users’ computers running web browser software
Internet or intranet A web browser connection requests data from or
sends data to the database. The Web Companion returns web pages that contain data
Host computer running FileMaker Pro. The Web Companion is enabled and the database is open
Note The Web Companion also acts as a Common Gateway Interface (CGI) application, handling the interaction between FileMaker Pro and web browser software. You can publish databases using other Common Gateway Interface (CGI) applications, available from third-party vendors.
About Instant Web Publishing You can use FileMaker Pro Instant Web Publishing to quickly and easily publish your database. You don’t have to change your database, use additional software, or design web pages. Instant Web Publishing is included in FileMaker Pro.
Note FileMaker Pro Instant Web Publishing is designed for sharing data in small workgroups, or for accessing your own data on a network. For information about the number of users that can access a published database, see FileMaker Pro Help. Choose Help menu > Contents and Index, click the Index tab, and type guests.

Publishing databases on the Web 14-3
There are two additional ways to publish your data using FileMaker Pro:
• For more control over the appearance and functionality of your published database, use the features available in the FileMaker Developer software. For example, you can create custom web pages that interactively enter web users’ names into a database field. For information about FileMaker Developer, choose Help menu > FileMaker on the Web.
• If your data rarely changes, or if you don’t want users to connect directly to your database, you can use static publishing to make your data available on the Internet or an intranet. With static publishing, you export FileMaker Pro data to create a web page. The web page doesn’t change when information in your database changes, and users don’t connect to your database. (With Instant Web Publishing, data is updated in a web browser window each time the browser sends a request to the Web Companion.)
Static publishing is documented in Help. Choose Help menu > Contents and Index, click the Index tab, and type static web publishing.
This chapter explains how to publish databases using the Instant Web Publishing feature.
How users work with databases on the Web To work with a published FileMaker Pro database, users need:
• web browser software. For more information, see “About browser requirements” on page 12-11.
• access to the Internet or an intranet
• the Internet Protocol (IP) address of the computer that hosts your database file
To access a published database, web users launch web browser software, then type the IP address of your host computer.
Type the IP address in the browser window
In the home page that displays, users click a filename to open a database. If the database requires a password, users must type it in the Password dialog box. Then, the database opens.
Note If you’re using the Web Security Database, web users must also enter a name in the Password dialog box. For information about the Web Security Database, see “Protecting published databases” on page 12-5.
Click a filename to open the
database
Web Companion built-in home page
The built-in home page, called the Instant Web Portal, lists the FileMaker Pro databases that are open on the host computer and enabled for web sharing. (See “Enabling Web Companion sharing” on page 12-10.)
FileMaker Pro Instant Web Publishing provides web pages, or views, for working with your database. Web users click buttons or links on the pages to browse, find, sort, add, edit, and delete records. (See “About browser views for web publishing” on page 12-14.)

14-4 FileMaker Pro User’s Guide
FileMaker Pro database in a web browser
Keep these points in mind:
• When you publish databases, you can use the Web Companion built-in home page, or create a custom home page. See “Creating a custom home page” on page 12-6 and “Choosing a home page for web publishing” on page 12-8.
• To prevent files from appearing on the built-in home page, see “Security considerations for published databases” on page 12-5.
• A web user can type the IP address of the host computer, or you can provide a link to your database on a web page that you set up.
• In some cases, web users can type the domain and host name of your computer instead of the IP address, for example http://accounts.yourcompany.com. Or, they can type the host name, like http://yourcompany.com. Contact your Internet service provider or network administrator for information.
• If you configure the Web Companion to use a port number other than 80 (which is the default), that port number must be appended to your IP address. See “Specifying a port number for web publishing” on page 12-9.
• For information about how web users work with graphics, sound, and movies, see FileMaker Pro Help. Choose Help menu > Contents and Index, click the Index tab, and type container fields.
What you need to publish databases on the Web To publish databases using Instant Web Publishing you need:
• a Windows– or Mac OS–based computer running FileMaker Pro
• FileMaker Pro Web Companion must be installed. For information about hardware requirements and software installation, see the FileMaker Pro Getting Started Guide
• access to the Internet or an intranet (see the following section)
• one or more FileMaker Pro databases
Keep these points in mind:
• For information about securing your data on the Web, see “Protecting published databases” on page 12-5.
• For information about setting up databases for web publishing, see “Publishing databases on the Web: an overview” on page 12-6.
• You can create a personalized home page for web publishing. See “Creating a custom home page” on page 12-6.
• For information about creating layouts for web publishing, including tips for designing layouts for the web, see FileMaker Pro Help. Choose Help menu > Contents and Index, click the Index tab, and type layouts, on Web.
Connecting to the Internet or an intranet When you publish databases on the Internet or an intranet, the host computer must be running FileMaker Pro, and your databases must be open. In addition:
• To publish your database on the Internet, the host computer should have a full-time connection to the Internet.

The host computer should have a static (permanent) IP address. However, if you connect to the Internet using a modem connection to an Internet service provider (ISP), your IP address could be dynamically allocated (it is different each time you connect). A dynamic IP address makes it more difficult for users to locate your databases.
• To publish your database within a company or workgroup, the host computer should have a full-time connection to an intranet using TCP/IP.
Important It is strongly recommended that you publish your database on a computer with a full-time Internet or intranet connection. You can publish databases without a full-time connection, but they are only available to users when your computer is connected to the Internet or an intranet.
If you are not sure of the type of access available to you, consult your Internet service provider or network administrator. For more information, choose Help menu > FileMaker on the Web.
Protecting published databases When you publish a database, you can limit who can access your database and the tasks that users can perform:
• If you specify FileMaker Pro access privileges for your database, those same access privileges are in effect when you publish your database on the Web. When web users open the database in their browser, they enter the same password they use to open the file in FileMaker Pro. See “How users work with databases on the Web” on page 12-3, and “Defining passwords” on page 9-1.
• You can allow or prevent remote administration. See “Enabling remote administration for web publishing” on page 12-8.
• You can specify the IP addresses that can request data from the Web Companion. See “Selecting a security method for web publishing” on page 12-9.
Publishing databases on the Web 14-5
• You can specify a layout to limit the fields that web users can access. (Web users can access all records in the open database.) See “Choosing layouts for web publishing” on page 12-12.
• You can select web styles that only allow users to search your database or enter new records. See “Choosing a web style” on page 12-11.
Tip When creating a password for a published database or remote administration, use only the characters A through Z, numerals, or a combination of the two. Do not include spaces in your password. (Some characters may be interpreted incorrectly over the Web.) See “Defining passwords” on page 9-1.
FileMaker Pro access privileges are convenient, easy to use, and the best choice for most database security needs. However, you can use the Web Security Database for additional security features. Keep these points in mind:
• When you select field restrictions for Instant Web Publishing, be sure to clear ExactSearch, ExactUpdate, and ExactDelete in the Web Security Database.
• For more information about the Web Security Database, see Web Security.pdf, located in the Web Security folder (inside the FileMaker Pro folder).
Security considerations for published databases Keep these security issues in mind when publishing databases:
• Warning Users who open a database with the Export records access privilege, including FileMaker Pro guests, can publish the database (by enabling FileMaker Pro Web Companion on their computers). Use caution when granting access privileges to guests. See “Defining passwords” on page 9-1.
• Due to the way web servers work, all files in the Web folder can be deleted by knowledgeable web users. Don’t put sensitive documents or databases inside the Web folder. (The Web folder is located in the FileMaker Pro folder.)

14-6 FileMaker Pro User’s Guide
• To prevent a published database from displaying on the built-in home page, rename the database to include an underscore character at the end of the filename, before any filename extension (for example, Orders_ or Orders_.fp5). If you change the filename, you may need to change references to the file in relationships and scripts.
• If you specify a layout for web publishing, web users can only access the fields on the specified layout. However, knowledgeable users can use features available with FileMaker Developer software to change the layouts that they access. See “Choosing layouts for web publishing” on page 12-12.
• If you publish a layout with related fields, they appear when a web user opens the master file. The related file opens with the privileges associated with the master file’s password. See “Choosing layouts for web publishing” on page 12-12 and “About relational databases” on page 8-2.
• If you have an open database on a host computer, but you don’t want to publish it, be sure Web Companion Sharing isn’t enabled for that database. See “Enabling Web Companion sharing” on page 12-10.
Creating a custom home page You can use a custom home page instead of the FileMaker Pro Web Companion built-in home page. (See “How users work with databases on the Web” on page 12-3.) For example, you can include these items on your custom home page:
• a link to your published database
• a description of your database
• your email address, or an automated email link, so users can contact you
• a company logo, or other graphics
To create a custom home page, you need software for editing HTML, like a text editor or web page authoring application. When you name the home page file, you must include the .htm or .html extension (for example, company.htm or company.html).
After creating the home page, move it into the top level of the Web folder in the FileMaker Pro folder. Then, configure the Web Companion to use your home page. See “Choosing a home page for web publishing” on page 12-8.
Publishing databases on the Web: an overview After setting up your Internet or intranet connection, you can publish your database.
Important Before publishing your database, be sure your data is secure. See “Protecting published databases” on page 12-5.
Perform the following steps on a computer connected to the Internet or an intranet via TCP/IP:
You only need to perform these steps once:
1. If you created a custom home page, move it into the top level of the Web folder in the FileMaker Pro folder. (See the previous section, “Creating a custom home page.”)
2. Enable FileMaker Pro Web Companion plug-in. (See “Enabling FileMaker Pro Web Companion” on page 12-7.)
3. Verify that Instant Web Publishing is enabled, (See “Enabling Instant Web Publishing” on page 12-8.)
4. Verify the remaining Web Companion options, and make changes if needed. (See “Configuring FileMaker Pro Web Companion” on page 12-7.)
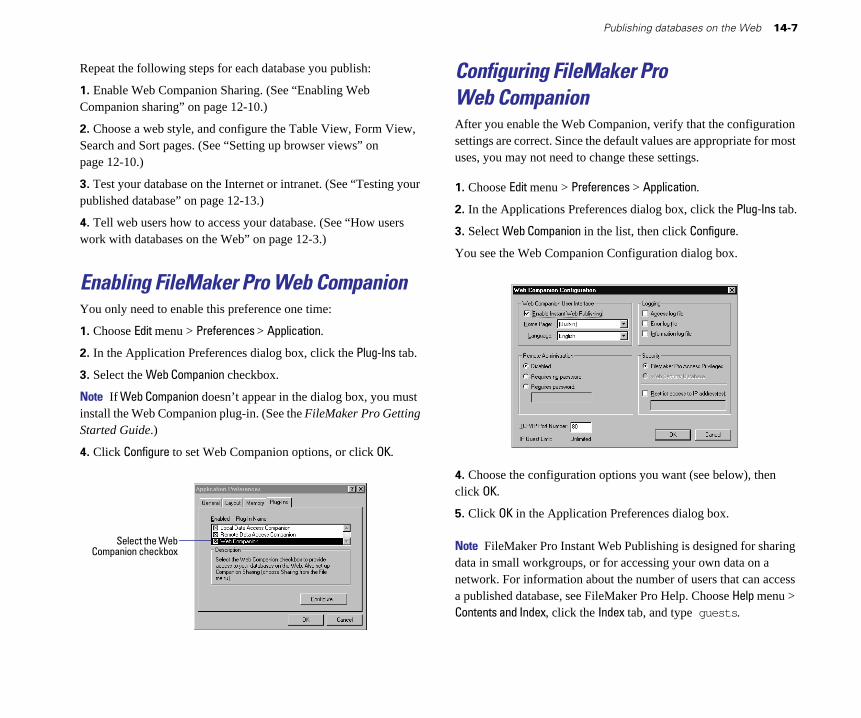
Repeat the following steps for each database you publish:
1. Enable Web Companion Sharing. (See “Enabling Web Companion sharing” on page 12-10.)
2. Choose a web style, and configure the Table View, Form View, Search and Sort pages. (See “Setting up browser views” on page 12-10.)
3. Test your database on the Internet or intranet. (See “Testing your published database” on page 12-13.)
4. Tell web users how to access your database. (See “How users work with databases on the Web” on page 12-3.)
Enabling FileMaker Pro Web Companion You only need to enable this preference one time:
1. Choose Edit menu > Preferences > Application.
2. In the Application Preferences dialog box, click the Plug-Ins tab.
3. Select the Web Companion checkbox.
Note If Web Companion doesn’t appear in the dialog box, you must install the Web Companion plug-in. (See the FileMaker Pro Getting Started Guide.)
4. Click Configure to set Web Companion options, or click OK.
Select the Web Companion checkbox
Publishing databases on the Web 14-7
Configuring FileMaker Pro Web Companion After you enable the Web Companion, verify that the configuration settings are correct. Since the default values are appropriate for most uses, you may not need to change these settings.
1. Choose Edit menu > Preferences > Application.
2. In the Applications Preferences dialog box, click the Plug-Ins tab.
3. Select Web Companion in the list, then click Configure.
You see the Web Companion Configuration dialog box.
4. Choose the configuration options you want (see below), then click OK.
5. Click OK in the Application Preferences dialog box.
Note FileMaker Pro Instant Web Publishing is designed for sharing data in small workgroups, or for accessing your own data on a network. For information about the number of users that can access a published database, see FileMaker Pro Help. Choose Help menu > Contents and Index, click the Index tab, and type guests.

14-8 FileMaker Pro User’s Guide
Enabling Instant Web Publishing
To Do this
Publish databases� Be sure Enable Instant Web Publishing is selected in the Web Companion Configuration dialog box.
Stop publishing all Clear Enable Instant Web Publishing. databases
Stop publishing Disable Web Companion Sharing in that database. See one database “Enabling Web Companion sharing” on page 12-10.
Choosing a home page for web publishing When web users specify the IP address (or host and domain name) of your host computer in a browser, they see your database home page. See “How users work with databases on the Web” on page 12-3.
If you created a custom home page, you can set an option to display it instead of the Web Companion built-in home page. See “Creating a custom home page” on page 12-6.
In the Web Companion Configuration dialog box, choose a home page from the Home Page list.
Choosing a language for Instant Web Publishing You can choose a language for the FileMaker Pro Instant Web Publishing interface and the Instant Web Publishing onscreen Help. This option has no effect on your data.
To specify the language for the FileMaker Pro Instant Web Publishing interface, choose a language from the Language list in the Web Companion Configuration dialog box.
Tracking web activity in log files To track the activity your databases receive from web users, enable one or more of the following options in the Web Companion Configuration dialog box.
Select To track In this file
Access log file Information about web users who access your access.log database (for example, the users’ IP addresses and pages accessed)
Error log file Errors generated by the Web Companion error.log
Information log file Entries made with FMP-Log replacement tags info.log in custom web publishing files. You can create custom files using FileMaker Developer software. For more information, see the documentation that comes with FileMaker Developer.
The Web Companion creates log files in the FileMaker Pro folder. You can view them in any application that opens text files.For more information, see FileMaker Pro Help. Choose Help menu > Contents and Index, click the Index tab, and type log of Web activity.
Tip You can also use FileMaker Pro Web Companion external functions to track user activity. The external functions are documented in Help. Choose Help menu > Contents and Index, click the Index tab, and type external functions.
Enabling remote administration for web publishing If you enable remote administration, you can perform the following tasks on a computer other than the computer hosting your published databases:
• open or close databases, using features available with FileMaker Developer software

• use HTTP Put and Get commands to upload or download database files to and from the Web folder (inside the FileMaker Pro folder). In addition, you can upload any file to the Web folder. For information about HTTP commands, see your web browser documentation or an HTML reference.
• access the Web Security Database. For more information about the Web Security Database, see WebSecurity.pdf, located in the Web Security folder.
Choose a Remote Administration option in the Web Companion Configuration dialog box:
To Select
Prevent remote administration Disabled
Allow remote administration Require no password without a password Warning If you select this option, any web
user can remotely administer your databases.
Require a password before Requires password, then type a password in allowing remote administration the box.
Passwords for remote administration are documented in Help. Choose Help menu > Contents and Index, click the Index tab, and type remote administration. For more information, see the documentation that comes with FileMaker Developer software.
Selecting a security method for web publishing The Web Companion uses FileMaker Pro access privileges by default. However, you can also use the Web Security Database for additional security features. For more information, see “Protecting published databases” on page 12-5.
To select a security method, choose FileMaker Pro Access Privileges or Web Security Database in the Web Companion Configuration dialog box.
Publishing databases on the Web 14-9
To specify the computers that can access your databases, select Restrict access to IP address(es), then type one or more IP addresses. For example, you can specify that only address 12.34.56.78 can access your database.
Keep these points in mind:
• If you don’t select Restrict access to IP address(es), any web user can access your database home page. However, you can limit access to individual databases with access privileges or the Web Security Database.
• When specifying IP addresses in the Web Companion Configuration dialog box:
• IP addresses must be numeric
• You can type multiple addresses separated by commas. For example, 1.2.3.4, 5.6.7.8
• You can type a wildcard symbol (*) for the last number in an address. For example, 1.2.* allows access from any IP address that starts with 1.2., like 1.2.3.4 or 1.2.34.56
Specifying a port number for web publishing The TCP/IP port number in the Web Companion Configuration dialog box specifies where web browsers can find FileMaker Pro databases.
If port number 80 is already in use (for example, in running another web server application), consider changing TCP/IP Port Number to 591. FileMaker, Inc. has registered port number 591 with the Internet Assigned Numbers Authority (IANA) for use with FileMaker Pro Web Companion.
Note If you use a port number other than 80, web users cannot access your database unless they append a colon, and the new port number, to your IP address (or host and domain name). For example, users would type 12.34.56.78:591 or http://accounts.yourcompany.com:591/
See “How users work with databases on the Web” on page 12-3.

14-10 FileMaker Pro User’s Guide
Enabling Web Companion sharing For each database you want to publish on the Web:
1. Open the database.
2. Choose File menu > Sharing.
You must have the Export records access privilege to open the File Sharing dialog box. If you can’t open the dialog box, reopen the database with a password that provides the Export records privilege. See “Defining passwords” on page 9-1.
3. In the Companion Sharing area of the File Sharing dialog box, select the Web Companion checkbox.
If Web Companion is dimmed, see “Enabling FileMaker Pro Web Companion” on page 12-7. If Web Companion doesn’t appear in the dialog box, you must install the Web Companion plug-in. (See the FileMaker Pro Getting Started Guide.)
Select the Web Companion
checkbox Click to set upbrowser views
4. Click Set Up Views to configure the browser views, or click OK.
See the next section, “Setting up browser views.”
To stop publishing the current database, clear Web Companion in the File Sharing dialog box. To stop publishing all databases, disable Instant Web Publishing. See “Enabling Instant Web Publishing” on page 12-8.
Setting up browser views In a web browser, users can see different pages, or views, of your database:
• a Table View page, for working with several records at a time
• a Form View page, for working with one record at a time
• a Search page, for finding information
• a Sort page, for sorting information (if enabled)
When you set up browser views, you can choose a web style for the database. You can also choose the layouts that display in Table View, Form View, or Search pages. Web styles and layouts work together to determine how your database appears in a web browser.
Web users see only the pages and features that you set up. For example, if you disable sorting, Web users don’t see the Sort page. For more information about the pages that users can access, see “About browser views for web publishing” on page 12-14.
To set up web publishing views:
1. Choose File menu > Sharing.�
See the previous section, “Enabling Web Companion sharing.”�
2. In the Companion Sharing area of the File Sharing dialog box, select �Web Companion, then click Set Up Views.�
3. In the Web Companion View Setup dialog box, choose the options �you want (see below).�
4. Click Done, then click OK in the File Sharing dialog box.�
Note These settings apply only to the current database. You must set up browser views separately for each published database.

Publishing databases on the Web 14-11
Choosing a web style FileMaker Pro Instant Web Publishing includes web styles that determine the appearance of your database in a browser. For example, you can choose the Lavender style to display titles and buttons in a purple color scheme. You can also choose styles specifically designed for searching for records, or for creating records.
You can choose a different web style for each published database.
To choose a web style, click the Web Style tab in the Web Companion View Setup dialog box, then select a style from the list.
Click Web Style
Select a web style
Information about the selected style
Unless noted in the following table, web styles can display these web pages: Form View, Table View, Search, Sort, New Record, and Edit Record. For more information, see the next sections, “About browser requirements” and “About layout rendering.”
Renders Web style layouts Comments
Soft Grey Yes These styles are identical, except for the color Lavender scheme of the titles and buttons. Soft Grey uses Wheat neutral colors that work with many layouts.
Renders Web style layouts Comments
Blue and Gold 1 Yes� Similar to the style used in FileMaker Pro 4.0 Instant Web Publishing, but doesn’t include the record range or book icon
Blue and Gold 2 No� Identical to the style used in FileMaker Pro 4.0 Instant Web Publishing. The record range and book icons only appear in Java™ enabled browsers. If the browser isn’t Java enabled, the controls appear as links.
Search Only Yes� Similar to a search engine, this style only allows web users to find and view records. Only the Form View, Table View, and Search pages display.
Entry Only Yes� Like a guest book, this style only allows web users to add a record. Only the New Record page displays. (The Web Companion displays a confirmation message after adding the record.)
About browser requirements When choosing a web style, keep in mind the web browser software that is used to access your database:
• If you choose a web style that renders layouts, users must view your database in a browser that supports cascading style sheets level 1 (CSS1), like Internet Explorer 4.0. In addition, JavaScript must be enabled in the browser. For more information, see the web browser documentation.
• If you choose a web style that doesn’t render layouts, users don’t need a browser that supports cascading style sheets. For example, they can view your database in Internet Explorer 3.0 or Netscape Navigator 3.0.
• If you’re unsure which browsers are used to access your database, consider choosing the Fern Green style.
Fern Green No Similar in appearance to Soft Grey, Lavender, and Wheat, but can be viewed in more browsers

14-12 FileMaker Pro User’s Guide
About layout rendering Most web styles render layouts—they display your layouts in a web browser almost as they appear in a FileMaker Pro window. Web styles can render layouts in Form View, New Record, and Edit Record pages. (See “About browser views for web publishing” on page 12-14.)
If you choose a style that doesn’t render layouts, Web users don’t see text styles, backgrounds, and colors that display in the FileMaker Pro window.
Database in FileMaker Pro window
Soft Grey web style in a browser window
This stylerenders the layout you see in the FileMaker Pro window
Fern Green style in a browser window
This style doesn’t render the layout.For example, the logo doesn’t appear, and thefield names and fields display vertically.
Choosing layouts for web publishing Layouts determine the fields and the format of the data that web users see.
To choose a layout for a web page, click the Table View, Form View, or Search tab in the Web Companion View Setup dialog box, then select a layout from the list.
Click a tab
Select a layout
Fields in the selected
layout

Publishing databases on the Web 14-13
Keep these points in mind:
• The layout you choose for Form View is also used for New Record and Edit Record pages. See “About browser views for web publishing” on page 12-14.
• For Table View and Search pages, you can choose All Fields (no layout) to display all the fields defined in the database, in the order they were created. However, in most cases, you should specify a layout with the fields you want web users to see.
• Related fields don’t display if you choose All Fields (no layout). For more information about displaying related fields, see “Security considerations for published databases” on page 12-5.
• For the Search page, choose a layout that doesn’t include summary, global, or container fields. If your layout includes these field types, users can’t enter search criteria into the fields, even though they display in the web browser.
• For more information about layouts for web publishing, including tips for designing layouts for the web, see FileMaker Pro Help. Choose Help menu > Contents and Index, click the Index tab, and type layouts,on Web.
Setting sort options for web publishing You can set options for the Sort page that appears in a web browser.
To set sort options, click the Sort tab in the Web Companion View Setup dialog box, then choose one of the following:
To Select
Disable sorting in Do not sort records the web browser� This option speeds up access to the database. Records
display in the order they were added to the database. The Sort button does not appear in Table View or Form View.
To Select
Let users define User defines sorting by specified fields in the browser. Click how data is sorted Specify to choose the fields, then click OK in the Specify
Sort dialog box.
If a user sorts records, it doesn’t affect the record order for other users. Users are limited to sorting on the fields you choose.
Sort records before Predefined sorting by specified fields before downloading to they display in the the browser. Click Specify to choose the fields, then click web browser OK in the Specify Sort dialog box.
Records always display in the order you choose. The Sort button doesn’t appear in Table View or Form View.
For information about sort fields and sort orders, see “Sorting records” on page 3-8.
Click Sort
Choose an option for the Sort page
Sort fields that you specify
Testing your published database Before notifying users that your published database is available, verify that it looks and functions as you expect. For example:
• Click links and buttons to display different pages.
• Test features like searching and adding records.

14-14 FileMaker Pro User’s Guide
• Test your published database in different operating systems and browsers.
• Check to be sure unauthorized users can’t access or modify your data.
Tip You can test web publishing features in FileMaker Pro without connecting to the Internet or an intranet. For more information, see FileMaker Pro Help. Choose Help menu > Contents and Index, click the Index tab, and type Web Companion,testing databases.
Click to view a list of records
About browser views for web publishing The following sections describe the pages that are available in FileMaker Pro Instant Web Publishing.
Browsing records in Form View The Form View page displays one record at a time, making it easy to see the detail of each record.
Click for Help Click to view the next record
Type a record number, then click the arrow to see a specific record
Click to edit this record
Click to create a record
Click to delete this record
Click to look for a record or group of records
Click to display all records
Click to view the database home page
Click to sort records
Form View in a browser

Publishing databases on the Web 14-15
Browsing records in Table View The Table View page lists multiple records. Each row displays a record, and each column displays a field.
Click to display the first Type the range of records yourecord in Form View want to view (like 1-5), then
click the arrow
Click a record number to display the record in Form View
Table View in a browser
Searching for records The Search page provides options for finding information in your database. The results of the search display in Table View.
Click to search for records
Click to reset the search criteria
Click to return to Table View or Form
Choose a search operator
Type the search criteria, thenView without searching the database click Start Search
Choose a search type
Searching in a browser

14-16 FileMaker Pro User’s Guide
Sorting records The Sort page provides options for changing the record order.
Sorting records in a browser
Click to sort records
Click to reset the sort order
Click to return to Table View or Form View
without sorting records
Select ascending or descending sort order,Select field names for the first, second, third, and fourth sorts
Creating records The New Record page displays a form for entering data.
Note There isn’t a separate web page for deleting a record. When users click Delete Record in Form View, they are prompted to confirm the deletion.
Creating records in a browser
or a custom sort order based on a value list
Click to add a record to the database
Clear the information you’ve entered
Click to return to Table View or Form View without adding a record
Enter data into the fields

Publishing databases on the Web 14-17
Editing records The Edit Record page displays a form for changing existing data in a record.
Editing records in a browser
Click to change the record in the database
Clear the information you’ve changed
Click to return to Table View or Form View without changing the record
Change the data in the fields


Chapter 15 Using ODBC with FileMaker Pro
This chapter explains how to:
• set up a FileMaker Pro database to share data via ODBC
• import data into an existing FileMaker Pro database using ODBC
About ODBC Open Database Connectivity (ODBC) is an application programming interface (API) that enables applications to access data from many different database management systems. ODBC gives a wide variety of client applications a common language for interacting with a variety of data sources and database services.
All applications that support ODBC recognize a common subset of Structured Query Language (SQL) statements. SQL lets you use other applications (like query and reporting tools, spreadsheets, and word processing applications) to view, analyze, and modify FileMaker Pro data.
ODBC components Client
Application
Driver Manager
Oracle
SQL Server ODBC Driver
FileMaker Pro ODBC Driver
Oracle ODBC Driver
FileMaker Pro Microsoft SQL Server
ODBC terminology Before working with ODBC, it’s useful to understand the following terms.
This term Means
Database Management An application that allows users to store, process, System (DBMS) and retrieve information in a database
Data source The data you want to access (like a DBMS) and information to locate the data (like the path or IP address)
Structured Query A standard programming language that controls and Language (SQL) interacts with a DBMS
Client application The application that is requesting data (using SQL) from a data source using ODBC
Query Retrieving, manipulating, or modifying data from a data source by sending SQL statements
Table A collection of data, similar to a FileMaker Pro file
Column An attribute in a table, similar to a field in a FileMaker Pro file
Row A set of cells in a table, similar to a record in a FileMaker Pro file
ODBC Driver A DLL (Windows) or shared library (Mac OS) that sends a SQL query to access data stored in a database and delivers data to the client application
Local Data Access Companion
The FileMaker Pro companion plug-in that enables sharing data via ODBC on the same computer
Remote Data Access The FileMaker Pro companion plug-in that enables Companion sharing data via ODBC across a TCP/IP network

15-2 FileMaker Pro User’s Guide
ODBC support in FileMaker Pro You can use the ODBC support in FileMaker Pro to:
• work with FileMaker Pro data from ODBC-compliant applications to create charts, construct ad-hoc queries, and analyze your data with a variety of software applications
• construct SQL queries in FileMaker Pro to import data from other ODBC data sources like Microsoft Access or Oracle databases
See FileMaker Pro Help for these and other ODBC topics: using SQL statements in FileMaker Pro to update data in client applications, and the SQL commands that FileMaker Pro supports.
Sharing FileMaker Pro data via ODBC This section provides instructions for sharing FileMaker Pro data with other ODBC-compliant applications. The process of constructing SQL queries varies for each ODBC client application.
The FileMaker Pro ODBC driver enables you to access FileMaker Pro data from other ODBC-compliant applications. For example, you can:
• perform mail merges with Microsoft Word (Windows only)
• create charts with Microsoft Excel
• move or back up FileMaker Pro data to corporate-level DBMSs, like Microsoft SQL Server
• further analyze your FileMaker Pro data with query or reporting tools like BrioQuery or Crystal Reports to create charts, construct ad-hoc queries, and perform drill-down analysis
• create a Microsoft Visual Basic application that shares information with FileMaker Pro
FileMaker Pro shares data via ODBC with the Data Access Companions. The Data Access Companions are FileMaker Pro plug-ins that interface between the FileMaker Pro ODBC driver and your FileMaker Pro database. They respond to SQL queries sent from
other ODBC-compliant applications. Enable the Local Data Access Companion to share a FileMaker Pro file on the same computer. Enable the Remote Data Access Companion to share the FileMaker Pro file across a TCP/IP network.
Sharing data via ODBC: an overview To share FileMaker Pro databases using ODBC, you:
1. Prepare the database files by enabling the Data Access Companion plug-ins.
It’s a good idea to review the file’s access privileges to prevent data from being inadvertently modified or deleted.
2. In the ODBC client application, configure the data source using the ODBC control panel.
3. Connect to the FileMaker Pro data source, then construct and execute the SQL query in a client application (like Microsoft Query or BrioQuery).
The procedures are described in more detail below.
Enabling the Data Access Companions To share your data via ODBC, start by enabling the Data Access Companion plug-ins:
1. Choose Edit menu > Preferences > Application.
2. Select the Plug-Ins tab.
3. Enable the desired Data Access Companions and click Done.
• Enable Local Data Access Companion to share the FileMaker Pro data with ODBC-compliant applications on the same computer.
• Enable Remote Data Access Companion to share FileMaker Pro data across a TCP/IP network.
4. In each database you want to share, choose File menu > Sharing, enable the Data Access Companions, and click OK.
• Enable Local Data Access Companion to share this FileMaker Pro database with ODBC-compliant applications on the same computer.

• Enable Remote Data Access Companion to share this FileMaker Pro database with ODBC-compliant applications remotely across a TCP/ IP network.
5. Verify that the file was opened using a password that allows you to export records.
Important Each file must remain open for client applications to access the data.
The FileMaker Pro data is ready to be accessed by an ODBC-compliant client application through the FileMaker Pro ODBC driver. Each FileMaker Pro file that is open and has a Data Access Companion enabled is represented as a table. The filename (without the extension) is used as the table name. FileMaker Pro fields are represented as columns. The complete field name, including any non-alphanumeric characters, displays as the column name.
Note If your FileMaker Pro field names contain spaces, some query tools may not be able to access the data. To prevent this, eliminate spaces from field names in FileMaker Pro or surround the field names with a double quote or grave character (the accent above the Tab key) in the SQL query.
To install the FileMaker Pro ODBC driver on a remote machine, consider licensing FileMaker Developer software, which includes a separate installer for the FileMaker Pro ODBC driver. For more information, choose Help menu > FileMaker on the Web.
Security issues If data is unprotected, it can be modified and deleted from other applications. To protect your data, specify file passwords (and, if desirable, groups) using FileMaker Pro access privileges. For more information, see “Defining passwords” on page 9-1.
The Password dialog box is generated by the ODBC client application, so each application might present the dialog box at different times.
Using ODBC with FileMaker Pro 15-3
Important Review the following security issues:
• A FileMaker Pro guest on a network can share data via ODBC unless they open the file with a password that does not allow them to export records. For information on assigning passwords, see “Defining passwords” on page 9-1.
• Only the data in fields is protected with passwords. Table and column names are available to an ODBC client without a password.
• The first password is saved (cached) during an ODBC connection. If you use the same password for all files, users won’t need to re-specify the password.
Accessing FileMaker Pro data from an ODBC client application Once a FileMaker Pro file is shared with a Data Access Companion, you can connect to it from an ODBC client application. To access data from the client application, you:
1. Create and configure the DSN (data source name) using the ODBC control panel (by choosing the FileMaker Pro ODBC driver and specifying where the data is located)
2. Construct and execute the SQL query.
Configuring the ODBC control panel This section provides instructions for specifying FileMaker Pro as the data source.
Note Each ODBC client application connects to the FileMaker ODBC data source differently. The way you interact with data sources, provide passwords, and perform and display query results varies for each client application. For more information, refer to the documentation that comes with the client application.

15-4 FileMaker Pro User’s Guide
To configure the ODBC control panel to access FileMaker Pro data via ODBC:
1. Open the ODBC control panel (named ODBC Data Sources (32bit) in Windows and ODBC Setup PPC in the Mac OS).
2. In the User DSN tab, click Add to configure a new data source.
3. Select the FileMaker Pro ODBC driver (named FileMaker Pro in Windows and ODBC 3.11 FileMaker Pro PPC in the Mac OS) and click Finish.
4. In the General tab, type a Data Source Name and Description.
The data source name should be meaningful to others accessing the data.
5. If you are accessing a remote FileMaker Pro data source, select Use Remote Connection and provide the IP address of the computer sharing the FileMaker Pro database.
The FileMaker Pro ODBC driver must be installed on the computer generating the SQL query.
6. Click OK, or click the Advanced tab to specify additional settings. See the next section for more information.
You may specify options in other tabs, depending on which control panel and driver you are working with. For example, the File DSN tab is used by file-based data sources and can be shared by multiple users who are using the same type of driver.
Specifying advanced options Use the Advanced tab in the ODBC FileMaker Driver Setup dialog box to specify the following optional settings:
This option Refers to
Max Text Length The maximum length of a column in a specific row (64000 is the maximum number of characters allowed in a row). Decreasing this number uses less memory and can improve performance.
File Open Cache The maximum number of used file handles to cache. By specifying a value, you are choosing how many tables to keep open.
Fetch Chunk Size The number of rows that each fetch request (to FileMaker Pro) uses when the driver scrolls forward through a rowset. For best results, the number should match the number of records you’re retrieving.
International Sort The order records are retrieved when you include the ORDER BY clause. Select to use international sort order as defined by your operating system.
Clear to use the ASCII sort order (the default setting).
Number, Time, and The driver treats Number, Date, and Time values as text Date as Text rather than numeric data. This preserves all data in a
field, even if the data isn’t the same as the field type.
Applications Using Enables the driver to work with multi-threaded Threads applications. Clear this checkbox if you’re working
with single-threaded applications.
Translate button Translates your data from one character set to another.
After configuring the control panel, you connect to the FileMaker Pro data source and construct a SQL query in the ODBC client application. For a list of SQL statements that FileMaker Pro supports, choose Help menu > Contents and Index, click the Index tab, and type SQL support.
Note Performing complex queries or retrieving a large number of records may take time. Consider batching the requests for optimal performance.

Importing data from other data sources Using ODBC, you can import records into an existing database or a new FileMaker Pro file by opening an ODBC data source (like Oracle or Microsoft Access databases) directly. The FileMaker Pro SQL query builder makes it easy to construct queries that can search a data source or DBMS, fetch specific records, and import the resulting records into a FileMaker Pro database.
Use one of the included ODBC drivers to import data from its corresponding data source:
• Text (Windows and Mac OS)
• Oracle 8 (Windows)
• Oracle 7 (Mac OS)
• SQL Server 7 (Windows only)
You can also import ODBC data using a number of third-party ODBC drivers from vendors.
Importing data from an ODBC data source: an overview Here are general steps to construct SQL queries with FileMaker Pro:
1. Configure the data source in the ODBC control panel (by specifying what kind of data you’re accessing and how to locate the data).
2. In FileMaker Pro, connect to the ODBC data source.
3. Use the FileMaker Pro query builder to generate a SQL query. Then, the data resulting from the query is imported into the FileMaker Pro database.
The procedures are described in more detail below.
Using ODBC with FileMaker Pro 15-5
Configuring the ODBC control panel This section provides instructions for importing data from ODBC data sources into FileMaker Pro.
Note Configuring the ODBC control panel varies for each driver type. For example, to configure the remote Oracle ODBC driver, you must first configure SQL Net Easy Configuration, where you specify a variety of options (like the driver, data source name, server location, the database instance name, and the user ID). When accessing a local Microsoft Access data source, however, you simply provide the path to the data source. Additionally, the steps may vary from one ODBC driver manufacturer to another. Refer to the documentation that accompanies the data source for the exact procedure.
1. Open the ODBC control panel (named ODBC Data Sources (32bit) in Windows and ODBC Setup PPC in the Mac OS).
2. To configure a new data source, click Add. Select the ODBC driver that corresponds to your data source and click Finish.
3. To configure an existing data source, select the data source name and click Configure.
4. In the General tab of the ODBC Driver Setup dialog box, begin configuring the ODBC driver by specifying a Data Source Name and Description.
The name identifies the data source to ODBC clients.
5. For some file-based data sources, specify the path in Database Directory. In Windows, include the filename and extension.

15-6 FileMaker Pro User’s Guide
Specify advanced settings
Specify the data source name and
description
Select to import column names
Windows 32bit ODBC control panel (text driver)
Specify the data source name
and description
Mac OS ODBC Setup PPC control panel (text driver)
6. If necessary, click the Advanced tab to specify additional settings.
After you’ve configured the ODBC control panel, you can import data into FileMaker Pro. See “Configuring the ODBC control panel for the Text driver” on page 12-9 for instructions on importing data from the sample text files.
Connecting to an ODBC data source from FileMaker Pro After you’ve specified and configured the data source, you can open your FileMaker Pro database and import ODBC data.
To select the ODBC data source:
1. Open the FileMaker Pro database file you’ll import data into.
2. In Browse mode, choose File menu > Import Records.
3. Choose the file import format.
Windows: For Files of type, select ODBC Data Source.
Mac OS: Select ODBC in the Show list.
Select the ODBC import file filter
4. In the Select ODBC Data Source dialog box, select the name of the data source to import from, then click OK.

Using ODBC with FileMaker Pro 15-7
Select an ODBC data source
5. If appropriate, enter the user name and password for the data source you selected, and click OK.
Building a SQL query in FileMaker Pro Build your SQL query in the Specify ODBC SQL Query dialog box, which appears after you’ve selected the data source in steps four and five (above). Start by using the SQL SELECT clause to specify which tables and columns you want to import.
1. In the SELECT tab, click the table to import in the Tables list.
The columns associated with this table appear in the Columns list box.
Specify the columns from each table to insert into
the SQL query
Click to add choices into the SQL query below
As you make choices in each tab, the SQL query is
automatically generated
Click to execute the SQL query
2. Select a column to insert into your SQL query and click Insert into SQL Query.
This constructs the SQL statement in the SQL Query box.
3. Insert additional columns into the SQL query by double-clicking on the column name.
4. Click the WHERE tab to construct search criteria. This reduces the number of records that are imported. You can also join data from two tables.

15-8 FileMaker Pro User’s Guide
Select Matching Names if column namesmatch FileMaker Pro field names
Creating a SQL join
Using the WHERE SQL statement
5. To sort records before importing, click the ORDER BY tab, then specify the name of the column to sort by and whether the sort should be ascending or descending.
6. When you’re finished constructing the query, click Execute, then map the ODBC columns to FileMaker Pro fields.
Note You can also type a SQL statement directly into the SQL Query box.
Importing the results of the query into FileMaker Pro After executing the SQL query, you’re ready to import the resulting records into FileMaker Pro. For information on importing data into a FileMaker Pro database, see “Importing data into FileMaker Pro” on page 12-2.
Align columns with field names
Choose a mapping option
Specify howrecords are
imported
FileMaker Pro Import Field Click to import Mapping dialog box records
An ODBC import example To help you get acquainted with importing data from ODBC sources, there is a sample database, Sales Reports, and two text files, Salespeople and Sales_Data, that you can import from.
• The Salespeople table has information for seven employees, such as their name, their manager’s name, their sales region, and their employee identification number.
• The Sales_Data table has 250 records tracking sales that the employees have made.
In the next three sections, you’ll import data from the tables by creating SQL statements. You can then evaluate the imported data in the Sales Reports database.

Configuring the ODBC control panel for the Text driver 1. In the User DSN tab of the ODBC control panel (named ODBC Data Sources (32bit) in Windows and ODBC Setup PPC in the Mac OS), click Add.
2. Select the ODBC driver for the data source you are importing from, and click Finish.
Windows: Choose FileMaker Text Driver.
Mac OS: Choose FileMaker 3.11 Text PPC.
3. In the General tab of the ODBC Driver Setup dialog box, type ODBC Demo for the Data Source Name.
4. For Description, type ODBC import into Sales Reports.fp5.
5. For Database Directory, specify the path to the data source.
Windows: Type the full path to the ODBC Example folder, which is located in the folder where the FileMaker Pro application is installed. For example: C:\Program Files\FileMaker\FileMaker Pro\Examples\ODBC Example. (Use Windows Explorer to verify the exact path on your computer.)
Mac OS: Click Select Directory and select the folder containing the data source (ODBC Example in the Examples folder).
6. Select the Column Names in First Line checkbox.
7. Click the Advanced tab to specify additional settings.
8. In the Advanced tab, verify that the Data File Extension information is TXT.
9. Verify that the Action for Undefined Tables is Guess Definition (Windows) or Guess (Mac OS).
Leave the control panel open, and continue to the next section.
Using ODBC with FileMaker Pro 15-9
Choose Guess Definition to retrieve column names
Click Define to specify ODBC tables
Advanced options in the Text ODBC control panel (Windows)
Specifying the tables and columns in Windows After choosing and configuring the ODBC text driver in the ODBC control panel, you specify the tables and columns to import.
1. In the Advanced tab of the Windows ODBC control panel, click Define.
2. In the Define File dialog box, change the Files of type option to All Files.
3. Select the Sales_Data table located in the ODBC Example folder, and click Open.
4. Select the Column Names in First Line checkbox.
5. For column information, click the Guess button. The ODBC driver retrieves the column names from the specified table.

15-10 FileMaker Pro User’s Guide
Click Guess to insert column names
Select to retrieve column names from the
ODBC table
6. Select the Date_Sold column and verify that the Type and Mask values are correct.
The Type should be Date, and the Mask should be m/d/yy.
When importing columns that store date information, you should verify that the driver recognizes the correct column type and mask, especially if the data source is from a Unix computer.
7. Click OK.
This saves the information for the Sales_Data table.
8. Specify the information for the Salespeople table by following steps 2-7 above.
Click the close box to close the control panel.
Specifying the tables and columns in the Mac OS After choosing and configuring the ODBC text driver in the ODBC control panel, you specify the tables and columns to import.
1. In the Mac OS, click the Define tab.
The Sales_Data table appears in the Table pop-up menu. If Salespeople appears, switch to the Sales_Data table.
2. Select the Column Names in First Line checkbox.
3. For column information, click the Guess button. The ODBC driver retrieves the column names from the specified table.
Click Guess to insert column names
Select to retrieve column names from the
ODBC table
4. Specify the information for the Salespeople table.
For Table, choose Salespeople.
You’ll be prompted to save changes to the table definition. Click Yes.
5. Click the Guess button to retrieve the column names for the Salespeople table, then click OK. Click Yes to save changes, then click OK again.
Connecting to the ODBC Demo data source To connect to the ODBC Demo data source from FileMaker Pro:
1. Open the Sales Reports file, located in the ODBC Example folder.
2. In Browse mode, choose File menu > Import Records.
3. Choose the file import format.
Windows: For Files of type, select ODBC Data Sources.
Mac OS: For Show, select ODBC.
4. In the Select ODBC Data Source dialog box, select ODBC Demo, then click OK.

Using ODBC with FileMaker Pro 15-11
Select the ODBC data source you
previously configured
5. Leave the user name and password blank and click OK.
Specifying the SQL query in FileMaker Pro Start your SQL query with the SQL SELECT tab to specify what data you want to extract from the data source.
1. If there is a SQL statement in the SQL Query area, click Clear Query.
2. In the SELECT tab, click the Salespeople table.
Specify columns to insert in the SQL query
Click to add statements
The SQL query is automatically generated
3. Select the Salesperson ID column, then click Insert into SQL Query.
4. Insert the following columns by double-clicking the column name: Salesperson, Sales_Manager, and Sales_Region.
5. Click Execute. The Import Mapping dialog box appears. For more information on importing records, see “Importing data into FileMaker Pro” on page 12-2.
Importing ODBC data with a join Use the WHERE tab in the FileMaker Pro query builder to create a multi-table SQL query, or join. A join combines data from two or more tables into a new table.
Specifying a SQL join In this example, we want to view a report that contains information about sales transactions (from the Sales_Data table), along with information about the salesperson (from the Salespeople table). To ensure that the data is combined in a meaningful way, you should link the two tables with a matching field.
Because both tables in the ODBC example files contain the Salesperson_ID column, we can create a variety of reports by doing a join on the Salesperson_ID column.
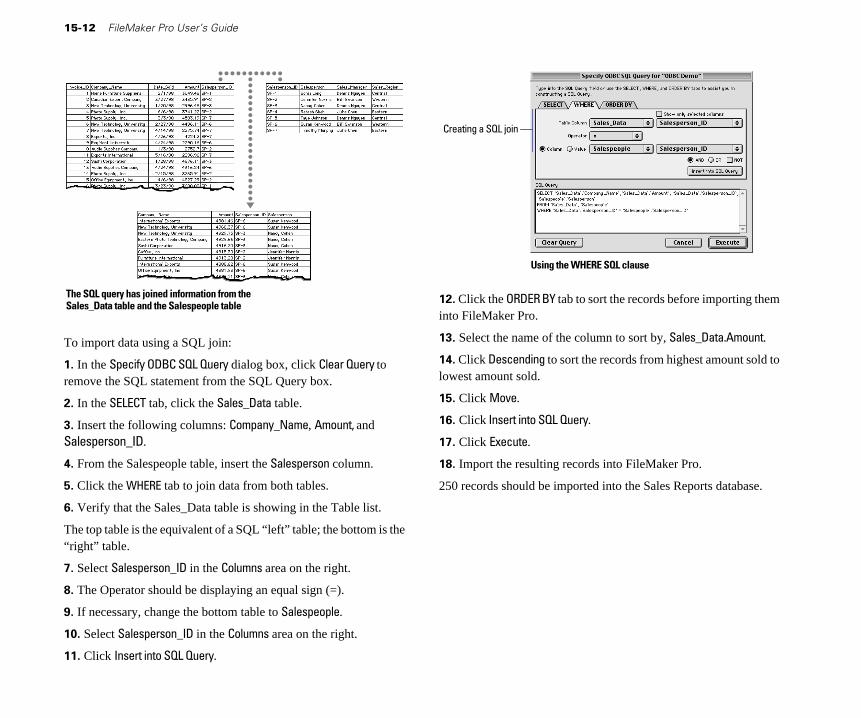
15-12 FileMaker Pro User’s Guide
The SQL query has joined information from the Sales_Data table and the Salespeople table
To import data using a SQL join:
1. In the Specify ODBC SQL Query dialog box, click Clear Query to remove the SQL statement from the SQL Query box.
2. In the SELECT tab, click the Sales_Data table.
3. Insert the following columns: Company_Name, Amount, andSalesperson_ID.
4. From the Salespeople table, insert the Salesperson column.
5. Click the WHERE tab to join data from both tables.
6. Verify that the Sales_Data table is showing in the Table list.
The top table is the equivalent of a SQL “left” table; the bottom is the “right” table.
7. Select Salesperson_ID in the Columns area on the right.
8. The Operator should be displaying an equal sign (=).
9. If necessary, change the bottom table to Salespeople.
10. Select Salesperson_ID in the Columns area on the right.
11. Click Insert into SQL Query.
Creating a SQL join
Using the WHERE SQL clause
12. Click the ORDER BY tab to sort the records before importing them into FileMaker Pro.
13. Select the name of the column to sort by, Sales_Data.Amount.
14. Click Descending to sort the records from highest amount sold to lowest amount sold.
15. Click Move.
16. Click Insert into SQL Query.
17. Click Execute.
18. Import the resulting records into FileMaker Pro.
250 records should be imported into the Sales Reports database.

Using ODBC with FileMaker Pro 15-13
SQL query using all three clauses: SELECT, WHERE, and ORDER BY
Use the Sales Reports database to view reports of your data.
To view a summary report of total sales for each salesperson, click the Reports button, then the By Salesperson button.
Automating ODBC connections Because accessing ODBC data sources is a task that’s frequently repeated, you might want to create a script with the Import Records script step that automatically finds the data source. Since FileMaker Pro interacts with an ODBC driver, however, some options behave differently than when used with other file formats.
The Specify File option stores:
• the data source name
• the user ID and password (optional)
• the SQL query to be executed against the data source
Keep these points in mind:
• To save the user name and password, select the Save user name and password checkbox in the ODBC Enter Password dialog box.
• The Perform without dialog option hides all dialog boxes encountered during an ODBC import. If you haven’t specified a data source to import from, you must manually select ODBC in the Open File dialog box while performing the import script.
• The Restore import order ScriptMaker option stores the field order in the Import Field Mapping dialog box, similar to other scripted imports.
• The Set Error Capture ScriptMaker step suppresses all ODBC error messages and alerts that might occur during an ODBC import.
• Each script can save one set of ODBC import options. To access multiple ODBC data sources or to automate multiple queries, you must create a separate script.
Note The ODBC import feature saves the data source name, user ID and password, and the SQL query from the previous ODBC import. Keep this in mind when selecting the Restore import order or Specify File options.
Tip To automate the interaction across multiple applications, explore the ActiveX functionality (Windows only). For more information, see chapter 10, “Creating scripts to automate tasks.”


Appendix A Customizing FileMaker Pro
This appendix shows you how to customize FileMaker Pro by setting application and document preferences for options like:
• network protocol and user name
• color palette
• memory and saving
• plug-in activation
• graphics storage
• actions to perform automatically when opening and closing a file
• spelling
Setting application preferences Application preferences apply to any file you open. Preferences remain in effect until you change them.
To set application preferences:
1. Choose Edit menu >Preferences > Application.
2. Click a preference tab, then set options according to the sections in this appendix.
Choose a preference type
Set options to customize the way you work
3. Click OK.
Setting general application preferences
Mac OS
Windows

A-2 FileMaker Pro User’s Guide
Do this To
Windows: Type a name for User name
Mac OS: Select System in the User Name area
or
For User Name, select Custom, then type a name in the text box
Set the name that identifies the user. This value is used, for example, when you choose Insert menu > Current User Name, or as the host name when you host files on a network.
Mac OS: The System name is the Owner Name entered in the Network Identity area in the File Sharing control panel.
Select To
Always lock layout tools Keep a layout tool selected until you select a different one or press Enter. If you don’t select this option, FileMaker Pro returns to the arrow pointer after you use a tool.
Add newly defined fields to Add new fields to the bottom of the current layout current layout when you define them.
Standard system palette Use a 256-color palette.
System subset Use an 88-color palette.
Web palette Use a palette of 216 colors that look the same on Windows and Mac OS.
Setting memory preferences FileMaker Pro automatically records your changes as you work. These changes are stored temporarily in an area of (RAM) memory called the cache. In memory preferences, you specify when FileMaker Pro saves the contents of the cache to the hard disk. In Windows and Mac OS X, you can also set the size of the cache here. To change the cache in Mac OS 9, see instructions in Help. Choose Help menu > Contents and Index, click the Index tab, and type cache.
Windows and Mac OS X: Set
the size of the cache
Select an option from the Select a network protocol to host databases and Network Protocol list open shared databases. Changes take effect after
you quit FileMaker Pro and then start it again.
Select Enable drag and drop Use drag and drop to transfer text without using text selection the Clipboard.
Select (Show) Templates in Display a list of template files when you start New Database dialog FileMaker Pro or choose File menu > New
Database.
Windows: Select (Show) All Display all keyboard shortcuts. keyboard shortcuts in menus
Select (Show) Recently Display recently opened files in the File menu. opened files, then type a You can also specify how many files appear in number from 1 to 9 the menu, up to nine files.
Setting layout preferences In layout preferences, you set options for the way you like to work in Layout mode.

Customizing FileMaker Pro A-3
Do this To
Select during idle time Save changes when the file is idle or when the file cache is full.
Select every <value> or when Save changes at a specified time interval or necessary, then choose an when the file cache is full. Saving less often on interval from the list battery-powered portable computers conserves
power. Saving more often reduces the chance of data loss in a system crash.
Windows and Mac OS X: Type a number for Attempt cache size of <value> K on FileMaker restart
Increase this number to improve application performance. Decrease this number to save changes to disk more frequently and thus help protect against data loss in a system crash. Changes take effect after you exit FileMaker Pro and start it again.
Setting preferences for dialing phone numbers FileMaker Pro can dial phone numbers stored in a database. To dial the phone in FileMaker Pro, set modem and dialing preferences as described here, define a script that includes the Dial Phone script step, then perform the script. For general information about scripting, see chapter 10, “Creating scripts to automate tasks.” For information about the Dial Phone script step, choose Help menu > Contents and Index, click the Index tab, and type Dial Phone.
Note Phone dialing is not supported on Mac OS X.
Windows: Modem and dialing settings are controlled by the operating system. If you have already specified Modems settings in the control panel, you probably don’t need to change them. For more information, see the documentation that came with your operating system software.
Setting modem preferences (Mac OS) For information about the settings you should use, see the documentation that came with your modem.
Options default to standard Hayes-compatible settings
If you change the default settings, click to restore
the default values
For Do this
Setup Type the command (all uppercase or all lowercase) to initialize your modem.
Prefix Type the command (all uppercase or all lowercase) for starting a call.
Hang up Type the command (all uppercase or all lowercase) for disconnecting a call.
Output Choose the port your modem is connected to. If you choose Speaker, FileMaker Pro does not dial out through the modem and you don’t need to set the other modem preferences.
Speed Choose a baud rate (the speed for transmitting data between your computer and the modem) from the list.
Setting dialing preferences (Mac OS) FileMaker Pro uses these preferences when you select the Use Dialing Preferences option in the Dial Phone script step.
FileMaker Pro dialing preferences let you dial phone numbers in different ways, depending on your location and the number you call.
For example, when dialing another extension in the same office, you might not want to dial the area code and exchange. When dialing a number outside the office, you might need to dial a prefix for a local area code, or several prefixes for a long-distance call.
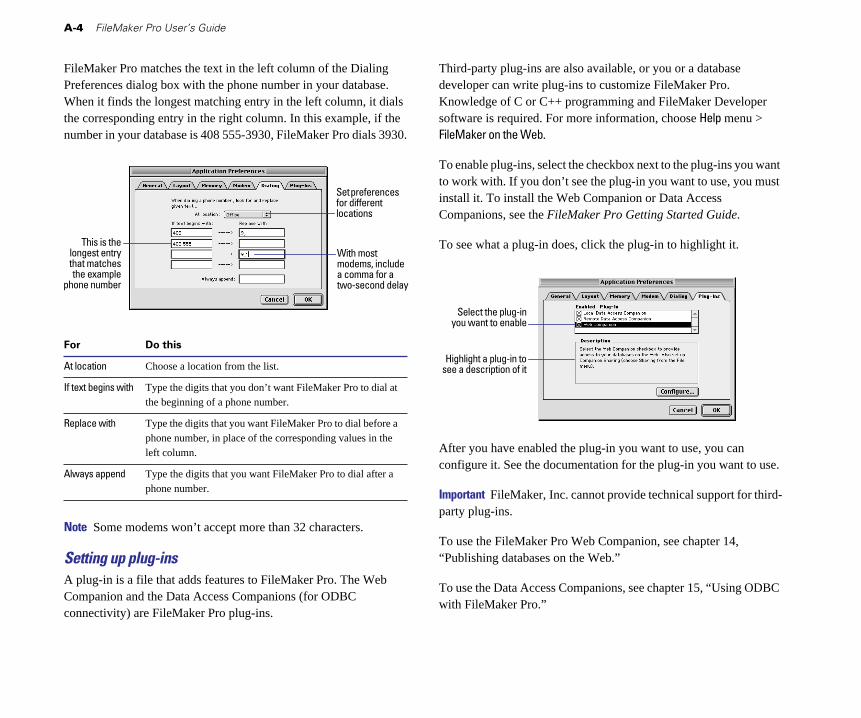
A-4 FileMaker Pro User’s Guide
FileMaker Pro matches the text in the left column of the Dialing Preferences dialog box with the phone number in your database. When it finds the longest matching entry in the left column, it dials the corresponding entry in the right column. In this example, if the number in your database is 408 555-3930, FileMaker Pro dials 3930.
Set preferences for different locations
This is the longest entry With most that matches modems, include the example a comma for a
phone number two-second delay
For Do this
At location Choose a location from the list.
If text begins with Type the digits that you don’t want FileMaker Pro to dial at the beginning of a phone number.
Replace with Type the digits that you want FileMaker Pro to dial before a phone number, in place of the corresponding values in the left column.
Always append Type the digits that you want FileMaker Pro to dial after a phone number.
Note Some modems won’t accept more than 32 characters.
Setting up plug-ins A plug-in is a file that adds features to FileMaker Pro. The Web Companion and the Data Access Companions (for ODBC connectivity) are FileMaker Pro plug-ins.
Third-party plug-ins are also available, or you or a database developer can write plug-ins to customize FileMaker Pro. Knowledge of C or C++ programming and FileMaker Developer software is required. For more information, choose Help menu > FileMaker on the Web.
To enable plug-ins, select the checkbox next to the plug-ins you want to work with. If you don’t see the plug-in you want to use, you must install it. To install the Web Companion or Data Access Companions, see the FileMaker Pro Getting Started Guide.
To see what a plug-in does, click the plug-in to highlight it.
Select the plug-in you want to enable
Highlight a plug-in to see a description of it
After you have enabled the plug-in you want to use, you can configure it. See the documentation for the plug-in you want to use.
Important FileMaker, Inc. cannot provide technical support for third-party plug-ins.
To use the FileMaker Pro Web Companion, see chapter 14, “Publishing databases on the Web.”
To use the Data Access Companions, see chapter 15, “Using ODBC with FileMaker Pro.”

Customizing FileMaker Pro A-5
Setting document preferences Document preferences affect the current database file. You can set different document preferences for different files.
Note A shared file has the same document preferences for every user. You can change the document preferences if you have the master password or if there isn’t password protection in the file. See chapter 9, “Protecting databases with passwords and groups.”
To set document preferences:
1. Open a FileMaker Pro file.
2. Choose Edit menu > Preferences > Document.
3. In the Document Preferences dialog box, click a preference tab, then set options for general or spelling preferences.
4. Click OK.
Setting general document preferences
Choose a preference type
Changes to document preferences only
affect this file
Select To
Use smart quotes Use curly apostrophes (’) and quotation marks (“ ”). If you deselect this option or use a font that doesn’t have smart quotes, FileMaker Pro uses plain marks (' "). Changes affect new typing only; they do not affect existing data.
Store compatible graphics
(Note that both platforms can display GIF, JPEG, and PICT images.)
Windows: Select this option to allow Mac OS users to view Windows Metafile images in a file.
Mac OS: Select this option if you might host this file from a Windows machine in future and you want to store compatible graphics.
Deselect this option to conserve disk space. Changing this option affects only the objects you create after the change.
Try default password, Automatically enter a password when the file is then type a password opened. If the password isn’t valid, FileMaker Pro
prompts the user to type another password. To temporarily bypass the default password and enter a different one, press Shift (Windows) or Option (Mac OS) while opening the file.
Switch to layout, then choose a layout from the list
Display the specified layout when you open the file. If you don’t select this option, FileMaker Pro opens the layout you displayed when you closed the file, or opens a layout you specify in a startup script. (See the Perform script option below.)
Perform script, then choose a name from the list
Perform a startup or close script when you open or close the file. For example, you can define a startup script to hide the status area or set the window size. If the file opens automatically because it is needed by a relationship or value list in another file, FileMaker Pro doesn’t perform the startup script.

A-6 FileMaker Pro User’s Guide
Setting document spelling preferences FileMaker Pro can check your spelling as you type. You can also have the Spelling dialog box always appear where you place it onscreen.
Select how you want to be alerted
as you type
Choose where youwant the Spelling
dialog box to appear
To use the spelling checker, see chapter 2, “Adding and viewing data.”

Appendix B Backing up and recovering files
Power failures, hardware problems, and other factors can damage a FileMaker Pro file. While the recover feature of FileMaker Pro may be able to salvage your damaged file, it is strongly recommended that you back up your important FileMaker Pro files on a regular basis. Consistent and properly executed backups are the best protection against damaged or corrupted databases.
This appendix describes:
• why regular backups are important
• how to automate database backups with FileMaker Pro scripting
• some reasons why files may become corrupt
• how to recover a FileMaker Pro database
Backing up files Routine backups are imperative for any document stored on a computer. Magnetic media has a sometimes transitory nature, and is susceptible to a variety of problems. Extreme heat, cold, sunlight, and the presence of electric and magnetic fields can all contribute to the failure of magnetic storage media.
Keep in mind that it is easier to back up a database than it is to recreate it. Whether you should be backing up every day, several times a week, or less frequently is usually determined by the amount of data you are adding to your database(s), and how difficult it would be to recreate your files in the event they become corrupt.
A strong backup strategy is one that employs multiple media and backs up on a consistent schedule. The multiple copies you create by backing up your data to different media afford you some protection against the failure of a single hard disk, removable disk, tape, or other media.
In its simplest form, backing up means copying your file(s) to another disk for safe keeping. As your files become larger or more numerous, you might need to use a third-party program to do a proper backup.
A good third-party backup program should provide multiple copies of a database as sources for restoration. A scheme involving rotating backups can accomplish this. Typically, this method involves separate backup copies over no less than a two-week rotation. The file is backed up to a set on day one, a new set on day two, until ten sets of backups exist (assuming a five-day work week). On the eleventh day, the first set is reused. This type of rotation ensures that a lurking problem will not spoil your chances of a complete file restoration.
For very important files, it’s a good idea to store backups at an off-site location. Fires, earthquakes, and other disasters can and do occur, and there is added safety in securing copies of your vital files off-site.
Using a backup script You can use the following script to save automated backup copies of a FileMaker Pro database.
This script saves a copy of your database on the fifth close and every fifth close thereafter. To make the script work, you will need to define a global field called Count Field. You should define this script in all solution files that require backups.
1. Choose Scripts menu > ScriptMaker.
2. For script name, type Backup.
3. Click Create.

B-2 FileMaker Pro User’s Guide
4. Enter the following script:
Set Field ["Count Field", "Count Field + 1"]If ["Count Field > 4"]
Save a copy as ["Backup Copy"]Set Field ["Count Field", "0"]
End if
5. After adding all the steps above, click OK.
6. Click Done.
7. Choose Edit menu > Preferences > Document.
8. In the General tab (Windows) or the General pop-up menu (Mac OS), under When closing <solution filename>, select the Perform script checkbox.
9. Select the script Backup.
10. Click Done.
11. Close the solution file.
Once these steps are executed, you will have a script that will create a backup of your file every fifth time you close the file.
Maintaining files While consistent backups are the most important form of regular maintenance you can perform on your databases, most heavily used databases are also good candidates for routine compression.
When you have FileMaker Pro save a compressed copy, FileMaker Pro rewrites the entire database, fitting as much data into each block as is possible. This procedure not only reclaims unused space in the file, it also rebuilds the file’s structure. Compression can be time-consuming if the file is large, however, and might be best accomplished as an overnight task.
Saving a compressed copy 1. Make sure that you have enough room on your intended storage media.
While a compressed copy may be significantly smaller than an uncompressed copy, we strongly recommend that you have at least as much free space on your intended media as the size of your uncompressed file. It is not a good idea to fill any storage media up to its maximum capacity.
2. Choose File menu > Save a Copy As.
3. Choose compressed copy (smaller) from the Save a drop-down list (Windows) or Type pop-up menu (Mac OS). You can also change the default name of the file and/or its location at this time.
4. Click Save.
Understanding file damage In order to understand how corruption occurs, it is useful to know how FileMaker Pro manages data.
FileMaker Pro is a disk-based application, so it does not need to load the entire database into RAM as the file is opened. Instead, the application transfers data as needed from the hard drive to RAM and back; as the file is used, updated data is written from data buffers in RAM to the hard drive. The most common cause of file damage is an unexpected application termination. In most cases, an unexpected

quit will occur when the file is between hard-drive updates. In this situation, the next time the database is opened, FileMaker Pro runs a consistency check on the file and the file typically opens without problems. However, if the unexpected quit occurs during a hard drive update, the file is likely to require recovery.
Keep these points in mind:
• Because unexpected application termination is the most common cause of database corruption, try to ensure that your operating system is stable.
• Make sure that you are running the most current and/or stable version of .DLL files (Windows) and extensions and control panels (Mac OS).
• Run only the software that is absolutely necessary on your most critical machines. Keeping your configurations simple reduces the chance that some software may conflict, and makes it easier to troubleshoot if there is a problem.
• Use an uninterruptable power supply (UPS) if your files are being used in an area subject to power outages. The cost of a UPS might equal the time involved in one file recovery.
• Be conscious of file size. FileMaker Pro has a maximum file size of 2 gigabytes. Files that have exceeded that limit may be damaged beyond repair, since key elements of the file structure may be overwritten. If your file is approaching the file size limit, it is strongly recommended that you archive some of the less frequently used data and save a compressed copy of the file.
• Consider all hard disk problems to be potentially serious. In cases of multiple corrupted files on a hard drive, the hard drive itself may be at fault. Check the hard drive with a disk utility program.
• Software that optimizes, compresses, or partitions the hard drive should be the most current version. Driver software must be compatible with your version of the operating system.
Backing up and recovering files B-3
Recovering damaged files In the event that a file does become damaged, you may be able to use the Recover feature of FileMaker Pro to salvage your file.
Important Because of the way the recover feature operates, do not attempt to recover a damaged file with a third-party disk repair utility. The use of a third-party disk repair utility may further damage the file’s structure and make it impossible for the file to be recovered.
When to recover In general, you should recover only files that will not open or are displaying problems with finding and sorting.
Note There are many problems more common than corruption that can result in incorrect finding or sorting, including mismatched field types, incorrect criteria, and misunderstood foreign character set standards. You should investigate these and other possibilities before you recover a file.
Because the recovery process removes structures that may harbor corruption, you should not use the Recover command for routine maintenance. Each time you recover a file, examine the file carefully to be sure that all objects are intact, as corrupt objects will be removed.
To recover a file:
1. Make sure that you have enough space on your intended storage media.
If there isn’t enough space, the recovered file will be unusable. A recovered copy might be as big or bigger as the original file, so it is important that there be adequate room on the media to which you are saving the recovered file. As with saving compressed copies of files, it is not a good idea to fill any storage media up to its maximum capacity.
2. Close the damaged file if it is open.

B-4 FileMaker Pro User’s Guide
3. Choose File menu > Recover.
4. In the Open Damaged File dialog box, select the file you wish to recover.
5. Click Open.
6. Name the recovered file, and make sure that it is being saved to the desired location.
FileMaker Pro inserts <filename> Recovered as the default name.
7. Click Save.
FileMaker Pro will attempt to recover the file. For large files, this may take some time, as each record, field, layout, and script must be tested and copied to the new file.
A status message tells you about the recovery process. A second message reports the success of the recovery—how many bytes were salvaged, the number of records and values skipped, and the number of lost field definitions that were rebuilt.
8. Click OK.
If the recovery process was successful, you should be able to open the newly recovered file. If the file opens successfully, you should close it and rename it to match the name of the original file (to preserve any predefined relationships and external scripts).
Keep these points in mind:
• To ensure you always have a file that’s up to date, make frequent backup copies of your files, and don’t write over the most recent copies.
• A file can grow or shrink in size. A file can grow if the indexes are damaged and repaired. A file can shrink when data deleted by the user, like a paragraph, has finally been deleted from the file.
• If a file is severely damaged, you might not be able to recover it. If you are unable to recover a file using the Recover feature, you will need to contact FileMaker Technical Support. Go to Help menu > FileMaker on the Web, or point your browser to www.filemaker.com for the most current information on contacting FileMaker Technical Support.

Appendix C FileMaker Pro Quick Reference (Windows)
Keyboard and mouse shortcuts Working with layout objects Align objects using the current settings Ctrl+K
Align to grid off while resizing/moving an object Alt+resize / Alt+drag
Bring an object forward Ctrl+Shift+[
Bring an object to the front Ctrl+Alt+[
Constrain a line to 45° increments Ctrl+drag
Constrain a rectangle to a square Ctrl+drag
Constrain an oval to a circle Ctrl+drag
Constrain movement to vertical or horizontal Shift+drag
Constrain resizing to vertical or horizontal Shift+resize
Display an object’s format Alt+double-click
Drag the selected layout part past an object Alt+drag
Duplicate by dragging Ctrl+drag
Field Borders dialog box Alt+Ctrl+Shift+B
Field Format dialog box Ctrl+Shift+M
Group objects Ctrl+R
Lock an object Alt+Ctrl+L
Move the selected object one pixel at a time Arrow keys
Redefine a field on a layout Double-click
Reorder the selected part Shift+drag
Re-orient the part labels Ctrl+click
Reset the default format based on an object Ctrl+click
Rotate an object Alt+Ctrl+R
Select items partially contained in the marquee Ctrl+drag
Select objects by type Ctrl+Shift+A
Send an object backward Ctrl+Shift+]
Send an object to the back Alt+Ctrl+]
Set Alignment dialog box Ctrl+Shift+K
Show/Hide T-squares Ctrl+T
Square the object being resized Ctrl+resize
Toggle the current tool with the selection tool Enter (numeric keypad)
Toggle the object grids Ctrl+Y
Ungroup objects Ctrl+Shift+R
Unlock an object Alt+Ctrl+Shift+L
Formatting text (Layout and Browse) Align text center (horizontally) Ctrl+\
Align text left Ctrl+[
Align text right Ctrl+]
Align text full (full justification) Ctrl+Shift+\
Insert a tab character in text Ctrl+Tab
Next point size down Ctrl+<, Ctrl+, (comma)
Next point size up Ctrl+>, Ctrl+. (period)
Nonbreaking space Ctrl+Space bar
One point larger Ctrl+Shift+>
One point smaller Ctrl+Shift+<
Selecting text (Layout and Browse) Extend selection to end of line Shift+End
Extend selection to end of text Ctrl+Shift+End
Extend selection to next end of word Ctrl+Shift+B
Extend selection to previous start of word Ctrl+Shift+A
Extend selection to start of line Shift+Home
Extend selection to start of text Ctrl+Shift+Home
Move insertion point to end of line End
Move insertion point to end of text Ctrl+End

C-2 FileMaker Pro User’s Guide
Move insertion point to end of the word Ctrl+B
Move insertion point to the beginning of the word Ctrl+A
Move insertion point to start of line Home
Move insertion point to start of text Ctrl+Home
Select a word Double-click
Select a line Triple-click
Select a paragraph Four clicks
Select entire contents of a text area Five clicks or Ctrl+A
Editing Bold selected text or object Ctrl+Shift+B
Copy the found set (Browse) if no field is active Ctrl+Shift+C
Delete record, layout, or request Ctrl+E
Delete record without confirmation Ctrl+Shift+E
Delete selection/next character Delete
Delete selection/previous character Backspace
Duplicate record, layout object, or request Ctrl+D
Insert a merge field (Layout) Ctrl+M
Insert the current date Ctrl+- (hyphen)
Insert the current time Ctrl+;
Insert the current user name Ctrl+Shift+N
Italicize selected text or object Ctrl+Shift+I
New record, layout, or request Ctrl+N
Next field (Browse and Find) Tab
Next record, layout, or request Ctrl+D, or Shift+Page Down
Insert from the index (Browse and Find) Ctrl+I
Insert from the last record (Browse and Find) Ctrl+’
Insert from the last record and move to the next field Ctrl+Shift+’
Paste without style Ctrl+Shift+V, Ctrl+Shift+Insert
Previous field (Browse and Find) Shift+Tab
Previous record, layout, or request Ctrl+C, Shift+Page Up
Replace the contents of the current field in all Ctrl+= records in the found set
Remove all style from selected word or object (return to Ctrl+Shift+P Plain)
Spell check the selected word Ctrl+Shift+Y
Underline selected word or object Ctrl+Shift+U
Working with files Close the database Ctrl+W, Ctrl+F4
Exit FileMaker Pro Ctrl+Q, Alt+F4
Hosts (Open) dialog box Ctrl+Shift+O
Open dialog box Ctrl+O
Print Ctrl+P
Print without Print dialog box Ctrl+Shift+T
Save FileMaker Pro saves automatically
Switching between modes Go to Browse mode Ctrl+B
Go to Find mode Ctrl+F
Go to Layout mode Ctrl+L
Go to Preview mode Ctrl+U
Controlling windows Cascade windows Shift+F5
Maximize/Restore window Ctrl+Shift+Z
Next window Ctrl+F6
Previous window Ctrl+Shift+F6
Scroll the document window up or down Page Up or Page Down
Scroll left in the document window Ctrl+Page Up
Scroll right in the document window Ctrl+Page Down
Show/Hide status area Ctrl+Shift+S
Tile windows horizontally Shift+F4
Tile windows vertically Shift+F5
Zoom the document in F3
Zoom the document out Shift+F3

FileMaker Pro Quick Reference (Windows) C-3
Miscellaneous actions Move object in list in dialog box Ctrl+C or Ctrl+D
Cancel a dialog box Esc Omit Record (Browse) Ctrl+M
Cancel a paused script Alt+N Omit Multiple (Browse) Ctrl+Shift+M
Check/Uncheck the Omit checkbox in Find Alt+O Play or record sound in a sound field Space bar
Define Fields dialog box Ctrl+Shift+D Select all Ctrl+A
Find/Replace dialog box Ctrl+Shift+F Sort Ctrl+S
Execute script (first 10 scripts) Ctrl+1 — Ctrl+0 (by Use the layout pop-up menu F2, then C or D, then Enter number) Use the Symbols pop-up menu in Find Alt+B, then C or D
Show all records Ctrl+J What’s This Help Shift+F1 Help F1
Modify the last find Ctrl+R
Status area
In Browse mode In Layout mode In Find mode
Choose a different layout
Click a page or drag the bookmark to move forward or backward in your records
Number of the current record (editable) Number of the current layout (editable)
Number of records in file
Shows whether records are unsorted, sorted, or semi-sorted Layout tools
Button tool Portal tool
Field tool Fill pattern palette Part tool
Percent of Fill color palette
Emboss palette
magnification Fill icon Current fill properties
Zooms window smaller or Pen color palette Pen pattern palette Line width palette
larger Pen icon
Shows or hides the Current line properties
status area
Number of the current request (editable)
Number of existing requests
Click to omit the records found by the current request
Click to choose operators (like <, >, and =) to paste into a find request
Click to begin the search


Appendix D FileMaker Pro Quick Reference (Mac OS)
Keyboard and mouse shortcuts
Working with layout objects Align objects using the current settings 2-K
Align to grid off while resizing/moving an object 2-resize/ 2-drag
Bring an object forward Shift-2-[
Bring an object to the front Option-2-[
Constrain a line to 45° increments Option-drag
Constrain a rectangle to a square Option-drag
Constrain an oval to a circle Option-drag
Constrain movement to vertical or horizontal Shift-drag
Constrain resizing to vertical or horizontal Shift-resize
Display an object’s format Option-double-click
Drag the selected layout part past an object Option-drag
Duplicate by dragging Option-drag
Field Borders dialog box Option-2-B
Field Format dialog box Option-2-F
Group objects 2-R
Lock an object Option-2-L
Move the selected object one pixel at a time Arrow keys
Redefine a field on a layout Double-click
Reorder the selected part Shift-drag
Re-orient the part labels 2-click
Reset the default format based on an object 2-click
Rotate an object Option-2-R
Select items partially contained in the marquee 2-drag
Select objects by type Option-2-A
Send an object backward Shift-2-]
Send an object to the back Option-2-]
Set Alignment dialog box Shift-2-K
Show/Hide T-Squares 2-T
Sliding/Printing dialog box Option-2-T
Square the object being resized Option-resize
Toggle the current tool with the selection tool Enter
Toggle the object grids 2-Y
Ungroup objects Shift-2-R
Unlock an object Shift-Option-2-L
Formatting text (Layout and Browse) Align text center (horizontally) 2-\
Align text left 2-[
Align text right 2-]
Full text justification Shift-2-\
Insert a tab character in text Option-Tab
Next point size down Shift-2-<
Next point size up Shift-2->
Nonbreaking space Option-Space bar
One point larger Shift-Option-2->
One point smaller Shift-Option-2-<
Selecting text (Layout and Browse) Extend selection to end of line Shift-2-B
Extend selection to end of text Shift-2-D
Extend selection to next end of word Shift-Option-B
Extend selection to previous start of word Shift-Option-A
Extend selection to start of line Shift-2-A
Extend selection to start of text Shift-2-C
Move insertion point to end of line 2-B
Move insertion point to end of text 2-D

D-2 FileMaker Pro User’s Guide
Move insertion point to the end of the word Option-B
Move insertion point to the beginning of the word Option-A
Move insertion point to start of line 2-A
Move insertion point to start of text 2-C
Select a word Double-click
Select a line Triple-click
Select a paragraph Four clicks
Select entire contents of a text area Five clicks or 2-A
Editing Bold selected object or text Shift-2-B
Copy the found set (Browse) if no field is active Option-2-C
Delete record, layout, or request 2-E
Delete selection/next character Del
Delete selection/previous character Delete
Duplicate record, layout object, or request 2-D
Insert a merge field (Layout) Option-2-M (Mac OS X) 2-M (Mac OS 9)
Insert from the index (Browse and Find) 2-I
Insert from the last record (Browse and Find) 2-’
Insert the current date 2-- (hyphen)
Insert the current time 2-;
Insert the current user name Shift-2-N
Italicize selected object or text Shift-2-I
New record, layout, or request 2-N
Next field (Browse and Find) Tab
Next record, layout, or request Control-D
Outline selected object or text Shift-2-O
Insert from the last record and move to the next field Shift-2-’ (apostrophe)
Paste without style Option-2-V
Previous field (Browse and Find) Shift-Tab
Previous record, layout, or request Control-C
Replace the contents of the current field in all records in the 2-=
Remove all style from selected word or object (return to Shift-2-P Plain)
Shadow selected object or text Shift-2-S
Spell check the selected word Shift-2-Y
Subscript selected object or text Shift-2--(hyphen)
Superscript selected object or text Shift-2-=, Shift-2-+
Underline selected object or text Shift-2-U
Working with files Close the database 2-W
Hosts (Open) dialog box Option-2-O
Open dialog box 2-O
Print 2-P
Print without Print dialog box Option-2-P
Quit FileMaker Pro 2-Q
Save FileMaker Pro saves automatically
Controlling windows Scroll the document window down page down
Scroll the document window up page up
Show/Hide the status area Option-2-S
Toggle between full size and the previous size in Layout Shift-2-Zmode
Minimize the current window (Mac OS X) 2-M
Hide the FileMaker Pro application (Mac OS X) 2-H
Switching between modesGo to Browse mode 2-B
Go to Find mode 2-F
Go to Layout mode 2-L
Go to Preview mode 2-U
found set

FileMaker Pro Quick Reference (Mac OS) D-3
Miscellaneous actions Cancel a dialog box Esc
Cancel an operation 2-. (period)
Check/Uncheck Omit checkbox in Find 2-T (Mac OS X) 2-M (Mac OS 9)
Define Fields dialog box Shift-2-D
Find/Replace dialog box Shift-2-F
Delete a record, layout or request 2-E
Delete a record without dialog Option-2-E
Execute script (first 10 scripts) 2-1 — 2-0 (by number)
Show all records 2-J
Help 2-?
Modify the last find 2-R
New Record, layout or request 2-N
Omit Record (Browse) 2-T (Mac OS X) 2-M (Mac OS 9)
Omit Multiple (Browse) Shift-2-T (Mac OS X) Shift-2-M (Mac OS 9)
Play or record sound in a sound field Space bar
Select all 2-A
Sort 2-S
Status area
In Browse mode In Layout mode In Find mode
forward or backward in your records
Number of the current record (editable)
Number of records in file
Shows whether records are unsorted, sorted, or semi-sorted
Percent of magnification
Zooms window smaller or larger
Shows or hides the status area
Choose a different layout
Click a page or drag the bookmark to move
Number of the current layout (editable)
Layout tools
Portal tool
Fill pattern palette
Emboss palette
Current fill properties Pen pattern palette Line width palette
Current line properties
Button tool Field tool Part tool
Fill color palette Fill icon
Pen color palette Pen icon
Number of the current request (editable)
Number of existing requests
Click to omit the records found by the current request Click to choose operators (like <, >, and =) to paste into a find request
Click to begin the search


Index
Symbols ! 3-6– 5-3, 11-3" 5-3" " 3-2, 3-3, 11-2, 11-4, 11-12## 7-11& 5-3, 11-4( 5-3) 5-3* 3-2, 3-6, 5-3, 11-3+ 5-3, 11-3, 5-3... 3-4/ 5-3, 11-3// 3-4, 6-24, 7-11: 5-3:: 5-3, 6-24, 7-11; 5-3< 3-4, 5-3, 11-3<= 3-4, 11-3<> 11-3= 3-3, 3-6, 5-3, 11-3== 3-3> 3-4, 5-3, 11-3>= 3-4, 11-3? 3-4, 6-23@ 3-2@@ 7-11^ 11-3_ 5-3, 13-4|| 7-11¶ 11-4≠ 5-3, 11-3≤ 3-4, 11-3≥ 3-4, 11-3
A Access privileges
associating passwords with groups 9-3
changing 9-3, 9-5described 9-1fields 9-4, 9-6groups 9-1, 9-3layouts 9-4, 9-5, 9-6passwords 9-1, 9-6record locking 13-2related files
planning 8-9working with 8-5, 9-2
selecting 9-1, 9-3Web 14-5, 14-8
Accessing data from a third file 8-14
Accounts. See Access privileges Actions. See Scripts ActiveX Automation 10-1Adding
See also Defining, Inserting, Placing
comments to scripts 10-9fields 5-3graphics to layouts 7-14layout parts 6-26objects to layouts 6-27, 7-14records 2-4related records 2-5, 8-11Script menu items 10-5, 10-10scroll bars to fields 7-2text to layouts 7-10
Aggregate functions 11-7Aligning
objects 7-18, 7-19tabs 7-13
text 7-12, 7-13AND operator 11-4AND searches 3-5
in match fields 8-6Animation 2-12Appearance
layout themes 6-5web styles 14-11
Apple events 10-1, 10-9AppleScript 10-1, 10-9Application preferences A-1Arrange toolbar 1-5ASCII sort 3-9Attributes
fill 7-15paragraph 7-13pen 7-15tab 7-13text 6-22, 7-12
Authorized users. See Access privileges
Auto Enter 5-8AutoGrid. See Object Grids 7-21Automatic phone dialing A-3Automating tasks. See Scripts Average for summary fields 5-7AVI format 2-12
B Background color 7-14
See also Themes, layoutBackups B-1Baselines, field borders 7-2BASIC format 12-1Batteries, preferences for saving A-3
Beepsin spell checking A-6script for 10-9
Blankpasswords 9-1, 9-3records, printing 4-5
Blank layout See also Layouts described 6-5
Blank spaces, closing up. See Sliding objects
Body 6-25Book icon
Browse mode 2-1, 2-4Find mode 3-6Layout mode 6-8Preview mode 4-4
Boolean expressions 11-3Boolean values
described 3-3finding 3-4formatting 6-22
Borders 7-14button 7-17field 7-1
Boundaries of fields, text, buttons 7-17
Break fields 6-26, 6-27BrioQuery 15-2Browse mode 1-3, 2-1Browser, Web
home page 14-3, 14-6opening URL 2-8, 10-9, 14-3protecting files 14-5requirements 14-11setting up views for 14-10starting 10-9

I-2 FileMaker Pro User’s Guide
viewing databases in 14-3, 14-6, 14-14
views for 14-14Browsing records
access privileges 9-1described 2-1groups of 2-1in a list 2-2individually 2-2on Web 14-14sorted 3-8
Built-in home page 14-3, 14-6, 14-8
hiding databases on 14-6Buttons
borders 7-17changing appearance 7-14copying or deleting 10-13defining 10-12described 10-12non-printing 7-25, 10-13performing scripts 10-2, 10-12showing 10-13
C Cache, setting size A-3Calculation fields
changing 5-12defining 5-5described 5-4formulas 5-5, 11-1functions 11-5importing 12-2moving to 2-7stored results 5-11unstored results 5-11
Calculations See also Calculation fields formatting 6-22formulas in match fields 8-5functions 11-5
importing 12-2related fields
field references to 5-5summarizing data 8-12
Cascading style sheets 14-2, 14-11
Case-sensitive text, finding 3-3CGI applications 14-2CGM format 2-12Changing
See also Editingaccess privileges 9-3calculation fields 5-12dictionary terms 2-14field definitions 5-11formulas 5-11, 5-12layout parts 6-26, 6-29, 6-30layouts 6-8passwords 9-3portals 6-19preferences A-1related fields 6-17relationships 8-12scripts 10-10serial numbers 2-10stacking order 7-18units 7-12value lists 2-9
Characters, deleting 2-14Charts, with FileMaker Pro data 15-2
CheckboxesSee also Value listschoosing from 2-9displaying field values 7-6editing 2-9
Client application, ODBC 15-1Clients. See Guests Clones 1-7Closing FileMaker Pro 1-8
Closing files 1-7, 13-4Coffee cup icon 13-2Color
cross-platform A-2fill 7-15in layout themes 6-5in web views 14-11palette 7-15, A-2pen 7-15text 7-12
Columnar list/report layoutSee also Layoutsdescribed 6-3reports with grouped data 6-5
Columnsin Excel spreadsheets 12-4, 12-6
in ODBC tables 15-1, 15-8in tables 2-2, 6-10page breaks 6-29printing 4-2printing records in 6-8resizing 7-22setup 6-9
Commands. See Script steps Comma-Separated Text format 12-1
Comments, in scripts 10-9Comparison operators 11-3Complex key fields 8-6Compressed copies of files 1-7, B-2
Confidential information. See Access privileges
Connecting files. See OLE objects; Relational databases
Constants 11-2Container fields
See also Fieldscomparing contents of 11-5deleting 2-13
described 2-11, 5-4exporting 12-8formatting 6-24importing 12-2inserting graphics, movies, and sounds into 2-11
on the Web 14-4searching by 3-2
Context menus 1-5Converting
field names in importing 12-6files 1-7files from other applications 12-6
Copyingbuttons 6-13field definitions 1-7fields
between fields 12-2between files 6-13, 12-1from previous record 2-8
found set 2-8graphics, movies, and sounds 2-8
layouts 6-8objects 6-13OLE objects 13-3records 2-4, 2-8related records 2-5, 2-8scripts 1-7, 10-10text 2-14text using drag and drop A-2value lists 7-5values 2-8versus importing or exporting 12-1
Count for summary fields 5-7Creating. See Adding; Defining Cross-platform
considerations 13-2exporting 12-1

Index I-3
file sharing 1-6, 13-1importing 12-1
Crystal Reports 15-2Currency
exporting formats 12-7formatting 6-22
Current date
formatting 6-24in calculations 11-7, 11-11inserting on layout 7-11pasting into fields 2-10
field 2-6record 2-3time
formatting 6-24in calculations 11-12inserting on layout 7-11pasting into fields 2-10
user name inserting on layout 7-11pasting into fields 2-10setting A-2
Current file. See Files; Master file Custom
field values 7-4line spacing 7-13order, sort by value list 3-8
Custom Web Publishing, described 14-3
Customer support xiCustomizing FileMaker Pro. See Preferences
Cuttingobjects 6-13text 2-14
D Data
described 1-1entering automatically 2-5, 5-8
from other files 8-1ODBC 15-1relationships 8-10saving automatically A-3view as form, list, table 2-2
Data Access Companion 15-1enabling 15-2
Data entry 5-8–5-11access privileges 9-1exporting 12-1importing 12-1tab order 7-8
Data source, ODBC 15-1connecting to 15-6
Data types See also Field types and calculation results 5-6, 11-1
for global fields 5-8Database files. See Files Database locks. See Access privileges
Database system 1-1Databases
described 1-1planning 5-1publishing on Web 14-1
Databases, relational. See Relational databases
Datefields 5-4finding today’s 3-4functions 11-7symbol, formatting 6-24
Date fields4-digit years 1-7, 5-10
described 5-4typing values in 2-7
Dates See also Date; Date fields current
formatting 6-24in calculations 11-7, 11-11pasting into fields 2-10
entering data 2-7finding 3-4formatting 6-23in calculations 11-7, 11-11inserting on layout 7-11invalid 3-4typing in 2-7validating 5-10
dBASE file format 12-1DBF format 12-1, 12-8DBMS 15-1DDE (Dynamic Data Exchange)
See also OLE objects scripts 10-9
Decimal numbers 6-22Decimal tabs 7-13Default
formats 6-22passwords A-5
Default password 9-3Defining
See also Placing See also Adding calculation fields 5-5fields 5-3global fields 5-8lookups 8-6passwords 9-1portals 6-19related records 2-5relational databases 8-9relationships 8-10scripts 10-4
summary fields 5-6value lists 7-3
Deletingcharacters 2-14data 2-7, 5-12dictionary terms 2-14fields 5-12, 9-5
from a layout 6-17find requests 3-5graphics 2-13groups 9-5imported records 12-5layout parts 6-30layouts 6-8master records 2-5, 8-11movies 2-13objects 6-13passwords 9-3portals 6-20records 2-5related records 2-5, 8-11Script menu items 10-10script steps 10-5scripts 10-10sounds 2-13text 2-14value lists 7-5
Design functions 11-12Designing databases
creating layouts 6-1planning 5-1relational 8-7
Destination file, import 12-2Detail databases. See Related files Detail tables. See Related files Dialing phone numbers
procedures A-3script steps 10-9
Dictionariesadding words 2-15described 2-14

I-4 FileMaker Pro User’s Guide
main 2-14user
adding words 2-15described 2-14
DIF format 12-1Display formats 6-22Document preferences A-5Double arrow icon 13-2Drag and drop
described 2-9disabling 2-9enabling for text A-2fields onto layout 6-16objects 6-13
Drivers, ODBC 15-1Drop shadow effect, objects 7-15DRW format 2-12Duplicate database files 8-10Duplicate records
finding 3-6finding with scripts 10-13
Duplicating. See Copying Dynamic Data Exchange. See DDE
E Edit items 2-9, 7-6Editing
See also Changing find requests 3-5objects quickly 1-5text 2-14value lists 2-9
Edition File format 12-1Elements. See Objects Email, sending 10-9Embedded groups 7-18Embossed effect, objects 7-15Empty fields 3-6
Enabling plug-ins 15-2, A-4Encryption. See Access privileges Engraved effect, objects 7-15Entering data
automatically 5-8typing in fields 2-7
Entry optionschanging 5-11tab order 7-8
Envelope layout See also Layouts described 6-5headers 6-7using 6-5
Envelopesprinting 4-3, 6-7
Error messages See also Troubleshooting displaying in scripts 10-6suppressing in scripts 10-6
Excelconverting 12-6format 12-1importing 12-4, 15-2
Exchanging filesSee also Exporting, Importing, Networks, ODBC
cross-platform considerations 12-1
exporting 12-1, 12-6importing 12-1lookups 8-1, 8-6relational databases 8-1with other applications 12-1, 15-1
Exchanging information. See Exchanging files
Exiting FileMaker Pro 1-8, 13-4Exporting
See also Exchanging files access privileges for 9-1
described 12-1dictionaries 2-14field order 12-7file formats 12-1formatting 12-7grand summary data 12-7, 12-8
opening exported files 12-7related records 12-7repeating fields 12-8reports with grouped data 12-8shared files 12-1subsummary data 12-8versus copying and pasting 12-1
ExpressionsBoolean 11-3described 11-2
Extended columnar layout. See Columnar list/report layout
External files. See Exchanging files; Exporting
External functions 11-13for Web publishing 11-13, 14-8
External scripts 10-2
F False 6-22, 11-3Field definitions
changing 5-11copying 1-7described 1-2duplicating 5-11printing 4-5related fields 5-12reordering 5-12
Field labels 6-16, 7-10Field labels, layout 6-16Field names 5-3
in Excel import 12-4, 12-6
in table headings 6-10Field rights. See Access privileges Field tool 6-16Field types
changing 5-11described 5-4for match fields 8-5importing field types 12-6in calculations 11-1sort order 3-9
Field valuesdescribed 1-2
Fields See also Calculation fields; Container fields; Date fields; Global fields; Match fields; Number fields; Related fields; Summary fields; Text; Time fields
access privileges 9-4, 9-5, 9-6adding to a layout 6-15, A-2borders 7-1boundaries, showing/hiding 7-17
changingappearance 7-14calculations 5-12definitions 5-11entry options 5-11formulas 5-11, 5-12names 5-11sort order of 3-8types 5-11
copyingbetween fields 2-8between files 6-13from previous record 2-8
current 2-6custom values 7-4defining 5-3deleting 5-12, 9-5
from a layout 6-17

Index I-5
described 1-2displaying 1-3, 6-1duplicating definitions 5-11Edit items 2-9editing 5-11empty, finding 3-6entry options 5-8formatting 6-21, 7-1
scroll bars 7-2identifying records 10-14indexing 5-11lookups
defining 8-6updating 8-13
maximum text entry 2-7merge 6-17moving between files 6-13naming 5-5opening URL from 2-8options 5-5Other items 2-9pasting into 2-10patterns 7-2placing on a layout 6-15planning 5-1positioning 6-14, 7-19removing from a layout 6-17reordering definitions 5-12repeating
described 5-11formatting 7-7sorting 3-9tab order 7-9
rotating 7-18scroll bars 7-2selecting 6-12, 7-8stored results 5-11tab order 7-8types 5-4typing in 2-7unstored results 5-11
validation options 5-9value lists 7-3values 1-2Web display 14-12
File formatsgraphics 2-12import/export 12-1Macintosh PICT A-5repeating fields 12-8
FileMaker Pro as ODBC client application 15-5–15-13
as ODBC data source 15-2–15-3
customer support xidocumentation information xifile format 12-1registering xi
FileMaker Pro HelpBalloon Help (Mac OS) xviusing xiiiWhat’s This? Help (Windows) xvi
FileMaker Pro Web Companion. See Web Companion
FileMaker Server 13-1, 13-5, 13-6
Files See also Exchanging files; File formats; Related files
access privileges 9-1backing up B-1cloning 1-7closing 1-7converting 1-7creating 5-2described 1-1duplicate filenames 8-10exporting 12-6importing 12-2international 1-7joins 8-15
lookup 8-6multiuser 13-3
hiding 13-4opening 1-6
cross-platform 12-1planning 5-1protecting 9-1recovering B-3related 8-1, 8-2shared
access privileges 9-1closing 13-4described 13-1hiding 13-4on Web 14-1, 14-5, 14-10preferences A-5requirements 13-1
templates creating files 5-2described 5-2displaying A-2
updating to current version 1-7Files, master. See Master file Fill attributes
color 7-15pattern 7-2
Financial functions 11-9Find mode 1-3, 3-1Find requests
See also Finding add new 3-5defining 3-1deleting 3-5described 3-1editing 3-5mixing find and omit 3-7multiple 3-5, 3-6operators in 3-2, 3-6order of 3-7repeating 3-5, 3-7reverting 3-6
summary fields in 3-2Finding
See also Find requests adding new request 3-5all records 3-2Boolean numbers 3-4dates 3-4described 3-1duplicate records 3-6, 10-13empty fields 3-6exact values 3-3excluding records 3-6graphics 3-2invalid dates and times 3-4multiple criteria 3-5narrowing searches 3-5numbers 3-3operators 3-2, 3-6order of requests 3-7partial or variable text 3-2ranges 3-4records 3-1records on Web 14-11, 14-15records using related fields 3-4symbols 3-3text 3-3times 3-4today’s date 3-4
Font menucustomizing 7-13
Fontschoosing 7-12text ruler 7-12
Footersdescribed 6-25showing in table view 6-10
Form letters 6-17Form View, Web
setting up 14-10viewing in browser 14-14

I-6 FileMaker Pro User’s Guide
Formatsdefault 6-22display 6-22international 1-7
Formattingcalculations 6-22custom line spacing 7-13dates 6-23export data 12-7fields
defaults 6-22text 7-12
graphics 6-24import data 12-1merge fields 6-18paragraphs 7-12repeating fields 7-7scroll bars 7-2tables 6-10text 6-22, 7-12, 7-13times 6-24
Forms See also Layouts Standard form layout 6-3viewing records as 2-2
Formulascalculation fields 5-5changing 5-11, 5-12constants 11-2described 11-1expressions 11-2field references 11-2functions 11-5operators 11-3results 11-1syntax 11-1
Found setcopying 2-8deleting 12-5described 2-1, 3-1import data 12-5switching with omitted set 3-7
FP5 filename extension 1-6Fraction of Total for summary fields 5-7
Functionsdescribed 11-5parameters 11-5Web Companion 11-13
G Getting help. See FileMaker Pro Help
Global fields See also Fields defining 5-8described 5-4, 5-8examples 10-13importing 12-2shared files 13-2
Glossary, in FileMaker Pro Help xii, xiii
Grand summaries See also Grand summary parts described 6-26exporting 12-8
Grand summary partsSee also Subsummary partsdescribed 6-26leading 6-26page breaks 6-29printing 6-28trailing 6-26
Graphic objects
adding to layouts 7-14, 7-16
rulers described 7-20showing/hiding 7-20
Graphicsadding to layouts 7-16comparing 11-5
copying 2-8deleting 2-13file formats 2-12finding 3-2inserting into fields 2-11on the Web 14-4pasting 2-13positioning 6-14, 7-19rotating 7-18saving in Macintosh PICT format A-5
storing methods 2-11Grids
in tables 6-10on layouts 7-20
Grouping objects 7-17Groups
access privileges 9-1, 9-3associating with passwords 9-4
changing 9-5defining 9-3deleting 9-5embedded 7-18examples 9-4limiting access 9-1master passwords 9-5versus passwords 9-6
Guest book, on Web 14-11Guests
closing files 13-4described 13-1limits, on the Web 14-2opening files 13-5performing tasks 13-2saving files 13-2, 13-4sending messages to 13-3
Guides. See Object Grid; Ruler lines; T-squares
H Headers
described 6-25Envelope layout 6-7showing in table view 6-10title 6-25
Helpfor databases in browser 14-6, 14-14
for FileMaker Pro xiHiding objects
See also Showing/hiding during printing 7-22, 7-25
Hiding shared files 13-4Home page
built-in 14-3, 14-6, 14-8customizing 14-6directing Web users to 14-3logging activity 14-8replacing built-in 14-6specifying default 14-8
Hostclosing files 13-4database on Web 14-1, 14-5described 13-1FileMaker Server 13-1, 13-5opening files 13-3performing tasks 13-2saving files 13-2, 13-4sending messages to guests 13-3
HTML filesdescribed 14-1
HTML table format 12-1HTTP commands 14-9HyperText Markup Language. See HTML
Index I-7
IIdentification fields 10-14Importing
See also Exchanging files, Exporting, Inserting
appending new records 12-2, 12-3
canceling 12-5cross-platform considerations 12-1
data order 12-2described 12-1destination file 12-2dictionaries 2-14Excel spreadsheets 12-4exception fields 12-2field order 12-4field types 12-6file formats supported 12-1found set 12-5into existing files 12-3layouts 6-8ODBC data 15-5–15-13
from more than one table 15-8, 15-11
options 12-2record order 12-2related records 12-2repeating fields 12-5replacing data 12-2, 12-3requirements 12-7scripts 10-11shared files 12-1source file 12-2updating existing records 12-2, 12-3, 12-6
validating data 12-6versus copying and pasting 12-1
Indexin FileMaker Pro Help xiv
pasting from 2-7Indexing
fields 5-11match fields 8-5text field limitations 3-3, 3-6, 8-5
Insertinggraphics 2-11movies 2-12
Instant Web Portal 14-3Instant Web Publishing
built-in home page 14-3, 14-6, 14-8
described 14-2disabling or enabling 14-8language in interface 14-8setting up pages 14-10sharing files 14-2, 14-7showing value lists 7-7styles 14-11testing databases 14-13using Scripts with 10-1viewing browser pages 14-3, 14-6, 14-14
International files 1-7Internet
See also Web access 14-4described 14-1
Internet Explorer 14-11Internet Service Provider. See ISP Intranet 14-1
See also WebIP addresses 14-2
defined 14-2limiting 14-2, 14-7, 14-9specifying port numbers 14-9typing in browser 14-3
ISP 14-2, 14-5
J Java Script, in Web browsers 14-11
Join expressions. See Relationships
Join fields. See Match fields Join files for many-to-many relationships 8-15
Join, SQL 15-11Joins. See Relationships
K KAR format 2-12Key fields. See Match fields Keyboard shortcuts
for Mac OS D-1for Windows C-1scripts 10-11showing A-2
L Labels
See also Labels layoutfield 6-16, 7-10margins 7-21printing 4-3, 6-6sizes 6-4
Labels layoutSee also Layoutscustomizing 6-7described 6-4page setup 6-6printing 6-6, 6-7standard sizes 6-4
Language, in sorting 3-8Launching FileMaker Pro 1-6Layout mode 1-3, 6-1Layout objects. See Objects
Layout partsadding 6-26adding objects to 6-27body 6-25changing 6-26, 6-29, 6-30deleting 6-30described 6-25field labels 6-16footer 6-25grand summary 6-26header 6-25modifying 6-30page breaks 6-29page numbers 6-29reordering 6-29resizing 6-30subsummary 6-26title footer 6-25title header 6-25
Layout pop-up menu 2-1, 6-8Layout text. See Text Layouts
access privileges 9-1, 9-4, 9-5, 9-6
adding fields 6-15adding graphics 7-14, 7-16adding objects 6-12adding text 7-10Blank 6-5blank space, removing 7-22buttons 10-12changing 6-8choosing 6-8Columnar list/report 6-3columns
page breaks 6-29resizing 7-22setup 6-9
creating 6-2custom line spacing 7-13deleting 6-8

I-8 FileMaker Pro User’s Guide
deleting fields from 6-17described 1-3, 6-1duplicating 6-8Envelope 6-5field boundaries 7-17fields
displaying 1-3, 6-1dragging onto layout 6-16placing 6-15removing 6-17selecting 6-12
form layout 6-3form view 2-2graphic objects 7-14, 7-16importing 6-8Labels 6-4margins 7-22modifying 6-8naming 6-8objects
adding 6-12, 7-14, 7-16deleting 6-13enhancing 7-15locking 6-15non-printing 7-25
on Web 14-12placing related records 6-16print area 7-22printing
overview 7-22procedures 4-4subsummary reports 4-3wide 4-2
related fieldsplacing 6-16removing 6-17
removing 6-8renaming 6-8reordering the menu list 6-8setting preferences A-2, A-5setting up views 6-10
Standard form 6-3switching 6-8text, adding 7-10tools
described 6-11locking 7-14, A-2
types 6-3Leading summaries 6-26Leading. See line spacing, custom Line spacing, custom 7-13Lines 7-14Links, between database files. See Relationships
List separators 11-5Lists, pop-up. See Pop-up lists Lists, viewing records as 2-2Literal text searches 3-3Local Data Access Companion 15-2
Lockingobjects 6-15shared records 13-2tools 7-14
Log, of Web activity 14-8Logical
AND search 3-5functions 11-10operators 11-4OR search 3-5
Lookupsand accessing related data from third file 8-14
and relational databases 8-1changing 8-13defining 8-6, 8-13defining relationships 8-10destination field as match field 8-6
lookup destination field 8-2lookup source field 8-2
stopping or suspending 8-13updating 8-13
Lotus 1-2-3 format 12-1
M MacIPX 13-2Macros. See Scripts Mail merge
using merge fields 6-17using ODBC 15-2
Mailing labels 6-4Main database. See Master file Main forms. See Master records Many-to-many relationships, defining 8-15
Marginsalternating 7-21changing, text ruler 7-12displaying
in Layout mode 7-22in Preview mode 4-3
labels 7-21setting 7-21
Master filedescribed 8-2planning 8-8
Master passworddefining 9-1groups 9-5
Master recordscopying 2-8deleting 2-5, 8-11duplicating 2-5finding with related fields 3-4sorting with related fields 3-9
Master table. See Master file Match fields
See also Fields calculation formulas in 8-5described 8-2
field types for 8-5in import update 12-2indexing 8-5multiple values in 8-6non-alphanumeric characters in 8-6
planning 8-5Matching records, updating 12-2Mathematical operators 11-3Maximizing window size A-5Maximum for summary fields 5-7Memory preferences A-2Menu commands
performing 1-4Menu commands, access privileges 9-2
Menuscontext, described 1-5File
listing recent files A-2Font, customizing 7-13layout pop-up 6-8Script
adding items 10-5, 10-10deleting items 10-10reordering items 10-11
Menus, pop-up. See Pop-up menus
Merge fieldsdescribed 6-17, 7-24formatting 6-18placing 6-17
Messages, sending 13-3Microsoft Access 15-2Microsoft Excel. See Excel Microsoft SQL Server 15-2, 15-5Microsoft Visual Basic 15-2Microsoft Word 12-1, 15-2MIDI format 2-12Minimum for summary fields 5-7

Index I-9
Mode pop-up menu 1-3, 6-1Modems, configuring A-3Modes 1-3Modifying. See Changing Movies
deleting 2-13inserting into fields 2-12
script step 10-7moving 2-12on the Web 14-4pasting 2-13playing 2-12
Movingfields between files 6-13movies 2-12objects
between applications 6-13between layouts 6-13on layouts 6-14, 7-19
part labels 6-28record to record 2-4to calculation fields 2-7to summary fields 2-7
Multi-key fields 8-6Multimedia 2-12Multiple platforms. See Cross-platform
Multi-table databases. See Relational databases
Multiuser files 13-3hiding in Hosts dialog box 13-4
N Naming
fields 5-5, 5-11layouts 6-8relationships 8-10scripts 10-4value lists 7-3
Netscape Navigator 14-11Networks
changing connections A-2cross-platform 13-1FileMaker Server 13-1, 13-5, 13-6
sharing filesWeb 14-5
New Layout/Report assistantdescribed 6-2
No password 9-1Non-printing objects 7-25NOT operator 11-4Number fields
See also Fieldsdescribed 5-4entering data 2-7finding 3-3formatting 6-22sorting numbers 3-9
Number functions 11-6
O Object Grids
described 7-21reshaping objects without 6-14
Object Linking and Embedding. See OLE objects
Objectsadding to layouts 6-27, 7-14, 7-16
aligning 7-18, 7-19copying 6-13cutting 6-13deleting 6-13described 6-11editing quickly 1-5embossed, engraved, drop shadow effects 7-15
fill 7-14
graphic 7-14, 7-16grouping 7-17locking 6-15moving
between applications 6-13between layouts 6-13on layouts 6-14, 7-19
non-printing 7-25pasting 6-13positioning 6-14, 7-19resizing 6-14, 7-19rotating 7-18selecting 6-12sliding
described 7-22displaying 7-23, 7-24setting 7-24
stacking order 7-18text
adding 7-10deleting 2-14pasting 2-14removing 2-14replacing 2-14
ungrouping 7-17ODBC
See also Data Access Companion
configuring control panel 15-3, 15-5
described 15-1field name considerations 5-3FileMaker Pro as client application 15-5–15-13
FileMaker Pro as data source 15-2–15-3
protecting data 15-3OLE objects
adding to layouts 7-16working with 2-15, 13-3
Omitting fields
during printing 7-22, 7-25from tab order 7-9
recordsfind requests 3-6related 3-4
One-to-many relationships, defined 8-4
One-to-one relationships, defined 8-4
OpeningFileMaker Pro Help xiiifiles 1-6, 13-3URLs 10-9
OperatorsAND 11-4comparison 11-3in find requests 3-2, 3-6in formulas 11-3logical 11-4mathematical 11-3NOT 11-4OR 11-4precedence 11-3text 11-4XOR 11-4
Options, default. See Preferences OR operator 11-4OR searches 3-5Oracle databases 15-2, 15-5Other items 2-9Oval tool 7-14
P Page breaks
defining 6-29viewing
in Preview mode 4-3Page margins 7-21Page numbers
and page breaks 6-29

I-10 FileMaker Pro User’s Guide
inserting on layout 7-11Page orientation for printing 4-2, 4-4, 4-5
Pages, Websetting up 14-10viewing databases in 14-3, 14-10, 14-14
Palettescolor 7-15, A-2pen 7-15Size 6-14, 7-19tools 7-14
Paragraphsattributes 7-13formatting 7-12
Parametersseparating 11-5
Parameters, functiondescribed 11-5
Part labels, displaying 6-28Parts. See Layout parts Passwords
access privileges 9-1, 9-6associating with groups 9-4automatic A-5blank 9-1, 9-3case sensitivity 9-1changing 9-3default 9-1, 9-3, A-5defining 9-1deleting 9-3limiting activities 9-6master 9-1no password 9-1prompt for 9-3related files
master file 8-5planning 8-9working with 9-2
versus groups 9-6Web administration 14-5, 14-8
Pastingcurrent date, time, or user name 2-10
from the index 2-7graphics 2-13movies 2-13objects 6-13OLE objects 13-3sounds 2-13symbols 7-11text 2-14
Patternsfield 7-2fill 7-2pen 7-15selecting 7-15
Pausing scripts. See Scripts, pausing
PCX format 2-12Pen attributes 7-15Performing scripts
described 10-1on closing 10-2, A-5on opening 10-2, A-5procedures 10-2
Permissions. See Access privileges
Phone numbersdialing A-3script step for dialing 10-9
PIC format 2-12PICT format (Macintosh) A-5Picture fields. See Container fields
Pictures. See Graphics; OLE objects
Placingfields 6-15merge fields 6-17
Planningdatabases 5-1
fields 5-1relational databases 8-7scripts 10-3
Playingmovies 2-12sounds 2-13
Plug-insData Access Companion, enabling 15-2
described 15-1, A-4enabling A-4external functions 11-13Web Companion, enabling 14-7, A-4
Pointer tool. See Selection tool Pointers to files. See Relationships
Pop-up lists See also Value lists choosing from 2-9displaying field values 7-6editing 2-9showing/hiding 2-9
Pop-up menus See also Value lists choosing from 2-9displaying field values 7-6editing 2-9layout 6-8
Portal tool 6-19Portals
See also Relational databases changing 6-19changing appearance 7-14changing relationships for 8-12
defining 6-19deleting 6-20described 8-2formatting 6-20placing related records 6-16
rotating 7-18scroll bars 6-20selecting 6-12sorting 8-11summarizing data in 8-12
Portals, Instant Web Portal 14-3Positioning
fields 6-14, 7-19graphics 6-14, 7-19objects 6-14, 7-19
Precedence of formula operators 11-3
PreferencesSee also Settingsadding fields to current layout A-2
application A-1cache size A-3changing A-1color palettes A-2configuring plug-ins A-4dialing phone numbers A-3displaying template files A-2document A-5enabling drag and drop A-2layout A-2locking layout tools A-2maximizing window size A-5memory A-2modem A-3network connections A-2opening to specific layout A-5opening with default password A-5
performing scripts A-5saving files A-3shared files A-5showing keyboard shortcuts A-2
showing/hiding status area A-5

Index I-11
specifying user names A-2storing graphics A-5using smart quotes A-5Web Companion 14-7window size A-5
Prefixes 2-11Preview mode 1-3, 4-3Previewing
See also Printing columns 6-9layouts 4-3records 4-3subsummary reports 6-28
Primary keys. See Match fields Print area
objects outside 7-22viewing 4-3, 7-22
Print preview. See Preview mode Printer, selecting 4-2Printing
access privileges for 9-1blank records 4-5, 7-22envelopes 4-3field definitions 4-5, 7-22fixed margins 7-21forms 4-4, 7-22labels 4-3
setup 6-6tips 6-6
layouts 4-4, 7-22merge fields 6-18non-printing objects 7-25page orientation 4-2, 4-4, 4-5previewing 4-3print area 4-3, 7-22procedures 4-4records 4-4reports 4-4reports with grouped data 4-3script definitions 4-4, 7-22scripts 4-5
setup 4-2, 4-5subsummary reports 4-3wide layouts 4-2
Privileges. See Access privileges Properties, table 6-10Protecting files. See Access privileges
Publishing, databases on the Web 14-1
overview 14-6Pushbuttons. See Buttons
Q Query, SQL 15-1QuickTime
described 2-12script step 10-7
Quitting FileMaker Pro 1-8Quotation marks in searches 3-2, 3-3
Quotes, smart A-5
R Radio buttons
See also Value listschoosing from 2-9displaying field values 7-6editing 2-9
Ranges, finding 3-4Read/write password. See Access privileges
Read-only password. See Access privileges
Record locking 13-2Record numbers
inserting on layout 7-11Recording
scripts 10-4sounds 2-13
Recordsaccess privileges 9-1adding 2-4
on Web 14-16appending 12-3browsing
groups of 2-1in a list 2-2individual 2-2on Web 14-14sorted records 3-8
copying 2-4, 2-8current 2-3deleting 2-5
on Web 14-16deleting duplicates 3-6described 1-2displaying sorted related 8-11duplicating 2-4editing, on Web 14-17exporting 12-6finding 3-1
example script 10-13on Web 14-15
importing 12-2locked 13-2matching 12-2moving to 2-4numbers 7-11omitting 3-6printing
blank 4-4in columns 6-8large 4-3procedures 4-4
reserializing 2-10reverting 2-7selecting 2-3semi-sorted 3-9sorting 3-8
on Web 14-13
related records 8-11viewing as forms, lists, or tables 2-2
Records, master. See Master records
Records, related. See Related records
Recovering files B-3Rectangle tool 7-14Registering FileMaker Pro xiRelated fields
See also Fields; Relational databases
calculations 5-5changing 6-17described 8-2display on Web 14-6field definitions 5-12finding 3-4on layouts 6-16planning 8-8removing from a layout 6-17sorting on 3-9summarizing data 8-12syntax for field names 8-2
Related files See also Files; Relational databases
access privileges 8-5, 8-9, 9-2accessing data from a third file 8-14
changing in relationship 8-10described 8-2planning 8-8
Related records See also Records; Relational databases
adding 2-5, 8-11copying 2-8defining 2-5deleting 2-5, 8-11

I-12 FileMaker Pro User’s Guide
described 8-2displaying in portals 6-16duplicating 2-5exporting 12-7finding and omitting 3-4importing 12-2sorting 8-11summarizing data 8-12
Relational databases See also Portals; Related fields; Related files; Related records; Relationships
copying related records 2-5defining 8-9defining portals 6-19deleting related records 2-5described 8-2duplicate filenames for 8-10finding and omitting related records 3-4
many-to-many relationships between data 8-15
master filedescribed 8-2planning 8-8
match fieldsdescribed 8-2planning 8-5
one-to-many relationships between data 8-4
one-to-one relationships between data 8-4
planning 8-7portals 8-2sorting 3-9terminology 8-2, 8-6
RelationshipsSee also Relational databaseschanging 8-12changing for portals 8-12changing related file 8-10defining 8-10
described 8-2joins, for many-to-many relationships 8-15
planning 8-9self-joins 8-5sorting in dialog box 8-11to and from same file 8-5
Relookups, described 8-13Remarks, in scripts 10-9Remote Data Access Companion 15-2
Remote files, sharingvia ODBC 15-3Web 14-5, 14-8
Removing. See Deleting Renaming layouts 6-8Rendering layouts, on Web 14-12Reordering
field definitions 5-12layout parts 6-29layouts 6-8Script menu items 10-11script steps 10-4, 10-10sort fields 3-8
Repeating fieldsdefining 5-11described 5-11exporting 12-8formatting 7-7importing 12-5separating 12-8sorting on 3-9splitting 12-8tab order 7-9using in calculations 11-9
Repeating find requests 3-5, 3-7Repeating functions 11-9Repeating panels. See Portals Repetitions. See Repeating fields Replacing
data during import 12-2, 12-3data in multiple records 2-10text 2-14
Reports See also Layouts; Subsummaries
adding date, time, page numbers 7-11
Columnar list/report 6-5creating 6-2previewing 4-3printing 4-4records in columns 6-8with grouped data
creating 6-3, 6-5printing 4-3, 4-4, 6-28
Requests. See Find requests Requirements
exporting 12-7importing 12-7Web Companion 14-3, 14-4
Reserializing records 2-10Resizing
layout parts 6-30objects 6-14, 7-19
Restricting access. See Access privileges
Retrieving data from other files. See Exchanging files
Revertingfind requests 3-6records 2-7
Right-click menus. See Context menus 1-5
Rights. See Access privileges RMI format 2-12Rotating objects 7-18Rounded rectangle tool 7-14Rows
in Excel import 12-4in portals 6-20
Rows, in ODBC tables 15-1Ruler lines
described 7-20setting units 7-20showing/hiding 7-20
Rulersgraphic 7-20lines 7-20setting units 7-20showing/hiding 7-20text 7-12
Running scripts 10-2
S Saving
data automatically A-3setting preference for A-3shared files 13-2, 13-4
Scientific notation in number fields 6-23
Script menuadding items 10-5, 10-10deleting items 10-10reordering items 10-11
Script specifications. See Scripts, settings
Script stepsadding 10-4deleting 10-4described 10-6for related fields 10-6italicized 10-10OLE objects 10-8options 10-4, 10-6reordering 10-4, 10-10
ScriptMakerexamples 10-13steps 10-6
Scripts adding
comments 10-9

Index I-13
menu items 10-5, 10-10remarks 10-9
automatically performing A-5automating relookups 10-8backup script B-1buttons 10-12changing 10-10commands 10-6copying 1-7, 10-10DDE 10-9defining 10-4deleting 10-10deleting menu items 10-10described 10-2designing 10-3dialing phone numbers 10-9, A-3
displaying error messages 10-6
duplicating 10-10examples 10-13external 10-2for ODBC import 15-13importing 10-11keyboard shortcuts 10-11looping 10-6modifying 10-10naming 10-4passwords 9-1pausing 10-2
adding to scripts 10-5described 10-2example 10-1
performing 10-1, 10-2planning 10-3printing 4-4, 4-5reordering in Script menu 10-11
resuming 10-2running 10-2setting preferences A-5
settings keeping 10-10replacing 10-10restoring 10-4storing 10-4
shutdown 10-2, A-5startup 10-2, A-5stopping 10-2subscripts
adding to scripts 10-4changing 10-10described 10-2
testing 10-3with Instant Web Publishing 10-1
Scroll barsadding to fields 7-2in portals 6-20
Search page, Webchoosing layouts for 14-13setting up 14-10viewing in browser 14-15
Search requests. See Find requests Searching. See Finding Secondary files. See Relational databases
Security, file. See Access privileges
Selectingcheckboxes 2-9Edit items 2-9from pop-up lists 2-9from pop-up menus 2-9objects 6-12
grouping 7-17ungrouping 7-17
Other items 2-9patterns 7-15printer 4-2radio buttons 2-9records 2-3
text 2-13Selection handles 6-14Selection tool 6-12Self-joins
described 8-5for summarizing data in portals 8-12
Semi-sorted records 3-9Sending mail 10-9Sending messages 13-3Serial numbers, modifying 2-10Server. See Host; FileMaker Server
SettingsSee also Preferencesalignment 7-18tab order 7-8Web Companion 14-7
Shared files See also Networks access privileges 9-1closing 13-4coffee cup icon 13-2described 13-1double arrow icon 13-2exiting FileMaker Pro 13-4guests 13-1host 13-1in workgroups 14-2, 14-7
limitations 13-1on Web 14-1, 14-10
access privileges 14-5, 14-8
opening 13-5quitting FileMaker Pro 13-4related 13-3saving 13-2, 13-4
Sharing information. See Exchanging files
Showing/hiding See also Hiding objects
ruler lines 7-20rulers 7-20status area 2-1T-squares 7-20
Shutdownoptions 10-2scripts 10-2, A-5
Single-page form layout. See Standard form layout
Size palette
described 7-19positioning objects 7-19resizing objects 6-14, 7-19
text 7-12text ruler 7-12
Sliding objectsdisplaying 7-23, 7-24parts 7-23setting 7-24
Smart quotes A-5Sort order
changing 3-8creating 3-8for different field types 3-9in scripts 10-4records on Web 14-13restoring original 3-9summary fields 3-10
Sort page, Websetting up 14-10viewing in browser 14-16
Sorting 3-8See also Sort orderascending order 3-8canceling 3-8custom order 3-8descending order 3-8described 3-8in scripts 10-4

I-14 FileMaker Pro User’s Guide
master records with related fields 3-9
on break fields 6-28records in table 2-2records on Web 14-13related fields 3-9related records 8-11relationships in dialog box 8-11
repeating fields 3-9summary fields 3-10
Soundscopying 2-8deleting 2-13inserting into fields 2-12on the Web 14-4playing 2-13recording 2-13
Source file, import 12-2Space, removing blank 7-22Spelling
See also Dictionaries checking 2-14options 2-14setting preferences A-6
Splitting repeating fields 12-8Spreadsheets
converting 12-6importing 12-4
SQL 15-1building queries 15-7SQL join 15-8, 15-11
SQL Server 15-2Stacking objects 7-18Standard Deviation for summary fields 5-7
Standard form layoutSee also Layoutsdescribed 6-3
Standard toolbar 1-5Starting FileMaker Pro 1-6
Startupoptions 10-2scripts
described 10-2performing A-5
Static web publishing 14-3Status area
Browse mode 2-1, C-3Find mode 3-6, C-3Layout mode 6-11, C-3showing/hiding 2-1, 6-12, A-5
Status functionsdescribed 11-10using in scripts 10-6
Steps. See Script steps Stopping
See also Closing lookups 8-13scripts 10-2
Stored results 5-11Strict data type 5-10Strings, text. See Text, literal Styles, in web views 14-11Subforms. See Portals Subscripts. See Scripts, subscripts Subsummaries
See also Grand summaries; Reports; Subsummary parts; Summary fields
creating reports 6-3, 6-5described 6-26exporting 12-8printing 4-3, 4-4, 6-28sorting subsummary values 3-10
viewing 6-28Subsummary parts
See also Grand summary parts; Subsummaries
described 6-26page breaks 6-29
Subtotals. See Subsummaries; Summary fields
Suffixes 2-11Summaries. See Grand summary parts; Subsummary parts; Summary fields
Summarizing data in related fields 8-12
Summary fieldsAverage for 5-7Count for 5-7defining 5-6described 5-4, 5-6exporting 12-7find requests 3-2, 3-6formulas 11-1Fraction of Total for 5-7importing 12-2Maximum for 5-7Minimum for 5-7moving to 2-7on layouts 6-26, 6-28options for 5-7sorting 3-10Standard Deviation for 5-7Total for 5-7
Summary functions 11-8Summary parts. See Subsummary parts; Grand summary parts
Switching layouts 6-8SYLK format 12-1, 12-8Symbols
exporting 12-6finding 3-3pasting 7-11underscore 14-6
Symbols pop-up menu 3-2Syntax
formulas 11-1related field names 8-2
System formats. See Formats
T Tab order
omitting fields 7-9on the Web 7-9repeating fields 7-9setting 7-8
Table rights. See Access privileges
Table View, Websetting up 14-10viewing in browser 14-15
Table View. See View as table Tables
controlling formatting 6-10viewing records as 2-2, 6-4
Tables, database. See Files Tabs
alignment 7-13attributes 7-13decimal 7-13inserting in a field 2-7setting 7-12, 7-13
Tab-Separated Text format 12-1TCP/IP 14-5, A-2Templates
creating files 5-2described 5-2displaying A-2suppress New Database dialog box 5-2
Text See also Fields adding 2-7, 2-13adding to a layout 7-10alignment 7-13attributes 6-22, 7-12baselines 7-2boundaries, showing/hiding 7-17
changing appearance 7-14color 7-12, 7-14

Index I-15
copying 2-14, 6-13cutting 2-14, 6-13deleting 2-14, 6-13editing 2-14fields 5-4finding 3-3formatting 6-22, 7-12line spacing 7-13operators 11-4paragraphs 7-12pasting 2-14, 6-13removing 2-14replacing 2-14rotating 7-18selecting 2-13, 6-12styles 7-12tool 7-10typing values in fields 2-7using drag and drop A-2
Text fields. See Text Text Formatting toolbar 1-5Text functions 11-5Text ruler
changing text attributes 7-12setting tabs 7-12showing/hiding 7-20
Text tool 7-10Themes, layout 6-5Time
See also Time fields current 2-10finding 3-4formatting 6-24functions 11-7inserting on layout 7-11invalid 3-4symbol, formatting 6-24
Time fields See also Fields; Time described 5-4entering data 2-7
typing values in 2-7Title headers and footers
described 6-25Today’s date, finding 3-4Toolbars, described 1-5Tools
described 6-11locking 7-14switching between 7-14tool palette
field tool 6-16tools palette
line tool 7-14oval tool 7-14portal tool 6-19rectangle tool 7-14rounded rectangle tool 7-14
selection tool 6-12text tool 7-10
working with 7-14Tools toolbar 1-5Tooltips 1-5Total for summary fields 5-7Totals. See Summaries Trailing summaries 6-26Transactions, Web 14-8Trigger fields. See Match fields Troubleshooting xiTrue 6-22, 11-3T-squares
adjusting 7-20described 7-20showing/hiding 7-20
Tutorial xviiTyping in fields 2-7
U Unauthorized users. See Access privileges
Ungrouping objects 7-17Unsorting records 3-9Unstored results 5-11Update, import 12-2Updating files. See Converting Updating lookup values 8-13Updating records. See Importing URLs, opening 2-8, 10-9, 14-3User dictionaries. See Dictionaries
User names current
pasting into fields 2-10script step 10-7
inserting on layout 7-11setting A-2
Using data from other files. See Exchanging files
VValidating fields 5-9Value lists
See also Checkboxes; Pop-up lists; Pop-up menus; Radio buttons
access privileges 9-1copying 7-5custom sorting by 3-8defining 7-3deleting 7-5described 7-3Edit items 2-9, 7-6editing 2-9naming 7-3options 7-4Other items 2-9showing/hiding 2-9
Valuescopying 2-8displaying 7-6finding duplicates 3-6finding exact 3-3inserting indexed 2-7looking up automatically 8-6
Values, field. See Field values View as Form 2-2View as List
described 2-2subsummaries 6-28
View as Table 6-4, 6-5described 2-2setting properties 6-10
Viewing records as forms, lists, or tables 2-2
Views, Web 14-14appearance 14-11setting up 14-10
Virtual results 5-11
W WAV format 2-12Web
access 14-4described 14-2field name considerations 5-3hosting databases on 14-2terminology 14-1web servers 14-2
Web browser. See Browser, Web Web Companion
See also Instant Web Publishing
and tab order 7-9configuring 14-7default settings 14-7enabling A-4functions 11-13

I-16 FileMaker Pro User’s Guide
home page 14-3, 14-6, 14-8 Instant Web Publishing browser pages 14-3, 14-6, 14-14
remote administration 14-8 requirements 14-3, 14-4 setting up 14-7 setting up layouts 14-12 styles 14-11 testing databases 14-13 tracking user activity 11-13, 14-8
Web Security Database 14-5, 14-9
Web styles 14-11 Wide layouts
printing 4-2 Wildcards in searches 3-2 Windows
setting size A-5 WKS format 12-8
WK1 format 12-1 Workgroups, sharing files 14-2, 14-7
World Wide Web. See Web
X XOR operator 11-4
Y Y2K
and date functions 11-7 converting files 1-7 defining date fields 5-5 entering data 2-7 importing files 12-2 searching for years 3-3 sorting dates 3-9 year validation 2-7, 5-9, 5-10
Z Zoom controls 2-1