fourth edition input devices - city tech openlab · mike meyers’comptia a+® guide to managing...
TRANSCRIPT

© 2012 The McGraw-Hill Companies, Inc. All rights reserved
Mike Meyers’ CompTIA A+®
Guide to
Managing and
Troubleshooting PCs
Fourth Edition
Input DevicesChapter 20

© 2012 The McGraw-Hill Companies, Inc. All rights reserved
Mike Meyers’ CompTIA A+®
Guide to
Managing and
Troubleshooting PCs
Fourth Edition
Overview
• In this chapter, you will learn how to
– Explain how to support common input/output ports
– Identify certain standard input devices on a PC
– Describe how certain multimedia input devices work on a PC

© 2012 The McGraw-Hill Companies, Inc. All rights reserved
Mike Meyers’ CompTIA A+®
Guide to
Managing and
Troubleshooting PCs
Fourth Edition
Supporting Common Ports
• Serial
• USB
• FireWire

© 2012 The McGraw-Hill Companies, Inc. All rights reserved
Mike Meyers’ CompTIA A+®
Guide to
Managing and
Troubleshooting PCs
Fourth Edition
Serial Ports
• Convert data between serial and parallel devices
• RS-232 Standard
– Primary standard used for serial devices
– Rarely used today in PCs
– Other standards (such as
USB) are much quicker
• COM ports are serial
– 9-pin connector
– Used by modems and other devices
Figure 1: Serial port

© 2012 The McGraw-Hill Companies, Inc. All rights reserved
Mike Meyers’ CompTIA A+®
Guide to
Managing and
Troubleshooting PCs
Fourth Edition
Serial Port Properties
• Speed set in bits per second
– 75 bps to 128,000 bps
– 9600 bps common for
devices other than modems
– Use Device Manager
• Size of data chunks sent is 7 or 8 bits
• Stop bits
– Identify end of chunk
• Flow controlFigure 2: Serial port settings

© 2012 The McGraw-Hill Companies, Inc. All rights reserved
Mike Meyers’ CompTIA A+®
Guide to
Managing and
Troubleshooting PCs
Fourth Edition
Serial Port Properties (continued)
Figure 3: Serial port instructions

© 2012 The McGraw-Hill Companies, Inc. All rights reserved
Mike Meyers’ CompTIA A+®
Guide to
Managing and
Troubleshooting PCs
Fourth Edition
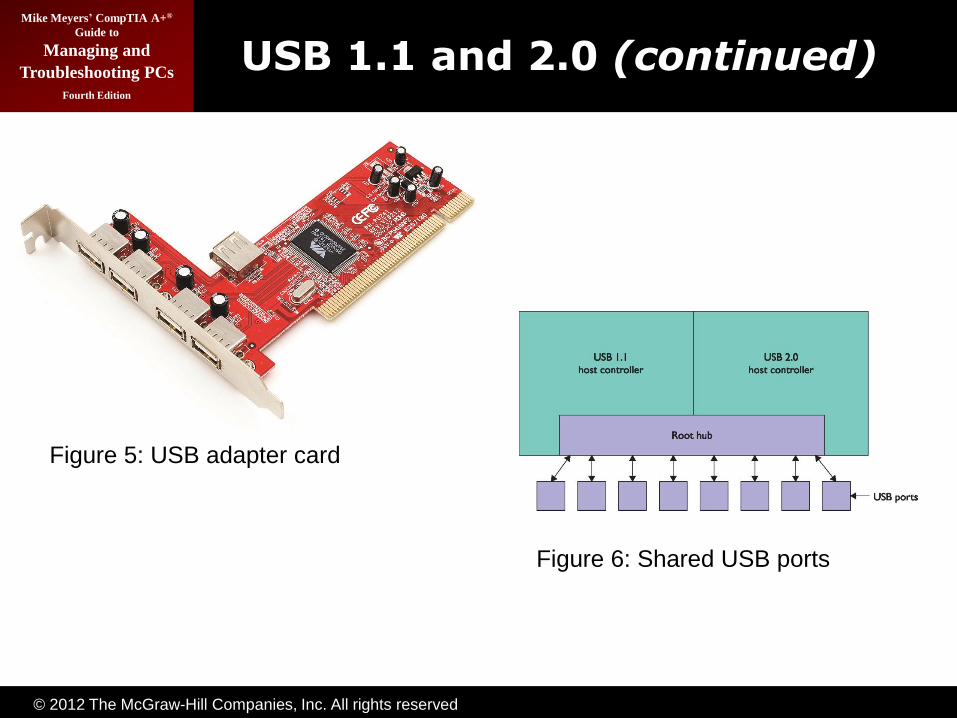
USB Ports
• Understanding USB
– Host controller (often in chipset) contains root hub
– Root hub is like an
expansion bus
– All the USB devicesconnect to the roothub ports
– All devices share the same bandwidth
• The more devices
you have on a single
USB host controller,
the slower they run
Figure 4: Host controller, root hub, and USB ports

© 2012 The McGraw-Hill Companies, Inc. All rights reserved
Mike Meyers’ CompTIA A+®
Guide to
Managing and
Troubleshooting PCs
Fourth Edition
USB 1.1 and 2.0 Speeds
• USB 1.1—first widely adopted standard
– 1.5 Mbps (Low-Speed)
– 12 Mbps (Full-Speed)
• USB 2.0—backward-compatible
– 480 Mbps (Hi-Speed)
• To get Hi-Speed
– Hi-Speed device must be plugged into Hi-Speed port
• Speed is total speed of bus
– Divided among all the devices
• Most systems support both 1.1 and 2.0
© 2012 The McGraw-Hill Companies, Inc. All rights reserved
Mike Meyers’ CompTIA A+®
Guide to
Managing and
Troubleshooting PCs
Fourth Edition
USB 1.1 and 2.0 (continued)
Figure 5: USB adapter card
Figure 6: Shared USB ports

© 2012 The McGraw-Hill Companies, Inc. All rights reserved
Mike Meyers’ CompTIA A+®
Guide to
Managing and
Troubleshooting PCs
Fourth Edition
USB 3.0
• USB 3.0
– Called SuperSpeed USB
– Throughput speeds up to 5 Gbps
– Devices showing up in 2010
– Connectors differ, but provide backward compatibility with older USB standards
• USB 2.0 cables will plug into USB 3.0 devices
– All devices will run at USB 2.0 speeds
• USB 3.0 cables will not fit into prior-version USB devices
• USB 3.0 cables required for the higher speed
• Ports are separate and clearly marked as USB 3.0, usually colored blue

© 2012 The McGraw-Hill Companies, Inc. All rights reserved
Mike Meyers’ CompTIA A+®
Guide to
Managing and
Troubleshooting PCs
Fourth Edition
USB 3.0 (continued)
Figure 7: USB 3.0 ports
Figure 8: USB 3.0 cable

© 2012 The McGraw-Hill Companies, Inc. All rights reserved
Mike Meyers’ CompTIA A+®
Guide to
Managing and
Troubleshooting PCs
Fourth Edition
USB Hubs and Cables
• USB controller theoretically supports up to 127 devices—but that is not practical in the real world
– Add hubs to add additional ports
• Hubs can be powered or unpowered
• USB 1.1 and 2 cables can’t be longer than 5 meters—USB 3 does not have this restriction

© 2012 The McGraw-Hill Companies, Inc. All rights reserved
Mike Meyers’ CompTIA A+®
Guide to
Managing and
Troubleshooting PCs
Fourth Edition
USB Hubs and Cables (continued)
• USB connectors and ports come in multiple sizes:
– A, B, mini-A, mini-B, micro-A, and micro-B
– USB A ports and connectors are for interfacing with the PC
– Most peripherals use B, mini-B, or micro-B
connectors and ports
– Micro connections are especially popular on smartphones

© 2012 The McGraw-Hill Companies, Inc. All rights reserved
Mike Meyers’ CompTIA A+®
Guide to
Managing and
Troubleshooting PCs
Fourth Edition
USB Hubs and Cables (continued)
Figure 9: USB cable
Figure 10: USB hub
Figure 11: USB keyboard with built-in hub

© 2012 The McGraw-Hill Companies, Inc. All rights reserved
Mike Meyers’ CompTIA A+®
Guide to
Managing and
Troubleshooting PCs
Fourth Edition
USB Configuration
• Windows has a large number of built-in drivers for USB devices
• First rule of USB device installation– Install driver BEFORE installing device – exception: USB
thumb drives
– Device Manager provides many details on USB devices
Figure 12: Windows XP speed warning

© 2012 The McGraw-Hill Companies, Inc. All rights reserved
Mike Meyers’ CompTIA A+®
Guide to
Managing and
Troubleshooting PCs
Fourth Edition
USB Configuration (continued)
• Device Manager shows all USB devices
– Locate USB hub under Universal Serial Bus Controller icon
– Has a Power tab to show power properties
• Beware of sleeping devices
– System tells them to sleep to save power
– Sleeping devices no longer appear in Device Manager
– Might not wake up

© 2012 The McGraw-Hill Companies, Inc. All rights reserved
Mike Meyers’ CompTIA A+®
Guide to
Managing and
Troubleshooting PCs
Fourth Edition
USB Configuration (continued)
Figure 13: USB hub Power tab
Figure 14: General purpose bus-powered hub
Figure 15: Power Management tab
© 2012 The McGraw-Hill Companies, Inc. All rights reserved
Mike Meyers’ CompTIA A+®
Guide to
Managing and
Troubleshooting PCs
Fourth Edition
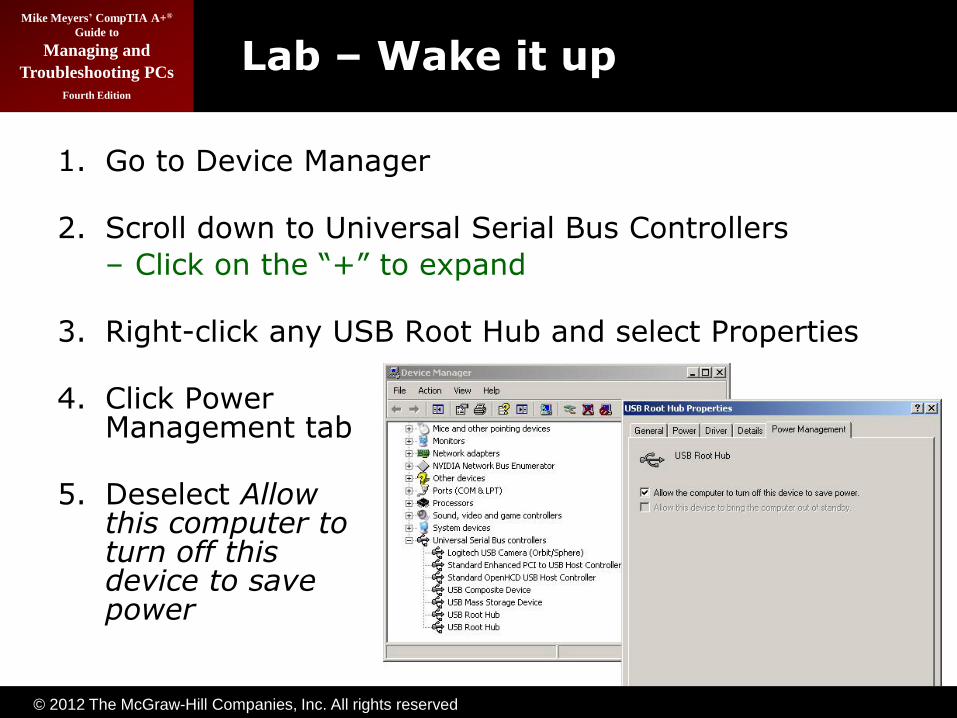
Lab – Wake it up
1. Go to Device Manager
2. Scroll down to Universal Serial Bus Controllers
– Click on the ―+‖ to expand
3. Right-click any USB Root Hub and select Properties
4. Click Power Management tab
5. Deselect Allow this computer to turn off this device to save power

© 2012 The McGraw-Hill Companies, Inc. All rights reserved
Mike Meyers’ CompTIA A+®
Guide to
Managing and
Troubleshooting PCs
Fourth Edition
IEEE 1394 (FireWire)
• Similar to USB
– Different speeds and different connectors
• IEEE 1394
– 1394a runs at 400 Mbps
– 1394b runs at 800 Mbps
– 6-pin powered connector
– 4-pin (unpowered) connector
– 9-pin 1394b connector

© 2012 The McGraw-Hill Companies, Inc. All rights reserved
Mike Meyers’ CompTIA A+®
Guide to
Managing and
Troubleshooting PCs
Fourth Edition
FireWire
• Devices can be connected to a hub or daisy-chained
• Up to 63 devicessupported
• Max cable length
can be up to 4.5 meters
• Can network twocomputers in
Windows 2000/XP,but not Vista
Figure 16: Hubbed versus daisy-chain connections

© 2012 The McGraw-Hill Companies, Inc. All rights reserved
Mike Meyers’ CompTIA A+®
Guide to
Managing and
Troubleshooting PCs
Fourth Edition
General Port Issues
• Use Hardware Removal Tool
• Basic checks
– Is the port bad or is the device bad?
– Plug in known-good device to
check port
– Plug into another port on the motherboard
• If port is bad
– Check CMOS—turned off?
– Check Device Manager for
disabled devices
Figure 17: Disabled parallel port in Device Manager in both Vista
and XP

© 2012 The McGraw-Hill Companies, Inc. All rights reserved
Mike Meyers’ CompTIA A+®
Guide to
Managing and
Troubleshooting PCs
Fourth Edition
General Port Issues
• Check for physical damage
– Bent, missing pins
– Sometimes possible to reshape pins and plugs
Figure 18: Broken USB port
Figure 19: Badly bent PS/2 plug

© 2012 The McGraw-Hill Companies, Inc. All rights reserved
Mike Meyers’ CompTIA A+®
Guide to
Managing and
Troubleshooting PCs
Fourth Edition
Common Standard Input Devices
• Keyboards
• Mice
• Scanners
• Digital cameras
• Web cameras
• Biometric Devices

© 2012 The McGraw-Hill Companies, Inc. All rights reserved
Mike Meyers’ CompTIA A+®
Guide to
Managing and
Troubleshooting PCs
Fourth Edition
• Primary method of input
• USB keyboards
– Make sure USB Keyboard Support Option is enabled in CMOS
• Some settings are available
in Keyboard applet (Windows 2000/XP)
• Personalization applet(Windows Vista) offers
extra settings
– Ease of Access
Keyboards
Figure 20: CMOS USB Keyboard Support option

© 2012 The McGraw-Hill Companies, Inc. All rights reserved
Mike Meyers’ CompTIA A+®
Guide to
Managing and
Troubleshooting PCs
Fourth Edition
Keyboards (continued)
Figure 21: Keyboard Control Panel applet

© 2012 The McGraw-Hill Companies, Inc. All rights reserved
Mike Meyers’ CompTIA A+®
Guide to
Managing and
Troubleshooting PCs
Fourth Edition
Cleaning the Keyboard
• Clean the top with cloth dampened with water
• Can use isopropyl alcoholfor stubborn dirt
• Power off before cleaning!
Figure 22: Cleaning keys

© 2012 The McGraw-Hill Companies, Inc. All rights reserved
Mike Meyers’ CompTIA A+®
Guide to
Managing and
Troubleshooting PCs
Fourth Edition
Cleaning the Keyboard
(continued)
• Cleaning under the keys
– Start with compressed air
– Can sometimes take the layers apart and clean
– Keep track of the location of all keys and parts
– Allow sheets to dry before reassembling
– Careful when removing keys—can break them

© 2012 The McGraw-Hill Companies, Inc. All rights reserved
Mike Meyers’ CompTIA A+®
Guide to
Managing and
Troubleshooting PCs
Fourth Edition
Cleaning the Keyboard
(continued)
Figure 23: Serious keyboard surgery
Figure 24: Prying off a key

© 2012 The McGraw-Hill Companies, Inc. All rights reserved
Mike Meyers’ CompTIA A+®
Guide to
Managing and
Troubleshooting PCs
Fourth Edition
Mice
• Hot keys enable you to work without a mouse in Windows
• Mouse applet in Control Panel
Figure 25: Mouse Control Panel applet

© 2012 The McGraw-Hill Companies, Inc. All rights reserved
Mike Meyers’ CompTIA A+®
Guide to
Managing and
Troubleshooting PCs
Fourth Edition
Mice (continued)
• Two primary technologies
– Ball mice—use small round ball
– Optical mice—use LEDs or lasers
• Common problem with ball mice
– They get dirty
– Mouse pointer becomes jumpy
• Optical mice preferred

© 2012 The McGraw-Hill Companies, Inc. All rights reserved
Mike Meyers’ CompTIA A+®
Guide to
Managing and
Troubleshooting PCs
Fourth Edition
• Ball mouse
– Remove the ball and washwith soap and water
– Dry completely before returningto the mouse
– Remove dirt from roller
• Optical mouse
– Rarely need cleaning
– Clean optics when necessary
Cleaning the Mouse

© 2012 The McGraw-Hill Companies, Inc. All rights reserved
Mike Meyers’ CompTIA A+®
Guide to
Managing and
Troubleshooting PCs
Fourth Edition
Cleaning the Mouse (continued)
Figure 26: Removing the collar on a ball mouse
Figure 27: Cleaning the rollers on a ball
mouse
Figure 28: Cleaning an optical mouse

© 2012 The McGraw-Hill Companies, Inc. All rights reserved
Mike Meyers’ CompTIA A+®
Guide to
Managing and
Troubleshooting PCs
Fourth Edition
Scanners
• Enable you to make digital copies of
– Photos
– Documents
– Drawings
– Negatives
• Can enable optical character recognition (OCR)
• Flatbed scanners
– Place document on the glass
– Close the lid
– Run the software
Figure 29: Scanner open with photograph face down

© 2012 The McGraw-Hill Companies, Inc. All rights reserved
Mike Meyers’ CompTIA A+®
Guide to
Managing and
Troubleshooting PCs
Fourth Edition
Scanners (continued)
• Software used to capture image
• Default driver
– TWAIN (Technology Without An Interesting Name)
• Common software
– Scanner-specific
– Gnu Image Manipulation
Program (GIMP)
Figure 30: Epson software with Photoshop open in the background

© 2012 The McGraw-Hill Companies, Inc. All rights reserved
Mike Meyers’ CompTIA A+®
Guide to
Managing and
Troubleshooting PCs
Fourth Edition
Scanners (continued)
Figure 31: Acquiring an image in GNU Image Manipulation Program

© 2012 The McGraw-Hill Companies, Inc. All rights reserved
Mike Meyers’ CompTIA A+®
Guide to
Managing and
Troubleshooting PCs
Fourth Edition
How to Choose a Scanner
• Consider five primary variables– Resolution—dots per inch (dpi)
– Color depth—bits used for color (8, 16, 24, 36, 42, 48)
– Grayscale depth—bits for shades of gray (8, 16, more)
– Connection—typically USB or FireWire
– Scan speed—seconds

© 2012 The McGraw-Hill Companies, Inc. All rights reserved
Mike Meyers’ CompTIA A+®
Guide to
Managing and
Troubleshooting PCs
Fourth Edition
How to Choose a Scanner (continued)
Figure 32: Earring scanned at 72 dpi and
24-bit color
Figure 33: Same earring, scanned at 300 dpi and
24-bit color
Figure 34: Same earring, scanned at 1200 dpi and 24-bit
color

© 2012 The McGraw-Hill Companies, Inc. All rights reserved
Mike Meyers’ CompTIA A+®
Guide to
Managing and
Troubleshooting PCs
Fourth Edition
Installing and Scanning Tips
• Scanners use USB or FireWire connections today—older ones use SCSI or parallel
– Install drivers before plugging in
• Do the best quality possible first
– Then manipulate size and quality for end use
• Two resources affect what you can do
– RAM: 8 x 10 @ 600 dpi is about 93 MB
– Processor speed

© 2012 The McGraw-Hill Companies, Inc. All rights reserved
Mike Meyers’ CompTIA A+®
Guide to
Managing and
Troubleshooting PCs
Fourth Edition
Installing and Scanning Tips (continued)
• Watch out for the Locking Bar!
– All scanners have a lock for the scanning mechanism to protect it during a move from one
location to another.
– If you have a recently moved scanner that won’t scan, check the lock.
• Unlock as necessary
• An excellent site for scanner information (for instance, if you’re creating family archives)
www.scantips.com

© 2012 The McGraw-Hill Companies, Inc. All rights reserved
Mike Meyers’ CompTIA A+®
Guide to
Managing and
Troubleshooting PCs
Fourth Edition
• Used for authentication or recognition
– Fingerprint scanners
– Retinal scanners
– Voice recognition
Biometric Devices
Figure 35: USB thumb drive with fingerprint
scanner (photo courtesy of Lexar Media, Inc.)
Figure 36: Microsoft fingerprint scanner on a
keyboard

© 2012 The McGraw-Hill Companies, Inc. All rights reserved
Mike Meyers’ CompTIA A+®
Guide to
Managing and
Troubleshooting PCs
Fourth Edition
Biometric Devices (continued)
• Biometric devices don’t replace passwords
– All biometric devices require training
• Voice recognition devices, for example, require that you spend a lot of time getting the software to understand your voice
• Installing
– Install the device (driver first, then USB device)
– Register your identity (insert body part here)
– Configure the software to tell the device what to do when it recognizes you

© 2012 The McGraw-Hill Companies, Inc. All rights reserved
Mike Meyers’ CompTIA A+®
Guide to
Managing and
Troubleshooting PCs
Fourth Edition
• Designed to read standard Universal Product Code (UPC)
• Frequently used to track inventory
– Includes asset inventory
– Also used in point-of-sale systems
– Connectors
– PS/2
– USB
Bar Code Readers
Figure 37: Typical UPC code
Figure 38: Pen scanner (photo courtesy of Wasp® Barcode Technologies)

© 2012 The McGraw-Hill Companies, Inc. All rights reserved
Mike Meyers’ CompTIA A+®
Guide to
Managing and
Troubleshooting PCs
Fourth Edition
Touch Screens
• A monitor with a sensing device on its face
• Detects location of touch
– Either by finger or stylus
– Responds as if it were a mouse click
• Touch screens can be seen in
– Information kiosks
– Smartphones
– Point-of-sale systems
– Tablets

© 2012 The McGraw-Hill Companies, Inc. All rights reserved
Mike Meyers’ CompTIA A+®
Guide to
Managing and
Troubleshooting PCs
Fourth Edition
KVM
• Keyboard, video, mouse (KVM) switch
• Enables you to connect multiple computers to a single keyboard, video, and mouse
• Useful when space is limited
Figure 39: A typical KVM switch

© 2012 The McGraw-Hill Companies, Inc. All rights reserved
Mike Meyers’ CompTIA A+®
Guide to
Managing and
Troubleshooting PCs
Fourth Edition
Gamepads and Joysticks
• Two peripherals are commonly used for controlling PC games: joysticks and gamepads
– Games that use joysticks have declined in
popularity
– Most modern PC games are controlled by mouse and keyboard
Figure 40: A joystick
Figure 41: A gamepad

© 2012 The McGraw-Hill Companies, Inc. All rights reserved
Mike Meyers’ CompTIA A+®
Guide to
Managing and
Troubleshooting PCs
Fourth Edition
Gamepads and Joysticks (continued)
• Some PC games, especially those that were designed to played on gaming consoles, are best enjoyed when using a gamepad
– A gamepad looks more like a standard video game controller, usually covered in an array of buttons and triggers
– Joysticks and gamepads previously used a special joystick connector; now they use USB
• May require additional or specific drivers

© 2012 The McGraw-Hill Companies, Inc. All rights reserved
Mike Meyers’ CompTIA A+®
Guide to
Managing and
Troubleshooting PCs
Fourth Edition
Gamepads and Joysticks (continued)
• In Windows XP and Vista, they can be configured using the Game Controllers Control Panel applet
• In Windows 7, open the Start menu and select Devices and Printers. Right-click on the controller and select Game controller settings

© 2012 The McGraw-Hill Companies, Inc. All rights reserved
Mike Meyers’ CompTIA A+®
Guide to
Managing and
Troubleshooting PCs
Fourth Edition
Gamepads and Joysticks (continued)
Figure 42: Game controller properties

© 2012 The McGraw-Hill Companies, Inc. All rights reserved
Mike Meyers’ CompTIA A+®
Guide to
Managing and
Troubleshooting PCs
Fourth Edition
Digitizers
• A digitizer (otherwise known as a pen tablet) enables users to paint, ink, pencil, or otherwise draw on a computer
– Receives input using a special surface
– Most digitizers connect to your PC via a USB connection
– Should include both drivers and a configuration utility
– Some may require specific graphics software
to function

© 2012 The McGraw-Hill Companies, Inc. All rights reserved
Mike Meyers’ CompTIA A+®
Guide to
Managing and
Troubleshooting PCs
Fourth Edition
Digitizers (continued)
Figure 43: A type of digitizer known as the
Wacom pen tablet
Figure 44: Drawing with a digitizer

© 2012 The McGraw-Hill Companies, Inc. All rights reserved
Mike Meyers’ CompTIA A+®
Guide to
Managing and
Troubleshooting PCs
Fourth Edition
Multimedia Devices

© 2012 The McGraw-Hill Companies, Inc. All rights reserved
Mike Meyers’ CompTIA A+®
Guide to
Managing and
Troubleshooting PCs
Fourth Edition
Digital Cameras
• Storage media—digital film
– Most devices use a removable storage media instead of film
– Usually a Secure Digital (SD) card
– Usually range in capacity from 1 GB to 32 GB
– Some cameras have built-in hard drives for larger capacity
• Connection
– Most digital cameras plug directly into a USB port
– Another common option is to connect only the camera’s storage media to the computer, using a built-in or external digital media reader—most readers can handle multiple formats

© 2012 The McGraw-Hill Companies, Inc. All rights reserved
Mike Meyers’ CompTIA A+®
Guide to
Managing and
Troubleshooting PCs
Fourth Edition
Digital Cameras (continued)
Figure 45: Secure Digital card
Figure 46: Camera connecting to USB port

© 2012 The McGraw-Hill Companies, Inc. All rights reserved
Mike Meyers’ CompTIA A+®
Guide to
Managing and
Troubleshooting PCs
Fourth Edition
Digital Cameras (continued)
• Quality
– Usually expressed as some number of megapixels
– Range from 1 megapixel (older) to newer 5, 10, and
higher megapixels
– Choose optical zoom (built into the camera lens) over digital zoom (uses software built into the camera) whenever possible for better quality
• Form factor
– Come in many sizes and shapes
– Bigger is usually better in terms of quality and features

© 2012 The McGraw-Hill Companies, Inc. All rights reserved
Mike Meyers’ CompTIA A+®
Guide to
Managing and
Troubleshooting PCs
Fourth Edition
Digital Cameras (continued)
• Form factors (continued)
– Digital SLR (high-quality lens, CCDs/CMOS sensors, and flash; plus have interchangeable parts)
– Super Zoom (like SLR, but smaller and usually fixed)
– Mid-sized
– Pocket-sized
• Sensors matter
– Bigger is almost always better
– CCD (charge-coupled device)
– CMOS (complimentary metal-oxide semiconductor)

© 2012 The McGraw-Hill Companies, Inc. All rights reserved
Mike Meyers’ CompTIA A+®
Guide to
Managing and
Troubleshooting PCs
Fourth Edition
Digital Cameras (continued)
Figure 48: Typical digital cameras
Figure 49: Digital camcorders

© 2012 The McGraw-Hill Companies, Inc. All rights reserved
Mike Meyers’ CompTIA A+®
Guide to
Managing and
Troubleshooting PCs
Fourth Edition
Web Cameras
• PC cameras are often called webcams because their most common use is for Internet video communication.
• Image quality is the biggest issue with webcams.
– Webcams measure their resolution in pixels, just like digital cameras.
– Webcams can have from as few as 100,000 pixels
up to millions of pixels.
– As with digital cameras, a higher number of megapixels is usually better—up to a point.

© 2012 The McGraw-Hill Companies, Inc. All rights reserved
Mike Meyers’ CompTIA A+®
Guide to
Managing and
Troubleshooting PCs
Fourth Edition
Web Cameras (continued)
Figure 50: Video chatting by webcam with Skype

© 2012 The McGraw-Hill Companies, Inc. All rights reserved
Mike Meyers’ CompTIA A+®
Guide to
Managing and
Troubleshooting PCs
Fourth Edition
Web Cameras (continued)
• Image quality (continued)
– The more megapixels, the larger the file size. Around 1.3 megapixels is the highest resolution
quality you can use before your video becomes too large for even broadband connections without slowing them down.
– The next issue with webcams is the frame rate—
higher frame rates make for smoother video; 30 frames per second is considered the best.
• Many cameras come with microphones, or you can use a better-quality headset.

© 2012 The McGraw-Hill Companies, Inc. All rights reserved
Mike Meyers’ CompTIA A+®
Guide to
Managing and
Troubleshooting PCs
Fourth Edition
Web Cameras (continued)
• Many cameras now can track you when you move, to keep your face in the picture—they recognize a human face with little or no ―training‖ and rotate position to keep your face in the picture.
• Almost all webcams use USB connections.
• Windows has limited drivers for webcams, so use the ones that come with the product—they also usually come with application software.

© 2012 The McGraw-Hill Companies, Inc. All rights reserved
Mike Meyers’ CompTIA A+®
Guide to
Managing and
Troubleshooting PCs
Fourth Edition
Web Cameras (continued)
Figure 51: This webcam program’s animated character mirrors your movements as you conference with friends or coworkers.

© 2012 The McGraw-Hill Companies, Inc. All rights reserved
Mike Meyers’ CompTIA A+®
Guide to
Managing and
Troubleshooting PCs
Fourth Edition
Web Cameras (continued)
Figure 52: Camera Settings applet

© 2012 The McGraw-Hill Companies, Inc. All rights reserved
Mike Meyers’ CompTIA A+®
Guide to
Managing and
Troubleshooting PCs
Fourth Edition
Web Cameras (continued)
• Some applications have trouble recognizing your webcam.
– Configure the program to use a camera.
– Select whether you want the camera to turn on automatically when you chat.
– Configure the image quality.
– Test the camera.
• To troubleshoot camera issues, use the general I/O troubleshooting steps first.
– Turn off other programs that use the camera—
Windows allows one program at a time to use the webcam.