from planning to canning
TRANSCRIPT

1
how to grow a
from planning to canningSalsa Garden
by Jill McSheehyof journeywithjill.net

2
One of the main reasons many home gardeners grow tomatoes is to make their own salsa! Truly there is no bet-ter salsa than one made with fresh-picked tomatoes!
Planting a salsa garden isn’t difficult. The biggest challenges lie in knowing when to plant and what to do when certain crops come to harvest earlier than others.
In this guide I will take you from plan-ning to canning – and everything in between.
Don’t want to can your salsa? No worries! Here’s a secret – I’m not a big fan of home-canned salsa. I’ve tried many recipes but our family just doesn’t care for the vinegar taste in properly (safely) canned salsas. I prefer to make mine fresh.
And for the other times of the season when the ingredients aren’t handy? Well, I have a secret for you there, and I’ll share it with you.
Still, so many of you guys love home canned salsa and I’ll include a few recipes. Oh, and don’t worry if you have no idea how to can salsa. I’ll take you through those steps as well.
Let’s get started!
~Jill

3
Contents:Ingredients......4 Supplies......10Planting.....14 Recipes.......22

4
IngredientsMost salsas include the same basic ingredients, and
these are the ones I will focus on in this book: tomatoes, onions, jalapenos, garlic, and cilantro.
TomatoesHome gardeners use all types of tomatoes in their salsas, and you can use just about any kind of tomato you want to grow. However, I recommend a paste tomato for making salsa.
Paste tomatoes have more flesh, less juice, and fewer seeds. This results in more “meat” from each tomato going into your salsa.
The types I recommend below are all paste tomatoes.
If you choose to use a slicing tomato, under-stand that you will have more juice and less flesh. You may be fine with that, especially if you grow a tomato with a taste you prefer. If you choose a slicing tomato, you can salt your chopped tomatoes in a colander to draw out the juice and develop the flavors before you place the tomatoes in the recipe.
But let’s assume that I’ve convinced you that using a paste tomato is the best tomato for salsa. Next, you’ll have to decide whether to grow a determinate or indeterminate variety.
Determinate tomatoes are bushier, require less staking, and most importantly, bear
Paste Tomatoes: - less juice & fewer seeds
- more flesh- will make more salsa per pound due to flesh content
Slicing Tomatoes:- more juice & seeds- more robust flavor
- might require juicing or salting to avoid a runny end
product

5
most of their fruit at once.
Indeterminate tomatoes vine out, require more staking, and most importantly, bear their fruit for the duration of the growing season – many will continue until you get your first frost.
The main advantage of growing determinate tomatoes for salsa is that you’ll get all of your tomatoes in one go. Once they’re ripe, you pick them all and – if your peppers are ripe – do all your canning at once.
The advantage of growing indeterminate to-matoes is you will get tomatoes for a longer period. Except during the hottest part of the year, they produce well into the fall.
I did find with my Amish paste variety, how-ever, that when they first begin to bear, they produced more at first, almost like a determi-nate type, and then they trickled in the rest of the season.
Determinate Tomatoes: - bear all at once
- need smaller stakes- good for having enough to-
matoes to can at one time
Indeterminate Tomatoes:- bear throughout the season- need a more robust staking
method- good if you want fresh salsa
for an extended period
- better flavor
RecommendedVarieties of Determinate Tomatoes
RomaRoma tomatoes are the most reliable, basic tomatoes you can grow. Don’t let the seed packet fool you; you will need some staking like a tomato cage or, my preference, weaving twine between stakes, also known as the Florida Weave. The Romas I grow bear a heavy fruit load at once and produce a little here and there the rest of the season. As we’ll talk about in the next session, you can grow Roma tomatoes from seed, but since they are such a popular tomato, you will find transplants at your local nursery or garden center as well.

6
RecommendedVarieties of Indeterminate Tomatoes
Amish PasteI tried Amish Paste in my garden for the first time last year after hearing so many good things about this variety hailing from Lancast-er County, Pennsylvania. It has an excellent flavor and the vines grew vigorously – too vigorously! If you grow Amish Paste, you definitely need a staking system in place. My vines grew over 7’ tall!
These highly productive tomatoes bore a heavy load of fruit at the beginning of the fruiting season but then slowed down during the heat of the summer. My guess is they would do better in cooler parts of the country. I also fought early blight on these, which may have factored into their midseason production.
Though not as popular as Romas, I have seen Amish Paste transplants at garden centers, but you can also easily grow these from seed.
San MarzanoPopular for their flavor, canned San Marzano tomatoes can be found in the organic aisle of your grocery store. They commanded a place in my garden for two seasons and grew vigorously – though not as much as Amish Paste. The fruits were smaller than Amish Paste and Romas. The main problem I had with these is their tops never fully ripened for me. I have friends in other parts of the country whose fruits are uniform red, though, so it may just be my area.
Super Italian Paste
Though I haven’t grown this type, Super Italian Paste comes up in many sources for good salsa options. It boasts 6” long fruits with excellent flavor.
Fresh SalsaJust like the name says, this hybrid tomato is famous for its firm, meaty flesh that holds up to chopping. I haven’t grown Fresh Salsa, but those who have rave about it.
You are most likely to have to grow these from seed, as I haven’t seen these transplants at garden centers, at least in my area.

7
OnionsThe second ingredient in your salsa garden is the onion. If you haven’t grown onions before, they are not hard to grow as long as you under-stand a few basics.
First, the type of onion you plant depends on your location, and this is of utmost importance. The three types of onions are called “short-day,”
“long-day,” and “day-neutral” (also called intermediate day). The difference between the three is at what point the onions begin pouring their energy into producing bulbs.
Let me explain a bit more. When you first plant your onion sets in the ground (an onion set is just a fancy term for a baby onion plant), they will begin producing tall, vibrant green leaves. Then, at some point, the energy the plant used to create these leaves diverts to producing the onion bulb itself. The more green leaves the onion produces before bulb growth begins, the more energy the onion can use to create larger bulbs.
So what triggers the onion plant to stop producing leafy growth and instead grow onion bulbs?
Day length.
That’s where the different types of onions make a difference. In the southern US, where I live, our summer days are shorter than in the north. But we can also plant our onions sooner because of our milder temperatures. With short-day onions, bulb growth begins earlier in the season, allowing this cool-weather loving plant to start bulb production before the heat causes the onion to bolt, thus halt-ing the bulb growth.
In the northern US, bulb production doesn’t be-gin until later in the season. Because onions aren’t planted as early in the northern US, the plants need more time for leaf growth before bulbs begin to form. That’s why long-day onions are imperative for northern gardeners.
If southern gardeners planted long-day onions, bulb growth wouldn’t begin until the tempera-tures rose too high. Thus the plant would bolt and the bulb wouldn’t form. If northern gardeners planted short-day onions, bulb growth would trigger before enough energy-rich leafy growth had emerged, thus creating a tiny onion bulb.
The third type, “day-neutral” onions, are for those locations on the border between the short-day and a long-day preference.

8
Confusing? Use the map below as your guide. The green and the orange represent areas of overlap. (Those in green could grow intermediate day or long-day, and those in the orange could grow short-day or intermediate day.)
map from http://www.thelocalbeet.com/2015/03/16/long-day-or-short-day-onions/
Now that you know which type of onion to plant, you need to know which variety is best for salsa.
Ideally, white onions and red onions are best bets for salsa. White onions will offer a more sharp flavor, with red onions boasting a sweeter and milder taste.
Here are some suggestions:
White Short-Day: Texas Sweet WhiteRed Short-Day: Sweet RedWhite Long-Day: White Sweet Spanish, Ringmaster, Southport White GlobeRed Long-Day: Red Cipollini, RedwingDay Neutral: Red Candy Apple, Superstar
Still overwhelming? Here’s my recommendation: buy what you find at your local garden center. They will carry the right day-length variety for your area, and I’ve always found them clearly labeled as either white, red, or yellow varieties. (I have seen some northern gardeners who complain that short-day onions are sold to them locally; be sure and check before you plant!)
One more thing: you’re looking for long, thin baby onion plants -- the size of straws, in bundles. Do not buy the little baby onions – those are for green onion tops, not bulbs. I made that mistake the first year and had lots of green onions but no bulbs. Some recipes do call for green onions, but with most, you will want the bulb.

9
PeppersThe next ingredient in every good salsa is peppers. De-pending on your taste, you may prefer sweet bell peppers, jalapenos, green chiles like Anaheim peppers, a hot variety, or a combination. For most of my recipes, I use jalapenos.
Before you plant, decide on which salsa recipe(s) you want to try, and make sure to grow the kind of pepper in that recipe.
The main thing you need to know about peppers is that the rest of the ingredients in your salsa garden will be waiting on the peppers to get ready. Peppers notoriously do not begin producing until the weather gets HOT – and this could be weeks or months after you’ve harvested some of your other crops. That’s why it’s important to get your peppers in the ground as soon as the weather allows.
For a salsa garden, I do not recommend planting seeds directly in the garden. Pepper seeds take a long time to germinate. If you do begin your peppers by seed, start them indoors very early in the season (for my Zone 7 climate, that is the end of January. Starting peppers indoors is tricky and takes patience. If you’ve never done this before, it might be a better bet to purchase transplants at your garden center.
GarlicIdeally, garlic is planted in the fall and is harvested the following season. If you’re starting your salsa garden from scratch in the spring, you can plant garlic in the spring (the earlier the better) but the bulbs will not grow as large.
If you haven’t planted garlic in the fall and you’re not interested in trying it in the spring, there’s no shame in
buying what you need at the store. Then, if your salsa garden is a success this year, just plant garlic in the fall for next season.
Popular Pepper Varities for Salsa, from mild to hot:
Sweet Bell Pepper (red or green)Banana Pepper
AnaheimJalapenoSerrano

10
CilantroEvery salsa has to have cilantro, right? (I personally dou-ble the amount in mine!) But cilantro is the trickiest ingredient to grow in a salsa garden because it does not like heat. In fact, my best cilantro grows in January!
If you live in a mild climate, early plantings of cilantro may work for you, but if you are in a hot climate like I am, you have two options:
(1) Grow it early in the season; harvest it; freeze it until the other crops ripen.(2) Buy it at the grocery store.
Again, there’s no shame in #2! You’re still growing the major ingredients in your garden. Just know that if you choose to grow cilantro, it’s the earliest crop you start, so you’ll need to make a decision on that pretty quickly.
SuppliesBefore we get to the basics of planting the salsa
garden, it’s best to make sure we have supplies on hand once that bounty starts coming to harvest!
If you only plan to eat fresh salsa, you can skip this section, but if you want to can your salsa for the season, I’ve listed the basic supplies you need:

11
Water Bath CannerWhen it comes to canning homegrown produce, there are two methods: water bath canning and pressure canning.
In water bath canning, you submerge jars of fruits or vegetables in boiling water for a pre-scribed amount of time. Because water bath can-ning only heats the jars to a certain point, not all produce can be canned using this method.
In general, fruits can be water-bath canned be-cause their high acidity level kills potential bac-teria, but because vegetables lack those acidity levels, they are usually pressure-canned.
Tomatoes are in the middle ground, and in recipes like salsa, extra acidity (in the form of vinegar or
lemon juice) is added to the jars to compensate for the low acidi-ty levels in the vegetables present (peppers, garlic, etc.).
For this reason, it is very important ONLY to use salsa recipes tested and approved, and it is important NEVER to alter the ratio of vegetables or quantity of acid (like vinegar) in the recipe.
You can use a water bath canner or a pressure canner with the lid off. The advantage to these options is the bottoms are grooved, which allows airflow under the jars. You can also use a large pot or dutch oven. I used a dutch oven for years, and it worked well enough. But once I got a true water bath canner I realized what I was missing.
A dutch oven is not large and can only hold about 4-5 pint-size jars, but the main drawback is its flat bottom. This can cause jars to break because the air bubbling from the bottom has trouble rising to the top.
To prevent breakage, you can lay canning rings on the bottom to allow air circulation to flow between the bottom of the pot and the bottom of the jars. This isn’t a perfect method and can be cumbersome. Still, it will work until you decide you’d like to invest in a water bath or pressure canner.
A pressure canner like this one can double as a water
bath canner. You simply run the boiling water bath without
the lid.

12
Mason JarsSalsa is generally canned in pint-sized jars. You can purchase these anywhere from grocery stores to home improvement stores to garage sales. Just make sure if you obtain used jars that you run your finger around the rim to make sure they are smooth on top.
In my experience, the most widely-known brands (Ball and Kerr) are heavier weight and are less prone to cracking. Off-brand jars perform well enough but I’ve had more of those crack than the others, though this only occurs after repeated uses.
Lids & BandsIf you buy new jars, they will come with lids (the metal tops) and bands (what you screw onto the top of the jar during the canning process).
Metal lids are only good for one use, though the bands can last indefinitely. When you start re-using your jars and bands, you will need to purchase additional lids. I have found no difference in the performance of off-brand bands compared to the name-brands.
You can reuse the bands as long as they don’t rust. To keep them in top shape, don’t let water dry on them.
Re-usable Tattler brand lids and bands are also a great option. Though they are more expensive to begin with, they can last an indefinite amount of uses. (I’ve had mine for years and they are still going strong.) There is a slight learning curve and I have more jars not seal properly than using metal lids; however, that count is still very low and worth it to me. Once you get a han-dle on canning and decide it’s something you want to continue doing, in my opinion they’re worth the investment.

13
Canning KitI recommend purchasing a canning kit, which includes a funnel, jar lifter, a measuring stick/bubble popper, and a magnetic lid lifter.
Other SuppliesLabels
After canning your salsa, you will want to label your jars with the contents and the date. You can buy fancy ones from the canning section of your grocery store or office supply stores, use address labels, or get creative in a number of ways.
Vinegar or Lemon Juice (check your salsa recipe)
Canning Salt
Once you have these supplies on hand, you’re set!

14
Planting
When to Plant What, and When to Expect a Harvest:
GarlicWhen to Plant:
Ideally, you will have planted your garlic in the fall. If you haven’t, you may plant the cloves as soon as the soil can be worked in the spring, when the soil has warmed to 55 degrees. (You can purchase a soil thermometer at a garden center.)
When to Harvest:
This depends on your climate and whether you planted your garlic in the fall or the spring. For fall
planted garlic, expect to harvest in June or July in most regions.
The biggest challenge to planting a salsa garden is the timing of the harvest. In an ideal world, all the
veggies and herbs ripen at the same time. Unfortunately, this is not the case. But, with
strategic timing of your planting, and a few storing techniques, you’ll be on your way to fresh salsa.

15
CilantroWhen to Plant:
If you are planting cilantro by seed, sow the seed as soon as the soil can be worked in the spring. If you purchase a transplant, it can be planted a few weeks be-fore your average last frost in the spring.
When to Harvest:
Cilantro can be harvested in the early spring but before the leaves
become feathery and send up a seed stalk (after that, they are
bitter and unusable).
OnionsWhen to Plant:
If you’re planting from onion sets, you can put them in the ground 4 weeks before your average last frost. (If you start them by seed indoors, sow the seeds 8-12 weeks prior to outdoor planting, which is 12-16 weeks before your last frost.)
When to Harvest:
In most areas, harvest in June or July.
PeppersWhen to Plant:
If you’re starting your pepper plants by seed indoors, start plant-ing 3 months before your average last frost. Transplant them into the garden (or purchase transplants at a garden center) 2 weeks after the danger of frost has passed.
When to Harvest:
Peppers ripen most quickly the hotter the weather. Some areas
may begin harvest in late July but most areas will have to wait until
August and September.

16
TomatoesWhen to Plant:
If you’re starting your tomato plants by seed indoors, plant your seeds 8 weeks before your aver-age last spring frost. Transplant them into the garden (or purchase transplants at a garden center) when the last frost has passed.
When to Harvest:
The tomato harvest usually be-gins in July, depending on your
area. Indeterminate varieties will produce until frost.
In places with hot summers, the harvest will slow when temps
consistently hover over 95.
Sample Layout: 4x8 spaceTomatoes: 1 plant per 2x2 area. Onions: 3” apart in rows 6” apart (32 in a 2x2 area). Garlic: 3” apart in rows 6”
apart (32 in a 2x2 area). Peppers: 4 plants per 2x2 area. Cilantro: 4 plants per 2x2 area.

17
Garlic November 1 June
Cilantro February April - May
Peppers (Seeds indoors) January 15
Tomato (Seeds indoors) February 15
Onions March 15 June
Tomato (transplants) April 15 July - September
Pepper (transplants) May 1 August - September
Planting and Harvesting Chart for the Zone 7 Garden
Crop Planting Date Estimated Harvest Date
If you live in a different zone, I have included a blank chart that you can modify to fit your zone on the next page. The average last frost date for the Zone 7 garden (above) is April 15th. For your
zone, adjust the dates to your average last frost. For example, if you live in Zone 6, your average last frost date is likely May 15th. Therefore, you would delay the spring-planted crops above (all except garlic) by one month, such as planting your tomatoes outdoors on May 15th instead of April 15th.

18
Garlic __________________ (2 weeks before first fall frost) (depends on area and planting
date)
Cilantro __________________ (2 months before last spring
frost) early spring
Peppers (Seeds indoors) __________________ (10 weeks before last spring frost)
Tomato (Seeds indoors) __________________ (8 weeks before last spring frost)
Onions __________________ (1-2 months before last spring
frost)(depends on area and planting
date)
Tomato (transplants) __________________ (after last spring frost) July - September
Pepper (transplants) __________________ (2-4 weeks after last spring frost) August - September
My Planting and Harvest Chart My Zone: _____ Est. last spring frost: ______
Crop Planting Date Estimated Harvest Date
The above dates are estimates. I recommend looking up information online for your particular area, especially when it comes to predicted harvest dates.

19
Waiting on those Peppers... (what to do with the early crops)
While you’re waiting on your peppers to mature, you may be stuck with the conundrum of what to do with
your earlier-harvested crops.
Here is what I do to preserve my early crops until the peppers ripen:
GarlicAs mentioned before, you will likely harvest garlic between June and July. Wait until most of the leaves die back with the exception of the innermost ones. (Don’t wait until ALL of the leaves fall over.) Dig them carefully on a dry day and shake the dirt loose from them. Then, they need a few weeks to cure in a dry, shady location.
You can lay them flat or hang them up. I do this in my garage, but you could also utilize a pan-try or sheltered spot. Just make sure they don’t get wet and they have plenty of air circulation. After a few weeks, watch for the stalks to dry up. Trim the roots and brush off any dried soil from the bulb. If you planted softneck types, you can braid the stalks together. Cut the dried leaves off and store in a cool, dry location.
The garlic I grow stores for several months.
20
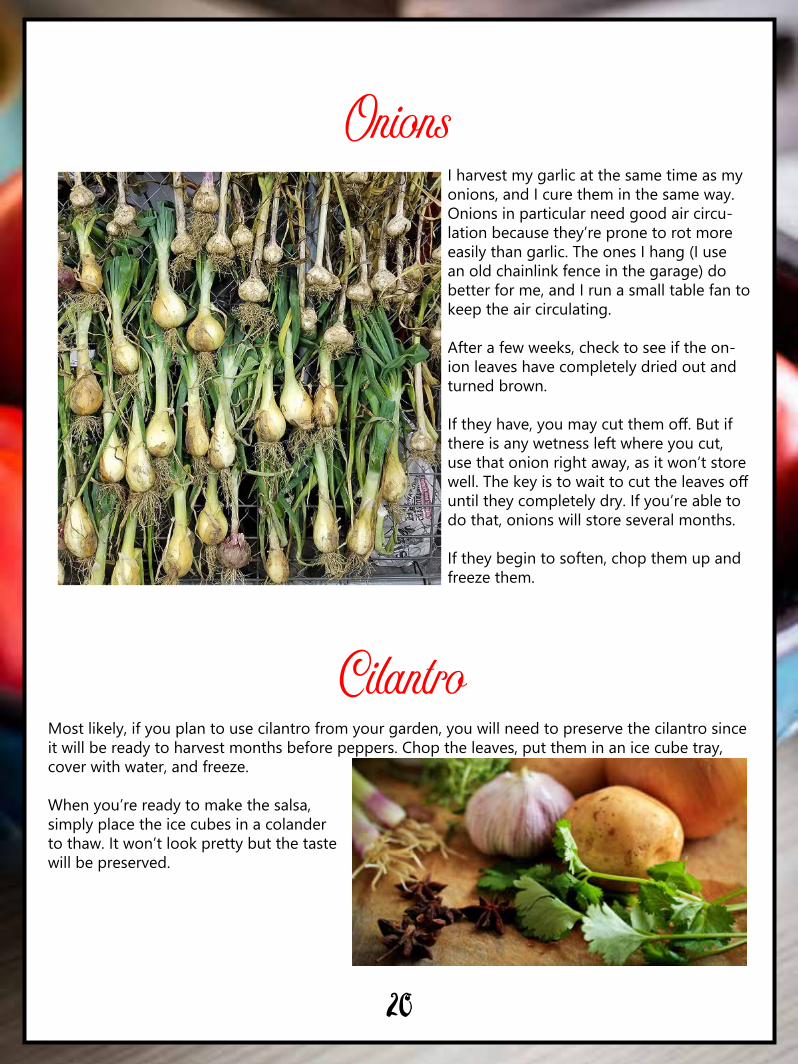
OnionsI harvest my garlic at the same time as my onions, and I cure them in the same way. Onions in particular need good air circu-lation because they’re prone to rot more easily than garlic. The ones I hang (I use an old chainlink fence in the garage) do better for me, and I run a small table fan to keep the air circulating.
After a few weeks, check to see if the on-ion leaves have completely dried out and turned brown.
If they have, you may cut them off. But if there is any wetness left where you cut, use that onion right away, as it won’t store well. The key is to wait to cut the leaves off until they completely dry. If you’re able to do that, onions will store several months.
If they begin to soften, chop them up and freeze them.
CilantroMost likely, if you plan to use cilantro from your garden, you will need to preserve the cilantro since it will be ready to harvest months before peppers. Chop the leaves, put them in an ice cube tray, cover with water, and freeze.
When you’re ready to make the salsa, simply place the ice cubes in a colander to thaw. It won’t look pretty but the taste will be preserved.

21
TomatoesIdeally, you will still have tomatoes fruiting when your peppers ripen. But most likely, your greatest harvest of tomatoes will come much sooner. To utilize these early tomatoes in your later salsa, you have three options:
Throw them in the freezer. Yes, you can freeze whole tomatoes. In fact, once you thaw them, the skin will slip right off, eliminating the need to blanche them to remove the skin. The texture will break down, but the flavors will be preserved.
Can the tomatoes now. Follow the directions for canning crushed tomatoes listed later in this book, and preserve the crushed tomatoes this way.
I do this and make salsa all year by just canning the tomatoes, freezing the other ingredients (except garlic), and putting it all together when I’m ready for salsa.
Acquire the peppers from a different source and can your salsa when you harvest the toma-toes. Peppers at this point are your only hold-up. You can purchase what you need from a grocery store or farmer’s market, or utilize peppers if you have any in the freezer from last year.
You can also wait until the peppers ripen and plan to utilize any tomatoes still growing then. It is a slight risk if you’ve never grown tomatoes and you’re not certain of their growth habit later in the summer, but most gardeners I know still have tomatoes in August. You just may not have as many.
Personally, I do both. I can crushed tomatoes for salsa later, and I make fresh salsa when tomatoes and peppers are ripe in my garden. This method yields fresh salsa for a few months. When the to-matoes and peppers stop producing in October, I start making salsa with the crushed tomatoes and other frozen ingredients.

22
Recipes, Please!I’m sure you can find as many recipes for salsa as
Mexican restaurants in Texas. Your choices are end-less! The main thing you need to decide is whether you want a recipe for fresh salsa or a recipe for can-ning (though you may want both!). Just remember,
NEVER can salsa that hasn’t been tested. The recipes in the Ball Book of Canning have all been tested, and if you find a recipe on a blog, make sure you verify if
it’s safe to water-bath can.
Amy’s Fresh SalsaMy friend Amy sent me her salsa recipe. Though I haven’t tried it, her family of 5 loves it!
4 cups fresh, chopped tomatoes1/2 cup chopped onion2 cloves garlic, mincedsmall bunch cilantro, chopped1/4 cup vinegar2 jalapenos, minced (seeds removed)salt & pepper, to taste
Place all ingredients in a bowl and stir to com-bine. Refrigerate to develop flavors.
Freeze excess; this recipe has not been tested for canning.
Fresh Salsa Recipes

23
Matt’s Fresh SalsaMy husband brought this recipe home from work, saying it was the best salsa he’d ever tasted. I have to agree. We love this salsa and we make it both fresh and from canned crushed tomatoes in the winter. Unfortunately, it’s not safe for canning, and when we froze it, the flavor just wasn’t the same.
4 cups fresh tomatoes, crushed, or 1 quart canned crushed tomatoes1/2 cup chopped onioncilantro to taste (~1/4 cup)4 jalapenos, minced (seeds removed)1 tbsp. sugar1 tbsp. crushed garlic (fresh or in a jar)
Place all ingredients in a bowl and stir to combine. Using a food processor or blender will com-promise flavors. Refrigerate.
This recipe has not been tested for canning.
Canning BasicsEntire books have been written about canning, so I won’t attempt to go in-depth here. Many sourc-es online walk you through safe water-bath canning practices, so I recommend you do some re-search. But don’t worry, canning isn’t difficult. Here are the basics to get you started:
Sterilize your jars. The easiest way to sterilize your jars is to heat them up with your water in your pot. The water will have to be brought to boiling anyway, so it just makes sense to bring it to a boil while sterilizing the jars. When the water boils, let the jars stay in the boiling water for 10 minutes before filling them.
Leave proper headspace. Canned salsa recipes will tell you how much “headspace” to leave. Head-space is the amount of air between your filled jar and the top. It’s critical not to overfill your jars or they could break during the canning process. If you purchase a canning kit, the measuring stick makes it easy to allow proper headspace.

24
Warm your lids, but don’t boil them. Your metal lids need to be warmed and even brought to a brief boil (for sterilization), but do not allow them to sit in boiling water or it could damage their seal. Instead, turn the burner to low (I put mine in a 1-quart size saucepan) immediately after they come to a boil.
Do not boil your bands. It’s just not necessary.
Always wipe the top of your jars off with a clean cloth after you fill your jars. This is required for a good seal.
After you place your lids on the jars, screw the bands over them, but don’t overtighten them. The lids need some wiggle room to allow air to escape during the canning process. Stop turning them after you encounter resistance.
Process your jars in a boiling water bath for the proper amount of time as listed in the recipe. Start the timer when the water returns to a full boil after you lower the jars.
After the processing time has finished, lift the jars out of the water with a jar lifter, and place on a clean towel on the counter. Allow them to rest for a full day before putting them away.
Don’t forget to label your jars, but do that after the jars have cooled. You can remove the bands before you put them in your pantry if you like, so you can reuse the bands.
Canned Salsa RecipesI know I’ve said this before, but it’s worth repeating. Never can salsa that
hasn’t been tested. What does that mean? Salsa must have enough acidity to inhibit the growth of botulism in the salsa. Whoa! Botulism? Yep. No one
wants to play around with that.
But what if you want to adjust the tested recipe? You can safely adjust the herbs but never the tomatoes, acid (vinegar or lemon juice), or vegetables.
Before beginning, make sure you understand proper canning procedures, which can be found online or in the Ball Blue Book of Canning.

25
Ball Blue Book zesty Salsa10 cups chopped cored peeled tomatoes (about 25 medium)5 cups chopped seeded green bell peppers (about 4 large)5 cups chopped onions (about 6 to 8 medium)2-1/2 cups chopped seeded chili peppers, such as hot banana, Hungarian wax, serrano or jala-peño (about 13 medium)1-1/4 cups cider vinegar3 cloves garlic, finely chopped2 Tbsp finely chopped cilantro1 Tbsp salt1 tsp hot pepper sauce, optional
PREPARE boiling water canner. Heat jars in simmering water until ready for use. Do not boil. Wash lids in warm soapy water and set bands aside.
COMBINE tomatoes, green peppers, onions, chili peppers, vinegar, garlic, cilantro, salt and hot pepper sauce, if using, in a large stainless steel saucepan. Bring to a boil over medium-high heat, stirring constantly. Reduce heat and boil gently, stirring frequently, until slightly thickened, about 10 minutes.
LADLE hot salsa into hot jars, leaving 1/2 inch headspace. Remove air bubbles and adjust head-space, if necessary, by adding hot salsa. Wipe rim. Center lid on jar. Apply band until fit is finger-tip tight.
PROCESS both pint and half pint jars in a boiling water canner for 15 minutes, adjusting for alti-tude. Remove jars and cool. Check lids for seal after 24 hours. Lid should not flex up and down when center is pressed.
Makes 6 pints or 12 half-pints
View original recipe here: http://www.freshpreserving.com/zesty-salsa-%7C-spicy-salsa-recipe---ball-fresh-preserving-br1131.html

26
Simply Tomato Salsa5 lbs of tomatoes1 lb large Anaheim green chilies (5-6 chiles)3 jalapeno chilies, seeded and stems removed, chopped1 1/2 cups chopped onion3 cloves garlic, minced1 cup apple cider vinegar1/2 cup loosely packed fresh chopped cilantro (including stems)2 teaspoons dried oregano1/2 teaspoon ground cumin2 teaspoons salt1 to 2 Tbsp sugar or more (to taste, depending on how sweet your tomatoes are)
1. Heat jars in boiling water to sterilize.
2. Roast green chilies by placing them on a cookie sheet underneath the broiler in your oven. Turn when blackened, until they are blackened all over. Then promptly transfer them to a zip-top bag and let them steam and cool.
3. Meanwhile, prepare tomatoes by blanching them, removing the seeds and most of the juice, and chopping them. You’ll need 7 cups of chopped tomatoes.
4. Remove peppers from bag, and using latex gloves, slip the skins off the peppers. Chop.
5. Place all ingredients in a large, non-aluminum pot. Bring to a boil and simmer for 10 min-utes.
6. Sterilize jar lids by placing in a small saucepan of boiling water. Turn heat off after 1 minute.
7. Ladle salsa into canning jars, leaving 1/2-inch headspace. Wipe rim of jar and place lids and bands on the jars.
8. Place sealed jars into boiling water bath. Make sure water covers the jars by at least 1 inch.
9. Boil in water bath for 15 minutes (20 minutes for altitudes 1000 to 6000 ft, 25 minutes above 6000 ft).
10. Lift jars from water and set on towel on the counter. Lids should pop within a few minutes indicating a good seal.
Recipe adapted from Simply Recipes. To view full recipe plus photos, visit here: http://www.sim-

27
Crushed TomatoesI can crushed tomatoes each year and use the final product to make Matt’s Salsa (recipe on p. 23). I either blanche (submerge into boiling water for a few minutes and immediately sub-merge them into ice water), and peel fresh tomatoes, or I use previously frozen whole toma-toes (in which I can easily peel the thawed product without blanching).
12 pounds tomatoesBottled lemon juiceSalt (optional)
1. Heat 6 pint-sized jars in boiling water to sterilize.
2. Blanche and peel tomatoes and place in stock pot over medium heat. Use wooden spoon to crush tomatoes. Simmer 15 minutes.
3. Add 1 tablespoon bottled lemon juice to each jar.
4. Carefully pack crushed tomatoes, leaving 1/2-inch headspace, in a pint-sized jar. Slide your bubble popper/measuring stick into the jar, removing bubbles until the natural juice fills the spaces between the tomatoes.
5. Add 1/2 teaspoon salt to each jar.
6. Adjust two-piece caps (lids and bands).
7. Boil in water bath for 40 minutes.
8. Lift jars from water and set on towel on the counter. Lids should pop within a few minutes indicating a good seal.
Recipe adapted from the Ball Blue Book of Canning and from http://www.dailypea.com/can-diced-crushed-tomatoes.

I hope this book has been an informative resource to help you get started planning and planting your salsa garden!
I’m always learning new things, so please let me know if you have any suggestions!
I hope you’ll join me on my gardening journey at
journeywithjill.netWe all started somewhere, and my hope is to offer valuable resources for beginning gardeners that I wish I had when I first started!
Happy Planting!
~Jillfacebook.com/journeywithjillinthegarden instagram.com/thebeginnersgarden pinterest.com/jillmcsheehyyoutube.com/c/JourneywithjillNet