fuze 3d/stereoscopy supplement user guide (version 5.5) · 2 1 3 i 4 fuze 3d/stereoscopy supplement...
TRANSCRIPT
Fuze 3D/Stereoscopy Supplement User Guide (Version 5.5)
Fuze3D/Stereoscopy
Supplement User Guide
Supplement User Guide: Fuze 3D/StereoscopyDocument Version 5.5 for the Fuze Software Version 5.5 and higher
Copyright © 2013 by Rohde & Schwarz DVS GmbH, Hanover. All rights reserved.
The manuals as well as the soft- and/or hardware described here and all their constituent parts are protected by copyright. Without the express permission of Rohde & Schwarz DVS GmbH any form of use which goes beyond the narrow bounds prescribed by copyright legislation is prohibited and liable to prosecution.
This particularly applies to duplication, copying, translation, processing, evaluation, publishing, and storing and/or processing in an electronic system.
Specifications and data may change without notice. We offer no guarantee that this documentation is correct and/or complete. In no event shall Rohde & Schwarz DVS GmbH be liable for any damages whatsoever (including without limitation any special, indirect or consequential damages, and dam-ages resulting from loss of use, data or profits, or business interruption) arising out of the use of or inability to use the hardware, software and/or manual materials.
Those parts of this documentation that describe optional software or hardware features usually con-tain a corresponding note. Anyway, a lack of this note does not mean any commitment from Rohde & Schwarz DVS GmbH.
DVS is a registered trademark of Rohde & Schwarz DVS GmbH.
Any other product names mentioned in this documentation may be trademarks or registered trade-marks of their respective owners and as such are subject to the usual statutory provisions.
2
1
3
I
4
Fuze 3D/Stereoscopy Supplement User Guide
Introduction
Getting Started
Working with 3D Material
Generating 3D Material
Index
Headquarters:
Support:
Rohde & Schwarz DVS GmbHKrepenstr. 830165 HannoverGERMANY
Phone: +49-511-67807-0
Fax: +49-511-630070
E-mail: [email protected]
Internet: http://www.dvs.de
Phone: +49-511-67807-125
Fax: +49-511-371985
E-mail: [email protected]
i
CContents
1 Introduction ...............................................................................1-1
1.1 Overview .................................................................................1-2
1.2 Target Group ...........................................................................1-2
1.3 Conventions Used in this User Guide .....................................1-3
1.4 General Notes .........................................................................1-3
2 Getting Started .........................................................................2-1
2.1 Types of 3D Material ...............................................................2-2
2.2 Preparing the Edit Tool for 3D .................................................2-3
2.2.1 Preparing Two Separate Clips as 3D Material ...................2-3
2.2.2 Preparing Interleaved 3D Material ...................................2-4
3 Working with 3D Material ..................................................3-1
3.1 Merging and Unmerging Video Tracks ...................................3-2
3.1.1 Changing the Track Mode ...............................................3-2
3.1.2 Setting the Track Properties ............................................3-3
3.1.3 Particulars about Merging and Unmerging .......................3-3
3.2 Editing .....................................................................................3-6
3.3 Subtitles in 3D .........................................................................3-7
3.3.1 Adding 3D to 2D Subtitles ..............................................3-7
3.3.2 Using Depth-animated Subtitles ......................................3-7
3.4 Viewing and Playing Out .........................................................3-9
3.4.1 Configuring the Output Mode .........................................3-9
3.4.2 Configuring the Display ................................................3-10
3.4.3 Configuring the Output ................................................3-11
3.5 Keyboard Shortcuts for 3D ....................................................3-13

ii
Contents
4 Generating 3D Material ........................................................4-1
4.1 Finalizing 3D Material ..............................................................4-2
4.2 Recording 3D Material ............................................................4-3
I Index ............................................................................................... I-1

1-1
1Introduction
This document describes the 3D/stereoscopic workflow feature of Fuze.
The 3D/stereoscopic workflow feature allows you to work with 3D ma-terial in Fuze. The complete production chain from ingest (optional) over editing to output/finalizing is supported.
With this you can easily record or import 3D material, add it to a time-line and then edit it. During all work the end result can be comfortably controlled either in the video overlay or at the outputs of the DVS sys-tem.
Once your work is finished, you can finalize the 3D material in all pop-ular 3D methods (e.g. as separate clips, interleaved, anaglyph, side by side, etc.) or play it out via two separate HD-SDI or DVI outputs to feed two projectors or 3D monitors (also in all popular 3D methods).

1-2
Introduction
1.1 Overview
This user guide describes the possibilities and user interface items of the 3D/stereoscopic workflow feature of Fuze.
The chapters in this user guide contain the following information:
1.2 Target Group
To use this manual and the 3D/stereoscopic workflow feature effective-ly, you should be familiar with the DVS soft- and hardware as well as the manuals delivered with the DVS system.
Chapter 1 Begins with a short introduction to the 3D/ste-reoscopic workflow feature, followed by a note regarding the audience this manual is written for and an explanation of the conventions used in this manual. Additionally, it details some general notes that you should observe.
Chapter 2 Describes the steps to get started using 3D ma-terial in Fuze.
Chapter 3 Describes how to work with 3D material in the Edit Tool, for example, how to merge and un-merge video tracks or how to edit, view and play out 3D clips.
Chapter 4 Explains how to generate 3D material, i.e. how to finalize a project in 3D or how to record ma-terial in 3D.
Index This chapter facilitates the search for specific terms.

1-3
Introduction
1.3 Conventions Used in this User Guide
The following typographical conventions will be used in this documen-tation:
Texts preceded by this symbol describe activities that you must per-form in the order indicated.
– Texts preceded by this symbol are parts of a list.
1.4 General Notes
In the following you can find some general notes that may be helpful for your work with the 3D/stereoscopic workflow feature or this user guide:
Texts preceded by this symbol are general notes intended to fa-cilitate work and help avoid errors.
“ ” Texts enclosed by quotation marks are references to other man-uals, guides, chapters, or sections.
’Window’ Text in bold with single quotation marks indi-cates a window name
BUTTON Text in small caps and bold indicates a push but-ton
Menu Text in italic and bold indicates either a menu name or options in a menu list
Menu » Option In the specified menu select the stated item
Item Text in bold only stands for other labeled items of a user interface
Entry Parameters, selections or entries made in the program
For further details about user interface items not described in this document please refer to the other user guides delivered with the DVS system.

2-1
2Getting Started
This chapter describes the steps to get started using 3D material in the Edit Tool. First, the different types of 3D material that can be used in the DVS software will be described, followed by a description of how to prepare the Edit Tool for 3D depending on the type of material available to you.

2-2
Getting Started
2.1 Types of 3D Material
Stereoscopic material provides for each human eye a separate video stream (clip), commonly called left eye and right eye clip. They can be stored differently on a storage and the following two types of 3D mate-rial can be used in the DVS software:
– Two separate video clips (one for the left eye and one for the right eye).
– A single video clip that contains both eyes by interleaving the two video streams (interleaved video clip):
Figure 2-1: Interleaving of a 3D video clip
Depending on the type of material that is available to you, the DVS soft-ware has to be prepared differently (see section “Preparing the Edit Tool for 3D” on page 2-3).
The DVS software starts an operation for 3D (such as a finaliz-ing or playout) with the left eye clip as the first frame. However, by setting the right eye clip to be the left eye clip this behavior can be changed (see section “Merging and Unmerging Video Tracks” on page 3-2).

2-3
Getting Started
2.2 Preparing the Edit Tool for 3D
Depending on the type of material that is available to you (see section “Types of 3D Material” on page 2-2) the Edit Tool has to be prepared differently to be able to work in 3D. This section describes how to pre-pare the different types of 3D material.
2.2.1 Preparing Two Separate Clips as 3D Material
If two separate video clips are available as 3D material, you can add them to separate video tracks in the timeline of the Edit Tool and then merged these tracks to a single stereo track. For this perform the fol-lowing:
Add the two clips for the left and right eye to the bin, for example, by dragging them to the contents area of the bin from a file man-ager or by using the menu option Add clip… of the bin’s context menu.
Next configure the timeline to show a second video track, for exam-ple, via the timeline output settings or by using the menu option Track » Add on the context menu of a video track.
Add the video clips from the bin each to a video track in the time-line. It is recommended to add the left eye video clip to the first video track and the right eye video clip to the second video track.
Once this is done, the timeline of the Edit Tool will look similar to the following figure:
Figure 2-2: Left eye and right eye clip in the timeline
Then the two tracks can be merged to a single stereo track:
Either perform a click on one of the items labelled Single track or click on the triangle to the right and select from the drop-down menu the entry Stereoscopic 3D track.
After this the track properties window of the respective track will be displayed on the screen.
For further information about the track properties window and the track mode item see section “Merging and Unmerging Vid-eo Tracks” on page 3-2.

2-4
Getting Started
In this window activate the radio button Stereoscopic 3D track and configure the tracks according to where (in which track) you have added the respective clips.
When finished confirm your settings with the OK button.
This will merge the two video tracks to a single 3D stereo track in the timeline:
Figure 2-3: 3D stereo track in the timeline
Afterwards the preparations for two separate video clips as 3D material are finished and you can now start your work as described in chapter “Working with 3D Material” on page 3-1.
2.2.2 Preparing Interleaved 3D Material
When only a single video clip is available (i.e. an interleaved 3D clip), you have to alter its bin clip properties accordingly. Afterwards it can be added to a stereo track of the Edit Tool. For this perform the following:
Add the interleaved 3D clip to the bin, for example, by dragging it to the contents area of the bin from a file manager or by using the menu option Add clip… of the bin’s context menu.
Afterwards the interleaved clip will be visible in the contents area of the bin. However, because an interleaved clip is registered by the DVS soft-ware just as a normal clip you have to correct its properties to account for its 3D content:
Open the properties of the interleaved video clip in the bin (context menu of bin clip » Properties…).
Then the properties window of the bin clip will be displayed on the screen.
In this window configure the setting Stereoscopic Clip to Inter-leaved Stereo and confirm this with the OK button.
Figure 2-4: Configuring a clip to an interleaved clip
2-5
Getting Started
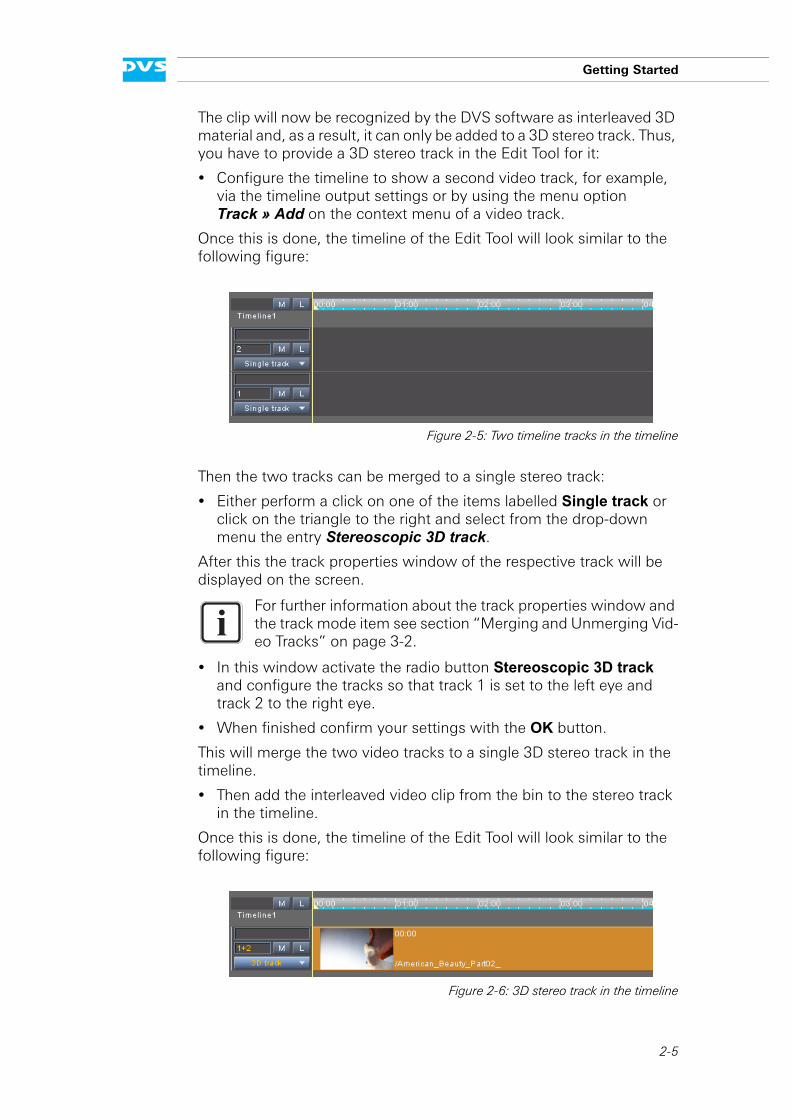
The clip will now be recognized by the DVS software as interleaved 3D material and, as a result, it can only be added to a 3D stereo track. Thus, you have to provide a 3D stereo track in the Edit Tool for it:
Configure the timeline to show a second video track, for example, via the timeline output settings or by using the menu option Track » Add on the context menu of a video track.
Once this is done, the timeline of the Edit Tool will look similar to the following figure:
Figure 2-5: Two timeline tracks in the timeline
Then the two tracks can be merged to a single stereo track:
Either perform a click on one of the items labelled Single track or click on the triangle to the right and select from the drop-down menu the entry Stereoscopic 3D track.
After this the track properties window of the respective track will be displayed on the screen.
In this window activate the radio button Stereoscopic 3D track and configure the tracks so that track 1 is set to the left eye and track 2 to the right eye.
When finished confirm your settings with the OK button.
This will merge the two video tracks to a single 3D stereo track in the timeline.
Then add the interleaved video clip from the bin to the stereo track in the timeline.
Once this is done, the timeline of the Edit Tool will look similar to the following figure:
Figure 2-6: 3D stereo track in the timeline
For further information about the track properties window and the track mode item see section “Merging and Unmerging Vid-eo Tracks” on page 3-2.

2-6
Getting Started
The left eye and right eye video streams interleaved in the clip are now accessible to the DVS software. With this the preparations for an inter-leaved clip as 3D material are finished and you can now start your work as described in chapter “Working with 3D Material” on page 3-1.

3-1
3Working with 3D Material
This chapter describes how to work with 3D material in the Edit Tool af-ter it has been prepared and added correctly to the timeline (see section “Preparing the Edit Tool for 3D” on page 2-3). First the items for merg-ing and unmerging video tracks will be described, followed by some particulars about this. After this it will be explained how to edit 3D clips, how to use subtitles for 3D material and how to view or play out 3D clips. The chapter will be concluded with a list of further keyboard shortcuts especially available for your work with 3D material.

3-2
Working with 3D Material
3.1 Merging and Unmerging Video Tracks
As soon as two or more video tracks are displayed in the timeline (see also section “Preparing the Edit Tool for 3D” on page 2-3), they can be merged to a stereoscopic 3D track (stereo track) as well as unmerged.
3.1.1 Changing the Track Mode
To merge or unmerge two video tracks, you have to change its track mode. For this the track mode item right in front of a video track has to be used:
Figure 3-1: The track mode item
When clicking on the triangle to the right of the track mode item, a drop-down menu will be displayed which can be used to configure the tracks:
When clicking the track mode item directly, the properties window of the respective track will be displayed immediately (see section “Setting the Track Properties” on page 3-3).
Single track Configures the respective track to a standard single video track of the Edit Tool. If a 3D track already, it will be unmerged to two single tracks again, one containing the left eye clip and one the right eye clip. When unmerging a track con-taining an interleaved 3D clip, it will also be split into two separate clips (left and right eye).
Stereoscopic 3D track
Configures the respective track (and its partner track, if it was a 3D track before) to a 3D stereo track again. If the respective track has not been a 3D track yet, the properties window of the re-spective track will be opened (see section “Set-ting the Track Properties” on page 3-3).

3-3
Working with 3D Material
3.1.2 Setting the Track Properties
When configuring a track that has not been a stereo track before to a stereo track or when clicking on the track mode item directly, the prop-erties window of the respective track will be opened:
Figure 3-2: The track properties window
With the track properties window you can set and change the proper-ties of a (stereo) track, for example, by assigning the streams. It pro-vides the following settings items:
Once everything is set correctly, you can confirm your settings by click-ing the OK button. The CANCEL button will close the properties window without altering the states of the track(s).
3.1.3 Particulars about Merging and Unmerging
There are several particulars that you should be aware of when merging and unmerging video tracks:
Single track Same as the option Single track of the track mode item (see section “Changing the Track Mode” on page 3-2).
Stereoscopic 3D track
When this option is activated, the tracks as in-dicated by the items Stream 1 and Stream 2 will be configured to a 3D stereo track. Select the partner track of the first stream (i.e. of the track where the properties window has been invoked) with the Track no. combo box of Stream 2. With the combo boxes to the right you have to assign the streams and determine which of the tracks contains the left and the right eye clip.
The DVS software starts an operation for 3D (such as a finaliz-ing or playout) with the left eye clip as the first frame. However, by configuring the track of the right eye clip to Left Eye this behavior can be changed.
3-4
Working with 3D Material
Automatic Activation of Stereoscopic Output Mode
When video tracks are merged to a 3D stereo track, the stereoscopic output mode is automatically activated (button SETTINGS… of the time-line area, see section “Configuring the Output” on page 3-11) and it will remain activated for this project if not deactivated manually.
Interleaved Video Clips
A clip configured as an interleaved video clip can be added to a 3D ste-reo track only (see section “Preparing the Edit Tool for 3D” on page 2-3). Its two streams are then accessible to the DVS software. By unmerging a stereo track containing an interleaved video clip, the two streams can be accessed separately as two individual clips, one for the left and one for the right eye.
Track Numbers
The (first) number in front of a video track indicates the track number. If a second number is displayed with a plus sign in front, it details the respective partner track of this track (either if currently a 3D track or previously configured to one): <track no.>+<partner track no.>.
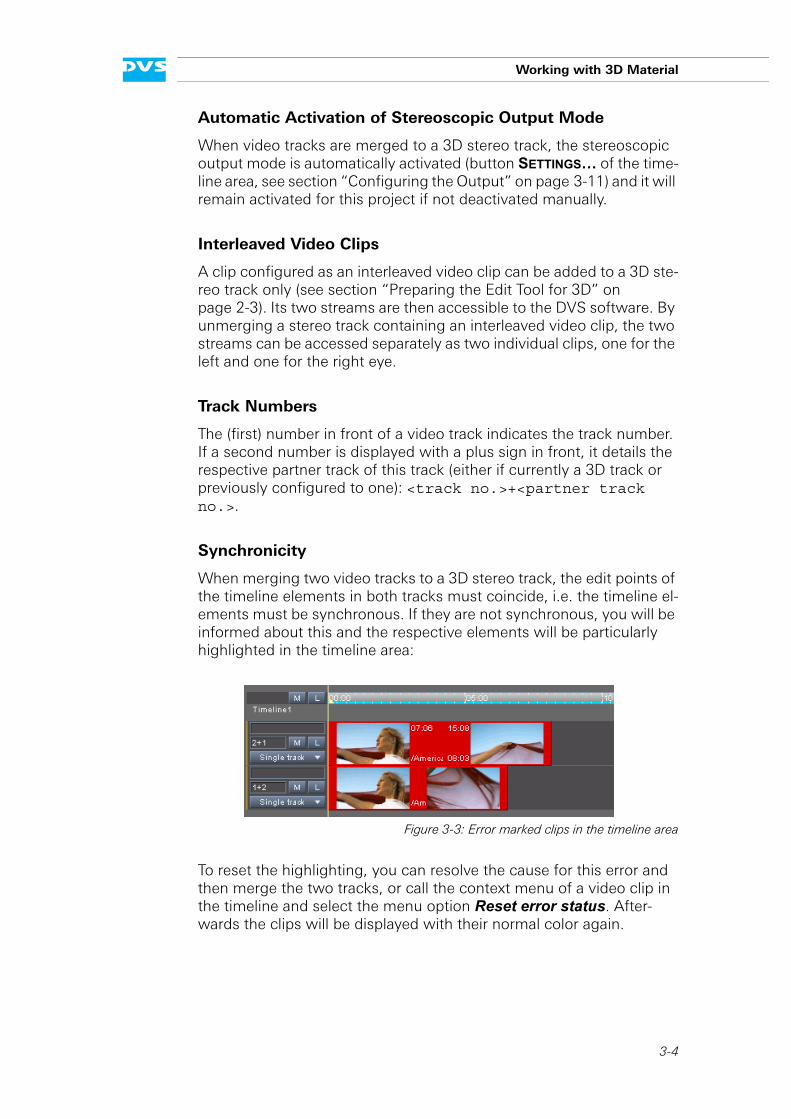
Synchronicity
When merging two video tracks to a 3D stereo track, the edit points of the timeline elements in both tracks must coincide, i.e. the timeline el-ements must be synchronous. If they are not synchronous, you will be informed about this and the respective elements will be particularly highlighted in the timeline area:
Figure 3-3: Error marked clips in the timeline area
To reset the highlighting, you can resolve the cause for this error and then merge the two tracks, or call the context menu of a video clip in the timeline and select the menu option Reset error status. After-wards the clips will be displayed with their normal color again.

3-5
Working with 3D Material
No Partner Element
The complementary partner element of a left/right eye clip pair can be left out from the timeline, meaning timeline stretches on one of the tracks to be merged to a 3D track can be left empty. These tracks can still be merged to a 3D stereo track, as long as synchronicity is ob-served (see above). Then the timeline element without a partner will be duplicated and added to the empty track. When unmerging the track again, you will find instead of just one timeline element identical time-line elements in both tracks.
3-6
Working with 3D Material
3.2 Editing
Once 3D material is properly prepared and available in the timeline of the Edit Tool (see section “Preparing the Edit Tool for 3D” on page 2-3), you can start editing it.
A stereo track available in the timeline area of the Edit Tool can be ed-ited the same way as any standard single video track. The timeline ele-ments on 3D stereo tracks can be, for example, cut or trimmed, or transitions and effects can be applied. All editing work will be applied to both streams at the same time. For further information about this please refer to the “Fuze Edit Tool” user guide.
When merging two video tracks with different effects applied to the timeline elements, the effects operators will be copied from the elements of the first stream to the elements of the second stream.
3-7
Working with 3D Material
3.3 Subtitles in 3D
Subtitles (integral texts or images) can be used in 3D as well. For this you can either equip 2D subtitles with depth information in the DVS software or you can use 3D subtitles, i.e. depth-animated subtitles, which will provide the depth information automatically.
This section describes how to equip subtitles with depth information or how to use depth-animated subtitles.
3.3.1 Adding 3D to 2D Subtitles
The 3D/stereoscopic feature can be used for 2D subtitles (subtitles without any depth information) as well. Once such a subtitle file (XML or MXF) has been added to a 3D stereo track, 3D information can be added to the subtitles. For this perform the following on a subtitle time-line element present in a 3D stereo track:
Display the subtitle’s timeline element properties either by double-clicking the subtitle timeline element in the timeline or by selecting Show » Effect properties from its context menu.
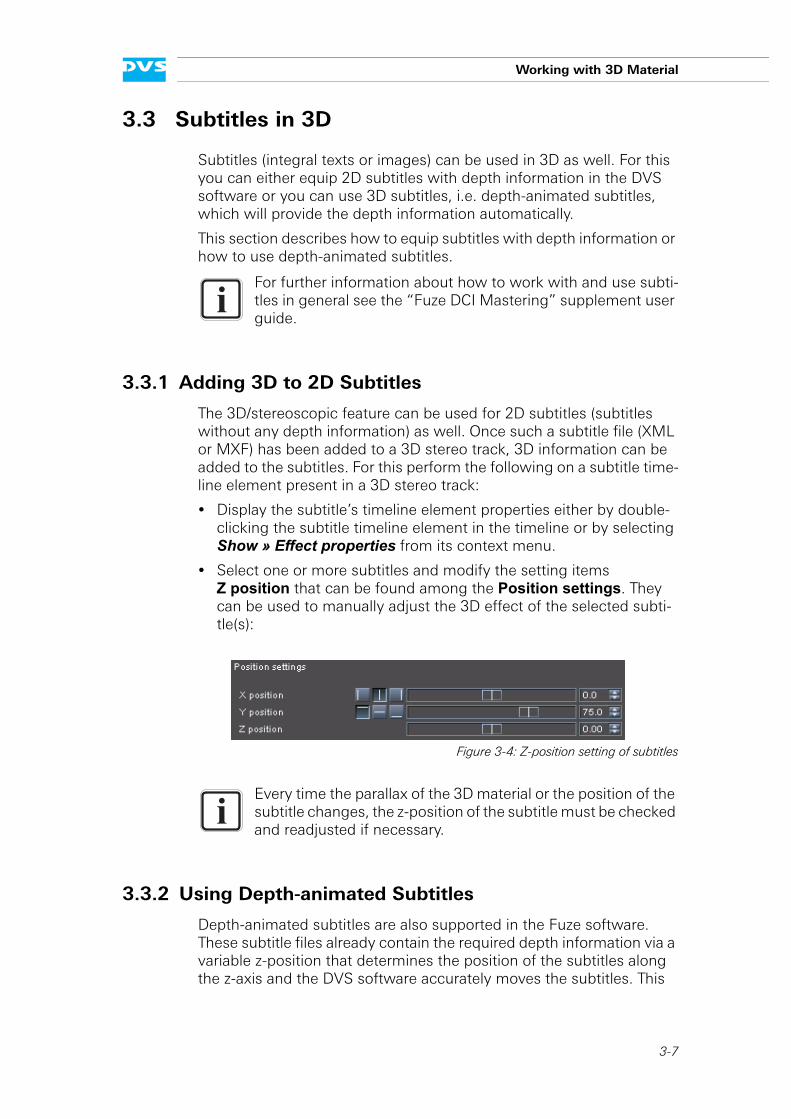
Select one or more subtitles and modify the setting items Z position that can be found among the Position settings. They can be used to manually adjust the 3D effect of the selected subti-tle(s):
Figure 3-4: Z-position setting of subtitles
3.3.2 Using Depth-animated Subtitles
Depth-animated subtitles are also supported in the Fuze software. These subtitle files already contain the required depth information via a variable z-position that determines the position of the subtitles along the z-axis and the DVS software accurately moves the subtitles. This
For further information about how to work with and use subti-tles in general see the “Fuze DCI Mastering” supplement user guide.
Every time the parallax of the 3D material or the position of the subtitle changes, the z-position of the subtitle must be checked and readjusted if necessary.

3-8
Working with 3D Material
enables the subtitles to flow back and forth in the depth of the 3D im-ages together with the scene.
To use such a subtitle file, you have to add it to a 3D stereo track in the timeline. Afterwards it can be used same as any normal subtitle file.
However, the settings items for the z-position among the Position set-tings (see section “Adding 3D to 2D Subtitles” on page 3-7) will be dif-ferent for a depth-animated subtitle. After one or more subtitles have been selected you will see the Z offset settings items instead of the Z position items:
Figure 3-5: Z-animation settings of subtitles
They and the settings items below them offer you the following possi-bilities:
Z offset These items determine the offset that will be added to the variable z-position specified in the subtitle file.
Use Z animation Turns on or of the variable z-position. When turned off you can set the Z position items will be displayed again instead of the Z offset items.
Inverse behaviour Reverses the effect of the variable z-position.
Z offset unit Allows you to specify the unit of the Z offset items (pixel or percent). However, for internal reasons pixel values cannot be translated di-rectly to percent and back, they have to be di-vided by 100: For example, a value of 19.2 pixels (for a clip in 1920 × 1080) is the same as 20% when the unit is set to percent.
3-9
Working with 3D Material
3.4 Viewing and Playing Out
Your work on 3D material can be easily controlled via the video overlay or a monitor connected to the outputs of the DVS system. For example, an anaglyph emulation mode allows you to control the 3D depth of the material on the fly in the video overlay, and afterwards it can be played out in all common 3D methods.
This section explains how to configure and set up the display of the 3D material in the DVS software as well as at the outputs of the DVS sys-tem.
3.4.1 Configuring the Output Mode
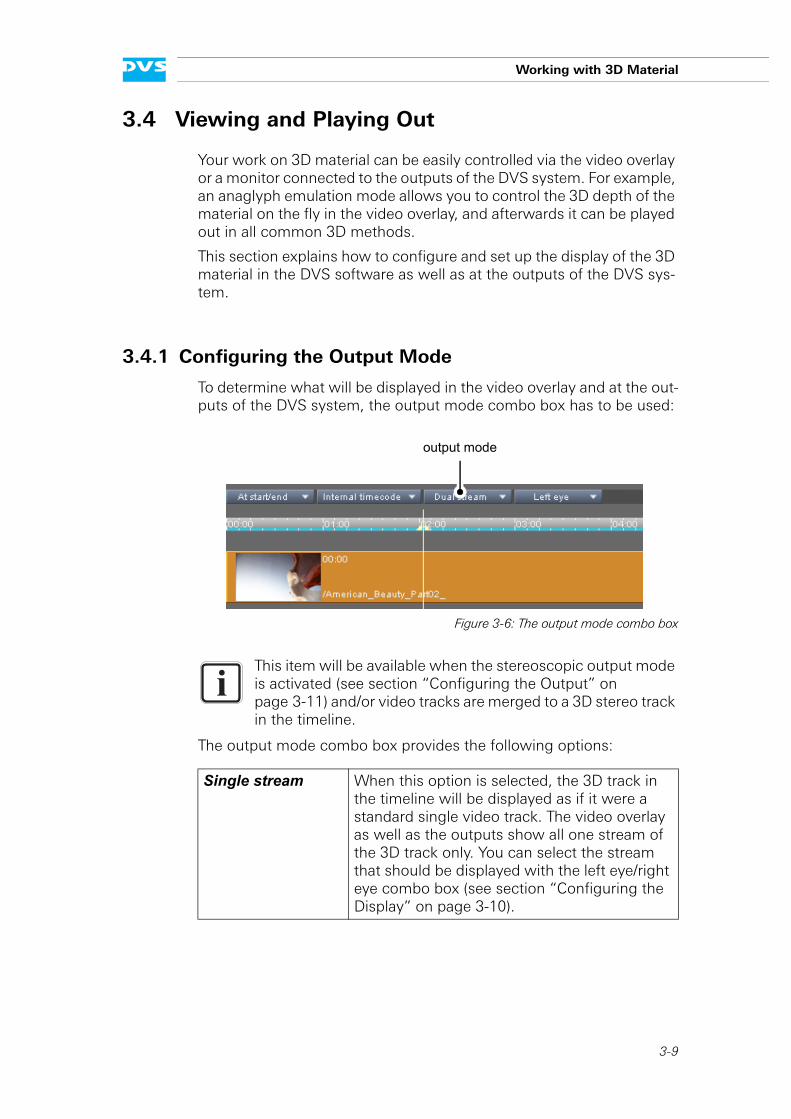
To determine what will be displayed in the video overlay and at the out-puts of the DVS system, the output mode combo box has to be used:
Figure 3-6: The output mode combo box
The output mode combo box provides the following options:
This item will be available when the stereoscopic output mode is activated (see section “Configuring the Output” on page 3-11) and/or video tracks are merged to a 3D stereo track in the timeline.
Single stream When this option is selected, the 3D track in the timeline will be displayed as if it were a standard single video track. The video overlay as well as the outputs show all one stream of the 3D track only. You can select the stream that should be displayed with the left eye/right eye combo box (see section “Configuring the Display” on page 3-10).
output mode

3-10
Working with 3D Material
3.4.2 Configuring the Display
What to display in the user interface of the DVS software can be con-figured with the left eye/right eye combo box:
Figure 3-7: The left eye/right eye combo box
Anaglyph red-cyan 0% saturation
Anaglyph red-cyan 100% saturation
These options combine the two streams of the 3D track to a single anaglyph stream for red/cyan glasses and display it in the video overlay as well as at the outputs of the system. You can choose between two saturations (0 or 100%) for the color of the 3D material.
Anaglyph red-green…
Same as Anaglyph red-cyan…, but the ana-glyph stream is for red/green glasses.
Side - by - side
Top - bottom
Interlaced
Blending
These options combine the two streams of the 3D track to a single stream and display it in the video overlay as well as at the system’s outputs (e.g. for special 3D displays). You can choose between displaying the two images side by side, top/bottom, interlaced, or blended to-gether (left eye 75%, right eye 25%).
Dual stream Displays the two streams of the 3D track inde-pendently at two different output ports of the system. The output ports can be configured with the timeline output settings (see section “Configuring the Output” on page 3-11). With this the control area (video overlay) shows both streams next to each other in two separate overlays.
This item will be available when the stereoscopic output mode is activated (see section “Configuring the Output” on page 3-11) and/or video tracks are merged to a 3D stereo track in the timeline.
left eye/right eye
3-11
Working with 3D Material
With the left eye/right eye combo box you can select, depending on the setting for the output mode (see section “Configuring the Output Mode” on page 3-9), which of the streams to view in the video overlay. Additionally, it controls whether the left eye or right eye stream/clip should be displayed by the representations of the video clips in the 3D track.
Furthermore, in the Single stream output mode it effects the signal displayed at the output ports of the DVS system (see section “Config-uring the Output Mode” on page 3-9).
3.4.3 Configuring the Output
Via the SETTINGS… button you can set up and configure the output of stereoscopic material as well as the output ports that should be used for this. It is located at the top left side of the timeline area.
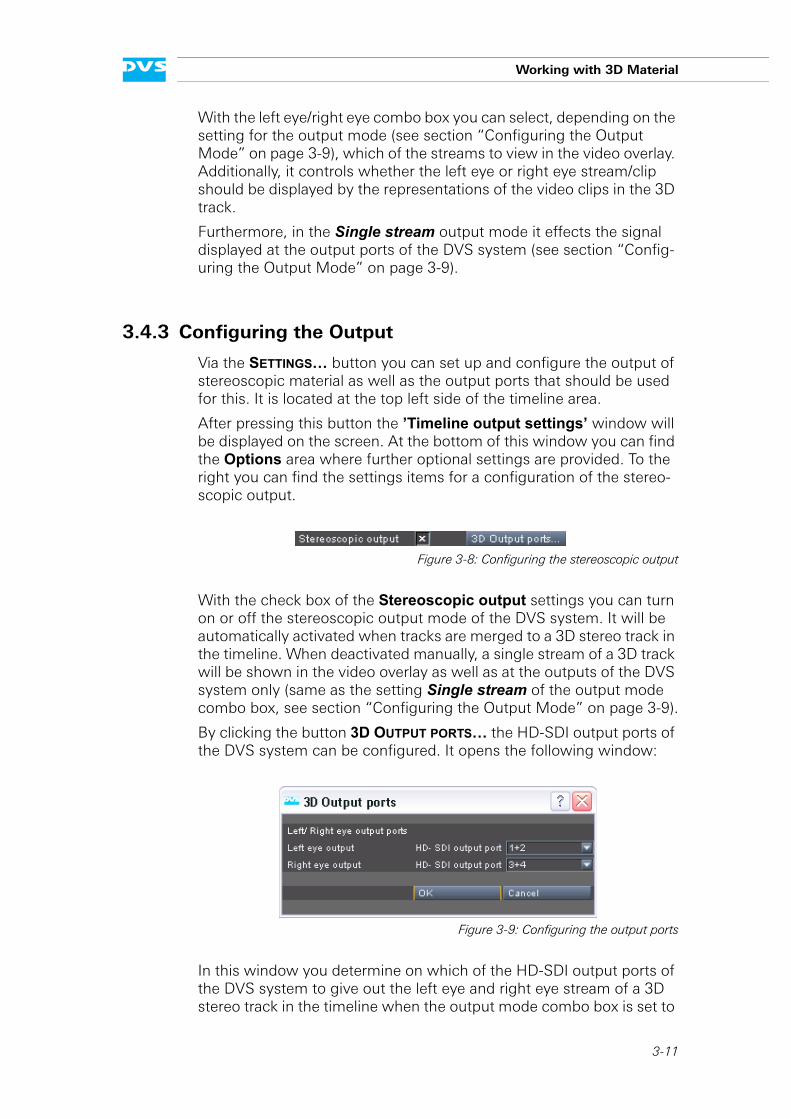
After pressing this button the ’Timeline output settings’ window will be displayed on the screen. At the bottom of this window you can find the Options area where further optional settings are provided. To the right you can find the settings items for a configuration of the stereo-scopic output.
Figure 3-8: Configuring the stereoscopic output
With the check box of the Stereoscopic output settings you can turn on or off the stereoscopic output mode of the DVS system. It will be automatically activated when tracks are merged to a 3D stereo track in the timeline. When deactivated manually, a single stream of a 3D track will be shown in the video overlay as well as at the outputs of the DVS system only (same as the setting Single stream of the output mode combo box, see section “Configuring the Output Mode” on page 3-9).
By clicking the button 3D OUTPUT PORTS… the HD-SDI output ports of the DVS system can be configured. It opens the following window:
Figure 3-9: Configuring the output ports
In this window you determine on which of the HD-SDI output ports of the DVS system to give out the left eye and right eye stream of a 3D stereo track in the timeline when the output mode combo box is set to

3-12
Working with 3D Material
Dual stream (see section “Configuring the Output Mode” on page 3-9).
Once everything is set as wanted, the configuration of the stereoscopic output is complete and you can view the 3D material as configured via the HD-SDI outputs of the DVS system.

3-13
Working with 3D Material
3.5 Keyboard Shortcuts for 3D
When working with 3D material in the Edit Tool, there are several spe-cial keyboard shortcuts available:
Action Shortcut
Slip left eye one (1) frame forward [Ctrl + .]
Slip left eye one (1) frame backward [Ctrl + ,]
Slip left eye ten (10) frames forward [Ctrl + /]
Slip left eye ten (10) frames backward [Ctrl + M]
Slip right eye one (1) frame forward [Alt + .]
Slip right eye one (1) frame backward [Alt + ,]
Slip right eye ten (10) frames forward [Alt + /]
Slip right eye ten (10) frames backward [Alt + M]
Merge/unmerge 3D stereo tracks (when such tracks have been created)
[Shift + E]
Toggle between left/right eye in Single stream mode (does not affect the output)
[Shift + W]
Activate Single stream output mode for left eye
[Shift + A]
Activate Single stream output mode for right eye
[Shift + S]
Activate Dual stream output mode [Shift + D]

4-1
4Generating 3D Material
In this chapter it is explained how to generate 3D material with the DVS system and its software. It will be explained how to finalize a project in 3D and how to record material in 3D.

4-2
Generating 3D Material
4.1 Finalizing 3D Material
3D material can be created via a finalizing. For this your content must be appropriately prepared with the video data in 3D stereo tracks (see section “Preparing the Edit Tool for 3D” on page 2-3). Then it can be fi-nalized in 3D.
In the finalize dialog you can find among the optional items for a video output the setting Stereoscopic output:
Figure 4-1: Configuring the stereoscopic output for a finalizing
To create stereoscopic content via finalizing, the check box of the Ste-reoscopic output setting must be activated. With the combo box to the right you can then configure the output format of the 3D material. The following settings are available:
With the Stereoscopic output setting activated the material will be fi-nalized according to your configurations once the finalizing is initial-ized.
3D Interleaved stream
The 3D stereo track will be finalized into an in-terleaved clip (see section “Types of 3D Materi-al” on page 2-2).
3D Dual stream Two separate clips, one for the left eye and one for the right eye, will be created.
3D Anaglyph R/C stream...
The two streams of the 3D track will be com-bined to a single anaglyph stream for red/cyan glasses and then finalized to a clip. There are two settings available for this that can be used to select the saturation of the images’ colors (0 or 100%).
3D Anaglyph R/G stream...
Same as 3D Anaglyph R/C stream..., but the anaglyph stream is for red/green glasses.
3D Single stream...
The two streams of the 3D track will be com-bined to a single stream and then finalized to a clip. You can choose between finalizing the two images side by side, top/bottom or interlaced.

4-3
Generating 3D Material
4.2 Recording 3D Material
With the DVS software you can also capture 3D material. This has to be performed in the optionally available I/O Tool software module of the DVS software. When configuring the input format, you can find sorted under the video format type ’Other’ (button OTHER) several rasters tagged with ’STEREO’ in the column ’Group’:
Figure 4-2: Configuring an input
These video rasters can be used to record a 3D dual stream. The two streams must be available at the input ports of the DVS system (HD-SDI input ports A/B and C/4 (dual link; in single link ports A and B only)). The left eye will be captured at the ports A/B and the right eye at C/4 (dual link; in single link ports A and B only). Once the video format set-tings are confirmed the combo box Stereoscopic output among the general settings for the record operation (storage information) will be available:
Figure 4-3: Configuring the stereoscopic output for a record
With it you can configure the format of the recorded 3D material (i.e. interleaved vs. dual stream, see section “Finalizing 3D Material” on page 4-2 and section “Types of 3D Material” on page 2-2).

4-4
Generating 3D Material
With this the two streams will be captured according to your settings as soon as the record operation is started.
I-1
IIndex
Numerics
2D subtitle .......................................3-73D anaglyph R/C stream ......... 3-10, 4-23D anaglyph R/G stream ......... 3-10, 4-23D dual stream ................ 3-10, 4-2, 4-33D interleaved clip 2-2, 2-4, 3-4, 4-2, 4-33D single stream .................... 3-10, 4-23D subtitle .......................................3-73D track ................................... 3-2, 3-3
configuration ..............................3-2editing .......................................3-6empty timeline stretch ................3-5merging ............................. 3-2, 3-3properties ..................................3-3synchronicity ..............................3-4track number ..............................3-4unmerging ......................... 3-2, 3-3
3D/stereoscopic workflow .................1-1
A-C
anaglyph red/cyan .................. 3-10, 4-2anaglyph red/green ................. 3-10, 4-2animated subtitle ..............................3-7blending ........................................3-10button
3D Output ports .......................3-11Other .........................................4-3Settings ...................................3-11
capturing .........................................4-3chapter overview ..............................1-2clip
interleaved ....2-2, 2-4, 3-4, 4-2, 4-3left eye/right eye . 2-2, 2-3, 3-10, 4-3preparation ........................ 2-3, 2-4separate ............... 2-2, 2-3, 4-2, 4-3
configuringcapturing ...................................4-3display .....................................3-10finalizing ....................................4-2output .....................................3-11output mode ..............................3-9tracks ........................................3-2
conventions of user guide .................1-3
D-F
depth-animated subtitle ....................3-7display configuration ......................3-10dual stream ...........................3-10, 3-12
capturing ...................................4-3finalizing ....................................4-2
editing .............................................3-6empty timeline stretch ......................3-5error status ......................................3-4
reset ..........................................3-4finalizing ..........................................4-2
G-I
HD-SDI ...................................3-11, 4-3I/O Tool ...........................................4-3input format .....................................4-3interlaced ...............................3-10, 4-2interleaved clip .................. 2-2, 2-4, 3-4
capturing ...................................4-3finalizing ....................................4-2
J-L
keyboard shortcuts .........................3-13left eye .................... 2-2, 2-3, 3-10, 4-3
output .......................................3-9

I-2
Index
M-O
merging tracks ......................... 3-2, 3-3monitor ...........................................3-9MXF (subtitle) ..................................3-7notes ...............................................1-3number of track ...............................3-4operation (start of) .................... 2-2, 3-3output ................................... 3-9, 3-11
HD-SDI ....................................3-11left eye .......................................3-9right eye ....................................3-9
output configuration .......................3-11output mode .......................... 3-4, 3-11
configuration ..............................3-9overview of chapters ........................1-2
P-R
preparinginterleaved clip ...........................2-4separate clips .............................2-3
properties of track ............................3-3raster (STEREO) ...............................4-3resetting error status ........................3-4right eye .................. 2-2, 2-3, 3-10, 4-3
output ........................................3-9
S-T
saturation (anaglyph) .............. 3-10, 4-2separate clips ........................... 2-2, 2-3
capturing ...................................4-3finalizing ....................................4-2
shortcuts .......................................3-13
side by side .............................3-10, 4-2single stream ...................................3-9
3D ....................................3-10, 4-2single track ...............................3-2, 3-3start of operation (3D) ................2-2, 3-3STEREO (raster) ...............................4-3stereo track ......................................3-2
see 3D trackstereoscopic 3D track ................3-2, 3-3stereoscopic output mode .......3-4, 3-11subtitle ............................................3-7
2D to 3D ....................................3-7depth-animated ..........................3-7z-offset ......................................3-8z-position ...................................3-7
synchronicity ...................................3-4target group .....................................1-2timeline output settings .........3-10, 3-11top/bottom .............................3-10, 4-2track mode item ........................3-2, 3-3track number ...................................3-4track properties window ...................3-3typographical conventions ................1-3
U-Z
unmerging tracks ......................3-2, 3-3variable z-position ............................3-7video input format ............................4-3video overlay ..........................3-9, 3-11XML (subtitle) ..................................3-7z-animation ......................................3-8z-offset (subtitle) ..............................3-8z-position (subtitle) ...........................3-7
variable ......................................3-7