geometric thinking and geometric concepts...
TRANSCRIPT

Chapter
7
179
GEOMETRIC THINKING AND
GEOMETRICCONCEPTS
Geometry in K–8 is finally being taken seriously. Geometry used to bethe chapter that was skipped or put off until late in the year. Manyteachers were not comfortable with geometry, associating it with
high school and proofs. Nor was geometry seen as important because it was only mini-mally tested on standardized tests. Nowgeometry is a strand of the curriculum innearly every state and district.
This change is due in large part to theinfluence of the NCTM standards movementbeginning in 1989. A second significantinfluence is an attention to a theoreticalperspective that has helped us understandhow students reason about spatial concepts.
Geometry Goals for Your StudentsIt is useful to think about your geom-
etry objectives in terms of two quite differ-ent yet related frameworks: spatialreasoning, or spatial sense, and the specificcontent such as that most likely found inyour state or district objectives. The first ofthese frameworks has to do with the waystudents think and reason about shape and space. There is a well-researched theoreticalbasis for organizing the development of geometric thought that guides this framework.The second framework is content in the more traditional sense—knowing about
big ideas1 What makes shapes alike and different can be deter-
mined by an array of geometric properties. Forexample, shapes have sides that are parallel, perpen-dicular, or neither; they have line symmetry, rotationalsymmetry, or neither; they are similar, congruent, or neither.
2 Shapes can be moved in a plane or in space. These changes can be describedin terms of translations (slides), reflections (flips), and rotations (turns).
3 Shapes can be described in terms of their location in a plane or in space.Coordinate systems can be used to describe these locations precisely. In turn,the coordinate view of shape offers another way to understand certain prop-erties of shapes, changes in position (transformations), and how they appearor change size (visualization).
4 Shapes can be seen from different perspectives. The ability to perceiveshapes from different viewpoints helps us understand relationships betweentwo- and three-dimensional figures and mentally change the position andsize of shapes.
ch07.qxd 5/4/2005 2:51 PM Page 179
symmetry, triangles, parallel lines, and so forth. The NCTM Principles and Standards forSchool Mathematics authors have helped describe content goals across the grades. Weneed to understand both of these aspects of geometry—thought and content—so thatwe can best help students grow.
Spatial SenseSpatial sense can be defined as an intuition about shapes and the relationships
among shapes. Individuals with spatial sense have a feel for the geometric aspects oftheir surroundings and the shapes formed by objects in the environment.
Spatial sense includes the ability to mentally visualize objects and spatial relationships—to turn things around in your mind. It includes a comfort with geo-metric descriptions of objects and position. People with spatial sense appreciate geo-metric form in art, nature, and architecture. They are able to use geometric ideas todescribe and analyze their world.
Many people say they aren’t very good with shape or that they have poor spatialsense. The typical belief is that you are either born with spatial sense or not. This sim-ply is not true! We now know that rich experiences with shape and spatial relation-ships, when provided consistently over time, can and do develop spatial sense. Withoutgeometric experiences, most people do not grow in their spatial sense or spatial reason-ing. Between 1990 and 1996, NAEP data indicated a steady, continuing improvement instudents’ geometric reasoning at all three grades tested, 4, 8, and 12 (Martin &Strutchens, 2000). Students did not just get smarter. More likely there has been anincreasing emphasis on geometry at all grades. Still, much more needs to be done ifU.S. children are to rise to the same level as their European and Asian counterparts.
Geometric ContentFor too long, the geometry curriculum in the United States has been somewhat of
an eclectic mix of activities and lists of “bold print words”—too much emphasis hasbeen placed on learning terminology. At the same time, the growing emphasis placedon geometry has spawned a huge assortment of wonderful tasks for students. Fortu-nately, the authors of Principles and Standards for School Mathematics have provided acontent framework for the pre-K–12 curriculum. As with each of the content standards,the geometry standard has a number of goals that apply to all grade levels. The fourgoals for geometry can be loosely summarized with these headings: Shapes and Proper-ties, Transformation, Location, and Visualization. A very brief description of these head-ings is offered next.
• Shapes and Properties includes a study of the properties of shapes in both twoand three dimensions, as well as a study of the relationships built on properties.
• Transformation includes a study of translations, reflections, and rotations(slides, flips, and turns) and the study of symmetries.
• Location refers primarily to coordinate geometry or other ways of specifyinghow objects are located in the plane or in space.
• Visualization includes the recognition of shapes in the environment, develop-ing relationships between two- and three-dimensional objects, and the abilityto draw and recognize objects from different perspectives.
180
Chapter 7 GEOMETRIC THINKING AND GEOMETRIC CONCEPTS
ch07.qxd 5/4/2005 2:51 PM Page 180

The value of these content goals is that a content framework finally exists thatcuts across grades so that both teachers and curriculum planners can examine growthfrom year to year.
You are strongly encouraged to read the geometry goals for grades pre-K–2 and3–5 in Principles and Standards (NCTM, 2000).
Geometric Thought: Reasoning About Shapes and RelationshipsNot all people think about geometric ideas in the same manner. Certainly, we are
not all alike, but we are all capable of growing and developing in our ability to thinkand reason in geometric contexts. The research of two Dutch educators, Pierre vanHiele and Dina van Hiele-Geldof, has provided insight into the differences in geometricthinking and how the differences came to be. The van Hieles’ work began in 1959 andimmediately attracted a lot of attention in the Soviet Union but for nearly two decadesreceived little notice in this country (Hoffer, 1983; Hoffer & Hoffer, 1992). But todaythe van Hiele theory has become the most influential factor in the American geometrycurriculum.
The van Hiele Levels of Geometric ThoughtThe most prominent feature of the model is a five-level hierarchy of ways of
understanding spatial ideas. Each of the five levels describes the thinking processesused in geometric contexts. The levels describe how we think, and what types of geo-metric ideas we think about, rather than how much knowledge we have. A significantdifference from one level to the next is the objects of thought—what we are able tothink about geometrically.
Level 0: Visualization
The objects of thought at level 0 are shapes and what they “look like.”
Students recognize and name figures based on the global, visual characteristics ofthe figure—a gestaltlike approach to shape. Students operating at this level are able tomake measurements and even talk about properties of shapes, but these properties arenot abstracted from the shapes at hand. It is the appearance of the shape that defines itfor the student. A square is a square “because it looks like a square.” Because appear-ance is dominant at this level, appearances can overpower properties of a shape. Forexample, a square that has been rotated so that all sides are at a 45-degree angle to thevertical may now be a diamond and no longer a square. Students at this level will sortand classify shapes based on their appearances—“I put these together because they areall pointy” (or “fat,” or “look like a house,” or are “dented in sort of,” and so on). Witha focus on the appearances of shapes, students are able to see how shapes are alike anddifferent. As a result, students at this level can create and begin to understand classifica-tions of shapes.
The products of thought at level 0 are classes or groupings of shapes that seem to be “alike.”
181
GEOMETRIC THOUGHT: REASONING ABOUT SHAPES AND RELATIONSHIPS
ch07.qxd 5/4/2005 2:51 PM Page 181

Level 1: Analysis
The objects of thought at level 1 are classes of shapes rather than individual shapes.
Students at the analysis level are able to consider all shapes within a class ratherthan a single shape. Instead of talking about this rectangle, it is possible to talk aboutall rectangles. By focusing on a class of shapes, students are able to think about whatmakes a rectangle a rectangle (four sides, opposite sides parallel, opposite sides samelength, four right angles, congruent diagonals, etc.). The irrelevant features (e.g., size ororientation) fade into the background. At this level, students begin to appreciate that acollection of shapes goes together because of properties. Ideas about an individualshape can now be generalized to all shapes that fit that class. If a shape belongs to aparticular class such as cubes, it has the corresponding properties of that class. “Allcubes have six congruent faces, and each of those faces is a square.” These propertieswere only implicit at level 0. Students operating at level 1 may be able to list all theproperties of squares, rectangles, and parallelograms but not see that these are sub-classes of one another, that all squares are rectangles and all rectangles are parallelo-grams. In defining a shape, level 1 thinkers are likely to list as many properties of ashape as they know.
The products of thought at level 1 are the properties of shapes.
Level 2: Informal Deduction
The objects of thought at level 2 are the properties of shapes.
As students begin to be able to think about properties of geometric objects with-out the constraints of a particular object, they are able to develop relationships betweenand among these properties. “If all four angles are right angles, the shape must be arectangle. If it is a square, all angles are right angles. If it is a square, it must be a rect-angle.” It is at this level that students can appreciate the nature of a definition. Withgreater ability to engage in “if–then” reasoning, shapes can be classified using onlyminimum characteristics. For example, four congruent sides and at least one right anglecan be sufficient to define a square. Rectangles are parallelograms with a right angle.Observations go beyond properties themselves and begin to focus on logical argumentsabout the properties. Students at level 2 will be able to follow and appreciate an infor-mal deductive argument about shapes and their properties. Proofs may be more intu-itive than rigorously deductive. However, there is an appreciation that a logicalargument is compelling. An appreciation of the axiomatic structure of a formal deduc-tive system, however, remains under the surface.
The products of thought at level 2 are relationships among properties of geometricobjects.
Level 3: Deduction
The objects of thought at level 3 are relationships among properties of geometric objects.
At level 3, students are able to examine more than just the properties of shapes.Their earlier thinking has produced conjectures concerning relationships among prop-erties. Are these conjectures correct? Are they “true”? As this analysis of the informalarguments takes place, the structure of a system complete with axioms, definitions, the-
182
Chapter 7 GEOMETRIC THINKING AND GEOMETRIC CONCEPTS
ch07.qxd 5/4/2005 2:51 PM Page 182

orems, corollaries, and postulates begins to develop and can be appreciated as the nec-essary means of establishing geometric truth. The student at this level is able to workwith abstract statements about geometric properties and make conclusions based moreon logic than intuition. This is the level of the traditional high school geometry course.
The products of thought at level 3 are deductive axiomatic systems for geometry.
Level 4: Rigor
The objects of thought at level 4 are deductive axiomatic systems for geometry.
At the highest level of the van Hiele hierarchy, the objects of attention areaxiomatic systems themselves, not just the deductions within a system. This is gener-ally the level of a college mathematics major who is studying geometry as a branch ofmathematical science.
The products of thought at level 4 are comparisons and contrasts among differentaxiomatic systems of geometry.
We have given brief descriptions of all five levels to illustrate the scope of the vanHiele theory. In every grade from 5 to 8, you will certainly see students at levels 0, 1,and 2.
Characteristics of the van Hiele LevelsYou no doubt noticed that the products of thought at each level are the same as
the objects of thought at the next. This object–product relationship between levels ofthe van Hiele theory is illustrated in Figure 7.1. The objects (ideas) must be created atone level so that relationships among these objects can become the focus of the nextlevel. In addition to this key concept of the theory, four related characteristics of thelevels of thought merit special attention.
1. The levels are sequential. To arrive at any level above level 0, students must movethrough all prior levels. To move through a level means that one has experiencedgeometric thinking appropriate for that level and has created in one’s own mindthe types of objects or relationships that are the focus of thought at the nextlevel.
Shapes
Classes ofshapes
0. Visualization
The van Hiele Theory of Geometric Thought
1. Analysis
2. Informal Deduction
3. Deduction
4. Rigor
Relationshipsamongproperties
Deductivesystems ofproperties
Analysis ofdeductivesystems
Properties ofshapes
FIGURE 7.1At each level of geometricthought, the ideas createdbecome the focus or object ofthought at the next level.
183
GEOMETRIC THOUGHT: REASONING ABOUT SHAPES AND RELATIONSHIPS
ch07.qxd 5/4/2005 2:51 PM Page 183

2. The levels are not age dependent in the sense of the developmental stages ofPiaget. A third grader or a high school student could be at level 0. Indeed, some students and adults remain forever at level 0, and a significant number of adults never reach level 2. But age is certainly related to the amount and types of geometric experiences that we have. Therefore, it is reasonable to assumethat most children in the K–2 range as well as many children in grades 3 and 4 areat level 0.
3. Geometric experience is the greatest single factor influencing advancementthrough the levels. Activities that permit children to explore, talk about, andinteract with content at the next level, while increasing their experiences at theircurrent level, have the best chance of advancing the level of thought for thosechildren. Some researchers believe that it is possible to be at one level withrespect to a familiar area of content and at a lower level with less familiar ideas(Clements & Battista, 1992).
4. When instruction or language is at a level higher than that of the student, therewill be a lack of communication. Students required to wrestle with objects ofthought that have not been constructed at the earlier level may be forced intorote learning and achieve only temporary and superficial success. A student can,for example, memorize that all squares are rectangles without having constructedthat relationship. A student may memorize a geometric proof but fail to create thesteps or understand the rationale involved (Fuys, Geddes, & Tischler, 1988; Ged-des & Fortunato, 1993).
Implications for InstructionIf the van Hiele theory is correct—and there is much evidence to support it—then
a major goal of the K–8 curriculum must be to advance students’ level of geometricthought. If students are to be adequately prepared for the deductive geometry curricu-lum of high school, then it is important for their thinking to have grown to level 2 bythe end of the eighth grade.
Not every teacher will be able to move children to the next level. However, allteachers should be aware that the experiences they provide are the single most impor-tant factor in moving children up this developmental ladder. Every teacher should beable to see some growth in geometric thinking over the course of the year.
The van Hiele theory and the developmental perspective of this book highlightthe necessity of teaching at the child’s level of thought. However, almost any activitycan be modified to span two levels of thinking, even within the same classroom. For many activities, how we interact with individual children will adapt the activity to their levels and encourage them or challenge them to operate at the next higherlevel.
Explorations help develop relationships. The more students play around with theideas in activities, the more relationships they will discover. However, students need tolearn how to explore ideas in geometry and play around with the relationships in orderfor ideas to develop and become meaningful.
The following sections contain descriptions of the types of activity and question-ing that are appropriate for the first three levels. Apply these descriptors to the tasksthat you pose to students and use them to guide your interaction with students. Theuse of physical materials, drawings, and computer models is a must at every level.
184
Chapter 7 GEOMETRIC THINKING AND GEOMETRIC CONCEPTS
ch07.qxd 5/4/2005 2:51 PM Page 184

Instruction at Level 0Instructional activities in geometry appropriate for level 0 should:
• Involve lots of sorting and classifying. Seeing how shapes are alike and differ-ent is the primary focus of level 0. As students learn more content, the types ofthings that they notice will become more sophisticated. At an early stage theymay talk about very nongeometric-sounding attributes of shape such as “fat”or even the color of the pieces. When properties such as symmetry and num-bers of sides and corners are introduced, students should be challenged to usethese features to classify shapes.
• Include a sufficient variety of examples of shapes so that irrelevant features donot become important. Students need ample opportunities to draw, build,make, put together, and take apart shapes in both two and three dimensions.These activities should be built around specific characteristics or properties sothat students develop an understanding of geometric properties and begin touse them naturally.
To help students move from level 0 to level 1, students should be challenged totest ideas about shapes for a variety of examples from a particular category. Say tothem, “Let’s see if that is true for other rectangles,” or “Can you draw a triangle thatdoes not have a right angle?” In general, students should be challenged to see if obser-vations made about a particular shape apply to other shapes of a similar kind.
Instruction at Level 1Instructional activities in geometry appropriate for level 1 should:
• Focus more on the properties of figures rather than on simple identification. Asnew geometric concepts are learned, the number of properties that figures havecan be expanded.
• Apply ideas to entire classes of figures (e.g., all rectangles, all prisms) ratherthan individual models. Analyze classes of figures to determine new properties.For example, find ways to sort all possible triangles into groups. From thesegroups, define types of triangles. Dynamic geometry software such as TheGeometer’s Sketchpad (Key Curriculum Press) is especially useful for exploringmany examples of a class of shapes. This software is essential for exploring geo-metric ideas in grades 5 to 8.
To assist students in moving from level 1 to level 2, challenge them with ques-tions such as “Why?” and those that involve some reasoning. For example, ask “If thesides of a four-sided shape are all congruent, will you always have a square?” and “Canyou find a counterexample?”
Instruction at Level 2Instructional activities in geometry appropriate for level 2 should:
• Encourage the making and testing of hypotheses or conjectures. “Do you thinkthat will work all the time?” “Is that true for all triangles or just equilateralones?”
185
GEOMETRIC THOUGHT: REASONING ABOUT SHAPES AND RELATIONSHIPS
ch07.qxd 5/4/2005 2:51 PM Page 185

• Examine properties of shapes to determine necessary and sufficient conditionsfor different shapes or concepts. “What properties of diagonals do you thinkwill guarantee that you will have a square?”
• Use the language of informal deduction: all, some, none, if–then, what if, and so on.
• Encourage students to attempt informal proofs. As an alternative, require themto make sense of informal proofs that other students or you have suggested.
Assessment NoteNearly all students in grades K–3 will be at level 0. However, by at leastgrade 3 teachers certainly want to begin to challenge students who seemable to engage in level 1 thinking. Teachers in the upper grades mayhave children at two or even all three levels within the same classroom. How doyou discover the level of each student? Once you know, how will you select theright activities to match your students’ levels?
No simple test exists to pigeonhole students at a certain level. However,examine the descriptors for the first two levels. As you conduct an activity, lis-ten to the types of observations that students make. Can they talk about shapes as classes? Do they refer, for example, to “rectangles” rather than basing discus-sion around a particular rectangle? Do they generalize that certain properties are attributable to a type of shape or simply the shape at hand? Do they under-stand that shapes do not change when the orientation changes? With simpleobservations such as these, you will soon be able to distinguish between levels 0 and 1.
At the upper grades, attempt to push students from level 1 to level 2. If stu-dents are not able to follow or appreciate logical arguments and are not comfort-able with conjectures and if–then reasoning, these students are likely still at level1 or below.
Content and the Levels of ThinkingThis chapter offers a sample of activities organized around the four content areas:
Shapes and Properties, Transformations, Location, and Visualization. A section of thechapter is devoted to each of these areas. The van Hiele theory applies to all geometricactivity regardless of content. However, it is within the content area of shapes andproperties that the theory is most clearly seen. For that reason the activities in that sec-tion are subdivided into those appropriate for level 0, level 1, and level 2 thinkers. Youwill find this subdivision helpful for matching activities to your students and encourag-ing student development of thinking to higher levels. The three remaining sectionsfocus on activities for developing spatial sense through location, transformation, andvisualization. Each of these sections is organized in a progression of difficulty andsophistication.
Understand that all of these subdivisions are quite fluid; that is, the content areasoverlap and build on each other. Activities in one section may help develop geometricthinking in another area. For example, developing spatial sense through an investiga-tion of symmetry can help students move from level 0 to level 1. A more sophisticated
186
Chapter 7 GEOMETRIC THINKING AND GEOMETRIC CONCEPTS
ch07.qxd 5/4/2005 2:51 PM Page 186

analysis of symmetry can continue to help students move to level 2. In most instances,an activity described for one level of thinking can easily be adapted to an adjacent levelsimply by the way it is presented to students.
Shapes and Properties ActivitiesChildren need experiences with a rich variety of both two- and three-dimensional
shapes. It is useful for students to be able to identify common shapes, notice likenessesand differences among shapes, become aware of the properties that different shapeshave, and eventually use these properties to further define and understand their geo-metric world. As students find out more about shapes over time, they can begin toappreciate how definitions of special shapes come to be.
This gradual development of student understanding of shapes and their propertiesclearly reflects the van Hiele theory of geometric thought. Within this aspect of geo-metric content, an awareness and application of the theory to your instruction aremost important.
Activities for Level 0 ThinkersThe emphasis at level 0 is on the shapes that students can observe, feel, build,
take apart, and perceive in many ways. The general goal is to explore how shapes are alike and different and use these ideas to create classes of shapes (both physicallyand mentally). Some of these classes of shapes have names—rectangles, triangles,prisms, cylinders, and so on. Properties of shapes, such as parallel sides, symmetry,right angles, and so on, are included at this level but only in an informal, observa-tional manner.
Children need experience with a rich variety of both two- and three-dimensionalshapes. Triangles should be more than just equilateral. Shapes should have curved sides,straight sides, and combinations of these. Along the way, the names of shapes and theirproperties can be introduced casually but only after students have described the shapeor property.
Remember that level 0 is not a synonym for primary. If you teach in the uppergrades, you will almost certainly have students who need to begin with activities simi-lar to these.
Sorting and ClassifyingAs students work at classification of shapes, be prepared for them to notice fea-
tures that you do not consider to be “real” geometric attributes, such as “curvy” or“looks like a rocket.” Students at this level will also attribute to shapes ideas that arenot part of the shape, such as “points up” or “has a side that is the same as the edge ofthe board.”
For variety in two-dimensional shapes, create your own materials. A good setfound in the Blackline Masters is called 2-D Shapes. Make multiple copies so thatgroups of students can all work with the same shapes. The shapes in Figure 7.2 are simi-lar to those in the Blackline Masters, but you will want many more. Once you haveyour sets constructed, the following activities provide several ideas.
187
SHAPES AND PROPERTIES ACTIVITIES
FIGURE 7.2An assortment of shapes for sorting.
BLMs 12–18
ch07.qxd 5/5/2005 11:52 AM Page 187

ACT IV ITY 7 . 1
Shape Sorts
Have students work in groups of four with a set of 2-D Shapes similar to thosein Figure 7.2. Here are several related activities that might be done in order:
• Each student randomly selects a shape. In turn, students tell one or twothings they find interesting about their shape. There are no right orwrong responses.
• Students each randomly select two shapes. The task is to find some-thing that is alike about their two shapes and something that is differ-ent. (Have them select their shapes before they know the task.)
• The group selects one shape at random and places it in the center of theworkspace. Their task is to find all other shapes that are like the targetshape, but all according to the same rule. For example, if they say, “Thisone is like our shape because it has a curved side and a straight side,”then all other shapes that they put in the collection must have theseproperties. Challenge them to do a second sort with the same targetshape but using a different property.
• Have students share their sorting rules with the class and show exam-ples. All students then draw a new shape that will also fit in the groupaccording to the same rule. They should write about their new shapeand why it fits the rule.
• Do a “secret sort.” You or one of the students creates a small collectionof about five shapes that fit a secret rule. Leave others that belong inyour group in the pile. The other students try to find additional piecesthat belong to the set and/or guess the secret rule.
Why do you think that the teacher should not say things such as, “Find all thepieces with straight sides,” or “Find the triangles,” and instead let studentschoose how to sort?
In any sorting activity, the students should decide how to sort, not the teacher.This allows the students to do the activity using ideas they own and understand. By lis-tening to the kinds of attributes that they use in their sorting, you will be able to tellwhat properties they know and use and how they think about shapes. At level 0, stu-dents will likely make groups such as “has a curved side” or will sort by the number ofsides a shape has. They will use expressions such as “has sides that go the same way”for parallel, “dented in” for concave, and “square corners” for right angles.
The secret sorting activity is one option for introducing a new property. For exam-ple, sort the shapes so that all have at least one right angle or “square corner.” Whenstudents discover your rule, you have an opportunity to talk more about that property.
The following activity is also done with the 2-D Assorted Shapes.
ACT IV ITY 7 .2
What’s My Shape?
From the Blackline Masters, make a set of 2-D Shapes on paper. Cut outabout a third of the shapes and paste each inside a folded half-sheet of con-struction paper to make “secret shape” folders.
188
Chapter 7 GEOMETRIC THINKING AND GEOMETRIC CONCEPTS
ch07.qxd 5/4/2005 2:51 PM Page 188
In a group, one student is designated the leader and given a secret-shape folder. The other students are to find the shape that matches the shapein the folder. To this end, they ask questions to which the leader can answeronly “yes” or “no.” The students can sort the shapes as they ask questions tohelp narrow down the possibilities. They are not allowed to point to a pieceand ask, “Is it this one?” Rather, they must continue to ask questions thatreduce the choices to one shape. The final piece is tested against the one inthe leader’s folder.
The difficulty of Activity 7.2 largely depends on the shape in the folder. The moreshapes in the collection that resemble the secret shape, the more difficult the task.
Most of the activities in “Shape Sorts” can and should be done with three-dimensional shapes as well. The difficulty is finding or making a collection that has sufficient variability. Geoblocks are a large set of wooden blocks available throughvarious distributors. The variety is good, but no blocks have curved surfaces. Check cat-alogs for other collections. Consider combining several different sets to get variation.Another option is to collect real objects such as cans, boxes, balls, and Styrofoamshapes. Again, the types of categories that students use will be quite revealing.
Assessment NoteThe way that children describe shapes in
“Shape Sorts” and similar activities withthree-dimensional shapes is a good clue to
their level of thinking. The classifications madeby level 0 thinkers will generally be restricted to theshapes that they can actually put into a group. Asthey begin to think in terms of the properties ofshapes, they will create categories based on proper-ties, and their language will indicate that there aremany more shapes in the group than those that arephysically present. For example, students may say,“These shapes have square corners sort of like rect-angles,” or “These look like boxes. All the boxeshave square (rectangular) sides.”
Constructing and Dissecting ShapesStudents need to freely explore how shapes fit
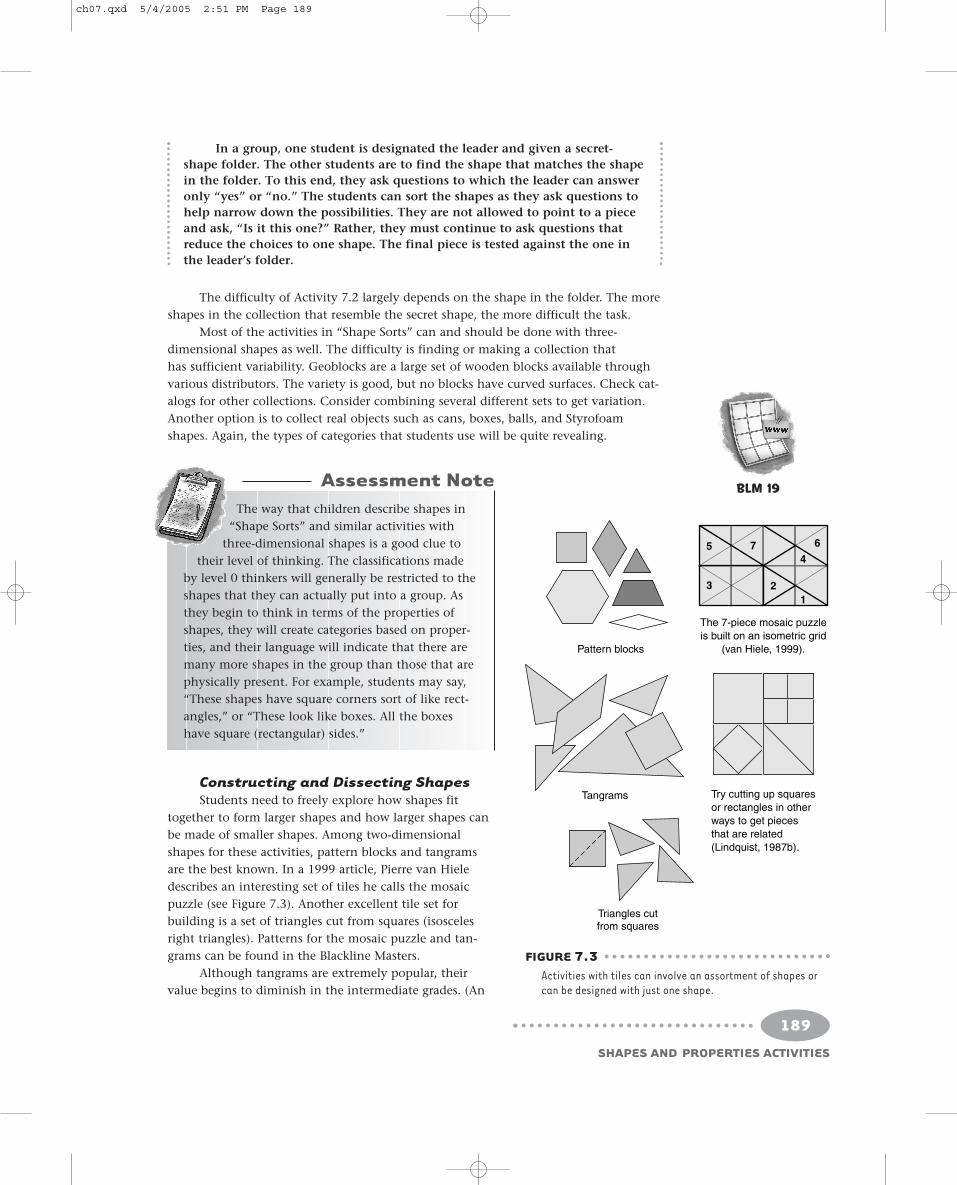
together to form larger shapes and how larger shapes canbe made of smaller shapes. Among two-dimensionalshapes for these activities, pattern blocks and tangramsare the best known. In a 1999 article, Pierre van Hieledescribes an interesting set of tiles he calls the mosaicpuzzle (see Figure 7.3). Another excellent tile set forbuilding is a set of triangles cut from squares (isoscelesright triangles). Patterns for the mosaic puzzle and tan-grams can be found in the Blackline Masters.
Although tangrams are extremely popular, theirvalue begins to diminish in the intermediate grades. (An
Pattern blocks
Tangrams Try cutting up squaresor rectangles in otherways to get piecesthat are related(Lindquist, 1987b).
Triangles cutfrom squares
The 7-piece mosaic puzzleis built on an isometric grid
(van Hiele, 1999).
5
3 2
4
1
67
FIGURE 7.3Activities with tiles can involve an assortment of shapes orcan be designed with just one shape.
189
SHAPES AND PROPERTIES ACTIVITIES
BLM 19
ch07.qxd 5/4/2005 2:51 PM Page 189

exception is their use in measuring area. See Chapter 8.) Nonethe-less, level 0 students do gain experiences with the way that shapesfit together when they solve tangram puzzles. A full-sized outlinethat will contain exactly all seven tangram pieces can be quite chal-lenging. The most difficult tangram puzzle is a shape that can bemade of all seven pieces but shown to the student in reduced form.(See Figure 7.4.) This latter puzzle format involves proportional rea-soning because the student must mentally enlarge the shape inorder to create it with the tangrams.
The value of van Hiele’s mosaic puzzle is partly due to the factthat the set contains five different angles (see Figure 7.5). If appro-priate, you can use the pieces to talk about square corners (rightangles) and angles that are more and less than a right angle (obtuseand acute angles).
Building three-dimensional shapes is a little more difficultcompared with two-dimensional shapes. A variety of commercialmaterials permits fairly creative construction of geometric solids (forexample, 3D Geoshapes, Polydron, and the Zome System). The 3DGeoshapes and Polydron are examples of materials consisting ofplastic polygons that snap together to make three-dimensional mod-els. The Zome System is a stick and connector set; skeletal modelscan be created with a great deal of variation. The following are threehighly recommended homemade approaches to skeletal models.
• Plastic coffee stirrers with pipe cleaners. Plastic stirrers can be easilycut to different lengths. To connect the corners, cut pipe cleanersinto 2-inch lengths. These are inserted into the ends of the stirrers.
• Plastic drinking straws with flexible joints. Cut the straws lengthwise with scissorsfrom the top down to the flexible joint. These slit ends can then be insertedinto the uncut bottom ends of other straws, making a strong but flexible joint.Three or more straws are joined in this fashion to form two-dimensional poly-gons. To make skeletal solids, use tape or wire twist ties to join polygons sideto side.
• Rolled newspaper rods. Fantastic superlarge skeletons can be built using newspa-per and masking tape. Roll three large sheets of newspaper on the diagonal toform a rod. The more tightly the paper is rolled, the less likely the rod is tobend. Secure the roll at the center with a bit of masking tape. The ends of therods are thin and flexible for about 6 inches where there is less paper. Connectthe rods by bunching this thin part together and fastening with tape. Usemasking tape freely, wrapping it several times around each joint. Additionalrods can be joined after two or three are already taped (see Figure 7.6).
With these homemade models, students should compare the rigidity of a trianglewith the lack of rigidity of polygons with more than three sides. Point out that trian-gles are used in many bridges, in the long booms of construction cranes, in gates, andin the structural parts of buildings. Discuss why this may be so. As students build largeskeleton structures, they will find that they need to add diagonal members to form tri-angles. The more triangles, the less likely their structure will collapse.
190
Chapter 7 GEOMETRIC THINKING AND GEOMETRIC CONCEPTS
Full-sizedoutlines
Outlines areto scale butmuch smaller.
Fit all seventangram piecesin this shape.
Each of theseshapes can be madeusing all seven pieces.
Harder
Hardest
(a)
(b)
FIGURE 7.4Two types of tangram puzzles that are differentin difficulty.
ch07.qxd 5/4/2005 2:51 PM Page 190

191
SHAPES AND PROPERTIES ACTIVITIES
This is a long parallelogram. What other parallelograms can you make?
Make this house with two pieces. Now do it a different way. Can you make it with three pieces? How many ways? What about four pieces?
How many different rectangles can you make? Can you make any in more than one way?
How many different-sized angles can you find in the set of pieces? Put them in order from smallest to largest.
Build enlargements of the equilateral triangle.
FIGURE 7.5A sample of activities with the mosaic puzzle.Based on van Hiele, P. M. (1999). Developing geometric thinking through activities that begin with play. Teaching Children Mathematics, 5, 310–316.
Use masking tapeat corners.
Roll three full sheets of newspaper verytightly on the diagonal. Secure with tape.Tight rolls make stronger sticks.
FIGURE 7.6Large skeletal structures andspecial shapes can be built withtightly rolled newspaper. Youngchildren can build free-formsculptures. Older children canbe challenged to build shapeswith specific properties. Over-lap the ends about 6 inches toensure strength.
ch07.qxd 5/4/2005 2:51 PM Page 191

The newspaper rod method is exciting because the structures quickly becomelarge. Let students work in groups of four or five. They will soon discover what makes astructure rigid and ideas of balance and form. Students can be challenged to makeshapes with specific properties. (See pp. 226–227.)
TessellationsA tessellation is a tiling of the plane using one or more shapes in a repeated pat-
tern with no holes or gaps. Making tessellations is an artistic way for level 0 and level 1students from first grade to eighth grades to explore patterns in shapes and to see howshapes combine to form other shapes. One-shape or two-shape tessellation activitiescan vary considerably in difficulty. Some shapes are easier to tessellate than others (seeFigure 7.7). When the shapes can be put together in more than one pattern, both theproblem-solving level and the creativity increase. Literally hundreds of shapes can beused as tiles for tessellations.
Most students will benefit from using actual tiles to create patterns. Simple con-struction paper tiles can be cut quickly on a paper cutter. Other tiles can be traced ontoconstruction paper and several thicknesses cut at once with scissors. When the tileshape fits in a grid, students can use dot or line grids and plan their tessellations withpencil and paper. To plan a tessellation, use only one color so that the focus is on thespatial relationships. To complete an artistic-looking tessellation, add a color design.Color designs are also repeated regularly all over the tessellation.
Tessellations can be made by gluing paper tiles to large sheets of paper, by draw-ing them on dot or line grids, or by tracing around a poster board tile. Work from thecenter out, leaving ragged edges to indicate that the pattern goes on and on.
Look at the top-left tessellation in Figure 7.7. What single tile (a combinationof squares and half squares) made this pattern?
192
Chapter 7 GEOMETRIC THINKING AND GEOMETRIC CONCEPTS
Tessellations can be drawn on grids or made of constructionpaper tiles. They are challenging and provide an opportunityfor both artistic creativity and spatial reasoning.
FIGURE 7.7Tessellations.
ch07.qxd 5/4/2005 2:51 PM Page 192
Activities for Level 1 ThinkersA significant difference between level 1 and
level 0 is the object of students’ thought. While stu-dents will continue to use models and drawings ofshapes, they begin to see these as representatives ofclasses of shapes. Their understanding of the proper-ties of shapes—such as symmetry, perpendicularand parallel lines, and so on—continues to berefined.
For the sake of clarity, the important defini-tions of two- and three-dimensional shapes are pro-vided here. You will notice that shape definitionsinclude relationships between and among shapes.
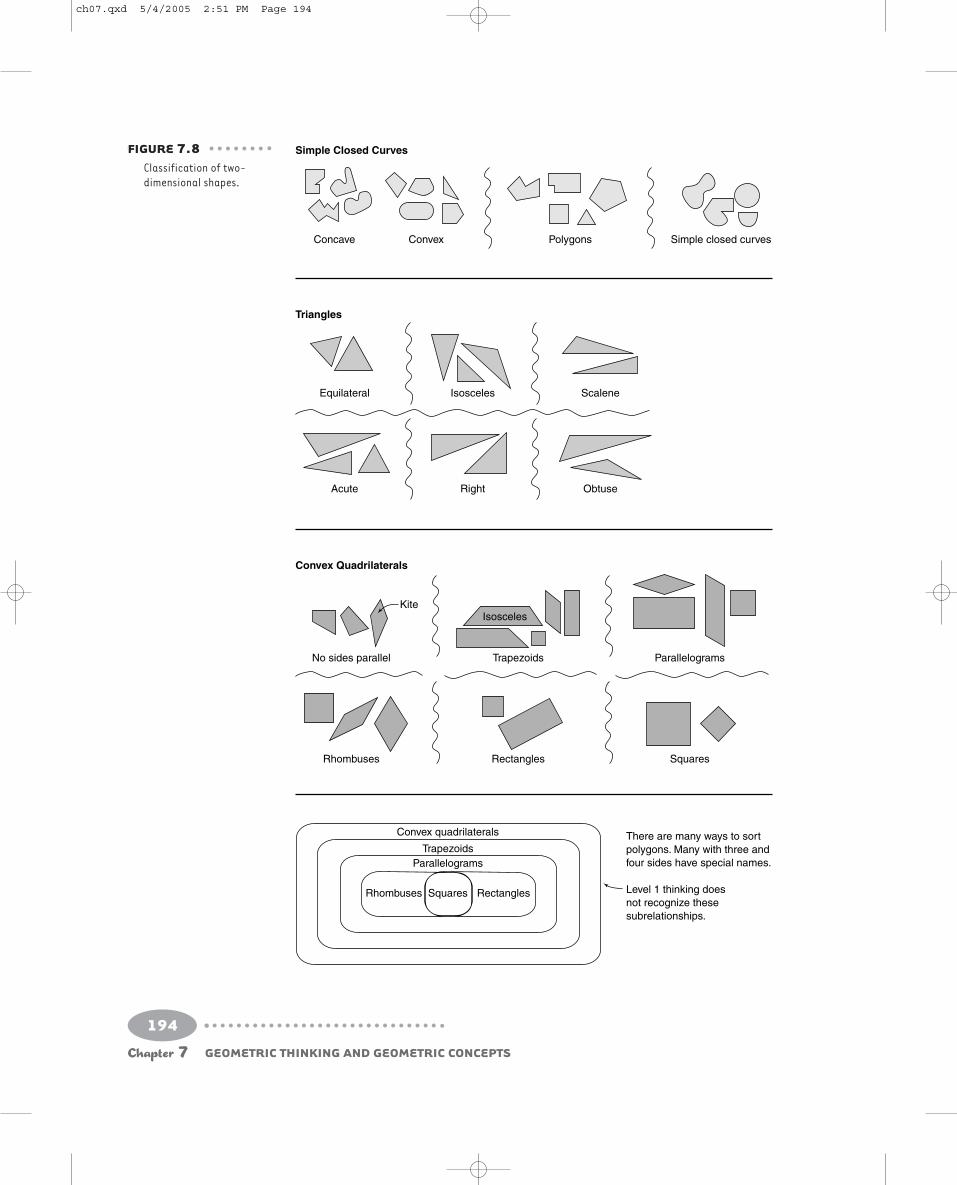
Special Categories of Two-Dimensional Shapes
Table 7.1 lists some important categories oftwo-dimensional shapes. Examples of these shapescan be found in Figure 7.8.
In the classification of quadrilaterals and par-allelograms, the subsets are not all disjoint. Forexample, a square is a rectangle and a rhombus. Allparallelograms are trapezoids, but not all trapezoidsare parallelograms.* Children at level 1 have diffi-culty seeing this type of subrelationship. They mayquite correctly list all the properties of a square, arhombus, and a rectangle and still identify a squareas a “nonrhombus” or a “nonrectangle.” Is it wrongfor students to refer to subgroups as disjoint sets? Byfourth or fifth grade, it is only wrong to encouragesuch thinking. Burger (1985) points out that upperelementary students correctly use such classificationschemes in other contexts. For example, individualstudents in a class can belong to more than oneclub. A square is an example of a quadrilateral thatbelongs to two other clubs.
Special Categories of Three-Dimensional Shapes
Important and interesting shapes and relation-ships also exist in three dimensions. Table 7.2describes classifications of solids. Figure 7.9 onp. 196 shows examples of cylinders and prisms.
*Some definitions of trapezoid specify only one pair of par-allel sides, in which case parallelograms would not betrapezoids. The University of Chicago School MathematicsProject (UCSMP) uses the “at least one pair” definition,meaning that parallelograms and rectangles are trapezoids.
193
SHAPES AND PROPERTIES ACTIVITIES
TABLE 7.1Categories of Two-Dimensional Shapes
Shape
Simple Closed Curves
Concave, convex
Symmetrical,nonsymmetrical
PolygonsConcave, convexSymmetrical, nonsymmetricalRegular
Triangles
Triangles
Classified by sidesEquilateralIsoscelesScalene
Classified by anglesRightAcute
Obtuse
Convex QuadrilateralsConvexquadrilaterals
Kite
TrapezoidIsoscelestrapezoid
ParallelogramRectangleRhombus
Square
Description
An intuitive definition of concavemight be “having a dent init.” If a simple closed curve isnot concave, it is convex. Amore precise definition ofconcave may be interesting toexplore with older students.
Shapes may have one or morelines of symmetry and may or may not have rotationalsymmetry. These conceptswill require more detailedinvestigation.
Simple closed curves with allstraight sides.
All sides and all angles arecongruent.
Polygons with exactly threesides.
All sides are congruent.At least two sides are congruent.No two sides are congruent.
Has a right angle.All angles are smaller than a
right angle.One angle is larger than a right
angle.
Convex polygons with exactlyfour sides.
Two opposing pairs of congruentadjacent sides.
At least one pair of parallel sides.A pair of opposite sides is
congruent.
Two pairs of parallel sides.Parallelogram with a right angle.Parallelogram with all sides
congruent.Parallelogram with a right angle
and all sides congruent.
ch07.qxd 5/4/2005 2:51 PM Page 193
194
Chapter 7 GEOMETRIC THINKING AND GEOMETRIC CONCEPTS
Equilateral Isosceles
Acute Right
Scalene
Obtuse
Triangles
Simple Closed Curves
Concave Convex Polygons Simple closed curves
No sides parallel Trapezoids
Rhombuses Rectangles
Parallelograms
Squares
IsoscelesKite
Convex Quadrilaterals
There are many ways to sortpolygons. Many with three andfour sides have special names.
Level 1 thinking doesnot recognize thesesubrelationships.
Convex quadrilaterals
TrapezoidsParallelograms
SquaresRhombuses Rectangles
FIGURE 7.8Classification of two-dimensional shapes.
ch07.qxd 5/4/2005 2:51 PM Page 194

Note that prisms are defined here as a special category of cylinder—a cylinder with apolygon for a base. Figure 7.10 shows a similar grouping of cones and pyramids.
Explain the following: Prisms are to cylinders as pyramids are to cones. How isthis relationship helpful in learning volume formulas?
195
SHAPES AND PROPERTIES ACTIVITIES
TABLE 7.2Categories of Three-Dimensional Shapes
Shape
Sorted by Edges and Vertices
Sphere and “egglike”shapes
Sorted by Faces and Surfaces
Polyhedron
Cylinders
Cylinder
Right cylinder
Prism
Rectangular prismCube
Cones
Cone
Circular conePyramid
Description
Shapes with no edges and no vertices (corners).Shapes with edges but no vertices (e.g., a flying saucer).Shapes with vertices but no edges (e.g., a football).
Shapes made of all faces (a face is a flat surface of a solid). Ifall surfaces are faces, all the edges will be straight lines.
Some combination of faces and rounded surfaces (cylindersare examples, but this is not a definition of a cylinder).
Shapes with curved surfaces.Shapes with and without edges and with and without vertices.Faces can be parallel. Parallel faces lie in places that never
intersect.
Two congruent, parallel faces called bases. Lines joiningcorresponding points on the two bases are always parallel.These parallel lines are called elements of the cylinder.
A cylinder with elements perpendicular to the bases. Acylinder that is not a right cylinder is an oblique cylinder.
A cylinder with polygons for bases. All prisms are specialcases of cylinders.
A cylinder with rectangles for bases.A square prism with square sides.
A solid with exactly one face and a vertex that is not on theface. Straight lines (elements) can be drawn from anypoint on the edge of the base to the vertex. The basemay be any shape at all. The vertex need not be directlyover the base.
Cone with a circular base.Cone with a polygon for a base. All faces joining the vertex
are triangles. Pyramids are named by the shape of thebase: triangular pyramid, square pyramid, octagonal pyra-mid, and so on. All pyramids are special cases of cones.
ch07.qxd 5/5/2005 11:52 AM Page 195

Many textbooks define cylinders strictly as circular cylinders. These books do nothave special names for other cylinders. Under that definition, the prism is not a specialcase of a cylinder. This points to the fact that definitions are conventions, and not allconventions are universally agreed upon. If you look at the development of the volumeformulas in Chapter 8, you will see that the more inclusive definition of cylinders andcones given there allows one formula for any type of cylinder—hence, prisms—with asimilar statement that is true for cones and pyramids.
Sorting and Classifying ActivitiesThe next activity provides a good method when you want to introduce a category
of shapes that you plan to define formally later.
196
Chapter 7 GEOMETRIC THINKING AND GEOMETRIC CONCEPTS
Cylinders have two parallel faces, and parallel lines join corresponding points on these faces. If the parallel faces are polygons, the cylinder can be called a prism.
Cylinders
Prisms Right prisms
Not Cylinders
Special Cylinders
Right cylinders (not prisms)
Cones and cones with a polygon base (pyramids) all have straight-line elements joining every point of the base with the vertex. (Yes, a pyramid is just a special type of cone.) Cones—not pyramids
Cones
Not cones
Special cones—pyramids
FIGURE 7.10Cones and pyramids.
FIGURE 7.9Cylinders and prisms.
ch07.qxd 5/4/2005 2:51 PM Page 196
ACT IV ITY 7 .3
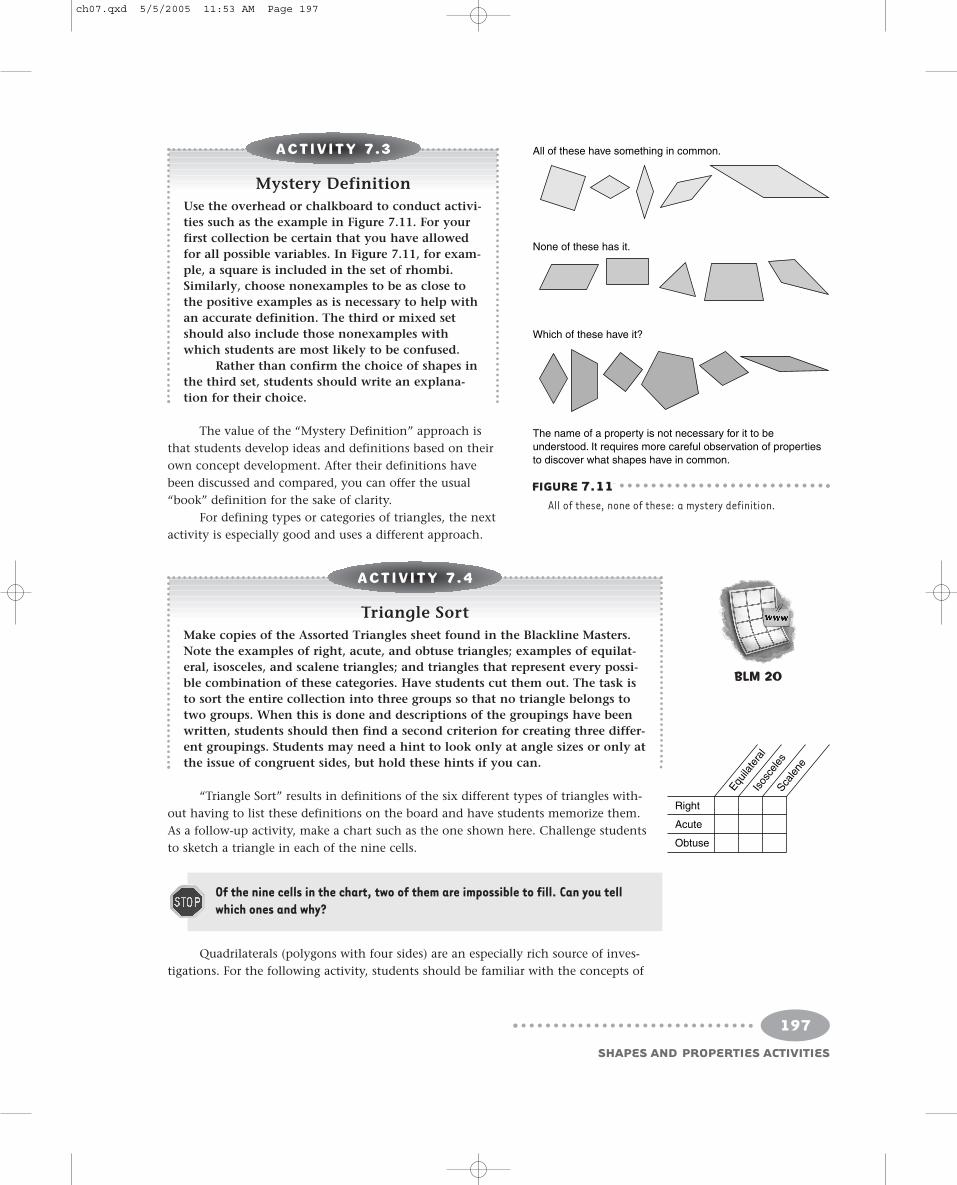
Mystery Definition
Use the overhead or chalkboard to conduct activi-ties such as the example in Figure 7.11. For yourfirst collection be certain that you have allowedfor all possible variables. In Figure 7.11, for exam-ple, a square is included in the set of rhombi.Similarly, choose nonexamples to be as close tothe positive examples as is necessary to help withan accurate definition. The third or mixed setshould also include those nonexamples withwhich students are most likely to be confused.
Rather than confirm the choice of shapes inthe third set, students should write an explana-tion for their choice.
The value of the “Mystery Definition” approach isthat students develop ideas and definitions based on theirown concept development. After their definitions havebeen discussed and compared, you can offer the usual“book” definition for the sake of clarity.
For defining types or categories of triangles, the nextactivity is especially good and uses a different approach.
ACT IV ITY 7 .4
Triangle Sort
Make copies of the Assorted Triangles sheet found in the Blackline Masters.Note the examples of right, acute, and obtuse triangles; examples of equilat-eral, isosceles, and scalene triangles; and triangles that represent every possi-ble combination of these categories. Have students cut them out. The task isto sort the entire collection into three groups so that no triangle belongs totwo groups. When this is done and descriptions of the groupings have beenwritten, students should then find a second criterion for creating three differ-ent groupings. Students may need a hint to look only at angle sizes or only atthe issue of congruent sides, but hold these hints if you can.
“Triangle Sort” results in definitions of the six different types of triangles with-out having to list these definitions on the board and have students memorize them.As a follow-up activity, make a chart such as the one shown here. Challenge studentsto sketch a triangle in each of the nine cells.
Of the nine cells in the chart, two of them are impossible to fill. Can you tellwhich ones and why?
Quadrilaterals (polygons with four sides) are an especially rich source of inves-tigations. For the following activity, students should be familiar with the concepts of
197
SHAPES AND PROPERTIES ACTIVITIES
All of these have something in common.
None of these has it.
Which of these have it?
The name of a property is not necessary for it to beunderstood. It requires more careful observation of propertiesto discover what shapes have in common.
FIGURE 7.11All of these, none of these: a mystery definition.
BLM 20
Right
Acute
Obtuse
Equila
tera
lIs
osce
les
Scale
ne
ch07.qxd 5/5/2005 11:53 AM Page 197

right, obtuse, and acute angles, congruence of line seg-ments, and symmetry (line and rotational).
ACT IV ITY 7 .5
Property Lists for Quadrilaterals
Prepare worksheets for parallelograms, rhombi,rectangles, and squares. (See the Blackline Mas-ters.) On each sheet are three or four examplesof that category of shape. Examples are illus-trated in Figure 7.12. Assign students workingin groups of three or four to one type of quadri-lateral. Their task is to list as many propertiesas they can. Each property listed must be appli-cable to all of the shapes on their sheet. Theywill need a simple index card to check rightangles, to compare side lengths, and to drawstraight lines. Mirrors (to check line symmetry)and tracing paper (for angle congruence androtational symmetry) are also useful tools.Encourage students to use the words “at least”when describing how many of something: forexample, “rectangles have at least two lines ofsymmetry,” since squares—included in the rectangles—have four.
Have students prepare their property lists under these headings: Sides, Angles,Diagonals, and Symmetries. Groups then share their lists with the class and eventuallya class list for each shape will be developed.
This last activity may take two or three periods. Share lists beginning with paral-lelograms, then rhombi, then rectangles, and finally squares. Have one group presentits list. Then others who worked on the same shape should add to or subtract from it.The class must agree with everything that is put on the list. As new relationships comeup in this presentation-and-discussion period, you can introduce proper terminology.For example, if two diagonals intersect in a square corner, then they are perpendicular.Other terms such as parallel, congruent, bisect, midpoint, and so on can be clarified as youhelp students write their descriptions. This is also a good time to introduce symbolssuch as ≅ for “congruent” or || for “parallel.”
As an extension, repeat Activity 7.5 using kites and trapezoids. “Property Lists forQuadrilaterals” has some important follow-ups that are described in the section onlevel 2 activities (see p. 203). Furthermore, similar activities can be used to introducethree-dimensional shape definitions.
Construction ActivitiesStudents building or drawing shapes continues to be important at level 1.
Dynamic geometry software (Geometer’s Sketchpad, The Geometry Inventor, and Cabri) dra-matically enhances the exploration of shapes at this level.
In the “Property Lists for Quadrilaterals” activity (Activity 7.5), students examinethe diagonals of various classes of quadrilaterals. If that activity has not been done
198
Chapter 7 GEOMETRIC THINKING AND GEOMETRIC CONCEPTS
Squares Parallelograms
Rhombi Rectangles
FIGURE 7.12Shapes for “Property Lists for Quadrilaterals” worksheets canbe found in the Blackline Masters.
BLMs 21–24
ch07.qxd 5/4/2005 2:51 PM Page 198

already, the following exploration is very interesting. Rather than beginning with theshapes, it begins with the diagonals.
ACT IV ITY 7 .6
Diagonal Strips
For this activity, students need three strips of tagboard about 2 cm wide. Twoshould be the same length (about 30 cm) and the third somewhat shorter(about 20 cm). Punch nine holes equally spaced along the strip. (Punch ahole near each end. Divide the distance between the holes by 8. This will bethe distance between the remaining holes.) Use a brass fastener to join twostrips. A quadrilateral is formed by joining the four end holes as shown inFigure 7.13. Provide students with the list of possible relationships for angles,lengths, and ratios of parts. Their task is to use the strips to determine theproperties of diagonals that will produce different quadrilaterals. The stripsare there to help in the exploration. Students may want to make drawings ondot grids to test the various hypotheses.
Every type of quadrilateral can be uniquely described in terms of its diagonalsusing only the conditions of length, ratio of parts, and whether or not they are perpen-dicular. Some students will work with the diagonal relationships to see what shapes canbe made. Others will begin with examples of the shapes and observe the diagonal rela-tionships. A dynamic geometry program such as The Geometer’s Sketchpad is an excellentvehicle for this investigation.
Similar Figures and Proportional ReasoningA good first definition of similar figures is shapes that “look alike but are different
sizes.” More precisely, two figures are similar if all of their corresponding angles are con-gruent and the corresponding sides are proportional. Many proportional reasoningactivities are good connections to geometry. Activities 6.8, 6.9, and 6.10 involve scaledrawings and proportional relationships in three-dimensional figures that are similar.
199
SHAPES AND PROPERTIES ACTIVITIES
Quadrilaterals can be determined by their diagonals. Consider the length of each, wherethey cross, and the angles between them. What conditions will produce parallelograms?Rectangles? Rhombi? Challenge: What properties will produce a nonisosceles trapezoid?
FIGURE 7.13Diagonals of quadrilaterals.
ch07.qxd 5/4/2005 2:51 PM Page 199

A dilation is a nonrigid transformation that produces similar figures. Figure 7.14shows how a given figure can be dilated to make larger or smaller figures. If groups ofstudents using different dilation points dilate the same figure using the same scale fac-tor, they will find that the resulting figures are all congruent. Dynamic geometry soft-ware makes the results of this exercise quite dramatic. The software allows for the scalefactors to be set at any value. Once a dilation is made, the dilation point can be draggedaround the screen and the size and shape of the image clearly stay unchanged. Scalefactors less than 1 produce smaller figures.
CirclesMany interesting relationships can be observed between measures of different
parts of the circle. Among the most astounding and important is the ratio betweenmeasures of the circumference and the diameter.
True or False: All circles are similar. Explain.
ACT IV ITY 7 .7
Discovering Pi
Have groups of students carefully measure the circumference and diameter ofmany different circles. Each group measures different circles.
Measure both the circumference and diameter of circular items such asjar lids, tubes, cans, and wastebaskets. To measure circumference, wrap stringonce around the object and then measure that length of string.
Also measure large circles marked on gym floors and playgrounds. Use atrundle wheel or rope to measure the circumference.
Collect measures of circumference and diameter from all groups andenter them in a table. Ratios of the circumference to the diameter should alsobe computed for each circle. A scatter plot of the data should be made with thehorizontal axis representing diameters and the vertical axis circumferences.
Most ratios should be in the neighborhood of 3.1 or 3.2. The scatter plotshould approximate a straight line through the origin. The slope of the lineshould be close to 3.1. (Recall from Chapter 6 that graphs of equivalent ratiosare always straight lines through the origin. The exact ratio is an irrationalnumber, about 3.14159, represented by the Greek letter π, pi.)
200
Chapter 7 GEOMETRIC THINKING AND GEOMETRIC CONCEPTS
C'
C D'D
E
E'
A
P
A'
BB'
C'
C
D'
D
E
E'A
P
A'B
B'
FIGURE 7.14Begin with figure ABCDEand place point P any-where at all. Draw linesfrom P through each ver-tex. Place point A' twice asfar from P as A is from P(scale factor of 2). Dosimilarly for the otherpoints. In this drawing,ABCDE is the same in bothfigures and the images arecongruent.
ch07.qxd 5/4/2005 2:51 PM Page 200

What is most important in Activity 7.7 is that students develop a clear under-standing of π as the ratio of circumference to diameter in any circle. The quantity π isnot some strange number that appears in math formulas; it is a naturally occurring anduniversal ratio.
Technology NoteAs students begin to do more than build with geometric “blocks” (tan-
grams, pattern blocks, grid drawing, etc.), the computer begins to offerpowerful tools for explorations. Dynamic geometry software is especially
powerful.
Dynamic Geometry SoftwareIn a dynamic geometry program, points, lines, and geometric figures are easily
constructed on the computer using only the mouse. Once drawn, the geometric objectscan be moved about and manipulated in endless variety. Distances, lengths, areas,angles, slopes, and perimeters can be measured. As the figures are changed, the mea-surements update instantly.
Lines can be drawn perpendicular or parallel to other lines or segments. Anglesand segments can be drawn congruent to other angles and segments. A point can beplaced at the midpoint of a segment. A figure can be produced that is a reflection, rota-tion, or dilation of another figure. The most significant thing is that when a geometricobject is created with a particular relationship to another object, that relationship ismaintained no matter how either object is moved or changed.
Three of the best-known dynamic geometry programs are The Geometer’s Sketchpad(Key Curriculum Press, 2001), Geometry Inventor (Riverdeep, 1996), and Cabri Geometry II(Texas Instruments, 1998). Although each operates somewhat differently, they are suffi-ciently alike that separate descriptions are not required here. Originally designed for highschool students, all can be used profitably and should be used starting about grade 4.
Dynamic Geometry ExamplesTo appreciate the potential (and the fun) of dynamic geometry software, you
really need to experience it on a computer. In the meantime, an example is offered herein an attempt to illustrate how these programs work.
In Figure 7.15, the midpoints of a freely drawn quadrilateral ABCD have beenjoined. The diagonals of the resulting quadrilateral (EFGH) are also drawn and measured.No matter how the points A, B, C, and D are dragged around the screen, even invertingthe quadrilateral, the other lines will maintain the same relationships (joining midpointsand diagonals), and the measurements will be instantly updated on the screen.
Remember that at level 1, the objects of thought are classes of shapes. In adynamic geometry program, if a quadrilateral is drawn, only one shape is observed, aswould be the case on paper or on a geoboard. But now that quadrilateral can bestretched and altered in endless ways. Students actually explore not one shape but anenormous number of examples from that class of shapes. If a property does not changewhen the figure changes, the property is attributable to the class of shapes rather thanany particular shape.
Another example in Figure 7.16 shows how Sketchpad can be used to investigatequadrilaterals starting with the diagonals. The directions for creating the sketch are
201
SHAPES AND PROPERTIES ACTIVITIES
ch07.qxd 5/4/2005 2:51 PM Page 201

included and can be done quite simply with minimal experience with the software. Bycreating the drawing in this manner, the diagonals of ABCD will always bisect each otherno matter how the drawing is altered. By dragging point C around, ABCD can be madeinto a parallelogram, rectangle, rhombus, and square. But for each of these figures, addi-tional information about the diagonals can be determined by looking at the drawing.
Dynamic geometry programs are also powerful for investigating concepts of sym-metry and transformations (slides, flips, and turns). The publishers of these programsprovide excellent activities that are appropriate for level 1 investigations. Many activi-ties are included with the software, and others are found in supplemental publications.
Why can’t the drawing in Figure 7.16 be transformed into a kite or a trapezoidthat is not also a parallelogram?
202
Chapter 7 GEOMETRIC THINKING AND GEOMETRIC CONCEPTS
Distance (J to E)Distance (G to J)Distance (J to H)Distance (F to J)
C
G
D
A
E
F
J
H
B
====
3.81 cm3.81 cm2.21 cm2.21 cm
FIGURE 7.15A Sketchpad constructionillustrating an interestingproperty of quadrilaterals.
C
A B
D
P
Quadrilaterals with diagonals that bisect each other.
AC = 4.1 cmCB = 5.7 cmBD = 4.1 cmDA = 5.7 cm
Draw segment AB with midpoint P.
Construct circle with center P and control point C.
Construct line through C and P and then construct intersection point D.
Construct ABCD and measure each side.
Drag C. What different quadrilaterals can you make?
What is true about the diagonals of every shape you make?
What can you find out about the diagonals of the shapes you make?
FIGURE 7.16With The Geometer’sSketchpad students canconstruct two line seg-ments that will alwaysbisect each other. Whenthe endpoints are joined,the resulting quadrilateralwill always be of the sameclass, regardless of howpoints A, B, C, and D aremoved around.
ch07.qxd 5/4/2005 2:51 PM Page 202
The symmetry investigations (both line symmetry and rotational symmetry),“Diagonal Strips” (Activity 7.6), investigations of similarity, and “Discovering Pi” (Activ-ity 7.7) can all be explored profitably with dynamic geometry programs. The publishersof these programs provide excellent activities that are appropriate for level 1 investiga-tions. Many activities are included with the software, and others are found in supple-mentary publications.
Activities for Level 2 ThinkersThe hallmark of level 2 activities is the inclusion of informal logical reasoning.
Most fifth- to eighth-grade students will still be at level 1 at best. However, as studentsdevelop an understanding of various geometric properties and attach these propertiesto important categories of shapes, it is essential to begin to encourage conjecture and toexplore informal deductive arguments. Do not be afraid to explore some of the activi-ties at this level just because you may be teaching fifth or sixth grade.
Definitions and ProofsTo really understand the difference between levels 1 and 2 of the van Hiele
theory, contrast the required thinking in the level 1 activity “Property Lists for Quad-rilaterals” (Activity 7.5) and the following activity that is designed as a follow-up tothat one.
ACT IV ITY 7 .8
Minimal Defining Lists
(This activity must be done as a follow-up to the “Property Lists for Quadri-laterals” activity on p. 198.) Once property lists for the parallelogram, rhom-bus, rectangle, and square (and possibly the kite and trapezoid) have beenagreed on by the class, have these lists posted or type them up and dupli-cate them. In groups, the task is to find “minimal defining lists,” or MDLs,for each shape. An MDL is a subset of the properties for a shape that is“defining” and “minimal.” “Defining” here means that any shape that hasall the properties on the MDL must be that shape. Thus, an MDL for a square will guarantee that you have a square. “Minimal” means that if anysingle property is removed from the list it is no longer defining. For example,one MDL for a square is a quadrilateral with four congruent sides and oneright angle. Students should attempt to find at least two or three MDLs fortheir shape. A proposed list can be challenged as either not minimal or notdefining. A list is not minimal if a property can be removed yet the list stilldefines the shape. A list is not defining if a counterexample—a shape otherthan one being described—can be produced using only the properties on the list.
The parallelogram, rhombus, rectangle, and square each have at least four MDLs.One of the most interesting MDLs for each shape consists only of the properties of itsdiagonals. For example, a quadrilateral with diagonals that bisect each other and areperpendicular (intersect at right angles) is a rhombus. Several MDLs have only oneproperty. For example, a parallelogram is a quadrilateral with rotational symmetry of at least order 2.
203
SHAPES AND PROPERTIES ACTIVITIES
ch07.qxd 5/4/2005 2:51 PM Page 203

The MDL activity is worth some further discussion. First, notice the logic com-ponent. “If a quadrilateral has these properties, then it must be a square.” Logic is alsoinvolved in disproving a faulty list. A second feature is the opportunity to discuss whatconstitutes a definition. In fact, any MDL could be the definition of the shape. The definitions we usually use are MDLs that have been chosen probably due to the easewith which we can understand them. A quadrilateral with diagonals that bisect eachother does not immediately call to mind a parallelogram. Recall that when students created their property lists, no definition was given, only a collection of shapes and alabel. Theoretically, the lists could have been created without ever having heard ofthese shapes. Finally, notice that the object of students’ thinking in this activity isclearly on properties, not on shapes. The products of the activity are relationshipsamong the properties.
The next activity is also a good follow-up to the “Property Lists for Quadri-laterals” activity, although it is not restricted to quadrilaterals and can include three-dimensional shapes as well. Notice again the logic involved.
ACT IV ITY 7 .9
True or False?
Prepare statements of the following forms: “If it is a _________, then it is alsoa _________.” “All ________ are ________.” “Some ________ are ________.”
A few examples are suggested here but numerous possibilities exist.
• If it is a square, then it is a rhombus.• All squares are rectangles.• Some parallelograms are rectangles.• All parallelograms have congruent diagonals.• If it has exactly two lines of symmetry, it must be a quadrilateral.• If it is a cylinder, then it is a prism.• All prisms have a plane of symmetry.• All pyramids have square bases.• If a prism has a plane of symmetry, then it is a right prism.
The task is to decide if the statements are true or false and to present anargument to support the decision. Four or five true-or-false statements willmake a good lesson. Once this format is understood, let students challengetheir classmates by making their own lists of five statements. Each list shouldhave at least one true statement and one false statement. Use the students’lists in subsequent lessons.
Use the property list for squares and rectangles to prove “All squares are rect-angles.” Notice that you must use logical reasoning to understand this state-ment. It does little good to simply force it on students who are not ready todevelop the relationship.
Although logic has been involved in the previous activities, you may have diffi-culty understanding how middle school students can actually do proofs. The followingactivity was designed by Sconyers (1995) to demonstrate that students can create proofsin geometry well before high school.
204
Chapter 7 GEOMETRIC THINKING AND GEOMETRIC CONCEPTS
ch07.qxd 5/4/2005 2:51 PM Page 204

ACT IV ITY 7 . 10
Two Polygons from One
Pose the following problem:
Begin with a convex polygon with a given number of sides. Con-nect two points on the polygon with a line segment forming twonew polygons. How many sides do the two resulting polygonshave together?
Demonstrate with a few examples (see Figure 7.17). Have students explore bydrawing polygons and slicing them. Encourage students to make a tableshowing sides in original and resulting sides. Students should first make con-jectures about a general rule. When groups are comfortable with their conjec-tures, they should try to reason why their statement is correct—that is, provetheir conjectures.
Obviously, the number of resulting sides depends on where the slice is made.With the exception of triangles, there are three possibilities. For each case, a clear argu-ment can be made. The appropriate conjecture and proof are left to you, but trust thatstudents working together can do this task.
Notice that in this task, as in others we have explored, the statements to beproved come from students. If you write a theorem on the board and ask students toprove it, you have already told them that it is true. If, by contrast, a student makes astatement about a geometric situation the class is exploring, it can be written on theboard with a question mark as a conjecture, a statement whose truth has not yet beendetermined. You can ask, “Is it true? Always? Can we prove it? Can we find a coun-terexample?” Reasonable deductive arguments can be forged out of discussions.
The Pythagorean RelationshipThe Pythagorean relationship is so important that it deserves special attention. In
geometric terms, this relationship states that if a square is constructed on each side of aright triangle, the areas of the two smaller squares will together equal the area of thesquare on the longest side, the hypotenuse. To discover this relationship, consider thefollowing activity.
205
SHAPES AND PROPERTIES ACTIVITIES
Begin with: 3 sidesTwo new shapes: 7 sides
Begin with: 4 sidesTwo new shapes: 7 sides
Begin with: 6 sidesTwo new shapes: 8 sides
Begin with: 5 sidesTwo new shapes: 8 sides
Begin with: 5 sidesTwo new shapes: 9 sides
FIGURE 7.17Start with a polygon and draw a segment todivide it into two polygons. How many sideswill the two new polygons have?
ch07.qxd 5/4/2005 2:51 PM Page 205

ACT IV ITY 7 . 1 1
The Pythagorean Relationship
Have students draw a right triangle on half-centimeter grid paper.Assign each student a different triangle by specifying the lengths ofthe two legs. Students are to draw a square on each leg and thehypotenuse and find the area of all three squares. (For the squareon the hypotenuse, the exact area can be found by making each ofthe sides the diagonal of a rectangle. See Figure 7.18.) Make a tableof the area data (Sq. on leg 1, Sq. on leg 2, Sq. on hyp.) and ask stu-dents to look for a relationship between the squares.
As an extension to the last activity, students can explore drawing otherfigures on the legs of right triangles and computing areas. For example, theycan draw semicircles or equilateral triangles instead of squares. The areas ofany regular polygons drawn on the three sides of right triangles will have thesame relationship.
Activity 7.11 establishes the Pythagorean relationship. What about aproof? Figure 7.19 shows two proofs that students can follow. The first con-sists of only the two drawings. It is taken from the book Proofs without Words(Nelson, 1993). An algebraic proof is shown below the drawings, based onthe second square.
Use the two drawings in Figure 7.19 to create a proof of the Pythagorean relationship.
Technology NoteThe e-Standards includes a dynamic proof without words of the Pythag-orean relationship that is worth sharing with your students (Applet 6.5).Because it requires knowing that parallelograms and rectangles with the samebase and height have the same area (see Chapter 8), it is also a good review.
Finding Versus Explaining RelationshipsDynamic geometry software such as The Geometer’s Sketchpad allows students
to explore an entire class of figures and observe properties or relationships that areattributable to that class. At level 2, however, the focus is on reasoning or deductivethinking. Can these computer programs help students develop deductive arguments tosupport the relationships they come to believe through inductive reasoning? Considerthe following situation.
Suppose that you have students use a dynamic geometry program to draw a trian-gle, measure all of the angles, and add them up. As the triangle vertices are draggedaround, the sum of the angles would remain steadfast at 180 degrees. Students can con-jecture that the sum of the interior angles of a triangle is always 180 degrees, and theywould be completely convinced of the truth of this conjecture based on this inductiveexperience. (Several noncomputer activities lead to the same conclusion.)
206
Chapter 7 GEOMETRIC THINKING AND GEOMETRIC CONCEPTS
4
4 4
4
16
4
4
FIGURE 7.18The Pythagorean relationship. Notethat if drawn on a grid, the area of allsquares is easily determined. Here4 + 16 = area of the square on thehypotenuse.
ch07.qxd 5/5/2005 11:53 AM Page 206

As Michael de Villiers notes in his excellent bookRethinking Proof with the Geometer’s Sketchpad (1999), “Theobservation that the sun rises every morning does notexplain why this is true” (p. 24). De Villiers points out thatthe experience leading to the conjecture or truth shouldalso help students develop a rationale for the result. In thecase of interior angles of a triangle, the experience just de-scribed fails to explain why it is so. Consider the followingactivity, which can be done easily with paper and scissorsor quite dramatically with a dynamic geometry program.
ACT IV ITY 7 . 1 2
Angle Sum in a Triangle
Have all students cut out three congruent trian-gles. (Stack three sheets of paper and cut threeshapes at one time.) Place one triangle on a lineand the second directly next to it in the sameorientation. Place the third triangle in the spacebetween the triangles as shown in Figure 7.20(a).Based on this experience, what conjecture can youmake about the sum of the angles in a triangle?
In a dynamic geometry program, the three triangles in Figure 7.20(a) can bedrawn by starting with one triangle, translating it to the right the length of AC, andthen rotating the same triangle about the midpoint of side BC. When vertices of theoriginal triangle are dragged, the other triangles will change accordingly and remaincongruent. We still do not know why the angle sum is always a straight angle, but thisexploration allows students to see why it might be so. In the figure, there are lines par-allel to each side of the original triangle. By using properties of angles formed by cut-ting parallel lines with a transverse line, it is easy to argue that the sum of the angleswill always be a straight line (see Figure 7.20(b); the proof is left to you).
Dynamic geometry software can be enormously powerful for helping studentsobserve geometric relationships and make conjectures. The truth of the conjectures willoften be obvious. At level 2, however, we must begin to ask why. The following activityfurther illustrates the point.
207
SHAPES AND PROPERTIES ACTIVITIES
a
b
c
c
c
c
a
b
a b
a
b
The area of the large square is (a + b)2 = a2 + 2ab + b2
So c2 + 2ab = a2 + 2ab + b2
c2 = a2 + b2
The same area is also c 2 plus 4 times the area of one triangle. c2 + 4 ( ab) = c2 + 2ab1—2
FIGURE 7.19Two proofs of the Pythagorean relationship. The two squarestogether are a “proof without words.” Can you supply thewords? The second proof is the algebraic proof based on theright-hand figure.
Three congruent triangles can be arranged to show that the sumof the interior angles will always be a straight angle or 180 degrees.
A C
B
(a)
A
B
E
DC
Draw CE parallel to AB. Why is angle BAC congruent to angle ECD? Why is angle ABC congruent to angle BCE?
(b)
FIGURE 7.20Deductive, logical reason-ing is necessary to proverelationships that appeartrue from observations.
ch07.qxd 5/4/2005 2:51 PM Page 207

ACT IV ITY 7 . 13
Triangle Midsegments
Using a dynamic geometry program, draw a triangle, and label the vertices A,B, and C. Draw the segment joining the midpoints of AB and AC, and labelthis segment DE, as in Figure 7.21. Measure the length of DE and BC. Alsomeasure angles ADE and ABC. Drag points A, B, and C. What conjectures canyou make about the relationships between segment DE, the midsegment ofABC, and BC, the base of ABC?
It is very clear that the midsegment is half the length of the base and parallel toit, but why is this so? Students will need a bit more guidance, but you should not nec-essarily have to provide the argument for them. Suggest that they draw a line throughA parallel to BC. List all pairs of angles that they know are congruent. Why are theycongruent? Note that triangle ABC is similar to triangle ADE. Why is it similar? Withhints such as these, many middle grade students can begin to make logical argumentsfor why the things they observe to be true are in fact true.
Assessment NoteWith a greater focus on explaining why something is true, we need toconsider how students may approach this endeavor. Researchers hypoth-esize that students’ abilities to justify and prove follow a developmentalpath that progresses from inductive to deductive approaches.
Stage 0: Students are ignorant of the need for, or existence of, proof.Stage 1: Students are aware of the notion of proof but consider checking a
few cases as sufficient.Stage 2: Students are aware that checking a few cases is not sufficient but are
satisfied that either (a) checking extreme cases or random cases isproof, or (b) use of a generic example forms a proof for a class ofobjects.
Stage 3: Students are aware of the need for a general argument but areunable to produce such arguments themselves; however, they arelikely to be able to understand the generation of such an argument(for example, by a classmate). This also includes the ability to follow
208
Chapter 7 GEOMETRIC THINKING AND GEOMETRIC CONCEPTS
EXPANDED LESSON
(pages 228–229)A complete lesson plan
based on “Triangle Midseg-ments” can be found at the end of this chapter.
m GAC = 35
m ACB = 35 m AED = 35
m FAB = 60
m ABC = 60 m ADE = 60
F G
A
D E
C
DE = 5.22BC = 10.44
B
FIGURE 7.21The midsegment of a tri-angle is always parallel tothe base and half as long.
ch07.qxd 5/4/2005 2:51 PM Page 208

a short chain of deductive reasoning. At this stage, students are ableto apply a definition without allowing intuitive and familiar notionsof a concept to interfere with the application of the definition. Theyare also able to understand necessary and sufficient conditions.
Stage 4: Students are aware of the need for a general argument, are able tounderstand the generation of such an argument, and are able toproduce such arguments themselves in a limited number of (famil-iar) contexts.
Stage 5: Students are aware of the need for a general argument, are able tounderstand the generation of such an argument (including moreformal arguments), and are able to produce such arguments them-selves in a variety of contexts (both familiar and unfamiliar) (Knuth,Choppin, Slaughter, & Sutherland, 2002, pp. 1694–1695).
Knuth et al.(2002) suggest that middle school students overwhelmingly rely on theuse of examples as a method of demonstrating and/or confirming the truth of astatement (Stage 1/Stage 2). It is very likely that most students in grades 5 to 8 willbe functioning between stages 0 and 3. As you work with students to help themgenerate logical arguments for why things are true, keep in mind these stages ofproof concept development to help you make sense of students’ approaches.
Transformation ActivitiesTransformations are also called “rigid motions”—movements that do not change
the size or shape of the object moved. Usually, three transformations are discussed ingrades 5–8: translations or slides, reflections or flips, and rotations or turns. The goal ofinstruction is to help students recognize and apply these transformations. You can use anonsymmetrical shape on the overhead to introduce these terms (see Figure 7.22). Mostelementary school textbooks only use the center of the figure as the point of rotationand a vertical or horizontal line as the line of reflection. These restrictions are for sim-plicity. In general, the center of rotation can be anywhere on or off the figure. Lines ofreflection can also be anywhere.
Interestingly, the study of symmetry is also includedunder the study of transformations. Do you know why?
If a shape can be folded on a line so that the twohalves match, then it is said to have line symmetry (or mir-ror symmetry). Notice that the fold line is actually a lineof reflection—the portion of the shape on one side of theline is reflected onto the other side. That is the connectionbetween line symmetry and transformations.
To explain line symmetry to students, you can showexamples and nonexamples. Another approach is to havestudents fold a sheet of paper in half and cut out a shapeof their choosing. When they open the paper, the fold linewill be a line of symmetry. A third way is to use mirrors.When you place a mirror on a picture or design so that
209
TRANSFORMATION ACTIVITIES
FIGURE 7.22Translation (slide), reflection (flip), rotation (turn).
ch07.qxd 5/4/2005 2:51 PM Page 209

the mirror is perpendicular to the table, you see a shape with symmetrywhen you look in the mirror.
Here is an activity with line symmetry.
ACT IV ITY 7 . 14
Dot Grid Line Symmetry
For this activity, students need to use either isometric or rectan-gular dot grid paper. Students should draw a line through sev-eral dots. This line can be horizontal, vertical, or skewed.Students should make a design completely on one side of thedrawn line that touches the line in some way (see the left-handdrawings in Figure 7.23). Now the task is to make the mirrorimage of their design on the other side of the line. (Studentscan exchange designs and make the mirror image of a class-mate’s design.) When finished, they can use a mirror to checktheir work. They place the mirror on the line and look into itfrom the side of the original design. With the mirror in place,they should see exactly the same image as they see when theylift the mirror. You can also challenge them to make designswith more than one line of symmetry.
A plane of symmetry in three dimensions is analogous to a line ofsymmetry in two dimensions. Figure 7.24 illustrates a shape built withcubes that has a plane of symmetry.
ACT IV ITY 7 . 15
Plane Symmetry Buildings
With cubes, build a building that has a plane of symmetry. Ifthe plane of symmetry goes between cubes, slice the shape byseparating the building into two symmetrical parts. Try makingbuildings with two or three planes of symmetry. Build variousprisms. Do not forget that a plane can slice diagonally throughthe blocks.
A shape has rotational symmetry if it can be rotated about a point and land in aposition exactly matching the one in which it began. A square has rotational symmetryas does an equilateral triangle.
A good way to understand rotational symmetry is to take a shape with rotationalsymmetry, such as a square, and trace around it on a piece of paper. Call this tracingthe shape’s “box.” The order of rotational symmetry will be the number of ways thatthe shape can fit into its box without flipping it over. A square has rotational symmetryof order 4, whereas an equilateral triangle has rotational symmetry of order 3. The paral-lelogram in Figure 7.25 has rotational symmetry of order 2. Some books would callorder 2 symmetry “180-degree symmetry.” The number of degrees refers to the smallestangle of rotation required before the shape matches itself or fits into its box. A squarehas 90-degree rotational symmetry.
210
Chapter 7 GEOMETRIC THINKING AND GEOMETRIC CONCEPTS
FIGURE 7.23Exploring symmetry on dot grids.
FIGURE 7.24A block building with oneplane of symmetry.
ch07.qxd 5/4/2005 2:51 PM Page 210

ACT IV ITY 7 . 16
Pattern Block Rotational Symmetry
Have students construct designs with pattern blockswith different rotational symmetries. They shouldbe able to make designs with order 2, 3, 4, 6, or 12rotational symmetry. Which of the designs havemirror symmetry as well?
Rotational symmetry in the plane (also referred to as point symmetry) has an anal-ogous counterpart in three dimensions. Whereas a figure in a plane is rotated about apoint, a three-dimensional figure is rotated about a line. This line is called an axis ofsymmetry. As a solid with rotational symmetry revolves around an axis of symmetry, itwill occupy the same position in space (its “box”) but in different orientations. A solidcan have more than one axis of rotation. For each axis of symmetry, there is a corre-sponding order of rotational symmetry. A regular square pyramid has only one axis ofsymmetry that runs through the tip of the pyramid and the center of the square. Acube, by contrast, has a total of 13 axes of symmetry: three (through opposite faces) oforder 4, four (through diagonally opposite vertices) of order 3, and six (through mid-points of diagonally opposite edges) of order 2.
ACT IV ITY 7 . 1 7
Find the Spin Lines
Give students a solid shape that has one or more axes of rotational symmetry.Color or label each face of the solid to help keep track. The task is to find allaxes of rotational symmetry (spin lines) and determine the order of rotationalsymmetry for each. Suggest that students use one finger of each hand to holdthe solid at the two points where the axis of symmetry emerges. A partner canthen slowly turn the solid, and both can decide when the solid is again “in itsbox”—that is, in the same space it was in originally (see Figure 7.26).
211
TRANSFORMATION ACTIVITIES
A B
CD
AB
C D
FIGURE 7.25This parallelogram fits in its box two ways without flipping it over. Therefore, it has rotational symmetry of order 2.
Edge-to-edge axes eachhave symmetry of order 2.How many are there?
If the axis is corner to opposite corner, what is the order of symmetry? How many of these axes are there?
With A on top, the cubefits in its “box” four ways.Through this axis, the orderof rotational symmetry isorder 4.
B
C
D
E
A
F
These two axes also have rotational symmetry of order 4.
FIGURE 7.26Rotations of a cube.
ch07.qxd 5/4/2005 2:51 PM Page 211

Composition of TransformationsOne transformation can be followed by another. For example, a figure can be
reflected over a line, and then that figure can be rotated about a point. A combinationof two or more transformations is called a composition.
Have students experiment with compositions of two or even three transforma-tions using a simple shape on a rectangular dot grid. For example, have students drawan L-shape on a dot grid and label it L1. (Refer to Figure 7.27.) Reflect it through a line,and then rotate the image turn clockwise about a point not on the shape. Call thisimage L2, the image of a composition of a reflection followed by a rotation. Notice thatif L1 is rotated turn clockwise about the same point used before to L3 there is a rela-tionship between L2 and L3. (How could you get L3 from L2?)
A composite transformation can involve more than two individual transforma-tions, just as multiplication can involve more than one factor (e.g., 3 × 8 × 2).Can you describe a composite transformation to get from L1 to L3 that is thesame as the single transformation of a quarter turn about A?
Continue to explore different combinations of transformations. Don’t forget toinclude translations (slides) in the compositions. Compositions do not have to involvedifferent types of transformations. For example, a reflection can be followed by anotherreflection. When your students understand compositions of transformations on a grid,challenge them with the next task.
ACT IV ITY 7 . 18
Mystery Transformations
Draw a small L-shaped figure near one corner of arectangular dot grid. On this page, students draw acongruent L-shape somewhere near the center ofthe page. The second L can be flipped or turned inany orientation they wish. Then students tradepapers with a partner. The task is to find somecombination of slides, flips, and or turns thatwill take the shape in the corner onto the shapedrawn by the students.
This is a challenging activity. To help students, ask ifthe L has been flipped over. If it is flipped over, then therewill have to be one or three reflections. Regardless of howthe two shapes are oriented, it can always be done in threeor fewer transformations.
Technology NoteIn NCTM’s e-Standards, “Understanding Con-gruence, Similarity, and Symmetry” (Applet 6.4)
12
14
14
14
212
Chapter 7 GEOMETRIC THINKING AND GEOMETRIC CONCEPTS
L1
L3
L2
A
j
FIGURE 7.27Shape L1 was reflected across line j and rotated turnabout point A resulting in L2. L1 was also rotated turnabout point A. How are L2 and L3 related? Will this alwayswork?
14
14
ch07.qxd 5/4/2005 2:51 PM Page 212

is one of the best examples of a simple yet valuable interactive applet. In the first part of the applet, students develop an understanding of all three rigidmotions. In the second part, a transformation is complete and the student uses a guess-and-check procedure to determine which exact transformation was done. In the last two parts, students can explore compositions of reflections and thenother compositions up to three transformations. This applet is strongly recommended.
Tessellations RevisitedEither by using transformations or by combining compatible polygons, students
can create tessellations that are artistic and quite complex.The Dutch artist M. C. Escher is well known for his tessellations, where the tiles
are very intricate and often take the shape of things like birds, horses, angels, or lizards.Escher took a simple shape, such as a triangle, parallelogram, or hexagon, and per-formed transformations on the sides. For example, a curve drawn along one side mightbe translated (slid) to the opposite side. Another idea was to draw a curve from themidpoint of a side to the adjoining vertex. This curve was then rotated about the mid-point to form a totally new side of the tile. These two ideas are illustrated in part (a) ofFigure 7.28. Dot paper is used to help draw the lines. Escher-type tessellations, as thesehave come to be called, are quite popular projects for students in grades 5 and up.Once a tile has been designed, it can be cut from two different colors of constructionpaper instead of drawing the tessellation on a dot grid.
A regular tessellation is made of a single tile that is a regular polygon (all sides andangles congruent). Each vertex of a regular tessellation has the same number of tilesmeeting at that point. A checkerboard is a simple example of a regular tessellation. Asemiregular tessellation is made of two or more tiles, each of which is a regular polygon.At each vertex of a semiregular tessellation, the same collection of regular polygonscomes together in the same order. A vertex (and, therefore, the complete semiregulartessellation) can be described by the series of shapes meeting at a vertex. Under eachexample of these tessellations in part (b) of Figure 7.28, the vertex numbers are given.Students can figure out what polygons are possible at a vertex and design their ownsemiregular tessellations.
Tessellations like these are very popular with teachers. A number of excellentresource books can be found in catalogs such as ETA/Cuisenaire.
Technology NoteSeveral computer programs make it easy to create Escher-type tessella-
tions. One example is TesselMania! (The Learning Company, 1994).Although exciting to use, these programs should be used with care. It is so
easy to create intricate results with almost no understanding of the transforma-tions being used. Planning on paper before using the computer is strongly recom-mended. Then the computer can be used to do the tedious work of creating afinished product complete with color and embellishments.
213
TRANSFORMATION ACTIVITIES
ch07.qxd 5/4/2005 2:51 PM Page 213

The following activity is a challenge to establish an interesting relationship betweensymmetries and transformations. The activity utilizes the 12 pentomino shapes, the setof all shapes made from five squares joined at matching edges. Many students in theupper grades will have done pentomino activities in earlier grades. If your students arenot familiar with pentominoes, you may want to have them do the “Pentominoes” activ-ity (Activity 7.26, p. 222) in the Visualization section that has students develop them.
ACT IV ITY 7 . 19
Pentomino Positions
Have students cut out a set of 12 pentominoes from 2-cm grid paper. (See Fig-ure 7.29.) Mark one side of each piece to help remember if it has been flippedover. The first part of the task is to determine how many different positionson the grid each piece has. Call positions “different” if a reflection or a turnis required to make them match. Therefore, the cross-shaped piece has only
214
Chapter 7 GEOMETRIC THINKING AND GEOMETRIC CONCEPTS
1. Start with a simple shape.
(a) (b)
A column of this tile will now match a like column that is rotated onecomplete turn. Find these rotated columns in the tessellation below. 4-3-4-6 3-4-3-3-4
8-8-4 3-3-3-3-6
2. Draw the same curve on two opposite sides. This tile will stack up in columns.
3. Rotate a curve on the midpoint of one side.
4. Rotate a curve on the midpoint of the other side. Use this tile for tessellation (below).
FIGURE 7.28(a) One of many ways tocreate an Escher-type tes-sellation. (b) Examples ofsemiregular tessellations.
ch07.qxd 5/4/2005 2:51 PM Page 214

one position. The strip of five squares has two positions.Some pieces have as many as eight positions. The secondpart of the task is to find a relationship between the linesymmetries and rotational symmetries for each piece andthe number of positions it can have on the grid.
The first part of this activity was adapted from the classic bookBoxes, Squares, and Other Things (Walter, 1970), which has many moreexcellent explorations. The second part of the problem is not hard ifstudents make a table of what they know. The solutions to the taskare left to you and your students. A follow-up to this activity can befound in Boxes, Squares, and Other Things.
The next task challenges students to develop generalizationsabout certain compositions of transformations.
ACT IV ITY 7 .20
Double Reflections
There are two similar tasks in this activity:
1. Verify that the composition of two reflections acrossparallel lines (first across one and then the other) isthe same as a translation. Make a drawing on a dotgrid to illustrate. Challenge: If you know the distancebetween the two parallel lines, what can you sayabout the translation—both its direction and its dis-tance? Does it matter where the shape begins (betweenthe lines or outside) or which line is used as the firstreflection? Explain your conclusions.
2. Verify that the composition of two reflections acrossintersecting lines is the same as a rotation about thepoint of intersection of the lines. Make a drawing on adot grid to illustrate. Challenge: How is the angle ofrotation related to the angle between the lines?Explain your conclusions.
In the first problem, the translation distance is always double the distancebetween the lines and is perpendicular to them. The direction is determined by whichline is used for the first reflection in relation to the preimage. In the second problem,the angle of rotation is double the angle between the lines. It is possible to constructreasonable arguments for these conclusions by examining drawings.
Location ActivitiesLocation activities prior to this level should prepare students for coordinates and
build on students’ position language (over, under, near, far, between, left, and right). Theneed for a coordinate system should be developed if it has not been already. Throughlocation activities, students in grades 5–8 should become more familiar with the four
215
LOCATION ACTIVITIES
Four of the different shapes thatsix equilateral triangles will make.
Four of the different shapes thatfour “half-square” triangles will make.
There are 12 pentominoes.
Finding all possible shapes madewith five squares—or six squares(called “hexominoes”) or sixequilateral triangles and so on—isa good exercise in spatial problemsolving.
FIGURE 7.29Pentominoes and related shape challenges.
ch07.qxd 5/4/2005 2:51 PM Page 215

quadrants in the coordinate grid. However, if your students are not familiar with gridsand coordinates, begin with activities that use the first quadrant only.
Once a coordinate system has been introduced, students may want to use it in asimple game similar to the commercial game called “Battleship.” Each player has a gridsimilar to the one in Figure 7.30. Players secretly put their initials on five intersectionsof their own grid. Then, with the grids kept hidden from each other, the players taketurns trying to “hit” the other player’s targets by naming a point on the grid usingcoordinates. The other player indicates if the “shot” was a hit or a miss. When a playerscores a hit, he or she gets another turn. Each player keeps track of where he or she hastaken shots, recording an “X” for a hit and an “0” for a miss. The game ends when oneplayer has hit all of the other player’s targets.
At this level, students are simply using coordinates to describe positions.Although this is not very challenging, it provides practice for finding coordinates in agamelike setting that can be motivating for students.
Taxicab Geometry: A Non-Euclidean ExcursionWhen determining coordinates, many students become confused about what they
are supposed to count—is it the interval between points or is it the points? In taxicabgeometry you are allowed to “travel” only on grid lines, as if you are traveling in a taxi-cab on the streets of a city laid out in grid form. Like taxis, travel is always toward thedestination. If moving toward the upper right, all paths are either upward or to theright. Distance between points is determined by counting the intervals (city blocks)between intersections. Figure 7.31 illustrates two of many legitimate paths betweenpoints A and B. Either path is a distance of 11 units. Will paths between two pointsalways be the same length?
The next activity is an introduction to this different version of geometry.
ACT IV ITY 7 .2 1
Taxicab Geometry Distances
Explain the following scenario to students:
Katie and Clarissa want to meet at a restaurant that is equidistantfrom each of their houses and such that the total of the distancesthey each travel does not exceed 8 miles. Their city is arrangedlike a grid, and they can either drive or walk along the streets, butthey cannot cut diagonally across a block. One block is 1 mile. IfClarissa’s house is 4 miles east and 2 miles north of Katie’s, draw amap showing where they could look for a restaurant. Explain.
It may be helpful to suggest that students locate Katie’s house at (0, 0),although this is not necessary.
Before continuing, try “Taxicab Geometry Distances.” What patterns do yousee? Look both at the coordinates and at the visual image you get.
In solving the problem in Activity 7.21, it is likely that students will first find thepoints that are 3 miles from each house since the distance between the houses is 6.
216
Chapter 7 GEOMETRIC THINKING AND GEOMETRIC CONCEPTS
4
4
3
3
2
2
Coordinate Grid
1
1
0
0
FIGURE 7.30A simple coordinate grid. TheX is at (3, 2) and the O is at(1, 3). Use the grid to playThree in a Row (like Tic-Tac-Toe). Put marks on intersec-tions, not spaces.
A
B
FIGURE 7.31Coloring in different pathson a grid. What is thefewest number of turnsneeded to get from A to B?The most?
ch07.qxd 5/4/2005 2:51 PM Page 216

Interestingly, there are three such points in this problem. But then you have to look fora longer distance for each to travel. There are lots of points that are 4 miles from eachhouse but only two that are 4 miles from both houses and similarly for 5, 6, 7, and 8miles away. If Katie’s house is placed at (0, 0), the sum of the coordinates forms a pat-tern. The closest three points have a sum of 3. The points at 4 miles have coordinatesof (1, 3) and (3, –1). If you add absolute values, these sums are 4. The sum for the nexttwo points is 5, and so on. If Katie’s house is placed at a point other than (0, 0), therewill still be a pattern, but it will be a bit different. In your discussion with students, tryto get them to see most of these ideas.
When looking for points farther away from each house, say, 5 miles from each, itmay be useful to look to find all of the points that are 5 miles from each house. In ourfamiliar geometry, called Euclidean geometry, the set of all points 5 units from a pointis commonly known as a circle with radius 5. What is the shape of all points 5 milesfrom a point in taxicab geometry? This shape can be referred to as a “taxicab circle.” Ifyou plot the taxicab circles for 3, 4, 5, 6, 7, and 8 miles from each house, the corre-sponding intersections will be the points that solve the problem. What is interesting isthat in Euclidean geometry the solution is exactly the same: The set of all pointsequidistant from two points is the set of intersections of all circles of like size.
Finally, students may wonder why the set of points in the solution is not quite in astraight path. Suggest that they try other locations for Clarissa’s house, beginning first at(3, 3). Keep Katie’s house at the origin, (0, 0), for simplicity and to better observe patterns.
Taxicab geometry is an example of non-Euclidean geometry. It is fun to explore ideasin Euclidean geometry and see how they turn out in taxicab geometry. Activity 7.21was one example. Definitions of line, angle, square, and circle can be applied to taxicabgeometry with interesting results. Are there parallel lines and perpendicular lines intaxicab geometry? What is the shortest distance between two points? Is that pathunique? Taxi-Cab Geometry: An Adventure in Non-Euclidean Geometry by Krause (1987)provides an excellent introduction to non-Euclidean geometry through activities thatcan be used with elementary and middle school students.
So far, the location activities and tasks in this section have used coordinates toidentify locations on a grid and to examine distances between points. In grades 5–8,students can also use coordinates to describe transformations on a coordinate grid. This can be done as an alternative method of introducing slides, flips, and turns or as a follow-up to that discussion.
Coordinates and TransformationsIn grades 5–8, shapes and properties can be investigated on a full coordinate grid.
Even fifth-grade students can use negative integers so that all four quadrants of theplane can be represented. The activities here suggest how coordinates can be used toexamine transformations.
ACT IV ITY 7 .22
Coordinate Reflections
Have students draw a five-sided shape in the first quadrant on coordinategrid paper using grid points for vertices. Label the figure ABCDE and call itFigure 1. Use the y-axis as a line of symmetry and draw the reflection of the
217
LOCATION ACTIVITIES
(continued)
ch07.qxd 5/4/2005 2:51 PM Page 217

shape in the second quadrant. Call it Figure 2(for second quadrant) and label the reflectedpoints A'B'C'D'E'. Now use the x-axis as the lineof symmetry. Reflect both Figure 2 and Figure 1into the third and fourth quadrants, respectively,and call these Figures 3 and 4. Label the points ofthese figures with double and triple primes (A''and A''', and so on). Write in the coordinates foreach vertex of all four figures.
• How is Figure 3 related to Figure 4? Howelse could you have gotten Figure 3? Howelse could you have found Figure 4?
• How are the coordinates of Figure 1 relatedto its image in the y-axis, Figure 2? What canyou say about the coordinates of Figure 4?
• Make a conjecture about the coordinates ofa shape reflected in the y-axis and a differ-ent conjecture about the coordinates of ashape reflected in the x-axis.
• Draw lines from the vertices of Figure 1 tothe corresponding vertices of Figure 2.What can you say about these lines? How isthe y-axis related to each of these lines?
Use Figure 7.32 or a drawing of your own to answer the questions in Activity 7.22.
Rotations can be explored in a similar manner to Activity 7.22. Have studentsbegin with a figure in the first quadrant, rotate it a quarter turn clockwise and a quarterturn counterclockwise into the second and fourth quadrants, using the origin as thecenter of rotation. Then have students rotate the original figure a half turn into thethird quadrant. Similar questions can be asked about the coordinates. An interestingresult can be seen in the figure in the third quadrant.
There is a relationship between a 180-degree turn and reflections through twoperpendicular lines. Can you tell what that is?
In the activities just discussed, students perform a transformation on a figure andobserve how the transformation affects the coordinates. In the next two activities, thecoordinates will be changed and students observe the resulting change on the figure.Get a coordinate grid and follow along with the next activity.
ACT IV ITY 7 .23
Coordinate Translations
Students begin with a five-sided shape in the first quadrant. Make a list of thecoordinates. Next, students make a new set of coordinates by adding 3 to allof the x-coordinates of the initial figure and then they draw this figure. Theythen create a third figure by subtracting 4 from each of the y-coordinates of
218
Chapter 7 GEOMETRIC THINKING AND GEOMETRIC CONCEPTS
C'
D'E'
B'
A'
C''
D''E''
B''
A''
C
D E
B
A
C'''
D''' E'''
B'''
A'''
–10
–5
5
10
–10 –5 5 10
2
3
1
4
A: (6.00, 1.00)A': (–6.00, 1.00)A'': (–6.00, –1.00)A''': (6.00, –1.00)
FIGURE 7.32Figure 1 (ABCDE) is reflected across the y-axis. Then bothFigures 1 and 2 are reflected across the x-axis.
ch07.qxd 5/5/2005 11:54 AM Page 218

the original figure. What happens? What will happen if you do both: add 3to the x-coordinates and subtract 4 from the y-coordinates? Try it. Studentsnow have the original and three image figures on their paper. Now havethem draw lines from the vertices of the original figure to the correspondingvertices of the last figure (the one in which both coordinates were changed).What do you notice about these lines? (They are parallel and the samelength.) In general, what does adding or subtracting a fixed value to all coor-dinates do to a figure?
Students who have done the two preceding activities and the variation for rota-tional symmetry should have a general way to describe translations, reflections acrossan axis, and 90-degree rotations about the origin all in terms of coordinates. In the fol-lowing activity, multiplying a constant times the coordinates makes a different type ofchange.
ACT IV ITY 7 .24
Coordinate Dilations
Students begin with a four-sided shape in the first quadrant. They then make alist of the coordinates and make a new set of coordinates by multiplying eachof the original coordinates by 2. They plot the resulting shape. What is the re-sult? Now have students multiply each of the original coordinates by andplot that shape. What is the result? Next, students draw a line from the originto a vertex of the largest shape on their paper. Repeat for one or two addi-tional vertices and ask for observations. (An example is shown in Figure 7.33.)
How do the lengths of the sides and the areas ofthe shapes compare when the coordinates aremultiplied by 2? What if they are multiplied by 3 or by ?
It is impressive to see how an arithmetic operationcan control a figure. Imagine being able to control slides,flips, turns, and dilations, not just in the plane but alsofor three-dimensional figures. The process is identical toand is the essence of computer animation techniques.
When the coordinates of a shape are multiplied asin the preceding activity, each by the same factor, theshape gets either larger or smaller. The size is changed but not the shape. The new shape is similar to the oldshape. This is called a dilation, a transformation that is not rigid because the shape changes.
Your students may enjoy exploring this phe-nomenon a bit further because they can get some quiteinteresting effects. If they start with a line drawing of asimple face, boat, or some other shape drawn withstraight lines connecting vertices, they see an interestingeffect by multiplying just the first coordinates, just the
12
12
219
LOCATION ACTIVITIES
B
B'
B"
10
5
105
B": (10.0, 8.0)B: (5.0, 4.0)B': (2.5, 2.0)
FIGURE 7.33Dilations with coordinates. Coordinates of the center figurewere multiplied by 2 and also by 0.5 to create the other twofigures.
ch07.qxd 5/5/2005 11:54 AM Page 219

second coordinates, or using a different factor for each. For example, students couldsketch the cat shown here on a coordinate grid. Then suggest that they add 10 to eachfirst coordinate and multiply each second coordinate by 3.
Before reading on, predict what you think will happen to the cat if you add 10to the first coordinates and multiply the second coordinates by 3. What willhappen if you do the reverse—multiply the first coordinates by 3 and add 10 tothe second coordinates?
Multiplication of both coordinates by a factor greater than one dilates the figureto a similar but larger shape. When only one coordinate is multiplied, the verticaldimensions alone are dilated, so the figure is proportionately stretched in a verticalmanner as in Figure 7.34. By adding 10 units to the first coordinates the new stretchedfigure is moved to the right so as not to interfere with the original. Students will enjoyexploring with variations of stretching and dilating shapes in various ways.
220
Chapter 7 GEOMETRIC THINKING AND GEOMETRIC CONCEPTS
(2, 9)
(12, 27)
(17, 15)
(14, 6)(7, 5)
(4, 2)
FIGURE 7.34Using coordinates to cause a distortion. The coordi-nates for the larger cat are based on those of thesmaller: (x + 10, 3y).
ch07.qxd 5/4/2005 2:51 PM Page 220

Applying the Pythagorean RelationshipThe geometric version of the Pythagorean relationship is about areas. The follow-
ing activity has students use the coordinate grid and the Pythagorean relationship todevelop a formula for the distance between points.
ACT IV ITY 7 .25
The Distance Formula
Have students draw a line between two points in the first quadrant that arenot on the same horizontal or vertical line. The task is to use only the coordi-nates of the endpoints to calculate the distance between them in terms of theunits on the grid. To this end, suggest that they draw a right triangle usingthe line as the hypotenuse. The vertex at the right angle will share one coor-dinate from each endpoint. Students can compute the areas of the squares onthe legs and add to find the area of the square on the hypotenuse. The lengthof the original line segment (the distance between the points) is the numberwhose square is the area of the square on the hypotenuse. (This last sentenceis a geometric interpretation of square root.) By computing the areas of thesesquares students can compute the length of the original line.
Have students look through all of their calculations and see how thecoordinates of the two endpoints were used. Challenge students to use thesame type of calculations to get the distance between two new points with-out drawing any pictures.
Although most students in the middle grades are unable to construct proofs, theyshould be able to follow the rationale if shown proofs. By leading students through theprocedure of finding the length of one line (or the distance between the endpoints),you give them sufficient information to compute the lengths of other lines. Studentswill see that all they need are the coordinates of the two endpoints to compute theareas of all three squares and, hence, the length of the hypotenuse. If you then helpthem substitute letters for specific coordinates, a general distance formula results.
SlopeThe topic of slope is another important connection between geometry and alge-
bra. To begin a discussion of slope, draw several different slanted lines on the board.Discuss how they are different. Some are steeper than others. Some go up, others godown. If you agree that “up” means sloping upward from left to right, then you canagree which ones go up and which go down. This “steepness” of a line is an attributethat can be measured like other measurable attributes. To give slope a number requiresa reference line. The coordinate grid provides a reference (the x-axis) and the numbersto use in the measurement. Spend some time having students invent their own meth-ods for attaching a number to the concept of steepness.
The convention for measuring the steepness of a line or the slope is based on theideas of the rise and run between any two points on the line. The rise is the verticalchange from the left point to the right point—positive if up, negative if down. The runis the horizontal distance from the left point to the right point. Slope is then defined asrise ÷ run or the ratio of the vertical change to the horizontal change (see Figure 7.35).By agreement, vertical lines have no slope or the slope is said to be “undefined.” Hori-zontal lines have a slope of 0 as a result of the definition.
221
LOCATION ACTIVITIES
ch07.qxd 5/4/2005 2:51 PM Page 221
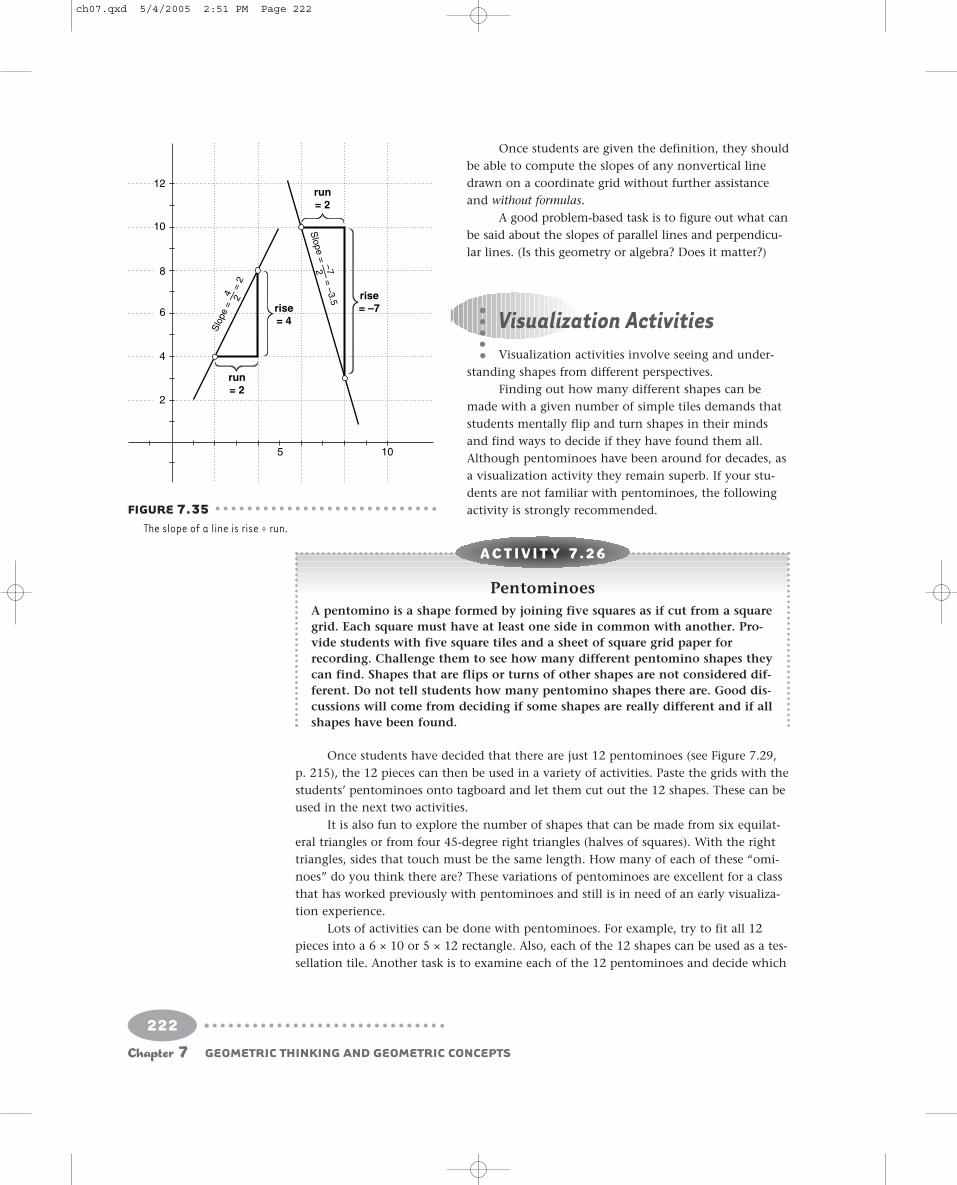
Once students are given the definition, they shouldbe able to compute the slopes of any nonvertical linedrawn on a coordinate grid without further assistanceand without formulas.
A good problem-based task is to figure out what canbe said about the slopes of parallel lines and perpendicu-lar lines. (Is this geometry or algebra? Does it matter?)
Visualization ActivitiesVisualization activities involve seeing and under-
standing shapes from different perspectives.Finding out how many different shapes can be
made with a given number of simple tiles demands thatstudents mentally flip and turn shapes in their mindsand find ways to decide if they have found them all.Although pentominoes have been around for decades, asa visualization activity they remain superb. If your stu-dents are not familiar with pentominoes, the followingactivity is strongly recommended.
ACT IV ITY 7 .26
Pentominoes
A pentomino is a shape formed by joining five squares as if cut from a squaregrid. Each square must have at least one side in common with another. Pro-vide students with five square tiles and a sheet of square grid paper forrecording. Challenge them to see how many different pentomino shapes theycan find. Shapes that are flips or turns of other shapes are not considered dif-ferent. Do not tell students how many pentomino shapes there are. Good dis-cussions will come from deciding if some shapes are really different and if allshapes have been found.
Once students have decided that there are just 12 pentominoes (see Figure 7.29,p. 215), the 12 pieces can then be used in a variety of activities. Paste the grids with thestudents’ pentominoes onto tagboard and let them cut out the 12 shapes. These can beused in the next two activities.
It is also fun to explore the number of shapes that can be made from six equilat-eral triangles or from four 45-degree right triangles (halves of squares). With the righttriangles, sides that touch must be the same length. How many of each of these “omi-noes” do you think there are? These variations of pentominoes are excellent for a classthat has worked previously with pentominoes and still is in need of an early visualiza-tion experience.
Lots of activities can be done with pentominoes. For example, try to fit all 12pieces into a 6 × 10 or 5 × 12 rectangle. Also, each of the 12 shapes can be used as a tes-sellation tile. Another task is to examine each of the 12 pentominoes and decide which
222
Chapter 7 GEOMETRIC THINKING AND GEOMETRIC CONCEPTS
Slope = –—
= –3.5–72
run= 2
run= 2
rise= 4
rise= –7
5
2
4
8
6
10
10
12
Slo
pe =
— =
24 2
FIGURE 7.35The slope of a line is rise ÷ run.
ch07.qxd 5/4/2005 2:51 PM Page 222

will fold up to make an open box. For those that are “box makers,” which square is thebottom? Once a “box maker” has been identified, challenge students to write the lettersM—A—T—H on the four sides so that the box will spell MATH around the sides.
As students work at mentally folding a “box maker” pentomino and attemptingto correctly orient the letters of MATH on the sides, they are making connectionsbetween the two-dimensional world and the three-dimensional world. If a “box maker”had one more square attached at an appropriate place, you could fold it up to make acube. A flat shape that will fold up to make a solid figure is called a net of that solid.The following activity suggests several challenges involving nets.
ACT IV ITY 7 .27
Net Challenges
The following tasks are only related because each involves nets of solids.
• For each of the pentomino “box makers,” see how many differentplaces a sixth square can be attached to create a net for a cube. Arethere other nets for a cube that do not begin with a pentomino?
• Begin with a solid, such as a rectangular prism or square pyramid.Sketch as many nets as possible for this shape. Add to the collectionsome arrangements of the sides of the solid that are not nets. Challengea friend to decide which are nets of the shape and which are not.
• Use Polydrons or 3D Geoshapes to create a flat figure that you thinkwill fold up into a solid. Test the result. If the number and/or the typeof flat shapes is specified, the task can be made more or less difficult.Can you make a net of a solid with 12 regular pentagons or 8 equilat-eral triangles? (These can be made into a dodecahedron and an octahe-dron, respectively, two of the five completely regular polyhedra, alsoknown as the five Platonic solids.)
The following activity also provides students with experiences in the three-dimensional world but in a rather different manner. Here students also must mentallymove shapes and predict the results. The activity combines ideas of line symmetry and(reflections) as well as visualization and spatial reasoning.
ACT IV ITY 7 .28
Notches and Holes
Use a half sheet of paper that will easily fit on the overhead. Fold it in halfand then half again, making the second fold in the opposite direction fromthe first. Students make a sketch of the paper when it is opened, showing aline for each fold. With the paper folded, cut notches in one or two sidesand/or cut off one or two corners. You can also use a paper punch to make ahole or two. While still folded, place the paper on the overhead showing thenotches and holes. The folded edges should be to the left and at the top. (SeeFigure 7.36.) The task is for students to draw the notches and holes that theythink will appear when you open the paper.
To introduce this activity, begin with only one fold and only two cuts.Stay with one fold until students are ready for a more difficult challenge.
223
VISUALIZATION ACTIVITIES
ch07.qxd 5/4/2005 2:51 PM Page 223

In “Notches and Holes” students will eventu-ally learn which cuts create holes and how manyand which cuts make notches in the edges or on thecorners. Notice how line symmetry, or reflections,plays a major role in the activity. Symmetry deter-mines the position, the shape, and the number ofholes created by each cut.
Stop now and try the “Notches and Holes”activity yourself. Try cuts in various placeson the folded paper and see what isinvolved in this well-known activity.
One of the main goals of the Visualizationstrand of the Geometry Standard is to be able toidentify and draw two-dimensional images of three-dimensional figures and to build three-dimensionalfigures from two-dimensional images. Activitiesaimed at this goal often involve drawings of small“buildings” made of 1-inch cubes.
ACT IV ITY 7 .29
Viewpoints
a. In the first version, students begin with abuilding and draw the left, right, front,and back direct views. In Figure 7.37, thebuilding plan shows a top view of thebuilding and the number of blocks ineach position. After students build abuilding from a plan like this, their taskis to draw the front, right, left, and backdirect views as shown in the figure.
b. In the reverse version of the task, stu-dents are given right and front views.The task is to build the building that hasthose views. To record their solution,they draw a building plan (top view withnumbers).
Notice that front and back direct views aresymmetric, as are the left and right views. That is why only one of each is given in part b of theactivity.
In “Viewpoints,” students made “buildings” out of 1-inch cubes and coordinatedthese with direct views of the sides and top. A significantly more challenging activity isto draw perspective views of these block buildings or to match perspective drawingswith a building. Isometric dot grids are used for the drawings. The next activity pro-vides a glimpse at this form of visualization activity.
224
Chapter 7 GEOMETRIC THINKING AND GEOMETRIC CONCEPTS
Step 1:Fold paper twice.
Step 2:Cut notches.
Step 4:Students draw their predictions.
Step 3:Show on overhead projector.
Fold
Fold
FIGURE 7.36An example showing how the “Notches and Holes” activity is done.Students make two folds and cut notches and/or punch holes in thefolded paper. Before unfolding, they draw a sketch predicting theresult when the paper is unfolded.
1213
1
1
2
Front
Building Plan
Back
RightLe
ft
Left Front Right Back
Direct Views
FIGURE 7.37Tasks can begin with the Building Plan, or with the Direct View, oreven with the building. Students give the other representations.
ch07.qxd 5/4/2005 2:51 PM Page 224

ACT IV ITY 7 .30
Perspective Drawings
a. In the first version, students begin with aperspective drawing of a building. Theassumption is that there are no hiddenblocks. From the drawing the students buildthe actual building with their blocks. Torecord the result, they draw a building planindicating the number of blocks in eachposition.
b. In the second version, students are giveneither a block plan or the five direct views.They build the building accordingly anddraw two or more of the perspective views.There are four possible perspectives fromabove the table: the front left and right, andthe back left and right. It is useful to buildthe building on a sheet of paper with thewords front, back, left, and right written onthe edges to keep from getting differentviewpoints confused.
Figure 7.38 shows an example of this last activity.Some excellent resource books exist for this type ofactivity. It is not necessary to prepare these tasks yourself. Perhaps the best-known bookis Middle Grades Mathematics Project: Spatial Visualization (Winter, Lappan, Phillips, &Fitzgerald, 1986). NCTM’s Navigating Through Geometry books have similar activities inboth the 3–5 and 6–8 grade books.
Technology NoteAn amazing computer tool, the “Isometric Drawing Tool,” for drawingperspective views of block buildings such as in Activity 7.30 is available
on the Illuminations website (www.illuminations.nctm.org/tools/isometric/isometric.asp). This applet requires only mouse clicks to draw either whole cubes,any single face of a cube, or just lines. The drawings, however, are actually “build-ings” and can be viewed as three-dimensional objects. They can be rotated inspace so that they can be seen from any vantage. Prepared investigations areinformative and also lead students through the features of the tool.
Another interesting connection between two and three dimensions is found inslicing solids in different ways. When a solid is sliced into two parts, a two-dimensionalfigure is formed on the slice faces. Figure 7.39 shows a cube being sliced off at the cor-ner, leaving a triangular face. Slices can be explored with clay sliced with a potter’s wireas shown in the figure. A niftier method is to partially fill a plastic solid with water. Thesurface of the water is the same as the face of a slice coinciding with the surface of thewater. By tilting the shape in different ways, every possible “slice” can be observed.Small plastic solids such as Power Solids are excellent for this.
225
VISUALIZATION ACTIVITIES
Front Right
Use cubes to buildthis shape and draw it.
Top
Back Left
FIGURE 7.38Develop perspective and visual perception with cubes andplain views. Draw block “buildings” on isometric grids.
ch07.qxd 5/4/2005 2:51 PM Page 225

ACT IV ITY 7 .3 1
Water Slices
Students are given a solid and challenged to find out how to slice it to makea designated slice face. The list of challenges should include some that areimpossible. Before water is poured into the solids, students must committhemselves on paper as to whether or not the slice is possible. If they think itis possible, they write and/or draw a description of where the slice must bemade. Then water is put into the shape to test their predictions. If there areno plastic shapes available, clay models are the next best option. Here is a listof potential slice faces for a cube:
Square, nonsquare rectangle, nonrectangular parallelogram, isosce-les trapezoid, nonisosceles trapezoid, equilateral triangle, isoscelesright triangle, other isosceles triangle, scalene right triangle, otherscalene triangle.
A tetrahedron, a square pyramid, and prisms offer similar challenges. Forother solids, it may be more interesting to find out how many different typesof slice faces can be found and to describe each.
A polyhedron is a three-dimensional shape with polygons for all faces. Among thevarious polyhedra, the Platonic solids are especially interesting. Platonic solids is thename given to the set of completely regular polyhedrons. Completely regular means thateach face is a regular polygon and every vertex has exactly the same number of facesjoining at that point. An interesting visualization task appropriate for this level is tofind and describe all of the Platonic solids.
ACT IV ITY 7 .32
Search for the Platonic Solids
Provide students with a supply of equilateral triangles, squares, regular pen-tagons, and regular hexagons from one of the plastic sets for building solids(e.g., Polydron or Geofix). Explain what a completely regular solid is. Thetask is to find as many different completely regular solids as possible.
226
Chapter 7 GEOMETRIC THINKING AND GEOMETRIC CONCEPTS
FIGURE 7.39Predict the slice facebefore you cut a claymodel with a potter’s wire.
ch07.qxd 5/4/2005 2:51 PM Page 226

One approach to conducting this activity is to leave it as stated and allow stu-dents to work with no additional guidance. Success will depend on their problem-solving skills. Alternatively, you might suggest a systematic approach as follows. Since the smallest number of sides a face can have is three, begin with triangles, thensquares, then pentagons, and so on. Furthermore, since every vertex must have thesame number of faces, try three faces at a point, then four, and so on. (It is clearlyimpossible to have only two faces at a point.)
With this plan, students will find that for triangles they can have three, four, orfive triangles coming to a point. For each of these, they can begin with a “tent” of tri-angles and then add more triangles so that each vertex has the same number. Withthree at a point you get a four-sided solid called a tetrahedron (tetra = four). With four ateach point you get an eight-sided solid called an octahedron (octa = eight). It is reallyexciting to build the shape with five triangles at each point. It will have 20 sides and iscalled an icosahedron (icosa = twenty).
In a similar manner, students will find that there is only one solid made ofsquares—three at each point and six in all—a hexahedron (hex = six), also called a cube.And there is only one solid with pentagons, three at each point, 12 in all. This is calleda dodecahedron (dodeca = twelve).
Why are there no regular polyhedra with six or more triangles or four or moresquares? Why are there no regular polyhedra made with hexagons or with poly-gons with more than six sides? The best way to answer these questions is toexperiment with the polygons and explain the answers in your own words. Stu-dents should do the same.
A fantastic skeletal icosahedron can be built out of the newspaper rods describedearlier. (See Figure 7.6, p. 191.) Since five triangles converge at each point, there are alsofive edges emerging at each point. Simply work at bringing five rods to each vertex andremember that each face is a triangle. This icosahedron will be about 4 feet across andwill be amazingly sturdy.
Assessment NotePrinciples and Standards is extremely helpful for articulating growth in
geometric content across the grades. For each of the four goals articulatedby the standards (shape and properties, location, transformations, and
visualization) examine the 3–5 grade-level expectations as well as those for the6–8 grade band. (See Appendix A, p. 352.)
Try to include a sense of growth over time in your assessment of content. Ifyou limit your assessment to a mastery of skills or definitions, the spirit of explo-ration that you want in your geometry program will be lost. We most often teachin a manner that reflects our assessment plans. Although mastery of some ideas isperhaps important, conceptual development is rarely reflected in memorizing def-initions. In deciding what to assess and how, it is best to take a long-term view ofgeometry rather than a more traditional mastery-oriented approach.
227
VISUALIZATION ACTIVITIES
ch07.qxd 5/4/2005 2:51 PM Page 227

EXPANDED LESSON
Triangle MidsegmentsBased on Activity 7.13, p. 208
GRADE LEVEL: Eighth grade.
MATHEMATICS GOALS• To look at the relationship between a triangle’s midseg-
ment and its base.• To develop the rationale for why particular relationships
exist in a triangle.• To develop logical reasoning in a geometric context.
THINKING ABOUT THE STUDENTS• Most students are beginning to function at the van Hiele
level 2, where they are ready to grapple with “why” and“what-if” questions. Students are aware of the proper-ties of angles formed by cutting parallel lines with atransverse line. They also have experience working withsimilar triangles.
• To do the lesson with a dynamic geometry program,students should be relatively competent with the pro-gram tools and be able independently to draw differentgeometric objects (e.g., triangles, lines, line segments),label vertices, find midpoints, and measure lengths andangles.
MATERIALS AND PREPARATION• This lesson can be done either with computers or as a
paper-and-pencil task. As described, the lesson onlyassumes a demonstration computer with display screen.Although desirable, a computer is not required.
• The computer used in the lesson requires a dynamicgeometry program, such as The Geometer’s Sketchpad.
• Students will need rulers that measure in centimeters.
l e s s on BEFORE
Brainstorm• Have each student draw a line segment measuring 16 cm near the long edge of a
blank sheet of paper. Demonstrate using the computer. Label the segment BC.• Have students randomly select another point somewhere on their papers but at least
a few inches above BC. Illustrate on the computer that you want all students to havevery different points. Some might be in the upper left, upper right, near the center,and so on. Have them label this point A and thendraw segments AB and AC to create triangle ABC.Do the same on the computer.
• Next, students find the midpoints D and E of ABand AC, respectively, and draw the midsegmentDE. Do the same on the computer. You can intro-duce the term midsegment if you wish as the linejoining the midpoints of two sides of a triangle.Terminology is not important, however.
• Have students measure their midsegments and report what they find. Amazingly, allstudents should report a measure of 8 cm. On the computer, measure BC and DE.Move point A all over the screen. The two measures will stay the same, with thelength of DE being half of BC. Even if B or C ismoved, the ratio of BC to DE will remain 2 to 1.
• Ask students for any conjectures they may haveabout why this relationship exists. Discuss eachidea briefly but without any evaluation.
• On the computer draw a line through A parallel toBC. Have students draw a similar line on theirpaper. Label points F and G on the line as shownhere.
228
Chapter 7 GEOMETRIC THINKING AND GEOMETRIC CONCEPTS
B C
A
B
F G
C
A
D E
ch07.qxd 5/4/2005 2:51 PM Page 228

• Ask students what else they know about the figure now that line FG has been added. List all ideas on the board.
The Task• What conjecture can be made about the midsegment of any triangle?• What reason can be given for why the conjecture might be true?
Establish Expectations• Students are to write out a conjecture about the midsegment of a triangle.• In pairs, students are to continue to explore their sketch, looking for reasons why
this particular relationship between the midsegment of a triangle and its base exists.They should record all of their ideas and be ready to share them with the class. Ifthey wish to explore an idea on the computer sketch, they should be allowed to do so.
DURING• Resist giving too much guidance at first. See what students can do on their own.
Notice what they focus on in forming conjectures.• For students having difficulty, suggest that they focus on angles ADE and ABC as
well as angles AED and ACB. (These pairs of angles are congruent.)• Suggest that they list all pairs of angles that they know are congruent. Why are they
congruent?• If necessary, ask students to compare triangle ABC with triangle ADE. What do they
notice? They should note that the triangles are similar. Why are they similar?
AFTER• Have students discuss their initial arguments for why the midsegment relationship
holds. They can use the demonstration computer to share their ideas.• Using their ideas, help students build arguments so that one can see how one point
flows to the next in a logical sequence.
ASSESSMENT NOTES• Look for students who struggle seeing the connections or relationships between
properties. They may not be functioning at level 2 of the van Hiele levels of geomet-ric thought.
• Do students see the difference between simply observing a relationship and consid-ering the reasons the relationship exists?
• If students are not able to follow logical arguments(yours or their peers’) in this activity, they may not yetbe at the van Hiele level 2. These students need moreinformal experiences exploring properties of shapes andlooking for relationships. Select from the level 1 activitiesfor Shapes and Properties beginning on p. 193.
• If this activity is successful, continue having studentsgrapple with making logical arguments for why
the things they observe to be true are in fact true. Activ-ity 7.12, “Angle Sum in a Tri-angle,” provides students another opportunity to consider the reasoning behind a geometric relation-ship. The arguments there are similar to those in thisactivity.
nex t s t e p s
229
EXPANDED LESSON
ch07.qxd 5/4/2005 2:51 PM Page 229