getting started with comceptdraw pro - conceptdra getting started with conceptdraw pro v11 for...
TRANSCRIPT

Getting Started with ConceptDraw PRO v11 for Windows
CS Odessa corp.

2
Getting Started with ConceptDraw PRO v11 for Windows
ContentsGETTING STARTED WITH CONCEPTDRAW PRO ..................................................3
ADDING SHAPES ................................................................................................4
SOLUTIONS and LIBRARIES ...............................................................................4
CLIPBOARD BUTTONS .......................................................................................4
FLOWCHART TOOLS ...........................................................................................5
CONNECTING OBJECTS ......................................................................................6
WORKING WITH YOUR DRAWING ......................................................................7
HYPERLINKS AND NOTES...................................................................................9
GRID AND RULERS .............................................................................................9
SMART OBJECTS ...............................................................................................10
RAPID DRAW .....................................................................................................11
MULTI-PAGE DRAWINGS ..................................................................................12
PRESENTING YOUR DRAWING ...........................................................................13
CUSTOM LIBRARIES ..........................................................................................14
IMPORTING/EXPORTING ...................................................................................14
PRINTING YOUR DRAWING ...............................................................................14
SOLUTION PARK ................................................................................................14
VIDEO ROOM .....................................................................................................14
SAMPLES ...........................................................................................................14
NO-CHARGE SUPPORT .......................................................................................15
CROSS-PLATFORM LICENSING ...........................................................................15
WINDOWS 32-/64-BIT SUPPORT ........................................................................15
MULTI-DISPLAY SUPPORT .................................................................................15
MULTI-LANGUAGE SPELL CHECK ........................................................................15
ABOUT CS ODESSA.............................................................................................15
FREQUENTLY ASKED QUESTIONS .......................................................................16

3
Getting Started with ConceptDraw PRO v11 for Windows
1. Navigate your web browser to www.ConceptDraw.com and click Sign In.
2. Fill in the form with your information, and then click Submit.
3. Check your email for the message from [email protected] that contains your confirmation link. (Spam filters may catch this message. If you don’t see the email within a few minutes, check your “Junk” or “Spam” folders.)
4. Follow the link to confirm your account, and then click Download Product.
5. Once the download is complete, run the installation file.
6. Follow all the on-screen instructions to complete the installation.
7. Once the installation is completed, ConceptDraw STORE runs automatically. The trial licenses listed in your account will be delivered to your computer automatically through your internet connection.
8. Congratulations! Your FREE 21-day trial of ConceptDraw PRO has begun.
GETTING STARTED WITH CONCEPTDRAW PRO
Thank you for your interest in ConceptDraw® PRO v11! To begin with, let’s install the program on your system. To install the product, and activate your trial license:
4
Getting Started with ConceptDraw PRO v11 for Windows
ADDING SHAPES
ConceptDraw PRO provides a complete range of business graphic documentation solu-tions with thousands of stencils and hundreds of templates for rapid diagramming. In addition to a wide assortment of basic shapes. Configurable drawing tools make it quick and easy to create professional diagrams that are clear and easily understood.
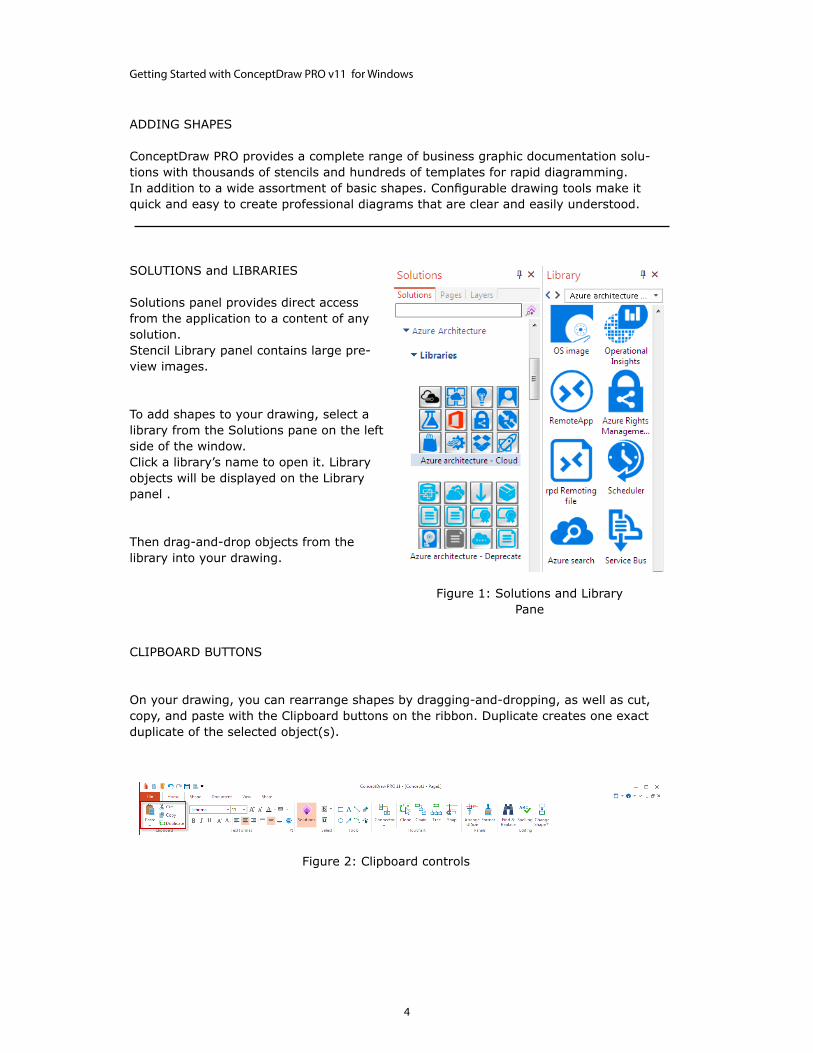
SOLUTIONS and LIBRARIES
Solutions panel provides direct access from the application to a content of any solution. Stencil Library panel contains large pre-view images.
To add shapes to your drawing, select a library from the Solutions pane on the left side of the window. Click a library’s name to open it. Library objects will be displayed on the Library panel .
Then drag-and-drop objects from the library into your drawing.
Figure 1: Solutions and Library Pane
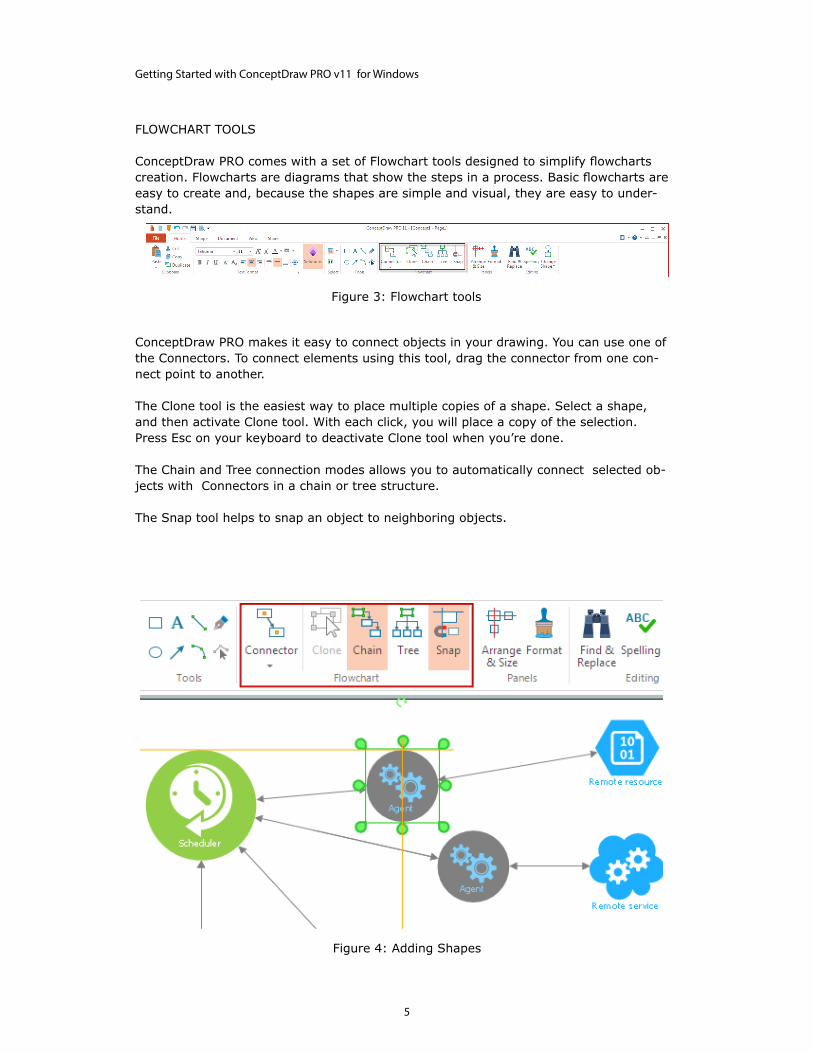
CLIPBOARD BUTTONS
On your drawing, you can rearrange shapes by dragging-and-dropping, as well as cut, copy, and paste with the Clipboard buttons on the ribbon. Duplicate creates one exact duplicate of the selected object(s).
Figure 2: Clipboard controls
5
Getting Started with ConceptDraw PRO v11 for Windows
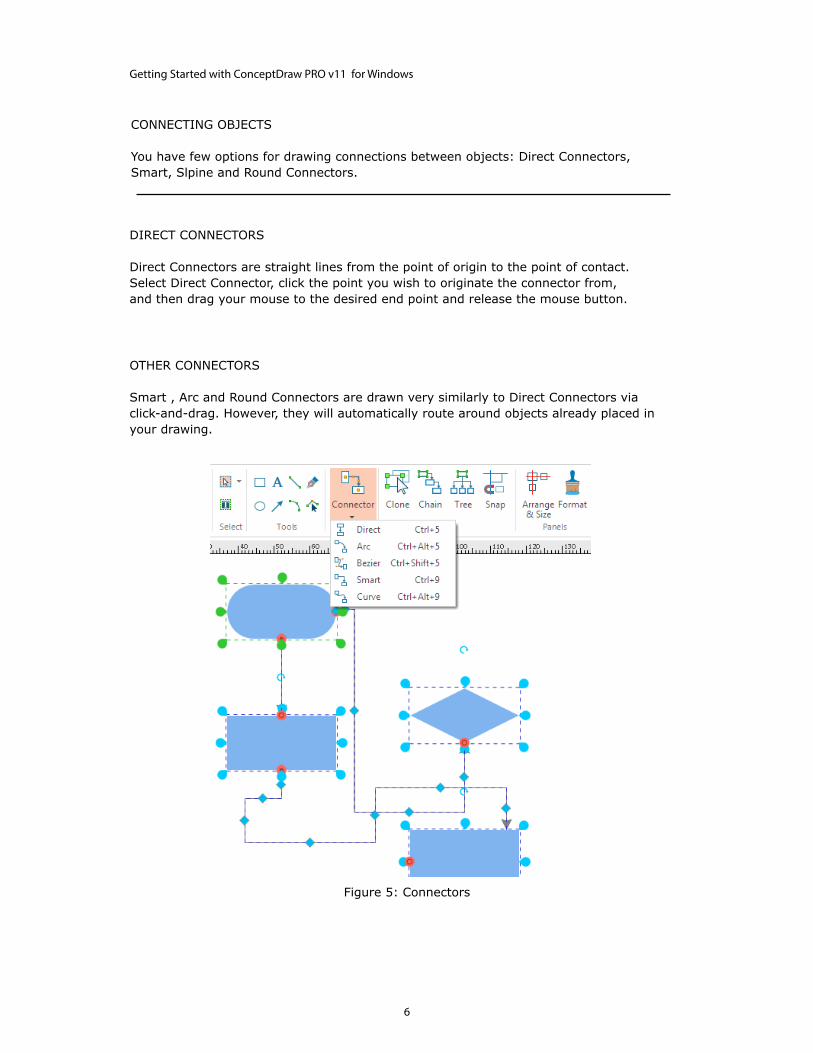
FLOWCHART TOOLS
ConceptDraw PRO comes with a set of Flowchart tools designed to simplify flowcharts creation. Flowcharts are diagrams that show the steps in a process. Basic flowcharts are easy to create and, because the shapes are simple and visual, they are easy to under-stand.
ConceptDraw PRO makes it easy to connect objects in your drawing. You can use one of the Connectors. To connect elements using this tool, drag the connector from one con-nect point to another.
The Clone tool is the easiest way to place multiple copies of a shape. Select a shape, and then activate Clone tool. With each click, you will place a copy of the selection. Press Esc on your keyboard to deactivate Clone tool when you’re done.
The Chain and Tree connection modes allows you to automatically connect selected ob-jects with Connectors in a chain or tree structure.
The Snap tool helps to snap an object to neighboring objects.
Figure 3: Flowchart tools
Figure 4: Adding Shapes
6
Getting Started with ConceptDraw PRO v11 for Windows
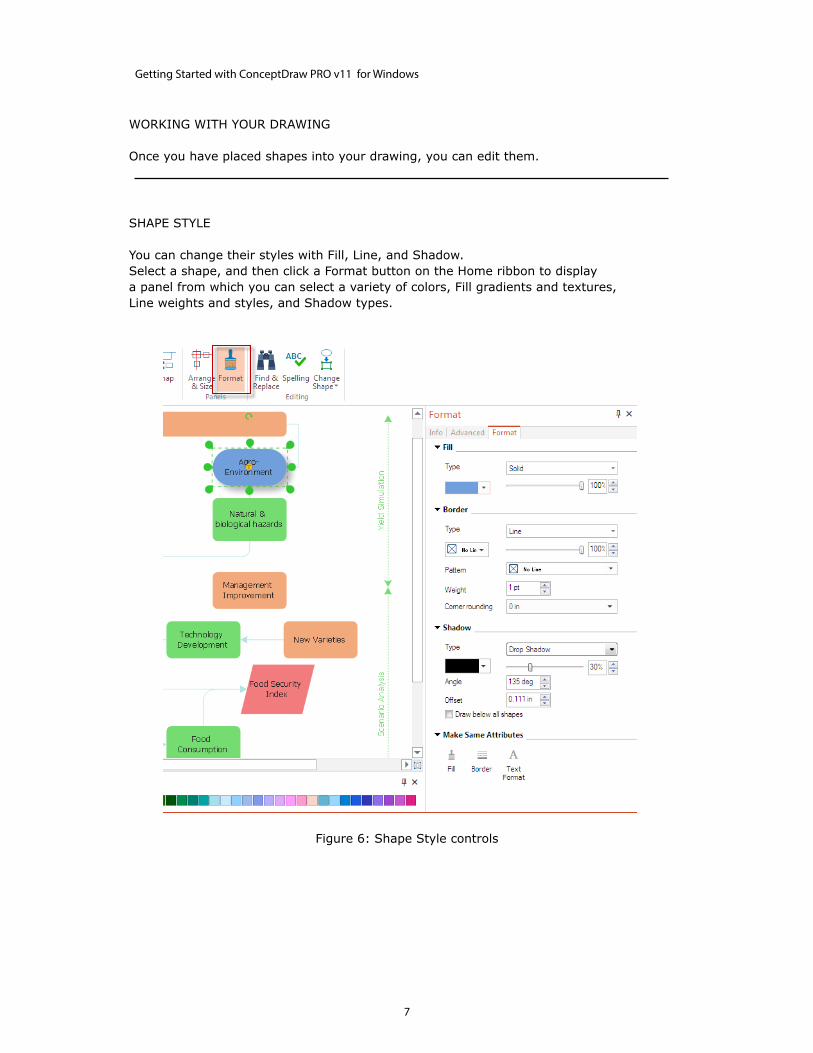
DIRECT CONNECTORS
Direct Connectors are straight lines from the point of origin to the point of contact. Select Direct Connector, click the point you wish to originate the connector from, and then drag your mouse to the desired end point and release the mouse button.
OTHER CONNECTORS
Smart , Arc and Round Connectors are drawn very similarly to Direct Connectors via click-and-drag. However, they will automatically route around objects already placed in your drawing.
CONNECTING OBJECTS
You have few options for drawing connections between objects: Direct Connectors, Smart, Slpine and Round Connectors.
Figure 5: Connectors
7
Getting Started with ConceptDraw PRO v11 for Windows
SHAPE STYLE
You can change their styles with Fill, Line, and Shadow. Select a shape, and then click a Format button on the Home ribbon to display a panel from which you can select a variety of colors, Fill gradients and textures, Line weights and styles, and Shadow types.
WORKING WITH YOUR DRAWING
Once you have placed shapes into your drawing, you can edit them.
Figure 6: Shape Style controls

8
Getting Started with ConceptDraw PRO v11 for Windows
SHAPE TOOLS
You have even more options for working with shapes on the Shape tab of the ribbon. Click the small arrows below any of the following buttons to set different parameters for the operation.
Rotate and Flip transform a selection geometrically. Step Front and Step Back place shapes on different layers of the drawing. Make Same conforms the dimensions of the secondary selection (blue highlight) to those of the primary selection (green highlight).
Align controls are used to align multiple shapes along a single axis. Distribute spaces shapes evenly on the page. Use Group to make multiple objects move as a single unit, yet retain their individual properties. Join makes multiple shapes into a single shape. Ungroup and Separate reverse these operations.
Figure 7: Shape tools
9
Getting Started with ConceptDraw PRO v11 for Windows
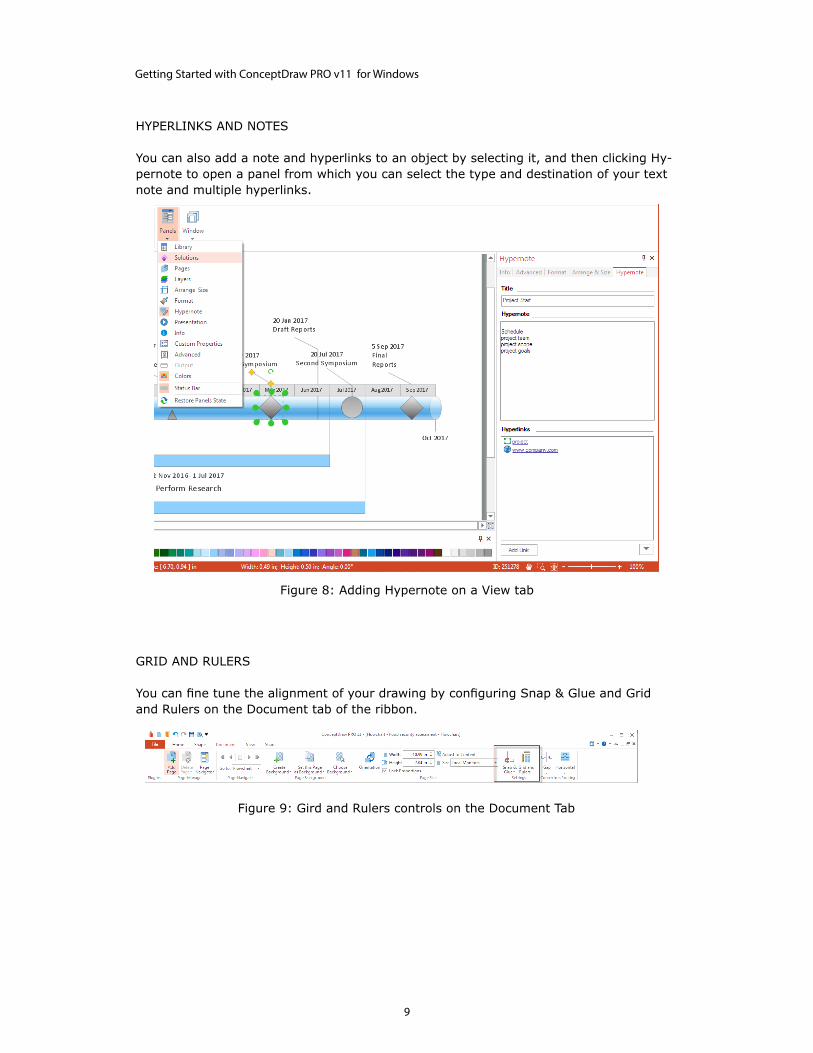
HYPERLINKS AND NOTES
You can also add a note and hyperlinks to an object by selecting it, and then clicking Hy-pernote to open a panel from which you can select the type and destination of your text note and multiple hyperlinks.
GRID AND RULERS
You can fine tune the alignment of your drawing by configuring Snap & Glue and Grid and Rulers on the Document tab of the ribbon.
Figure 8: Adding Hypernote on a View tab
Figure 9: Gird and Rulers controls on the Document Tab

10
Getting Started with ConceptDraw PRO v11 for Windows
Smart Objects are shapes with unique properties that can be edited by clicking the Smart Object icon that appears when they are selected in a drawing.
SMART OBJECTS
Many of ConceptDraw PRO’s libraries contain Smart Objects, identified by a blue tile in the library pane.
Figure 10: Smart object

11
Getting Started with ConceptDraw PRO v11 for Windows
Rapid Draw allows you to build professional flowchart quickly and easily. Engage Rapid Draw object from the Flowcharts Rapid Draw library and then hover your mouse over an object at a drawing page.
Click one of the small blue arrows that appear to draw a Smart Connector and Duplicate of the selection in the chosen direction. Using Rapid Draw objects you can easily create complex flowcharts in practically no time. You can adapt other objects for Rapid Draw flowcharting using the Rapid Draw button on the Shape tab.
RAPID DRAW
Rapid Draw mode is the fastest and easiest way to create a flowchart in ConceptDraw PRO.
Figure 11: Quick Flowcharting with Rapid Draw
12
Getting Started with ConceptDraw PRO v11 for Windows
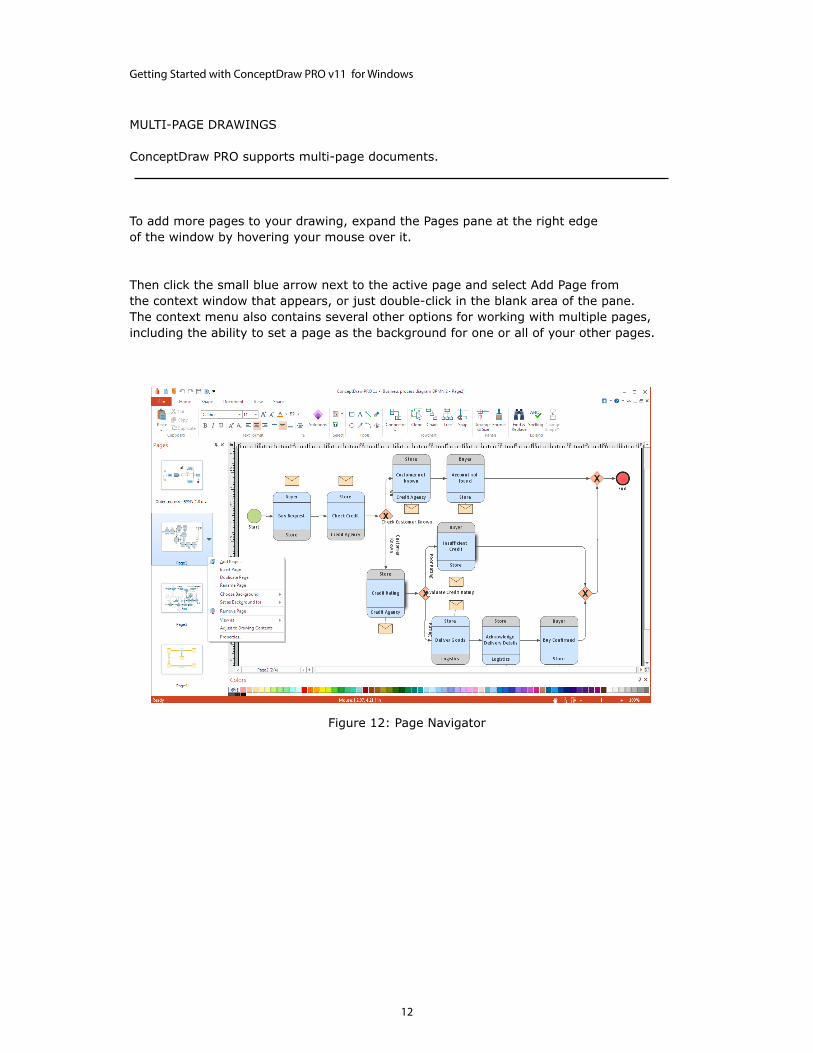
To add more pages to your drawing, expand the Pages pane at the right edge of the window by hovering your mouse over it.
Then click the small blue arrow next to the active page and select Add Page from the context window that appears, or just double-click in the blank area of the pane. The context menu also contains several other options for working with multiple pages, including the ability to set a page as the background for one or all of your other pages.
MULTI-PAGE DRAWINGS
ConceptDraw PRO supports multi-page documents.
Figure 12: Page Navigator
13
Getting Started with ConceptDraw PRO v11 for Windows
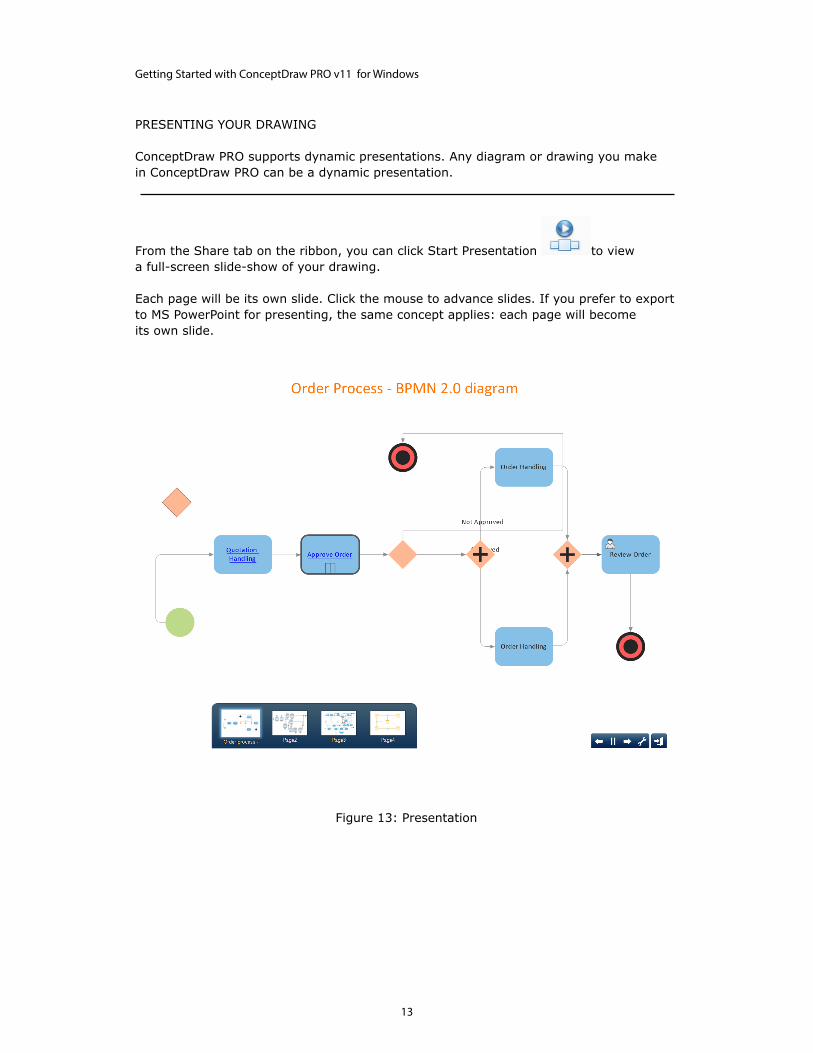
PRESENTING YOUR DRAWING
ConceptDraw PRO supports dynamic presentations. Any diagram or drawing you make in ConceptDraw PRO can be a dynamic presentation.
From the Share tab on the ribbon, you can click Start Presentation to view a full-screen slide-show of your drawing.
Each page will be its own slide. Click the mouse to advance slides. If you prefer to export to MS PowerPoint for presenting, the same concept applies: each page will become its own slide.
Figure 13: Presentation
14
Getting Started with ConceptDraw PRO v11 for Windows
CUSTOM LIBRARIES
From the File > Library menu you have numerous options for creating custom libraries, such as creating a new blank library into which you can drag-and-drop shapes from your drawing, saving the current library as a differently named file, and even sending the current active library via email.
SOLUTION PARK
ConceptDraw Solution Park is an ever-growing collection of free and paid business-spe-cific solutions and product add-ons that are available to add continued value after the initial purchase of a ConceptDraw product. For more information, visit http://www.conceptdraw.com/solution-park/
IMPORTING/EXPORTING
Also from the File menu, you can view all of ConceptDraw PRO’s import and export capabilities. Most notably, ConceptDraw PRO can import from and export to Microsoft® Visio’s® file format, as well as MS PowerPoint® files and a variety of popular graphics file formats. ConceptDraw PRO can also export to Adobe PDF and SWF.
PRINTING YOUR DRAWING
From the File menu, select Print to open the Print Preview. From this view, you can con-figure the various print options to ensure your drawing looks as great on paper as it does on the screen. Click Print to send your drawing to the printer, or Close Print Preview to return to your drawing.
VIDEO ROOM
CS Odessa offers a series of instructional videos for ConceptDraw Products. Users of all proficiency levels will find here new insights into the product’s functionality, as well as helpful tips to expedite their workflow. http://www.conceptdraw.com/video/
SAMPLES
CS Odessa offers an online collection of professional samples designed to help Concept-Draw users achieve their best. ConceptDraw Samples shows many of the varieties of tasks and possibilities that the ConceptDraw Product Line can achieve. http://www.conceptdraw.com/samples/about-samples
15
Getting Started with ConceptDraw PRO v11 for Windows
NO-CHARGE SUPPORT
CS Odessa offers no-charge support for all licensed and trial users of ConceptDraw Prod-ucts. ConceptDraw Maintenance Assurance P3 is also available to stay current with major updates to ConceptDraw Products.
CROSS-PLATFORM LICENSING
CS Odessa is one of the only companies in the world that offers a cross-platform license. This means that if you want to install your product on a Mac and a PC for your use, you can do so with our license. Most companies require that you purchase a separate license for each platform.
WINDOWS 32-/64-BIT SUPPORT
All ConceptDraw applications are compatible with Windows 7/8.1/10 3(2 and 64-bit ar-chitectures).
MULTI-DISPLAY SUPPORT
ConceptDraw PRO v11 supports working across multiple computer screens. This allows you to work on one screen and present on another.
MULTI-LANGUAGE SPELL CHECK
ConceptDraw PRO offers Spell Check in a variety of different languages.
ABOUT CS ODESSA
Founded in 1993, Computer Systems Odessa supplies cross-platform productivity tools and graphics technologies to professional and corporate users around the world.
From their headquarters in Odessa, Ukraine, and U.S. office in San Jose, CA, CS Odessa sells internationally in over 150 countries, both directly and through resellers.
The ConceptDraw Productivity Line has won numerous awards, and is used by hundreds of thousands all over the world. For more information, visit http://www.conceptdraw.com

16
Getting Started with ConceptDraw PRO v11 for Windows
FREQUENTLY ASKED QUESTIONS
What is the difference between Technical Support and Maintenance Assurance P3?
Technical support is a no charge item provided to our customers and individuals trialing or products. Our Tech Support team is there to help you with installing, product activation, and product issues. Technical support is available by submitting a ticket via our web site, and by phone and email. Minor product upgrades are at no additional cost.
When purchased at the same time of you ConceptDraw Product purchase, Maintenance Assurance P3 provides you the next major release of your product at no additional cost. When the next major upgrade of the product becomes available you will be notified of its availability for download and installation.
Why is ConceptDraw STORE part of the product I purchased?
When you activate a purchased license for your product, that authorization is stored in the cloud, and then synchronized with your desktop product(s) using ConceptDraw STORE. We do this so if the unthinkable occurs and you have a catastrophic event with your computer such as a hard disk failure, you can log into your account on ConceptDraw.com and retrieve your license, saving you time and headaches.
The ConceptDraw STORE also manages the versioning of all of your products, and give you access to all of the additional business solutions found in the ConceptDraw Solution Park.
I am with a large organization; do you support other methods of installation besides the one I experienced from my trial?
We have additional methods of delivering product to the users in your organization. Please contact our sales or support team for details.
Do you have pricing for academia and non-profits?
Yes, we have aggressive pricing for students, educators and employees of certified nonprofit organizations. Contact our sales team for pricing details.

17
Getting Started with ConceptDraw PRO v11 for Windows
TABLE OF FIGURES SUPPORT
Figure 1: Solutions and Library Pane Library Panels ...................................... 4
Figure 2: Clipboard controls ..................................................................... 4
Figure 3: Flowchart tools .......................................................................... 5
Figure 4: Adding Shapes ...........................................................................5
Figure 5: Connectors........ ....................................................................... 6
Figure 6: Shape Style controls .................................................................. 7
Figure 7: Shape Tools................................................................................ 8
Figure 8: Adding Hypernote........................................................................9
Figure 9: Gird and Rulers controls on the Document Tab ................................9
Figure 10: Smart Object ....................................................................... 10
Figure 11: Quick Flowcharting with Rapid Draw.... .....................................11
Figure 12 Pages Navigator ...................................................................... 12
Figure 13: Presentation .......................................................................... 13

18
Getting Started with ConceptDraw PRO v11 for Windows
KEYBOARD SHORTCUTS
Following is an abbreviated list of the most commonly used keyboard shortcuts. See the in-program Help file for the comprehensive list.
Keystroke FunctionCtrl + N Create a new documentCtrl + O Open a document/template/workspace fileCtrl + S Save the active documentCtrl + Shift + S Save the active document under a new
filenameCtrl + P Print the active documentCtrl + Shift + G Set Grid properties for the active
documentCtrl + Shift + U Set Snap & Glue options for the active
documentCtrl + A Select all the shapes on pageCtrl + Z Undo the last operationCtrl + X Cut the selection to the ClipboardCtrl + C Copy the selection to the ClipboardCtrl + V PasteCtrl + Shift + N Create a new libraryCtrl + Shift + O Open a libraryCtrl + 1 Select toolCtrl + 2 Text toolCtrl + 3 Line toolCtrl + 5 Direct Connector toolCtrl + 6 Spline toolCtrl + 7 Rectangle toolCtrl + 8 Ellipse toolCtrl + 9 Smart Connector toolCtrl + 0 Eye Dropper tool

19
Getting Started with ConceptDraw PRO v11 for Windows
CS OdessaTechnical Support/Sales Phone Numbers
US/Canada/Mexico:
Technical Support (Toll Free): +1 (877) 441-1150 x4 [email protected]
Sales (Toll Free): +1 (877) 441-1150 x3 [email protected]
Europe:
Technical Support: +38 (048) 760-1963 +44 (203) 514-7040 [email protected]
Sales: +38 (048) 760-1963 [email protected]
© 2018, CS Odessa corp.