gl ludemann y-strainers · receiving handling inspection and storage when the strainer is not...
TRANSCRIPT

GL LudemannY-Strainers
Installation, Operationand MaintenanceManual
GL LudemannGL LudemannGL LudemannGL LudemannGL LudemannGL LudemannGL LudemannGL LudemannGL LudemannGL LudemannGL LudemannY-StrainersY-StrainersY-StrainersY-StrainersY-StrainersY-StrainersY-StrainersY-StrainersY-StrainersY-StrainersY-StrainersY-Strainers
Installation, OperationInstallation, OperationInstallation, OperationInstallation, OperationInstallation, OperationInstallation, OperationInstallation, OperationInstallation, OperationInstallation, OperationInstallation, OperationInstallation, OperationInstallation, OperationInstallation, OperationInstallation, OperationInstallation, OperationInstallation, OperationInstallation, Operation
GL Ludemann Armaturen GmbH GL Ludemann Appendages GL Ludemann Robinetterie0049 221 933534-0 0031 598 690550 0049 221 [email protected] [email protected] [email protected] www.ludemann.info
EnglishIssue 1 - 03/2014 - Page 1/7
GENERALThese instructions are for installing, operation and maintenance of Y-strainers fabricated by GL Ludemann Arma-turen GmbH in Germany.
These instructions are for skilled employees that are familiar with the common process equipment terminology.
GL Ludemann Armaturen GmbH declares that it reserves its right to modify these instructions, the information, specifications and technical data contained in this document are subject to change without notice. You can check if you have the latest update of this document by contacting GL Ludemann Armaturen GmbH.
Attempts to modify and/or repair this strainer by unauthorized or unqualified persons void the product warranty and may cause damage to property and serious injury or death to persons.
These instructions have to be fully read and understood prior to installing or using the Y-strainer. Failure to comply with these instructions may cause damage to property and serious injury or death to persons.
Always wear appropriate protective equipment (helmet, gloves, safety goggles etc.) when installing or servicing the strainer.
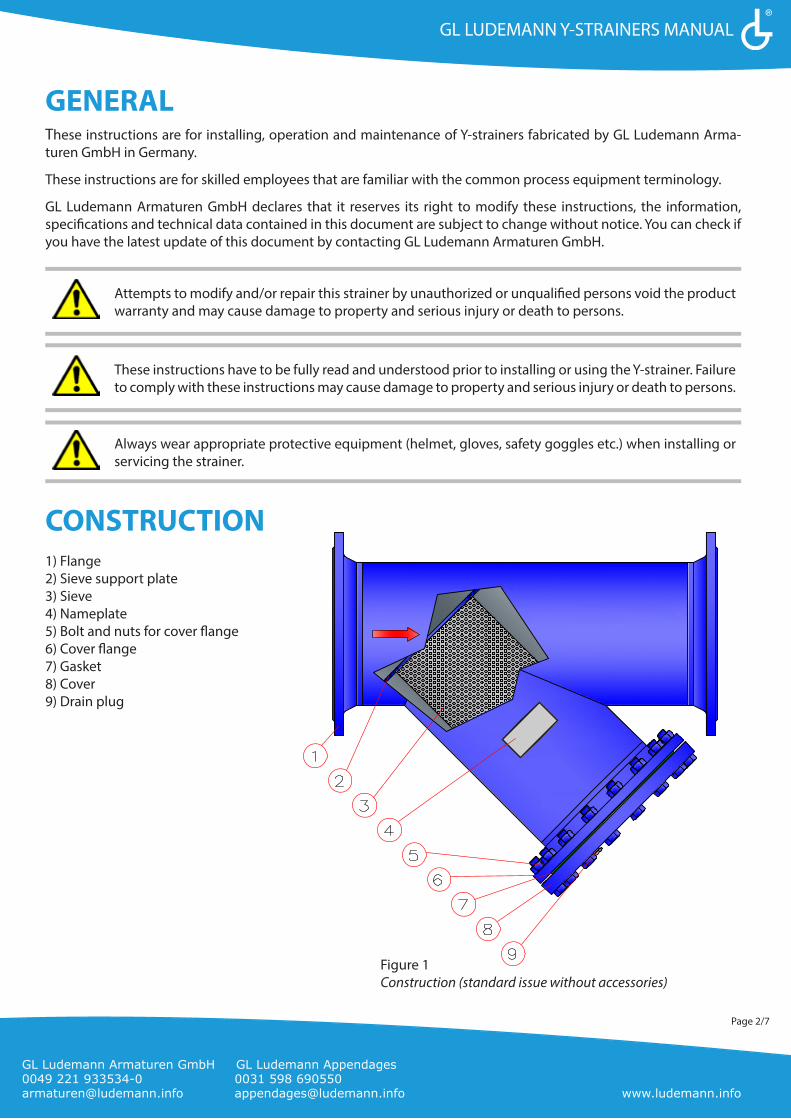
CONSTRUCTION1) Flange2) Sieve support plate3) Sieve4) Nameplate5) Bolt and nuts for cover flange6) Cover flange7) Gasket8) Cover9) Drain plug
Figure 1 Construction (standard issue without accessories)
GL Ludemann Armaturen GmbH GL Ludemann Appendages GL Ludemann Robinetterie0049 221 933534-0 0031 598 690550 0049 221 [email protected] [email protected] [email protected] www.ludemann.info
GL LUDEMANN Y-STRAINERS MANUAL
Issue 1 - 03/2014 - Page 2/7

CONSTRUCTIONThe fabricated Y-strainers made by GL Ludemann Armaturen GmbH are devices used in pipelines to remove dirt and other unwanted debris from fluids, steam or gas mediums. Y-strainers are designed to be used in horizontal or vertical lines.
The Y-strainers are fitted with a round sieving element. The elements are made from stainless steel plate with round openings for filtration. The standard perforated plate sieves can also be lined with wire mesh for fine filtration.
A drain (figure 1 item 9) is located at the cover flange for draining the strainer when the element has to be cleaned. With a standard issue Y-strainer the cover flange has to be removed to clean the element when flushing through the cover drain is not sufficient enough.
A flange connection (accessory) for mounting a valve with drain pipe can be fitted to clean the element by back-washing or can be used as a blow-off connection. In case of a proper blow-off connection the strainer can be self-cleaning without the need to remove the cover flange to clean the element.
All Y-strainers made by GL Ludemann Armaturen GmbH are fabricated to meet the exact needs of the customer and are thus build to customs specifications. Used materials, flange sizes and pressure rates can be various and depends upon the specifications provided by the customer. Also several accessories can be mounted such as a quick opening cover, connections for pressure gauges to measure pressure drop, flange connection on the cover drain, etc.
All strainers are shipped fully assembled, ready for installation and were pressure tested before leaving the factory.
Figure 2 Example nameplate
RECEIVING HANDLING INSPECTION AND STORAGEWhen receiving the strainer inspect it for damage occurring during transit. When any damage is found report to the carrier immediately.
Verify that the flange size (and rating) of the strainer is the same as ordered and that it fits to the other piping in the system. This flange size (and rating) can be found on both the in- and outlet flanges, on the nameplate and on the accompanying documents.
Verify that the pressure rating of the strainer is greater than or equal to the maximum pressure of the installation. This information can be found on the nameplate and/or on the accompanying documents.
GL Ludemann Armaturen GmbH GL Ludemann Appendages GL Ludemann Robinetterie0049 221 933534-0 0031 598 690550 0049 221 [email protected] [email protected] [email protected] www.ludemann.info
GL LUDEMANN Y-STRAINERS MANUAL
Issue 1 - 03/2014 - Page 3/7

RECEIVING HANDLING INSPECTION AND STORAGEWhen the strainer is not installed immediately after delivery the strainer must be stored indoors in a clean and dry environment.
When hoisting the strainer always use certified and proper sized hoisting slings without any defects. Lift it with slings under the in- and outlet.
INSTALLINGY-strainers are designed to be used in horizontal or vertical line.
The strainer has to be installed with the cover drain (figure 1 item 9) in the lowest position. For vertical installation the flow must be downward into the inlet. See the figure 3 below for allowable mounting positions.
When the strainer is used in a vertical line the cover (figure 1 item 8) has to be rotated 180° Celsius to get the cover drain at the lowest position.
Figure 3 Allowable mounting positions drain position at lowest point
Make sure that sufficient clearance is provided for easy opening of the cover and for screen removal.
Before installing the strainer in a system make sure the system is fully depressurized and all process fluid is drained from the system. Also assure that no process fluids can enter the system when installation is in progress. For gas make sure the system is rinsed thoroughly.
Check the interior and exterior of the strainer to assure the strainer has no defects caused by transport or storage. Check the interior of the strainer for any foreign objects (tools, waste etc.).
Clean the flange facing of the strainer thoroughly and always use new gaskets that are dimensionally correct for the specific flanges. Use full face gaskets to assure the whole flange facing is covered by the gasket. Make sure the gaskets that are used are suitable for the process fluid or gas used in the system. Also assure that the counter flanges of the piping are clean. Flanges can be cleaned with solvent dampened cloths.
Extra care has to be taken when using solvent, follow instructions of the solvent manufacturer.
GL Ludemann Armaturen GmbH GL Ludemann Appendages GL Ludemann Robinetterie0049 221 933534-0 0031 598 690550 0049 221 [email protected] [email protected] [email protected] www.ludemann.info
GL LUDEMANN Y-STRAINERS MANUAL
Issue 1 - 03/2014 - Page 4/7
INSTALLINGPosition the strainer in the pipeline with the flow following the same direction as the red flow direction arrow on the strainer. This arrow can be found on one of the flanges or on the nameplate bracket.
Quality of bolts and nuts (or stud bolts) used for installing the strainer should be of a proper grade (for DIN use 8.8 or higher, for ASTM use B7/2H or higher). Always use proper sized bolts and nuts. The bolts must have sufficient length.
The pipeline where the strainer is installed must be conducted and assembled in such a way that the strainer body is not subjected to bending moment, stretching forces or system vibrations. When necessary pipe supports should be fitted under the process piping near the in- and outlet of the strainer. Also make sure no stretching forces are generated by for example a different face-to-face length of the strainer.
When nozzles on the strainer have to be connected with external piping use care to prevent bending or expansion forces from acting on the nozzles.
START-UPBefore starting-up the system make sure that the pressure of the system can not exceed the maximum allowable pressure of the strainer. Maximum allowable pressure can be found on its nameplate.
Before starting-up the system make sure that the temperature of the system can not exceed the maximum allowable temperature of the strainer. Maximum allowable temperature of the strainer can be found on its nameplate.
Precaution should be taken when operation temperature can exceed 40 degrees Celsius because above that temperature limbs or other body parts can be burned when touching the strainer. In case tempera-ture could exceed 40° Celsius use proper covering or isolation.
If, for the start-up, the strainer has to be filled with liquid make sure that the bottom drain is closed and the air vent in cover is open. Make sure the strainer is completely filled with liquid without any air remaining.
Start-up the system GRADUALLY (pressure and when applicable also temperature) to eliminate sudden shock to the strainer and the piping system.
When the system is pressurized the cover, joints, gaskets and connections must be checked for any leakage. Gasket replacement or tightening of flange bolts or cover bolts is necessary if leakage occurs.
OPERATION AND MAINTENANCEAll operating conditions and specifications as stated before must be maintained and monitored during operation.
When any leakage to gaskets or connections of the strainer occurs immediate action is needed to avoid a hazardous situation for its environment. Gaskets that keep leaking after retightening the bolts must be exchanged.
GL Ludemann Armaturen GmbH GL Ludemann Appendages GL Ludemann Robinetterie0049 221 933534-0 0031 598 690550 0049 221 [email protected] [email protected] [email protected] www.ludemann.info
GL LUDEMANN Y-STRAINERS MANUAL
Issue 1 - 03/2014 - Page 5/7

OPERATION AND MAINTENANCECheck the inside of the body for corrosion when performing periodical maintenance to the strainer.
When any leakage to gaskets or connections of the strainer occurs immediate action is needed to avoid a hazardous situation for its environment. Gaskets that keep leaking after retightening the bolts must be exchanged.
The interval between inspection and maintenance will depend on service conditions. The pressure drop across the element should be periodically checked and recorded to determine when the screen needs cleaning. To measure the pressure drop across the element two pressure gauges must be installed near the in- and outlet of the strainer. Such connections for pressure gauges can also be fitted on the strainer (accessory).
Small amounts of contamination can be cleaned by flushing the bottom drain (figure 1 item 9). When flushing the bottom drain is not sufficient enough, the screen has to be cleaned more thoroughly by lifting the cover (figure 1 item 8). See the instructions below for screen removal.
When flushing the bottom drain or when removing the cover extra care has to be taken to avoid hazardous situations caused by any process fluid or gas coming out of the strainer.
FLUSH CLEANING THROUGH BOTTOM DRAINWhen working with a safe medium flush cleaning the strainer can be done by slowly unscrewing the bot-tom drain (figure 1 item 9 in). For the bottom drain a proper drain valve with drain pipe can be installed. When fitted with a proper blow-off connection the strainer could be self-cleaning. The screen could be cleaned by simply opening and closing a valve (accessory) mounted on the drain without shutting of flow. When draining the fluid must be piped to a safe discharge point to protect the operator.
CLEANING THE SCREEN BY REMOVING THE COVER
ALWAYS ENSURE NO LINE PRESSURE EXISTS WHEN OPENING THE COVER
Before removing the cover make sure the system is fully depressurized and all process fluid is drained from the strainer. For gas make sure the system is rinsed thoroughly.
When working with safe fluids drain the process fluid by unscrewing the bottom drain (figure 1 item 9) on the strainer body. For dangerous or hot liquids or gasses a proper drain pipe should be installed to drain the medium from the strainer.
Assure the strainer is completely drained before removing the cover.
GL Ludemann Armaturen GmbH GL Ludemann Appendages GL Ludemann Robinetterie0049 221 933534-0 0031 598 690550 0049 221 [email protected] [email protected] [email protected] www.ludemann.info
GL LUDEMANN Y-STRAINERS MANUAL
Issue 1 - 03/2014 - Page 6/7

CLEANING THE SCREEN BY REMOVING THE COVERAlthough the cover drain is positioned at a very low point on the cover there will always remain some medium in the strainer after drainage so extra care has to be taken when working with dangerous liquids.
Assure that no process fluids or gas can enter the system when maintenance is in progress.
Loosen all the bolts of the cover flange (figure 1 item 8) gradually. Please take care to loosen and to screw out the nuts in a crosswise manner in order to prevent the cover from tilting. After loosening all the bolts unscrew all the bolts completely and remove the cover. Smaller covers can be removed by hand, larger covers need extra support by for example a hoisting device or a forklift. Take care not to damage any machined surfaces when removing the cover.
Remove the element from the strainer body. Clean all debris from it as required (e.g. steam cleaning, solvent clean-ing or wire brushing). Do not let the basket debris get dry, as it would be more difficult to clean the basket.
Inspect the element for damage. When larger damages to the element are noticed the element has to be replaced for a new one. Information to be provided to Ludemann GmbH when ordering a spare element are the information on the nameplate (or a picture of it) and the dimensions of the screen (length, diameter and mesh).
Check the gasket (figure 1 item 7) and flange facings of the cover for any defects and clean them thoroughly.
When spiral wounded gaskets have been used always use a new one when replacing the cover. Spiral wounded gaskets can NOT be used twice.
Clean the cover bolts and make sure they are undamaged, if damaged replace them.
Place back the element, make sure that it is pressed into place and correctly placed otherwise it can be distorted when closing the cover.
Place back the cover with its gasket (figure 1 item 7). Assure that the gasket is correctly fitted.
Hand tighten all nuts and bolts (or stud bolts) of the cover and afterwards tighten them with a tool in a back and forth clockwise motion. Please take care to loosen and to screw out the nuts in a crosswise manner in order to pre-vent the cover from tilting
Reinstall and tighten the drain plug (figure 1 item 9).
Fill the strainer GRADUALLY and start-up the system GRADUALLY (pressure and when applicable also temperature) to eliminate sudden shock to the strainer and the piping system.
When the system is pressurized the cover, joints, gaskets and connections must be checked for any leakage. Retigh-tening of the cover flange bolts or gasket replacement or is necessary if leakage occurs.
GL Ludemann Armaturen GmbH GL Ludemann Appendages GL Ludemann Robinetterie0049 221 933534-0 0031 598 690550 0049 221 [email protected] [email protected] [email protected] www.ludemann.info
GL LUDEMANN Y-STRAINERS MANUAL
Issue 1 - 03/2014 - Page 7/7