glm300 – semi-auto slicer sop# -...
TRANSCRIPT
For Service and Repairs, contact Woolworths Service Desk 1800 00 85 84 – 24 Hours Prepared By: Non Trade Fresh Vendor Manager
Department: Equipment Procurement Authorised By: Senior Equipment and R&D Manager
Document : Version : Revised: Page: 1 of 6 NOTE: This SOP has taken into account the relevant OHS standards, Legislation & Code of Practice
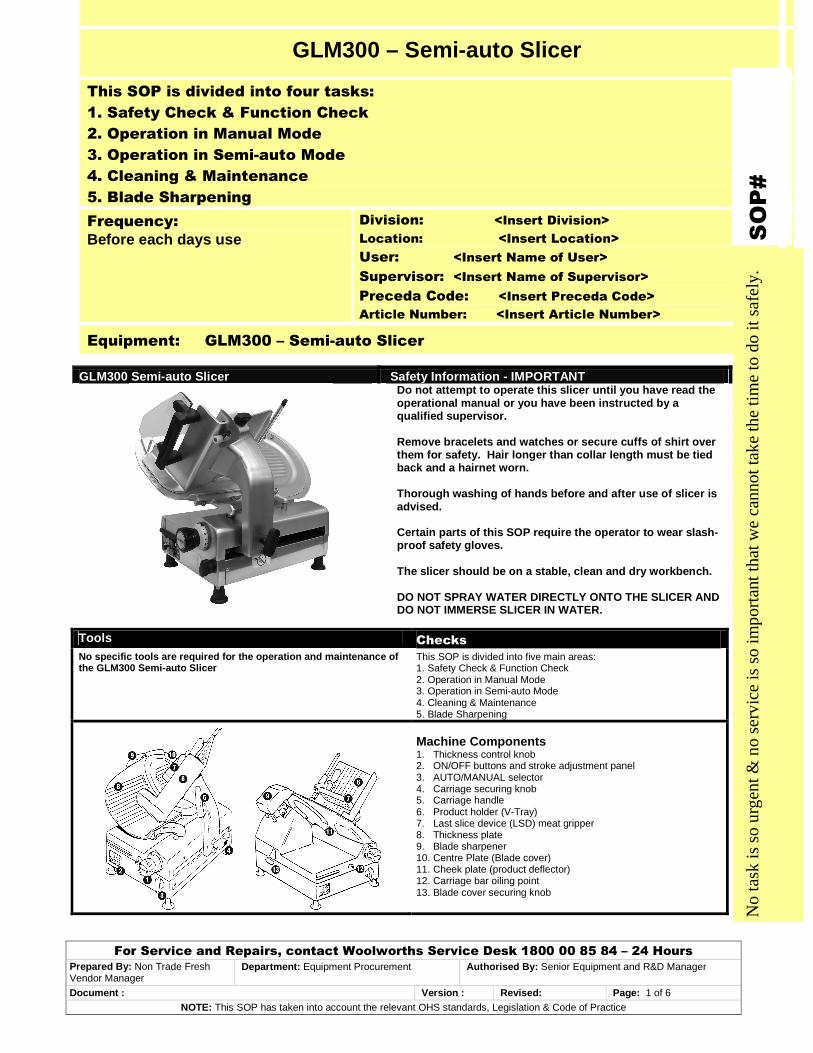
GLM300 Semi-auto Slicer Safety Information - IMPORTANT
Do not attempt to operate this slicer until you hav e read the operational manual or you have been instructed by a qualified supervisor. Remove bracelets and watches or secure cuffs of shi rt over them for safety. Hair longer than collar length mu st be tied back and a hairnet worn. Thorough washing of hands before and after use of s licer is advised. Certain parts of this SOP require the operator to w ear slash-proof safety gloves. The slicer should be on a stable, clean and dry wor kbench. DO NOT SPRAY WATER DIRECTLY ONTO THE SLICER AND DO NOT IMMERSE SLICER IN WATER.
Tools Checks
No specific tools are required for the operation an d maintenance of the GLM300 Semi-auto Slicer
This SOP is divided into five main areas: 1. Safety Check & Function Check 2. Operation in Manual Mode 3. Operation in Semi-auto Mode 4. Cleaning & Maintenance 5. Blade Sharpening
Machine Components 1. Thickness control knob 2. ON/OFF buttons and stroke adjustment panel 3. AUTO/MANUAL selector 4. Carriage securing knob 5. Carriage handle 6. Product holder (V-Tray) 7. Last slice device (LSD) meat gripper 8. Thickness plate 9. Blade sharpener 10. Centre Plate (Blade cover) 11. Cheek plate (product deflector) 12. Carriage bar oiling point 13. Blade cover securing knob
GLM300 – Semi-auto Slicer
This SOP is divided into four tasks:
1. Safety Check & Function Check
2. Operation in Manual Mode
3. Operation in Semi-auto Mode
4. Cleaning & Maintenance
5. Blade Sharpening
Frequency:
Before each days use Division: <Insert Division>
Location: <Insert Location>
User: <Insert Name of User>
Supervisor: <Insert Name of Supervisor>
Preceda Code: <Insert Preceda Code>
Article Number: <Insert Article Number>
Equipment: GLM300 – Semi-auto Slicer
No
task
is s
o ur
gent
& n
o se
rvic
e is
so
impo
rtan
t tha
t we
cann
ot ta
ke th
e ti
me
to d
o it
safe
ly.
S
OP
#
For Service and Repairs, contact Woolworths Service Desk 1800 00 85 84 – 24 Hours Prepared By: Non Trade Fresh Vendor Manager
Department: Equipment Procurement Authorised By: Senior Equipment and R&D Manager
Document : Version : Revised: Page: 2 of 6 NOTE: This SOP has taken into account the relevant OHS standards, Legislation & Code of Practice
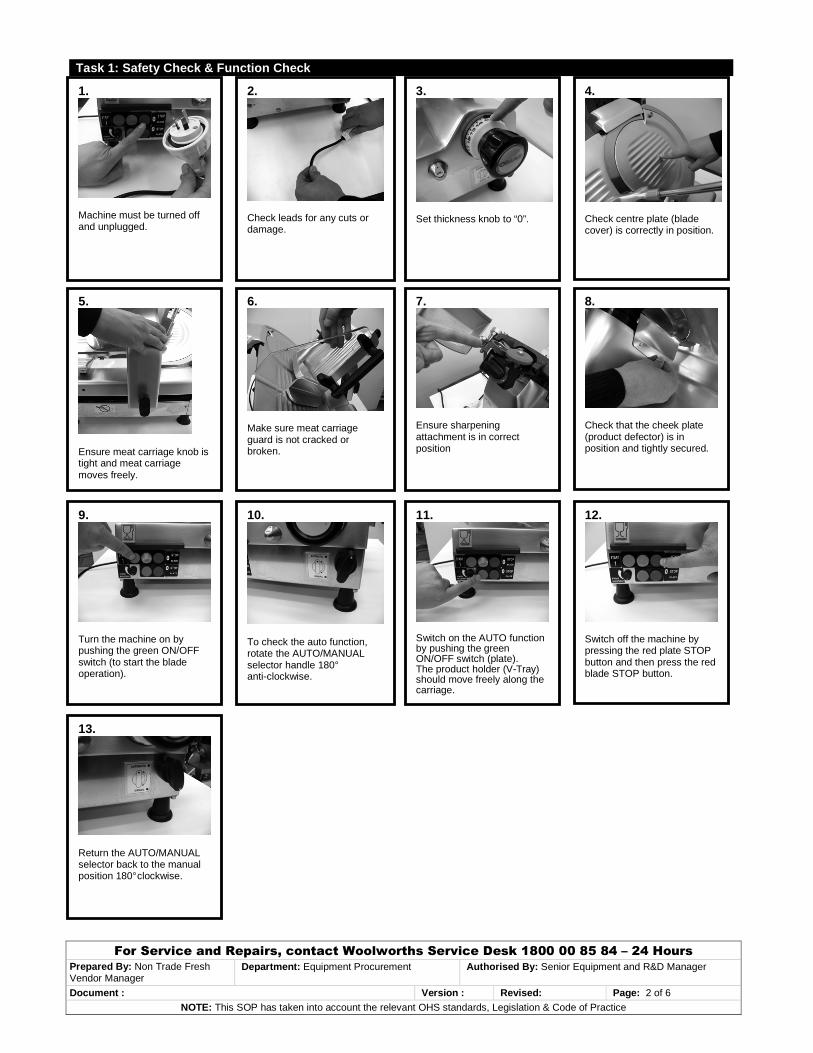
Task 1: Safety Check & Function Check
1.
Machine must be turned off and unplugged.
2.
Check leads for any cuts or damage.
3.
Set thickness knob to “0”.
4.
Check centre plate (blade cover) is correctly in position.
5.
Ensure meat carriage knob is tight and meat carriage moves freely.
6.
Make sure meat carriage guard is not cracked or broken.
7.
Ensure sharpening attachment is in correct position
8.
Check that the cheek plate (product defector) is in position and tightly secured.
9.
Turn the machine on by pushing the green ON/OFF switch (to start the blade operation).
10.
To check the auto function, rotate the AUTO/MANUAL selector handle 180° anti-clockwise.
11.
Switch on the AUTO function by pushing the green ON/OFF switch (plate). The product holder (V-Tray) should move freely along the carriage.
12.
Switch off the machine by pressing the red plate STOP button and then press the red blade STOP button.
13.
Return the AUTO/MANUAL selector back to the manual position 180° clockwise.

For Service and Repairs, contact Woolworths Service Desk 1800 00 85 84 – 24 Hours Prepared By: Non Trade Fresh Vendor Manager
Department: Equipment Procurement Authorised By: Senior Equipment and R&D Manager
Document : Version : Revised: Page: 3 of 6 NOTE: This SOP has taken into account the relevant OHS standards, Legislation & Code of Practice
Task 2: Operation in Manual Mode
1.
Plug in machine.
2.
Set thickness knob to “0”.
3.
Raise last slice device.
4.
Place product on product holder (V-Tray).
5.
Lower LSD.
6.
Turn the machine on by pushing the green ON/OFF switch (to start the blade operation).
7.
Rotate thickness knob to desired slice thickness.
8.
Using the meat tray handle (not LSD handle) gently move meat carriage towards the blade and slice.
9.
Let meat fall onto receiving tray. DO NOT PLACE HAND AT REAR OF BLADE TO CATCH MEAT.
10.
When slicing is complete return meat carriage to the start position.
11.
Set thickness knob back to “0”.
12.
Switch off the machine by pressing the red blade STOP button.
13.
Raise the LSD arm and remove meat product.
USING THE LSD
The LSD enables you to cut the meat product to a much lower level reducing waste and ensuring greater safety. Ensure the spikes press into the meat product.
USING THE LSD
DO NOT HOLD THE MEAT PRODUCT WITH YOUR HANDS.
For Service and Repairs, contact Woolworths Service Desk 1800 00 85 84 – 24 Hours Prepared By: Non Trade Fresh Vendor Manager
Department: Equipment Procurement Authorised By: Senior Equipment and R&D Manager
Document : Version : Revised: Page: 4 of 6 NOTE: This SOP has taken into account the relevant OHS standards, Legislation & Code of Practice
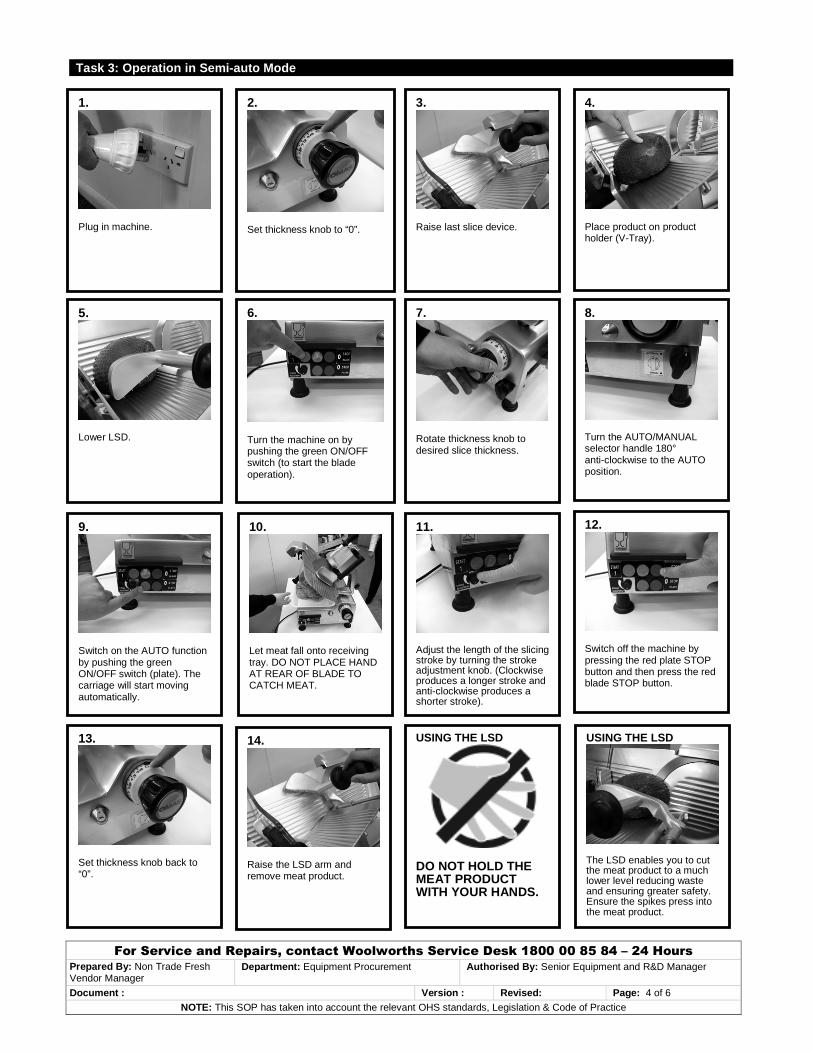
Task 3: Operation in Semi-auto Mode
1.
Plug in machine.
2.
Set thickness knob to “0”.
3.
Raise last slice device.
4.
Place product on product holder (V-Tray).
5.
Lower LSD.
6.
Turn the machine on by pushing the green ON/OFF switch (to start the blade operation).
7.
Rotate thickness knob to desired slice thickness.
8.
Turn the AUTO/MANUAL selector handle 180° anti-clockwise to the AUTO position.
9.
Switch on the AUTO function by pushing the green ON/OFF switch (plate). The carriage will start moving automatically.
13.
Set thickness knob back to “0”.
12.
Switch off the machine by pressing the red plate STOP button and then press the red blade STOP button.
14.
Raise the LSD arm and remove meat product.
10.
Let meat fall onto receiving tray. DO NOT PLACE HAND AT REAR OF BLADE TO CATCH MEAT.
11.
Adjust the length of the slicing stroke by turning the stroke adjustment knob. (Clockwise produces a longer stroke and anti-clockwise produces a shorter stroke).
USING THE LSD
The LSD enables you to cut the meat product to a much lower level reducing waste and ensuring greater safety. Ensure the spikes press into the meat product.
USING THE LSD
DO NOT HOLD THE MEAT PRODUCT WITH YOUR HANDS.
For Service and Repairs, contact Woolworths Service Desk 1800 00 85 84 – 24 Hours Prepared By: Non Trade Fresh Vendor Manager
Department: Equipment Procurement Authorised By: Senior Equipment and R&D Manager
Document : Version : Revised: Page: 5 of 6 NOTE: This SOP has taken into account the relevant OHS standards, Legislation & Code of Practice
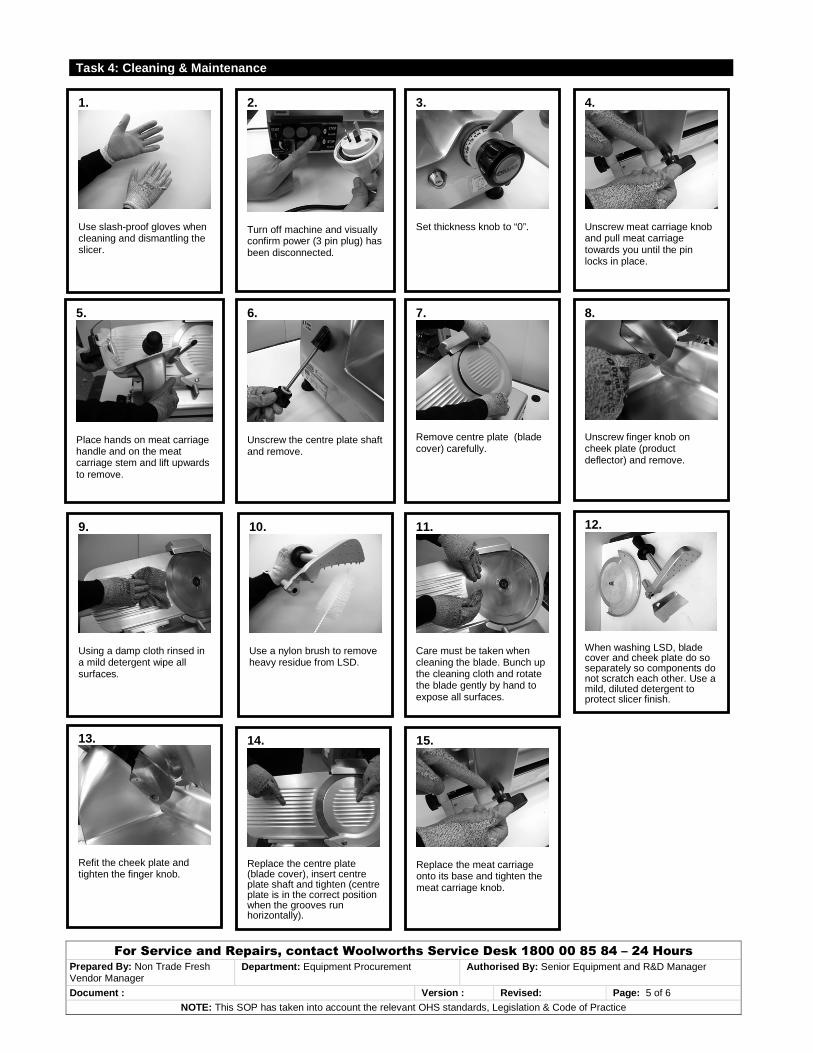
Task 4: Cleaning & Maintenance
1.
Use slash-proof gloves when cleaning and dismantling the slicer.
2.
Turn off machine and visually confirm power (3 pin plug) has been disconnected.
3.
Set thickness knob to “0”.
4.
Unscrew meat carriage knob and pull meat carriage towards you until the pin locks in place.
6.
Unscrew the centre plate shaft and remove.
7.
Remove centre plate (blade cover) carefully.
8.
Unscrew finger knob on cheek plate (product deflector) and remove.
9.
Using a damp cloth rinsed in a mild detergent wipe all surfaces.
13.
Refit the cheek plate and tighten the finger knob.
12.
When washing LSD, blade cover and cheek plate do so separately so components do not scratch each other. Use a mild, diluted detergent to protect slicer finish.
14.
Replace the centre plate (blade cover), insert centre plate shaft and tighten (centre plate is in the correct position when the grooves run horizontally).
10.
Use a nylon brush to remove heavy residue from LSD.
11.
Care must be taken when cleaning the blade. Bunch up the cleaning cloth and rotate the blade gently by hand to expose all surfaces.
15.
Replace the meat carriage onto its base and tighten the meat carriage knob.
5.
Place hands on meat carriage handle and on the meat carriage stem and lift upwards to remove.
For Service and Repairs, contact Woolworths Service Desk 1800 00 85 84 – 24 Hours Prepared By: Non Trade Fresh Vendor Manager
Department: Equipment Procurement Authorised By: Senior Equipment and R&D Manager
Document : Version : Revised: Page: 6 of 6 NOTE: This SOP has taken into account the relevant OHS standards, Legislation & Code of Practice
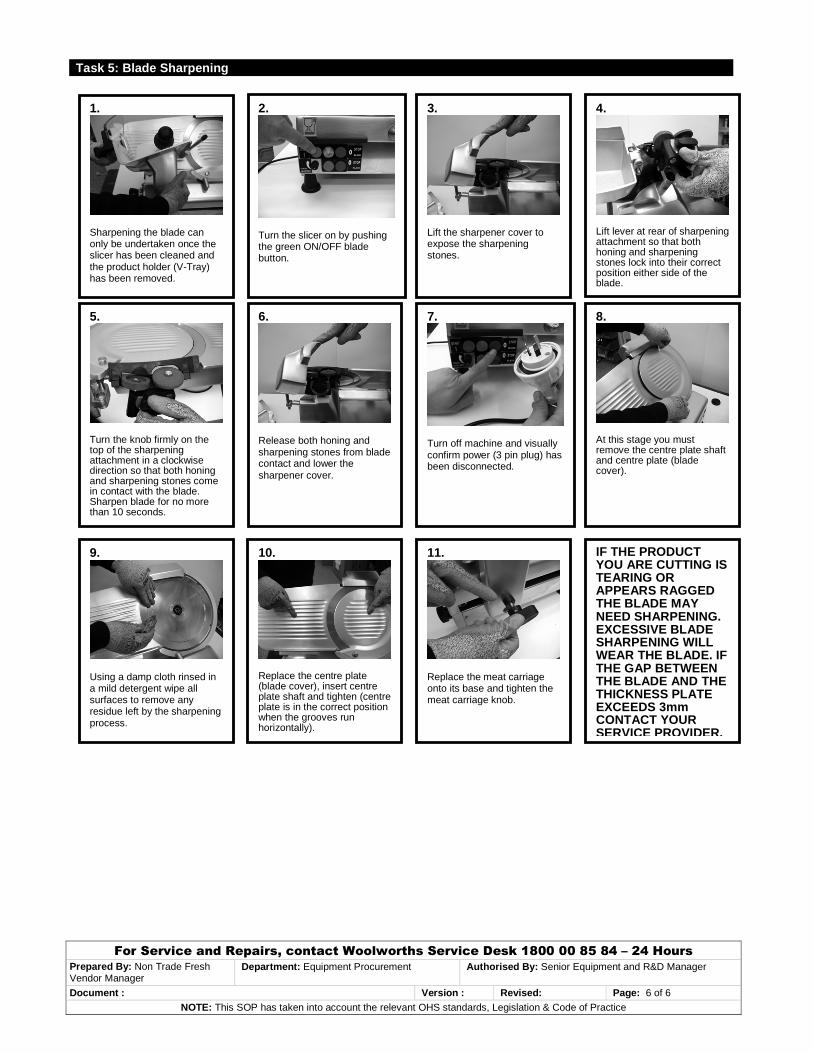
Task 5: Blade Sharpening
1.
Sharpening the blade can only be undertaken once the slicer has been cleaned and the product holder (V-Tray) has been removed.
2.
Turn the slicer on by pushing the green ON/OFF blade button.
3.
Lift the sharpener cover to expose the sharpening stones.
4.
Lift lever at rear of sharpening attachment so that both honing and sharpening stones lock into their correct position either side of the blade.
6.
Release both honing and sharpening stones from blade contact and lower the sharpener cover.
7.
Turn off machine and visually confirm power (3 pin plug) has been disconnected.
8.
At this stage you must remove the centre plate shaft and centre plate (blade cover).
9.
Using a damp cloth rinsed in a mild detergent wipe all surfaces to remove any residue left by the sharpening process.
10.
Replace the centre plate (blade cover), insert centre plate shaft and tighten (centre plate is in the correct position when the grooves run horizontally).
11.
Replace the meat carriage onto its base and tighten the meat carriage knob.
IF THE PRODUCT YOU ARE CUTTING IS TEARING OR APPEARS RAGGED THE BLADE MAY NEED SHARPENING. EXCESSIVE BLADE SHARPENING WILL WEAR THE BLADE. IF THE GAP BETWEEN THE BLADE AND THE THICKNESS PLATE EXCEEDS 3mm CONTACT YOUR SERVICE PROVIDER.
5.
Turn the knob firmly on the top of the sharpening attachment in a clockwise direction so that both honing and sharpening stones come in contact with the blade. Sharpen blade for no more than 10 seconds.