grading instructions - home | queen's university · 2 grade entry using spreadsheet upload...
TRANSCRIPT

1
GRADE ENTRY USING SPREADSHEET UPLOAD
GRADING INSTRUCTIONS:
Grade Entry Using Spreadsheet Upload Grades may be uploaded from an Excel spreadsheet by both instructors and administrative staff directly to the
Grade Roster.
When complete, the Grade Roster will need to be marked as “Ready for Review”.
Processing Steps Screenshots
Accessing the Excel Spreadsheet template for its intended use.
Step 1:
Begin by clicking on the Main Menu
and follow the navigation:
Reporting Tools > Query > Query Viewer
Step 2:
1. On the Query Viewer page,
enter the Query Name or
partial name in the search
field.
Enter QU_GR_CLASS_LST_FOR_GRD_UPL
2. Click the Search button.
Step 3:
Select the Excel link.
This will bring you to the next
screen where you will enter the
specifics of the class that you want
to grade.

2
GRADE ENTRY USING SPREADSHEET UPLOAD
Processing Steps Screenshots
Step 4:
The Class List for Grade Upload page will display; this page works based on Prompts.
You are required to enter information into each field in order for the correct class list to be produced.
Institution: QUNIV
Term: Use the Lookup tool or, enter the Term code if known.
Session: Select the session using the drop-down list of valid values.
Subject: Use the Lookup tool to see the list of valid values for the term selected.
Catalog: Use the Lookup tool to see the list of valid class offerings for the specified term and subject.
Selection: Select the Section number for the subject and catalog number you have selected. Select the section number of the graded component (usually the lecture) to ensure that you capture all the students.
Class Nbr: This is a PeopleSoft generated number and is specific to the Subject, Catalog Number, Section and Term of the class. Use the Lookup tool to retrieve the valid Class number.
Step 5:
1. For our example, we have entered the following information:
Institution – QUNIV
Term – 2169
Session – Regular Academic Session
Subject – CHEE
Catalog – 452
Section – 001
Class Nbr – 2162
2. Click the View Results button.

3
GRADE ENTRY USING SPREADSHEET UPLOAD
Processing Steps Screenshots
Step 6:
After clicking the View Results button, choose the option of:
1. Opening the Excel spreadsheet for immediate viewing and/or entering of grades, or
2. Saving the spreadsheet to a preferred drive for later use.
Modify the Excel Spreadsheet template for its intended use.
In the Excel spreadsheet, Columns A through to H are required for the Grades Spreadsheet Upload process.
Step 7:
1. Sort the file so that all Students ID’s are in Ascending order.
2. Compare this list with your list or file. There should be a one-to-one match on Student ID’s between both files.
Step 8:
Use Column H – Grade to enter your marks.
You can enter either a letter or numeric mark on this spreadsheet.
Note: Letter grades must be entered in upper case.
Save the file.
Once you have completed entering the marks, into the Excel spreadsheet and have reviewed the data entry to ensure it is final, you are ready to upload the marks.
Prepare the Excel Spreadsheet template for loading.

4
GRADE ENTRY USING SPREADSHEET UPLOAD
Processing Steps Screenshots
Step 9:
Delete the header rows on the spreadsheet; there should be no column headings.
Note: To use this process, you must delete any values in columns I onwards; if the columns are not blank, your upload will not work.
Step 10:
1. Save the file as a Text (Tab-delimited) file for uploading into PeopleSoft.
2. Give the file a meaningful name. We suggest a combination of Subject, Course Number and Instructor Name i.e. CHEE452 Davis.
Note for Mac Users: To save as a Text (Tab delimited) file, open the file using Text Wrangler, and save the file as per the naming convention above. Remember to select the option for line breaks to Windows
Prepare the Grade Roster for the Upload.
Step 11:
Next, navigate back to Faculty Center - Grade Roster to prepare the Grade Roster for the upload.

5
GRADE ENTRY USING SPREADSHEET UPLOAD
Processing Steps Screenshots
Step 12:
The Student ID’s must be in Ascending order.
On the Grade Roster tab, to sort the Grade Roster so that the Student ID’s are in ascending order, click on ID heading.
Spreadsheet Upload Process
Step 13:
You can upload the grades while on the Grade Roster tab by clicking on the Upload Grades link.
This will bring you to the Load Grades to Roster page.
Note: To upload the grades you can also use the navigation:
Curriculum Management > Grading > Load Grades to Roster.
This navigation will also bring you to the Load Grades to Roster page.
6
GRADE ENTRY USING SPREADSHEET UPLOAD
Processing Steps Screenshots
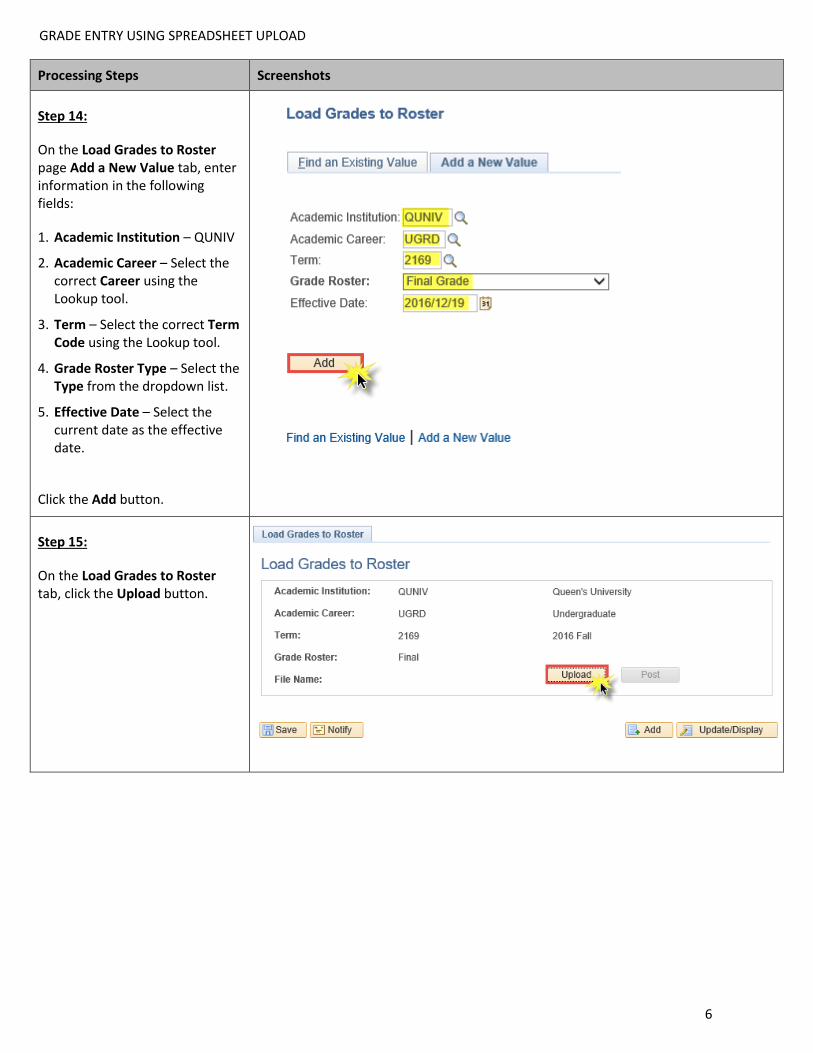
Step 14:
On the Load Grades to Roster page Add a New Value tab, enter information in the following fields:
1. Academic Institution – QUNIV
2. Academic Career – Select the correct Career using the Lookup tool.
3. Term – Select the correct Term Code using the Lookup tool.
4. Grade Roster Type – Select the Type from the dropdown list.
5. Effective Date – Select the current date as the effective date.
Click the Add button.
Step 15:
On the Load Grades to Roster tab, click the Upload button.

7
GRADE ENTRY USING SPREADSHEET UPLOAD
Processing Steps Screenshots
Step 16:
1. Select the Browse button.
2. Navigate to where you saved the Text (Tab delimited) file.
Step 17:
Click on the file.
In this example, we click on CHEE452 Davis.
Step 18:
Click the Upload button.

8
GRADE ENTRY USING SPREADSHEET UPLOAD
Processing Steps Screenshots
Step 19:
The text file will display beside File Name.
Click the Post button.
Step 20:
The process may take a few minutes.
If there are no errors, a Message box will display informing you that “No errors found. All grades uploaded.”
Note: If there are errors, a report will display. You will have to go back to the spreadsheet, to ensure that the previous steps have been followed accurately, or that the grades have been entered correctly.
Step 21:
1. Navigate back to the Faculty Centre.
2. Click on the My Schedule tab to go back to the course selection screen.

9
GRADE ENTRY USING SPREADSHEET UPLOAD
Processing Steps Screenshots
Step 22:
Click on the Grade Roster icon to the left of the Class (Course Catalog Code, Section Number and Class Number) to refresh your course selection and access the Grade Roster.
Step 23:
The marks will now appear on the Grade Roster sheet.
10
GRADE ENTRY USING SPREADSHEET UPLOAD
Processing Steps Screenshots
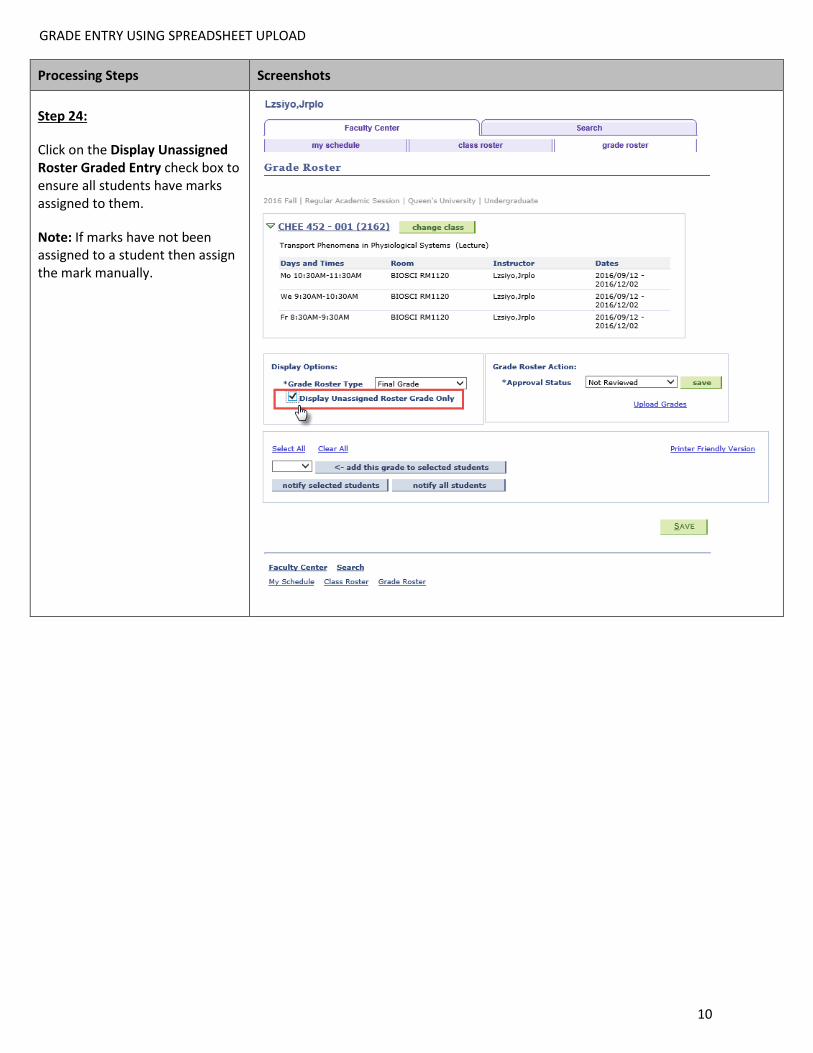
Step 24:
Click on the Display Unassigned Roster Graded Entry check box to ensure all students have marks assigned to them.
Note: If marks have not been assigned to a student then assign the mark manually.

11
GRADE ENTRY USING SPREADSHEET UPLOAD
Processing Steps Screenshots
Step 25:
1. If all mark entries are complete, set the Approval Status to Ready for Review.
Note: Once any data is entered in the Roster Grade column, a message will now display at the top of the page. Only click on the enable tabs & links button to clear any data entered that has not been previously saved. Disregard this message unless you want to delete any grade entries you have made that have not been saved.
2. Click the Save button to move the class to the Grade Approval Process.
Step 26:
Once saved, the grades will appear in the Roster Grade column.