graywaterdesignmanual san francisco for outdoor …
TRANSCRIPT

graywaterdesignmanualfor OUTDOOR IRRIGATION
SAN FRANCISCO

I I
S a n F r a n c i s c o G r a y w a t e r D e s i g n M a n u a l
S e p t e m b e r 2 0 1 8 V e r s i o n - U p d a t e s w i l l b e p u b l i s h e d a s n e c e s s a r y

I I I
“Water is the most critical resource issue of our lifetime and our children’s lifetime. The health of our waters is the principal measure of how we live on the land.”
- Luna Leopold
SAN FRANCISCO PUBLIC UTILITIES COMMISSION
graywater design manualFOR OUTDOOR IRRIGATION
SAN FRANCISCO
S a n F r a n c i s c o G r a y w a t e r D e s i g n M a n u a l

I V
City and County of San FranciscoLondon Breed, Mayor
San Francisco Public Utilities CommissionIke Kwon, President
Vince Courtney, Vice PresidentAnn Moller Caen, CommissionerFrancesca Vietor, Commissioner
Anson Moran, CommissionerHarlan L. Kelly, Jr., General Manager
Greg Norby, Assistant General ManagerSteven R. Ritchie, Assistant General Manager
S a n F r a n c i s c o G r a y w a t e r D e s i g n M a n u a l

V
San Francisco Public Utilities CommissionWater Enterprise - Water Resources DivisionWastewater Enterprise - Planning and Regulatory Compliance DivisionSan Francisco Department of Building Inspection - Plumbing Inspection DivisionSan Francisco Department of Public Health
AcknowledgementsLaura AllenRaphael GarciaJeff ParkerArt LudwigWater Resources Engineering, Inc.
PROJECT TEAM
S a n F r a n c i s c o G r a y w a t e r D e s i g n M a n u a l
V I
C O N T E N T SCity and County of San FranciscoSan Francisco Public Utilities Commission
Int roduct ion 1Overview of GuideSan Francisco’s Water SupplyWhat is Graywater?Benefits of GraywaterGraywater BasicsGraywater RegulationsWhen a Permit Is Not RequiredWhen a Permit Is Required in San Francisco
Developing a Gray water System 6
Siz ing Your Gray water System 8
Est imat ing Gray water Flows 9Permitted System CalculationsIrrigation Supply Calculations
Soi l Absorpt ion and Dist r ibut ion A rea 11Soil Ribbon TestLaboratory TestDrainage TestCalculating Your Landscape Distribution AreaProtecting Groundwater References
S a n F r a n c i s c o G r a y w a t e r D e s i g n M a n u a l
V I I
Setback Requirement s: W here Not to Put Your Gray water ! 15
Laundr y-to-Landscape System 16System OverviewParts You Will NeedTools You Will NeedHow to Build a Laundry-to-Landscape SystemKey PointsOperation and Maintenance
Branched-Dra in System 28System OverviewHow to Build a Branched-Drain System
Pumped Systems 31Electricity and Water in CaliforniaOverview of Pumped SystemsPumped System with No FiltrationHow to Build a Pumped System with No Filtration
Other Gray water Systems 34Dual-Drainage PlumbingManufactured Graywater SystemsIndoor Use
Glossa r y 38
S a n F r a n c i s c o G r a y w a t e r D e s i g n M a n u a l

V I I I
Appendix A : Signs for Your Gray water System A-1
Append ix B: Operat ion and Ma intenance Manua l
Template s B -1Creating a Simple Plot PlanThis sketch is for your own use, so it can be as simple or detailed as you like. An example is shown at right. Sample Operation and Maintenance Manual for Branched-Drain Graywater SystemCreating a Plot PlanSample Operation and Maintenance Manual for Pumped Graywater SystemCreating a Plot Plan
Append ix C: Product s C-IProduct Ingredients to AvoidRecommended Soaps and Products
Append ix D: W hat to I r r igate w ith Gray water and How
Much Water to Use D-1Irrigation EdiblesEasy Plants to WaterWhat Not to WaterSoil Health
S a n F r a n c i s c o G r a y w a t e r D e s i g n M a n u a l

I X
Appendix E: Example of Succe s s fu l Plumbing Permit
Appl ic at ion with Sample Plot Plans E -1
Append ix F: In format ion and Resource s F-1San Francisco InformationAdditional Resources
S a n F r a n c i s c o G r a y w a t e r D e s i g n M a n u a l

I n t r o d u c t i o n 1
This guide gives an overview of the design, construction, permitting, and operation of graywater systems for outdoor irrigation, including laundry-to-landscape, branched-drain, and pumped systems.
IntroductionOverview of GuideWhy send your laundry water to a wastewater treatment plant when you could use it to water plants and trees in your own yard? Reusing this relatively clean water in your garden helps reduce the amount of drinking water needed for irrigation and reduces the amount of water entering the sewer system for treatment. Many Californians are taking advantage of this relatively simple idea and are using their laundry and shower water to keep their landscapes green, even during times of drought.
The San Francisco Graywater Design Manual for Outdoor Irrigation is an educational resource for homeowners and professionals who want to install residential graywater systems for subsurface outdoor irrigation. In this guide, you'll learn about the benefits of graywater, when and where to use it, when not to use it, permitting requirements, what products to use, and suggested plants to irrigate.
S a n F r a n c i s c o G r a y w a t e r D e s i g n M a n u a l

2 I n t r o d u c t i o n
The guide provides suggested methods for designing and installing a laundry-to-landscape system and a basic overview of the design and installation of branched-drain and pumped systems. The methods described in this guide may not be the only acceptable procedures for designing and installing systems that meet current requirements. Each homeowner’s circumstances are different: you must ensure that a graywater system on your property is designed and installed safely, is consistent with applicable code requirements, and is operated in a manner that causes no harm or damage to yourself or neighbors. If at any time you have doubts about undertaking the installation of a graywater system, please consult a professional installer.
San Francisco’s Water SupplyResidents of San Francisco receive some of the highest quality tap water in the nation. Our regional water system, which includes the Hetch Hetchy reservoir and five Bay Area reservoirs, provides water to 2.7 million customers throughout San Francisco and the Bay Area. The San Francisco Public Utilities Commission (SFPUC), provider of San Francisco's water, power and sewer, is committed to maximizing use of all water supplies through conservation, recycled water, use of local groundwater projects, and by using alternate water supplies—such as rainwater, graywater, blackwater, stormwater, and foundation drainage water—for non-potable purposes.
What is Graywater?Graywater is water from washing machines, showers, bathtubs, and bathroom sinks. It is wastewater that can contain some soap, salts, hair, suspended solids and bacteria, but that is clean enough to water plants. Water from toilets, kitchen sinks, or wash water from diapers is not considered graywater in California.
Graywater (treated or untreated) is not the same as municipal recycled water, which is highly treated wastewater from a centralized treatment facility. Recycled water can be used for landscape irrigation, toilet and urinal flushing, cooling, and other approved uses.
Benefits of GraywaterReusing graywater is an important component of sustainable water practices. There are many benefits of using graywater instead of potable drinking water for irrigation.
Start by Saving Water!Saving water and money is easy! You can reduce your water use by about 35 percent just by installing water-efficient fixtures and appliances.
You can obtain free high-efficiency showerheads and aerators and possibly qualify for a rebate on a water-efficient washing machine from the SFPUC. Call 415-551-4730 or visit sfwater.org/conservation for more information.
S a n F r a n c i s c o G r a y w a t e r D e s i g n M a n u a l

I n t r o d u c t i o n 3
Reusing graywater can:
yy Decrease potable water use by 16 to 40 percent, depending on the site (Cohen 2009).
yy Decrease water and wastewater utility bills.
yy Diversify San Francisco’s water supply portfolio by providing an alternate source of water for landscape irrigation, reserving potable water for drinking purposes.
yy Reduce the energy (approximately 2 watt-hours per gallon of water) and chemicals needed to treat wastewater.
Another benefit of using graywater is that it connects us to our water supply, helping us understand where our water comes from and where it goes. Becoming conscious of our water supply encourages healthier product choices and engagement with our landscape. By reusing household graywater, we preserve water resources for other living things. In concert with water-wise landscaping, rainwater harvesting, and conservation, using graywater as a resource helps reduce dependency on imported water and protects watersheds.
Graywater BasicsGraywater is a unique source of water and must be used differently from potable water and rainwater. These are some basic guidelines for residential graywater systems:
yy Do not store graywater more than 24 hours. If you store graywater, the nutrients in it start to break down and create bad odors.
yy Minimize contact with graywater. Graywater can contain pathogens. All systems must be designed so that water soaks into the ground and is not accessible to contact by people or animals.
yy Infiltrate graywater into the ground; do not allow it to pool or run off. You'll need to know how fast water soaks into your soil to properly design your system. Pooling graywater can provide opportunities for mosquitoes to breed, as well as for human contact.
Inform Your Gardener or Landscaper About Your Graywater SystemBe sure to inform anyone who works in your yard about your new graywater system. Show him or her where the pipes and irrigation points are so that the pipes don't get accidentally punctured or the mulch basins altered or buried. Otherwise, your system could be unintentionally damaged by people who don't understand how it functions.
S a n F r a n c i s c o G r a y w a t e r D e s i g n M a n u a l

4 I n t r o d u c t i o n
yy Keep your system as simple as possible. Simple systems last longer, require less maintenance, use less energy, and cost less. Keep in mind that systems with pumps and filters require more commitment and regular maintenance.
yy Install a diverter valve at a convenient location to allow for easy switching between the graywater system and the sewer system.
yy Match the amount of graywater directed to your plants with their irrigation needs. See Appendix C for information about plant-friendly products; many products contain salts and boron, which harm most plants.
Graywater RegulationsGraywater use is legal in California. In 2009, California’s graywater regulations changed, allowing for lower-cost graywater systems to be installed legally, including some without the need for a permit. In San Francisco, a permit is not required for a laundry graywater system that meets certain design and installation criteria. All other types of graywater systems require a permit from San Francisco Department of Building Inspection—Plumbing Inspection Division (DBI-PID). California's regulations for residential graywater systems can be found in Chapter 15 of the 2016 California Plumbing Code.
When a Permit Is Not RequiredYou can install a graywater system for outdoor irrigation without a permit if you meet all of the following requirements:
yy Graywater comes from the clothes washing machine only.
yy Graywater system does not alter household plumbing (you access graywater from the hose of the machine, not by cutting into the plumbing).
yy Graywater system is for a one- or two-unit residential building.
yy Graywater system follows 13 guidelines set forth in the California Plumbing Code (see Appendix B, “Operation and Maintenance Manual for Laundry-to-Landscape Graywater System”).
S a n F r a n c i s c o G r a y w a t e r D e s i g n M a n u a l

I n t r o d u c t i o n 5
When a Permit Is Required in San FranciscoYou need a permit to install a graywater system for outdoor irrigation when your graywater system:
yy Collects water from showers, sinks, or baths.
yy Alters the plumbing (you cut into drainage plumbing to access the graywater).
yy Is installed in a building that is not a one- or two-unit residential building.
yy Includes a pump (besides the washing machine’s internal pump) or a tank.
For additional information about permitting a graywater system, contact DBI-PID at 415-558-6088.
ReferencesCalifornia Residential Graywater Code: California Plumbing Code, California Code of Regulations Title 24, Part 5, Chapter 15. Available at http://www.hcd.ca.gov
Cohen, Yorem, 2009. Graywater—A potential source of water. Luskin Center for Innovation. Available at http://innovation.luskin.ucla.edu/content/graywater-potential-source-water
This landscape is irrigated with graywater. Note: The pond is not supplied by graywater and is lined so that graywater doesn’t enter it. Photo: WaterSprout.
S a n F r a n c i s c o G r a y w a t e r D e s i g n M a n u a l
6 D e v e l o p i n g a G r a y w a t e r S y s t e m
Developing a Graywater SystemGraywater systems can range from the very simple to the very complicated. Follow these steps to create a well-functioning and safe system.
1. Start with conservation! Conservation is always the most economical and environmentally beneficial place to begin. You might find that your landscape doesn't require as much water as you've been giving it, or that there are easy ways to greatly reduce the amount of water your household uses. The SFPUC provides free programs and services to help you save water and money.
yy Before planning a graywater system, consider scheduling a free Water-Wise Evaluation with an SFPUC water conservation technician. The SFPUC can help you assess your indoor and outdoor water use, identify leaks, and provide free water-efficient devices like showerheads, faucet aerators, and garden hose nozzles. To schedule your free evaluation, contact 415-551-4730 or visit sfwater.org/conservation.
yy Sometimes the location of your clothes washer or access to your home's plumbing may be too difficult to install a graywater system. But don't be deterred, you can still reuse water by collecting shower water in a bucket as the water heats up and using it to water your plants.
2. Determine which fixtures in your home are candidates for graywater capture.
yy Washing machines are usually the easiest place to begin. If your machine is in a room with an exterior wall, it’s usually simple to send a pipe outside. If your machine is in an interior room, you’ll need a way to run the pipe outside, either through a crawl space or basement.
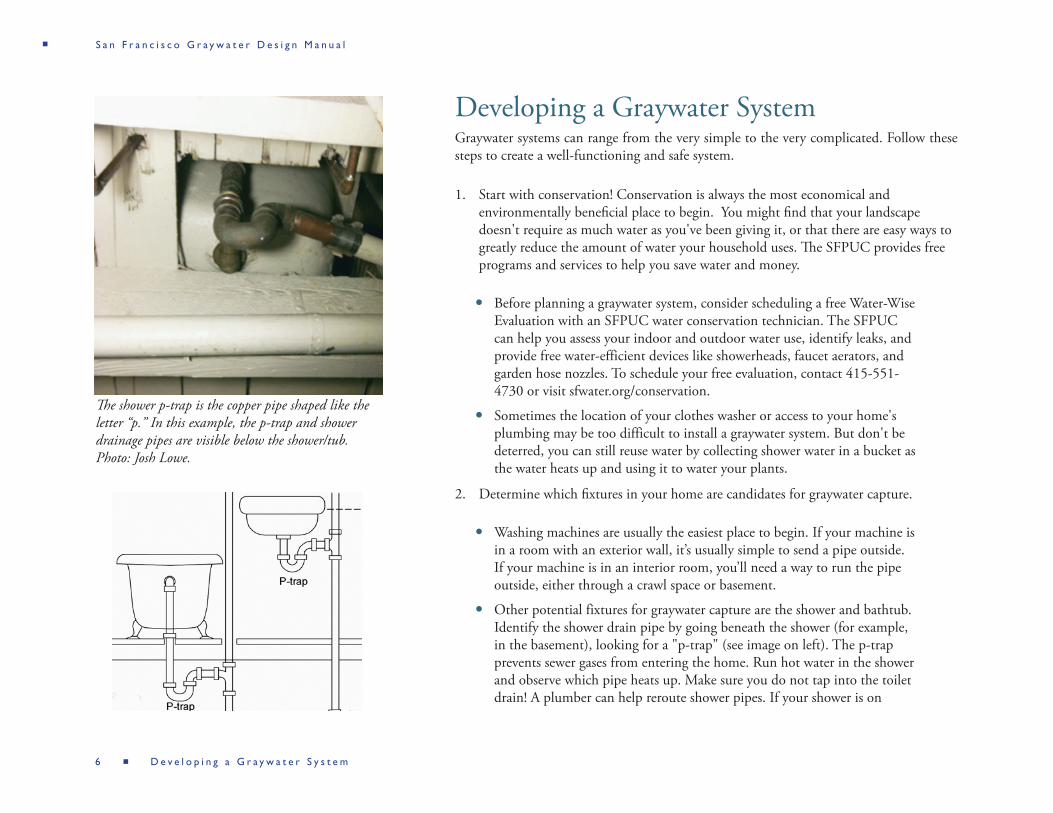
yy Other potential fixtures for graywater capture are the shower and bathtub. Identify the shower drain pipe by going beneath the shower (for example, in the basement), looking for a "p-trap" (see image on left). The p-trap prevents sewer gases from entering the home. Run hot water in the shower and observe which pipe heats up. Make sure you do not tap into the toilet drain! A plumber can help reroute shower pipes. If your shower is on
The shower p-trap is the copper pipe shaped like the letter “p.” In this example, the p-trap and shower drainage pipes are visible below the shower/tub. Photo: Josh Lowe.
S a n F r a n c i s c o G r a y w a t e r D e s i g n M a n u a l

D e v e l o p i n g a G r a y w a t e r S y s t e m 7
the second story, and the pipes run inside the wall, the drain is probably combined with the toilet drain in the floor, making shower graywater inaccessible without a major plumbing remodel.
3. Estimate the quantity of graywater that your chosen source produces by referring to the “Estimating Graywater Flows” section of this manual.
4. Analyze how water drains in your landscape and determine your soil type with a “soil ribbon test” and/or a low-cost laboratory analysis (required if your system needs a permit). In combination with your flow calculations, this analysis will help determine the landscape area needed for graywater distribution.
5. Read about setback requirements on page 15 to determine your system layout.
6. Read about types of graywater systems starting on page 16 and decide which is best for you. Figure 1 provides some guidance for your selection.
7. Draw a sketch of your proposed system. If a permit is required, you'll need to submit a plot plan and details about the system to DBI-PID. For more information, contact DBI-PID at 415-588-6088. Note: If your current plumbing is not up to code, you'll need to upgrade the part of the plumbing affected by the installation of the graywater system. For example, if the shower drain is undersized, you will need to upgrade to 2-inch pipe.
8. Find a qualified installer or install the system yourself.
9. Remember to label the system (3-way valve and all above-ground graywater pipes) and keep an operation and maintenance manual. If you sell your home, the manual must stay with the residence.
10. Operate and maintain your system.
Figure 1. Guidance for choosing your graywater system.
S a n F r a n c i s c o G r a y w a t e r D e s i g n M a n u a l

8 D e v e l o p i n g a G r a y w a t e r S y s t e m
Sizing Your Graywater SystemThere are three steps to sizing your graywater system. It is important to follow these steps in order to design a system that has adequate landscape distribution. Remember, state law requires that graywater irrigation systems never cause pooling or runoff.
1) Estimate your graywater flows. There are different methods for estimating your graywater flows based on whether your system requires a permit or not. Follow the steps in the “Estimating Graywater Flows” section to estimate how much water your system will produce (page 9).
2) Estimate the absorption capacity of your soils. Use the methods outlined in the “Soil Absorption and Distribution Area” section to determine the rate at which your soil absorbs water (page 11).
3) Determine the distribution area. Use your graywater flow calculations and your soil absorption estimate to calculate the necessary size of your mulch basins (page 13).
After calculating the necessary size of your landscape distribution area, record this information in the operation and maintenance (O&M) manual for your system (a sample O&M manual can be found in Appendix B). Be sure to include the assumptions you used for your calculations. That way, if you sell your home or move out, the new occupants will know how much water the system was designed for. If the new household produces significantly more or less water, alterations may need to be made to the system.
Notes on Requirements for Calculating Graywater FlowsFor Permitted Systems: The California Code of Regulations describes a specific method that must be used to calculate graywater flows for systems that require permits (Title 24, Part 5, Chapter 15). This method is described on page 9 of this manual.
For Systems That Do Not Require a Permit: Laundry-to-landscape systems can be sized using the method described for permitted systems OR the method described in the "Irrigation Supply Calculations" section found on page 10.
S a n F r a n c i s c o G r a y w a t e r D e s i g n M a n u a l

E s t i m a t i n g G r a y w a t e r F l o w s 9
Estimating Graywater FlowsPermitted System CalculationsChapter 15 of the California Plumbing Code indicates that graywater flows for permitted systems in single- and multi-family dwellings can be estimated based on records of water use, calculated based on local daily per-person interior water use, or calculated using the following default method:
1) Calculate the number of occupants in your household using:
2 occupants in the First Bedroom
1 occupant in Each Additional Bedroom
2) Calculate graywater flows using:
Showers, Bathtubs, and Washbasins (combined): 25 gallons per day (gpd)/occupant
Washing Machines: 15 gdp/occupant 3) Multiply the number of occupants (as calculated above, not the actual number of people who live in the home) by the estimated graywater flow in gpd per occupant to determine the total estimated daily graywater flow:
Number of occupants x graywater flow per occupant = total estimated daily graywater flow
In San Francisco, you must present calculations based on this default method to DBI -PID when you apply for a permit (see Appendix E for an example). However, you may be able to reduce your graywater flow calculations if you consistently use less water in your home and can produce documentation of reduced graywater production for DBI-PID review. Please contact DBI-PID if you would like to make alternate calculations based on reduced graywater production in your home. Note that it is best to contact DBI-PID early in the process so staff can assist you in creating a well-designed graywater system that works for you and future occupants of your home.
Example Graywater Flow Estimate for Permitted Systems Using the Default Plumbing Code MethodIn a three-bedroom home with three people, graywater volume is calculated as follows:
Step 1) The number of occupants is calculated as four, two in the first bedroom plus one for each additional bedroom.
Step 2) Graywater flows are calculated as:
Shower, Bathtubs, and Washbasins Graywater: 25 gpd x 4 people = 100 gpd
Washing Machine Graywater: 15 gpd x 4 people = 60 gpd
Step 3) Total graywater produced is calculated as: 100 + 60 gpd = 160 gpd
Design Your System for Highest Calculated FlowNote that if your irrigation supply calculations (page 10) yield a higher flow than the permitted system calculations, you should size your system based on the irrigation supply calculations.
S a n F r a n c i s c o G r a y w a t e r D e s i g n M a n u a l
1 0 E s t i m a t i n g G r a y w a t e r F l o w s
Irrigation Supply Calculations (can also be used to size laundry-to-landscape systems)
Calculating how much graywater your home actually produces is an important step for all graywater systems. These calculations determine how much water will be distributed to your plants, regardless of whether you have a permitted or non-permitted system. These calculations will help you ensure that your plants are not getting over- or under-watered.
The following irrigation supply calculations can be used instead of the default Plumbing Code method to size the landscape distribution area for systems that do not require a permit. Hence, they can only be used to size the landscape distribution area for laundry-to-landscape systems.
Washing machines (weekly flow): __ gallons/load (the rating of your machine) x __ loads per week = __ gallons per week
Washing machines (daily flow): __ gallons/load (the rating of your machine) x __ loads on a typical laundry day = __ gallons per typical laundry day
Showers: __ gallons per minute (the flow rate of your showerhead) x __ minutes you shower x __ showers per day x actual number of home occupants = gallons per day
Note that if you regularly produce higher amounts of graywater in a single day, you'll need to consider this when you design your system. Examples include multiple loads of laundry in one day or baths. You will also need to consider situations where you produce atypical amounts of graywater. If you sometimes do five loads of laundry in one day, rather than spread them out over the week, you'll need to consider this when you design and operate your system. In cases of high flows, one option is to redirect the laundry water to the sewer system using the 3-way valve. Remember that you must design and operate your system to avoid pooling and runoff of graywater.
Note that performing these calculations for your specific household fixtures yields the most accurate estimate of the amount of graywater available for your plants, yet it does not consider future changes. Volumes could vary if the size or habits of your household change over time or if a new owner moves in.
Example Estimation of Graywater Produced Using the Irrigation Calculation MethodIn a three-bedroom house, each person takes a 8-minute shower every day: They have a front-loading washing machine rated at 20 gallons/load and each does one load of washing a week, plus there is an extra load for towels, totaling four loads per week.
Shower graywater: 2.0 gpm x 8 minutes/person per day x 3 people = 48 gallons per day (gpd)
Washer graywater: 4 loads/week x 20 gallons/load = 80 gallons per week/ 7 days = 11.43 gpd
Total graywater produced:
48 + 11.4 = 59.4 gpd
Example Graywater Flow Estimate Using the Irrigation Supply Calculation MethodIn a three-bedroom, three-person household with a laundry-to-landscape system, each person does one load of washing a week, plus there is an extra load for towels, totaling four loads per week. Washing machine use is spread out across the week, sometimes two loads of laundry in one day. The household's front-loading washing machine is rated at 20 gallons per load.
Washing machine graywater (weekly flow): 4 loads per week x 20 gallons per load = 80 gallons per week
Washing machine graywater (daily flow): 2 loads per day x 20 gallons per load = 40 gallons per day
Irrigation during VacationsKeep in mind that most types of simple graywater systems only irrigate when you are at home producing graywater. If you travel or take frequent summer vacations, you will have to make arrangements for watering the areas irrigated with graywater.
S a n F r a n c i s c o G r a y w a t e r D e s i g n M a n u a l

S o i l A b s o r p t i o n a n d D i s t r i b u t i o n A r e a 1 1
Soil Absorption and Distribution AreaUnderstanding the absorption capacity of the soils in your yard is critical for designing your graywater system and sizing your landscape distribution area. The distribution area must be sized to allow the graywater to soak into the soil without pooling or runoff.
If your system requires a permit, you must provide DBI-PID with the results of a laboratory soil analysis to confirm your soil type. See page 12 for details. To learn the basics about the soil in your yard, you should also conduct a simple soil “ribbon test” described below.
After you have identified your soil type via laboratory analysis (required for permitted systems) and/or a ribbon test, conduct a simple drainage test to find out how well water drains on your property. This drainage test will help ensure that you select ideal locations for your graywater outlets.
Soil Ribbon TestTo conduct the soil ribbon test, take a small handful of soil in your hand, slowly moisten it with water, and knead it. Try to form the soil into a ball. Squeeze it to see if you can make a cast (an impression of your fingers). Place the ball of soil in your hand between your thumb and forefinger, gently squeeze the soil, and push it upwards into a ribbon (see image at right). Let the ribbon break from its weight. Don't try to mold the soil into a ribbon
Soil forms a “cast,” an impression of your fingers. Photo: Josh Lowe.
Soil ribbon being squeezed between thumb and finger. Photo: Josh Lowe.
Table 2. Identifying Soil Type Using the Ribbon Test
epyT lioS ro erutxeT lioS elpmaS lioS fo scitsiretcarahC
Soil does not stay in a ball. Loose and gritty feeling when moistened. Sand
A cast, or molded imprint of your fingers, forms, but it breaks easily. It does not form a ribbon. Soil feels slightly gritty.
Sandy loam
A short ribbon can be formed but breaks when about ½ inch long. Loam
A ribbon can be formed. It is moderately strong until it breaks at about ¾ inch length. Soil feels slightly sticky.
Clay loam
The soil can easily be formed into a ribbon that is an inch or more long. Soil feels very sticky and gritty.
Sandy/silty clay
The soil can easily be formed into a ribbon that is an inch or more long. Soil feels very sticky and smooth.
Clay
Source: Adapted from Alameda County Waste Management Authority and Source Reduction and Recycling Board (StopWaste.org), 2010, and Thein, S.J., 1979.
Table 1. Identifying Soil Type Using the Ribbon Test
S a n F r a n c i s c o G r a y w a t e r D e s i g n M a n u a l
1 2 S o i l A b s o r p t i o n a n d D i s t r i b u t i o n A r e a
by rolling it in your palms, as this will give inaccurate results. See Table 1 to identify the texture or type of soil you have. You should conduct a ribbon test at several locations on your property to understand the variability of soil characteristics.
Laboratory TestIf your system requires a permit, you must provide DBI-PID with the results of a soil analysis. This requirement can be fulfilled by submitting a soil sample to a laboratory for an inexpensive soil texture analysis (see Appendix F for local laboratories) or by providing an existing soil analysis to DBI-PID. The soil sample must be taken from the area intended to be irrigated with graywater. If there is more than one type of soil, representative samples from different areas must be taken. An example of an existing soil analysis is a geotechnical study done for your property. Note that the geotechnical report must be signed and stamped by a licensed engineer or geologist.
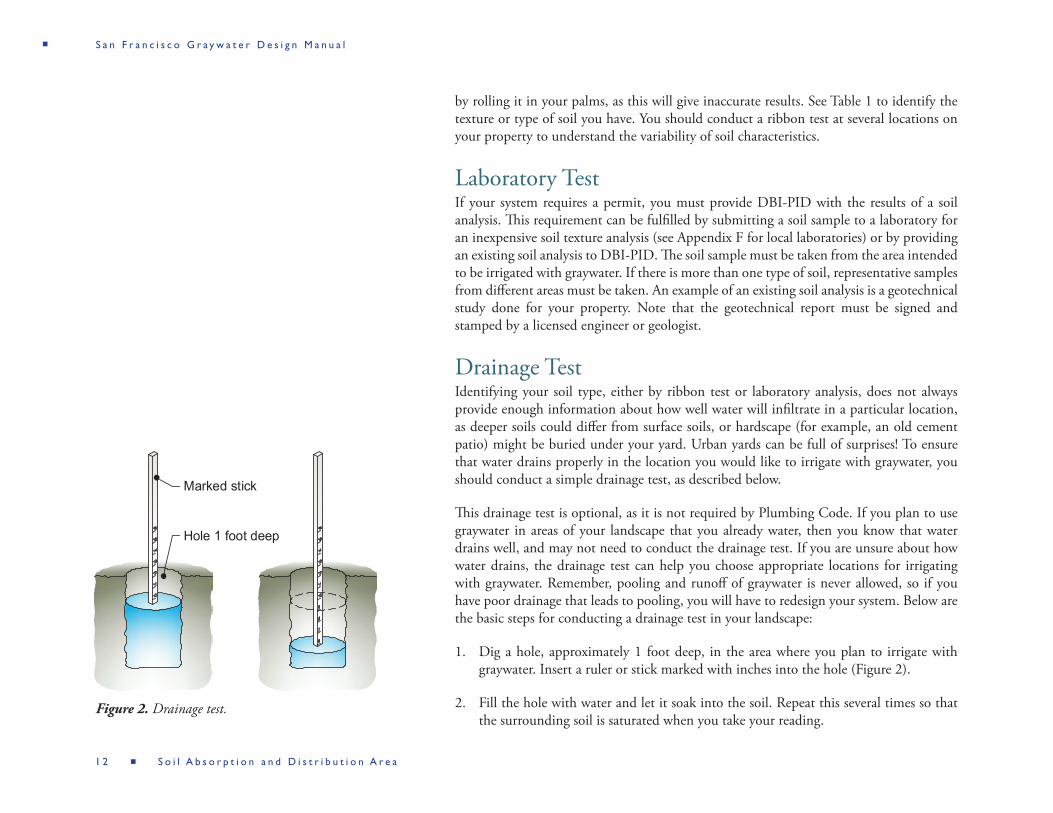
Drainage TestIdentifying your soil type, either by ribbon test or laboratory analysis, does not always provide enough information about how well water will infiltrate in a particular location, as deeper soils could differ from surface soils, or hardscape (for example, an old cement patio) might be buried under your yard. Urban yards can be full of surprises! To ensure that water drains properly in the location you would like to irrigate with graywater, you should conduct a simple drainage test, as described below.
This drainage test is optional, as it is not required by Plumbing Code. If you plan to use graywater in areas of your landscape that you already water, then you know that water drains well, and may not need to conduct the drainage test. If you are unsure about how water drains, the drainage test can help you choose appropriate locations for irrigating with graywater. Remember, pooling and runoff of graywater is never allowed, so if you have poor drainage that leads to pooling, you will have to redesign your system. Below are the basic steps for conducting a drainage test in your landscape:
1. Dig a hole, approximately 1 foot deep, in the area where you plan to irrigate with graywater. Insert a ruler or stick marked with inches into the hole (Figure 2).
2. Fill the hole with water and let it soak into the soil. Repeat this several times so that the surrounding soil is saturated when you take your reading.
Figure 2. Drainage test.
Marked stick
Hole 1 foot deep
S a n F r a n c i s c o G r a y w a t e r D e s i g n M a n u a l

S o i l A b s o r p t i o n a n d D i s t r i b u t i o n A r e a 1 3
3. Fill the hole with water again; this time record how long it takes for the water level to go down a few inches. If it drains approximately 1 inch per hour or faster, you have adequate drainage for irrigating the area with graywater.
4. If it takes longer than two hours for the water level to go down 1 inch, or the hole doesn’t drain all day, don’t use graywater to irrigate this area. Try another location to see if the drainage is better. If you irrigate an area that does not have adequate drainage, you could have pooling and runoff. Plants could also be damaged by water-logged soil, so make sure to irrigate only properly draining soils, or amend your soil by adding compost to improve drainage.
Calculating Your Landscape Distribution AreaOnce you know how many gallons per day your home produces (see the Estimating Graywater Flows section), have identified your soil type (either by ribbon test or laboratory analysis), and know that water drains well in the area you wish to irrigate, you can calculate how large an area you need to ensure proper drainage of graywater.
To calculate your landscape distribution area, you will need the following information:
y Gallons of graywater generated each day
y Soil type (to be used with Table 2)
Table 2. Minimum Irrigation Area for Different Soil Types
Soil Type Square Feet of Area Needed to Infiltrate Each Gallon of Graywater (per day)
Coarse sand or gravel 0.2
Fine sand 0.25
Sandy loam 0.4
Sandy clay 0.6
Clay with considerable sand or gravel 0.9
Clay with small amounts of sand or gravel 1.2
Source: Table 1502.10, Design of Six Typical Soils, California Plumbing Code Chapter 15.
S a n F r a n c i s c o G r a y w a t e r D e s i g n M a n u a l
1 4 S o i l A b s o r p t i o n a n d D i s t r i b u t i o n A r e a
Multiply your gallons of graywater per day by the number corresponding to your soil type in Table 2. This calculation gives you the minimum area, in square feet, needed to infiltrate your graywater.
When you design your system, make sure that the total surface area (not volume) of the bottom of your mulch basins is at least as large as the minimum distribution area calculated above. Your irrigation area can be larger, but not smaller. Record your system specifications in your O&M manual for future reference.
Protecting Groundwater Graywater must be discharged a minimum of three feet above the groundwater table. Groundwater occurs deeper than three feet on most of the western side of San Francisco, but some areas, especially on the eastern side, can have shallower groundwater. If you don’t know how deep groundwater is beneath your property, you can check by digging a hole three feet deep below your lowest anticipated graywater discharge point. If no water enters the hole, then it is safe to irrigate the area with graywater. If water enters the hole, the groundwater table is too shallow, and graywater may not be used for irrigation. If you dig a hole to check the depth to groundwater, do so during the irrigation season, as this is the time you’ll be using graywater. Graywater systems must be shut off and graywater must be diverted back to the sewer during during the rainy months, with any signs of pooling or runoff from rainfall, or in places where the groundwater table rises.
ReferencesAlameda County Waste Management Authority and Alameda County Source Reduction and Recycling Board, 2010. Bay-Friendly Gardening. Available at www.rescapeca.org
Thein, S.J., 1979. A Flow Diagram for Teaching Texture by Feel Analysis. Journal of Agronomic Education, 8:54-55
Example: Calculating Minimum Infiltration or Irrigation AreaIf you identified your soil type as sandy loam, you would need 0.4 square feet per gallon of graywater (Table 2). If you produce 100 gallons of graywater per day, multiply 0.4 square feet/gpd by 100 gpd to get 40 square feet, the minimum area needed for your graywater to infiltrate.
100 gpd x 0.4 square feet per gpd (from Table 2) = 40 square feet of total irrigation area
This irrigation area can be spread across different locations in your yard. For example, if you want to irrigate 10 trees and your total irrigation area must be 40 square feet, each mulch basin would need to be at least 4 square feet.
This calculation does not take into consideration the appropriate amount of water necessary for the plants; refer to Appendix D for plant water requirements.
Note: If your system incorporates drip irrigation, there is a different way to size the irrigation area; refer to Chapter 15 of the California Plumbing Code, Table 1502.11.
S a n F r a n c i s c o G r a y w a t e r D e s i g n M a n u a l

S e t b a c k R e q u i r e m e n t s 1 5
Setback Requirements: Where Not to Put Your Graywater!Your graywater system should irrigate plants without causing problems for you or your neighbors. A setback is a required distance between structures, such as between a building and another building, other structure, or property line. The purpose of setbacks is to avoid potential problems caused by nearby land uses. For example, you'll need to keep graywater a certain distance from your house to avoid damaging its foundation, from your neighbor’s yard to maintain good neighborly relations, and from creeks to prevent contamination of freshwater. Table 3 lists setback requirements in San Francisco.
Note that if your yard is elevated above your neighbors, and particularly above hardscape, you should increase the property line setback so graywater does not seep out through the ground and onto your neighbor's yard.
S a n F r a n c i s c o G r a y w a t e r D e s i g n M a n u a l
Table 3. Setbacks Required in San Francisco
Minimum Distance (Horizontal) from
Irrigation Field (Feet) Tank (Feet)
Building structures (not including porches and steps or covered walkways, patios, driveways, etc.)
2 5
Private property lines 1.5 5
Water supply wells 100 50
Streams and lakes 100 50
On-site domestic water service line 0 5
Pressurized public water main 10 10
Water table 3 feet above (see note 1). NA
Retaining wall2 2 NANotes:Unless otherwise noted, setbacks are from the California Plumbing Code (California Code of Regulations, Title 24, Part 5, Chapter 15, Table 1502.4).1. A test hole 3 feet deep without water can demonstrate that the site is far enough above the ground water table. The graywater
system must be shut off in the rainy season. 2. Requirement specific to San Francisco.
Table 3. Setbacks Required in San Francisco

1 6 L a u n d r y - t o - L a n d s c a p e S y s t e m
Laundry-to-Landscape SystemSystem OverviewA laundry-to-landscape graywater system captures graywater from the discharge hose of your washing machine, enabling you to reuse the water without altering the existing plumbing in your home.
In this system, the hose leaving the washing machine is attached to a valve that allows for easy switching between the graywater system and the sewer. It is important to be able to switch to the sewer anytime you don’t want to send the water outside, for example if you’re using bleach, which could harm plants, or if the soil is saturated during the rainy season. The graywater is distributed through a 1-inch irrigation line with outlets directing water to specific plants (Figure 3). This system is low-cost, easy to install, and very flexible if you need to make future changes to your home or landscaping.
Parts You Will NeedYou can purchase most of the parts you need from large irrigation stores. A 1-inch brass 3-way valve can be found at some plumbing supply stores and complete laundry-to-landscape kits can be purchased online. Discounted laundry-to-landscape kits are also available through the SFPUC's Laundry-to-Landscape Program (visit www.sfwater.org/graywater for current incentives).
Assemble these parts:
1. 3-way valve2. PVC 1-inch male adapter3. 1-inch barbed male adapter4. Hose clamp5. PVC 1-inch x 1½-inch bushing6. PVC 1½-inch female adapter (slip by FPT)7. Auto vent (or air admittance valve)8. 1-inch PVC tee
Laundry-to-Landscape SystemDescription: The washing machine pump sends graywater from the drain hose out to the landscape through 1-inch tubing. The system does not alter the existing plumbing and does not require a permit. Best suited for irrigating trees, bushes, shrubs, small perennials and larger annuals.
Installation: Easy to install for the do-it-yourselfer or a professional.
Cost: Ranges from a few hundred dollars (installed by homeowner) to $1,000 to $2,000 (professional installation).
Watch a System Being InstalledWant to see how a laundry-to-landscape system is built? Watch this episode from PBS's Ask This Old House, that features a San Francisco resident. Video available at www.sfwater.org/graywater
An Easy Way to Borrow ToolsParticipants of the SFPUC's Laundry-to-Landscape Program can check-out a toolbox with all the necessary tools and equipment to install their graywater system.
S a n F r a n c i s c o G r a y w a t e r D e s i g n M a n u a l

L a u n d r y - t o - L a n d s c a p e S y s t e m 1 7
3-way valve for diverting laundry graywater to the landscape. Auto vent shown at right. Photo: Laura Allen.
Cleaning the Pump FilterIf your front loading washing machine is not pumping out the water properly, the most frequent cause is objects (for example, coins or paperclips) getting stuck in the pump filter and blocking the flow of water. It is a good idea to check the pump filter before installing your graywater system. See the references at the end of this section for more information about how to clean a washing machine pump filter.
9. 1-inch barbed x slip adapter10. 1-inch x ½-inch barbed tee or 1-inch x ½-inch Blu-Lock tee11. “Green or purple back” ball valve (as needed)12. Barbed 1-inch female hose thread adapter13. 1-inch by 1-inch by 1-inch tee14. 1-inch schedule 40 PVC pipe15. ½-inch poly tubing16. 1-inch HDPE tubing17. Mulch shield or valve box18. Garden staples
Tools You Will Needyy Measuring tape
yy PVC cutting tools (ratcheting cutters or a saw)
yy Two pairs of channel locks
yy Level
yy Tubing cutters
yy Drill
yy 1½-inch hole saw
yy ¼-inch pilot bit
yy ¼-inch masonry bit (if the wall is stucco)
yy Caulking gun and adhesive caulk
yy Hammer
yy Chisel
yy Tin snips
yy Shovel and pickaxe
3-way valve
LegendLegend1
2
3
2 1 2
6
4
3
8
5
6
7
48
Hose clamp
5
PVC 112-inch female adapter
(slip by FPT)
1-inch PVC tee
7
Auto vent
PVC 1-inch x 112-inch bushing
1-inch barbedmale adapter
PVC 1-inchmale adapter
S a n F r a n c i s c o G r a y w a t e r D e s i g n M a n u a l

1 8 L a u n d r y - t o - L a n d s c a p e S y s t e m
Figure 3. Laundry-to-landscape overview. Source: Clean Water Components.
A typical front-loading machine can distribute water up to eight locations, though an ultra-efficient machine can only reach up to four locations. A typical top-loading machine can distribute water up to 12 locations (and even a few more) depending on the site.
All irrigation points are 2 inchesbelow the surface in mulch basins
15
3-way valve
PVC 1-inch male adapter
1-inch barbed male adapter
Hose clamp
PVC 1-inch x 1½-inch bushing
PVC 1½-inch female adapter (slip by FPT)
Auto vent (or air admittance valve)
1-inch PVC tee
1-inch barbed x slip adapter
LegeLegenndd
11
1-inch x ½-inch barbed tee or1-inch x ½-inch Blu-Lock tee
"Greenback" ½-inch ball valve
Barbed 1-inch female hose threadadapter (not shown)
1-inch by 1-inch by 1-inch tee
1-inch schedule 40 PVC pipe
½-inch poly tubing
1-inch HDPE tubing
Mulch shield or valve box
15
10
10
10
14
9
16
13
10
14
5
6
7
8
2
1
34
1
2
3
5
4
6
7
8
9
10
11
12
13
14
15
16
To sewer
End of main 1-inch lineshould be fully openwith no plug or valve
17
17
17
17
17
1717
Standpipe
17
10
S a n F r a n c i s c o G r a y w a t e r D e s i g n M a n u a l
L a u n d r y - t o - L a n d s c a p e S y s t e m 1 9
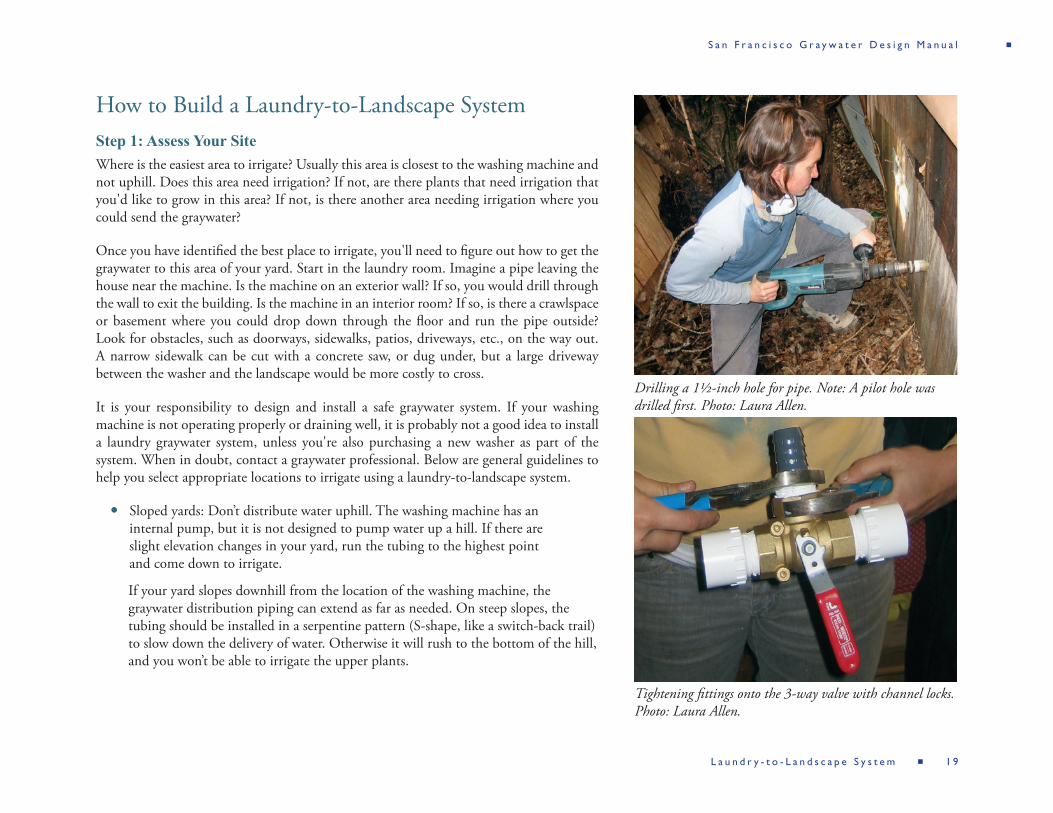
How to Build a Laundry-to-Landscape SystemStep 1: Assess Your SiteWhere is the easiest area to irrigate? Usually this area is closest to the washing machine and not uphill. Does this area need irrigation? If not, are there plants that need irrigation that you'd like to grow in this area? If not, is there another area needing irrigation where you could send the graywater?
Once you have identified the best place to irrigate, you'll need to figure out how to get the graywater to this area of your yard. Start in the laundry room. Imagine a pipe leaving the house near the machine. Is the machine on an exterior wall? If so, you would drill through the wall to exit the building. Is the machine in an interior room? If so, is there a crawlspace or basement where you could drop down through the floor and run the pipe outside? Look for obstacles, such as doorways, sidewalks, patios, driveways, etc., on the way out. A narrow sidewalk can be cut with a concrete saw, or dug under, but a large driveway between the washer and the landscape would be more costly to cross.
It is your responsibility to design and install a safe graywater system. If your washing machine is not operating properly or draining well, it is probably not a good idea to install a laundry graywater system, unless you're also purchasing a new washer as part of the system. When in doubt, contact a graywater professional. Below are general guidelines to help you select appropriate locations to irrigate using a laundry-to-landscape system.
yy Sloped yards: Don’t distribute water uphill. The washing machine has an internal pump, but it is not designed to pump water up a hill. If there are slight elevation changes in your yard, run the tubing to the highest point and come down to irrigate.
If your yard slopes downhill from the location of the washing machine, the graywater distribution piping can extend as far as needed. On steep slopes, the tubing should be installed in a serpentine pattern (S-shape, like a switch-back trail) to slow down the delivery of water. Otherwise it will rush to the bottom of the hill, and you won’t be able to irrigate the upper plants.
Tightening fittings onto the 3-way valve with channel locks. Photo: Laura Allen.
Drilling a 1½-inch hole for pipe. Note: A pilot hole was drilled first. Photo: Laura Allen.
S a n F r a n c i s c o G r a y w a t e r D e s i g n M a n u a l

2 0 L a u n d r y - t o - L a n d s c a p e S y s t e m
yy Flat yards: For most machines, it is generally safe to distribute graywater up to 50 feet across a flat yard. Greater distances could result in damage to the washing machine pump, since friction losses increase with distance and put more pressure on the machine's pump.
Draw a simple sketch of your system, from the washing machine to the plants. Graph paper is provided in Appendix B. Collect the tools and parts needed.
Now you're ready to start building the system.
Step 2: Make an Exit for the PipeIdentify where the pipe will exit the building. Visually inspect the wall for potential obstacles; for example, an outlet indicates that there are electrical wires in the wall. Be careful not to cut into electrical wires, pipes, or studs. Drill a ¼-inch pilot hole with a thin, long drill bit that can pass through the entire wall. Ensure you are not hitting anything in the wall. You may need to try more than one location if you hit a stud or other obstacle.
If the drill path is clear of electrical wires, pipes, and studs, and the hole exits in a good location on the outside of the building, use the pilot hole as a guide and drill with a 1½-inch hole saw to make a hole large enough for the 1-inch PVC pipe. The type of bit you'll need depends on what the wall is made of: use stucco bits on stucco walls and wood bits on wooden walls. To make a clean hole on both sides, drill from both the outside in and from the inside out. After you finish installing your system, you will need to seal the hole with a waterproof adhesive, such as Sikaflex®, to prevent moisture from entering the wall.
If your washing machine is located in an interior room and the pipe will exit the house through a crawlspace or basement, go under the house and look for potential obstacles. Then follow the same instructions for drilling as described above, although you only need to drill from the top down, since it won't matter what the hole looks like in the crawlspace.
Step 3: Prepare the 3-Way ValveNote that numbers in parentheses refer to the parts list on page 16 and 17.
1. Wrap Teflon® tape clockwise around the threaded fittings (two male adapters [#2] and one barbed male adapter [#3] fitting).
Gluing pipes on either side of a 3-way valve. Photo: Laura Allen.
Important Considerations for Exterior Walls
Exterior walls within 3 feet of the property line must be fire-rated. If your pipe exits a fire-rated wall, then you must comply with applicable building and plumbing codes to ensure that the integrity of the wall is not compromised. Consult a professional or contact DBI with questions.
S a n F r a n c i s c o G r a y w a t e r D e s i g n M a n u a l

L a u n d r y - t o - L a n d s c a p e S y s t e m 2 1
The 3-way valve is slightly above the sewer connection (behind the machine), while the auto vent is about a foot higher than the flood rim of the machine. Photo: Laura Allen.
2. Insert the male adapters into the threads on both sides of the 3-way valve and turn gently, by hand, making sure not to cross-thread the plastic threads. Do the same with the barbed male adapter, inserting it into the middle of the valve. Turn clockwise with your hands as tightly as you can.
3. With two pairs of channel locks, continue to tighten the fittings until very tight.
4. Remove the laundry drain hose from the sewer connection (utility sink or standpipe) and place a hose clamp (#4) over the end of the hose. If the drain hose has a rigid U-shaped piece on its end, remove it. Connect the hose to the barbed fitting on the tee and use the hose clamp to tighten and secure the hose in place, making a watertight seal. If the hose is rigid plastic, heating the plastic can soften it and make it easier to slip over the barbed fitting. You can use a blow dryer or cup of hot water to heat the hose. After the system is complete, you will check this seal by running the machine.
Note: These directions are written for a 1-inch laundry drain hose, which is the most common size. Some of the newer, ultra-efficient hoses are ¾-inch. If your hose is non-standard, you'll need to use a barbed fitting that fits your hose and then adapt it to a 1-inch male pipe thread fitting to attach to the 3-way valve. For example, if your hose is ¾-inch, you'll use a ¾-inch barbed male adapter threaded into a ¾-inch by 1-inch threaded bushing.
Step 4: Plumbing to and from the 3-Way Valve
1. Hold the 3-way valve (#1) up and look for a good place on the wall to mount it so that the handle can turn freely and is accessible. The valve MUST be above the flood rim of the washing machine; don't put it lower than the machine (see photo at right).
Auto vent (or air admittance valve)
Flood rim
LegendLegend
1
1
2
2
S a n F r a n c i s c o G r a y w a t e r D e s i g n M a n u a l
2 2 L a u n d r y - t o - L a n d s c a p e S y s t e m
2. Choose the most direct route for plumbing one side of the valve to the sewer, and orient the other side of the valve towards the hole in the side of the house, or the floor, depending on your situation. Note: If your system exits through the floor, the auto vent will be inside the home, since you must put the auto vent at the high point in the system, usually directly above the hole in the floor. See Step 7 for instructions on installing the auto vent.
3. Measure all the pipe pieces you need, cut the 1-inch PVC (#14), and connect the piping and fittings without any glue. Once glued, the pipe will slide farther into the fitting to a lip on the interior, so take this into account when measuring. Leave a few inches of pipe sticking out of the hole on the outside of the building.
4. Mark all of the fittings and pipe so that when you glue them together, they are in the position you would like them to be.
5. One at a time, glue the pipe sections and fittings together with PVC glue, being sure to protect underlying surfaces from dripping glue. “Gorilla PVC” is a less toxic PVC glue (do not confuse "Gorilla PVC" with "Gorilla Glue").
6. Go outside and glue the branch of the tee onto the pipe sticking out of the wall. While the glue is wet, adjust the tee with a level so the long axis of the tee is pointing straight up and down. Remember, if the pipe goes through the crawl space or basement, the auto vent must be located inside the laundry room. Make sure the auto vent (see next step below) is accessible so that it can be changed if it wears out and needs replacement. If water ever leaks out of the auto vent, it must be replaced.
7. The auto vent should be at least 6 inches above the flood rim of the washing machine and, when possible, located outside in case it fails and leaks. To assemble the auto vent, follow these steps. Glue the bushing (#5) into the slip portion of the 1½-inch female adapter (#6). Wrap Teflon® tape on the threads of the auto vent (#7), and then thread the auto vent into the threaded side of the female adapter (#6) and tighten. Glue one end of a small 2-inch piece of 1-inch PVC pipe (#14) into the 1-inch side of the bushing (#5). Then glue the other end into the top of the tee (#8).Mulch basin around a dwarf peach tree being filled with
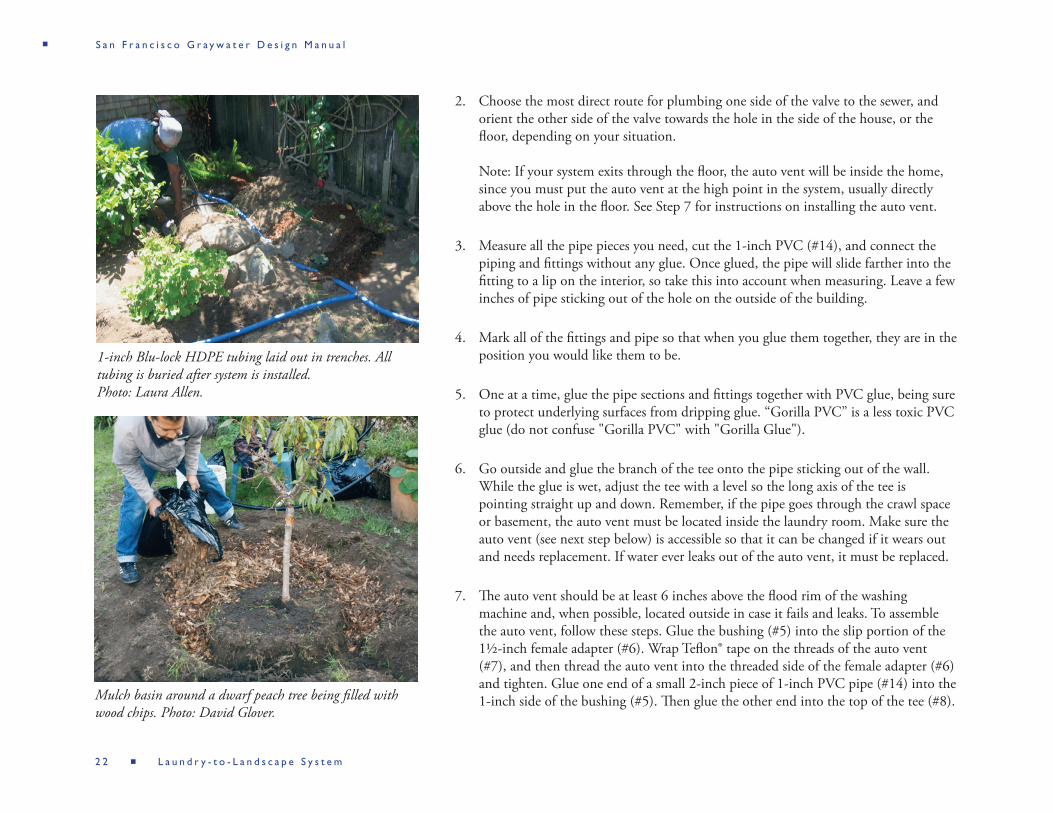
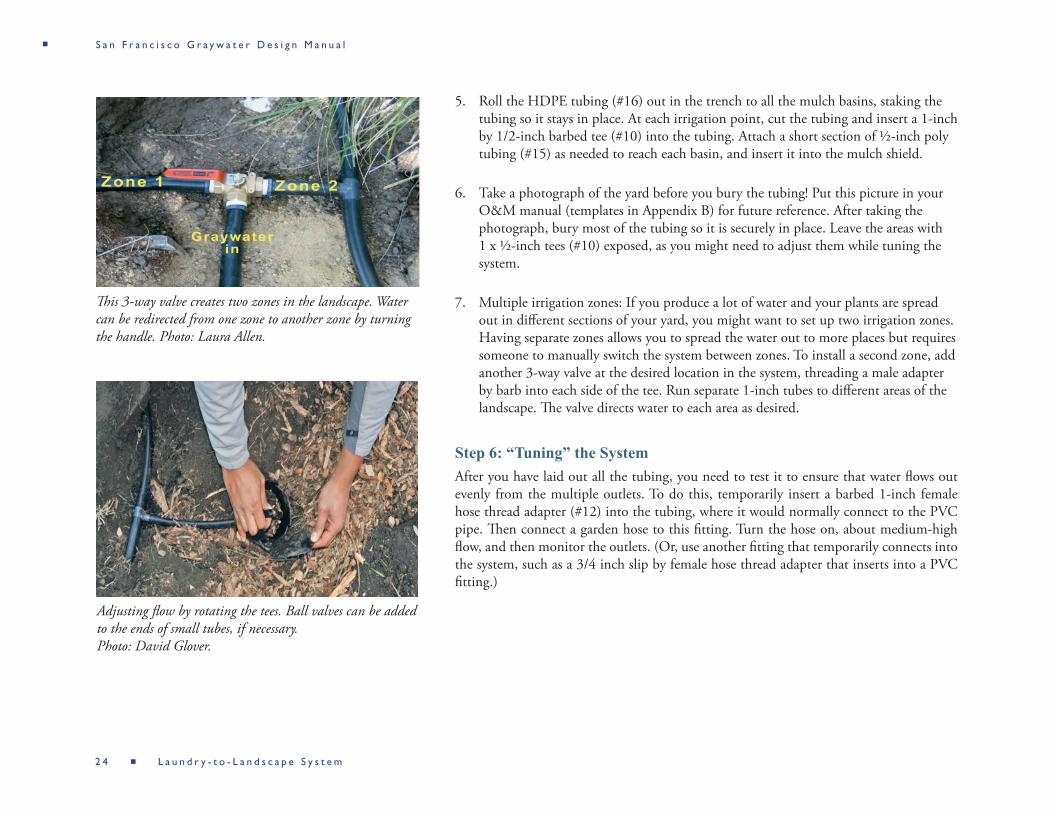
wood chips. Photo: David Glover.
1-inch Blu-lock HDPE tubing laid out in trenches. All tubing is buried after system is installed. Photo: Laura Allen.
S a n F r a n c i s c o G r a y w a t e r D e s i g n M a n u a l

L a u n d r y - t o - L a n d s c a p e S y s t e m 2 3
8. Measure, cut, and glue a piece of PVC pipe to extend from the bottom part of the tee to the ground. If there is a deck or other obstacle between your washer and the irrigation area, you will have to route the pipe around the obstacles. Try to maintain a downward slope whenever possible. Put a 90-degree bend at the bottom of the vertical pipe section and direct the pipe towards the landscape. Place the 1-inch barbed x slip adapter (#9) on the end of the pipe. This is where the 1-inch HDPE tubing (#16) will connect.
Step 5: Preparing the Landscape and Running the Irrigation Tubing
1. Dig mulch basins around the drip line of all the plants you wish to irrigate with graywater. The drip line is the exterior boundary of the plant, where the branches end. Mulch basins are created by removing soil and filling the empty space with mulch. If you can't dig a basin around the entire plant, dig a semi-circle, or trench on one side of the plant. The mulch basins should be between 6 and 12 inches deep, depending on the mature size of the plant. Smaller plants need less water and smaller basins.
2. Dig a trench, about 4 inches deep, from the PVC pipe to the first mulch basin. Continue the trench to all the basins, taking the most direct route possible while avoiding sharp turns. If possible, maintain a slight downward slope or at least a level gradient. If the system has dips and rises, it will be harder to get even distribution of water when you tune the system.
3. Make or buy a “valve box” or “mulch shield” for each graywater outlet (Figure 4). Mulch shields can be made out of sections of 4-inch drain pipe. Cut a 6-inch section from the drain pipe and drill a hole 2 inches below the top for the graywater tube to enter. Cover the open top with a paver or file. If a more sturdy shield is needed, a valve box can be purchased and altered in a similar way.
4. Place each box or shield in a mulch basin. Make sure there is 2 to 4 inches of mulch underneath the mulch shield. The graywater outlet must enter the shield at least 2 inches below the ground surface.
Figure 4. Mulch shield placement.
1-inch x 1/2-inch tee
Drip line of plantbeing watered
Mulchbasin
4 inches
4 inches
Paving stone marker
1/2-inch tubing,discharging 2 inchesbelow grade
Cut a 6-inch section from the drain pipe and drill a hole 2 inches below the top for the graywater tube to enter. Cover the open top with a paver or tile.
S a n F r a n c i s c o G r a y w a t e r D e s i g n M a n u a l
2 4 L a u n d r y - t o - L a n d s c a p e S y s t e m
5. Roll the HDPE tubing (#16) out in the trench to all the mulch basins, staking the tubing so it stays in place. At each irrigation point, cut the tubing and insert a 1-inch by 1/2-inch barbed tee (#10) into the tubing. Attach a short section of ½-inch poly tubing (#15) as needed to reach each basin, and insert it into the mulch shield.
6. Take a photograph of the yard before you bury the tubing! Put this picture in your O&M manual (templates in Appendix B) for future reference. After taking the photograph, bury most of the tubing so it is securely in place. Leave the areas with 1 x ½-inch tees (#10) exposed, as you might need to adjust them while tuning the system.
7. Multiple irrigation zones: If you produce a lot of water and your plants are spread out in different sections of your yard, you might want to set up two irrigation zones. Having separate zones allows you to spread the water out to more places but requires someone to manually switch the system between zones. To install a second zone, add another 3-way valve at the desired location in the system, threading a male adapter by barb into each side of the tee. Run separate 1-inch tubes to different areas of the landscape. The valve directs water to each area as desired.
Step 6: “Tuning” the SystemAfter you have laid out all the tubing, you need to test it to ensure that water flows out evenly from the multiple outlets. To do this, temporarily insert a barbed 1-inch female hose thread adapter (#12) into the tubing, where it would normally connect to the PVC pipe. Then connect a garden hose to this fitting. Turn the hose on, about medium-high flow, and then monitor the outlets. (Or, use another fitting that temporarily connects into the system, such as a 3/4 inch slip by female hose thread adapter that inserts into a PVC fitting.)
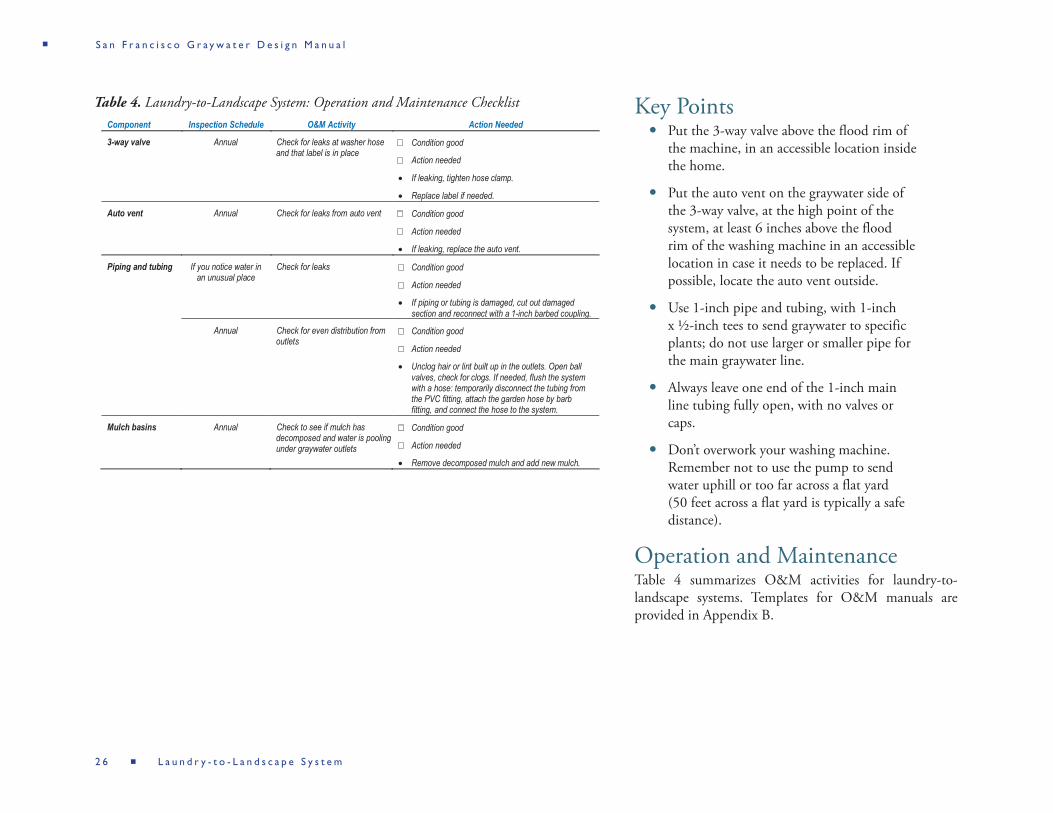
Adjusting flow by rotating the tees. Ball valves can be added to the ends of small tubes, if necessary. Photo: David Glover.
This 3-way valve creates two zones in the landscape. Water can be redirected from one zone to another zone by turning the handle. Photo: Laura Allen.
S a n F r a n c i s c o G r a y w a t e r D e s i g n M a n u a l

L a u n d r y - t o - L a n d s c a p e S y s t e m 2 5
If you notice that more water is exiting the first outlet and none is reaching the end, you can adjust the angle of the tees, turning them up or down depending on whether there is too much or too little water coming out. If the flow is still uneven after you've done that, add a ½-inch green or purple back ball valve (#11) to the first outlet and shut off the flow slightly. These are full-port ball valves; do not use other types of ball valves, as they clog quickly. Is water coming out evenly among outlets now? If not, you may need to add another valve and repeat the process until water flows evenly from all the outlets. Avoid adding extra ball valves, because they are a point of potential clogging. NEVER put a valve or plug into the end of the main 1-inch line. If you restrict the end of the main line and your outlets clog, the washing machine pump could get damaged. If you have more than one 1-inch line, as when you use a 1-inch by 1-inch by 1-inch tee, and send two 1-inch lines in different directions, then it is okay to restrict one end, since there is a second end fully open.
Step 7: Testing the SystemAfter you have tuned the part of the system outside your home, disconnect the hose and connect the tubing to the PVC pipe. Now you'll test the system with the washing machine. Run a load of laundry with the 3-way valve turned briefly to the sewer and then to the graywater system. As the water flows out, check the glued joints, making sure they are all watertight. Check the connection from the washer hose to the 3-way valve; this is a common place to have leaks. You might need to tighten the hose clamp or add a second clamp. Next, go outside and observe how water flows through the system. You might need to readjust the ball valve(s), since the water pressure from the machine will be different from that of the hose. After testing is complete, paint exposed PVC pipe with regular house paint, usually the same color as the building (to protect it from UV damage), and waterproof any holes.
Step 8: Labeling the SystemLabel the 3-way valve and aboveground graywater pipes (Appendix A). The 3-way valve must be labeled with clear instructions for changing the direction of graywater flow (to sewer or landscape). Aboveground pipes must be labeled with the words “CAUTION: NON-POTABLE GRAYWATER, DO NOT DRINK” at intervals of 5 feet or less.
Exposed PVC pipe is painted to protect it from UV degredation. The hole is sealed with an adhesive sealant to prevent moisture from entering. Photo: David Glover.
S a n F r a n c i s c o G r a y w a t e r D e s i g n M a n u a l
2 6 L a u n d r y - t o - L a n d s c a p e S y s t e m
Table 4. Laundry-to-Landscape System: Operation and Maintenance ChecklistComponent Inspection Schedule O&M Activity Action Needed
3-way valve Annual Check for leaks at washer hose and that label is in place
Condition good
Action needed
If leaking, tighten hose clamp.
Replace label if needed.
Auto vent Annual Check for leaks from auto vent Condition good
Action needed
If leaking, replace the auto vent.
Piping and tubing If you notice water in an unusual place
Check for leaks Condition good
Action needed
If piping or tubing is damaged, cut out damaged section and reconnect with a 1-inch barbed coupling.
Annual Check for even distribution from outlets
Condition good
Action needed
Unclog hair or lint built up in the outlets. Open ball valves, check for clogs. If needed, flush the system with a hose: temporarily disconnect the tubing from the PVC fitting, attach the garden hose by barb fitting, and connect the hose to the system.
Mulch basins Annual Check to see if mulch has decomposed and water is pooling under graywater outlets
Condition good
Action needed
Remove decomposed mulch and add new mulch.
Key Pointsyy Put the 3-way valve above the flood rim of
the machine, in an accessible location inside the home.
yy Put the auto vent on the graywater side of the 3-way valve, at the high point of the system, at least 6 inches above the flood rim of the washing machine in an accessible location in case it needs to be replaced. If possible, locate the auto vent outside.
yy Use 1-inch pipe and tubing, with 1-inch x ½-inch tees to send graywater to specific plants; do not use larger or smaller pipe for the main graywater line.
yy Always leave one end of the 1-inch main line tubing fully open, with no valves or caps.
yy Don’t overwork your washing machine. Remember not to use the pump to send water uphill or too far across a flat yard (50 feet across a flat yard is typically a safe distance).
Operation and MaintenanceTable 4 summarizes O&M activities for laundry-to-landscape systems. Templates for O&M manuals are provided in Appendix B.
S a n F r a n c i s c o G r a y w a t e r D e s i g n M a n u a l

L a u n d r y - t o - L a n d s c a p e S y s t e m 2 7
Figure 5. Second standpipe option. Source: City of Berkeley.
Second Standpipe Option for Laundry GraywaterAnother option for a washing machine system is to install a second standpipe next to the existing standpipe (Figure 5). A standpipe is a vertical pipe into which the washing machine hose discharges. The existing standpipe should be plumbed to the sanitary sewer. The second standpipe can be plumbed to a graywater irrigation system.
In a second standpipe graywater system, the exterior graywater irrigation system should be identical to the branched-drain system described in the section titled "Branched-Drain System." There is no 3-way valve inside the house at the washing machine, and the hose from the washing machine is moved manually from one standpipe to the other. The second standpipe method adds no extra strain on the washing machine pump. If your machine is old or has any problems, and you are worried that a laundry-to-landscape system might not be good for the machine, you can install a second standpipe graywater system instead. This method does make it harder to distribute the water to plants than the laundry-to-landscape system, because it is a gravity-based system and does not take advantage of the washing machine’s pump to distribute graywater.
The second standpipe option does not require a permit as long as the graywater system is for a one- or two- unit residential building and follows the 13 guidelines set forth in the California Plumbing Code (see Appendix B).
ReferencesClean Water Components.: http://www.cleanwatercomponents.com
Create an Oasis with Greywater 5th Ed.: http://oasisdesign.net
Label on wallshowing flowdirection ofsecond standpipe
Second standpipeto garden; must bevented
Washingmachine
Washing machine hoseto sanitary sewervia standpipe
S a n F r a n c i s c o G r a y w a t e r D e s i g n M a n u a l

2 8 B r a n c h e d - D r a i n S y s t e m
Branched-Drain SystemDescription: Graywater drains through a series of branching pipes and is dispersed into the landscape via mulch basin outlets. Branched-drain systems are typically installed on shower drains and/or sinks; however, they can also be installed on washing-machine systems that use the second standpipe variation. When installed on shower drains or sinks, branched-drain systems alter the existing plumbing and require a permit. A branched-drain system is best suited for irrigating trees, bushes, shrubs, and other larger perennial plants.
Installation: Installation difficulty varies greatly depending on the existing household plumbing. A solid understanding of plumbing is needed, as well as basic landscaping skills. Installation is more time-consuming than for a laundry-to-landscape system.
Cost: Costs can range from a few hundred dollars (installed by homeowner) to a few thousand dollars (professional installation).
Branched-Drain SystemSystem OverviewA branched-drain system allows a homeowner to use graywater from other sources besides the washing machine. The system is simple and requires no electricity. A branched-drain system is driven by gravity flow; no pressure is provided by a washing machine pump or any other pump. This type of system usually distributes graywater from showers and/or sinks, although it is often used in the second standpipe system (for washing machines) described on the previous page. A branched-drain system distributes graywater to the landscape using standard 1½-inch or 2-inch drainage pipe (Figure 6). The irrigated area must be lower in elevation than the graywater source, and the entire distribution system must have a downward slope of 2 percent (¼ inch per foot). Branched-drain systems are best suited to irrigating trees or large shrubs. This kind of system can be time-consuming to construct, but once complete, it requires little maintenance and lasts a long time, since it has no moving parts to break.
How to Build a Branched-Drain SystemNote that the following description provides a basic outline of the steps for installing this type of system, but you will need to consult other resources when you plan and install your system.
1. Assess your site. Identify the graywater pipes (shower, sink, or laundry), make sure that you can access them, and install a 3-way valve before the
3-way diverter valve
Small valve box or rigid plastic pot
ABS 1.5" or 2" double ell (aka twin 90)
ABS 1.5" or 2" double ell (aka twin 90)with inspection/clean-out port
Legend1.5" or 2" long sweep 90° bend
Optional 3-way valve actuator
Backwater valve
6
To garden1
2 5
4
2
2
To sewer
4
3
2
1
4
5
6
2
2
2
2
3
2
3
7
7
Figure 6. Branched-drain system. Source: Cleanwater Components.
S a n F r a n c i s c o G r a y w a t e r D e s i g n M a n u a l

B r a n c h e d - D r a i n S y s t e m 2 9
Figure 7. Location of the 3-way valve in a shower or sink system. Source: Art Ludwig, Oasis Design.
pipes combine with the toilet drain. Think about how the pipe could be directed to your landscape, considering obstacles like driveways or patios. Identify appropriate plants to irrigate: this type of system is best for trees, shrubs, vines, and other large perennials.
2. Obtain a graywater permit from DBI-PID. See Appendix E for more details.
3. Install a 3-way diverter valve in the drainpipe of the fixture you will be collecting graywater from (Figure 7). The valve must be installed after the p-trap and vent but before the connection to a toilet or kitchen sink drain. If you must install the valve in an inaccessible area because of space considerations, for example, in a small crawlspace, you can add a motor (called an actuator) to the valve and connect it to a switch in the bathroom or other convenient location.
4. Plumb the graywater pipe to your landscape. Follow standard plumbing techniques including strapping, maintaining a ¼-inch-per-foot gradient, using clean-outs (pipe fittings with a removable plug to allow access to the interior of a pipe, for example, for removing clogs) when needed, and properly sealing the hole you created to exit the building. When exiting the building, make sure not to damage electrical, gas, or plumbing pipes that could be located in the wall, and avoid structural beams and the building foundation. If you have any doubts about plumbing and/or drilling through floors or walls, call in a professional! Chapter 7 of the California Plumbing Code contains the drainage plumbing requirements that must be followed when you install the system.
Tubvent
Sinkvent
Toiletvent
Vents tied together12" above spill pointof highest fixture
P-trap
P-trap3-way diverter valve
Pipeto garden Vents tied together
Tosewer Clean-out
Clean-out
Backwater valve
No-hub connector
S a n F r a n c i s c o G r a y w a t e r D e s i g n M a n u a l

3 0 B r a n c h e d - D r a i n S y s t e m
5. Prepare the landscape. Dig mulch basins around the drip lines of the plants to be irrigated, trench the pipe to the plants, and construct mulch shields for subsurface irrigation (Figure 8). Make sure that the graywater is discharged at least 2 inches below ground surface and that it falls through the air onto 4 to 6 inches of mulch.
6. Pipe must slope at least 1/4 inch per foot, which is the standard slope for drainage plumbing. The burial depth of the pipe does not have to meet standard depths for sewer pipes, since this is an irrigation system. In flat yards, start with the pipe buried as shallowly as possible (approximately 2 inches), as it will get progressively deeper. If yard is downward sloping, bury the pipe deep enough to prevent it from becoming exposed over time. Consult with DBI-PID about proper depths in this situation.
7. Test the system by turning on the fixture(s), making sure that the graywater flows properly.
For more information about how to install a branched-drain system, see the book references in Appendix F.
Figure 8. Mulch shield inside of mulch basin. Note: Roots of a real tree would extend under basin and outside of drip line by many feet.
ABS PipeMulch
6"
Outlet at least2 inchesbelow surface
4 inches frombottom of pipeto bottom of shield
S a n F r a n c i s c o G r a y w a t e r D e s i g n M a n u a l

P u m p e d S y s t e m s 3 1
Pumped SystemsElectricity and Water in CaliforniaIn California, almost 20 percent of all electricity and over 30 percent of natural gas is used to pump, heat, and treat water. Graywater systems sometimes need to incorporate a pump, but the homeowner should carefully examine non-pumping options first to minimize the use of electricity. Pumped systems are most often installed when irrigation is needed uphill of the graywater source. Pumped systems can also be installed to pressurize graywater for a drip irrigation system, in which case the water must be filtered.
Overview of Pumped SystemsIn pumped systems, graywater is directed to a holding tank for temporary storage (less than 24 hours) before being pumped to the landscape. If the system is to be used for drip irrigation, the graywater must be filtered before it reaches the drip emitters (see description of manufactured systems with self-cleaning filters in the next section). The pumped system described below does not include filtration and therefore can only be used for sending graywater uphill, not for drip irrigation.
Pumped System with No FiltrationAs illustrated in Figure 9, in a pumped system with no filtration, also referred to as a “drum with effluent pump system,” graywater is directed to a watertight tank (also called a surge tank), from which an effluent pump
Pumped Systems with No FiltrationDescription: Graywater from showers, sinks, or laundry is directed to a temporary holding tank and then pumped to the landscape, which can be uphill of the graywater source(s). This system usually alters the existing plumbing and always requires a permit; an additional electrical permit might also be required for the outlet that the pump is plugged into. These systems are best suited for irrigating perennials of any size and larger annuals.
Installation: Installation difficulty varies greatly depending on the existing household plumbing. A solid understanding of plumbing is needed, as well as basic landscaping skills. If a new electrical outlet is required, electrical skills are also required.
Cost: Costs can range from $500-$700 (installed by homeowner) to a few thousand dollars (professional installation).
Figure 9. Drum with effluent pump. Source: Robert Kourik, in Drip Irrigation for Every Landscape and All Climates.
Automaticoverflow pipe
Graywaterinlet pipe
One-way sewage check valve ackwater
To sewer
Blackwater 4" pipe
Effluent pump withfloat control switch
Surge tank
One waycheck valve
Graywater out tolandscape via1" tubing, seelaundry-to-landscape systemdiagramUnion
Union
Power cordto GFCI outlet (GroundFault Circuit Interrupter)
Vent
Union
Union
Union
Note that most backwater valves must be installedin the horizontal position.
S a n F r a n c i s c o G r a y w a t e r D e s i g n M a n u a l
3 2 P u m p e d S y s t e m s
discharges water through tubing to the landscape. This system is lower in cost and easier to install than a system that includes a filter for drip irrigation, but it is less water-efficient, since the outlets are larger.
It is possible to put in simple filters to capture hair and lint “upstream” of the surge tank, thus reducing the power required of the pump, but the filters need to be cleaned regularly. Cleaning a graywater filter is a smelly, slimy, and generally unpleasant task that is sometimes left undone, leading to clogged filters, possibly graywater overflows, and other undesired consequences. It is critical to understand the maintenance requirements of your system before installing it. See the Manufactured System section for information about other filtering options.
How to Build a Pumped System with No FiltrationOnce you have determined that pumping the graywater is the only possible way to reach your landscape, the steps below provide a general overview for installing a simple pumped system with no filtration. Note that you will need to consult additional resources to build the system. Keep in mind that a pumped system is more complicated than the systems described previously.
1. Assess your site. Identify the graywater pipes (shower, sink, or laundry) and make sure you can access them. Identify a location for the surge tank and an outlet to plug in the pump. If there is an existing outlet nearby, you'll need to determine if the outlet can handle the additional electrical load of the pump. If you are unsure how to determine this, hire a professional. If you need to add an electrical outlet, an electrical permit will be required.
2. Apply to DBI-PID for a graywater permit and for an electrical permit, if a new outlet or dedicated circuit is needed for the pump.
3. Install a 3-way diverter valve in the drain line of the desired graywater fixture, after the p-trap and vent but before the connection to a toilet or kitchen sink drain.
4. Install the surge tank and route the graywater to it. Check the California Plumbing Code for requirements for how to outfit the tank. Requirements include a union fitting, vent, overflow pipe with a backwater valve, and a swing-check valve on the
S a n F r a n c i s c o G r a y w a t e r D e s i g n M a n u a l
P u m p e d S y s t e m s 3 3
graywater pipe exiting the tank. Graywater may not be stored for longer than 24 hours, so size the tank so that it empties at least once a day.
5. Direct the irrigation line to the landscape using 1-inch tubing and reducing tee fittings at each plant. Travel to the highest plant first, then irrigate the remaining plants down the slope. See Figure 3 for the laundry-to-landscape system for more details.
6. Prepare the landscape. Dig mulch basins around the drip lines of the plants to be irrigated, trench the pipe to the plants, and construct mulch shields for subsurface irrigation.
7. Test the system by turning on the fixture(s), making sure that the graywater flows properly, the pump turns on when it should, and graywater is distributed evenly to the landscape.
Materials needed for a pumped system:yy 3-way valveyy ABS fittingsyy Tankyy Effluent pump rated to pump ¾-inch solidsyy Unionsyy Backwater valveyy Swing-check valveyy 1-inch tubingyy Barbed fittings with ½-inch outlets
yy Mulch
For more information about pumped systems, see the references in Appendix F.
ReferenceCalifornia's Water-Energy Relationship." California Energy Commission, November 2005, http://www.energy.ca.gov/research/iaw/water.html
S a n F r a n c i s c o G r a y w a t e r D e s i g n M a n u a l
3 4 O t h e r G r a y w a t e r S y s t e m s
Other Graywater SystemsIn addition to the systems described previously in this manual, there are other options for designing and installing more complex graywater systems. Some of these options are briefly discussed below. New construction or full plumbing remodels can give you access to more graywater sources than are typically available in a retrofit situation. With a larger volume of graywater available, more complex options might be appropriate for your situation. These systems are usually more expensive, can distribute water to more locations, and are a more water-efficient way to irrigate. Complex graywater systems are typically found in high-end residential new construction, especially houses seeking green building certifications. Such systems always require a permit.
Dual-Drainage PlumbingIf you are building a new house or doing a major plumbing remodel, you can ask the plumber to keep the graywater drains separate from the toilet and kitchen sink drains, enabling you to access all the household graywater in one pipe. This is dual-drainage plumbing. In this scenario, the graywater and black water (toilet and kitchen sink) pipes can combine either after they exit the house or “downstream” of a convenient location for installing a 3-way valve on the graywater pipe.
Manufactured Graywater SystemsSeveral types of manufactured graywater systems are available for purchase in California, and they all require a permit for installation. Manufactured systems typically filter graywater so that it can be distributed in graywater-compatible drip irrigation tubing. Drip irrigation makes it possible to irrigate smaller plants and to spread the water out over a larger area than is possible with a laundry-to-landscape, branched drain, or unfiltered pumped system. Manufactured graywater systems are typically higher in cost than the previously mentioned simple systems. The technology of most manufactured systems is relatively new and still being developed, resulting in uncertainty about their long-term performance.
S a n F r a n c i s c o G r a y w a t e r D e s i g n M a n u a l
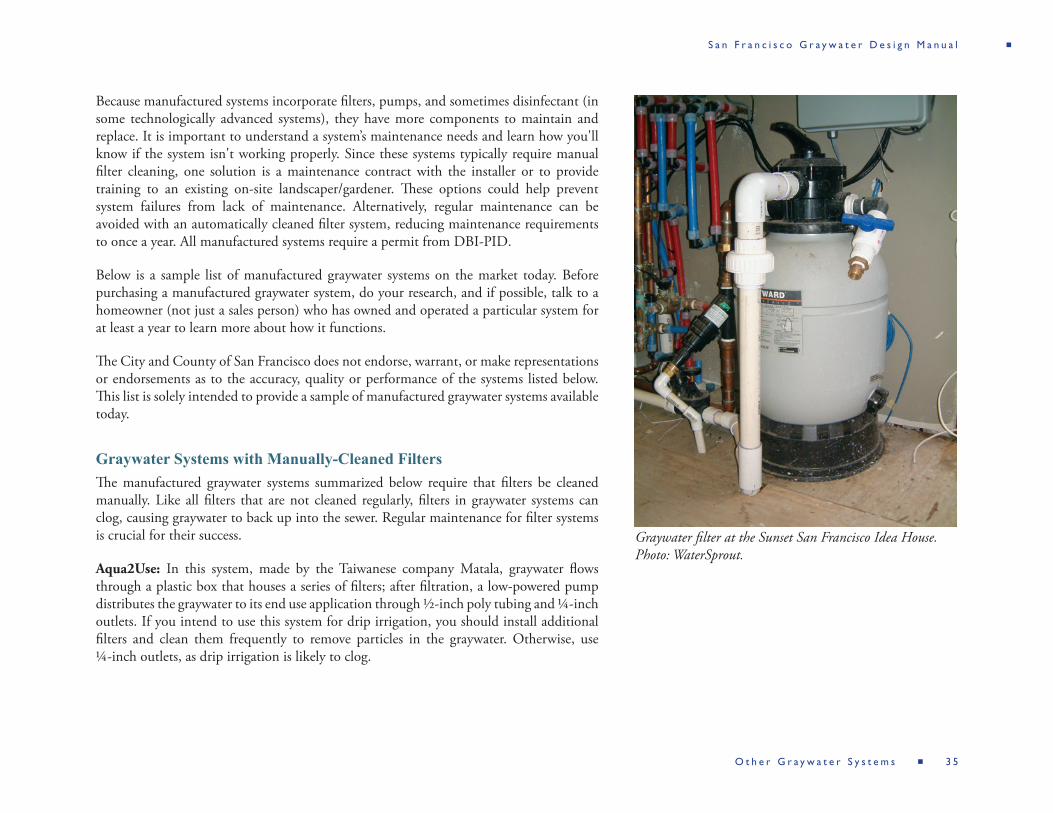
O t h e r G r a y w a t e r S y s t e m s 3 5
Because manufactured systems incorporate filters, pumps, and sometimes disinfectant (in some technologically advanced systems), they have more components to maintain and replace. It is important to understand a system’s maintenance needs and learn how you'll know if the system isn't working properly. Since these systems typically require manual filter cleaning, one solution is a maintenance contract with the installer or to provide training to an existing on-site landscaper/gardener. These options could help prevent system failures from lack of maintenance. Alternatively, regular maintenance can be avoided with an automatically cleaned filter system, reducing maintenance requirements to once a year. All manufactured systems require a permit from DBI-PID.
Below is a sample list of manufactured graywater systems on the market today. Before purchasing a manufactured graywater system, do your research, and if possible, talk to a homeowner (not just a sales person) who has owned and operated a particular system for at least a year to learn more about how it functions.
The City and County of San Francisco does not endorse, warrant, or make representations or endorsements as to the accuracy, quality or performance of the systems listed below. This list is solely intended to provide a sample of manufactured graywater systems available today.
Graywater Systems with Manually-Cleaned FiltersThe manufactured graywater systems summarized below require that filters be cleaned manually. Like all filters that are not cleaned regularly, filters in graywater systems can clog, causing graywater to back up into the sewer. Regular maintenance for filter systems is crucial for their success.
Aqua2Use: In this system, made by the Taiwanese company Matala, graywater flows through a plastic box that houses a series of filters; after filtration, a low-powered pump distributes the graywater to its end use application through ½-inch poly tubing and ¼-inch outlets. If you intend to use this system for drip irrigation, you should install additional filters and clean them frequently to remove particles in the graywater. Otherwise, use ¼-inch outlets, as drip irrigation is likely to clog.
Graywater filter at the Sunset San Francisco Idea House. Photo: WaterSprout.
S a n F r a n c i s c o G r a y w a t e r D e s i g n M a n u a l

3 6 O t h e r G r a y w a t e r S y s t e m s
GreyFlow G-Flow: The Australian company, Advanced Waste Water Systems, makes several graywater irrigation systems. Their most basic system, G-Flow, consists of a small plastic box with filters and a small pump to send graywater into compatible drip irrigation. A lower-maintenance and more sophisticated system is their GreyFlow PS Plug-in-Play System, which has a self-cleaning filter and is described in the following section.
Gray-It: This system is made by the Israeli company Green Solutions. The system has two sets of filters and a pump that sends filtered graywater into a drip irrigation system. A controller monitors how much graywater flows through the system; in case of insufficient graywater, the system brings in potable water to complete the irrigation cycle. Since this system has a connection to your home’s potable water supply, it requires an air gap protection against backflow. Talk to DBI-PID about the permitting requirements for this feature.
Self-Cleaning Filter SystemsSelf-cleaning systems require much less maintenance than those with filters requiring manual cleaning. Most self-cleaning systems use potable water to backflush the filter(s). Since most of these systems have the potential for backflow into the potable water supply, they require backflow protection and thus have additional permitting requirements. Talk to DBI-PID if you're considering a system with this feature. One self-cleaning system, GreyFlow PS Plug-in-Play, has a self-cleaning mechanism that does not require a potable water connection, which makes permitting easier and less expensive.
IrriGRAY: The IrriGRAY system is made by the company WaterReNu. (Note: this system should not be confused with an earlier version, now discontinued, that had a manually cleaned filter.) Graywater is pumped through a self-cleaning filter (backflushed by potable water) into the drip irrigation system, complete with zones and controllers. The system can be monitored remotely from a smart phone or computer.
Grey Flow PS Plug-N-Play: Made by Advanced Waste Water Systems, this system includes a filter, pump (after the filter), indexing valve, and graywater-compatible drip irrigation tubing. The indexing valve, installed ahead of the drip system, allows multiple irrigation zones without an irrigation controller, offering a simple way to regulate how much water is directed to different parts of a landscape. On a regular basis, the system automatically cleans the filter by blasting compressed air through the filter to dislodge dirt and debris,
S a n F r a n c i s c o G r a y w a t e r D e s i g n M a n u a l
O t h e r G r a y w a t e r S y s t e m s 3 7
while incoming graywater washes the debris to the sewer. Since there is no connection to the potable water supply, the system is simpler to install and may have lower permitting fees than other types of self-cleaning filter systems.
Nexus E-Water: This US-Australian company makes products that are typically installed in new construction homes, and the systems are designed for reusing graywater for irrigation or toilet flushing. The system has a four-step filtration and disinfection process and can capture and recycle heat from the graywater (using heat pump technology), thus reducing water and energy use in the home. The system also has remote monitoring capabilities.
ReWater: This California-based company offers graywater systems that have been on the marker for over 20 years, far longer than any other manufactured graywater system. The currently available self-cleaning system consists of a surge tank, pump, self-cleaning sand filter (backflushed with potable water), irrigation controllers, and a graywater-compatible drip irrigation system.
Indoor UseGraywater can be filtered, disinfected, and pumped back inside residential buildings to be used for toilet flushing and other non-potable uses. However, rigorous water quality standards must be met for indoor graywater reuse. For example, a graywater system that treats water to meet NSF 350 standards can be used for toilet flushing.
While technology has been developed to meet these standards, it can be expensive for individual homes. Currently, it may be easier for most households to use rainwater for toilet flushing and graywater for outdoor irrigation.
S a n F r a n c i s c o G r a y w a t e r D e s i g n M a n u a l

3 8 O t h e r G r a y w a t e r S y s t e m s
Glossary3-way diverter valve A valve that directs water in one of two directions: the sewer
or the landscape. Diverter valves come in different materials and sizes.
ABS Acrylonitrile butadiene styrene, a black plastic pipe used in drainage plumbing. ABS pipe is used in gravity-based graywater systems, such as branched-drain systems. ABS is cut with a saw or tubing cutters and glued together with ABS glue, also called ABS cement.
Actuator A motor that attaches to the face of a plastic 3-way valve and connects to a plug-in transformer and a toggle switch so that a graywater system can be turned on or off from another location (usually inside the house).
Auto vent (also called air admittance valve, AAV, Studor valve, in-line vent) A device that allows air to enter a drainage plumbing system. In a graywater system, it prevents water being “sucked out” or siphoned out of the washing machine while it is filling. The auto vent must be located at the high point of the graywater system. This device must not be installed on the plumbing system of the house or unit, as this is not allowed under the San Francisco Plumbing Code.
Backflow preventer An assembly that prevents water from reversing its flow direction. Backflow preventers are used to protect the municipal water system from contamination, for example, by graywater from a sand filter-to-drip irrigation system. Backflow preventer assemblies must be tested annually by a licensed tester to ensure they're working properly. A reduced pressure principle backflow preventer (RP) is required for graywater systems that include municipal make-up water and do not have an air gap.
Backwater valve A type of swing-check valve used on the overflow pipe of a graywater tank, as well as on the sewer-side of the 3-way diverter valve. Its purpose is to prevent sewage from either entering the tank or passing by a partially open 3-way valve in the event of a sewage clog.
S a n F r a n c i s c o G r a y w a t e r D e s i g n M a n u a l

G l o s s a r y 3 9
Ball valve A device that shuts off the flow through a tube or pipe when a “ball” is turned inside the valve. Only use full-port ball valves with unfiltered graywater.
Barbed fitting Fitting used in the irrigation part of a laundry-to-landscape system. The tubing fits over the barbs and can be forcibly removed if needed. The connection may not be completely watertight; if a watertight connection is required, a hose clamp can be added. A Blu-Lock fitting, a special type of irrigation fitting, can be used as an alternative to barbed fittings. Blu-Lock fittings make a watertight seal and are easy to work with.
Branched-drain system A simple graywater system that uses standard drainage plumbing parts to distribute graywater by gravity out to the landscape.
Double ell (also called twin 90, double ¼ bend) A plumbing fitting that divides the flow in a branched-drain system. Typical sizes are 1½ and 2 inches.
Drainage test A test to determine how well water drains on a site.
Drip line The outer point of the leaves on a tree or shrub, where water would drip off onto the ground in a light rain. Trees should be irrigated at or beyond their drip lines; roots typically extend at least twice the distance from the trunk to the drip line.
Dual-drainage plumbing Separate plumbing systems for separate wastewater flows. As applied to graywater systems, dual-drainage plumbing separates graywater flows (laundry, sinks, and shower/baths) from toilet and kitchen sink wastewater, enabling the entire graywater flow to be accessed in one pipe.
Effluent pump A pump designed to pump wastewater, including graywater. A graywater effluent pump should be able to pass ¾-inch solids.
S a n F r a n c i s c o G r a y w a t e r D e s i g n M a n u a l
4 0 G l o s s a r y
Emitter An outlet that discharges water into the landscape. Drip irrigation emitters have very small openings and thus must have adequate filtration if graywater is used. Unfiltered graywater requires emitters, or outlets, of at least 1/2 inch in diameter.
Evapotranspiration The combination of water transpired from plants and evaporated from soil and surfaces. The evapotranspiration rate, or ET, is one variable that determines how much irrigation plants require.
FHT (female hose thread) An adapter or fitting that has hose threads on the inside of the fitting. These hose threads are incompatible with pipe threads.
FPT (female pipe thread) An adapter or fitting that has standard pipe threads on the inside of the fitting.
Filter A device that captures lint, hair, and other particles in graywater to prevent clogging in the rest of the system.
HDPE/PE High density polyethylene or polyethylene, a type of plastic that is used in irrigation tubing. The manufacturing process for HDPE and PE produces fewer toxins than that for PVC, and they are also recyclable.
Loam Soil material that is 7 to 27 percent clay particles, 28 to 50 percent silt particles, and less than 52 percent sand particles.
Laundry-to-landscape system A type of graywater system that diverts laundry water directly to the landscape. This system does not require a permit in a one- or two-family dwelling so long as 13 guidelines are followed and the system does not alter the drainage plumbing.
MPT (male pipe thread) Pipes that have standard pipe threads on the outside of the adapter or fitting.
Manufactured system A type of graywater system purchased from a company. These types of systems usually incorporate a surge tank, a filter, and a pump.
S a n F r a n c i s c o G r a y w a t e r D e s i g n M a n u a l
G l o s s a r y 4 1
Mulch A covering, usually of organic matter, placed on the soil surface. For graywater systems, the preferred mulch is large wood chips (not shredded wood or small chips), as the large chips take longer to decompose and thus require less frequent replacement.
Mulch basin An area created by removing soil and filling the empty space with mulch. Mulch basins are typically located in the drip line of a plant and are sized according to the amount of graywater entering them. Mulch basins create a large space for graywater to spread out and sink into the ground without pooling or runoff.
Mulch shield See valve box.
Overflow A pipe exiting a surge tank to allow graywater to flow to the sewer in case of pump failure. The diameter of the overflow pipe must be at least the size of the total of all inlet pipes to the tank.
P-trap A curved, U-section of drain pipe that holds a water seal to prevent sewer gasses from entering a building through a fixture’s drain pipe.
Pathogens of concern Disease agents and viruses that enter graywater through contact with fecal matter or other infectious agents. Such pathogens could harm health if ingested.
Phytophthora (crown rot) A plant disease caused by water pooling at the base of the plant, or crown. Crown rot can be prevented by irrigating in the drip zone of the plant and locating the plant on a mound so its crown is above the elevation of the landscape.
Plot plan A simple aerial view drawing of the site, including the footprint of the building, property lines, municipal supply lines, graywater lines, and areas to be irrigated.
Pooling Pools or puddles of water at the surface. Pooling of graywater is not allowed under the California Plumbing Code and is also unsightly. Pooled graywater provides a place for mosquitoes to breed and the potential for contact by people or pets.
S a n F r a n c i s c o G r a y w a t e r D e s i g n M a n u a l

4 2 G l o s s a r y
PVC Polyvinyl chloride, a material commonly used for pipes. The manufacturing process is highly toxic, so PVC pipe use should be minimized. PVC is used to make rigid 1-inch pipe that is easy to work with.
Recycled water Treated wastewater produced by a municipal wastewater treatment plant, also referred to as reclaimed water.
Slip connection A connection of plastic fittings made by slipping one piece of pipe inside the fitting. These fittings must be glued with the appropriate glue (depending on pipe material) to create a watertight seal.
Surge tank A tank that temporarily collects graywater before it is pumped or drained out to the landscape. Surge tanks should not store graywater for longer than 24 hours.
Surfactants (anionic and nonionic) Substances used in detergents and cleaning products to loosen dirt from fabric and prevent it from re-adhering. Surfactants can be made from plants or petro-chemicals.
Swing-check valve (one-way valve) A valve that allows water to flow in one direction only. Inside the valve is a flap that swings open in one direction; if water begins to flow backward, the valve closes and prevents water from passing. These valves are used in pumped systems when the irrigated area is higher in elevation than the pump. Note: do not confuse a “swing” check valve with a “spring” check valve, as they are not the same thing.
Valve box Also called a mulch shield, a valve box is a subsurface cavity into which graywater is discharged. Graywater flows from the valve box into mulch. Air space between the outlet and the mulch prevents roots from growing back into the graywater pipe and clogging the system. Valve boxes can be purchased or made at home out of 1- to 5-gallon plastic pots, the size depending on the quantity of graywater to be discharged.
Water table The upper surface of the saturated zone, where water fills the pore spaces of soil or rock.
S a n F r a n c i s c o G r a y w a t e r D e s i g n M a n u a l

A p p e n d i x A A - 1
Appendix A: Signs for Your Graywater Systemyy Your graywater system must be labeled so
that all users (current and future) know how to turn it on and off. Sample signs are shown in the images to the right.
yy Label all above-ground graywater pipes as follows: “CAUTION: NON-POTABLE GRAYWATER, DO NOT DRINK” at intervals of 5 feet or less. Although purple pipe is not required by code for laundry-to-landscape graywater systems, it can be used so that it's clear the pipe contains non-potable water.
yy Consider putting a reminder of what soaps to use on or near your machine, particularly if you share it with other people.
Examples of labeling the 3-way valve.
S a n F r a n c i s c o G r a y w a t e r D e s i g n M a n u a l

B - 1 A p p e n d i x B
Appendix B: Operation and Maintenance Manual TemplatesSample Operation and Maintenance Manual for Laundry-to-Landscape Graywater SystemCongratulations on your new graywater system! This manual will help you maintain a well-functioning, water-saving graywater irrigation system. This manual is to remain with the building throughout the life of the system. Upon change of ownership or occupancy, the new owner or tenant must be notified that the structure contains a graywater system. A map showing the location of all graywater system components should be attached to this manual.
Insert the calculations you used to design your system here:
My washing machine uses ___________ gallons per load.
My household does ___________ loads of laundry per day on a typical laundry day.
My household does ___________ loads of laundry per week.
Soil type ____________________
This system was designed to accommodate _____________ gallons per day.
1. How do I turn my graywater system off?To turn your graywater system off, turn the handle of the 3-way valve to direct the water towards the sewer or septic system. The first few times you do this, check to make sure the system is turning off and that your 3-way valve is labeled correctly.
S a n F r a n c i s c o G r a y w a t e r D e s i g n M a n u a l

A p p e n d i x B B - 2
These are common times you'll need to turn off your system:
yy During the rainy season. Graywater may be used if there are extended dry periods during the typical rainy season, but the system must be turned off as soon as the rain resumes.
yy When washing dirty diapers.
yy When washing anything with chemicals, such as oily rags.
yy Anytime you notice that the water isn't draining well and you see pooling or runoff.
yy If you think your plants are receiving too much water.
yy Anytime you use products that are harmful to plants (like bleach or harsh cleaners).
2. What products can I use in my graywater system?It is important to use plant-friendly products when reusing your graywater. All products should be biodegradable and non-toxic. In addition, they should be free of salt (sodium) and boron (borax), two common ingredients that are non-toxic to people but are harmful to plants and/or the soil.
Chlorine bleach is harmful to plants and should be diverted, along with any other harmful products, to the sewer or septic system (by switching the 3-way valve). Hydrogen peroxide bleaches are less harmful and can be used instead of chlorine.
Another consideration with cleaning and personal care products, such as shampoos and conditioners, is their effect on the pH of the water. While many soaps do not change the water’s pH, some do. In general, liquid soaps do not affect the pH, while bar soaps make the water alkaline (opposite of acidic). Certain acid-loving plants might not be happy with alkaline water. If you're uncertain if the pH is being affected, use the graywater to irrigate plants that are not acid-loving. Acid-loving plants include ferns, azaleas, camellias, rhododendrons, and blueberries.
S a n F r a n c i s c o G r a y w a t e r D e s i g n M a n u a l
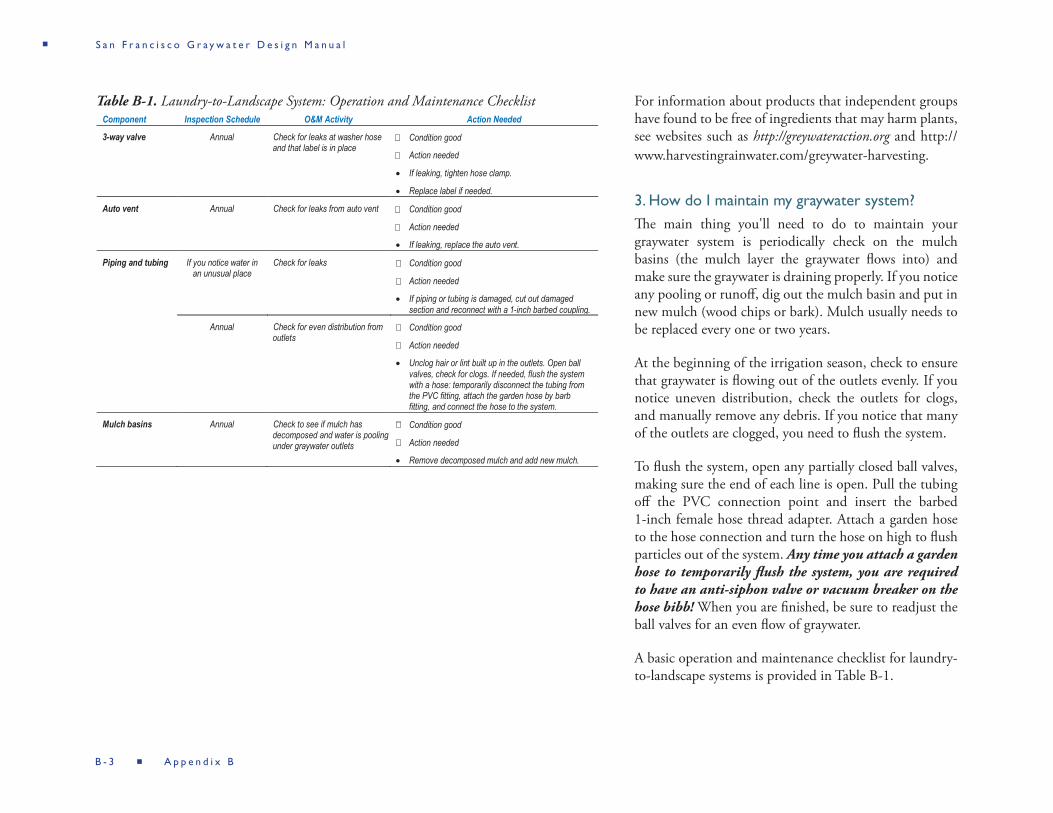
B - 3 A p p e n d i x B
For information about products that independent groups have found to be free of ingredients that may harm plants, see websites such as http://greywateraction.org and http://www.harvestingrainwater.com/greywater-harvesting.
3. How do I maintain my graywater system?The main thing you'll need to do to maintain your graywater system is periodically check on the mulch basins (the mulch layer the graywater flows into) and make sure the graywater is draining properly. If you notice any pooling or runoff, dig out the mulch basin and put in new mulch (wood chips or bark). Mulch usually needs to be replaced every one or two years.
At the beginning of the irrigation season, check to ensure that graywater is flowing out of the outlets evenly. If you notice uneven distribution, check the outlets for clogs, and manually remove any debris. If you notice that many of the outlets are clogged, you need to flush the system.
To flush the system, open any partially closed ball valves, making sure the end of each line is open. Pull the tubing off the PVC connection point and insert the barbed 1-inch female hose thread adapter. Attach a garden hose to the hose connection and turn the hose on high to flush particles out of the system. Any time you attach a garden hose to temporarily flush the system, you are required to have an anti-siphon valve or vacuum breaker on the hose bibb! When you are finished, be sure to readjust the ball valves for an even flow of graywater.
A basic operation and maintenance checklist for laundry-to-landscape systems is provided in Table B-1.
Table B-1. Laundry-to-Landscape System: Operation and Maintenance ChecklistComponent Inspection Schedule O&M Activity Action Needed
3-way valve Annual Check for leaks at washer hose and that label is in place
Condition good
Action needed
If leaking, tighten hose clamp.
Replace label if needed.
Auto vent Annual Check for leaks from auto vent Condition good
Action needed
If leaking, replace the auto vent.
Piping and tubing If you notice water in an unusual place
Check for leaks Condition good
Action needed
If piping or tubing is damaged, cut out damaged section and reconnect with a 1-inch barbed coupling.
Annual Check for even distribution from outlets
Condition good
Action needed
Unclog hair or lint built up in the outlets. Open ball valves, check for clogs. If needed, flush the system with a hose: temporarily disconnect the tubing from the PVC fitting, attach the garden hose by barb fitting, and connect the hose to the system.
Mulch basins Annual Check to see if mulch has decomposed and water is pooling under graywater outlets
Condition good
Action needed
Remove decomposed mulch and add new mulch.
S a n F r a n c i s c o G r a y w a t e r D e s i g n M a n u a l

A p p e n d i x B B - 4
4. What are the 13 guidelines I must follow to comply with the law?Under the 2016 California Plumbing Code (California Code of Regulations, Title 24, Part 5, Chapter 15), washing machine systems in one- or two-unit residential buildings do not require a permit as long as the installer follows the 13 minimum requirements outlined in the code:
1. If required, notification has been provided to the enforcing agency regarding the proposed location and installation of a graywater irrigation or disposal system.
2. The design shall allow the user to direct the flow to the irrigation or disposal field or the building sewer. The direction control of the graywater shall be clearly labeled and readily accessible to the user.
3. The installation, change, alteration or repair of the system does not include a potable water connection or a pump and does not affect other building, plumbing, electrical or mechanical components including structural features, egress, fire-life safety, sanitation, potable water supply piping or accessibility. Note: The pump in a clothes washer shall not be considered part of the graywater system.
4. The graywater shall be contained on the site where it is generated.
5. Graywater shall be directed to and contained within an irrigation or disposal field.
6. Ponding or runoff is prohibited and shall be considered a nuisance.
7. Graywater may be released above the ground surface provided at least two (2) inches (51 mm) of mulch, rock, or soil, or a solid shield covers the release point. Other methods which provide equivalent separation are also acceptable.
8. Graywater systems shall be designed to minimize contact with humans and domestic pets.
9. Water used to wash diapers or similarly soiled or infectious garments shall not be used and shall be diverted to the building sewer.
S a n F r a n c i s c o G r a y w a t e r D e s i g n M a n u a l

B - 5 A p p e n d i x B
10. Graywater shall not contain hazardous chemicals derived from activities such as cleaning car parts, washing greasy or oily rags, or disposing of waste solutions from home photo labs or similar hobbyist or home occupational activities.
11. Exemption from construction permit requirements of this code shall not be deemed to grant authorization for any graywater system to be installed in a manner that violates other provisions of this code or any other laws or ordinances of the enforcing agency.
12. An operation and maintenance manual shall be provided to the owner. Directions shall indicate the manual is to remain with the building throughout the life of the system and upon change of ownership or occupancy.
13. Graywater discharge from a clothes washer system through a standpipe shall be properly trapped in accordance with Section 1005.0
S a n F r a n c i s c o G r a y w a t e r D e s i g n M a n u a l
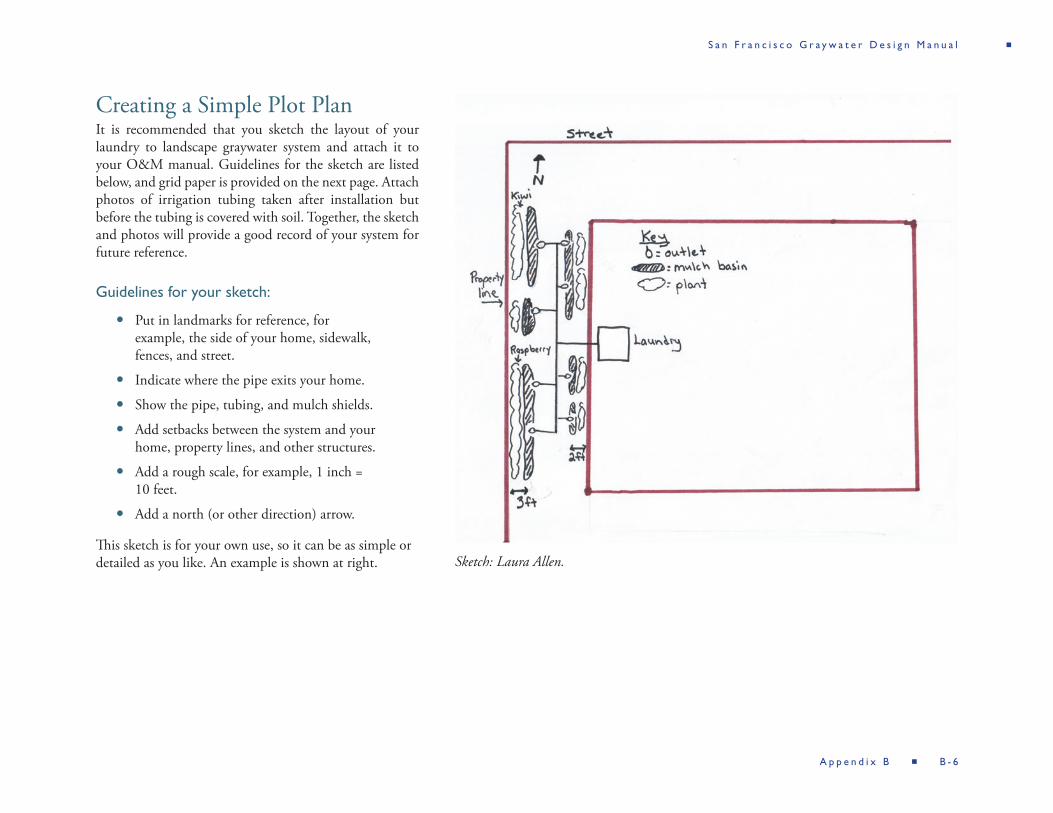
A p p e n d i x B B - 6
Creating a Simple Plot PlanIt is recommended that you sketch the layout of your laundry to landscape graywater system and attach it to your O&M manual. Guidelines for the sketch are listed below, and grid paper is provided on the next page. Attach photos of irrigation tubing taken after installation but before the tubing is covered with soil. Together, the sketch and photos will provide a good record of your system for future reference.
Guidelines for your sketch:
yy Put in landmarks for reference, for example, the side of your home, sidewalk, fences, and street.
yy Indicate where the pipe exits your home.
yy Show the pipe, tubing, and mulch shields.
yy Add setbacks between the system and your home, property lines, and other structures.
yy Add a rough scale, for example, 1 inch = 10 feet.
yy Add a north (or other direction) arrow.
This sketch is for your own use, so it can be as simple or detailed as you like. An example is shown at right. Sketch: Laura Allen.
S a n F r a n c i s c o G r a y w a t e r D e s i g n M a n u a l

Graywater System Plot Plan
Date: __________________________________________Address: __________________________________________________________

A p p e n d i x B B - 8
Sample Operation and Maintenance Manual for Branched-Drain Graywater SystemCongratulations on your new graywater system! This manual will help you maintain a well-functioning, water-saving graywater irrigation system.
This manual is to remain with the building throughout the life of the system. Upon change of ownership or occupancy, the new owner or tenant must be notified that the structure contains a graywater system. A map showing the location of all graywater system components is attached to this O&M manual.
Insert the information you used to design your system here:
Estimated graywater flow (permitted systems calculation) ___________
Soil type ____________________
Minimum size of irrigation or infiltration area required _________________
Actual size of irrigation or infiltration area _____________
Estimated graywater flow (irrigation supply calculations) ___________
1. How do I turn my graywater system off?To turn your graywater system off, turn the handle of the 3-way valve to direct the water towards the sewer or septic system. The first few times you do this, check to make sure the system is turning off and that your 3-way valve is labeled correctly.
These are common times you'll need to turn off your system.
yy During the rainy season. Graywater may be used if there are extended dry periods during the typical rainy season, but the system must be turned off as soon as the rain resumes.
yy When washing dirty diapers.
S a n F r a n c i s c o G r a y w a t e r D e s i g n M a n u a l

B - 9 A p p e n d i x B
yy When washing anything with chemicals, such as oily rags.
yy Anytime you notice that the water isn't draining well and you see pooling or runoff.
yy If you think your plants are receiving too much water.
yy Anytime you use products that are harmful to plants (like bleach or harsh cleaners).
2. What products can I use in my graywater system?It is important to use plant-friendly products when reusing your graywater. All products should be biodegradable and non-toxic. In addition, they should be free of salt (sodium) and boron (borax), two common ingredients that are non-toxic to people but are harmful to plants and/or the soil.
Chlorine bleach is harmful to plants and should be diverted, along with any other harmful products, to the sewer or septic (by switching the 3-way valve). Hydrogen peroxide bleaches are less harmful and can be used instead of chlorine.
Another consideration with cleaning and personal care products, such as shampoos and conditioners, is their effect on the pH of the water. While many soaps do not change the water’s pH, some do. In general, liquid soaps do not affect the pH, while bar soaps make the water alkaline (opposite of acidic). Certain acid-loving plants might not be happy with alkaline water. If you're uncertain if the pH is being affected, use the graywater to irrigate plants that are not acid-loving. Acid-loving plants include ferns, azaleas, camellias, rhododendrons, and blueberries.
For information about products that independent groups have found to be free of ingredients that may harm plants, see websites such as http://greywateraction.org and http://www.harvestingrainwater.com/greywater-harvesting. You can also find out what's in your products at http://www.ewg.org/skindeep/. In a shower, shampoo is fairly diluted so it is not as important as detergents in the washing machine.
S a n F r a n c i s c o G r a y w a t e r D e s i g n M a n u a l
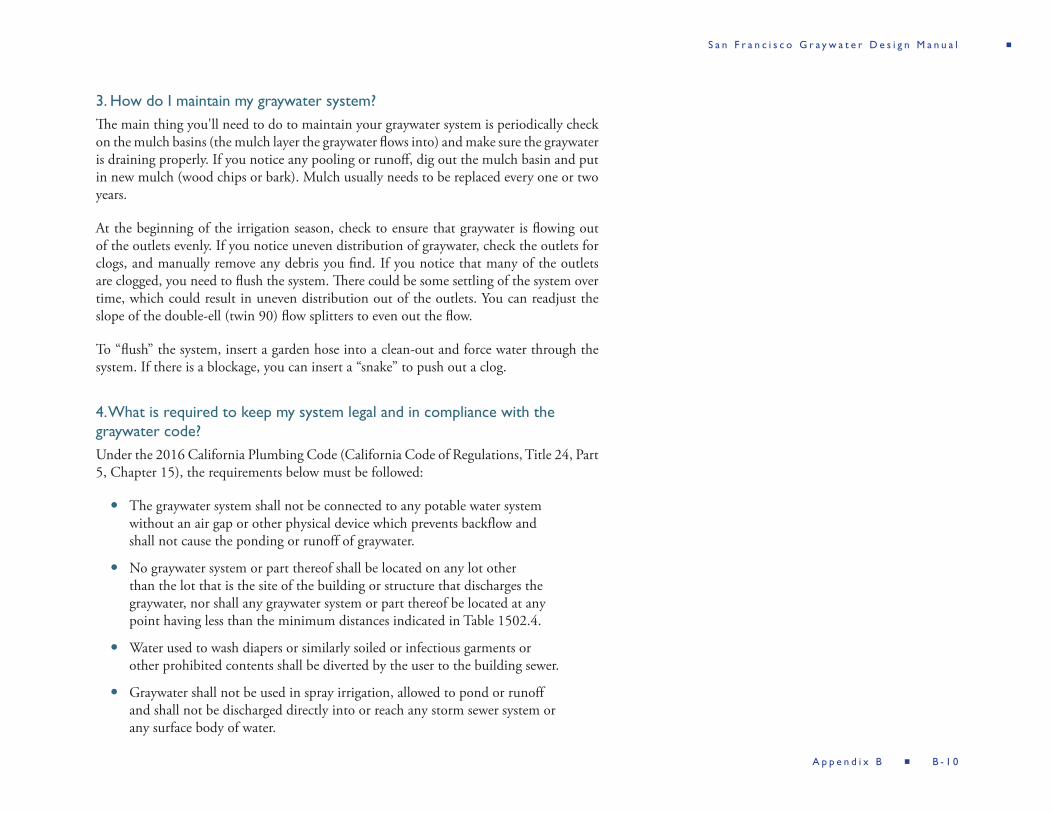
A p p e n d i x B B - 1 0
3. How do I maintain my graywater system?The main thing you'll need to do to maintain your graywater system is periodically check on the mulch basins (the mulch layer the graywater flows into) and make sure the graywater is draining properly. If you notice any pooling or runoff, dig out the mulch basin and put in new mulch (wood chips or bark). Mulch usually needs to be replaced every one or two years.
At the beginning of the irrigation season, check to ensure that graywater is flowing out of the outlets evenly. If you notice uneven distribution of graywater, check the outlets for clogs, and manually remove any debris you find. If you notice that many of the outlets are clogged, you need to flush the system. There could be some settling of the system over time, which could result in uneven distribution out of the outlets. You can readjust the slope of the double-ell (twin 90) flow splitters to even out the flow.
To “flush” the system, insert a garden hose into a clean-out and force water through the system. If there is a blockage, you can insert a “snake” to push out a clog.
4. What is required to keep my system legal and in compliance with the graywater code?Under the 2016 California Plumbing Code (California Code of Regulations, Title 24, Part 5, Chapter 15), the requirements below must be followed:
yy The graywater system shall not be connected to any potable water system without an air gap or other physical device which prevents backflow and shall not cause the ponding or runoff of graywater.
yy No graywater system or part thereof shall be located on any lot other than the lot that is the site of the building or structure that discharges the graywater, nor shall any graywater system or part thereof be located at any point having less than the minimum distances indicated in Table 1502.4.
yy Water used to wash diapers or similarly soiled or infectious garments or other prohibited contents shall be diverted by the user to the building sewer.
yy Graywater shall not be used in spray irrigation, allowed to pond or runoff and shall not be discharged directly into or reach any storm sewer system or any surface body of water.
S a n F r a n c i s c o G r a y w a t e r D e s i g n M a n u a l

B - 1 1 A p p e n d i x B
yy Human contact with graywater or the soil irrigated by graywater shall be minimized and avoided, except as required to maintain the graywater system. The discharge point of any graywater irrigation or disposal field shall be covered by at least 2 inches of mulch, rock, or soil, or a solid shield to minimize the possibility of human contact.
yy Graywater shall not be used to irrigate root crops or edible parts of food crops that touch the soil.
S a n F r a n c i s c o G r a y w a t e r D e s i g n M a n u a l
A p p e n d i x B B - 1 2
Creating a Plot PlanPermitted SystemIf your system requires a permit because you altered the existing plumbing to access sink or shower water, you will be required to submit a plan of your graywater system to DBI-PID. Contact DBI-PID for plot plan requirements. For an example of the level of detail that might be required, refer to the example plans in Appendix E of the Graywater Design Manual. Keep this plot plan with your O&M manual. Attach photos of irrigation tubing taken after installation but before the tubing is covered with soil. Together, the plan and photos will provide a good record of your system for future reference.
Unpermitted SystemIf you have a second-standpipe system for laundry graywater and have not altered the existing plumbing, it is recommended (but not required) that you sketch the layout of your graywater system and attach it to your O&M manual. Guidelines for the sketch are listed below, and grid paper is provided on the next page. Attach photos of irrigation tubing taken after installation but before the tubing is covered with soil. Together, the sketch and photos will provide a good record of your system for future reference.
Guidelines for your sketch:Put in landmarks for reference, for example, the side of your home, sidewalk, fences, and street.yy Indicate where the pipe exits your home.
yy Show the pipe, tubing, and mulch shields.
yy Add setbacks between the system and your home, property lines, and other structures.
yy Add a rough scale, for example, 1 inch = 10 feet.
yy Add a north (or other direction) arrow.
S a n F r a n c i s c o G r a y w a t e r D e s i g n M a n u a l

Graywater System Plot Plan
Date: __________________________________________Address: __________________________________________________________

A p p e n d i x B B - 1 4
Sample Operation and Maintenance Manual for Pumped Graywater SystemCongratulations on your new graywater system! This manual will help you maintain a well-functioning, water-saving graywater system.
This manual is to remain with the building throughout the life of the system. Upon change of ownership or occupancy, the new owner or tenant must be notified that the structure contains a graywater system. A map showing the location of all graywater system components is attached to this O&M manual.
1. How do I turn my graywater system off?To turn your graywater system off, turn the handle of the 3-way valve to direct the water towards the sewer or septic system. The first few times you do this, check to make sure the system is turning off when you want and that your 3-way valve is labeled correctly.
These are common times you'll need to turn off your system:
yy During the rainy season. Graywater may be used if there are extended dry periods during the typical rainy season, but the system must be turned off as soon as the rain resumes.
yy When washing dirty diapers.
yy When washing anything with chemicals, such as oily rags.
yy Anytime you notice poor drainage, causing graywater to pool or run off.
yy If you think your plants are receiving too much water.
yy Anytime you use products that are harmful to plants (like bleach or harsh cleaners).
S a n F r a n c i s c o G r a y w a t e r D e s i g n M a n u a l

B - 1 5 A p p e n d i x B
2. What products can I use in my graywater system?It is important to use plant-friendly products when reusing your graywater. All products should be biodegradable and non-toxic. In addition, they should be free of salt (sodium) and boron (borax), two common ingredients that are non-toxic to people but are harmful to plants and/or the soil.
Chlorine bleach is harmful to plants and should be diverted, along with any other harmful products, to the sewer or septic system (by switching the 3-way valve). Hydrogen peroxide bleaches are less harmful and can be used instead of chlorine.
Another consideration with cleaning and personal care products, such as shampoos and conditioners, is their effect on the pH of the water. While many soaps do not change the water’s pH, some do. In general, liquid soaps do not affect the pH, while bar soaps make the water alkaline (opposite of acidic). Certain acid-loving plants might not be happy with alkaline water. If you're uncertain if the pH is being affected, use the graywater to irrigate plants that are not acid-loving. Acid-loving plants include ferns, azaleas, camellias, rhododendrons, and blueberries.
For information about products that independent groups have found to be free of ingredients that may harm plants, see websites such as http://greywateraction.org and http://www.harvestingrainwater.com/greywater-harvesting. You can also find out what’s in your products at www.ewg.org/skindeep. In a shower, shampoo is fairly diluted so it is not as important as detergents in the washing machine.
3. How do I maintain my system?You will be required to submit a plan of your graywater system with your permit application. Contact DBI-PID for requirements. For an example of the level of detail that might be required, refer to the example plans in Appendix E of the Graywater Design Manual. Attach photos of irrigation tubing taken after installation but before the tubing is covered with soil. Together, the plan and photos will provide a good record of your system for future reference.
S a n F r a n c i s c o G r a y w a t e r D e s i g n M a n u a l
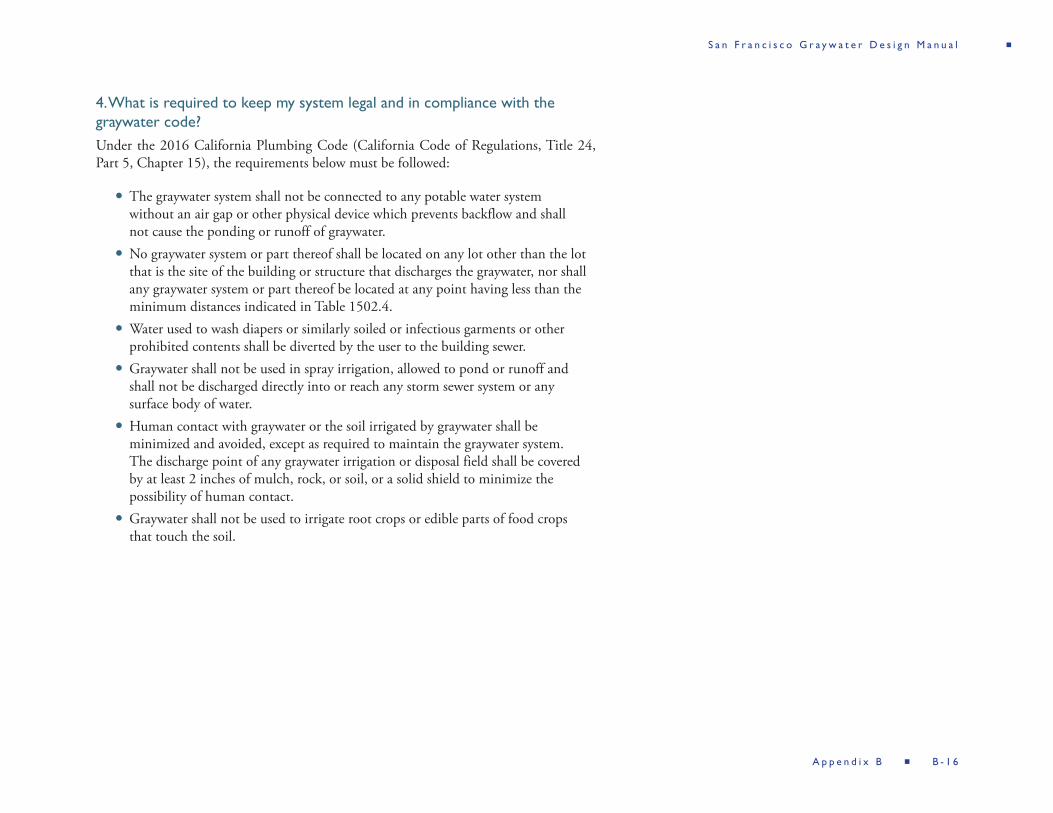
A p p e n d i x B B - 1 6
4. What is required to keep my system legal and in compliance with the graywater code?Under the 2016 California Plumbing Code (California Code of Regulations, Title 24, Part 5, Chapter 15), the requirements below must be followed:
yy The graywater system shall not be connected to any potable water system without an air gap or other physical device which prevents backflow and shall not cause the ponding or runoff of graywater.yy No graywater system or part thereof shall be located on any lot other than the lot that is the site of the building or structure that discharges the graywater, nor shall any graywater system or part thereof be located at any point having less than the minimum distances indicated in Table 1502.4.yy Water used to wash diapers or similarly soiled or infectious garments or other prohibited contents shall be diverted by the user to the building sewer.yy Graywater shall not be used in spray irrigation, allowed to pond or runoff and shall not be discharged directly into or reach any storm sewer system or any surface body of water.yy Human contact with graywater or the soil irrigated by graywater shall be minimized and avoided, except as required to maintain the graywater system. The discharge point of any graywater irrigation or disposal field shall be covered by at least 2 inches of mulch, rock, or soil, or a solid shield to minimize the possibility of human contact.yy Graywater shall not be used to irrigate root crops or edible parts of food crops that touch the soil.
S a n F r a n c i s c o G r a y w a t e r D e s i g n M a n u a l

B - 1 7 A p p e n d i x B
Creating a Plot PlanYou will be required to submit a plot plan of your graywater system with your permit application. For an example of the level of detail that might be required for simpler systems, refer to the example plans in Appendix E of the Graywater Design Manual. However, depending on system complexity, you may be required to provide additional details to DBI-PID. Contact DBI-PID for requirements. You may need to consult with a professional to assist you with your plans. Keep this plot plan with your O&M manual. Attach photos of irrigation tubing taken after installation but before the tubing is covered with soil. Together, the plan and photos will provide a good record of your system for future reference.
S a n F r a n c i s c o G r a y w a t e r D e s i g n M a n u a l

Graywater System Plot Plan
Date: __________________________________________Address: __________________________________________________________

C - I A p p e n d i x C
Appendix C: ProductsProduct Ingredients to AvoidSalt and sodium compounds: Salts can build up in the soil and prevent plants from taking up water. Over time, salt build-up can kill plants.
Boron or borax: Boron is a plant micronutrient, but once plants have their boron needs met, it quickly becomes a microtoxin that damages plants. Since boron is non-toxic to people, it is a common element in ecological detergents. To avoid boron poisoning of your plants, do not use any soap or detergent that contains boron or borax.
Chlorine bleach: Chlorine bleach kills soil microorganisms and can damage your plants. Do not use it in a graywater system! Hydrogen peroxide bleach can be used as an alternative.
Recommended Soaps and ProductsLook for products that are free of the ingredients above. For information about products that independent groups have found to be free of ingredients that may harm plants, see websites such as http://greywateraction.org and http://www.harvesingrainwater.com/. You can also read the back of detergent bottles. If a company doesn’t list all its ingredients, you’ll have no way of knowing if the product is safe for your plants or not. There are also soap alternatives for laundry machines, such as soap nuts, magnets, and balls that deionize the water.
Cleaners: Many cleaners have high levels of salts, contain harmful chemicals, and can be very basic (alkaline). In general, cleaning products made from vinegar are better for plants. Use cleaners sparingly.
Personal care products: If you are interested in learning more about the ingredients in your shampoos, conditioners, and deodorants, visit http://www.ewg.org/skindeep, a website that allows you to investigate what is in your products.
S a n F r a n c i s c o G r a y w a t e r D e s i g n M a n u a l

A p p e n d i x D D - 1
This graywater system is used to irrigate plants with similar water needs. The fruit trees and larger perennials are irrigated from the laundry machine in one “hydrozone.” Photo: Leigh Jerrard.
Table D-1. Water Needs of Some Common Plants Low
(Species Factor 0.2) Moderate
(Species Factor 0.5) High
(Species Factor 0.8)
California poppy Tulip tree Birch
Pineapple guava Apple tree Willow
European grape Fig tree Coast redwood
Bougainvillea (Most other fruit trees) Kiwi
Lemon verbena Shasta daisy White Alder
Source: Water Use Classification of Landscape Species, California Department of Water Resources.
Table D-1. Water Needs of Some Common Plants
Appendix D: What to Irrigate with Graywater and How Much Water to Use Irrigation The key to proper irrigation with low-tech graywater systems is to get an accurate estimate of how much graywater is produced and then match the available amount of graywater with the proper plants. Typically, plants with larger root zones, like trees and shrubs, can withstand times without irrigation, although they do better with regular watering.
“Hydrozoning” is keeping plants with similar water needs on the same irrigation cycle. This practice is important for conserving water in a landscape. In a landscape irrigated with graywater, it is important to put your water-loving plants in locations accessible to graywater while putting drought-tolerant plants in other areas. This way you can avoid the need for irrigation with potable water. Low-tech graywater systems typically supply only one hydrozone at a time, whereas more complex systems can supply multiple hydrozones.
The information below will help you estimate how much of your landscape can be irrigated using a graywater system.
A typical medium-sized fruit tree in San Francisco needs approximately 10 to 20 gallons of water per week during the dry season. Using this rough estimate, graywater from one load of laundry from a front-loading machine (approximately 20 gallons) could irrigate one to two trees per week; graywater from a top loader (approximately 40 gallons) could irrigate three to four trees per week.
Another easy rule of thumb for estimating plant water needs is to find the square footage of the plant's canopy and divide it by 4. This approximates the gallons per week the plant needs. For example, an apple tree with a canopy area of 80 square feet might need 80/4, or about 20 gallons per week. Note that drought-tolerant plants require much less water than estimated by this method!
You can also use an equation to estimate how much water your specific plants need. However, note that there are many variables that affect plant water needs, so any technique you use will be an approximation.The most important thing is to observe your plants and note how they are doing.
S a n F r a n c i s c o G r a y w a t e r D e s i g n M a n u a l
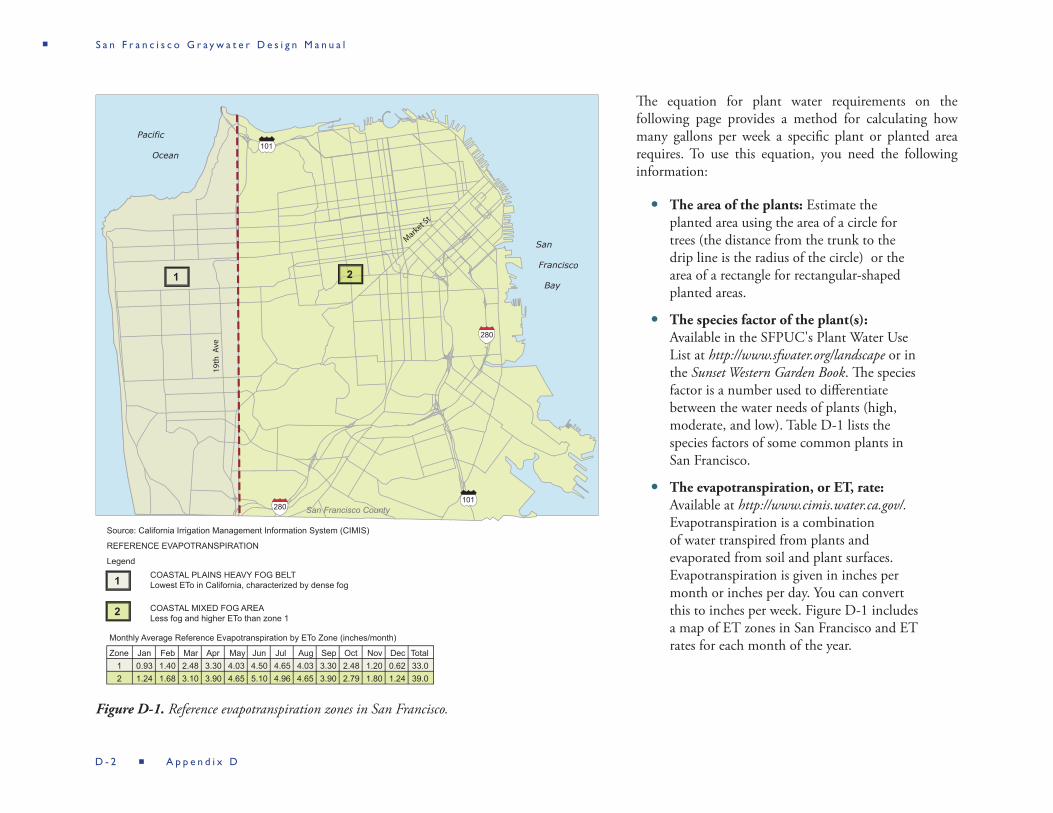
D - 2 A p p e n d i x D
The equation for plant water requirements on the following page provides a method for calculating how many gallons per week a specific plant or planted area requires. To use this equation, you need the following information:
yy The area of the plants: Estimate the planted area using the area of a circle for trees (the distance from the trunk to the drip line is the radius of the circle) or the area of a rectangle for rectangular-shaped planted areas.
yy The species factor of the plant(s): Available in the SFPUC's Plant Water Use List at http://www.sfwater.org/landscape or in the Sunset Western Garden Book. The species factor is a number used to differentiate between the water needs of plants (high, moderate, and low). Table D-1 lists the species factors of some common plants in San Francisco.
yy The evapotranspiration, or ET, rate: Available at http://www.cimis.water.ca.gov/. Evapotranspiration is a combination of water transpired from plants and evaporated from soil and plant surfaces. Evapotranspiration is given in inches per month or inches per day. You can convert this to inches per week. Figure D-1 includes a map of ET zones in San Francisco and ET rates for each month of the year.
Figure D-1. Reference evapotranspiration zones in San Francisco.
San Francisco County
LegendCOASTAL PLAINS HEAVY FOG BELTLowest ETo in California, characterized by dense fog
COASTAL MIXED FOG AREALess fog and higher ETo than zone 1
1
2
REFERENCE EVAPOTRANSPIRATION
Source: California Irrigation Management Information System (CIMIS)
Monthly Average Reference Evapotranspiration by ETo Zone (inches/month)
Mark
et St
19th
Ave
280
280
101
101
San
Francisco
Bay
Pacific
Ocean
1 2
Zone12
Jan0.93
Feb Mar Apr May Jun Jul Aug Sep Oct Nov Dec
1.241.401.68
2.483.10
3.303.90
4.505.10
4.034.65
4.654.96
4.034.65
3.303.90
2.482.79
1.201.80
0.621.24
Total33.039.0
S a n F r a n c i s c o G r a y w a t e r D e s i g n M a n u a l

A p p e n d i x D D - 3
Plant water requirements (in gallons per week) = 0.62 (conversion factor for the ET rate, converting inches to gallons) x planted area (square feet) x species factor (high, moderate, or low) x evapotranspiration (ET) rate (inches per week).
For simplicity, it is assumed that all the water goes to the roots of the plants, i.e., that the irrigation is 100 percent efficient.
Note that although July has the highest ET and thus the highest irrigation needs of the year, you don’t need to irrigate at the July rate all year long. You could decide to irrigate your plants with graywater at less than their July requirement for most of the year, knowing that your plants might need additional water in July. Alternatively, if you have more graywater than your plants need, you could irrigate your plants according to their peak need all year round, even though they don’t need that much water most of the year. If your drainage is good, slight over-watering with graywater will not harm your plants, although it is unnecessary.
To learn more about plant water requirements and evapotranspiration rates, visit the California Irrigation Management Information Systems (CIMIS) at http://www.cimis.water.ca.gov/
The website Water Wonk (www.waterwonk.us) will calculate plant water requirements for you. Sign up for a free account, create a plant list, and then click on “drip irrigation worksheet.” On this page you’ll enter the mature size of the plants and the website will tell you how much to irrigate on a weekly basis based on the ET rates for SF.
Example: Estimating How Much Water Your Plants NeedA western San Francisco household has a yard with eight small fruit trees and native plants. The homeowners currently irrigate the trees using tap water, but they would like to use graywater from their washing machine instead. The homeowners estimate that they produce 60 gallons of graywater from their washing machine per week. The drip lines of the trees are 3 feet from their trunks.
The homeowners start by making a rough estimate of how much water the trees need. Since a medium-sized fruit tree requires between 10 and 20 gallons per week, they assume that their small fruit trees will need less than 10 gallons per week, or less than a total of 80 gallons for all eight trees.
For a more accurate estimate, they use the plant water requirements formula at right. Three variables are needed for this calculation: area of the trees, species factor, and evapotranspiration (ET) rate.
Area of each tree: πr2 = 3 x 3 feet x 3 feet = 27 square feet (note that π = 3.14, but 3 is close enough for this estimate)
Species factor: 0.5 (a moderate water use plant from http://www.sfwater.org/landscape or the Sunset Western Garden Book)
July weekly ET = 1.16 and April weekly ET = 0.82. For weekly ET divide monthly ET by four (July ET 4.65/4 = 1.16)
Using the plant water requirements formula:
Weekly plant water needs in July (in gallons) = 0.62 (to convert to gallons per square feet) x 1.16 (July ET weekly) x 0.5 (species factor) x 27 square feet (area of each tree) = 9.7 gallons per week in July
Using the April ET weekly rate of 0.82, the homeowners calculate that each tree requires 6.9 gallons per week in April.
The homeowners estimate that if they split the 60 gallons equally between eight trees, each will get approximately 7 gallons a week. This is less than the peak irrigation need in July but enough for most of the year. They decide to install a laundry-to-landscape system, with graywater distributed equally to all eight trees. They plan to observe the trees in the summer. If the trees exhibit signs of water stress, they will supplement the graywater irrigation with tap water.
S a n F r a n c i s c o G r a y w a t e r D e s i g n M a n u a l

D - 4 A p p e n d i x D
EdiblesYou can safely irrigate edible crops with graywater, as long as the graywater does not touch the edible part of the plant. For example, the California graywater code prohibits watering root crops like carrots with graywater. It is possible that the graywater could come into contact with the carrots, and someone who ate a carrot without washing it first could ingest graywater. It is generally easier to irrigate perennial plants and trees with graywater, but good edibles to water can be fruit trees, fruiting vines, berries, and large perennials.
Any system that uses drip irrigation tubing can water all types of vegetables with the edible portion above the ground. Vegetable beds with larger annuals and food above the ground, like corn, beans, tomatoes, etc. can be watered with laundry and pumped systems, since it is easier to spread out the water to reach these plants using pumped systems. In contrast, it is not as easy to irrigate vegetables with gravity-fed, branched-drain systems.
Easy Plants to Wateryy Fruit trees adapted to your local microclimate
yy Berries
yy Riparian plants that like irrigation (willow, maple, birch, water-loving plants)
yy Any plant that likes to be irrigated
What Not to Wateryy Root crops. Reason: Health risk. Someone ingesting a root crop without washing it could ingest graywater. The graywater code prohibits irrigation of root crops.
yy Drought-established plants. Reason: Risk to plant. Plants that have never been watered before, like an oak tree, or an old citrus that was never irrigated, are used to extended dry periods and could be damaged by sudden frequent irrigation.
yy Possibly acid-loving plants (depending on the pH of graywater). Reason: Risk to plant. Graywater tends to be basic (alkaline), and acid-loving plants might not do well with basic irrigation water. You can use pH-neutral liquid laundry detergents and put acidic bark in mulch basins to create acidic soil conditions. Common acid-loving plants include ferns, azaleas, rhododendrons, camellias, and
Graywater irrigates this row of fruit trees. Thick mulch from a local tree company has been placed over the pathway, as well as inside the mulch basins. Photo: Leigh Jerrard.
S a n F r a n c i s c o G r a y w a t e r D e s i g n M a n u a l

A p p e n d i x D D - 5
blueberries. You can look up the pH needs of your plants in a plant or gardening book. If the book doesn't mention pH or acidic conditions, it is generally safe to assume the plant doesn't need acidic conditions, as garden plants commonly prefer neutral or slightly alkaline conditions.
yy Very sensitive plants. Reason: Risk to plant. Plants that are generally hard to grow, like some ferns and avocados, might not be a good choice for graywater irrigation.
Soil HealthTo have healthy plants, you need healthy soils! Soils are alive with billions of beneficial organisms. These are some easy steps you can take to promote healthy soils in your yard:
yy A few times a year, irrigate with rainwater or freshwater. A rainy day counts!
yy Add compost to your soil
yy Use mulch
yy Don't use chemical pesticides or fertilizers
yy Only use plant-friendly products; salts and chlorine bleach can harm soil and soil microbes
ReferencesCalifornia Irrigation Management Information Systems (CIMIS) at: http://www.cimis.water.ca.gov
Sunset Western Garden Book
California Department of Water Resources Water Use Classification of Landscape Species at: http://www.water.ca.gov/wateruseefficiency/landscape
SFPUC Plant Water Use List at: sfwater.org/landscape
S a n F r a n c i s c o G r a y w a t e r D e s i g n M a n u a l

E - 1 A p p e n d i x E
Sample plot plan showing the street, building, setbacks, location of irrigation area, and size of mulch basins.
Sample laboratory results from a soil texture analysis.
Appendix E: Example of Successful Plumbing Permit Application with Sample Plot PlansThe following is a simplified example of the design and permitting steps followed by two San Francisco homeowners when they installed a branched-drain graywater system. Samples of the documentation submitted with their permit application are included. Elements of this example have been fictionalized for simplicity and clarity.
Note that if you are installing your own system, you will need to consult the applicable sections of this manual for an overview of installation requirements for your system, as well as consult additional resources for further details on branched-drain systems.
Step 1: Estimated the gallons of graywater generated by the shower fixture in a one-bedroom home using the permitted systems estimation method on page 9 of this manual.
yy One-bedroom home = 2 occupants
yy System uses graywater from a shower only: 25 gpd x 2 people = 50 gpd
Step 2: Identified the soil type.
Soil ribbon test indicated soil to be sandy loam. Soil was also sent to a laboratory for soil texture analysis, which confirmed the soil to be sandy loam.
Step 3: Calculated minimum irrigation, or infiltration, area based on soil type and gallons of graywater generated per day. This process is described on page 13 of this manual.
yy As shown in Table 2 of this manual, “sandy loam soil” needs 0.4 square feet of infiltration area per gallon per day.
yy 0.4 square feet per gallon per day x 50 gpd = 20 square feet
S a n F r a n c i s c o G r a y w a t e r D e s i g n M a n u a l

A p p e n d i x E E - 2
Sample plumbing detail showing the 3-way valve connection after the p-trap and vent; pipe size shown as 2-inch, which is required for a shower drain.
Sample graywater permit.
Step 4: Drew a plot plan (previous page) and plumbing detail (at right).
yy In the plot plan, the flow was divided into seven outlets, with basins of 7 square feet each, totaling 49 square feet of infiltration area. This number is significantly higher than the minimum 20 square feet calculated using Table 2 of this manual, as the homeowners designed their system to spread the graywater out to many plants across their yard.
yy The plumbing diagram on the right shows the 3-way valve located after the p-trap and vent, as well as the size of pipe used. The graywater pipe is 2-inch ABS (plastic) since it is for irrigation, while the rest of the plumbing is cast iron.
yy House had up-to-code plumbing, so it did not need to be upgraded.
Step 5: Applied for a permit.
Step 6: Constructed the system.
yy Installed the system. This system started with the pipe shallowly buried (approximately 2 inches) and got deeper as the system progressed.
yy Tested system.
yy Buried straight runs of pipe. Runs with bends were left exposed for inspection.
yy Labeled above-ground pipe.
yy Labeled 3-way valve.
yy Attached O&M manual under the 3-way valve.
Step 7: Called DBI-PID to schedule an inspection.
S a n F r a n c i s c o G r a y w a t e r D e s i g n M a n u a l

E - 3 A p p e n d i x E
Sample image of a completed graywater system after installation and planting. Photo: Josh Lowe.
Sample image of a graywater system pre-burial. Photo: Josh Lowe.
Mulch basin2 feet
Sample image of a 3-way valve clearly labeled. Photo: Josh Lowe.
Sample image of a completed graywater system after one year of operation and plant growth. Photo: Josh Lowe.
Step 8: Operated the system.
Notes from the homeowers one year after installing the graywater system: "The graywater system is going great. We have not watered the yard with anything but the graywater since the weekend after we planted the plants. They are doing great and the ground cover is really taking off too."
S a n F r a n c i s c o G r a y w a t e r D e s i g n M a n u a l

A p p e n d i x F F - 1
Appendix F: Information and ResourcesSan Francisco InformationSan Francisco Public Utilities Commission:
Water Resources Division 525 Golden Gate Avenue, San Francisco, CA 94102Email: [email protected]://sfwater.org/graywater
San Francisco Department of Building Inspection - Plumbing Inspection Division:1660 Mission Street, San Francisco, CA 94103Tel: (415) 558-6088 Email: [email protected]://www.sfdbi.org
San Francisco Department of Public Health:101 Grove Street, San Francisco, CA 94102-4505 Tel: (415) 554-2625 http://www.sfdph.org/
California Graywater Regulations: California Plumbing Code, Chapter 15: "Alternate Water Sources for Nonpotable Applications." https://archive.org/details/gov.ca.bsc.title24.2016.05
Additional ResourcesNote that the following lists are not comprehensive and contain only a few of the resources available to homeowners designing and installing graywater systems. The inclusion of these organizations and resources is intended to assist homeowners and designers in their process and does not imply any endorsement by the SFPUC.
Websites
Oasis Design: http://www.oasisdesign.net/greywaterGreywater Action: http://www.greywateraction.orgWhollyH2O: http://www.whollyh2o.org/
S a n F r a n c i s c o G r a y w a t e r D e s i g n M a n u a l

F - 2 A p p e n d i x F
Books
Greywater, Green Landscape by Laura Allen, 2017.The Water-Wise Home: How to Conserve, Capture, and Reuse Water in Your Home and Landscape, by Laura Allen, 2015.Create an Oasis with Greywater, by Art Ludwig. 19th Revision, Oasis Design. 2009.Golden Gate Gardening: Year-Round Food Gardening in the San Francisco Bay Area and Coastal California, by Pam Pierce. 1998.
Classes
Greywater Action: http://www.greywateraction.org/The Ecology Center: http://www.ecologycenter.org/The Garden for the Environment: http://www.gardenfortheenvironment.org/
Plants
Sunset Western Garden Book Water Use Classification of Landscape Species: http://www.water.ca.govSFPUC Plant Water Use List: http://sfwater.org/landscapeWater Wonk: http://www.waterwonk.us
S a n F r a n c i s c o G r a y w a t e r D e s i g n M a n u a l

A p p e n d i x F F - 3
Laboratories for Soil Analyses
A&L Western Agricultural Laboratories 1311 Woodland Ave #1 Modesto, CA 95351 Telephone: (209) 529-4080 http://www.al-labs-west.com/
Control Laboratories 42 Hangar Way Watsonville, CA 95076 Telephone: (831) 724-5422 http://controllabwatsonvilleca.com/
Waypoint Analytical 1101 S. Winchester Boulevard, Suite G-173 San Jose, CA 95128 http://www.waypointanalytical.com/ (408) 727-0330 [Note: The Soil and Plant Laboratory refers to soil analysis as the "USDA Particle Size" test].
Materials
Urban Farmer Store (kits for laundry-to-landscape systems): http://urbanfarmerstore.comClean Water Components (kits for graywater systems): http://cleanwatercomponents.comLocal tree trimmers (for wood chips)SFPUC Graywater Program (for discounted laundry-to-landscape kits and graywater permit rebates): http://sfwater.org/graywater
S a n F r a n c i s c o G r a y w a t e r D e s i g n M a n u a l

“Water is the most critical resource issue of our lifetime and our children’s lifetime. The health of our waters is the principal measure of how we live on the land.”
- Luna Leopoldgraywater design manualFOR OUTDOOR IRRIGATION
SAN FRANCISCO
Printed on post-consumer recycled paper.