grimmspeed install guide series installing the grimmspeed ...€¦ · grimmspeed install guide...
TRANSCRIPT

GrimmSpeed Install Guide Series Installing the GrimmSpeed 2015+ WRX Boost Control Solenoid
Updated 4/14/15
Introduction: This guide will illustrate the installation of the GrimmSpeed 2015+ WRX Boost Control Solenoid. The difficulty here is medium, so take your time and enjoy the job! Expect to spend 30-60min, depending on level of experience.
Tools: The tools listed below are suggested for this task. Optional tools are noted.
- Flathead and phillips screwdrivers - Pliers - 10mm, 12mm socket and accompanying extensions/ratchet - 10mm wrench
Tips: Take care not to over tighten the plastic tapping screws and damage the threads on the plastic turbo inlet. Also, be sure that your vacuum lines are routed such that they aren’t tight or rubbing on sharp edges.

Procedure:
1. Begin by collecting your tools and popping your hood (helps provide light). Next, safely raise the front of the vehicle and support it with jackstands or ramps.
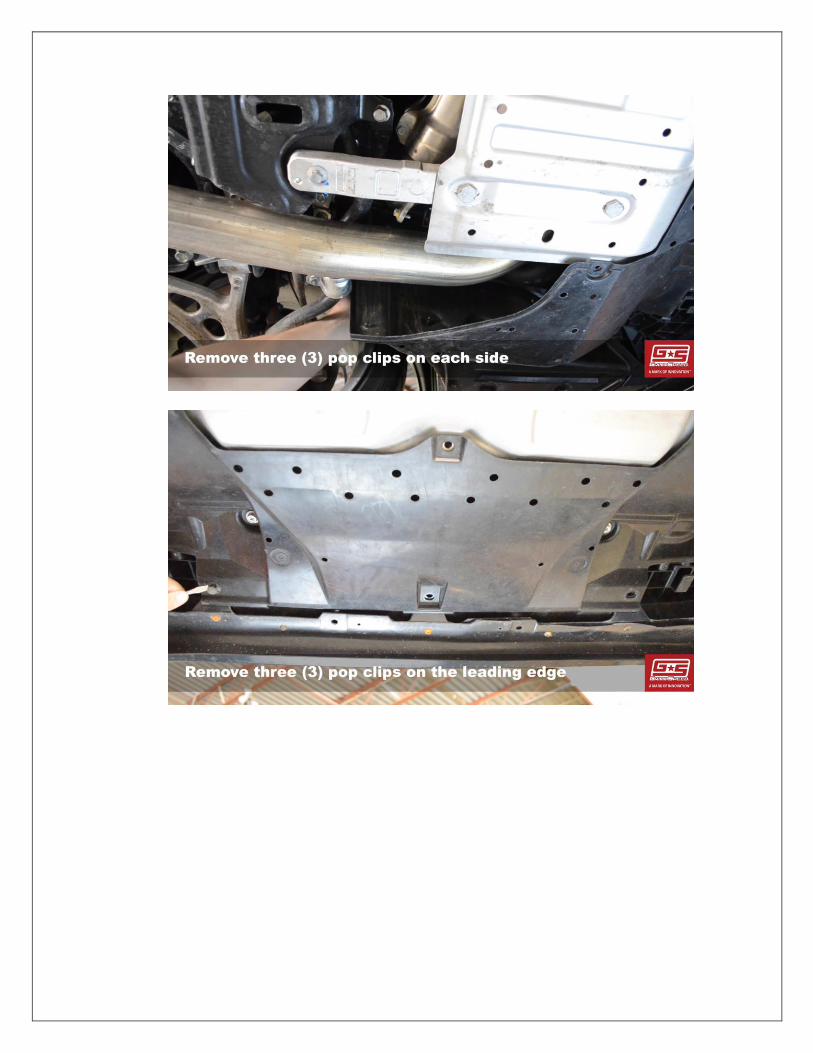
2. Next, remove the factory splash guard. You’ll need to remove four pop clips surrounding the skid plate, three clips on each side of the car and then three clips along the leading edge of the splash guard. Lastly, use a 12mm socket to remove the two bolts securing the front of the splash guard.

3. Next, remove the factory skid plate by removing the four 12mm bolts securing it. Be sure to support its weight when removing the final bolts.
4. Remove the factory vacuum lines that go to the turbo, wastegate and OEM solenoid.

5. Disconnect the two large hoses that are attached to the turbo inlet. One has a spring clamp that you’ll need to move using your pliers. At this time, you can also disconnect the small vacuum hose that’s attached to the bypass valve. No clamp here, so just tug on it.

6. Reach behind the turbo and disconnect the factory wiring harness from the OEM boost control solenoid.
7. Next, disconnect the intake from the turbo inlet using a properly sized socket or a flathead screwdriver.

8. Remove the two 10mm bolts securing the plastic turbo inlet to your turbo using a 10mm wrench or socket.
9. Loosen the hose clamp securing the bypass valve to the charge pipe. We’ll be leaving the bypass valve installed on the turbo inlet and removing the entire assembly, so make sure the clamp is plenty loose before working the inlet free from the car.

10. Remove the two Philips screws securing the factory boost control solenoid to the turbo inlet. You may need to twist the bypass valve out of the way to get access to one of the screws, just remember to twist it back later. Once the two screws have been removed, remove the factory solenoid and set it aside.

11. Install the GrimmSpeed solenoid assembly into the turbo inlet. You should feel a small amount of resistance from the pre-installed o-ring before it pops into place. Use the two provided plastic tapping screws to secure the solenoid, tightening only until they are seated flat against the machined adaptor.

12. Double check that the factory turbo inlet rubber gasket is still seated into the inlet and is clear of debris. This is what seals your intake system to your turbo.
13. Finally, reinstall the turbo inlet assembly into the car in the reverse order that we used to remove it in steps 4 through 9. Be very careful not to cross thread the 10mm bolts into your turbo. They should be easily installed by hand. If you feel any resistance, try repositioning the turbo inlet before continuing.

14. Reach behind the turbo and connect the GrimmSpeed solenoid to the factory wiring harness.
15. Cut a piece of vacuum line to fit between the center port of the BCS (port 3) and the turbo nipple. Secure each end with a zip tie and carefully trim the excess.

16. Cut another piece of vacuum hose to length and fit it between the remaining port on the BCS (port 2) and the internal wastegate behind the turbo. Secure each of these with a zip tie as well.
17. Finally, double check all connections (don’t forget the bypass valve vacuum line!), reinstall the factory skid plate and splash guard and let your tuner know that you’re ready to make some power!

That’s it! You should be all set to go. Check the assembly periodically to make sure everything is still snug. As this solenoid is a definite upgrade to your boost control system and will affect the way that it performs, it is highly recommended that you
work with a tuner to ensure that your car is controlling boost properly!
Don’t hesitate to contact us directly with any questions! [email protected] | 612-379-0000