guide to cafebonappetit · reason you cannot “remove” a station is that it will delete all of...
TRANSCRIPT

GUIDE TO CAFEBONAPPETIT.COM
1
Table of Contents
Click on the heading to go directly to that section. I. Accessing the Menu System (Café Manager) ................................................................................... 2
II. Lost Password Procedures ................................................................................................................ 2
III. Changing or Adding Permissions to Your Café Manager Login Credentials ..................................... 3
IV. Café Setup ......................................................................................................................................... 3
V. Café Stations ..................................................................................................................................... 6
VI. Café Day Parts & Hours ..................................................................................................................... 7
VII. Menu Items ..................................................................................................................................... 11
VIII. Adding Multiple Sizes and Pricing ................................................................................................... 13
IX. Editing an Existing Item ................................................................................................................... 16
X. Repositioning Items ........................................................................................................................ 17
XI. Sides ................................................................................................................................................ 17
XII. Static (Recurring) Items ................................................................................................................... 18
XIII. BAMCO Custom Spelling Checker ................................................................................................... 20
XIV. Saving Time: Cloning, Multiple Day Parts/Days, Borrowing from Searchable Database ................ 22
XV. Printing Station Signage .................................................................................................................. 28
XVI. Monotony Breakers ........................................................................................................................ 35
XVII. Print Menu for Staff ........................................................................................................................ 36
XVIII. Menu Spreadsheet, Daily Usage Tracking, Time & Temperature Logs ........................................... 37
XIX. Farm to Fork .................................................................................................................................... 40
XX. Meet the Team | Contact Us .......................................................................................................... 43
XXI. Menu Mail ....................................................................................................................................... 43
XXII. Menu Mail Promotions ................................................................................................................... 47
XXIII. Community Events on Cafebonappetit.com ................................................................................... 52
XXIV. View Your Campus’s Cafebonappetit.com Statistics ...................................................................... 53
XXV. Digital Signage in Your Café(s) ........................................................................................................ 55
XXVI. Sales Proposals ................................................................................................................................ 56
STILL NEED HELP? Contact your RMD or [email protected]

2
I. Accessing the Menu System (Café Manager)
A. Go to www.cafebonappetit.com/cafemanager.
B. If this is your first time logging in since 1 P.M. PST on Thursday, July 10, 2014, enter your
unit’s 5-digit cost center and your password (bamco123).
C. You will then be prompted to create a new individual login, which is your 8-digit personnel
number (employee ID #).
NOTE: Do NOT use your STAFF Clock-In ID, which has an extra digit at the end. Use the 8-
digit personnel number that is on your paycheck.
D. If you don’t have an 8-digit personnel number, or need help, contact cba-
[email protected] or your RMD for assistance.
E. Next, create your private password, which needs to be 8+ characters with at least 1
number and 1 letter.
F. Choose an email address where your password reset information will be sent in the event
you forget your password.
G. Once activated, continue to log in using your 8-digit employee ID number and your new
password.
II. Lost Password Procedures
A. If you forget your password, click on “Forgot password?”.
B. You will be asked for your email you used when setting up your café manager login.
C. You will receive an email with a reactivation code:
3
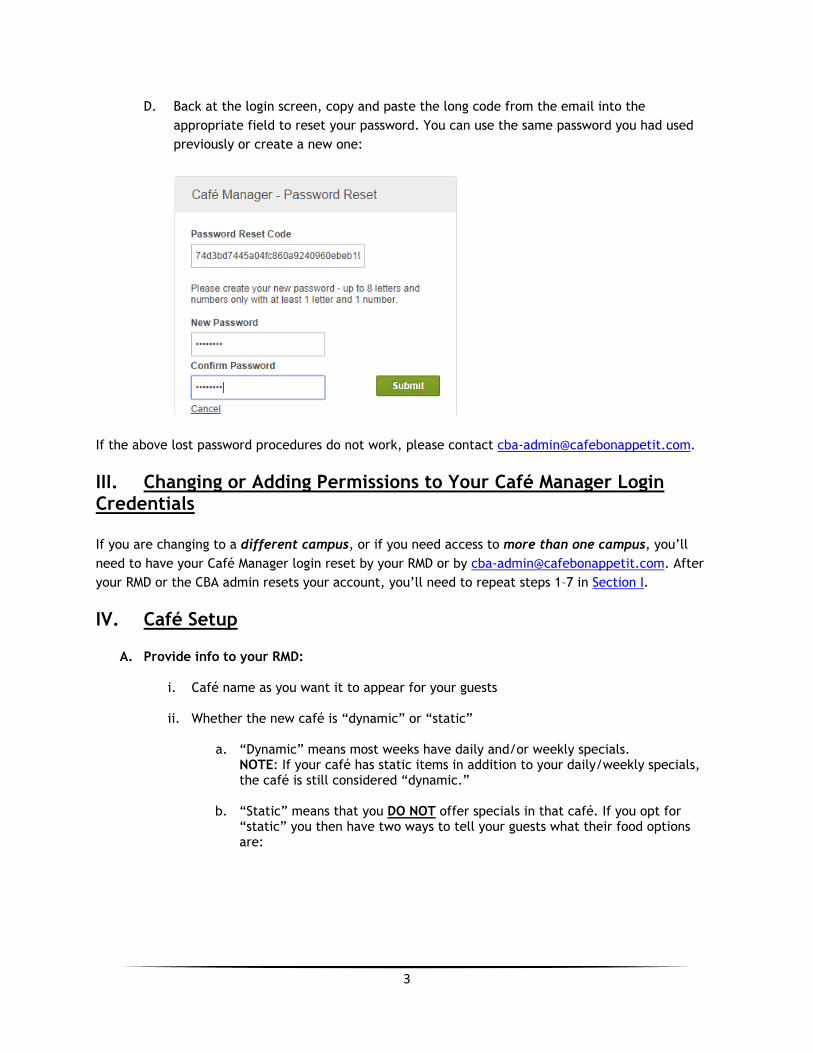
D. Back at the login screen, copy and paste the long code from the email into the
appropriate field to reset your password. You can use the same password you had used
previously or create a new one:
If the above lost password procedures do not work, please contact [email protected].
III. Changing or Adding Permissions to Your Café Manager Login Credentials
If you are changing to a different campus, or if you need access to more than one campus, you’ll
need to have your Café Manager login reset by your RMD or by [email protected]. After
your RMD or the CBA admin resets your account, you’ll need to repeat steps 1–7 in Section I.
IV. Café Setup
A. Provide info to your RMD:
i. Café name as you want it to appear for your guests
ii. Whether the new café is “dynamic” or “static”
a. “Dynamic” means most weeks have daily and/or weekly specials. NOTE: If your café has static items in addition to your daily/weekly specials, the café is still considered “dynamic.”
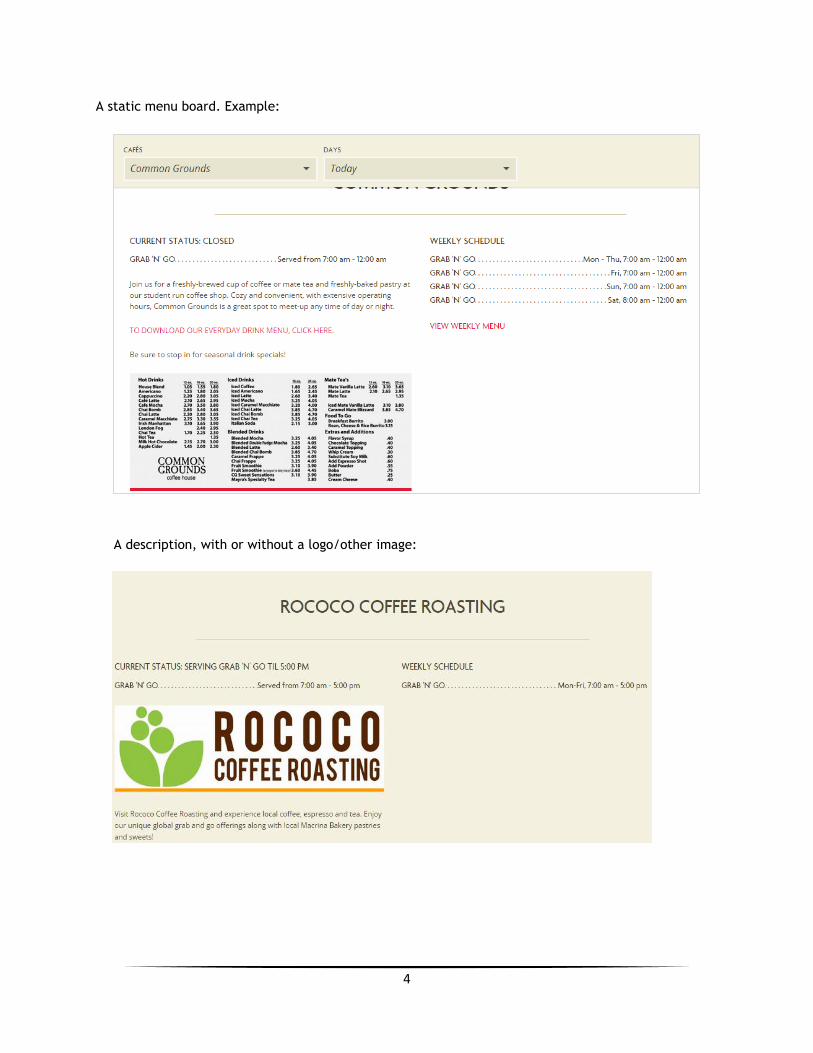
b. “Static” means that you DO NOT offer specials in that café. If you opt for “static” you then have two ways to tell your guests what their food options are:
4
A static menu board. Example:
A description, with or without a logo/other image:
5
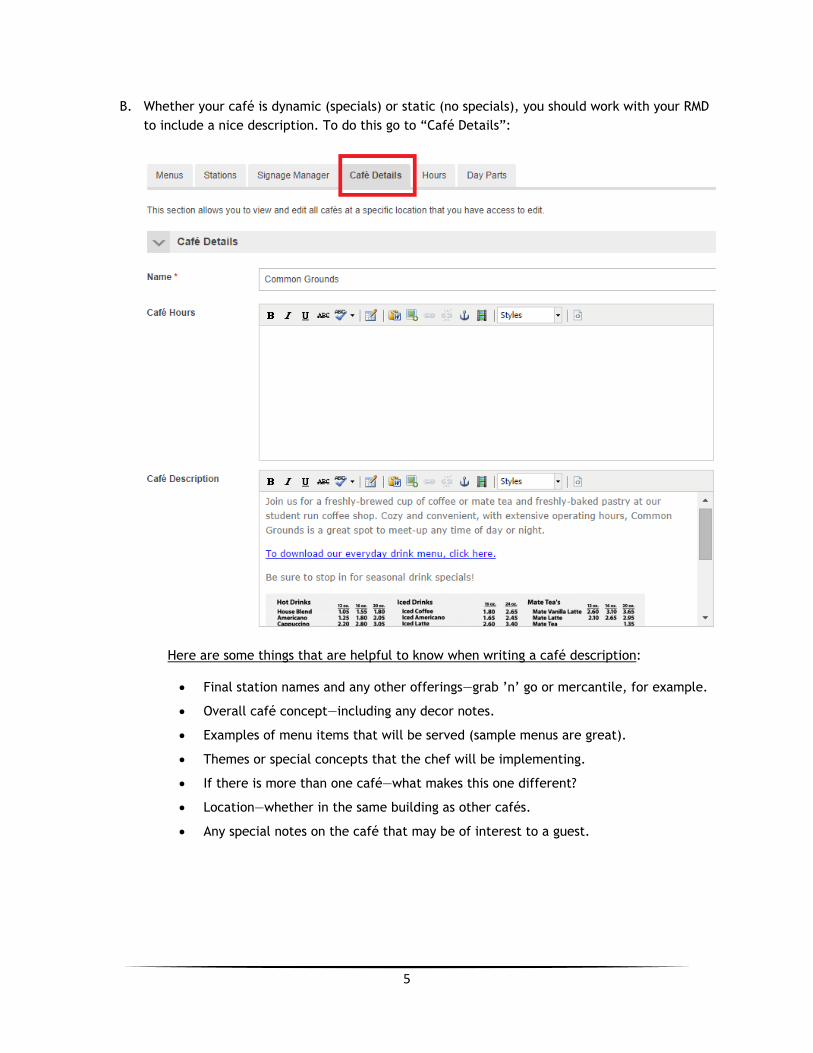
B. Whether your café is dynamic (specials) or static (no specials), you should work with your RMD
to include a nice description. To do this go to “Café Details”:
Here are some things that are helpful to know when writing a café description:
Final station names and any other offerings—grab ’n’ go or mercantile, for example.
Overall café concept—including any decor notes.
Examples of menu items that will be served (sample menus are great).
Themes or special concepts that the chef will be implementing.
If there is more than one café—what makes this one different?
Location—whether in the same building as other cafés.
Any special notes on the café that may be of interest to a guest.
6
C. Examples of nice café descriptions:
“Café Elevate, located at 580 N. Mary Avenue on the 5th floor in Sunnyvale, offers
uninterrupted, panoramic tree-top views. With an emphasis on culinary greatness, our chefs
create culturally inspired menus of Mediterranean, Spanish, Asian, Italian, and Japanese
cuisines. Our menu changes frequently to keep your appetite intrigued.”
“The Plaza Café is a perfect place start to your morning. Enjoy coffee, seasonal fruits and
healthy options, or a hearty breakfast special.”
“Come back for lunch when you can choose from traditional dishes, featured international
favorites, imaginative vegetarian and vegan entrées, nutritious salads, and made-from-scratch
soups. Every day, you’ll find abundant local, sustainable and satisfying selections!”
“Join us for a freshly brewed cup of coffee or mate tea and freshly baked pastry at our
student-run coffee shop. Cozy and convenient, with extensive operating hours, Common
Grounds is a great spot to meet up any time of day or night.”
“The River Room provides an opportunity to enjoy a relaxed lunch in a casual atmosphere with
a beautiful view! The River Room features a fresh and local salad bar with a buffet selection of
all of your favorite entrées, vegetables, soups, and desserts made from scratch daily.”
D. Enter any custom day parts and the new café’s hours. See Section VI below.
E. Enter your menus. See Section VII below.
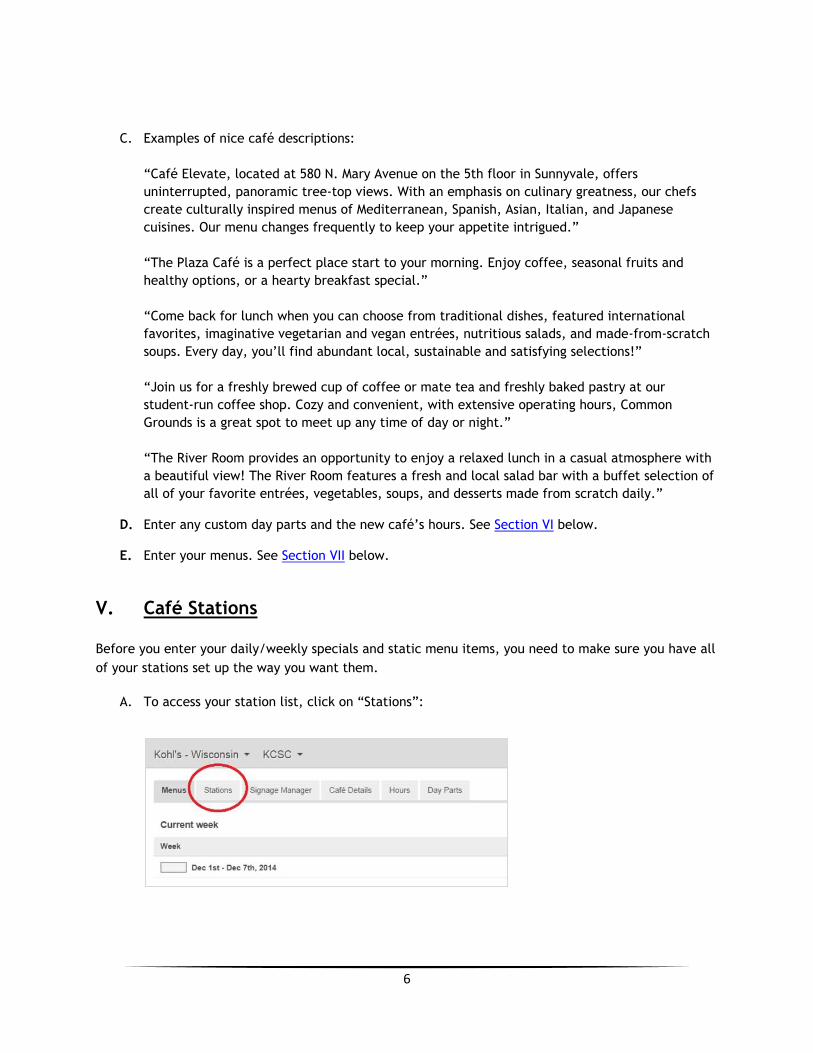
V. Café Stations
Before you enter your daily/weekly specials and static menu items, you need to make sure you have all
of your stations set up the way you want them.
A. To access your station list, click on “Stations”:
7
B. You can then edit the names of the stations, hide stations from your weekly calendar, add new
stations, and change the order of your stations:
NOTE: Order determines the order the stations are listed on your weekly calendar view, on the print
menu for staff, and for your guests. Make sure to put your most important stations higher up to
minimize scrolling for you and to feature those specials for your guests on Cafebonappetit.com.
NOTE: You cannot “remove” a station if any specials have ever been assigned to that station. The
reason you cannot “remove” a station is that it will delete all of the menu items from the database.
Instead, you can elect to “hide” a station. When you “hide” a station, the station and any items
associated with it will no longer appear on the calendar.
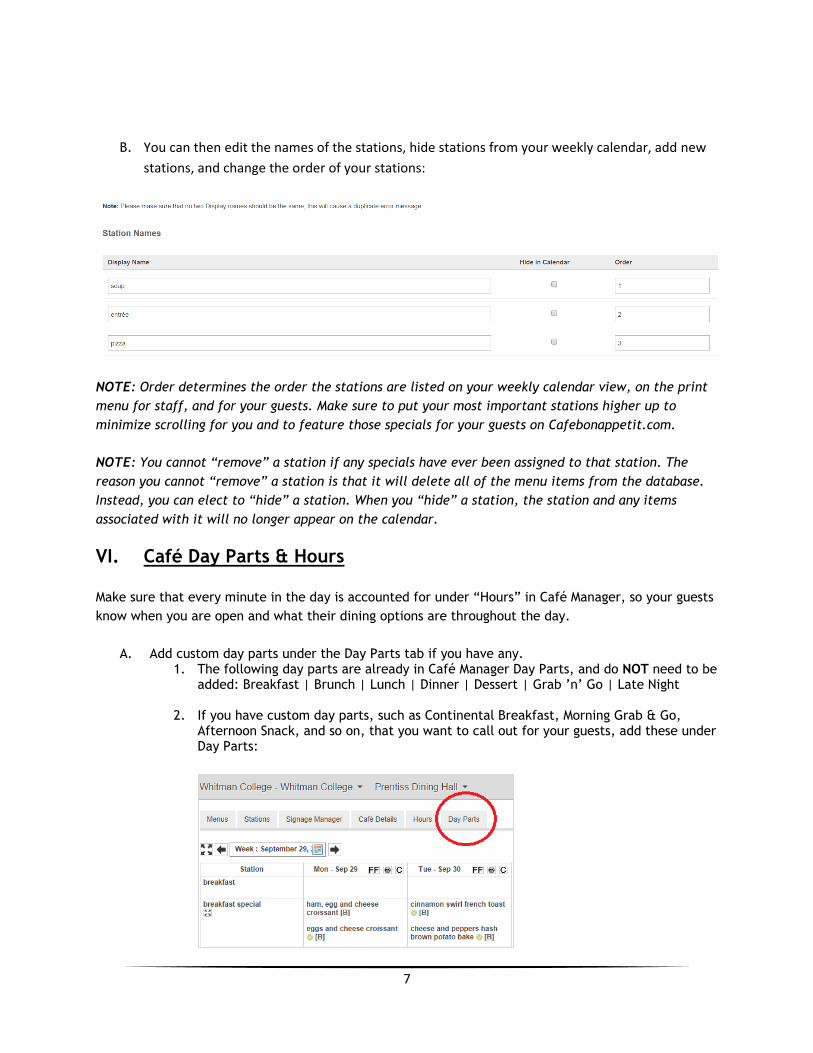
VI. Café Day Parts & Hours
Make sure that every minute in the day is accounted for under “Hours” in Café Manager, so your guests
know when you are open and what their dining options are throughout the day.
A. Add custom day parts under the Day Parts tab if you have any. 1. The following day parts are already in Café Manager Day Parts, and do NOT need to be
added: Breakfast | Brunch | Lunch | Dinner | Dessert | Grab ’n’ Go | Late Night
2. If you have custom day parts, such as Continental Breakfast, Morning Grab & Go, Afternoon Snack, and so on, that you want to call out for your guests, add these under Day Parts:
8
3. Add the day part name.
NOTE: If this day part will overlap with any other day parts and/or will be offered
more than once during the day, make sure to check the appropriate box(s).
4. The custom day part you added will be available immediately under Hours so you can
assign hours to it.
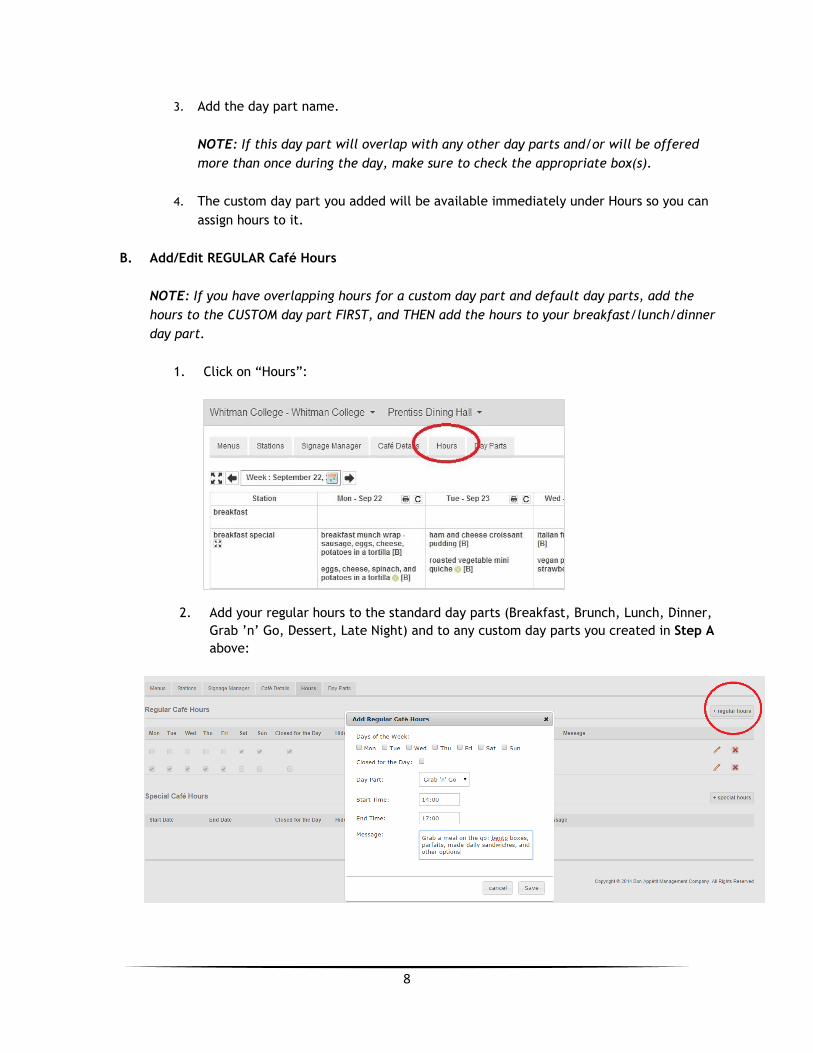
B. Add/Edit REGULAR Café Hours
NOTE: If you have overlapping hours for a custom day part and default day parts, add the
hours to the CUSTOM day part FIRST, and THEN add the hours to your breakfast/lunch/dinner
day part.
1. Click on “Hours”:
2. Add your regular hours to the standard day parts (Breakfast, Brunch, Lunch, Dinner,
Grab ’n’ Go, Dessert, Late Night) and to any custom day parts you created in Step A
above:

9
3. Using the “Message” field allows you to add information about your day parts, so
your guests have an overview of what dining options are available at the café:
C. Add/Edit SPECIAL Café Hours
Having SPECIAL café hours allows you to let your guests know of any upcoming closures due
to holidays, spring break, special events, etc., and if you will be opening earlier or later on
specific days.
1. You can set special hours or closures as far in advance as you like:
10
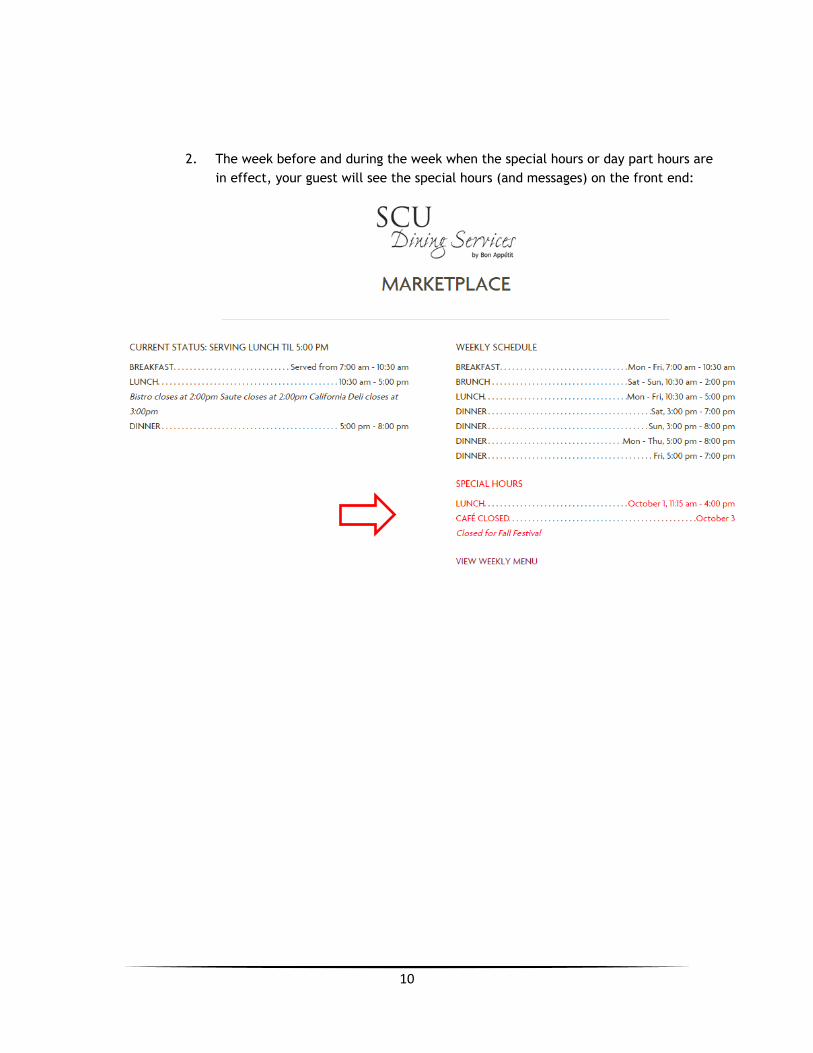
2. The week before and during the week when the special hours or day part hours are
in effect, your guest will see the special hours (and messages) on the front end:
11
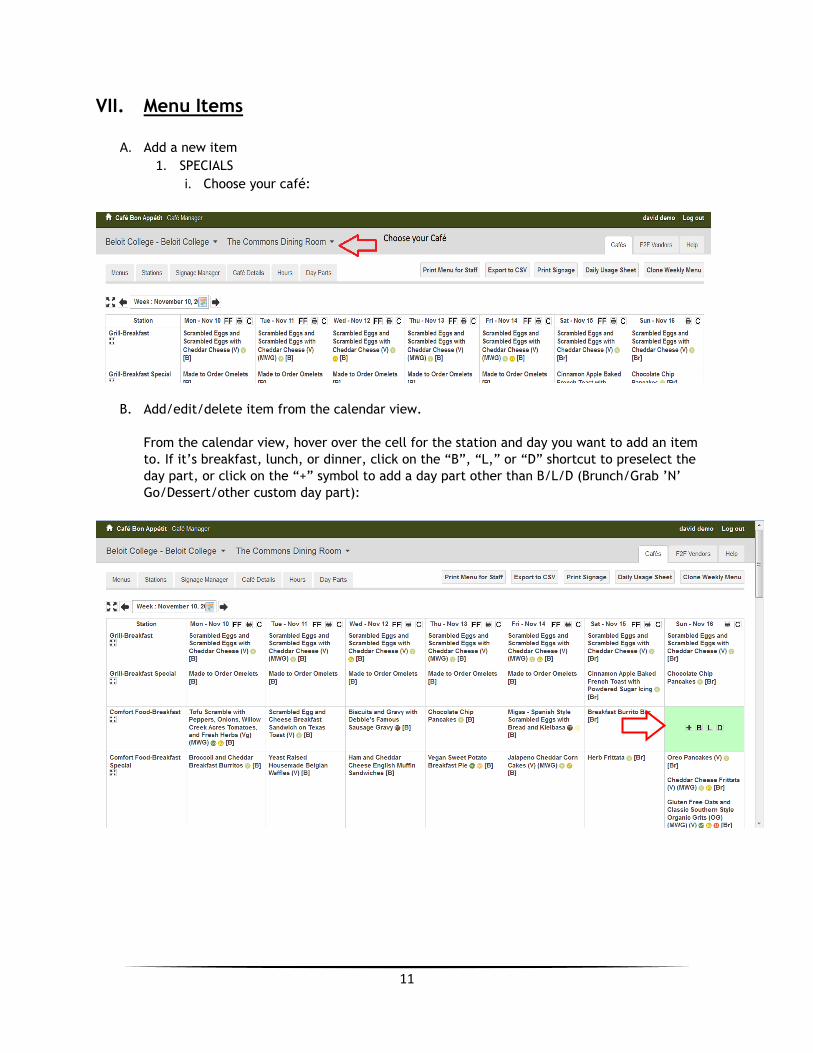
VII. Menu Items
A. Add a new item 1. SPECIALS
i. Choose your café:
B. Add/edit/delete item from the calendar view.
From the calendar view, hover over the cell for the station and day you want to add an item
to. If it’s breakfast, lunch, or dinner, click on the “B”, “L,” or “D” shortcut to preselect the
day part, or click on the “+” symbol to add a day part other than B/L/D (Brunch/Grab ’N’
Go/Dessert/other custom day part):
12
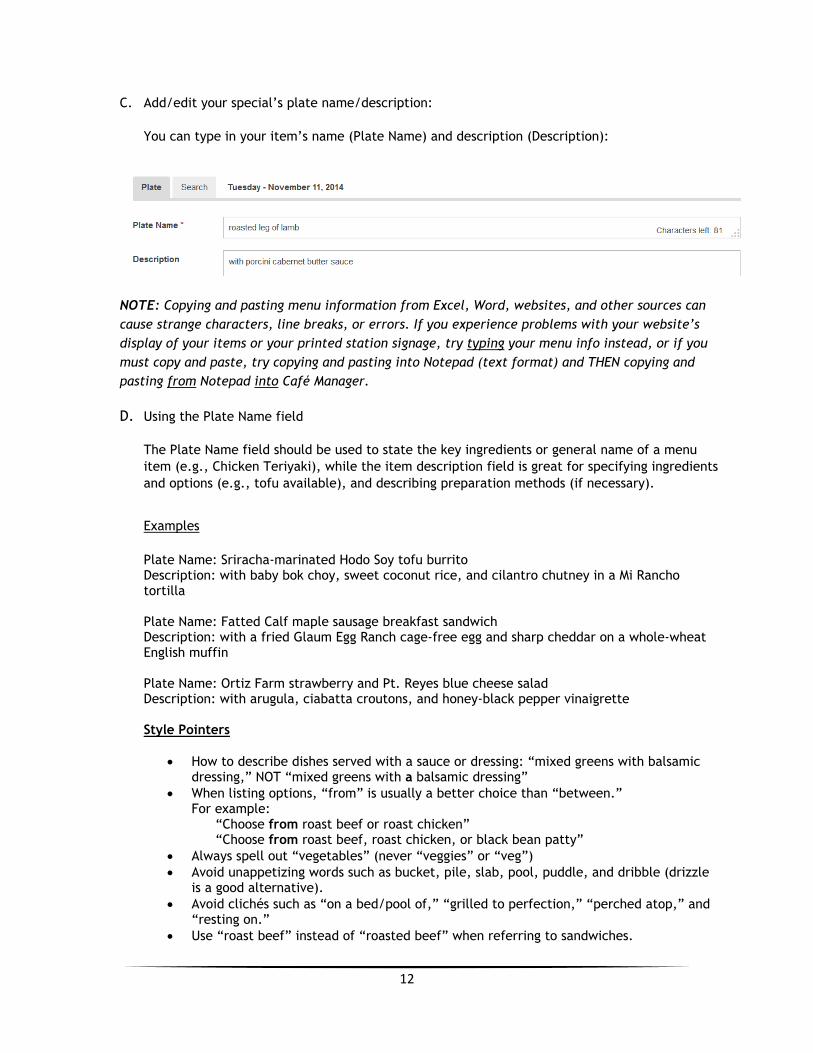
C. Add/edit your special’s plate name/description:
You can type in your item’s name (Plate Name) and description (Description):
NOTE: Copying and pasting menu information from Excel, Word, websites, and other sources can
cause strange characters, line breaks, or errors. If you experience problems with your website’s
display of your items or your printed station signage, try typing your menu info instead, or if you
must copy and paste, try copying and pasting into Notepad (text format) and THEN copying and
pasting from Notepad into Café Manager.
D. Using the Plate Name field
The Plate Name field should be used to state the key ingredients or general name of a menu
item (e.g., Chicken Teriyaki), while the item description field is great for specifying ingredients
and options (e.g., tofu available), and describing preparation methods (if necessary).
Examples
Plate Name: Sriracha-marinated Hodo Soy tofu burrito Description: with baby bok choy, sweet coconut rice, and cilantro chutney in a Mi Rancho tortilla Plate Name: Fatted Calf maple sausage breakfast sandwich Description: with a fried Glaum Egg Ranch cage-free egg and sharp cheddar on a whole-wheat English muffin Plate Name: Ortiz Farm strawberry and Pt. Reyes blue cheese salad Description: with arugula, ciabatta croutons, and honey-black pepper vinaigrette
Style Pointers
How to describe dishes served with a sauce or dressing: “mixed greens with balsamic dressing,” NOT “mixed greens with a balsamic dressing”
When listing options, “from” is usually a better choice than “between.” For example:
“Choose from roast beef or roast chicken” “Choose from roast beef, roast chicken, or black bean patty”
Always spell out “vegetables” (never “veggies” or “veg”)
Avoid unappetizing words such as bucket, pile, slab, pool, puddle, and dribble (drizzle is a good alternative).
Avoid clichés such as “on a bed/pool of,” “grilled to perfection,” “perched atop,” and “resting on.”
Use “roast beef” instead of “roasted beef” when referring to sandwiches.
13
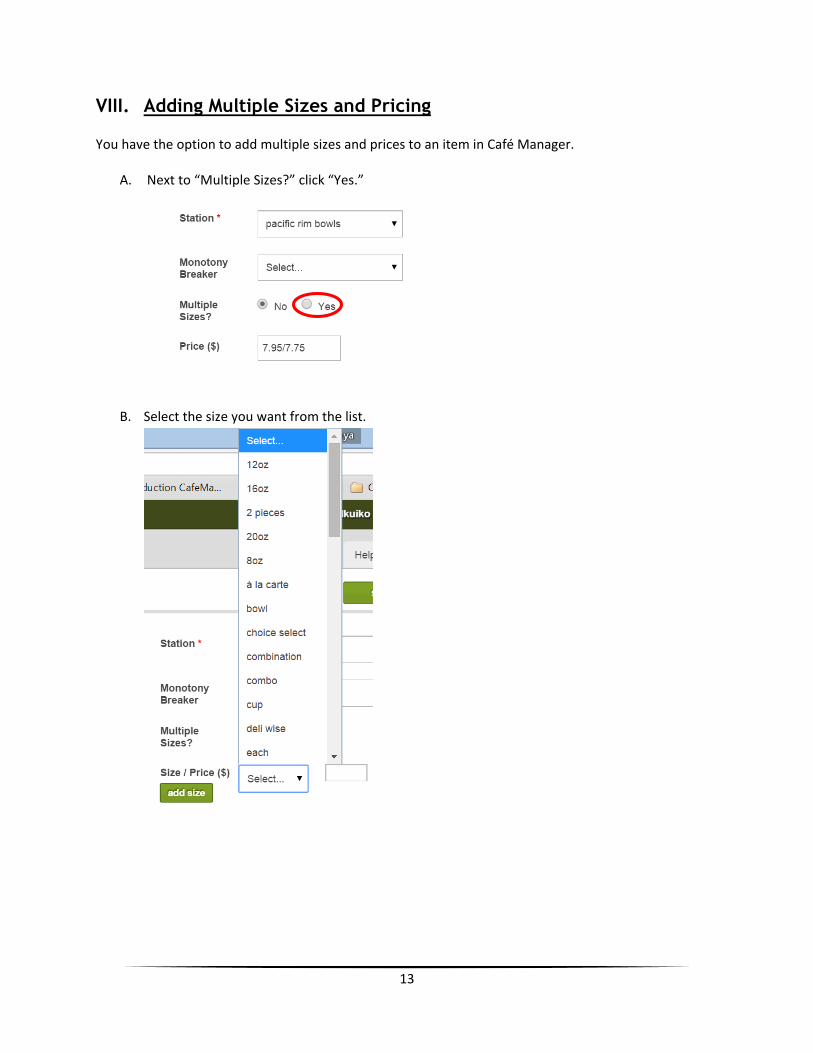
VIII. Adding Multiple Sizes and Pricing You have the option to add multiple sizes and prices to an item in Café Manager.
A. Next to “Multiple Sizes?” click “Yes.”
B. Select the size you want from the list.
14
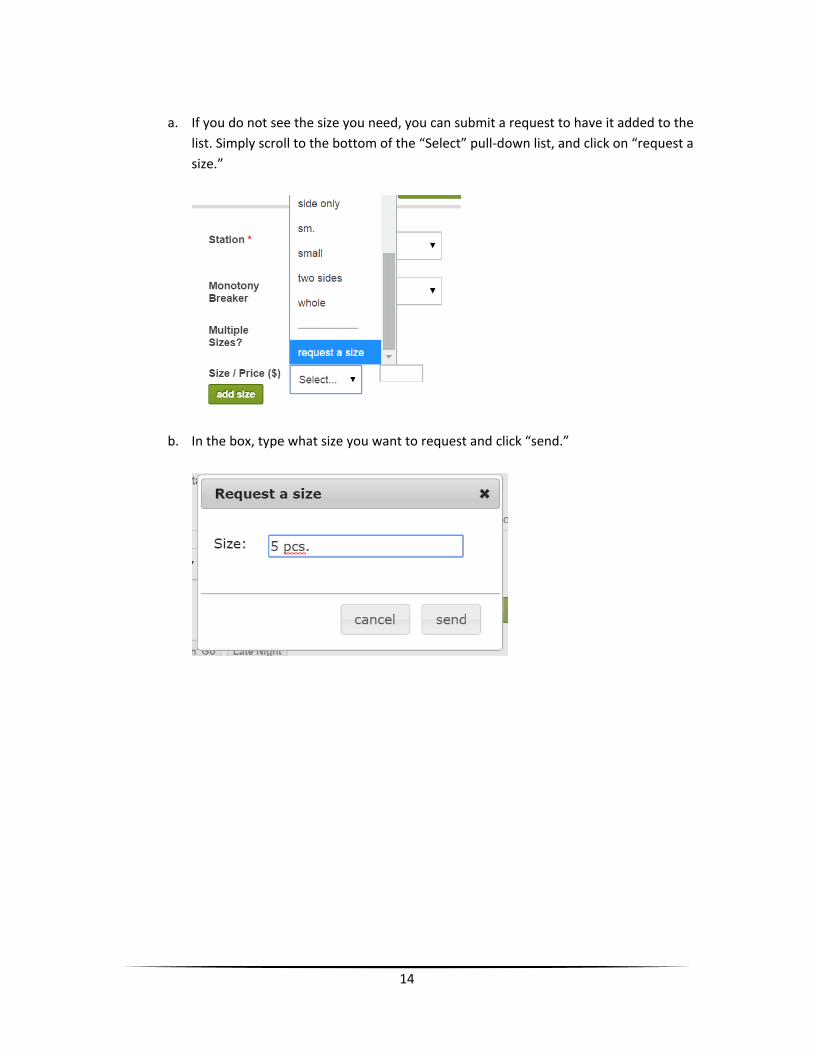
a. If you do not see the size you need, you can submit a request to have it added to the
list. Simply scroll to the bottom of the “Select” pull-down list, and click on “request a
size.”
b. In the box, type what size you want to request and click “send.”
15
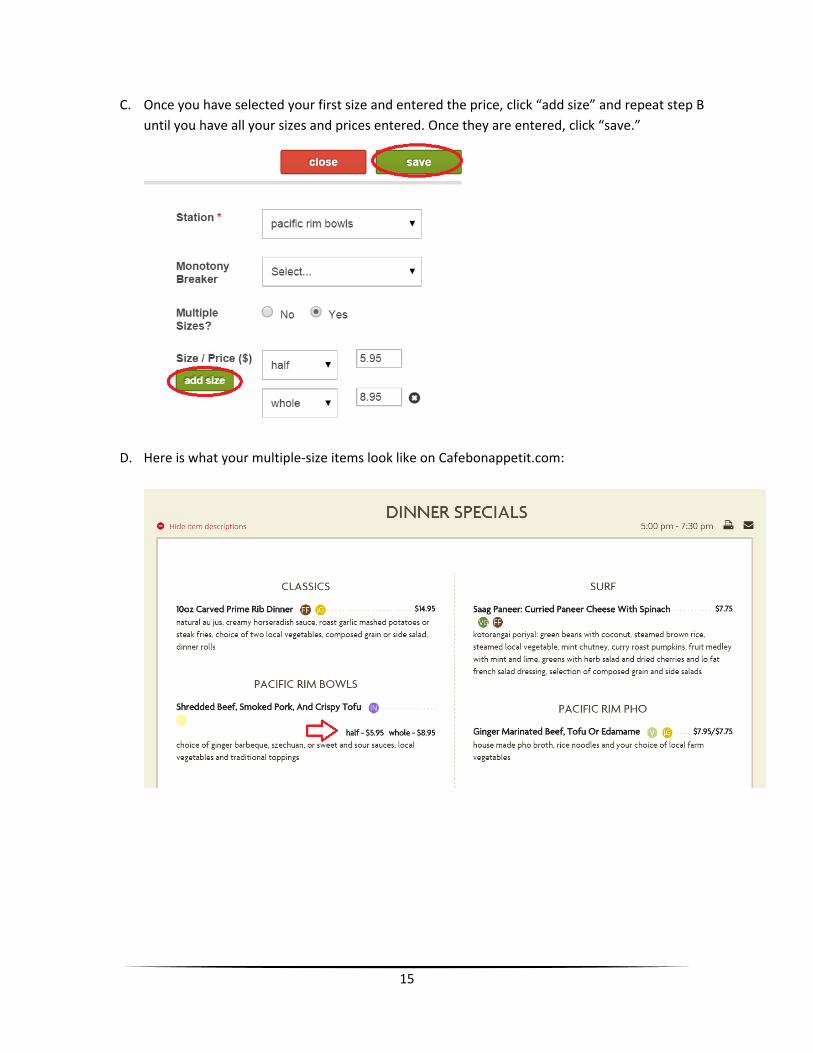
C. Once you have selected your first size and entered the price, click “add size” and repeat step B
until you have all your sizes and prices entered. Once they are entered, click “save.”
D. Here is what your multiple-size items look like on Cafebonappetit.com:
16
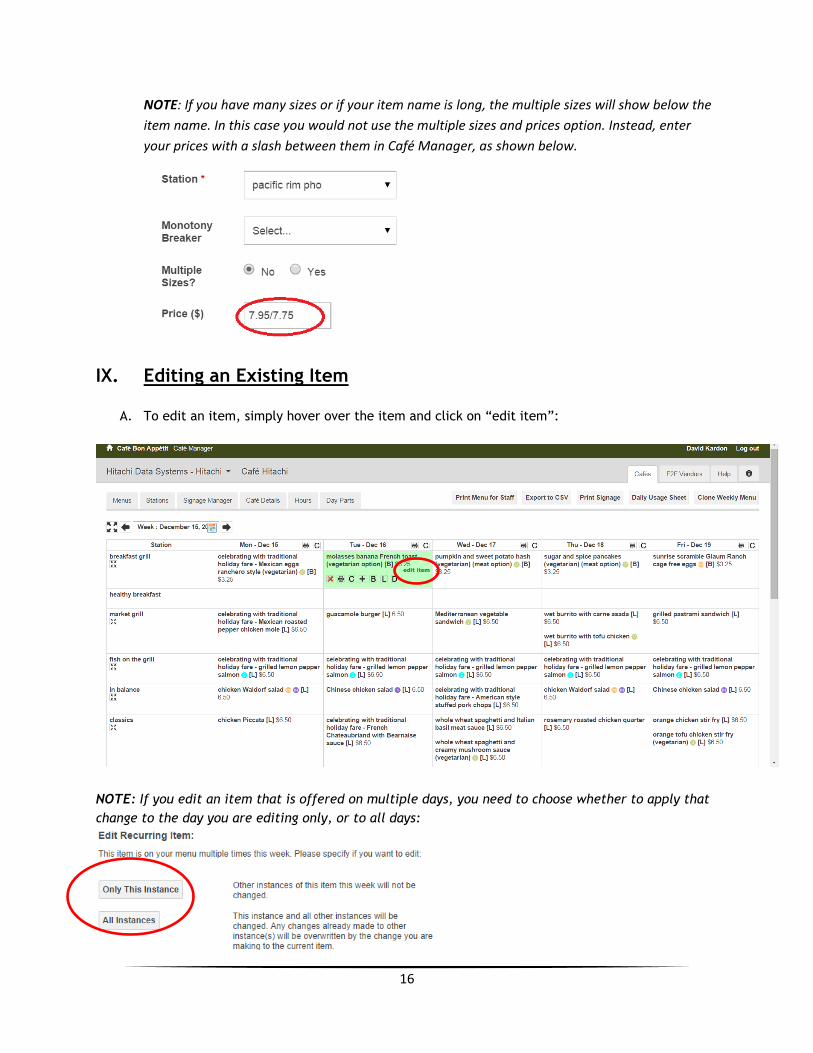
NOTE: If you have many sizes or if your item name is long, the multiple sizes will show below the
item name. In this case you would not use the multiple sizes and prices option. Instead, enter
your prices with a slash between them in Café Manager, as shown below.
IX. Editing an Existing Item
A. To edit an item, simply hover over the item and click on “edit item”:
NOTE: If you edit an item that is offered on multiple days, you need to choose whether to apply that
change to the day you are editing only, or to all days:
17
X. Repositioning Items
Chefs and managers can now use drag & drop to reposition items. The order you set on the calendar
view will control the order for Print Signage, your www.cafebonappetit.com menu site, Print Menu for
Staff, Menu Mail, and Digital Signage.
A. Click on the item you want to move. B. Drag it to its new position that day or another day that week, and you will see the new position
highlighted in blue. C. Drop it there.
NOTE: It takes a little practice since the calendar has a lot of information on one screen, but this
method will save you time as you put together your weekly menu.
Click HERE for a short video demo. Password = draganddrop
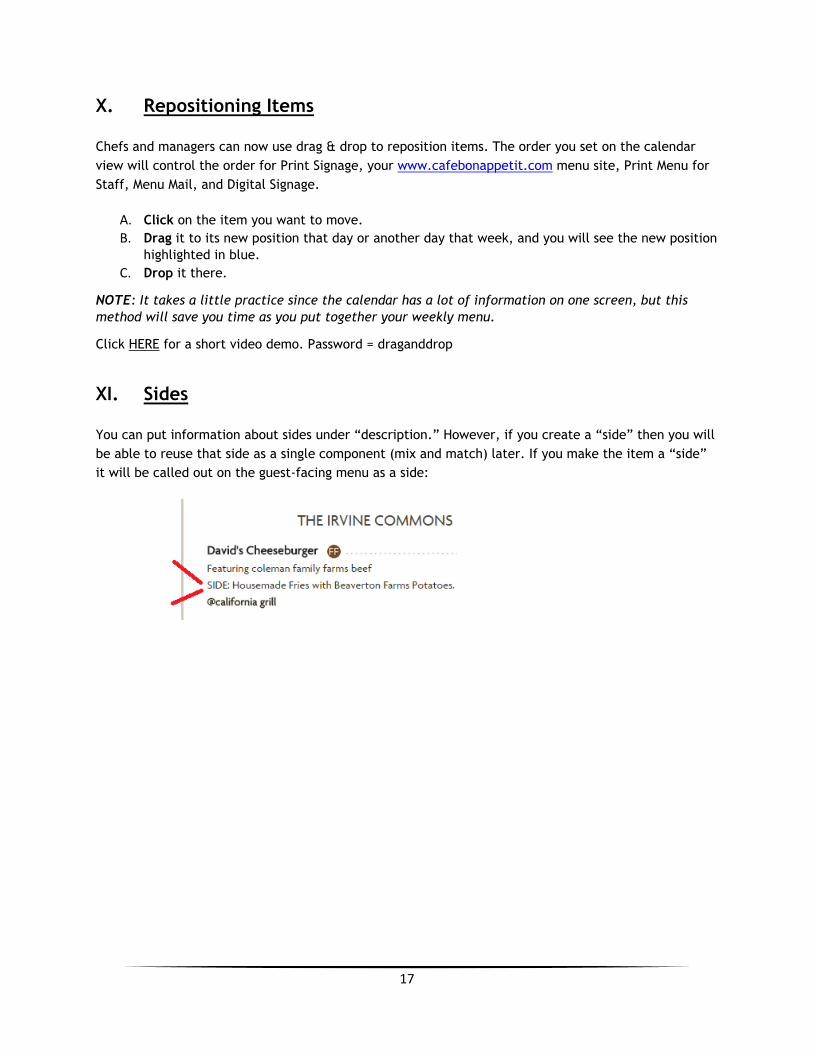
XI. Sides
You can put information about sides under “description.” However, if you create a “side” then you will
be able to reuse that side as a single component (mix and match) later. If you make the item a “side”
it will be called out on the guest-facing menu as a side:
18
XII. Static (Recurring) Items
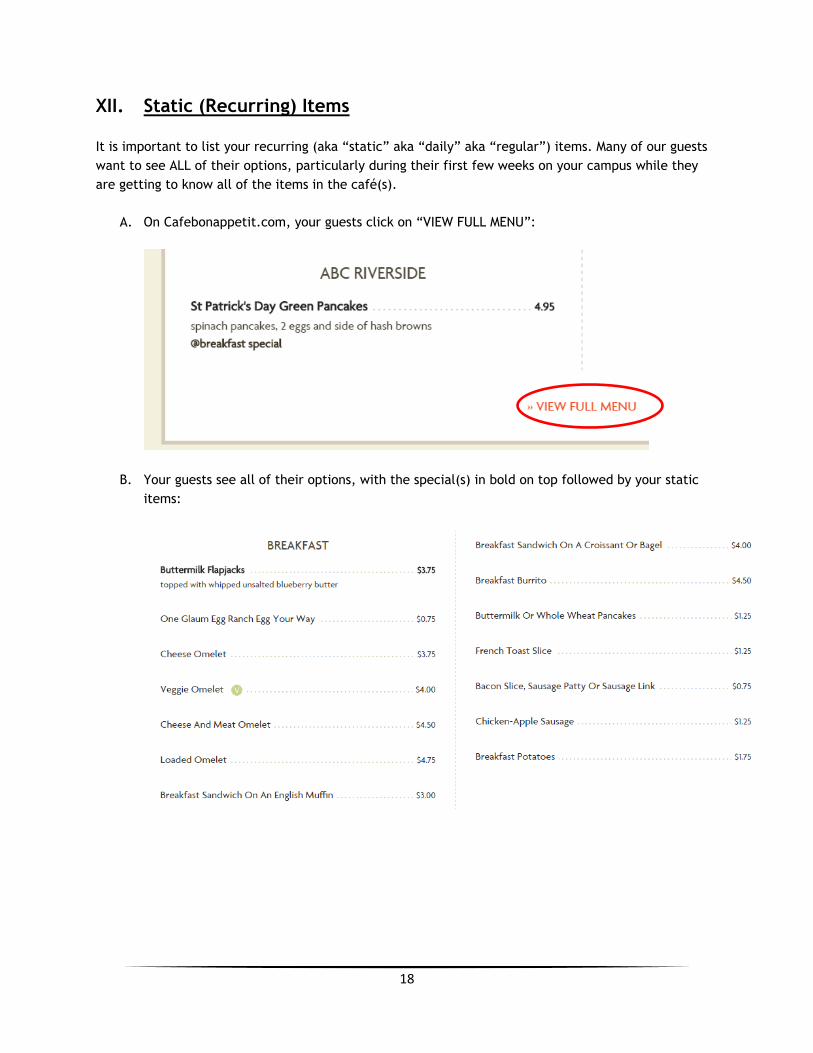
It is important to list your recurring (aka “static” aka “daily” aka “regular”) items. Many of our guests
want to see ALL of their options, particularly during their first few weeks on your campus while they
are getting to know all of the items in the café(s).
A. On Cafebonappetit.com, your guests click on “VIEW FULL MENU”:
B. Your guests see all of their options, with the special(s) in bold on top followed by your static
items:
19
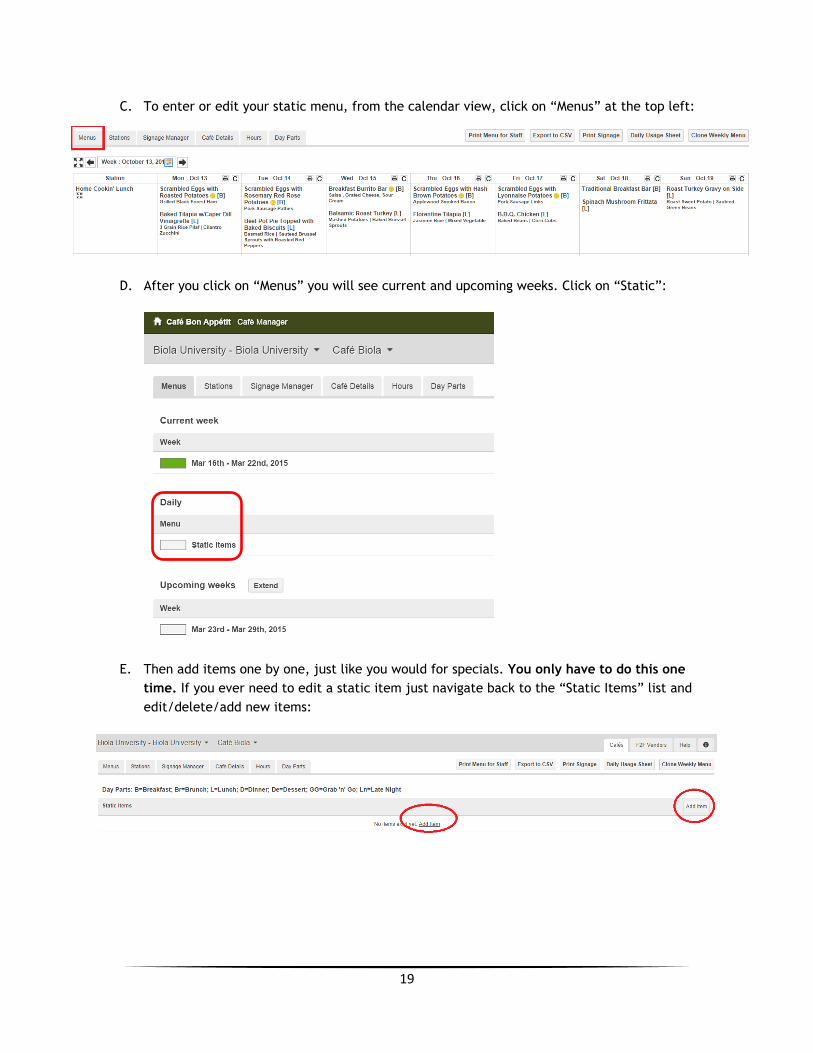
C. To enter or edit your static menu, from the calendar view, click on “Menus” at the top left:
D. After you click on “Menus” you will see current and upcoming weeks. Click on “Static”:
E. Then add items one by one, just like you would for specials. You only have to do this one
time. If you ever need to edit a static item just navigate back to the “Static Items” list and
edit/delete/add new items:
20
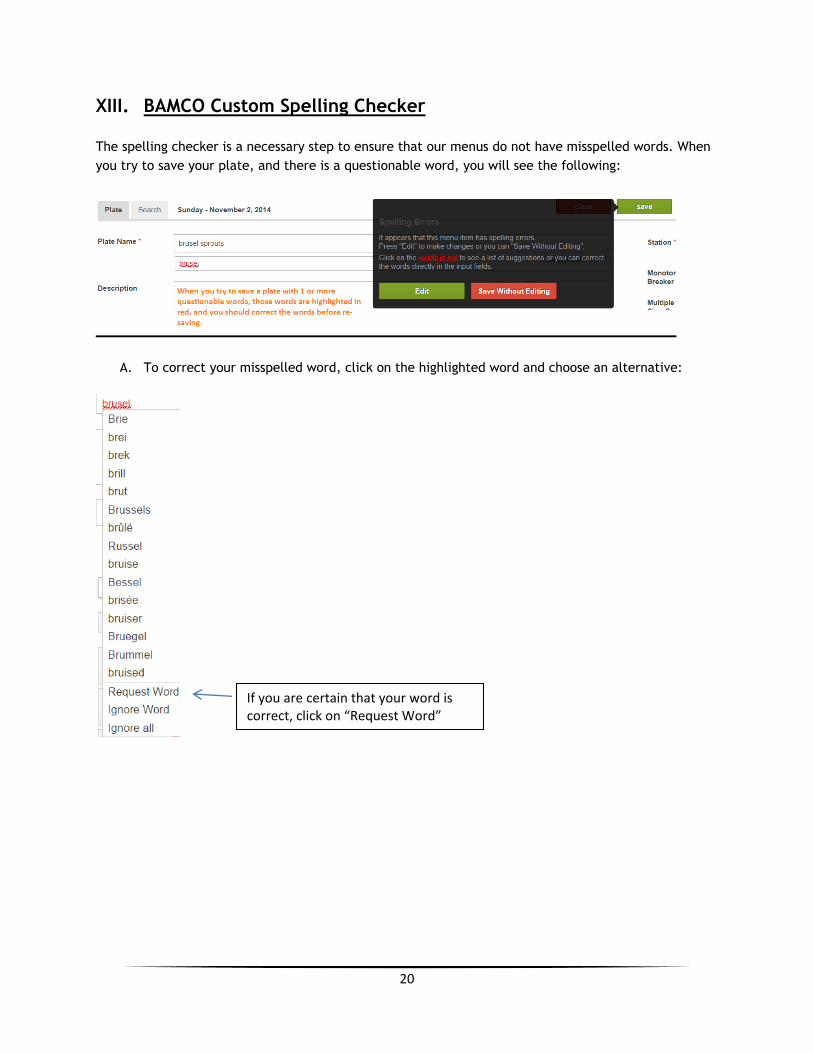
XIII. BAMCO Custom Spelling Checker
The spelling checker is a necessary step to ensure that our menus do not have misspelled words. When
you try to save your plate, and there is a questionable word, you will see the following:
A. To correct your misspelled word, click on the highlighted word and choose an alternative:
If you are certain that your word is correct, click on “Request Word”

21
B. If you believe that a word that has been marked as “incorrect” may be a legitimate word, click
on “Request Word.” When you click on “Request Word” you’ll see a confirmation:
Your word request is automatically sent to a team of Bon Appétit chefs, who are constantly updating
the custom dictionary with culinary terms to minimize the time it takes. In addition, all Farm to Fork
producers and their cities (e.g., Watsonville, CA) are part of the custom spelling checker.
NOTE regarding capital letters: In some regions and at some accounts, normal rules for
capitalization are not followed on our menus. If you believe that your client or region requires you to
use all lowercase, contact your RMD. Otherwise, if you use lowercase for a word that is normally
capitalized, such as a city or Farm to Fork vendor, the spelling checker will consider it a misspelled
word:

22
XIV. Saving Time: Cloning, Multiple Day Parts/Days, Borrowing from Searchable Database
A. Cloning
Rather than retyping your menu, you can clone a particular item, a particular station’s
items, a particular day, or a whole week. You can clone up to 9 months in advance.
To clone, click on the “C” on the weekly calendar view below a particular item or at the
top of a particular day, or click on “Clone Weekly Menu” on top right of the calendar:
i. Single Item Clone
To clone a single item (plate), hover over that item on the calendar, and click on the “C.” You can clone that item into a different café or the same café, to the same station or a different station, and to a different day or to the same day:
23
NOTE: If you clone a single item that is offered multiple days, you can only clone it into ONE day. If
you want to clone the item into multiple days, you need to clone it to ONE day, and then EDIT the
item and check additional day(s) you want it to run.
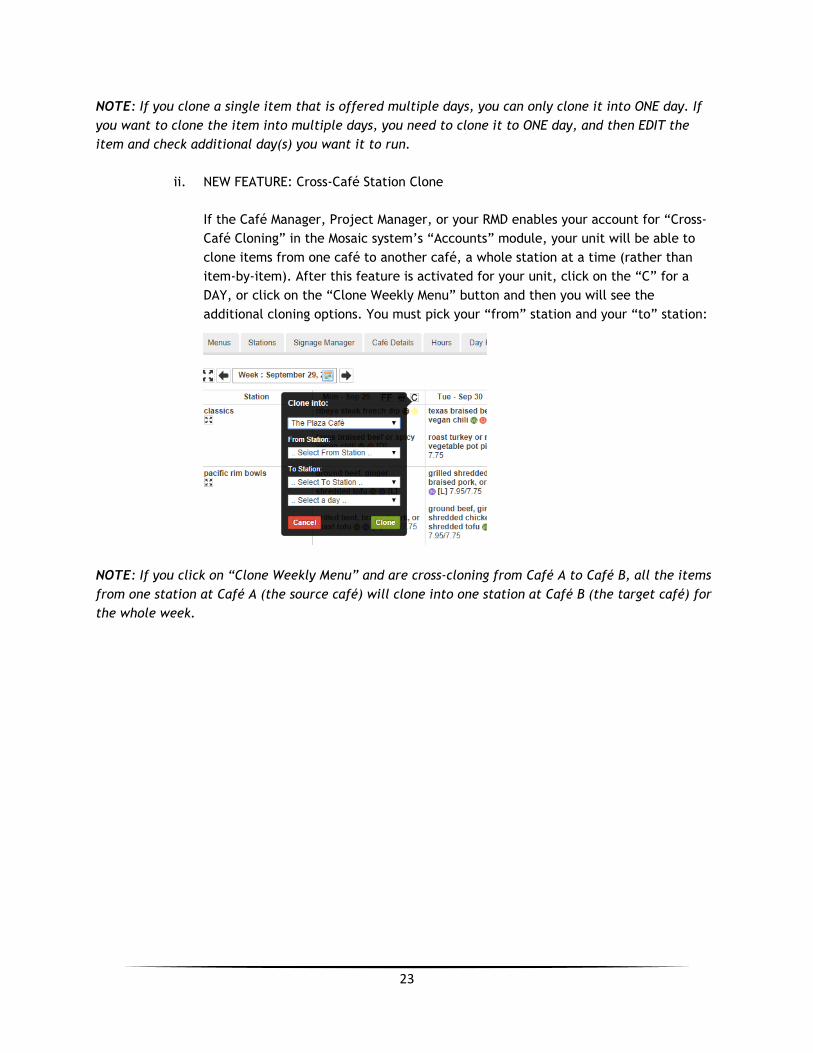
ii. NEW FEATURE: Cross-Café Station Clone
If the Café Manager, Project Manager, or your RMD enables your account for “Cross-
Café Cloning” in the Mosaic system’s “Accounts” module, your unit will be able to
clone items from one café to another café, a whole station at a time (rather than
item-by-item). After this feature is activated for your unit, click on the “C” for a
DAY, or click on the “Clone Weekly Menu” button and then you will see the
additional cloning options. You must pick your “from” station and your “to” station:
NOTE: If you click on “Clone Weekly Menu” and are cross-cloning from Café A to Café B, all the items
from one station at Café A (the source café) will clone into one station at Café B (the target café) for
the whole week.
24
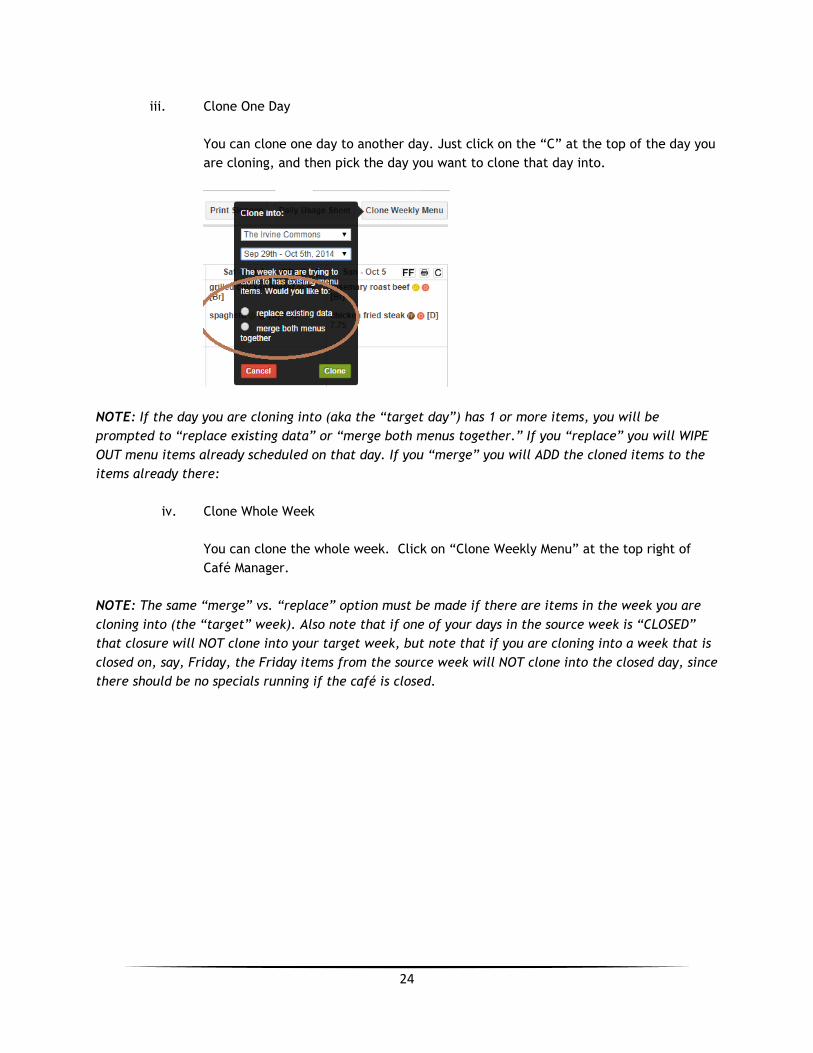
iii. Clone One Day
You can clone one day to another day. Just click on the “C” at the top of the day you
are cloning, and then pick the day you want to clone that day into.
NOTE: If the day you are cloning into (aka the “target day”) has 1 or more items, you will be
prompted to “replace existing data” or “merge both menus together.” If you “replace” you will WIPE
OUT menu items already scheduled on that day. If you “merge” you will ADD the cloned items to the
items already there:
iv. Clone Whole Week
You can clone the whole week. Click on “Clone Weekly Menu” at the top right of
Café Manager.
NOTE: The same “merge” vs. “replace” option must be made if there are items in the week you are
cloning into (the “target” week). Also note that if one of your days in the source week is “CLOSED”
that closure will NOT clone into your target week, but note that if you are cloning into a week that is
closed on, say, Friday, the Friday items from the source week will NOT clone into the closed day, since
there should be no specials running if the café is closed.
25
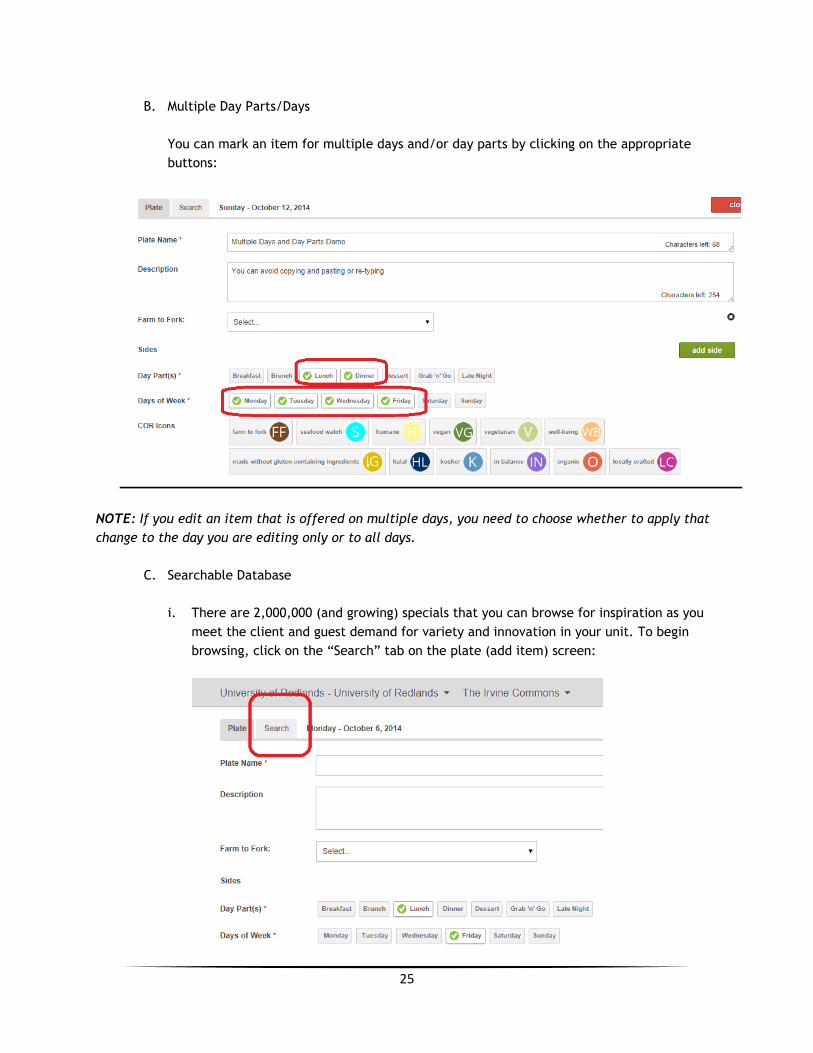
B. Multiple Day Parts/Days
You can mark an item for multiple days and/or day parts by clicking on the appropriate
buttons:
NOTE: If you edit an item that is offered on multiple days, you need to choose whether to apply that
change to the day you are editing only or to all days.
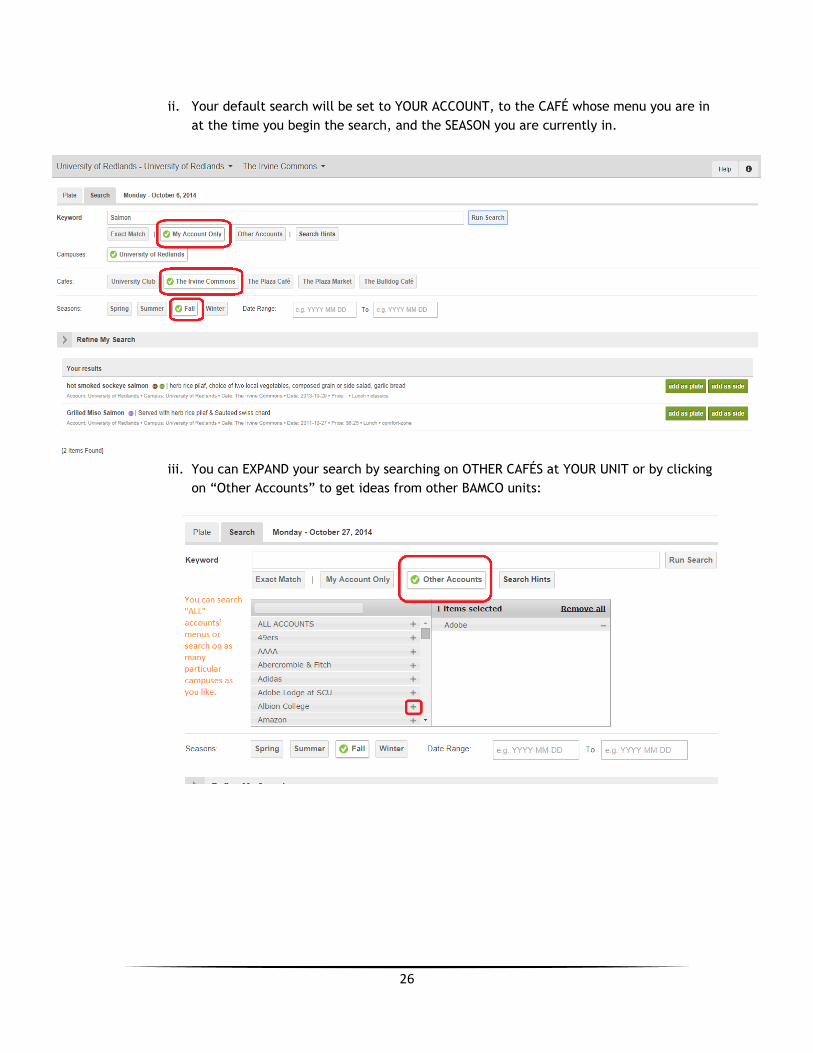
C. Searchable Database
i. There are 2,000,000 (and growing) specials that you can browse for inspiration as you
meet the client and guest demand for variety and innovation in your unit. To begin
browsing, click on the “Search” tab on the plate (add item) screen:
26
ii. Your default search will be set to YOUR ACCOUNT, to the CAFÉ whose menu you are in
at the time you begin the search, and the SEASON you are currently in.
iii. You can EXPAND your search by searching on OTHER CAFÉS at YOUR UNIT or by clicking
on “Other Accounts” to get ideas from other BAMCO units:
27
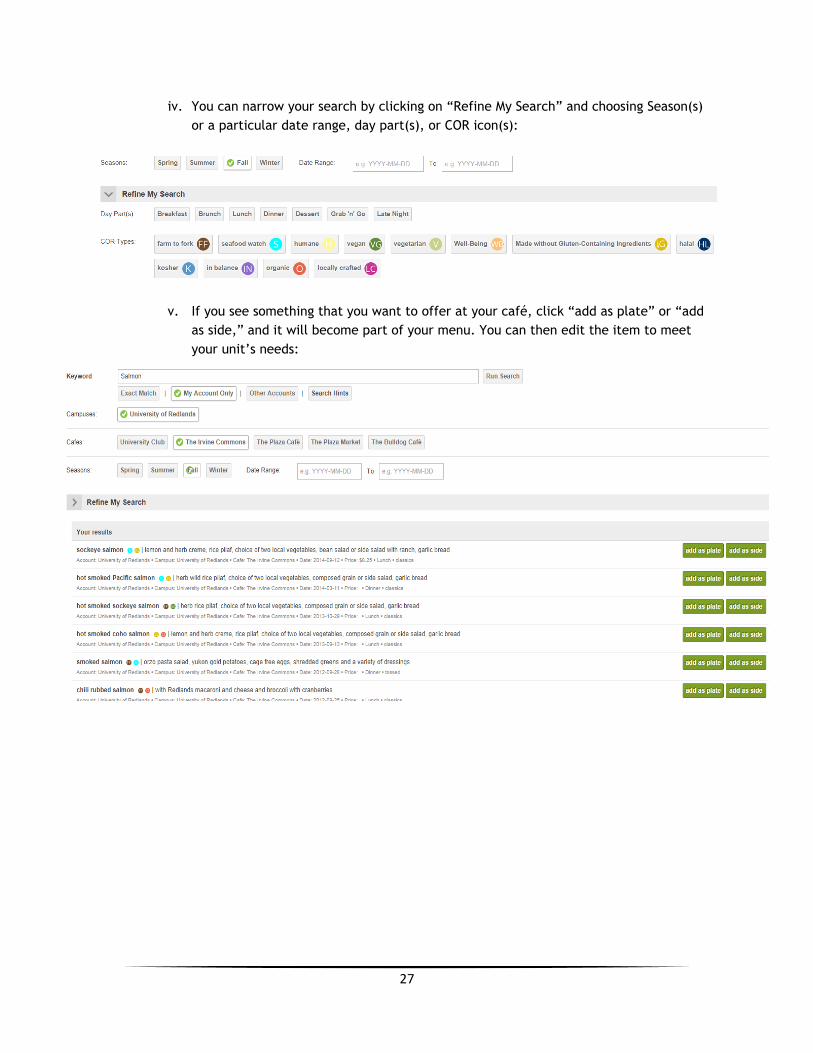
iv. You can narrow your search by clicking on “Refine My Search” and choosing Season(s)
or a particular date range, day part(s), or COR icon(s):
v. If you see something that you want to offer at your café, click “add as plate” or “add
as side,” and it will become part of your menu. You can then edit the item to meet
your unit’s needs:

28
XV. Printing Station Signage
Once you have entered in your menus, you can quickly produce 8.5" by 11" station signs without having
to double-enter your menu items.
A. The first step is to confirm that your account will follow the standard font sizes and standard
“left” alignment:
Number
of Items
on Sign
Font
Size—
Station
Font
Size—
Plate
Name
Font Size—
Description
Font Size—
Price
Font Size—
Additional
Text
Text
Align
1 60 36 24 24 20 left
2 60 36 24 24 15 left
3 60 36 24 24 15 left
4 60 24 18 18 12 left
5 60 24 18 18 12 left
6 60 24 18 18 12 left
B. Next, in Café Manager, go to “Signage Manager”:
29
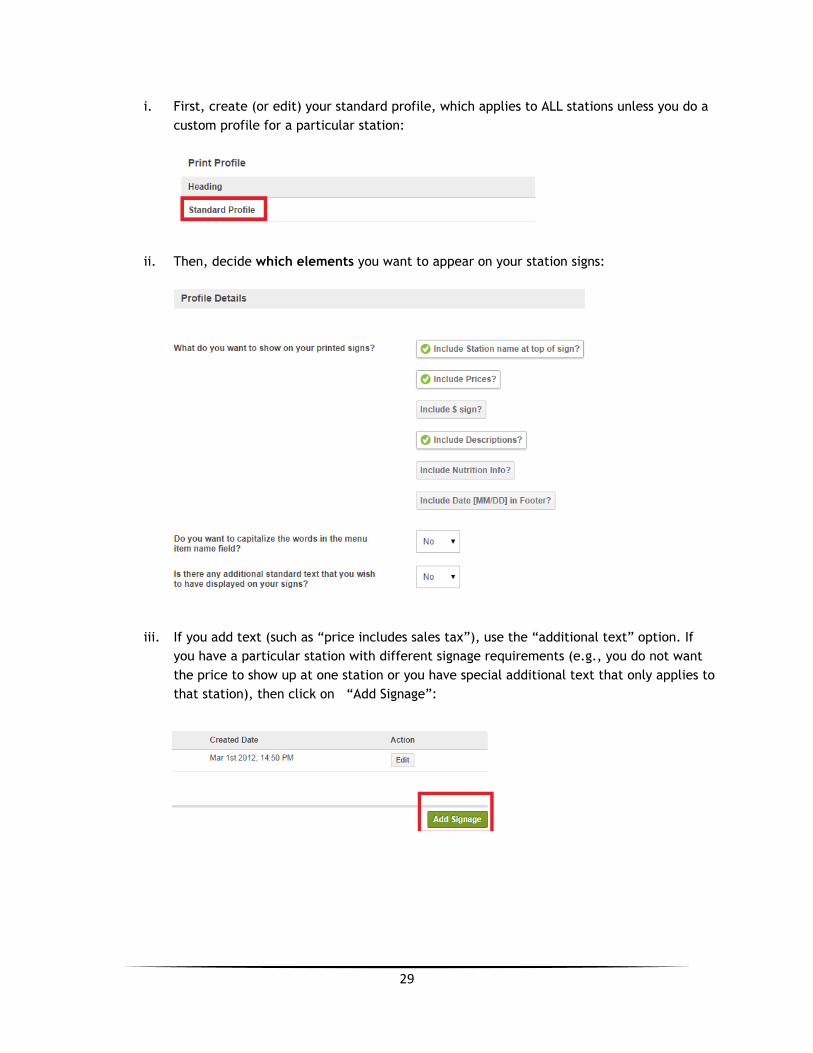
i. First, create (or edit) your standard profile, which applies to ALL stations unless you do a
custom profile for a particular station:
ii. Then, decide which elements you want to appear on your station signs:
iii. If you add text (such as “price includes sales tax”), use the “additional text” option. If
you have a particular station with different signage requirements (e.g., you do not want
the price to show up at one station or you have special additional text that only applies to
that station), then click on “Add Signage”:

30
iv. You then will choose a station to create a custom profile for and then choose your
elements just as you did for your standard profile:
v. After creating/editing your print signage profile(s) click on “Menus” and choose the week
you want to print station signage for:
a. You can access print signage from multiple places, depending on which day(s),
day part(s), and station(s) you need to print out:
You can print ONE SIGN by clicking on the printer icon for that particular station/day
You can print multiple stations and/or multiple day parts on ONE DAY by clicking on the printer icon next to that day on top of your calendar
You can print signage for MULTIPLE DAYS by clicking on “Print Signage” here
31
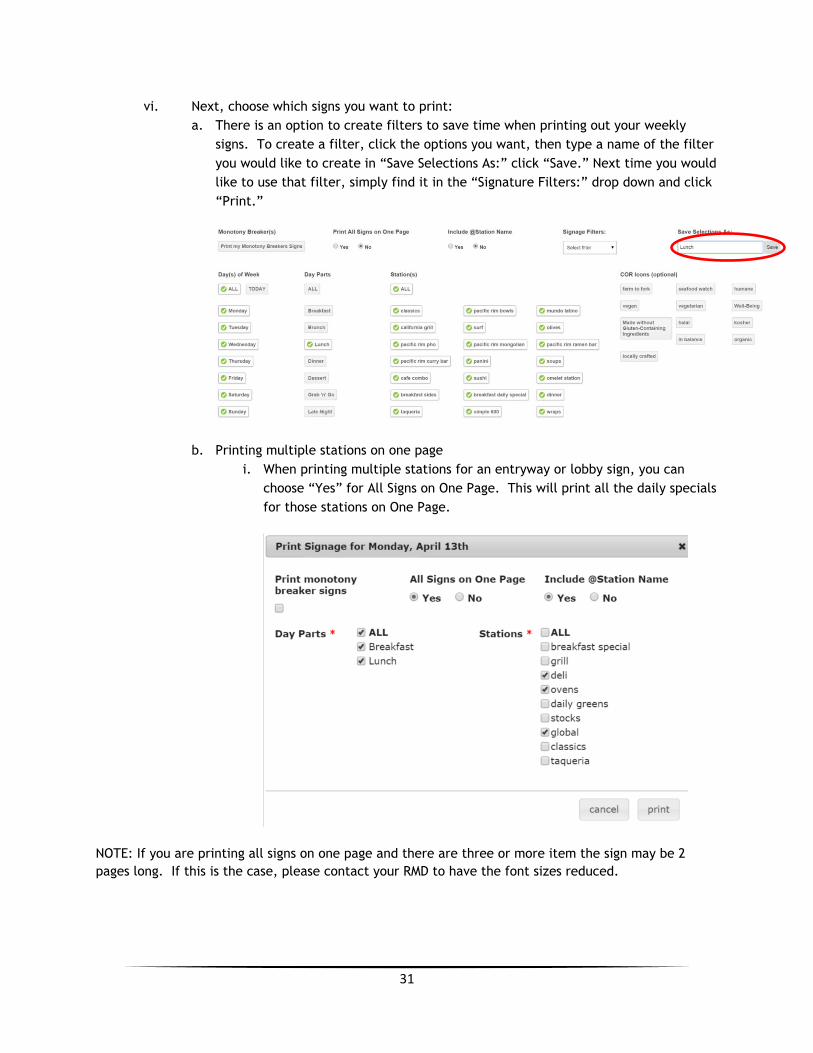
vi. Next, choose which signs you want to print:
a. There is an option to create filters to save time when printing out your weekly
signs. To create a filter, click the options you want, then type a name of the filter
you would like to create in “Save Selections As:” click “Save.” Next time you would
like to use that filter, simply find it in the “Signature Filters:” drop down and click
“Print.”
b. Printing multiple stations on one page
i. When printing multiple stations for an entryway or lobby sign, you can
choose “Yes” for All Signs on One Page. This will print all the daily specials
for those stations on One Page.
NOTE: If you are printing all signs on one page and there are three or more item the sign may be 2
pages long. If this is the case, please contact your RMD to have the font sizes reduced.

32
ii. You can also have @Station Name shown for each item, if you choose to
have all signs on one page. Here is an example of a multiple station sign:
c. COR Icon Specific Signs
i. You can print signs that will group specific COR Icon specials on one page.
Click “Yes” on Print All Signs on One Page. Next, make your COR Icon
selection.

33
ii. Here is an example of all items marked with the “Vegetarian” COR Icon in Café
Manager printed on one sign:
d. Specials and Static Items on One Sign
i. Click the print icon to print the station specials
iii. Check the box next to “Combine Static Items” and click “Print”

34
iv. Here is an example of specials and static items together on one page. The
special will always appear above the static items.
NOTE: The static item(s) MUST be on the same station as the special(s).
vii. Once you have made your selections on any the above options, click “print” and a Word
document will download to your computer with your signs. Make sure to check all of
your signs BEFORE printing to save paper and time. You may need to make small
adjustments to spacing so that all items fit nicely on one page. When your signs look
right, print the signs just like you would print any Word document. Make sure to use
approved menu paper:
NOTE: You will need to stay stocked with COR icon stickers. As of fall 2014 COR icons are NOT part of
the Word signage program.
35
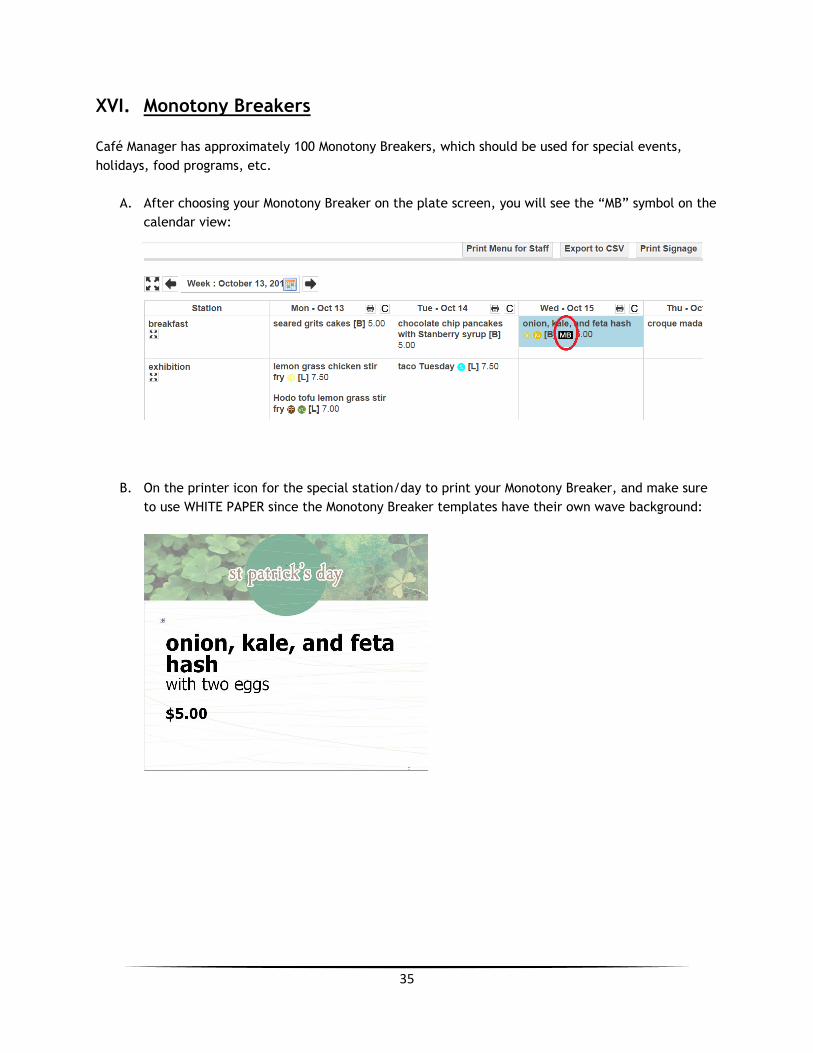
XVI. Monotony Breakers
Café Manager has approximately 100 Monotony Breakers, which should be used for special events,
holidays, food programs, etc.
A. After choosing your Monotony Breaker on the plate screen, you will see the “MB” symbol on the
calendar view:
B. On the printer icon for the special station/day to print your Monotony Breaker, and make sure
to use WHITE PAPER since the Monotony Breaker templates have their own wave background:
36
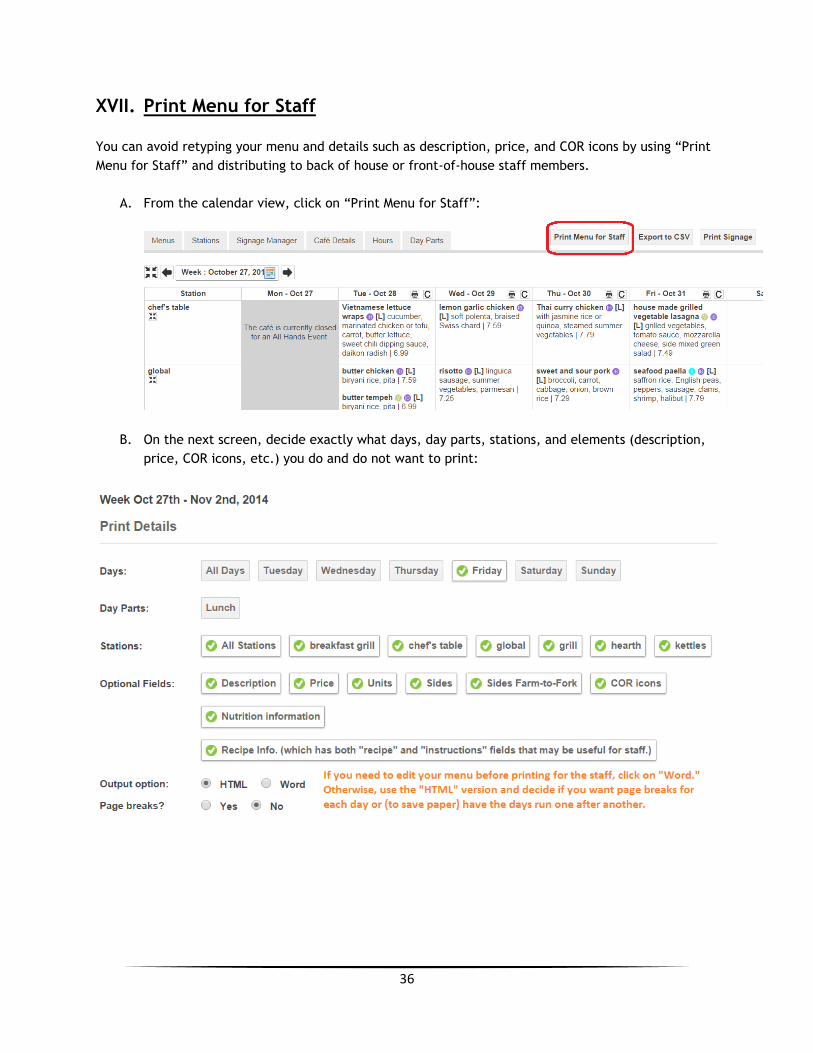
XVII. Print Menu for Staff
You can avoid retyping your menu and details such as description, price, and COR icons by using “Print
Menu for Staff” and distributing to back of house or front-of-house staff members.
A. From the calendar view, click on “Print Menu for Staff”:
B. On the next screen, decide exactly what days, day parts, stations, and elements (description,
price, COR icons, etc.) you do and do not want to print:
37
XVIII. Menu Spreadsheet, Daily Usage Tracking, Time & Temperature Logs
Café Manager is, of course, not a full back-of-house system (production sheets, inventory, staffing,
ordering, etc.), but there are some tools to help you use the information that you are entering into
Café Manager with your other systems.
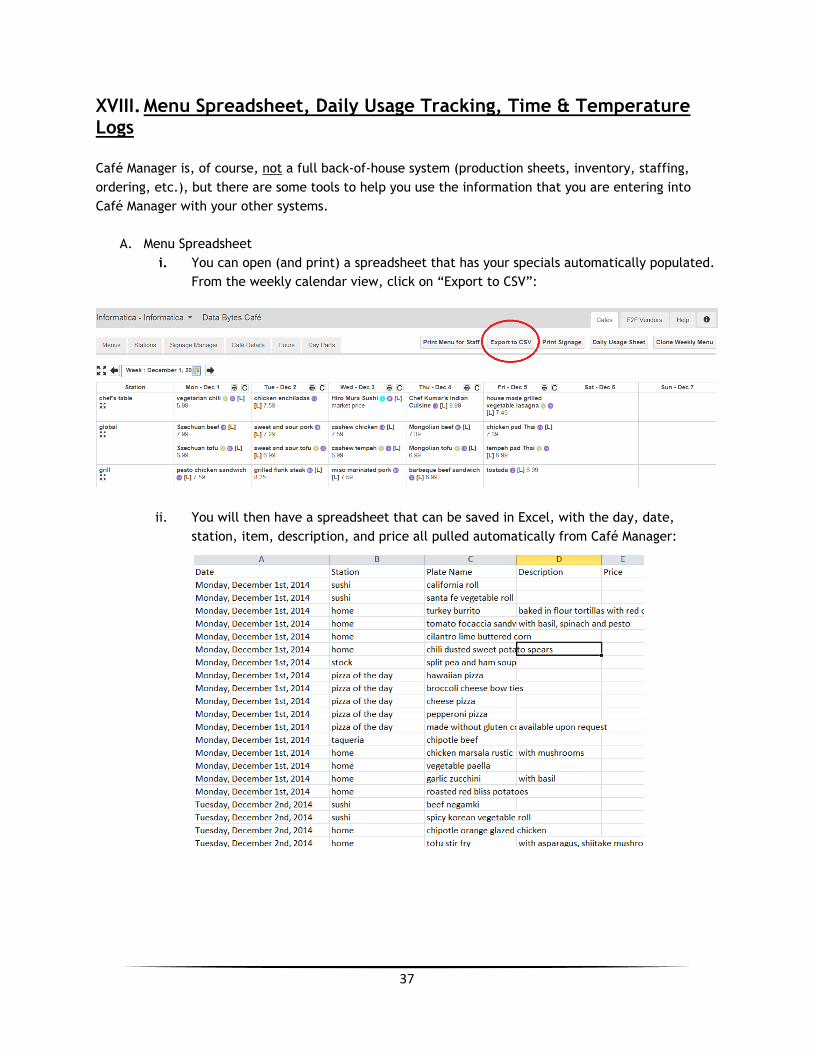
A. Menu Spreadsheet
i. You can open (and print) a spreadsheet that has your specials automatically populated.
From the weekly calendar view, click on “Export to CSV”:
ii. You will then have a spreadsheet that can be saved in Excel, with the day, date,
station, item, description, and price all pulled automatically from Café Manager:
38
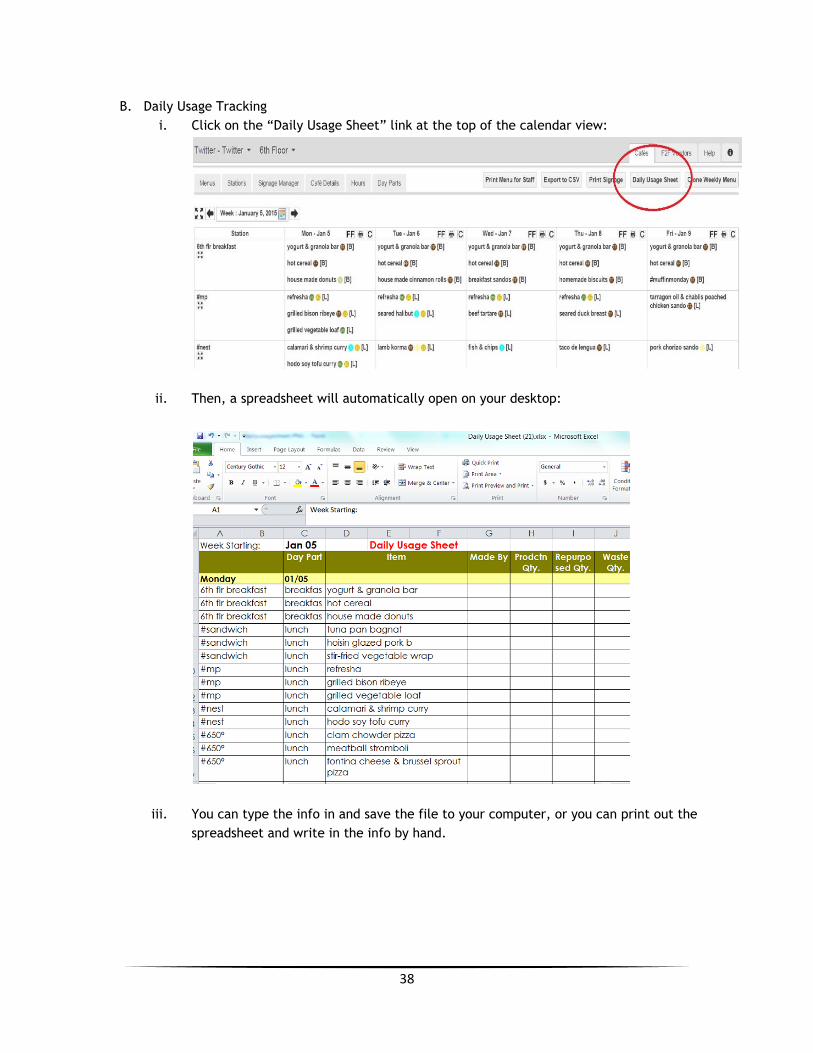
B. Daily Usage Tracking
i. Click on the “Daily Usage Sheet” link at the top of the calendar view:
ii. Then, a spreadsheet will automatically open on your desktop:
iii. You can type the info in and save the file to your computer, or you can print out the
spreadsheet and write in the info by hand.
39
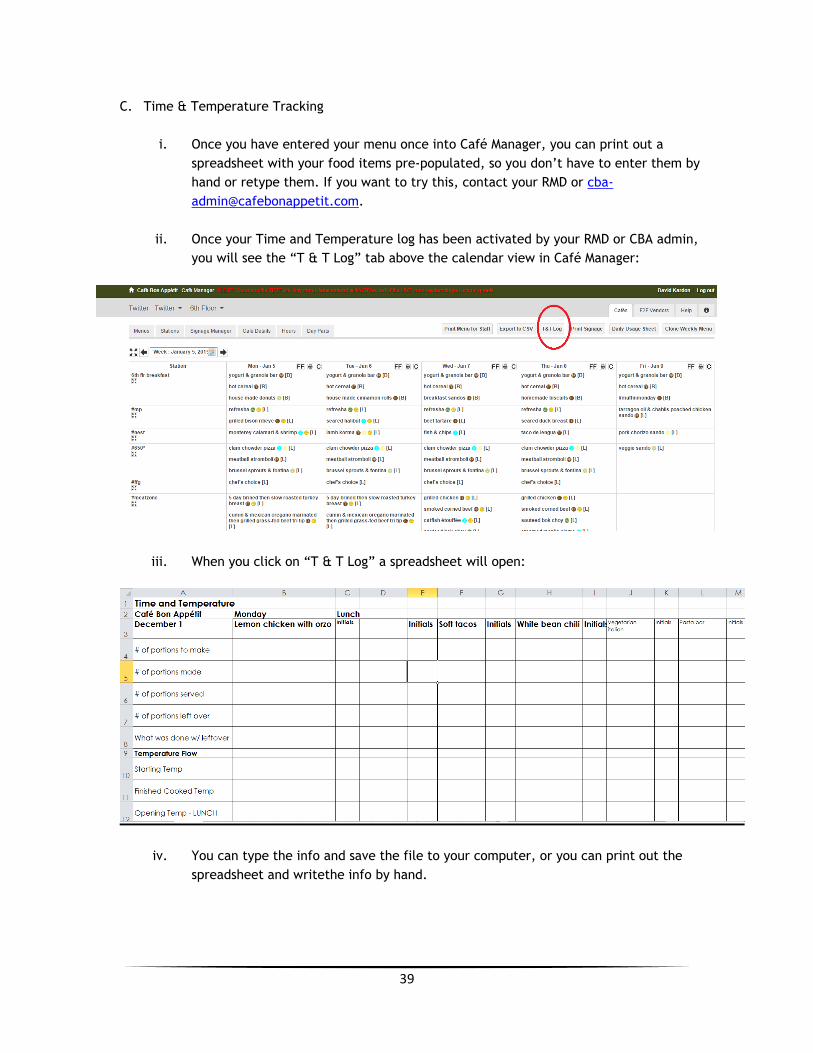
C. Time & Temperature Tracking
i. Once you have entered your menu once into Café Manager, you can print out a
spreadsheet with your food items pre-populated, so you don’t have to enter them by
hand or retype them. If you want to try this, contact your RMD or cba-
ii. Once your Time and Temperature log has been activated by your RMD or CBA admin,
you will see the “T & T Log” tab above the calendar view in Café Manager:
iii. When you click on “T & T Log” a spreadsheet will open:
iv. You can type the info and save the file to your computer, or you can print out the
spreadsheet and writethe info by hand.
40
XIX. Farm to Fork
In focus groups, our guests have told us that they want more information about where their food comes
from and that having local producers provide ingredients for their meals makes the food taste better
and makes them happier to eat in our cafés. So, to meet that demand, Café Manager,
Cafebonappetit.com, Digital Signage, and Menu Mail have a variety of new features to help you
communicate your Farm to Fork program to your guests.
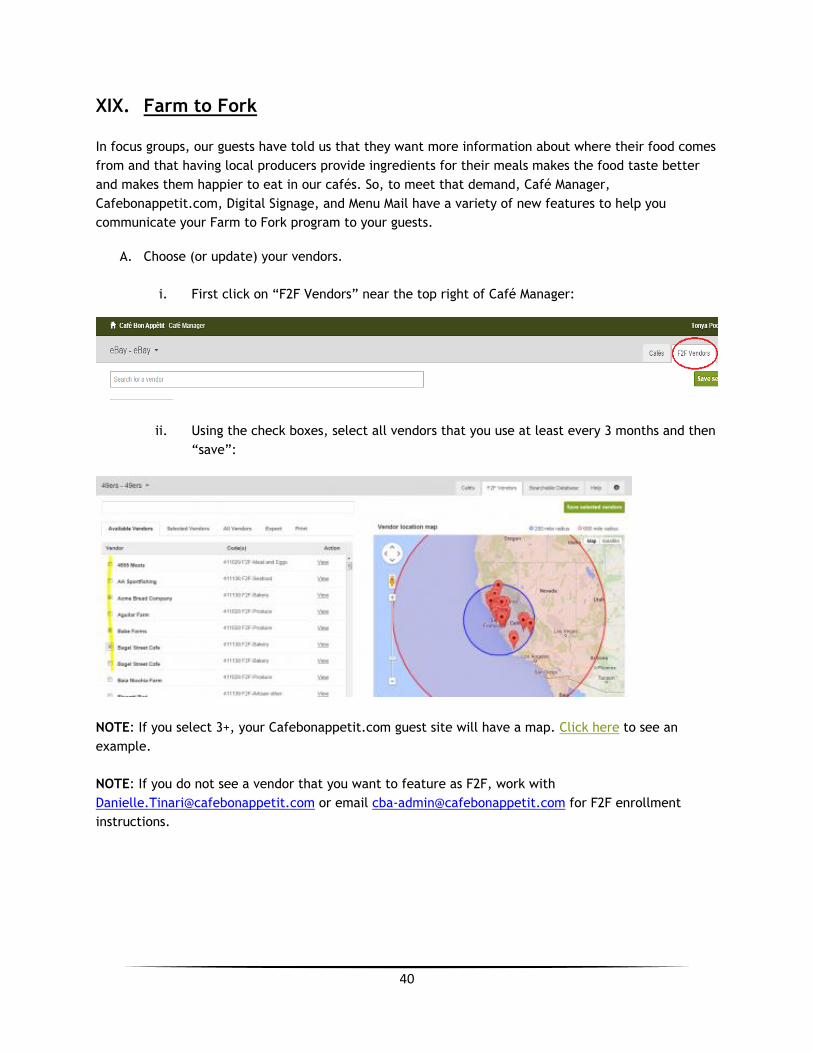
A. Choose (or update) your vendors.
i. First click on “F2F Vendors” near the top right of Café Manager:
ii. Using the check boxes, select all vendors that you use at least every 3 months and then
“save”:
NOTE: If you select 3+, your Cafebonappetit.com guest site will have a map. Click here to see an
example.
NOTE: If you do not see a vendor that you want to feature as F2F, work with
[email protected] or email [email protected] for F2F enrollment
instructions.
41
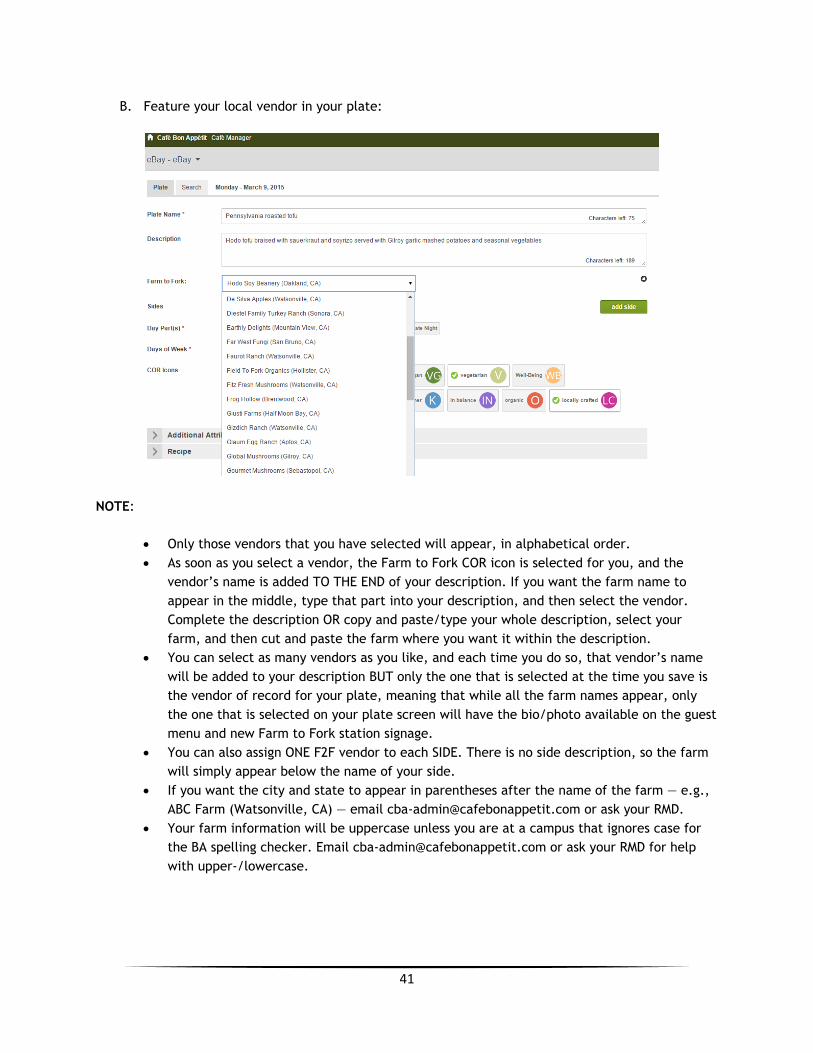
B. Feature your local vendor in your plate:
NOTE:
Only those vendors that you have selected will appear, in alphabetical order.
As soon as you select a vendor, the Farm to Fork COR icon is selected for you, and the
vendor’s name is added TO THE END of your description. If you want the farm name to
appear in the middle, type that part into your description, and then select the vendor.
Complete the description OR copy and paste/type your whole description, select your
farm, and then cut and paste the farm where you want it within the description.
You can select as many vendors as you like, and each time you do so, that vendor’s name
will be added to your description BUT only the one that is selected at the time you save is
the vendor of record for your plate, meaning that while all the farm names appear, only
the one that is selected on your plate screen will have the bio/photo available on the guest
menu and new Farm to Fork station signage.
You can also assign ONE F2F vendor to each SIDE. There is no side description, so the farm
will simply appear below the name of your side.
If you want the city and state to appear in parentheses after the name of the farm — e.g.,
ABC Farm (Watsonville, CA) — email [email protected] or ask your RMD.
Your farm information will be uppercase unless you are at a campus that ignores case for
the BA spelling checker. Email [email protected] or ask your RMD for help
with upper-/lowercase.
42
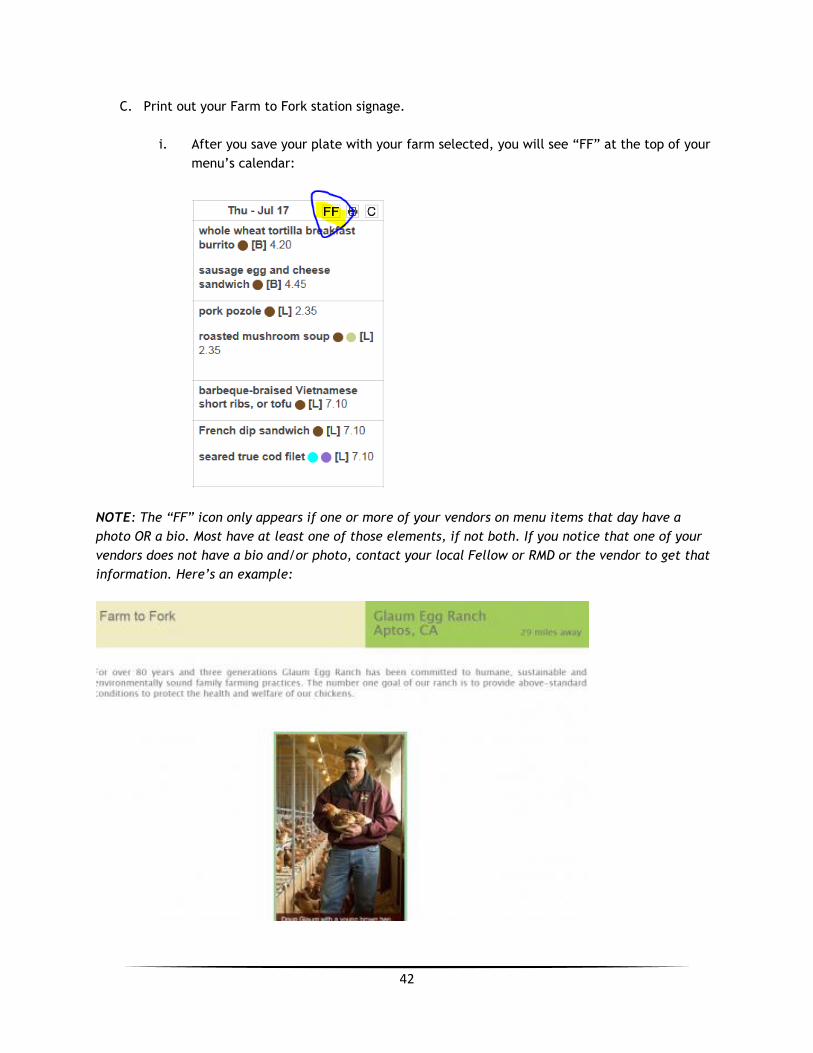
C. Print out your Farm to Fork station signage.
i. After you save your plate with your farm selected, you will see “FF” at the top of your
menu’s calendar:
NOTE: The “FF” icon only appears if one or more of your vendors on menu items that day have a
photo OR a bio. Most have at least one of those elements, if not both. If you notice that one of your
vendors does not have a bio and/or photo, contact your local Fellow or RMD or the vendor to get that
information. Here’s an example:
43
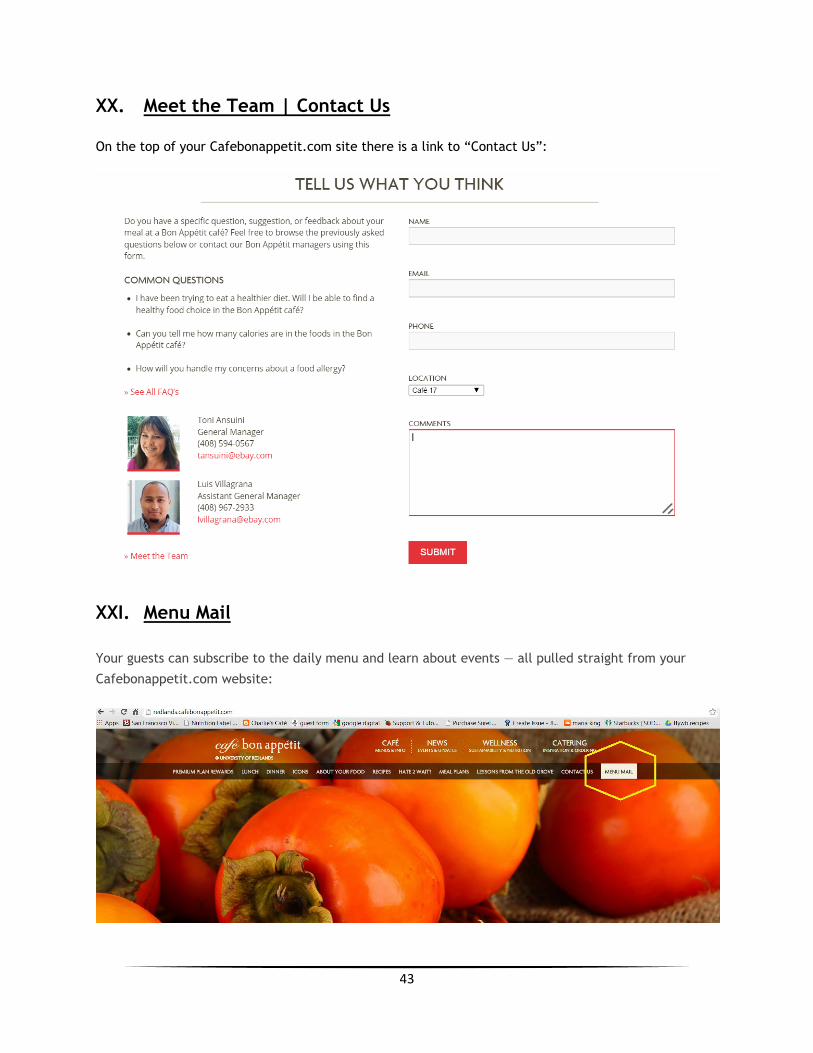
XX. Meet the Team | Contact Us
On the top of your Cafebonappetit.com site there is a link to “Contact Us”:
XXI. Menu Mail
Your guests can subscribe to the daily menu and learn about events — all pulled straight from your
Cafebonappetit.com website:
44
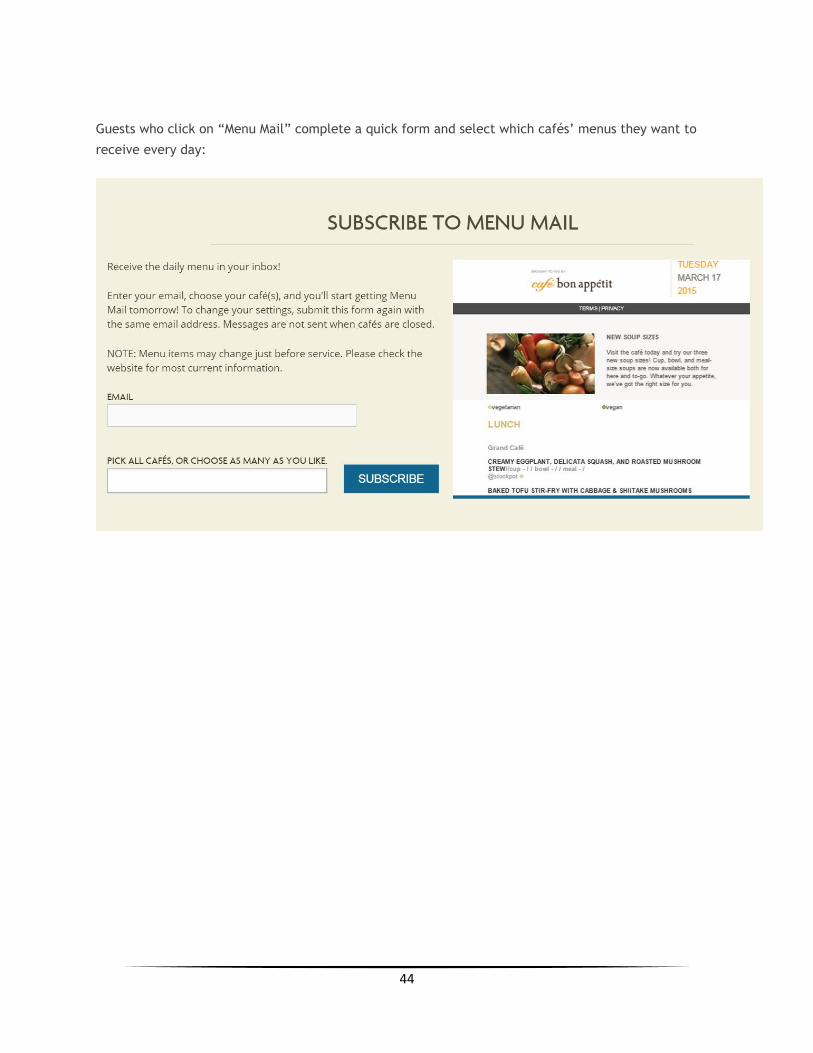
Guests who click on “Menu Mail” complete a quick form and select which cafés’ menus they want to
receive every day:
45
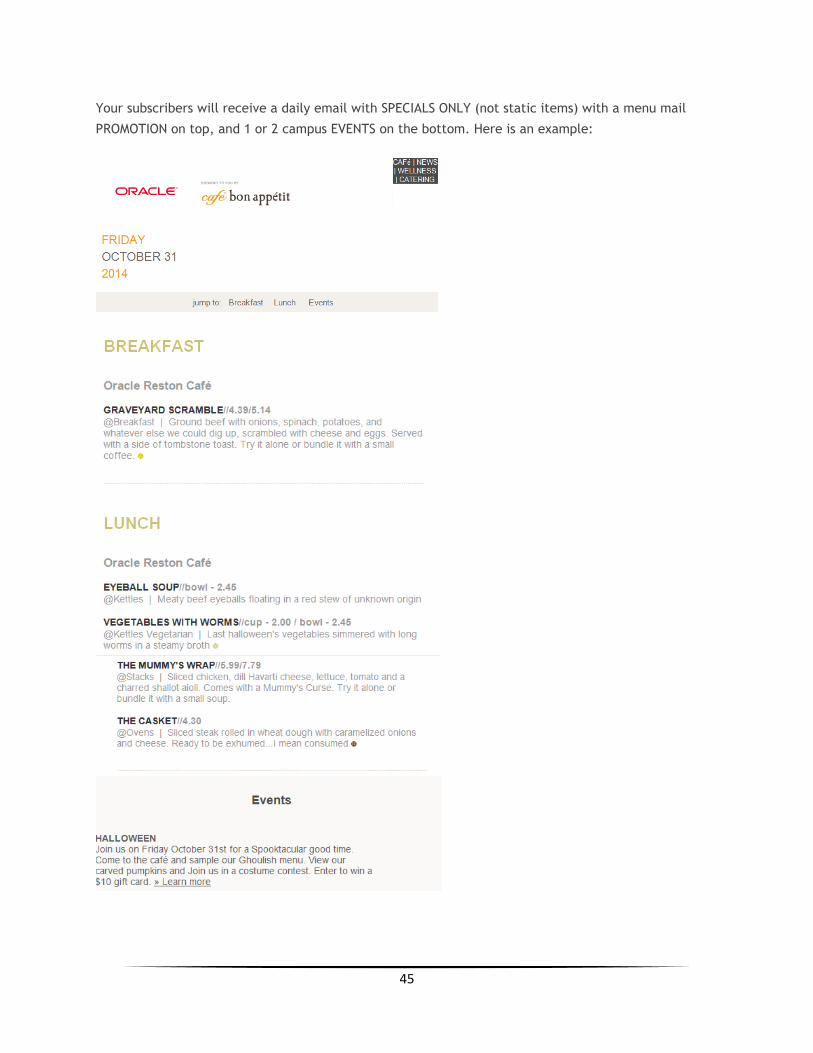
Your subscribers will receive a daily email with SPECIALS ONLY (not static items) with a menu mail
PROMOTION on top, and 1 or 2 campus EVENTS on the bottom. Here is an example:
46
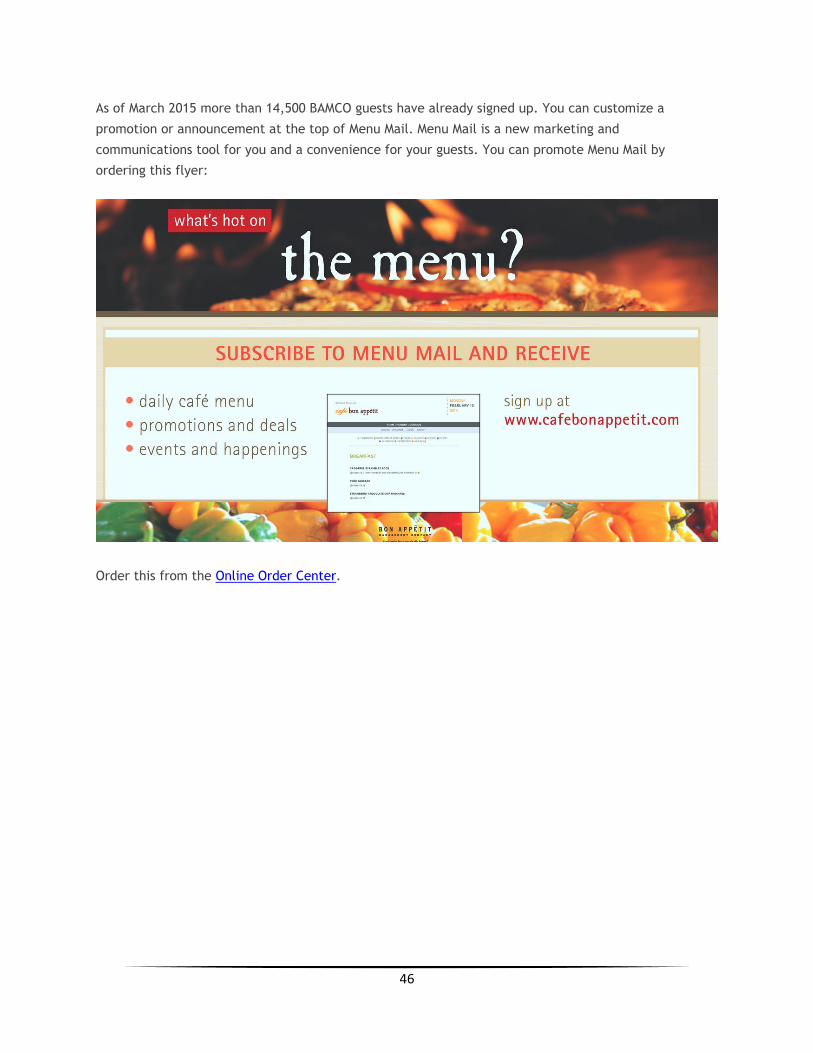
As of March 2015 more than 14,500 BAMCO guests have already signed up. You can customize a
promotion or announcement at the top of Menu Mail. Menu Mail is a new marketing and
communications tool for you and a convenience for your guests. You can promote Menu Mail by
ordering this flyer:
Order this from the Online Order Center.
47
XXII. Menu Mail Promotions
You can create Menu Mail promotions to provide your guests with information you would like to
highlight at the top of your Menu Mail daily email. Items you may wish to highlight are drink or food
promotions, new employees, meeting a special guest, etc.
A. You will go to your campus’ WordPress Admin site at
[yourcampusname].cafebonappetit.com/wp-admin and log in with your campus credentials
i. Example Username: bamco
ii. Example Password: 12345 (5-digit cost center)
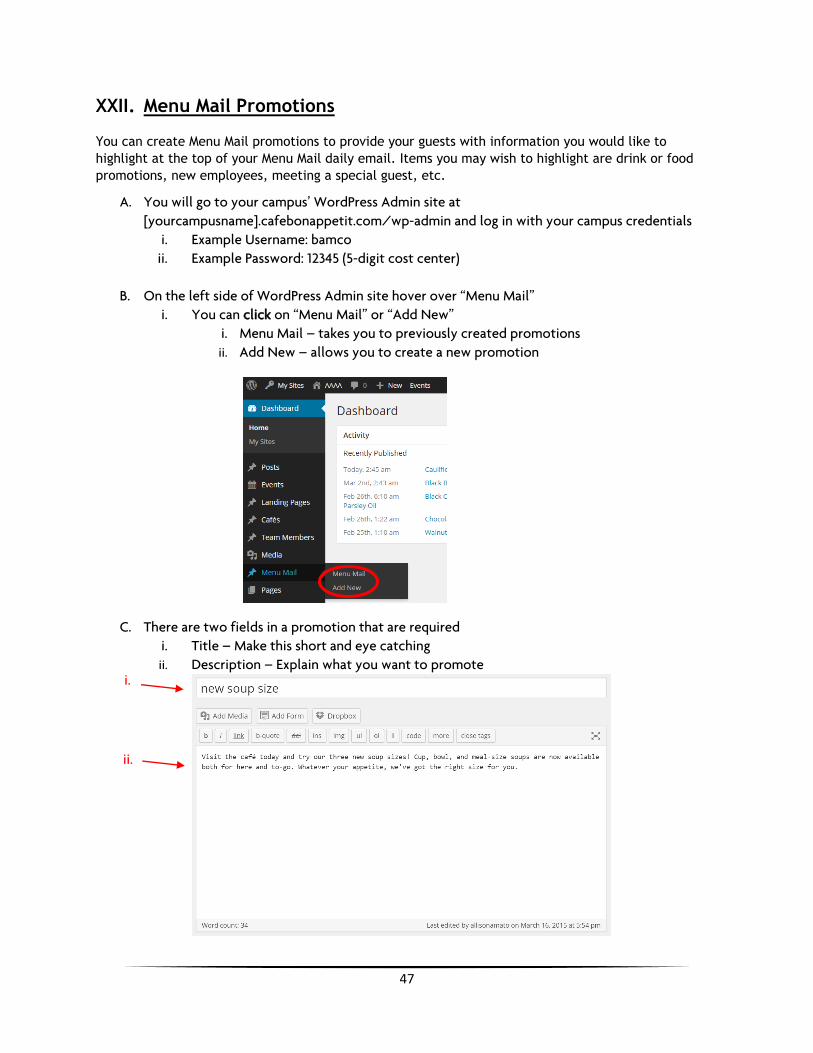
B. On the left side of WordPress Admin site hover over “Menu Mail”
i. You can click on “Menu Mail” or “Add New”
i. Menu Mail – takes you to previously created promotions
ii. Add New – allows you to create a new promotion
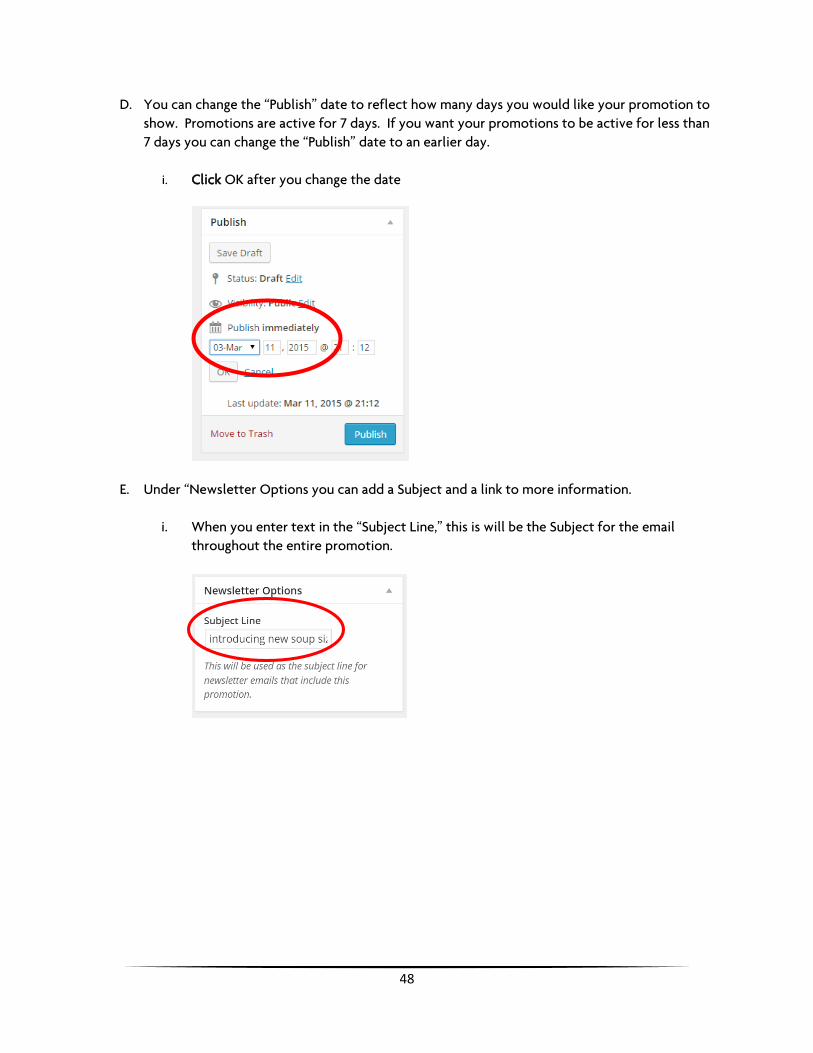
C. There are two fields in a promotion that are required
i. Title – Make this short and eye catching
ii. Description – Explain what you want to promote
ii.
i.
48
D. You can change the “Publish” date to reflect how many days you would like your promotion to
show. Promotions are active for 7 days. If you want your promotions to be active for less than
7 days you can change the “Publish” date to an earlier day.
i. Click OK after you change the date
E. Under “Newsletter Options you can add a Subject and a link to more information.
i. When you enter text in the “Subject Line,” this is will be the Subject for the email
throughout the entire promotion.
49
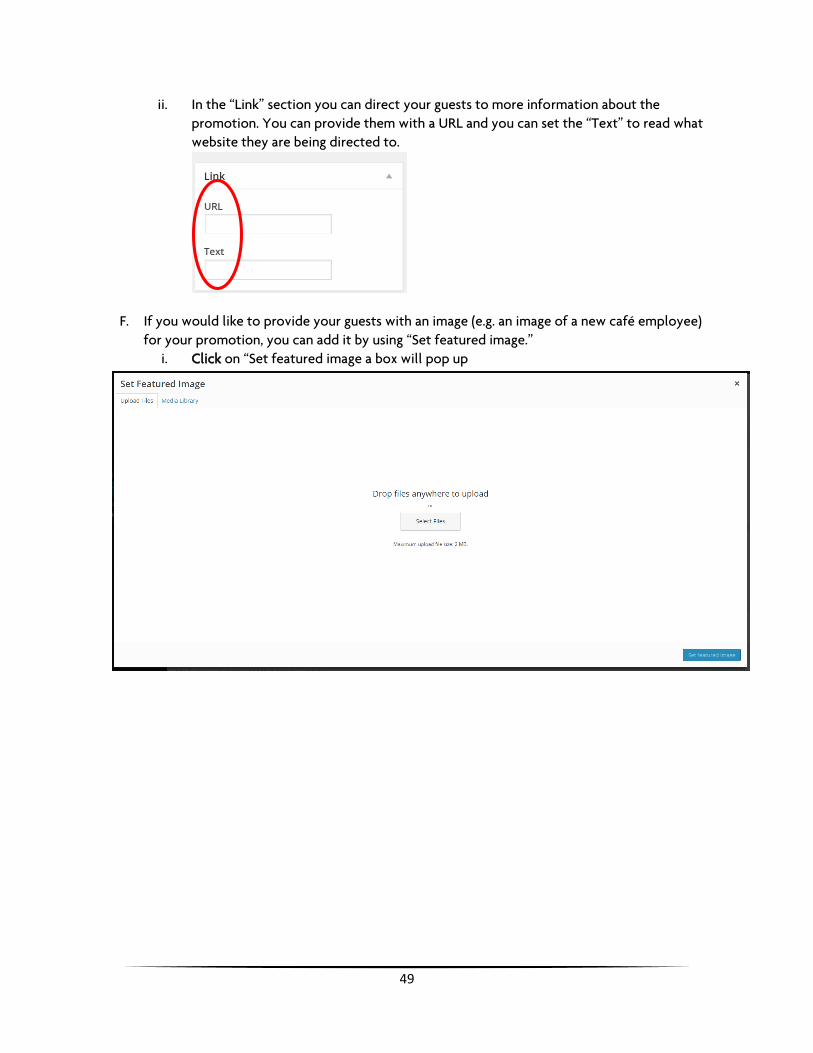
ii. In the “Link” section you can direct your guests to more information about the
promotion. You can provide them with a URL and you can set the “Text” to read what
website they are being directed to.
F. If you would like to provide your guests with an image (e.g. an image of a new café employee)
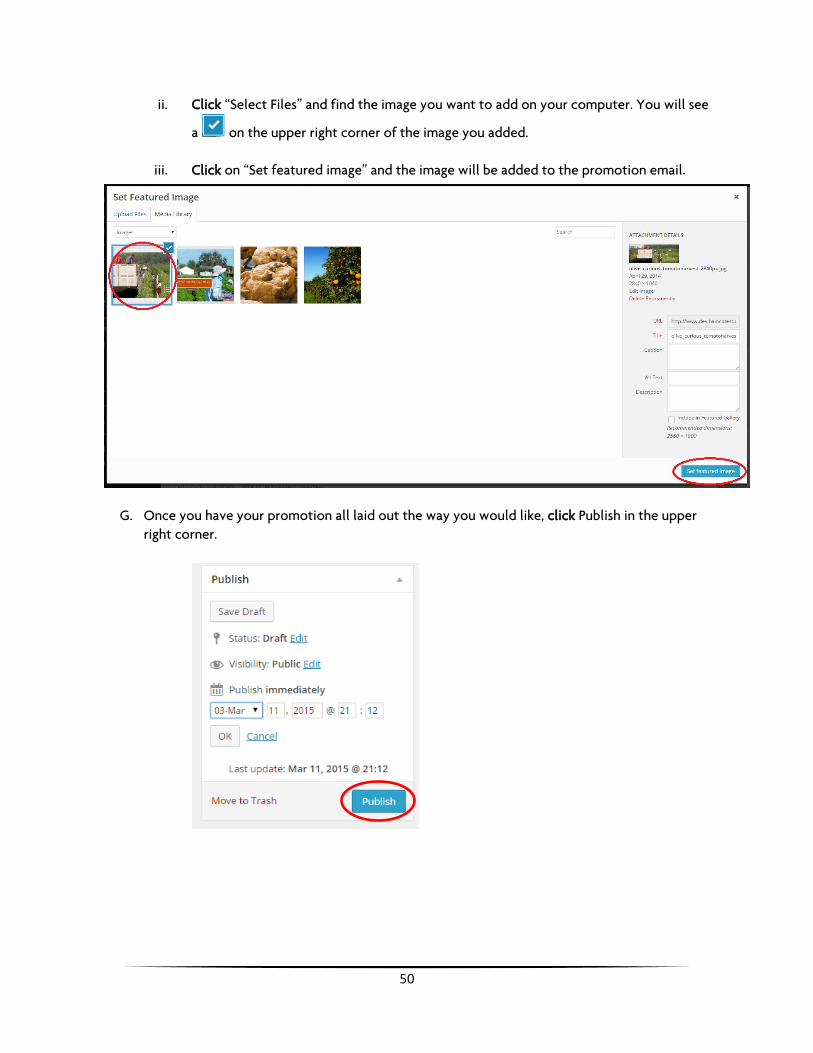
for your promotion, you can add it by using “Set featured image.”
i. Click on “Set featured image a box will pop up
50
ii. Click “Select Files” and find the image you want to add on your computer. You will see
a on the upper right corner of the image you added.
iii. Click on “Set featured image” and the image will be added to the promotion email.
G. Once you have your promotion all laid out the way you would like, click Publish in the upper
right corner.
51
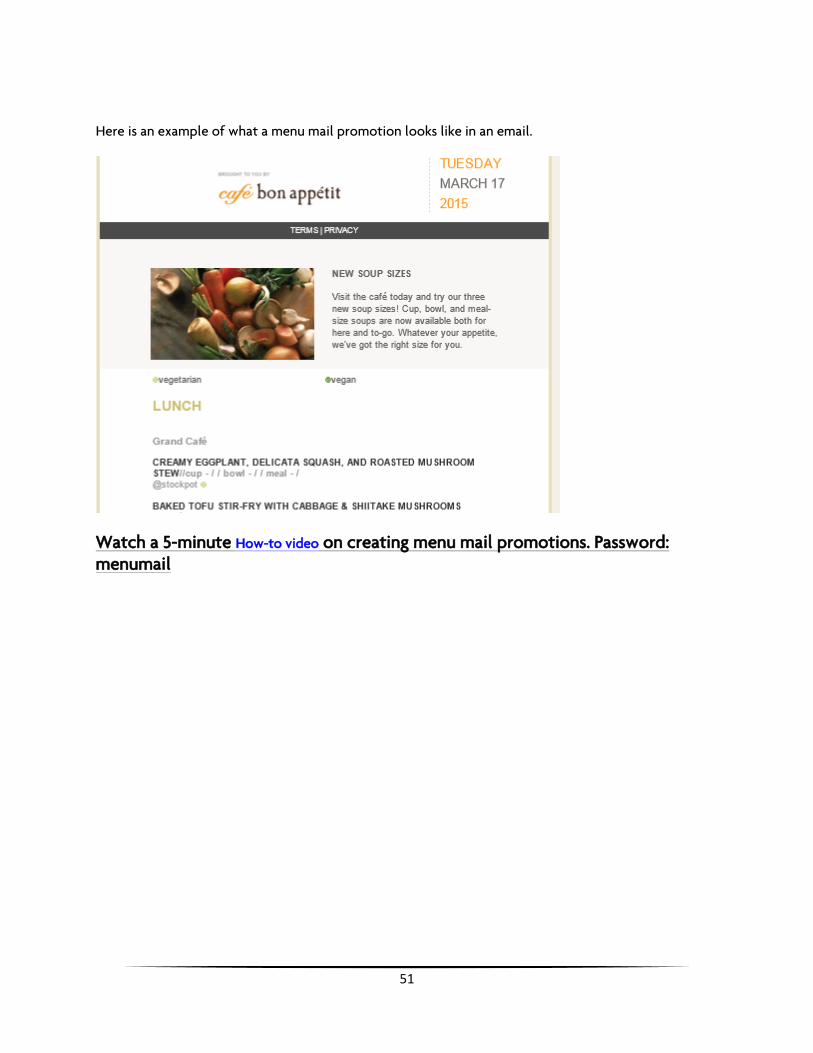
Here is an example of what a menu mail promotion looks like in an email.
Watch a 5-minute How-to video on creating menu mail promotions. Password: menumail
52
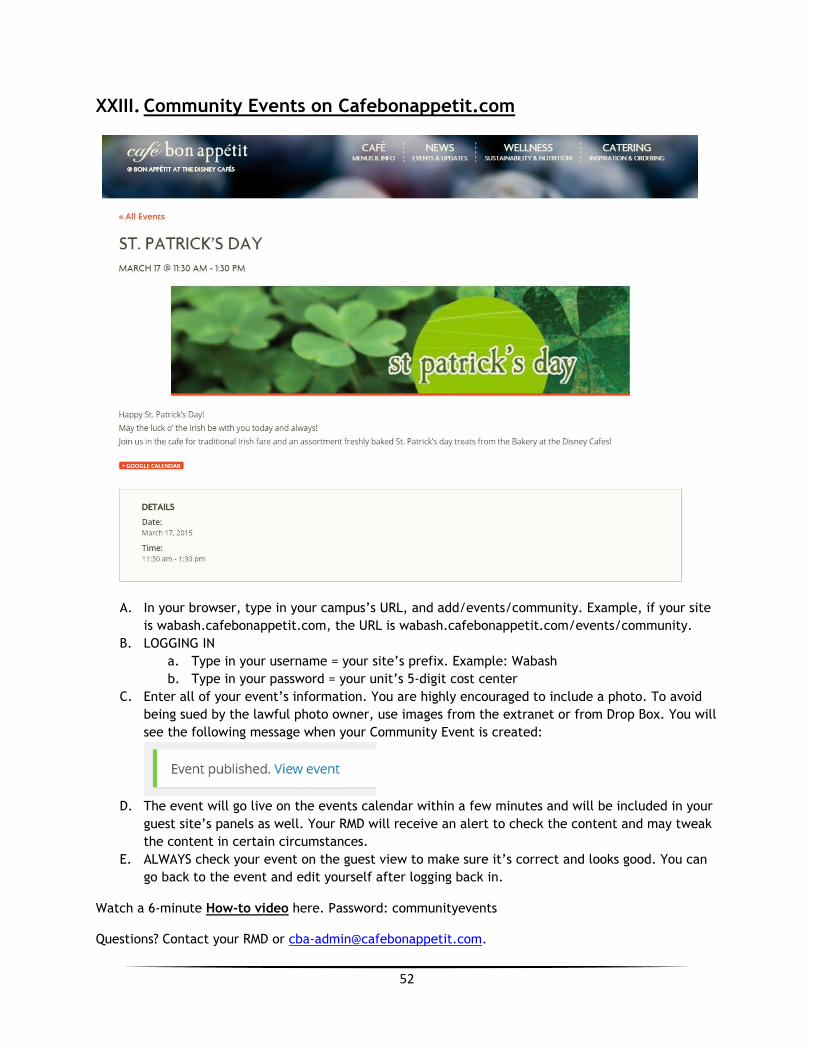
XXIII. Community Events on Cafebonappetit.com
A. In your browser, type in your campus’s URL, and add/events/community. Example, if your site
is wabash.cafebonappetit.com, the URL is wabash.cafebonappetit.com/events/community.
B. LOGGING IN
a. Type in your username = your site’s prefix. Example: Wabash
b. Type in your password = your unit’s 5-digit cost center
C. Enter all of your event’s information. You are highly encouraged to include a photo. To avoid
being sued by the lawful photo owner, use images from the extranet or from Drop Box. You will
see the following message when your Community Event is created:
D. The event will go live on the events calendar within a few minutes and will be included in your
guest site’s panels as well. Your RMD will receive an alert to check the content and may tweak
the content in certain circumstances.
E. ALWAYS check your event on the guest view to make sure it’s correct and looks good. You can
go back to the event and edit yourself after logging back in.
Watch a 6-minute How-to video here. Password: communityevents Questions? Contact your RMD or [email protected].

53
XXIV. View Your Campus’s Cafebonappetit.com Statistics In Café Manager you can view how many guests you reach with your campus’s Cafebonappetit.com website. There are three different statistic views.
A. Page Views
Here you can see how many guests have visited the site:
In the Last 30 Days
This Week
This Month
Year-to-Date (YTD)
Since your page was created (Since Started)
54
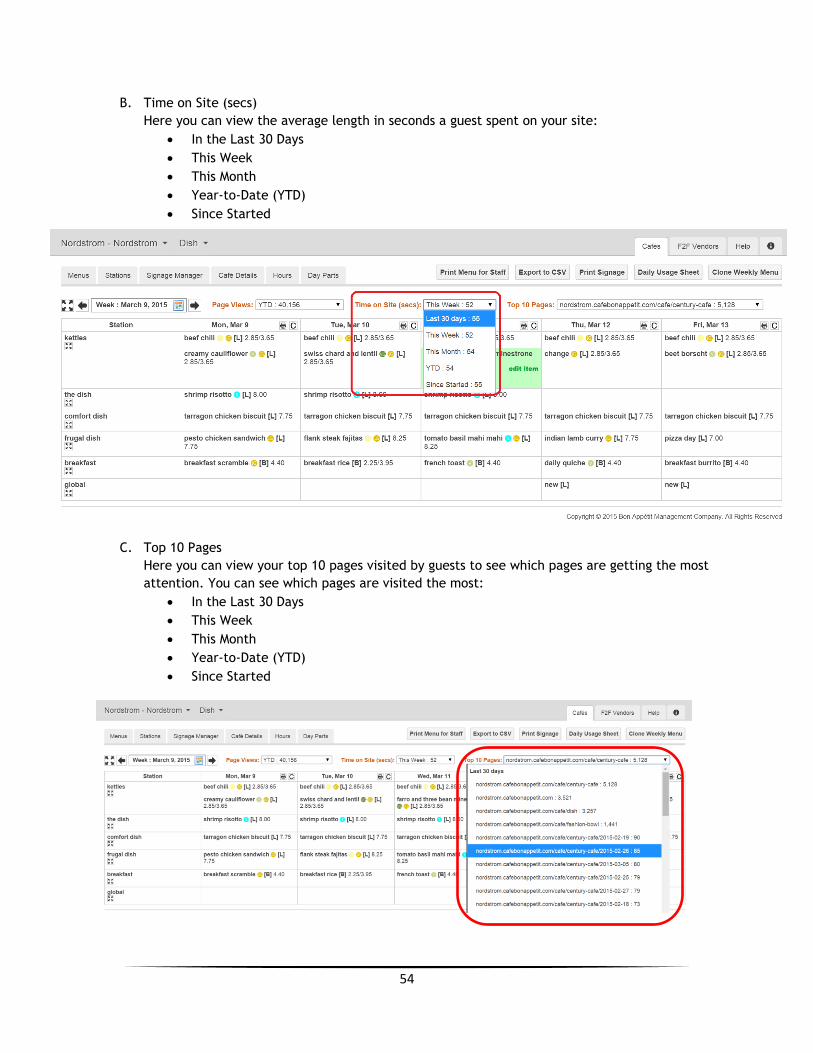
B. Time on Site (secs)
Here you can view the average length in seconds a guest spent on your site:
In the Last 30 Days
This Week
This Month
Year-to-Date (YTD)
Since Started
C. Top 10 Pages
Here you can view your top 10 pages visited by guests to see which pages are getting the most
attention. You can see which pages are visited the most:
In the Last 30 Days
This Week
This Month
Year-to-Date (YTD)
Since Started
55
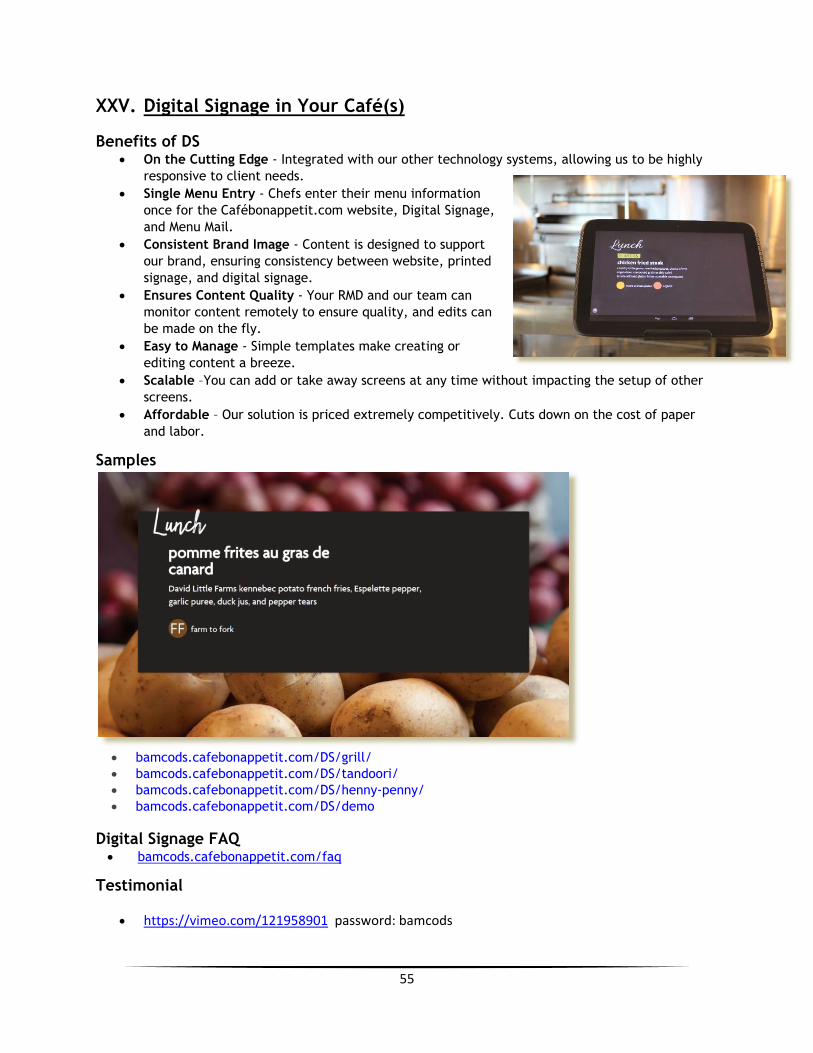
XXV. Digital Signage in Your Café(s)
Benefits of DS On the Cutting Edge - Integrated with our other technology systems, allowing us to be highly
responsive to client needs.
Single Menu Entry - Chefs enter their menu information
once for the Cafébonappetit.com website, Digital Signage,
and Menu Mail.
Consistent Brand Image - Content is designed to support
our brand, ensuring consistency between website, printed
signage, and digital signage.
Ensures Content Quality - Your RMD and our team can
monitor content remotely to ensure quality, and edits can
be made on the fly.
Easy to Manage - Simple templates make creating or
editing content a breeze.
Scalable –You can add or take away screens at any time without impacting the setup of other
screens.
Affordable – Our solution is priced extremely competitively. Cuts down on the cost of paper
and labor.
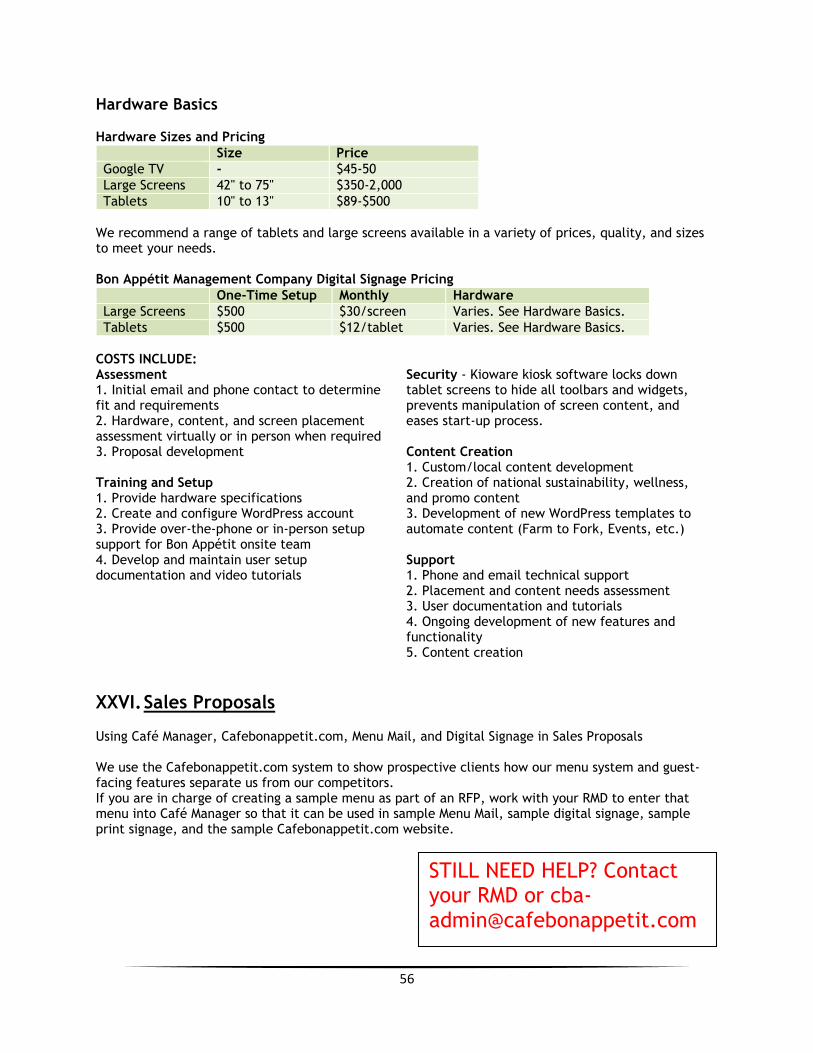
Samples
bamcods.cafebonappetit.com/DS/grill/
bamcods.cafebonappetit.com/DS/tandoori/
bamcods.cafebonappetit.com/DS/henny-penny/
bamcods.cafebonappetit.com/DS/demo
Digital Signage FAQ bamcods.cafebonappetit.com/faq
Testimonial
https://vimeo.com/121958901 password: bamcods
56
Hardware Basics Hardware Sizes and Pricing
Size Price
Google TV - $45-50
Large Screens 42" to 75" $350-2,000
Tablets 10" to 13" $89-$500
We recommend a range of tablets and large screens available in a variety of prices, quality, and sizes to meet your needs. Bon Appétit Management Company Digital Signage Pricing
One-Time Setup Monthly Hardware
Large Screens $500 $30/screen Varies. See Hardware Basics.
Tablets $500 $12/tablet Varies. See Hardware Basics.
COSTS INCLUDE: Assessment 1. Initial email and phone contact to determine fit and requirements 2. Hardware, content, and screen placement assessment virtually or in person when required 3. Proposal development Training and Setup 1. Provide hardware specifications 2. Create and configure WordPress account 3. Provide over-the-phone or in-person setup support for Bon Appétit onsite team 4. Develop and maintain user setup documentation and video tutorials
Security - Kioware kiosk software locks down tablet screens to hide all toolbars and widgets, prevents manipulation of screen content, and eases start-up process. Content Creation 1. Custom/local content development 2. Creation of national sustainability, wellness, and promo content 3. Development of new WordPress templates to automate content (Farm to Fork, Events, etc.) Support 1. Phone and email technical support 2. Placement and content needs assessment 3. User documentation and tutorials 4. Ongoing development of new features and functionality 5. Content creation
XXVI. Sales Proposals Using Café Manager, Cafebonappetit.com, Menu Mail, and Digital Signage in Sales Proposals We use the Cafebonappetit.com system to show prospective clients how our menu system and guest-facing features separate us from our competitors. If you are in charge of creating a sample menu as part of an RFP, work with your RMD to enter that menu into Café Manager so that it can be used in sample Menu Mail, sample digital signage, sample print signage, and the sample Cafebonappetit.com website.
STILL NEED HELP? Contact your RMD or [email protected]