guide to using k’nex in post-16 and adult education &...
TRANSCRIPT

Guide to using K’NEX in post-16 and adult
education & training
…including 10 K‟NEX challenges
www.knexusergroup.org.uk

Lots more K‟NEX resources for post-16 education and training at www.knexusergroup.org.uk 2
Contents 1. Introduction
2. Why use K'NEX in post-16 and adult education and training?
3. K‟NEX for structural engineering
4. K‟NEX for vocational skills
5. K‟NEX for adult numeracy
6. K‟NEX for innovation, problem-solving and team-building
7. K‟NEX for aptitude tests
8. Accredited learning with K‟NEX
9. Helping adults with learning difficulties
Appendices
A. Resources for photocopying
B. K‟NEX set reviews and order form
1. Introduction
The K‟NEX construction kit has been available for educational use in the UK since 1995.
Initially, K‟NEX was seen just as an innovative and exciting way of helping primary school students to understand the Design and Technology curriculum, but increasingly K‟NEX has been put to many different educational uses, in:
Design, technology, engineering, science, maths and computer control
Family learning
Home education
Childcare schemes
Clubs for children and adults
Primary schools
Secondary schools
Further education (FE)
Higher education (HE)
Adult education and training
Team-building and aptitude tests
The purpose of this short guide is to explain how K‟NEX can be used to best effect in post-16 education and training.
1.1 Who is this guide for?
This Guide has been written for everyone who has an interest in post-16 and adult education and training, including:
Lecturers
Teachers
Adult tutors
Training officers
Personnel departments
1.2 What is K’NEX
K'NEX is one of the most successful construction kits in the world, second in popularity only to Lego. It is based around a series of "rods", which can be joined together by "connectors" such as the one shown in our logo. Once they have mastered using these simple components, children and adults alike can use their imagination to make potentially millions of different working models.
It is ease of use and versatility that make K'NEX such a good investment for educational purposes, whether in schools, home education, children‟s clubs, childcare schemes, family learning or post-16 education and training. You will find that there is no age limit for enjoying K'NEX - it is suitable for all ages from 5 to 95. There is also a version of K'NEX with bigger components for 3 to 7 year olds, called Kid K'NEX, as shown in the photo.
Building K'NEX models helps children and adults to understand subjects such as structures, forces and simple machines, in the way that Meccano educated an earlier generation. However, Meccano was aimed and advertised exclusively at boys, whereas both girls and boys find K'NEX easy and enjoyable to use. K'NEX can also be used effectively with adults, once they have mastered the basic techniques for joining rods and connectors together, and overcome any initial lack of confidence.
A further strength of K'NEX is that, when used to set Challenges, it can help both children and adults to develop skills such as innovation skills, problem-solving skills and team-working skills. These are skills that are much sought after by employers. It is also worth remembering that even though educational organisations use K'NEX because of its high educational value, children and adults enjoy using K'NEX simply because it is fun. This makes K'NEX a good vehicle for engaging hard-to-reach students, such as disaffected students and students with behavioural and emotional difficulties.
Version 1.0 1/09/05
Author Andy Shercliff of the K‟NEX User Group, a not-for-profit division of 4children2enjoy Ltd
Email [email protected]
Website www.knexusergroup.org.uk
Copyright © 2005 K‟NEX User Group
Any organisation purchasing this Guide may photocopy the pages in the Appendix to assist them to run K’NEX® projects with their own students. Apart from this restricted permission to photocopy, the Guide must not be photocopied or otherwise reproduced
without our prior agreement in writing. We have endeavoured to make sure that the information in this Guide is current and correct. We cannot guarantee that there will be
no errors or omissions, and we do not, either expressly or implicitly, warrant the use thereof. No liability is assumed for any incidental, direct, indirect, or consequential injury
or damages from your use or reliance on the Guide.
K’NEX ® is the registered trademark of K’NEX industries, Inc.

Lots more K‟NEX resources for post-16 education and training at www.knexusergroup.org.uk 3
2. Why use K’NEX in post-16 and adult education and training?
K'NEX is increasingly being used in different forms of post-16 education and training, including Further Education, Higher Education, Adult education and Adult training. K‟NEX is used in these settings:
As a versatile structural engineering system, which helps students to learn about structural engineering in a hands-on way.
As an enjoyable method for developing the vocational skills of students.
To allow adults to develop basic numeracy skills and maths skills.
As a vehicle for K'NEX Challenges that help to develop innovation skills, problem-solving skills and team-working skills.
As a system for hands-on aptitude tests, that can help assess the skills of applicants in areas such as problem-solving, team-working and leadership.
For accredited learning
To assist students with learning difficulties to develop skills and self-esteem
Sections 3 to 9 of this Guide describe how K‟NEX may be used in the above fields. The following general recommendations about using K‟NEX post-16 may also be of help:
1. We would suggest you put your students into groups of 2, 3 or 4 to use K'NEX. This will help them to develop teamwork skills and communication skills whilst they are completing their K'NEX projects.
2. If you can afford it, buy enough K'NEX for whole class or group to use at once. Appendix B includes details of the most popular K‟NEX sets for post-16 education and training.
3. It will help greatly if you store your K'NEX carefully arranged in compartmented trays, rather than all mixed up in a big box. This approach means that time is not wasted in searching for the components you need. Many of the K'NEX Education sets in Appendix B include compartmented trays.
4. Once you and your students have mastered building K'NEX models from the instruction books that arrive with the sets, you may want to think about starting to use K'NEX challenges, such as those in Appendix A and on our website. This will help you to get more value out of your investment in K'NEX.
3. K’NEX for structural engineering
K‟NEX is much more than a construction kit – it is a versatile and powerful structural engineering system that can be used to build strong structures such as:
Bridges of any length from 30cm up to 10m or more
Towers up to 5m high or more
Scale models of Buildings
Full-size items of Furniture
The design, building and testing of K‟NEX structures enables students to develop their structural engineering knowledge and experience in a practical, hands-on way.
One suggested approach for achieving this is:
1. Ask the students to work in pairs to build, test and improve one of the 30cm bridges in the K‟NEX Introduction to Structures: Bridges set. Eg a Warren Truss bridge, which can be modified to support a weight of 10Kg. This will give them confidence and experience in using K‟NEX for basic bridge building.
2. Set students working in groups of 4 the task of building one of the 1.5m long replica bridges in the K‟NEX Real Bridges set. Eg Sydney Harbour bridge.
3. Set students the challenge of designing, building and testing a bridge to a given specification without instructions Eg 3m long and able to support 10Kg.
4. Set students the challenge of designing, building and testing other K‟NEX structures to a specification. Eg a 3m tower with a revolving restaurant on top.
When it comes to designing K‟NEX structures before starting building, there are a number of approaches which can be taken:
1. Ask the students to sketch their structure before starting.
2. Use a general-purpose CAD package to design the bridge.
3. Use the Westpoint Bridge designer, which can be downloaded free from http://bridgecontest.usma.edu
The “Post-16” page of our website includes a case study which explains how Westpoint Military Academy uses K‟NEX not only to help students learn about structural engineering, but also to provide a realistic construction management project for the class.
4. K’NEX for vocational skills
There is a whole generation of children and young people growing up who gained great enjoyment in their childhood from building K‟NEX models. The oldest of this “K‟NEX generation” are now in their early twenties.
This gives a major opportunity for those who are involved in teaching vocational skills to use K‟NEX as a vehicle for the development of skills and experience in fields such as:
Structural engineering Mechanical engineering
Product design and development

Lots more K‟NEX resources for post-16 education and training at www.knexusergroup.org.uk 4
Students should initially be given a K‟NEX project which involves building a K‟NEX model from instructions. This will develop their experience and confidence, and give the tutor or teacher an opportunity to assess their existing level of K‟NEX knowledge.
The real strength of K‟NEX comes though when the students are then set a series of “K‟NEX challenges”, in which they must design, build and test K‟NEX models that meet a given specification. Appendix A includes 10 K‟NEX challenges, and our website www.knexusergroup.org.uk includes 30 more.
Examples of K‟NEX challenges in the Appendix that can help develop vocational skills are:
Structural engineering – Bridge that Gap challenge and Earthquake challenge.
Mechanical engineering – Crane challenge and Block & tackle challenge.
Product design and development – Fork lift truck challenge and Wheelchair challenge
The K‟NEX challenges can also be provided within accredited learning units, as described in section 8.
5. K’NEX for adult numeracy
The K‟NEX construction kit is being used increasingly in colleges and other forms of adult education as a hands-on vehicle for the delivery of the Adult Numeracy Curriculum, including:
Numeracy
Shape and Space
Measure
Handling data
Students greatly enjoy K‟NEX maths activities such as “Build and cost a K‟NEX bird table”, “Use K‟NEX to make a net for a cube” (see photo opposite), or “Make a measuring wheel out of K‟NEX and use it to make a map”.
The User Group has written a Guide entitled “K‟NEX for Hands-on Maths”, which includes 101 K‟NEX maths activities. Extracts from this Guide may be found in the Members‟ Area of our website www.knexusergroup.org.uk
6. K’NEX for innovation, problem-solving and team-building
K‟NEX challenges are also excellent for developing and assessing the “soft skills” of students, including:
Innovation skills
Problem-solving skills
Technical communication skills
Teamwork
These skills can successfully be developed in:
Primary schools
Secondary schools
FE colleges
HE institutions
Adult education
Company training courses
Seminars and conferences
If you already have K'NEX, we would suggest getting participants to work in pairs, seated around tables, each with their own box of K'NEX. In choosing a challenge, you might like to use one of the Challenges in Appendix A, or from our website, or alternatively devise your own challenge. We would suggest giving the session a catchy name such as "Bridge-building with K'NEX". Next, print out a copy of the Challenge card for each group, and also give them copies of any Handy Hints required. It will also help if you have a "Facilitator" on hand, who can answer any questions, and assist groups with any technical problems they may encounter. The Facilitator should complete the challenge themselves in advance.
If you don't already have K'NEX, Appendix B includes some of the most popular general-purpose K‟NEX sets.
One of the advantages of completing K'NEX challenges in pairs is that it will require a lot of communication and co-operation. For this reason, some organisations use a K'NEX team-building challenge as a "getting-to-know-you" or “ice-breaking” activity, for instance with new employees, new students, or at a seminar.
7. K’NEX for aptitude tests
Selecting the best candidate from amongst many applicants for a job or a course can be a difficult task, particularly when the job or course requires skills that are not easy to identify via interviews and traditional aptitude tests.
Some organisations now set applicants a K'NEX task as part of their assessment process, as follows:
1. Select a K'NEX task that is appropriate to the level of skill required. If you already have K'NEX, you might build a simple K'NEX model from the st's instruction book, or complete one of the K'NEX Challenges on this website. If you don't already have K'NEX, you might consider buying some of the £5 K'NEX sample sets, which have been designed for adult use.
2. Print out sufficient copies of the photo or challenge for each applicant.
3. Determine whether you want the applicants to complete the task individually or in groups. Carrying out a fairly difficult K'NEX task in groups may allow you to assess characteristics such as teamworking skills and leadership skills.

Lots more K‟NEX resources for post-16 education and training at www.knexusergroup.org.uk 5
4. Before starting the challenge, allow the applicants to become familiar with K'NEX, and explain any Handy Hints relevant to the K'NEX task. Also ask if any of the applicants have used K'NEX before, so you can allow for this in the assessment process.
5. Seat the applicants (or groups of applicants) so that they cannot copy from each other without this become obvious.
6. Ensure that all applicants start the K'NEX task at the same time.
7. Answer any questions that applicants ask, but make a note of their questions.
8. When the applicant(s) claim to have finished the task, check that they have done so correctly, and if not, point out what still needs to be done.
9. Record the time at which each applicant (or group of applicants) finally completes the task.
8. Accredited learning with K’NEX
Many educational organisations have a requirement to deliver accredited learning to their post-16 students. To assist them in this process, the K‟NEX UK User Group has developed the following accredited learning units.
For learners (all 10 hours):
K‟NEX for hands-on Technology (levels 1 or 2)
K‟NEX for hands-on Science (level 1)
K‟NEX for hands-on Numeracy (level 1)
For tutors (6 hours):
K‟NEX for hands-on Learning (for Tutors) (level 2)
All of the above are accredited as progression units by both the National Open College Network (NOCN), and the independent Open College North West (OCNW). Any organisation delivering adult education or family learning can register as a learning centre with their local OCN or with OCNW, and deliver the units to their learners, using coursework materials supplied by the User Group. The unit for tutors is usually delivered directly by the User Group.
No previous experience of the K‟NEX construction kit is required for any of the units.
8.1 K’NEX for hands-on Technology
Learners will build models from the K‟NEX construction kit to help them to better understand the technology of everyday life, including structures and simple machines.
The learner will start by gaining familiarity with the K‟NEX construction kit, by building two simple working models from instruction cards (eg seesaw, swing). The learner will then complete a series of nine “challenges”, in which they must build a K‟NEX model of an everyday structure or simple machine, without instructions (eg house, tower, bridge, crash helmet, car, roundabout, baby buggy, mousetrap, crane).
The education materials for this unit are in the User Group Guide to “Hands-on Science and Technology”.
8.2 K’NEX for hands-on Science
Learners will build ten models from the K‟NEX construction kit to help them to better understand the science of everyday life, including forces, motion and sources of energy.
The learner will complete ten working K‟NEX models from instruction cards. Each model will demonstrate a different aspect of forces, energy and motion (eg weighing scales, wheelbarrow, steering wheel, battery powered car, rubber band-powered car, windmill, waterwheel, food mixer, exercise bicycle, block and tackle).
The education materials for this unit are in the User Group Guide to “Hands-on Science and Technology”.
8.3 K’NEX for hands-on Numeracy
Learners will complete ten one-hour model-building sessions using the K‟NEX construction kit, to help them to better understand numeracy, shape, space, measure and handling data in the adult numeracy core curriculum.
The learner will complete ten K‟NEX model-building sessions last one hour, working from instruction cards. Each session will cover one or more aspects of the adult numeracy core curriculum (eg counting, patterns and relationships, fractions, squares, cubes, estimating, equations, costing, 2-D shapes, 3-D shapes, nets, angles, segments, congruence, similarity, rotation, reflection, symmetry, areas, volumes, rulers, weighing, compasses, clock faces, sundials, dice, spinners, tables and bar charts).
The education materials for this unit are in the User Group Guide to “Hands-on Maths”.
8.4 K’NEX for hands-on Learning (for Tutors)
The unit will train teachers, tutors and other educators how to use the K‟NEX construction kit to help adults and/or children to develop:
a better understanding of technology, science and numeracy, and
improved creativity skills and problem-solving skills.

Lots more K‟NEX resources for post-16 education and training at www.knexusergroup.org.uk 6
The unit is for teachers, tutors, family learning practitioners, club leaders, leaders of childcare schemes, home educators, post-16 tutors and other educators. It lasts six hours, split equally between theory and practical sessions.
The learner will:
a) Receive Powerpoint presentations on “Introduction to K‟NEX”, “Educational uses of K‟NEX” and “Planning and delivering a K‟NEX event”.
b) Build at least two K‟NEX models from instruction cards.
c) Complete at least two K‟NEX challenges.
9. Helping adults with learning difficulties
Many educational organisations have found that K'NEX can assist some students with learning difficulties to develop essential skills. This is not always the case. Every student with learning difficulties is different, but we have been told about many different K'NEX projects in which students with learning difficulties have done well, and on occasion exceeded the expectations of their teachers.
The following notes may assist:
1. We suggest you start by assessing whether each student is physically able to make use of K'NEX. For instance, some students with visual impairments, or cerebral palsy that affects their arms, or severe learning difficulties may find K'NEX too difficult to use. An alternative may be to use Kid K’NEX, a version of K‟NEX with larger pieces (see website).
2. You should then think carefully about how you introduce the K‟NEX or Kid K‟NEX set to the student. Start with easy tasks that are within the student‟s capability, and give as much assistance as is needed. Early failure may cause the student to reject the whole idea, even though by starting with simple tasks and then gradual development onto more difficult tasks, the student could have achieved excellent results.
3. If you find that the student does enjoy using K'NEX, you might then think about purchasing one or more of the smaller K'NEX or Kid K‟NEX education sets specifically for him or her. Prices start at £18 (see Appendix B), and the sets come with instruction books that are designed for educators. The "Discovery Building set" is a good general-purpose starter set.
4. Some students will not wish to develop beyond the stage of building the models in the instruction book you receive with the set, but if they do, you might like to start building models using the Instruction Cards and/or the K'NEX Challenges on our website.
5. We suggest you also consider encouraging your student to build K'NEX models and carry out K'NEX challenges in a team of two or three students. Such an approach can help develop the communication skills and team-working skills of all the students participating.
Note that not only can K'NEX help students with learning difficulties develop curriculum skills and vocational skills, but achieving success with K'NEX can also help to develop self-esteem and confidence.
Appendix A – Photocopiable resources
Handy Hints
Hint L1 - 3 ways to connect rods and connectors
Hint L3 - Making corners with blue & purple connectors
Challenge cards
Block and Tackle Bridge that Gap
Crane Earthquake
Fork lift truck Golf
Land yacht Mars rover
Spotlight Wheelchair
Appendix B – K’NEX Catalogue and Order Form
Reviews of popular K‟NEX Education sets
K‟NEX Order Form
Note that more full-colour Handy Hints, instruction
cards and K‟NEX challenges are available on www.knexusergroup.org.uk.

Handy Hints
Hint L1 - 3 ways to connect rods and connectors
There are only three ways to connect K‟NEX rods to K‟NEX connectors: End-on, Side-on, and Through the hole in the middle. All three are shown in the main picture.
To make an End-on connection, put the connector on the table, position the rod over the side of the slot in which you wish it to go, and push down gently. If it won‟t connect easily, reposition the rod, and try again. You don‟t need a lot of strength to make End-on connections.
To make a Side-on connection, hold the connector in one hand, the rod in the other, and push the edge of the rod into one of the slots. You will need to push quite hard - young children may find this type of connection difficult. Note that you can only make this type of connection where there are ridges along a rod - so Side-on connections can‟t be used with the short green rods, or right at the end of any rod.
To make a connection through the hole in the middle, simply put the rod through the hole. Note that a few special-purpose connectors don‟t have a hole in the middle.
Hint L3 - Making corners with blue & purple connectors
Blue and purple connectors have slots in. This means you can connect two purple connectors to each other; two blue connectors to each other; or a blue connector to a purple connector. To do this, put one slot inside the other slot, and push until you hear a click.
Using blue and purple connectors together like this is very useful if you are making a 3-D K‟NEX model which needs corners, which can be a good starting point for some K'NEX challenges.
Younger children may find connecting blue and purple connectors together quite difficult. You may prefer to join them together yourself for them, before they start their K'NEX challenge.
Note that in K'NEX sets that have mainly grey components, rather than components in secondary colours, the corresponding connectors are mid grey and dark blue.
There are lots more Handy Hints available at www.knexusergroup.org.uk
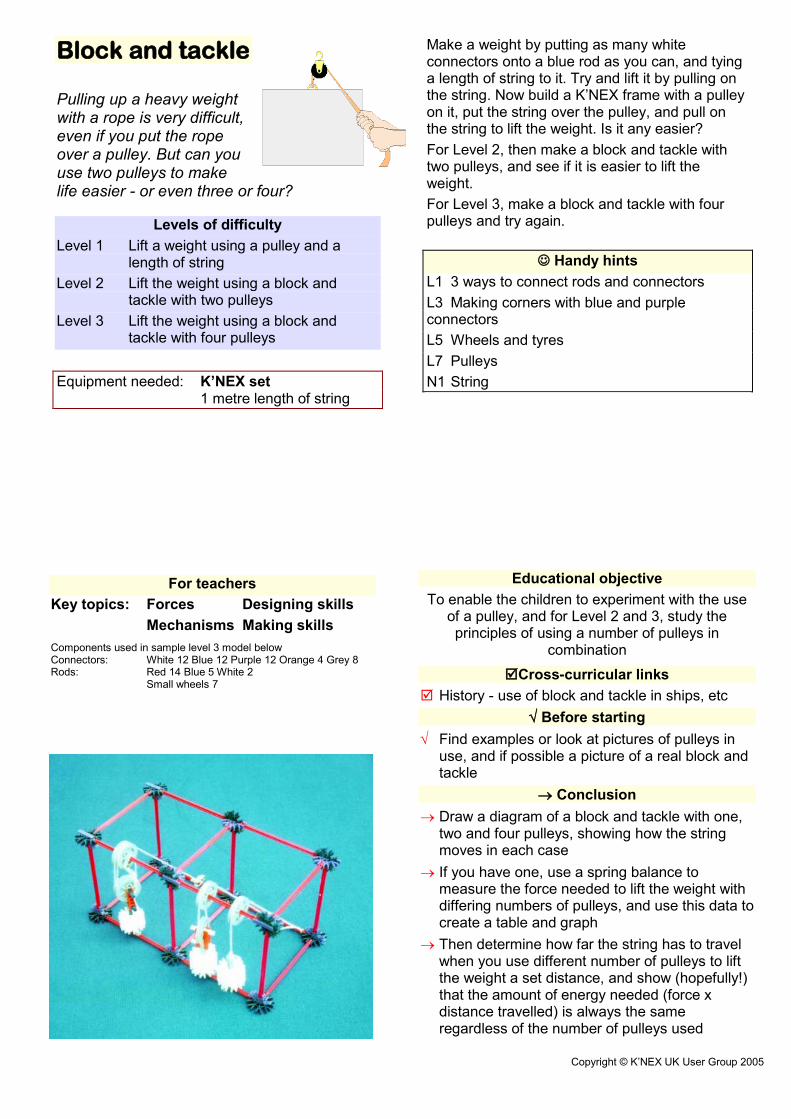
Block and tackle
Pulling up a heavy weight with a rope is very difficult, even if you put the rope over a pulley. But can you use two pulleys to make life easier - or even three or four?
Levels of difficulty
Level 1 Lift a weight using a pulley and a length of string
Level 2 Lift the weight using a block and tackle with two pulleys
Level 3 Lift the weight using a block and tackle with four pulleys
Equipment needed: K’NEX set 1 metre length of string
Make a weight by putting as many white connectors onto a blue rod as you can, and tying a length of string to it. Try and lift it by pulling on the string. Now build a K‟NEX frame with a pulley on it, put the string over the pulley, and pull on the string to lift the weight. Is it any easier?
For Level 2, then make a block and tackle with two pulleys, and see if it is easier to lift the weight.
For Level 3, make a block and tackle with four pulleys and try again.
Handy hints
L1 3 ways to connect rods and connectors
L3 Making corners with blue and purple connectors
L5 Wheels and tyres
L7 Pulleys
N1 String
For teachers
Key topics: Forces Designing skills
Mechanisms Making skills
Components used in sample level 3 model below Connectors: White 12 Blue 12 Purple 12 Orange 4 Grey 8 Rods: Red 14 Blue 5 White 2
Small wheels 7
Educational objective
To enable the children to experiment with the use of a pulley, and for Level 2 and 3, study the principles of using a number of pulleys in
combination
Cross-curricular links
History - use of block and tackle in ships, etc
Before starting
Find examples or look at pictures of pulleys in use, and if possible a picture of a real block and tackle
Conclusion
Draw a diagram of a block and tackle with one, two and four pulleys, showing how the string moves in each case
If you have one, use a spring balance to measure the force needed to lift the weight with differing numbers of pulleys, and use this data to create a table and graph
Then determine how far the string has to travel when you use different number of pulleys to lift the weight a set distance, and show (hopefully!) that the amount of energy needed (force x distance travelled) is always the same regardless of the number of pulleys used
Copyright © K‟NEX UK User Group 2005

Copyright © K‟NEX UK User Group 2005
Bridge that gap
A big storm has washed away part of the main road near your school. A child in the school is very ill, and the Ambulance can’t get through. We need your help - can you design and build a bridge that can carry the ambulance across the big gap in the road?
Levels of difficulty
Level 1 Make a bridge which will span a 1m gap without supports
Level 2 Make a bridge which will span a 2m gap without supports
Level 3 As level 2, and will also support the weight of a box of K‟NEX in the middle
Equipment needed: K’NEX set For level 3: Books to use as weights Test area: Gaps of 1m and 2m for
testing
K‟NEX is superb for building bridges, provided you get the design right. Think about how you can make your bridge really strong. Try out your ideas in a short bridge, and test it between two tables. Does it break or sag in the middle? If so, how could you strengthen it? Push down on the centre of the bridge - does it start to fail in any way? How can you prevent this? Don‟t be afraid to start again after you have tested your bridge - getting the best design is not easy.
When you are happy with your short bridge, extend it to 1 metre long, and test it again. Can you improve your design even further?
Finally extend the bridge to 2 metres, and test it. If it stands up OK, try adding books to the centre one at a time (carefully!). If the bridge starts to bend or break - back to the drawing board!
Handy hints
L1 3 ways to connect rods and connectors
L4 Strong 3-D structures
Educational objective
How to make structures more stable and withstand greater loads. How structures can fail when loaded, and
techniques for reinforcing and strengthening them
Cross-curricular links
Geography - purpose and location of bridges
History - early peoples, Victorians
Mathematics - symmetry
Before starting
Look at pictures of different types of bridge, and consider which might work best with K‟NEX
If possible, visit a real example of a bridge built from steel girders
Conclusion
Ask the children what they have learnt in the process of completing the challenge
Ask them to compare the different bridges built by the class, and assess the strengths and weaknesses of each
Possible follow-on activities
Visit (or look at pictures of) examples of different types of bridge, and discuss why each has been used
Project on the history and structure of a local bridge
For teachers
Key topics: Structures Designing skills
Forces Making skills
Components used in sample level 3 model below Connectors: Yellow 50 Rods: Red 71 Yellow 48

Copyright © K‟NEX UK User Group 2005
Crane
Four large tractor wheels have fallen out of a helicopter flying over your school, and luckily landed in the playground when no-one was there. We need to put them on a lorry, as they are urgently needed by a local farmer. Can you help, by building a crane that will lift the wheels onto the back of the lorry?
Levels of difficulty
Level 1 Build a simple model of a crane
Level 2 Build a crane with a hook on the end of the string that goes up and down when you turn a handle
Level 3 As level 2, and the crane can pick up 4 of the larger K‟NEX wheels and tyres without falling over
Equipment needed: K’NEX set
1m length of string
Do you know what cranes are used for? What do they look like? - there are lots of different types. How could you build one out of K‟NEX? What shape will it be?
For level 2, how can you add a handle, and a length of string that will make a hook go up and down when you turn the handle?
For level 3, test your crane with 4 wheels on the hook. Does it work OK, or does it overbalance? If it does, how can you improve the design to prevent it overbalancing?
Handy hints
L1 3 ways to connect rods and connectors
L3 Making corners with blue and purple connectors
L5 Wheels and tyres
L6 Making rods turn with wheels or connectors
L7 Pulleys
L8 Handles
N1 String
Educational objective
A practical project to design and build a model of a familiar working object. At level 3, a project which
demonstrates the effects of balanced and unbalanced forces on a static object
Cross-curricular links
None
Before starting
Look at pictures or real examples of different types of crane, and discuss how they work
Conclusion
Test all the models in the class, to see whose model can lift the most wheels
Discuss the different ways in which the models achieve the objective, and why the design of the winning model is the best
Possible follow-on activities
None
For teachers
Key topics: Mechanisms Designing skills
Forces Making skills
Components used in sample Level 3 model below Connectors: White 22 Blue 12 Purple 44 Orange 1 Grey 9 Rods: Red 9 Yellow 45 Blue 8
Small wheels 2 String

Copyright © K‟NEX UK User Group 2005
Earthquake
On a visit to San Francisco, you hear a radio warning that an earthquake is going to take place the next day. Can you help the local people, who will lose their houses and blocks of flats, by making them an earthquake-proof building to live in?
Levels of difficulty
Level 1 Build a house that will stand up in an earthquake
Level 2 Build a 0.5m tower that will stand up in an earthquake
Level 3 As level 2, but a 1m tower
Equipment needed: K’NEX set Test area: Sheet of board or stiff
cardboard 50cm square, on 4 blocks each 5cm high
When the earthquake comes, the ground underneath your building will move and shake. Can you build a house that is strong enough not to break, and stable enough not to fall over?
For level 2 and 3, think about the effect the earthquake will have on a tall building. How can you stop the movement making your tower fall over sideways?
Handy hints
L1 3 ways to connect rods and connectors
L3 Making corners with blue and purple connectors
L4 Strong 3-D structures
For teachers
Key topics: Forces Designing skills
Structures Making skills
Components used in sample level 3 model below Connectors: Blue 4 Purple 44 Rods: Red 48
Educational objective
To consider how naturally-created forces can cause a building to fall. To design a structure which will have
the stability to prevent this
Cross-curricular links
Geography - earthquakes
Before starting
Demonstrate how an earthquake can be simulated in the Test area by knocking the blocks away one at a time
Conclusion
Tell the class that you are going to increase the scale of the earthquake by putting taller blocks under the board. Ask them to predict the effects this will have on their models, and state the modifications they will need to prevent it falling. Then test the larger earthquake with and without the modifications, and discuss the results.
Possible follow-on activities
Project on forces in nature making objects move, such as wind, waves, tides, earthquakes and volcanoes.

Copyright © K‟NEX UK User Group 2005
Fork lift truck
A very big box has arrived at our local factory, containing a million nuts and bolts. We need to take it off the lorry, but it is too heavy to lift. Can you make a fork lift truck, which will the lift the box down, and then take it into the factory?
Levels of difficulty
Level 1 Make the vehicle for a fork lift truck, with a simple fork on the front to carry a weight
Level 2 As level 1, plus a fork on the front which goes up and down
Level 3 As level 2, with the fork operated by a handle
Equipment needed: K’NEX set Paperback books to use as
weights For level 3: 1m length of string
How can you make a „fork‟ out of K‟NEX to carry a box? Can you make a vehicle which will carry the fork on the front?
For level 2, can you make the fork go up and down? How could you add a handle to your model, which will make the fork go up and down when it is turned?
For level 3, can you fasten a motor to your vehicle that will make the fork go up and down?
Handy hints
L1 3 ways to connect rods and connectors
L3 Making corners with blue and purple connectors
L5 Wheels and tyres
L6 Making rods turn with wheels or connectors
L8 Handles
M2 Battery motors
N1 String
For teachers
Key topics: Forces Designing skills
Mechanisms Making skills
Components used in sample level 3 model below Connectors: Purple 4 Yellow 2 Red 12 Orange 1 Grey 19 Tan 1 Rods: Red 3 Yellow 20 White 5 Small wheel/tyre 4 String
Educational objective
A practical project to build a model which is capable of lifting weights, and which can then be used as the basis for an
experiment on balanced and unbalanced forces
Cross-curricular links
Mathematics - measuring
History - early machines for moving heavy weights (eg at Stonehenge)
Before starting
If possible, visit a factory to see a fork lift truck in use
Conclusion
Ask the children to predict what will happen to their model if the weight to be lifted is increased (it will tip forward).
Then ask them to consider how they can prevent this happening (eg a counterbalance weight set as far to the back of the vehicle as possible), and to test their ideas.
Finally, ask them to try and determine the relationship between the weight of the counterbalance and its distance from the front wheels, using a graph
Possible follow-on activities
Investigate as many ways as possible of lifting and moving heavy weights

Copyright © K‟NEX UK User Group 2005
Golf
Even Tiger Woods has never played golf this way. Before you can play a par 3 hole, you must first make your own golf club!
Levels of difficulty
Level 1 Make a simple golf club, and hit a golf ball with it
Level 2 Make a golf club that can hit a golf ball 5 metres
Level 3 As level 2, and complete a golf hole in only 3 shots (with a witness!)
Equipment needed: K’NEX set Golf ball (eg a light practice
plastic ball with holes in) Test area (level 2): 5m distance marked out Test area (level 3): Simple par 3 golf hole, with
a starting point to tee off from, and a hole to finish in
How long will your golf club be? How can you make the shaft which you hold? What will the club head that strikes the ball look like? How will you fasten the head to the shaft?
For level 2, how can you make the club strong enough to hit the ball hard? Should the club head be flat like a putter, or at an angle like an iron and a wedge? If your club breaks when you hit the ball, how can you prevent this?
For level 3 … the best of luck!
Handy hints
L1 3 ways to connect rods and connectors
L11 Making shafts for sports equipment
Educational objective
A project to design, make and test a strong structure, which will particularly interest children who enjoy sport
Cross-curricular links
Physical education - golf
Before starting
Set up a par three golf hole on the playground, or on an area with well-mown grass
Conclusion
Hold competitions to see who can hit the ball furthest, and who can complete the golf hole in fewest shots
Examine the best clubs to see how the makers have built a strong structure
Possible follow-on activities
Asking a golfer to visit, and talk about the different things that can happen when you hit a golf ball with different clubs (spin, height, force, etc)
For teachers
Key topics: Structures Designing skills
Making skills
Components used in sample level 3 model below Connectors: White 5 Yellow 14 Rods: Red 16 Blue 3 Green 9
Copyright © K‟NEX UK User Group 2005
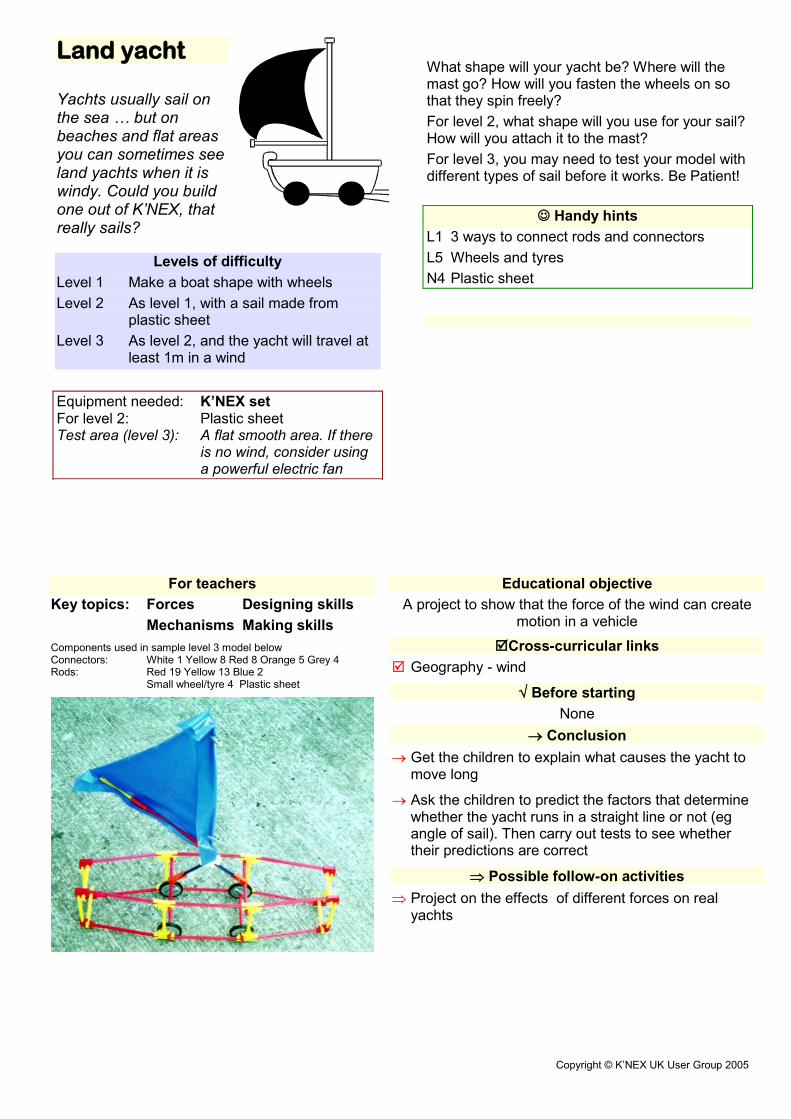
Land yacht
Yachts usually sail on the sea … but on beaches and flat areas you can sometimes see land yachts when it is windy. Could you build one out of K’NEX, that really sails?
Levels of difficulty
Level 1 Make a boat shape with wheels
Level 2 As level 1, with a sail made from plastic sheet
Level 3 As level 2, and the yacht will travel at least 1m in a wind
Equipment needed: K’NEX set For level 2: Plastic sheet Test area (level 3): A flat smooth area. If there
is no wind, consider using a powerful electric fan
What shape will your yacht be? Where will the mast go? How will you fasten the wheels on so that they spin freely?
For level 2, what shape will you use for your sail? How will you attach it to the mast?
For level 3, you may need to test your model with different types of sail before it works. Be Patient!
Handy hints
L1 3 ways to connect rods and connectors
L5 Wheels and tyres
N4 Plastic sheet
For teachers
Key topics: Forces Designing skills
Mechanisms Making skills
Components used in sample level 3 model below Connectors: White 1 Yellow 8 Red 8 Orange 5 Grey 4 Rods: Red 19 Yellow 13 Blue 2 Small wheel/tyre 4 Plastic sheet
Educational objective
A project to show that the force of the wind can create motion in a vehicle
Cross-curricular links
Geography - wind
Before starting
None
Conclusion
Get the children to explain what causes the yacht to move long
Ask the children to predict the factors that determine whether the yacht runs in a straight line or not (eg angle of sail). Then carry out tests to see whether their predictions are correct
Possible follow-on activities
Project on the effects of different forces on real yachts

Copyright © K‟NEX UK User Group 2005
Mars rover
“Hello, Houston? We have a problem. It is zero minus one hour and counting, and we have developed a malfunction with our Mars rover vehicle. Can you ship in a replacement soonest?”
Levels of difficulty
Level 1 Build a simple model of a Mars rover vehicle
Level 2 As level 1, with a motor, which will cross the landscape of Mars
Level 3 As level 2, which will steer round in a circle
Equipment needed: K’NEX set For level 2: Battery motor Test area (for level 2): A rough piece of ground, or
a floor area with small objects on it, to test the vehicle’s ability to climb over obstacles
What shape will your Mars rover be? How many wheels will it have? How will the wheels be fastened to the body?
For level 2, how can you make the motor drive the wheels? Will the rover travel over rough ground like that found on Mars?
For level 3, how can you make the Mars rover steer around in a circle?
Handy hints
L1 3 ways to connect rods and connectors
L5 Wheels and tyres
L6 Making rods turn with wheels or connectors
M2 Battery motors
For teachers
Key topics: Mechanisms Designing skills
Earth & beyond Making skills
Components used in sample level 3 model below Connectors: Yellow 4 Green 4 Red 2 Orange 2 Grey 7 Tan 2 Rods: Red 3 Yellow 3 Blue 1 White 9 Green 4 Small wheel/tyre 4 Battery motor
Educational objective
To design a working vehicle which is capable of travelling over rough ground, and steering
Cross-curricular links
None
Before starting
Look at a picture or video of the surface of Mars, and if possible of the real Mars rover vehicle
Conclusion
Discuss the equipment that a real Mars rover would have to carry in order to perform different experiments on the planet surface
Possible follow-on activities
Project on Mars

Copyright © K‟NEX UK User Group 2005
Spotlight
The spotlight is on YOU … to make a K’NEX model that can throw light on anything!
Levels of difficulty
Level 1 Make a K‟NEX holder for a torch
Level 2 As level 1, and fasten the holder onto a base so the torch can be turned around to point in any direction
Level 3 As level 2, and add a means by which the torch can be pointed at a set angle downwards or upwards as well
Equipment needed: K’NEX set Hand torch Test area: Table in a darkened room
What shape is your torch? How could you make a frame out of K‟NEX that will hold the torch?
For level 2, how can you make a strong stable base? How might you fasten the torch holder onto the base so that the torch can point in any direction?
For level 3, how could add a mechanism to your model that will enable the torch to be pointed up or down at a set angle, as well being moved around?
Handy hints
L1 3 ways to connect rods and connectors
L3 Making corners with blue and purple connectors
For teachers
Key topics: Light Designing skills
Mechanisms Making skills
Components used in sample level 2 model below Connectors: White 8 Blue 8 Purple 8 Red 8 Orange 1 Grey 8 Tan 4
Light grey 2 Rods: Grey 1 Red 4 Yellow 8 Blue 18 White 5 Green 18 Torch
Educational objective
To build a mechanism that will point a beam of light in any vertical or horizontal direction
Cross-curricular links
Art - lighting in theatres
Before starting
Look at an example of a spotlight used to illuminate a stage
Conclusion
Stand all the models around the edges of a table in a darkened room. Ask the children to make their beam of light follow a model of an „actor‟ as he or she moves across the table
Possible follow-on activities

Copyright © K‟NEX UK User Group 2005
Wheelchair
Have you ever seen someone going along in a wheelchair? Did the person in the wheelchair propel themselves, or was there someone pushing them, or did the wheelchair have a motor? Was it easy for them to travel along, or were there lots of obstacles in the way?
Levels of difficulty
Level 1 Make a simple model of a wheelchair for a large doll
Level 2 As level 1, plus swivel wheels on the front to go around corners
Level 3 As level 2, and use it to carry out a wheelchair accessibility survey in your school
Equipment needed: K’NEX set Large doll
What shape is a wheelchair? Where do the wheels go? Where does the person sit? Can you make one large enough for your doll?
For level 2, think about how your wheelchair can be pushed round a corner. Will it have swivel wheels on the front, or can you think of another way of steering it?
For level 3, push your wheelchair around the school. If you find anywhere that the wheelchair can‟t go, write down what it is and where it is on a piece of paper. How do you think the obstacle could be removed or circumvented?
Handy hints
L1 3 ways to connect rods and connectors
L3 Making corners with blue and purple connectors
L5 Wheels and tyres
Educational objective
To consider the problems experienced by a wheelchair-based person
Cross-curricular links
None
Before starting
Ask a wheelchair user to come into school, to demonstrate their wheelchair, and talk about some of the access problems they experience
Conclusion
Ask each pair of children to carry out the accessibility survey, and compare the results
Hold a discussion on how each obstacle or access problem can be overcome (ramps, lifts, moving furniture, etc)
Possible follow-on activities
Ask them to consider wheelchair accessibility everywhere they go for the next week (shops, etc)
For teachers
Key topics: Forces Designing skills
Mechanisms Making skills
Components used in sample level 3 model below Connectors: White 2 Blue 5 Purple 9 Yellow 9 Red 6 Orange 2
Grey 11 Rods: Red 7 Yellow 14 Blue 9 White 6 Green 6 Small wheel/tyre 8

K’NEX Set reviews The K‟NEX User Group sells a full range of K‟NEX education sets, guides and parts in its online shop at www.knexusergroup.org.uk. Two of the most popular K‟NEX sets are described below, together with an Order Form overleaf.
K’NEX Discovery Building set
A general purpose K'NEX set that is equally effective in the home, schools, clubs, childcare schemes and family learning.
20 different models can be built from instructions, and the set is also a good base for setting simpler K'NEX challenges.
Suggested age range: 5 to 95
Number that one set can support:
2-4 children, working in pairs
K'NEX Simple machines deluxe set
An enormous K'NEX set that is ideal as a general-purpose K'NEX resource for schools, clubs, childcare schemes and family learning. The set includes:
3,400 pieces of K‟NEX.
a mains-powered 12v motor
5 teacher‟s guides (Levers, Pulleys, Gears, Wheel & Axles, Inclined Planes)
57 lesson plans for key stages 1 & 2
instructions to build a science fair model, the 4‟ tall Big Ball Factory
Suggested age range: 5 to 95
Number that one set can support:
Supports 20-30 students working in teams of 2-3.

K’NEX Order Form
To use this order form, please print it out, and fill in every field marked with an asterisk. Then fax to (0208) 196 2248, or mail to K'NEX User Group, 87A Newton Road, Mumbles, Swansea SA3 4BN. If you have any queries on completing this form, please email us via [email protected]
*Date ordered *Your purch. order ref.
*Organisation
*Address
*Postcode
*Telephone *Email
*Name *Position
*Signature (Order not valid unless signed)
Part no. Description Price *Quantity *Value
78650 K’NEX Discovery set
79520 K'NEX Simple machines deluxe set
* Nett value of goods = £
All orders are subject to our Terms and conditions, which may be found at:
http://www.knexusergroup.org.uk/acatalog/tandc.html