guidelines for posting shorebird and seabird sites in … · 3 florida shorebird alliance handbook...
TRANSCRIPT

Guidelines for posting shorebird and seabird sites in Florida
FLORIDA SHOREBIRD ALLIANCE management handbook Prepared by Naomi Avissar, Chris Burney, and Nancy Douglass
Dec. 2012

Table of Contents
Introduction ............................................................................................................................................................................ 3
Posting: Why, When, and What You Should Know ................................................................................................................. 4
Why posting is necessary .................................................................................................................................................... 4
When to post ...................................................................................................................................................................... 5
Pre-posting ..................................................................................................................................................................... 5
When to take down ........................................................................................................................................................ 6
Protecting wildlife ............................................................................................................................................................... 6
Materials ................................................................................................................................................................................. 7
Signs .................................................................................................................................................................................... 7
Advisory signs ................................................................................................................................................................. 7
Educational signs ............................................................................................................................................................ 9
Stakes .................................................................................................................................................................................. 9
Roping ............................................................................................................................................................................... 10
Flagging ............................................................................................................................................................................. 11
Hardware and tools .......................................................................................................................................................... 11
Other essentials ................................................................................................................................................................ 12
Methods ................................................................................................................................................................................ 13
Step 1: Preparing the site ................................................................................................................................................. 13
Step 2: Digging postholes ................................................................................................................................................. 13
Step 3: Placing stakes ....................................................................................................................................................... 13
Steps 4 & 5: Symbolic fencing with roping and flagging ................................................................................................... 14
Step 6: Attaching signs ...................................................................................................................................................... 16
Monitoring & Maintenance .............................................................................................................................................. 16
Site-Specific Considerations .................................................................................................................................................. 17
Distance from nest(s) ........................................................................................................................................................ 17
Pedestrian corridors (“Walk-throughs”) ........................................................................................................................... 17
Frequency of signs ............................................................................................................................................................ 17
FWC Regional Contact Information ...................................................................................................................................... 18
Table: Recommended setback distances .............................................................................................................................. 19
Sources .................................................................................................................................................................................. 19
Field Guide: How to Post....................................................................................................................................................... 20
Field Guide: Packing List........................................................................................................................................................ 21

3
Florida Shorebird Alliance handbook – Contact [email protected] for questions
Introduction In response to partners’ requests for guidelines on posting beach-nesting shorebird and seabird nest sites, the Florida Shorebird Alliance (FSA) has developed this management handbook, Guidelines for posting shorebird and seabird sites in Florida. These guidelines build on those outlined in previous documents (O’Meara and Gore 1988; Kress and Hall 2004), incorporating recent scientific findings and best management practices used by wildlife managers and local field experts.
This handbook is intended to serve as both a comprehensive resource and quick how-to guide for anyone interested in posting a nesting site. The last two pages of this document can be printed separately to serve as a quick reference guide in the field, illustrating recommended posting techniques and providing a checklist of materials. The rest of the document provides a more detailed explanation of why and when to post, what materials are appropriate, and outlines posting methods with site-specific considerations. We recommend that partners read this entire handbook before posting an area.
Always obtain permission from landowner and consult with Florida Fish & Wildlife Conservation Commission (FWC) before posting, and abide by any applicable laws and regulations.
Acknowledgements: This handbook was prepared by Naomi Avissar, Chris Burney, and Nancy Douglass. Guidelines were compiled with input from Monique Borboen, Janell Brush, Terry Doonan, Beth Forys, John Himes, Adam Kent, Marianne Korosy, Alex Kropp, Patrick Leary, Susan Leitholf, Lindsay Nester, Brie Ochoa, Clinton Smith, Rick West, Ricardo Zambrano, and Margo Zdravkovic. We also thank Monique Borboen, Dave Kandz, and Jack Rogers for providing photographs. Cover design and illustrations (unless otherwise specified) by Chris Burney.
4
Florida Shorebird Alliance handbook – Contact [email protected] for questions
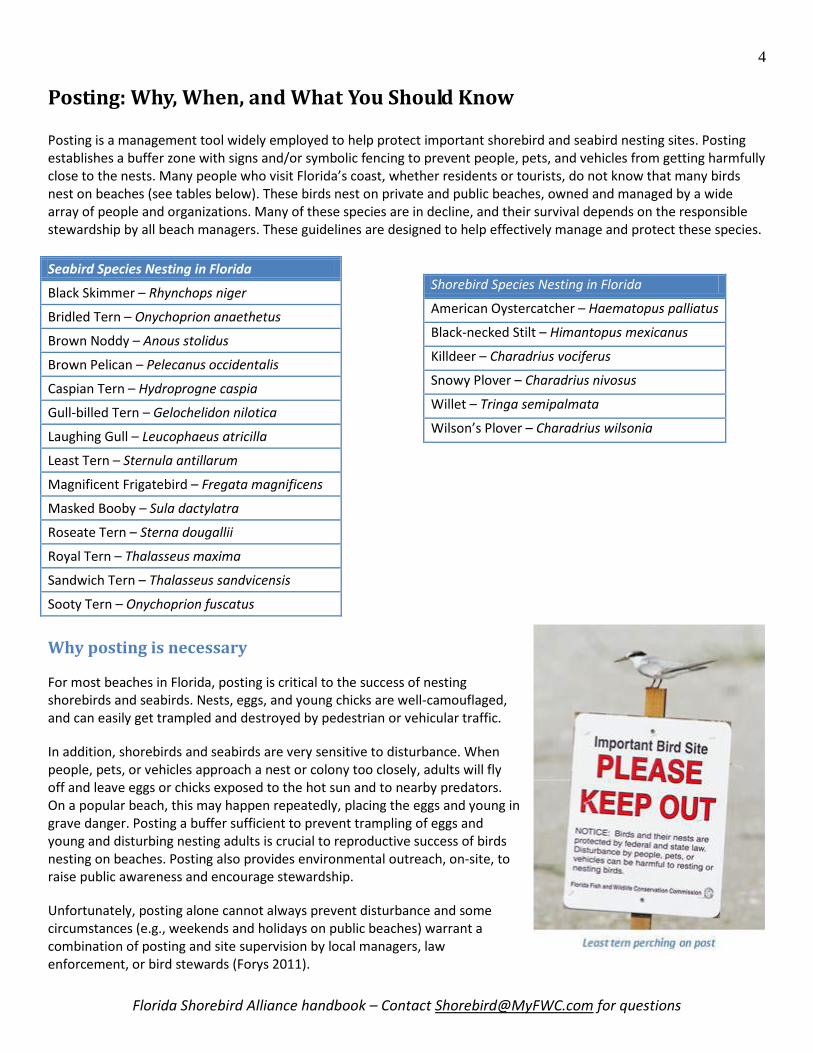
Posting: Why, When, and What You Should Know Posting is a management tool widely employed to help protect important shorebird and seabird nesting sites. Posting establishes a buffer zone with signs and/or symbolic fencing to prevent people, pets, and vehicles from getting harmfully close to the nests. Many people who visit Florida’s coast, whether residents or tourists, do not know that many birds nest on beaches (see tables below). These birds nest on private and public beaches, owned and managed by a wide array of people and organizations. Many of these species are in decline, and their survival depends on the responsible stewardship by all beach managers. These guidelines are designed to help effectively manage and protect these species.
Seabird Species Nesting in Florida
Black Skimmer – Rhynchops niger
Bridled Tern – Onychoprion anaethetus
Brown Noddy – Anous stolidus
Brown Pelican – Pelecanus occidentalis
Caspian Tern – Hydroprogne caspia
Gull-billed Tern – Gelochelidon nilotica
Laughing Gull – Leucophaeus atricilla
Least Tern – Sternula antillarum
Magnificent Frigatebird – Fregata magnificens
Masked Booby – Sula dactylatra
Roseate Tern – Sterna dougallii
Royal Tern – Thalasseus maxima
Sandwich Tern – Thalasseus sandvicensis
Sooty Tern – Onychoprion fuscatus
Shorebird Species Nesting in Florida
American Oystercatcher – Haematopus palliatus
Black-necked Stilt – Himantopus mexicanus
Killdeer – Charadrius vociferus
Snowy Plover – Charadrius nivosus
Willet – Tringa semipalmata
Wilson’s Plover – Charadrius wilsonia
Why posting is necessary
For most beaches in Florida, posting is critical to the success of nesting shorebirds and seabirds. Nests, eggs, and young chicks are well-camouflaged, and can easily get trampled and destroyed by pedestrian or vehicular traffic.
In addition, shorebirds and seabirds are very sensitive to disturbance. When people, pets, or vehicles approach a nest or colony too closely, adults will fly off and leave eggs or chicks exposed to the hot sun and to nearby predators. On a popular beach, this may happen repeatedly, placing the eggs and young in grave danger. Posting a buffer sufficient to prevent trampling of eggs and young and disturbing nesting adults is crucial to reproductive success of birds nesting on beaches. Posting also provides environmental outreach, on-site, to raise public awareness and encourage stewardship.
Unfortunately, posting alone cannot always prevent disturbance and some circumstances (e.g., weekends and holidays on public beaches) warrant a combination of posting and site supervision by local managers, law enforcement, or bird stewards (Forys 2011).

5
Florida Shorebird Alliance handbook – Contact [email protected] for questions
When to post
Pre-posting is recommended on beaches where shorebirds have consistently nested in the past, and where human disturbance is likely to interfere with nesting. Otherwise, signs and symbolic fencing should be installed immediately when a nest with eggs is found on the beach or when nesting is imminent (i.e., when scrapes are found). If you or your team is not confident of determining when nesting/egg-laying are imminent, consult experienced partners or an FWC Regional Biologist.
Posting activity may cause the nesting birds to temporarily leave their eggs, so it is advisable to post early in the morning or late in the day to avoid sun exposure during the hottest portion of the day. Avoid posting during inclement weather (high winds or heavy rain). If posting a large colony, plan carefully to minimize the time that nesting birds are disturbed. You may need to recruit additional people to help post the area more quickly, or schedule breaks to allow disturbed birds to return to their nests at regular intervals.
All posting activity should be coordinated with FWC, and permission must be obtained by the property owner. If you find an unposted nest or colony, and are unsure who owns or manages the property, please contact an FWC Regional Biologist immediately.
Pre-posting Where possible, we recommend posting an area before the birds begin nesting, to give them a chance to court and establish territories free from human disturbance. This management tool is known as pre-posting. Sites that were previously used by shorebirds and seabirds (historic sites) are good candidates for pre-posting, as are places where routine, incompatible disturbances (e.g., raking, beach driving, or heavy recreational use) may otherwise prohibit nesting. The dates for pre-posting can vary by region and species, but generally pre-posting should begin prior to April 1 for seabirds, February 15 for Snowy plovers, and March 15 for American oystercatchers. One should be familiar with typical, species-specific nesting habitat to ensure that suitable habitat is enclosed in the pre-posted area.
Pre-posting provides a “refuge” from disturbance, and can also be used to encourage birds to nest in a more protected area (i.e., some distance away from popular beach access ramps and other areas of conflict). Clearly-marked pedestrian corridors can then be planned to allow for beach access while minimizing disturbance to nesting birds. Pre-posting is NOT intended to induce birds to nest away from the beach’s most suitable nesting habitat. Managers can create attractive nesting opportunities elsewhere (in similar, compatible, low-predator habitat), but it is important to pre-post historic nesting areas as well, because the birds are often keying in on specific breeding habitat cues that are typically met in previously occupied nesting areas. Pre-posting must be done with landowner consent on private beaches and requires coordination with site managers on public lands.
Especially with colonial-nesting seabirds, decoys can be a very effective tool for attracting nesting birds to an area. The use of decoys increases the likelihood of pre-posted areas being used as opposed to unposted areas, so placing a few decoys in the middle of a pre-posted area is recommended. In addition, as birds may be hesitant to nest near anything which provides perches to avian predators (e.g., trees, poles, and signs), a larger pre-posted area provides a greater buffer and is more likely to draw nesting birds.
Occasionally, birds will nest in close proximity to pre-posted boundaries or corridors and thus obtain no protective buffer for their eggs and nest. This potential development

6
Florida Shorebird Alliance handbook – Contact [email protected] for questions
requires close monitoring of sites and an adaptive response by managers. If sufficient space is available, a posted boundary or corridor should be shifted or adjusted to create a spatial buffer from recreational activities, vehicles, etc.
When to take down Temporary postings can be removed when the birds have abandoned the area or when nesting is complete and all young birds are able to maintain sustained flight. Flightless young of precocial shorebirds may occasionally leave the posted area after hatching, but the posting should remain in place to provide them with refuge until they are flight-capable. Removing your posting at the earliest appropriate date is extremely important to avoid unnecessary risk to wildlife or inconveniencing beachgoers. However, if the posted area is regularly monitored and does not significantly interfere with human use of the beach, we recommend leaving the posting up until the end of nesting season (September 1) to benefit roosting shorebirds.
Some land managers have taken posting one step further, and designated year-round posted areas as bird sanctuaries. This is a highly successful management tool that encourages birds to concentrate in a specific area, giving them refuge from chronic disturbance while serving as an attraction for beachgoers, birdwatchers, and photographers. Establishing a permanent sanctuary eliminates the need to install and remove posts every season, and sturdier materials should be used.
Protecting wildlife
It is critical to ensure that no wildlife is inadvertently harmed while posting a shorebird site. Before posting, make sure everyone in your crew is aware of nest locations and carefully avoids posting, driving, or walking too closely to any nest. Place temporary flags or stakes at the nests if necessary while posting, and remove them immediately afterwards.
Posting materials in disrepair are not only ineffective, but they can also become hazardous to wildlife, especially loose or broken twine that can entangle birds or sea turtles. Always consider the risk of entanglement posed by even well-maintained twine, versus the benefit of posting an area. It is the responsibility of the person who initiates or coordinates posting to ensure that the posted area is regularly checked and repaired quickly if needed. At a minimum, posted areas should be checked weekly and following extreme high tides, severe storms, or any other event that may result in damage to the posting. To minimize the risk of entangling sea turtles, the twine should be strung at a minimum height of 2.5’.
Digging postholes can accidentally destroy sea turtle nests. Before posting an area during the sea turtle nesting season (May 1 – October 31 on Florida’s west coast; April 1 – October 31 on the east coast), it is very important to consult with the land manager or local sea turtle monitoring program to be aware of potential turtle nest locations. Never dig near a marked turtle nest, keeping in mind that a nest cavity may span several feet. If there is a high likelihood of undetected or unmarked nests in an area, take great care when digging, especially near dunes, and stay alert to changes in substrate that may indicate a nest.
Finally, always consider local predation risks when posting an area and take precautions to avoid drawing unwanted predator attention to nesting areas. Avian predators (e.g., crows) are a serious threat to nesting shorebirds, and posting materials (e.g., sign posts, rope) can provide perching opportunities with unobstructed views of nearby nests. This handbook includes guidelines for making postings less hospitable to perching predators.

7
Florida Shorebird Alliance handbook – Contact [email protected] for questions
Materials Posting a site requires basic materials which are outlined in this section. When several options exist for a particular material, we highlight available choices and provide recommendations based on our experience posting beach habitats.
Signs
Signs for posting nesting areas are generally classified as either advisory or educational. Most of the signs used in posting are advisory signs, which mark the specific boundary of a protected area. Depending on the size of the closure and the volume of traffic on the beach, you may want to post additional educational signs outside the perimeter of your nesting area as well.
Advisory signs Advisory signs can either be regulatory or informational, but they generally state “Do Not Enter” and provide a justification (reason or regulation) and contact information for questions or reporting violations. Regulatory signs cite laws, regulations, or requirements which apply either at all times or at specified times or places. Failure to comply with regulatory signs constitutes a violation, and the offender(s) may be subject to a penalty. Regulatory signs are the only signs that can establish an enforceable “no entry” boundary, and people who cross this boundary are in violation regardless of whether wildlife is disturbed or not. Informational signs may also inform people of rules that protect the wildlife and advise people to keep out of a posted area. Unlike regulatory signs, however, these signs do not establish an enforceable boundary, so posting an area with informational signs is usually faster.
Before posting an area with any signs, obtain permission from the property owner or land manager and contact FWC. Many parks and agencies have their own signs citing locally enforceable regulations, so please check with the site manager for signs. If the landowner/manager does not have preferred signs, partners can request appropriate signage from FWC or print and laminate signs on their own. Several templates can be downloaded from the FSA website: http://flshorebirdalliance.org/resources-pages/signs.html.

8
Florida Shorebird Alliance handbook – Contact [email protected] for questions
Since advisory signs are placed on the boundary of the nesting area, they should be small enough (e.g., 8.5 x 11”) so that the birds’ view of any approaching predators is not compromised. Where possible, use triangular or diamond-shaped signs, because avian predators cannot perch on those as easily as they can on rectangular signs. The top of the sign should extend beyond the post to further deter predators from perching (see Step 6).
Advisory sign for Snowy Plover nesting area (diamond shape)
Advisory sign for Black Skimmer nesting area (diamond shape)
“No Vessel” signs can be used to restrict landing in nesting areas designated as closed by proper authorities. These regulatory signs have special restrictions and must be approved by Florida Department of Environmental Protection, FWC Boating and Waterways, U.S. Army Corps of Engineers, and U.S. Coast Guard.
For consistency with uniform waterways marker system requirements, the signs must have an orange border, orange diamond in the center, and legal references at the bottom. These signs must be visible by boat, so they should be large and sturdy.
“No vessel” regulatory sign

9
Florida Shorebird Alliance handbook – Contact [email protected] for questions
Educational signs Educational signs provide information on the birds nesting in the area and how to protect them. We recommend posting with both advisory and educational signs when posting nesting sites at popular or busy beaches. These signs provide environmental outreach and can draw awareness and support for shorebird conservation.
Since educational signs serve an interpretive function, they should be larger and posted at eye-level. They should be sited further away from the posting boundary to prevent those reading the signs from disturbing the birds. They may also be placed at beach access points.
If the property manager does not have a preferred sign, a template is available on the FSA website (see link above).
Stakes
Various materials can be used as posting stakes. Standard (4’) untreated wooden construction stakes, dock pilings, PVC pipes, and fiberglass (e.g., Carsonite) markers are commonly used. Signs can be attached to any of these stakes, and customized decals (e.g. Area Closed) can also be adhered to fiberglass markers.

10
Florida Shorebird Alliance handbook – Contact [email protected] for questions
The following factors should be considered in selecting stakes:
• Type/size of sign: We recommend that different types of signs be placed at their optimal heights. Advisory signs should be tall enough to effectively delineate a closed area’s boundaries, but short enough to discourage perching by avian predators. Kress and Hall (2004) suggest a total height of 4’, but we recommend 3’ due to high rates of predation by avian predators in Florida. Although shorter signs may lose interpretive value, they are less threatening to nesting birds because they do not block their view or create optimal predator perches. Educational signs should be set at eye-level, since they are placed farther from the colony. Also consider the size of the sign that the stakes must support. Large, heavy signs (e.g., “No Vessel” signs) require the support of sturdier stakes or dock pilings.
• Durability: Pilings or fiberglass markers hold up well against the elements, so they are preferable in areas that are frequently exposed to strong winds, overwash, or tidal flows. Some stakes have a built-in footer (“dead man”) to help stabilize them as well.
• Substrate: Most stake types, including wooden stakes, can be easily installed in sand. It is more difficult to dig postholes in peat, cobble, and heavy shell, however, so those substrates may call for PVC or fiberglass markers that can be installed with a pounder, and have thinner shapes that “slice” through the substrate better.
• Cost: Price per stake and the number of stakes needed for posting may be an important consideration. Wooden stakes are generally less expensive than PVC pipes and fiberglass. They may require more frequent replacement, however.
• Portability: If materials must be carried into a site by hand or using a wheelbarrow, lightweight stakes may be preferred. If you can use a boat, truck, or ATV to transport stakes, heavier stakes may not be an issue.
• Susceptibility to theft or vandalism: Wooden stakes and signs are occasionally used for beach bonfires in some sites. For sites that are prone to theft or damage, consider using PVC or fiberglass stakes.
• Predation: As avian predators are a threat to nesting shorebirds, stakes that can be modified to deter perching are recommended. The top ends of wooden stakes or PVC pipes can be cut at angles fairly easily, as opposed to fiberglass markers. However, using a triangular or diamond-shaped sign (see section above) can compensate for a level-topped stake.
• Maintenance: How often a posted area can be maintained is another consideration for selecting posting materials. For postings that can be maintained frequently, standard wooden construction stakes are acceptable. Carsonite markers are preferred for posting sites that are less accessible (e.g., islands). They are more expensive, but they hold up better in water and wind, and therefore require less maintenance.
Please note that accidental entrapment of small birds (e.g., wrens) in PVC pipes has been documented; the birds enter upright pipes and cannot escape. Although this has not been a problem on Florida beaches thus far, this is a problem of which managers should be aware, particularly in storing their PVC pipes. We recommend storing PVC in a horizontal position.
Roping
The sign posts are usually connected with string or rope, creating a visual and physical boundary for the nest area known as “symbolic fencing.” As with stakes, roping options vary and have corresponding maintenance and risk considerations (persistence, strength, etc.).
11
Florida Shorebird Alliance handbook – Contact [email protected] for questions
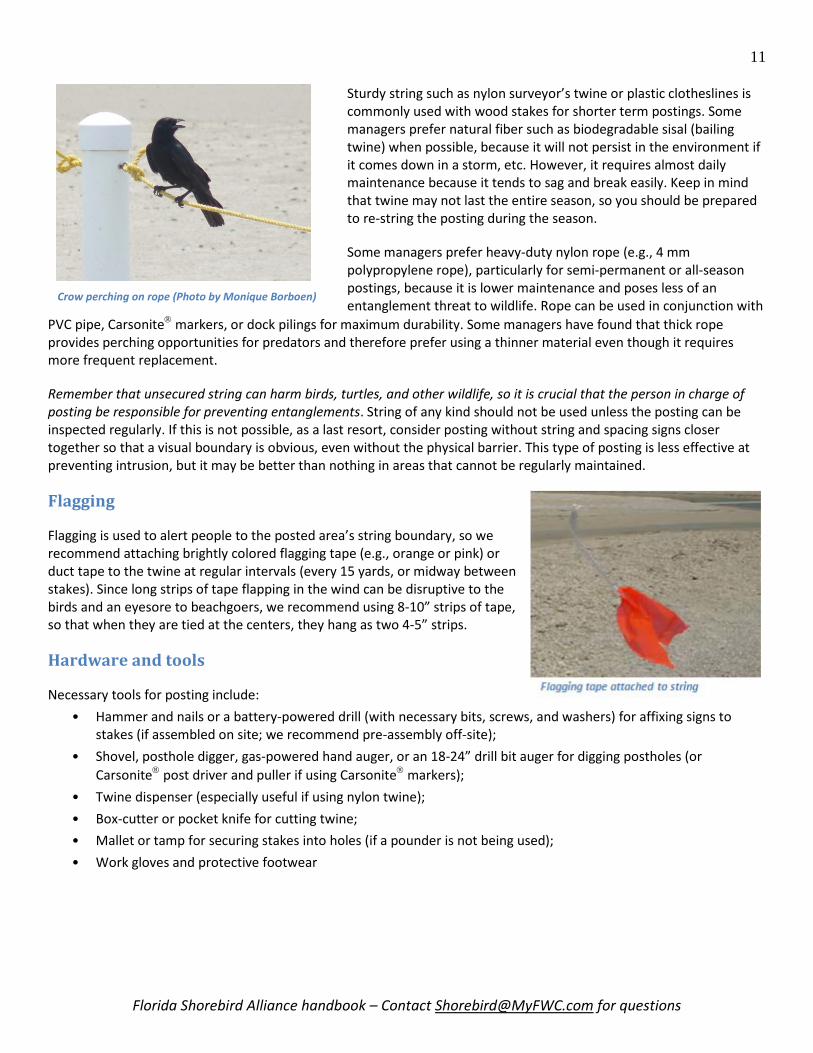
Sturdy string such as nylon surveyor’s twine or plastic clotheslines is commonly used with wood stakes for shorter term postings. Some managers prefer natural fiber such as biodegradable sisal (bailing twine) when possible, because it will not persist in the environment if it comes down in a storm, etc. However, it requires almost daily maintenance because it tends to sag and break easily. Keep in mind that twine may not last the entire season, so you should be prepared to re-string the posting during the season.
Some managers prefer heavy-duty nylon rope (e.g., 4 mm polypropylene rope), particularly for semi-permanent or all-season postings, because it is lower maintenance and poses less of an entanglement threat to wildlife. Rope can be used in conjunction with
PVC pipe, Carsonite markers, or dock pilings for maximum durability. Some managers have found that thick rope provides perching opportunities for predators and therefore prefer using a thinner material even though it requires more frequent replacement.
Remember that unsecured string can harm birds, turtles, and other wildlife, so it is crucial that the person in charge of posting be responsible for preventing entanglements. String of any kind should not be used unless the posting can be inspected regularly. If this is not possible, as a last resort, consider posting without string and spacing signs closer together so that a visual boundary is obvious, even without the physical barrier. This type of posting is less effective at preventing intrusion, but it may be better than nothing in areas that cannot be regularly maintained.
Flagging
Flagging is used to alert people to the posted area’s string boundary, so we recommend attaching brightly colored flagging tape (e.g., orange or pink) or duct tape to the twine at regular intervals (every 15 yards, or midway between stakes). Since long strips of tape flapping in the wind can be disruptive to the birds and an eyesore to beachgoers, we recommend using 8-10” strips of tape, so that when they are tied at the centers, they hang as two 4-5” strips.
Hardware and tools
Necessary tools for posting include:
• Hammer and nails or a battery-powered drill (with necessary bits, screws, and washers) for affixing signs to stakes (if assembled on site; we recommend pre-assembly off-site);
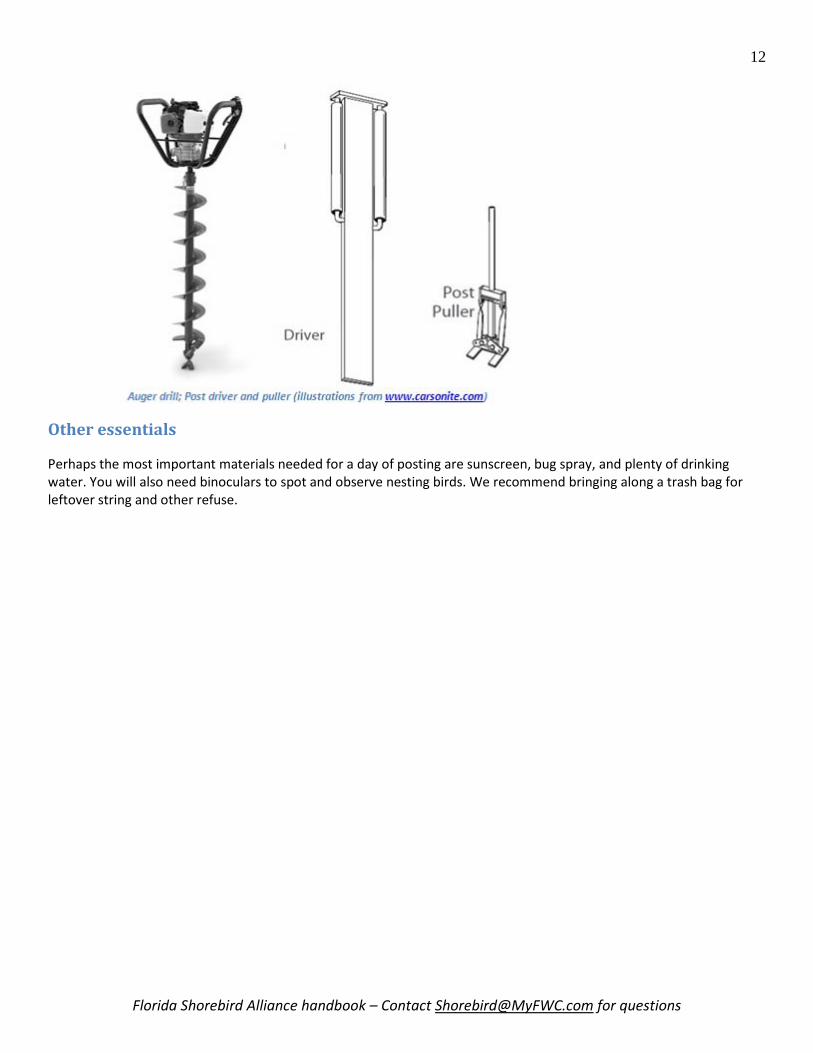
• Shovel, posthole digger, gas-powered hand auger, or an 18-24” drill bit auger for digging postholes (or Carsonite post driver and puller if using Carsonite markers);
• Twine dispenser (especially useful if using nylon twine);
• Box-cutter or pocket knife for cutting twine;
• Mallet or tamp for securing stakes into holes (if a pounder is not being used);
• Work gloves and protective footwear
Crow perching on rope (Photo by Monique Borboen)
12
Florida Shorebird Alliance handbook – Contact [email protected] for questions
Other essentials
Perhaps the most important materials needed for a day of posting are sunscreen, bug spray, and plenty of drinking water. You will also need binoculars to spot and observe nesting birds. We recommend bringing along a trash bag for leftover string and other refuse.

13
Florida Shorebird Alliance handbook – Contact [email protected] for questions
Methods Posting nesting sites requires considerable time, energy, and materials, and therefore requires planning (getting your equipment and materials ready, and finding additional help). This section outlines the six steps to posting a site.
At larger posting sites, we recommend using an “assembly line” approach. This approach minimizes the distance everyone needs to walk (i.e. no need to make three trips around the boundary if each person completes a task in order), and reduces the amount of time that a posting project takes, which minimizes impact on the birds. You may be able to post smaller sites with fewer people, by going through each step yourself at each stake location, but it is helpful to have at least two people: one to lay out and install the stakes, and one to follow behind with string, flagging, and signs.
Step 1: Preparing the site
The person outlining the site boundary should be familiar with the site (species needs, location of walk-throughs, etc.). Stakes are typically spaced around 20’ apart, though this may range from 15-45’, depending on materials used and site conditions (e.g., 45’ using sturdy stakes and strong roping, 15’ using flimsy stakes and string). Use paces to measure regular (20’) intervals, and mark location of each stake. You can lay the stakes out as placeholders or use flags to delineate posthole locations before digging. It is helpful to use a beach cart or ATV to transport the stakes and other posting materials as you move along and post the site boundary.
Step 2: Digging postholes
At pre-measured post site, dig a hole with a posthole digger or auger. Use caution when operating a gas-powered auger to avoid injuries (e.g., kickback from the auger may cause broken fingers). Be familiar with the tool’s safety precautions, and wear protective footwear and clothing.
If using Carsonite markers as stakes, you will need a fitted post driver to pound the markers into place (see below). A mallet or similar tool may be used as a back-up to inserting markers into the ground, but this practice is inadvisable, as continued usage of such tools will eventually smash in the top of the marker.
On low-energy beaches, a 1’ depth is usually sufficient for stakes along the boundaries of a posted area (standard 4’ wooden construction stakes stand at a recommended 3’ height when 1’ is buried). However, areas prone to high winds or overwash may require deeper holes and longer stakes (e.g., 6’ stakes set at least 3’ into the substrate). Larger signs outside the posting boundary (e.g., educational signs) also require larger posts and deeper holes to stabilize them.
Step 3: Placing stakes
Place the stake in the posthole, and pack the sand around the base, preferably using a tamp or another stake to pack the sand. Foot-tamping alone is usually not sufficient because the stakes lean more easily, causing the string to loosen.
14
Florida Shorebird Alliance handbook – Contact [email protected] for questions
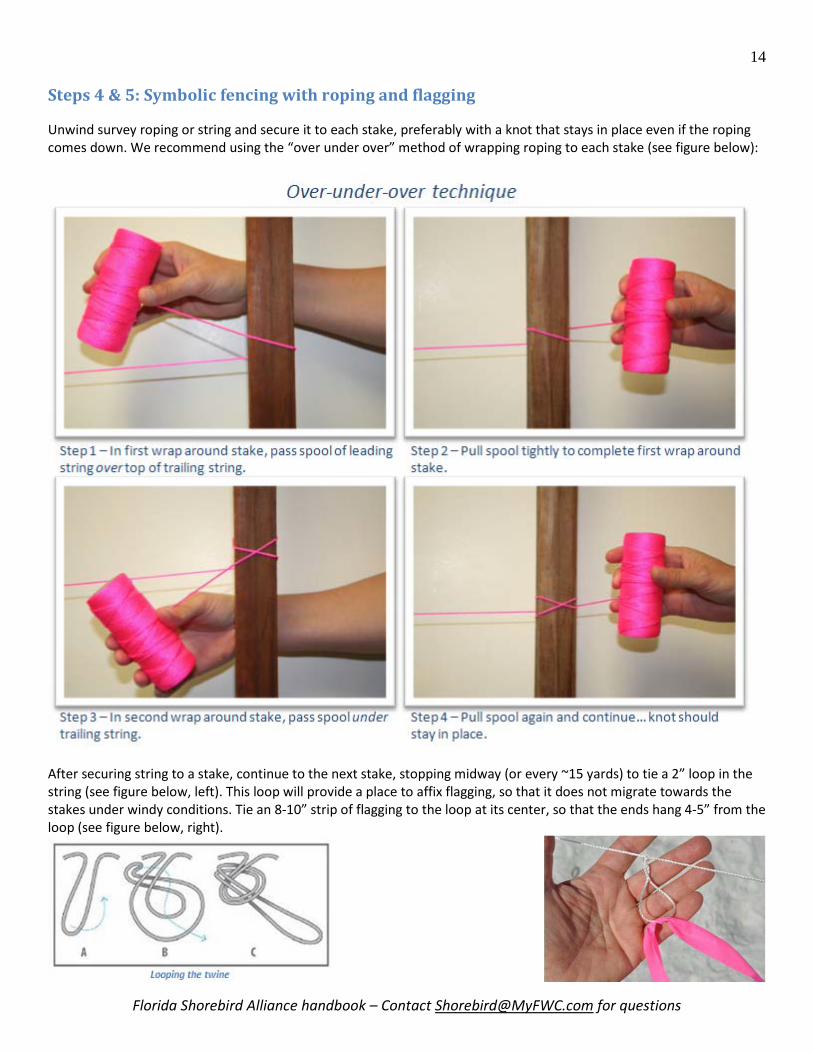
Steps 4 & 5: Symbolic fencing with roping and flagging
Unwind survey roping or string and secure it to each stake, preferably with a knot that stays in place even if the roping comes down. We recommend using the “over under over” method of wrapping roping to each stake (see figure below):
After securing string to a stake, continue to the next stake, stopping midway (or every ~15 yards) to tie a 2” loop in the string (see figure below, left). This loop will provide a place to affix flagging, so that it does not migrate towards the stakes under windy conditions. Tie an 8-10” strip of flagging to the loop at its center, so that the ends hang 4-5” from the loop (see figure below, right).

15
Florida Shorebird Alliance handbook – Contact [email protected] for questions
Before you wrap the roping around the next stake, stretch it tightly (but not so taut that it snaps or pulls down stakes). Since string tends to loosen over the season as it is exposed to the elements, it should be tight on initial posting to minimize drooping. Every few stakes, use a secure knot such as a modified clove hitch (see figure below) to prevent the entire line of string from falling around a boundary if a break occurs between two stakes. Carry plenty of extra roping.
16
Florida Shorebird Alliance handbook – Contact [email protected] for questions
Roping should be strung at a minimum height of 2.5’ to minimize entanglement risk to sea turtles. Because we recommend that signs be posted at a 3’ height, this may require roping before attaching signs to ensure correct height.
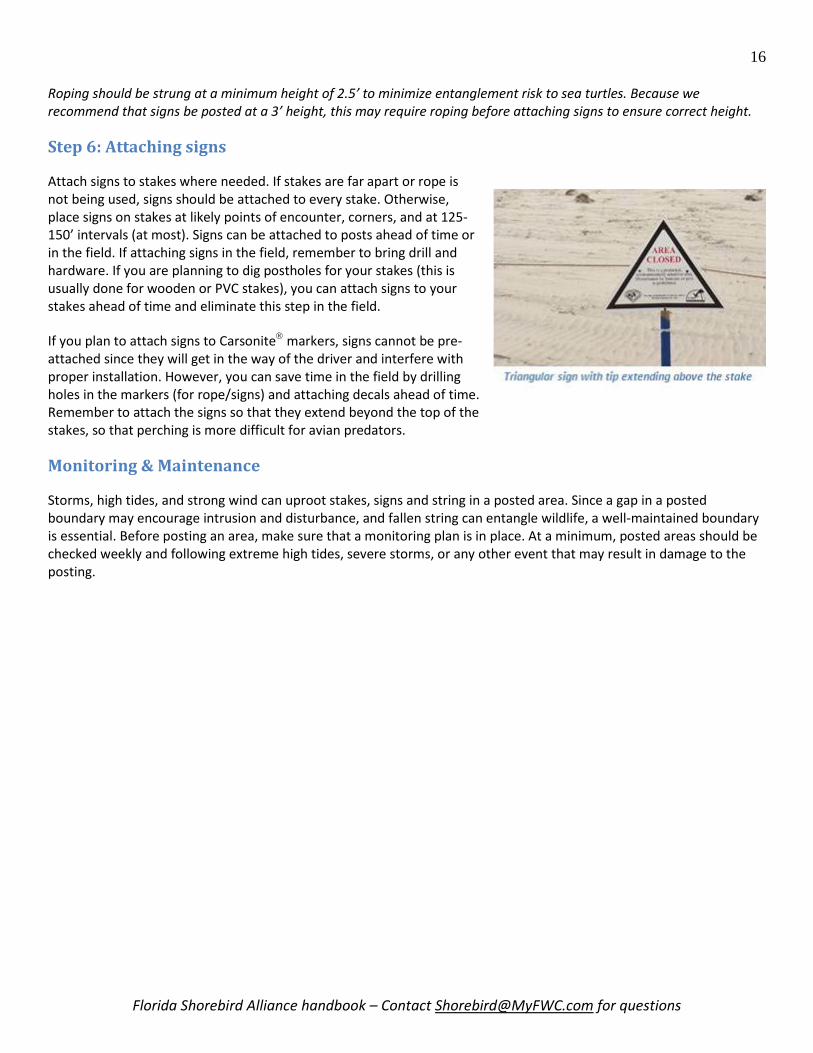
Step 6: Attaching signs
Attach signs to stakes where needed. If stakes are far apart or rope is not being used, signs should be attached to every stake. Otherwise, place signs on stakes at likely points of encounter, corners, and at 125-150’ intervals (at most). Signs can be attached to posts ahead of time or in the field. If attaching signs in the field, remember to bring drill and hardware. If you are planning to dig postholes for your stakes (this is usually done for wooden or PVC stakes), you can attach signs to your stakes ahead of time and eliminate this step in the field.
If you plan to attach signs to Carsonite markers, signs cannot be pre-attached since they will get in the way of the driver and interfere with proper installation. However, you can save time in the field by drilling holes in the markers (for rope/signs) and attaching decals ahead of time. Remember to attach the signs so that they extend beyond the top of the stakes, so that perching is more difficult for avian predators.
Monitoring & Maintenance
Storms, high tides, and strong wind can uproot stakes, signs and string in a posted area. Since a gap in a posted boundary may encourage intrusion and disturbance, and fallen string can entangle wildlife, a well-maintained boundary is essential. Before posting an area, make sure that a monitoring plan is in place. At a minimum, posted areas should be checked weekly and following extreme high tides, severe storms, or any other event that may result in damage to the posting.
17
Florida Shorebird Alliance handbook – Contact [email protected] for questions
Site-Specific Considerations Before you post a site, please keep in mind that there can be significant variation from site to site, not only in physical factors (e.g., substrate, beach width, etc.) but also in beach use, management, public access paths, and disturbance types. Consequently, the guidelines in this handbook may need to be tailored to best suit the site you are posting. It is a good idea to consult with local managers and others familiar with the site for advice on how to best install and maintain a posted area, given local variables. The following are some examples of site-specific consideration to keep in mind:
Distance from nest(s)
The distance at which birds will react to disturbance varies by species, location, and type of disturbance (see Table: Recommended setback distances). Certain species or individual birds tend to be less tolerant of human disturbance and will abandon their nests if frequently disturbed. In some areas, birds have acclimated to high beach usage and will nest regardless. Type of disturbance also matters; for example, birds react to approaching dogs at a much greater distance than to a human, and beaches where vehicles are driven require greater buffer distances than do beaches where only pedestrian traffic is allowed. If multiple species are present at a nest site, use the buffer distance that accommodates the most sensitive of the birds. That is, species with the largest flush distances should be used to calculated set back distances (Rodgers and Schwikert 2003; Cohen et al. 2006).
Given the variation in birds and sites, a good indication of where to place the boundary of your posting is the distance at which birds no longer react to your presence. If the birds start become agitated or move off their nests, you are too close, and you need to bring your boundary further out. If you cannot expand the boundary without cutting off pedestrian access or subjecting your signs to overwash, please consult with your FWC Regional Biologist for guidance. If avian predators are in the vicinity, it is important to place the signs at greater buffer distances from the nest(s), so as to avoid drawing unwanted attention to the site.
FWC guidelines require a 300’ setback distance from the nest for beach nourishment permits, and recommend that buffer for other beach management activities that may disturb shorebirds. This is based on best available science, and ideally, all postings should accommodate that setback distance as well. However, if this is not possible, base your boundary on the birds’ reaction to your presence, as described above.
Pedestrian corridors (“Walk-throughs”)
If a posted area blocks a significant public or private access point to the beach, you may need to strategically place a pedestrian corridor in the area. Guidance on how to locate appropriate places for pedestrian corridors or how many are needed per linear distance of beach can be provided by your FWC Regional Biologist.
Frequency of signs
Posting should protect the resource with minimal intrusiveness to both people and birds. Therefore, signage needs to be limited to that which is most necessary and effective. While legal guidelines require advisory signs to be placed no more than 500’ apart along, and at each corner of, the posted area (Florida Statute 810.011(5)(a)), we recommend placing signs at regular 125-150’ intervals. If stakes are close enough together, you could attach an advisory sign to every few stakes so that signs are within this enforceable distance. Advisory signs should be visible from anywhere along the string perimeter (i.e., from any angle of approach), and additional signs can also be added where people are most likely to first encounter the posted area. Depending on the size of the posted area, you may wish to post one or two educational signs at main encounter points as well.

18
Florida Shorebird Alliance handbook – Contact [email protected] for questions
FWC Regional Contact Information

19
Florida Shorebird Alliance handbook – Contact [email protected] for questions
Table: Recommended setback distances This table provides a summary of recommended setback (buffer) distances, by disturbance type, for four imperiled beach-nesting bird species in Florida (letters in superscript reference sources below). Distances are from nests, unless otherwise specified (e.g., unfledged chicks).
SPECIES DISTURBANCE TYPE Pedestrian beach Dogs present ORV/Driving beach American Oystercatcher 180 – 200 yards A 150 yards A – 200 yards A
200 yards A (unfledged chicks) Black Skimmer
178 yards F – 200 yards C 200 yards A
Least Tern 50 yards E – 100 yards A, C – 154 yards F 100 yards A 200 yards A (unfledged chicks)
Snowy Plover (same buffers recommended for Wilson’s Plovers)
19 yards D – 50 yards B 22.6 yards D 50 yards B
Sources A Cohen, J. B., R. M. Erwin, J. B. French, J. L. Marion, and J. M. Meyers. 2006. Synthesis of Management, Monitoring, and
Protection Protocols for Threatened and Endangered Species and Species of Special Concern at Cape Hatteras National Seashore, North Carolina. Available at: http://parkplanning.nps.gov/document.cfm?parkID=358&projectId=13331&documentID=12970.
B Cohen, J. B., and M. Zdravkovic. 2011. Pilot study: Effects of human-caused disturbance on breeding Snowy Plovers (Charadrius alexandrinus) and Least Terns (Sternula antillarum) in Northwest Florida.
C Erwin, R. M. 1989. Responses to human intruders by birds nesting colonies: experimental results and management guidelines. Colonial Waterbirds 12:104–108.
D Faillace, C. A. 2010. Breeding Snowy Plovers (Charadrius alexandrinus) exhibit variable response to human disturbance on two islands in southwest Florida. M.S. Thesis, Rutgers Univ., New Brunswick, NJ, USA.
Forys, B. 2011. An evaluation of existing shorebird management techniques’ success at locations in Pinellas County. Final report in fulfillment of Audubon of Florida grant. St. Petersburg, FL, USA.
E Kress, S. W., and C. S. Hall. 2004. Tern Management Handbook. USFWS, Hadley, MA, USA.
O’Meara, T. E., and J. A. Gore. 1988. Guidelines for Conservation and Management of Least Tern Colonies in Florida. Florida Game and Fresh Water Fish Commission, Tallahassee, USA.
F Rodgers, J. A., and H. T. Smith. 1995. Set-Back Distances to Protect Nesting Bird Colonies from Human Disturbance in Florida. Conservation Biology 9: 89-99.
Rodgers, J. A., and S. T. Schwikert. 2003. Buffer zone distances to protect foraging and loafing waterbirds from disturbance by airboats in Florida. Waterbirds 26, 437-443.

20
Florida Shorebird Alliance handbook – Contact [email protected] for questions
Field Guide: How to Post Six steps to posting a site Posting large sites requires considerable time, energy, and materials. Planning ahead is key- getting your equipment and materials ready, and finding additional help. An “assembly line” approach is very efficient since it minimizes the distance everyone needs to walk (i.e. no need to make three trips around the boundary if each person completes a task in order).
STEP 1- Preparing the site. Person outlining site boundary should be familiar with the site (species needs, walk-through locations, etc.). Use paces to measure regular (15-45’) intervals and mark location of each stake. Stakes can be layed down as placeholders (helpful to have beach cart or ATV to carry stakes). STEP 2- Digging postholes. At pre-measured post site, dig a hole with a posthole digger or auger (heed safety precautions). If using Carsonite markers, use a driver to pound the markers into place. STEP 3- Placing stakes. Place a stake in each posthole, and pack the sand around the base. STEPS 4 & 5- Roping & Flagging. Unwind and tie rope or string to each stake using over-under-over technique. Every few stakes, tie the roping to the stake with a secure knot such as a modified clove hitch. Stretch roping tightly between stakes. Midway between stakes (or every ~15 yards), tie a 2” loop in the roping, as shown in diagram below:
Brightly-colored flagging or duct tape (8-10” strips) can then be tied to these loops so that it does not slide down the roping.
STEP 6- Attaching signs. Attach signs to stakes where needed (if stakes are far apart or rope is not being used, signs should be attached to every stake; otherwise, place signs at likely points of encounter, corners, and every few stakes so that they are at most 125-150’ apart). Signs can be attached to posts ahead of time or in the field (remember to bring drill and hardware). If using Carsonite markers, you may wish to drill holes for rope/signs and attach decals ahead of time.
Maintenance: Materials in disrepair can be hazardous to wildlife, and gaps in posted boundaries may encourage intrusion. Thus, posted sites should be checked and maintained regularly.

21
Florida Shorebird Alliance handbook – Contact [email protected] for questions
Field Guide: Packing List
Stakes: one stake per every 15-45’ of boundary
Signs: one advisory sign for every 125-150’ of boundary (minimum), corners, and encounter points, plus 1 educational sign for each major encounter point
Roping: make sure you have enough roping/string length to cover perimeter of posting boundary (15-45’ of string per stake). We recommend bringing plenty of extra roping.
Flagging: make sure you have enough flagging to cover perimeter of posting boundary (10” of flagging per stake)
Hardware and tools
• Hammer and nails or a battery-powered drill (with necessary bits, screws, and washers) for affixing signs to stakes (if assembled on site; we recommend pre-assembly off-site);
• Shovel, posthole digger, gas-powered hand auger, or an 18-24” drill bit auger for digging postholes (or Carsonite post driver and puller if using Carsonite markers);
• Twine dispenser (especially useful if using nylon twine);
• Box-cutter or pocket knife for cutting twine;
• Mallet or tamp for securing stakes into holes (if a pounder is not being used);
• Work gloves and protective footwear
Other essentials
• sunscreen
• bug spray
• drinking water
• binoculars
• trash bag