guitar - d2vvqscadf4c1f.cloudfront.net all-american rejects, “my name is jonas” by weezer and...
TRANSCRIPT

GUITAR• FOR •
A b s olU T ebeGINNeRs

In 2004, New York City Guitar School consisted of a single room in
the Recording and Rehearsal Arts Building on West 30th Street
in Manhattan. One door led to the offices of four other businesses.
The other led to a shared bathroom. As my students and I moved
our guitars aside to allow yet another person to use the facilities, I
did not imagine that six years later New York City Guitar School
would have over thirty teachers and twenty classrooms in three loca-
tions in Manhattan, Brooklyn and Queens, or that thousands of
students would learn to play guitar using the curriculum which you
now hold in your hands. This would not have happened without the
support, involvement and encouragement of hundreds of people.
The heart of a great guitar school is great teachers. Lenny
Molotov, Anne Husick, Matt Boas and Suke Cerulo joined the
school six years ago and are still teaching spectacular lessons here to-
day. I thank them for forming the core of the most student-centered
guitar faculty in America, and for improving this guitar manual by
letting me know what did and did not work for their students.
The development of the book has been inseparable from the
development of New York City Guitar School itself. This success
would not have been possible without the enthusiasm, dedication
and leadership of Director Jen Elliott, for which I thank her. I
am also thankful to Shane Chapman, who runs Brooklyn Guitar
School, where his creativity and hard work have brought this
course to hundreds of happy Brooklynites. Appreciation is also due
to veteran front desk superstar Genifer Owen for the sweet voice
and mind-blowing enthusiasm which have helped many nervous
first time students get off to a successful start in their guitar career.
NYC Guitar School teacher Vince DeMasi generously read
and advised me on the material. He also did much of the research
on song progressions which you’ll see at the end of each lesson,
and with his permission I’ve kept intact some of his text and jokes,
especially at the end of lessons 2, 3, 7 and 8. Brooklyn Guitar
School teacher Woody Quinn took most of the photos in the
book. Work-study student April Koester typed the entire manual
three times. Alia Madden (www.avphibes.com) created most of
the most striking images in the manual (the not striking ones
are mine). Chika Azuma did the amazing book design. Suzanne
Bilyeu edited the material, improving it dramatically despite
removing hundreds of my precious exclamation points!!!
The lions share of the credit goes to the amazing New York
City Guitar School Students. Early students Rita Caliendo, Nelson
Cheung, Mary Ghiorzi, and Gerry Borrell encouraged me to have
a larger vision of the course. Since then hundreds of students have
taken a moment in the lounge, elevator or hallways to say what
they liked and disliked about the course. Their support has car-
ried me through days both fair and foul. I can’t believe my good
fortune to be so constantly surrounded by such wonderful and
inspiring people.
Finally, words cannot express my thanks to my wife, Miriam,
for her unyielding faith in me.
Acknowledgements
Guitar for Absolute Beginners ©2009 New York City Guitar School
Text © 2009 by Dan EmeryIllustrations © 2009 Dan Emery (pages 8-12, 14, 23-24, 38-39, 40, 46, 48)Illustrations © 2009 Alia Madden (pages 13-15, 17-18, 21, 32-33, 50, 53, 64-65, 73, 79, 81, 85-86, 92)All Photographs by Woody Quinn except page 33 by Dan Emery and page 96 by Genifer Owen
All rights reserved. No part of this book may be reproduced in any manner in any media, or transmitted by any means whatsoever, electronic or mechanical (including photocopy, film or video recording. Internet posting, or any other information storage and retrieval system), without the prior written permission of the publisher.
Published in the United States by NYC Guitar School.
NYC Guitar School251 West 30th Street New York, NY 10001
Publisher: Dan EmeryCopy editor: Suzanne BilyeuBook design: Chika AzumaIllustrator: Dan Emery and Alia MaddenPhotographer: Woody Quinn, Dan Emery, and Genifer Owen
Paper: Oxford The Holly Hunt Collection, Fired, 100 lb. cover and Cougar Natural Opaque, 60 lb. textPrinting: Peeq Media
ISBN 978-0-9825998-0-8First edition
Printed and Bound in the United States

NeW YoRK CITY GUITAR sCHool
GUITAR• FOR •
A b s olU T ebeGINNeRs

| C l a s s O n e | 7 |
The Fundamental Habits of Great Guitar Players.
Learn your first two chords, which could be used to play such songs as “What I Got” by Sublime and “Give Peace A Chance” by John Lennon.
Identifying strings, frets and fingers; the rest stroke; chord diagrams; D, G; proper fretting; planting; strumming the optimum number of strings; how to practice and
FOR NEXT WEEK BRING A TUNER TO CLASS.
| C l a s s T w O | 2 3 |
The Single Most Important Habit of a Good Guitarist is Playing in Rhythm.
Also, you’ll learn a third chord, which will empower you to play three-chord songs like “Still Haven’t Found What I’m Looking For” by U2. PLUS Superhero-Themed Tab Reading!
Using a tuner; playing with a pick; strum on the beat—quarter-note strums; the A7 chord; memorize songs; how to practice; how to read tablature and play cool licks.
| C l a s s T h r e e | 3 5 |
Learn This and Learn Many of the Greatest Songs of All Time.
This class will unlock the secret to thousands of songs, including “Stand by Me” by Ben King, “The Reason” by Hoobastank and “Crazy” by Aerosmith. Yes, it is HUGE!
Pivot changes and how and why to use them; E minor, C major and D7; the concept of progressions; song sections to practice pivot changes.
| C l a s s F O u r | 4 6 |
The Secret to Playing Great Rhythm Guitar PLUS the Small Barre—
Gateway to Future Guitar Greatness.After this class, you’ll have the chords necessary for playing songs like “Swing, Swing” by
The All-American Rejects, “My Name is Jonas” by Weezer and “First Cut” by Cat Stevens (a la Sheryl Crow).
Lock your hand in with the beat; how to count eighth notes and more licks.
N Y C G U I T A R S C H o o L
GUITAR FOR ABSOLUTE BEGINNERS ObjeCTive: To learn fundamental skills, concepts and techniques of great guitar players, play
songs by heart and establish a strong foundation for further study in any style.

| C l a s s F i v e | 5 5 |
The Gentle Art of Riffing PLUS A Minor (The Saddest Chord).
By this time you finish this session, you’ll be getting downright crazy guitar chops, gaining the ability to play everything from songs like “Wild Thing” by the Troggs to “Knocking on Heaven’s Door” by Bob Dylan.
How to count and play riffs; planting fingers to change between G, C and D; A minor
| C l a s s s i x | 6 1 |
Rhythm 101: Learn This and Understand How Strums Work.
After this class, you’ll have the skills to play songs such as “Every Morning” by Sugar Ray, “Leaving on a Jet Plane” by Peter, Paul and Mary, and more. DISCUSS CLASS TEN.
The powerful “basic strum” pattern
| C l a s s s e v e n | 7 0 |
Learn the Best Strum and Always Sound Terrific.
Would you like to play songs like “Take It Easy” by The Eagles and “Brown Eyed Girl” by Van Morrison? If so, you’d better learn the Best Strum.
Mixing strums, changing chords in the middle of a measure, more eighth-note riffing
| C l a s s e i g h T | 7 6 |
How Great Guitarists Think About Music. You can’t be a bluesman if you don’t know this, and you can’t play A-chord songs
like “Sweet Child of Mine” by Guns and Roses unless you know how to play an A chord! CHooSE WHAT SoNG To PLAY AS A CLASS IN CLASS TEN.
A and E with pivots!
| C l a s s n i n e | 8 4 |
Mixed Rhythms and Split Measures.These moves can be heard in such songs as “Imagine” by John Lennon, “Redemption Songs” by Bob Marley,
“Hey Ya” by outkast, “La Bamba” by R. Valens and on and on. PRACTICE THE SoNG FoR CLASS TEN.
Mixing the best strum and the basic strum; changing chords in the middle of a measure
| C l a s s T e n | 9 0 |
REVIEW, OPEN CLASS and GRAND FINALE!Review and then perform a song as a group for guests and interested fellow students.

Perhaps you want to play guitar because you really
love music, and you want to be able to make beauti-
ful music yourself. Maybe you want to eventually play
music with other people, or write your own songs, or
play for your toddler—or perhaps you want to be a rock
star! All of these and others are fine reasons to play guitar.
Regardless of your particular motivation, let us rec-
ognize the one thing that you MUST do on your way
to achieving your goals. To be a guitar player, you must
play guitar! That’s right! If you truly want to play guitar,
let us understand right now that you are going to have
to pick up your guitar, hold it in your hands and play it
to the best of your ability. This is called “practicing,” and
the more often you practice, the more and the sooner you
will realize your goal and desire of being a guitar player.
In your studies at New York City Guitar School, you
will gain a solid understanding of the habits and techniques
necessary for a lifetime of guitar enjoyment and learning.
Your teachers will present these powerful ideas to you in
a clear and uplifting manner. But as committed and en-
thusiastic as the teachers at New York City Guitar School
are, they will not deserve the credit for your progress. The
credit will be all yours; playing guitar is in your hands.
If you will only pick up your guitar and play it regu-
larly, then with the aid of your teachers you will soon be
amazing yourself. In fact, I think you will be surprised
by how easily and comfortably you will learn. To play
guitar with confidence and skill, make a deep and pow-
erful commitment right now to the fundamental secret
of playing guitar:
To master guitar playing you must play your guitar!
What is the Fundamental Secret of Playing Guitar Successfully?
TO MASTER GUITAR PLAYING
YOU MUST PLAY YOUR GUITAR!
6 | N Y C G U I T A R S C H o o L | G U I T A R F o R A B S o L U T E B E G I N N E R S

N Y C G U I T A R S C H O O L | G U I T A R F O R A B S O L U T E B E G I N N E R S
his is a hands-on lesson, so grab your
soon-to-be trusty guitar, sit down
and put it right in your lap, with
this text on the table, counter or milk
crate in front of you. Today you will
begin to internalize the habits of a great guitar player!
What is This Thing in My Lap?It is called a guitar. Since you are now a guitar play-
er, you need to know your way around the guitar, just
like an astronaut needs to know which button is which
in the space shuttle. So let’s learn the PARTS OF THE
GUITAR. I know that you are eager to cut to the chase
and begin playing fun songs—so please read through
this section so that you learn the material and you never
need to study it again.
Most of the people taking this course have an acous-
tic guitar at home like the one pictured below. A picture
may be worth a thousand words—but actually reaching
out and touching something is worth a thousand pic-
tures. So reach out and touch each part of your guitar
corresponding to the labeled parts in the pictures below,
and clearly recite the name to yourself. If you are play-
ing a classical guitar it will have nylon strings and no
pickguard, and if you are playing an electric guitar it
will have some electronic parts and controllers, but the
essentials will be the same.
c l a s s
1The Fundamental Habits of
Great Guitar Players~ by Dan Emery of NYC Guitar School ©2009 ~
{ Identifying strings, frets and fingers; the rest stroke; chord diagrams; D and G chords;
proper fretting; planting fingers; strumming the optimum number of strings; how to practice.
FOR NEXT WEEK, BRING A TUNER TO CLASS. Plus—Great Songs! }
7 | N Y C G U I T A R S C H O O L | C L A S S O N E

How to Hold the GuitarWe’re not learning to play classical guitar in this
book, and most players in every other style of music rest
the guitar on their thigh. Why don’t you do that, and
play some experimental-having-no-idea-what-you’re-
doing guitar for a moment. Let your strumming arm
rest on top of the guitar, relax, and
imagine yourself playing your favorite
song. If you feel a little awk-
ward, that is OK, because
after all you’ve been
a guitar player
for only four
or five minutes.
How to Strum the Guitar CorrectlyRight now you are developing habits
that will stay with you for many, many
years. Doesn’t it make sense to develop
good habits immediately? In the next
lesson we’ll start using a pick, but first
we want to achieve perfect, beautiful
strumming form, and that is best ac-
complished by spending some time
strumming with your thumb using a
technique called “the rest stroke.” Let the
thumb of your strumming hand (i.e. the right hand for
right-handers and left hand for left-handers) rest on the
thickest string of the guitar, more or less over the sound
hole. Be relaxed—let gravity drag some of the weight of
your thumb and hand against the string. Emulate the
picture below as much as possible:
Now, allow gravity to gently pull your thumb
down. It will strum the thickest string as it falls to
REST against the next string. Here is a picture of the
same thumb after strumming the sixth string with a
rest stroke:
The rest stroke is not only restful
and relaxed, but the thumb always
comes to a REST on the next string.
That’s why it is called the rest stroke.
Try playing rest strokes on various
strings one by one, always with the
thumb coming to rest on the next
string. When you get to the thinnest
string, let your thumb fall against the
body of the guitar, as below:
Spend a moment investing in your
guitar future by becoming modestly
comfortable with rest strokes. Practice
playing rest strokes on various strings. Then prac-
tice strumming all the strings; your thumb will brush
against each string in turn, finishing against the body
of the guitar.
By the way, there are two habits to especially avoid
in strumming: Don’t grip the bottom of the guitar with
your fingers. Don’t swoop your hand or thumb out into
the air. Do play smooth, relaxed efficient rest strokes.
Using rest strokes is one of the fundamental habits of a
great guitar player.
Good Guitar
Players Strum
Efficiently, Using
Rest Strokes.
When strumming,
let your hand drop and
brush against
the string or strings,
coming to a rest against
another string or
the guitar body.
8 | N Y C G U I T A R S C H O O L | G U I T A R F O R A B S O L U T E B E G I N N E R S

To Play Guitar, You Must Identify Strings. Here’s How:strings are numbered from thinnest to thickest
—the thinnest string is called the first string, the next
thinnest is called the second string, and so on until
we get to the thickest string, which
is called the sixth string. Remember:
The thinnest string is called the first
string. Learn the string numbers by
doing the following exercise—put the
thumb of your strumming hand on
the 6th (thickest) string and play a rest
stroke. Now your thumb is on the 5th
string. Play it with a rest stroke. Now
find and play the following strings:
4, 3, 2, 1, 6, 1, 5, 2, 3, 4. You now
know how to identify strings. Here is a
labeled picture:
NOTE: This is a NEw, aErial viEw Of ThE sTriNgs, as ThOugh ThE guiTar
is siTTiNg ON yOur lap faciNg up.
To Play Guitar, You Must Identify Frets. Here’s How:Now examine this pictograph of the very end of the
neck, where it meets the head. Note that the frets are
also numbered. The fret closest to the nut is called the
first fret; the next one is the second fret and so on. Touch
the following frets with any finger you like as an exer-
cise: 1, 2, 3, 4, 2, 1, 3.
This is aN aErial viEw
Do you see what we’ve accomplished
here? We can now identify any inter-
section of string and fret on the guitar!
Try it. Remember that the thinnest
string is the first string and locate:
the first string at the first fret; the sec-
ond string at the second fret; the sixth
string at the third fret; the fourth string
at the first fret; the third string at the
fourth fret. Again, remember that the
thinnest string is called the first string.
Good work! You now understand how
to locate frets and strings.
Use Your Fingertips to Play Clear and Clean NotesDid you know that fingers might
be identified differently when playing
different instruments? For example,
piano players call their thumb the first
finger. But not us guitarists! We call a
thumb a thumb, and the index finger
is the first finger.
Thumb
1sT fiNgEr
2Nd fiNgEr
3rd fiNgEr
4Th fiNgEr
Remember,
the Thinnest String
is the First String and
the Thickest String
is the Sixth String!
Fret with the
Tip of your Finger
Almost, but Not
Quite, on the Fret!
9 | N Y C G U I T A R S C H O O L | C L A S S O N E

Now try “fretting” a note. Press the tip of your first
finger against the first string just behind the first fret
(“behind” means on the head side of the fret, not the
body side of the fret). Push down until the string is
pressed against the fret. Following is a helpful picture.
Notice that this guitarist is really using just the fingertip.
Keep your thumb behind the neck, providing support
for the fingers; the arm is relaxed, elbow near the body.
After you fret the first string at the first fret, put the
thumb of your right hand on the first string and strum
it with a rest stroke. If you hear a buzzing sound, or a
“thunk” instead of a clear note, then everything is pro-
ceeding normally! Ask yourself: “Am I using the very tip
of my finger?”; “Is my fingertip close to the first fret (but
not actually on top of it)?”; “Is my thumb against the
back of the neck opposite your first finger?” and “Am I
pressing the string down hard enough to press the string
against the fret?” Keep trying until you hear your note.
By the way, if your nails are too long, you won’t be
able to fret clearly. I realize that it really can be a sacri-
fice to get out the nail clippers and cut them down to
size. Just remember that Bonnie Raitt, Ani Difranco and
Tracy Chapman cut their nails, and they can play the
heck out of the guitar.
Take a moment to fret and strum notes all over the
guitar on different strings with different fingertips. Re-
member to use a beautifully relaxed and efficient rest
stroke each time.
Your First Chord
You have learned two vital habits of playing guitar—
rest strokes and using your fingertips to hold down the
string close to the fret. You are now ready to tease the
fingers of your fretting hand into a strange configuration
known as a “chord.” You can think of a chord as a set of
notes that sound good together. Your first chord will be
the D major chord, usually just called “D.” At first, you
may think that D stands for “darn it” or “dang it,” but
soon you will discover that D stands for “Dy-no-mite!”
Begin making a D chord by putting the first finger
of your left hand on the third string at the second fret.
This is your plant finger. Always when you make a D
chord, you will begin with this finger, until that time
at which all your fingers will fret the chord simultane-
ously. Of course, I know that you will remember the
fundamental good habits of using your fingertips and
playing close to the fret. So put the tip of your first
finger on that third string almost but not quite on the
second fret and press down.
Now in addition to your first finger, put your second
finger on the first string (thinnest), also at the second
fret. Ideally both fingertips should be close to the fret—
it may be helpful to turn your hand slightly to accom-
plish this.
10 | N Y C G U I T A R S C H O O L | G U I T A R F O R A B S O L U T E B E G I N N E R S

Finally, reach out with the third finger to play the
second string at the third fret. Sort of a reach, huh? Do
not be dismayed if this seems difficult—remember that
every guitarist had to do this for the first time at some
point. Press the strings down with all three fingertips.
You’re now making a D chord! Lift all your fingers up
and make a D chord again, one finger at a time. Notice
that your fingertips outline a triangle.
Then do it again. And again. And again, again, again,
again, again.
Strumming the D ChordNow rest the thumb of your strumming hand on
the fourth string and try an experimental strum or two.
Let your thumb fall all the way down to the body of the
guitar with each strum.
If each string sounded pristine and clear, you may do a
dance of joy. However, if you are like me when I started,
or just about everybody else, one, two or even three of the
strings made a “buzz” or “thunk” instead of a clear sound.
If this is the case, look over at your left hand. Probably
one of your fingers is bumping into a string (usually it is
the third finger bumping against the first string.)
Here’s a chord-troubleshooting checklist:
Are you using your fingertips to fret the chord?
Are you fretting close to (but not on top of) the frets?
Are you pushing the strings against the frets?
Readjust and try again, string by string. Each time
you make the D chord, begin with your first fingertip
(because it is the plant finger!).
Remember that we seek perfection—but we don’t
expect it immediately. New guitar players typically
need several weeks of practice before their D chord is
consistently clear. (But don’t wait for perfection—start
learning to play songs even if just a couple of strings
ring out clearly.)
Please note that ideally, we want to hear not only
the three strings that you are holding down with your
fingers, but also the fourth string, even though it is open
(i.e. unfretted). We DON’T want to hear the fifth and
sixth strings—they aren’t part of our D chord.
Now, practice making the D chord. The first thing we
need to accomplish is a rough familiarity with the chord,
so don’t worry about how it sounds. Just repeatedly form
a D chord by putting the first fingertip down, then the
second, then the third, and then a beautiful little strum of
the four thinnest strings. Do this for five or 15 minutes,
just long enough to begin feeling a little comfortable with
the D chord. Then go on to the next section.
P ractice Makes Perfect
ThE d majOr chOrdYour journey of a thousand
songs begins with D.
ThE g majOr chOrdKnowing G is an absolute must,
because it shows up more often and in more songs than any other chord.
11 | N Y C G U I T A R S C H O O L | C L A S S O N E

The Next Chord: G Major
Use your newfound chord-diagram reading skills to
learn the G major chord. This chord is used more than
any other chord in rock and roll.
Learning to Read Chord Diagrams
There is a conventional way for guitarists to
communicate how a chord is played, called a CHORD
DIAGRAM.
Remember when we zoomed in on the neck of the
guitar when we learned how to identify frets? This is an
aerial view. We’re looking straight down at the guitar. It
is lying on its back.
Let’s zoom in even more.
Now let’s superimpose the fingertips of a D chord.
Next, we’ll indicate that we’re supposed to strum
only four strings on this chord by Xing out the strings
that we don’t play (the 5th and 6th strings.) While we’re
at it, let’s make it clear that we do play the 4th string,
even though we’re not fretting it, by placing an “O” for
open next to that string.
Now, let’s turn this picture into a diagram by taking
out the head of the guitar, and the extra frets, and by
turning the nut and thick strings into just normal lines.
From now on, not only in this course but for the rest
of your guitar career, you will be reading and under-
standing chord diagrams.
D
G
12 | N Y C G U I T A R S C H O O L | G U I T A R F O R A B S O L U T E B E G I N N E R S

You can think of G standing for “giant” because there
is a giant stretch involved. Put down the second finger on
the sixth (thickest) string, close to the third fret. This is
your plant finger. Eventually, all your fingers will make the
chord simultaneously, but in the meantime, when playing
a G, lead with the second finger, which holds down the
most important note in the chord. Remember to fret with
your fingertip close to (but not on top of) the fret.
Then put down the third finger on the opposite side
of the guitar neck, on the first (thinnest) string, also
close to the third fret.
Finally, put down the first finger on the fifth string
(next-to-thickest) and close to the second fret. This is
sort of a bonus finger—many competent guitarists leave
it off.
Again, as you did with the D chord, make a few
experimental strums. This time you will strum all six
strings. And again, check to avoid those buzzing and
thunk-like sounds by asking:
Am I using my fingertips to fret the chord?
Am I fretting close to (but not on top of) the frets?
Am I pushing the strings against the frets?
Take five or ten minutes to achieve a rough famil-
iarity with the G chord. Again, we strive for perfection
but we don’t expect it immediately. Even though your G
chord doesn’t yet sound completely clear, when you are
moderately confident with the basic shape of it, go on
to the next section.
Back in my college days,� I ran track and cross-
country for the University of Idaho. I was always try-
ing to find some special way to practice that would give
an extra edge, preferably without running eight or ten
miles every morning. Once I read an article about a new
workout consisting of jumping on and off a box, and
I excitedly ran to see Ken, the trainer. “Ken,” I yelled,
“I’m gonna jump up on a box and then back down for
45 minutes every morning so that I’ll be a better long-
distance runner.”
Ken looked at me for a moment, then said, “Dan,
jumping on and off a big wooden box might help you
to become a better box jumper, but if you want to be a
better long-distance runner, why don’t you go run eight
or ten miles?”
So it is with guitar playing. Drills are great, but the
best way to get good at playing guitar is to play guitar—
so let’s begin! The single most powerful thing you can do
right now to become a better guitar player is to change
back and forth between a D and a G chord incessantly.
You see, making a chord isn’t the hard part of guitar
playing—changing chords in the middle of a song is
the hard part. So get ready, and change back and forth
between D and G. Take your time. Remember:
ON THE D CHORD—Lead with your first finger…use
your fingertips…strum four strings.
ON THE G CHORD—Lead with your second finger…
use your fingertips…strum six strings.
It seems to me that most people need to play this
change somewhere between 400 and 900 times to feel
really confident with it—so do your rock-star guitar-
playing self a great favor and change chords relentlessly
over the next week! Change chords while listening to
music, watching TV, talking on the phone, at breakfast,
while riding your unicycle.
The Most Powerful Chord Exercise of All
13 | N Y C G U I T A R S C H O O L | C L A S S O N E

Questions and Answers for Beginning Guitarists
Q: My fingertips hurt—is that okay?
A: That’s okay. As long as they aren’t actually bleeding
or blistering, there is no problem. Jimi Hendrix, Eric
Clapton and Sheryl Crow all had sore fingertips when
they started playing guitar! The only way to make your
fingertips stop hurting is to play enough for your fingers
to toughen up—usually this takes three or four weeks of
steady practice. If your fingers do blister, you might be
practicing too much, but more likely your guitar is a bad
instrument, or you’re playing with way too much force,
or both. Remember, almost every challenge in guitar is
solved with good form, not brute force.
Q: My wrist hurts—is that okay?
A: No, that is not okay. Fingertip pain is a pain in a
fleshy bit of your finger, which soon adapts. Wrist pain
can be in your tendons and joint and can get worse with
time. And when pain gets worse, it is hard to practice
relentlessly. Avoid wrist pain by keeping your fretting
wrist straight, as in the following sketches:
Now, some people may tell you that the bent wrist
method is more proper, especially trained classical-guitar
players. But trained classical guitarists have been build-
ing up their strength for years—and besides, they usually
aren’t playing chords. Also, they are holding their guitars
almost vertically on their laps. On the other hand, look
at just about any accomplished rock, folk, country, pop
or alternative player, and you’ll see that their wrists are
relatively straight. So let’s be like them! In fact, if you
have to choose between a clear-sounding chord and a
healthy wrist position, be healthy! Chord clarity will
come with time and practice. In the unlikely, but not
unheard of, event that your wrists, joints or tendons are
extremely sore after a week of practice, bring your guitar
in so that your teacher can check it for playability, and
ask for advice on your playing.
I’ve included charts and sketches below to help you
determine if your pain is okay, or not okay.
DON’T DO THIS—the bent wrist causes wrist pain DO THIS—a relatively straight wrist is good.
TYPE OF PAIN OkAY PAIN NOT-OkAY PAIN
Fleshy finger pad soreness
Muscle soreness
Wrist pain
Joint/tender pain
Bleeding fingers
14 | N Y C G U I T A R S C H O O L | G U I T A R F O R A B S O L U T E B E G I N N E R S

How to Practice Guitar Effectively
1. Practice Accurately.When you practice playing your guitar, you are liter-
ally creating new pathways in your neurons, which are
cells in your brain. As you practice your D chord over
and over, for example, you deepen and widen this path-
way and make new connections. For the beginning gui-
tarist, a D chord will consist of several
different actions in your mind, like
this set of commands to your brain
and body:
You: “Hey brain and fingers–give me
a D chord!”
Your Brain: “OK, let’s see here, uh,
first I’ll put your first finger down on
the third string, then I’ll, uh, remember
that the strings are counted from thin
to thick, and then, uh, I’ll remember
that I need to use the fingertip, OK,
now let’s go with the second finger—
I mean, fingertip—and I’ll make sure
that the fingertip is close to the fret...
so far so good, now for the third finger-
tip, and I’m not forgetting to keep your
fingers coming in all pointy...there you
go, a D chord—oh, wait, I almost for-
got that I need to have my right hand
strum, uh, five, no four strings!”
It is amazing that we can do this
difficult and complex task at all…but
as you practice and practice, your brain
learns the sequence. So after a month of regular practice
your conversation with your brain looks more like this.
You: “Gimme a D!”
Your Brain: BAM! (Your brain has made a D chord and
is ready for its next mission.)
Now what can we learn from this insight into how
your brain learns to play guitar? Something impor-
tant, something vital! Since you are using your prac-
tice time to create and deepen a sequence of firing
synapses, you’d better make sure that the sequence is
correct! Otherwise you may end up with several in-
grained sequences for your D chord.
One of them will be the correct one,
and the others will be WRONG. Per-
haps you’ll put your third finger down
on the third string instead of the sec-
ond string, or maybe you’ll make an E
chord instead.
The outcome is, according to the
researchers, a simple matter of statis-
tics. Let’s say that half the time you
practice your D chord correctly...a
quarter of the time you practice your
D chord with the third finger on the
wrong string...and the rest of the time
you accidentally make an extremely
exotic chord, the D-major/minor7th
chord. Then, after a month of prac-
tice, when you are in the middle of
playing a song, you’ll get this conver-
sation between you and your brain:
You: “Gimme a D!”
Your Brain: BAM! (50 % of the time
has made a D chord)
BAM! (25% of the time has made an
incorrectly fingered D chord)
BAM! (25% of the time has fingered an D-major/mi-
nor7th chord)
The important thing to remember here is that at this
point it is too late. Your conscious mind has little con-
trol over which D you’ll get in the middle of a fast song.
Practice
Guitar
Regularly!
15 | N Y C G U I T A R S C H O O L | C L A S S O N E

What you practiced is what you got! That’s why it is vital
that you take the time at the beginning to create an ac-
curate pattern in your mind.
Once you have gradually created the accurate path-
way in your mind, you can then go through it quickly,
and more quickly, and more quickly again. This idea is
expressed by the Latin phrase “Festina Lente,” or “Hurry
Slowly.” If you want to be a fast guitar player then don’t
worry about being a fast guitar player. Instead, make
sure that you are an accurate guitar
player, and you will also end up being
a fast guitar player. When you want a
D, you’ll get a D, and when you want
a D quickly, you’ll get a D quickly.
To practice guitar accurately, re-
member this:
Festina Lente.
When you practice guitar,
practice accurately to create
accurate patterns in your
mind and body.
2. Practice Regularly.We all have complicated lives. A thousand con-
cerns push and pull us, a hundred desires and duties ask
us for our limited time. It can be difficult to find the
time or make the time to do even that which we most
desire to do–such as practicing guitar. Yet we know that
without practicing guitar, we cannot play guitar.
And there is a most effective way for this practice to
occur–often! If a person can practice guitar several times
over the course of a week, even for a shorter period of
time, they will learn more than a person who practices
only once in that week, even for a longer period of time.
Each time you return to your instrument, it will be with
a deeper understanding and a greater ability.
Make a regular time for your guitar practice. Don’t
go overboard: Set yourself a time and a place that make
sense in your life. Some students practice first thing when
they get home from work or school. Others practice af-
ter dinner. Think of a time and place that will work for
you and make a commitment to practice several times a
week at least. There may be a time when you don’t feel
motivated. Don’t wait for motivation to strike, but start
practicing and the motivation will follow. Of course, if
you find yourself playing guitar for hours on end at all
times of day and night, that also is OK.
If possible, leave your guitar out of its case on a guitar
stand or leaning up against the wall so
that it is especially easy to pick up and
play. Its purpose is to be played, not to
sit in a case!
By making the practice of an art a
regular part of your life, you are becom-
ing a practitioner of that art. Be a prac-
titioner of guitar. Remember the words
of Henry Wadsworth Longfellow:
The heights by great men
reached and kept,
Were not attained by sudden flight.
But they, while their
companions slept,
Were toiling upwards in the night.
3. Practice Effectively.The guitar teacher and author David Mead tells
a story about a famous classical musician. As a young
British man in the 1940s, he was inducted into the
National Service. He thought for sure that his music
career was ended. But he thought “at least I can try to
keep from losing ALL my musical skill and technique.”
So he made a plan to practice what he considered to
be the very most vital elements of music for the short
time each day he might get to keep for himself, just to
try to stay even.
As the end of his service approached, he found to
his surprise that he was a better musician than ever.
Those few focused minutes per day were accomplishing
If Something is
Worth Doing, it
is Worth Doing Well.
Practice with
Focus.
16 | N Y C G U I T A R S C H O O L | G U I T A R F O R A B S O L U T E B E G I N N E R S

more for his technique than hours of practice and
playing had done before his enlistment. Why? The
answer is this—FOCUS. He spent his limited time do-
ing the very most important things in an intense, fo-
cused manner.
Let us do the same. When you sit down to practice,
turn the TV off. Turn the radio off. Make a plan about
what you will practice. And then pay attention to what
you are doing! This focus will result in each practice ses-
sion being as helpful, valuable and fulfilling as possible.
As you practice with focus, you will feel great satisfac-
tion in your inexorable progress as a guitarist.
At first, at the beginning of your practice sessions,
you may find it difficult to focus. This is normal. Profes-
sor Mihaly Csikszentmihaly of the University of Chi-
cago, has dedicated his life to the study of “flow,” which
is the state of complete immersion in an activity. He
found in his research that to achieve this complete focus
requires an initial effort, perhaps of 15 minutes. For this
reason, it is best that you make your practice sessions at
least 30 minutes long; for the first half of the session you
may find yourself struggling to fully pay attention, and
then you may be surprised by how quickly the second
half flows by.
As you continue practicing guitar, you will find that
it becomes easier and easier to enter this state of com-
plete attention. Merely picking up your guitar and hold-
ing it in your lap and hands may become a trigger for
relaxed focus.
Remember that old saying “if something is worth
doing, it is worth doing well.” It is worthwhile to
play guitar, and it is worthwhile to play it well. Play-
ing well does not mean performing incredible feats
of musicianship—it means to play to the best of your
ever expanding ability, and to pay attention to what
you are doing.
17 | N Y C G U I T A R S C H O O L | C L A S S O N E

1 2 3 4
FUNDAMENTAL HABITS OF A GOOD GUITAR PLAYER
U sE yOur fiNgErTip TO frET NOTEs, almOsT, buT NOT QuiTE, ON ThE frET!
Use the very tip of your finger to fret a note; place the fingertip as
close to the fret as you can without actually being on the fret.
S Trum EfficiENTly, usiNg rEsT sTrOKEs. Let your thumb rest against the thickest string of a chord; then let your hand
drop and brush against the strings, coming to a rest against the guitar.
W hEN chaNgiNg chOrds, mOvE ThE mOsT impOrTaNT fiNgEr firsT!
For the G move the 2nd finger first; for the D move the 1st finger first.
A lways play ThE OpTimum NumbEr Of sTriNgs iN a chOrd!
For G strum six strings and for D strum four strings.
R EmEmbEr ThaT ThE mOsT impOrTaNT habiT Of a gOOd guiTar playErs is TO pracTicE!
18 | N Y C G U I T A R S C H O O L | G U I T A R F O R A B S O L U T E B E G I N N E R S

Practice Suggestions for Class One
You will be doing yourself a service by becoming confident and comfortable with rest strokes
and with your first two chords. You don’t need to be fast—aim for CONFIDENCE and COMFORT.
Practice at least three times for a half hour each. If you practice more, that would be great!
Warm up by making a D chord and playing the strings one by one, using 3
rest strokes and striving for clarity on each string. Repeat with the G chord.
Remember to play the correct number of strings on each chord—four on
the D and six on the G.
Change between D and G over and over and over, strumming each one in 3
turn. Don’t worry about speed or rhythm, but do remember to move the
most important finger first (the 1st finger on D, and the 2nd finger on G).
Play and sing your songs. Even if you do not consider yourself to be a great 3
vocalist, singing with the songs will greatly improve your guitar playing.
Mess around on the guitar. Fret different notes with different fingers; 3
experiment.
Do Yourself a Giant Favor, and Get an Electronic Tuner Now
My first guitar teacher said, “Dan, I’ve been play-
ing guitar for 14 years and seven of those years have
been spent tuning.”
Please, I beg you, don’t waste seven years of YOUR
life. Do the second-most-useful thing* you can do to
ensure your success as a guitar player—GET A TUNER!
When I got married, my wife and I were given two
gift certificates by two different friends. One was a
$150 gift certificate to a cookware store. The other one
was a $150 gift certificate to a music store. I don’t know
what Miriam did with the first gift certificate, but I ran
up to 48th Street (also known as “The Street of 1000
Guitar Shops”) and spent the entire $150 on one single
state-of-the-art tuner. Now, 10 years later, you can get an
even better tuner for around $20, or even less! Where?
You can get a great electronic guitar tuner online from
Musician’s Friend or another on-line purveyor. You can
download a tuning application for many phones.
You can also get a great electric tuner from Allan
at Gotham Guitar Works (our neighbor here in the
Recording and Rehearsal Arts Building), from 30th
Street Guitars (across the street from our building, near
the old Fire Station), any Guitar Center or Sam Ash, or
virtually any music-related store.
Don’t worry about how to use it—we’ll cover that
in the next lesson!!
* ThE firsT-mOsT-usEful ThiNg is TO pracTicE.
19 | N Y C G U I T A R S C H O O L | C L A S S O N E

Dear NYC Guitar School Student—
I have written this little note to you from my heart.
You want to play guitar. In fact, you want to play guitar so much that you put your hard-earned money
on the line and signed up for a class at New York City Guitar School. I know you didn’t do that lightly, and
I don’t take it for granted.
Even more importantly, you made a commitment of your time. As a busy person in New York City, I
know how precious your time is. It is difficult to balance work and responsibilities, and still find the time
to make your dreams come true.
I have good news for you. At New York City Guitar School, we have developed what I believe is the
world’s most effective curriculum for learning to play rock guitar. This curriculum has been created espe-
cially for the busy New York City adults who are our students. The lessons have been constantly rewritten
and tested on over one thousand people who have successfully learned to play guitar.
Furthermore, we have dedicated and expert teachers who give their all to help their students be successful.
We hire less than ten percent of those who seek a position here, and they are not allowed to teach this course
until they have spent months teaching private lessons, becoming familiar with the curriculum, and proving
their commitment to their students. I feel very fortunate to work with them!
But good as our curriculum is, it cannot guarantee that you will play guitar. And as gifted as your
teacher may be, he or she cannot make you a guitar player, either. Only one person on this planet can ensure
that you learn to play guitar.
That is YOU.
The students who have successfully learned to play guitar in this course practiced three times per week,
for a half hour at a time. Some practiced more, but those who practiced three times each week made steady
progress. They also attended class regularly. If they had to miss a class, they called the school at 646-485-
7244 to schedule a make-up class or free mini-lesson.
Please take a moment right now to make a commitment to yourself to regular practice and attendance
over the next ten weeks. In class ten, when you perform for your classmates, you will be astounded by how
much you’ve learned, and how much fun you’ve had.
Congratulations on deciding to PLAY GUITAR! Sincerely,
Dan Emery
Founder, New York City Guitar School
P.S. Please do not hesitate to call me at 646-485-7244 with any comment or concern!
P.P.S. If you must miss your class, please arrange to make it up by attending the same lesson on another day
or night, or with a free mini-lesson. Mini-lessons are 15 minutes long, and are taught by super-patient and
friendly teachers. Please call 646-485-7244 or drop by the office to reserve your time. All your classes must
be made up within a week of the end of your course.
20 | N Y C G U I T A R S C H O O L | G U I T A R F O R A B S O L U T E B E G I N N E R S

CLASS ONE SONGS D to G
You know the D chord. You know the G chord.
These are the most important two chords you’ll ever
learn, because they are your first chords. Every future
chord will just be another chord.
Surprisingly, you can already play songs with only
these two chords. I’ve listed some below, along with a
little short-cut approximate chord progression applica-
ble to each one. The way these little charts (which you’ll
see many of in your guitar career) work is that in each
four-beat measure, there is a letter for the chord. For
example:
1 @ # $ 1 @ # $“ D \ G ‘
means “Play a D chord on the first beat of one measure,
and play a G chord on the first beat of the other.” The
“:” means “repeat.”
1 @ 3 $“ D G ‘
on the other hand, means play “D on the first beat and
G on the third beat of the measure.
Working from more beats between changes to fewer,
“Born in the USA” by Bruce Springsteen is based on a
progression like this one:
1 @ # $ e“ D \ D \ D \ D \
\ G \ G \ G \ G ‘
“Feel Like Making Love” by Bad Company, “Baby
You Can Drive My Car” by The Beatles (verse), “Take
A Walk on The Wild Side” by Lou Reed, “You Sexy
Thing” by Hot Chocolate (capo III)* and “Bells Ring”
by Mazzy Star (capo V) are based on the same change
over two measures, along these lines:
1 @ # $ e“ D \ G ‘
And as you get faster, smoother and more confident
with your D to G you can try something like “What I
Got” by Sublime, which is based on the same change
within just one measure:
1 @ 3 $“ D G ‘
Here is my recommendation to you—first practice
changing from D to G lots and lots and lots. Once you
get comfortable, get a copy of “What I Got” and try
to play along strumming each chord once. That’s fast!
Here’s a practice progression for you to play:
Early
1 @ # $ e“ D \ G \ D \ G \
\ D \ G \ D \ G ‘
* yOu will lEarN all abOuT capOs iN class ThrEE.
21 | N Y C G U I T A R S C H O O L | C L A S S O N E

CLASS PRACTICE CHART:
Your teacher will assign you something great to fill in on this page! (If you’re studying this book on your own, then use this page as a worksheet to figure out and write down an entire song you’d like to practice, or just write your own if you prefer.)
|\ \ \ \ \
|\ \ \ \ \
|\ \ \ \ \
|\ \ \ \ \
|\ \ \ \ \
|\ \ \ \ \
|\ \ \ \ \
|\ \ \ \ \
PRACTICE TAB, LICk or RIFF
T A B
W W W . N Y C G U I T A R S C H O O L . C O M 6 4 6 - 4 8 5 - 7 2 4 4
RHYTHM: \ ! + @ + # + $ + \

N Y C G U I T A R S C H O O L | G U I T A R F O R A B S O L U T E B E G I N N E R S
ood Guitarists Play in TuneThe first thing most guitarists
do when they pick up a guitar is
to TUNE it using an electronic
tuner. I used to be a purist. “I learned how to tune by
ear, and so should everybody,” I’d say. Then I realized
that students who used tuners progressed faster than
other students, and even learned to tune by ear better,
because they knew what “in-tune” sounded like. Now
I think that a tuner is the single most important tool a
guitarist can have. As I mentioned last week, mine cost
$150, but technology has advanced so rapidly you can
get a better one for $10-$20.
To use a tuner, we need to know the names of the
strings. A useful mnemonic device is “Elephants And
Deers Got Big Ears.” This grammatically incorrect
statement is true; elephants and deer do have big ears,
and the names of the strings from thick to thin are
E-A-D-G-B-E. Remember—The thickest string is the
“Elephant” string, also called the “low E” string because
it is the lowest, deepest-sounding string. The thinnest
string, the “Ears” string, is called the “high E string”
because it is the highest, brightest-sounding string. See
below for several helpful sketches of strings and tuners.
Let’s tune! There are two types of tuners, manual and
chromatic. Turn yours on. If you have a manual tuner,
switch it to the “E/6” setting. Put the tuner on your leg
right next to the guitar, and boldly play the sixth string
with a rest stroke.
If the note is perfectly in tune, the arrow, pointer,
light or other display element will be centered. If the
note is too low-pitched, the arrow, etc. will point to
the left of center. If the note is too high pitched, the
c l a s s
2The Single Most Important Habit
of a Good Guitarist is Playing in Rhythm~ by Dan Emery of NYC Guitar School ©2009 ~
{ Using a tuner; playing with a pick; strumming on the beat—quarter-note strums; the A7
chord; how to practice; how to read tablature and play cool licks; memorize songs. }
23 | N Y C G U I T A R S C H O O L | C L A S S T W O

arrow, etc. will point to the right of center. In either case,
reach out with your fretting hand, grab the tuner at
the end of the sixth string, and turn it. By experiment-
ing you’ll soon discover which direction tightens the
string, making it higher pitched, and which loosens
the string, making it lower pitched. Every so often
strum the string again until the display is centered.
Now those of you with chromatic tuners, congratu-
lations! Your chromatic tuner is the bee’s knees, and
can be used for many arcane tuning needs which you
may or may not ever need. Still, there is an extra step.
FIRST you must approximately tune the guitar. When
you play that E string, ignore the pointer and instead
look for the note display, which will tell you what
note the string is currently approximately making. If
the display says D or E f (“ f” is pronounced “flat” and
means “a half step lower than”) or another note lower
than E, then you need to tighten the string until the
note display says E. If the display says F, G f, F s (“ s”
is pronounced “sharp” and means “a half step higher
than”) or another note higher than E then you need to
loosen the string until the note display says E. Once
the note display says E continue tuning using the
centering display.
The Pick
Section 1.3.1. To or To Not PickMany great players use only thumbs and fingers to
pluck and strum. Most country, rock, folk, pop and
punk guitarists use picks. Those who play nylon string
(classical) guitars prefer fingers. Fingers are well suited
for fingerpicking. Most steel-string players use picks,
which rarely blister.
Section 1.3.2. Descriptionscalled pick, plectrum, flat pick. Made of plastic,
nylon, tortoiseshell, steel, even felt. Usually teardrop or
triangle shaped. Sizes include too big, too small and just
right. Thicknesses include really thick, kinda thick, not
so thick, thinner than tracing paper. Billy Gibbons of
ZZ Top cut up his credit cards and used them as picks.
Section 1.3.3. Holding the Pick
LongitudinaL axis of thumb.
LongitudinaL axis of pick.
Fig. A. Relationship of pick to thumb. Fig. B. The crease of the first joint of the first finger is a handy place to tuck a pick.
24 | N Y C G U I T A R S C H O O L | G U I T A R F O R A B S O L U T E B E G I N N E R S

Section 1.3.4. Using the PickStep One: Line up pick with thumb. (See Fig. A.)
Step Two: Use index finger to hold pick against thumb. Do
not hold too firmly. Do not hold too loosely. Experiment.
Step Three: Strum.
The Most Important Element of Guitar Greatness
so far you’ve been working the PHYSICAL side of
playing guitar. You haven’t been making much music—
you’ve been teaching your hands to make a D and a G
chord, and you’ve been internalizing important habits
through exercise. These habits include:
Strumming the correct number of strings in a chord •with a beautiful, efficient rest stroke.
Using the fingertips to fret the strings very close to •the fret.
When changing chords, planting the most important •finger first (D=1st, G=2nd)
Good job! Your D and G chords give you HAR-
MONY—nice-sounding combinations of notes. But to
make music we need more than just harmony. We need
RHYTHM! So grab your guitar and read on, because
you are about to learn the single most essential skill of a
good guitarist—playing in rhythm!
That’s right, being “on the beat” is more important
than making a nice-sounding chord. Let’s perform a
thought experiment. Imagine that you’re sitting around
a campfire with friends, strumming your guitar in per-
fect rhythm, and everybody’s singing along, when sud-
denly you go to a G chord but finger it quite badly. It’s
more like an X chord—but you keep strumming any-
way as though it was a perfect chord.
What happens? Most of your friends don’t even no-
tice, that’s what! They just keep on drunkenly singing!
And afterwards, they refer to you behind your back as
“an amazing guitar player.” Why? Because you were IN
RHYTHM—job one of any guitarist.
Let’s imagine a different scenario. There you are play-
ing next to the campfire, your friends are singing along,
you move to that pesky G chord and realize that you
can’t make the change in time. So you wait to strum
until you’ve formed the perfect chord, and only then do
you strum. What happens now? Disaster—everybody
gets off rhythm, the song comes crashing to a halt,
somebody starts telling a ghost story, and your so-called
friends hide your guitar behind some rocks.
From this simple parable, we learn that THE MOST
IMPORTANT JOB OF A GUITARIST IS TO PLAY
IN RHYTHM! Of course, we want “good chord, good
rhythm”—but we also want to know what our priority
is. It is rhythm. Let’s talk about it.
About 95% of the songs you hear are “in 4,” or played
with a feeling of four beats. Songs in a feeling of four are
usually said to be in 4/4 time, which for right now we
can think of as meaning 4 beats at a time, over and over.
To get an idea of what I am talking about, you’re going
to tap your foot slowly and evenly, and with each tap of
your foot, say a number. This is very important, and we
need to be able to do it to play ACTUAL SONGS. Your
foot will never speed up or slow down—your voice will
be even. Got it? Good, now start slowly and evenly tap-
ping your foot, and then begin speaking along:
ONE two three four ONE two three four ONE two
three four ONE two three four (etc.)
Do this until you are comfortable and confident with
counting and tapping your foot. Remember, no beat is
ever faster or slower than any other beat—keep the tim-
ing of each beat absolutely even.
Step 1.3.5. Additional Detailsat first holding, a pick may seem awkward, espe-
cially when you drop it into the sound hole of your
guitar.
25 | N Y C G U I T A R S C H O O L | C L A S S T W O

Strumming in RhythmNow that you know how to tap and count, let’s get
the guitar involved. You’re going to make a G chord.
You’re going to get your right hand
ready to strum. You’re going to begin
tapping your foot slowly and evenly,
just as before. You’re going to begin
counting along slowly and evenly, just
as before. But THIS time, in addition
to tapping and counting, you will also
calmly strum down across all six strings
each time that you say count a number.
This is called “playing on the beat”—
and if you can learn to do this, you are
destined for success.
So make a G chord, start tapping,
start counting aloud and start strum-
ming along with every one, two, three
and four. Do this several times. (I’ve
written the numbers as numerals in-
stead of words.)
1 2 3 4 1 2 3 4 1 2 3 4 1 2 3 4
Measures and BarsIn this next set of “one-two-three-four’s,” I’ve divid-
ed each set of four beats with a vertical slash. In music,
each of these sets of four is called a MEASURE of mu-
sic. Among the cooler rocker types, a measure is often
called a BAR of music. We are those cool rocker types,
so we’ll usually call those things bars. I’ll also put a “D”
over the top of each measure, to signify that you will be
playing D chords.
So make a D chord, start tapping and counting, and
strum on each beat in the following four bars. Do this
several times.
D D D D\ 1 2 3 4 \ 1 2 3 4 \ 1 2 3 4 \ 1 2 3 4 \
This Chapter’s Big Fun: Changing Chords in Rhythm You are just a few minutes away from changing
chords in perfect rhythm! To do so,
you’ll not only need to play in rhythm
as you’ve been doing, but to change
chords at the same time. We’ll use
D and G. Why don’t you prepare by
practicing this change for a moment?
Remember to lead with the first finger
when changing to D and the second
finger changing to G.
Got it? Good. At the end of this
paragraph you’ll start tapping, you’ll
start counting aloud, and you’ll strum
the D chord right on the “one.” Then
as you continue to count and tap your
foot and strum on each beat, you’ll
move your fingers into the G chord,
and strum IT right on the “one” and
subsequent beats. Then you’ll change
back to D and strum, then to G again,
and so on. Do this slowly and evenly and remember
that the strumming hand is most important! KEEP
IT MOVING EVENLY AND STEADILY, even while
changing chords. This is called “locking your hand in
with the beat.”
D G D G\ 1 2 3 4 \ 1 2 3 4 \ 1 2 3 4 \ 1 2 3 4 \
Lock Your Hand in With the BeatThis means moving your hand exactly with the
beat—not rushing, but just confidently letting your
hand fall into a strum exactly when each beat falls. It’s
the single most important skill in rock and roll. It is
much more important to keep steadily strumming in an
even tempo than it is to play a clean-sounding chord.
This is vital! If the change is a little too challeng-
ing, simply tap your foot more slowly. Spend some time
The Most
Important Job of
a Good Guitarist
is to
STRUM ON THE
BEAT!
26 | N Y C G U I T A R S C H O O L | G U I T A R F O R A B S O L U T E B E G I N N E R S

with this exercise, building skill and confidence. Don’t
worry too much about how clear the chords sound or
even if you are correctly strumming four strings on the
D and six on the G. Although those things are impor-
tant, let us take care of our first priority—strumming
the chord right on the beat.
Take your time. Recall that ideally, you strum
four strings on the D and six on the G—but also re-
call that a good guitarist always takes care of the most
important thing first—and strumming on the beat is
the most important thing. Spend five minutes, or 15
minutes, or 50 minutes on this exercise—when you
feel confident and consistent, the time is right to move
on. (Sometimes students find it helpful to break the
chord change into one finger move per beat. On the D
that would be the first finger, then the second, then the
third. On the G that would be the second finger, then
third, then the first.)
Strumming evenly on each beat is THE essential gui-
tar skill. Even the most advanced rock-star guitarist is
often strumming right on the beat exactly as you as you
are doing.
The A7 ChordRight now, you are the grand master of D and G. Sad-
ly, there aren’t very many songs you can play with only
two chords—but with three chords you can play literally
thousands. We need one more chord to put those songs
in your reach, and here it is—the A7 chord. Don’t worry
right now about what the “7” means—just assume it is a
lucky number for you. Here is the chord diagram for an
A7 chord. (These things are used so often in guitar that
soon you’ll be reading them like a pro!)
In this chord, the first finger is your plant finger.
Once again, become basically familiar with the chord—
repeatedly finger the chord, leading with your first fin-
ger, and then strum five strings. Occasionally check to
hear that each string rings out clearly, asking yourself
these very important questions:
Am I using my fingertips to fret the chord?
Am I fretting close to (but not on top of) the frets?
Am I pushing the strings against the frets?
Change chords between the D and the A7. Don’t
worry about strumming on every beat at first. Just
strum every time you say “one.” To remind you to strum
just on the one, I’ve circled each “1” below. Count, tap
and play:
D A7 D A7\ 1 @ # $ \ 1 @ # $ \ 1 @ # $ \ 1 @ # $ \
Now let’s do this using the single most important
skill of any guitarist—playing on every beat. Count
slowly, strum evenly. To show you that we are strum-
ming on every beat, I’ve circled every beat below.
D A7 D A7\ 1 2 3 4 \ 1 2 3 4 \ 1 2 3 4 \ 1 2 3 4 \
Repeat these exercises with G and A7. Remember to
lead with your second finger on the G and your first
finger on the A7. Count and play:
G A7 G A7\ 1 @ # $ \ 1 @ # $ \ 1 @ # $ \ 1 @ # $ \
And then:
G A7 G A7\ 1 2 3 4 \ 1 2 3 4 \ 1 2 3 4 \ 1 2 3 4 \
A7
27 | N Y C G U I T A R S C H O O L | C L A S S T W O

How to Read Tablature and Use it to Play Cool Licks
You’ve been playing guitar for perhaps a week right
now, and I’m sure you are constantly wondering “Why
can’t I play cool licks yet, such as ‘Stairway to Heaven,’
or the guitar theme to the old TV show ‘Batman,’ or the
lead guitar part from ‘Teen Spirit’ by Nirvana?”
Q: Dan, what is a lick?
A: A “lick” is a neat little guitar part, usually made up of
single notes. It is called a “lick” because it sounds so tasty.
Now is the time for you to learn the awesome power
of tablature and to begin playing lead guitar. Tablature is
a system of writing music for the guitar that was devel-
oped by flamenco guitarists in 15th-century Spain.
Here is how it works. Do you remember our trusty
chord diagram?
Tablature is based on the same idea; there are six
lines, each corresponding to one of the six strings on
the guitar. The line at the top stands for the first and
thinnest string. The line at the bottom stands for the
sixth and thickest string. Just as in a chord diagram,
the lines depict an aerial view of the guitar strings, or
a tracing of the guitar strings with the head at the left
where it says “TAB”
Now to tell you what to play, the person writing tab-
lature will write a number over one of the lines. This
number will tell you two things—first, that you should
play the indicated string; second, that you should play
it at the indicated fret. Read and play through the fol-
lowing examples:
means “pLay the first string at the first fret”
means “pLay the fifth string at the third fret”
When you’re supposed to play the string open, with-
out fretting it, the writer will place a zero on the string/
line in question. For example:
means “pLay the third string open”
By the way, let’s notice something important that
tablature doesn’t tell us—it doesn’t say what finger to
use! Never think that the numbers in a tab have any-
thing to do with what finger you’re supposed to use.
6th (thickest) string
1st (thinnest) string
1
3
0
this line stands for the first and thinnest stringsecond string
third stringfourth string fifth string
this line stands for the sixth and thickest string
28 | N Y C G U I T A R S C H O O L | G U I T A R F O R A B S O L U T E B E G I N N E R S

Sometimes more than one string is played at the
same time. This is shown by stacking the notes on top
of each other. For example:
means “pLay the third and the second string open at the same time”
means “pLay the first string at the third fret and second string at the fifth fret at the same time”
Often a complicated-looking tab notation is just tell-
ing you to play an open chord! For example:
means “pLay the d chord!”
Tablature shows the time element of music by mov-
ing left to right–in other words, you first play whatever
is written on the left, then you play the next note, then
the next and so on.
means “pLay the first string open, then at the first fret, then at the second, then at the third”
means “pLay the third string open, then at the first fret, then pLay the first and second strings open at the same time”
Again, sometimes a complicated-looking tablature is
simply a chord written out. For example:
means “pLay the d chord one string at a time —first the open fourth string, then the fretted third string, then the fretted second string, and
finaLLy the fretted first string”
If you can read and play through all the preceding
examples, then you have a great beginning understand-
ing of tablature: Now, it is true that there are lots of
other symbols showing techniques such as the “scratch,”
“slide,” “hammer-on,” “bend,” “vibrato” and so on.
You’ll gradually be introduced to them. But we won’t
worry about those right now
Now you theoretically have the ability to play your
favorite songs note for note.
“Note for note” means “exactly as the original art-
ist played it.” In many cases, the original artist would
never play it exactly the same way twice. Real feeling
and understanding are always more important than rote
memorization. That said, it’s a lot of fun to play some-
thing just the way your favorite guitarist did, and it’s
great for your technique!
Many of your favorite songs have been written out
in tablature and are available in books sold at fine music
stores, book stores and web sites. Furthermore, millions
of amateur guitarists have attempted to figure out how
to play their favorite songs and have posted their tabs
on the Internet. Some of them are quite good. So if you
want to play, say, a Coldplay song note for note, you
can either purchase the official Coldplay book, which
will contain an extremely accurate transcription, or you
can search for “Coldplay guitar tab” on the Internet and
have your choice of many different tabs of greater or
lesser accuracy. Although things change quickly on the
Internet, try “mxtabs.net” as a resource—tabs on this
00
35
3320
0 1 2 3
00
0 1
23
20
29 | N Y C G U I T A R S C H O O L | C L A S S T W O

site are free to guitarists, but the artists and publishers
get a cut of the advertising revenue from the site.
Let me stress, though, that good guitar music is
not written down on paper—it exists
as sound and feeling—so regardless
of which tab you might use to figure
out how to play your favorite song, it
is vital and essential that you have a
copy of the original song to listen to
and play along with! So really listen to
your Coldplay CD, or your AFI CD,
or your, uh, AC/DC CD, before, dur-
ing and after learning to play a lick or
song note for note.
Your First Cool Lick Written out in Tablaturesince tablature doesn’t give the
proper fingering, I’ve written the rec-
ommended left-hand finger below
each note. Since tablature doesn’t give
pick direction, I’ve written the recom-
mended right-hand picking direction above each note
( [ = down, ] = up). Since tablature doesn’t give tim-
ing, I’ve also written the timing above each measure.
Cool Lick # 1This lick is FANTASTIC for teaching your left and
right hand to work together. It also is great for teach-
ing your right hand to lock in with the beat, moving
down on every beat and up in between beats. Also it is
fun to play and fun to listen to. When playing this at a
party, don’t forget to occasionally yell
“Batman!”
Remember your fundamental
great habits of playing guitar: Use
your fingertips close to the frets. Be
efficient—don’t let your left-hand fin-
gers get too far away from the guitar.
You want a nice, smooth transition
between notes, rather than a staccato,
pecking-chicken effect. Play slowly
and evenly so that you can lock your
hand in with the beat.
Practicing Lickslicks should be practiced and
mastered just like chord changes. Go
slowly at first, and go correctly. Your
fingers and mind are learning impor-
tant skills as you practice these fancy
moves. Gradually build your speed as your confidence
and clarity improve.
Memorize SongsDid you know that when a professional guitarist plays
a five-minute song by heart, he or she has not memorized
five minutes of music? That’s right—experienced guitar
timing: 1 = 2 = 3 = 4 =pick direction: [ ] [ ] [ ] [ ]
5 5 4 4 3 3 4 4
finger: 3 3 2 2 1 1 2 2
Good
Guitarists Memorize
Songs by
Perceiving Patterns
in Music!
Usually these
patterns are in sets
of four!
Cool Lick # 1
30 | N Y C G U I T A R S C H O O L | G U I T A R F O R A B S O L U T E B E G I N N E R S

players think of songs in terms of fairly short sections
that repeat many times over the course of a song. A very
typical arrangement of a song, for example, would be
an eight-bar verse repeated several times over the course
of a song, and a four-bar chorus that is also repeated
several times.
Do you think you could memorize the following
progression? (A “progression” is a series of chords.)
D D D D G G D D
Of course you could! Now, do you think you can
memorize this next progression?
A 7 G D D
Take a moment to commit each of those chord pro-
gressions to memory. Congratulationsº! You’ve learned a
great song by heart! Get used to memorizing sets of four
and eight chords, because nearly every progression in guitar
music is either four bars, or a multiple of four bars, long.
1. Good Guitarists Play on the Beat: Rhythm is Most Important!
When playing, keep the strumming hand moving
in perfect rhythm. This is more important than good
fretting, clean changes and accurate strumming.
In guitar as in life, do what is most important, and in
guitar that is locking your hand in with the beat!
2. Good Guitarists Play Songs by Heart.
To memorize songs, look for and recognize pat-
terns in the music, especially sets of four and eight.
Class Review
Practice Suggestions for Class Two
Practice at least three times for half-an-hour each! If you practice more, that would be great!
Warm up by reviewing tablature and playing Cool Lick # 1 incessantly. 3
Take your time—you are not yet striving for speed, but you do want to
grow in confidence, clarity and comfort.
Make each of your three chords and strum string by string for clarity. 3
Play and sing your songs. Memorize them, words and music alike. 3
Incessantly change chords, when you listen to music or watch TV, leading 3
with the most important finger.
31 | N Y C G U I T A R S C H O O L | C L A S S T W O

1 2 3 4
REvIEW OF PREvIOUS HABITS
U se your fingertip to fret notes, aLmost, but not Quite, on the fret!
Use the very tip of your finger to fret a note; place the fingertip as
close to the fret as you can without actually being on the fret.
S trum efficientLy, using rest strokes. Let your thumb rest against the thickest string of a chord; then let your hand
drop and brush against the strings, coming to a rest against the guitar.
W hen changing chords, moVe the most important finger first!
For the G move the 2nd finger first; for the D move the 1st finger first.
A LWays pLay the optimum number of strings in a chord!
For G strum six strings and for D strum four strings.
R emember that the most important habit of a good guitar pLayers is to practice!
32 | N Y C G U I T A R S C H O O L | G U I T A R F O R A B S O L U T E B E G I N N E R S

CLASS TWO SONGS D, G, A7
The 12-measure progression below is an extremely
common music structure called the 12-bar blues. You
can use these to play The Beatles’ “Why Don’t We Do
It in the Road” (capo VII), Chuck Berry’s “Johnny
B. Goode” (capo VIII), Jimi Hendrix’s “Red House”
(capo VIII), Van Halen’s “Ice Cream Man” (capo I)
and many others.
1 2 3 4 e“D \ D \ D \ D \
\ G \ G \ D \ D \
\ A7 \ G \ D \ D ‘
Sometimes songs follow the 12-bar blues with a little
twist. For example, “Wipe Out” is a 12-bar blues without
chord strums—instead, for most
of the song, a single note lead
guitar line follows the (im-
plied) chord changes. “I
Still Haven’t Found What
I’m Looking For” by U2
follows a 12-bar blues pattern,
except that the first eight bars are
repeated before going onto the
final four bars.
I’m calling the following practice progression “Where
Is My Guitar Pick?” in honor of that U2 song and also
because, right at the moment I cannot find my gui-
tar pick. To adapt this progression to play the “I Still
Haven’t Found What I’m Looking For,” as always, get a
copy of the song and listen to it, then try to play along.
Where is My Guitar Pick?
Verse1 2 3 4 e
“ D \ D \ D \ D \
\ G \ G \ D \ D ‘
Chorus
“ A7 \ G \ D \ D ‘
pickHere’s an example of
a well held pick.
33 | N Y C G U I T A R S C H O O L | C L A S S T W O

CLASS PRACTICE CHART:
Your teacher will assign you something great to fill in on this page! (If you’re studying this book on your own, then use this page as a worksheet to figure out and write down an entire song you’d like to practice, or just write your own if you prefer.)
|\ \ \ \ \
|\ \ \ \ \
|\ \ \ \ \
|\ \ \ \ \
|\ \ \ \ \
|\ \ \ \ \
|\ \ \ \ \
|\ \ \ \ \
PRACTICE TAB, LICK or RIFF
T A B
W W W . N Y C G U I T A R S C H O O L . C O M 6 4 6 - 4 8 5 - 7 2 4 4
RHYTHM: \ ! + @ + # + $ + \

N Y C G U I T A R S C H O O L | G U I T A R F O R A B S O L U T E B E G I N N E R S
:WHAT DO THESE SONGS ALL
HAVE IN COMMON?
“Stay Just A Little Bit Longer” by
Jackson Browne, “Love Hurts” by
Nazareth, “Every Breath You Take”
by The Police, “Crocodile Rock” by Elton John, “Oh Don-
na” by Richie Valens, “Last Kiss” by Pearl Jam, “Dream”
by The Everly Brothers,” “Blue Moon” by Elvis, “Stand By
Me” by Ben King, “Joey” by Concrete Blond, “Crazy” by
Aerosmith, “Complicated” by Avril Levine, “The Reason”
by Hoobastank AND MORE!
A: They are all based, in some fashion, on a single
AMAZINGLY POWERFUL chord progression. This
happens all the time in music; melodies and lyrics
change, but the chords remain the same. A “chord pro-
gression” usually refers to a repeating series of chords,
and this one goes like this:
G Em C D (or D7)
While we learn this progression, we’re also going to
learn one of the fundamental habits of a good guitar
player—pivoting—which means leaving your fingers
down whenever possible. A good guitar player is efficient.
Begin learning to pivot and play all these great songs by
making your G chord. As always, remember to use your
fingertips and play close to the frets.
The E minor chordNow, pivot to an E minor chord by LEAVING YOUR
FIRST FINGER DOWN. End up in:
Minor chords are usually described as sad-sounding
chords. “Comfortably Numb” by Pink Floyd, “Heart
of Gold” by Neil Young, and “Losing My Religion” by
R.E.M. are examples of songs which begin with a minor
G
Em
c l a s s
3Learn This and Learn
Many Greatest Songs of All Time~ by Dan Emery of NYC Guitar School ©2009 ~
{ Pivot changes and how and why to use them; E minor, C major and D7th; the concept of progressions; song sections to practice pivot changes. }
35 | N Y C G U I T A R S C H O O L | C L A S S T H R E E

The Whole Shebang
1 + 2 + 3 + 4 + 1 + 2 + 3 + 4 +
“ G \ Em \
1 + 2 + 3 + 4 + 1 + 2 + 3 + 4 +
\ C \ D7 ‘
36 | N Y C G U I T A R S C H O O L | G U I T A R F O R A B S O L U T E B E G I N N E R S
chord. Change back and forth between G and Em un-
til you are comfortable with the change, strumming six
strings on each chord, on the first beat. Then, build up
to playing on EVERY beat. Remember that good guitar-
ists lock their hands in with the beat. Keep your hand
moving even when you are changing chords!
1 + 2 + 3 + 4 + 1 + 2 + 3 + 4 +“ G \ Em ‘
The C major chordThe c major chord may be a stretch at first—soon
it will be one of your favorites. Begin by putting your
fingers down in an E minor. LEAVE YOUR SECOND
FINGER DOWN—it’s your PIVOT. Reach out with
your third finger, then with your first, to form the C.
Then go back and forth between C and Em, pivoting
with the second finger. Practice until you feel reasonably
confident with this change, playing six strings on the E
minor and five on the C major.
1 + 2 + 3 + 4 + 1 + 2 + 3 + 4 +“ Em \ C ‘
C
The D7 chorda seventh chord creates a feeling of motion—the
need to travel to some other chord. The D7 chord, for
example, is resolved by a move to a G chord. To learn the
D7 chord, begin with a C chord. LEAVE THE FIRST
FINGER DOWN—it’s your PIVOT. Move your second
finger and third finger to make the D7 chord, like so:
Now make lots of exchanges between D7 and C. Play
five strings on C, and four on D7. When you return to C
from D7, really reach out with that third finger!
1 + 2 + 3 + 4 + 1 + 2 + 3 + 4 +“ C \ D7 ‘
The Whole ShebangNow let’s do the entire progression. Make a G
and strum six strings. Then PIVOT with the first finger
into the Em chord and strum six strings. Then PIVOT
with the second finger into a C chord and play 5 strings.
Finally, PIVOT with the first finger into a D7 chord and
play 4 strings. Then return to a G chord by reaching out
with your second finger. That’s your plant. Now you’re
ready to begin again!
D7

sometimes a student will learn that they can play
a dozen or a thousand songs with the same few chords
in the same order, and they will feel a little disappointed.
“Oh,” they’ll say, “there’s a trick to this—these songwrit-
ers aren’t as creative as I thought—they all wrote a song
using the same chords.”
Q: Did Picasso use the color blue? Did Picasso, the guy of-
ten called the greatest painter of all time,
use the color blue? Did he?
A: Yes, Dan—Picasso, the great painter,
did use the color blue.
Q: But didn’t Van Gogh use the color
blue, too? Didn’t Georgia O’ Keeffe use
the color blue? Didn’t Leonardo da Vinci
use the color blue? Are these painters all
copycat hacks, copying the color blue off
of each other?
A: They didn’t use the color blue be-
cause they are copycat hacks. They
were all great genius painters, and
when you’re a painter you use paint,
and sometimes paint is blue. It’s HOW you paint that
makes you a great painter.
Similarly, when you’re a songwriter, you use chord
progressions. Thousands of songs have been written with
the progression “G-Em-C-D”, thousands more have been
written with the twelve bar ”A-A-A-A-D-D-A-A-E-D-A-
E”, hundreds more have been based on simply “C-F” and
so on. The progression isn’t what makes a song great—it’s
the EXPRESSION, the strums, rhythms, tone, technique,
attitude, etc. that make a song great.
As a guitar player, you should be attuned to progres-
sions. Usually they will come along in sets of four or
eight measures. Constantly be on the look out for pat-
terns! Now, this doesn’t always work, but after many
glorious years spent figuring out how to play songs by
listening to CDs and the radio, let me assure you that 99
percent of the songs you want to play contain solid re-
peating patterns. The more you attune to these patterns,
the easier it is going to be for you to understand songs as
the songwriter does, and to play songs by heart. So let’s
always look for patterns in chord progressions.
Now, it is a dream of mine for this guitar manual
to someday be sitting on a shelf in the
bookstore, filled with your favorite
songs, note-for-note guitar parts, and
exact lyrics. We haven’t yet gotten the
requisite permissions, so in the mean-
time, we must make a virtue of neces-
sity. In each class, rather than learning
an exact song, you’ll learn a chord pro-
gression and strumming pattern which
can be used to play many songs.
Sometimes you will find that it is
quite easy to adapt this knowledge to
play a particular song. For example, I
will tell you that many songs are based
on a D to G chord change, including
“What I Got” by Sublime. Once you get comfortable
with those chords, you will find it a very easy matter
to listen to the song, and begin playing along. At other
times the song won’t be as obvious. In that case, follow
these easy steps:
Most importantly, get the song and LISTEN to it. 1.
Then try to play along. Often, this will be enough.
If you still need help, you may need to get a chart. 2.
Legal charts can be found at no charge at mxtabs.net,
among other places (the copyright holders are paid a
share of the site’s advertising revenue).
Remember, practice makes perfect. Each time you 3.
adapt a basic progression to a particular song you
will find it easier.
An Important Note about Chord Progressions Which MUST be Understood to Get the Most from this Class!
To Play
with Heart Play
by Heart, by Noticing
and Remembering
Patterns in
Music!
37 | N Y C G U I T A R S C H O O L | C L A S S T H R E E

By the way, here at New York City Guitar School we
often get calls from people who have played for years,
but don’t feel as confident as they think they ought to
be. Why? Because they don’t know any songs, that’s
why! Imagine—you begin playing guitar because you
love songs, and you love the way the guitar sounds in
those songs. You learn how to play 10 or 15 chords,
and to strum through charts with different rhythms.
After a couple of years of this, you walk into a room
with a guitar resting in the corner, and you tell the
guitar owner, “Hey, I play guitar, too!” “Wow!” exclaims
the guitar owner (who is stunningly attractive), “will
you play something for me?” And then you say, “Well,
actually I don’t remember how to play anything.” Is that
what you wanted when you set out to play guitar? Of
course not!
This happens to people who never learn to look for
and remember the patterns that are found in music. But
it won’t happen to you, because now and forever more
you will remember songs by noticing the repeating four-
and eight-measure patterns of which they consist!
Yes, picking out the patterns in music might be a
little challenging in the beginning, just like learning a
chord is a little challenging—but it is a learned skill and
after a while it will become a habit for you. And when
you play a song BY heart it is easier to play WITH your
heart; it is easier to sing, to feel and to express yourself.
When a student asked the famous jazz guitarist Joe
Pass what was the most important thing he could do to
improve, he thought he’d be told to “practice scales” or
“work on technique”—but Joe Pass told him to learn to
play songs by heart, all the way through!
“capo” means “head” in Italian. A Mafia capo is
the head of a branch of a crime family. Please do not
use a Mafia capo to help you play guitar. Instead, use
a guitar capo, which is a device which squeezes all
six of your guitar strings against whichever fret you
place it behind, thus becoming the new “head” of
the guitar. It is a tremendously useful tool, because it
allows you to leverage just a
few chords to be able to play
along with lots and lots of
different songs.
For example, this week
you are learning the incred-
ibly useful G to E minor to
C to D7 progression, which
can be used to play such
songs as “Stand By Me” by
Ben King and “Stay Just A Little Longer” by Jackson
Browne. If you sing either of these songs while you
play G to E minor to C to D7, you’ll sound great!
However, if you try playing along with the recordings,
you will be in tune with Jackson Browne, but you will
not be in tune with Ben King. Why? Because Ben King
will not be playing G to E minor to C to D7. Instead,
he will be playing A to F sharp minor to D to E—and
you don’t know these chords!
BUT, if you put your capo on the second fret, and
then you play G to Em minor to C to D7, you will now
be in tune with Ben King!
You see, by putting the capo
on the guitar, you changed
the actual pitch of the notes
you are holding down, so a
G chord with a capo on the
second fret is, strictly speak-
ing, an A chord.
It is of vital importance
that at this point you do not
try to think of such a G chord as an A chord, though,
because the whole point of a capo is to allow the guitarist
to THINK in terms of the chords with which he or she
is most familiar.
Capos and Their Care and Feeding
Fig. 3a
38 | N Y C G U I T A R S C H O O L | G U I T A R F O R A B S O L U T E B E G I N N E R S

Figure 3a is a picture of a capo in action. Notice that
the capo is placed near but not on the fret. This guitar is
capoed at the second fret, ready to be played along with
Ben King.
By the way, many long-haired, metal-head guitar-
shredder types (i.e. me back in my Idaho woodshed-
ding days) go through an “I don’t need no stinking capo”
phase. After a few years of playing guitar you might go
through this phase, too, because you will know how to
play an F sharp minor chord. But even such extremely
experienced guitar players as Bob Dylan, Noel Gallagher
of Oasis, Tom Petty and many, many more use capos rou-
tinely. So do I.
There are many types of capos, and just about any
one of them will do the job. If you are at home right
now reading this, and you do not have a capo handy,
you can easily rig up a “poor man’s capo” with a pencil
and a couple of rubber bands!
as you know, there are typically four beats per measure
of music. That is why when you strum “on the beat” you
strum four times per bar. Just as a measure can be di-
vided into four beats, so too a beat can be divided. If we
divide it in half, we say that we are playing eighth notes,
because we now have a total of eight notes per measure
of four beats.
The note that happens exactly on the beat is counted
as a “one” or a “two” or so on, and is said to be “on” the
beat. A note that happens between the beats is counted
as an “and” and is said to be “off ” the beat.
Here is a great lick which is somewhat reminiscent of
the guitar part from Peter Gunn and which will give all
four of your fingers quite a workout. It will also help you
to understand counting. Count aloud as you play the
lick, and make sure that you play ON all the beats with a
DOWN strum as you TAP your foot, and OFF the beats
with an UP strum as you LIFT your foot!
Remember to count aloud when you first practice
this lick! Understanding rhythm is important, and
spending a week counting aloud as you tap your foot
will be very helpful to your guitar career. Also remem-
ber your fundamental great habits of playing guitar;
use your fingertips close to the frets. Be efficient—
don’t let your left hand fingers get too far away from
the guitar. You want a nice, smooth transition between
notes, rather than a staccato, pecking-chicken effect.
Play slowly and evenly at first!
timing: 1 = 2 = 3 = 4 =pick direction: [ ] [ ] [ ] [ ]
0 0 2 0 3 0 4 5
finger: - - 1 - 2 - 3 4
Count and Play in 8th Notes as You Read Tab and Play a Cool Lick
Somewhat But Not Quite Reminiscent of the Guitar Part from Peter Gunn
39 | N Y C G U I T A R S C H O O L | C L A S S T H R E E

1 2 3 4 5 6 7
FUNdAMENTAL HABITS OF A GOOd GUITAR PLAYER
GOOD GUITARISTS KNOW THAT PLAYING IN RHYTHM IS MOST IMPORTANT!
Good guitarists are efficient. L EAVE FINGERS DOWN WHENEVER POSSIBLE —PIVOT, PIVOT, PIVOT!
USE YOUR FINGERTIP TO FRET NOTES, ALMOST BUT NOT QUITE ON THE FRET.
STRUM EFFICIENTLY, USING REST STROKES.
WHEN CHANGING CHORDS, MOVE THE MOST IMPORTANT FINGER FIRST.
ALWAYS PLAY THE OPTIMUM NUMBER OF STRINGS IN A CHORD.
PERCEIVE AND REMEMBER PATTERNS IN MUSIC!
40 | N Y C G U I T A R S C H O O L | G U I T A R F O R A B S O L U T E B E G I N N E R S

Practice Suggestions for Class Three
Warm up by playing your cool lick from Class Three, incessantly, slowly 3
and accurately.
Pivot from G, to Em and back again over and over and over. Do the same 3
thing with Em to C and with to C, to D7. You can sing and play your
mini-songs. Every once in a while, strum your chords string by string to
check for clarity.
G and Em: FIRST FINGER STAYS DOWN
Try singing “About A Girl” by Nirvana as you play this change.
1 + 2 + 3 + 4 + 1 + 2 + 3 + 4 +
“ Em \ G ‘
Em and C: SECOND FINGER STAYS DOWN
Try singing the “Ground Control to Major Tom” David Bowie line with this change.
1 + 2 + 3 + 4 + 1 + 2 + 3 + 4 +
“ C \ Em ‘
C and D7: FIRST FINGER STAYS DOWN
Try singing “On Broadway” by Ben King as you play these chords.
1 + 2 + 3 + 4 + 1 + 2 + 3 + 4 +
“ D7 \ C ‘
Play and sing all your songs, especially your G-Em-C-D7 song. 3
Singing and playing songs all the way through is real guitar playing.
Remember that studies show that it usually takes about 15 minutes to get 3
into a practice session—so commit to practicing for a half-hour at a time,
three times a week.
41 | N Y C G U I T A R S C H O O L | C L A S S T H R E E

The G-Em-c-D7 chord pro-
gression is absolutely vital. It
is the foundation for hun-
dreds of songs. Playing one
chord per measure gives you
songs like The 5 Satins’ “In
the Still of the Night,” (capo
very inconvenient, don’t both-
er) and “Last Kiss” which was
made most popular by Pearl
Jam (open, meaning “no capo
necessary”). Spend twice as long on each chord and
you’ve got the basis for “Joey” by Concrete Blond (open)
and “The Reason” by Hoobastank. (capo IX—but if I
were you I would just play it open and sing along—it
will sound great). We’re going to call this a One-Six-
Four-Five. Don’t worry about why, yet—the numbers
refer to some simple music theory that we’ll cover in a
later class. Right now, just concentrate on leaving those
pivot fingers down.
One-Six-Four-Five
1 2 3 4 e
“G \ Em \ C \ D7 ‘
Play the exact same pro-
gression only with two
chords per measure (two
beats per chord) and you’ll
be strumming The Mar-
cels’ version of “Blue Moon”
(open), “Stay Just A Little
Bit Longer” by Jackson
Browne (open), “Crazy”
by Aerosmith (capo II), and “Complicated” by Avril
Levine (capo X but just play it open).
One-Six-Four-Five Split Measures
1 2 3 4
“G \ Em \ C \ D7 ‘
Here’s a common variant of the G-Em-C-D7 pro-
gression heard in songs like “Every Breath You Take”
by the Police (capo I) and Ben E.
King’s timeless “Stand By Me.”
(capo II and covered by John
Lennon and Seal among
others.) Notice you’re play-
ing the C and D7 for one
measure each, but every other
chord for two measures consec-
utively.
One-Six-Four-Five Stretched
1 2 3 4 e
“G \ G \ Em \ Em \
\ C \ D7 \ G \ G ‘
Play the same progression only beginning with C to
get a pattern heard in Coldplay’s “Viva la Vida” (capo I),
Joe Satriani’s “If I Could Fly” (capo V) or part of the
chorus to Van Morrison’s “Brown Eyed Girl” (open).
Four-Five-One-Six
1 2 3 4 e
“C \ D7 \ G \ Em ‘
Now play your favorite G-Em-C-D7 song—or just
write your own! Remember, you only need a capo if you
are playing along with the actual song recording. You
can always sing and play any song on your own without
a capo.
CLASS THREE SONGS G, Em, C, D
THE E MINOR CHORDThe first finger is on the same string and same fret in both
the Em and G chords, and can be left in place when changing
between them.
THE C MAjOR CHORDOnce you’ve got the C down,
you’re well on your way to playing with comfort and confidence.
THE D SEVENTH CHORDUse the first finger on the second
string at the first fret to pivot between D7 and its good friend, C.
42 | N Y C G U I T A R S C H O O L | G U I T A R F O R A B S O L U T E B E G I N N E R S

CLASS PRACTICE CHART:
Your teacher will assign you something great to fill in on this page! (If you’re studying this book on your own, then use this page as a worksheet to figure out and write down an entire song you’d like to practice, or just write your own if you prefer.)
|\ \ \ \ \
|\ \ \ \ \
|\ \ \ \ \
|\ \ \ \ \
|\ \ \ \ \
|\ \ \ \ \
|\ \ \ \ \
|\ \ \ \ \
PRACTICE TAB, LICK or RIFF
T A B
W W W . N Y C G U I T A R S C H O O L . C O M 6 4 6 - 4 8 5 - 7 2 4 4
RHYTHM: \ ! + @ + # + $ + \

1
44 | N Y C G U I T A R S C H O O L | G U I T A R F O R A B S O L U T E B E G I N N E R S

1 After 20 years in New York City, I am still impressed by all the tall buildings. NYC Guitar School’s 11th floor balcony is a convenient perch for admiring them. We’re located in the Recording and Rehearsal Arts Building on West 30th street, along with about 30 other music-related businesses.
2 NYC Guitar School teacher Tom demonstrates that the proper technique for holding a guitar includes an expression of enjoyment.
3 If you visit New York City Guitar School get ready to be smiled at. Jen (center) runs the school. She has a degree in Geology, which means she is well versed in all forms of rock. If you call up the school, you’ll probably be warmly greeted by Genifer (left). This picture must have been taken on a Tuesday, because that is the
day that Austin (right) takes a recovery from his eight hours of daily guitar playing and teaching to answer phones.
4 Here are a couple brand new Guitar for Absolute Beginner students. It looks like Matt W. is showing Richard and Laura how to play an A7 chord. Good luck, new students! (Matt just opened up Boston School of Guitar. If you’re in Boston, check it out!)
5 Are these students so excited because they are about to take their guitar lesson? Or are they simply exhilarated to have survived our notoriously decrepit elevator? (Repairs are almost complete, so you may not get to experience the thrill that Tom, Dave, and Mika are feeling in this picture.)
2 3
4 5
45 | N Y C G U I T A R S C H O O L | C L A S S T H R E E

N Y C G U I T A R S C H O O L | G U I T A R F O R A B S O L U T E B E G I N N E R S
ou are SMOKING: That’s right,
you’re a smoking ball of guitar fire!
You can play D, G, A7, Em, C and
D7. Here’s a picture of thousands
bowing before you!
Now, let’s learn a new rhythm! Right now, you’re
good at quarter-note strums. They’re called that be-
cause there are four of them in the typical measure,
just like there are four quarters in the typical dollar.
And you’re good, I hope, at tapping your foot once per
beat and strumming down with your hand just as your
foot taps down. You are, right?
We can represent this rhythm that you already
know like this:
Down Down Down Down
1 2 3 4
Or instead of using the word “down,” we could
use the official guitarist symbol for down, which is
“ [ ” = down strum.
So we could rewrite that rhythm like this:
[ [ [ [1 2 3 4
Now, I have a crazy question for you. If you strum
down, and then you strum down again, what direction
is your hand going between those down strums?
If you said “up,” then give yourself 25 gold stars, be-
cause you are right. What goes all the way down must
come up before it can go down again. We guitarists
identify the moment when your hand is coming up as
being “off the beat.” So on the beat you strum down,
and off the beat you lift your hand up to get ready to
strum again. There are four beats, so there are four off-
beats. This makes a total of eight, so you could describe
what we will learn in this lesson as eighth-note strum-
ming. Since this involves swinging your hand up and
down, we could also call this strum the swing strum or
alternate strumming.
To get the idea of this, let’s first count aloud as you
tap your foot. On the beat, as you tap down, say “one”
or whatever the number is. Off the beat, when you lift
your foot, say “and,” which will be written as “+.” Really
try to feel the beat, as you tap your foot. Feel the heavi-
ness of the beat. Do this for several measures in a row,
c l a S S
4The Secret to Playing Great
Rhythm Guitar is to
LOCK YOUR HAND WITH THE BEAT!~ by Dan Emery of NYC Guitar School ©2009 ~
46 | N Y C G U I T A R S C H O O L | G U I T A R F O R A B S O L U T E B E G I N N E R S

until you’re comfortable and confident counting aloud
with your foot tap.
You say: “one” “and” “two” “and” “three” “and” “four” “and”The count is: 1 = 2 = 3 = 4 =With your foot: tap lift tap lift tap lift tap lift
Now it is time for actual eighth-note strums! Grab
your guitar and make a chord—a G chord, let’s say.
Count aloud and tap your foot. Each time you say a
number, strum down: That’s the downbeat. Each time
you say “and,” strum up, it’s the upbeat. Above each
count I’ve written the official guitar symbols for down
( [ ) and up (]).
[ ] [ ] [ ] [ ]1 = 2 = 3 = 4 =
\ G \
Don’t worry about the exact number of strings you
hit with your up strum. You don’t need to hit all the
strings—just make sure you catch a few. Keep a nice,
loose feeling in your arm and hand as you strum. Most
importantly, feel the beat. Strum down, on the beat, and
strum up, off the beat.
Play through the measure of eighth notes a few times,
until you feel confident and comfortable. This technique
is also called alternate strumming because you alternate
between down and up strums.
Now try the D chord.
[ ] [ ] [ ] [ ]1 = 2 = 3 = 4 =
\ D \
This one is a little trickier because it’s only 4 strings.
But persevere: If Keith Richards learned to do it, so
can you!
Understanding ON and OFF the beat is very impor-
tant. For the rest of your guitar career, you’ll be playing
extremely complicated alternating strum patterns based
on this fundamental precept:
The secret to playing great rhythm guitar is to
move your hand with the beat.
Usually this means: ON the beat, strum DOWN
and OFF the beat, strum UP.
Changing in RhythmNow we’re going to play this rhythm as we change
chords—from an Em to a G, let’s say. We’ll discuss this
further. But first, give it a try. Count yourself in, tap
your foot, and play:
[ ] [ ] [ ] [ ] [ ] [ ] [ ] [ ]
1 = 2 = 3 = 4 = 1 = 2 = 3 = 4 =“ Em \ G ‘
At first, you probably won’t be able to make your
chord change exactly between the very last up strum of
the G and the very first down strum of the Em.
Good guitar players begin moving to the next chord
DURING the “and of four,” so that they can cleanly
finger the new chord on the next “one.” That’s taking
care of JOB ONE, the most important part of guitar
playing—which is playing the chord right on the beat.
KEEP YOUR STRUM HAND MOVING no matter
what, down on the downbeat and up on the offbeat.
Then you change chords AS you strum.
Let’s try that change again. I’ve put three asterisks
below the “and of four” to remind you to begin chang-
ing chords there.
[ ] [ ] [ ] [ ] [ ] [ ] [ ] [ ]
1 = 2 = 3 = 4 = 1 = 2 = 3 = 4 =“ Em *** \ G *** ‘
Got that? An excellent way to master this rhythm
will be to pick a pair of chords and strum your way back
and forth between them, before jumping into a song.
Here are some nice pairs:
G-Em Em-C C-D7 D7-G D-G D-A7 G-A7
47 | N Y C G U I T A R S C H O O L | C L A S S F O U R

The Small Barre, Gateway to Future Greatness
let’s look ahead in your career as a guitar player. Here
you are, learning lots of great chords and great songs,
becoming comfortable with your “axe,” and playing up
a storm. But speaking of storms, there is a one lurking
out there in the future. It is called the “barre chord,”
or more often it is called “the @*#^! barre chord!” It is
the technique which separates the guitar players from
the guitar weenies. Many times in my career as a guitar
teacher I have picked up the ringing telephone only to
hear a sobbing voice on the other line. With effort I’ll be
able to make out the words “finger,” “pain” and “help,
please, help” and I know that yet again someone is call-
ing for assistance with barre chords.
Q: Dan, what is a barre chord?
A: A barre chord is a chord in which one finger, usually
the first, holds down more than one string at the same
time—sometimes even four or five!
I have good news for you–that crying, sobbing, dis-
heartened guitar player pleading for barre chord help
will not be you! Why not? Because my fellow teachers at
the New York City Guitar School and I have discovered
that by teaching the “small barre” well ahead of the “big
barre” we can ensure that students smoothly and com-
fortably play barre chords like the complete and natu-
ral guitar demigods they are. So even though you won’t
learn the actual barre chord for some time, maybe even a
few months, let’s lay the foundation right now.
Let’s examine the small barre more closely by trying
one out. The small barre requires you to hold down two
strings, the first and the second, with your first finger.
Take your guitar in hand and place your first finger
down flat on the first
two strings at the first
fret, as close to the fret
as possible. Here is a
helpful picture:
Note that the first finger is locked out at the first
joint. Note also that the knuckles of the fretting hand
are forward. Try the small barre a few times, and strum
each of the strings to make sure that you are holding
them down cleanly. Be patient—this usually takes a
little practice! The muscle for this technique comes
from the palm and the thicker part of your finger, with
a little help from your thumb. By the way, I know that
one of the fundamental great habits of playing guitar
is to use your fingertips―but a barre is a different tech-
nique. Use the padded part of the end of your first
finger, nice and flat.
The best way to practice the small barre is to use it to
play famous licks. The small barre appears in countless
songs, differing only in the fret where it is played and
the rhythm. In fact, a significant percentage of whatever
hits happen to be on the radio at this very moment use
this move. It is one of the fundamental techniques of a
great lead guitar player.
Small Barre Lick # 1This is a small-barre lick reminiscent of the first sin-
gle-note guitar line heard in “Teen Spirit” by Nirvana,
and it’s a fun way to practice your small barre. Several
months from now you’ll really need to use a barre for
an advanced “big barre chord” and you’ll be very happy
that you practiced this. So put your first finger down flat
on the first and second strings, nice and close to the fret,
and try it out. Play down on the second string/second
beat, and up on the first string/first beat.
timing: 1 = @ + # + $ +pick direction: [ ] [ ] [ ] [ ]
11
finger: 1 1
48 | N Y C G U I T A R S C H O O L | G U I T A R F O R A B S O L U T E B E G I N N E R S
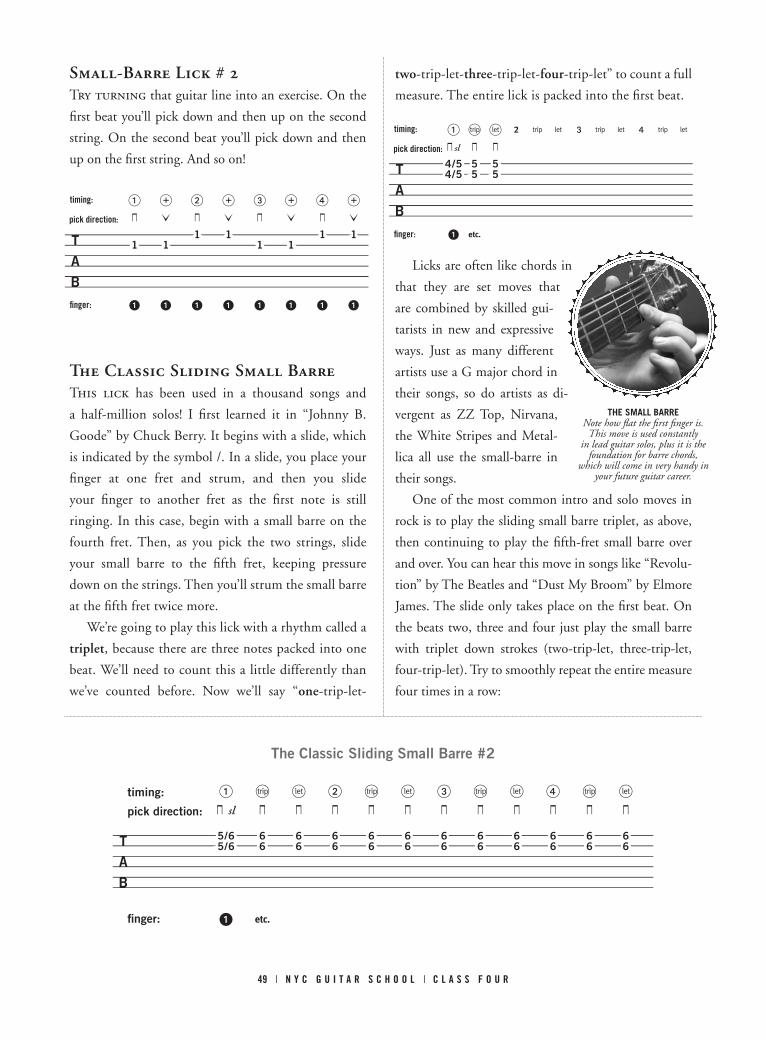
Small-Barre Lick # 2Try turning that guitar line into an exercise. On the
first beat you’ll pick down and then up on the second
string. On the second beat you’ll pick down and then
up on the first string. And so on!
The Classic Sliding Small BarreThis lick has been used in a thousand songs and
a half-million solos! I first learned it in “Johnny B.
Goode” by Chuck Berry. It begins with a slide, which
is indicated by the symbol /. In a slide, you place your
finger at one fret and strum, and then you slide
your finger to another fret as the first note is still
ringing. In this case, begin with a small barre on the
fourth fret. Then, as you pick the two strings, slide
your small barre to the fifth fret, keeping pressure
down on the strings. Then you’ll strum the small barre
at the fifth fret twice more.
We’re going to play this lick with a rhythm called a
triplet, because there are three notes packed into one
beat. We’ll need to count this a little differently than
we’ve counted before. Now we’ll say “one-trip-let-
two-trip-let-three-trip-let-four-trip-let” to count a full
measure. The entire lick is packed into the first beat.
Licks are often like chords in
that they are set moves that
are combined by skilled gui-
tarists in new and expressive
ways. Just as many different
artists use a G major chord in
their songs, so do artists as di-
vergent as ZZ Top, Nirvana,
the White Stripes and Metal-
lica all use the small-barre in
their songs.
One of the most common intro and solo moves in
rock is to play the sliding small barre triplet, as above,
then continuing to play the fifth-fret small barre over
and over. You can hear this move in songs like “Revolu-
tion” by The Beatles and “Dust My Broom” by Elmore
James. The slide only takes place on the first beat. On
the beats two, three and four just play the small barre
with triplet down strokes (two-trip-let, three-trip-let,
four-trip-let). Try to smoothly repeat the entire measure
four times in a row:
timing: 1 = 2 = 3 = 4 =pick direction: [ ] [ ] [ ] [ ]
1 1 1 11 1 1 1
finger: 1 1 1 1 1 1 1 1
timing: 1 7 8 @ & * # & * $ & *pick direction: [ sl [ [
4/5 5 54/5 5 5
finger: 1 e
timing: 1 7 8 2 7 8 3 7 8 4 7 8pick direction: [ sl [ [ [ [ [ [ [ [ [ [ [
5/6 6 6 6 6 6 6 6 6 6 6 65/6 6 6 6 6 6 6 6 6 6 6 6
finger: 1 e
The Classic Sliding Small Barre #2
The small barreNote how flat the first finger is.
This move is used constantly in lead guitar solos, plus it is the
foundation for barre chords, which will come in very handy in
your future guitar career.
49 | N Y C G U I T A R S C H O O L | C L A S S F O U R

1 2 3 4 5 6 7
FUNdAmENTAL HABITS OF A GOOd GUITAR PLAYER
GOOD GUITarIsTs KNOW ThaT PlaYING IN rhYThm Is mOsT ImPOrTaNT!
The secret to playing great rhythm guitar is to move your hand with the beat.
Usually this means: ON the beat, strum DOWN. OFF the beat, strum UP.
Good guitarists are efficient. L eaVe FINGers DOWN WheNeVer POssIble —PIVOT, PIVOT, PIVOT!
Use YOUr FINGerTIP TO FreT NOTes, almOsT bUT NOT QUITe ON The FreT.
STrUm eFFICIeNTlY, UsING resT sTrOKes.
WheN ChaNGING ChOrDs, mOVe The mOsT ImPOrTaNT FINGer FIrsT.
AlWaYs PlaY The OPTImUm NUmber OF sTrINGs IN a ChOrD.
PerCeIVe aND remember PaTTerNs IN mUsIC!
50 | N Y C G U I T A R S C H O O L | G U I T A R F O R A B S O L U T E B E G I N N E R S

Practice Suggestions for Class Four
Warm up by playing your small-barre licks. Then play your licks from 3
Classes Two and Three.
Play your Class Four song incessantly and smoothly and repeatedly. Sing 3
along—download the mp3 or buy a CD if you aren’t familiar with the words.
Play all the way through your other songs. 3
my First Guitar
Many people learn to play guitar on a borrowed in-
strument. Jimi Hendrix did, and so did I. My first guitar
actually belonged to the father of my best friend, Ted,
back in the rural North Idaho country where I grew up.
It was perhaps inevitable that Ted and I would be-
come best friends. We had a lot of important qualities in
common, including:
We were the only two boys in our entire high school 1.
class who did not chew tobacco.
We were the only two boys in our entire high school 2.
class who took Physics.
Nobody else wanted to be seen with us.3.
Ted lived on a farm high above the Potlatch River
canyon. His father, Robert, was a thick, strong and frugal
farmer of wheat and lentils who rose early each morning
for a focused 12 or 14 hours of work in the fields be-
fore returning to the house to relax before bedtime with
some accounting or minor repair jobs. Ironically, he was
allergic to wheat, and during the harvest season I mostly
remember him as one big red inflammation. The dual
intensity of his allergy and work ethic were matched by
his shrewd love of bargains and his careful hoarding of
any item that someday might prove useful under some
scenario, no matter how unlikely.
(In the close environs of a New York City apartment,
such an attitude could prove dangerous. For example, I
recently read about a guy in the Bronx who saved every-
thing until one of the narrow passageways through his
apartment collapsed, trapping him. Luckily, after several
days he was able to reach his phone and call for help. As
an industrious farmer living on several hundred acres,
Robert did not worry about being trapped by his stock-
pile of potentially useful items, although he did build
several more barns in his spare time.)
Sometimes Robert’s bargain hunting came in handy
for me. For example, Ted, his brother Jed, my brother
Luke and I all shared a love of Coca-Cola. One day,
Robert took us all to the supermarket with a stack of
coupons for cases of Coca-Cola for some unbeliev-
ably low price. He sent us in and out of the store with
coupons and five-dollar bills until the car was com-
pletely full. When I said, “Uh, where are we going to
sit on the way back?” he didn’t even bother to answer.
He gave each of us teenagers an extra case to carry on
the five-mile walk back home. In an effort to light-
en our load we drank as many cans as we could, but
it made the trip much longer because soon we were
forced to stop every 50 yards to relieve ourselves. Also,
we had to tie the empty cans up in our shirts because
51 | N Y C G U I T A R S C H O O L | C L A S S F O U R

we knew Robert would insist that they be returned for
the nickel deposit.
Anyway, I digress, because this story is about my first
guitar. The story actually begins a very long time ago, be-
fore I was born, when the young man who would become
Ted’s father saw an unbelievably good deal on a cheap
acoustic guitar in a department store that was going out
of business. He laid down his 12 dollars and took the gui-
tar home to this conversation with his young wife, which
I have made up on account of not being there:
Roz: “Now what did you go and buy that for, Bob? You’re
never going to use it!”
Robert: “This will come in handy one day. You’ll see.”
Then Robert carefully placed the guitar in the corner
of one of his first barns, along with some other things
which might very well come in handy one day, like a
coffee can full of bent nails and the driver-side door
from a 1934 International one-ton pickup truck.
Years passed. The sun rose and set. The earth turned
from day into night. Each morning, Robert woke up
and worked like a force of nature, farming, building and
occasionally fathering sons, pausing only to stockpile
useful items. Week by week such items were placed in
the barn, layer upon layer, like sediments being depos-
ited onto the bottom of a prehistoric sea.
Then, after a long time, I, Dan Emery, was born,
mostly grew up, and became extremely interested in
becoming a rock star. I had a great band name, which
I will not reveal except under medieval torture. I also
had a great band—Ted would be the singer, his brother
Jed would be the drummer, my brother Luke would be
the keyboard player, and I would be the guitar player.
(A bass player was deemed unnecessary.) I even had my
band’s first write-up in the paper thanks to a gullible
reporter on a tight deadline.
Clearly, the only thing standing between me and
stardom was the fact that I lacked a guitar. Ted and Jed
apparently mentioned this at home because one morn-
ing they told me that their father not only had a guitar,
but he would lend it to me for as long as I wanted, as
soon as he found it.
Two months later, I held my first guitar in my hands.
The strings were brittle with age, the neck was bowed, and
the first time I tried to tune it one of the tuners fell off,
but I loved it. I practiced for two hours the first day, two
hours the second day, and then I built up from there.
Each time I attempted to tune the guitar, I tight-
ened the strings a little more and the neck of the guitar
warped a little more under the tension, until the strings
were almost impossible to push down against the frets.
One day I heard a creaking sound from the corner of
the room where the guitar was leaning. Right before
my astonished eyes, the guitar convulsed like an tasered
python, and then the neck snapped off with a dramatic
crack and twang.
“Ted,” I said, “the guitar broke.”
“That’s no problem,” he replied. “We have a shop.”
Ted and Jed had been fixing farm equipment since
an early age and considered no repair job beyond them.
They saw their mission as two-fold: first, to reattach the
neck of the guitar to the body, and secondly to render it
impervious to future breakage. They put metal plates on
the neck and body, then connected them with a thick
metal brace on each side of the neck with the same care
and attention to durability they used when repairing
plows. They even welded it to be sure nothing came
loose. When I got the guitar back, there was so much
steel plate on it that I had to squat to lift it. Also, it
could never be tuned again. It was great, especially since
I wanted to play heavy-metal guitar anyway.
In conclusion, I want to publicly thank Robert for
giving me my first guitar, and to applaud his foresight
in stockpiling it for my future use. If aliens invade, if a
gigantic volcanic explosion plunges the world into three
years of winter, if there is a major meteor impact, etc.,
etc., I will immediately depart New York City and head
for the barns that contain the solution to any problem
that may arise. I will leave you with another imagined
conversation between Robert and Roz:
Robert: “I told you that guitar would come in handy
one day.”
Roz: “Oh, Bob—have another Coke.”
52 | N Y C G U I T A R S C H O O L | G U I T A R F O R A B S O L U T E B E G I N N E R S

CLASS FOUR SONGS G-D-Em-C/Em-C-G-D Alt Strums D-A7-G-A7 Alt Strums & Split Measures
You are building up some serious guitar-playing
firepower, and you are now ready to learn one of the
most mind-blowingly popular chord progressions of all
time. Using this progression you can play hundreds or
thousands of songs, including: “Swing, Swing” by The
All-American Rejects (open), “Don’t Matter” by Akon
(capo II), “Far Away” by Nickelback (capo IV), “My
Name Is Jonas” by Weezer (capo IV), “Down, Down,
Down” by Bruce Springsteen (capo II) and many oth-
ers. We’ll see more of much more of this intensely pow-
erful progression in future classes. In the meantime, pick
your favorite G-D-Em-C song, adjust a capo as needed,
and play along with the band.
Remember, keep your strum hand moving!
Mind Blowing Progression in G[ ] [ ] [ ] [ ]1 = 2 = 3 = 4 = e“G \ D \ Em \ C ‘
Songs will often be driven by the same chords played
in the same order, but starting on a different chord in
the progression. For example if we play the progression
from the top of this page, but simply start on the E
minor instead of the G, we’ll be playing the underlying
harmony for ‘90s rock anthems like practically all of
The Cranberries’ “Zombie” (open) and practically all
of The Smashing Pumpkins’ “Disarm” (open).
90s Rock Anthem[ ] [ ] [ ] [ ]1 = 2 = 3 = 4 = e“Em \ C \ G \ D ‘
In all the excitement of playing C chords, do you
remember that A7 chord? I hope so, because here is a
classic D-A7-G-A7 repeating pattern. Please note that
the chords change every two beats—that means that for
every chord, you’ll get a down-up-down-up.
KEEP YOUR HAND MOVING, even when you
are changing chords. This pattern can be discerned in
songs like “First Cut” by Cat Stevens (covered famously
by Sheryl Crow, open), the verse to “All Star” by Smash
Mouth (capo IV) and most of “Small Town” by John
Cougar (capo IX) and “Love Stinks” by the J. Geils
Band (capo X). Depending on the song you might need
to vary your strum. As always, get the song, LISTEN,
and try to play along. I recommend trying the Sheryl
Crow version of “First Cut” to begin with. If you don’t
have the song, buy it, listen carefully and then try play-
ing along. Here’s a practice progression entitled “You
Are A First Cut All-Star”.
You Are A First Cut All-Star[ ] [ ] [ ] [ ]1 = 2 = 3 = 4 = e
“D A7 \ G A7 ‘
53 | N Y C G U I T A R S C H O O L | C L A S S F O U R
CLASS PRACTICE CHART:
Your teacher will assign you something great to fill in on this page! (If you’re studying this book on your own, then use this page as a worksheet to figure out and write down an entire song you’d like to practice, or just write your own if you prefer.)
|\ \ \ \ \
|\ \ \ \ \
|\ \ \ \ \
|\ \ \ \ \
|\ \ \ \ \
|\ \ \ \ \
|\ \ \ \ \
|\ \ \ \ \
PRACTICE TAB, LICK or RIFF
T A B
W W W . N Y C G U I T A R S C H O O L . C O m 6 4 6 - 4 8 5 - 7 2 4 4
RHYTHM: \ ! + @ + # + $ + \

N Y C G U I T A R S C H O O L | G U I T A R F O R A B S O L U T E B E G I N N E R S
aster the Gentle Art of Riffing through Basic CountingBlack Sabbath! AC/DC!
Metallica! Joan Jett! Besides a
propensity for wearing black, these artists and many
others share a tendency to not strum in a folksy manner.
Instead, they “riff ” on chords. A riff is a set of chords or
notes played in a short and memorable pattern. Think of
the introductions to “Smoke on the Water,” by Deep Pur-
ple or the main guitar part to “Teen Spirit” by Nirvana.
There is no better first-chord riff than the one used
as the backbone for more songs than probably any other
riff in existence. I am going to call it the “Wild Thing”
riff, even though the exact same riff can be used to play
“Walking on Sunshine” by Katrina and the Waves, the
chorus to “All Star” by Smashmouth and hundreds or
even thousands of other songs. We’re going to learn this
riff in the key of G, using open chords. (A “key” is a
way in which skilled guitarists perceive order in music—
you’ll learn about keys in just a few lessons!)
First let’s learn the G chord part. Count yourself in
using eighth notes (“one and two and, etc.”) and then
boldly strum the G chord on “one” and “two”. Remem-
ber that “[ ” means “strum down.”
[ [1 + 2 + # + $ + ! + @ + # + $ +
“ G G \ ‘
Now let’s turn this into almost a riff. We’re going to
do something we’ve never done before: We’re going to
play a down strum OFF the beat on the “AND.”
So now, very slowly, count and play the full first
measure until you can do so in a reasonably confident
manner four times through. Try to lead with your third
finger when changing to the C chord.
[ [ [ [1 + 2 + # = 4 + ! + @ + # + $ +
“ G G C C \ ‘
Next, learn the second measure of the riff. You’ll
strum with the exact same timing, only now going from
D to C. Again, do this until you can play in a reasonably
confident manner four times in a row. Try to lead with
your third finger when changing to the C chord.
[ [ [ [! + @ + # + $ + 1 + 2 + # = 4 +
“ \ D D C C ‘
C l A S S
5The Gentle Art of Riffing
PLUS A minor (The Saddest Chord)~ by Dan Emery of NYC Guitar School ©2009 ~
{ How to count and play riffs; planting fingers to
change between G, C and D; A minor. }
55 | N Y C G U I T A R S C H O O L | C L A S S F I V E

Notice that in both measures, the C chord is
SYNCOPATED. In other words, instead of changing
and playing ON the third beat, we play it OFF the
third beat, or on the “and of three.” This syncopation is
the key to making “Wild Thing” and the various other
songs built on this riff sound like they should.
Now, here comes the entire riff. Count and play
slowly until you get the hang of this riff. Good finger
plants will be extremely helpful when making these fast,
syncopated changes. When changing to G plant the sec-
ond finger. When changing to C plant the third finger.
When changing to D, plant the first finger.
It is time for another emotional, poignant minor chord,
the very famous A-minor chord. In the movie “Spinal
Tap,” a Nigel Tufnel proclaims that D minor is, in fact,
the saddest chord. But many take issue with this analy-
sis, considering A minor to be even sadder. Below is a
diagram of the A-minor chord, often written as “Am”.
I’ve heard people say that we think of major chords
as “happy” and minor chords as “sad” simply through
association—if you see enough movies of weeping
people with a minor chord playing in the background,
after a while a minor chord makes you want to cry,
goes this argument. I think this is untrue—somehow
the mathematics of the vibrations involved in a minor
chord just resonate in a particular way with humans.
Am
Now, Learn this Chord to Make Your Listeners Weep with Raw, Ragged Emotion!
For example, I was listening to some classical music
in a minor key with my 2-year-old son, and he said,
“Dada, the violins are lonely.” He knew, without be-
ing told.
The A-minor chord is often used with the C-major
chord. What an easy change! You only have to move
your third finger, and you strum five strings on each of
the chords. Practice this change until you are reasonably
comfortable and confident.
[ [ [ [ [ [ [ [1 + 2 + 3 + 4 + 1 + 2 + 3 + 4 +
“ C \ Am ‘
Your plant finger on the A minor is the second fin-
ger. In other words, when fingering this chord, begin
with the second finger before adding the other two.
Try changing between Am and G (six strings and also a
second-finger plant) and then between Am and D (four
strings and a first-finger plant) to get more comfortable
with A minor.
The WILD RIff
[ [ [ [ [ [ [ [1 + 2 + 3 + 4 + 1 + 2 + 3 + 4 +
“ G \ Am ‘
[ [ [ [ [ [ [ [1 + 2 + 3 + 4 + 1 + 2 + 3 + 4 +
“ D \ Am ‘
A Minor CatastropheSpeaking of A minor, I once taught
one of the worst guitar lessons in my
life with an A-minor-laden song,
“Knocking on Heaven’s Door.” Back
before New York City Guitar School
existed, I used to hold open “anti-pro-
crastination” sessions in my apartment
in Williamsburg, Brooklyn. I’d invite
my illustrator/writer/thesis-writing/
etc. friends over to drink coffee and
work on whatever we’d been putting
off. If I had a guitar lesson I’d go into
the other room to teach my student.
One day my friend Alia came over.
Alia’s cool—she hammers nails into
her nose, eats glass, and lies on beds
of nails. as “Vulvina, Queen of Nails.”
But on this day she was just Alia, pro-
fessional illustrator and badly in need
of some concentrated drawing to meet
an impending deadline. In she came,
and she said, “Dan, how is it going?”
“Well,” I said, “it’s going great except that there’s this
song that’s driving me nuts. It’s ‘Knocking on Heaven’s
Door,’ and I keep teaching it to people because it’s the
best song for learning A minor. But lately, every time I’m
playing the song, I feel like darkness is closing in around
me, and I feel like I’ve done nothing for my entire life
except sing and play ‘Knocking on Heaven’s Door,’ and
I think ‘Is this it? Is this my life? Will this always be my
life?’ I’ve got to stop teaching that song, because if I do it
one more time I’m going to jump out the window!”
Just then the doorbell rang. Alia retreated to the
other room and began drawing furiously, and I went to
the door. “Hi Lisa,” I said, and in came Lisa, a gifted
Broadway dancer and a brand-new-guitarist. We settled
down with our guitars and she said “I’m so excited to
learn ‘Knocking on Heaven’s Door’ today.”
There was a single, loud and suddenly suppressed
snort of laughter from the other room, and I began to
laugh uncontrollably. In fact, I couldn’t stand up!
“What’s so funny?” Lisa asked.
“Oh, nothing,” I said, and we went on
with the lesson, except that approxi-
mately each verse I’d start laughing
again. Poor Lisa! Honesty is always the
best policy, and I should have told her
the full story; in retrospect she must
have thought I was laughing at her, or
perhaps that I was under the influence
of some laugh-inducing substance!
She never came back, even though she
showed great promise as a guitarist. I
remember that lesson with great shame
as a teacher. On the other hand, ever
since then I’ve loved to teach “Knock-
ing on Heaven’s Door”!
The first time I heard “Knocking
on Heaven’s Door,” it was by Guns n’
Roses. I liked it! A few months later I
heard a very different version by Eric
Clapton. I said, “Wow! Guns n’ Ros-
es are bigger than I thought—I can’t
believe that Eric Clapton covered one of their songs!”
When I tried to impress an attractive girl with this piece
of information, she informed me of what you already
know: Bob Dylan wrote the song. Years later Avril
Levigne released her own version, and across America
right now there are millions of people who think she
wrote it! Sometimes I’ll give a class a choice between
learning an unnamed song by Clapton, Guns and Roses,
or Avril Levigne. We’ll discuss the pros and cons, and
hopefully the discussion will become spirited. Then we
take a vote, after which I reveal that we’ll be learning a
song made famous by all three artists.
Nigel Tufnel
Proclaims
that D Minor is,
in Fact, the
Saddest Chord.
But Many Take Issue
with this Analysis,
Considering
A Minor to
be Even Sadder.
57 | N Y C G U I T A R S C H O O L | C L A S S F I V E

Practice Suggestions for Class Four
Begin by playing the Wild Riff. Play the Wild Riff early, often and over and 3
over—it is laying the groundwork for next week’s lesson. PLAY LOTS OF
WILD RIFF!
Play entire songs all the way through. Play Knocking, You Are A First Cut 3
All Star, and any other songs you have learned. Try singing!
Finish by playing all your licks. 3
TRy To pRAcTIce AT LeAsT ThRee TImes ThIs Week!
You are doing quite well in your musical endeav-
or. You’ve learned to play chords and songs, and you
are building the habits of a skilled guitar player. Most
importantly, you recognize that there is only one way
to learn to play guitar—and that is to practice! The
more faithfully you pick up your guitar to play, the
greater will be your enjoyment and mastery. In fact,
the practicing is itself a large part of the playing; the
journey is the end.
When you form a chord with your fretting hand, you
habitually use your fingertips, and you finger close to
the frets. This allows you to expend the least amount
of energy with the maximum results when fingering
chords. Speaking of fretting-hand efficiency, you leave
fingers down when possible while changing chords—
this is called pivoting. Also, you put the most important
finger down first—we call this finger the plant finger.
With your strumming hand, you consistently play the
optimum number of strings; your hand plays from the
root note of any given chord.
You know that music is made up of patterns. You
look for these patterns when you learn new songs, and
doing so helps you to learn songs by heart.
Finally, you recognize that the key element of sound-
ing great is to play in rhythm. Therefore, you tap your
foot and you lock your strumming hand in with the
beat. Furthermore, when changing chords you always
hit the new chord right on the beat.
Let’s Review Some of the Fundamental Principles of Guitar Playing.
58 | N Y C G U I T A R S C H O O L | G U I T A R F O R A B S O L U T E B E G I N N E R S

CLASS FIVE SONGS G-C-D-C The Wild Riff G-D-Am/C Alt Strums
If you want to write a hit rock song that makes peo-
ple dance, I suggest you try working The Wild Riff into
it. Very similar riffs drive songs such as “Walking on
Sunshine” by Katrina and The Waves (capo III), the
chorus to “All Star” by “Smash Mouth” (very incon-
venient with a capo, but very convenient in the future
when you know barre chords!), “Get Off My Cloud”
by The Rolling Stones (ditto), “Hang on Sloopy” by
The McCoys (no capo needed!), “Wild Thing” by The
Troggs (capo II), and others.
The WILD Riff[ [ [ [ [ [ [ [1 + 2 + # = 4 + 1 + 2 + # = 4 +
“ G G C C \ D D C C ‘
The following killer chord progression can be used
to play “What You Meant” by Franz Ferdinand (open),
“Roses From My Friends” by Ben Harper (open), and
most notably for guitar players, “Knocking on Heaven’s
Door” by Bob Dylan (open, covered famously by Eric
Clapton, Avril Lavigne, and of course Guns N’ Roses).
Try playing with alternate strums.
proto-knocking[ ] [ ] [ ] [ ]1 = 2 = 3 = 4 = e“G \ D \ Am \ Am ‘
Of course, the C-major chord
is THE key chord of beginning
guitar. By adding a C to the
end of the G-D-Am pro-
gression, we get the essential
harmony behind “Closing
Time” by Semisonic (open),
“Hot N Cold” by Katy Perry
(open), and much of “These
Girls” by Ryan Adams (capo
III) and “‘J’ For Jules” by ‘Til Tuesday (capo III). Oh,
and just play the same repeating four chords only start-
ing on the Am to get “Who Will Save Your Soul” by
Jewel (open). Remember to leave your first and second
finger down when changing from Am to C—just reach
out with your third finger!
G to D to A minor to c Time[ ] [ ] [ ] [ ]1 = 2 = 3 = 4 = e
“ G D \ Am C ‘
Here’s a practice progression including changes
from D to A minor and also D to C, which I’m calling
“Knocking” in honor of “Knockin’ On Heaven’s Door.”
As always, get a copy of whichever song you want to
learn to play, listen to it carefully, and then try to play
along with it. If you need help, ask a friend or classmate,
or get the sheet music.
knocking
[ ] [ ] [ ] [ ]1 = 2 = 3 = 4 = e“ G \ D \ Am \ Am \
\ G \ D \ C \ C ‘
The A Minor chordLearn the A minor to
make your listeners weep with raw, jagged emotion.
59 | N Y C G U I T A R S C H O O L | C L A S S F I V E

cLAss pRAcTIce chART:
Your teacher will assign you something great to fill in on this page! (If you’re studying this book on your own, then use this page as a worksheet to figure out and write down an entire song you’d like to practice, or just write your own if you prefer.)
|\ \ \ \ \
|\ \ \ \ \
|\ \ \ \ \
|\ \ \ \ \
|\ \ \ \ \
|\ \ \ \ \
|\ \ \ \ \
|\ \ \ \ \
pRAcTIce TAB, LIck or RIff
T A B
W W W . N Y C G U I T A R S C H O O L . C O M 6 4 6 - 4 8 5 - 7 2 4 4
RhyThm: \ ! + @ + # + $ + \

N Y C G U I T A R S C H O O L | G U I T A R F O R A B S O L U T E B E G I N N E R S
ave you ever played air guitar?
Have you played blazing air lead
guitar, your fin-
gers undulating
like over-caffein-
ated garter snakes? You weren’t sitting
down, and you were having a good
time, right?
Despite my years of intensive study
of the actual guitar and hundreds of
hours spent on stage playing actual
guitar songs in front of actual people,
I must admit that my greatest exploits
came with my trusty air guitar in hand.
Why, I can’t even count the times that
I casually tossed off a Chuck Berry solo
note for note on my air Telecaster, of-
ten while simultaneously eating deep-
fried potato products.
I achieved my greatest air-guitar tri-
umphs as a “student” at the University
of Idaho. I lived there for several years
in a dormitory called Upham Hall,
which featured a large communal shower room with
six high-powered nozzles. Early in the morning, this
room was occupied by a rotating cast of surly, hung-over
young men. I, however, was not one of those worthy
class-bound students, because staying
up all night playing guitar and jug-
gling made me too sleepy to get up
before noon.
Anyway, at two or three in my typi-
cal afternoon, I woke up and experi-
enced a momentary pang of regret at
having missed lunch. I generally decid-
ed to make the best of it. “I’ll work on
my air-guitar skills,” I said to myself,
heading off to the giant shower room.
Alone, I turned on all six show-
ers full throttle and as hot as possible.
The roar of the water cascading and
echoing against the tiles sounded a lot
like the open throated cries of forty
thousand people screaming “EM-ER-Y,
EM-ER-Y!” The rising steam quickly
cut vision to just a few inches, much
like six powerful fog machines. The
large tiled floor provided me ample
room to leap, slide and duck-walk, and the scarring jets
of hot water aided me in concentrating fully on creating
c l a s s
6Rhythm 101
—Learn This and Understand
Strumming Patterns~ by Dan Emery of NYC Guitar School ©2009 ~
The Secret
to Playing Great
Rhythm Guitar is to
Move Your Hand
with the Beat.
Usually this means:
ON the beat, strum DOWN.
OFF the beat, strum UP.
61 | N Y C G U I T A R S C H O O L | C L A S S S I X

the ultimate air concert for my fans. Best of all, thanks
to the University of Idaho’s “physical plant” (whatever
that is) the hot water never ran out. Sometimes it would
be five or six in the afternoon by the time I staggered out
into the hallway, pink and wrinkled and barely in time
to get ready for juggling club.
Yes, those were good times, and I’m sure you can relate.
But my point is, if you want to play guitar like a superstar,
then you’d better work on your air-guitar skills!
Do you remember the secret to playing great rhythm
guitar? It’s locking your hand in with the beat.
For example, if you were to play a G chord with the
alternate strums, on every beat you would strum down,
and off every beat (on the “and”) you would strum up.
Try it:
[ ] [ ] [ ] [ ]1 = 2 = 3 = 4 =
“ G ‘
Wouldn’t it feel great to strum complicated, tricky
strum patterns which mixed down and up strums? You
CAN strum those strums—but first you have to learn
to lock your hand in with the beat so completely that it
keeps moving exactly in rhythm regardless of the strum
pattern that you are playing. In other words, you must
learn to properly air strum!
Proper Air StrumsTo properly air strum, move your hand up and
down, down on the beat and up off the beat—without
making a sound. Your hand will keep moving even if
you are not actually hitting the strings of the guitar. This
is vitally important! Make a G chord, count aloud and
move your hand with the beat, but don’t actually hit the
strings of the guitar. To show this, I’ve written a measure
complete with count and the strum direction. Move
your hand with the beat:
[ ] [ ] [ ] [ ]! + @ + # + $ +
Now let’s practice articulating a strum here or there.
Count aloud, move your hand with the beat, but only
strum the indicated beat. It is important to place your air
strums exactly in rhythm. Your hand will move DOWN
on every beat and UP on every “and” and it will actually
strum the strings only on “two.”
[ ] [ ] [ ] [ ]! + 2 + # + $ +
“ G ‘
Now try a solitary off-beat, in this case the “and of
two”, which will be played with an up strum.
[ ] [ ] [ ] [ ]! + @ = # + $ +
“ G ‘
Play through this next measure several times. It’s
tricky! Keep your hand moving with the beat, and strum
the indicated beats and off-beats. You know, if you were
watching from a distance, each of these exercises would
look exactly the same—the hand would just be moving
steadily with the beat.
[ ] [ ] [ ] [ ]1 + @ = # = $ +
“ G ‘
The Basic StrumNow you’ll apply your new knowledge to an actu-
al strum. I call it the basic strum, because it basically
sounds great on just about any song. Keep your hand
moving, including on the “and of one” and the “and of
three” when you aren’t actually strumming. Please try to
make these air strums exactly with the count. You never
need to speed your hand or slow your hand—everything
will be where it is needed when it is needed. I’ve writ-
ten in the pick direction only when you actually strum,
because I know that you will remember to lift your hand
up on the +’s.
62 | N Y C G U I T A R S C H O O L | G U I T A R F O R A B S O L U T E B E G I N N E R S

[ [ ] [ [ ]1 + 2 = 3 + 4 =
“ G ‘
Some people call it the “Down, Down-Up, Down,
Down-Up” strum, because that is how you do it. Oth-
ers call it “The Country Strum” because it is used in so
many country and folk songs. Play it until you begin
to feel comfortable with it, then try changing chords
as you strum.
Changing in Rhythmsmoking! Okay, now we’re going to play this rhythm
as we change chords—from an Em to a G, so that we
have that nice first-finger pivot to help us out. Count
yourself in, tap your foot, and play:
[ [ ] [ [ ] [ [ ] [ [ ]
1 + 2 = 3 + 4 = 1 + 2 = 3 + 4 =“ Em \ G ‘
After you’ve done that a few times in a row, try the
basic strum with a plant change, D to G. Here I’ve writ-
ten the rhythm out without the pick direction, because
I know that on the beat your hand moves down, and off
the beat your hand moves up! Play this change through
until it feels moderately comfortable.
[ [ ] [ [ ] [ [ ] [ [ ]
1 + 2 = 3 + 4 = 1 + 2 = 3 + 4 =“ D \ G ‘
Often beginning guitarists will say, “Hey, if I’m right-
handed, why am I using my left hand for these tricky
chords? Shouldn’t I be using my very coordinated right
hand for that?”
Left-handers will ask the same question except
reversed.
Now you know the answer—the fretting hand merely
SETS UP the music—it is the strumming hand that
EXPRESSES the music! Therefore your dominant
hand is the one that strums.
GOOD GUITARISTS KNOW THAT RHYTHM IS MOST IMPORTANT!
The secret to playing great rhythm guitar is to move your hand with the beat
WHETHER YOU’RE ACTUALLY STRUMMING OR NOT!
Usually this means: ON the beat, strum or (air strum) DOWN.
OFF the beat, strum or (air strum) UP.
63 | N Y C G U I T A R S C H O O L | C L A S S S I X

1 2 3 4 5 6 7
FUNDAMENTAL HABITS OF A GOOD GUITAR PLAYER
GOOD GUITARISTS KNOW THAT PLAYING IN RHYTHM IS MOST IMPORTANT!
The secret to playing great rhythm guitar is to move your hand with the beat.
Usually this means: ON the beat, strum DOWN. OFF the beat, strum UP.
Good guitarists are efficient. L EAVE FINGERS DOWN WHENEVER POSSIBLE —PIVOT, PIVOT, PIVOT!
USE YOUR FINGERTIP TO FRET NOTES, ALMOST BUT NOT QUITE ON THE FRET.
STRUM EFFICIENTLY, USING REST STROKES.
WHEN CHANGING CHORDS, MOVE THE MOST IMPORTANT FINGER FIRST.
ALWAYS PLAY THE OPTIMUM NUMBER OF STRINGS IN A CHORD.
PERCEIVE AND REMEMBER PATTERNS IN MUSIC!
64 | N Y C G U I T A R S C H O O L | G U I T A R F O R A B S O L U T E B E G I N N E R S

Practice Suggestions for Class Six
First and Third Practice Sessions:
Warm up by playing the Wild Riff incessantly to get used to the 3
G to C change.
Then play your Class Four song incessantly to get used to changing chords 3
as you continue strumming. Sing along!
Review the basic strum, then play your Class Six song. 3
Finish with concentrated Wild Riff practice. 3
Second Practice Session:
Warm up by strumming through your Class Three and Class Five songs. 3
Practice your Cool Licks. 3
Review the basic strum, then play your Class Three and Class Five songs 3
again, only this time using the basic strum.
Play your Class Six song. 3
Finish with concentrated Small Barre practice. 3
65 | N Y C G U I T A R S C H O O L | C L A S S S I X
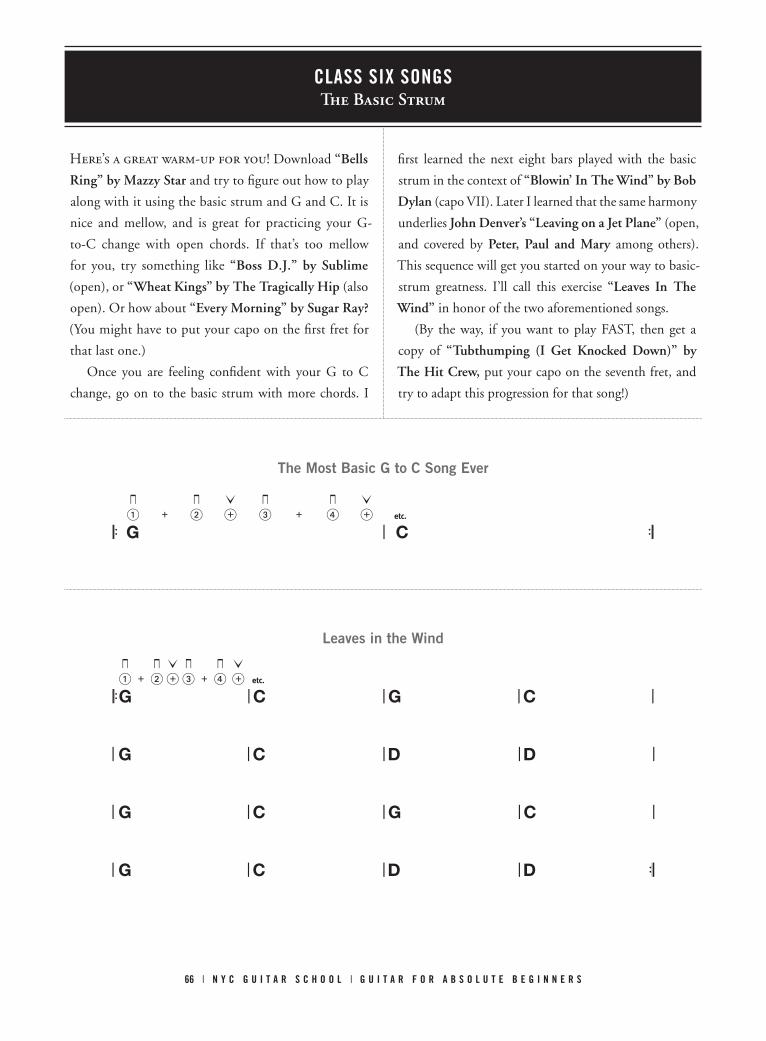
CLASS SIX SONGS The Basic Strum
Here’s a great warm-up for you! Download “Bells
Ring” by Mazzy Star and try to figure out how to play
along with it using the basic strum and G and C. It is
nice and mellow, and is great for practicing your G-
to-C change with open chords. If that’s too mellow
for you, try something like “Boss D.J.” by Sublime
(open), or “Wheat Kings” by The Tragically Hip (also
open). Or how about “Every Morning” by Sugar Ray?
(You might have to put your capo on the first fret for
that last one.)
Once you are feeling confident with your G to C
change, go on to the basic strum with more chords. I
first learned the next eight bars played with the basic
strum in the context of “Blowin’ In The Wind” by Bob
Dylan (capo VII). Later I learned that the same harmony
underlies John Denver’s “Leaving on a Jet Plane” (open,
and covered by Peter, Paul and Mary among others).
This sequence will get you started on your way to basic-
strum greatness. I’ll call this exercise “Leaves In The
Wind” in honor of the two aforementioned songs.
(By the way, if you want to play FAST, then get a
copy of “Tubthumping (I Get Knocked Down)” by
The Hit Crew, put your capo on the seventh fret, and
try to adapt this progression for that song!)
Leaves in the Wind
[ [ ] [ [ ]1 + 2 = 3 + 4 = e
“G \ C \ G \ C \
\ G \ C \ D \ D \
\ G \ C \ G \ C \
\ G \ C \ D \ D ‘
The Most Basic G to C Song Ever
[ [ ] [ [ ]1 + 2 = 3 + 4 = e
“ G \ C ‘
66 | N Y C G U I T A R S C H O O L | G U I T A R F O R A B S O L U T E B E G I N N E R S

CLASS PRACTICE CHART:
Your teacher will assign you something great to fill in on this page! (If you’re studying this book on your own, then use this page as a worksheet to figure out and write down an entire song you’d like to practice, or just write your own if you prefer.)
|\ \ \ \ \
|\ \ \ \ \
|\ \ \ \ \
|\ \ \ \ \
|\ \ \ \ \
|\ \ \ \ \
|\ \ \ \ \
|\ \ \ \ \
PRACTICE TAB, LICK or RIFF
T A B
W W W . N Y C G U I T A R S C H O O L . C O M 6 4 6 - 4 8 5 - 7 2 4 4
RHYTHM: \ ! + @ + # + $ + \

1 2
68 | N Y C G U I T A R S C H O O L | G U I T A R F O R A B S O L U T E B E G I N N E R S

1 On the other hand, if you visit Brooklyn Guitar School, prepare to be greeted with ukuleles and juggling. This is Shane, who keeps a lot of things in the air while running the school!
2 Our bathroom is for both male guitar players and female guitar players.
3 Students waiting for their classes mix, mingle and make impromptu music in the school lounge. Meghan is standing with her guitar and Saurabh and Ellen are playing.
4 One of the doors in our lounge leads to Allan and Gotham Guitar Works. Here is Allan performing surgery on somebody’s guitar.
5 The vast majority of NYC Guitar School students are adults, but we do have some younger players. Here Josh fingertaps the solo to “Beat It”. Eliane, who runs our Teen Rock Guitar program, listens proundly. I’m proud, too—I taught Josh his very first lessons.
6 The students in this picture are actually taking a lead guitar class, not Absolute Beginners. I’ve included their picture for two reasons: first, they used to be beginners, so they are inspirational examples; second, their teacher, Suke, is one of the very first NYC Guitar School teachers. He’s not in the picture, but you can see how pleased Gene, Matthew and Eric are. About half the faculty of our guitar school have taken lessons from Suke, includuing me.
3 4
5 6
69 | N Y C G U I T A R S C H O O L | C L A S S S I X

N Y C G U I T A R S C H O O L | G U I T A R F O R A B S O L U T E B E G I N N E R S
: Who exactly is performing?
A: Your entire class, including
your teacher!
Q: Should I feel nervous about this?
A: Absolutely not. You’ll have lots of company strum-
ming, your audience will generally be fewer than five
people, and they will be very friendly, too.
Q: Why do we do this?
A: At NYC Guitar School, we have found that students
who play in front of others are massively more success-
ful in playing guitar. Even just strumming a D chord
in front of others forces you to achieve a higher level of
mastery with the D chord and strumming. Playing in
front of others is a breakthrough point as big as learning
to change chords in rhythm!
Q: Can I play a song by myself?
A: Absolutely, if you would like to. Just let your teacher
know!
Q: How about with a friend or classmate?
A: Absolutely!
Q: Will I have to do this after every class I take here?
A: Nope—just this course and a few electives which may
be a year or two in your future.
c l a s s
7Learn the Best Strum and
Always Sound Terrific~ by Dan Emery of NYC Guitar School ©2009 ~
{— S P E C I A L C L A S S T E N N O T E ! —
Class Ten, which is your MASSIVE MOMENT OF GLORY, is coming up in just a few weeks. That’s right—in Class Ten you will have the opportunity as a class to informally perform a song for an
audience of several NYCGS staff and students as well as any friend or relative you wish to invite. }
N ext Week You wil l Choose a Song to Play!
70 | N Y C G U I T A R S C H O O L | G U I T A R F O R A B S O L U T E B E G I N N E R S

The basic strum sounds great and is used in many,
many songs. But there is one strumming pattern which
is used even more. In fact, this strum sounds so good
that many people learn it and never bother to learn any
other strum. At NYC Guitar School we call it “the best
strum.” Master the material in this lesson, and you’ll
have a strum that will make you sound like a pro on
virtually every song for the rest of your life!
Let’s review alternate strumming. First and most im-
portantly, remember that:
The secret to playing great rhythm guitar is to move your hand with the beat.
Usually this means: ON the beat, strum DOWN. OFF the beat, strum UP.
Review air strums. Make a G chord, count aloud and
move your hand with the beat, but don’t actually hit the
strings of the guitar. Move your hand with the beat!
[ ] [ ] [ ] [ ]! + @ + # + $ +
\| G \
Review articulating a strum here or there. Count
aloud, move your hand with the beat, and strum the
indicated beats for the next several exercises. Place your
air strums exactly in rhythm. Your hand will move down
on every beat and up on every “and” and will actually
strum only on the circled beats. Keep your hand mov-
ing even when you are not strumming!
[ ] [! + 2 = # + 4 +
\| G \
[ ]! + 2 + # = $ +
\| G \
And here are several reviews of THE BASIC
STRUM. I’ve included some redundant rhythm no-
tation to subliminally prepare you for future musical
exploits. Don’t be alarmed!
1 + 2 = 3 + 4 =
“ G ‘
1 + 2 = 3 + 4 = 1 + 2 = 3 + 4 =
“ Em \ G ‘
1 + 2 = 3 + 4 = 1 + 2 = 3 + 4 =
“ D \ G ‘
The Best StrumBegin building up to the full best-strum rhythm by
air strumming your way into this bar. Repeat it a few
times. Keep your hand moving on the 1 + 2 + 3. Keep
your hand moving with the beat whether or not you
are actually strumming!
] [ ]! + @ + # = 4 =
\| G \
Now leap into the best strum. Try it once through
nice and slow. The key is: move your hand down on the
“three” (even though you are not actually strumming!)
move your hands down right here on the “three” so that your hand will
be in position for the up strum.
[ [ ] ] [ ]1 + 2 = # = 4 =
\| G \
71 | N Y C G U I T A R S C H O O L | C L A S S S E V E N

Then cycle through it. Some people call this the
“Down, Down-Up, Up-Down-Up” strum, because that
is how you do it. As long as your hand is moving with
the beat, though, your hand will be moving in the right
direction at the right time.
[ [ ] ] [ ]1 + 2 = # = 4 =
\| G \
Play it until you begin to feel moderately comfort-
able before progressing to chord changes.
Best-Strumming with Chord Changesstart with a pivot change—�from an Em to a G.
Tap your foot, count yourself in and play. You never
need to speed your hand or slow your hand—every-
thing will be where it is needed when it is needed.
Remember to leave your first finger down on the fret
while you change chords.
[ [ ] ] [ ] [ [ ] ] [ ]1 + 2 = # = 4 = 1 + 2 = # = 4 =
“ Em \ G ‘
After you’ve done that a few times in a row, try the
best strum with a plant change, G to C. Begin moving
your fretting hand right after the “four” as you maintain
your strum. It is the job of the chords to keep up with the
strum because RHYTHM IS MOST IMPORTANT.
Change Chords here
[ [ ] [ [ ] [ [ ] [ [ ]
1 + 2 = 3 + 4 = 1 + 2 = 3 + 4 =“ G \ C ‘
Sometimes it’s Just HardIsn’t it true that if you step back for a moment and
take a clear-eyed look at where you are and where you’ve
been, it is obvious that you have made massive prog-
ress in the art of guitar playing? Sometimes it is hard to
maintain that perspective, though, when you’re in the
middle of trying to master yet another new and unusual
guitar technique, rhythm or chord.
It’s been about eight years since I put away my riding-
in-a-van-hustling-guitar-slinging ways aside. Since then I
have devoted myself to making learning guitar as abso-
lutely accessible, achievable and easy for my students as
possible. “It’s easy to play guitar!” I shouted. “Anybody
can learn to do it!” I strove to make every chord, every
progression and every piece of theory as easy as possible.
But one day one of my teenage students came in and
taught me a valuable lesson. He said, “Hey, Dan—I just
realized something.”
“What?” I asked.
“Sometimes guitar playing is just not easy” he ex-
plained. “Sometimes it’s just hard, and you just have to
keep working at it until you get it, and it takes a lot of
time and effort.”
I felt like I’d been hit by a thunderbolt. He was abso-
lutely right. And in my effort to make guitar accessible to
people, I’d actually been doing them a disservice by inti-
mating that it was always easy to play guitar. No wonder
my students sometimes got discouraged when it wasn’t!
For example, for most beginning guitar players, the
G to C change is a giant and inconvenient pain in the
phalanges. Theoretically, it is easy to get comfortable
with the change—after all, you simply need to practice
the change somewhere between 1,000 and 2,000 times.
But, practically, practicing changing from G to C be-
tween 1,000 and 2,000 times takes a lot of, uh, practice.
And sometimes that’s not easy!
The good news is that YOU CAN DO IT! And when
you get tired, when your fingertips are sore, when you
lose your focus, give yourself a pat on the back! In life and
guitar playing alike, persevering may not always be easy—
but you’ll be glad when you can say “it was worth it!”
72 | N Y C G U I T A R S C H O O L | G U I T A R F O R A B S O L U T E B E G I N N E R S

Practice Suggestions for Class Seven
This is an important week of practice! You are nearing the end of the course—this is a vital week for
solidifying what you’ve learned so far, so that you can understand new concepts in the final lessons.
First and Third Sessions
Warm up with all your licks. Take your time, have fun! 3
Play The Wild Riff. 3
Play Your Class Seven song incessantly! 3
Finish up with one of your old songs. 3
Second Session
Review the best strum and use it to play your 3
Class Three and Class Five songs.
Review the basic strum and use it to play your 3
Class One and Class Four songs.
Play your Class Seven song. 3
Q: Dan, is it wrong to practice more than three times a week?
A: Was Jimi Hendrix British? Is Eric Clapton female? Is Keith Richards attractive?
73 | N Y C G U I T A R S C H O O L | C L A S S S E V E N

CLASS SEVEN SONGS The Best Strum
since the G-to-c change is so incredibly important
in guitar, why don’t you warm up with some of the same
songs from last week—only this time, try playing the
best strum. Again, songs built on good G-to-C-type
progressions include “Bells Ring” by Mazzy Star, “Boss
D.J.” by Sublime, “Wheat Kings” by The Tragically
Hip, “Every Morning” by Sugar Ray and lots more
which you will probably discover for yourself.
The Best G to C Song Ever[ [ ] ] [ ]1 + 2 = # = 4 = e
“ G \ C ‘
The G-C-G-D progression is closely related to the
chorus to Sam Cooke’s “Another Saturday Night” (capo
II...it was covered by Cat Stevens, too) or the verse to
Van Morrison’s “Brown Eyed Girl” (open). You can also
use it to play “The Lion Sleeps Tonight” (open, The
Tokens and others).
In the Jungle[ [ ] ] [ ]1 + 2 = # = 4 = e
' G \ C \ G \ D ‘
Below is a two part chord progression to practice
your best strums and G to C changes. It is similar to
“Brown Eyed Girl,” so I challenge you to get a copy of
that song and try to adapt the progression to play it.
Brown Eyed Chords
Verse[ [ ] ] [ ]1 + 2 = # = 4 = e
' G \ C \ G \ D \
\ G \ C \ G \ D \
\ G \ C \ G \ D \
\ G \ C \ G \ D \
Chorus
\ C \ D \ G \ Em \
\ C \ D \ G \ D ‘
74 | N Y C G U I T A R S C H O O L | G U I T A R F O R A B S O L U T E B E G I N N E R S

CLASS PRACTICE CHART:
Your teacher will assign you something great to fill in on this page! (If you’re studying this book on your own, then use this page as a worksheet to figure out and write down an entire song you’d like to practice, or just write your own if you prefer.)
|\ \ \ \ \
|\ \ \ \ \
|\ \ \ \ \
|\ \ \ \ \
|\ \ \ \ \
|\ \ \ \ \
|\ \ \ \ \
|\ \ \ \ \
PRACTICE TAB, LICK or RIFF
T A B
W W W . N Y C G U I T A R S C H O O L . C O M 6 4 6 - 4 8 5 - 7 2 4 4
RHYTHM: \ ! + @ + # + $ + \

N Y C G U I T A R S C H O O L | G U I T A R F O R A B S O L U T E B E G I N N E R S
ood guitar players are efficient:
They leave fingers down when
possible. Make a D chord and the
LEAVE YOUR FIRST FINGER
DOWN while you make a new
chord, the A-major chord.
A Major
Ah, the A-major chord. Mike Dulak taught it to me,
back in Moscow, Idaho. Thanks, Mike, for teaching me
my first guitar chord and banjo, too! Note that this is a
five-string chord.
You know A7. You know A minor. And now you know
A major, which is usually just called “A.” You’ve got a lot
of A chords! Did you know that there are many different
ways to finger a chord? For example, many good guitarists
finger an A chord with their fingers in a row. Try it:
Also A Major
This is a legitimate way to finger an A chord. But
it doesn’t give as many pivots or set up as many other
future chord changes.
A year from now, you may use several different finger-
ings for each chord you know. Right now, give yourself
a strong foundation for future guitar playing by using
the first fingering given. Spend a few minutes changing
between D and A leaving your first finger down, with-
out counting. When you start to feel comfortable, add
the best strum.
[ [ ] ] [ ] [ [ ] ] [ ]
1 + 2 = # = 4 = 1 + 2 = # = 4 =
\ D \ A \
A
A
c l A s s
8How Great Guitar Players
Understand Songs~ by Dan Emery of NYC Guitar School ©2009 ~
{ First, decide what song you will play in class 10! }Before Learning How Great Guitar Players Understand
Songs, Learn the Mighty A Chord
76 | N Y C G U I T A R S C H O O L | G U I T A R F O R A B S O L U T E B E G I N N E R S

Good guitar players are efficient: They leave fin-
gers down when possible. Make a D chord and then
slide your first finger on the third string while you
make a new chord, the E-major chord. Your fingertip
will never leave the third string, even though you are
changing frets.
Now change between D and E. Begin with just one
strum per measure, and work up to the best strum. Keep
your first finger down!
[ [ ] ] [ ] [ [ ] ] [ ]1 + 2 = # = 4 = 1 + 2 = # = 4 =
“ D \ E ‘
E
When you are finished with that, try A to E. Begin
with one strum per chord and work up to the best strum
again. Don’t pick up your first finger—instead, slide it
along the third string.
[ [ ] ] [ ] [ [ ] ] [ ]1 + 2 = # = 4 = 1 + 2 = # = 4 =
“ A \ E ‘
This progression is used in lots of songs, including
“Sympathy For The Devil” by the Rolling Stones and
the end of almost every blues song. It is a great progres-
sion for trying out your pivot changes. Leave the first
finger down. Try it out!
“ E \ D \
\ A \ E ‘
Continue Preparing to Understand Songs with the Mighty E Chord with a SLIDING Pivot
How Great Guitar Players Think about Music
Music theory involves perceiving the patterns in mu-
sic. You’ve already done this by noticing that chord pro-
gressions usually happen in sets of four or eight. Now
you will learn to notice even deeper patterns.
Do you remember our “Wild Riff?” Let’s play it a
few times:
1 + 2 + # = 4 = 1 + 2 + # = 4 =“ G i C i \ D i C i ‘
Jimi Hendrix is one of the many great guitarists
who played this riff. Incredibly, he did not think of it as
“G-G-C-C-D-D-C-C.” Instead, he thought of it as a set
of relationships among chords, which in this particular
instance used G, C and D. Whenever he felt like it, he
used completely different chords to play the song, and
it still sounded right, because he kept the relationship
the same. That’s what good guitar players do: They see
structure and relationships in songs where the inexperi-
enced player may see only a set of
random chords.
Go to the circus and you’ll
see lots of parents and kids.
When you look at them,
you’ll immediately identify a
set as “probably a mom, a big
brother, a little sister” for exam-
ple. Later you may learn that The e Major chord
If you ever want to play Johnny Cash songs, you’d better
get good at playing E.
77 | N Y C G U I T A R S C H O O L | C L A S S E I G H T

their names are Miriam, Elijah
and Neoma, and that they are
my family—but you don’t
need to know those specifics
to understand the relation-
ships involved. As a human
you instinctively sense the con-
nections between people. Now
you will learn the relationships
between chords.
Q: Dan, this music-theory stuff sounds hard.
A: And yet, what you will learn today is shockingly easy
given its power and utility.
Begin Learning Music Theory in a Shockingly Easy Manner! Step one: Can you count on your fingers, starting with
your thumb? Try it. Feel free to use the handy guide be-
low. Note that I have used Roman Numerals as well as
Arabic Numerals:
I1
23 4
5
IV
V
iiiii
Step two: Can you say the musical alphabet? It is just like
the regular alphabet, except that there are only seven let-
ters: A, B, C, D, E, F and G. Whenever you get to “G”
you start over with A again. The other wrinkle is that you
can start on any letter. Study the following examples:
The musical alphabet starting with A is
A, B, C, D, E, F, G, A, B, C, D, E, F, etc.
The musical alphabet starting with C is
C, D, E, F, G, A, B, C, D, E, F, G, A, etc.
The musical alphabet starting with G is
G, A, B, C, D, E, F, G, A, B, C, D, E, etc.
Continue Learning Music Theory in a Shockingly Easy Manner!For reasons having to do with the physics of music,
any note is strongly related to the fourth and fifth notes
following it. This is not a random relationship. These
three notes, called the “first note,” the “fourth note”
and the “fifth note” are caused by vibrations which are
mathematically related. They are in harmony with each
other. In other words, they sound good! Practice count-
ing on your hands as follows:
Id
ef G
a
IV
V
iiiii
STarTING WITh d
Ic
de F
G
IV
V
iiiii
STarTING WITh c
Ia
bc d
e
IV
V
iiiii
STarTING WITh a
IG
ab c
d
IV
V
iiiii
STarTING WITh G
The a Major chordThe preferred NYC Guitar
School fingering for an A Major may look convoluted,
but it makes changing to D and E a snap, because you
can use your first finger as a pivot.
78 | N Y C G U I T A R S C H O O L | G U I T A R F O R A B S O L U T E B E G I N N E R S

Songs usually start and end on the same chord.
This chord can be called the “one” chord, and would
be written as a Roman Numeral: I. The other major
chords in the song are almost always the IV and the V
chords. Because the I chord is so important, it is the
key to understanding the song. When somebody says
“étude in the key of A major” or “blues in the key of A”
or “let’s do this one in A” they mean that the I chord
will be the A.
If we want to do a song in the key of A, what will the
other chords be? Refer to the hand above.
In the key of A, the I chord is A, the IV chord is D,
and the V chord is E. In textbooks on music theory, this
is usually shown with a chart. Fill in the rest of the chart.
Feel free to count on your fingers or to refer to the hand
diagrams. You probably don’t know how to play all these
chords. That’s OK.
KEY I Chord IV Chord V Chord
A A D E
C C
D
E
G
Let’s return to Jimi Hendrix and the Wild Riff. Jimi
could play it in the key of G just like us. Play it again.
1 + 2 + # = 4 = 1 + 2 + # = 4 =“ G i C i \ D i C i ‘
But Jimi perceived the chord progression as a rela-
tionship which could be played based on any chord. He
thought of it as:
1 + 2 + # = 4 = 1 + 2 + # = 4 =“ I i IV i \ V i IV i ‘
Because he knew music theory, he then played that
progression starting with any chord he wanted, for ex-
ample, the A chord. So how does this song go in the
key of A? Fill it in, referring to the Key of A chart as
necessary.
KEY I Chord IV Chord V Chord
A A D E
1 + 2 + # = 4 = 1 + 2 + # = 4 =“ I = _ IV = _ \ V = _ IV = _ ‘
Take your time. Refer to the charts, count on your
fingers, and figure out how to transpose (that means
“change”) the wild riff from the key of G to the key
of A. Play it a few times and notice that it definitely
still sounds right; the chords are different but the song
remains the same!
Q: Dan, is this all there is to music theory?
A: No. It just goes on and on and gets more and more
complicated—but so what? I’ve heard that Mozart became
frustrated because he couldn’t understand everything in
a music-theory textbook by the choral music composer
Palestrina. Music theory is endless, just like quantum
physics is endless. But you don’t need to understand the
theory of relativity to know that “what goes up must come
down.” And you don’t need to know jazz chord substitu-
tions or counterpoint harmony to know that A, D and E
79 | N Y C G U I T A R S C H O O L | C L A S S E I G H T

A
C
The SaMe NUMBer!!
Practice Suggestions for Class Eight
This is an important week of practice! You are nearing the end of the course—this is a vital week for
solidifying what you’ve learned so far, so that you can understand new concepts in the final lessons.
First and Third Sessions
Warm up by playing a selection of riffs and licks. 3
Strum through your Class Nine songs. 3
Play your song for Class Ten over and over again. Play it sitting in one 3
chair. Play it sitting in another. Play it singing. Play it without singing. Play
it fast. Play it slow. Then practice it for a friend or relative, or record your-
self playing it, or play it into the mirror!
Second and Fourth Sessions
Warm up with a selection of licks and riffs. 3
Play your song for Class Ten over and over. Play it looking only at your right 3
hand. Play it looking only at your left hand. Play it with your eyes closed.
CONGRATULATIONS ON LEARNING SO MUCH AND PRACTICING SO MUCH!
sound good together! At this point we don’t need to know
about sharps or flats or relative minors or any of a mil-
lion other things. The best thing you can do to prepare to
learn these other concepts later is to pay attention to the
I-IV-V theory that we learned today.
Return to Pivots!Try out one more cool pivot with your new A major
chord. This change is to C, and your second finger re-
mains down. Start with single strums per measure and
work up to the best strum!
80 | N Y C G U I T A R S C H O O L | G U I T A R F O R A B S O L U T E B E G I N N E R S

1 2 3 4 5 6 7
FUNDAMENTAL HABITS OF A GOOD GUITAR PLAYER
Good GUITarISTS KNoW ThaT PLaYING IN rhYThM IS MoST IMPorTaNT!
The secret to playing great rhythm guitar is to move your hand with the beat.
Usually this means: ON the beat, strum DOWN. OFF the beat, strum UP.
Good guitarists are efficient. L eaVe FINGerS doWN WheNeVer PoSSIBLe —PIVoT, PIVoT, PIVoT!
USe YoUr FINGerTIP To FreT NoTeS, aLMoST BUT NoT QUITe oN The FreT.
STrUM eFFIcIeNTLY, USING reST STroKeS.
WheN chaNGING chordS, MoVe The MoST IMPorTaNT FINGer FIrST.
ALWaYS PLaY The oPTIMUM NUMBer oF STrINGS IN a chord.
PerceIVe aNd reMeMBer PaTTerNS IN MUSIc!
81 | N Y C G U I T A R S C H O O L | C L A S S E I G H T

CLASS EIGHT SONGS More Best Strum plus WILD RIFF w/A-D-E
In the key of A, a I-IV progression would be A to
D, which can be found in songs like “All I Want Is
You” by U2 (open) and “In Between Days” by The
Cure (open) What? Just two chords? Yes—these great
songs and many others are written off of just a couple
of chords! After all, the essence of great guitar playing is
not “lots of chords”—the essence of great guitar play-
ing is LOTS OF EXPRESSION. Listen to “All I Want
Is You.” The Edge is playing his heart out with two
chords—he’s strumming them one way, then another.
He’s fingering them this way, then that way. He’s adding
a note. He’s taking a note away. He can do this because
his foundation is so secure—he’s thinking of this song
as a two-chord vamp and then he’s letting his heart take
over. As always, download the song or get the CD so
that you can soak up the feeling of a great guitar player.
Then emulate the feeling. Sure, you don’t know every-
thing that the Edge knows about guitar playing—but
you know how it feels to be alive and to feel deeply…so
play this song like you mean it!
All I Want is A to D
[ [ ] ] [ ]
e
“ A \ D ‘
The next progression will allow you to sing the
“naaaa...naaa...naaa....na na na naaaaa....” part of The
Beatles’ “Hey Jude” (capo V). In open position you
can sing along with the “Seven Bridges Road” by Steve
Young (I’m sure you’ve heard The Eagles’ version, or one
by Dolly Parton, Ian Matthews or FireHouse) and espe-
cially for us guitar players, the verse to Guns and Roses’
“Sweet Child of Mine.” I’m calling the progression
“Sweet Chord Changes” in honor of that song.
Sweet Chord Changes[ [ ] ] [ ]
“ D \ D \ C \ C \
\ G \ G \ D \ D ‘
Improve your A-to-C change with the chord pro-
gression below, which is similar to the chorus of “Sweet
Child of Mine” and the big jam at the end of Lynyrd
Skynyrd’s “Freebird.” Mess around with those songs
open (no capo).
Sweet Chorus Changes[ [ ] ] [ ]
“ A \ C \ D \ D \
\ A \ C \ D \ D ‘
Here’s The Wild Riff again, only in the key of A, us-
ing A, D and E instead of G, C and D.
The Wild Riff[ [ [ [ [ [ [ [1 + 2 + # = 4 + 1 + 2 + # = 4 +
“ A i D i \ E i D i ‘
(Here’s an extra-credit project: The D-C-G-D pro-
gression from the top of the page can be adapted for
“Swingin’” by Tom Petty and The Heartbreakers,
“Time Has Come Today” by The Ramones, and the
chorus to “Angel From Montgomery” by John Prine.
Download one of those songs and see if you can figure
out how to play it!)
82 | N Y C G U I T A R S C H O O L | G U I T A R F O R A B S O L U T E B E G I N N E R S

CLASS PRACTICE CHART:
Your teacher will assign you something great to fill in on this page! (If you’re studying this book on your own, then use this page as a worksheet to figure out and write down an entire song you’d like to practice, or just write your own if you prefer.)
|\ \ \ \ \
|\ \ \ \ \
|\ \ \ \ \
|\ \ \ \ \
|\ \ \ \ \
|\ \ \ \ \
|\ \ \ \ \
|\ \ \ \ \
PRACTICE TAB, LICK or RIFF
T A B
W W W . N Y C G U I T A R S C H O O L . C O M 6 4 6 - 4 8 5 - 7 2 4 4
RHYTHM: \ ! + @ + # + $ + \

N Y C G U I T A R S C H O O L | G U I T A R F O R A B S O L U T E B E G I N N E R S
ixed RhythmsThis lesson continues to build
on your fundamental habit of
locking your hand in with the
beat, even if you are not actually
strumming. Let’s play through each of our massively
useful rhythms for a moment in order to prepare for
mixed rhythms. First, the basic strum:
1 + 2 = 3 + 4 =
\ G \
After you’ve played through the basic strum a few
times, review the best strum:
1 + 2 = # = 4 =
\ G \
Now you are ready to mix these two rhythms togeth-
er. On the first measure you will play the best strum,
smoothly continuing with the basic strum on the second
c l a s s
9RHYTHM 102
—Mixed Rythms and Split Measures~ by Dan Emery of NYC Guitar School ©2009 ~
{— C L A S S T E N N O T E —
If you are inviting guests to Class Ten next week, ask them to come for the last 15-20 minutes of class. They are welcome to wait in the lounge beforehand. (At the discretion and inclination of the
students and teacher, you may wish to spend the bulk of this lesson working on your Class Ten song.) }measure. Remember to keep your hand moving! You
will be playing a different strum pattern on each mea-
sure. Play the following line until you are moderately
comfortable and confident with it. The chord remains
the same—only the strum is changed!
HERE IS THE BEST STRUM HERE IS THE BASIC STRUM
[ [ ] ] [ ] [ [ ] [ [ ]1 + 2 = # = 4 = 1 + 2 = 3 + 4 =
“ G \ G ‘
In a way, this will be easier with a chord change, be-
cause it will be easier to hear the two different patterns.
Try a pivot change for a few times:
HERE IS THE BEST STRUM HERE IS THE BASIC STRUM
[ [ ] ] [ ] [ [ ] [ [ ]1 + 2 = # = 4 = 1 + 2 = 3 + 4 =
“ Em \ G ‘
And now play mixed rhythms with a plant change,
D to G. Here I’ve written the rhythm in notation and
without the pick direction, because you remember that
84 | N Y C G U I T A R S C H O O L | G U I T A R F O R A B S O L U T E B E G I N N E R S

on the beat, your hand moves down, and off the beat
your hand moves up! (In this class you don’t have to
read standard rhythm notation—I just put it in now and
then so it will soak into you by osmosis and help pre-
pare you for the next course.) Play through this change
a bunch of times until you feel comfortable smoothly
repeating the line:
[ [ ] ] [ ] [ [ ] [ [ ]
“ D \ G ‘
Your Sure-Fire Method to Sound Great on Just about Any Songas you know, some measures of music contain two
chords. That means that you will often need to change
chords in the middle of a measure. We can call these
measures split measures because they are split into two
chords. Here is a typical progression:
“ D G \ A7 ‘
What do you do? Well, as a guitarist with ever-greater
understanding and skill, you will soon feel that the pos-
sibilities are infinite. In the meantime, 99 percent of the
time your songs will sound great if you play them with the
best strum, except for split measures, which you’ll handle
with the basic strum. In fact, let’s make a note of this:
A great default arrangement for virtually any
song is to play all one-chord measures with the
best strum, and to play all split measures with
the basic strum.
Let’s give it a shot. The following two measures can
be used to play “La Bamba,” “Twist and Shout” and lots
of other songs. Play through them until you get mod-
estly comfortable. The D will fall right on the “one” and
the G will fall right on the “three”.
HERE IS THE BASIC STRUM HERE IS THE BEST STRUM
[ [ ] [ [ ] [ [ ] ] [ ]1 + 2 = 3 + 4 = 1 + 2 = # = 4 =
“ D G \ A7 ‘
The key, as always, is to keep your hand moving.
Here’s another typical two-measure progression to get
comfortable with. It is the chorus for such songs as
“Imagine” by the Beatles, “Redemption Song” by Bob
Marley and numerous other tunes. I put it down in
rhythm notation.
HERE IS THE BEST STRUM HERE IS THE BASIC STRUM
[ [ ] ] [ ] [ [ ] [ [ ]
“ G \ C D ‘
Good guitarists don’t just bash away at the guitar
with a single uniform strum all the way through a
song. They are expressive and flexible. You will be too.
Remember this:
A great default arrangement for virtually any
song is to play all one-chord measures with the
best strum, and to play all split measures with
the basic strum.
85 | N Y C G U I T A R S C H O O L | C L A S S N I N E

1 2 3 4 5 6 7
FUNdAmENTAL HABITS OF A GOOd GUITAR PLAYER
GOOD GUITARISTS KNOW THAT PLAYING IN RHYTHM IS MOST IMPORTANT!
The secret to playing great rhythm guitar is to move your hand with the beat.
Usually this means: ON the beat, strum DOWN. OFF the beat, strum UP.
Good guitarists are efficient. L EAVE FINGERS DOWN WHENEVER POSSIBLE —PIVOT, PIVOT, PIVOT!
USE YOUR FINGERTIP TO FRET NOTES, ALMOST BUT NOT QUITE ON THE FRET.
STRUM EFFICIENTLY, USING REST STROKES.
WHEN CHANGING CHORDS, MOVE THE MOST IMPORTANT FINGER FIRST.
ALWAYS PLAY THE OPTIMUM NUMBER OF STRINGS IN A CHORD.
PERCEIVE AND REMEMBER PATTERNS IN MUSIC!
86 | N Y C G U I T A R S C H O O L | G U I T A R F O R A B S O L U T E B E G I N N E R S

Practice Suggestions for Class Nine
First Session
Play through your Class Ten song 3
Play lots of other songs. 3
Play your Class Nine song. 3
Second Session
Warm up by playing your small-barre licks, 3then your licks.
Play the progressions below incessantly: 3
HERE IS THE BASIC STRUM HERE IS THE BEST STRUM
[ [ ] [ [ ] [ [ ] ] [ ]1 + 2 = 3 + 4 = 1 + 2 = # = 4 =
“ D G \ A7 ‘
and
HERE IS THE BEST STRUM HERE IS THE BASIC STRUM
[ [ ] ] [ ] [ [ ] [ [ ]1 + 2 = # = 4 = 1 + 2 = 3 + 4 =
“ G \ C A7 ‘
…then play your Class Nine song.
Practice your Class Ten song. 3
Third Session
Play your song for Class Ten repeatedly. 3
Play your Class Nine song. 3
Finish with The Wild Riff. 3
87 | N Y C G U I T A R S C H O O L | C L A S S N I N E

CLASS NINE SONGS Mixed Rhythms and Split Measure
Redemption Chords
[ [ ] ] [ ]1 + 2 = # = 4 = e
' G \ Em \ C \ Am \
\ G \ Em \ C \ Am \
\ G \ Em \ C \ Am \
\ G \ Em \ C \ D \ D \
[ [ ] ] [ ] [ [ ] [ [ ]1 + 2 = # = 4 = 1 + 2 = 3 + 4 = e
\ G \ C D \ G \ C D \
\ Em \ C D \ G \ C D ‘
congratulations! You now have the chords and
strums to have fun and sound good on a large propor-
tion of rock, pop, folk, country, you-name-it guitar
songs. As you put together your one-chord-per-measure
best strum with your split-measure variant on the basic
strum, there will be no stopping you!
Incredible quantities of songs are built off of a two-
bar pattern like the one below, with the first measure
split between G and C followed by a full measure of
D, including “Twist and Shout” by The Isley Brothers
(The Beatles cover is more well known), “La Bamba”
by Ritchie Valens, “Make Me Lose Control” by Eric
Carmen and “Stand” by R.E.M.
[ [ ] [ [ ] [ [ ] ] [ ]1 + 2 = 3 + 4 = 1 + 2 = # = 4 =
“ G C \ D ‘
Play the same chords in the same order, but with
a full measure of G and a split measure of C and D
and you have the harmony behind “Come On Let’s
Go” (once again by Ritchie Valens) and the choruses to
“Redemption Song” by Bob Marley and “Imagine” by
John Lennon.
[ [ ] ] [ ] [ [ ] [ [ ]1 + 2 = # = 4 = 1 + 2 = 3 + 4 =
“ G \ C D ‘
Here’s a more complicated progression for you,
mixing best strums and basic strums, in the style of
“Redemption Song.”
88 | N Y C G U I T A R S C H O O L | G U I T A R F O R A B S O L U T E B E G I N N E R S

CLASS PRACTICE CHART:
Your teacher will assign you something great to fill in on this page! (If you’re studying this book on your own, then use this page as a worksheet to figure out and write down an entire song you’d like to practice, or just write your own if you prefer.)
|\ \ \ \ \
|\ \ \ \ \
|\ \ \ \ \
|\ \ \ \ \
|\ \ \ \ \
|\ \ \ \ \
|\ \ \ \ \
|\ \ \ \ \
PRACTICE TAB, LICK or RIFF
T A B
W W W . N Y C G U I T A R S C H O O L . C O m 6 4 6 - 4 8 5 - 7 2 4 4
RHYTHM: \ ! + @ + # + $ + \

N Y C G U I T A R S C H O O L | G U I T A R F O R A B S O L U T E B E G I N N E R S
c l a s s
10Review and Show!~ by Dan Emery of NYC Guitar School ©2009 ~
{ C O N G R A T U L A T I O N S ! ! }ongratulations. If you prac-
ticed several times a week over the
past two and a half months then
you are a significantly improved
guitar player. You know the most
commonly used chords in guitar, you can strum on and
off the beat, you can read chord diagrams and tabla-
ture, you can play songs, licks and riffs, you can play
several of the most important strum patterns in guitar...
you have made a tremendous amount of progress,
and you deserve to be proud.
I’m writing these words in the Borders bookstore
near Madison Square Garden…my table is littered with
empty coffee cups, and I’ve just finished proofing the
final layout of this guitar manual, so I’m feeling a sense
of accomplishment, too.
I’m pondering the effect of little steps over time. A
finished book begins with a few words, and over time,
repeated sessions of writing result in what to me is a
bit of a miracle—a finished book! And every capable
and confident guitar player began as a novice guitar
player who knew nothing, but kept playing. Like you.
Good job!
At your teachers discretion you may just go right on
to get some last minute practice in on your Class Ten
performance song. Otherwise, let’s review your massive
array of new-found guitar skills.
CongRatulationS! You Know the Most Essential guitar Chords.
D
G
A7
Em
90 | N Y C G U I T A R S C H O O L | G U I T A R F O R A B S O L U T E B E G I N N E R S

CongRatulationS! Rhythm is Most important, and You’ve learned a lot of Rhythm!
THE ALTERNATE STRUM:
[ ] [ ] [ ] [ ]1 = 2 = 3 = 4 = e
“ D A7 \ G A7 ‘
RIFFING:
The WILD Riff!
[ [ [ [ [ [ [ [1 + 2 + # = 4 + 1 + 2 + # = 4 +
“ G G C C \ D D C C ‘
THE BASIC STRUM:
[ [ ] [ [ ] [ [ ] [ [ ]1 + 2 = 3 + 4 = 1 + 2 = 3 + 4 =
“ D \ G ‘
THE BEST STRUM:
[ [ ] ] [ ] [ [ ] ] [ ]1 + 2 = # = 4 = 1 + 2 = # = 4 =
“ G \ C ‘
MIXED RHYTHMS AND SPLIT MEASURES:
HERE IS THE baSIc STRUM HERE IS THE bEST STRUM
[ [ ] [ [ ] [ [ ] ] [ ]1 + 2 = 3 + 4 = 1 + 2 = # = 4 =
“ D G \ A7 ‘
HERE IS THE bEST STRUM HERE IS THE baSIc STRUM
[ [ ] ] [ ] [ [ ] [ [ ]1 + 2 = # = 4 = 1 + 2 = 3 + 4 =
“ G \ C A7 ‘
And how about all your vital habits?
Are there more chords? Yes, but you can play thou-
sands of songs with the chords you know. These chords
are the most commonly used chords in guitar…and
every future chord will be “another chord” instead of
“the first chord.”
To MASTER GUITAR PLAYING YoU MUST PLAY YoUR GUITAR!
C
D7
Am
A
E
91 | N Y C G U I T A R S C H O O L | C L A S S T E N

1 2 3 4 5 6 7
FUNdAmENTAL HABITS OF A GOOd GUITAR PLAYER
GOOD GUITaRISTS KNOW THaT PLaYING IN RHYTHM IS MOST IMPORTaNT!
The secret to playing great rhythm guitar is to move your hand with the beat.
Usually this means: ON the beat, strum DOWN. OFF the beat, strum UP.
Good guitarists are efficient. L EaVE FINGERS DOWN WHENEVER POSSIbLE —PIVOT, PIVOT, PIVOT!
USE YOUR FINGERTIP TO FRET NOTES, aLMOST bUT NOT QUITE ON THE FRET.
STRUM EFFIcIENTLY, USING REST STROKES.
WHEN cHaNGING cHORDS, MOVE THE MOST IMPORTaNT FINGER FIRST.
ALWaYS PLaY THE OPTIMUM NUMbER OF STRINGS IN a cHORD.
PERcEIVE aND REMEMbER PaTTERNS IN MUSIc!
92 | N Y C G U I T A R S C H O O L | G U I T A R F O R A B S O L U T E B E G I N N E R S

Practice accurately. 3 Festina Lente (“hurry slowly”). When you practice guitar,
practice accurately to create correct patterns in your mind and body.
Practice guitar regularly! 3
The heights by great men reached and kept,
Were not attained by sudden flight.
But they, while their companions slept,
Were toiling upwards in the night.
Practice effectively. “If something is worth doing, it is worth doing well.” 3
Pay attention to what you are doing.
to Practice guitar or anYtHing Successfully:
Dear NYC Guitar School Student—
Congratulations on completing Guitar for Absolute Beginners at NYC Guitar School. In order to finish
this class, you’ve needed to fulfill a commitment to yourself to attend class and to practice. This is a big
accomplishment as a guitar player and as a human.
In this class you learned the fundamental habits, chords and rhythms of a good guitar player. You can
build on this knowledge over a lifetime of playing. If you would like more formal study we would be
privileged to continue helping you in your progress. The next class, Guitar for Near Beginners, covers the
fundamentals of expression and tone, as well as adding more rhythms, chords and songs.
Thank you for taking a class at NYC Guitar School. Your teacher, our entire staff and I appreciate the
opportunity to be part of your life.
Congratulations on deciding to PLAY GUITAR!
Sincerely,
Dan Emery
Founder, New York City Guitar School
93 | N Y C G U I T A R S C H O O L | C L A S S T E N

CLASS PRACTICE CHART:
Your teacher will assign you something great to fill in on this page! (If you’re studying this book on your own, then use this page as a worksheet to figure out and write down an entire song you’d like to practice, or just write your own if you prefer.)
|\ \ \ \ \
|\ \ \ \ \
|\ \ \ \ \
|\ \ \ \ \
|\ \ \ \ \
|\ \ \ \ \
|\ \ \ \ \
|\ \ \ \ \
PRACTICE TAB, LICK or RIFF
T A B
W W W . N Y C G U I T A R S C H O O L . C O m 6 4 6 - 4 8 5 - 7 2 4 4
RHYTHM: \ ! + @ + # + $ + \

CANDID PHOTO OF THE AUTHOR, DAN EMERYHere I am with the tools of my trade—
guitar, dry erase marker and white board. I really enjoy teaching guitar.
Want More?Visit New York City Guitar School.
Take the 1 2 or 3 to Penn Station or the BDNQRVWPATH to Herald Square. Walk downtown to 30th Street.
We’re on the 11th floor of the Recording and Rehearsal Arts Building at
251 West 30th Street, between 7th and 8th Avenue.
Come on by!
View a complete schedule of upcoming classes on
the web at www.NYCGuitarSchool.com.
Click on the “Resources” link for lesson videos and
song examples that go along with this book.
For more books and special pricing for teachers and schools, contact Jen
at [email protected] or call 646-485-7244.