gx300 - gme australia · the gme gx300 is a 27 mhz am radio that combines both marine and citizens...
TRANSCRIPT

27 MHz MARINE AND CB RADIO
GX300
I N S T R U C T I O N M A N U A L
12 p/p folded once to 148 x 210 mm stitched with 2 wires
Print CMYK on 130 gsm gloss art
The GX300 is a radio transmitting device.
•Whentransmitting,keeptheantennamorethan25 mm from any part of the head or body.
•Donottransmitnearelectricalblasting equipment or in explosive atmospheres.
•Donotallowchildrentooperatearadiotransmitter unsupervised.
SAFETY INFORMATION.............................................. 2
INTRODUCTION ........................................................ 2
FEATURES ................................................................. 3
SWITCHINGBETWEENMARINEANDCBBANDS ....... 3
CONTROLS ................................................................ 3
OPERATION-GENERALFUNCTIONS ......................... 4
Volume on/off ................................................... 4
Squelch Control ................................................. 4
Channel Selection .............................................. 4
DisplayBrightness ............................................. 4
Transmitting ...................................................... 4
Noise Limiter ..................................................... 5
Scanning ........................................................... 5
OPERATIONINTHEMARINEMODE ........................... 5
Channel 88 ....................................................... 5
Channel 88 Switch ............................................ 5
DualWatch(MarineMode) ................................ 5
MarineBandProcedures .................................... 6
Emergency Procedures ....................................... 6
Marine Channel Assignments ............................. 6
OPERATIONINTHECBMODE ................................... 6
Priority Channel ................................................. 6
DualWatch(CBMode) ...................................... 6
27MHzChannelAssignments ........................... 7
INSTALLATION .......................................................... 8
General ............................................................. 8
InstallingtheUnit .............................................. 8
DCConnections ................................................. 8
Antenna Installation .......................................... 9
Noise Suppression ............................................. 9
DisconnectingtheMicrophone ........................... 9
SPECIFICATIONS ..................................................... 10
SCCONTRACTWARRANTYAGAINSTDEFECTS ........ 11
CONTENTS
PAGE2 INSTRUCTIONMANUAL GX300
WARNING: SAFETY INFORMATION
Congratulations. You have just purchased one of the most technicallyadvanced27MHzradiosintheworld.
TheGMEGX300isa27MHzAMradiothatcombinesbothMarineandCitizensBandfunctionsintotheoneradio.TheGX300hasanumberofenhancedfeaturesincludingfullyuserprogrammableChannelScanning,Channel88selection(marinemode),Prioritychannel(CBmode)andbacklitLiquidCrystalDisplaywithdimmingfunction.
WithitscompactsizeandIP55*designitcaneasilybeinstalled into almost any mounting location in your motor vehicle,motorcycleorboat.
Please read this manual thoroughly to ensure you get the bestfromtheGX300’sfeatures.
ForusersinNewZealand,SouthAfricaorP.N.G.pleaserefertoamendmentforlocalfrequencies,channelallocationsandlicensing requirements.
INTRODUCTION
GX300 INSTRUCTIONMANUAL PAGE3
FEATURES
• IngressprotectiontoIP55*
• LCDdisplaywithlampdimmingfunction
• Rotary squelch control
• Channel scanning with memory
• Advancednoiselimiter(NL)circuitry
• Surface mount technology
• UserselectionofAustralian27MHzmarine or27MHzCBchannels.
• Provision for up to 10 private channels (GMEprogrammableoptiononly)
• Channel 88 safety channel for marine application
• PrioritychannelforCBapplication
*Refer:http://www2.gme.net.au/IPRatings
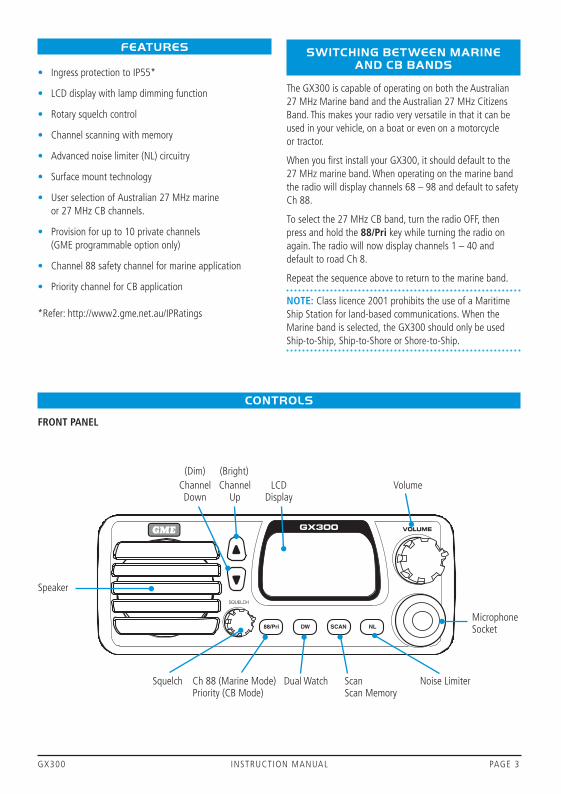
Channel Channel LCD Volume Down Up Display
Microphone Socket
Speaker
CONTROLS
FRONT PANEL
TheGX300iscapableofoperatingonboththeAustralian27MHzMarinebandandtheAustralian27MHzCitizensBand.Thismakesyourradioveryversatileinthatitcanbeusedinyourvehicle,onaboatorevenonamotorcycle or tractor.
WhenyoufirstinstallyourGX300,itshoulddefaulttothe27MHzmarineband.Whenoperatingonthemarinebandthe radio will display channels 68 – 98 and default to safety Ch 88.
Toselectthe27MHzCBband,turntheradioOFF,thenpress and hold the 88/Prikeywhileturningtheradioonagain. The radio will now display channels 1 – 40 and default to road Ch 8.
Repeat the sequence above to return to the marine band.
NOTE: Class licence 2001 prohibits the use of a Maritime ShipStationforland-basedcommunications.WhentheMarinebandisselected,theGX300shouldonlybeusedShip-to-Ship,Ship-to-ShoreorShore-to-Ship.
SWITCHING BETWEEN MARINE AND CB BANDS
Squelch Ch88(MarineMode) Priority(CBMode)
DualWatch Scan Scan Memory
Noise Limiter
(Dim) (Bright)

VOLUME ON/OFF
Rotate the volumecontrolclockwisepastthe‘click’toturntheGX300ON.Continuetoadvancethecontrolclockwiseto increase the volume. Rotate the control counter-clockwisetoturntheradioOFF.
NOTE: Atminimumvolumesettingthereisstillsufficientvolume to be heard in a quiet cabin environment.
SQUELCH CONTROL
Thesquelchcontrolisusedtoeliminatethebackgroundnoise when there are no signals present. To adjust the squelch,firstrotateitfullycounter-clockwiseuntilthebackgroundnoiseisheard,thenslowlyrotateitclockwiseuntil the noise just disappears. If there are signals on the channel,youshouldwaituntilthechannelisclearbeforeadjustingthesquelch(orselectaquietchannel).
Onceadjusted,thereceiverwillremainquietaslongastherearenosignalspresent,butanincomingsignalwilloverridethesquelchandbeheardinthespeaker.Asthecontrolisadvancedfurtherclockwisethesquelchactionisprogressively increased and stronger incoming signals are neededtooverrideit.Toreceiveveryweaksignalsortodisablethesquelch,simplyturnthecontrolfullycounter-clockwise.
CHANNEL SELECTION
Select the required channel by briefly pressing the or keys.TheselectedchannelisdisplayedontheLCDdisplay.Pressandholdeitherkeytoquicklyadvanceupwardsordownwardsthroughthechannels.Releasethekeywhenthe required channel is displayed.
DISPLAY BRIGHTNESS
TheLCDhastwobrightnesslevelstoprovidesuitable lighting for day or night use. The default setting is bright.
To select the ‘Dim’ setting
Press and hold the Channel Downkeywhileturningtheradio ON. Minimum brightness will be selected.
To select the ‘Bright’ setting
Press and hold the Channel UpkeywhileturningtheradioON. Full brightness will be selected.
The selected brightness level will be retained in memory.
TRANSMITTING
Totransmit,pressthePTTbuttononthemicrophone.Holdthe microphone 2-6 cm from your mouth and slightly to one side so your voice does not project directly into the microphone.Speakatanormalvoicelevel.YourGX300has
PAGE4 INSTRUCTIONMANUAL GX300
REAR PANEL
OPERATION - GENERAL FUNCTIONS
Transmit Indicator Channel Number
Channel in Scan Memory
Noise Limiter Selected
Scan SelectedDualWatchSelected
Priority Channel Selected
Safety Channel Selected
BusyIndicator
88 Key Selected
DISPLAY
MICROPHONE
ChannelUpChannelDownPTT Switch
CH88/PriorityChannel
AntennaSocket DCLead ExternalSpeaker Socket

GX300 INSTRUCTIONMANUAL PAGE5
a build-in speech processor which automatically controls the level of your transmitted voice. It is not necessary to raise your voice or shout into the microphone.
NOISE LIMITER
The NLkeyactivatesanextremelyeffectivenoiselimitercircuit which helps to eliminate most electrical impulse interference caused by engine ignition systems etc. This allowsclearerreceptionofweaksignalsevenundernoisyelectrical conditions.
WhentheNLkeyisselected,‘NL’isdisplayedontheLCD.
SCANNING
TheGX300isfittedwithaScanfunctionthatallowsagroup of user selected channels to be scanned for activity. YourGX300hasascanmemorywhichrememberswhichchannelsyouwouldliketoscan.BydefaultyourGX300issupplied with all channels in the scan memory.
To see which channels are presently in the scan memory
Select each channel one by one using the or keyandchecktoseeif‘M’isdisplayedtothelowerrightofthechannel number.
If‘M’isdisplayed,thechannelisinthescanmemory,otherwise the channel is not in the scan memory.
To Add or Remove a channel from the scan memory
Selecttherequiredchannel,thenpressandholdtheSCAN keyuntilabeepisheard.If‘M’appearstothelowerrightofthechannelnumber,thechannelhasbeenaddedtothescanmemory,otherwiseithasbeenremoved.
To scan
Adjust the squelchcontrolsotheradioisquiet,thenbrieflypress the SCANkey.Ahighbeepwillbeheard,‘SCAN’willappear in the display and the channel numbers will change rapidlyastheradiobeginsscanning.Ifasignalisfound,the radio will pause on that channel and will remain there as long as the channel remains busy. Once the channel has beenclearfor5seconds,scanningwillresume.
NOTE: you must have at least two channels programmed intothescanmemoryotherwisetheradiowon’tscan.
To change the scan direction
Press the or key.Theradiowillscaninthedirectionoftheselectedchannelkey.
To skip over a busy channel and resume scanning
Brieflypressthe or key.Scanningwillresume.
To transmit on a busy channel
Waitforabreakintheconversation,thenpressthePTT switch. The radio will exit the scan mode and stay on the channel allowing you to communicate with others on that channel.
To resume scanning briefly press the SCANkeyagain.
NOTE: If the PPTispressedwhiletheradioisscanning,itwill be ignored and a low beep will be heard when the PPT is released.
To exit the Scan mode manually
BrieflypresstheSCANkey.‘SCAN’willdisappearfrom the display.
NOTE: Excessive noise on a channel can cause the scanner to pause on that channel even if there is no signal there. If thisonlyhappensononechannel,youmayneedtoremovethat channel from the scan memory. If it happens on all channels,youshouldtryincreasingthesquelchsetting.
OPERATION IN THE MARINE MODE
CHANNEL 88
Channel88isthedesignated27MHzmarinesafetychannel and in many areas is monitored by coastal-watch andrescueorganizationsforemergencyandsafetypurposes.WhenChannel88isselected,‘SAFETY’isdisplayedontheLCD.
Whenmakingradiocalls,youshouldmakeinitialcontacton Channel 88 then switch to another channel to continue your conversation. This leaves Channel 88 free for other calls or emergencies.
CHANNEL 88 SWITCH
YourGX300hasadedicatedChannel88keytoallowinstantaccesstoChannel88.PressingthiskeycancelsallotherfunctionssuchasScanorDualWatchandtakesyoustraighttoChannel88.WhenChannel88isselectedbythe88key,‘CH88’isdisplayedontheLCD.Themanual or keysaredisabledinthismode.
To return to normal channel operations briefly press the 88 keyagain.‘CH88’willdisappearfromthedisplayandtheradio will return to the previously selected channel.
DUAL WATCH (MARINE MODE)
DualWatchintheMarinemodeallowsyourGX300tomonitor both Channel 88 and another selected channel byquicklyswitchingbetweenthem.Anysignalsreceived onChannel88takeprecedenceoversignalsonthe selected channel.

TousetheDualWatchfeature,adjustthesquelch control sotheradioisquiet,selectyourpreferredworkingorclubchannel then press the DWkey.‘DW’willappearonthedisplay and the channel display will alternate between your selected channel and Channel 88.
Ifasignalisreceivedonyourselectedchannel,theradiowill pause on that channel but will continue to switch to Channel 88 every 2 seconds and a brief interruption to the signalwillbenoticed.Oncethesignalhasgone,normalDualWatchswitchingwillresume.
IfasignalappearsonChannel88atanytime,theradiowillstop switching and will remain on Channel 88 for as long asthesignalispresent.Oncethesignalhasgone,normalDualWatchswitchingwillresume.
NOTE: If you press the PTTswitchwhileDualWatchisselected,yourGX300willtransmitontheselectedchannel.IfyouwishtotalkonChannel88,pressthe88keytocanceltheDualWatchandswitchstraighttoChannel88.
MARINE BAND PROCEDURES
Most calls to other vessels or stations are made on Channel 88.AfterlisteningtoensureChannel88isclear,calltheotherstation,repeatingbothcallsignsthreetimes.
e.g.“CoastGuard,CoastGuard,CoastGuard. Thisis–SeaSpray,SeaSpray,SeaSpray Over”
Oncecontacthasbeenestablished,movestraighttoanotherchannel(e.g.91or94)tocontinueyourconversation,leavingChannel88clearforemergenciesorfurthercalls.Don’tforgettoreturntoChannel88whenyouhavefinished(orselectDualWatchonyourradio)otherwiseyou may miss other calls meant for you.
EMERGENCY PROCEDURES
All emergency calls should be made on Channel 88. There are three main types of emergency call.
1. “MAYDAY, MAYDAY, MAYDAY”
This call should be used when you are in grave or imminent danger and require immediate assistance. You should call MAYDAYthreetimesfollowedbyyourvessel’snameorcallsignthreetimes.Thenstateyourposition,abriefdescriptionofyourvessel,thenatureoftheemergency,thenumberofpeopleonboardandtheircondition.Ifyouhearnoreply,repeat the call at short intervals because someone may be able to hear you but you might not be able to receive their reply.
Aftercontacthasbeenmade,followanyinstructionsgivento you.
2. “PAN, PAN, PAN”
Usethiscallwhenanemergencysituationexistsbutthereis no immediate danger. The call should be made in the samewayastheMAYDAYcall.Ifyouhearnoreply,repeatthe call at regular intervals.
3. “SECURITE, SECURITE, SECURITE” (Pronounced Say-cure-e-tay)
Thiscallisusedtowarnshippingofdangersorhazards,e.g.badweather,containeradriftetc.Thecallmaybemadetoalocal monitoring station or to all ships in the area.
MARINE CHANNEL ASSIGNMENTS
Channel Frequency Use
68 27.680MHz Commercial,ship-shore-ship
72 27.720MHz Professional Shipping
82 27.820MHz Professional Shipping
86 27.860MHz Secondary distress and safety
88 27.880MHz Primary distress and safety
90 27.900MHz Domesticship-shore-ship
91 27.910MHz Domesticship-shore-ship
94 27.940MHz Clubevents,ship-shore-ship
96 27.960MHz Ship to ship
98 27.980MHz Rescue organisations
OPERATION IN THE CB MODEPRIORITY CHANNEL
The Priority channel is preset to road Channel 8 allowing it tobeinstantlyrecalledatthepressofakey.
To use the Priority channel
Simply press the 88/Prikeyatanytime.Theradiowilljump straight to the road Channel 8. If Scan or DW was selected,theywillbecancelled.
To return to the previously selected channel
Press the 88/Prikeyagain.
DUAL WATCH (CB MODE)
DualWatchinCBmodeallowsyourGX300tomonitorboth the Priority channel and another selected channel by quicklyswitchingbetweenthem.AnysignalsreceivedonthePrioritychanneltakeprecedenceoversignalsontheselected channel.
TousetheDualWatchfeature,adjustthesquelch control sotheradioisquiet,selectyourpreferredchannelusingtheChannel Up/DownkeysthenpresstheDWkey.‘DW’will
PAGE6 INSTRUCTIONMANUAL GX300

GX300 INSTRUCTIONMANUAL PAGE7
appear on the display and the channel display will alternate between your selected channel and the Priority channel.
Ifasignalisreceivedonyourselectedchannel,theradiowill pause on that channel but will continue to switch to the Priority channel every 2 seconds and a brief interruption tothesignalwillbenoticed.Oncethesignalhasgone,normalDualWatchswitchingwillresume.
IfasignalappearsonthePrioritychannelatanytime,theradio will stop switching and will remain on the Priority channel for as long as the signal is present. Once the signal hasgone,normalDualWatchswitchingwillresume.
NOTE: If you press the PTTswitchwhileDualWatchisselected,yourGX300willtransmitontheselectedchannel.IfyouwishtotalkonthePrioritychannel,pressthe88/PrikeytocanceltheDualWatchandswitchstraighttothePriority channel.
27 MHz CHANNEL ASSIGNMENTS
Channel Frequency Suggested Usage
1 26.965MHz GeneralAM
2 26.975MHz GeneralAM
3 26.985MHz GeneralAM
4 27.005MHz GeneralAM
5 27.015MHz GeneralAM
6 27.025MHz GeneralAM
7 27.035MHz GeneralAM
8 27.055MHz GeneralAM(2)
9 27.065MHz Emergency(1)
10 27.075MHz GeneralAM
11 27.085MHz Call Channel
12 27.105MHz GeneralAM
13 27.115MHz GeneralAM
14 27.125MHz GeneralAM
15 27.135MHz GeneralAM
16 27.155MHz GeneralUse
17 27.165MHz GeneralUse
18 27.175MHz GeneralUse
19 27.185MHz GeneralUse
20 27.205MHz GeneralUse
21 27.215MHz GeneralUse
22 27.225MHz GeneralUse
27 MHz CHANNEL ASSIGNMENTS
Channel Frequency Suggested Usage
23 27.255MHz GeneralUse
24 27.235MHz GeneralUse
25 27.245MHz GeneralUse
26 27.265MHz GeneralUse
27 27.275MHz GeneralUse
28 27.285MHz GeneralUse
29 27.295MHz GeneralUse
30 27.305MHz GeneralUse
31 27.315MHz GeneralUse
32 27.325MHz GeneralUse
33 27.335MHz GeneralUse
34 27.345MHz GeneralUse
35 27.355MHz GeneralUse
36 27.365MHz GeneralUse
37 27.375MHz GeneralUse
38 27.385MHz GeneralUse
39 27.395MHz GeneralUse
40 27.405MHz GeneralUse
(1)LegallyDesignated(2)SuggestedRoadChannel

GENERAL
It is advisable to spend a little time selecting the best locationforyourGX300.Themountingbracketcanberotatedabove,beloworbehindtheradioenablingtheradiotobemountedinawiderangeoflocations.Inaddition,anoptionalflushmountingkitallowstheradiotobeflushmounted in a panel or dashboard.
Keep the following points in mind when choosing a location
• TheGX300isdesignedtomeetIP55*standard.Werecommendedyouselectalocationthatwillminimise excessive exposure to continuous rain or spray.
• Selectalocationthatwon’texposeyourradioto continuous direct sunlight which could cause overheating.
• Ensurethelocationallowsafreeflowofairaroundtheheatsinkonthebackoftheradio.
• Themicrophoneandallcontrolsshouldbereadilyaccessibleandtheloudspeakereasilyheardfromthe normal steering or driving position. An extension speakercanbeinstalledifrequired.
• Componentsandcurrentsintheradiocreatemagneticfields.Toavoidinterferencetocompasses,shipsautopilotsensorsetc,theGX300shouldbemounted at least 300 mm from such devices.
INSTALLING THE UNIT
Afterchoosingalocation,holdtheunitwiththemountingbracketattached,tothedesiredpositionandmarkthelocationwithapencil.Removethemountingbracketfromtheradioanddrillthemountingholes.Boltorscrewthebracketinplaceusinghardwaresuitableforthemountingsurface.Theunitissuppliedwithstainlesssteelscrews,however,ifthemountingsurfaceisunsuitableforscrews
you may need to replace these with stainless steel bolts. Rememberthefixingsforoverheadmountedunitsmayhave to withstand heavy pounding when a vessel is in rough water or being towed on a trailer or the vehicle is on rough road.
DC CONNECTIONS
ConnecttheREDpowerleadtothePositive(+)sideofthebatteryortoanaccessorypointinthevesselorvehicle’sfuse box.
ConnecttheBLACKpowerleadtotheNegative(-)sideofthe battery or to a ground point in your vessel or vehicle.
NOTE: TheDCconnectorisnotwaterproof.Ifinstalledin anexposedlocation,theconnectorshouldbeprotectedwith waterproof tape to prevent water ingress.
IMPORTANT: TheREDpowerleadisfittedwitha2Ampfuse.Ifthefuseblows,useonlyastandard2Amp(3AG)fuseasareplacement.Useofahigherratedfuseoraslow-blow type could result in damage to your radio which would void the warranty.
Ifrequired,anextensionspeakermaybeinstalledtoimprove sound levels in noisy environments or in locations further away from the steering or driving position. For locations exposed to water we recommend the SPK45 whichwillfitthesuppliedadaptorthatconnectstotheextensionspeakersocketontherearoftheradio.
*Refer:http://www2.gme.net.au/IPRatings
PAGE8 INSTRUCTIONMANUAL GX300
FlushMounting(OptionalMK001W/B flushmountingkitavailable)
Panel Mounting Overhead Mounting UprightMounting
INSTALLATION

GX300 INSTRUCTIONMANUAL PAGE9
ANTENNA INSTALLATION
Itisessentialtoselectagoodquality,highefficiency, 27MHzantenna.Apoorqualityantennaoronenotdesignedforthespecificfrequencybandyouareusing will give very poor performance.
SincetheGX300iscapableofbeingswitchedbetweenthe27MHzmarineandthe27MHzCBbands,itisimportant to connect an antenna suitable for the band youhaveselected.Becauseeachbandisinadifferentpartofthefrequencyspectrumitisn’tpossibletohaveasingleantennathatwillworkwellonbothbands.Youwilltherefore need to select a suitable antenna to suit the band you have selected.
GMEhaveahugerangeofsuitable27MHzCBand27MHzmarineantennastosuitmostinstallationsandapplications.Werecommendyoucontactyourlocaldealerfor advice.
Connecttheantennacabletotherearantennasocketusinga PL259 coaxial connector.
NOTE: The antenna connector is not waterproof.
NOISE SUPPRESSION
27MHzmarineandCBradiocanbepronetoelectricaland ignition interference. The reason is that electrical noise is a form of AM transmission similar to that used by your radioandyourradio’sreceiverisverysensitive.Inmostcases,ignitionnoisecanbegreatlyreducedoreliminatedby selecting the Noise Limiter (NL)keyontheradio.Insomeseverecases,additionalsuppressionmayneedtobefittedtotheignitionsystemofyourvesselorvehicle,inwhich case we recommend you consult an auto or marine electricianforadvicespecifictoyourinstallation.
Higherfrequencyelectricalinterferencecausedbyelectricmotors and bilge pumps can be suppressed directly at the motor terminals. Electronic interference caused by other electronicdevicessuchasfishfindersisbestminimizedbykeepingtheunits,includingallwiringandcables,separatefromyourGX300.
DISCONNECTING THE MICROPHONE
It is recommended that the microphone be left permanently connectedtotheGX300,butifitmustbedisconnected,proceedasfollows:
1. Insert a small screwdriver between the rubber boot and the lip of the raised area on the front panel.
2. Ease the rubber boot out of the cable entry hole and slide it along the cable away from the front panel.
3. Identifythepluglockinglever,workthescrewdriverblade behind it and move the lever towards the plug body. At the same time gently pull the plug from the socket(seediagrambelow).
Ifrequired,replacementmicrophonesareavailablewithplugandrubberbootalreadyfitted.
ExtensionSpeaker (optional)
27MHzAntenna
Fuse
Black- Red+
GX300 12 Volt Battery
Cable
Screwdriver
Lockinglevermove to left to release plug
Cable entry hole

ELECTRICAL
General
Complies with: AS4367 and AS/NZS4355(Australiaonly)
Frequency Range: 26.965-27.980MHz
Channel Set: Australian27MHzmarine Australian27MHz
CitizensBand
Modulation: AM(A3E)
Supply Voltage: •12.6VDCnominal •10.8–15.2VDCrange
Frequency Error: < 50 ppm over temperature range
Dual Watch: Monitor Time - 250 ms Monitor Period - 2 seconds
Scan Rate: 5 channels/second
Transmitter
Modulation Frequency Response: 300Hzto3kHz,+1-3dB Max Modulation Depth: 100%
Carrier Output Power: 4 watts max
Microphone Level @1 kHz for 60% Modulation: 1 Pa
Spurious Emissions: <-26dBm
Receiver
Demodulated Frequency Response: 300Hzto3kHz,+1-3dB
Receive Sensitivity for 12 dB SINAD @ 30% Modulation: -110dBm
Max Squelch: <-80dBm
Adjacent Channel Sensitivity: ≥55dB
Spurious Response Immunity: ≥55dB
Conducted Spurous Radiation: -57dBm
Audio Output Power 8 Ohms: 2.5Watts
MECHANICAL
Dimensions: 65(H)x167(D)x55(W)mm
Weight: 450 grams
ENVIRONMENTAL
Temperature Range: -10°Cto+60°C
Ingress Protection Rating: IP55
Refer:http://www2.gme.net.au/IPRatings
TheGX300willoperateoverthe26-30MHzfrequencyrange.ForinformationspecifictofrequenciesoutsideoftheAustralianmarineorCBbands,pleaserefertotheappropriateamendment,orcontactGMEat [email protected]
SPECIFICATIONS
Specificationsaretypicalunlessotherwiseindicatedandmaybesubjecttochangewithoutnoticeorobligation.
PAGE10 INSTRUCTIONMANUAL GX300
GX300 INSTRUCTIONMANUAL PAGE11
This warranty against defects is given by Standard CommunicationsPtyLtdACN000346814(We,us,ourorGME).Ourcontactdetailsaresetoutinclause2.7.Thiswarranty statement only applies to products purchased in Australia.PleasecontactyourlocalGMEdistributorforproducts sold outside of Australia. Local distributor details at www.gme.net.au/export.
1. Consumer guarantees
1.1 Our goods come with guarantees that cannot be excluded under the Australian Consumer Law. You are entitled to a replacement or refund for a major failure and for compensation for any other reasonably foreseeable loss or damage. You are also entitled to have the goods repaired or replaced if the goods fail to be of acceptable quality and the failure does not amount to a major failure.
1.2Totheextentweareable,weexcludeallotherconditions,warrantiesandobligationswhichwouldotherwise be implied.
2. Warranty against defects
2.1Thiswarrantyisinadditiontoanddoesnotlimit,exclude or restrict your rights under the Competition andConsumerAct2010(Australia)oranyothermandatory protection laws that may apply.
2.2Wewarrantourgoodstobefreefromdefectsinmaterialsandworkmanshipforthewarrantyperiod(seewarrantytable)fromthedateoforiginalsale(oranotherperiodweagreetoinwriting).Subjecttoourobligationsunderclause1.2,wewillatouroption,eitherrepairorreplacegoodswhichwearesatisfiedaredefective.Wewarrantanyreplacementpartsfortheremainder of the period of warranty for the goods into which they are incorporated.
2.3Totheextentpermittedbylaw,oursoleliabilityforbreachofacondition,warrantyorotherobligationimplied by law is limited
(a)inthecaseofgoodswesupply,toanyoneofthefollowing as we decide -
(i) thereplacementofthegoodsorthesupplyofequivalent goods;
(ii) therepairofthegoods;
(iii)thecostofrepairingthegoodsorofacquiringequivalent goods;
(b)inthecaseofserviceswesupply,toanyoneofthefollowing as we decide –
(i) thesupplyingoftheservicesagain;
(ii) thecostofhavingtheservicessuppliedagain.
2.4Forrepairsoutsidethewarrantyperiod,wewarrantour repairs to be free from defects in materials and
workmanshipforthreemonthsfromthedateoftheoriginalrepair.Weagreetore-repairorreplace(atouroption)anymaterialsorworkmanshipwhichwearesatisfiedaredefective.
2.5 Wewarrantthatwewillperformserviceswithreasonablecareandskillandagreetoinvestigateanycomplaint regarding our services made in good faith. Ifwearesatisfiedthatthecomplaintisjustified,andasoursoleliabilitytoyouunderthiswarranty(totheextentpermittedatlaw),weagreetosupplythoseservices again at no extra charge to you.
2.6Tomakeawarrantyclaimyoumustbeforetheendoftheapplicablewarrantyperiod(seewarrantytable),atyourowncost,returnthegoodsyouallegearedefective,providewrittendetailsofthedefect,andgiveus an original or copy of the sales invoice or some other evidence showing details of the transaction.
2.7Sendyourclaimto: Standard Communications Pty Ltd. UnitB,22-24CollegeStreet, Gladesville,NSW2111,Australia. Tel:(02)98798888Fax:(02)98164722. Email:[email protected]
2.8Ifwedeterminethatyourgoodsaredefective,wewillpay for the cost of returning the repaired or replaced goodstoyou,andreimburseyouforyourreasonableexpenses of sending your warranty claim to us.
3. What this warranty does not cover
3.1Thiswarrantywillnotapplyinrelationto:
(a)goodsmodifiedoralteredinanyway;
(b)defectsanddamagecausedbyusewithnonStandard Communications products;
(c)repairsperformedotherthanbyourauthorisedrepresentative;
(d)defectsordamageresultingfrommisuse,accident,impact or neglect;
(e)goodsimproperlyinstalledorusedinamannercontrary to the relevant instruction manual; or
(f) goodswheretheserialnumberhasbeenremovedor made illegal.
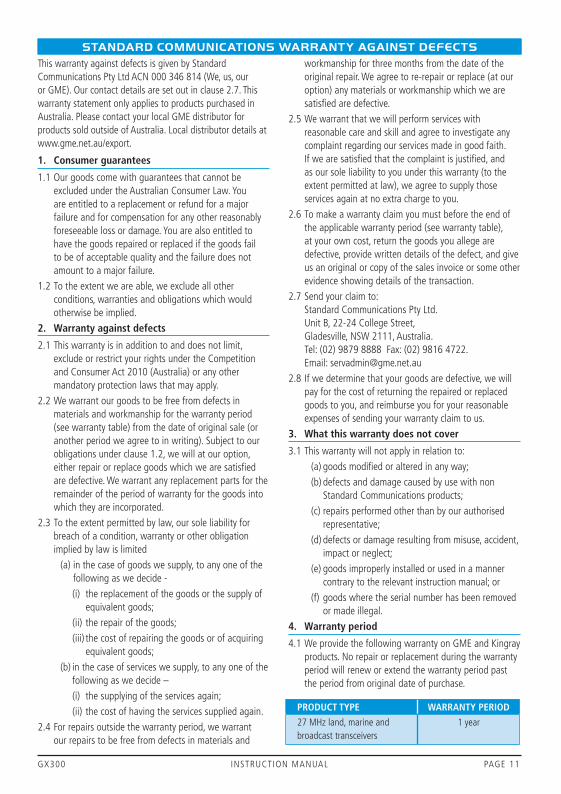
4. Warranty period
4.1WeprovidethefollowingwarrantyonGMEandKingrayproducts. No repair or replacement during the warranty period will renew or extend the warranty period past the period from original date of purchase.
STANDARD COMMUNICATIONS WARRANTY AGAINST DEFECTS
PRODUCT TYPE WARRANTY PERIOD
27MHzland,marineand broadcast transceivers
1 year

Part Number: 310344 Drawing Number: 42844-6 GX300
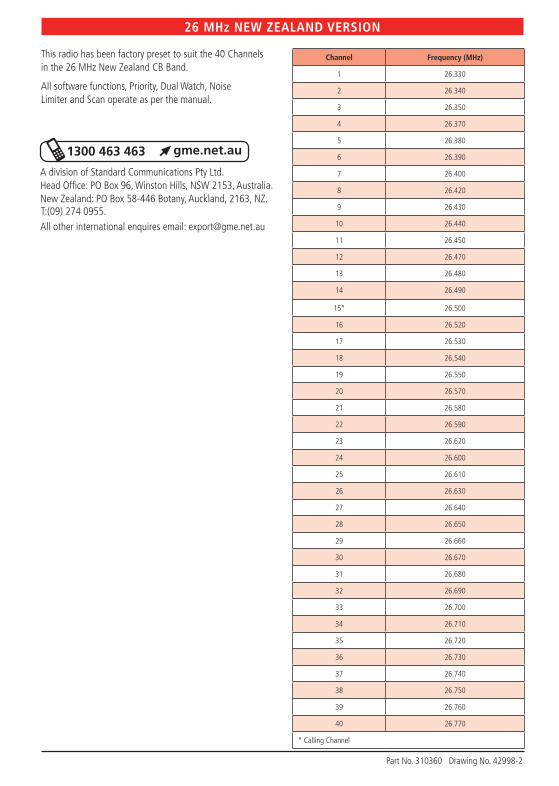
This radio has been factory preset to suit the 40 Channels in the 26 MHz New Zealand CB Band.
All software functions, Priority, Dual Watch, Noise Limiter and Scan operate as per the manual.
26 MHz NEW ZEALAND VERSION
Channel Frequency (MHz)
1 26.330
2 26.340
3 26.350
4 26.370
5 26.380
6 26.390
7 26.400
8 26.420
9 26.430
10 26.440
11 26.450
12 26.470
13 26.480
14 26.490
15* 26.500
16 26.520
17 26.530
18 26.540
19 26.550
20 26.570
21 26.580
22 26.590
23 26.620
24 26.600
25 26.610
26 26.630
27 26.640
28 26.650
29 26.660
30 26.670
31 26.680
32 26.690
33 26.700
34 26.710
35 26.720
36 26.730
37 26.740
38 26.750
39 26.760
40 26.770
* Calling Channel
Part No. 310360 Drawing No. 42998-2

REAR VIEW
Cut Out 156 mm x 58 mm
6.0 Radius
Adhesive Backing Plate
Ensure that the location selected for in dash mounting is convenient for the operator and that there is sufficient space behind the panel to accommodate the body of the radio and allow a free flow of air. Refer to page 13 of the Instruction Manual for more hints.
Once the most suitable location has been selected, mark and centre punch the cross hair in each corner and drill a 12 mm diameter hole. Mark a straight line from the outer edge of each hole to form a rectangle. Cut to the inside edge of these lines.
Remove the backing paper from the metallic backing strips exposing the self adhesive surface and fix them in position vertically at either end of the hole on the rear side of the dashboard flush with the edge. See figure 1
Place the GX600 through the hole. If the dashboard is subject to water spray it may be beneficial to apply a thin bead of sealant to prevent any water ingress between the body of the radio and the dashboard.
The S/S brackets can now be fastened to the rear panel of the GX600 with the 4 S/S self tappers supplied. Note that the brackets can be reverse mounted to allow for varying thicknesses of dashboards. See figure 2
Insert the remaining metal-thread screws so that they bear down on the two metallic backing strips and tighten until the GX600 is held firmly in place.
Connect the power lead and antenna lead as illustrated in the Instruction Manual.
Contents:2 S/S brackets2 adhesive backing strips4 S/S self tapping screws4 S/S metal-thread screws
MK600 IN DASH FITTING INSTRUCTIONS
Figure 2
Figure 1
✂
✂
✂
✂
58 mm
157
mm
TEM
PLA
TE
D.N.
422
61-3
P.N
. 310
226
Head Office: PO Box 96, Winston Hills, NSW 2153, AustraliaA division of Standard Communications Pty Ltd.

MK
00
1B
INS
TALL
ATI
ON
- C
UTT
ING
TE
MP
LATE
66 m
m8
mm
2.5
mm
165
mm
10 m
m D
rill B
it
Mou
ntin
g
Scre
w C
lear
ance
8
mm
Dril
l Bit
Mar
k an
d cu
t a h
ole
66 m
m (h
) by
165
mm
(w),
allo
win
g fo
r cle
aran
ce o
f the
two
mou
ntin
g sc
rew
s ho
ldin
g th
e ra
dio
to th
e su
rrou
nd.
Use
a 1
0 m
m d
rill b
it to
form
the
radi
us o
f the
cor
ners
and
an
8 m
m d
rill b
it fo
r the
cle
aran
ce o
f the
mou
ntin
g sc
rew
s.
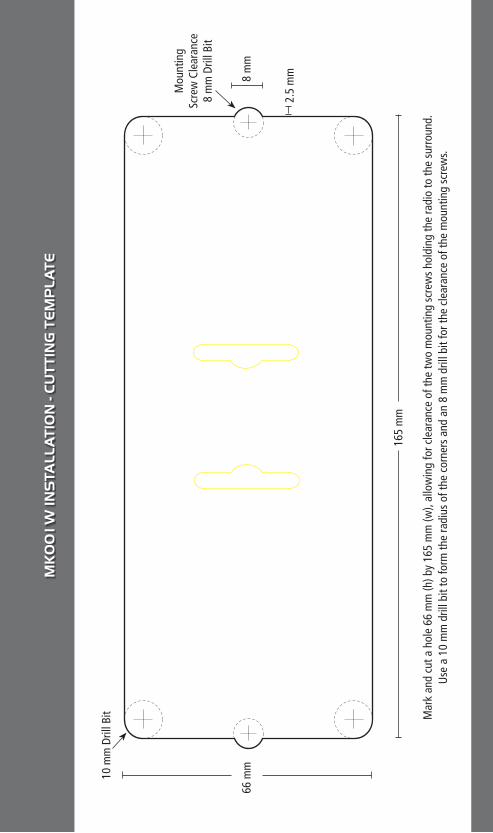
MK
00
1W
INS
TALL
ATI
ON
- C
UTT
ING
TE
MP
LATE
66 m
m8
mm
2.5
mm
165
mm
10 m
m D
rill B
it
Mou
ntin
g
Scre
w C
lear
ance
8
mm
Dril
l Bit
Mar
k an
d cu
t a h
ole
66 m
m (h
) by
165
mm
(w),
allo
win
g fo
r cle
aran
ce o
f the
two
mou
ntin
g sc
rew
s ho
ldin
g th
e ra
dio
to th
e su
rrou
nd.
Use
a 1
0 m
m d
rill b
it to
form
the
radi
us o
f the
cor
ners
and
an
8 m
m d
rill b
it fo
r the
cle
aran
ce o
f the
mou
ntin
g sc
rew
s.