hand rehabilitation protocols
TRANSCRIPT
If you have any questions or concerns, please call 859-562-1980.
HAND REHABILITATION PROTOCOLS

Hand Rehabilitation Protocols | 2
If you have any questions or concerns, please call 859-562-1980.
TABLE OF CONTENTSEPL Repair Early Active Motion 3
Extensor Tendon Injury Zone III-IV Short Arc Motion (SAM) Program 5
Extensor Tendon Repair Zones IV to VII Relative Motion Extension (RME) 7
Flexor Tendon Repair Zones I, II, III-Early Active Motion (EAM) 9
Flexor Tendon Repair Zones I, II, II-Modified Duran 12
FPL repair Early Active Motion 15
FPL repair Modified Duran 18
Percutaneous Pinning P1 Fracture 20
Proximal Row Carpectomy (PRC) 22
Therapy Management of Tendon Transfers 24
Total Wrist Arthrodesis 28
Total Wrist Arthroplasty 30
Flexor Tendon Repair Zones IV and V-Early Active Motion 32
Four Corner Fusion 36
Mallet Finger Zone I-II Extensor Tendon Injury 38
ORIF Distal Radius 39
Trapeziectomy with LRTI 41
Trapeziectomy with Tightrope Suspension 43
Flexor Tendon Reconstruction Stage I 45

Hand Rehabilitation Protocols | 3
If you have any questions or concerns, please call 859-562-1980.
EPL REPAIR EARLY ACTIVE MOTION
Phase I Precautions: The primary goal is to protect the surgically repaired extensor tendon while providing early motion to prevent tendon adhesion. All exercises must be completed within the protective orthosis. Patient compliance and good communication with MD is extremely important.
Emphasis on... Orthosis ExercisePhase I (0-4 weeks)
1 week
Gentle AROM to unaffected fingers
One-handed ADLs
Post-op dressing removed and custom forearm-based thumb spica with dynamic IP extension assist is fabricated. Wrist should be positioned in 20° extension and thumb midway between palmar and radial abduction. Block IP flexion at 20°.
- Initiate AROM of unaffected fingers to limits of orthosis.
- Short arc thumb IP flexion to the limits of the rubber band block, emphasize relaxation for rubber band assist to extend IP joint. NO thumb MP or wrist ROM.
- Initiate edema control including: light coban wrapping, ice, elevation.
2-3 weeks Goal is to achieve full AROM of unaffected fingers to the limits of the orthosis.
Custom orthosis is continued between exercise sessions and at night. IP block can be adjusted to 40° flexion assuming no extension lag.
- Initiate gentle scar management techniques.
- Gentle AROM of wrist with NO thumb AROM.
- Gentle thumb MP AROM with no wrist AROM.
- Light ADL activities are permitted with affected hand while in orthosis. Activities may include picking up paper, passively stabilizing light objects less than 1-2 lbs.
Phase II Precautions: Continue to protect surgical repair and monitor for signs of extension lag.
Emphasis on... Orthosis Exercise
Phase II (4-8 weeks)
4 weeks
Goal is to restore full ROM of wrist, fingers, and thumb with minimal to no extension lag by the end of phase II.
Custom orthosis is continued between exercise sessions and at night. IP block can be adjusted to allow full flexion assuming no extension lag is present.
- Continue AROM outside of brace.
- With wrist and thumb in slight flexion add full IP extension.
- Add composite active flexion and extension of thumb and wrist.
Hand Rehabilitation Protocols | 4
If you have any questions or concerns, please call 859-562-1980.
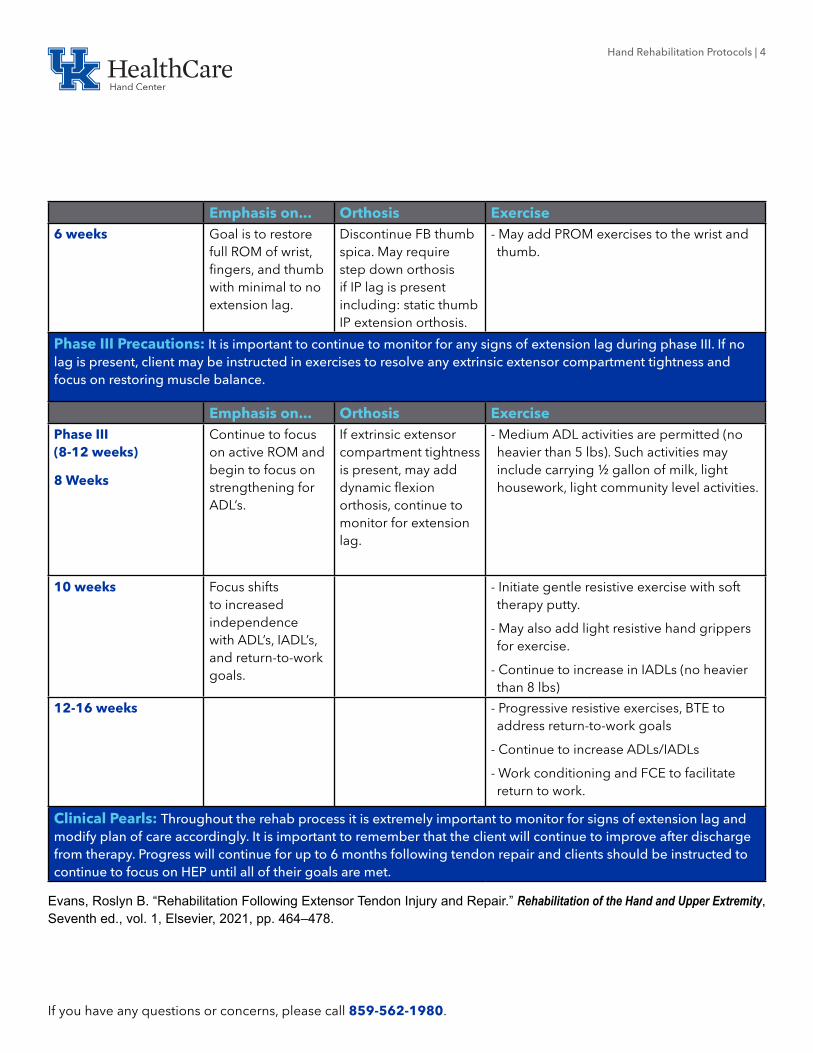
Emphasis on... Orthosis Exercise6 weeks Goal is to restore
full ROM of wrist, fingers, and thumb with minimal to no extension lag.
Discontinue FB thumb spica. May require step down orthosis if IP lag is present including: static thumb IP extension orthosis.
- May add PROM exercises to the wrist and thumb.
Phase III Precautions: It is important to continue to monitor for any signs of extension lag during phase III. If no lag is present, client may be instructed in exercises to resolve any extrinsic extensor compartment tightness and focus on restoring muscle balance.
Emphasis on... Orthosis ExercisePhase III (8-12 weeks)
8 Weeks
Continue to focus on active ROM and begin to focus on strengthening for ADL’s.
If extrinsic extensor compartment tightness is present, may add dynamic flexion orthosis, continue to monitor for extension lag.
- Medium ADL activities are permitted (no heavier than 5 lbs). Such activities may include carrying ½ gallon of milk, light housework, light community level activities.
10 weeks Focus shifts to increased independence with ADL’s, IADL’s, and return-to-work goals.
- Initiate gentle resistive exercise with soft therapy putty.
- May also add light resistive hand grippers for exercise.
- Continue to increase in IADLs (no heavier than 8 lbs)
12-16 weeks - Progressive resistive exercises, BTE to address return-to-work goals
- Continue to increase ADLs/IADLs
- Work conditioning and FCE to facilitate return to work.
Clinical Pearls: Throughout the rehab process it is extremely important to monitor for signs of extension lag and modify plan of care accordingly. It is important to remember that the client will continue to improve after discharge from therapy. Progress will continue for up to 6 months following tendon repair and clients should be instructed to continue to focus on HEP until all of their goals are met.
Evans, Roslyn B. “Rehabilitation Following Extensor Tendon Injury and Repair.” Rehabilitation of the Hand and Upper Extremity, Seventh ed., vol. 1, Elsevier, 2021, pp. 464–478.

Hand Rehabilitation Protocols | 5
If you have any questions or concerns, please call 859-562-1980.
EXTENSOR TENDON INJURY ZONE III-IV SHORT ARC MOTION (SAM) PROGRAM
Phase I Precautions: Protect surgical repair with well-fitting orthosis to prevent gap formation and attenuation of the surgical repair should position the PIP joint in 0° extension and should be monitored closely. Monitor for extension lag and good communication with MD is vital.
Emphasis on... Orthosis ExercisePhase I: (0-4 weeks)
3-5 days
Initiate hand therapy for short arc motion within limits of orthoses and AROM of unaffected digits while wearing protective orthosis.
- Post-operative dressing removed and fabricate custom volar thermoplastic protective orthosis to involved finger positioning PIP and DIP joints in 0° extension.
-Exercise Template orthosis 1 allows 30° PIP flexion and 20-25 degrees DIP flexion.
-Exercise Template orthosis 2 is fabricated to position PIP in 0° extension and allows full DIP flexion.
-Protective orthosis is worn at night and in between exercises.
- Exercise position for SAM protocol during first 3 weeks includes: 30° wrist flexion, 0° MCP joint extension, PIP joint motion from 0-30° flexion, DIP joint motion from 0-25° using exercise template orthosis 1.
- Exercise Template orthosis 2 allows full DIP flexion if lateral bands were not repaired; if lateral bands are repaired DIP motions is to 30-35° flexion.
- Edema Control including: Coban, ice, elevation.
- Exercises performed 6-8 times per day for 10-minute sessions.
2 weeks In the absence of extension lag SAM protocol is advanced.
-Template 1 is adjusted to allow 40° PIP flexion.
-Continue with Protective orthosis at night and in between exercises.
- Continue exercises as above with adjusted template.
3 weeks - Template 1 is adjusted to allow 50° PIP flexion.
- Continue with Protective orthosis at night and in between exercises.
- Continue exercises as above with adjusted template.
- Initiate scar management techniques.

Hand Rehabilitation Protocols | 6
If you have any questions or concerns, please call 859-562-1980.
Phase II Precautions: Continue to protect surgical repair and monitor for signs of extension lag. If extension lag develops, flexion increments can be more modest with focus returning to active extension.
Emphasis on... Orthosis ExercisePhase II: (4-8 weeks)
4 weeks
In the absence of extension lag, client can perform up to 70-80° flexion by end of fourth week.
- Continue with Protective orthosis at night and in between exercises.
- Exercise sessions can be performed outside of thermoplastic exercise orthoses templates focus on PIP and DIP flexion and active IP extension.
5 weeks - Composite flexion exercises may be added.
6 weeks - May discontinue protective orthosis during day but continue to wear at night.
- May initiate PROM exercises with less than 10° extension lag.
Phase III Precautions: Continue to protect surgical repair moderate to heavy activity and monitor for signs of extension lag. It is important to remember that the client will continue to improve for 3-6 months following tendon repair and should continue to focus on HEP until all goals have been met.
Emphasis on... Orthosis ExercisePhase III: (8-12 weeks)
Week 8
Continue to focus on active ROM and begin to focus on strengthening for ADL’s.
- Discontinue protective orthosis during day and may continue to wear at night.
- Medium ADL activities are permitted (no heavier than 5 lbs). Such activities may include carrying ½ gallon of milk, light housework, light community-level activities.
- Initiate gentle resistive exercise with soft therapy putty.
- May also add light resistive hand grippers for exercise.
Week 10 Focus shifts to increased independence with ADL’s, IADL’s, and return-to-work goals.
- Progressive resistive exercises, BTE to address return-to-work goals.
Week 12 - Work conditioning and FCE to facilitate return to work.
Evans, Roslyn B. “Rehabilitation Following Extensor Tendon Injury and Repair.” Rehabilitation of the Hand and Upper Extremity, Seventh ed., vol. 1, Elsevier, 2021, pp. 464–478.

Hand Rehabilitation Protocols | 7
If you have any questions or concerns, please call 859-562-1980.
EXTENSOR TENDON REPAIR ZONES IV TO VII RELATIVE MOTION EXTENSION (RME)
Phase I Precautions: Goal is to protect the surgically repaired extensor tendon while allowing early motion. All exercises must be completed within the protective orthosis. Patient compliance and good communication with the MD is extremely important for an excellent therapy outcome.
Emphasis on... Orthosis ExercisePhase I: (0-4 weeks)
0- 10 days
Initiate hand therapy for gentle AROM to unaffected fingers and light hand use (such as picking up paper, passively stabilizing light objects less than 1- 2 lbs.)
Post- operative dressing removed and
custom RME orthosis with 15-20° finger extension and combined wrist extension orthosis with 30° extension are fabricated. Protective orthoses are always worn.
- Initiate AROM within RME orthosis including hook fist, composite finger flexion / extension.
- Perform 20 repetitions every 2 hours.
- Initiate edema control including: light coban wrapping, ice, elevation.
3 weeks Goal is to achieve full hook fist to the limits of the orthosis.
Continue with protective orthoses.
- Initiate gentle scar management techniques.
- Light ADL activities are permitted.
4 weeks Avoid combined composite fist with wrist flexion, except zone VII.
May discontinue wrist extension orthosis upon MD recommendations for zones IV to VI. May discontinue RME orthosis upon MD recommendations for zone VII.
- Initiate gentle wrist motion including: wrist flexion and extension
- Light to medium ADL activities are permitted (no heavier than 5 lbs). Such activities may include carrying ½ gallon of milk, light housework, light community level activities.

If you have any questions or concerns, please call 859-562-1980.
Hand Rehabilitation Protocols | 8
Phase II Precautions: Continue to protect surgical repair and monitor for signs of extension lag.
Emphasis on... Orthosis ExercisePhase II: (4-8 weeks)
6 weeks
Goal is to restore full ROM of wrist and fingers with minimal to no extension lag.
Discontinue all orthoses during day but continue at night.
- May introduce composite fist with combined wrist flexion.
8 weeks Continue to focus on active ROM and begin to focus on strengthening for ADL’s.
- Medium ADL activities are permitted.
- Initiate gentle resistive exercise with soft therapy putty.
- May also add light resistive hand grippers for exercise.
Phase III Precautions: It is important to remember that the client will continue to improve for 3- 6 months following tendon repair and should continue to focus on HEP until all goals have been met.
Emphasis on... Orthosis Exercise10 weeks Focus shifts
to increased independence with ADL’s, IADL’s, and return-to-work goals.
Progressive resistive exercises, BTE to address return-to-work goals.
12 weeks Work conditioning and FCE to facilitate return to work.
Clinical Pearls: Research has shown good ROM by weeks 3- 4 with relative motion program compared to other protocols with relatively few tendon ruptures. RME participants typically demonstrate grip strength returns to 85% by week 8 and WNL’s by 12 weeks.
Merritt, Wyndell H. “Relative Motion Orthoses: The Concepts and Application to Hand Therapy Management of Finger Extensor Tendon Zone III and VII Repairs, Acute and Chronic Boutonniere Deformity, and Sagittal Band Injury.” Rehabilitation of the Hand and Upper Extremity, Seventh ed., vol. 2, Elsevier, 2021, pp. 1496–1510.
Hand Rehabilitation Protocols | 9
If you have any questions or concerns, please call 859-562-1980.
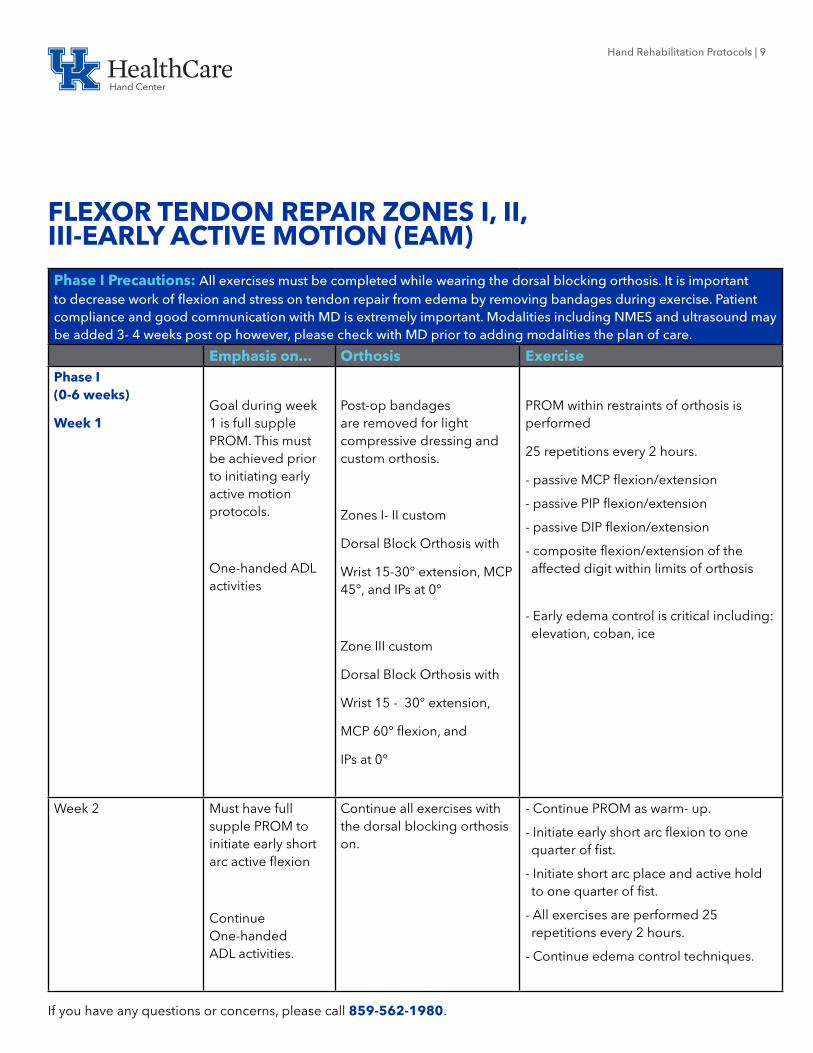
FLEXOR TENDON REPAIR ZONES I, II, III-EARLY ACTIVE MOTION (EAM)
Phase I Precautions: All exercises must be completed while wearing the dorsal blocking orthosis. It is important to decrease work of flexion and stress on tendon repair from edema by removing bandages during exercise. Patient compliance and good communication with MD is extremely important. Modalities including NMES and ultrasound may be added 3- 4 weeks post op however, please check with MD prior to adding modalities the plan of care.
Emphasis on... Orthosis ExercisePhase I (0-6 weeks)
Week 1Goal during week 1 is full supple PROM. This must be achieved prior to initiating early active motion protocols.
One-handed ADL activities
Post-op bandages are removed for light compressive dressing and custom orthosis.
Zones I- II custom
Dorsal Block Orthosis with
Wrist 15-30° extension, MCP 45°, and IPs at 0°
Zone III custom
Dorsal Block Orthosis with
Wrist 15 - 30° extension,
MCP 60° flexion, and
IPs at 0°
PROM within restraints of orthosis is performed
25 repetitions every 2 hours.
- passive MCP flexion/extension
- passive PIP flexion/extension
- passive DIP flexion/extension
- composite flexion/extension of the affected digit within limits of orthosis
- Early edema control is critical including: elevation, coban, ice
Week 2 Must have full supple PROM to initiate early short arc active flexion
Continue One-handed ADL activities.
Continue all exercises with the dorsal blocking orthosis on.
- Continue PROM as warm- up.
- Initiate early short arc flexion to one quarter of fist.
- Initiate short arc place and active hold to one quarter of fist.
- All exercises are performed 25 repetitions every 2 hours.
- Continue edema control techniques.

Hand Rehabilitation Protocols | 10
If you have any questions or concerns, please call 859-562-1980.
Emphasis on... Orthosis ExerciseWeek 3 Continue to
maintain supple PROM; monitor for signs of adhesion formation, triggering, or gapping.
Continue One- handed ADL activities.
Continue all exercises with the dorsal blocking orthosis on.
- Continue PROM as warm- up.
- Advance early short arc flexion to one third of fist.
- Advance short arc place and active hold to one third of fist.
- All exercises are performed 25 repetitions every 2 hours.
- Continue edema control techniques.
- Initiate scar management techniques.
Week 4 Continue to maintain supple PROM; monitor for signs of adhesion formation, triggering, or gapping.
Continue One- handed ADL activities.
The dorsal blocking orthosis can now be removed to perform exercises without the orthosis. Continue with the dorsal block orthosis between exercise sessions and at night.
- Continue PROM as warm- up.
- Advance early short arc flexion to half a fist.
- Advance short arc place and active hold to half fist.
- Initiate hook fist exercise, passively.
- All exercises are performed 25 repetitions every 2 hours.
- Continue edema control techniques.
- Initiate scar management techniques.
Week 5 Continue to maintain supple PROM; monitor for signs of adhesion formation, triggering, or gapping.
Continue One- handed ADL activities.
Continue with the dorsal block orthosis between exercise sessions and at night.
- Advance early short arc flexion to full fist.
- Advance to full arc place and active hold.
- Continue hook fist exercise, active.
- Continue all exercises as prescribed above.

Hand Rehabilitation Protocols | 11
If you have any questions or concerns, please call 859-562-1980.
Phase II Precautions: Continue to monitor for signs of adhesion formation, triggering, or gapping. Never perform blocking exercises to small finger due to increased chance of tendon rupture to the small finger. Continue to have communication with MD prior to progressing the protocol.
Emphasis on... Orthosis ExercisePhase II (6-10 weeks)
Week 6
Focus shifts on unassisted active flexion and extension.
Dorsal Blocking Orthosis is discontinued at 6 weeks.
- Initiate differential tendon glides, individual tendon glides.
- Continue with full arc place and hold.
- Light ADL activities are permitted.
Week 8 Continue to focus on active ROM and begin to focus on strengthening for ADL’s.
May utilize relative motion extension orthosis to encourage FDP glide if there is DIP flexion lag.
- Joint blocking exercise may be added to program.
- Gentle resistive exercise with soft therapy putty in cylinder shape to encourage DIP flexion.
Week 9 - Add light resistive hand grippers for exercise.
Phase III Precautions: Client may need to be evaluated for return to work through a formal work conditioning program and/or FCE.
Emphasis on... Orthosis ExercisePhase III
(10-12 weeks) Focus shifts to increased independence with ADL’s, IADL’s, and return- to- work goals.
May begin corrective orthosis if needed for any unresolved flexion contracture.
Progressive resistive exercises, BTE simulator may be added to address return-to-work goals.
Clinical Pearls: Throughout the rehab process it is extremely important to monitor for signs of tendon adhesion and modify plan of care accordingly. It is important to remember that the client will continue to improve after discharge from therapy. Progress will continue for up to 1 year following tendon repair and clients should be instructed to continue to focus on a HEP until all of their goals are met. Therapy visits are most important during the first 2- 4 weeks to achieve good motion and prevent tendon adhesion. Both active and passive ROM measurements should be taken on each visit with a goal of 5- 10° gains in flexion each visit.
Cannon, Nancy M. “Therapy Management of Flexor Tendon Injuries and Repairs.” Rehabilitation of the Hand and Upper Extremity, Seventh ed., vol. 1, Elsevier, 2021, pp. 421–431.
Hand Rehabilitation Protocols | 12
If you have any questions or concerns, please call 859-562-1980.
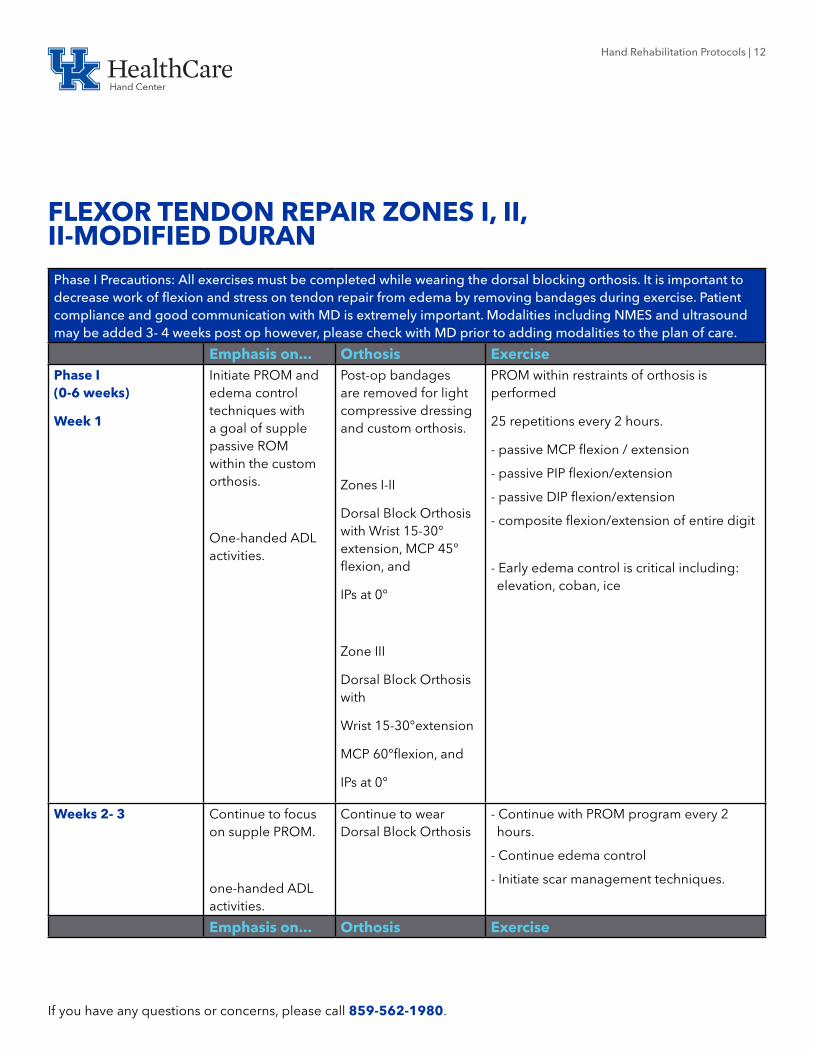
FLEXOR TENDON REPAIR ZONES I, II, II-MODIFIED DURAN Phase I Precautions: All exercises must be completed while wearing the dorsal blocking orthosis. It is important to decrease work of flexion and stress on tendon repair from edema by removing bandages during exercise. Patient compliance and good communication with MD is extremely important. Modalities including NMES and ultrasound may be added 3- 4 weeks post op however, please check with MD prior to adding modalities to the plan of care.
Emphasis on... Orthosis ExercisePhase I (0-6 weeks)
Week 1
Initiate PROM and edema control techniques with a goal of supple passive ROM within the custom orthosis.
One-handed ADL activities.
Post-op bandages are removed for light compressive dressing and custom orthosis.
Zones I-II
Dorsal Block Orthosis with Wrist 15-30° extension, MCP 45° flexion, and
IPs at 0°
Zone III
Dorsal Block Orthosis with
Wrist 15-30°extension
MCP 60°flexion, and
IPs at 0°
PROM within restraints of orthosis is performed
25 repetitions every 2 hours.
- passive MCP flexion / extension
- passive PIP flexion/extension
- passive DIP flexion/extension
- composite flexion/extension of entire digit
- Early edema control is critical including: elevation, coban, ice
Weeks 2- 3 Continue to focus on supple PROM.
one-handed ADL activities.
Continue to wear Dorsal Block Orthosis
- Continue with PROM program every 2 hours.
- Continue edema control
- Initiate scar management techniques.
Emphasis on... Orthosis Exercise

Hand Rehabilitation Protocols | 13
If you have any questions or concerns, please call 859-562-1980.
Week 3 Continue to focus on full supple PROM. May begin gentle AROM.
Continue one- handed ADL activities.
- Initiate early short arc flexion to one quarter of fist within confines of the orthosis.
- Initiate short arc place and active hold to one quarter of fist.
Week 4 Gentle AROM from one quarter to one third of a fist.
Dorsal Block Orthosis may be removed for AROM but continue wear between exercise sessions and night.
- Continue with short arc flexion exercises.
- Continue with short arc place and active hold.
- Initiate wrist tenodesis
- NMES and ultrasound may be added to program for heavy scarring or limited tendon glide.
Week 5 Gentle AROM from one third to one half a fist.
- Advance early short arc flexion to full fist.
- Advance to full arc place and active hold.
- Initiate hook fist exercise, active.
Phase II Precautions: Continue to monitor for signs of adhesion formation, triggering, or gapping. Never perform blocking exercises to small finger due to increased chance of tendon rupture to the small finger. Continue to have communication with MD prior to progressing the protocol.
Emphasis on... Orthosis Exercise
Phase II (6-10 weeks)
Week 6
AROM from one half fist to full fist.
Dorsal Blocking Orthosis is discontinued at 6 weeks.
- Initiate differential tendon glides, individual tendon glides.
- Continue with full arc place and hold.
- Isolated joint blocks may be added.
- Light ADL activities are permitted, such as picking up paper, passively stabilizing light objects less than 1-2 lbs.
Week 8 Focus shifts on unassisted active flexion and extension.
- Begin resisted composite fist, hook, and straight fist with use of therapy putty and progressing to hand exerciser.
- Continue to gradually advance ADL/IADL activities with affected hand.

Hand Rehabilitation Protocols | 14
If you have any questions or concerns, please call 859-562-1980.
Phase III Precautions: Clients may need to be evaluated for return-to-work programs through a formal work conditioning program and/or FCE around 12- 16 weeks.
Emphasis on... Orthosis ExercisePhase III (10-12 weeks)
Week 10
Focus shifts to increased independence with ADL’s, IADL’s, and return- to- work goals.
May add corrective splinting options for unresolved flexion contractures.
- Progressive resistive exercises,
- BTE to address return- to- work goals.
- Full participation in ADL’s/IADL’s
Weeks 12-16 - Work conditioning/FCE for return- to- work goals.
Clinical Pearls: Throughout the rehab process it is extremely important to monitor for signs of tendon adhesion and modify plan of care accordingly. It is important to remember that the client will continue to improve after discharge from therapy. Progress will continue for up to 1 year following tendon repair and clients should be instructed to continue to focus on a HEP until all of their goals are met. Therapy visits are most important during the first 2- 4 weeks to achieve good motion and prevent tendon adhesion. Both active and passive ROM measurements should be taken on each visit with a goal of 5- 10° gains in flexion each visit.
Cannon, Nancy M. “Therapy Management of Flexor Tendon Injuries and Repairs.” Rehabilitation of the Hand and Upper Ex-tremity, Seventh ed., vol. 1, Elsevier, 2021, pp. 421–431.

Hand Rehabilitation Protocols | 15
If you have any questions or concerns, please call 859-562-1980.
FPL REPAIR EARLY ACTIVE MOTION
Phase I Precautions: All exercises must be completed while wearing the dorsal blocking orthosis (DBO). It is important to decrease work of flexion and stress on tendon repair from edema by removing bandages during exercise. Patient compliance and good communication with MD is extremely important.
Range of Motion Orthosis ExercisePhase I (0-6 weeks)
Week 1
Full supple PROM of unaffected digits must be obtained prior to initiating early active motion protocol in week 2. Edema control is critical to decrease work of flexion.
One- handed ADLs
Post-op bandages are removed for light compressive dressing and custom orthosis.
Dorsal Blocking Orthosis (DBO) with wrist neutral to 20° extension, Thumb MP 15° flexion, IP flexed to 30°. Fingers are left free.
- PROM to thumb within restraints of DBO 25 repetitions every 2 hours including:
- PROM MP flexion/extension,
- PROM IP flexion/extension,
- Composite MP and IP flexion and extension.
- Early edema control is including: elevation, coban, ice.
Week 2 Must have full supple PROM to initiate early short arc active flexion
Continue one- handed ADLs
Continue all exercise within confines of DBO.
Tenodesis performed outside DBO with controlled supervision by therapist.
- Continue PROM exercise as warm- up.
- Initiate short arc flexion to one quarter of flexion.
- Initiate short arc place and active hold to one quarter of flexion.
- Initiate tenodesis with passive wrist extension and simultaneous passive thumb flexion.
- Continue edema control techniques.
Week 3 Continue one- handed ADLs
- Initiate scar management techniques.

Hand Rehabilitation Protocols | 16
If you have any questions or concerns, please call 859-562-1980.
Range of Motion Orthosis ExerciseWeek 4 Continue to maintain
supple PROM; monitor for signs of adhesion formation, triggering, or gapping.
Continue one- handed ADLs
DBO is continued between exercise sessions and at night.
- NMES and ultrasound may be added to facilitate FPL excursion.
- unrestricted AROM of wrist and thumb
Week 5 May use affected hand/thumb in light ADL activities (less than 1-2 lbs of resistance).
- Initiate active wrist and thumb flexion followed by wrist and thumb extension for max excursion of FPL.
- Light ADL activities are permitted.
Phase II Precautions: Continue to monitor for signs of adhesion formation, triggering, or gapping. Continue to have communication with MD prior to progressing the protocol.
Range of Motion Orthosis Exercise
Phase II (6-10 weeks)
Week 6
Focus on unassisted active flexion and extension.
Dorsal Blocking Orthosis is discontinued at 6 weeks.
- Initiate blocking exercises to FPL if excursion is limited.
- Initiate passive extension of wrist and thumb to resolve extrinsic flexor tightness.
Week 8 Continue to focus on active ROM and begin to focus on strengthening for ADL’s.
- Initiate progressive strengthening using putty, hand exerciser, 1-2 # hand weights.
- Pt education to avoid heavy lifting and/or tight sustained pinch.
Phase III Precautions: Client may need to be evaluated for return to work through a formal work conditioning program and/or FCE.
Range of Motion Orthosis ExercisePhase III (10-12 weeks)
Focus shifts to increased independence with ADL’s, IADL’s, and return- to- work goals.
- Progressive resistive exercises, BTE to address return- to- work goals.
12-16 weeks - Work conditioning and FCE to facilitate return to work.

Hand Rehabilitation Protocols | 17
If you have any questions or concerns, please call 859-562-1980.
Clinical Pearls: Throughout the rehab process it is extremely important to monitor for signs of tendon adhesion and modify plan of care accordingly. It is important to remember that the client will continue to improve after discharge from therapy. Progress will continue for up to 1 year following tendon repair and clients should be instructed to continue to focus on a HEP until all of their goals are met. Therapy visits are most important during the first 2- 4 weeks to achieve good motion and prevent tendon adhesion. Both active and passive ROM measurements should be taken on each visit with a goal of 5- 10° gains in flexion each visit.
Cannon, Nancy M. “Therapy Management of Flexor Tendon Injuries and Repairs.” Rehabilitation of the Hand and Upper Extremity, Seventh ed., vol. 1, Elsevier, 2021, pp. 421–431.

Hand Rehabilitation Protocols | 18
If you have any questions or concerns, please call 859-562-1980.
FPL REPAIR MODIFIED DURANPhase I Precautions: All exercises must be completed while wearing the dorsal blocking orthosis (DBO). It is important to decrease work of flexion and stress on tendon repair from edema by removing bandages during exercise. Patient compliance and good communication with MD is extremely important.
Emphasis on Orthosis ExercisePhase I (0-6 weeks)
Week 1
PROM within limits of DBO and edema control to decrease work of flexion.
One- handed ADLs.
Post-op bandages are removed for light compressive dressing and custom orthosis.
DBO fabricated with wrist neutral to 20° extension, Thumb MP 15° flexion, IP at 30° flexion, fingers are left free.
- PROM within restraints of DBO 25 repetitions every 2 hours including:
- PROM MP flexion/extension,
- PROM IP flexion/extension,
- Composite MP and IP flexion and extension.
- Early edema control is including: elevation, coban, ice.
Week 2 Goal is full supple PROM.
Continue with one- handed ADLs.
Continue all exercise within confines of DBO.
- Continue PROM exercise
- Continue edema control techniques.
Week 3 Continue with one-handed ADLs.
Continue all exercise within confines of DBO.
- Initiate scar management techniques.
- Initiate short arc flexion to one quarter of flexion.
- Initiate short arc place and active hold to one quarter of flexion.
Week 4 Continue to maintain supple PROM; monitor for signs of adhesion formation, triggering, or gapping.
DBO is continued between exercise sessions and at night.
- NMES and ultrasound may be added to facilitate FPL excursion.

Hand Rehabilitation Protocols | 19
If you have any questions or concerns, please call 859-562-1980.
Emphasis on Orthosis ExerciseWeek 5 May use affected
hand/thumb in light ADL activities (less than 1- 2 lbs of resistance).
- unrestricted AROM of wrist and thumb
- Initiate active wrist and thumb flexion followed by wrist and thumb extension for max excursion of FPL.
- Light ADL activities are permitted.
Phase II Precautions: Continue to monitor for signs of adhesion formation, triggering, or gapping. Continue to have communication with MD prior to progressing the protocol.
Emphasis on Orthosis ExercisePhase II (6-10 weeks)
Week 6
Focus on unassisted active flexion and extension.
- Dorsal Blocking Orthosis is discontinued at 6 weeks.
- Wrist and thumb static splint may be needed at night for full extension.
- Initiate blocking exercises to FPL if excursion is limited.
- Initiate passive extension of wrist and thumb to resolve extrinsic flexor tightness.
Week 8 Continue to focus on active ROM and begin to focus on strengthening for ADL’s.
- Initiate progressive strengthening using putty, hand exerciser, 1-2 # hand weights.
- Pt education to avoid heavy lifting and/or tight sustained pinch.
Phase III Precautions: Client may need to be evaluated for return to work through a formal work conditioning program and/or FCE.
Emphasis on Orthosis ExercisePhase III (10-12 weeks)
Focus shifts to increased independence with ADL’s, IADL’s, and return- to- work goals.
- Progressive resistive exercises, BTE to address return-to- work goals.
12-16 weeks - Work conditioning and FCE to facilitate return to work.
Clinical Pearls: Throughout the rehab process it is extremely important to monitor for signs of tendon adhesion and modify plan of care accordingly. It is important to remember that the client will continue to improve after discharge from therapy. Progress will continue for up to 1 year following tendon repair and clients should be instructed to continue to focus on a HEP until all of their goals are met. Therapy visits are most important during the first 2- 4 weeks to achieve good motion and prevent tendon adhesion. Both active and passive ROM measurements should be taken on each visit.
Cannon, Nancy M. “Therapy Management of Flexor Tendon Injuries and Repairs.” Rehabilitation of the Hand and Upper Ex-tremity, Seventh ed., vol. 1, Elsevier, 2021, pp. 421–431

Hand Rehabilitation Protocols | 20
If you have any questions or concerns, please call 859-562-1980.
PERCUTANEOUS PINNING P1 FRACTURE
Phase I Precautions: Protect healing fracture and percutaneous pins with thermoplastic orthosis, prevent pin tract infection with daily pin care.
Emphasis on... Orthosis ExercisePhase I (0-4 weeks)
Week 1
AROM of uninvolved fingers with expectation of at least 75% AROM by the end of phase I.
May use fingers, thumb, and unaffected joints to hold objects less than 1 lbs. during ADLs/IADLs while in orthosis.
Custom thermoplastic hand- based (HB) orthosis in safe position with MP flexion to 60- 70°, PIP and DIP 0° extension.
- Initiate AROM of all uninvolved fingers, wrist, elbow, and shoulder.
- With MD clearance, Gentle DIP flexion of involved finger.
- Daily pin care to prevent infection.
- Edema control including: coban, elevation, ice.
- Light ADL’s with protective orthosis.
Phase II Precautions: Percutaneous pin removal between 4- 6 weeks depending upon fracture healing. Continue to perform daily pin care until pins are removed. Once pins have been removed continue to protect healing fracture with gentle ROM and no forceful manipulations of the injured finger.
Phase II (4-8 weeks)
Week 4
Nearly full AROM of uninvolved fingers. Initiate gentle AROM of involved finger after pin removal. Goal of at least 75% AROM of involved finger by end of phase II.
May use affected finger and hand to hold objects less than 1 lbs and perform light ADLs such as putting on and taking off loose clothing and shoes, washing dinnerware, and folding clothing.
Continue with protective HB orthosis between exercise sessions and at night. May need adjustment after pin removal and as edema resolves.
- Initiate gentle AROM of involved finger including: PIP and DIP joint blocks, differential tendon glides, individual tendon glides.
- Light to moderate ADL activities are permitted.

Hand Rehabilitation Protocols | 21
If you have any questions or concerns, please call 859-562-1980.
Emphasis on... Orthosis ExerciseWeeks 5 Monitor for extension lag
due to extensor tendon adhesions along pin site.
May discontinue HB orthosis during daytime for static finger orthosis to protect finger and maintain IP extension.
- Initiate scar massage once pin sites are closed and fully healed.
- Differential gliding while stabilizing scar to free up tendon adhesions.
6 weeks Continue to monitor for extension lag while maintaining flexion gains.
If client is maintaining good IP extension, may discontinue protective orthosis with MD clearance.
- With good fracture healing may begin gentle PROM.
- Reverse blocking for IP extension if IP lag is observed.
Phase III Precautions: Continue to protect healing fracture, restore normal muscle balance, and focus on gentle strengthening. Client goals should continue to address ADL’s, IADL’s, and return to work goals.
Emphasis on... Orthosis ExercisePhase III (8-12 weeks)
8 Weeks
- Continue with A/PROM for involved finger.
- May add gentle strengthening with therapy putty and hand grippers.
- Continue ADL activities.
10 weeks Focus on increased independence with ADL’s, IADL’s, and return-to-work goals.
May add corrective orthosis for finger flexion limitations, if MD confirms fracture healing: static progressive composite finger flexion orthosis.
- Progressive resistive exercises including: BTE simulator and return- to- work goals.
- Progress toward independence with IADL’s.
12-16 weeks - Work conditioning,
- Focus on HEP.
Clinical Pearls: Therapy visits should be preserved until phase II after pin removal. Phase I intervention should focus primarily with instruction in HEP, pin care, and edema control with weekly to biweekly visits depending upon patient compliance. It is important to remember that patients will continue to progress for up to 6 months following injury. Continue to instruct client in the importance of HEP to maximize progress until all of their goals are met.
Skirven, T.M., Osterman, A. L., Fedorczyk, J. M., Amadio, P. C., Feldscher, S. B., & Shin, E. K. (2021). Rehabilitation of the hand and upper extremity. Philadelphia, PA: Elsevier.

Hand Rehabilitation Protocols | 22
If you have any questions or concerns, please call 859-562-1980.
PROXIMAL ROW CARPECTOMY (PRC)
Phase I Precautions: Protect surgical repair, pain control and edema control.
Emphasis on... Orthosis ExercisePhase I (0-4 weeks)
- Wrist is immobilized in 0-10° wrist extension for 4 weeks.
- Achieve full shoulder, elbow, finger and thumb ROM on affected side within 4 weeks.
- Short arm cast for 4 weeks.
- Finger ROM exercises including: Differential Tendon Gliding, Individual Tendon Gliding, Composite Fist
- Gentle AROM of forearm, elbow, and shoulder is initiated.
- All exercises should be performed 4-6 times per day for up to 5-10 minutes.
- Edema Control: Elevation, Ice, Coban wrapping of fingers.
Phase II Precautions: Avoid composite wrist and digit flexion and extension to prevent overstretching of extrinsic muscle/tendon length.
Phase II (4-8 weeks)
4 weeks
- Full finger ROM and initiate gentle wrist AROM with goal to obtain approximately 50% wrist AROM by the end of phase II.
May perform light ADLs with affected hand. Light ADLs include putting on and taking off loose clothing and shoes, washing dinnerware, and folding clothing.
- Thermoplastic wrist hand orthosis (WHO) with wrist positioned in neutral, removed only for exercise and hygiene.
- Initiate gentle AROM of wrist including: “Dart thrower’s Motion”.
- Initiate scar management and desensitization techniques.
- Light ADL activities can resume.
6 weeks - Initiate wrist AAROM.
- Initiate isometrics.
Hand Rehabilitation Protocols | 23
If you have any questions or concerns, please call 859-562-1980.
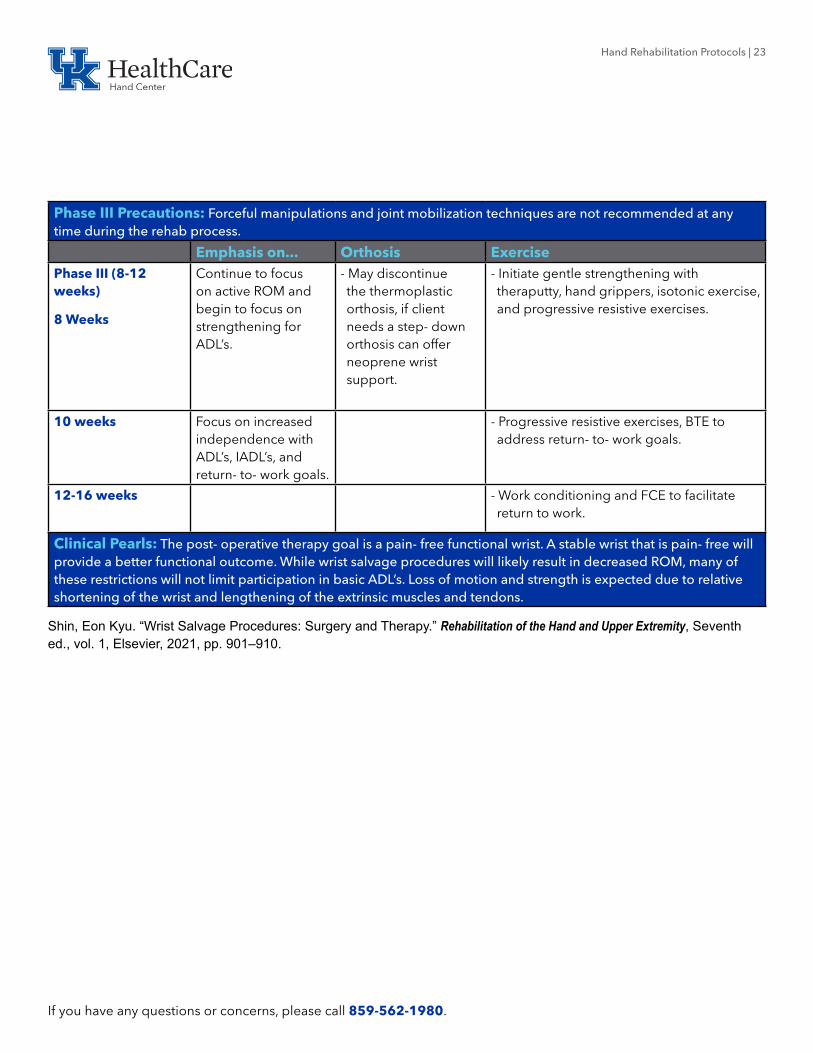
Phase III Precautions: Forceful manipulations and joint mobilization techniques are not recommended at any time during the rehab process.
Emphasis on... Orthosis ExercisePhase III (8-12 weeks)
8 Weeks
Continue to focus on active ROM and begin to focus on strengthening for ADL’s.
- May discontinue the thermoplastic orthosis, if client needs a step- down orthosis can offer neoprene wrist support.
- Initiate gentle strengthening with theraputty, hand grippers, isotonic exercise, and progressive resistive exercises.
10 weeks Focus on increased independence with ADL’s, IADL’s, and return- to- work goals.
- Progressive resistive exercises, BTE to address return- to- work goals.
12-16 weeks - Work conditioning and FCE to facilitate return to work.
Clinical Pearls: The post- operative therapy goal is a pain- free functional wrist. A stable wrist that is pain- free will provide a better functional outcome. While wrist salvage procedures will likely result in decreased ROM, many of these restrictions will not limit participation in basic ADL’s. Loss of motion and strength is expected due to relative shortening of the wrist and lengthening of the extrinsic muscles and tendons.
Shin, Eon Kyu. “Wrist Salvage Procedures: Surgery and Therapy.” Rehabilitation of the Hand and Upper Extremity, Seventh ed., vol. 1, Elsevier, 2021, pp. 901–910.
Hand Rehabilitation Protocols | 24
If you have any questions or concerns, please call 859-562-1980.
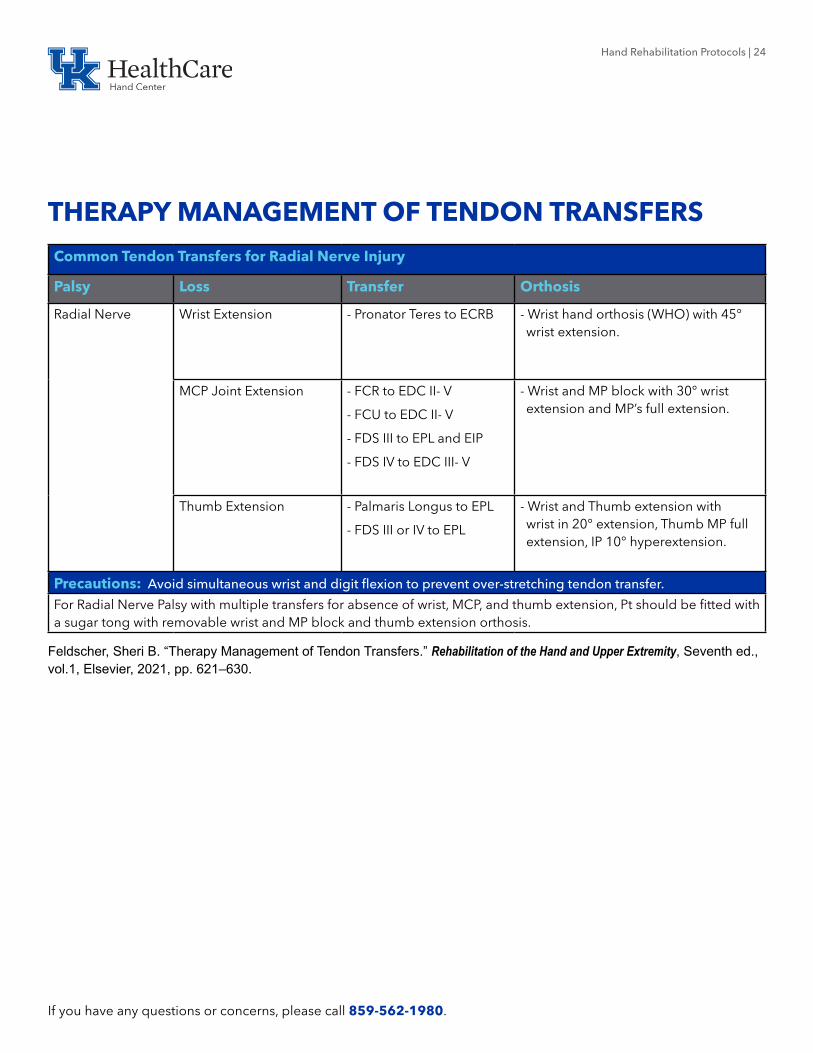
THERAPY MANAGEMENT OF TENDON TRANSFERS
Common Tendon Transfers for Radial Nerve Injury
Palsy Loss Transfer Orthosis
Radial Nerve Wrist Extension - Pronator Teres to ECRB - Wrist hand orthosis (WHO) with 45° wrist extension.
MCP Joint Extension - FCR to EDC II- V
- FCU to EDC II- V
- FDS III to EPL and EIP
- FDS IV to EDC III- V
- Wrist and MP block with 30° wrist extension and MP’s full extension.
Thumb Extension - Palmaris Longus to EPL
- FDS III or IV to EPL
- Wrist and Thumb extension with wrist in 20° extension, Thumb MP full extension, IP 10° hyperextension.
Precautions: Avoid simultaneous wrist and digit flexion to prevent over-stretching tendon transfer.
For Radial Nerve Palsy with multiple transfers for absence of wrist, MCP, and thumb extension, Pt should be fitted with a sugar tong with removable wrist and MP block and thumb extension orthosis.
Feldscher, Sheri B. “Therapy Management of Tendon Transfers.” Rehabilitation of the Hand and Upper Extremity, Seventh ed., vol.1, Elsevier, 2021, pp. 621–630.

Hand Rehabilitation Protocols | 25
If you have any questions or concerns, please call 859-562-1980.
Common Tendon Transfers for Median Nerve Injury
Palsy Loss Transfer OrthosisHigh Median Nerve injuries: At or above the elbow.
Thumb IP joint flexion - Brachioradialis to FPL Dorsal Block orthosis (DBO) with 20° wrist flexion, Thumb MP and IP 20° flexion, CMC in palmar abduction.
II and III finger flexion - Suture FDP II and III to functioning FDP IV and V.
- ECRL to FDP II and III if additional power is needed.
DBO with 20° wrist flexion, MP’s 65° flexion, IP’s full extension.
Low Median Nerve Injuries: Below the elbow
Opposition - FDS IV to APB
- EIP to APB
- ADM to APB
- DBO with 20° wrist flexion, Thumb wide palmar abduction.
- Same as above unless dorsal approach: Wrist is 15° wrist extension.
- HB splint with thumb in wide palmar abduction.
Thumb Abduction - PL to APB - Thumb Spica 20° wrist flexion, thumb wide palmar abduct.
Precautions: Avoid simultaneous wrist, thumb, and finger extension.
Feldscher, Sheri B. “Therapy Management of Tendon Transfers.” Rehabilitation of the Hand and Upper Extremity, Seventh ed., vol. 1, Elsevier, 2021, pp. 621–630.
Common Tendon Transfers for Ulnar Nerve Injury

Hand Rehabilitation Protocols | 26
If you have any questions or concerns, please call 859-562-1980.
Palsy Loss Transfer OrthosisHigh Ulnar Nerve FDP IV and V + low ulnar
nerve deficits.- Suture IV and V to FDP II and III.
- DBO with 20°wrist flexion, MP’s 65° flexion, IP’s in full extension.
Intrinsics
*Interossei
*Ulnar Lumbricals
- FDS to radial lateral band.
- ECRL to lateral band
- ECRB to lateral band (dorsal approach)
- MCP joint capsulodesis
- Same as above.
- Same as above
- DBO with 30° wrist extension, MP’s 60° flexion, IP’s in full extension
- DBO with MP’s in 30° of flexion, wrist and IP’s are not included.
Thumb Adduction - ECRL + graft to AP
- BR + graft to AP
- DBO with wrist 20° extension, thumb 30° palmar abduction.
Precautions: Avoid MCP joint extension and simultaneous finger, thumb, and wrist extension.
Feldscher, Sheri B. “Therapy Management of Tendon Transfers.” Rehabilitation of the Hand and Upper Extremity, Seventh ed., vol. 1, Elsevier, 2021, pp. 621–630.

Hand Rehabilitation Protocols | 27
If you have any questions or concerns, please call 859-562-1980.
Postoperative Management Treatment GuidelinesPhase I: Immobilization 0-4 weeks - Protect Transfer - Protective orthosis
- A/PROM of the uninvolved joints
- 25 repetitions every 2 hours.
- Edema control; elevation, ice, compression.
10-14 days - Post- op bandage and splint removed in favor of custom orthosis.
3 weeks Facilitate tendon gliding without placing undue stress on healing juncture site.
- Initiate AROM to recruit tendon transfer.
- Scar management
4 weeks - NMES for activation of transfer.
Phase II: Activation of transfer; active motion
5-8 weeks Facilitate tendon gliding without placing undue stress on healing juncture site.
- Continue Tendon transfer training
- Active Motion
- Initiate Biofeedback
- Facilitation techniques including: vibration, tapping, etc.
- Edema Control
- Scar Management
- Initiate light ADL activities
6 weeks - Protective orthosis discontinued during daytime.
Phase III: Strengthening and return to function
8-12 weeks Increase strength and endurance to allow for return to function.
- Putty exercise, hand grippers
- Light hand weights
- Increased participation in ADL activities
8-10 weeks - Night splinting is discontinued.
10-12 weeks - BTE or work simulator
- independent ADL’s.
14-16 weeks - FCE/return to work.
Feldscher, Sheri B. “Therapy Management of Tendon Transfers.” Rehabilitation of the Hand and Upper Extremity, Seventh ed., vol. 1, Elsevier, 2021, pp. 621–630.

Hand Rehabilitation Protocols | 28
If you have any questions or concerns, please call 859-562-1980.
TOTAL WRIST ARTHRODESIS
Phase I Precautions: Protect surgical repair, pain control and edema control. Client will have 5lb lifting restriction for up to 8 weeks.
Emphasis on Orthosis ExercisePhase I (0-4 weeks)
- Achieve nearly full finger and thumb ROM of affected hand within 4 weeks.
- Expect full elbow and shoulder ROM within 4 weeks.
Short arm cast for 4 weeks.
- Current literature positions the wrist in 10-15° wrist extension.
- Finger AROM exercises including: Differential Tendon Gliding, Individual Tendon Gliding, Composite Fist
- Gentle AROM of forearm, elbow, and shoulder is initiated.
- All exercises should be performed 4-6 times per day for up to 5-10 minutes.
- Edema Control: Elevation, Ice, Coban wrapping of fingers.
Phase II Precautions: With delayed healing or non- union phase I may be delayed. Therapist should continue to monitor for signs of infection, hematoma, excessive edema and dehiscence at the incision site. Focus on EDC gliding to prevent scar adhesions.
Phase II (4-8 weeks)
4 weeks
Full ROM of elbow, shoulder, and hand by the end of phase II.
May perform light ADLs with affected hand. Light ADLs include putting on and taking off loose clothing and shoes, washing dinnerware, and folding clothing.
- Forearm based wrist hand orthosis (WHO) to be worn between exercise sessions and at night.
- If MCP lag is present, may attach extension support at night.
- If MCP flexion is limited may add exercise orthosis to promote MCP flexion.
- Initiate scar management and desensitization techniques.
- Light ADL activities can resume.
- May begin blocking exercises and PROM of fingers if any limitations are present.
6 weeks - WHO can be discontinued at 6 weeks.
- Continue outlined plan above.
- Focus on fine motor tasks and medium ADL activities.

Hand Rehabilitation Protocols | 29
If you have any questions or concerns, please call 859-562-1980.
Phase III Precautions: Continue to protect healing fusion. 5lb lifting restriction may be removed at 8 weeks but progression of resistive exercises should be client centered and include MD regarding healing of the fusion.
Emphasis on Orthosis Exercise
Phase III (8-12 weeks)
8 Weeks
- Begin to focus on strengthening for ADL’s.
- Client can continue with a step- down orthosis if needed for heavy ADL’s to ease Pt concerns over injury.
- Initiate gentle isometric strengthening progress to light theraputty exercise.
10 weeks - Focus on increased independence with ADL’s, IADL’s, and return- to- work goals.
- Hand grippers, isotonic exercise, and progressive resistive exercises.
12- 16 weeks - Work conditioning and FCE to facilitate return to work.
Clinical Pearls: Grip strength will not plateau for up to 1 year following surgery. Client may continue to have difficulty with ADL’s and IADL’s for up to 6- 12 months following surgery and should receive instruction in adaptive equipment, ergonomic adjustments, and task modification to meet ongoing ADL goals.
Shin, Eon Kyu. “Wrist Salvage Procedures: Surgery and Therapy.” Rehabilitation of the Hand and Upper Extremity, Seventh ed., vol. 1, Elsevier, 2021, pp. 901–910.

Hand Rehabilitation Protocols | 30
If you have any questions or concerns, please call 859-562-1980.
TOTAL WRIST ARTHROPLASTY
Phase I Precautions: Protect surgical repair, pain control and edema control.
Emphasis on Orthosis Exercise
Phase I (0-6 weeks)
- Achieve full AROM of affected fingers, elbow, and shoulder by end of phase I.
- Depending upon MD: short arm cast or removable thermoplastic wrist hand orthosis (WHO) which is removed only for hygiene.
- Initiate finger and thumb ROM to limits of cast or orthosis.
- Initiate AROM for forearm, elbow, and shoulder.
- Edema control techniques including: elevation, ice, coban wrapping of fingers.
2-3 weeks - Initiate scar management techniques.
4 weeks - Initiate gentle AROM of wrist.
Phase II Precautions: Continue to protect surgical repair. Focus on good tendon glide of extensor tendons to prevent tendon adhesion.
Emphasis on Orthosis Exercise
Phase II (6-8 weeks)
6 weeks
- Obtain full AROM of fingers and uninvolved joints. Client should obtain 30° flexion and extension (arc of 60°).
- May perform light ADLs with affected hand. Light ADLs include putting on and taking off loose clothing and shoes, washing dinnerware, and folding clothing.
- Client can be weaned from the WHO by end of phase II.
- Continue with ROM goals outlined above.
- May add isometric strengthening for hand, wrist, and forearm with progression to isotonic exercises at phase III.

Hand Rehabilitation Protocols | 31
If you have any questions or concerns, please call 859-562-1980.
Phase III Precautions: Continue to protect surgical repair, manipulations and joint mobilization techniques are not advised at any point in the rehab process. If a static progressive orthosis is ordered by MD be cautious to avoid overstressing the joint.
Emphasis on Orthosis Exercise
Phase III (8-12 weeks)
8 Weeks
- Active ROM and begin to focus on light strengthening for ADL’s.
- If wrist stiffness is present, with MD approval, may add static progressive orthosis.
- Gentle PROM of wrist may be added.
- Initiate isotonic exercise including: light theraputty exercise and hand grippers.
10 weeks Focus on increased independence with ADL’s, IADL’s, and return- to- work goals.
- Progressive resistive exercises working within 10 lb. lifting restrictions.
12 weeks - Focus on HEP.
Clinical Pearls: It is important to remember this procedure is most appropriate for lower demand patients. Patients should be instructed to avoid loading and lifting anything greater than 10 lbs. to protect the prosthesis. Maximal gains in motion may not be expected for up to 6 months following surgery and include: 60° flexion/extension arc, 10° radial deviation, and 25° ulnar deviation. Grip strength can take up to 1 year to reach maximal potential with a goal of 70% of the unaffected side.
Shin, Eon Kyu. “Wrist Salvage Procedures: Surgery and Therapy.” Rehabilitation of the Hand and Upper Extremity, Seventh ed., vol. 1, Elsevier, 2021, pp. 901–910.

Hand Rehabilitation Protocols | 32
If you have any questions or concerns, please call 859-562-1980.
FLEXOR TENDON REPAIR ZONES IV AND V-EARLY ACTIVE MOTION
Phase I Precautions: All exercises must be completed while wearing the dorsal blocking orthosis. It is important to decrease work of flexion and stress on tendon repair from edema by removing bandages during exercise. Patient compliance and good communication with MD is extremely important. Modalities including NMES and ultrasound may be added 3- 4 weeks post op however, please check with MD prior to adding modalities the plan of care.
Emphasis on Orthosis ExercisePhase I (0-6 weeks)
Week 1
Full supple PROM of digits; this must be obtained prior to initiating early active motion protocol in week 2.
One-handed ADLs.
Post-op bandages are removed for light compressive dressing and custom orthosis.
Zones IV- V
- Dorsal Block Orthosis
Wrist 15- 30° extension, MCP 60°- 75° flexion to intentionally favor intrinsic shortening, and
IPs at 0°
- With concomitant nerve repairs, the wrist may need to be placed in slight flexion initially, consult with MD.
PROM within restraints of orthosis is performed
25 repetitions every 2 hours.
- passive MCP flexion/extension
- passive PIP flexion/extension
- passive DIP flexion/extension
- composite flexion/extension of entire digit in limits of orthosis
- Early edema control is critical including: elevation, coban, ice
Week 2 Must have full supple PROM to initiate early short arc active flexion
Continue one-handed ADLs.
Continue all exercises within the confines of the dorsal blocking orthosis.
- Continue PROM as warm- up.
- Initiate early short arc flexion to one quarter of fist.
- Initiate short arc place and active hold to one quarter of fist.
- All exercises are performed 25 repetitions every 2 hours.
- Continue edema control techniques.
Hand Rehabilitation Protocols | 33
If you have any questions or concerns, please call 859-562-1980.
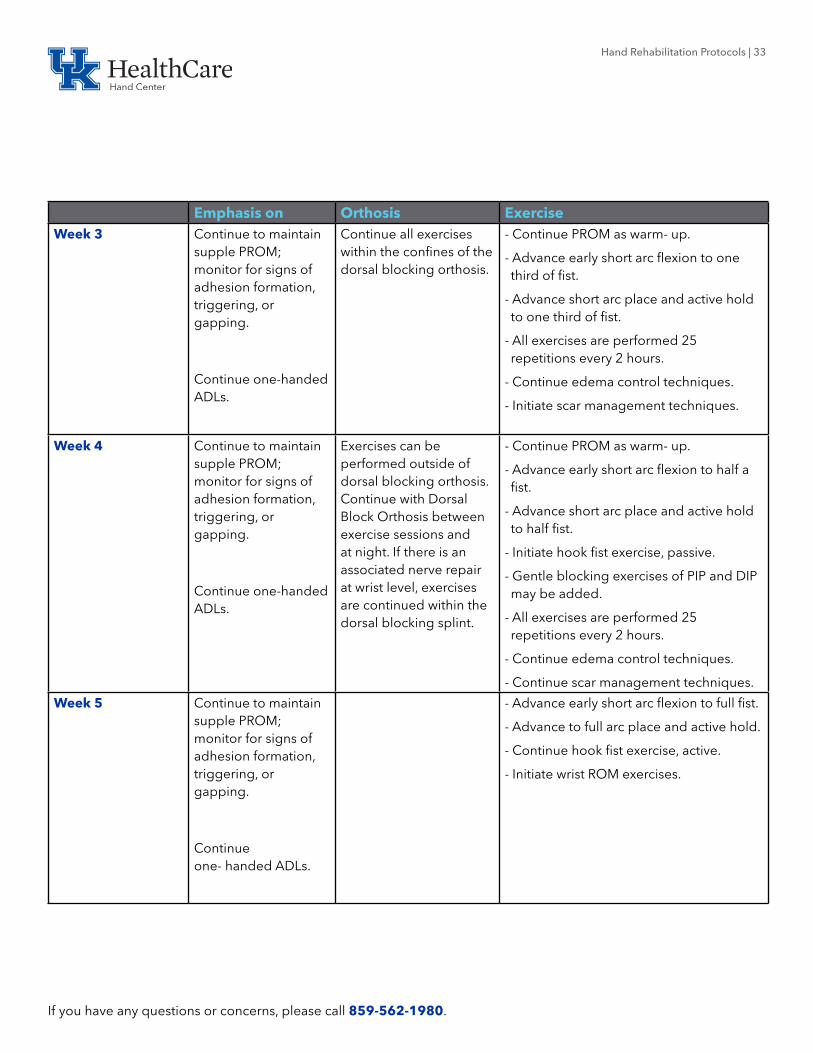
Emphasis on Orthosis ExerciseWeek 3 Continue to maintain
supple PROM; monitor for signs of adhesion formation, triggering, or gapping.
Continue one-handed ADLs.
Continue all exercises within the confines of the dorsal blocking orthosis.
- Continue PROM as warm- up.
- Advance early short arc flexion to one third of fist.
- Advance short arc place and active hold to one third of fist.
- All exercises are performed 25 repetitions every 2 hours.
- Continue edema control techniques.
- Initiate scar management techniques.
Week 4 Continue to maintain supple PROM; monitor for signs of adhesion formation, triggering, or gapping.
Continue one-handed ADLs.
Exercises can be performed outside of dorsal blocking orthosis. Continue with Dorsal Block Orthosis between exercise sessions and at night. If there is an associated nerve repair at wrist level, exercises are continued within the dorsal blocking splint.
- Continue PROM as warm- up.
- Advance early short arc flexion to half a fist.
- Advance short arc place and active hold to half fist.
- Initiate hook fist exercise, passive.
- Gentle blocking exercises of PIP and DIP may be added.
- All exercises are performed 25 repetitions every 2 hours.
- Continue edema control techniques.
- Continue scar management techniques.
Week 5 Continue to maintain supple PROM; monitor for signs of adhesion formation, triggering, or gapping.
Continue one- handed ADLs.
- Advance early short arc flexion to full fist.
- Advance to full arc place and active hold.
- Continue hook fist exercise, active.
- Initiate wrist ROM exercises.
Hand Rehabilitation Protocols | 34
If you have any questions or concerns, please call 859-562-1980.
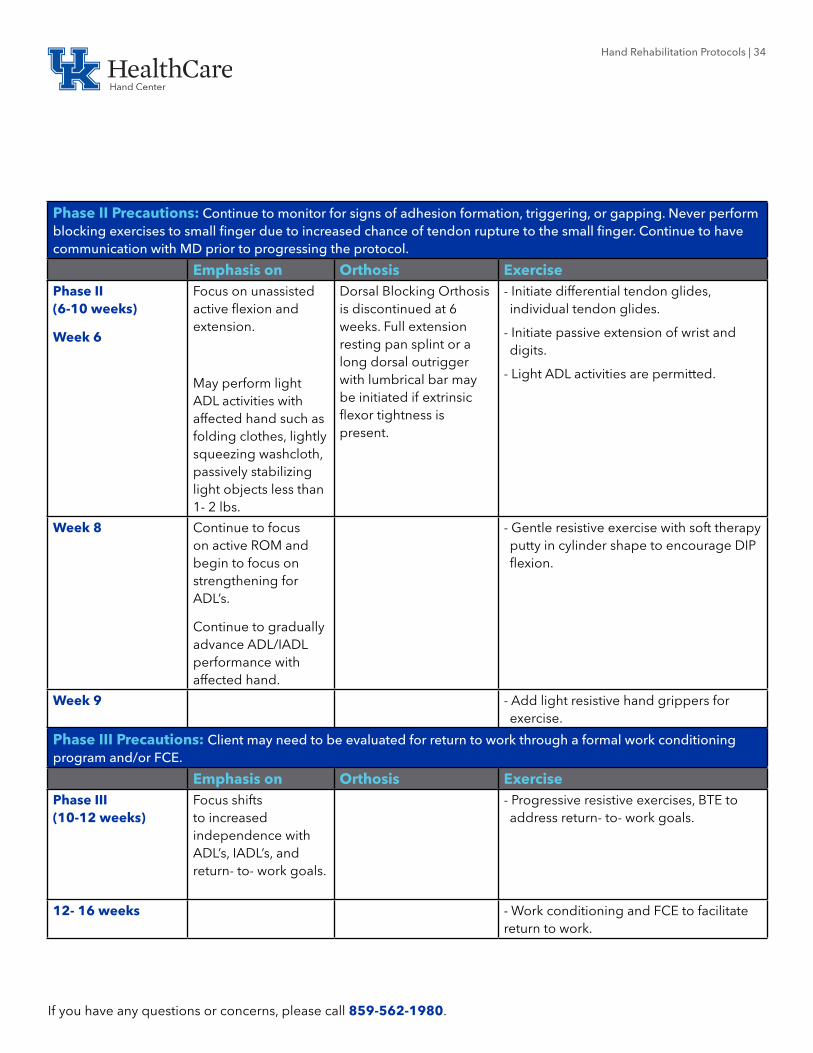
Phase II Precautions: Continue to monitor for signs of adhesion formation, triggering, or gapping. Never perform blocking exercises to small finger due to increased chance of tendon rupture to the small finger. Continue to have communication with MD prior to progressing the protocol.
Emphasis on Orthosis ExercisePhase II (6-10 weeks)
Week 6
Focus on unassisted active flexion and extension.
May perform light ADL activities with affected hand such as folding clothes, lightly squeezing washcloth, passively stabilizing light objects less than 1- 2 lbs.
Dorsal Blocking Orthosis is discontinued at 6 weeks. Full extension resting pan splint or a long dorsal outrigger with lumbrical bar may be initiated if extrinsic flexor tightness is present.
- Initiate differential tendon glides, individual tendon glides.
- Initiate passive extension of wrist and digits.
- Light ADL activities are permitted.
Week 8 Continue to focus on active ROM and begin to focus on strengthening for ADL’s.
Continue to gradually advance ADL/IADL performance with affected hand.
- Gentle resistive exercise with soft therapy putty in cylinder shape to encourage DIP flexion.
Week 9 - Add light resistive hand grippers for exercise.
Phase III Precautions: Client may need to be evaluated for return to work through a formal work conditioning program and/or FCE.
Emphasis on Orthosis ExercisePhase III (10-12 weeks)
Focus shifts to increased independence with ADL’s, IADL’s, and return- to- work goals.
- Progressive resistive exercises, BTE to address return- to- work goals.
12- 16 weeks - Work conditioning and FCE to facilitate return to work.

Hand Rehabilitation Protocols | 35
If you have any questions or concerns, please call 859-562-1980.
Clinical Pearls: Throughout the rehab process it is extremely important to monitor for signs of tendon adhesion and modify plan of care accordingly. It is important to remember that the client will continue to improve after discharge from therapy. Progress will continue for up to 1 year following tendon repair and clients should be instructed to continue to focus on a HEP until all of their goals are met. Therapy visits are most important during the first 2- 4 weeks to achieve good motion and prevent tendon adhesion. Both active and passive ROM measurements should be taken on each visit with a goal of 5- 10° gains in flexion each visit. With combined median and ulnar nerve repairs may require MP blocking orthosis to prevent clawing. You may also consider a web spacer orthosis at night if the patient begins to develop a web space contracture following median nerve repair.
Cannon, Nancy M. “Therapy Management of Flexor Tendon Injuries and Repairs.” Rehabilitation of the Hand and Upper Extremity, Seventh ed., vol. 1, Elsevier, 2021, pp. 421–431.

Hand Rehabilitation Protocols | 36
If you have any questions or concerns, please call 859-562-1980.
FOUR CORNER FUSIONPhase I Precautions: There are a variety of techniques described in the literature to secure the arthrodesis, the chosen method of fixation will determine the post- operative care. In general, protect surgical repair, assist in pain and edema control techniques.
Emphasis on... Orthosis ExercisePhase I (0-4 weeks)
- Wrist and thumb immobilization for 4 weeks.
- Goal is to achieve full finger ROM within 4 weeks.
- Expect full elbow and shoulder ROM within 4 weeks.
- Primarily one- handed ADLs with assistance of fingers and thumb of affected limb
- Thumb Spica cast for 4 weeks.
- Finger ROM exercises including: Differential Tendon Gliding, Individual Tendon Gliding, Composite Fist
- Gentle AROM of forearm, elbow, and shoulder is initiated.
- All exercises should be performed 4- 6 times per day for up to 5- 10 minutes.
- Edema Control: Elevation, Ice, Coban wrapping of fingers.
Phase II Precautions: Avoid undue stress at the repair site such as grip strengthening exercises or tasks that significantly load the carpus until physician has indicated fusion can tolerate resistive activities.
Emphasis on... Orthosis ExercisePhase II (4-8 weeks)
4 weeks
- Initiate gentle AROM of wrist and thumb. Goal of 50% ROM by the end of phase II.
- Initiate light ADL activities that require less than 1- 2 lbs of strength
- Thermoplastic thumb spica with wrist positioned in neutral, removed only for exercise and hygiene.
- Initiate gentle AROM of wrist and thumb.
- Initiate scar management and desensitization techniques.
- Light ADL activities can resume.
6 weeks - Initiate wrist AAROM.
- Initiate isometrics.

Hand Rehabilitation Protocols | 37
If you have any questions or concerns, please call 859-562-1980.
Phase III Precautions: Forceful manipulations and joint mobilization techniques are not advised.
Emphasis on... Orthosis ExercisePhase III (8-12 weeks)
8 Weeks
Continue to focus on active ROM and begin strengthening for ADL’s.
- May discontinue the thermoplastic orthosis, if client needs a step- down orthosis can offer neoprene thumb and wrist support.
- Initiate gentle strengthening with theraputty, hand grippers, isotonic exercise, and progressive resistive exercises.
10 weeks Focus on increased independence with ADL’s, IADL’s, and return- to- work goals.
- Progressive resistive exercises, BTE to address return- to- work goals.
12- 16 weeks - Work conditioning and FCE to facilitate return to work.
Clinical Pearls: The post- operative therapy goal is a pain- free functional wrist. A stable wrist that is pain- free will provide a better functional outcome. While wrist salvage procedures will likely result in decreased ROM, many of these restrictions will not limit participation in basic ADL’s. Return to work for high physical demand jobs may take up to 6 months. Outcome studies show on average return of 50% wrist ROM in flexion and extension and 40% wrist radial/ulnar ROM, along with 50% grip strength compared to contralateral side.
Shin, Eon Kyu. “Wrist Salvage Procedures: Surgery and Therapy.” Rehabilitation of the Hand and Upper Extremity, Seventh ed., vol. 1, Elsevier, 2021, pp. 901–910.
Hand Rehabilitation Protocols | 38
If you have any questions or concerns, please call 859-562-1980.
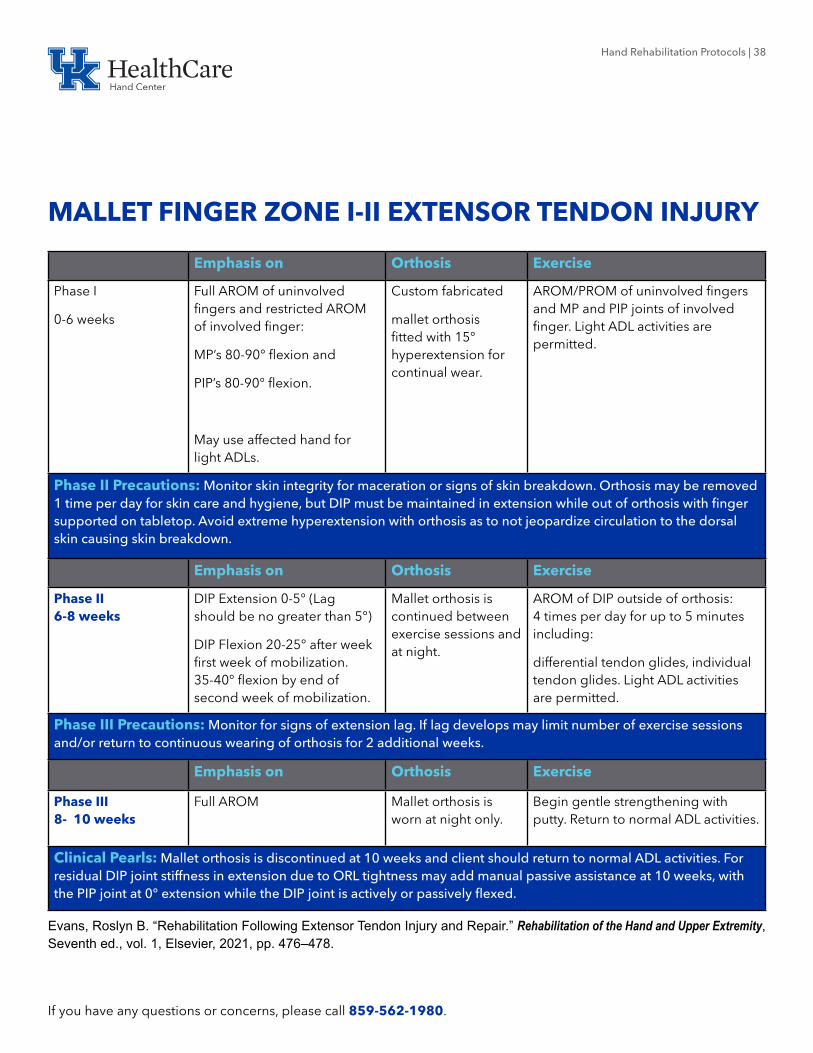
MALLET FINGER ZONE I-II EXTENSOR TENDON INJURY
Emphasis on Orthosis Exercise
Phase I
0-6 weeks
Full AROM of uninvolved fingers and restricted AROM of involved finger:
MP’s 80-90° flexion and
PIP’s 80-90° flexion.
May use affected hand for light ADLs.
Custom fabricated
mallet orthosis fitted with 15° hyperextension for continual wear.
AROM/PROM of uninvolved fingers and MP and PIP joints of involved finger. Light ADL activities are permitted.
Phase II Precautions: Monitor skin integrity for maceration or signs of skin breakdown. Orthosis may be removed 1 time per day for skin care and hygiene, but DIP must be maintained in extension while out of orthosis with finger supported on tabletop. Avoid extreme hyperextension with orthosis as to not jeopardize circulation to the dorsal skin causing skin breakdown.
Emphasis on Orthosis Exercise
Phase II 6-8 weeks
DIP Extension 0-5° (Lag should be no greater than 5°)
DIP Flexion 20-25° after week first week of mobilization. 35-40° flexion by end of second week of mobilization.
Mallet orthosis is continued between exercise sessions and at night.
AROM of DIP outside of orthosis: 4 times per day for up to 5 minutes including:
differential tendon glides, individual tendon glides. Light ADL activities are permitted.
Phase III Precautions: Monitor for signs of extension lag. If lag develops may limit number of exercise sessions and/or return to continuous wearing of orthosis for 2 additional weeks.
Emphasis on Orthosis Exercise
Phase III 8- 10 weeks
Full AROM Mallet orthosis is worn at night only.
Begin gentle strengthening with putty. Return to normal ADL activities.
Clinical Pearls: Mallet orthosis is discontinued at 10 weeks and client should return to normal ADL activities. For residual DIP joint stiffness in extension due to ORL tightness may add manual passive assistance at 10 weeks, with the PIP joint at 0° extension while the DIP joint is actively or passively flexed.
Evans, Roslyn B. “Rehabilitation Following Extensor Tendon Injury and Repair.” Rehabilitation of the Hand and Upper Extremity, Seventh ed., vol. 1, Elsevier, 2021, pp. 476–478.

Hand Rehabilitation Protocols | 39
If you have any questions or concerns, please call 859-562-1980.
ORIF DISTAL RADIUS
Phase I Precautions: MD will determine if fracture is stable and ready to initiate therapy. Early goals are to obtain excellent finger ROM, edema control, and protect healing fracture.
Emphasis on Orthosis ExercisePhase I (0-4 weeks)
Week 1
Initiate early unrestricted motion of fingers to the limits of post- op bandage or wrist hand orthosis (WHO).
May use fingers, thumb, and unaffected joints to stabilize object during ADLs/IADLs while in cast.
Remove post- op bandage and apply
short arm cast.
- Finger ROM including: gentle fist and thumb ROM.
- Edema control: elevation, ice, coban.
Week 2 Goal is to have good finger ROM by end of phase I.
May use fingers, thumb, and unaffected joints to hold objects less than 1 lbs. during ADLs/IADLs while in orthosis.
Custom thermoplastic WHO with slight wrist extension.
- Finger ROM including:
Differential tendon glide, individual tendon glide, joint blocks.
- Initiate gentle wrist ROM including: wrist blocks, pronation/supination.
- Continue edema control
- Initiate gentle scar management techniques including: scar massage, elastomer.
Phase II Precautions: Continue to focus on edema control, scar management and desensitization techniques. Common pitfalls to avoid include: extrinsic flexor compartment tightness, intrinsic tightness. Gentle manipulations may be added with caution.
Emphasis on Orthosis ExercisePhase II (4-8 weeks)
Week 4
Full finger ROM and obtain approximately 50% wrist AROM.
May perform light ADLs with affected hand. Light ADLs include putting on and taking off loose clothing and shoes, washing dinnerware, and folding clothing.
Continue to remove thermoplastic WHO for exercise and short periods of time during the day.
- Add gentle wrist PROM including prayer stretch, pronation/supination.
- AAROM for extrinsic compartment length
- intrinsic stretches
- continue edema control and scar management.
- Light ADL’s are permitted.

Hand Rehabilitation Protocols | 40
If you have any questions or concerns, please call 859-562-1980.
Emphasis on Orthosis ExerciseWeek 6 Client should focus on
achieving 75% of wrist ROM.Thermoplastic orthosis can be discontinued. Step down orthosis can be provided if client requests soft wrist support.
- Continue to focus on muscle balance with A/PROM
- Focus on extrinsic and intrinsic length stretches.
- May initiate gentle grip strengthening with therapy putty and hand grippers.
Phase III Precautions: Continue to protect healing fracture, restore normal muscle balance, and focus on gentle strengthening. Client goals should continue to address ADL’s, IADL’s, and return- to- work goals.
Emphasis on Orthosis ExercisePhase III (8-12 weeks)
Week 8
Client should have nearly full wrist and finger ROM within 8 weeks.
If needed, may add intrinsic stretch orthosis.
- Begin gentle wrist and forearm strengthening including: hand weights and theraband.
- initiate scapula stabilization exercises.
- initiate gentle weightbearing activities including: table top dusting, modified wall push- ups.
Week 10 Focus on increased independence with ADL’s, IADL’s, and return- to- work goals.
May add any required corrective orthosis, if MD confirms fracture healing: static progressive wrist flexion/extension, pronation/supination.
- Progressive resistive exercises including: BTE simulator and return- to- work goals.
- Progress toward independence with IADL’s.
Week 12- 16 - Work conditioning,
- Focus on HEP.
Clinical Pearls: It is important to remember that the client will continue to improve after discharge from therapy. Progress will continue for up to 1 year after surgery and clients should be instructed to continue to focus on a HEP until all of their goals are met.
Naughton, Nancy. “Therapy Management of Distal Radius Fractures.” Rehabilitation of the Hand and Upper Extremity, Seventh ed., vol. 1, Elsevier, 2021, pp. 833–848.

Hand Rehabilitation Protocols | 41
If you have any questions or concerns, please call 859-562-1980.
TRAPEZIECTOMY WITH LRTI
Phase I Precautions: No heavy lifting greater than 2 lbs. Monitor for signs of skin breakdown from orthosis. CMC joint should be supported during range of motion exercises and avoid thumb opposition for 8 weeks to prevent stretching suspensionplasty.
Emphasis on Orthosis Exercise
Phase I (0-4 Weeks)
1- 14 days post- op
Gentle finger ROM to limits of post- op bandage.
Post- Op Bandage - Gentle finger AROM to the limits of the post- op bandage.
- Edema control techniques.
10-14 days post-op to 4 weeks
Thumb Spica Cast Initiate A/PROM of fingers including: differential tendon glides, individual tendon glides.
4 Weeks Initiate gentle thumb ROM with CMC supported.
Custom HB thumb spica orthosis midway between palmar and radial abduction. Remove only for ADL’s and exercise.
- AROM/PROM of thumb MCP and IP joint with supported CMC joint. 3 times per day for 5 minutes
- AROM/PROM of wrist.
- Continue edema control.
- Initiate scar management techniques.
Phase II Precautions: Continue to avoid thumb opposition until 8 weeks post- surgery.
Emphasis on Orthosis ExercisePhase II (4-8 Weeks)
6 Weeks
50% of thumb ROM for MCP and IP joints
May perform light ADLs with affected hand. Light ADLs include putting on and taking off loose clothing and shoes, washing dinnerware, and folding clothing
- Continue HB Thumb Spica for repetitious activities, lifting, or pinch.
Initiate gentle AROM of thumb CMC joint including: abduction, adduction, flexion, and extension.
Light ADL’s permitted

Hand Rehabilitation Protocols | 42
If you have any questions or concerns, please call 859-562-1980.
Phase III Precautions: If client experiences increased pain or swelling with strengthening program, delay strengthening for 2 weeks. Important to remember healing process can take up to a full year. Continue with HEP until all goals have been met.
Emphasis on Orthosis Exercise
Phase III (8-12 Weeks)
8 weeks
Full AROM for MCP and IP joints by 8 weeks.
- Discontinue HB Thumb Spica by 8 weeks.
- Initiate progressive strengthening program.
10 weeks Full A/PROM of thumb MCP, IP, and CMC joints.
- Continue with HEP for ROM and strengthening.
12 weeks - Client may resume normal ADL activities as tolerated.
- Client may return to work full duty if job requirements have been met.
Valdes, Kristen. “Therapist’s Management of the Thumb Carpometacarpal Joint with Osteoarthritis.” Rehabilitation of the Hand and Upper Extremity, Seventh ed., vol. 2, Elsevier, 2021, pp. 1261–1277.

Hand Rehabilitation Protocols | 43
If you have any questions or concerns, please call 859-562-1980.
TRAPEZIECTOMY WITH TIGHTROPE SUSPENSION
Phase I Precautions: No heavy lifting greater than 2 lbs. Monitor for signs of skin breakdown from orthosis. CMC joint should be supported during range of motion exercises and avoid thumb opposition for 8 weeks to prevent stretching suspensionplasty.
Emphasis on... Orthosis Exercise
Phase I (0-4 Weeks)
1-14 days post- op
Full AROM of uninvolved fingers.
Post- Op Bandage - AROM/PROM of uninvolved fingers
- Edema control techniques.
10-14 days post-op
Initiate gentle thumb ROM with CMC supported.
Custom FB thumb spica orthosis midway between palmar and radial abduction. Remove only for ADL’s and exercise.
- AROM/PROM of thumb MCP and IP joint with supported CMC joint. 3 times per day for 5 minutes
- AROM/PROM of wrist.
- Continue edema control.
3 weeks 50% of thumb ROM for MCP and IP joints
- Initiate scar management techniques.
Phase II Precautions: Continue to avoid thumb opposition until 8 weeks post- surgery.
Emphasis on... Orthosis ExercisePhase II (4-8 Weeks)
Full AROM for MCP and IP joints by 8 weeks.
- FB Thumb Spica may be removed at 4 weeks for light ADL’s and worn at night only.
- HB Thumb Spica should be worn for repetitious activities, lifting, or pinch.
Initiate gentle AROM of thumb CMC joint including: abduction, adduction, flexion, and extension.
- Light ADL activities are permitted.
6 weeks - FB Thumb Spica discontinued at night.
- HB Thumb Spica should be continued with repetitious activities, lifting, or pinch.

Hand Rehabilitation Protocols | 44
If you have any questions or concerns, please call 859-562-1980.
Phase III Precautions: If client experiences increased pain or swelling with strengthening program, delay strengthening for 2 weeks. Important to remember healing process can take up to a full year. Continue with HEP until all goals have been met.
Emphasis on... Orthosis ExercisePhase III
(8-12 weeks) Full A/PROM of thumb MCP, IP, and CMC joints.
- Discontinue HB Thumb Spica by 8 weeks.
- 8 weeks initiate progressive strengthening program.
10 weeks - Continue with HEP for ROM and strengthening.
12 weeks - Client may resume normal ADL activities as tolerated.
- Client may return to work full duty if job requirements have been met.
Valdes, Kristen. “Therapist’s Management of the Thumb Carpometacarpal Joint with Osteoarthritis.” Rehabilitation of the Hand and Upper Extremity, Seventh ed., vol. 2, Elsevier, 2021, pp. 1261–1277.
Hand Rehabilitation Protocols | 45
If you have any questions or concerns, please call 859-562-1980.
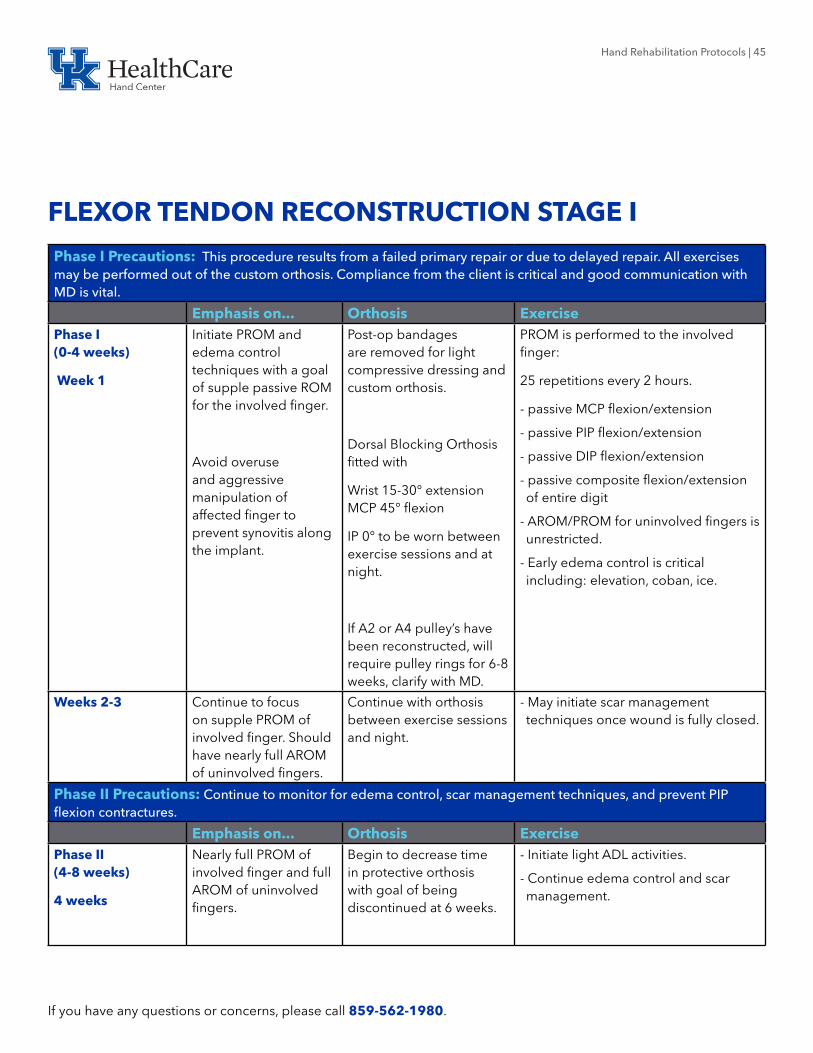
FLEXOR TENDON RECONSTRUCTION STAGE I
Phase I Precautions: This procedure results from a failed primary repair or due to delayed repair. All exercises may be performed out of the custom orthosis. Compliance from the client is critical and good communication with MD is vital.
Emphasis on... Orthosis ExercisePhase I (0-4 weeks)
Week 1
Initiate PROM and edema control techniques with a goal of supple passive ROM for the involved finger.
Avoid overuse and aggressive manipulation of affected finger to prevent synovitis along the implant.
Post-op bandages are removed for light compressive dressing and custom orthosis.
Dorsal Blocking Orthosis fitted with
Wrist 15-30° extension MCP 45° flexion
IP 0° to be worn between exercise sessions and at night.
If A2 or A4 pulley’s have been reconstructed, will require pulley rings for 6-8 weeks, clarify with MD.
PROM is performed to the involved finger:
25 repetitions every 2 hours.
- passive MCP flexion/extension
- passive PIP flexion/extension
- passive DIP flexion/extension
- passive composite flexion/extension of entire digit
- AROM/PROM for uninvolved fingers is unrestricted.
- Early edema control is critical including: elevation, coban, ice.
Weeks 2-3 Continue to focus on supple PROM of involved finger. Should have nearly full AROM of uninvolved fingers.
Continue with orthosis between exercise sessions and night.
- May initiate scar management techniques once wound is fully closed.
Phase II Precautions: Continue to monitor for edema control, scar management techniques, and prevent PIP flexion contractures.
Emphasis on... Orthosis ExercisePhase II (4-8 weeks)
4 weeks
Nearly full PROM of involved finger and full AROM of uninvolved fingers.
Begin to decrease time in protective orthosis with goal of being discontinued at 6 weeks.
- Initiate light ADL activities.
- Continue edema control and scar management.

Hand Rehabilitation Protocols | 46
If you have any questions or concerns, please call 859-562-1980.
6 weeks Expectation is full supple PROM of involved finger and full AROM of uninvolved fingers.
Discontinue protective orthosis. May add buddy straps to increase function. If using pulley rings may continue up to 8 weeks.
- Advance to moderate ADL activities (no heavier than 5 lbs). Such activities may include carrying ½ gallon of milk, light housework, light community level activities.
- Initiate light strengthening tasks with therapy putty and hand grippers.
Phase III Precautions: Continue to focus on protection of pulley repairs, resolve any contractures, intrinsic and extrinsic compartment length.
Emphasis on... Orthosis ExercisePhase III (8-12 weeks)
8 Weeks
Focus shifts to increased independence with ADL’s, IADL’s
Discontinue pulley rings. May add corrective splinting options for unresolved flexion contractures.
- Initiate progressive resistive exercises to increase strength and ADL performance.
10-12 weeks Focus on HEP for PROM, strengthening, and ADL’s.
Clinical Pearls: Stage II of the reconstruction will occur around 6 months following stage I depending upon MD preference. It is important that the client achieves full PROM of the affected finger, maximum strength of the involved hand, and trace levels of edema.
Culp, Randall W. “Secondary and Reconstructive Tendon Procedures.” Rehabilitation of the Hand and Upper Extremity, Seventh ed., vol. 1, Elsevier, 2021, pp. 488–492.