hasbro furby 2012 speaker replacement - amazon web services · 2019-09-19 · orient the furby on...
TRANSCRIPT

Hasbro furby 2012 Speaker ReplacementReplace your Furby's broken speaker and restore sound to your device.
Written By: Jordan Castillo
Hasbro furby 2012 Speaker Replacement Draft: 2016-12-05Guide ID: 72349 -
This document was generated on 2019-09-19 03:37:16 AM (MST).
© iFixit — CC BY-NC-SA www.iFixit.com Page 1 of 10

INTRODUCTION
The furby speaker is connected to a circuit board that is accessible once the outer shell is removed.Removing the connector tabs are the hardest part of this guide.
TOOLS:Metal Spudger Set (1)Phillips #0 Screwdriver (1)Flathead 3/32" or 2.5 mm Screwdriver (1)1.0 mm Flathead Screwdriver (1)Tweezers (1)
Hasbro furby 2012 Speaker Replacement Draft: 2016-12-05Guide ID: 72349 -
This document was generated on 2019-09-19 03:37:16 AM (MST).
© iFixit — CC BY-NC-SA www.iFixit.com Page 2 of 10

Step 1 — Outer Shell
Use a flathead screwdriver to remove the two 10mm screws on the base of the Furby.
Step 2
Use a Phillips #0 driver to unscrew the eight 10mm screws.
Remove the base ring after unscrewing all the screws.
Be careful when lifting the base ring from the Furby. There are sharp edges that hold the base ringin place.
Hasbro furby 2012 Speaker Replacement Draft: 2016-12-05Guide ID: 72349 -
This document was generated on 2019-09-19 03:37:16 AM (MST).
© iFixit — CC BY-NC-SA www.iFixit.com Page 3 of 10

Step 3
Unhook the white ribbon from the tab on the base.
Step 4
Roll the Furby's fur downward.
Disconnect the now exposed red wire.
Hasbro furby 2012 Speaker Replacement Draft: 2016-12-05Guide ID: 72349 -
This document was generated on 2019-09-19 03:37:16 AM (MST).
© iFixit — CC BY-NC-SA www.iFixit.com Page 4 of 10

Step 5
Locate the two middle clips first.
Locate the two remaining clips on Furby's sides, they are opposite each other.
Orient the Furby upside down with the tail facing away from you.
Step 6
Insert a metal prying tool directly into the clip opening.
Press upward into the clip. At the same time, use your other hand to pull away the plastic seamfrom the Furby's body.
Repeat the previous step to remove the remaining three clips.
Hasbro furby 2012 Speaker Replacement Draft: 2016-12-05Guide ID: 72349 -
This document was generated on 2019-09-19 03:37:16 AM (MST).
© iFixit — CC BY-NC-SA www.iFixit.com Page 5 of 10
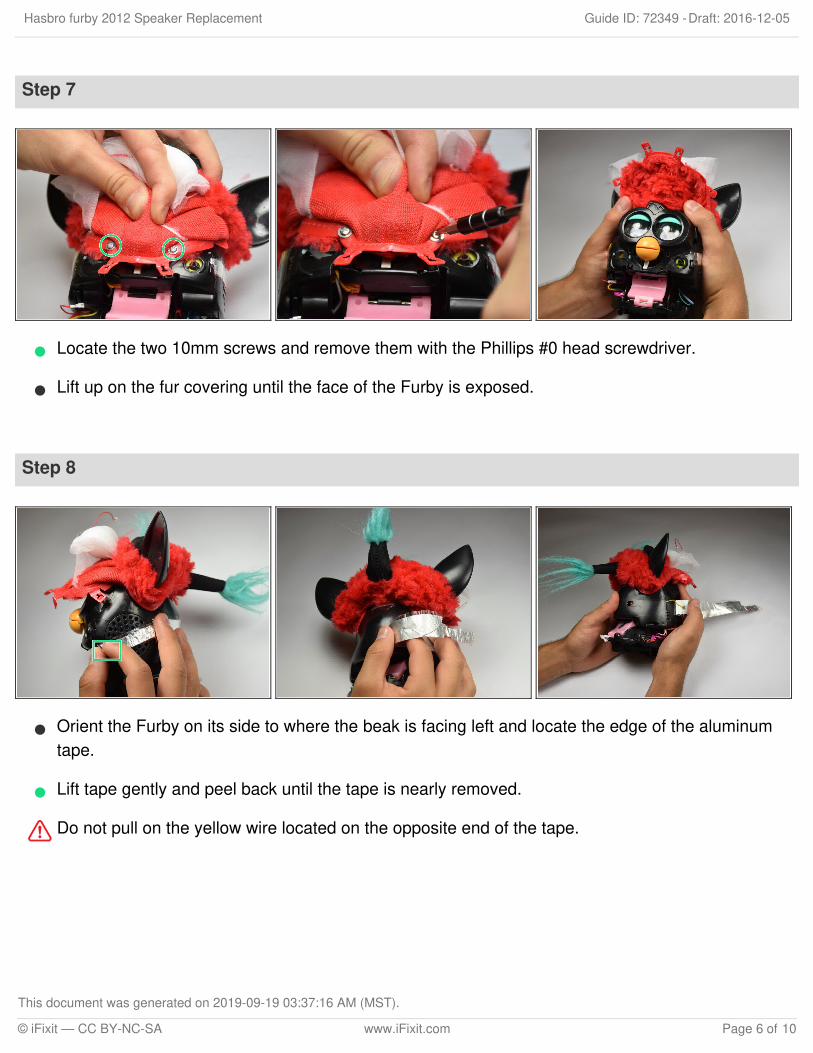
Step 7
Locate the two 10mm screws and remove them with the Phillips #0 head screwdriver.
Lift up on the fur covering until the face of the Furby is exposed.
Step 8
Orient the Furby on its side to where the beak is facing left and locate the edge of the aluminumtape.
Lift tape gently and peel back until the tape is nearly removed.
Do not pull on the yellow wire located on the opposite end of the tape.
Hasbro furby 2012 Speaker Replacement Draft: 2016-12-05Guide ID: 72349 -
This document was generated on 2019-09-19 03:37:16 AM (MST).
© iFixit — CC BY-NC-SA www.iFixit.com Page 6 of 10
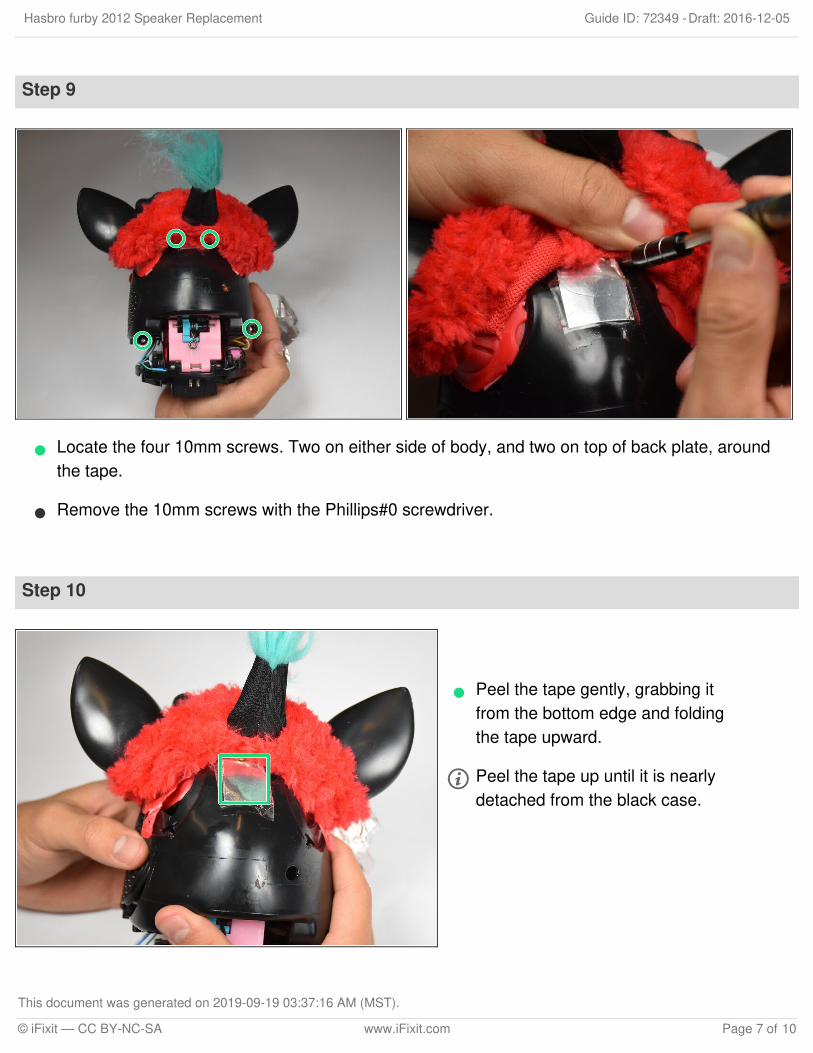
Step 9
Locate the four 10mm screws. Two on either side of body, and two on top of back plate, aroundthe tape.
Remove the 10mm screws with the Phillips#0 screwdriver.
Step 10
Peel the tape gently, grabbing itfrom the bottom edge and foldingthe tape upward.
Peel the tape up until it is nearlydetached from the black case.
Hasbro furby 2012 Speaker Replacement Draft: 2016-12-05Guide ID: 72349 -
This document was generated on 2019-09-19 03:37:16 AM (MST).
© iFixit — CC BY-NC-SA www.iFixit.com Page 7 of 10

Step 11
Orient the Furby face down, with the base facing away from you.
Locate the clips below the ears.
Repeat the technique used in Step 6. Create leverage using a metal prying tool to press upwardinto the clip, while also pulling back on the clip itself.
Hasbro furby 2012 Speaker Replacement Draft: 2016-12-05Guide ID: 72349 -
This document was generated on 2019-09-19 03:37:16 AM (MST).
© iFixit — CC BY-NC-SA www.iFixit.com Page 8 of 10

Step 12
Remove the loose, plastic back panel by pulling the panel away from Furby's body.
Step 13 — Speaker
Orient Furby to where the mouth is facing left. Locate the speaker on the side of the device.
Lift the speaker out.
Hasbro furby 2012 Speaker Replacement Draft: 2016-12-05Guide ID: 72349 -
This document was generated on 2019-09-19 03:37:16 AM (MST).
© iFixit — CC BY-NC-SA www.iFixit.com Page 9 of 10

To reassemble your device, follow these instructions in reverse order.
Step 14
Use the blunt tweezers to pinch the latch on the speaker's casing. Detach the speaker from theboth latches on both sides and remove the speaker's casing.
Step 15
Lift the connector, using the Blunt Tweezers, while tugging on the speaker's wire.
Plug the new speaker in by clipping the connector into place where the old connector was removedfrom.
Hasbro furby 2012 Speaker Replacement Draft: 2016-12-05Guide ID: 72349 -
This document was generated on 2019-09-19 03:37:16 AM (MST).
© iFixit — CC BY-NC-SA www.iFixit.com Page 10 of 10