hdu-hpqg a5
TRANSCRIPT

Digital Ceramic Tower Heater with Remote Control
DANGER-HIGH TEMPERATURES MAY BE GENERATEDUNDER CERTAIN ABNORMAL CONDITION. DO NOTPARTIALLY OR FULLY COVER OR OBSTRUCT THE
FRONT OF THIS HEATER.
HPS15B-E 120V~ 60Hz 1500W
;
This heater is hot when in use. To avoid burns, do not let bare skin touch hot surfaces. Use the handle when moving this heater. Keep combustible materials, such as furniture, pillows, bedding, papers, clothes and curtains at least 3' (0.9 m) from the front and top of the heater and keep them away from the sides and rear. Keep the rear grille away from walls or drapes so it does not block the air intake.
1.
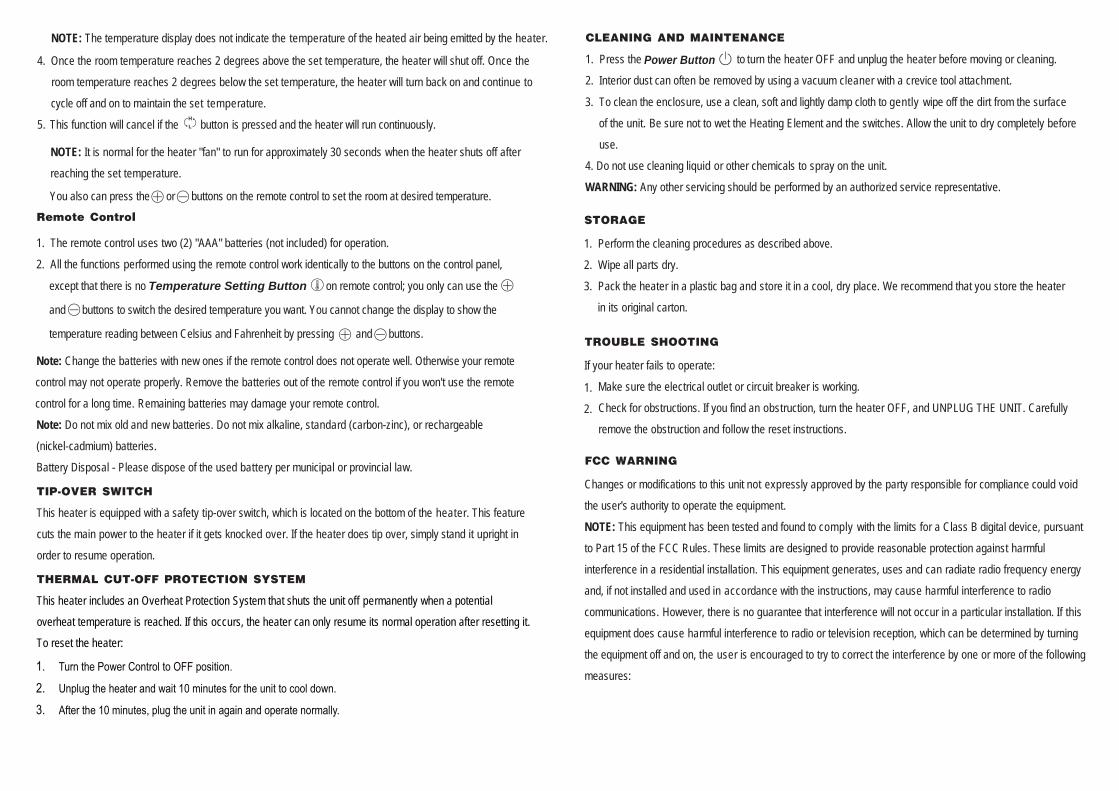
2. Align two screw bosses and boss holes on back of two halves of base according to Figure 2.
3. Press two halves of the base, as in Figure 3, to interlock them together. (Figure 3)
4. Align power cord to the slot on the top side of the base. (Figure 4)
. 5
Unscrew three (3) locking screws from the bottom of the heater body (Figure 1) and save them.
ASSEMBLY INSTRUCTIONS
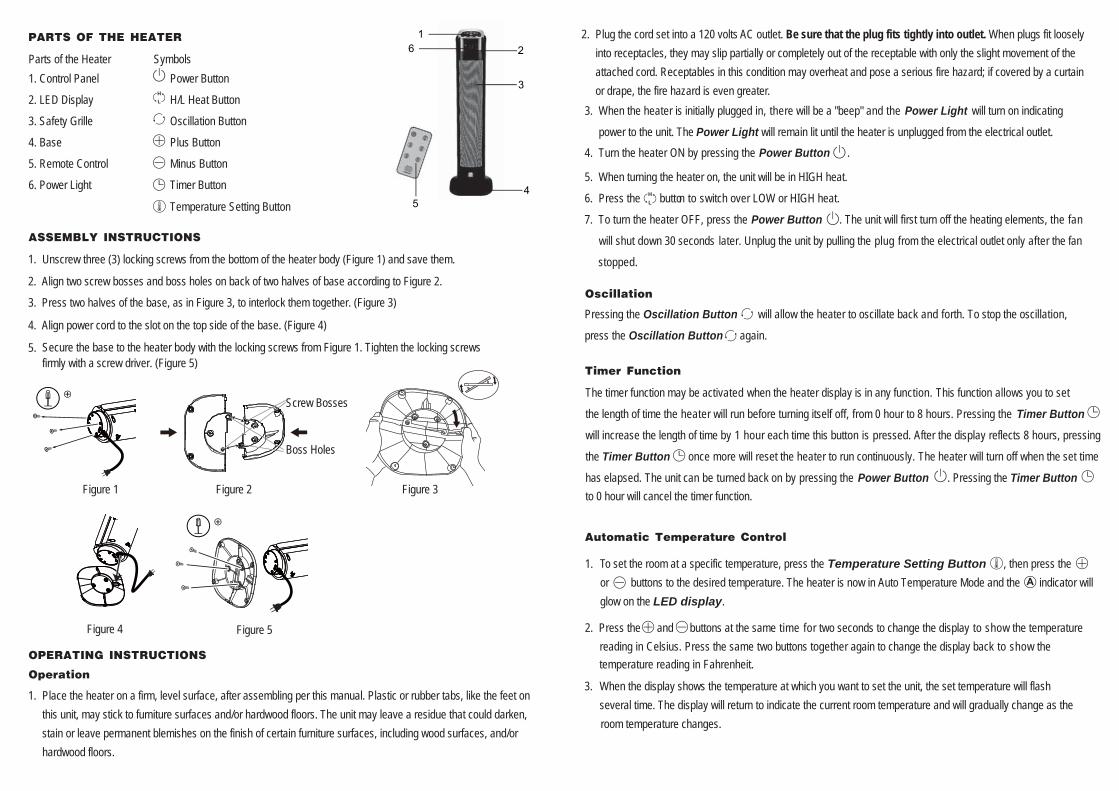
Parts of the Heater SymbolsPower Button
H/L Heat Button
Oscillation Button
Plus Button
Minus Button
Timer Button
PARTS OF THE HEATER
1. Control Panel
2. LED Display
3. Safety Grille
4. Base
5. Remote Control
6. Power Light
16
3
45
2
Figure 4 Figure 5
Temperature Setting Button
Secure the base to the heater body with the locking screws from Figure 1. Tighten the locking screws firmly with a screw driver. (Figure 5)
1.
OPERATING INSTRUCTIONS
Operation
Place the heater on a firm, level surface, after assembling per this manual. Plastic or rubber tabs, like the feet on this unit, may stick to furniture surfaces and/or hardwood floors. The unit may leave a residue that could darken, stain or leave permanent blemishes on the finish of certain furniture surfaces, including wood surfaces, and/or hardwood floors.
3.
4. Turn the heater ON by pressing the Power Button .
Pressing the Oscillation Button will allow the heater to oscillate back and forth. To stop the oscillation,
press the Oscillation Button again.
Oscillation
3. When the heater is initially plugged in, there will be a "beep" and the Power Light will turn on indicating
power to the unit. The Power Light will remain lit until the heater is unplugged from the electrical outlet.
When the display shows the temperature at which you want to set the unit, the set temperature will flash several time. The display will return to indicate the current room temperature and will gradually change as the
room temperature changes.
2.
Plug the cord set into a 120 volts AC outlet. Be sure that the plug fits tightly into outlet. When plugs fit loosely into receptacles, they may slip partially or completely out of the receptable with only the slight movement of the attached cord. Receptables in this condition may overheat and pose a serious fire hazard; if covered by a curtain or drape, the fire hazard is even greater.
reading in Celsius. Press the same two buttons together again to change the display back to show the temperature reading in Fahrenheit.
2. Press the and buttons at the same time for two seconds to change the display to show the temperature
5. When turning the heater on, the unit will be in HIGH heat.
6. Press the button to switch over LOW or HIGH heat.
7. To turn the heater OFF, press the Power Button . The unit will first turn off the heating elements, the fan
r the fanetfa ylno teltuo lacirtcele eht morf gulp eht gnillup yb tinu eht gulpnU .retal sdnoces 03 nwod tuhslliw
stopped.
Timer Function
The timer function may be activated when the heater display is in any function. This function allows you to set
the length of time the heater will run before turning itself off, from 0 hour to 8 hours. Pressing the Timer Button
will increase the length of time by 1 hour each time this button is pressed. After the display reflects 8 hours, pressing
the nottuB r emiT once more will reset the heater to run continuously. The heater will turn off when the set time
has elto 0 hour will cancel the timer function.
apsed. The unit can be turned back on by pressing the Power Button . Pressing the Timer Button
1.
Automatic Temperature Control
To set the room at a specific temperature, press the Temperature Setting Button , then press the or buttons to the desired temperature. The heater is now in Auto Temperature Mode and the indicator will glow on the LED display.
A
Figure 1 Figure 2 Figure 3
Screw Bosses
Boss Holes
1. Press the to turn the heater OFF and unplug the heater before moving or cleaning.
2. Interior dust can often be removed by using a vacuum cleaner with a crevice tool attachment.
3. To clean the enclosure, use a clean, soft and lightly damp cloth to gently wipe off the dirt from the surface
of the unit. Be sure not to wet the Heating Element and the switches. Allow the unit to dry completely before
use.
4. Do not use cleaning liquid or other chemicals to spray on the unit.
WARNING: Any other servicing should be performed by an authorized service representative.
CLEANING AND MAINTENANCE
NOTE: It is normal for the heater "fan" to run for approximately 30 seconds when the heater shuts off after
reaching the set temperature.
Remote Control
1. The remote control uses two (2) "AAA" batteries (not included) for operation.
2. All the functions performed using the remote control work identically to the buttons on the control panel,
TIP-OVER SWITCH
This heater is equipped with a safety tip-over switch, which is located on the bottom of the heater. This feature
cuts the main power to the heater if it gets knocked over. If the heater does tip over, simply stand it upright in
order to resume operation.
THERMAL CUT-OFF PROTECTION SYSTEM
This heater includes an Overheat Protection System that shuts the unit off permanently when a potential
overheat temperature is reached. If this occurs, the heater can only resume its normal operation after resetting it.
To reset the heater:
Note: Change the batteries with new ones if the remote control does not operate well. Otherwise your remote
control may not operate properly. Remove the batteries out of the remote control if you won't use the remote
control for a long time. Remaining batteries may damage your remote control.
Note: Do not mix old and new batteries. Do not mix alkaline, standard (carbon-zinc), or rechargeable
(nickel-cadmium) batteries.
Battery Disposal - Please dispose of the used battery per municipal or provincial law.
STORAGE
1. Perform the cleaning procedures as described above.
2.
1.
2.
Wipe all parts dry.
3. Pack the heater in a plastic bag and store it in a cool, dry place. We recommend that you store the heater
in its original carton.
FCC WARNING
Changes or modifications to this unit not expressly approved by the party responsible for compliance could void
the user's authority to operate the equipment.
NOTE: This equipment has been tested and found to comply with the limits for a Class B digital device, pursuant
to Part 15 of the FCC Rules. These limits are designed to provide reasonable protection against harmful
interference in a residential installation. This equipment generates, uses and can radiate radio frequency energy
and, if not installed and used in accordance with the instructions, may cause harmful interference to radio
communications. However, there is no guarantee that interference will not occur in a particular installation. If this
equipment does cause harmful interference to radio or television reception, which can be determined by turning
the equipment off and on, the user is encouraged to try to correct the interference by one or more of the following
measures:
TROUBLE SHOOTING
If your heater fails to operate:
Make sure the electrical outlet or circuit breaker is working.
Check for obstructions. If you find an obstruction, turn the heater OFF, and UNPLUG THE UNIT. Carefully
remove the obstruction and follow the reset instructions.
NOTE: The temperature display does not indicate the temperature of the heated air being emitted by the heater.
4. Once the room temperature reaches 2 degrees above the set temperature, the heater will shut off. Once the
room temperature reaches 2 degrees below the set temperature, the heater will turn back on and continue to
cycle off and on to maintain the set temperature.
5. T
You also can press the or buttons on the remote control to set the room at desired temperature.
his function will cancel if the button is pressed and the heater will run continuously.
except that there is no Temperature Setting Button on remote control; you only can use the
and buttons to switch the desired temperature you want. You cannot change the display to show the
temperature reading between Celsius and Fahrenheit by pressing and buttons.
Power Button
1. Reorient or relocate the receiving antenna.
2. Increase the separation between the equipment and receiver.
3. Connect the equipment into an outlet on a circuit different from that to which the receiver is connected.
4. C
This device complies with part 15 of the FCC Rules. Operation is subject to the following two conditions:
(1) this device may not cause harmful interference, and
(2) this device must accept any interference received, including interference that may cause undesired operation.
OceanAire Home Goods Company
1831-A West Oak Parkway, Marietta, GA 30062
1-888-880-3267
onsult the dealer or an experienced radio/TV technician for help.
SERVICING
For servicing, other than general user maintenance, please contact Customer Service at 1-888-880-3267,
We are open 24 hours a day, 7 days a week.


Partes del Calentador SímbolosBotón de Encendido
Botón de Temperatura H/L (alta o baja)
Botón de Oscilación
Botón Más
Botón Menos
Botón de Temporizador
PARTES DEL CALENTADOR
1. Coloque el calentador en una superficie firme y nivelada después de montarlo siguiendo los pasos de este
manual. Los fragmentos de plástico o de goma, como los pies de esta unidad, pueden pegarse a las
superficies de los muebles y/o a los pisos de madera dura. La unidad puede dejar un residuo que puede
INSTRUCCIONES DE FUNCIONAMIENTO
Del Cajón
1. Panel de Control
2. Pantalla LED
3. Parrilla de Seguridad
4. Base
5. Control Remoto
6. Luz de Encendido
1.
2. Alinee dos salientes de tornillos y orificios de salientes de la parte trasera de las dos mitades de la base como se muestra en la Figura 2.3. Presione las dos mitades de la base para entrecruzarlas, como se muestra en la Figura 3. (Figura 3)
5.
Desatornille los tres (3) tornillos de fijación de la parte inferior del cuerpo del calentador (Figura 1) y consérvelos.
Asegure la base al cuerpo del calentador con los tornillos de fijación de la Figura 1. Ajuste los tornillos de fijación con firmeza usando un destornillador. (Figura 5)
INSTRUCCIONES DE MONTAJE
Botón de Configuración de Temperatura
oscurecer, manchar o dejar defectos permanentes en el acabado de algunas superficies de los muebles,
incluyendo superficie de madera y/o pisos de madera dura.
2. Enchufe el cable en un tomacorriente de CA de 120 voltios. Asegúrese de que el enchufe entre firmemente
o
ra
á
s
Presionando el Botón de Oscilación le permitirá al calentador oscilar hacia atrás y hacia adelante. Para
detener la oscilación, presione el Botón de Oscilación otra vez.
La función de temporizador se puede activar cuando la pantalla del calentador esté en cualquier función. Esta
función le permite establecer la duración del tiempo en el que el calentador funcionará antes de apagarse por
sí solo, desde 1 a 8 horas. Presionando el Botón de Temporizador se incrementará la duración de tiemp
en intervalos de 1 hora cada vez que se presione el botón. Después de que la pantalla muestre 8 horas, al
presionar el Botón de Temporizador una vez más se reiniciará el calentador para que funcione de mane
continua. El calentador se apagará cuando haya transcurrido el tiempo establecido. La unidad se puede volver
a encender presionando el Botón de Encendido .
en el toma. Cuando los enchufes entran de manera suelta en los receptáculos, pueden deslizarse parcial o
completamente con sólo un pequeño movimiento del cable adjunto. Los receptáculos en esta condición
puede recalentarse y generar un grave riesgo de incendio; si se cubre con una cortina o un drapeado, el
riesgo de incendio es aún mayor.
3. Cuando el calentador se enchufa inicialmente, se escuchará un pitido y la Luz de Encendido se encender
indicando que hay energía en la unidad. La Luz de Encendido permanecerá encendida hasta que el
calentador se desenchufe del tomacorriente.
4. Encienda el calentador presionando el Botón de Encendido .
5. Cuando encienda el calentador, la unidad estará en temperatura ALTA.
6. Presione el botón (alta/baja) para cambiar la temperatura, BAJA o ALTA.
7. Para apagar el calentador, presione el Botón de Encendido . La unidad apagará primero los elemento
del calentador, el ventilador se apagará 30 segundos más tarde. Desenchufe la unidad quitando el enchufe
del tomacorriente únicamente después de que se haya detenido el ventilador.
Oscilación
Función de Temporizador
Control Automático de Temperatura
1. Para configurar el ambiente a una temperatura específica, presione el botón de configuración de temperatura y, luego, presione los botones o para establecer la temperatura deseada. El calentador está ahora
en el Modo de temperatura automática y el indicador se encenderá en la Pantalla LED.A
16
3
45
2
4. Alinee el cable de alimentación con la ranura de la parte superior de la base. (Figura 4)
Figura 4 Figura 5
Figura 1 Figura 2 Figura 3
Salientes de los tornillos
Orificios de las salientes

INTERRUPTOR DE CAÍDAS
Este calentador está equipado con un interruptor de seguridad para las caídas, ubicado en la parte inferior
del calentador. Esta característica corta el suministro eléctrico del calentador si este se cayera. Si el
calentador se cayera, simplemente vuelva a colocarlo de pie para reactivar su funcionamiento.
SISTEMA DE PROTECCIÓN DE APAGADO TÉRMICO
Control Remoto
1. El control remoto utiliza dos (2) pilas "AAA" (no se incluyen) para su funcionamiento.
2. Todas las funciones efectuadas con el control remoto funcionan de manera idéntica a los botones del panel de control, salvo que el control remoto no posee un Botón de Configuración de temperatura , y solo pueden usarse los botones y para cambiar la temperatura deseada. No es posible cambiar la pantalla para mostrar la lectura de temperatura entre Celsius y Fahrenheit al presionar los botones y .
Nota: Reemplace las pilas con pilas nuevas si el control remoto no funciona bien. De otra manera, su control
remoto puede no funcionar correctamente. Quite las pilas del control remoto si no va a utilizarlo durante un
período largo de tiempo. Las pilas restantes pueden dañar su control remoto.
Nota: No mezcle baterías viejas y nuevas. No mezcle diferentes tipos de baterías - alcalinas, convencionales
(carbón-zinc), o recargables (níquel-cadmio).
Eliminación de las pilas- Por favor, eliminar las pilas usadas según las leyes municipales o provinciales.
LIMPIEZA Y MANTENIMIENTO
1. Presione el botón de encendido para apagar el calentador y desenchúfelo antes de moverlo o de
limpiarlo.
2. Se puede extraer el polvo interno utilizando una aspiradora con una boquilla para rincones anexada.
3. Para limpiar la carcasa, use un paño limpio, suave y ligeramente humedecido para quitar delicadamente la
suciedad de la superficie de la unidad. Asegúrese de no mojar el Elemento de Calefacción ni los interruptores.
Deje que la unidad se seque completamente antes de usar.
4. No utilice líquido de limpieza ni otras sustancias químicas para rociar sobre la unidad .
ADVERTENCIA: Cualquier otra tarea de mantenimiento la debe realizar un representante autorizado del servicio
técnico.
3. Cuando la pantalla muestra la temperatura a la que desea establecer la unidad, la temperatura establecida
parpadeará varias veces. La pantalla volverá a indicar la temperatura ambiente actual y cambiará en forma
gradual a medida que lo haga la temperatura ambiente.
NOTA: La pantalla de temperatura no indica la temperatura del aire calefaccionado que emite el calentador.
4. Una vez que la temperatura de la habitación alcance 2 grado por encima de la temperatura establecida, el
calentador se apagará. Una vez que la temperatura ambiente alcance 2 grado por debajo de la temperatura
establecida, el calentador se volverá a encender y continuará funcionando intermitentemente para mantener
la temperatura establecida.
5. Esta función se cancelará si presiona si se botón (alta/baja) y el calentador funcionará en forma continua.
NOTA: Es normal que el "ventilador" del calentador funcione aproximadamente durante 30 segundos cuando
el calentador se apague después de alcanzar la temperatura establecida.
ALMACENAMIENTO
1. Realice los procedimientos de limpieza como se describe arriba.
2. Seque todas las partes.
3. Empaque el calentador en una bolsa de plástico y almacénela en un lugar seco y fresco. Recomendamos que
guarde el calentador en su caja original.
2. Presione los botones y al mismo tiempo para cambiar la pantalla para mostrar la temperatura en
grados Celsius. Presione los mismos dos botones juntos otra vez para volver a cambiar la pantalla para
mostrar la temperatura en grados Fahrenheit.
HDU-HPSB V0
SOLUCIÓN DE PROBLEMAS
Si su calentador no funcionara:
Asegúrese de que el tomacorriente eléctrico o interruptor esté funcionando.
Verifique las obstrucciones. Si encontrara una obstrucción, apague el calentador APAGADO y DESENCHUFE
LA UNIDAD. Remueva cuidadosamente la obstrucción y siga las instrucciones de reinicio.
ADVERTENCIA DE FCC
Los cambios o modicaciones que se hagan a esta unidad que no sean aprobados expresamente por la parte
responsable para el cumplimiento, podrán anular laautoridad del usuario para hacer funcionar el equipo.
NOTA: Este equipo ha sido probado y se ha encontrado que cumple con los límites para dispositivos digitales
Clase B, según la parte 15 de las Reglas de la FCC. Estos límites están diseñados para ofrecer protección
razonable en contra de interferencia nociva en una instalación residencial. Este equipo genera, usa y puede irradiar
energía de radiofrecuencia y, si no se instala y usa de acuerdo con las instrucciones, puede generar interferencia
perjudicial en las comunicaciones de radio. Sin embargo, no hay garantía de que la interferencia no fuese a
ocurrir en una instalación particular. Si este equipo llegara a generar una interferencia dañina a la recepción de
radio o televisión, que se puede identicar al prender y apagar el equipo, se recomienda al usuario que intente
corregir la interferencia por medio de una o varias de las medidas que se detallan a continuación:
1. Redirigir o relocalizar la antena receptora.
2. Aumentar la separación entre el equipo y el receptor.
3. Conectar el equipo a un enchufe o a un circuito diferente a aquel en el que esté conectado el receptor.
4.Este dispositivo cumple con la parte 15 de las Reglas de la FCC. La utilización está sujeta a las siguientes dos condiciones:(1) este dispositivo no puede causar interferencia y(2) este dispositivo debe aceptar cualquier interferencia que reciba, incluida la interferencia que pueda causar un funcionamiento no deseado.
OceanAire Home Goods Company
1831-A West Oak Parkway, Marietta, GA 30062
1-888-880-3267
Consulte con su vendedor o con un técnico en radio y televisión experimentado para obtener ayuda.
REPARACIONES
Para cualquier reparación, que no sea de mantenimiento general por parte del usuario, por favor contacte a
nuestro equipo de Servicio al Cliente al 1-888-880-3267. Estamos abiertos las 24 horas del día, los 7 días de la semana.