headers, footers and cover pages for microsoft word...
TRANSCRIPT

Headers, Footers and Cover Pages for Microsoft Word Documents
In this lesson you will find out how to make your Microsoft
Word documents look more professional by adding and customising Headers, Footers and Cover Pages.
Headers and Footers allow you to insert details such as
title, date, page numbers etc. so that they appear on each page and update automatically. A Cover Page will make
your document look more polished and is a desirable addition to any formal report.
If you haven’t already, please read “Introduction to the
Ribbon” guide as this gives you an idea as to how to use the toolbars at the top of the screen.

H e a d e r s a n d F o o t e r s
2 | P a g e D i g i t a l S k i l l s A c a d e m y 2 0 1 6
Table of Contents
Lesson 1: Adding a Header/Footer to a document ................................................ 3
Adding a built-in Header/Footer ................................................... 3
Creating a Custom Header/Footer ................................................. 6
Editing the Header/Footer .......................................................... 6
Adding a Page Number to the Footer .............................................. 7
Adding a Date to a Footer ........................................................... 9
Using a different First Page Header/Footer ..................................... 10
Lesson 2: Adding a Cover Page to a document .................................................... 11
Adding a Built-in Cover Page ....................................................... 11
Editing the Cover Page .............................................................. 12

H e a d e r s a n d F o o t e r s
3 | P a g e D i g i t a l S k i l l s A c a d e m y 2 0 1 6
Lesson 1: Adding a Header/Footer to a document
Adding a built-in Header/Footer
1. Create a new blank document and type the following paragraph:
2. Click the Insert tab at the top of the Ribbon.
3. Click the Header icon.
4. Click on the Blank option at the top of the
Built-in list. Note that the other options on
the Built-in list are simply variations on the
type of Header format you can insert.
These pre-formatted options will
automatically position the text you add into
the Header for your current document. You
might wish to try a few of these later to see
how this works. Note that another exercise
will also show you a way of designing your
own Header from scratch.
Is global warming bad? The earth is naturally warmed by rays (or radiation) from the sun, which pass through the earth's atmosphere and are reflected back out to space again.
The atmosphere's made up of layers of gases, some of which are called 'greenhouse gases'. They're mostly natural and make up a kind of thermal blanket over the earth.
This lets some of the rays back out of the atmosphere, keeping the earth at the right temperature for animals, plants and humans to survive (60°F/16°C).
So some global warming is good. But if extra greenhouse gases are made, the thermal blanket gets thicker and too much heat is kept in the earth's atmosphere. That's when global warming's bad.
H e a d e r s a n d F o o t e r s
4 | P a g e D i g i t a l S k i l l s A c a d e m y 2 0 1 6
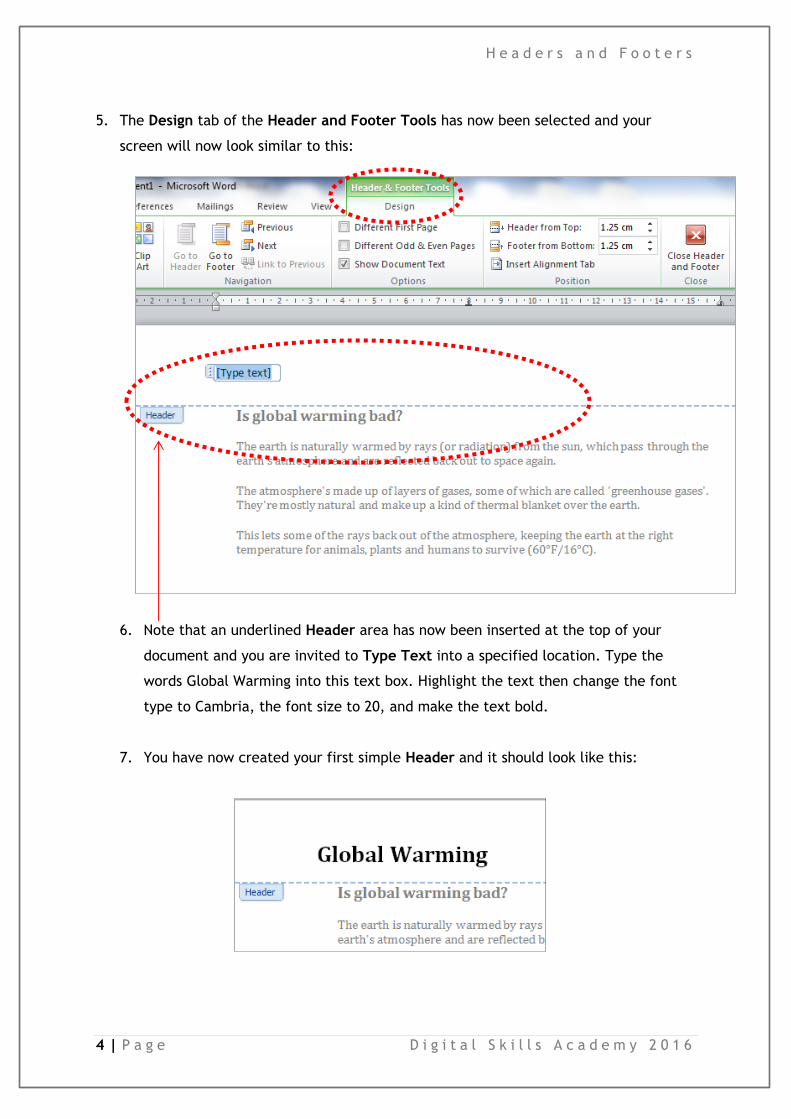
5. The Design tab of the Header and Footer Tools has now been selected and your
screen will now look similar to this:
6. Note that an underlined Header area has now been inserted at the top of your
document and you are invited to Type Text into a specified location. Type the
words Global Warming into this text box. Highlight the text then change the font
type to Cambria, the font size to 20, and make the text bold.
7. You have now created your first simple Header and it should look like this:

H e a d e r s a n d F o o t e r s
5 | P a g e D i g i t a l S k i l l s A c a d e m y 2 0 1 6
8. Click on the Go to Footer option on the ribbon.
Notice that a blank Footer area has also appeared at the bottom of the page.
9. The Footer will have the
same initial formatting as
the Built-in Header you
selected earlier. This area
can now be used to hold
additional information about
the document. This
information can even update automatically where required e.g. page number,
date, time etc.
10. To remove the
underlining but
leave the
Header/Footer
Text simply
double-click
somewhere else on the document, outside the Header/Footer area. Alternatively,
you can click the Close Header and Footer option on the Ribbon. Your document
will now look like this:
11. If you wish to edit the Header/Footer Text later, double-click at the top or bottom
of the document and the Header/Footer areas will reappear.

H e a d e r s a n d F o o t e r s
6 | P a g e D i g i t a l S k i l l s A c a d e m y 2 0 1 6
Creating a Custom Header/Footer
12. Create a new blank document and double-click at the top of the page. An empty
Header area will appear. Scroll down to the bottom of the page and you will see
there is also a blank Footer.
13. Creating a custom Header/Footer in a document allows you to make your own
decision, from the start, about what text you want to include in the
Header/Footer and where the text will appear. You can use the text alignment
buttons and the Tab key to adjust the layout and position the text where you
would like to see it.
14. When you have finished simply double-click somewhere else on the document or
click the Close Header and Footer option on the Ribbon.
Editing the Header/Footer
15. All the standard MS Word formatting tools are available to use with any text you
have typed or added into the Header or Footer area, so you can change the way it
looks and where it appears. This applies to both Built-in and Custom Headers and
Footers.
16. Click inside either the Header or the Footer area and the Design tab of the
Header and Footer Tools will be displayed. The options here include making a
different Header/Footer for the first page of your document, or creating different
Headers and Footers for odd numbered and even numbered pages. You can also
reposition the Header and Footer to be nearer to, or further from, the edge of the
page. Let’s try some of these options to see how they work.

H e a d e r s a n d F o o t e r s
7 | P a g e D i g i t a l S k i l l s A c a d e m y 2 0 1 6
Adding a Page Number to the Footer
17. Go to the Footer in your document.
18. Click on the Design tab on the Ribbon.
19. Click on Page Number.
20. Select Current Position from the drop-down list.
H e a d e r s a n d F o o t e r s
8 | P a g e D i g i t a l S k i l l s A c a d e m y 2 0 1 6
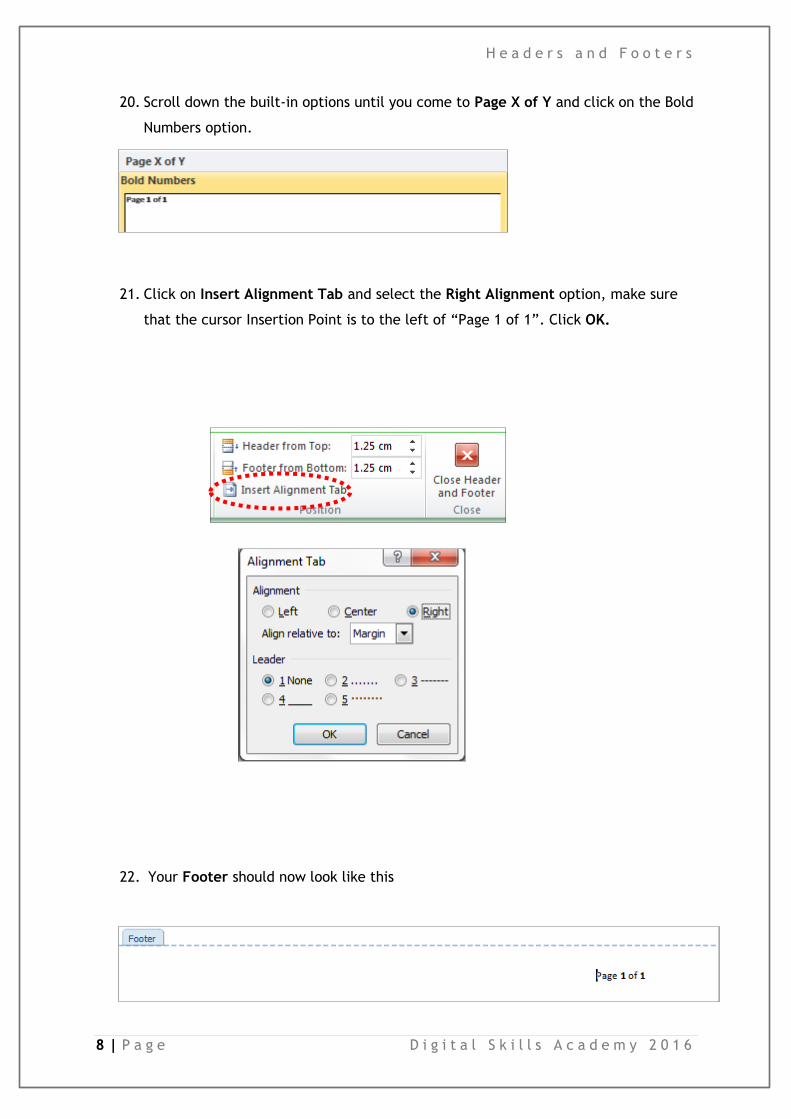
20. Scroll down the built-in options until you come to Page X of Y and click on the Bold
Numbers option.
21. Click on Insert Alignment Tab and select the Right Alignment option, make sure
that the cursor Insertion Point is to the left of “Page 1 of 1”. Click OK.
22. Your Footer should now look like this

H e a d e r s a n d F o o t e r s
9 | P a g e D i g i t a l S k i l l s A c a d e m y 2 0 1 6
Adding a Date to a Footer
23. Reposition the cursor to the left hand side of the Footer section, Click on the
Date & Time option on the Ribbon. Select the format of your choice, tick the
Update Automatically checkbox and click OK.
24. Your Footer should now look something like this:

H e a d e r s a n d F o o t e r s
10 | P a g e D i g i t a l S k i l l s A c a d e m y 2 0 1 6
Using a different First Page Header/Footer
25. Click inside either the Header or the Footer area
and the Design tab of the Header and Footer
Tools will be displayed.
26. Tick the checkbox to select Different First Page
27. Tick the Odd and Even Pages checkbox if you want
a different Header/Footer on alternate pages of
your document. You will then have to create the
text for each alternate Header/Footer - create Odd
pages using Page 1 and Even pages using Page 2.
28. You can also adjust the position of the Header/Footer In relation to the edge of
your document but be
careful when doing
this as it will alter the
depth of the typing
area on your
document, and the
position of any existing text.

H e a d e r s a n d F o o t e r s
11 | P a g e D i g i t a l S k i l l s A c a d e m y 2 0 1 6
Lesson 2: Adding a Cover Page to a document
If you would like your document to have a Cover Page you can either create this manually
by simply designing Page 1 of your document to meet your requirements - for example,
you might want to insert an image, or add a frame to the page, or colour the background.
There are other Microsoft Word training documents to show you how to do these things.
Alternatively Microsoft Word has a selection of pre-formatted Cover Pages for you to
choose from.
Adding a Built-in Cover Page
1. Click the Insert tab at the top of the Ribbon.
2. Click the Cover Page icon and a selection of Built-in cover pages will appear. Note
that you can see further Cover Pages by using the scroll bar at the side of the pop-up
window and an even wider selection is available if you access the Office.com website.
3. Click on the Alphabet Cover Page or any other page and the design will
automatically appear as Page 1 of your document. Any text you had previously typed
will now become Page 2 etc.

H e a d e r s a n d F o o t e r s
12 | P a g e D i g i t a l S k i l l s A c a d e m y 2 0 1 6
Editing the Cover Page
4. Each Built-in Cover Page can be customised to contain the details you require. The
format you have selected is a template and you can now edit in your own information.
5. Click inside the brackets around Type the Document Title and type Climate Change.
Highlight the text and change the Font to Cambria, size 22, and the colour to Blue.
Click outside the brackets to save the changes.
6. Click on Type the Document Subtitle and type The Effects of Global Warming.
Highlight the text and change the Font to Cambria, size 16, and the colour to Red.
Click outside the brackets to save the changes.
7. Click on Date, and click the drop-down arrow that appears, this will give you a
calendar and you can select a date. Select today’s date. If the date is in the wrong
format (e.g. American mm/dd/yyyy), click the Insert tab on the Ribbon and select the
Date & Time option.
8. Choose the date format you prefer, change
the Language to English (U.K.), and click
OK.
9. Click on the field below the date and the label Author will appear, this field will
already contain some text. The name of the PC owner will automatically have been
entered here. Change this to your own name and click outside the field to save the
changes.

H e a d e r s a n d F o o t e r s
13 | P a g e D i g i t a l S k i l l s A c a d e m y 2 0 1 6
10. Your Cover Page will now look something like this
11. This will now be the first page of your
document. Remember that if you
previously created a different First
Page Header, this will no longer exist
as your former Page 1 is now Page 2 of
the document.
12. Try creating a few different styles of
Cover Page to see what other options
are available.
13. To remove a Cover Page, click on the
Insert tab, select the Cover Page icon
and the Remove Current Cover Page
option.
14. All previous page numbers will then be
reset.
END OF EXERCISE.