hec-hms lab 1: creating a single basin hec-hms modelvmerwade/education/hms1.pdf · 2 instructions...
TRANSCRIPT

1
HEC-HMS Lab 1: Creating a Single Basin HEC-HMS Model
Created by Venkatesh Merwade ([email protected])
Learning outcomes
The objective of this lab is to explore the basic structure of HEC-HMS modeling system, and create a
simple single basin model to simulate a rainfall event. By the end of this exercise, you should be able to:
1) Create a new HEC-HMS project with a single sub-basin model
2) Know the inputs and outputs associated with HEC-HMS model
3) Run a simple HEC-HMS simulation and interpret model’s output
4) Know the meaning and use of different files created by HEC-HMS. Specifically, the .hms file,
.basin file, .met file and the control file
Student Time Required: 50 minutes
Data Inputs
Numerical Inputs Rainfall : Hourly Rainfall Hyetograph in mm Watershed Area: 100 km2 Curve Number : 75 Lag time: 60 minutes Simulation Time step: 10 minutes Simulation Start Time: 09/01/2013 09:00 AM Simulation time period: 4-5 days Text Inputs Loss Method: SCS Transform Method: SCS Baseflow Method: None
Model: HEC-HMS 4.1 (Note: You should be able to do this exercise by using any version of HEC-HMS, but
the images in this document may not match exactly with what you see on your screen)
2
Instructions
Start HEC-HMS
In most typical installations on windows system, you go to StartProgramsHECHEC-HMS 4.1. This
path may be different in computer labs. Just search for HEC-HMS and open the program.
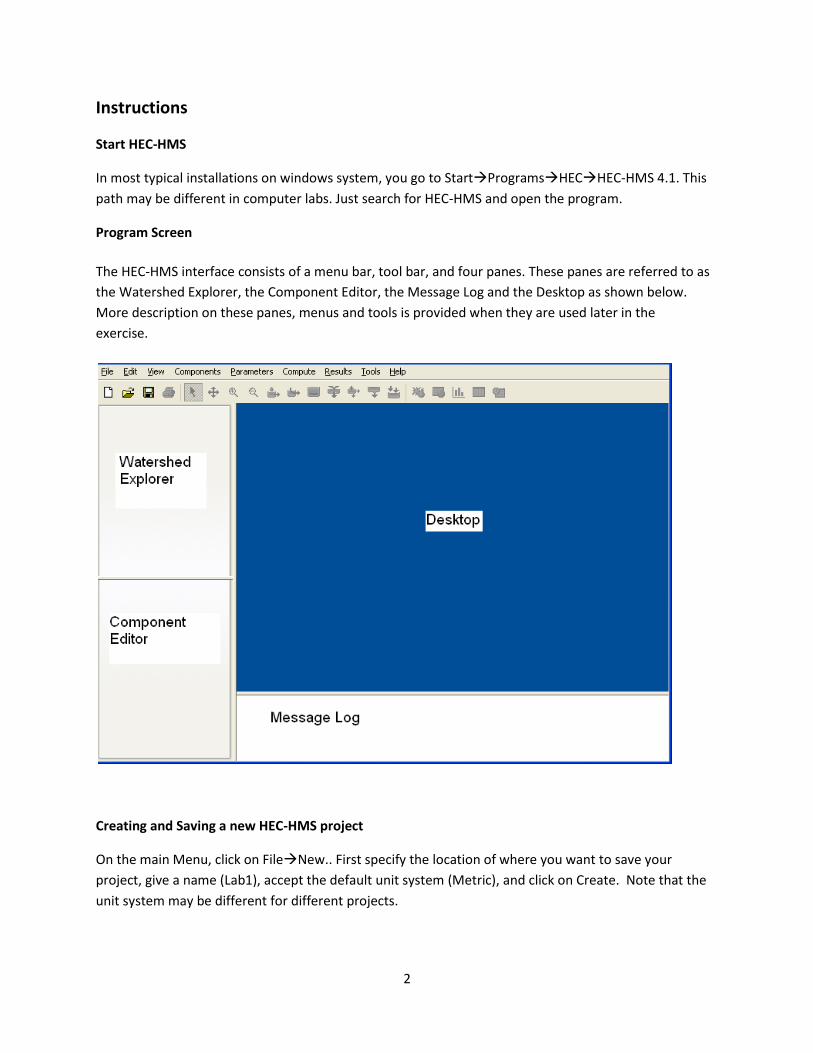
Program Screen
The HEC-HMS interface consists of a menu bar, tool bar, and four panes. These panes are referred to as
the Watershed Explorer, the Component Editor, the Message Log and the Desktop as shown below.
More description on these panes, menus and tools is provided when they are used later in the
exercise.
Creating and Saving a new HEC-HMS project
On the main Menu, click on FileNew.. First specify the location of where you want to save your
project, give a name (Lab1), accept the default unit system (Metric), and click on Create. Note that the
unit system may be different for different projects.

3
After you create a project, go to the directory where you saved the project using windows explorer, and
you will see that the following folders and files are created.
Go ahead, and open the .hms file using Notepad. You will see that it is a simple text file with some basic
information about the version of the model. Similarly, all the messages you see in the message box in
the HEC-HMS program are saved in text file (lab1.txt in this case).
Now that we have created a project, lets populate this project with the required elements to create a
simple hydrologic model.
Creating a Basin Model
A basin model represents the physical description of the watershed in a HEC-HMS project. First an
empty basin model is created, and then it is populated with all the necessary information needed to
create the complete description of a watershed. In addition to including the physical description, a basin
model also includes information on the mathematical methods (or equations) that will be used in
simulating the hydrology of the basin, and the values for all the variables in those equations. The
variables in all the equations are called parameters because by changing the values for these parameters
we can change the output from the model.
To create a basin model, click on ComponentsBasin Model Manager.. Then click on New, and enter
the name of the basin and some basic description as shown below, and click Create.

4
You will see that a folder called Basins is now added in the Watershed Explorer pane, expand the folder
and you will see Basin 1. Double click on Basin 1, and an empty basin (white window) will be added to
the desktop pane. Save your project.
After a basin is created, all the tools (see below) necessary to populate the basin will also become
available.
In the above figure, these elements (from left to right) can be used to add sub-basin, reach, reservoir,
junction, diversion, source and sink. In this lab, we will create a single sub-basin that has an area of 100
km2.
Create Sub-basin
This is done by using the create sub-basin tool ( ). Select the sub-basin tool, and click on the basin
model (white window in the desktop pane). You will be prompted to enter the name and description of
the new sub-basin as shown below.
Click Create. You will see that you basin model now has a sub-basin and all the information related to
this sub-basin can be entered in the component editor. A sub-basin is just one of the components of
your basin model.
Expand Basin 1 and Sub-basin 1 in the watershed explorer, and you will see the following (or a variation
of it):

5
This information can be edited by using the component editor, and each label above is related to a
“method” in the basin model. You can think of a method as a hydrologic process, and then you have to
choose which equation you want to use to simulate this hydrologic process. The Canopy method allows
users to model the interception and evapotranspiration in the watershed. For this lab, we will ignore this
method. The surface method allows users to represent depression storage in the watershed. Again, we
will ignore surface method for this lab. The next method allows users to represent losses in the rainfall.
We know that not all rainfall becomes runoff because some of it is lost to infiltration. The loss method
lets users to model this infiltration by using various equations. We have not covered this topic in the
class yet, but for completing this lab, just change the loss method to SCS Curve Number for now by using
the component editor. The transform method allows users to convert the rainfall (after subtracting
losses) to streamflow hydrograph. Change the transform method to SCS Unit Hydrograph. Baseflow
method allows users to account for existing flow conditions in the outlet stream. Again, we will ignore
baseflow for this lab.
Finally, enter the area of the watershed (100 km2) in the area box of the component editor. If you see
input for latitude, longitude, etc., simply ignore those for now. The exact placement of this sub-basin is
not important for this lab.
By specifying names for each method, we are basically telling the program which equation to use. To
execute these equations, we need to also specify values for all the variables (parameters) needed. The
values for these parameters are provided in the additional tabs that you see in the component editor for
each method. Because we only chose two methods (Loss and Transform), you will see that there is a tab
for each method in the component editor. Click on the Loss tab, and enter a value of zero for initial

6
abstraction, 75 for curve number and zero for impervious cover. We will learn about these variables
later in the semester.
In the transform tab, enter a value of 60 min for lag time.
Do not input any information for options. Select “None” for Canopy, Surface and Baseflow methods.
Save your project. You have now entered all the necessary information needed to represent a
watershed in the basin model.
Go back to windows explorer, and open the Basin1.basin file in notepad to see how all the information
in the basin model is stored in a simple text file. Now that we have a basin model, we need some input
to drive the simulation. The primary driver of a hydrologic event is precipitation. Note that
precipitation/rainfall are typically recorded using weather stations or rainfall gauges. So to provide
rainfall input, we first have to create a precipitation gage.
Creating a Precipitation Gage
To create a precipitation gage, go to Components EditorTime Series Data Manager. Select Data Types
as precipitation gages, and click on New.
Use the default name and provide some basic description for the gage. Click Create.

7
In the watershed explorer, you will see that a new folder called Time Series is created. Expand this folder
to see another folder called Precipitation Gages, and then Gage 1 is created inside the Precipitation
Gages folder. We will populate this gage with the information presented in the table below. What we
have here is hourly rainfall data in mm from 9 AM to 3 PM on Sep 01, 2013. Note that this information is
hypothetical!
Date Time Precipitation (mm)
9/1/2013 9:00 0.000
9/1/2013 10:00 5.080
9/1/2013 11:00 10.160
9/1/2013 12:00 2.540
9/1/2013 13:00 2.000
9/1/2013 14:00 1.000
9/1/2013 15:00 0.000
Select Gage 1 in watershed explorer and change the time interval to 1 hour in the component editor as
shown below.
Next, Click on the time-stamp label under Gage 1 in watershed explorer and enter the Start date/time
and end date/time for this gage as shown below in the component editor.

8
Next, click on the table tab, enter the information from the table above to populate the table, and also
see the graph (hyetograph).
The gage that we just created has the input that we need, but the program does not know that this gage
is located in the sub-basin we have created. To link this precipitation to the sub-basin, we need to create
a meteorologic model. Before you proceed, check that the units for rainfall are correct.

9
Creating a Meteorologic Model
A meteorologic model or file contains meteorologic information to drive the hydrologic simulation. You
cannot run a HEC-HMS simulation without a meteorologic model/file. To create a meteorologic model,
go to ComponentsMeterologic Model Manager, and create New. Use the default name and provide
some basis description and click Create.
You will see a new folder called Meteorologic Models in the watershed explorer, and if you expand this
folder, you will see the Met 1 file that you just created. Under Met 1 label, you will see Specified
Hyetograph label. Click on Met 1 in the watershed explorer and then click on the Basins tab in the
Component editor, and then click Yes on Include sub-basins. This will link Gage 1 to sub-basin 1.
Next, select the specified hyetograph label in watershed explorer, and then select Gage 1 for subbasin-1
in the component editor as shown below.

10
Next, select the Met 1 and then change the Replace Missing to “Set to Default” as shown below. The
earlier option (abort) will not let the model run if the simulation time is longer than the rainfall duration.
Save your project. Now we have the watershed description and the input information. The next thing is
to provide some basic information on the time-step to run the model and the duration because we
know that the rainfall occurred from 9 AM to 3 PM, but the water from this event will keep flowing into
the river even after 3 PM so we need to specify when to start and end the simulation. This is done by
creating a control specification model.
Creating a Control Specification Model
The control specification file basically tells HEC-HMS how long the simulation will last and the time step
to continue the simulation. You cannot run a HEC-HMS simulation without creating a control
specification file. To create a control specification model, go to ComponentsControl Specification
Manager.. and create New. Accept the default name, enter some basic description, and the click Create.

11
You will now see that another folder called Control Specifications is now added in the watershed
explorer. Expand the folder, select Control 1 and enter the start date/time, end date/time and time
interval in the component editor as shown below.
Basically, we will run the model for four days to make sure we account for all the flow that is coming to
the outlet from this event. Save your project. Once we have create the basin file, meteorologic file and
control specification file for the project, the model is ready for simulation.
Creating a Simulation Run
To create a simulation Run go to ComputeCreate ComputeSimulation Run. Accept the default name
Run 1 and then accept all the default models and finish creating the run. If you had more than one
model for Basin, Meteorology and Control specification, you get to select them during this step. Because
we have only one model for each, the process is straight forward. Save the project.
Running a Simulation
Once a simulation run is created, select the simulation by going to the Compute tab in the watershed
explorer and select the run as shown below.
Next, go to the Compute tab on the menu bar, and select Compute Run [ComputeCompute Run].

12
(Note: The simulation should not take more than a minute to run. If it is taking longer, cancel the simulation and check for the following:
Your rainfall gage is included in the sub-basin
Your control specification time period covers the rainfall event
Your units are correct including the area of the watershed) Looking at Results
To look at the results from simulation, you will use the Results Tab in the Watershed Explorer Window
and then select the Run as shown below (the name of the Run for you may be different)
Expand Run1 (or whatever the name given by you), and you will see Global Summary and the sub-basin.
If you expand subbasin-1, you will see more options to explore results related to individual component
of this sub-basin such as losses and runoff.
Look the global summary and the Summary Table for subbasin-1. Because we have only one basin, the
information such as peak discharge and volume is identical. If we have more than one sub-basins, we
will see the final results for the entire watershed in the global summary table and individual results for
sub-basins in the Summary Table for each basin.
Turn-in before the next lab:
1) Hydrograph of the sub-basin (either take a screen shot of just the hydrograph or create a graph in
Excel)
2) Peak discharge in m3/s
3) Total duration of the hydrograph (in hours)
4) Water budget for subbasin-1 in mm (how much water did it get from rainfall, how much was lost to
infiltration, and how much came out as runoff)
5) Write down the name and use/meaning of the four important files to run a HEC-HMS simulation.