hi q ot2 200 kit - thermo fisher scientific · ion pi™ hi‑q™ ot2 200 kit user guide for use...
TRANSCRIPT
For Research Use Only. Not for use in diagnostic procedures.
Ion PI™ Hi‑Q™ OT2 200 KitUSER GUIDE
for use with:Ion PI™ Hi‑Q™ OT2 200 KitIon OneTouch™ 2 System
Catalog Number A26434
Publication Number MAN0010857
Revision D.0

Manufacturer: Life Technologies Corporation | 5781 Van Allen Way | Carlsbad, CA 92008
The information in this guide is subject to change without notice.
DISCLAIMER: TO THE EXTENT ALLOWED BY LAW, LIFE TECHNOLOGIES AND/OR ITS AFFILIATE(S) WILL NOT BE LIABLE FOR SPECIAL, INCIDENTAL,INDIRECT, PUNITIVE, MULTIPLE, OR CONSEQUENTIAL DAMAGES IN CONNECTION WITH OR ARISING FROM THIS DOCUMENT, INCLUDING YOURUSE OF IT.
Revision history: MAN0010857
Revision Date DescriptionD.0 25 September 2017 Handling and storage of Ion PI™ Master Mix clarified. Thawed Master Mix should be used at room
temperature, and can be stored up to 8 hours at 2°C−8°C when not in use.
C.0 12 January 2017 • Appendices C ("Set up, calibrate, and maintain the Ion OneTouch™ ES") and D ("Supplementalprocedures") deleted. Users are referred to the Ion OneTouch™ 2 System User Guide (Pub. No.MAN0014388)
• ISP quality control sections updated and moved to new user guides:
– Ion Sphere™ Assay on the Qubit™ 2.0 Fluorometer User Guide (Pub. No. MAN0016387)
– Ion Sphere™ Assay on the Qubit™ 3.0 Fluorometer User Guide (Pub. No. MAN0016388)
• Graphics enhanced
• Web links updated
• Ion OneTouch™ ES Instrument setup clarified
• Minor clarifications and corrections made
B.0 23 March 2015 • Users advised to update Torrent Suite™ Software to v4.4.2
• Corrections and screenshot updates
A.0 19 December 2014 New user guide, which includes instructions on how to use the Ion PI™ Hi‑Q™ OT2 200 Kit with theIon OneTouch™ 2 System.
Important Licensing Information: This product may be covered by one or more Limited Use Label Licenses. By use of this product, you accept theterms and conditions of all applicable Limited Use Label Licenses.Trademarks: All trademarks are the property of Thermo Fisher Scientific and its subsidiaries unless otherwise specified. Agilent and Bioanalyzer aretrademarks of Agilent Technologies, Inc. Agencourt and AMPure are trademarks of Beckman Coulter, Inc. Guava is a trademark of Merck KGaA.Kimwipes is a trademark of Kimberly-Clark Corporation. Eppendorf and Eppendorf LoBind are trademarks of Eppendorf AG. Luer-Lok is a trademarkof Becton, Dickinson and Company. Parafilm is a trademark of Bemis Company, Inc. Stripwell is a trademark of Corning, Inc. Tween is a trademark ofCroda Americas LLC. Xiameter is a trademark of Dow Corning Corporation.
©2017 Thermo Fisher Scientific Inc. All rights reserved.

Contents
About this guide . . . . . . . . . . . . . . . . . . . . . . . . . . . . . . . . . . . . . . . . . . . . . . . . . . . . . . . . . . . . 6
Purpose . . . . . . . . . . . . . . . . . . . . . . . . . . . . . . . . . . . . . . . . . . . . . . . . . . . . . . . . . . . . . . . . . . . . . . . 6
■ CHAPTER 1 Product information . . . . . . . . . . . . . . . . . . . . . . . . . . . . . . . . . . . . . . . 7
Product description . . . . . . . . . . . . . . . . . . . . . . . . . . . . . . . . . . . . . . . . . . . . . . . . . . . . . . . . . . . . . 7
Kit contents and storage . . . . . . . . . . . . . . . . . . . . . . . . . . . . . . . . . . . . . . . . . . . . . . . . . . . . . . . . . 7
Required materials not supplied . . . . . . . . . . . . . . . . . . . . . . . . . . . . . . . . . . . . . . . . . . . . . . . . . . 9Additional materials required for Ion OneTouch™ ES . . . . . . . . . . . . . . . . . . . . . . . . . . . 10
Materials recommended for the Ion OneTouch™ 2 System . . . . . . . . . . . . . . . . . . . . . . . . . . . 10
■ CHAPTER 2 Before you begin . . . . . . . . . . . . . . . . . . . . . . . . . . . . . . . . . . . . . . . . . . 11
Procedural guidelines . . . . . . . . . . . . . . . . . . . . . . . . . . . . . . . . . . . . . . . . . . . . . . . . . . . . . . . . . . 11
Unpack and install the Ion OneTouch™ 2 Instrument and Ion OneTouch™ ES . . . . . . . . . . . 12
Check the firmware . . . . . . . . . . . . . . . . . . . . . . . . . . . . . . . . . . . . . . . . . . . . . . . . . . . . . . . . . . . . 12
Initialize the Ion OneTouch™ 2 Instrument . . . . . . . . . . . . . . . . . . . . . . . . . . . . . . . . . . . . . . . . 12
Perform a verification run . . . . . . . . . . . . . . . . . . . . . . . . . . . . . . . . . . . . . . . . . . . . . . . . . . . . . . . 13
■ CHAPTER 3 Prepare template-positive Ion PI™ ISPs . . . . . . . . . . . . . . . 14
Ion OneTouch™ 2 Instrument layout . . . . . . . . . . . . . . . . . . . . . . . . . . . . . . . . . . . . . . . . . . . . . . . 15
Run the Ion OneTouch™ 2 Instrument . . . . . . . . . . . . . . . . . . . . . . . . . . . . . . . . . . . . . . . . . . . . . 16
Set up the Ion OneTouch™ 2 Instrument . . . . . . . . . . . . . . . . . . . . . . . . . . . . . . . . . . . . . . . . . . . 18Materials required . . . . . . . . . . . . . . . . . . . . . . . . . . . . . . . . . . . . . . . . . . . . . . . . . . . . . . . . . 18Install the Ion OneTouch™ Recovery Tubes and Ion OneTouch™ Recovery Router . . . 18Install the Ion OneTouch™ Amplification Plate . . . . . . . . . . . . . . . . . . . . . . . . . . . . . . . . . 19Install the disposable injector . . . . . . . . . . . . . . . . . . . . . . . . . . . . . . . . . . . . . . . . . . . . . . . 21Install the Ion OneTouch™ Oil . . . . . . . . . . . . . . . . . . . . . . . . . . . . . . . . . . . . . . . . . . . . . . . . 23Install the Ion OneTouch™ Recovery Solution . . . . . . . . . . . . . . . . . . . . . . . . . . . . . . . . . . 24
Ion PI™ Hi‑Q™ OT2 200 Kit User Guide 3
Empty the Waste Container . . . . . . . . . . . . . . . . . . . . . . . . . . . . . . . . . . . . . . . . . . . . . . . . . 24Inspect the oil waste tray . . . . . . . . . . . . . . . . . . . . . . . . . . . . . . . . . . . . . . . . . . . . . . . . . . . 24
Prepare and install the amplification solution . . . . . . . . . . . . . . . . . . . . . . . . . . . . . . . . . . . . . . 25Materials required . . . . . . . . . . . . . . . . . . . . . . . . . . . . . . . . . . . . . . . . . . . . . . . . . . . . . . . . . 25Prepare the amplification solution . . . . . . . . . . . . . . . . . . . . . . . . . . . . . . . . . . . . . . . . . . . 26Fill the Ion OneTouch™ Reaction Filter . . . . . . . . . . . . . . . . . . . . . . . . . . . . . . . . . . . . . . . . 28Install the filled Ion OneTouch™ Reaction Filter . . . . . . . . . . . . . . . . . . . . . . . . . . . . . . . . 30
Start the run . . . . . . . . . . . . . . . . . . . . . . . . . . . . . . . . . . . . . . . . . . . . . . . . . . . . . . . . . . . . . . . . . . 31Abort and restart a run . . . . . . . . . . . . . . . . . . . . . . . . . . . . . . . . . . . . . . . . . . . . . . . . . . . . . 31
Recover the template-positive Ion PI™ ISPs . . . . . . . . . . . . . . . . . . . . . . . . . . . . . . . . . . . . . . . . 32Materials required . . . . . . . . . . . . . . . . . . . . . . . . . . . . . . . . . . . . . . . . . . . . . . . . . . . . . . . . . 32Recover the template-positive ISPs . . . . . . . . . . . . . . . . . . . . . . . . . . . . . . . . . . . . . . . . . . 32Wash the template-positive ISPs . . . . . . . . . . . . . . . . . . . . . . . . . . . . . . . . . . . . . . . . . . . . . 33
Maintain the Ion OneTouch™ 2 Instrument . . . . . . . . . . . . . . . . . . . . . . . . . . . . . . . . . . . . . . . . . 35Materials required . . . . . . . . . . . . . . . . . . . . . . . . . . . . . . . . . . . . . . . . . . . . . . . . . . . . . . . . . 35Clean the Ion OneTouch™ 2 Instrument . . . . . . . . . . . . . . . . . . . . . . . . . . . . . . . . . . . . . . . 35
■ CHAPTER 4 Enrich the template-positive Ion PI™ ISPs . . . . . . . . . . . . . 38
Materials required . . . . . . . . . . . . . . . . . . . . . . . . . . . . . . . . . . . . . . . . . . . . . . . . . . . . . . . . . . . . . 38
Determine if a residual volume test is necessary . . . . . . . . . . . . . . . . . . . . . . . . . . . . . . . . . . 39
Prepare reagents then fill the 8-well strip . . . . . . . . . . . . . . . . . . . . . . . . . . . . . . . . . . . . . . . . . 39Prepare Melt-Off Solution . . . . . . . . . . . . . . . . . . . . . . . . . . . . . . . . . . . . . . . . . . . . . . . . . . . 39Wash and resuspend the Dynabeads™ MyOne™ Streptavidin C1 Beads . . . . . . . . . . . . 39Fill the 8-well strip . . . . . . . . . . . . . . . . . . . . . . . . . . . . . . . . . . . . . . . . . . . . . . . . . . . . . . . . 40
Prepare the Ion OneTouch™ ES . . . . . . . . . . . . . . . . . . . . . . . . . . . . . . . . . . . . . . . . . . . . . . . . . . 41
Perform the run . . . . . . . . . . . . . . . . . . . . . . . . . . . . . . . . . . . . . . . . . . . . . . . . . . . . . . . . . . . . . . . 43
Remove and wash the enriched ISPs . . . . . . . . . . . . . . . . . . . . . . . . . . . . . . . . . . . . . . . . . . . . . . 45
(Optional) Perform enriched ISP quality control . . . . . . . . . . . . . . . . . . . . . . . . . . . . . . . . . . . . 47
■ APPENDIX A Troubleshooting . . . . . . . . . . . . . . . . . . . . . . . . . . . . . . . . . . . . . . . . . 48
Ion OneTouch™ 2 Instrument . . . . . . . . . . . . . . . . . . . . . . . . . . . . . . . . . . . . . . . . . . . . . . . . . . . . 48
Ion OneTouch™ ES . . . . . . . . . . . . . . . . . . . . . . . . . . . . . . . . . . . . . . . . . . . . . . . . . . . . . . . . . . . . . 50
Ion Sphere™ Assay troubleshooting table . . . . . . . . . . . . . . . . . . . . . . . . . . . . . . . . . . . . . . . . . . 54
■ APPENDIX B Quality control of Ion PI™ ISPs . . . . . . . . . . . . . . . . . . . . . . . . . 55
Quality control using the Ion Sphere™ Assay on the Qubit™ Fluorometer . . . . . . . . . . . . . . . 55
Acceptance criteria for unenriched Ion PI™ ISPs . . . . . . . . . . . . . . . . . . . . . . . . . . . . . . . . . . . 55
Quality control using the Guava™ easyCyte 5 Benchtop Flow Cytometer . . . . . . . . . . . . . . . 56
Contents
4 Ion PI™ Hi‑Q™ OT2 200 Kit User Guide

■ APPENDIX C Safety . . . . . . . . . . . . . . . . . . . . . . . . . . . . . . . . . . . . . . . . . . . . . . . . . . . . . 57
Instrument safety . . . . . . . . . . . . . . . . . . . . . . . . . . . . . . . . . . . . . . . . . . . . . . . . . . . . . . . . . . . . . . 57
Chemical safety . . . . . . . . . . . . . . . . . . . . . . . . . . . . . . . . . . . . . . . . . . . . . . . . . . . . . . . . . . . . . . . . 58
Biological hazard safety . . . . . . . . . . . . . . . . . . . . . . . . . . . . . . . . . . . . . . . . . . . . . . . . . . . . . . . . . 59
■ Documentation and support . . . . . . . . . . . . . . . . . . . . . . . . . . . . . . . . . . . . . . . . . . . . . 60
Customer and technical support . . . . . . . . . . . . . . . . . . . . . . . . . . . . . . . . . . . . . . . . . . . . . . . . . 60
Limited product warranty . . . . . . . . . . . . . . . . . . . . . . . . . . . . . . . . . . . . . . . . . . . . . . . . . . . . . . . 60
Contents
Ion PI™ Hi‑Q™ OT2 200 Kit User Guide 5

About this guide
IMPORTANT! Before using this product, read and understand the information in the“Safety” appendix in this document.
Purpose
This user guide describes how to use the Ion OneTouch™ 2 System to prepareenriched, template-positive Ion PI™ Ion Sphere™ Particles (ISPs) with 200 base-pairaverage insert libraries for sequencing on the Ion Proton™ System. TheIon OneTouch™ 2 System includes the Ion OneTouch™ 2 Instrument and theIon OneTouch™ ES Instrument.
The user guide is organized as follows:• Prepare template-positive ISPs containing clonally amplified DNA, using the Ion
PI™ Hi-Q™ OT2 200 Kit with the Ion OneTouch™ 2 Instrument (see Chapter 3,“Prepare template-positive Ion PI™ ISPs“).
• Enrich the template-positive ISPs with the Ion OneTouch™ ES (see Chapter 4,“Enrich the template-positive Ion PI™ ISPs“).
6 Ion PI™ Hi‑Q™ OT2 200 Kit User Guide

Product information
Product description
The Ion PI™ Hi-Q™ OT2 200 Kit includes the reagents required for preparing8 reactions of template-positive Ion PI™ Ion Sphere™ Particles (ISPs) on theIon OneTouch™ 2 System. The Ion PI™ Hi-Q™ OT2 200 Kit can be used with up to200 base-read average insert libraries of any type prepared using any available Ionlibrary kit.
IMPORTANT!· Use only the Ion PI™ Hi-Q™ OT2 200 Kit (Cat. No. A26434) with this user guide and
with the Ion OneTouch™ 2 System. Do not use the kit with the Ion OneTouch™
System.· Do not mix reactions or disposables including plates, solutions, and kit reagents
from other template preparation kits.· Template-positive Ion PI™ Ion Sphere™ Particles prepared with this kit should only
be used in conjunction with the Ion PI™ Hi-Q™ Sequencing 200 Kit (Cat. No. A26433or A26772). See the Ion PI™ Hi‑Q™ Sequencing 200 Kit User Guide (Pub. No.MAN0010947).
Kit contents and storage
IMPORTANT! Follow these special reagent handling instructions:
· Ion PI™ Master Mix in the Ion PI™ Hi-Q™ OT2 200 Kit is shipped and stored at –30°C to –10°C and should be thawed before use.
· Use only screw caps to seal reagent tubes in the Ion PI™ Hi-Q™ OT2 200 Kit. Do notseal the reagent tubes with any plastic paraffin film such as Parafilm™ M film.
Ion PI™ Hi‑Q™ OT2 200 Kit summary
Box Part No. Quantity per kit
Ion OneTouch™ 2 Supplies A26367 1 box
Ion PI™ Hi‑Q™ OT2 Reagents 200 A26428 1 box
Ion PI™ Hi‑Q™ OT2 Solutions 200 A26429 1 box
1
Ion PI™ Hi‑Q™ OT2 200 Kit User Guide 7

Kit contents and storage conditions
Components[1] Amount Storage
Ion OneTouch™ 2 Supplies (Part No. A26367)
Ion OneTouch™ Reagent Tubes 2 tubes
15ºC to 30ºC
Ion OneTouch™ Recovery Routers 8 routers
Ion OneTouch™ Recovery Tubes 16 tubes
Ion OneTouch™ Sipper Tubes 2 tubes
Ion OneTouch™ Amplification Plate 8 plates
Ion OneTouch™ Cleaning Adapter [2] 8 adapters
Ion OneTouch™ Reaction Filter 8 reaction filtersand tubes
Ion OneTouch™ ES Supplies[3] 1 bag
Ion PI™ Hi‑Q™ OT2 Reagents 200 (Part No. A26428)
Ion PI™ Master Mix (violet cap)
IMPORTANT! The Ion PI™ Master Mix isshipped and stored at –30°C to –10°C.Immediately before use, thaw tube(s) asneeded.
8 × 2 mL
–30ºC to –10ºC
Ion PI™ Enzyme Mix (brown cap) 960 µL–30ºC to –10ºC
Ion PI™ Ion Sphere™ Particles (black cap) 800 µL
Ion PI™ Hi‑Q™ OT2 Solutions 200 (Part No. A26429)
Ion OneTouch™ Breaking Solution (black cap) 2 × 1.2 mL
15ºC to 30ºC
Ion OneTouch™ Oil 450 mL
Ion OneTouch™ Reaction Oil 25 mL
Nuclease-free Water 30 mL
Ion OneTouch™ Recovery Solution 350 mL
Ion OneTouch™ Wash Solution 16 mL
Ion OneTouch™ ES Wash Solution 7.2 mL
MyOne™ Beads Capture Solution (green cap) 2 × 1.5 mL
ISP Resuspension Solution (red cap) 1.25 mL
Tween™ Solution 6 mL
[1] We have verified this protocol using this specific material. Substitution may adversely affect performance.[2] Each Ion OneTouch™ Cleaning Adapter is used for one cleaning only.[3] Ion OneTouch™ ES Supplies include 12 pipette tips and 1 box of ES 8-well strips.
Chapter 1 Product informationKit contents and storage1
8 Ion PI™ Hi‑Q™ OT2 200 Kit User Guide

Required materials not supplied
Unless otherwise indicated, all materials are available through thermofisher.com.MLS: Fisher Scientific (fisherscientific.com) or other major laboratory supplier.
3 Item[1] Source
Ion OneTouch™ 2 System
The system includes:
• Ion OneTouch™ 2 Instrument
• Ion OneTouch™ ES Instrument
• AC Power Supply and Cords
• Installation Kit
4474779
Dynabeads™ MyOne™ Streptavidin C1 Magnetic Beads 65001 (2 mL)
65002 (10 mL)
SimpliAmp™ Thermal Cycler or equivalent A24811
1.5-mL Eppendorf™ DNA LoBind™ Microcentrifuge Tubes Fisher Scientific13-698-791
Microcentrifuge[2] MLS
Pipettes (P2, P20, P200, P1000) and appropriatelow‑retention tips
MLS
Vortexer with a rubber platform MLS
Tube rack to fit 15-mL conical tube MLS
Tube rack for 50-mL conical tube MLS
[1] We have verified this protocol using this specific material. Substitution may adversely affect system performance.
[2] Must fit standard 0.2- and 1.5-mL microcentrifuge tubes; must generate 15,500 × g. To convert the RPMs of your centrifuge to RCF in units of gravity, see tools.thermofisher.com/content/sfs/brochures/TR0040-Centrifuge-speed.pdf.
Note: We recommend using a non-interruptible power supply (UPS) for laboratoriesthat experience frequent power outages or line voltage fluctuations. The UPS must berated for 1500 W output or higher. The 1500 VA unit from APC provides severalminutes of backup power for the Ion OneTouch™ 2 Instrument, the Ion OneTouch™ ESInstrument, the Ion Proton™ Sequencer, and the Torrent Server. Use a surge protectoror line conditioner as needed (see the Ion OneTouch™ 2 System User Guide Pub. No.MAN0014388 for further information).
Chapter 1 Product informationRequired materials not supplied 1
Ion PI™ Hi‑Q™ OT2 200 Kit User Guide 9
The following additional materials are required for use of the Ion OneTouch™ ESInstrument. Unless otherwise indicated, all materials are available through thermofisher.com. MLS: Fisher Scientific (fisherscientific.com) or other majorlaboratory supplier.
3 Item[1] Source
DynaMag™-2 magnet 12321D
0.2-mL PCR tubes (Axygen™ MAXYMum Recovery™
PCR Tube)Fisher Scientific 14-222-283
or MLS
1 M NaOH MLS
[1] We have verified this protocol using this specific material. Substitution may adversely affect system performance.
Materials recommended for the Ion OneTouch™ 2 System
Unless otherwise indicated, all materials are available through thermofisher.com.MLS: Fisher Scientific (fisherscientific.com) or other major laboratory supplier.
3 Item[1,2] Source
Ion PI™ Controls 200 Kit 4488985
Benchtop absorbent paper or mat MLS
Bleach MLS
Ethernet cable MLS
1/8-inch L-wrench (hex wrench) or equivalent tool MLS
[1] We have verified this protocol using this specific material. Substitution may adversely affect system performance.
[2] For materials needed for optional quality control of ISPs by the Qubit™ 2.0 or Qubit™ 3.0 Fluorometer, see the Ion Sphere™ Assay on the Qubit™ 2.0 Fluorometer User Guide (Pub. No. MAN0016387), or the Ion Sphere™ Assay on the Qubit™ 3.0 Fluorometer User Guide (Pub. No. MAN0016388).
Additionalmaterials requiredfor Ion OneTouch™
ES
Chapter 1 Product informationMaterials recommended for the Ion OneTouch™ 2 System1
10 Ion PI™ Hi‑Q™ OT2 200 Kit User Guide

Before you begin
■ Procedural guidelines . . . . . . . . . . . . . . . . . . . . . . . . . . . . . . . . . . . . . . . . . . . . . . . . . 11
■ Unpack and install the Ion OneTouch™ 2 Instrument andIon OneTouch™ ES . . . . . . . . . . . . . . . . . . . . . . . . . . . . . . . . . . . . . . . . . . . . . . . . . . . 12
■ Check the firmware . . . . . . . . . . . . . . . . . . . . . . . . . . . . . . . . . . . . . . . . . . . . . . . . . . . 12
■ Initialize the Ion OneTouch™ 2 Instrument . . . . . . . . . . . . . . . . . . . . . . . . . . . . . . 12
■ Perform a verification run . . . . . . . . . . . . . . . . . . . . . . . . . . . . . . . . . . . . . . . . . . . . . 13
Procedural guidelines
Preventing cross-contamination:• Use good laboratory practice to minimize cross-contamination of products and
reagents.• When designing the laboratory layout, consider the need for space separation of
pre- and post-PCR activities. Dedicate laboratory supplies and/or equipment tothe appropriate space to reduce the potential for contamination.
• A primary source of contamination is DNA fragments from previous sampleprocessing steps. Do not introduce amplified DNA into library preparationlaboratory or work area.
Reagent thawing:• Unless otherwise specified, thaw reagents on ice before use. Ensure that no ice
crystals are visible in the thawed reagent.
Pipetting recommendations:• Vortex all reagents, except for enzymes, for 5 seconds. Mix enzymes by flicking
the tube with your finger 4 times. Pulse centrifuge before use.• Pipet viscous solutions slowly and ensure complete mixing.• Change tips between pipetting steps.
2
Ion PI™ Hi‑Q™ OT2 200 Kit User Guide 11

Unpack and install the Ion OneTouch™ 2 Instrument andIon OneTouch™ ES
For detailed instructions on site preparation and installation of the Ion OneTouch™ 2Instrument and Ion OneTouch™ ES, see:
• Site preparation and installation requirements: Ion Proton™ System Site PreparationGuide (Pub. No. 4478733).
• Unpacking and installation instructions: Ion OneTouch™ 2 System User Guide (Pub.No. MAN0014388).
Check the firmware
Firmware updates to the software controlling the Ion OneTouch™ 2 Instrument areperiodically released. To check the firmware version, touch Options on the instrumenttouch screen, then touch Info. To update the firmware to the appropriate version, seeChapter 2 of the Ion OneTouch™ 2 System User Guide (Pub. No. MAN0014388).
IMPORTANT! Ensure that the latest firmware is installed on the Ion OneTouch™ 2Instrument
Initialize the Ion OneTouch™ 2 Instrument
Before operating the Ion OneTouch™ 2 Instrument for the first time, you mustinitialize the instrument. Initialization primes the pumps and tubing lines for reliableoperation. Perform initialization at any time before the first run. In addition, re-initialization is recommended when switching between sequencing platforms,between the Ion PI™ Hi-Q™ OT2 200 Kit and the Ion PQ™ Template OT2 Kit, andbetween kits with different lots of Ion OneTouch™ Oil.
Note: For detailed instructions on initialization of the Ion OneTouch™ 2 Instrument,and to set up the Ion OneTouch™ 2 Instrument when switching between sequencingplatforms and kits , see the Ion OneTouch™ 2 System User Guide (Pub No.MAN0014388).
Chapter 2 Before you beginUnpack and install the Ion OneTouch™ 2 Instrument and Ion OneTouch™ ES2
12 Ion PI™ Hi‑Q™ OT2 200 Kit User Guide

Perform a verification run
To ensure optimal use of the Ion OneTouch™ 2 Instrument, we recommend firstpreparing and enriching template-positive Ion PI™ Ion Sphere™ Particles (ISPs) on thesystem with a control library.
1. Obtain the Human CEPH Control 200 Library from the Ion PI™ Controls 200 Kit(Cat. No. 4488985).
2. Dilute 1 µL of control library into 259 µL of Nuclease-free Water in an EppendorfLoBind™ Tube. Use 100 µL of the dilution in the amplification solution (see “Prepare the amplification solution“ on page 26).
3. Follow the operating instructions to set up and use the Ion OneTouch™ 2Instrument to prepare template-positive ISPs and to use the Ion OneTouch™ ES toprepare enriched ISPs (see “Run the Ion OneTouch™ 2 Instrument“ on page 16).
4. If you have a Qubit™ 2.0 or Qubit™ 3.0 Fluorometer, determine the percenttemplate-positive ISPs (see Appendix B, “Quality control of Ion PI™ ISPs“). If youdo not have one of these instruments, proceed to step 5.
5. Before starting a run on the Ion Proton™ System, create a Planned Run in theTorrent Browser, then select the Ion PI™ Hi-Q™ OT2 200 Kit. Load the sample,then analyze the results.
Note: Use the Ion PI™ Hi-Q™ Sequencing 200 Kit (Cat. No. A26433). See the IonPI™ Hi‑Q™ Sequencing 200 Kit User Guide (Pub. No. MAN0010947).
6. Review the run report from the Torrent Browser and confirm successfulsequencing results with the control library. If you have questions regarding theresults, contact Technical Support.The instrument is ready for use.
Chapter 2 Before you beginPerform a verification run 2
Ion PI™ Hi‑Q™ OT2 200 Kit User Guide 13
Prepare template-positive Ion PI™
ISPs
■ Ion OneTouch™ 2 Instrument layout . . . . . . . . . . . . . . . . . . . . . . . . . . . . . . . . . . . . 15
■ Run the Ion OneTouch™ 2 Instrument . . . . . . . . . . . . . . . . . . . . . . . . . . . . . . . . . . 16
■ Set up the Ion OneTouch™ 2 Instrument . . . . . . . . . . . . . . . . . . . . . . . . . . . . . . . . 18
■ Prepare and install the amplification solution . . . . . . . . . . . . . . . . . . . . . . . . . . . . 25
■ Start the run . . . . . . . . . . . . . . . . . . . . . . . . . . . . . . . . . . . . . . . . . . . . . . . . . . . . . . . . . 31
■ Recover the template-positive Ion PI™ ISPs . . . . . . . . . . . . . . . . . . . . . . . . . . . . . . 32
■ Maintain the Ion OneTouch™ 2 Instrument . . . . . . . . . . . . . . . . . . . . . . . . . . . . . . 35
3
14 Ion PI™ Hi‑Q™ OT2 200 Kit User Guide

Ion OneTouch™ 2 Instrument layout
1
2
3
5
6
7
11
10
9
8
4
1 Ion OneTouch™ Reaction Filter2 Clamp handle to access the Amplification Plate in the heat block3 Pinch valve to hold disposable tubing4 Sipper Tubes5 Ion OneTouch™ Recovery Solution 6 Ion OneTouch™ Oil 7 Waste Container8 Oil waste tray (pull out)9 Centrifuge to spin the Recovery Tubes and Recovery Router
10 Ion OneTouch™ DL Injector Hub11 Instrument display
Note: The line drawing does not show the disposable tubing.
Chapter 3 Prepare template-positive Ion PI™ ISPsIon OneTouch™ 2 Instrument layout 3
Ion PI™ Hi‑Q™ OT2 200 Kit User Guide 15

Run the Ion OneTouch™ 2 Instrument
Note:· If this is the first use of the instrument, perform the initialization procedure before
the first run. See Chapter 2 of the Ion OneTouch™ 2 System User Guide(Pub. No. MAN0014388) for the initialization procedure.
· Ensure that the latest firmware is installed in your instrument (see “Check thefirmware“ on page 12).
1. Ensure that the centrifuge lid of the Ion OneTouch™ 2 Instrument is closed.
IMPORTANT! If you raise the centrifuge lid, do not hit the disposable injectoragainst the instrument. You can damage the disposable injector. If you damagethe disposable injector, appropriately discard the injector, tubing, andamplification plate. Use a new disposable injector, tubing, and Ion OneTouch™
Amplification Plate.
2. On the home screen, touch Run:
Chapter 3 Prepare template-positive Ion PI™ ISPsRun the Ion OneTouch™ 2 Instrument3
16 Ion PI™ Hi‑Q™ OT2 200 Kit User Guide

3. Touch the dropdown Protocol list, then select Proton: Ion PI™ Hi-Q™ OT2 200Kit:
4. Touch Next.
5. Touch Assisted or Expert:
• Assisted mode displays the individual task screens for setting up the run.Select this mode if you are a new user and need step-by-step onscreenguidance. Complete each task, and prepare and install the amplificationsolution (see page 25), then touch Next. After you touch Next on the lasttask, you see a progress bar, and the run starts.
• Expert mode bypasses the individual task screens for setting up the run.Select this mode if you are an experienced user and do not need step-by-steponscreen guidance. When you have finished the instrument setupprocedure, detailed in the following sections, touch Next. You see a progressbar, and the run starts without the complete list of task screens.
Chapter 3 Prepare template-positive Ion PI™ ISPsRun the Ion OneTouch™ 2 Instrument 3
Ion PI™ Hi‑Q™ OT2 200 Kit User Guide 17

Set up the Ion OneTouch™ 2 Instrument
Note:· To set up the Ion OneTouch™ System when switching between sequencing
platforms, see Chapter 5 of the Ion OneTouch™ 2 System User Guide(Pub. No. MAN0014388) for the procedure. Cleaning and initialization usingIon OneTouch™ Recovery Solution and Ion OneTouch™ Oil from the new kit arerequired.
· If this is the first run after instrument initialization, proceed to “Prepare and installthe amplification solution“ on page 25. The instrument consumables are alreadyinstalled and ready for the run.
Provided in Ion OneTouch™ 2 Supplies (Part No. A26367):• 2 Ion OneTouch™ Reagent Tubes• Ion OneTouch™ Recovery Router• 2 Ion OneTouch™ Recovery Tubes• Ion OneTouch™ Amplification Plate• 2 Ion OneTouch™ Sipper Tubes
Provided in Ion PI™ Hi-Q™ OT2 Solutions 200 (Part No. A26429):• Ion OneTouch™ Oil (450 mL size)• Ion OneTouch™ Breaking Solution• Ion OneTouch™ Recovery Solution
Note: We have verified this protocol using only the material specified. Substitutionmay adversely affect performance and safety.
IMPORTANT! Follow these special reagent handling instructions:
· Use only the Ion PI™ Hi-Q™ OT2 200 Kit (Cat. No. A26434) with this user guide andwith the Ion OneTouch™ 2 System. Do not mix reactions or disposables includingplates, solutions, and kit reagents from other template preparation kits.
· Use only the supplied screw caps in the Ion PI™ Hi-Q™ OT2 200 Kit to store thereagents. Do not seal the reagents with any plastic paraffin film such as Parafilm™
M film.
1. On the instrument display, touch Open Lid, wait until the lid clicks open, thenlift and hold the side of the centrifuge lid.
IMPORTANT! Do not lift the lid by the tubing attached to the Ion OneTouch™ DLInjector Hub. Do not force the lid open.
2. Dispense 150 µL Ion OneTouch™ Breaking Solution into each of two RecoveryTubes. The Recovery Tubes have rounded collars at their openings.
Note:· Breaking Solution is viscous. Draw and dispense slowly.· Ensure that the Ion OneTouch™ Breaking Solution is stored and used at room
temperature. If a white precipitate is present in the tube, warm the solution at30°C until the precipitate redissolves.
Materials required
Install theIon OneTouch™
Recovery TubesandIon OneTouch™
Recovery Router
Chapter 3 Prepare template-positive Ion PI™ ISPsSet up the Ion OneTouch™ 2 Instrument3
18 Ion PI™ Hi‑Q™ OT2 200 Kit User Guide

3. Insert a Recovery Tube containing Ion OneTouch™ Breaking Solution into eachslot of the centrifuge:
4. Slide the Recovery Router in position around each Recovery Tube extension.Pinch the sides of the Recovery Router, then push it down into the center slot ofthe centrifuge. The Recovery Router must be seated flat and secure in the centerof the rotor:
2
1
1
1 Ion OneTouch™ Recovery Tube2 Ion OneTouch™ Recovery Router
5. Close the lid of the centrifuge.
1. If there is a used Ion OneTouch™ Cleaning Adapter on the instrument, removeand appropriately discard it.
Note: The Cleaning Adapter may be filled with Ion OneTouch™ Oil.
2. Push the handle back to open the heat block.
CAUTION! Hot Surface. Use care when working around this area to avoidbeing burned by hot components.
WARNING! Safety Hazard. Do not use the instrument with flammable orexplosive materials. Use only the materials specified for use with theinstrument to ensure safety.
Install theIon OneTouch™
AmplificationPlate
Chapter 3 Prepare template-positive Ion PI™ ISPsSet up the Ion OneTouch™ 2 Instrument 3
Ion PI™ Hi‑Q™ OT2 200 Kit User Guide 19

3. Insert the Amplification Plate:a. Inspect the Amplification Plate to ensure that the plate port is straight and
perpendicular to the plate, and is not chipped or broken.
IMPORTANT! The disposable tubing and disposable injector are attached tothe Amplification Plate. Do not disconnect tubing from the top plate port. Ifyou have questions about the plate, contact Technical Support.
b. Hold the disposable injector, connected to the disposable tubing, in onehand and the Amplification Plate in the other hand.
CAUTION! PHYSICAL INJURY HAZARD. The pointed end of thedisposable injector can puncture your skin. Keep your hand awayfrom the point of the disposable injector.
c. Insert the Amplification Plate into the heat block so that the single plate portaligns with the left hole of the Ion OneTouch™ 2 Instrument:
IMPORTANT! Ensure that the plate port inserts cleanly into the hole so thatthe port seats properly when the heat block closes.
4. Pull the handle of the heat block to close the block, then thread the disposabletubing through the Ion OneTouch™ DL Tubing Catch:
Note: The disposable tubing is under the handle.
5. Install the disposable tubing in the pinch valve:a. Align the disposable tubing with the slot that runs along the bottom of the
pinch valve.
Chapter 3 Prepare template-positive Ion PI™ ISPsSet up the Ion OneTouch™ 2 Instrument3
20 Ion PI™ Hi‑Q™ OT2 200 Kit User Guide

b. Gently pull the disposable tubing upwards on the both sides of the pinchvalve until the disposable tubing is in the slot and secured in the roundnotch on each side of the pinch valve:
c. If necessary, adjust the disposable tubing along the notches of the openpinch valve so that there is sufficient length of disposable tubing to installthe disposable injector (see “Install the disposable injector“).
Note: The long metal shaft of the disposable injector can be slightly bent, which isnormal. If you have questions regarding the disposable injector, contact TechnicalSupport.
1. Ensure that the needle of the injector is screwed tightly onto the rubber tubing.Hold the centrifuge lid down with one hand, and with other hand install thedisposable injector by inserting it straight down into the injector hub. Push downuntil it just touches the router.
CAUTION! PHYSICAL INJURY HAZARD. The pointed end of theinjector can puncture your skin. Keep your hand away from the point ofthe injector.
Note: The color of the injector can vary.
Install thedisposableinjector
Chapter 3 Prepare template-positive Ion PI™ ISPsSet up the Ion OneTouch™ 2 Instrument 3
Ion PI™ Hi‑Q™ OT2 200 Kit User Guide 21

2. The spring-loaded top of the injector hub clicks on release, automaticallyadjusting the tip to the correct distance from the router surface. You can test thisby gently pushing the injector down again, then releasing. You should hear aclick from the hub.
Up position Down position
IMPORTANT! If the Injector Hub remains in the down position, see Appendix A,“Troubleshooting“.
IMPORTANT! If you raise the centrifuge lid, do not hit the injector against theinstrument. If you damage the disposable injector, appropriately discard theinjector, tubing, and Amplification Plate. Use a new injector and Ion OneTouch™
Amplification Plate.
Chapter 3 Prepare template-positive Ion PI™ ISPsSet up the Ion OneTouch™ 2 Instrument3
22 Ion PI™ Hi‑Q™ OT2 200 Kit User Guide
Fill the appropriate Ion OneTouch™ Reagent Tube with Ion OneTouch™ Oil on the leftfront port :
If you are Action
Using a newTemplate Kit
1. Use a new Reagent Tube from the kit.
2. Discard the used Reagent Tube and Sipper Tube. Appropriatelydiscard the residual Oil.
3. Use fresh gloves to attach the Luer-Lok™ end of a newIon OneTouch™ Sipper Tube to the left front port. Do not let theSipper Tube touch any surface.
4. Invert the Ion OneTouch™ Oil bottle (450-mL size) 3 times tomix, then fill the Reagent Tube half-full with Oil. Minimizebubbles.
5. Insert the filled Reagent Tube into the left front port, andscrew the Reagent Tube clockwise until it is fastened firmlyinto place.
Refilling theReagent Tubebetween runs
1. Remove the Reagent Tube from the instrument.
2. Invert Ion OneTouch™ Oil bottle (450-mL size) 3 times to mix.
3. Fill the Reagent Tube half-full with Oil. Minimize bubbles.
Note: It is not necessary to re-mix the Oil.
4. Insert the filled Reagent Tube into the left front port, andscrew the Reagent Tube clockwise until it is fastened firmlyinto place.
Install theIon OneTouch™ Oil
Chapter 3 Prepare template-positive Ion PI™ ISPsSet up the Ion OneTouch™ 2 Instrument 3
Ion PI™ Hi‑Q™ OT2 200 Kit User Guide 23

IMPORTANT! Use only the Ion OneTouch™ Recovery Solution provided as part of theIon PI™ Hi-Q™ OT2 200 Kit for the Ion OneTouch™ 2 Instrument. Do not use a differentrecovery solution from another kit.
1. Ensure that the Recovery Solution is clear. If it is clear, proceed to the next step. Ifthe Recovery Solution is not clear, warm the bottle of Recovery Solution in a 30°Cbath until the Recovery Solution is clear.
2. Fill the appropriate Ion OneTouch™ Reagent Tube with Ion OneTouch™ RecoverySolution on the right front port :
If you are Action
Using a newTemplate Kit
1. Use a new Reagent Tube from the kit.
2. Discard the used Reagent Tube and Sipper Tube.Appropriately discard the Recovery Solution.
3. Use fresh gloves to attach the Luer-Lok™ end of a newIon OneTouch™ Sipper Tube to the right front port. Do notlet the Sipper Tube touch any surfaces.
4. Invert the Recovery Solution 3 times to mix, then fill theReagent Tube one-third-full with Recovery Solution.Minimize bubbles.
5. Insert the filled Reagent Tube into the right front port,and screw the Reagent Tube clockwise until it is fastenedfirmly into place.
Refilling theReagent Tubebetween runs
1. Remove the Reagent Tube from the instrument.
2. Invert the bottle of Recovery Solution 3 times.
3. Add more Recovery Solution to the solution in theReagent Tube until the tube is one-third-full. Minimizebubbles.
4. Insert the filled Reagent Tube into the right front port,and screw the Reagent Tube clockwise until it is fastenedfirmly into place.
1. Pull the external tubing from the port of the Waste Container.
2. Empty the Waste Container into the appropriate receptacle.
3. Reinstall the empty Waste Container.
1. Slowly pull out the oil waste tray but do not remove it completely from the slotunderneath the center of the instrument.
2. Check for oil in the oil waste tray:• If there is little or no oil, push the tray back fully into the instrument.• If there is excessive oil, remove the tray, then appropriately dispose of the
oil. Reinsert the oil waste tray into the slot, then push the tray back fully intothe instrument. Contact Technical Support.
Install theIon OneTouch™
Recovery Solution
Empty the WasteContainer
Inspect the oilwaste tray
Chapter 3 Prepare template-positive Ion PI™ ISPsSet up the Ion OneTouch™ 2 Instrument3
24 Ion PI™ Hi‑Q™ OT2 200 Kit User Guide

Prepare and install the amplification solution
Provided in Ion PI™ Hi-Q™ OT2 Solutions 200 (Part No. A26429):• Ion OneTouch™ Reaction Oil (25-mL size)• Nuclease-free Water
Provided in Ion PI™ Hi-Q™ OT2 Reagents 200 (Part No. A26428):• Ion PI™ Master Mix• Ion PI™ Enzyme Mix• Ion PI™ Ion Sphere™ Particles (ISPs)
Provided in Ion OneTouch™ 2 Supplies (Part No. A26367):• Ion OneTouch™ Reaction Filter
(Optional) Provided in the Ion PI™ Controls 200 Kit (Cat. No. 4488985):• Human CEPH Control 200 Library
Other materials and equipment:• Diluted library• Microcentrifuge• Eppendorf™ DNA LoBind™ Microcentrifuge Tubes• Tube rack for 15-mL conical tube• Pipettes• Vortexer
Materials required
Chapter 3 Prepare template-positive Ion PI™ ISPsPrepare and install the amplification solution 3
Ion PI™ Hi‑Q™ OT2 200 Kit User Guide 25

IMPORTANT! Use only the Ion PI™ Hi-Q™ OT2 200 Kit with this user guide and withthe Ion OneTouch™ 2 System. Do not mix reactions or disposables including plates,solutions, and kit reagents from other template preparation kits.
IMPORTANT! We recommend preparing the amplification solution in a roomdedicated to pre-PCR activities or in a controlled pre-PCR hood.
1. Prepare the reagents as follows:
Reagents Preparation
Ion PI™ Master Mix 1. Allow the tube of Master Mix (2 mL) to come to roomtemperature before use.
2. Vortex the solution for 30 seconds, then centrifugethe solution for 2 seconds.
Note: Visually inspect the solution at the bottom ofthe tube and verify that there is no residualprecipitate. If precipitate is visible, see Appendix A,“Troubleshooting“.
3. Keep the tube of Master Mix at room temperatureduring use.[1]
Ion PI™ Enzyme Mix 1. Centrifuge the enzyme for 2 seconds.
2. Place on ice.
Ion PI™ Ion Sphere™
ParticlesPlace the suspension at room temperature.
[1] Thawed Master Mix can be stored up to 8 hours at 2°C−8°C when not in use.
IMPORTANT! Use only Ion PI™ Ion Sphere™ Particles (ISPs) from the Ion PI™
Hi-Q™ OT2 200 Kit with the Ion OneTouch™ 2 System. Do not use ISPs fromother or previously used kits.
Prepare theamplificationsolution
Chapter 3 Prepare template-positive Ion PI™ ISPsPrepare and install the amplification solution3
26 Ion PI™ Hi‑Q™ OT2 200 Kit User Guide

2. Dilute the library as shown in the table below. Use the library dilution within 48hours of preparation.
IonAmpliSeq™
DNA Library
IonAmpliSeq™
RNA Library
gDNAFragment or
AmpliconLibrary
IonTargetSeq™
Exome-EnrichedLibrary
Ion TotalRNA-SeqLibrary
Libraryconcentra‑tion
100 pM 100 pM 100 pM 100 pM 100 pM
Volume oflibrary
6–8 µL 6–8 µL 6–8 µL 6–8 µL 6–8 µL
Volume ofNuclease-free Water
92–94 µL 92–94 µL 92–94 µL 92–94 µL 92–94 µL
Totalvolume ofdilutedlibrary toadd to theamplifica‑tionsolution
100 μL 100 μL 100 μL 100 μL 100 μL
Note: If you are troubleshooting the amplification process, to 259 µL ofNuclease-free Water, add 1 µL of the Human CEPH Control 200 Library from theIon PI™ Controls 200 Kit (Cat. No. 4488985). Add 100 µL of this dilution to theamplification solution in place of your library.
a. Vortex the diluted library for 5 seconds, then centrifuge for 2 seconds.
b. Place the diluted library on ice.
3. Prepare the ISPs:a. Vortex the ISPs at maximum speed for 1 minute to resuspend the particles.
b. Centrifuge the ISPs for 2 seconds.
c. Pipet the ISPs up and down to mix.
d. Immediately proceed to the next step.
Chapter 3 Prepare template-positive Ion PI™ ISPsPrepare and install the amplification solution 3
Ion PI™ Hi‑Q™ OT2 200 Kit User Guide 27

4. To the tube containing 2 mL of Master Mix at 15°C to 30°C, add the followingcomponents in the designated order. Add each component, then pipet theamplification solution up and down to mix:
Order Reagent Cap color Volume
1 Nuclease-free Water — 80 μL
2 Ion PI™ Enzyme Mix Brown 120 μL
3 Ion PI™ ISPs Black 100 µL
4 Diluted library (not stock library) — 100 μL
— Total volume (including Master Mix) — 2400 μL
5. Vortex the solution prepared in step 4 at maximum speed for 5 seconds, thencentrifuge the solution for 2 seconds.
IMPORTANT! Start the run on the Ion OneTouch™ 2 Instrument ≤15 minutesafter preparing the amplification solution.
6. Proceed immediately to “Fill the Ion OneTouch™ Reaction Filter“
IMPORTANT! We recommend filling the Ion OneTouch™ Reaction Filter in a roomthat is dedicated to pre-PCR activities or in a controlled pre-PCR hood. Do not use areaction filter assembly from any other template preparation kit.
1. Place a Ion OneTouch™ Reaction Filter in a tube rack so that the three ports of thefilter face up. Identify the sample port, which is connected to a short tube thatextends into the Ion OneTouch™ Reaction Tube as shown below.
1
2
3
4
1
1 Sample port2 Ion OneTouch™ Reaction Filter3 Ion OneTouch™ Reaction Tube4 Short tube from sample port into Ion OneTouch™ Reaction Tube
Fill theIon OneTouch™
Reaction Filter
Chapter 3 Prepare template-positive Ion PI™ ISPsPrepare and install the amplification solution3
28 Ion PI™ Hi‑Q™ OT2 200 Kit User Guide

2. Set a P1000 pipette to 800 µL, then attach a new 1000-µL tip to the pipette.
3. Pipet the amplification solution (prepared in the previous section) up and downto mix, then fill the pipette tip with 800 µL of amplification solution.
4. Insert the tip firmly into the sample port, so that the tip is perpendicular to theport and forms a tight seal.
IMPORTANT! Do not add the amplification solution through one of the otherports.
5. Slowly pipet the 800 µL of amplification solution through the sample port. Keepthe plunger of the pipette depressed to avoid aspirating solution. With theplunger still depressed, remove the tip from the sample port, then appropriatelydiscard the tip.
6. Repeat steps 4−6 two more times, to add a total of 2.4 mL of amplificationsolution to the Reaction Filter.
7. If needed, gently dab a Kimwipes™ disposable wipe around the ports to removeany liquid.
8. Set a P1000 pipette to 200 µL, then attach a new 1000-µL tip to the pipette.
9. Draw up 200 µL of Ion OneTouch™ Reaction Oil into the pipette tip.
10. Insert the tip firmly into the sample port, so that the tip is perpendicular to theport and forms a tight seal.
11. Slowly pipet 200 µL of Reaction Oil through the sample port, then keep theplunger of the pipette depressed. With the plunger depressed, remove the tipfrom the sample port, then appropriately discard the tip.
12. If needed, gently dab a Kimwipes™ disposable wipe around the ports to removeany liquid.
Chapter 3 Prepare template-positive Ion PI™ ISPsPrepare and install the amplification solution 3
Ion PI™ Hi‑Q™ OT2 200 Kit User Guide 29

IMPORTANT! Follow the steps exactly to minimize contact of the short tubing in theReaction Tube with the amplification solution.
1. Position the tube rack containing the Ion OneTouch™ Reaction Filter so that thesample port on the filter is on the left.
2. Lift the Ion OneTouch™ Reaction Filter straight out of the tube rack. With thesample port still on the left, rotate the filter assembly clockwise as shown below,until the Reaction Tube is inverted and the three ports point down.
IMPORTANT! Correct rotation of the Ion OneTouch™ Reaction Filter ensuresminimal exposure of the short tubing in the Reaction Tube with the amplificationsolution.
3. Wipe the three holes on the top stage of the Ion OneTouch™ 2 Instrument with aKimwipes™ disposable wipe to remove any oil or residue from the previous run.
4. Insert the three ports into the three holes on the stage, so that the Ion OneTouch™
Reaction Filter is firmly seated (right) on the instrument. The tab protrudingfrom the outer edge of the Reaction Filter fits into the front notch of the stage:
Note: After inserting the Ion OneTouch™ Reaction Filter, bubbles may shoot upinto the Reaction Tube.
Install the filledIon OneTouch™
Reaction Filter
Chapter 3 Prepare template-positive Ion PI™ ISPsPrepare and install the amplification solution3
30 Ion PI™ Hi‑Q™ OT2 200 Kit User Guide

Start the run
1. After installing the Ion OneTouch™ Reaction Filter, touch Next to start the run.
IMPORTANT! Remember to add 150 µL of Ion OneTouch™ Breaking Solution toeach Recovery Tube before starting the run. On the reminder screen, confirm andtouch Yes to advance:
Note: After the run starts, the instrument makes clicking sounds. This is normal.
2. Remove the samples ≤16 hours after starting the run. If you touched Next on thecentrifuge screen to centrifuge samples at the end of the run, proceed immediatelyto “Recover the template-positive Ion PI™ ISPs“ on page 32.
Note: Typical instrument run time is 4.8−6.5 hours.
If it is necessary to abort and restart a run, follow these steps in the order listed:
1. Touch Abort, then touch Yes to confirm cancellation.
Note: If there is a high-pressure event on the instrument, the instrument abortsthe run automatically, and you do not have to touch Abort.
2. After a run is aborted, download the log files for troubleshooting by TechnicalSupport (see the Ion OneTouch™ 2 System User Guide [Pub. No. MAN0014388] formore information).
3. Power off the instrument.
4. If needed, retain all consumables on the instrument for troubleshooting.
5. After successful troubleshooting, appropriately discard all used consumables,then power on the instrument.
6. Set up the instrument with new kit components (see “Set up theIon OneTouch™ 2 Instrument“ on page 18).
Abort and restarta run
Chapter 3 Prepare template-positive Ion PI™ ISPsStart the run 3
Ion PI™ Hi‑Q™ OT2 200 Kit User Guide 31

7. Prepare a new amplification solution (see “Prepare and install the amplificationsolution“ on page 25).
8. Start a new run.
Recover the template-positive Ion PI™ ISPs
Provided in Ion PI™ Hi-Q™ OT2 Solutions 200 (Part No. A26429):• Ion OneTouch™ Wash Solution• ISP Resuspension Solution• Nuclease-free Water
Other materials and equipment:• Eppendorf™ DNA LoBind™ Microcentrifuge Tubes• Pipettes• Vortexer• Microcentrifuge
1. At the end of the run, follow the screen prompts to centrifuge the sample. If youremoved the Reaction Tubes at the end of the run before the Ion OneTouch™ 2Instrument had centrifuged the sample or have not processed the sample after15 minutes, centrifuge the sample on the instrument:
a. On the home screen of the instrument, touch Open Lid, wait until the lidclicks open, then insert the two filled Ion OneTouch™ Recovery Tubes fromthe run in the centrifuge rotor. Close the lid until it locks.
b. Touch Options4Final Spin (see the following figure), then follow thescreen prompts (touch Next on the next 2 screens) until the centrifugationstarts. Centrifugation of the samples takes 10 minutes.
c. When the centrifuge stops, immediately proceed to steps 3–5.
Materials required
Recover thetemplate-positiveISPs
Chapter 3 Prepare template-positive Ion PI™ ISPsRecover the template-positive Ion PI™ ISPs3
32 Ion PI™ Hi‑Q™ OT2 200 Kit User Guide

CAUTION! ROTATION HAZARD. Wait until rotation stops beforeopening. Rotating parts can cause injury.
2. During the final centrifuge spin, place a 50-mL conical tube in a tube rack, thenplace the tube rack with the empty tube next to the instrument.
Note: During the centrifugation, you can start preparing reagents for ISPenrichment (see “Prepare reagents then fill the 8-well strip“ on page 39).
3. Immediately after the centrifuge stops:a. Gently pull the disposable tubing downwards on both sides of the pinch
valve until the disposable tubing is out of the valve.
b. Place one hand on the centrifuge lid, then with the other hand firmly gripthe rigid plastic connector at the top of the disposable injector and steadilypull the disposable injector straight up from the Injector Hub.
CAUTION! PHYSICAL INJURY HAZARD. The pointed end of thedisposable injector can puncture your skin. Keep your hand awayfrom the point of the disposable injector.
c. Place the disposable injector into the empty 50-mL conical tube in the tuberack.
4. In the instrument display, touch Open Lid, wait until the lid clicks open, thenremove and discard the Ion OneTouch™ Recovery Router.
5. Carefully remove both Ion OneTouch™ Recovery Tubes from the instrument, thenput the two Recovery Tubes in a tube rack. You may see some cloudiness in thetube, which is normal.
IMPORTANT! Do not store the recovered, template-positive ISPs at −30°Cto −10°C. Proceed immediately to “Wash the template-positive ISPs". There is astopping point in the next section.
1. Use a pipette to remove all but~100 µL of Ion OneTouch™ RecoverySolution from each Ion OneTouch™
Recovery Tube. Withdraw thesupernatant from the surface and onthe opposite side from the pellet. Donot disturb the pellet of template-positive ISPs:
2. Resuspend the template-positiveISPs in the remaining RecoverySolution in each tube by pipettingthe suspension up and down.
3. Combine the suspension from eachRecovery Tube into a new labeled1.5-mL Eppendorf LoBind™ Tube.
Wash thetemplate-positiveISPs
1
2
1 Ion OneTouch™ Recovery Tube2 Location of ISP pellet
Chapter 3 Prepare template-positive Ion PI™ ISPsRecover the template-positive Ion PI™ ISPs 3
Ion PI™ Hi‑Q™ OT2 200 Kit User Guide 33

4. Add 100 µL of Nuclease-free Water to each Recovery Tube, pipet up and down tomix, then transfer the residual beads into the labeled 1.5-mL tube.
5. Bring the combined suspensions in the labeled 1.5-mL tube to 1 mL withNuclease-free Water.
STOPPING POINT The ISPs can be stored at 2°C to 8°C for up to 3 days. If youstored the template-positive ISPs at 2°C to 8°C, proceed to step 8. Do not storethe recovered ISPs in Ion OneTouch™ Recovery Solution.
6. Vortex for 30 seconds to completely resuspend the template-positive ISPs, thencentrifuge the tube for 2 seconds.
7. (Optional) Assess the quality of the unenriched, template-positive ISPs:
If you have a Action
Qubit™ 2.0FluorometerorQubit™ 3.0Fluorometer
Continue to step 8. You can perform quality control on the ISPsin step 12.
(Optional) Guava™
easyCyte 5Benchtop FlowCytometer
Perform quality control on the diluted, unenriched ISPs.Transfer a 2.0-μL aliquot of the diluted,unenriched ISPs (fromstep 6) to a 1.5-mL Eppendorf LoBind™ Tube. See the IonSphere™ Particles Quality Assessment Using the Guava™
easyCyte 5 Benchtop Flow Cytometer User Bulletin (Pub. No.MAN0007496), available at thermofisher.com.
8. Centrifuge the template-positive ISP suspension for 8 minutes at 15,500 × g.
Note: To convert the RPMs of your centrifuge to RCF in units of gravity, see tools.thermofisher.com/content/sfs/brochures/TR0040-Centrifuge-speed.pdf.
9. Remove all but 20 µL of supernatant.
10. Bring the combined washed suspensions in the new labeled tube to 100 µL in ISPResuspension Solution.
11. Vortex the pellet for 30 seconds to completely resuspend the template-positiveISPs, then centrifuge the tube for 2 seconds.
12. (Optional) If you have not used the Guava™ easyCyte 5 Benchtop FlowCytometer to perform quality control on the ISPs, you can retain a sample at thispoint to evaluate quality of the resuspended, unenriched template-positive ISPs(step 11) using the Qubit™ 2.0 Fluorometer or Qubit™ 3.0 Fluorometer. Transfer a2.0-µL aliquot of the resuspended, unenriched ISPs to a 0.2-mL PCR tube, thensee the
• Ion Sphere™ Assay on the Qubit™ 2.0 Fluorometer User Guide (Pub. No.MAN0016387), or
• Ion Sphere™ Assay on the Qubit™ 3.0 Fluorometer User Guide (Pub. No.MAN0016388),
available at thermofisher.com/order/catalog/product/4468656, for further details.
Chapter 3 Prepare template-positive Ion PI™ ISPsRecover the template-positive Ion PI™ ISPs3
34 Ion PI™ Hi‑Q™ OT2 200 Kit User Guide

Proceed to “Maintain the Ion OneTouch™ 2 Instrument“ and Chapter 4, “Enrich thetemplate-positive Ion PI™ ISPs“. You can start the enrichment procedure while theIon OneTouch™ 2 Instrument cleaning is in progress.
IMPORTANT! Do not store the recovered, template-positive ISPs at −30°C to −10°C.Do not store the recovered ISPs in Ion OneTouch™ Recovery Solution.
Maintain the Ion OneTouch™ 2 Instrument
IMPORTANT! Follow the cleaning procedure in this section to clean theIon OneTouch™ 2 Instrument with the Ion OneTouch™ Cleaning Adapter Perform thecleaning procedure after every run. Do not skip this procedure. The cleaning procedure isperformed according to the steps displayed on the instrument after removing theRecovery Tubes.
Note: To set up the Ion OneTouch™ 2 Instrument when switching betweensequencing platforms and/or template preparation kits, refer to Chapter 5 of theIon OneTouch™ 2 System User Guide (Pub. No. MAN0014388).
Provided in Ion OneTouch™ 2 Supplies (Part No. A26367):• Ion OneTouch™ Cleaning Adapter (single-use)
Provided in Ion PI™ Hi-Q™ OT2 Solutions 200 (Part No. A26429):• Ion OneTouch™ Oil
Other materials and equipment:• Kimwipes™ disposable wipes• 50-mL conical tube• Tube rack for 50-mL conical tube
Note: To ensure continued safe operation, visually inspect the rotor assembly andcasing periodically to ensure there are no signs of cracks or other physical damage.
1. Determine the appropriate reagents to use for maintaining the Ion OneTouch™ 2Instrument:
If you are Action
Switching to the Ion PI™ Hi‑Q™
OT2 200 Kit from another kit?See Chapter 5 of the Ion OneTouch™ 2 SystemUser Guide (Pub. No. MAN0014388). Use thereagents from the appropriate kit to maintain theIon OneTouch™ 2 Instrument.
Already using the Ion PI™ Hi‑Q™
OT2 200 Kit.Proceed to step 2. Continue to use the reagentsthat are provided in the Ion PI™ Hi‑Q™ OT2 200 Kit.
2. Check the level of Ion OneTouch™ Oil in the Reagent Tube. If the Reagent Tubehas <20 mL of Oil, pour Oil into the Reagent Tube until it is half-full.
Materials required
Clean theIon OneTouch™ 2Instrument
Chapter 3 Prepare template-positive Ion PI™ ISPsMaintain the Ion OneTouch™ 2 Instrument 3
Ion PI™ Hi‑Q™ OT2 200 Kit User Guide 35

3. Remove and appropriately discard the used Ion OneTouch™ Reaction Filter.Remove the assembly from the instrument by grasping the filter.
Note: The Reaction Tube is filled with Ion OneTouch™ Oil.
4. Keep the Ion OneTouch™ Amplification Plate in the heat block.
5. Firmly insert the 3 ports of a new single‑use Cleaning Adapter into the three holeson the top stage of the Ion OneTouch™ 2 Instrument (see the followingillustration). One of the two tabs protruding from the outer edge of the CleaningAdapter fits into the front notch of the stage:
6. Place a 50-mL conical tube in a tube rack, then place the tube rack next to theinstrument.
Note: Steps 6–9 are only necessary if you have not already removed thedisposable injector before removing the Recovery Tubes from the instrument.
7. Gently pull the disposable tubing downwards on both sides of the pinch valveuntil the disposable tubing is out of the valve.
8. Remove the disposable injector from the Ion OneTouch™ DL Injector Hub.a. Place one hand on the centrifuge lid.
b. With the other hand, firmly grip the rigid plastic connector at the top of thedisposable injector.
c. Slowly and steadily withdraw the disposable injector straight from the portof the Injector Hub.
CAUTION! PHYSICAL INJURY HAZARD. The pointed end of thedisposable injector can puncture your skin. Keep your hand away from thepoint of the disposable injector.
9. Place the used, disposable injector into the empty 50-mL conical tube in the tuberack. The conical tube is used to collect waste.
Chapter 3 Prepare template-positive Ion PI™ ISPsMaintain the Ion OneTouch™ 2 Instrument3
36 Ion PI™ Hi‑Q™ OT2 200 Kit User Guide

10. On the home screen of the instrument, touch Clean.
11. Complete each task that is displayed on the screen, then touch Next. After youtouch Next on the last task, a progress bar appears, and the cleaning starts.
12. At the end of the cleaning run, the screen displays "Time Remaining 00:00:00,Cleaning Run Complete". Press Next, then ensure that the task in bold displays:“Remove plate, injector, conical tube, and waste”.
Note: Keep the used Cleaning Adapter on the instrument between runs.
13. Appropriately discard the waste that was collected in the 50-mL conical tube.
14. Remove and appropriately discard the used Amplification Plate, disposableinjector, and tubing.
a. Push the handle to open the heat block.
b. Remove the disposable tubing from the Ion OneTouch™ DL Catch.
c. Gently pull back the Amplification Plate from the inlet and outlet holes ofthe instrument.
d. Remove the Amplification Plate from the heat block, then appropriatelydiscard the used Amplification Plate, injector, and tubing.
e. Leave the heat block open.
CAUTION! Hot Surface. Use care when working near this area to avoidinjury from contact with hot components.
15. On the instrument display, touch Open Lid, wait until the lid clicks open, thenopen the centrifuge lid. Wipe the residue from the centrifuge lid with dryKimwipes™ disposable wipers, then close the centrifuge lid.
16. Touch Next to return to the home screen on the instrument.
Chapter 3 Prepare template-positive Ion PI™ ISPsMaintain the Ion OneTouch™ 2 Instrument 3
Ion PI™ Hi‑Q™ OT2 200 Kit User Guide 37

Enrich the template-positive Ion PI™
ISPs
■ Materials required . . . . . . . . . . . . . . . . . . . . . . . . . . . . . . . . . . . . . . . . . . . . . . . . . . . . 38
■ Determine if a residual volume test is necessary . . . . . . . . . . . . . . . . . . . . . . . . . . 39
■ Prepare reagents then fill the 8-well strip . . . . . . . . . . . . . . . . . . . . . . . . . . . . . . . . 39
■ Prepare the Ion OneTouch™ ES . . . . . . . . . . . . . . . . . . . . . . . . . . . . . . . . . . . . . . . . 41
■ Perform the run . . . . . . . . . . . . . . . . . . . . . . . . . . . . . . . . . . . . . . . . . . . . . . . . . . . . . . 43
■ Remove and wash the enriched ISPs . . . . . . . . . . . . . . . . . . . . . . . . . . . . . . . . . . . . 45
■ (Optional) Perform enriched ISP quality control . . . . . . . . . . . . . . . . . . . . . . . . . . 47
Materials required
Provided in Ion PI™ Hi-Q™ OT2 Solutions 200 (Part No. A26429):• Ion OneTouch™ Wash Solution• MyOne™ Beads Capture Solution• Ion OneTouch™ ES Wash Solution• Tween™ Solution• Nuclease-free Water
Provided in Ion OneTouch™ 2 Supplies (Part No. A26367):• 8-well strip• Eppendorf™ LoRetention Dualfilter Tips (P300)
Other materials and equipment:• Dynabeads™ MyOne™ Streptavidin C1 Beads• Eppendorf™ DNA LoBind™ Microcentrifuge Tubes• 0.2-mL PCR tubes• 1 M NaOH• Pipettes• Vortexer• DynaMag™-2 magnet• Microcentrifuge
4
38 Ion PI™ Hi‑Q™ OT2 200 Kit User Guide

Determine if a residual volume test is necessary
IMPORTANT! Ensure that the AC line voltage module is installed correctly into theIon OneTouch™ ES Instrument. See the Ion OneTouch™ 2 System User Guide (Pub. No.MAN0014388) for information regarding instrument setup, calibration, andmaintenance.
To determine if a residual volume test is necessary, follow these guidelines:
Condition Action
First use of the instrument and duringmonthly maintenance
Perform a residual volume test (see"Ion OneTouch™ ES Instrument installation,setup, and maintenance" in theIon OneTouch™ 2 System User Guide Pub.No. MAN0014388).
Routine use and residual volume in Well 1and Well 8 is >5.0 µL
Routine use and residual volume in Well 1and Well 8 is ≤5.0 µL
Operate the instrument without performingthe residual volume test. Proceed to “Prepare reagents then fill the 8-wellstrip“ on page 39.
Prepare reagents then fill the 8-well strip
Prepare fresh Melt-Off Solution by combining the components in the following order:
Order Component Volume
1 Tween™ Solution 280 µL
2 1 M NaOH 40 µL
— Total 320 µL
IMPORTANT! Prepare Melt-Off Solution as needed, but appropriately dispose of thesolution after 1 day.
The final composition of the Melt-Off Solution is 125 mM NaOH and 0.1% Tween™ 20detergent.
1. Vortex the tube containing the Dynabeads™ MyOne™ Streptavidin C1 Beads for30 seconds to thoroughly resuspend the beads, then immediately proceed to thenext step.
2. Transfer 100 µL of Dynabeads™ MyOne™ Streptavidin C1 Beads to a new 1.5-mLEppendorf DNA LoBind™ Tube.
Note: If you are preparing MyOne™ Streptavidin C1 Beads for more than onesample, use a separate 1.5-mL Eppendorf DNA LoBind™ Tube for each sample.
Prepare Melt-OffSolution
Wash andresuspend theDynabeads™
MyOne™
Streptavidin C1Beads
Chapter 4 Enrich the template-positive Ion PI™ ISPsDetermine if a residual volume test is necessary 4
Ion PI™ Hi‑Q™ OT2 200 Kit User Guide 39

3. Place the tube on a magnet such as a DynaMag™-2 magnet for 2 minutes, thenremove and discard the supernatant without disturbing the pellet of Dynabeads™
MyOne™ Streptavidin C1 Beads.
4. Add 1 mL of Ion OneTouch™ Wash Solution to the aliquot of Dynabeads™
MyOne™ Streptavidin C1 Beads.
5. Remove the tube from the magnet, vortex the tube for 30 seconds, and centrifugethe tube for 2 seconds.
6. Place the tube on a magnet such as a DynaMag™-2 magnet for 2 minutes, thenremove and discard the supernatant.
7. Add 130 µL of MyOne™ Beads Capture Solution to the Dynabeads™ MyOne™
Streptavidin C1 Beads.
Note: You add the resuspended Dynabeads™ MyOne™ Streptavidin C1 Beads inthe 130 µL MyOne™ Beads Capture Solution to Well 2 of the 8-well strip.
8. Remove the tube from the magnet, vortex the tube for 30 seconds, and centrifugethe tube for 2 seconds.
1. Ensure that the template-positive ISPs from the Ion OneTouch™ 2 Instrument arein 100 µL of ISP Resuspension Solution. If the template-positive ISPs were storedin 1 mL Nuclease-free Water at 2°C to 8°C, follow the washing procedure for ISPs(see “Wash the template-positive ISPs“ on page 33).
2. Ensure that the square-shaped tab of the 8-well strip is on the left:
3
4
1
2
1 Well 12 Wells 2−83 Rounded tab4 Square-shaped tab
3. Pipet the ISPs up and down 10 times to mix, then transfer the entire volume(100 µL) of resuspended ISPs in ISP Resuspension Solution (step 1 of thisprocedure) into Well 1 of the 8-well strip.
Fill the 8-wellstrip
Chapter 4 Enrich the template-positive Ion PI™ ISPsPrepare reagents then fill the 8-well strip4
40 Ion PI™ Hi‑Q™ OT2 200 Kit User Guide

4. Fill the remaining wells in the 8-well strip as follows (see the figure in step 5):
Well number Reagent to dispense in well
Well 1[1] Entire template-positive ISP sample (100 µL; preparedin step 1 of this procedure)
Well 2 130 µL of Dynabeads™ MyOne™ Streptavidin C1 Beadsresuspended in MyOne™ Beads Capture Solution(prepared in “Wash and resuspend the Dynabeads™
MyOne™ Streptavidin C1 Beads“ on page 39)
Well 3 300 µL of Ion OneTouch™ ES Wash Solution
Well 4 300 µL of Ion OneTouch™ ES Wash Solution
Well 5 300 µL of Ion OneTouch™ ES Wash Solution
Well 6 Empty
Well 7 300 µL of freshly-prepared Melt-Off Solution [preparedin “Prepare Melt-Off Solution“ on page 39
Well 8 Empty
[1] Well closest to the square-shaped tab
5. Confirm that the square-shaped tab is on the left, then insert the filled 8-well stripwith the 8-well strip pushed all the way to the right end of the slot of the tray:
1 3 4 5 6 7 82
Prepare the Ion OneTouch™ ES
Before every enrichment performed on the Ion OneTouch™ ES Instrument, install anew PCR collection tube and a new Eppendorf™ LoRetention Dualfilter P300 pipettetip.
1. Insert an open 0.2-mL PCR tube into the hole in the base of the Tip Loader, asshown in the figure in step 3.
2. Place a new tip in the Tip Loader. Remove the Tip Arm from the cradle, thenalign the metal fitting of the Tip Arm with the tip.
Chapter 4 Enrich the template-positive Ion PI™ ISPsPrepare the Ion OneTouch™ ES 4
Ion PI™ Hi‑Q™ OT2 200 Kit User Guide 41

3. Keeping the fitting on the Tip Arm vertical, firmly press the Tip Arm down ontothe new tip until the Tip Arm meets the Tip Loader. Hold the Tip Arm to the TipLoader for ~1 second to ensure proper installation of the tip.
1
2
3
1 Tip Arm2 Tip Loader3 0.2‑mL PCR collection tube
4. Lift the Tip Arm straight up to pull the installed tip from the Tip Loader tube.
5. Return the Tip Arm to the cradle.a. Tilt the Tip Arm back (below left), then align the pins with the round
notches in the cradle (below center).
b. Lower the Tip Arm into position (below center).
c. Move the Tip Arm forward into the working position (below right).
1
1 Tip Arm pins resting in the notches in the cradle
IMPORTANT! Ensure that the back/bottom end of the Tip Arm is not resting ontop of the thumb screw, causing the Tip Arm to tilt forward.
Chapter 4 Enrich the template-positive Ion PI™ ISPsPrepare the Ion OneTouch™ ES4
42 Ion PI™ Hi‑Q™ OT2 200 Kit User Guide

Perform the run
Before starting the run:• Confirm that a new tip and open 0.2-mL PCR tube have been loaded in the
Ion OneTouch™ ES Instrument, and that the 8-well strip is correctly loaded.• Ensure that Well 1 (ISP sample) is the left-most well and the 8-well strip is pushed
to the right-most position in the slot.
1. Pipet the contents of Well 2 up and down to resuspend the beads before startingthe run. Do not introduce bubbles into the solution.
2. If needed, power on the Ion OneTouch™ ES Instrument, then wait for theinstrument to initialize. The screen displays "rdy". The Tip Arm performs a seriesof initialization movements and returns to the home position (~5 seconds).
3. Press Start/Stop. The screen displays "run" during the run. The run takes~35 minutes.
IMPORTANT! Remove the enriched ISPs ≤15 minutes after the end of the run.Evaporation and prolonged exposure to the Melt-Off solution can cause ISP andDNA damage. Do not leave the enriched ISPs in Melt-Off solution overnight.
Note: To stop a run, press Start/Stop. The instrument completes the current step,then stops the run and displays "End". Press Start/Stop again to return the TipArm to the home position. It is not possible to restart (where you left off) afterstopping a run.
4. At the end of the run, the instrument displays "End" and beeps every 60 seconds.Press the Start/Stop button to silence this alarm, then reset the Ion OneTouch™ ESInstrument for the next run. The instrument can be left on between runs.
5. Immediately after the run, securely close, then remove the PCR tube containingthe enriched ISPs.
Note: Ensure that the 0.2-mL PCR tube has >200 µL of solution containing theenriched ISPs. After a successful run on the instrument, the sample is in ~220 µLof Melt-Off Solution and Ion OneTouch™ ES Wash Solution. If the tube has<<200 µL of solution containing the enriched ISPs, contact Technical Support.
Chapter 4 Enrich the template-positive Ion PI™ ISPsPerform the run 4
Ion PI™ Hi‑Q™ OT2 200 Kit User Guide 43

6. Remove the used tip: with the Tip Arm in its cradle, twist the tipcounterclockwise (as viewed from above), then pull it downward to remove anddiscard the tip.
IMPORTANT! Improper removal of tips can loosen the metal tip adapter fittingon the Tip Arm and affect instrument operation.
7. Remove, then discard the used 8-well strip.
Proceed immediately to "Remove and wash the enriched ISPs".
Chapter 4 Enrich the template-positive Ion PI™ ISPsPerform the run4
44 Ion PI™ Hi‑Q™ OT2 200 Kit User Guide

Remove and wash the enriched ISPs
1. Centrifuge the 0.2-mL PCR tube containing the enriched ISPs at 15,500 × g for5 minutes.
2. Remove all but ~10 µL of supernatant without disturbing the pellet, then add200 µL of Nuclease-free Water.
3. Pipet the solution up and down 10 times to resuspend the pellet. The pellet canbe difficult to see.
4. Centrifuge the 0.2-mL PCR tube at 15,500 × g for 5 minutes.
5. Check for Dynabeads™ MyOne™ Streptavidin C1 Beads (a brown-tinted pellet) atthe bottom of the centrifuged tube, then select one of two options to proceed.
Chapter 4 Enrich the template-positive Ion PI™ ISPsRemove and wash the enriched ISPs 4
Ion PI™ Hi‑Q™ OT2 200 Kit User Guide 45
AreDynabeads™
MyOne™
StreptavidinC1 Beads
(brown pellet)present?
Action
No 1. Remove all but ~10 μL of supernatant without disturbing thepellet.
2. Add sufficient Nuclease-free Water for a final volume of100 μL.
3. Pipet up and down 10 times to resuspend the pellet.
4. Sequence or store the template-positive ISPs:For the Ion PI™ Hi‑Q™ OT2 200 Kit, use the Ion PI™ Hi‑Q™
Sequencing 200 Kit (Cat. No. A26433 or A26772). See the IonPI™ Hi‑Q™ Sequencing 200 Kit User Guide (Pub. No.MAN0010947).orStore the enriched ISPs at 2°C to 8°C for up to 3 days.
Yes 1. Pipet up and down 10 times to resuspend the pellet.
2. Place the 0.2-mL PCR tube against a magnet such as aDynaMag™-2 magnet for 4 minutes.
3. Transfer the supernatant to a new 0.2‑mL PCR tube withoutdisturbing the pellet.
4. Centrifuge the supernatant at 15,500 × g for 5 minutes.
5. Remove all but ~10 μL of supernatant without disturbing thepellet.
6. Add sufficient Nuclease-free Water for a final volume of100 μL.
7. Pipet up and down 10 times to resuspend the pellet.
8. Sequence or store the template-positive ISPs:
For the Ion PI™ Hi‑Q™ OT2 200 Kit, use the Ion PI™ Hi‑Q™
Sequencing 200 Kit (Cat. No. A26433 or A26772). See the IonPI™ Hi‑Q™ Sequencing 200 Kit User Guide (Pub. No.MAN0010947).orStore the enriched ISPs at 2°C to 8°C for up to 3 days.
Note: If you plan to run two Ion PI™ v3 Chips after a single initialization of theIon Proton™ Sequencer, we recommend storing enriched, template-positive ISPsat 2°C to 8°C until sufficient ISPs are on hand to load the two chips. Then run thetwo chips on the same day to obtain optimal performance.
Chapter 4 Enrich the template-positive Ion PI™ ISPsRemove and wash the enriched ISPs4
46 Ion PI™ Hi‑Q™ OT2 200 Kit User Guide

(Optional) Perform enriched ISP quality control
You can determine the appropriate library dilution and/or the enrichment efficiencyby using the Guava™ easyCyte 5 Benchtop Flow Cytometer. Transfer a 2.0-µL aliquotof the enriched ISPs to a 1.5-mL Eppendorf LoBind™ Tube. For more information, seethe Ion Sphere™ Particles Quality Assessment Using the Guava™ easyCyte 5 Benchtop FlowCytometer User Bulletin (Pub. No. MAN0007496), available at thermofisher.com.
Chapter 4 Enrich the template-positive Ion PI™ ISPs(Optional) Perform enriched ISP quality control 4
Ion PI™ Hi‑Q™ OT2 200 Kit User Guide 47

Troubleshooting
■ Ion OneTouch™ 2 Instrument . . . . . . . . . . . . . . . . . . . . . . . . . . . . . . . . . . . . . . . . . . 48
■ Ion OneTouch™ ES . . . . . . . . . . . . . . . . . . . . . . . . . . . . . . . . . . . . . . . . . . . . . . . . . . . 50
■ Ion Sphere™ Assay troubleshooting table . . . . . . . . . . . . . . . . . . . . . . . . . . . . . . . . 54
Ion OneTouch™ 2 Instrument
Observation Possible cause Recommended action
Firmware does not update orthe status update screen doesnot display in ≤10 seconds
Firmware is not updating onthe instrument.
1. Power the instrument OFF, then ON.2. Ensure that the USB flash drive is FAT32-
formatted and that the file is in the rootdirectory.
3. Remove then reinsert the USB flash driveimmediately after the main menu displays.
4. Repeat steps 1–3 as needed.
Disposable injector remainsin "down" position in theIon OneTouch™ DL InjectorHub
Reagent has built up aroundInjector Hub.
Clean any excess reagent from Injector Hub withmoistened Kimwipes™ wipe.
Newly installed Injector Hubdoes not move freely.
1. Gently pull from the top of the disposableinjector until the disposable injector justreturns to the “up” position in the InjectorHub.
2. Briefly press then release the spring-loadedtop of the Injector Hub 5– 10 times at thepoint indicated by the arrow. You should heara click.
3. If the Injector Hub remains in the “down”position, repeat step 2 once (up to 10 moreclicks).
Note: If the Injector Hub still does not movefreely and click up into place, contactTechnical Support.
A
48 Ion PI™ Hi‑Q™ OT2 200 Kit User Guide

Observation Possible cause Recommended action
Centrifuge lid does not open • A power failure occurred.
• A software crashoccurred.
1. Slide a 1/8-inch L-wrench (hex wrench) orequivalent tool into the right hole and alongthe top edge of the centrifuge hinge:
2. Push the tool into the hole until there is aslight compression of the tool against theinstrument and the centrifuge lid unlocksand opens.
3. Remove the tool from the hole, then open thelid.
4. If necessary, troubleshoot the lid lock, thenuse the instrument normally. Do not force thelid open.
The run fails Various causes are possible. Retrieve the log files. See the Ion OneTouch™ 2System User Guide (Pub. No. MAN0014388) for theprocedure.
IMPORTANT! Do not turn off or power cycle theinstrument until the log files are downloaded. If arun fails, contact Technical Support.
Precipitate is visible in the IonPI™ Master Mix aftervortexing
Thawed Master Mix wasstored at <2°C.
Ion PI™ Master Mix should bestored at −30°C to −10°C, andthawed as needed. ThawedMaster Mix can be stored at2°C to 8°C for up to 8 hours. Ifstored at <2°C, a precipitatecan form.
1. Ensure that the solution is fully thawed.2. Vortex the solution for 30 seconds, then leave
the tube at room temperature for 15 minutes.3. Vortex the solution again at maximum speed
for 1 minute.4. Centrifuge the tube for 30 seconds.5. Visually inspect the solution at the bottom of
the tube and verify that there is no residualprecipitate. If precipitate is visible, thenrepeat steps 1–4.
Note: If precipitate is still visible, thencontact Technical Support.
6. Keep the Master Mix at room temperatureduring use.
Appendix A TroubleshootingIon OneTouch™ 2 Instrument A
Ion PI™ Hi‑Q™ OT2 200 Kit User Guide 49

Observation Possible cause Recommended action
Recovery Tubes filled with gelafter a run
Breaking Solution was notadded to Recovery Tubesbefore start of run.
1. Add 150 μL Ion OneTouch™ Breaking Solutionto each Recovery Tube.
2. Seal the Recovery Tubes with Parafilm™ Mfilm and vigorously invert and vortex thetubes for 10 seconds to break the emulsion.
3. Follow the Final centrifuge procedure (see “Recover the template-positive Ion PI™
ISPs“ on page 32) to recover the ISPs.Alternatively, transfer samples to two 1.5-mLtubes and centrifuge in a microcentrifuge atmaximum speed for 10 minutes to pellet theISPs.
4. Proceed to the ISP washing steps (see “Washthe template-positive ISPs“ on page 33).Perform the ISP wash in 1-mL Nuclease-freeWater (steps 5–9) twice.
Ion OneTouch™ ES
For Ion OneTouch™ ES vertical and horizontal axis calibration and residual volumetest procedures, see Chapter 3 of the Ion OneTouch™ 2 System User Guide (Pub. No.MAN0014388).
Observation Possible cause Recommended action
Excessive foaming occurs • Instrument was improperlycalibrated resulting ininadequate volume in oneor more wells.
• Fitting was loose.
• Pipette tip was cracked.
1. Use the recommended volumes for allwells.
2. Ensure that fittings are tight, especially atthe elbow fitting, and the pipette tip is notcracked.
3. If necessary, perform the residual volumetest. If the residual volume test fails, thencalibrate the instrument.
Appendix A TroubleshootingIon OneTouch™ ESA
50 Ion PI™ Hi‑Q™ OT2 200 Kit User Guide

Observation Possible cause Recommended action
E12, E22, or E23 errors displayduring the run or duringcalibration
Calibration values were out ofrange.
1. Power OFF the instrument and wait3 seconds.
2. While holding down Vert. Adjust, powerON the instrument. This step restores thefactory default settings.
3. Recalibrate the vertical axis:
Note: The default setting for the verticalaxis is 310. If the setting is <310, theinstrument will likely display an error,because the Tip Arm position is too high.
a. Press the (minus) button tolower the Tip Arm until the tiptouches the shelf.
b. Press the (minus) button 8 moretimes. Typical vertical axis settingsare ~340–370.
4. Recalibrate the horizontal axis: Press the (plus) button to move the Tip Arm to
the right until the tip touches the left tabof the strip.
Note: The default setting for thehorizontal axis is 625. Typical horizontalaxis settings are ~640–670.
AC line voltage module wasinstalled incorrectly.
1. Determine the voltage of the electricaloutlet to plug in the Ion OneTouch™ ES.
2. Align the arrow by the correct voltage onthe AC line voltage module with theadjacent white arrow in the lower-rightcorner of the fuse socket.
If the AC line voltage module is installedincorrectly:
1. Gently remove the module with yourfingernail or a small flathead screwdriver.
2. Rotate the module so that the correctvoltage on the module is aligned andadjacent to the white arrow in the lowerright-hand corner of the fuse socket.
3. Insert the AC line voltage module into thefuse socket.
Appendix A TroubleshootingIon OneTouch™ ES A
Ion PI™ Hi‑Q™ OT2 200 Kit User Guide 51

Observation Possible cause Recommended action
E12 or E22 error is displayedwhen the unit is initializing
• Fuse was installedincorrectly.
• Unit was below operatingtemperature.
• Program or calibrationsetting was bad,or
• Tip Arm was not moving.
1. Ensure that the fuse module is installedcorrectly and that the unit is at itsrecommended operating temperature.
2. Reboot the instrument: Power OFF theinstrument, wait 3 seconds, then powerON the instrument.
3. If the error persists, restore the factorydefaults, then re-calibrate theinstrument:
a. Power OFF the instrument and wait3 seconds.
b. While holding down Vert. Adjust,power ON the instrument. This steprestores the factory default settings.
c. Repeat 3a–3b as needed to restorethe factory defaults.
d. Calibrate the vertical and horizontalaxes.
Either of the following:
• E12 or E22 errors aredisplayed.
• Tip Arm does not move ormoves slightly.
AC line voltage module wasinstalled incorrectly.
1. Determine the voltage of the electricaloutlet serving the Ion OneTouch™ ES.
2. Align the arrow by the correct voltage onthe AC line voltage fuse module with theadjacent white arrow in the lower-rightcorner of the fuse socket.
If the AC line voltage fuse module is installedincorrectly:
1. Gently remove the module with yourfingernail or a small flathead screwdriver.
2. Rotate the module so that the correctvoltage on the module is aligned andadjacent to the white arrow in the lowerright-hand corner of the fuse socket.
3. Insert the AC line voltage fuse moduleinto the fuse socket.
Instrument was not operated atthe recommendedtemperature.
Ensure that the Ion OneTouch™ ES is at anoperating temperature of 60°F to 77°F (15°C to25°C).
Solution overflows during run Reagent volumes wereoverloaded.
Repeat with reagent volumes described inenrichment procedure.
Tip is causing 8-well strip to liftout of tray slot during run
Tip was not aligned vertically. Perform the vertical calibration procedure.
Percent template-positive ISPsafter enrichment is <50% asmeasured by flow cytometry
Multiple causes are possible. Contact Technical Support.
Appendix A TroubleshootingIon OneTouch™ ESA
52 Ion PI™ Hi‑Q™ OT2 200 Kit User Guide

Observation Possible cause Recommended action
Problems with the stripposition
• Strip lifts up during strippush.
• Strip lifts up when tip israised from well.
• Immediately after strippush, the strip is not incontact with the magnet.
Instrument was not calibratedproperly.
• Perform horizontal calibration.
• Perform vertical calibration.
Tip grinds into base ofinstrument and Code "1999"displays
• Unit was not calibratedproperly.
• Vertical calibration settingwas too low or out-of-range.
1. Restore the factory default settings on theinstrument: Hold down the vertical adjustbutton while powering ON the instrument.The instrument beeps several times.
2. Re-calibrate the instrument.3. Perform a residual volume test.
Tip hits the top of the tray atstart of run
Tray was not properly seated inthe instrument.
Check for debris between the tray and theinstrument, then reinstall the tray. Press downfirmly to ensure that tray is fully seated in theinstrument.
Error messages display Various causes are possible. 1. Power the instrument OFF, then ON.2. If the error continues to display, restore
the factory default settings on theinstrument. Hold down the vertical adjustbutton while powering ON the instrument.The instrument beeps several times.
3. Re-calibrate the instrument.4. Perform a residual volume test.
Instrument does not aspirate ordispense liquids
Fitting(s) were loose. • Ensure that the Luer-Lok™ connections atthe elbow on the Tip Arm and at the tubingon the rear syringe pump are finger-tight.
• Ensure that the metal tip adapter fittingon the Tip Arm is finger-tight.
IMPORTANT! After any adjustments to themetal tip adapter, recalibrate theIon OneTouch™ ES.
Appendix A TroubleshootingIon OneTouch™ ES A
Ion PI™ Hi‑Q™ OT2 200 Kit User Guide 53

Ion Sphere™ Assay troubleshooting table
The following table contains troubleshooting information for unenriched ISPs testedwith the Ion Sphere™ Assay on the Qubit™ 2.0 or Qubit™ 3.0 Fluorometer.
Qubit™
Fluorometerobservation
Ion Proton™ Systemobservation Possible cause Recommended action
<10%Templated
ISPs
• Lower loading
• Lower % enriched
• Lower key signal
• Lower throughput
Too little library input intotemplate preparation
• Increase library input to target 10–25% templated ISPs.or
• Continue with sequencing; expectlower throughput.
>25%Templated
ISPs,
but <70%
Increased number offiltered reads
Too much library input intotemplate preparation
• Decrease library input to target 10–25% templated ISPs.or
• Continue with sequencing; expectlower throughput.
>70%Templated
ISPs
• Increased % primerdimer filtered reads
• Lower throughput
Adapter dimercontaminating library, morelikely in short amplicon, IonAmpliSeq™ or miRNAlibraries
• Check Agilent™ 2100 Bioanalyzer™
traces for adapter dimer peak(Amplicon library or Ion AmpliSeq™
library peak around 70 bp; miRNAlibrary peak around 60bp).
• Re-purify library using Agencourt™
AMPure™ XP Kit clean-up steps asoutlined in the appropriate userguides.
• Low loading
• Low % enriched
• Lower throughput
• High % filtered reads
Ion OneTouch™ 2Instrumentunderperformance
Troubleshoot with Technical Support or aField Application Scientist.
Appendix A TroubleshootingIon Sphere™ Assay troubleshooting tableA
54 Ion PI™ Hi‑Q™ OT2 200 Kit User Guide
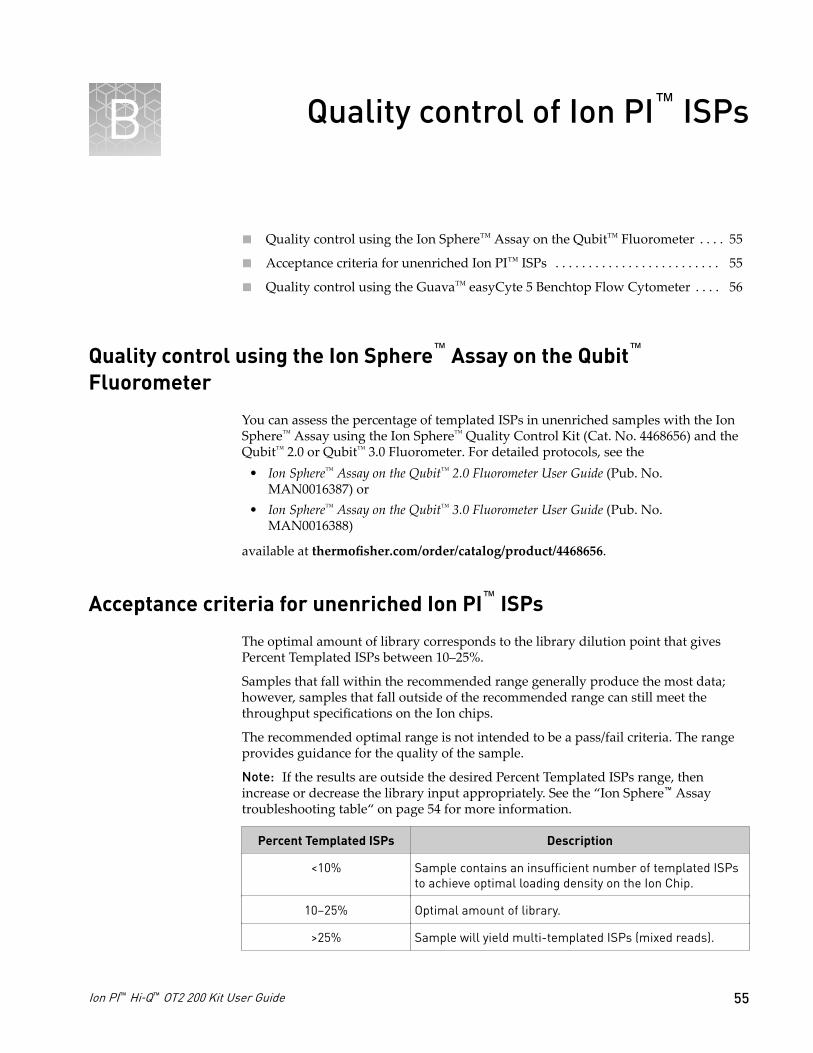
Quality control of Ion PI™ ISPs
■ Quality control using the Ion Sphere™ Assay on the Qubit™ Fluorometer . . . . 55
■ Acceptance criteria for unenriched Ion PI™ ISPs . . . . . . . . . . . . . . . . . . . . . . . . . 55
■ Quality control using the Guava™ easyCyte 5 Benchtop Flow Cytometer . . . . 56
Quality control using the Ion Sphere™ Assay on the Qubit™
Fluorometer
You can assess the percentage of templated ISPs in unenriched samples with the IonSphere™ Assay using the Ion Sphere™ Quality Control Kit (Cat. No. 4468656) and theQubit™ 2.0 or Qubit™ 3.0 Fluorometer. For detailed protocols, see the
• Ion Sphere™ Assay on the Qubit™ 2.0 Fluorometer User Guide (Pub. No.MAN0016387) or
• Ion Sphere™ Assay on the Qubit™ 3.0 Fluorometer User Guide (Pub. No.MAN0016388)
available at thermofisher.com/order/catalog/product/4468656.
Acceptance criteria for unenriched Ion PI™ ISPs
The optimal amount of library corresponds to the library dilution point that givesPercent Templated ISPs between 10–25%.
Samples that fall within the recommended range generally produce the most data;however, samples that fall outside of the recommended range can still meet thethroughput specifications on the Ion chips.
The recommended optimal range is not intended to be a pass/fail criteria. The rangeprovides guidance for the quality of the sample.
Note: If the results are outside the desired Percent Templated ISPs range, thenincrease or decrease the library input appropriately. See the “Ion Sphere™ Assaytroubleshooting table“ on page 54 for more information.
Percent Templated ISPs Description
<10% Sample contains an insufficient number of templated ISPsto achieve optimal loading density on the Ion Chip.
10–25% Optimal amount of library.
>25% Sample will yield multi-templated ISPs (mixed reads).
B
Ion PI™ Hi‑Q™ OT2 200 Kit User Guide 55

Quality control using the Guava™ easyCyte 5 Benchtop FlowCytometer
The Guava™ easyCyte 5 Benchtop Flow Cytometer can be used for quality assessmentof unenriched and enriched Ion PI™ Ion Sphere™ Particles generated for up to 200base-read sequencing on the Ion Proton™ System. For details, see the Ion Sphere™
Particles Quality Assessment for the Ion Proton™ and Ion S5™ Systems Using the Guava™
easyCyte 5 Benchtop Flow Cytometer User Bulletin (Pub. No. MAN0007496), available at thermofisher.com.
Appendix B Quality control of Ion PI™ ISPsQuality control using the Guava™ easyCyte 5 Benchtop Flow CytometerB
56 Ion PI™ Hi‑Q™ OT2 200 Kit User Guide

Safety
WARNING! GENERAL SAFETY. Using this product in a manner not specifiedin the user documentation may result in personal injury or damage to theinstrument or device. Ensure that anyone using this product has receivedinstructions in general safety practices for laboratories and the safetyinformation provided in this document.
· Before using an instrument or device, read and understand the safetyinformation provided in the user documentation provided by themanufacturer of the instrument or device.
· Before handling chemicals, read and understand all applicable Safety DataSheets (SDSs) and use appropriate personal protective equipment (gloves,gowns, eye protection, etc). To obtain SDSs, see the “Documentation andSupport” section in this document.
Instrument safety
For detailed information on instrument safety symbols and alerts, safety andelectromagnetic compatibility standards, and general instrument safety, see the Safetyappendix of the Ion OneTouch™ 2 System User Guide (Pub. No. MAN0014388), availableat thermofisher.com.
C
Ion PI™ Hi‑Q™ OT2 200 Kit User Guide 57

Chemical safety
WARNING! GENERAL CHEMICAL HANDLING. To minimize hazards,ensure laboratory personnel read and practice the general safety guidelines forchemical usage, storage, and waste provided below. Consult the relevant SDSfor specific precautions and instructions:
· Read and understand the Safety Data Sheets (SDSs) provided by thechemical manufacturer before you store, handle, or work with any chemicalsor hazardous materials. To obtain SDSs, see the “Documentation andSupport” section in this document.
· Minimize contact with chemicals. Wear appropriate personal protectiveequipment when handling chemicals (for example, safety glasses, gloves, orprotective clothing).
· Minimize the inhalation of chemicals. Do not leave chemical containers open.Use only with adequate ventilation (for example, fume hood).
· Check regularly for chemical leaks or spills. If a leak or spill occurs, followthe manufacturer's cleanup procedures as recommended in the SDS.
· Handle chemical wastes in a fume hood.· Ensure use of primary and secondary waste containers. (A primary waste
container holds the immediate waste. A secondary container contains spillsor leaks from the primary container. Both containers must be compatiblewith the waste material and meet federal, state, and local requirements forcontainer storage.)
· After emptying a waste container, seal it with the cap provided.· Characterize (by analysis if necessary) the waste generated by the particular
applications, reagents, and substrates used in your laboratory.· Ensure that the waste is stored, transferred, transported, and disposed of
according to all local, state/provincial, and/or national regulations.· IMPORTANT! Radioactive or biohazardous materials may require special
handling, and disposal limitations may apply.
Appendix C SafetyChemical safetyC
58 Ion PI™ Hi‑Q™ OT2 200 Kit User Guide

Biological hazard safety
WARNING! BIOHAZARD. Biological samples such as tissues, body fluids,infectious agents, and blood of humans and other animals have the potential totransmit infectious diseases. Conduct all work in properly equipped facilitieswith the appropriate safety equipment (for example, physical containmentdevices). Safety equipment can also include items for personal protection, suchas gloves, coats, gowns, shoe covers, boots, respirators, face shields, safetyglasses, or goggles. Individuals should be trained according to applicableregulatory and company/ institution requirements before working withpotentially biohazardous materials. Follow all applicable local, state/provincial,and/or national regulations. The following references provide generalguidelines when handling biological samples in laboratory environment.
· U.S. Department of Health and Human Services, Biosafety in Microbiologicaland Biomedical Laboratories (BMBL), 5th Edition, HHS Publication No. (CDC)21-1112, Revised December 2009; found at:www.cdc.gov/biosafety/publications/bmbl5/BMBL.pdf
· World Health Organization, Laboratory Biosafety Manual, 3rd Edition,WHO/CDS/CSR/LYO/2004.11; found at:www.who.int/csr/resources/publications/biosafety/Biosafety7.pdf
Appendix C SafetyBiological hazard safety C
Ion PI™ Hi‑Q™ OT2 200 Kit User Guide 59

Documentation and support
Customer and technical support
Visit thermofisher.com/support for the latest in services and support, including:• Worldwide contact telephone numbers• Product support, including:
– Product FAQs– Software, patches, and updates– Training for many applications and instruments
• Order and web support• Product documentation, including:
– User guides, manuals, and protocols– Certificates of Analysis– Safety Data Sheets (SDSs; also known as MSDSs)
Note: For SDSs for reagents and chemicals from other manufacturers,contact the manufacturer.
Limited product warranty
Life Technologies Corporation and/or its affiliate(s) warrant their products as set forthin the Life Technologies' General Terms and Conditions of Sale found on LifeTechnologies' website at www.thermofisher.com/us/en/home/global/terms-and-conditions.html. If you have any questions, please contact LifeTechnologies at www.thermofisher.com/support.
60 Ion PI™ Hi‑Q™ OT2 200 Kit User Guide


thermofisher.com/support | thermofisher.com/askaquestion
thermofisher.com
25 September 2017