high how to
DESCRIPTION
Chock-full of new tool coverage and cool home-improvement stories. From porch repair to fixing a sagging fence gate.TRANSCRIPT

PLUS:
Extreme H
ow-To
June 2
015
The Enthusiast’s Guide to Home Improvement
Repair a Rotted Porch Column | Install Mortarless Stone Veneer
June 2015 | ExtremeHowTo.com
0 09281 03600 5
0 6
$4.99US $4.99CAN
INSTALL FULL-LENGTH MIRROR BYPASS DOORS
FIX A SAGGING FENCE GATE
MOISTURE METERS
NEWTOOLS
FOR YOURTOOLBOX
The Enthusiast’s Guide to Home Improvement
EHTCover2EDIT_EHTCover5 4/6/15 1:00 PM Page Cov1

TGtools2FP_Layout 1 3/10/15 11:30 AM Page 2

GeneralTools2FP_Layout 1 4/6/15 1:29 PM Page IFC1

GeneralTools2FP_Layout 1 4/6/15 1:29 PM Page 1

TGtools2FP_Layout 1 4/6/15 1:33 PM Page 2

TGtools2FP_Layout 1 4/6/15 1:33 PM Page 3

F E A T U R E S
32 From Pillar to PostRepair a Rotted Structural Porch Column
46 New Additions for Your Toolbox
56 Stone-walledInstalling Mortarless Stone Veneer
04 www.extremehowto.com
E V E RY I S S U E
From the Editor
Advertisers Index
Q & A
Tool SchoolFinding Moisture in Materials
Do-It-YourselfFix a Sagging Fence Gate
32 56
8
12
22
COLUMN S
DE PARTM ENTS
6
79
Project NextInstall Mirror Bypass Doors
Everything AutoLess Smoke, More Power
Hot Products
64
72
76
Cover photo courtesy Channellock
21
TOCEDIT_EHT0504 TOCMTW 4/6/15 1:08 PM Page 4

LumberLiquidatorsFP_Layout 1 4/6/15 1:31 PM Page 5

From TheEditor-In-ChiefLETTER
Welcome to the June issue of Extreme How-To, which is chock-full of new tool coverage and cool home-improvement stories. From porch post repair to fixing
a sagging fence gate, we've got you covered with detailed tips and in-depth instruction.But we're more than just a print magazine. Use your computer
or tablet to explore the digital version of our magazine, where static pages come to life with pop-up videos and hyperlinks to your favorite tool manufacturers and suppliers. Visit extremehowtomag.com to check it out. And, anytime you're preparing a new home project, first research
the topic at our official home page, www.extremehowto.com. You'llfind archives of hundreds of free EHT stories that focus on jobsboth inside and outside the home, complete with professionaladvice and detailed step-by-step photos to walk you through your next project. Our website offers videos, sweepstakes and additional content you won't find anywhere else. Plus, I run the show at blog.extremehowto.com, where you
should stop and say hello between magazine issues. We have the occasional guest contributor, but it's usually me posting quick tips, product reviews, and small jobs I do around the house that we didn't have room to fit in the print magazine.
We've also got new ideas for the future.If all goes as planned we'll introduce ourfirst book in the not-too-distant future, aDIY Home Manual, to serve as a handyhow-to guide for the burgeoning homeenthusiast. Thanks for reading, and we hope to
see you online.
Extreme How-To (ISSN 1540-5346) is published and distributedmonthly to DIY home improvement enthusiasts by Latitude3 MediaGroup, LLC, 2300 Resource Drive, Suite B, Birmingham, AL 35242 (executive and editorial offices). All rights reserved. Neither thispublication nor any part of it may be reproduced, stored in aretrieval system, or transmitted in any form or by any means, electronic, mechanical, photocopying, recording, or otherwise,without permission of Latitude3 Media Group, LLC. Subscriptions:U.S. and possessions: 1 year (9 issues – $18.97); foreign, 1 year (9 issues – $32.50) U.S. funds only. POSTMASTER: Send addresschanges to: Extreme How-To P.O. Box 4320, Oregon, IL 61061. SUBSCRIBER SERVICE: To order a subscription or change youraddress, write to Extreme How-To P.O. Box 4320, Oregon, IL 61061,or call 888-587-8911; or E-mail to [email protected]; or visitwww.extremehowto.com. To order back issues, call (205) 949.1603.
The information in Extreme How-To’s editorial content is intendedto explain and simplify home-improvement tasks. Tools, products,materials, techniques, building codes and local regulationschange; therefore, Latitude3 assumes no liability for omissions,errors or the outcome of any project. The reader must always exercise reasonable caution, follow current codes and regulationsthat may apply, and is urged to consult with a licensed professionalif in doubt about any procedures. Printed in the USA
EDITOR - IN -CHIEFMatt Weber
ADVISORY BOARDMonte BurchRob Robillard Larry WaltonKathy ZiprikMark Clement
CREATIVE DIRECTORWesley Glassco
CIRCULATIONJennifer Pentecost
PUBLISHERJeremy Hollingsworth
SENIOR ACCOUNT EXECUTIVEJan Logan
ADVERTIS ING SALESJason Holsomback
Nick [email protected]
ONLINE MEDIA ASSISTANTSonia Buchanan
BUSINESS MANAGERDusty Statham
SUBSCRIPT IONSCustomer Service888-587-8911
PRESIDENTTrent R. Boozer
EXECUTIVE V ICE -PRESIDENTChad Gillikin
EXECUTIVE V ICE -PRESIDENTVal Carrier
Extreme How-To is published by LATITUDE3 MEDIA GROUP, LLC2300 Resource Drive, Suite B
Birmingham, AL 35242Phone 205.949.1600 • Fax 205.949.1601
www.extremehowto.com
06 ExtremeHowTo.com
EdLetter_Layout 1 4/6/15 1:15 PM Page 6

GRKfp_Layout 1 4/6/15 1:29 PM Page 7

Questions About Home Building, Remodeling? Have Your OwnHow-To Tip? Visit our blog at blog.extremehowto.comand click on Ask Our Experts.
Gota?QA&
08 ExtremeHowTo.com
Q:Does copper kill bacteria?
A:Antimicrobial copper alloys are the only solid metal "touch surface" materials registered by the U.S.Environmental Protection Agency to continuously kill more than 99.9 percent of bacteria associated
with the most common hospitalinfections (MRSA, Staphylococcusaureus, E. coli, etc.). This is why agrowing number of hospitals andrestaurants are increasingly usingcopper hardware for frequentlytouched surfaces such as door-knobs, pulls and handles. Brassand bronze are also antimicrobialcopper alloys. Learn more atantimicrobialcopper.com.
Q:How do I clean artificialstone in my house?
A:First, protect the areasaround the stone with
a drop cloth. Fill two bucketshalfway with warm water. Add alittle mild dishwashing detergentto one of the buckets. Start at thetop and work downward in smallareas at a time, using a scrubbrush and the soapy water towash the stone clean. Then, usea damp towel soaked in the cleanwater to rinse the suds off thestones. You'll need several towelsto replace them as they get toodirty. If possible, open doors andwindows in the room to ventilatethe area, which will help thestone to dry.
QAEDIT_Layout 1 4/6/15 1:06 PM Page 8

DuckbackFP_Layout 1 4/6/15 1:23 PM Page 9

Questions About Home Building, Remodeling? Have Your OwnHow-To Tip? Visit our blog at blog.extremehowto.comand click on Ask Our Experts.
Gota?QA&Q:Is it okay to use treated wood inside?
A:Many pressure-treated wood products do not emit any vapors and are safe for interior use, but you shouldcheck the information of specific products. Treated wood is commonly used for the sill plates of homes
and for fire-retardant materials.Treated wood should not, how-ever, be used for countertops orwhere it may become a compo-nent of food. In fact, the Foodand Drug Administration does not recommend using any woodfor kitchen countertops or food-cutting boards because knife cuts may allow food particles tobecome entrapped, creating anunsanitary environment.
Q:Should I use concrete to set a fence post?
A:Concrete will certainlywork to set a fence post,
but you should rest the end of the post first on a bed of crushedgravel to allow drainage at thebottom of the post before youadd the concrete. As the postexpands and contracts it willloosen from the surrounding concrete and allow water to seep inside. Therefore, the postwill need a drainage path so itdoesn’t sit in standing water. Theproblem with concrete is that ifyou ever need to replace thepost, you'll have to deal with the heavy hardened mass buriedat its base. An alterna-tive to concrete is to use firmlycompacted gravel around theburied post base, which allowsample drainage and is easier toremove if the post ever needsreplacing.
10 ExtremeHowTo.com
EHT
QAEDIT_Layout 1 4/6/15 1:06 PM Page 10

We’ve focused our passion for excellence in design and craftsmanship to produce a series of Hardwood Collections that offer a varied palette to create the style, scale and look that is right for any room or foyer.
Select from a broad array of designs that easily adapt to any decor and can be combined with our Iron Collection and Box Newel Collection to create a truly unique look.
SINCE 1874 - WE’VE GOT YOU COVERED EVERY STEP OF THE WAY. WM-COFFMAN.COM (800)-810-9204
Gather Inspiration.
Design with Dramatic Flair.
Create a Unique Masterpiece.
CoffmanFP_Layout 1 4/6/15 1:22 PM Page 11

TOOL SCHOOL
Ever build something in yourshop and have the woodwarp or split later on? Or
paint exterior siding or interior dry-wall, then watch the paint peeland flake afterward? Or installflooring materials, only to see yourhandiwork buckle and heave?
These situations vary widely, but the failures they represent allshare the same underlying cause:moisture content in the materialsbeing worked on. Professionalwoodworkers and building con-tractors know how to avoid thisproblem, and DIY'ers should takenote. Before any carpentry, paint-ing, drywall, concrete, or other
construction or finishing project,first test the materials with a moisture meter.
Some amount of water is ever-present in wood and most othermaterials used in construction—even when those materials seemadequately dry upon close inspec-tion. And that embedded moistureis forever seeking to find a bal-ance with the moisture in the environment around it.
If the wood you use for furnitureor flooring has a higher moisturecontent than its ambient surround-ings, it will eventually dry to anear-compatible level; when thedifference is extreme, it can cause
the wood to shrink and crack asthat moisture dissipates. Moisturemigrating out of materials alsocauses paint and other surfacefinishes to fail, just as moistureemanating out of subflooring caninvade the finished flooring laid on top of it, causing the wood toswell and buckle.
Moisture meters are a standardgo-to test and measurement toolin many industries, from materialhandling and storage to garden-ing and woodworking. As the prosknow, “If you can’t measure it, you can’t manage it.” Fortunately,these instruments are also readilyavailable in hardware and homestores at very affordable prices.And they’re easy to use—simplyhold one against the material you need to test and you’ll knowinstantly whether that material isready to work or finish, or if itneeds to be in an environmentwhere its moisture content cangradually reach equilibrium with its surroundings.
TWO TYPESFor the average user, there
are two basic types of moisture
An inexpensive, easy-to-use moisture meter is a valuable tool that every woodworker and DIY homeowner needs to have.
By Michael Morris
12 www.extremehowto.com
Finding Moisture in Materials
General’s easy-to-use MMD4Emoisture meter offers a good bal-ance between cost and features.This pin-type unit has a large digi-tal display, built-in memory selec-tion for common woods and vari-ous building materials, such asconcrete block, and a moisture-content measurement range of 5to 50 percent for wood and 1.5 to33 percent for other materials.
ToolSchoolLawnEDIT_Layout 1 4/6/15 1:14 PM Page 12

FeeneyFP_Layout 1 4/6/15 1:28 PM Page 13
TOOL SCHOOL
14 www.extremehowto.com
meters to choose between. Pin-type meters have sharp, needle-like pins that are designed to bestuck directly into the wood ormaterial to be tested. Their built-inor wire-connected pins measureelectrical resistance, which isaffected by the moisture contentin the material. Pinless, non-pene-trating meters have electrodeplates or knobs that are simplyplaced in contact with the materialsurface and generate an electricalfield to measure relative moisturecontent. Both types of meters willget the job done, but each type of measurement requires someinterpretation by the user.
For example, because differentmaterials have different densitiesand moisture-retaining properties,many inexpensive meters produceonly a measurement code number
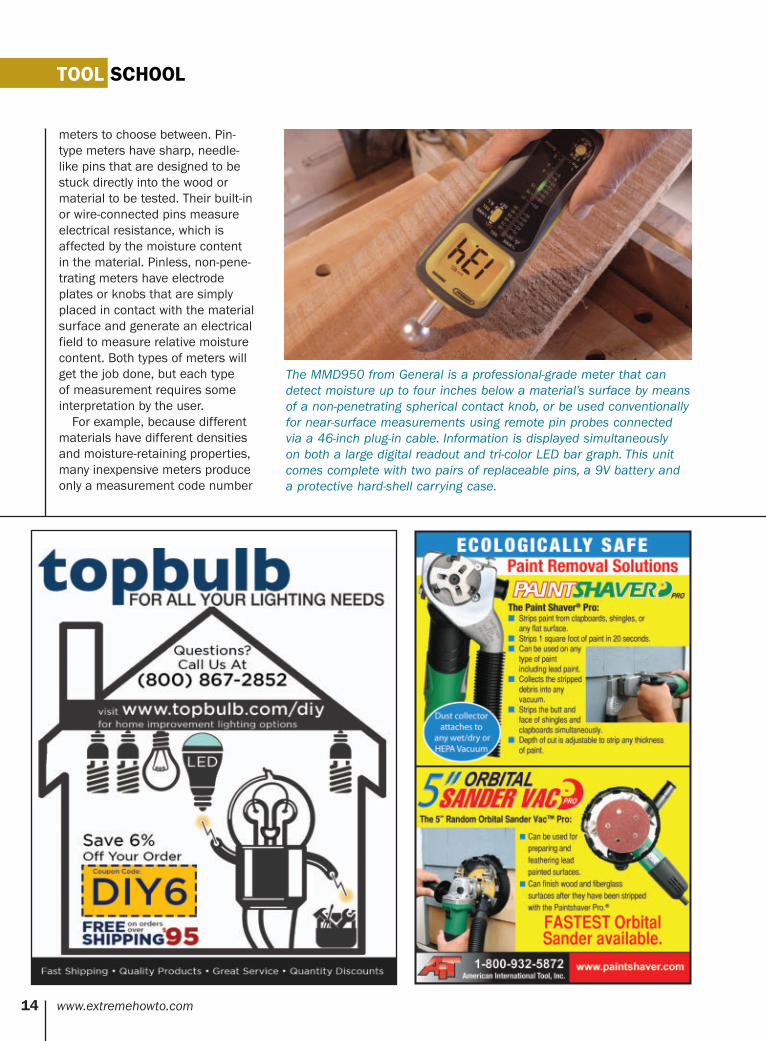
The MMD950 from General is a professional-grade meter that candetect moisture up to four inches below a material’s surface by meansof a non-penetrating spherical contact knob, or be used conventionallyfor near-surface measurements using remote pin probes connected via a 46-inch plug-in cable. Information is displayed simultaneously on both a large digital readout and tri-color LED bar graph. This unitcomes complete with two pairs of replaceable pins, a 9V battery and a protective hard-shell carrying case.
ToolSchoolLawnEDIT_Layout 1 4/6/15 1:14 PM Page 14
ArmstrongClarkFP_Layout 1 4/6/15 1:16 PM Page 15

that users must match to the specific gravity of the material. For woodworking purposes, a specific gravity reference list for common wood species may
be provided by the meter manu-facturer or is obtainable from various resources, such as theU.S.D.A.’s Forest ProductsLaboratory. More full-featured
meters often provide a directreadout that identifies the materi-al or wood species along with itsspecific gravity and additionaldescriptive information.
The two basic meter types alsodiffer in the way they measuremoisture content. Pin-type metersmeasure moisture at or justbelow a material’s surface, butbecause their pins must pene-trate—and potentially mar—thesurface they are less desirablefor testing finished goods. Pinlessmeters, on the other hand, can
TOOL SCHOOL
16 www.extremehowto.com
Restoration contractors, facilitymaintenance managers, HVACtechnicians and other profes-sional contractors will appreci-ate the full range of featuresavailable in General Tools &Instruments’ top-of-the-lineRHMG700DL (Data Logging)thermo-hygrometer with built-inmoisture meter. This compact,high-precision unit measures13 parameters—from relativeand absolute moisture levels todew point, wet-bulb tempera-ture, and atmospheric or vaporpressure—and is capable oflogging up to 8,000 data pointsand storing/retrieving up to 20pairs of readings. An optionalthermocouple probe is availablefor measuring surface and con-densation moisture.
ToolSchoolLawnEDIT_Layout 1 4/6/15 1:14 PM Page 16

(888) 782-4758 www.arkestairs.com
SPIRAL STAIRSAND MODULARSTAIR CASE KITS
The OAK 70.XTRAThe Oak 70.XTRA is an adjustable premier series spiral staircase thatfeatures solid Oak wooden stair treads and landing to complementand add style to any interior living space. Surrounding the full lengthof the staircase, the horizontal balusters and railing design is visuallyunique when compared to the traditional vertical baluster design ofmost stairs. The staircase can be easily installed by the homeownerin a single day using common household tools. The Oak 70.XTRA is available in 2 diameter sizes and is available in 2 choices ofcolor…Hi-Gloss Black and Hi-Gloss White.
• Standard kit includes 12 oak wood stair treads, a landing, a complete handrail, and all necessary hardware and connectors.
• Diameters available include a 5 ft. 3 in. model and a 4 ft. 3 in. model.
• The height range for the standard kit is adjustable from 8 ft. 3 in.to 10 ft. 2 7/8 in. and with additional components, can beinstalled to a maximum height of 11 ft. 9 5/16 in.
• Powder coat finished painted in either Hi-Gloss Black or Hi-Gloss White.
• Can be installed in a clockwise or counterclockwise rotation.
• Stair treads and landing are made of solid Oak wood with a natural stain and a polyurethane protective coating.
• Balcony rail kits are available in matching color and horizontal baluster and railing design.
• Handrail is manufactured from an aluminum core surrounded by a soft PVC cover to allow the handrail to be curved at thetime of installation to accommodate the radius of the staircase.
• Rise between stair treads is adjustable from 8 3/8 in. to 9 ¼ in.
• Interior installation only.
• A complete installation guide is included in all kits and an installation video is available upon request.
• Homeowner should consult with local building department concerning building codes prior to purchase.
AVAILABLE THROUGHOUT THE USA, ARKESPIRAL AND MODULAR STAIRCASE KITSCAN BE BUILT IN A DAY BY THE AVERAGE DO-IT-YOURSELF HOME ENTHUSIAST.
3
Arke4_Layout 1 4/6/15 1:16 PM Page 17
detect moisture up to four inchesbeneath a surface and are usefulfor determining moisture contentwithout damaging the material,such as in wallboard behind a tiledsurface, or for comparing the rela-tive moisture of two differentwoods that are to be glued or joint-ed. However, pinless meters do notmeasure the actual amount ofmoisture in a material but onlycompare the moisture in the
material to the moisture content in other areas or ambient surroundings.
General Tools & Instrumentsoffers an extensive variety of pinand pinless meters, as well asmeters that can do both penetrat-ing and non-penetrating measure-ments. According to Kevin Basso,General’s chief engineer, thechoice usually depends on theapplication or need at hand.
“Users may prefer the pinless,non-penetrating moisture meterson finished areas such as fineflooring or wall paneling,” Bassosays, “because it won’t harm ordamage the surface being inspect-ed. In checking areas using thismethod, a meter could indicate anincreasing relative moisture trendand you’d be able to identify a sus-pect area and determine if furthertesting and inspection is required.”
Moisture meters are especiallynecessary for woodworkingbecause wood is extremely sus-ceptible to moisture fluctuation.Fresh-cut logs may have up to 80percent moisture content, whilekiln-dried lumber may be as low as6 percent. Construction lumbergrade-stamped “S-dry” is requiredto have a moisture content of lessthan 19 percent. And the air-driedlumber stacked in your woodshopmay contain anywhere from 12 to20 percent water volume.
Knowing when wood is ready to be worked or finished oftendetermines a project’s success or failure, and not just in furni-ture-making. Framing carpentersbuilding with wet wood can expectcallbacks to replace buckled ply-wood, warped studs and poppeddrywall nails. Flooring installerswho fail to acclimate their materi-als to the relative humidity of aroom risk problems such as cup-ping, crowning and ruined finishes.
Wood finishes ranging from penetrating oils (tung, linseed,
TOOL SCHOOL
18 www.extremehowto.com
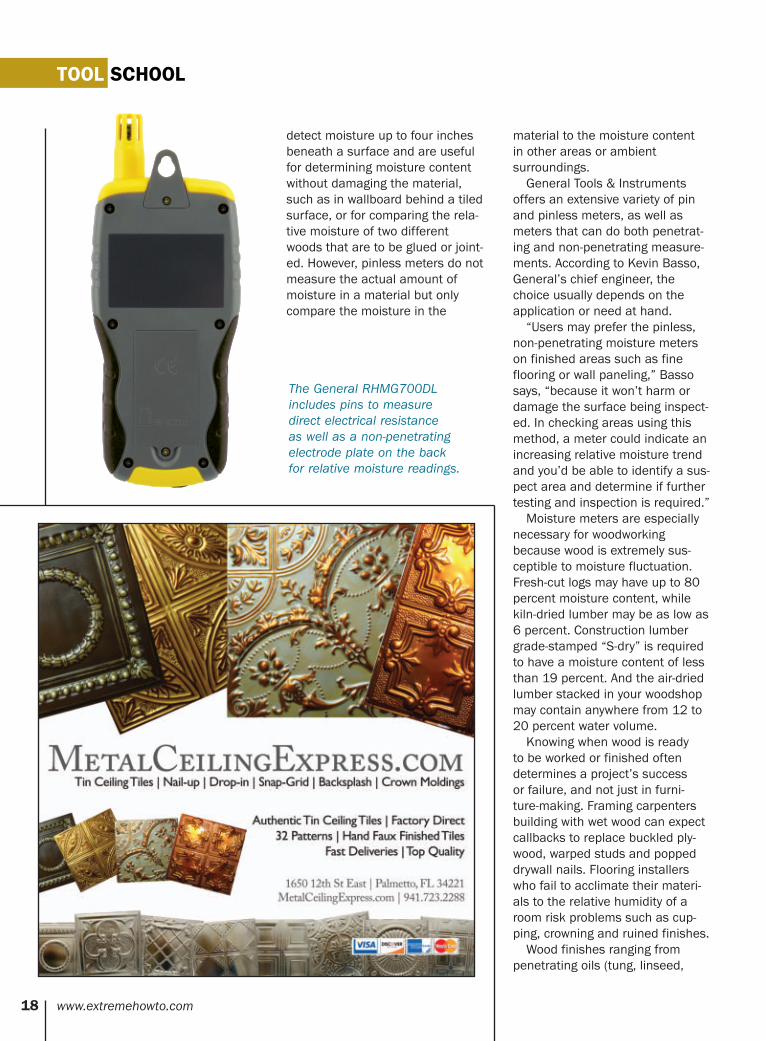
The General RHMG700DLincludes pins to measure direct electrical resistance as well as a non-penetratingelectrode plate on the back for relative moisture readings.
ToolSchoolLawnEDIT_Layout 1 4/6/15 1:14 PM Page 18

MazeFP_Layout 1 4/6/15 1:31 PM Page 19

etc.) to surface sealers (alkyds and polyurethanes) help to pro-tect wood from natural cycles ofabsorption and drying, but only if they are applied after the wood has reached a state of equilibrium moisture content, or EMC in industry terms. It’simportant to note that while finishes can help to slow the rate of moisture exchange, theywill not prevent it entirely. Also,some wood species, like whitepine and ash, are simply moreprone to moisture-related shrink-age and swelling, while others, like teak and mahogany frommoist tropical environments, contain natural oils that defendagainst this damage.
Finally, moisture meters domore than determine when woodand other materials are ready tobe worked. They can also enableyou to modulate the rate materialsdry to prevent rapid shrinkage thatleads to checking and splitting,and help when you design or plana project to allow for dimensionalmovement due to anticipatedchanges in relative humidity.
TOOL SCHOOL
20 www.extremehowto.com
General’s MMD8P is a precisionmoisture meter especially usefulfor woodworkers. Pre-loaded withspecies-specific information on48 common wood types, its digi-tal memory records and storesup 99 separate data inputs forconvenient reference. A high-visi-bility (OLED) dot-matrix screen,multiple display options, andambient temperature compensa-tion combine to make this unit atop choice for the shop.
ToolSchoolLawnEDIT_Layout 1 4/6/15 1:14 PM Page 20

SELECTIONWhen choosing a moisture
meter, key features to look forinclude:
• Multi-function units that offeroptions such as pin or pinlessmeasurement in the same unit,auto-calibration, and displays that show moisture content as a percentage or relative valuesimultaneously.
• Separate settings for variousmaterials such as softwoods andhardwoods, drywall and masonry.This can improve a unit’s accuracyand make using it more convenient.
• A wide range of applications.Some woodworking meters arecalibrated to nominal wood thick-nesses, such as 1/4-inch, 3/4-inch, or greater. While this canhelp to increase a meter’s accura-cy, it limits the unit’s usefulnessto specific applications. Also,some units only provide specificgravity ratings of the most com-mon wood species but not formore exotic species.
• Temperature and humiditycompensation. This is helpfulwhen testing lumber or materialslike finished flooring that aremoved from one environment to another, such as from a dry-ing kiln to an ambient humidityarea, or from outdoors to indoors.Some meters measure and dis-play ambient temperature and relative humidity (RH) along withmoisture level measurement.
• Data analysis and storage of frequently used information,such as moisture measurementrecords, comparisons of differentwood species tested, and ambientmoisture parameters at the timeof testing.
The MMD7NP moisture meterfrom General Tools & Instrumentsis a value-priced unit with a num-ber of high-value features, suchas automatic calibration and individual settings for drywall,masonry, softwood and hard-wood. Pinless, non-penetratingoperation reliably detects mois-ture underneath finished sur-faces, making this unit ideal for contractors and buildinginspectors as well as home-owners and woodworkers. A large (2" diagonal) backlit LCDscreen and tri-color bar graphmake readouts easy to see in any lighting situation.
EHT
www.extremehowto.com 21
ToolSchoolLawnEDIT_Layout 1 4/6/15 1:15 PM Page 21

Wooden fence gates arenotorious for getting outof whack. The wood's
inherent instability during tem-perature changes coupled with the heavy weight of the gate canstress the wood connections aswell as the metal hardware, caus-ing the gate to warp, sag andeventually require replacement.
Replacement was required forthe worn-out gate shown in thisproject. The original Z-braced gate had adopted a potato chipshape, broken loose from itshinges and would not completelyclose at the top or bottom. The
backyard dog was now attemptingto squeeze through the gap andmake a break for the wide blueyonder. We used a metal hardwarekit to rebuild the gate, and here'show it went.
STEP BY STEPWe picked up a Homax Easy
Gate No-sag Gate Kit at our localLowe's. The kit includes twohinged brackets, two non-hingedbrackets and 36 mounting screws.The kit is designed to fit a gate 25to 72 inches wide. We built thegate from pressure-treated 2x4lumber and 1x6 fence boards.
The original gate, which followedthe grade of the lawn, had warpedto the point it would no longerwork.
The stresses on the gate causedit to tear away from the hinges,and large gaps had opened at thetop and bottom.
The first step was disassemblingthe old gate. After checking with a hand level we determined thatthe old gate posts were stillplumb, and only the gate itself had deteriorated.
22 www.extremehowto.com
Fix a Sagging Fence GateMetal brackets make everything square again.
DO IT YOURSELF
By Matt Weber
DIYtvFenceGateEDIT_Layout 1 4/6/15 12:58 PM Page 22

MayhewFP_Layout 1 4/6/15 1:31 PM Page 23

A quick read of the tape measuretold us out gate dimensions. Wedesigned the new gate with a 1/2-in. expansion gap between postsso the gate can easily swing openand close, and the gate-bolt wouldeasily connect with the latch.
Next, we oriented the gate hard-ware on a large flat surface as itwould be configured for the gatedoor. It's important that the hingesare on the correct left or right sideof the gate opening for which waythe gate will swing.
We cut and installed the 2x4framing members so they fitsquarely into the metal brackets.The side rails fit flush between theupper and lower rails.
24 www.extremehowto.com
DO IT YOURSELF
DIYtvFenceGateEDIT_Layout 1 4/6/15 12:59 PM Page 24

DuxxbakFP_Layout 1 4/6/15 1:23 PM Page 25
DO IT YOURSELF
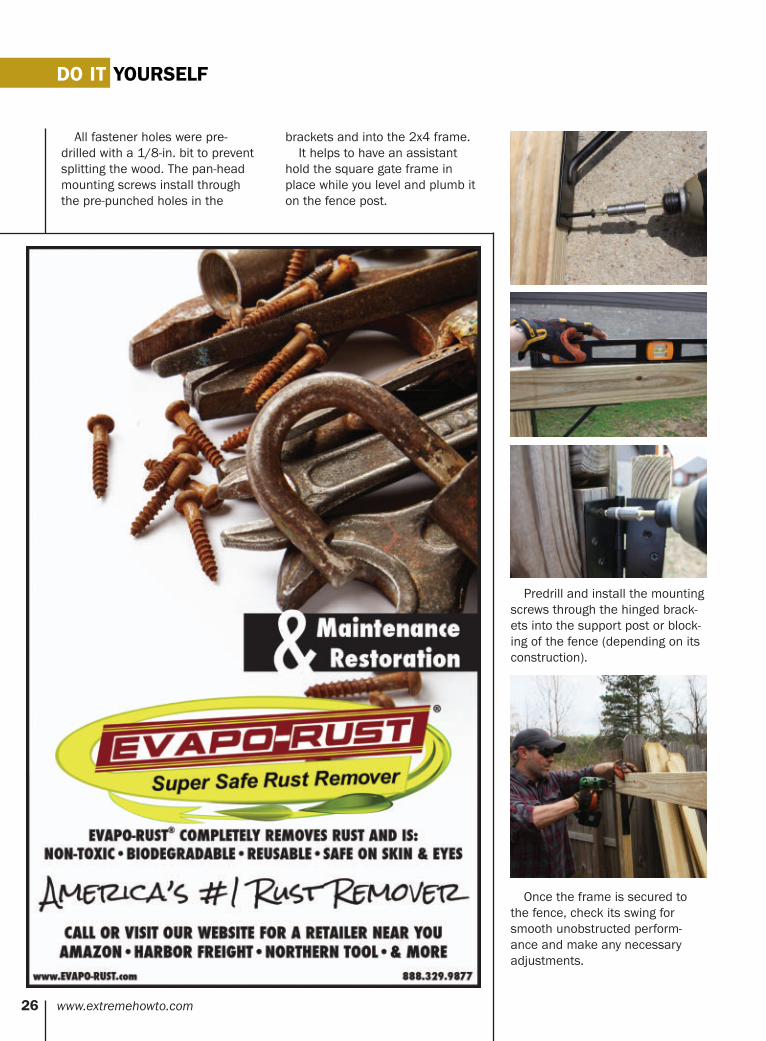
All fastener holes were pre-drilled with a 1/8-in. bit to preventsplitting the wood. The pan-headmounting screws install throughthe pre-punched holes in the
brackets and into the 2x4 frame. It helps to have an assistant
hold the square gate frame inplace while you level and plumb iton the fence post.
Predrill and install the mountingscrews through the hinged brack-ets into the support post or block-ing of the fence (depending on itsconstruction).
Once the frame is secured tothe fence, check its swing forsmooth unobstructed perform-ance and make any necessaryadjustments.
26 www.extremehowto.com
DIYtvFenceGateEDIT_Layout 1 4/6/15 12:59 PM Page 26

EarthwayFP_Layout 1 4/6/15 1:27 PM Page 27

DO IT YOURSELF
This particular fence was builton a slope, and the fence boardsclosely followed the grade of theland. Since the gate boards wouldneed to follow suit, I ran a string
from the top of one existing fenceboard to the top of the board on theopposite side of the gate. The stringserved as an elevation guide as weinstalled the gate boards.
Using quality decking screws,we fastened the boards to thegate frame using two screws ateach 2x4 location. Once theboards were secure, we installedhorizontal 2x4 cross-member inthe center of the frame andscrewed it to the boards to pre-vent deflection in the 1x material.
Shown is the completed repairwith the gate closed. The nextstep is to pressure-wash the fence and stain all the wood tomatch.
28 www.extremehowto.com
EHT
DIYtvFenceGateEDIT_Layout 1 4/6/15 12:59 PM Page 28

WesternTimberFP_Layout 1 4/6/15 1:34 PM Page 29

It has been said that tools arethe bridge between man andmachine. But many people might
not have thought about the historyof tools. In prehistoric times, thefirst tools were simple rocks orsticks, or what scientists refer toas “simple machines.” Over time,tools have become more complex,made from various materials andcrafted for specific jobs. Fromearly caves to modern garages,hand tools are still important andthere are some manufacturerswho have been making tools forsome time.One company that has been
manufacturing quality hand tools for more than 129 years
is Channellock Inc., in Meadville,Pennsylvania. While professionalsand serious DIY’ers are familiarwith the company’s American-made pliers with the signatureblue grip, they may not know thatit hasn’t always been known asCHANNELLOCK®.CHANNELLOCK® was once
known as the Champion-DeArmentTool Co. Before that, it was theChampion Tool Co. Even furtherback, it was simply a lone black-smith who strived to design a bet-ter set of farrier’s tools at theChampion Bolt Clipper Company. At 33 years old, George B.
DeArment, the great-great grand-father of current president and
COO Jon DeArment began thecompany by designing, testing and hand-forging hoof parers andnippers. According to history, hedid this because he couldn’t findany for sale that worked as well ashe wanted them to. After develop-ing a set of tools that he believedwere superior to anything elseavailable, he spent the winter of1885 building up inventory ofthese new tools. In the spring of1886, after the heavy rains hadstopped and the roads were firmenough to allow a heavily ladenwagon to pass, he loaded up histools and hit the road. DeArment family legend says
he traveled from town to town
30 www.extremehowto.com
History of Channellock Inc.
MADE IN THE USA
MadeUSAEDIT_Layout 1 4/6/15 1:02 PM Page 30
selling farrier’s tools until theentire inventory was gone, thensold his horse and wagon and took the railroad back home toEvansburg, Pennsylvania, which is now called Conneaut Lake. DeArment grew his business
over the next five years until 1891,when he started using the nameof The Champion Tool Company.The company’s reputation for qual-ity tools spread quickly. In fact, inAugust 1902, DeArment receivedan order for a set of Champion far-rier’s tools from King Edward VII of England.
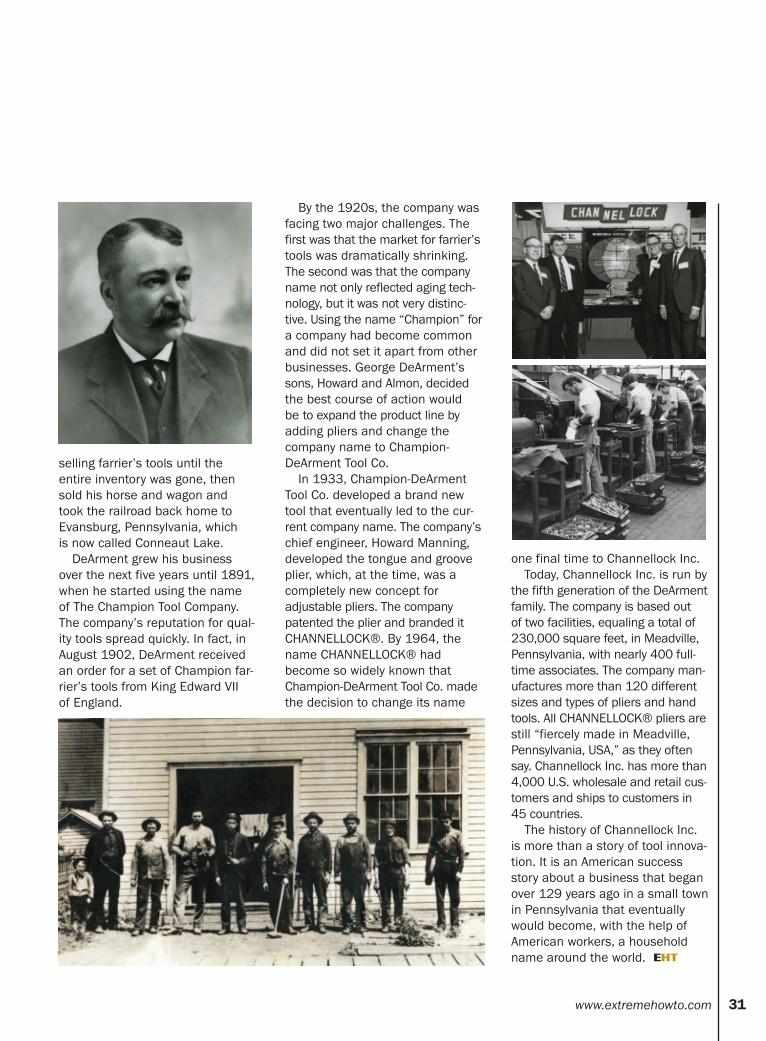
By the 1920s, the company wasfacing two major challenges. Thefirst was that the market for farrier’stools was dramatically shrinking.The second was that the companyname not only reflected aging tech-nology, but it was not very distinc-tive. Using the name “Champion” fora company had become commonand did not set it apart from otherbusinesses. George DeArment’ssons, Howard and Almon, decidedthe best course of action would be to expand the product line byadding pliers and change the company name to Champion-DeArment Tool Co.In 1933, Champion-DeArment
Tool Co. developed a brand newtool that eventually led to the cur-rent company name. The company’schief engineer, Howard Manning,developed the tongue and grooveplier, which, at the time, was a completely new concept foradjustable pliers. The companypatented the plier and branded itCHANNELLOCK®. By 1964, thename CHANNELLOCK® hadbecome so widely known thatChampion-DeArment Tool Co. madethe decision to change its name
one final time to Channellock Inc.Today, Channellock Inc. is run by
the fifth generation of the DeArmentfamily. The company is based out of two facilities, equaling a total of230,000 square feet, in Meadville,Pennsylvania, with nearly 400 full-time associates. The company man-ufactures more than 120 differentsizes and types of pliers and handtools. All CHANNELLOCK® pliers arestill “fiercely made in Meadville,Pennsylvania, USA,” as they oftensay. Channellock Inc. has more than4,000 U.S. wholesale and retail cus-tomers and ships to customers in45 countries.The history of Channellock Inc.
is more than a story of tool innova-tion. It is an American successstory about a business that beganover 129 years ago in a small townin Pennsylvania that eventuallywould become, with the help ofAmerican workers, a householdname around the world.
www.extremehowto.com 31
EHT
MadeUSAEDIT_Layout 1 4/6/15 1:02 PM Page 31

32 www.extremehowto.com
FROMPILLARTOPOSTWhat do anthills and porch
columns have in com-mon? The answer should
be nothing, but we know better... Columns add charm, person-
ality and beauty to walkways,decks, landings and porches.Many of the homes where I livehave beautifully turned woodcolumns as structural posts forporches. Unfortunately, becausethe posts are situated along theexterior perimeter of the porch,the wood is exposed to wind-driven rain and roof runoff orsplash-up, resulting in rot at thebase. Porch column rot is prettycommon along the base andeventually becomes a home forcarpenter ants.
As a renovation contractor I seecarpenter ants in just about everyhome I work on, mostly arounddamp wood as a result of water
intrusion or lack of proper mainte-nance. When you consider thatthere are 1.5 million ants on the planet for every person, it’seasy to understand why I see somany ants.
If you have a rotted structuralporch post, you can either replacethe column or repair it; on thisproject, we chose the latter.
SUPPORT ALLSTRUCTURAL REPAIRS
When a column supports a roofor structure it is considered struc-tural. Prior to replacement ormajor repair you should takesteps to temporary provide struc-tural support to the area aroundthe post needing repairs orreplacement.
Although some minor repairsfor porch column rot can be donein place, when the rot is extensive
enough, the best way to performthese repairs is on a workbench.
I often use 2x6 lumber as temporary porch post supports. I make a "T-shaped" jacking orshoring post. The “T", formed fromtwo board, keeps the support sur-face rigid, preventing each boardfrom bending on their flats. Iinstall 3-in. nails every 12 inchesto secure the two boards together.
I use a small 10-ton hydraulicjack to raise the shoring post andoverhead structure approximately1/8 inch. This assists in getting areciprocating blade to cut the fas-teners away and remove the post.It also assists later when insertingthe replacement or repaired post.
Once the structure is jacked up,I install a second temporary sup-port post to take the stress off thejack, and to provide additionalsupport at the new height. This
By Rob Robillard
PostRepairEDIT_Layout 1 4/6/15 1:04 PM Page 32

StructuralPorch Column
Rot Repair
PostRepairEDIT_Layout 1 4/6/15 1:04 PM Page 33

second support post can be T-shaped or simply two 2x6's doubled together and fastenedevery 16 inches with two 3-in. 12d nails.
REPAIRING ROT VS. REPLACEMENT
Many times it’s simply easierand less expensive to replace the porch post as opposed torepair it. In our situation we have three identical posts, and the replacement posts at thestore looked vastly different—not close enough to pass muster.
The decision to repair this postbecame a better option.
We assessed the post anddetermined that if we cut higherthan the rot, in the middle, wewould create a "stepped-key"
effect, essentially making our post repair a stronger connectionand also avoiding the creation ofa weakened "hinge" point at therepair.
OUT WITH THE OLDUsing a reciprocating saw and
multi-tool we cut out all of thenails fastened through the post at the top, bottom and railing connections. The next step was to remove the porch column rot,and that is when the ants camescurrying out!
We used a circular saw to makeall the long cuts and finished allcross-cuts with a multi-tool. Wemade these cuts on a workbench,because the better working condi-tions usually result in better look-ing cuts and results.
REPLACEMENT MATERIALI like to use mahogany or cedar
for my rot replacement material;you see cedar in these pictures.
We rough-sized our stock on the table saw, leaving it long, and glued it together with epoxyand clamps. We allowed it to dryovernight and the next morningwe used a thickness planer to thindown the glue-up and achieve asnug fit in our post cut-out. We
34 www.extremehowto.com
A T-shaped shoring post is used in conjunction with a hydraulic jack to lift the overhead structure.
Protect the overhead structurewith blocking to distribute thepressure.
Take the weight off the jackwith an additional temporarysupport post (doubled 2x6),then cut loose the post at the top and bottom with a
reciprocating saw and remove.
FROMPILLARTOPOST
PostRepairEDIT_Layout 1 4/6/15 1:04 PM Page 34

ChervonFP_Layout 1 4/6/15 1:22 PM Page 35

then dry-fitted the repair and thenglued and clamped the repair pieceinto the post.
TWO-PART EPOXYIn situations like this we like to
use a product called West Systemepoxy to bond the repair materials.This epoxy is a versatile two-part,marine-grade epoxy that bonds andcoats fiberglass, wood, metal, fab-rics and other composite materialsto provide superior strength andmoisture resistance.Two-step bonding, or structural
adhesion, is the preferred methodfor most situations because it pro-motes maximum epoxy penetrationinto the bonding surface and pre-vents resin-starved joints. We workthe epoxy into the wood surfaceswith a throwaway bristle brush.Note: Before mixing epoxy, check
all parts to be bonded for proper fitand surface preparation. Also,gather all the clamps and toolsnecessary for the operation. Applya neat resin/hardener mixture tothe surfaces to be joined, following
36 www.extremehowto.com
To avoid a weak hinge point wherethe new wood is spliced into theold, the post was cut above therot to allow room for an interlock-ing stepped, keyed joint.
The notched cuts were startedwith a circular saw and
completed with a multi-tool. The wood of the post was severelyrotted and damaged by ants.
FROMPILLARTOPOST
PostRepairEDIT_Layout 1 4/6/15 1:04 PM Page 36
www.extremehowto.com 37
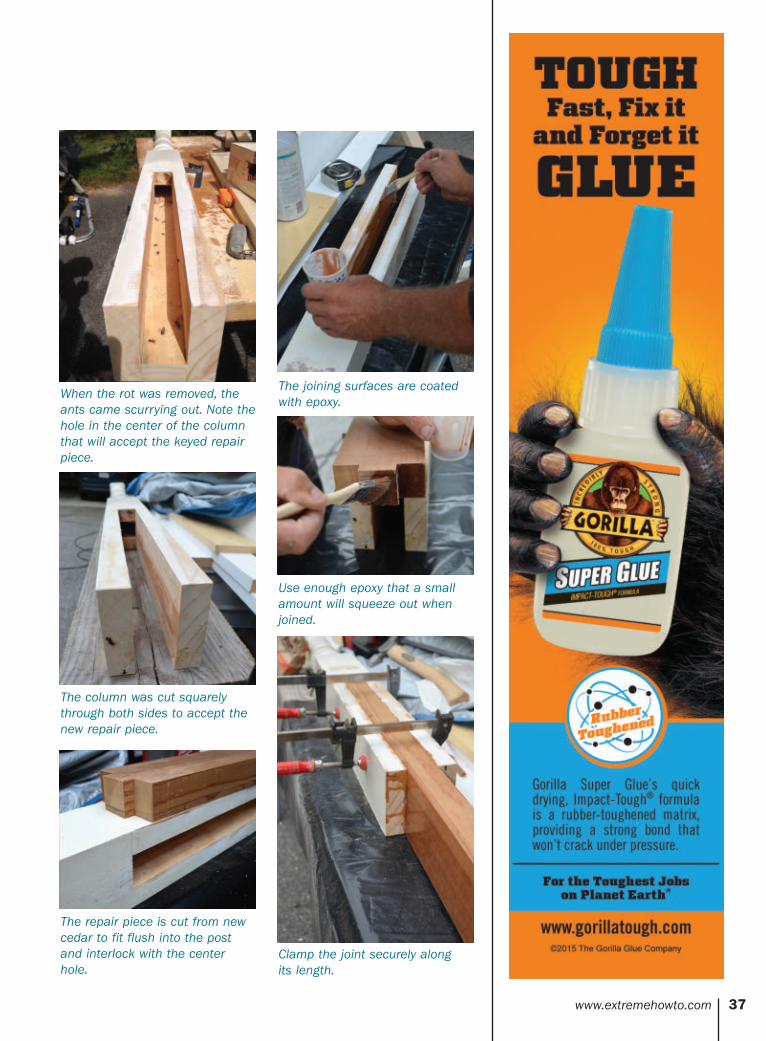
When the rot was removed, theants came scurrying out. Note thehole in the center of the columnthat will accept the keyed repairpiece.
The column was cut squarelythrough both sides to accept thenew repair piece.
The repair piece is cut from newcedar to fit flush into the postand interlock with the centerhole.
The joining surfaces are coatedwith epoxy.
Use enough epoxy that a smallamount will squeeze out whenjoined.
Clamp the joint securely along its length.
PostRepairEDIT_Layout 1 4/6/15 1:05 PM Page 37
the manufacturer's instructions.Use a disposable brush, foam roller or a putty knife to spread the hardener mixture evenly overthe surface. Apply enough of the
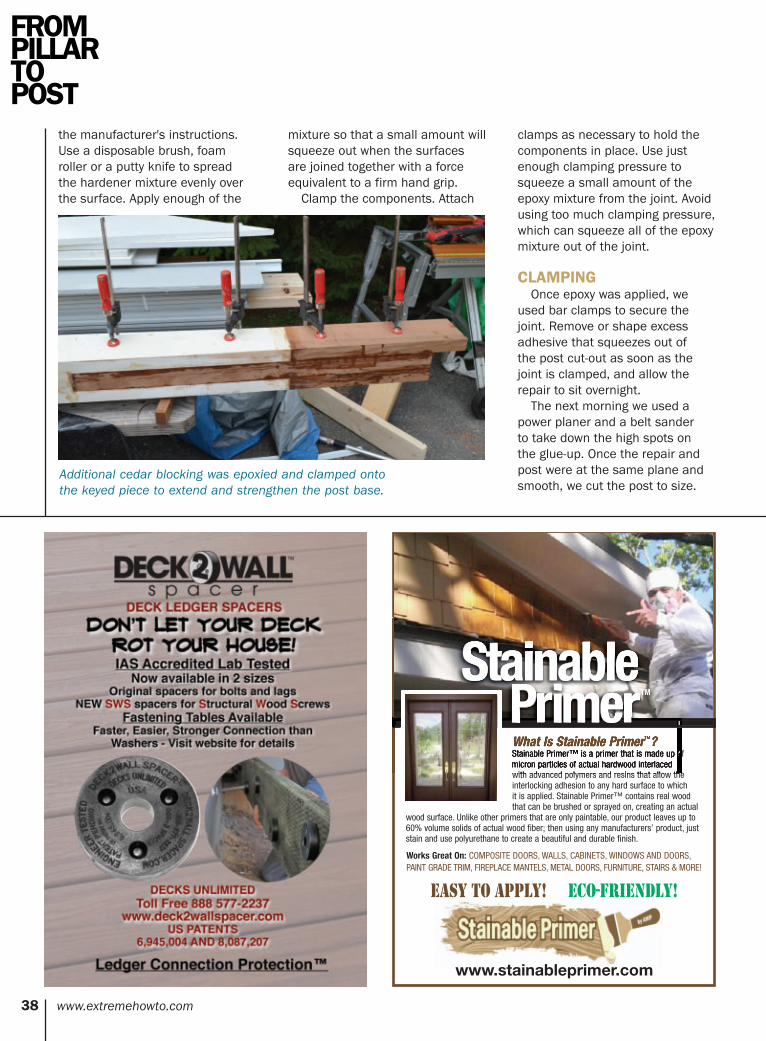
mixture so that a small amount willsqueeze out when the surfaces are joined together with a forceequivalent to a firm hand grip.Clamp the components. Attach
clamps as necessary to hold thecomponents in place. Use justenough clamping pressure tosqueeze a small amount of theepoxy mixture from the joint. Avoidusing too much clamping pressure,which can squeeze all of the epoxymixture out of the joint.
CLAMPINGOnce epoxy was applied, we
used bar clamps to secure thejoint. Remove or shape excessadhesive that squeezes out of the post cut-out as soon as thejoint is clamped, and allow therepair to sit overnight.The next morning we used a
power planer and a belt sander to take down the high spots on the glue-up. Once the repair andpost were at the same plane andsmooth, we cut the post to size.
38 www.extremehowto.com
Additional cedar blocking was epoxied and clamped onto the keyed piece to extend and strengthen the post base.
FROMPILLARTOPOST
What Is Stainable Primer™?Stainable Primer™ is a primer that is made up ofmicron particles of actual hardwood interlaced with advanced polymers and resins that allow theinterlocking adhesion to any hard surface to which it is applied. Stainable Primer™ contains real woodthat can be brushed or sprayed on, creating an actual
wood surface. Unlike other primers that are only paintable, our product leaves up to60% volume solids of actual wood fiber; then using any manufacturers’ product, juststain and use polyurethane to create a beautiful and durable finish.
StainablePrimer
StainablePrimer
Works Great On: COMPOSITE DOORS, WALLS, CABINETS, WINDOWS AND DOORS, PAINT GRADE TRIM, FIREPLACE MANTELS, METAL DOORS, FURNITURE, STAIRS & MORE!
EASY TO APPLY! ECO-FRIENDLY!
TM
www.stainableprimer.com
PostRepairEDIT_Layout 1 4/6/15 1:05 PM Page 38

www.extremehowto.com 39
The repair and post are then planed together. The joint is fine-tuned with a belt sander.
PostRepairEDIT_Layout 1 4/6/15 1:05 PM Page 39

The repair and post were then fin-ish-sanded with an orbital sanderand 120-grit, and all edges wereprimed, as well as the end grain.
Back at the porch we traced thepost base out on the mahogany
decking and used a multi tool to cut out the decking. We thenfilled this cut-out area with a PVCshim patch. This prevents the new structural post from sittingdirectly on top of the decking,
40 www.extremehowto.com
The porch decking is cut out anda PVC shim is installed beneaththe post location.
Lift the overhead structure slightlywith the jack and install therepaired post.
Minor rot repairs can be madewith the post in place, such asthis "Dutchman Patch" in whichthe damaged wood is notched outof the post with a multi-tool, andreplacement pieces are epoxiedinto the repair.
IN-PLACE POSTREPAIR
FROMPILLARTOPOST
PostRepairEDIT_Layout 1 4/6/15 1:05 PM Page 40

CentipedeFP_Layout 1 4/6/15 1:17 PM Page 41

which would cause problems laterif the deck boards need to bereplaced. The PVC is planed to sitjust below the deck surface andhides the post seam for a nice, fin-ished look.
INSTALLATION OFREPAIRED POSTThe post is then repositioned
back in place and plumbed. Wecountersunk screws into the baseand top of post. These screw loca-
tions can be filled with wood plugs,epoxy filler or wood-filler (Bondo). With the post fastened to the
header, deck and railing, we thenremoved the temporary supportpost and slowly lowered thehydraulic jack. Two coats of quality paint finish
the repair.
Editor’s Note: Robert Robillard is a remodeling contractor based inConcord, MA. He is also the editorof a www.AConcordCarpenter.com.
The post is fastened with countersunk screws at the top and bottom. The job is complete when all holes are filled and new paint is applied.
42 www.extremehowto.com
EHT
FROMPILLARTOPOST
Come knock on our doors.
Nick’s Building Supply has one of the
Largest Selections of Real Wood Doors
available on the internet today with an
emphasis on custom fit door assemblies
to fit almost any size opening. Nick’s
offers a wide variety of Door and Glass
Designs from Craftsman and Rustic to
Contemporary and Modern and we do
it the best for less. Building New or
Replacement Doors see the Nick’s
Building Supply difference.
So people canknock on yours.
www.nicksbuilding.comUse Coupon Code EXT415
Nick’s Building Supply, Inc.Selling Wood Doors Online at Wholesale Prices to the Public since 1999
PostRepairEDIT_Layout 1 4/6/15 1:05 PM Page 42

LandPrideFP_Layout 1 4/6/15 1:30 PM Page 43

BlueDevil2FP_Layout 1 4/6/15 1:16 PM Page 44

BlueDevil2FP_Layout 1 4/6/15 1:16 PM Page 45

Some people'sidea of shopping isa trip to the depart-
ment store. Extreme How-Toreaders prefer the hardwarestore. Here's a roundup of somecool tools to add to your wish list.
CHANNELLOCK LINEMAN’S PLIERSChannellock's 369 High-Leverage
Lineman’s Plier has a new design thatplaces the rivet closer to the head, whichgives the jaws greater leverage for cutting thethickest gauge wiring. For tackling any kind ofrewiring or electrical work around the house, the 369has knife-and-anvil, laser-heat-treated cutting edges andthe company’s trademark Code Blue comfort grip handles. Channellock also offers a version of the Lineman's Plier with
a new fish-tape puller. When routing wires or cable through a wall,this specialty plier has an innovative channel that runs from the tipof the jaws out the rear of the tool, providing clearance and better gripfor the tape hook. Visit www.channellock.com.
46 www.extremehowto.com
ADDITIONS FOR YOUR
TOOLBOXNEW
ToolboxEDIT_Layout 1 4/6/15 1:13 PM Page 46

HydeFP_Layout 1 4/6/15 1:30 PM Page 47

KAPRO SET & MATCHThe Kapro Set & Match is a
patented set-and-match ruler thatfeatures two easy-to-read levelingvials (both horizontal and vertical)that slide and lock in place. It’s agreat tool for DIY measuring andmarking projects, such as settingand aligning shelves, cabinets, mir-rors, stencils and wallpaper. Use itto mark/cut long lines on walls,wood, drywall and cardboard. Thebeveled edge of the ruler lies flushagainst the wall for exceptional visi-bility and accuracy when placing apencil to mark the measurement,which is a huge help for preciselyhanging framed photos and art-work. Choose from three lengths;24, 32, 40 and 48 inches. Visitwww.kapro.com.
STONEBREAKERPRO GLOVE LINESafety on the job site is impera-
tive, and the most prevalent injuriesinvolve the hands. Many pros don’twear gloves because they don’t properly fit, aren’t designed for themultiple tasks presented each day,or fear they will get in the way ofthem performing their jobs. Everypair of StoneBreaker gloves is constructed of the highest-qualitymaterials, from the leather to the thread, which provide better
protection and longer life while providing a “second-skin” fit. Theentire Fit To Work concept is abouta pattern whereby the material iscut and sewn to better fit the hand,whether it be strategically placedreinforced material for high wearpoints or padded protection whereit is needed most. The snug fitimproves dexterity, holds its shape,and doesn’t require a “break-in”period. High-quality leathers andbreathable synthetics deliver realprotection, all-day comfort andlonger glove life. Double-stitchedseams protect against rips andtears, and extended cuffs, superiorVelcro closures, or both, give added coverage and seal. Visit www.stone-breaker.com.
CONSTRUCTION MASTERPLUS EZThe Construction Master
Plus EZ (CMP EZ) is the newestin Calculated Industries’ line ofaward-winning Construction MasterPro construction-math calculators.The CMP EZ takes the “problem”out of construction-math problems.It walks you through all the stepsfor every job from stairs and fram-ing to crown molding and balusters.It even calculates quantities for 10kinds of building materials. TheCMP EZ has basic and advanced
solutions (lengths, angles, quanti-ties, etc.) for common rafters,hip/valley rafters, jack rafters andstairs. Other built-in solutionsinclude: Square-Ups, Areas andVolumes; Circular; Arcs; Rake Walls;Arch Studs; Balusters (Cap Walland Open Wall), Elliptical Arches;Crown Molding; Compound Angles;Polygons; and Spacing. The CMPEZ makes a valuable addition toany builder’s or serious do-it-your-selfer’s toolbox and comes with arugged shock-, dust- and moisture-resistant Armadillo Gear case. Visitwww.calculated.com/XPS15.
48 www.extremehowto.com
ADDITIONS FOR YOUR
TOOLBOXNEW
ToolboxEDIT_Layout 1 4/6/15 1:13 PM Page 48

TWEAKERThe Tweaker, from Mayhew
Steel Products is a specializedtwo-pronged pry bar used to tweakor adjust bent or warped lumber,and adjust studs, joists or rafters.It features a powder-coated finish,a cushion-grip handle and a nail-puller, and can also be used indemolition for wedging, strippingand wrecking. Visitwww.mayhew.com.
HYDE SPRAY SHIELDCARDBOARD CLIP
This high-impact polystyrene clipholds cardboard or other sheetgoods to shield surroundings fromoverspray while painting. The clipdesign enables the user to cut thecardboard into custom shapes andsizes, when the job involvesangles, curves or irregular shapesthat don't fita standardpaint shield.The SprayShield Clipincludes an18-in. Acmethreadedhardwood handle,and Hyde's patentedPivotNeck systemadjusts the shield toany angle. Visitwww.hydetools.com.
IRWIN VISE-GRIP MAXLEVERAGE DIAGONALCUTTING PLIERS
Manufactured for electriciansand general construction users,Irwin's 1902413 Max LeverageDiagonal Pliers feature PowerSlotTechnology, providing up to twicethe cutting power with half theeffort. The induction-hardened cutting edges cut through ACSR,
nails, screws and even piano wire. The three-zone comfort grips are contoured for optimalcushion and control, while thehandles are equipped with inte-grated hooks designed to attach to a lanyard for safer elevatedworking conditions and easierretrieval. The Max LeverageDiagonal Cutting Pliers are avail-able in 7- and 8-in. versions andcome with a lifetime guarantee.Visit www.irwin.com.
www.extremehowto.com 49
ToolboxEDIT_Layout 1 4/6/15 1:13 PM Page 49

50 www.extremehowto.com
HARDWOOD WRENCHThe Hardwood Wrench deck-
board straightening tool easily camlocks into place to hold deckboards straight while fasteners arebeing installed for true "one-maninstallation." With a pushing forceof around 1,100 lbs., the DeckWiseHardwood Wrench gives you up to8x more bending power than otherdeck-board straightening tools. Itworks with single or double joistsup to 3-1/2-in. wide and all typesof decking, including pre-grooved or standard lumber, compositesand PVC. The handle and joist pinshave been redesigned, givingbuilders the ability to straightendeck boards from both left or righthand direction, which is usefulwhen you need to straighten aboard on the outside of your deckframe. The handle and pins can beflipped, reversed and expanded towork on any crooked board youcome across. The new knurledknobs can even be used to gripand straighten house siding. Visit www.deckwise.com.
VAMPLIERS PROVamPLIERS Pro have uniquely
designed and patented concavejaws. The vertical and horizontalserrations inside the jaws make it possible to grab onto a smallstripped/rusted/corroded screw or rounded nut for extraction.VamPLIERS Pro will work on
screws that have special, tamper-proof or unique heads, such as aTorx screw. Made of high-qualitycarbon steel, they have a smoothvarnished finish and utilize an environmentally friendly elastomerfor ergonomic grips. VamPLIERSare great for professionals andDIY’ers to achieve the perfect“bite” around the screw’s head.Visit www.vampiretools.com.
WOODRIVER HAND PLANESWoodcraft has added three
planes to its private labelWoodRiver line; the No. 1 BenchHand Plane V3, plus the No. 91Small and No. 93 Large ShoulderPlanes. The new No. 1 Bench Hand Plane, 5-3/4 in. long and 1-1/2 in. wide, is patterned afterthe smallest of the Stanley benchplanes that was manufactured for70 years prior to World War II. Thisrare and highly collectable planewas originally sold to handle smallsmoothing jobs, sometimes in tightplaces, but is now often used in the palm of the hand like a blockplane. It features heavy stress-relieved, ductile iron casting, a fully machined adjustable frog, and a high-carbon steel blade.The No. 91 Small and No. 93
Large Shoulder Planes join the No.92 Medium Shoulder Plane to com-plete the set. Based on EdwardPreston and Sons designs, theseplanes have a major new feature,an adjustable toe to control thethroat opening and minimize tear-out of end grain. The plane bodiesare Cr40 stress-relieved ductilesteel, machined square and flat,and blades are high-carbon toolsteel hardened to HRC60-64. Visit www.woodcraft.com.
ADDITIONS FOR YOUR
TOOLBOXNEW
ToolboxEDIT_Layout 1 4/6/15 1:13 PM Page 50

ChannellockFP_Layout 1 4/6/15 1:17 PM Page 51

MILWAUKEEMETALWORKINGSOLUTIONS
Milwaukee Tool introduces sixnew Tinner Snip models that includethe industry’s first Compound-Offsettinner snip, a 3-in. Speed Seamer,and a 5-Blade HVAC Crimper forHVAC ductwork. The six new TinnerSnips are divided into three types—the industry’s first Compound-Offset Tinner, Classic Tinners andLightweight Tinners—all of whichcome with 40-percent larger han-dle loops that are much easier touse with commonly worn gloves.The Compound-Offset Tinner Snipsuse a compound mechanism thatamplifies the tool’s force to cuttough metal material—such asmetal lathe—with less effort.
The 3-in. Speed Seamer fea-tures a forged metal head and
comfortable over-molded handles,and includes 3/8-in. and 1-in.markings on the head to quicklymeasure the most common foldsin HVAC ductwork. The 5-BladeHVAC Crimper features reinforced
crimper ribs, which provide greater blade stability for up totwice the tool life. Both tools aredesigned to be comfortable foroverhand and underhand use.Visit www.milwaukeetool.com.
52 www.extremehowto.com
ADDITIONS FOR YOUR
TOOLBOXNEW
ToolboxEDIT_Layout 1 4/6/15 1:13 PM Page 52

www.extremehowto.com 53
GRIP 2 IN 1 COBFLASHLIGHTThe new 2 in 1 COB Flashlight
(item # 37175) features COB (chip on board) LED technology for working on electronics, emer-gency roadside repairs, or as a multipurpose work light. The anodized aircraft-grade aluminum housing is water- and impact-resistant,
and a magnetic bottom attach-es to ferrous surfaces. Light out-put: main 250 lumens, body 190 lumens. Visit www.gripontools.net.
INDEXING DECKWRECKER
The newest product inMayhew’s line of deconstruc-tion tools is the indexing DeckWrecker #41105. The geared head allows you to index the angle of the tool to get the right fit for the job at hand. Hot-forgedfrom high-quality alloy steel, theindexing Deck Wrecker is designedwith a nail puller on the back anda striking plate within the jaws,forcing the nail puller to catch the
nail head and remove the nail.The inside jaw width of 2-1/16 in. and an outside jaw width of 3-5/16in. allows you to remove decking with minimal damage tothe boards and joists. An overalllength of 33 inches provides forextra leverage while keeping thetool lightweight and easy to use. It is the perfect companion toMayhew’s full size Deck Wrecker#41104. Visit www.mayhew.com.
CHANNELLOCK 440 12”STRAIGHT JAW TONGUE & GROOVE PLIER
The Channellock 440 12-in.Straight Jaw Tongue & GroovePlier is the tool every home andgarage needs. This plier is engi-neered down to the smallest detail and is built in Meadville,Pennsylvania, USA, to last with a
ToolboxEDIT_Layout 1 4/6/15 1:14 PM Page 53
PermaLock fastener to eliminatenut and bolt failure, patented rein-forcing edge to minimize stressbreakage and right angle, laserheat-treated teeth to provide a better, longer lasting grip. It's
versatile, strong and durableenough to pass down to your kids.Visit www.channellock.com.
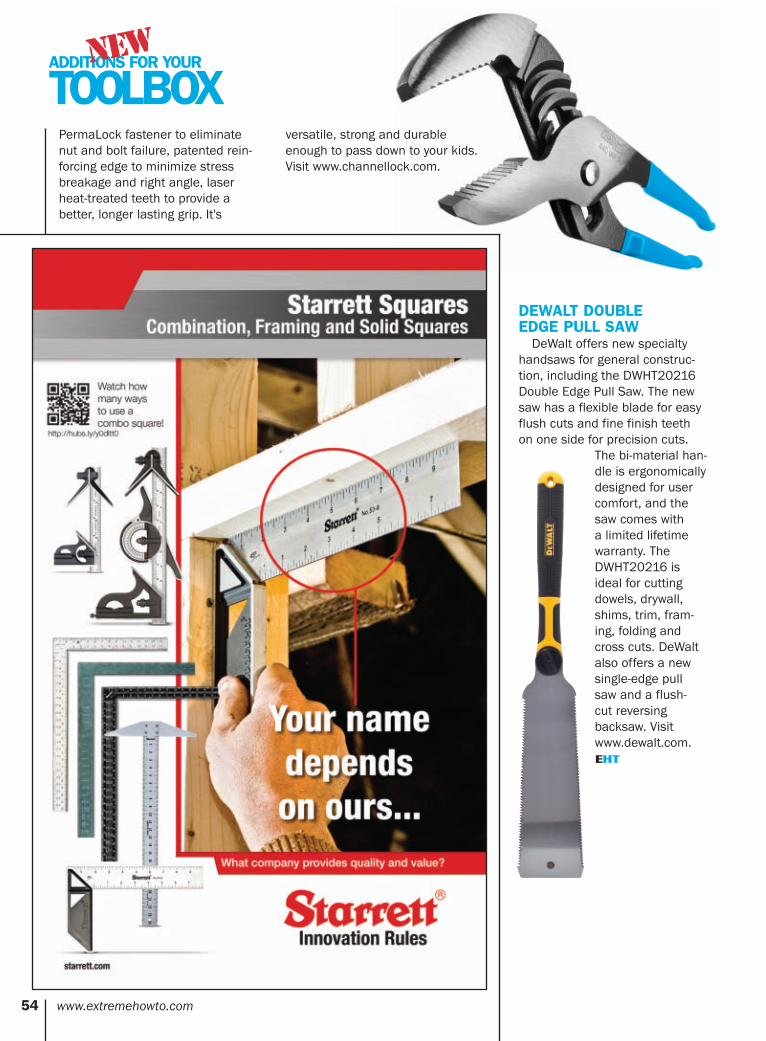
DEWALT DOUBLE EDGE PULL SAWDeWalt offers new specialty
handsaws for general construc-tion, including the DWHT20216Double Edge Pull Saw. The newsaw has a flexible blade for easyflush cuts and fine finish teeth on one side for precision cuts.
The bi-material han-dle is ergonomicallydesigned for usercomfort, and thesaw comes with a limited lifetimewarranty. TheDWHT20216 isideal for cuttingdowels, drywall,shims, trim, fram-ing, folding andcross cuts. DeWaltalso offers a new single-edge pull saw and a flush-cut reversing backsaw. Visitwww.dewalt.com.
ADDITIONS FOR YOUR
TOOLBOXNEW
54 www.extremehowto.com
EHT
ToolboxEDIT_Layout 1 4/6/15 1:14 PM Page 54

www.cshardware.com • 800-882-0009
CSHardwareFP_Layout 1 4/6/15 1:23 PM Page 55

56 www.extremehowto.com
By Matt Weber
STONE-WALLEDStone veneer that installs without the mess the mess of mortar is
rapidly growing in popularity among DIY'ers. Rather than mixingbatch after batch of mortar and troweling it over a mesh-covered
wall, mortarless veneer is simply installed with screws and a powerscrewdriver.
My wife and I wanted to spruce up our finished basement and decid-ed a stone accent wall would add a sense of rustic warmth to the livingspace. We selected a mortarless artificial stone system called ClipStonefrom Environmental Stoneworks. Here's how we used used the veneerto dramatically upgrade the décor of the basement.
PROJECT PREPA number of mortarless veneer systems are available
from a variety of manufacturers, and installation meth-ods vary. The ClipStone product utilizes wire hooksmolded into the back of the stone, and the hooks areattached to the wall with pan-head screws—two perstone.
First step in the project is to determine yourhouse wall is adequately constructed to support thenew stone, which is notably heavy. ClipStone isdesigned for installation over 7/16-in. or greater OSBor plywood sheathing attached to wood or metal studs.
Our basement walls were covered in thin wall paneling,which was an inadequate substrate. Therefore, to preparefor the stone I, removed all the trim-work and installed 7/16-in.OSB panels over the wall using screws and construction adhesive.
InstallingMortarless
Stone Veneer
StoneWallfeatureEDIT_Layout 1 4/6/15 1:07 PM Page 56

www.extremehowto.com 57
StoneWallfeatureEDIT_Layout 1 4/6/15 1:07 PM Page 57

Whether or not you need toadd wall panels, you'll still needto remove the wall trim for instal-lation. If you're using a smooth-faced stone, such as brick, itmight be wise to keep the trimintact for reinstallation after the veneer is installed. In ourcase, however, we were usingClipStone's Ledgestone product,which has a variegated cleft face,which gives it a very naturalisticappearance but also results in anuneven wall surface that doesn'teasily match crown or base mold-ing. We decided to leave the trimoff this project.
Follow your manufacturer'sguidelines for estimating theamount of product you shouldorder. It's usually a good idea toorder 5 to 10 percent extra mate-rial for waste due to cutting orbreakage.
Our particular project wasabout as simple as it gets—astraight interior wall with no cor-ners to deal with. Accessorypieces are available, however, for outside corners, outlet boxesand light fixtures, plus the com-pany offers a decorative sill forwindows or a wainscoting cap.
Note: For exterior installations,you'll need to cover the OSB orplywood with two layers of breath-able moisture barrier fastenedwith staples. Make sure all edgesare proplerly flashed.
STEP BY STEPINSTALLATION
Starter strips are available from the manufacturer, but I felt they were unnecessary forthis simple interior job.
I began installation of theveneer at the lower left-hand
58 www.extremehowto.com
Installation requires a substrate of 7/16" or greater OSB or plywood.
Before: The previousowner had remodeledthe basement with wallpaneling.
First step was to remove allmolding and trim.
STONE-WALLED
StoneWallfeatureEDIT_Layout 1 4/6/15 1:07 PM Page 58

FinPanFP_Layout 1 4/6/15 1:28 PM Page 59

corner. I used a pair of pliers tobend the lower clips even with thebottom of the stone, placed ontothe floor and checked it with a tor-pedo level. To attach the stone,simply push the stone back anddownward and drive screws intothe exposed eyelets. The stoneshould be snug when gently pull-ing on it.
Fasteners should be 1 to 1-1/2-in. long with washer-type headsthat pinch the wire to the wall. Iused 1-1/4-in. wood lath screws for this project. Repeat the procedure to com-
plete the first row, cutting the finalstone to fit. Cuts can be made tothe stone with a chop saw or agrinder with a diamond-grit blade. Each stone should have two
points of attachment. If necessary,cut from the left and right of theclips to make this happen. If this
isn’t possible with the cut stone,then use a quality constructionadhesive to glue the stone surfacestogether. (Use a polyurethane-based construction adhesive forexterior projects). The following rows install in
much the same way, but insteadand bending the lower clips, they fitbehind the stone of the lower rowand interlock for a more secureinstallation with a consistent stand-off from the wall. Remember tostagger the joints between stones
60 www.extremehowto.com
I bent the lower hooks out of theway to install the first stone.
Each stone installs with two screws.
Complete the first row.
Stagger joints from row to row. Some stones are half the height of othersand require two stones to be stacked together.
Check each stone for level.
STONE-WALLED
StoneWallfeatureEDIT_Layout 1 4/6/15 1:07 PM Page 60

www.extremehowto.com 61
from row to row, as with any masonry installation.Check each stone for level installation.
Because the Ledgestone is intended to look like anaturally occurring material, the stones have slightirregularities in size and shape that can complicatekeeping the rows level while also spacing the individ-ual units closely and evenly. My suggestion is to fre-quently take a step back and assess your progress. Ifyou run into complications from a stone that's slightlytoo large, set it as side for the first stone on the nextrow, and install similarly sized stones next to it. Forthe most part installation is a straightforward process,but it pays to keep an eye on your stone size and tomake minor corrections along the way.
Outlet stones are available for installation aroundelectrical boxes. You'll also need to install an exten-sion ring around the outlet box to bring it out flushwith the stone.
At the final top row, you can cut the stone as need-ed to fit beneath the ceiling. Try to keep two eyelets
Cut the stones using a chop saw or a grinder with adiamond-grit blade.
Outlet stones and other accessories are available forinstallation.
StoneWallfeatureEDIT_Layout 1 4/6/15 1:07 PM Page 61

on the stone for installation. If this isn't possible, glue thestone to the wall with heavy-duty construction adhesive.
It doesn't happen often with me, but I got lucky with thisinstallation. The full height of the top row was able to cap offthe wall with minimal cutting.
The result was a substantial improvement to our finish base-ment, which went from the look of a kid's playroom to "mancave" with the new installation of the stone accent wall.
For more information on ClipStone and mortarless stoneveneer, visit www.myclipstone.com.
62 www.extremehowto.com
EHT
STONE-WALLED
The rear of these stones showhow the wire clips interlock on the rear of the veneer.
To fasten the stones I used 1-1/4" wood lath screws that have washer-type heads. I usedconstruction adhesive to helpinstall the final top row of theproject.
T Shape of Painting!
GLIDE SPIN LIFT DRAIN
Paint in less time with less mess and no stress
T M
TheNewShape of Painting!
www.PaintGlider.com
F
TheNewShape f P !NEVER BEND OVER WHILE PAINTING - HOLDS 1 GALLON!
DURABLE & LIGHTWEIGHT
1-888-580-0230
StoneWallfeatureEDIT_Layout 1 4/6/15 1:08 PM Page 62

www.extremehowto.com 63
The completedveneer gives the
basement a warm,rustic feel and
greatly enhances the look of the room.
StoneWallfeatureEDIT_Layout 1 4/6/15 1:08 PM Page 63

PROJECT NEXT
64 www.extremehowto.com
Our habit of occasionallychanging houses meansthat I have been through the
ritual of finding a good location fora full length mirror a number oftimes. One of us doesn't just throwon a t-shirt, jeans and skatershoes every day, so apparentlychecking out the ensemble forclashing colors, misaligned but-tons and accessories is a thing.My thing is making sure my wifehas a mirror to view herself headto toe because I cannot be trusted
to call a timeout when she intendsto head out the door in violation ofsome fashion rule.
A good way to be in compliancewith the full length mirror rule is toinstall a set of mirror bypassdoors. Not only do these doorsfunction as full length mirrors, theycan also make a room look larger.
Another advantage of this prod-uct is that it can fit into a widerange of openings as long theheader is not too low or the open-ing too wide. The doors have quite
a range of elevation adjustmentand, because they overlap, thereis a good deal of leeway for howmuch they overlap each otherwhen the doors are closed.
Although these doors give theinstaller a lot of flexibility for open-ing size, there is an ideal setupthat looks best, provides maxi-mum access to the closet whenopen, and rolls the smoothestwhen operating the doors.Whenever possible, we try to getthe opening to this ideal. Ofcourse, when framing a new open-ing you can get it spot on. If youhave much experience with homeimprovement projects, you've dis-covered that things are rarely idealand you often have to figure outhow to make it work.
We'll take a look at some of theways to make mirrored bypassdoors work in some of the situa-tions you may have inherited, butfirst let's see how to set thesedoors up when starting with newconstruction.
FOR NEW CONSTRUCTIONMost of these door kits are
intended for 4-, 5- or 6-ft. open-ings in a house that has 6-ft., 8-in.high doors. Start with getting theright kit: 4, 5 or 6 feet. With some-one to help, open the kit some-where you can keep the doors pro-tected while the rest of theprocess is completed. (This maybe in your garage or a bedroomwhere there is wall space andwhere kids won't be playing.)
Get out the floor track and put iton the floor. Stand a door with thewheels in the floor track. Haveyour helper steady the door whileyou take some measurements.Look at the clearance from the
Make a room look bigger while providing full-length mirror bypass doors.
By Larry Walton
Double Bypass
ProjectNextMirrorDoorEDIT_Layout 1 4/6/15 1:37 PM Page 64

BriwaxFP_Layout 1 4/6/15 1:17 PM Page 65
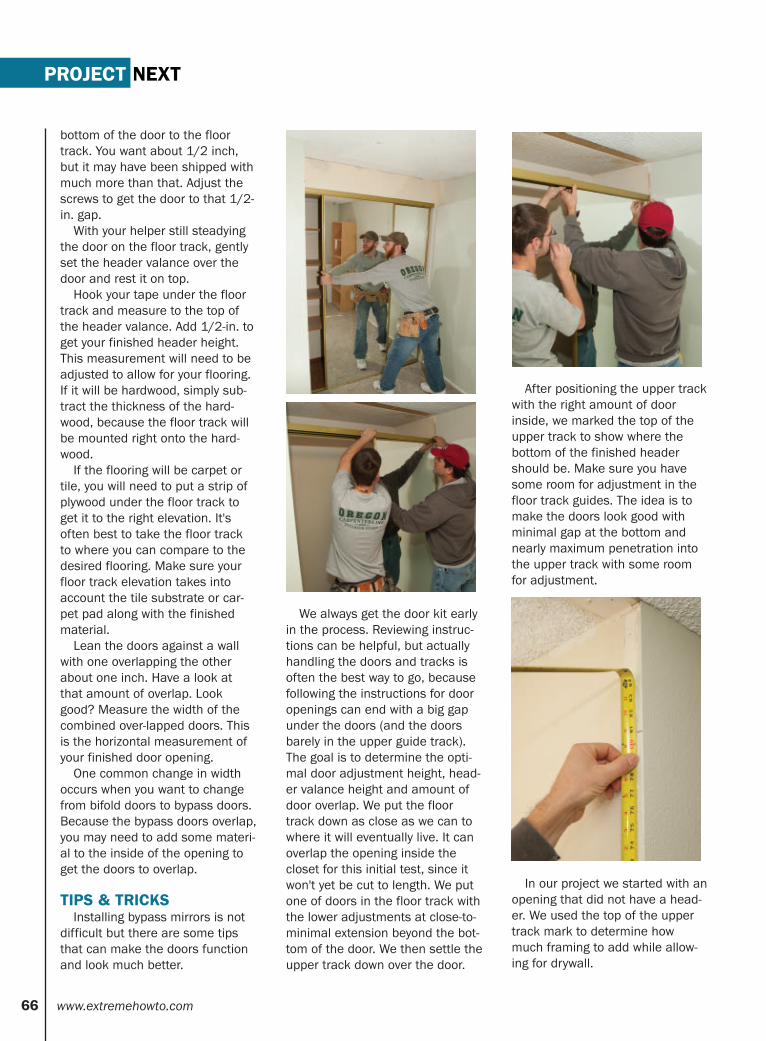
bottom of the door to the floortrack. You want about 1/2 inch,but it may have been shipped withmuch more than that. Adjust thescrews to get the door to that 1/2-in. gap.
With your helper still steadyingthe door on the floor track, gentlyset the header valance over thedoor and rest it on top.
Hook your tape under the floortrack and measure to the top ofthe header valance. Add 1/2-in. toget your finished header height.This measurement will need to beadjusted to allow for your flooring.If it will be hardwood, simply sub-tract the thickness of the hard-wood, because the floor track willbe mounted right onto the hard-wood.
If the flooring will be carpet ortile, you will need to put a strip ofplywood under the floor track toget it to the right elevation. It'soften best to take the floor trackto where you can compare to thedesired flooring. Make sure yourfloor track elevation takes intoaccount the tile substrate or car-pet pad along with the finishedmaterial.
Lean the doors against a wallwith one overlapping the otherabout one inch. Have a look atthat amount of overlap. Lookgood? Measure the width of thecombined over-lapped doors. Thisis the horizontal measurement ofyour finished door opening.
One common change in widthoccurs when you want to changefrom bifold doors to bypass doors.Because the bypass doors overlap,you may need to add some materi-al to the inside of the opening toget the doors to overlap.
TIPS & TRICKSInstalling bypass mirrors is not
difficult but there are some tipsthat can make the doors functionand look much better.
We always get the door kit earlyin the process. Reviewing instruc-tions can be helpful, but actuallyhandling the doors and tracks isoften the best way to go, becausefollowing the instructions for dooropenings can end with a big gapunder the doors (and the doorsbarely in the upper guide track).The goal is to determine the opti-mal door adjustment height, head-er valance height and amount ofdoor overlap. We put the floortrack down as close as we can towhere it will eventually live. It canoverlap the opening inside thecloset for this initial test, since itwon't yet be cut to length. We putone of doors in the floor track withthe lower adjustments at close-to-minimal extension beyond the bot-tom of the door. We then settle theupper track down over the door.
After positioning the upper trackwith the right amount of doorinside, we marked the top of theupper track to show where the bottom of the finished headershould be. Make sure you havesome room for adjustment in thefloor track guides. The idea is tomake the doors look good withminimal gap at the bottom andnearly maximum penetration intothe upper track with some roomfor adjustment.
In our project we started with anopening that did not have a head-er. We used the top of the uppertrack mark to determine howmuch framing to add while allow-ing for drywall.
PROJECT NEXT
66 www.extremehowto.com
ProjectNextMirrorDoorEDIT_Layout 1 4/6/15 1:37 PM Page 66

PAINTPIRANHA
A Paint Cleaning Tool With“REAL BITE”
The Paint Piranha cleans paint brushes and roller covers andrestores old brushes tolike new condition!
Whether you are a home-owner, a commercialpainter or an art student, the Paint Piranha can save you time, money and frustration.
The Paint Piranha paint remover is capable of cleaning out a
paintbrush that has fully hardened in two minutes. Most paintbrushes, when
cleaned using other methods can take up to 30 minutes
to clean thoroughly. Because of the speed of the Piranha and the accuracy
of cleaning each bristle, the time drops down to just a few minutes!
www.thepaintpiranha.com
We framed in the header thenwrapped it in drywall.
We installed corner bead beforeapplying drywall compound andtexture.
In order to make our doors over-lap each other properly, we addeda 3/4-in. vertical trim boardripped to the width of the header.This narrowed the openingenough to make 1 inch of dooroverlap when the doors wereclosed.
We measured the width of the opening at the bottom and cut the floor track to fit betweenthe trim boards. A miter saw with carbide teeth makes a very clean cut on the aluminumtrack. Key words: carbide, aluminum.
www.extremehowto.com 67
ProjectNextMirrorDoorEDIT_Layout 1 4/6/15 1:37 PM Page 67
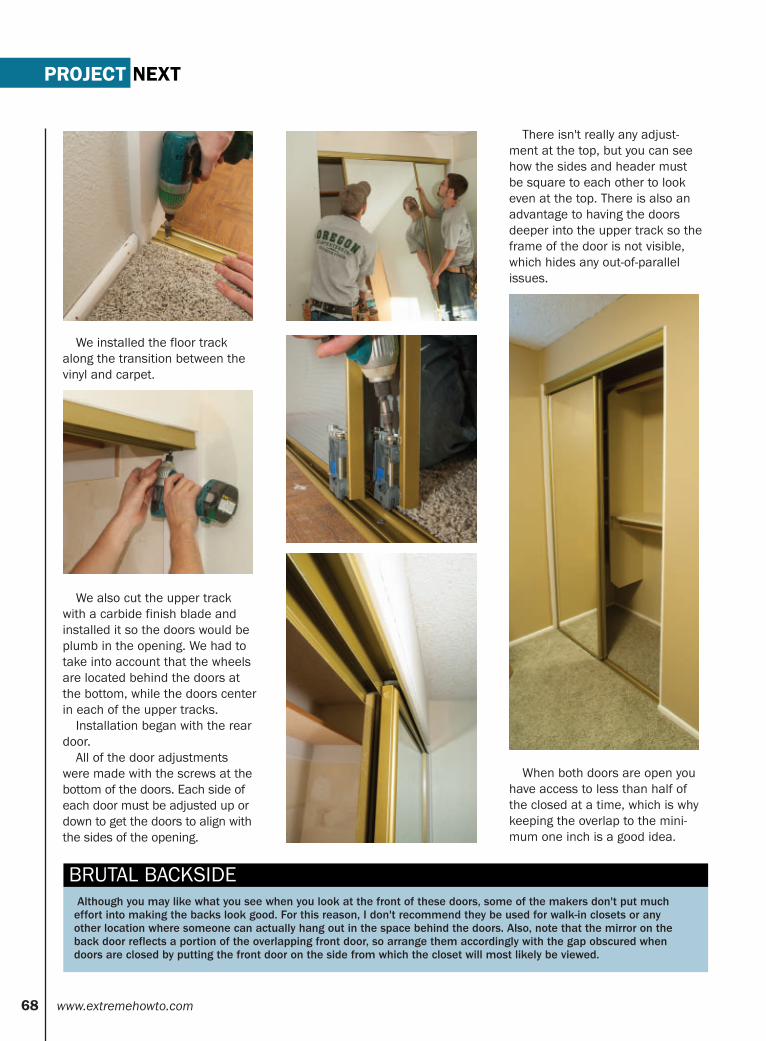
We installed the floor trackalong the transition between thevinyl and carpet.
We also cut the upper trackwith a carbide finish blade andinstalled it so the doors would beplumb in the opening. We had totake into account that the wheelsare located behind the doors atthe bottom, while the doors centerin each of the upper tracks.Installation began with the rear
door.All of the door adjustments
were made with the screws at thebottom of the doors. Each side ofeach door must be adjusted up ordown to get the doors to align withthe sides of the opening.
There isn't really any adjust-ment at the top, but you can seehow the sides and header mustbe square to each other to lookeven at the top. There is also anadvantage to having the doorsdeeper into the upper track so theframe of the door is not visible,which hides any out-of-parallelissues.
When both doors are open youhave access to less than half ofthe closed at a time, which is whykeeping the overlap to the mini-mum one inch is a good idea.
PROJECT NEXT
68 www.extremehowto.com
Although you may like what you see when you look at the front of these doors, some of the makers don't put mucheffort into making the backs look good. For this reason, I don't recommend they be used for walk-in closets or anyother location where someone can actually hang out in the space behind the doors. Also, note that the mirror on theback door reflects a portion of the overlapping front door, so arrange them accordingly with the gap obscured whendoors are closed by putting the front door on the side from which the closet will most likely be viewed.
BRUTAL BACKSIDE
ProjectNextMirrorDoorEDIT_Layout 1 4/6/15 1:37 PM Page 68

PlastProFP_Layout 1 4/6/15 1:32 PM Page 69

This pair of doors (left) areclosed the wrong way. You wantthe outside door to be parked onthe side where the gap betweendoors will be hidden. Family mem-bers may not cooperate with thisidea, but you can try.
This closet is done and ready tobe loaded. Notice that thepainters accentuated the verticaltrim board that made the openingthe right size.
70 www.extremehowto.com
PROJECT NEXT
Unlike traditional bypass doors, which hang from the upper track, this type of door rides on wheels at the floor track.This means the bottom track must be on reasonably solid footing—flat, straight and not too squishy. When we are set-ting up for these doors for carpet on both sides, we install a 1/2-in. thick strip of plywood to support the floor track.This strip is ripped to the width of the floor track and carefully fastened into the position determined by testing thedoors. We write instructions on the strip for the carpet installers to carpet up to (but not over) the strip on both sides.
FLOOR TRACK
EHT
ProjectNextMirrorDoorEDIT_Layout 1 4/6/15 1:37 PM Page 70

NO CARPENTRY OR PERMITS REQUIRED.Just roll-out your new wooden walkway over grass, stones, wood chips, pine needles, sand, gravel, old concrete and more. Create a beautiful new wooden walkway or renew an existing one--in just minutes.
A DO- IT-YOURSELF WOODEN BOARDWALK SYSTEM WITH A TRULY FINISHED CUSTOM LOOK!
Roll-OutWoodenWalkways
SATISFACTIONGUARANTEED!
• Install in minutes, use for years• Choose from teak/ipe, Trex®, more• Use on grass, sand, gravel – virtually any surface• Easy to customize with curves and turns• Choice of widths and slat spacing available
Call today!800-813-4050 www.MisterBoardwalk.com
EvergreenMarketingFP_Layout 1 4/6/15 1:28 PM Page 71

EVERYTHING AUTO
The single biggest advance in fuel-injection technologyhas been electronic control
systems. The introduction of com-puter management has improvedengine efficiency and fuel econo-my while also adding more powerand torque. Turbo-charged dieselengines have benefitted the mostfrom these innovations. Whencombined with free-flowing intakeand exhaust systems, fine-tuningfor more power or fuel economybecomes a very viable goal for aturbo-charged diesel.The factory tune is designed to
meet specific power and emissiongoals. Specially designed aroundtest setups, which rate the vehicleon a variety of benchmarks, thesestock settings may not match yourparticular situation. Optimal tuningfor your personal driving style canbe achieved with an aftermarket
tuning system, which can unleashmore power, give you better throt-tle response, or squeeze out moremiles per tank of fuel. Banks is a well-known electronic
tuner company in the diesel marketand for good reason. The BanksSix-Gun diesel tuner not only addsup to 155 horsepower and 385 lb-ft. of torque (with the recommend-ed airflow improvements), but alsofeatures the company's CleanTunetechnology to provide all thatpower without the soot. BanksActiveSafety technology monitorsyour engine and transmission withbuilt-in safeguards. Plus, the iQDashboard PC always gives youcustom tune-ability, and you canchange power levels with a touchof the screen.Here's how we installed the
Banks Six-Gun Tuner on aDuramax.
STEP BY STEPINSTALLATION
Removing the passenger-sidefender liner allows access to theexhaust manifold for installing thepyrometer, which adds extra safetyto the programmer setup.
When drilling the access hole,use grease on the end of the drillbit to catch the metal shavingsand reduce cleanup. Use a liberalamount of grease. Clean and reap-ply fresh grease to make sure itcontinues to catch shavings.
Using the grease leaves a cleanhole without debris inside theexhaust manifold, which is readyto be tapped. Use the correct sizeof bit for the tap. Starting withsmaller sizes and stepping up sizecan help by reducing drill torqueand minimizing friction.
Fine-tuning Engine Efficiency with Electronic Controls
Less Smoke, More Power
By Tim Walton
72 www.extremehowto.com
EverythingAutoEDIT_Layout 1 4/6/15 1:01 PM Page 72

MrBeamsFP_Layout 1 4/6/15 1:32 PM Page 73

Make sure the tap is straightand square, which will affect theangle of the bung and sensor onceinstalled. A socket adapter with anextension can be used in place ofthe conventional “T” wrench to getpast obstructions.
Once you’ve tapped the holeand used a magnet to ensure yougot all the metal shavings, insertthe bung that will accept the sen-sor into the manifold.
The exhaust gas temperature(EGT) sensor tightens into thealready inserted bung.
After routing the lead-wire forthe EGT across the engine bay andsafely down the engine to the EGTsensor, you can connect the wires.Be sure to put shrink-wrap overthe wires first so you can sealthem from the elements.
Run the mass air flow (MAF)harness adapter and put the stockplug into the Banks male plug. TheBanks female connector plugs intothe sensor.
Find the large engine plugs onthe driver’s side of the engine bay.Figure out which way will make theplugs sit close to the stock config-uration and out of the way.
Connect the EGT lead-wire tothe harness on this side of theengine bay, making sure to feedthe shrink-wrap over the wiringprior to connecting.
Use a heat gun to shrink thewrap onto the wires.
Secure the control unit of theBanks Six-Gun using the providedtape and hook-and-loop style fas-tener. Locate the rubber grommetin the driver’s side firewall andfeed the wiring harness throughthe firewall into the passengercompartment.
EVERYTHING AUTO
74 www.extremehowto.com
EverythingAutoEDIT_Layout 1 4/6/15 1:01 PM Page 74

Remove the screws from thelower portion of the interior panel(near the parking brake and closeto the center console) to accessthe under-dash area for fasteningthe wires and components.
Connect the Banks OBD II inter-face connector harness to the har-ness you ran through the firewallfrom the Power Tuner.
Plug the Banks OBD II interfaceinto the OBD II port on the truck.This allows the unit to use and display a variety of parametersfrom the pickup’s stock computercontrol unit.
Use the supplied cable ties to secure the Banks iQ BridgeModule and other wiring out of the way from damage or potentialinterference with your feet andpedals. Route the power connectorfor the IQ unit up the weatherstripping edge of the dash to wherever you’re going to mountthe unit.Find a good mounting spot
that doesn’t block your vision but allows you to easily see the
gauges and settings the iQ has to offer. The functions of the iQ all work wirelessly so you onlyneed the unit to be plugged in to power it. EHT
www.extremehowto.com 75
EverythingAutoEDIT_Layout 1 4/6/15 1:01 PM Page 75

HOTPRODUCTS
76 www.extremehowto.com
TYTAN SUBFLOOR HIGH YIELD ADHESIVEThe new Tytan Subfloor High Yield Adhesive from Selena USA features innovative col-
lapsing gel adhesive technology specifically formulated for installing subfloor, and otherhorizontal wood panel applications. The collapsing gel technology provides superior yield,maximum strength and gap filling on horizontal applications, and its squeak-preventionproperties are superior to traditional cartridge-applied subfloor adhesives. Its method ofapplication will also save builders and remodelers time and money. Because of its high-yield formulation, just one 29-ounce can of Tytan Subfloor High Yield Adhesive replacestwelve 28-ounce traditional adhesive cartridges. In other words, just one can equals onecase of traditional subfloor adhesive. Visit www.HighYieldAdhesive.com.
VERSATEX PVC CROSSHEAD PEDIMENT
Save labor when installing architecturaltrim get better results with an improved high-density PVC crosshead pediment profile fromVersatex. Leading building-supply dealersacross the U.S.A. now offer it in individuallywrapped 16-foot lengths with a smoothmatte finish. It's easy to cut, miter andinstall, and it’s compatible with standardmillwork tools, techniques and materials. Itdelivers long-lasting curb appeal with zeropainting and minimal maintenance. Visitwww.versatex.com.
MONKEYRACK LADDER STABILIZATION SYSTEMThe patented Monkeyrack Ladder Stabilization System uniquely
bonds a receiver hitch and an extension ladder together, to providesuperior ladder safety, stability and vital fall-protection. The systemis specifically designed to address the critical fall protection needsassociated with improper setup and use of extension ladders.Monkeyrack Products currently offers the Monkeyrack ContractorKit #MCK075, which includes a safety tag that satisfies the lock-out/tag-out requirements and the newest attachment innovation,the Monkeyrack Bolt-on kit. The Monkeyrack Bolt-on kit allows theMonkeyrack to be bolted directly to the receiver hitch while alsoallowing the flexibility to utilize the original hitch-pin attachmentoption. TheMonkeyrack Ladder Stabilizer was recognized with thePeople’s Choice Award for Innovation in Fall Protection at theASSE/ISHN Safety 2014 Conference and Expo. Learn more atwww.monkeyrack.com.
HotProductEDIT_Layout 1 4/6/15 1:02 PM Page 76

www.extremehowto.com 77
SONAR RTU AQUATIC HERBICIDE FOR PONDSFor successful do-it-yourself weed control for ponds, Sonar RTU is a unique Ready-
To-Use formula that controls most troublesome pondweeds, including duckweed.Many pond owners consider duckweed to be their toughest aquatic weed problem.Fortunately, no other aquatic herbicide is more effective; Sonar RTU provides com-plete, long-lasting control of duckweed and other stubborn unwanted aquatic vegeta-tion for a year or longer. Sonar RTU requires no mixing, special spray equipment oreven a boat. Simply open the bottle and treat from the shoreline. The innovative RTUformulation allows anyone to make water usable for recreation, bring fish popula-tions back into balance, and restore property values. Visit www.sepro.com.
“EXPRESS YOURSELF" BY FEENEY Feeney, Inc., manufacturer of CableRail brand stainless steel cable infill and the popular DesignRail alu-
minum railing system, is launching five new colors in the line of DesignRail aluminum railing colors. The newoffering satisfies the popular demand for bold and bright colors in home and building products, giving home-owners and designers a vivid palette of dramatic hues in addition to more traditional colors such as black,bronze and white.
“Homeowners, architects and designers are looking for ways to personalize residential and work spaces.We have added a splash of brilliant color at the railing to give them the inspiration to enliven any indoor oroutdoor living space,” says Andrew Penny, vice president, marketing and advertising.
DesignRail by Feeney is a customized, component-based aluminum railing system. Customers can add inoptional LED lighting and select from multiple mounting, top rail and infill options, including pickets, glass and
CableRail stainless steel cable infill.The “Express Yourself by Feeney”DesignRail line is currently availablein five colors, including Orange YouSassy, Not A Mellow Yellow, Red HotRed, Blazing Blue and MargaritaGreen. All DesignRail railings featurea durable AAMA-2604 powder-coatedfinish for superior color retention,impact resistance and weather pro-tection. Visit www.feeneyinc.com.
HotProductEDIT_Layout 1 4/6/15 1:02 PM Page 77

HOTPRODUCTS
78 www.extremehowto.com
LAND PRIDE SA20 SKID AUGER Land Pride’s SA20 Skid Auger fills a need
for users that require a quality post-holeattachment but don’t require a heavy-duty,commercial-grade SA35 Auger. This lighterplanetary-drive Skid Auger is ideal for landowners, landscapers, hobby farmers or con-tractors. The SA20 digs holes from 9 to 36inches in diameter and up to 48 inchesdeep (or deeper with available auger exten-sions). The SA20 is a versatile and depend-able tool with 10 different augers avail-able—seven double flight augers from 9 to36 in. and three tree augers in 24, 30, and36 in. Visit www.landpride.com.
ECOLIFE STABILIZED WEATHER-RESISTANT WOODAll Treated Wood is not the same. Build better outdoor projects with stabilized treated wood. Ecolife Stabilized
Weather-Resistant Wood (EL2) is an innovative wood-stabilizing preservative system that protects the naturalbeauty of above-ground exterior wood from the harmful effects of weathering, termite attack and decay.Ecolife’s built-in water repellency is pressure-treated throughout the wood, making the structural framing ofevery deck or wooden deck surface more stable, with up to 50 percent less surface cracking and checking
as compared to ordinary treated wood. Ecolife is available at East Coast retailers, lumberyards andhome centers. See the Ecolife performance video at www.treatedwood.com.
HotProductEDIT_Layout 1 4/6/15 1:02 PM Page 78

Advertisers June 2015
American International Tool, Inc. . . . . . . . . . . . . . . . . . . . . . . . . . . . . . . 14Arke . . . . . . . . . . . . . . . . . . . . . . . . . . . . . . . . . . . . . . . . . . . . . . . . . . . . . 17Armstrong Clark . . . . . . . . . . . . . . . . . . . . . . . . . . . . . . . . . . . . . . . . . . . 15Bigfoot Systems . . . . . . . . . . . . . . . . . . . . . . . . . . . . . . . . . . . . . . . . . . . 16Blue Devil Products . . . . . . . . . . . . . . . . . . . . . . . . . . . . . . . . . . . . . 44, 45BrassCraft . . . . . . . . . . . . . . . . . . . . . . . . . . . . . . . . . . . . . . . . . . . . . . . . 28Briwax International, Inc. . . . . . . . . . . . . . . . . . . . . . . . . . . . . . . . . . . . . 65Buddy Tools LLC . . . . . . . . . . . . . . . . . . . . . . . . . . . . . . . . . . . . . . . . . . . 79Calculated Industries . . . . . . . . . . . . . . . . . . . . . . . . . . . . . . . . . . . . . . . 20Centipede Tool . . . . . . . . . . . . . . . . . . . . . . . . . . . . . . . . . . . . . . . . . . . . 41Chennellock. . . . . . . . . . . . . . . . . . . . . . . . . . . . . . . . . . . . . . . . . . . . . . . 51Custom Service Hardware . . . . . . . . . . . . . . . . . . . . . . . . . . . . . . . . . . . 55Deck’s Unlimited. . . . . . . . . . . . . . . . . . . . . . . . . . . . . . . . . . . . . . . . . . . 38Donald Durham Co. . . . . . . . . . . . . . . . . . . . . . . . . . . . . . . . . . . . . . . . . 75Duckback. . . . . . . . . . . . . . . . . . . . . . . . . . . . . . . . . . . . . . . . . . . . . . . . . . 9Dustless Technologies . . . . . . . . . . . . . . . . . . . . . . . . . . . . . . . . . . . . . . 53DuxxBak. . . . . . . . . . . . . . . . . . . . . . . . . . . . . . . . . . . . . . . . . . . . . . . . . . 25Earthway . . . . . . . . . . . . . . . . . . . . . . . . . . . . . . . . . . . . . . . . . . . . . . . . . 27Ego Power Plus . . . . . . . . . . . . . . . . . . . . . . . . . . . . . . . . . . . . . . . . . . . . 35Eterna-Kote . . . . . . . . . . . . . . . . . . . . . . . . . . . . . . . . . . . . . . . . . . . . . . . 39Evapo-Rust . . . . . . . . . . . . . . . . . . . . . . . . . . . . . . . . . . . . . . . . . . . . . . . 26Feeney . . . . . . . . . . . . . . . . . . . . . . . . . . . . . . . . . . . . . . . . . . . . . . . . . . . 13FinPan . . . . . . . . . . . . . . . . . . . . . . . . . . . . . . . . . . . . . . . . . . . . . . . . . . . 59FrogTape . . . . . . . . . . . . . . . . . . . . . . . . . . . . . . . . . . . . . . . . . . . . . . . . . 21General Tools . . . . . . . . . . . . . . . . . . . . . . . . . . . . . . . . . . . . . . . . . . . IFC, 1Gorilla Glue . . . . . . . . . . . . . . . . . . . . . . . . . . . . . . . . . . . . . . . . . . . . . . . 37GRK Fasteners . . . . . . . . . . . . . . . . . . . . . . . . . . . . . . . . . . . . . . . . . . . . . 7Handibot . . . . . . . . . . . . . . . . . . . . . . . . . . . . . . . . . . . . . . . . . . . . . . . . . 10Healthful Home. . . . . . . . . . . . . . . . . . . . . . . . . . . . . . . . . . . . . . . . . . . . 40Hyde Tool . . . . . . . . . . . . . . . . . . . . . . . . . . . . . . . . . . . . . . . . . . . . . . . . . 47Ideal Stair Parts . . . . . . . . . . . . . . . . . . . . . . . . . . . . . . . . . . . . . . . . . . . 62Land Pride . . . . . . . . . . . . . . . . . . . . . . . . . . . . . . . . . . . . . . . . . . . . . . . . 43
Lumber Liquidators. . . . . . . . . . . . . . . . . . . . . . . . . . . . . . . . . . . . . . . . . . 5Mayhew Steel Products, Inc. . . . . . . . . . . . . . . . . . . . . . . . . . . . . . . . . . 23Maze Nails. . . . . . . . . . . . . . . . . . . . . . . . . . . . . . . . . . . . . . . . . . . . . . . . 19Metal Ceiling Express . . . . . . . . . . . . . . . . . . . . . . . . . . . . . . . . . . . . . . . 18Mister Boardwalk . . . . . . . . . . . . . . . . . . . . . . . . . . . . . . . . . . . . . . . . . . 71Monkeyrack. . . . . . . . . . . . . . . . . . . . . . . . . . . . . . . . . . . . . . . . . . . . . . . 52Mr. Beams . . . . . . . . . . . . . . . . . . . . . . . . . . . . . . . . . . . . . . . . . . . . . . . . 73Nick’s Building Supply, Inc. . . . . . . . . . . . . . . . . . . . . . . . . . . . . . . . . . . 42O’Berry Enterprises, Inc. . . . . . . . . . . . . . . . . . . . . . . . . . . . . . . . . . . . . 67Oneida Air Systems. . . . . . . . . . . . . . . . . . . . . . . . . . . . . . . . . . . . . . . . . 61PacTool . . . . . . . . . . . . . . . . . . . . . . . . . . . . . . . . . . . . . . . . . . . . . . . . . . 52Paint Glider . . . . . . . . . . . . . . . . . . . . . . . . . . . . . . . . . . . . . . . . . . . . . . . 62Paint Piranha . . . . . . . . . . . . . . . . . . . . . . . . . . . . . . . . . . . . . . . . . . . . . 67Plastpro . . . . . . . . . . . . . . . . . . . . . . . . . . . . . . . . . . . . . . . . . . . . . . . . . . 69Ready Seal. . . . . . . . . . . . . . . . . . . . . . . . . . . . . . . . . . . . . . . . . . . . . . . . 24SafeRacks . . . . . . . . . . . . . . . . . . . . . . . . . . . . . . . . . . . . . . . . . . . . . . . . 70Sakrete . . . . . . . . . . . . . . . . . . . . . . . . . . . . . . . . . . . . . . . . . . . . . . . . . . 80Sashco. . . . . . . . . . . . . . . . . . . . . . . . . . . . . . . . . . . . . . . . . . . . . . . . . . . BCSpecification Chemicals, Inc.. . . . . . . . . . . . . . . . . . . . . . . . . . . . . . . . . 78Stainable Primer . . . . . . . . . . . . . . . . . . . . . . . . . . . . . . . . . . . . . . . . . . . 38Starrett . . . . . . . . . . . . . . . . . . . . . . . . . . . . . . . . . . . . . . . . . . . . . . . . . . 54TG Tools . . . . . . . . . . . . . . . . . . . . . . . . . . . . . . . . . . . . . . . . . . . . . . . . . 2, 3The Cornice Store . . . . . . . . . . . . . . . . . . . . . . . . . . . . . . . . . . . . . . . . . . 79TimberTech. . . . . . . . . . . . . . . . . . . . . . . . . . . . . . . . . . . . . . . . . . . . . . . IBCTjernlund Products, Inc. . . . . . . . . . . . . . . . . . . . . . . . . . . . . . . . . . . . . . 63Top Bulb. . . . . . . . . . . . . . . . . . . . . . . . . . . . . . . . . . . . . . . . . . . . . . . . . . 14Tub O’ Towels . . . . . . . . . . . . . . . . . . . . . . . . . . . . . . . . . . . . . . . . . . . . . 49UGL . . . . . . . . . . . . . . . . . . . . . . . . . . . . . . . . . . . . . . . . . . . . . . . . . . . . . 36VamPLIERS . . . . . . . . . . . . . . . . . . . . . . . . . . . . . . . . . . . . . . . . . . . . . . . . 8Western Timber Frame. . . . . . . . . . . . . . . . . . . . . . . . . . . . . . . . . . . . . . 29WM Coffman . . . . . . . . . . . . . . . . . . . . . . . . . . . . . . . . . . . . . . . . . . . . . . 11
www.extremehowto.com 79
• No Sewing • Professional Looking
• Easy to Install • Fun to Create
• Includes Instructional DVD
623-556-5713
The
CorniceStore
Assemble, Decorate, Hang - That's all there is to it! www.cornicestore.com
DIY StyrofoamCornice Kits
HotProductEDIT_Layout 1 4/6/15 1:02 PM Page 79

SakreteFP_Layout 1 4/6/15 1:33 PM Page 80

TimberTechFP_Layout 1 4/6/15 1:34 PM Page IBC1

SashcoFP_Layout 1 4/6/15 1:33 PM Page BC1

Full Page_Layout 1 4/29/15 1:35 PM Page 1