hitachi data ingestor hyper v installation guide data ingestor single node getting started guide...
TRANSCRIPT
Hitachi Data Ingestor Hyper-V Installation Guide
1
All Rights Reserved, Copyright Ⓒ 2015, Hitachi, Ltd.
Hitachi Data Ingestor
Hyper-V Installation Guide
Hitachi, Ltd., IT Platform Division Group
Hitachi Data Ingestor Hyper-V Installation Guide
2
All Rights Reserved, Copyright Ⓒ 2015, Hitachi, Ltd.
1. Overview ............................................................................................................................................................3
1.1. Purpose of this document ..........................................................................................................................3
1.2. Intended audience .....................................................................................................................................3
1.3. Related document ......................................................................................................................................3
1.4. The intended version of HDI ....................................................................................................................3
1.5. Trademarks ................................................................................................................................................3
1.6. Document Revision History ......................................................................................................................4
2. Overview of VMA ..............................................................................................................................................5
2.1. Overview of system configuration ............................................................................................................5
2.2. Application hardware ................................................................................................................................5
2.3. Differences between VMA and HDI in a single-node configuration ......................................................6
2.4. Supported virtual machine setting values ..............................................................................................6
3. Hyper-V installation procedure .......................................................................................................................8
4. Creating a virtual machine ............................................................................................................................16
5. Installing HDI .................................................................................................................................................25
6. Update installation of HDI ............................................................................................................................30
7. Live migration .................................................................................................................................................30
7.1. Connecting the host .................................................................................................................................31
7.2. Enabling the live migration function .....................................................................................................32
7.3. Performing a live migration ....................................................................................................................34
8. Troubleshooting ...............................................................................................................................................37
9. Support coverage ............................................................................................................................................38
Hitachi Data Ingestor Hyper-V Installation Guide
3
All Rights Reserved, Copyright Ⓒ 2015, Hitachi, Ltd.
1. Overview
1.1. Purpose of this document
This is a guide for installing Hitachi Data Ingestor (HDI) on Hyper-V. Hereafter, instances of HDI installed
on Hyper-V are referred to as “VMA”. This guide is intended to explain the following information about
installation:
Applicable virtual machine environment
Procedure for setting up HDI on Hyper-V
1.2. Intended audience
Users who have a basic knowledge of virtual machine operation by using Hyper-V.
A person who has acquired knowledge described in Hitachi Data Ingestor User’s Guide for
Single Node.
1.3. Related document
This guide is based on the following documents:
Hitachi Data Ingestor Installation and Configuration Guide
Hitachi Data Ingestor User’s Guide for Single Node Configuration
Hitachi Data Ingestor Single Node Getting Started Guide
1.4. The intended version of HDI
This document revision applies to the installation of Hitachi Data Ingestor version 6.0.0-00 or later.
1.5. Trademarks
Intel, Xeon, and Itanium are trademarks or registered trademarks of Intel Corporation or its
subsidiary in the United States and other countries.
Linux is a trademark or a registered trademark of Linus Torvalds in the United States and
other countries.
Microsoft, Windows, and Windows Server are trademarks or registered trademarks of
Microsoft Corporation in the United States and other countries.
VMware is a trademark or a registered trademark of VMware, Inc. in the United States and
other countries.
All other brand or product names are or may be trademarks or service marks of and are used to
identify products or services of their respective owners.
Hitachi Data Ingestor Hyper-V Installation Guide
4
All Rights Reserved, Copyright Ⓒ 2015, Hitachi, Ltd.
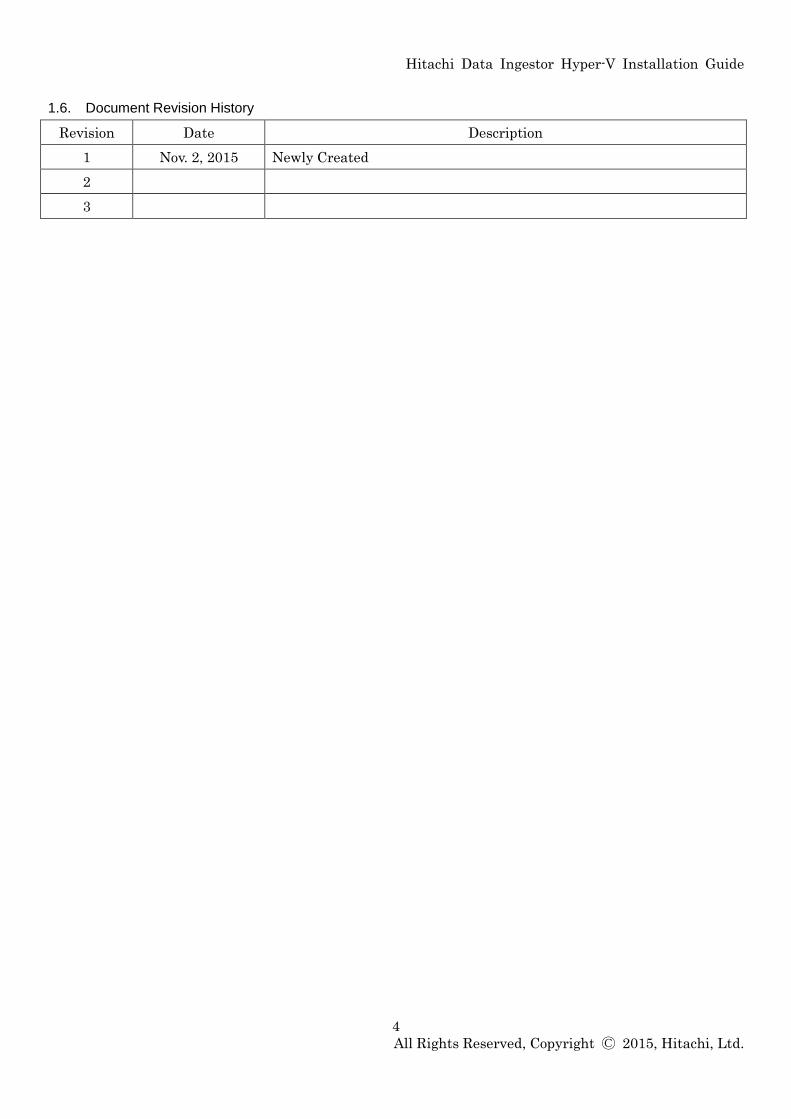
1.6. Document Revision History
Revision Date Description
1 Nov. 2, 2015 Newly Created
2
3
Hitachi Data Ingestor Hyper-V Installation Guide
5
All Rights Reserved, Copyright Ⓒ 2015, Hitachi, Ltd.
2. Overview of VMA
Hyper-V is a virtual platform environment that runs on Windows Server 2012 R2.
VMA is executed as a guest OS on Hyper-V. VMA, and HDI in a single-node configuration, both provide the
same functionality.
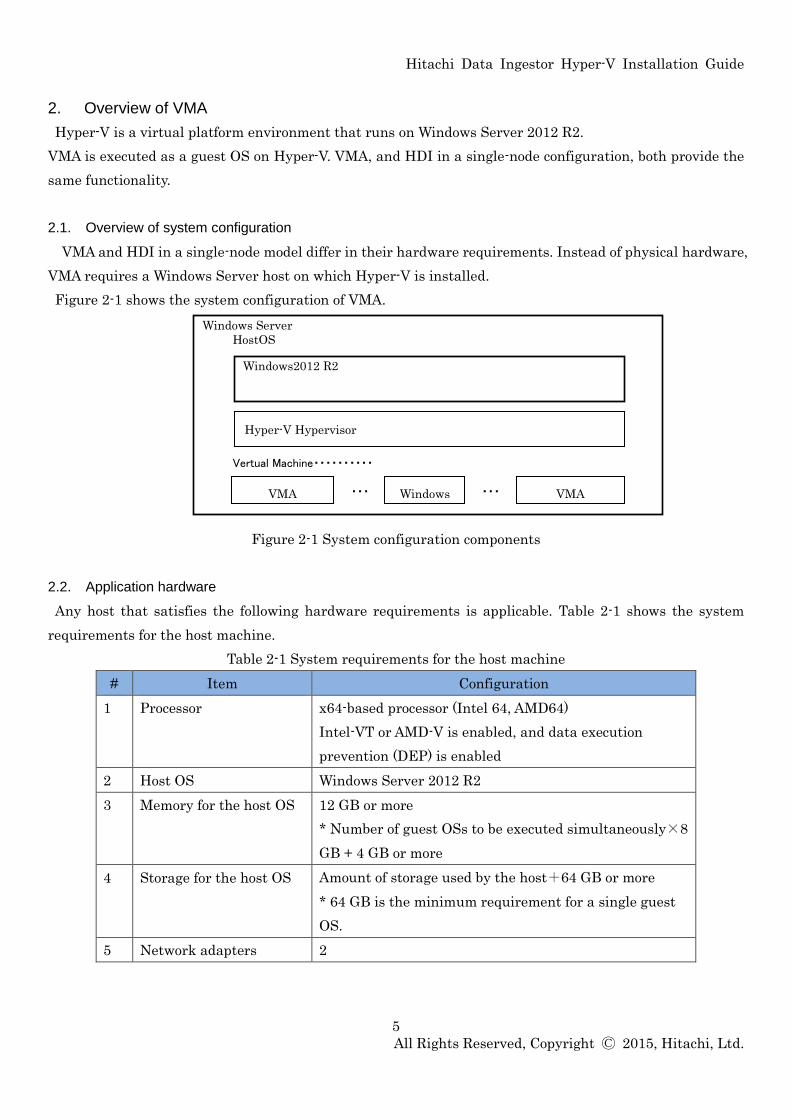
2.1. Overview of system configuration
VMA and HDI in a single-node model differ in their hardware requirements. Instead of physical hardware,
VMA requires a Windows Server host on which Hyper-V is installed.
Figure 2-1 shows the system configuration of VMA.
Figure 2-1 System configuration components
2.2. Application hardware
Any host that satisfies the following hardware requirements is applicable. Table 2-1 shows the system
requirements for the host machine.
Table 2-1 System requirements for the host machine
# Item Configuration
1 Processor x64-based processor (Intel 64, AMD64)
Intel-VT or AMD-V is enabled, and data execution
prevention (DEP) is enabled
2 Host OS Windows Server 2012 R2
3 Memory for the host OS 12 GB or more
* Number of guest OSs to be executed simultaneously×8
GB + 4 GB or more
4 Storage for the host OS Amount of storage used by the host+64 GB or more
* 64 GB is the minimum requirement for a single guest
OS.
5 Network adapters 2
Windows Server
HostOS
Vertual Machine・・・・・・・・・・
Windows2012 R2
Hyper-V Hypervisor
VMA Windows VMA
・・・ ・・・

Hitachi Data Ingestor Hyper-V Installation Guide
6
All Rights Reserved, Copyright Ⓒ 2015, Hitachi, Ltd.
2.3. Differences between VMA and HDI in a single-node configuration
Compared to HDI in a single-node configuration, VMA has the following characteristics:
Tagged VLAN, link aggregation, line redundancy, and negotiation mode cannot be set in VMA.
These functions can be set in the host.
Performance depends on the load on the Hyper-V host.
The speed of "Ethernet Interface" in the Network tab of VMA is always displayed as "--".
The link speed of "Network Interface" displayed when the hwstatus command of VMA is
executed is always displayed as "-".
Media type, Negotiation mode, Speed, and Duplex in the List of Data Ports window of VMA are
always displayed as "-".
VMA’s performance in hardware failure monitoring is lower than that of HDI in a single-node configuration.
2.4. Supported virtual machine setting values
Table 2-2 shows the supported virtual machine setting values.
Table 2-2 Supported virtual machine setting values
# Item Configuration Remarks
1 Virtual machine
generation
Generation 1 Generation 2 is not supported.
2 Number of processors 2 or more
3 Memory 8192 MB or
more
4 IDE controllers 2
5 SCSI controllers 1 Multiple SCSI controllers are not supported.
6 Number of
virtual disks
OS LUs 1 Create this item on 0 of IDE controller 0
(mandatory).
Shared
LUs
1 Create this item on 0 of the SCSI controller
(mandatory).
User LUs 1 to 63 Create this item on 1 to 63 of the SCSI
controller.
At least 1 user LU is required.
7 Virtual disk
capacity (*1)
OS LUs 26 GB or more Fixed capacity
Shared
LUs
36 GB or more Fixed capacity
User LUs 2 GB or more Fixed capacity
8 Disk type VHD
9 Network Adapters 2
10 CD/DVD Drives 1 Create this item on 0 of IDE controller 1.
Hitachi Data Ingestor Hyper-V Installation Guide
7
All Rights Reserved, Copyright Ⓒ 2015, Hitachi, Ltd.
Map the ISO image.
Note:
*1: Virtual disk capacity cannot be extended after installation. Estimate the required capacity of user LUs
before installation
Hitachi Data Ingestor Hyper-V Installation Guide
8
All Rights Reserved, Copyright Ⓒ 2015, Hitachi, Ltd.
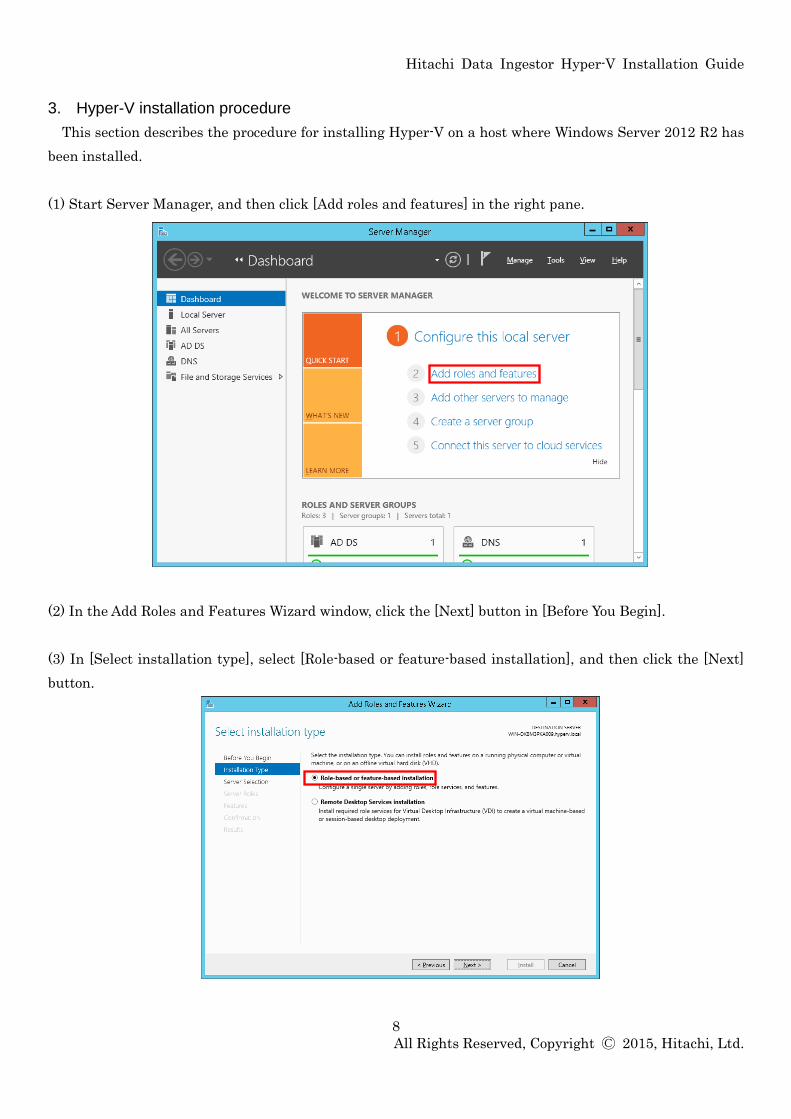
3. Hyper-V installation procedure
This section describes the procedure for installing Hyper-V on a host where Windows Server 2012 R2 has
been installed.
(1) Start Server Manager, and then click [Add roles and features] in the right pane.
(2) In the Add Roles and Features Wizard window, click the [Next] button in [Before You Begin].
(3) In [Select installation type], select [Role-based or feature-based installation], and then click the [Next]
button.
Hitachi Data Ingestor Hyper-V Installation Guide
9
All Rights Reserved, Copyright Ⓒ 2015, Hitachi, Ltd.
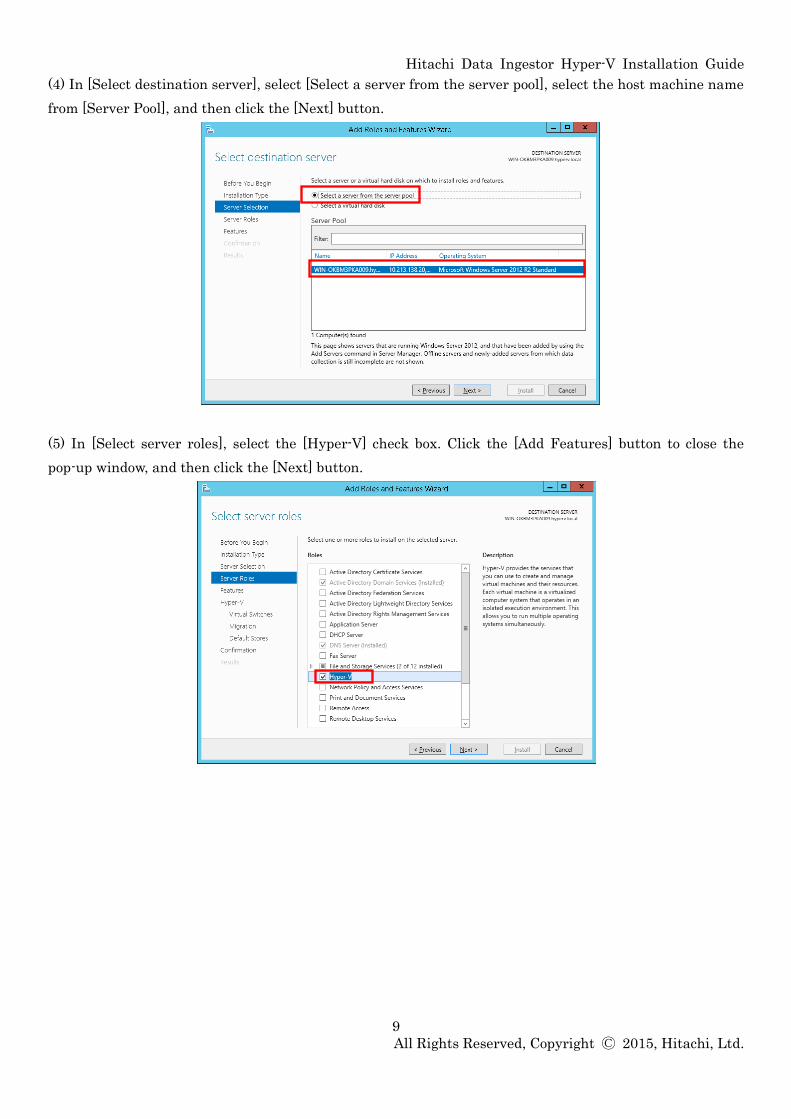
(4) In [Select destination server], select [Select a server from the server pool], select the host machine name
from [Server Pool], and then click the [Next] button.
(5) In [Select server roles], select the [Hyper-V] check box. Click the [Add Features] button to close the
pop-up window, and then click the [Next] button.
Hitachi Data Ingestor Hyper-V Installation Guide
10
All Rights Reserved, Copyright Ⓒ 2015, Hitachi, Ltd.
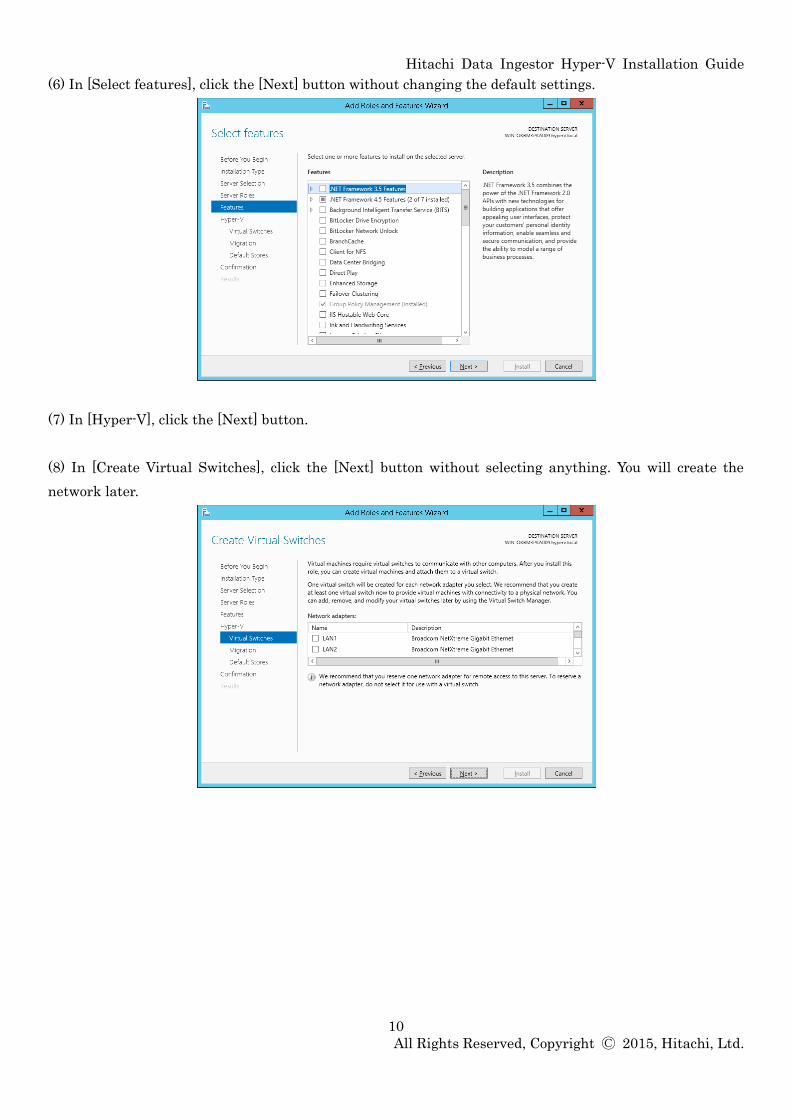
(6) In [Select features], click the [Next] button without changing the default settings.
(7) In [Hyper-V], click the [Next] button.
(8) In [Create Virtual Switches], click the [Next] button without selecting anything. You will create the
network later.
Hitachi Data Ingestor Hyper-V Installation Guide
11
All Rights Reserved, Copyright Ⓒ 2015, Hitachi, Ltd.
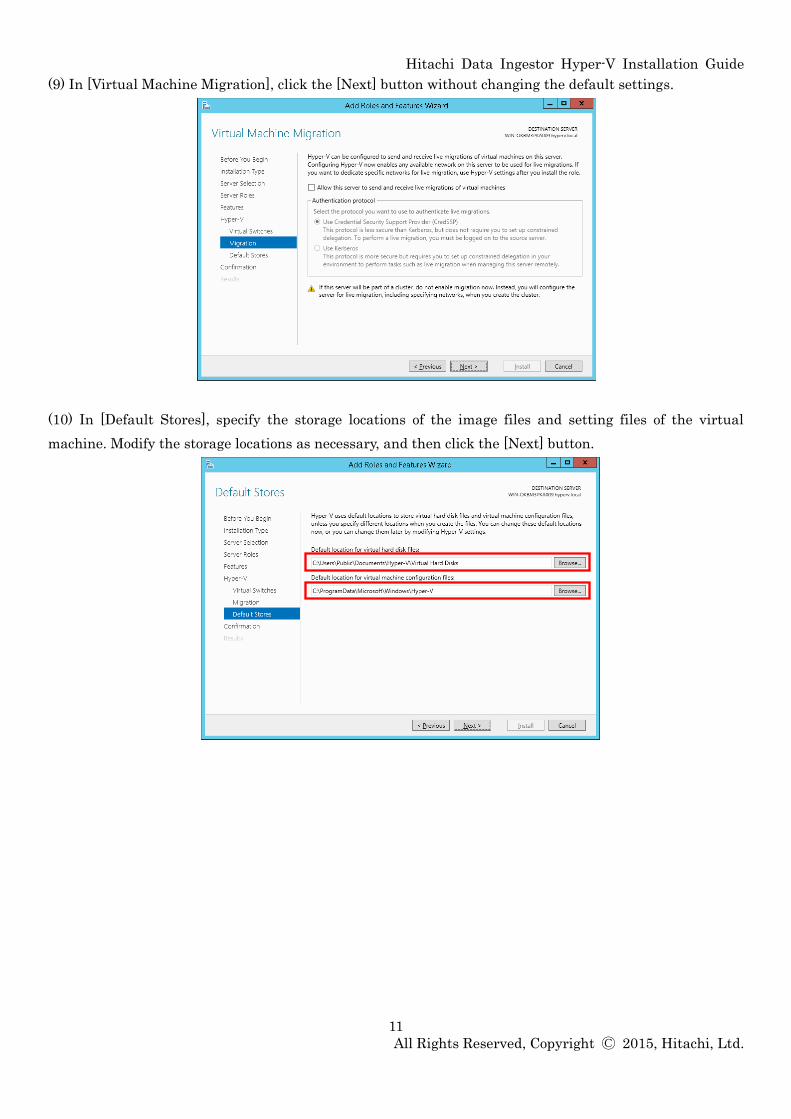
(9) In [Virtual Machine Migration], click the [Next] button without changing the default settings.
(10) In [Default Stores], specify the storage locations of the image files and setting files of the virtual
machine. Modify the storage locations as necessary, and then click the [Next] button.

Hitachi Data Ingestor Hyper-V Installation Guide
12
All Rights Reserved, Copyright Ⓒ 2015, Hitachi, Ltd.
(11) In [Confirm installation selections], select the [Restart the destination server automatically if required]
check box (because the host OS needs to be restarted after installation), and then click the [Install] button.
(12) After the restart is completed, in [Installation progress], click the [Close] button to close the window.
Hitachi Data Ingestor Hyper-V Installation Guide
13
All Rights Reserved, Copyright Ⓒ 2015, Hitachi, Ltd.
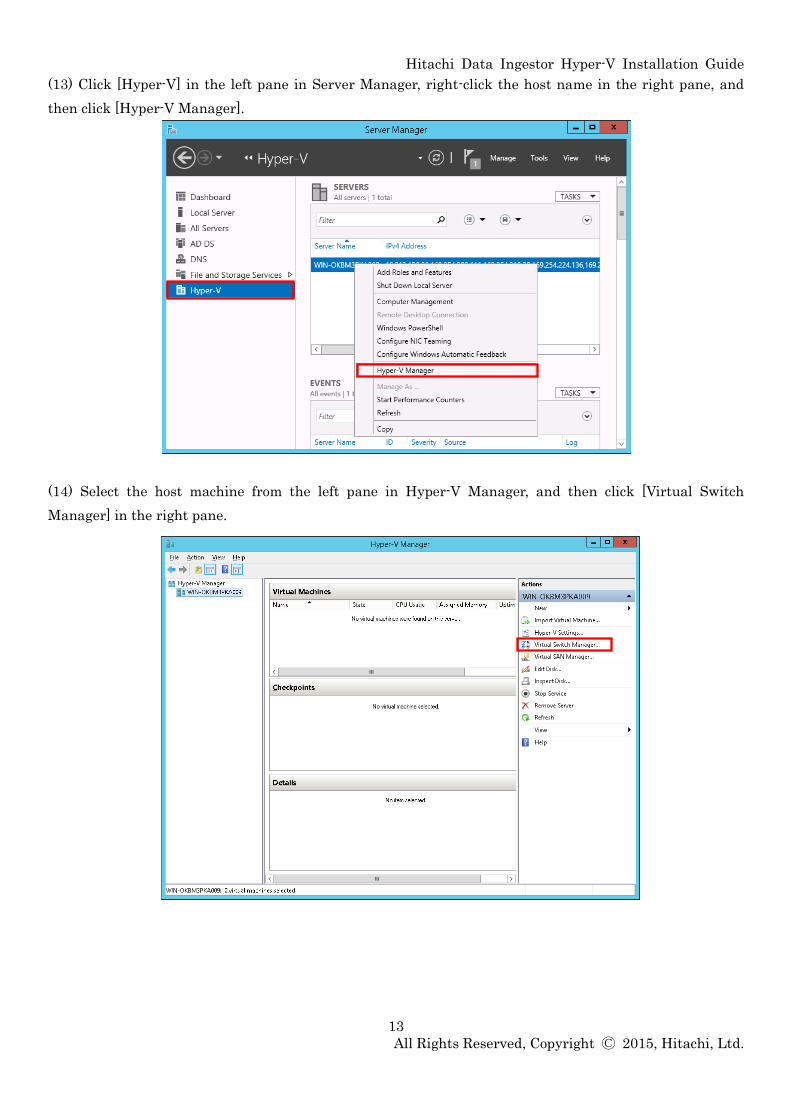
(13) Click [Hyper-V] in the left pane in Server Manager, right-click the host name in the right pane, and
then click [Hyper-V Manager].
(14) Select the host machine from the left pane in Hyper-V Manager, and then click [Virtual Switch
Manager] in the right pane.
Hitachi Data Ingestor Hyper-V Installation Guide
14
All Rights Reserved, Copyright Ⓒ 2015, Hitachi, Ltd.
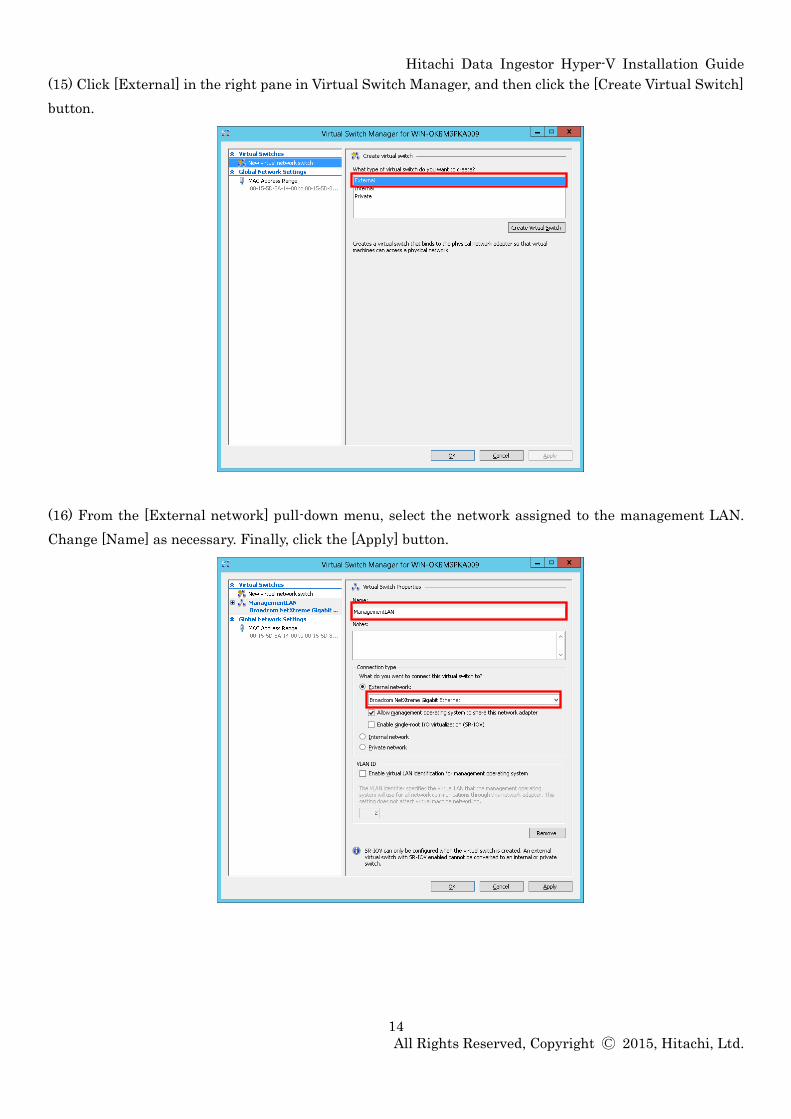
(15) Click [External] in the right pane in Virtual Switch Manager, and then click the [Create Virtual Switch]
button.
(16) From the [External network] pull-down menu, select the network assigned to the management LAN.
Change [Name] as necessary. Finally, click the [Apply] button.
Hitachi Data Ingestor Hyper-V Installation Guide
15
All Rights Reserved, Copyright Ⓒ 2015, Hitachi, Ltd.
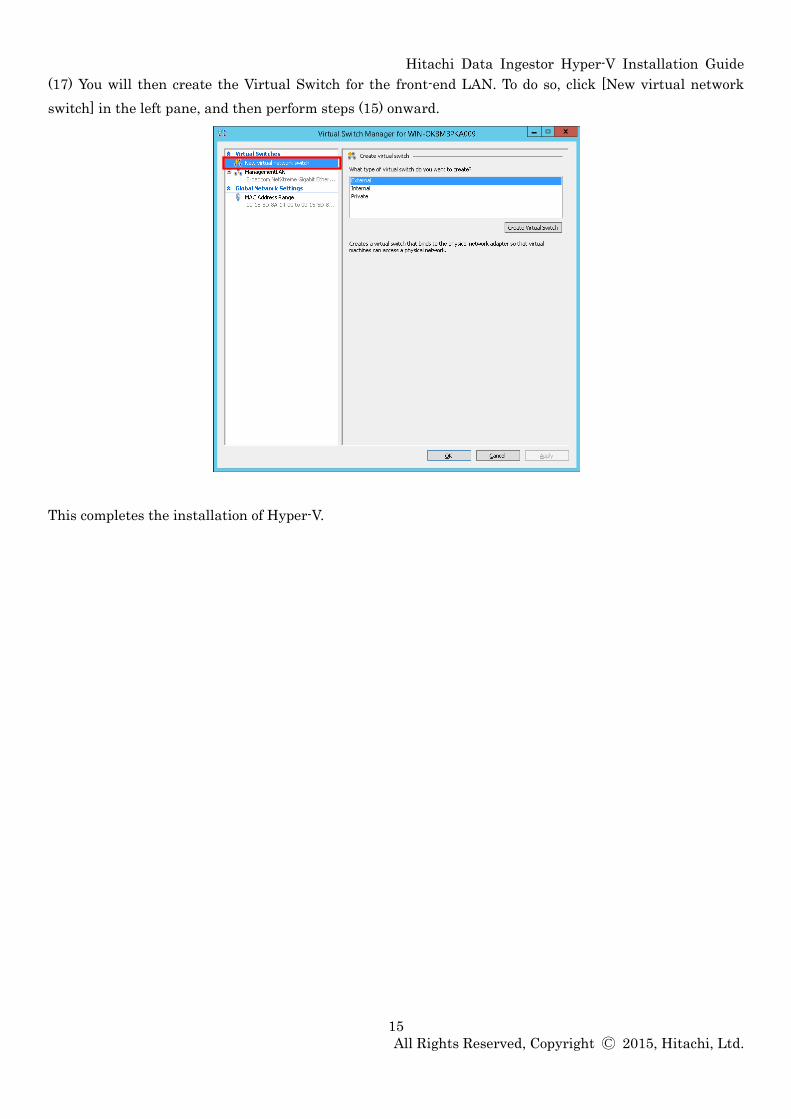
(17) You will then create the Virtual Switch for the front-end LAN. To do so, click [New virtual network
switch] in the left pane, and then perform steps (15) onward.
This completes the installation of Hyper-V.
Hitachi Data Ingestor Hyper-V Installation Guide
16
All Rights Reserved, Copyright Ⓒ 2015, Hitachi, Ltd.
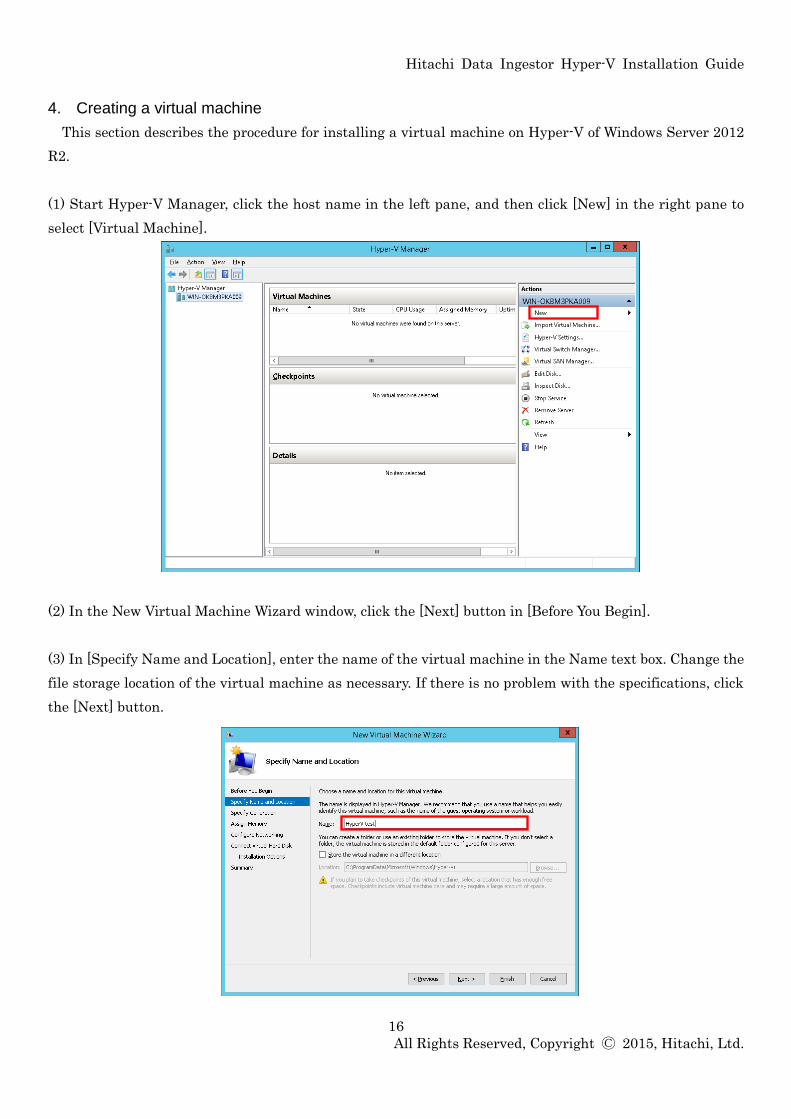
4. Creating a virtual machine
This section describes the procedure for installing a virtual machine on Hyper-V of Windows Server 2012
R2.
(1) Start Hyper-V Manager, click the host name in the left pane, and then click [New] in the right pane to
select [Virtual Machine].
(2) In the New Virtual Machine Wizard window, click the [Next] button in [Before You Begin].
(3) In [Specify Name and Location], enter the name of the virtual machine in the Name text box. Change the
file storage location of the virtual machine as necessary. If there is no problem with the specifications, click
the [Next] button.
Hitachi Data Ingestor Hyper-V Installation Guide
17
All Rights Reserved, Copyright Ⓒ 2015, Hitachi, Ltd.
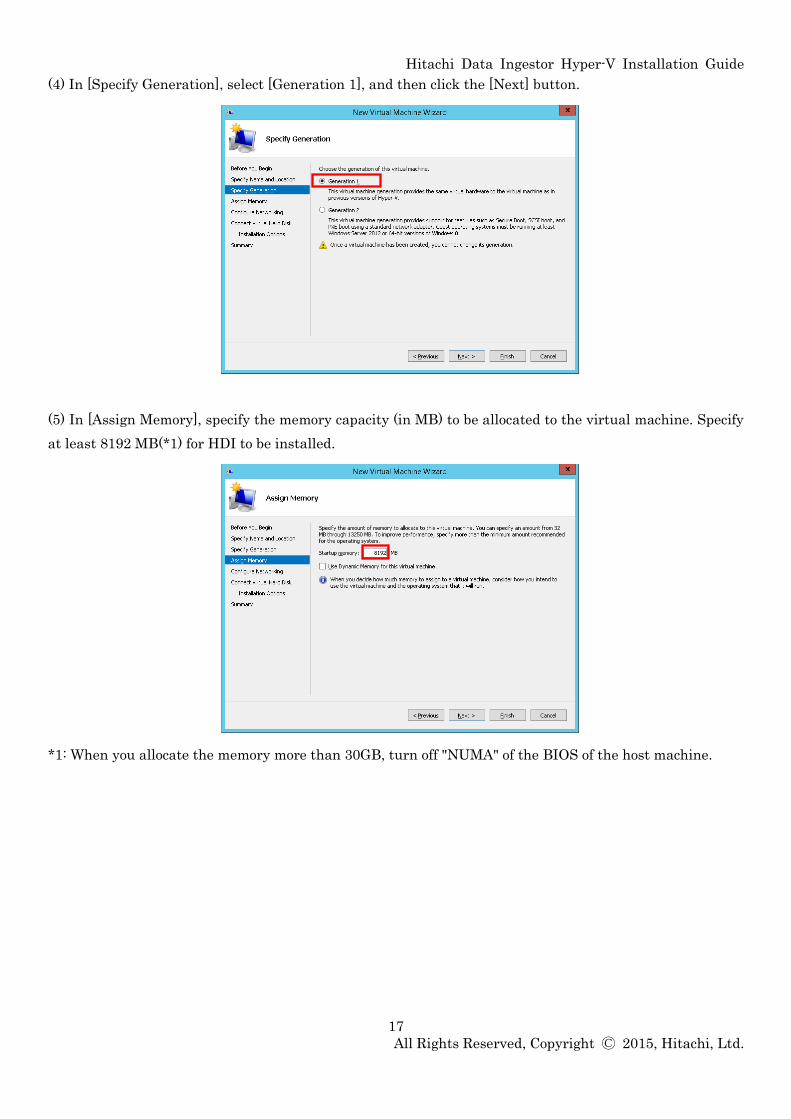
(4) In [Specify Generation], select [Generation 1], and then click the [Next] button.
(5) In [Assign Memory], specify the memory capacity (in MB) to be allocated to the virtual machine. Specify
at least 8192 MB(*1) for HDI to be installed.
*1: When you allocate the memory more than 30GB, turn off "NUMA" of the BIOS of the host machine.
Hitachi Data Ingestor Hyper-V Installation Guide
18
All Rights Reserved, Copyright Ⓒ 2015, Hitachi, Ltd.
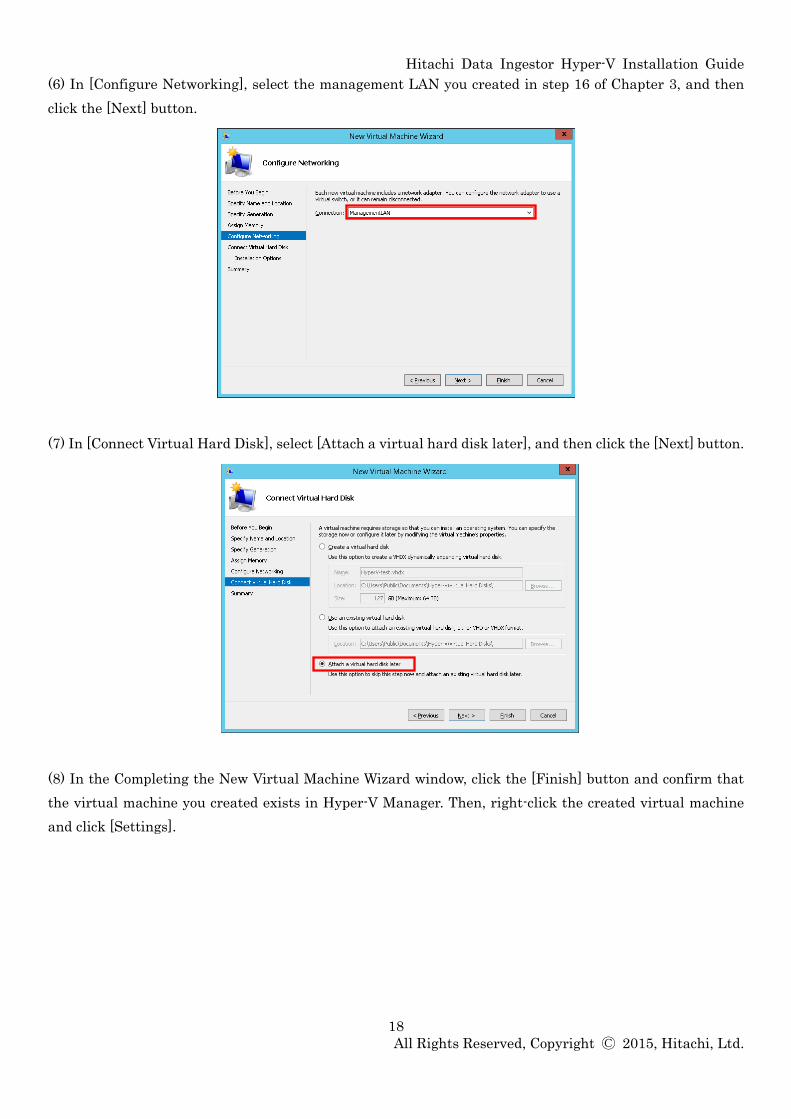
(6) In [Configure Networking], select the management LAN you created in step 16 of Chapter 3, and then
click the [Next] button.
(7) In [Connect Virtual Hard Disk], select [Attach a virtual hard disk later], and then click the [Next] button.
(8) In the Completing the New Virtual Machine Wizard window, click the [Finish] button and confirm that
the virtual machine you created exists in Hyper-V Manager. Then, right-click the created virtual machine
and click [Settings].

Hitachi Data Ingestor Hyper-V Installation Guide
19
All Rights Reserved, Copyright Ⓒ 2015, Hitachi, Ltd.
(9) Select [IDE Controller 0] in the left pane in the Settings window, select [Hard Drive] in the right pane,
and then click the [Add] button.
(10) Select [0 (in use)] for [Location], and then click the [New] button under the [Virtual hard disk] field.
(11) In [Before You Begin] in the New Virtual Hard Disk Wizard window, click the [Next] button.
Hitachi Data Ingestor Hyper-V Installation Guide
20
All Rights Reserved, Copyright Ⓒ 2015, Hitachi, Ltd.
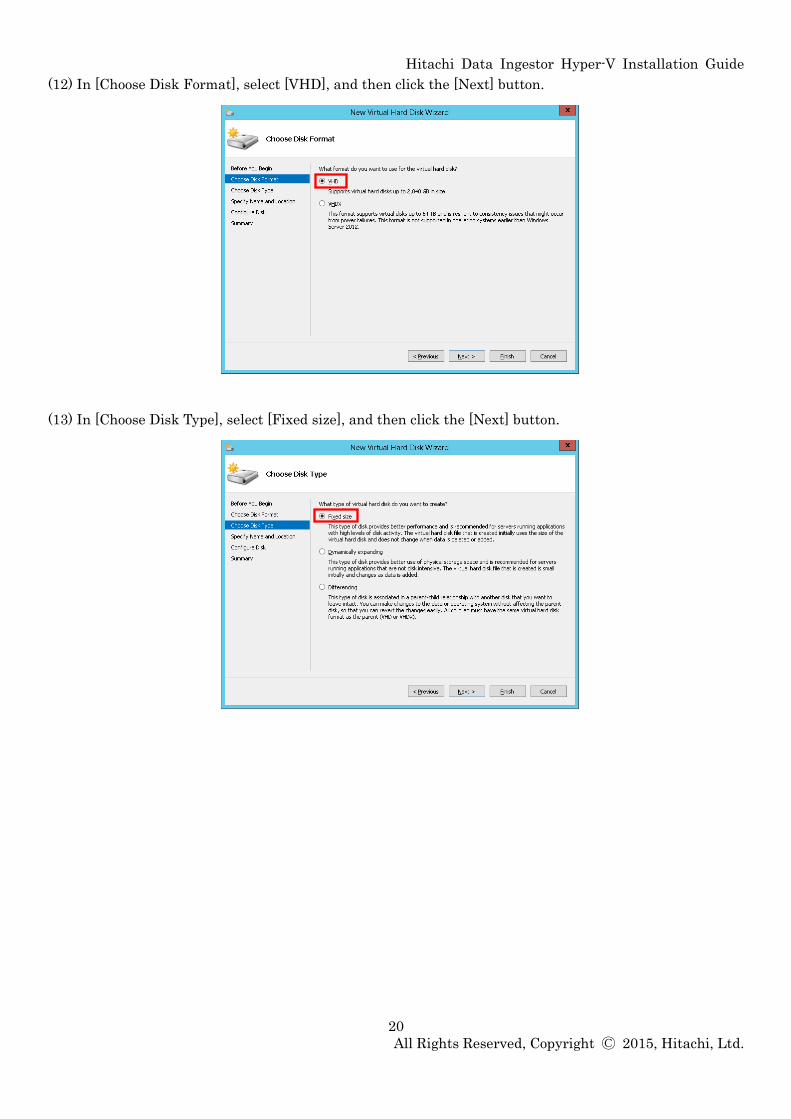
(12) In [Choose Disk Format], select [VHD], and then click the [Next] button.
(13) In [Choose Disk Type], select [Fixed size], and then click the [Next] button.
Hitachi Data Ingestor Hyper-V Installation Guide
21
All Rights Reserved, Copyright Ⓒ 2015, Hitachi, Ltd.
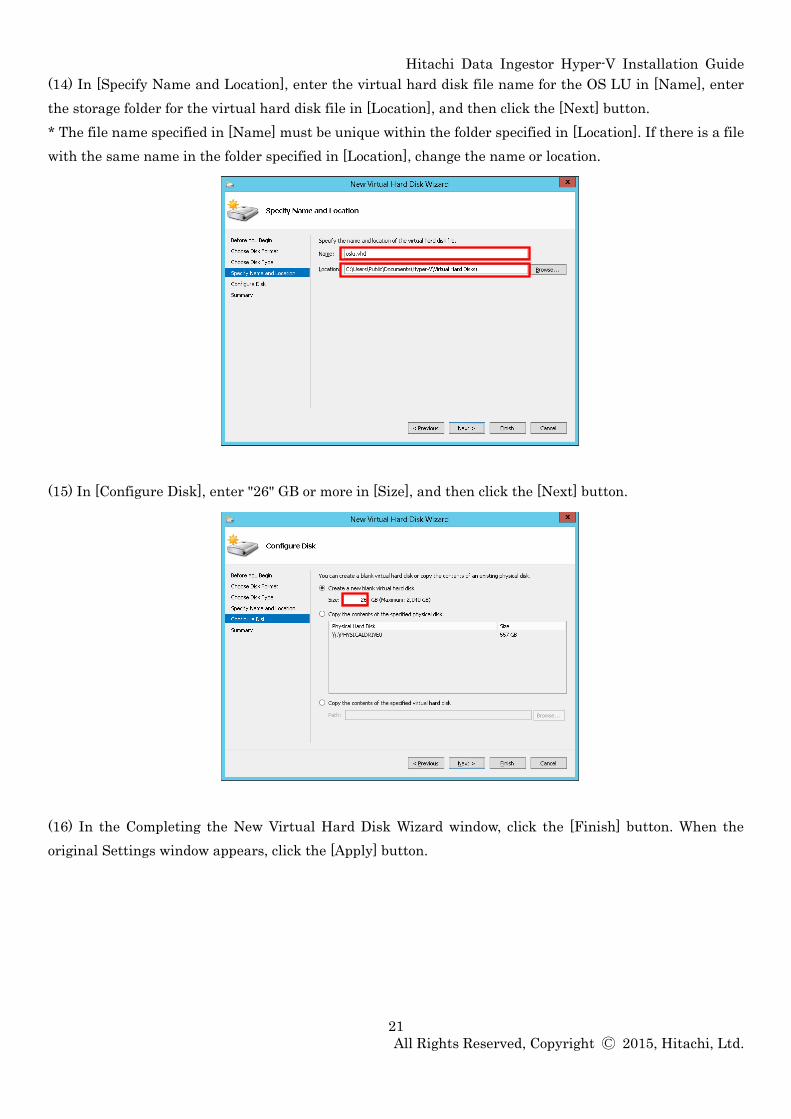
(14) In [Specify Name and Location], enter the virtual hard disk file name for the OS LU in [Name], enter
the storage folder for the virtual hard disk file in [Location], and then click the [Next] button.
* The file name specified in [Name] must be unique within the folder specified in [Location]. If there is a file
with the same name in the folder specified in [Location], change the name or location.
(15) In [Configure Disk], enter "26" GB or more in [Size], and then click the [Next] button.
(16) In the Completing the New Virtual Hard Disk Wizard window, click the [Finish] button. When the
original Settings window appears, click the [Apply] button.
Hitachi Data Ingestor Hyper-V Installation Guide
22
All Rights Reserved, Copyright Ⓒ 2015, Hitachi, Ltd.
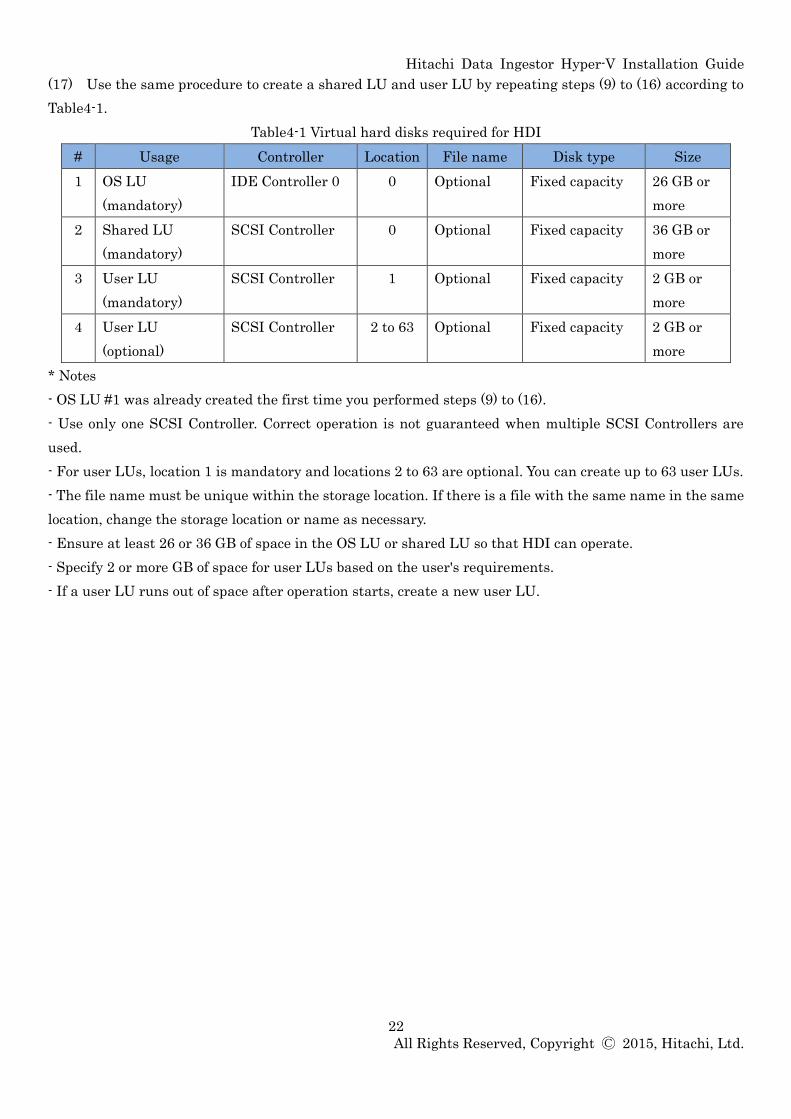
(17) Use the same procedure to create a shared LU and user LU by repeating steps (9) to (16) according to
Table4-1.
Table4-1 Virtual hard disks required for HDI
# Usage Controller Location File name Disk type Size
1 OS LU
(mandatory)
IDE Controller 0 0 Optional Fixed capacity 26 GB or
more
2 Shared LU
(mandatory)
SCSI Controller 0 Optional Fixed capacity 36 GB or
more
3 User LU
(mandatory)
SCSI Controller 1 Optional Fixed capacity 2 GB or
more
4 User LU
(optional)
SCSI Controller 2 to 63 Optional Fixed capacity 2 GB or
more
* Notes
- OS LU #1 was already created the first time you performed steps (9) to (16).
- Use only one SCSI Controller. Correct operation is not guaranteed when multiple SCSI Controllers are
used.
- For user LUs, location 1 is mandatory and locations 2 to 63 are optional. You can create up to 63 user LUs.
- The file name must be unique within the storage location. If there is a file with the same name in the same
location, change the storage location or name as necessary.
- Ensure at least 26 or 36 GB of space in the OS LU or shared LU so that HDI can operate.
- Specify 2 or more GB of space for user LUs based on the user's requirements.
- If a user LU runs out of space after operation starts, create a new user LU.
Hitachi Data Ingestor Hyper-V Installation Guide
23
All Rights Reserved, Copyright Ⓒ 2015, Hitachi, Ltd.
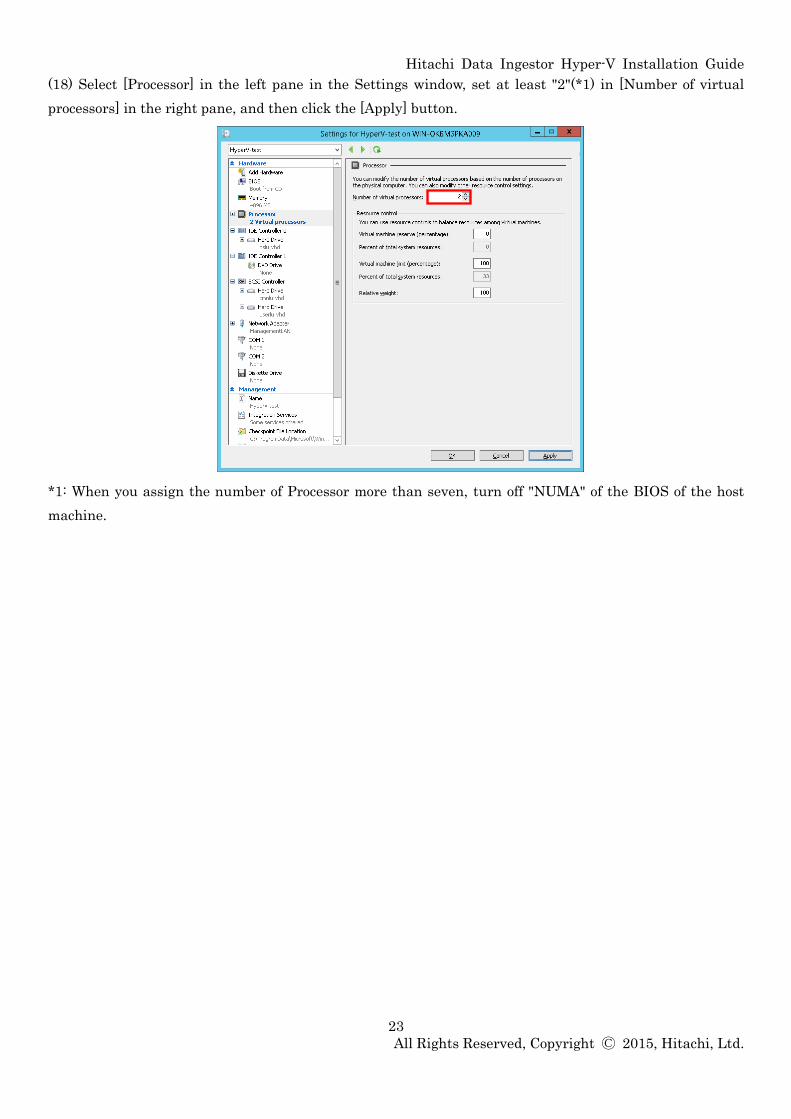
(18) Select [Processor] in the left pane in the Settings window, set at least "2"(*1) in [Number of virtual
processors] in the right pane, and then click the [Apply] button.
*1: When you assign the number of Processor more than seven, turn off "NUMA" of the BIOS of the host
machine.
Hitachi Data Ingestor Hyper-V Installation Guide
24
All Rights Reserved, Copyright Ⓒ 2015, Hitachi, Ltd.
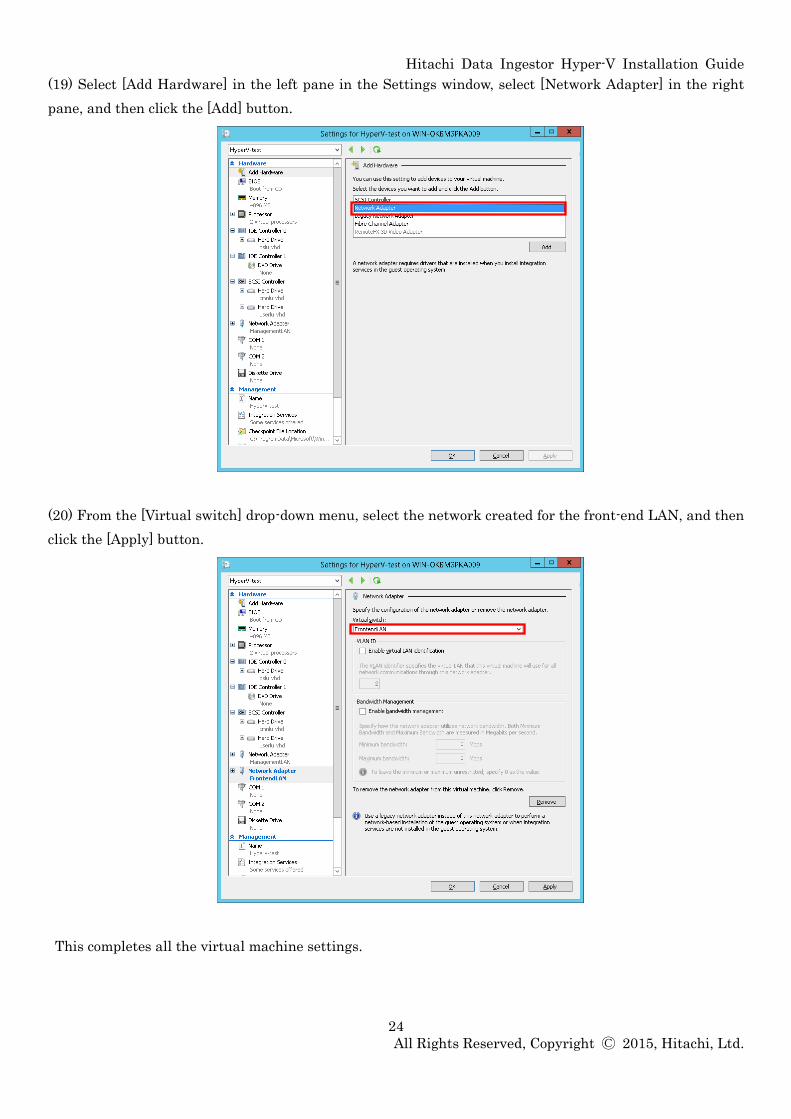
(19) Select [Add Hardware] in the left pane in the Settings window, select [Network Adapter] in the right
pane, and then click the [Add] button.
(20) From the [Virtual switch] drop-down menu, select the network created for the front-end LAN, and then
click the [Apply] button.
This completes all the virtual machine settings.
Hitachi Data Ingestor Hyper-V Installation Guide
25
All Rights Reserved, Copyright Ⓒ 2015, Hitachi, Ltd.
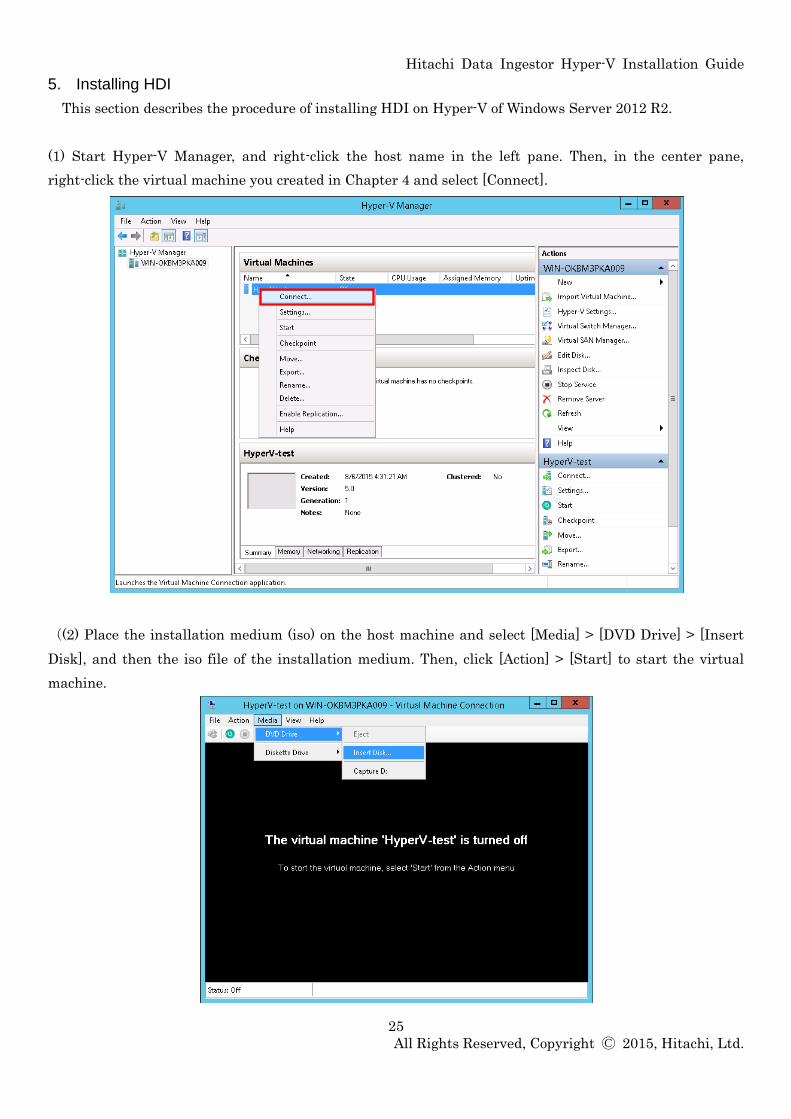
5. Installing HDI
This section describes the procedure of installing HDI on Hyper-V of Windows Server 2012 R2.
(1) Start Hyper-V Manager, and right-click the host name in the left pane. Then, in the center pane,
right-click the virtual machine you created in Chapter 4 and select [Connect].
((2) Place the installation medium (iso) on the host machine and select [Media] > [DVD Drive] > [Insert
Disk], and then the iso file of the installation medium. Then, click [Action] > [Start] to start the virtual
machine.
Hitachi Data Ingestor Hyper-V Installation Guide
26
All Rights Reserved, Copyright Ⓒ 2015, Hitachi, Ltd.
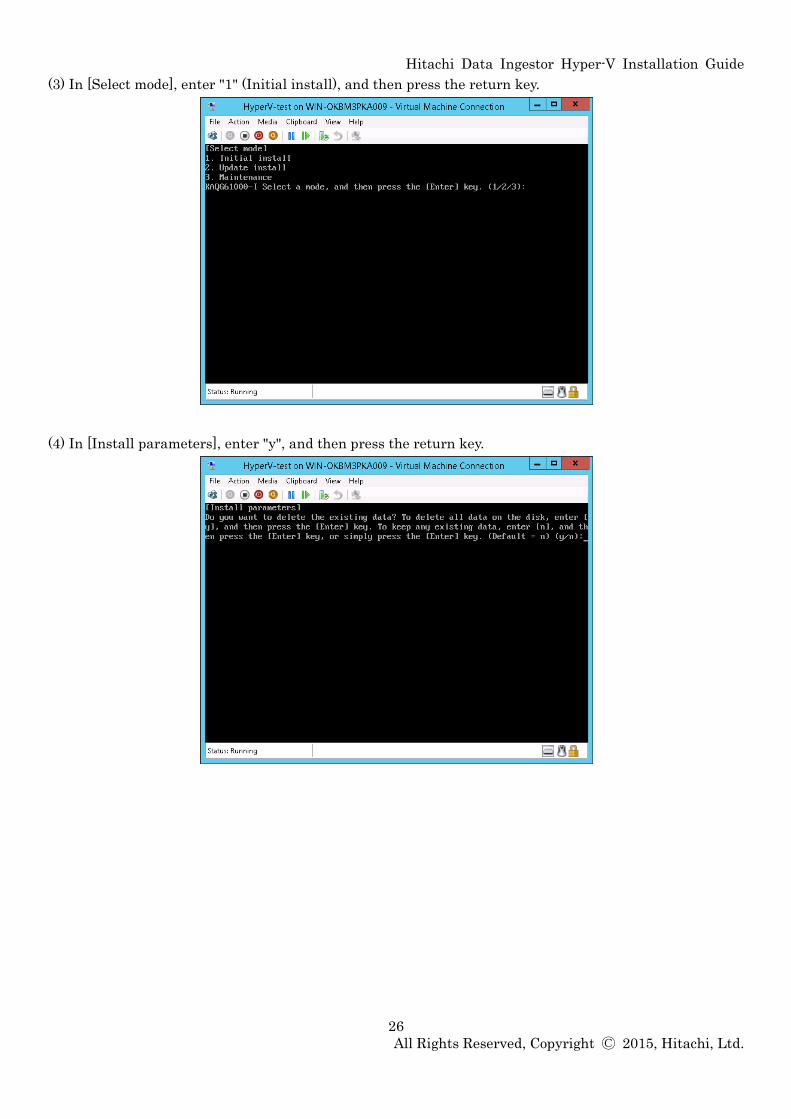
(3) In [Select mode], enter "1" (Initial install), and then press the return key.
(4) In [Install parameters], enter "y", and then press the return key.
Hitachi Data Ingestor Hyper-V Installation Guide
27
All Rights Reserved, Copyright Ⓒ 2015, Hitachi, Ltd.
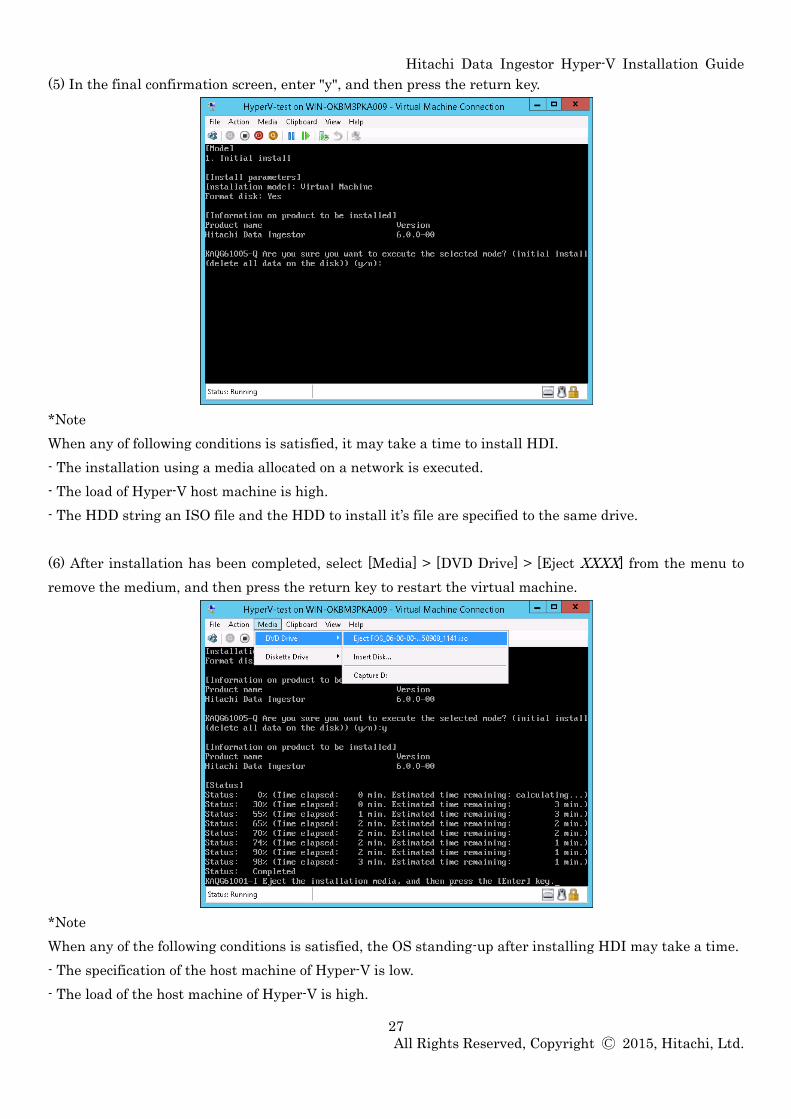
(5) In the final confirmation screen, enter "y", and then press the return key.
*Note
When any of following conditions is satisfied, it may take a time to install HDI.
- The installation using a media allocated on a network is executed.
- The load of Hyper-V host machine is high.
- The HDD string an ISO file and the HDD to install it’s file are specified to the same drive.
(6) After installation has been completed, select [Media] > [DVD Drive] > [Eject XXXX] from the menu to
remove the medium, and then press the return key to restart the virtual machine.
*Note
When any of the following conditions is satisfied, the OS standing-up after installing HDI may take a time.
- The specification of the host machine of Hyper-V is low.
- The load of the host machine of Hyper-V is high.
Hitachi Data Ingestor Hyper-V Installation Guide
28
All Rights Reserved, Copyright Ⓒ 2015, Hitachi, Ltd.
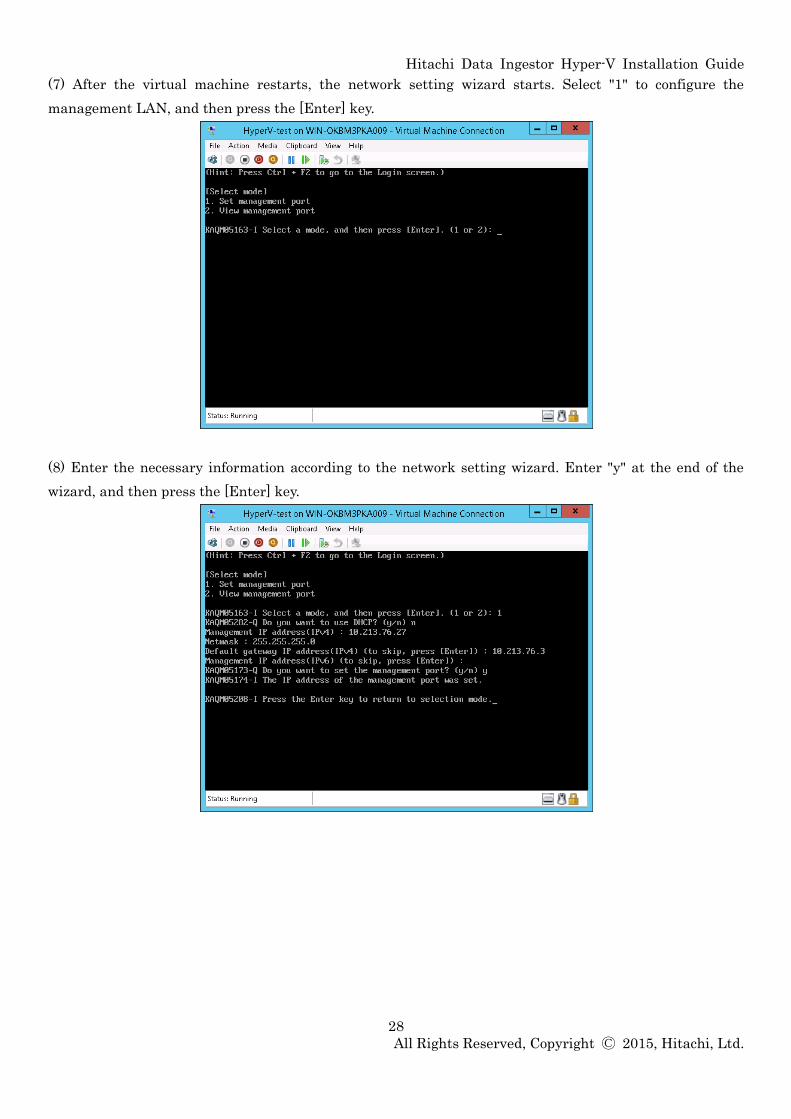
(7) After the virtual machine restarts, the network setting wizard starts. Select "1" to configure the
management LAN, and then press the [Enter] key.
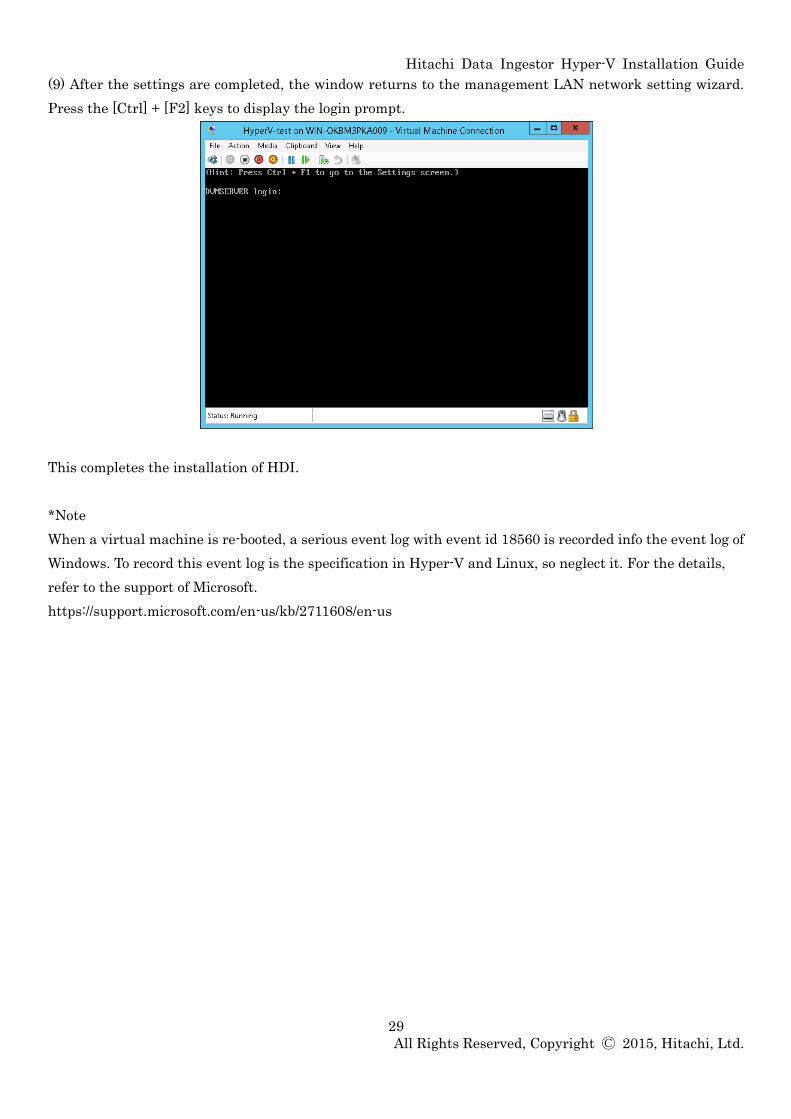
(8) Enter the necessary information according to the network setting wizard. Enter "y" at the end of the
wizard, and then press the [Enter] key.
Hitachi Data Ingestor Hyper-V Installation Guide
29
All Rights Reserved, Copyright Ⓒ 2015, Hitachi, Ltd.
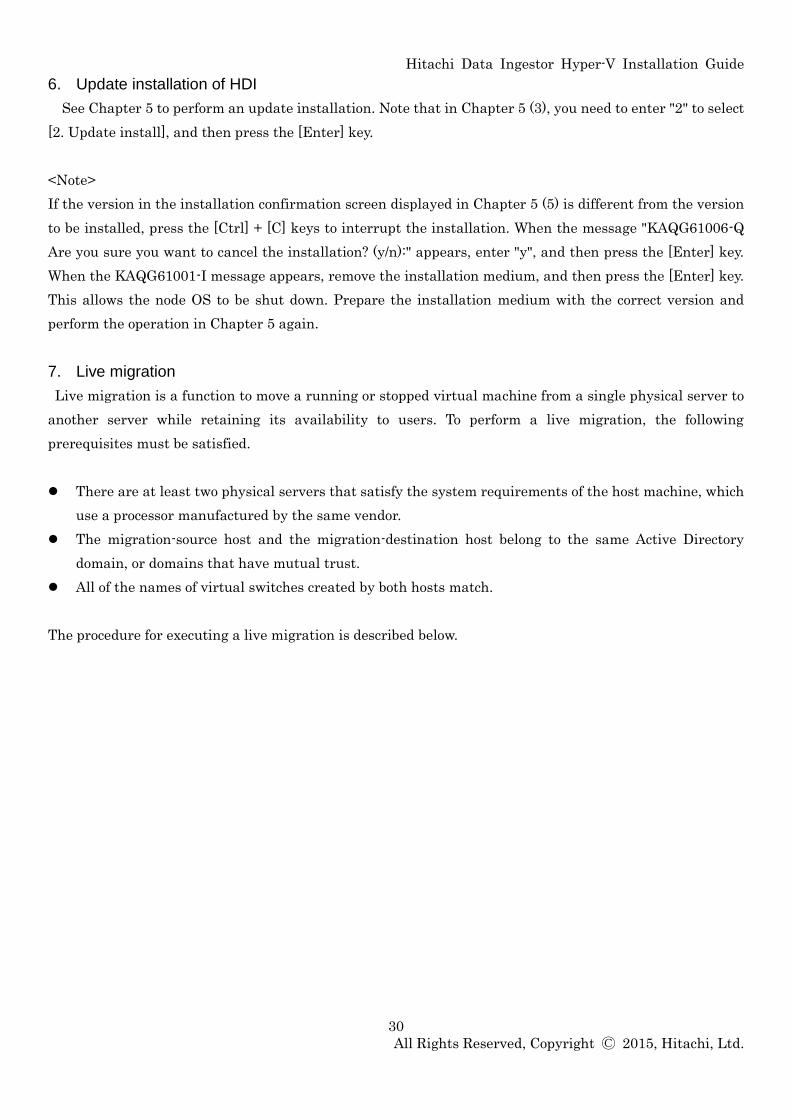
(9) After the settings are completed, the window returns to the management LAN network setting wizard.
Press the [Ctrl] + [F2] keys to display the login prompt.
This completes the installation of HDI.
*Note
When a virtual machine is re-booted, a serious event log with event id 18560 is recorded info the event log of
Windows. To record this event log is the specification in Hyper-V and Linux, so neglect it. For the details,
refer to the support of Microsoft.
https://support.microsoft.com/en-us/kb/2711608/en-us
Hitachi Data Ingestor Hyper-V Installation Guide
30
All Rights Reserved, Copyright Ⓒ 2015, Hitachi, Ltd.
6. Update installation of HDI
See Chapter 5 to perform an update installation. Note that in Chapter 5 (3), you need to enter "2" to select
[2. Update install], and then press the [Enter] key.
<Note>
If the version in the installation confirmation screen displayed in Chapter 5 (5) is different from the version
to be installed, press the [Ctrl] + [C] keys to interrupt the installation. When the message "KAQG61006-Q
Are you sure you want to cancel the installation? (y/n):" appears, enter "y", and then press the [Enter] key.
When the KAQG61001-I message appears, remove the installation medium, and then press the [Enter] key.
This allows the node OS to be shut down. Prepare the installation medium with the correct version and
perform the operation in Chapter 5 again.
7. Live migration
Live migration is a function to move a running or stopped virtual machine from a single physical server to
another server while retaining its availability to users. To perform a live migration, the following
prerequisites must be satisfied.
There are at least two physical servers that satisfy the system requirements of the host machine, which
use a processor manufactured by the same vendor.
The migration-source host and the migration-destination host belong to the same Active Directory
domain, or domains that have mutual trust.
All of the names of virtual switches created by both hosts match.
The procedure for executing a live migration is described below.
Hitachi Data Ingestor Hyper-V Installation Guide
31
All Rights Reserved, Copyright Ⓒ 2015, Hitachi, Ltd.
7.1. Connecting the host
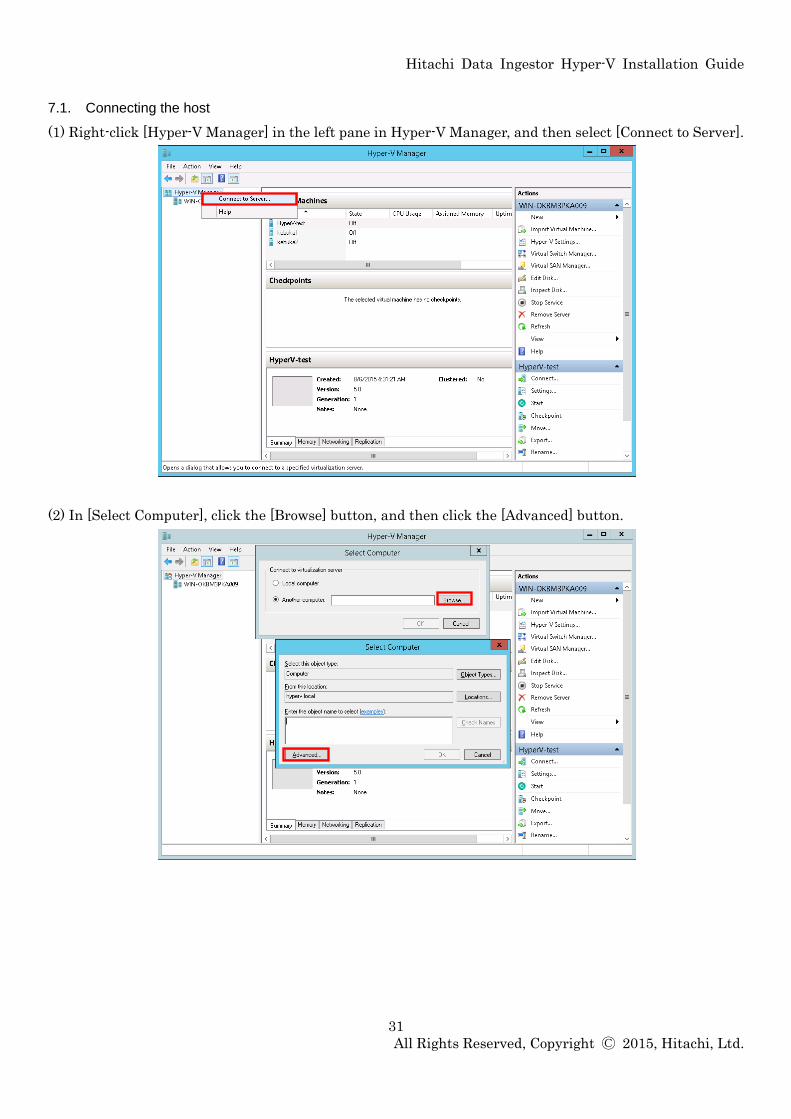
(1) Right-click [Hyper-V Manager] in the left pane in Hyper-V Manager, and then select [Connect to Server].
(2) In [Select Computer], click the [Browse] button, and then click the [Advanced] button.
Hitachi Data Ingestor Hyper-V Installation Guide
32
All Rights Reserved, Copyright Ⓒ 2015, Hitachi, Ltd.
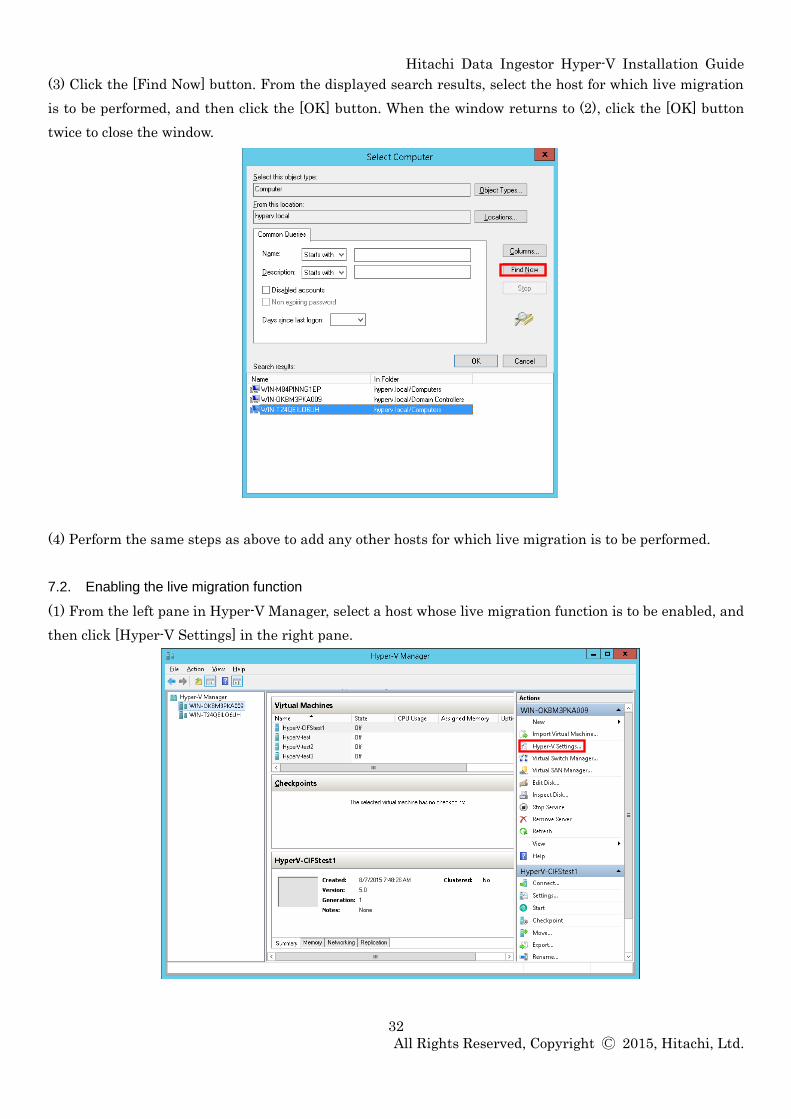
(3) Click the [Find Now] button. From the displayed search results, select the host for which live migration
is to be performed, and then click the [OK] button. When the window returns to (2), click the [OK] button
twice to close the window.
(4) Perform the same steps as above to add any other hosts for which live migration is to be performed.
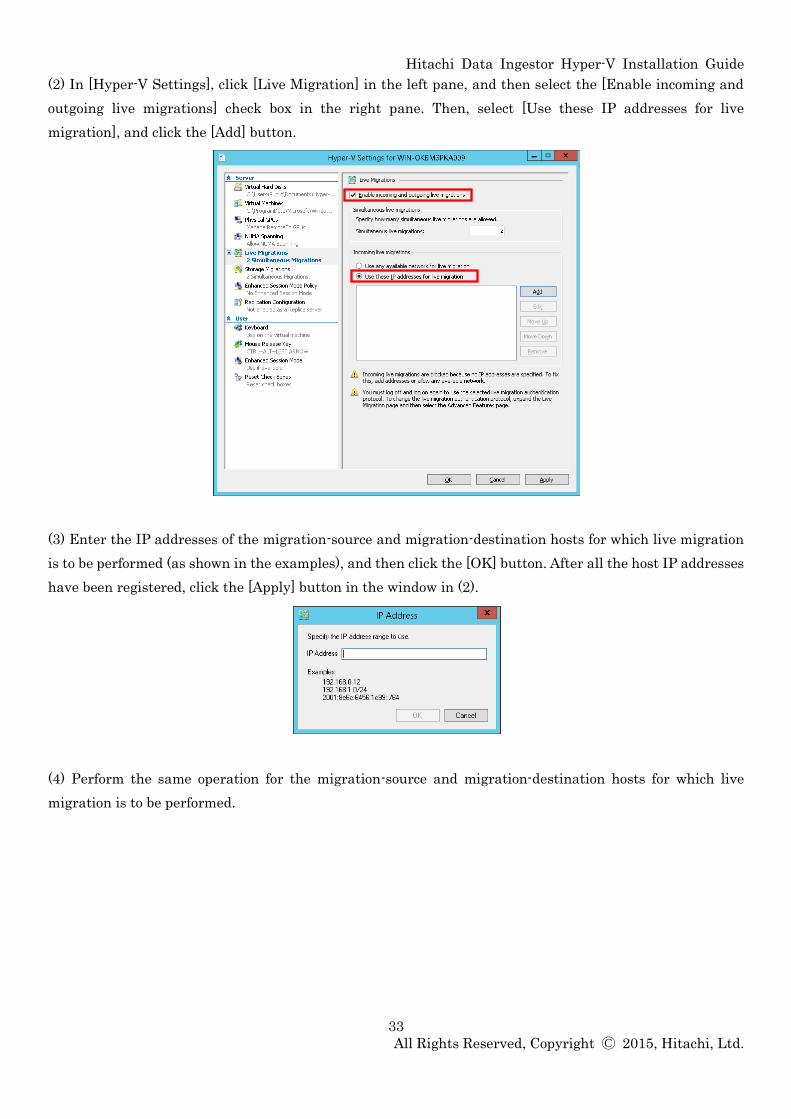
7.2. Enabling the live migration function
(1) From the left pane in Hyper-V Manager, select a host whose live migration function is to be enabled, and
then click [Hyper-V Settings] in the right pane.
Hitachi Data Ingestor Hyper-V Installation Guide
33
All Rights Reserved, Copyright Ⓒ 2015, Hitachi, Ltd.
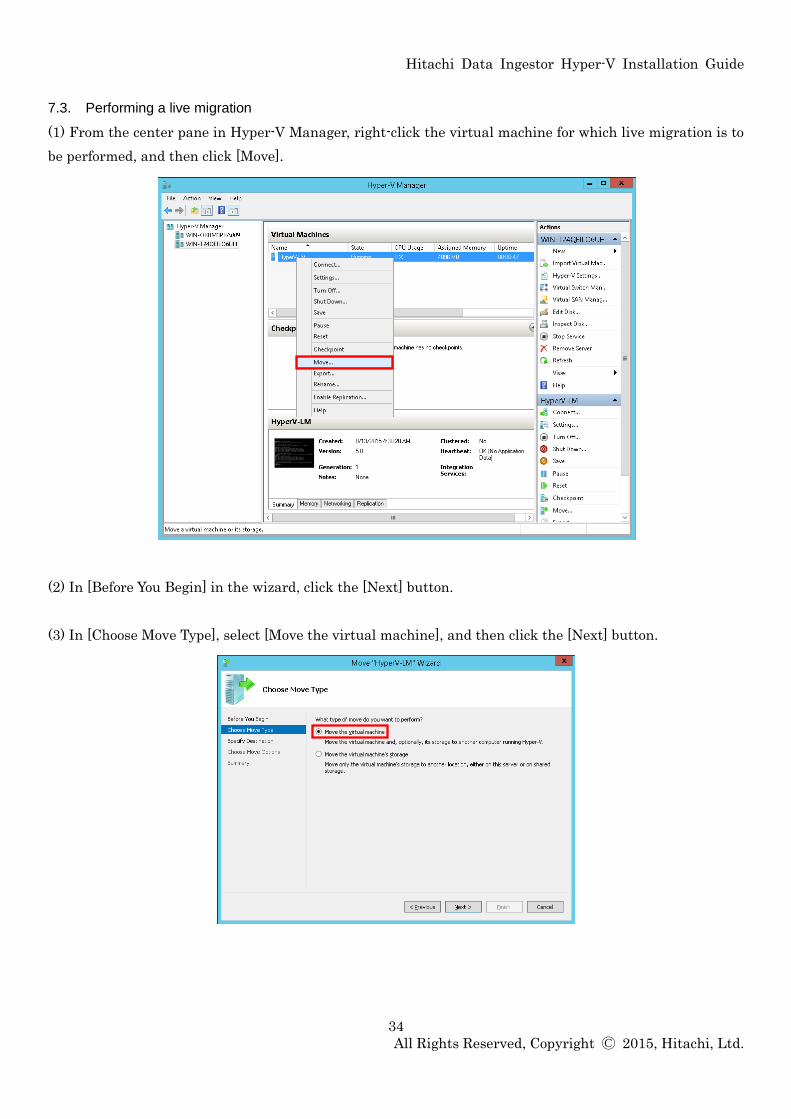
(2) In [Hyper-V Settings], click [Live Migration] in the left pane, and then select the [Enable incoming and
outgoing live migrations] check box in the right pane. Then, select [Use these IP addresses for live
migration], and click the [Add] button.
(3) Enter the IP addresses of the migration-source and migration-destination hosts for which live migration
is to be performed (as shown in the examples), and then click the [OK] button. After all the host IP addresses
have been registered, click the [Apply] button in the window in (2).
(4) Perform the same operation for the migration-source and migration-destination hosts for which live
migration is to be performed.
Hitachi Data Ingestor Hyper-V Installation Guide
34
All Rights Reserved, Copyright Ⓒ 2015, Hitachi, Ltd.
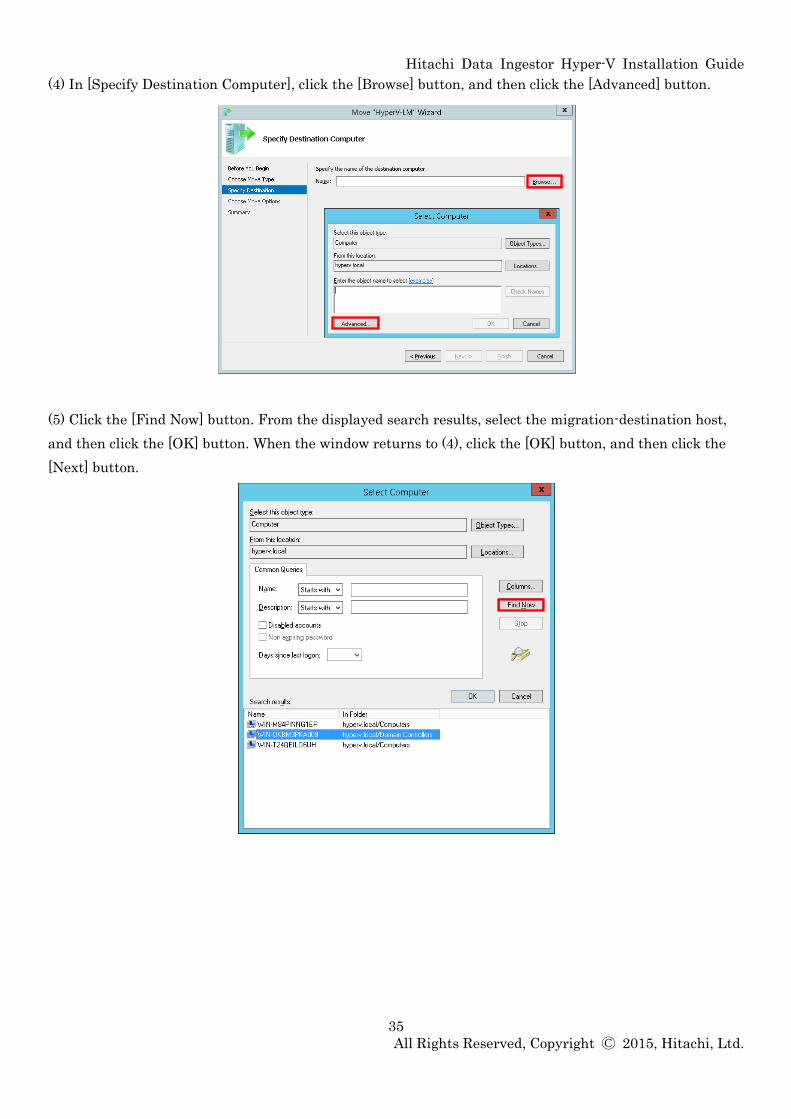
7.3. Performing a live migration
(1) From the center pane in Hyper-V Manager, right-click the virtual machine for which live migration is to
be performed, and then click [Move].
(2) In [Before You Begin] in the wizard, click the [Next] button.
(3) In [Choose Move Type], select [Move the virtual machine], and then click the [Next] button.
Hitachi Data Ingestor Hyper-V Installation Guide
35
All Rights Reserved, Copyright Ⓒ 2015, Hitachi, Ltd.
(4) In [Specify Destination Computer], click the [Browse] button, and then click the [Advanced] button.
(5) Click the [Find Now] button. From the displayed search results, select the migration-destination host,
and then click the [OK] button. When the window returns to (4), click the [OK] button, and then click the
[Next] button.
Hitachi Data Ingestor Hyper-V Installation Guide
36
All Rights Reserved, Copyright Ⓒ 2015, Hitachi, Ltd.
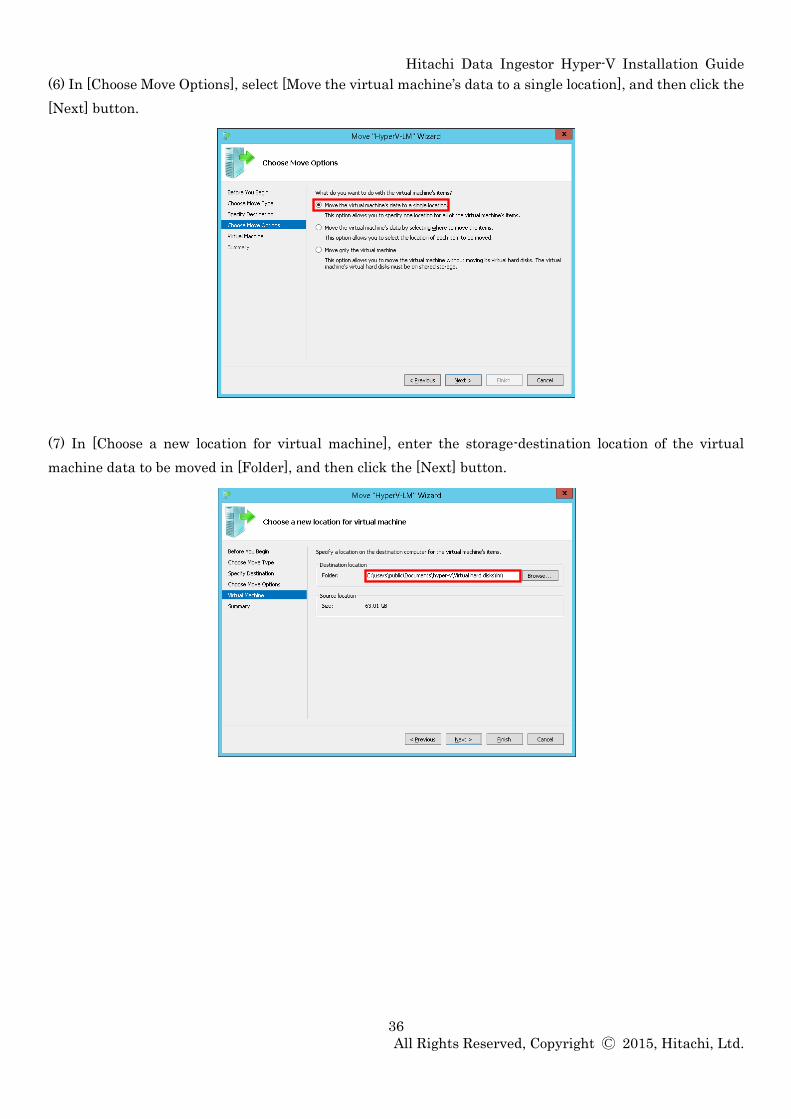
(6) In [Choose Move Options], select [Move the virtual machine’s data to a single location], and then click the
[Next] button.
(7) In [Choose a new location for virtual machine], enter the storage-destination location of the virtual
machine data to be moved in [Folder], and then click the [Next] button.
Hitachi Data Ingestor Hyper-V Installation Guide
37
All Rights Reserved, Copyright Ⓒ 2015, Hitachi, Ltd.
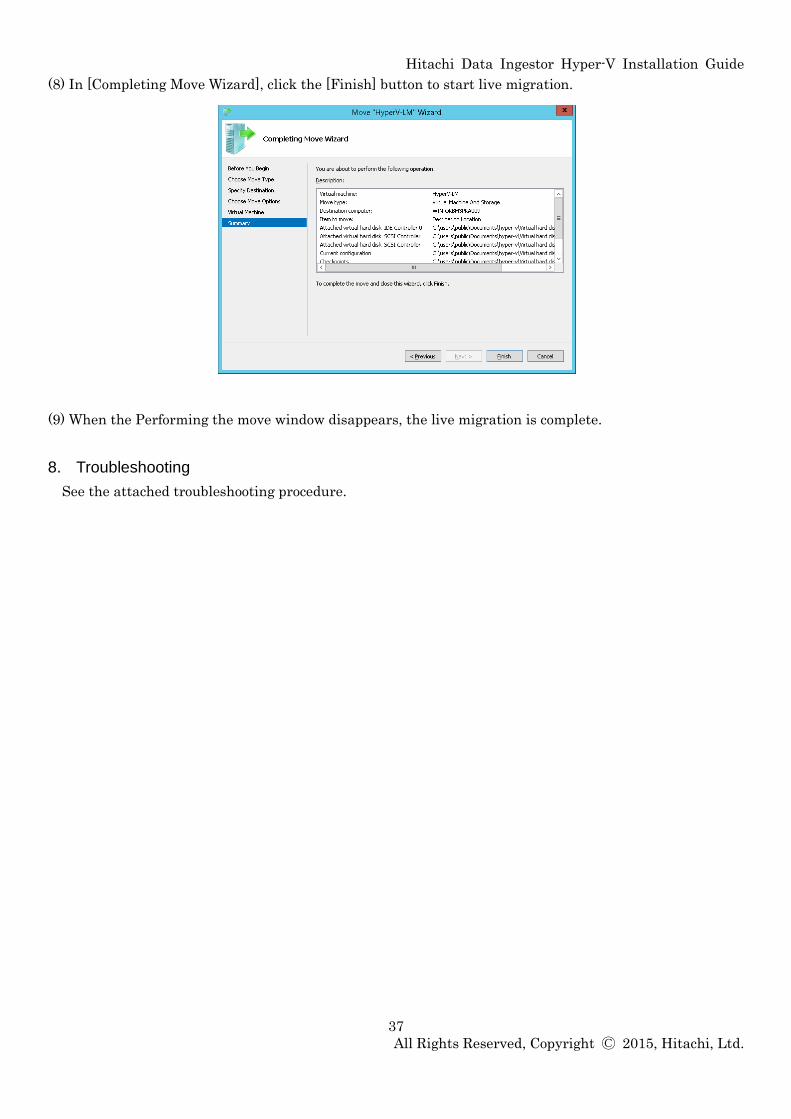
(8) In [Completing Move Wizard], click the [Finish] button to start live migration.
(9) When the Performing the move window disappears, the live migration is complete.
8. Troubleshooting
See the attached troubleshooting procedure.
Hitachi Data Ingestor Hyper-V Installation Guide
38
All Rights Reserved, Copyright Ⓒ 2015, Hitachi, Ltd.
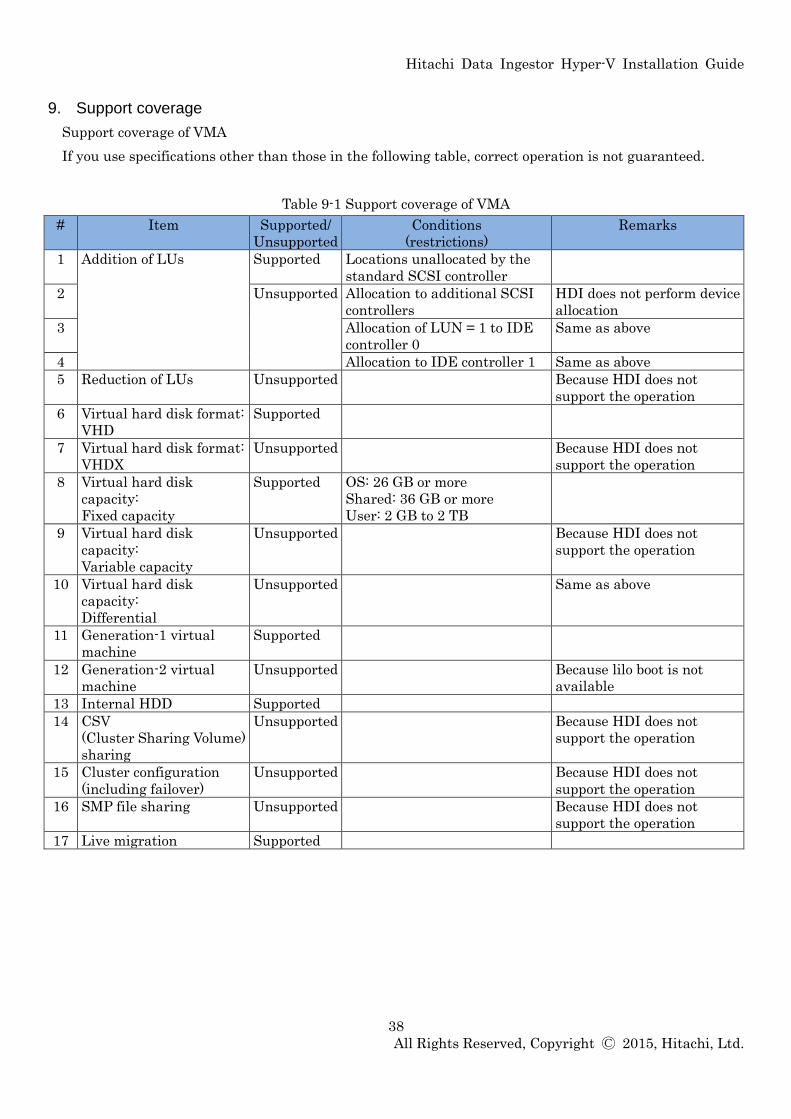
9. Support coverage
Support coverage of VMA
If you use specifications other than those in the following table, correct operation is not guaranteed.
Table 9-1 Support coverage of VMA
# Item Supported/
Unsupported
Conditions
(restrictions)
Remarks
1 Addition of LUs Supported Locations unallocated by the
standard SCSI controller
2 Unsupported Allocation to additional SCSI
controllers
HDI does not perform device
allocation
3 Allocation of LUN = 1 to IDE
controller 0
Same as above
4 Allocation to IDE controller 1 Same as above
5 Reduction of LUs Unsupported Because HDI does not
support the operation
6 Virtual hard disk format:
VHD
Supported
7 Virtual hard disk format:
VHDX
Unsupported Because HDI does not
support the operation
8 Virtual hard disk
capacity:
Fixed capacity
Supported OS: 26 GB or more
Shared: 36 GB or more
User: 2 GB to 2 TB
9 Virtual hard disk
capacity:
Variable capacity
Unsupported Because HDI does not
support the operation
10 Virtual hard disk
capacity:
Differential
Unsupported Same as above
11 Generation-1 virtual
machine
Supported
12 Generation-2 virtual
machine
Unsupported Because lilo boot is not
available
13 Internal HDD Supported
14 CSV
(Cluster Sharing Volume)
sharing
Unsupported Because HDI does not
support the operation
15 Cluster configuration
(including failover)
Unsupported Because HDI does not
support the operation
16 SMP file sharing Unsupported Because HDI does not
support the operation
17 Live migration Supported