home greenhouse controller - · pdf filehome greenhouse controller ... user settings report...
TRANSCRIPT

Home Greenhouse Controller
Low Cost Greenhouse Automation
Tom Schmidt
3/17/2015
http://www.tschmidt.com
In 2012 I designed a simple system to manage greenhouse ventilation and thermal storage. This paper describes the various features and the tradeoffs involved in implementing them. The brain of the system is a low cost programmable logic controller (PLC) that includes a web server. The system has been extremely successful. This revision documents several features I’ve added over the years.

1
Table of Contents Greenhouse Basics ........................................................................................................................................ 3
Automation Wish List .................................................................................................................................... 4
Summer Ventilation ...................................................................................................................................... 5
Thermal Storage – Stone Floor ..................................................................................................................... 5
Thermal Storage – Water Barrels.................................................................................................................. 6
Freeze Protection .......................................................................................................................................... 6
Impending Freeze Warning ........................................................................................................................... 7
Integration of Greenhouse and Wood Heat Controller ................................................................................ 7
Humidity Control ........................................................................................................................................... 7
Solar Batch Water Heater ............................................................................................................................. 8
PTRV .......................................................................................................................................................... 8
Cold Water Supply .................................................................................................................................... 9
Water Freeze Protection ........................................................................................................................... 9
Lighting .......................................................................................................................................................... 9
Switched Receptacles ................................................................................................................................. 10
Sensors ........................................................................................................................................................ 10
Temperature ........................................................................................................................................... 10
Outside Air .......................................................................................................................................... 11
Greenhouse Air ................................................................................................................................... 11
Water Barrel ........................................................................................................................................ 11
End-to-End Domestic Hot Water ........................................................................................................ 11
Humidity .................................................................................................................................................. 11
Door Monitoring ..................................................................................................................................... 12
Web Interface ............................................................................................................................................. 12
Email Alerts ................................................................................................................................................. 13
Daily Status Email .................................................................................................................................... 13
User Settings Report ............................................................................................................................... 13
Freeze Warning ....................................................................................................................................... 14
Basements Fan Door Warning ................................................................................................................ 14
Temperature Sensor Failure ................................................................................................................... 14
System Implementation .............................................................................................................................. 15

2
WebControl PLC ...................................................................................................................................... 16
Interface PCB ........................................................................................................................................... 17
Temperature Display ............................................................................................................................... 17
DC Power ................................................................................................................................................. 17
AC Power ................................................................................................................................................. 18
Sensor Cabling ......................................................................................................................................... 18
To-do List ..................................................................................................................................................... 19
Conclusions ................................................................................................................................................. 19
Appendix A Schematics ............................................................................................................................... 20
Chassis Wiring ......................................................................................................................................... 20
Front Panel Wiring .................................................................................................................................. 21
PLC Wiring ............................................................................................................................................... 22
Interface – Logic ...................................................................................................................................... 23
Interface – Switch Conditioning .............................................................................................................. 24
Sensor Wiring .......................................................................................................................................... 25
Appendix B PLC Configuration .................................................................................................................... 26
Network Setup ........................................................................................................................................ 26
I/O Setup ................................................................................................................................................. 27
Temperature Setup ................................................................................................................................. 27
Email Setup ............................................................................................................................................. 28
Appendix C PLC code ................................................................................................................................... 29

3
Greenhouse Basics We have an 8 x 16 foot lean-to greenhouse attached to the south facing wall of the house. The lean-to
design reduced cost and minimizes heat loss through the rear greenhouse wall. The greenhouse floor is
at basement floor walk out level with a concrete frost wall extending 4 feet below and rising about 4
feet above the floor. The concrete wall is insulated with 2” of foam board and much of it is below
ground level minimizing heat loss.
Greenhouse structure is 2x6 and 2x4 pressure treated
lumber with a channel routed to accept 8mm dual
wall polycarbonate panels. The inspiration for this
construction technique came from a New Yankee
Workshop episode where they built a small
standalone greenhouse. I struggled with the problem
of using fixed size glazing panels. Because this is a
lean-to design roof height is determined by the
bottom of the first floor windows. Standard sized
panels did not fit in the available space. The
polycarbonate panels are ideal as they can be easily cut to size. Routing channels in the framing lumber
eliminated the cost of aluminum extrusions normally used to mount the panels. Since the panels are
retained in routed channels the structure is not completely watertight so there are a few drips during
heavy rain/snow. This would be a problem if we were using it as a sun room but not as a greenhouse.
The leaks did however affect how the electrical system was installed.
Ventilation is provided by three windows, one each on the east and
west wall and a central roof vent. I built the window frames out of
pressure treated lumber and used the polycarbonate panels for
glazing. The windows are operated by Bayliss Autovent passive
openers. A temperature sensitive cylinder forces the window open
as it heats up. A knurled knob at the top adjusts opening
temperature. The openers work great but simply opening windows
does not move enough air to maintain reasonable temperature
during full summer sun. Even with a shade cloth hung on the south face indoor temperature is
significantly higher than outdoor.
To keep the sidewall windows tightly closed I used 3 lb. cable tensioners to augment
the Autovent openers. These are government surplus devices made by John Evan’s
Sons Inc. I removed the Velcro and hooks and mounted them at the bottom of each
window. The Autovent is able to lift 14 lbs. so works fine counteracting the
tensioner. The roof window is heavy enough that gravity keeps it well sealed.
There are two entrance doors one from the basement and one on the west wall to the outside. The
basement door has a dual pane fixed glass center section to let light into the basement. The exterior
entrance door is a Larson midview storm door with a large movable screened opening to provide

4
additional ventilation during the summer. During the winter we add a non-opening interior storm panel
to minimize heat loss.
Due to the large amount of glazing greenhouse solar gain is high but so are loses. Without a large
thermal mass temperature fluctuates rapidly, dropping at night and overheating during sunny days. This
requires venting excess heat during the day and adding makeup heat at night. Adding thermal mass
helps moderate temperature swing by absorbing heat during the day and releasing it at night. We opted
for water barrel storage. Used 55 gallon polyethylene drums are cheap and water to fill them even
cheaper. We use 6 55 gallon drums placed along the north wall. When I was searching for a local
supplier was surprised to discover how many folks are selling them. Each barrel is painted black to
maximize heat absorption. Ideally I should have used an additional 6 stacked on top but that would have
consumed too much valuable space. Insufficient thermal storage means temperature fluctuation is
higher than desired and without augmentation or opening the basement door greenhouse air
temperate falls dangerously low during cold nights.
The floor of the greenhouse is filled with 4 feet of pea stone. Stone and masonry are great ways to store
heat, the trick is to warm up the stone during the day and extract heat at night.
These limitations prompted me to embark on a project to automate greenhouse ventilation, energy
storage and if needed to steal heat from the basement to maintain adequate temperature. The resulting
controller is described in this paper.
Automation Wish List 1. Reduce summertime overheating and maintain adequate winter temperature.
2. Manage humidity during the winter when greenhouse is buttoned up.
3. If a problem occurs want to be notified without having to go to the greenhouse.
4. Override automatic functions in case the controller fails or we encounter unusual conditions.
5. Manage multiple indoor and outdoor temperature sensors.
6. Built in web server so greenhouse functions may be monitored remotely.
7. Local display of greenhouse air temperature.
8. The controller is on 24/7/365 so low power consumption is important.
9. Low price and cost of ownership.
Later when I built the 2nd generation wood heat controller added a 10th item to the list:
communicate with the wood heat controller.
The design I ultimately came up with meets these requirements and I was able to add a few other
features to boot. Being programmable allowed me to add features and tweak performance as
needed.

5
Summer Ventilation The passive actuators work great to open and close the vents so I
augment them with a roof mounted exhaust fan. I used a dual fan
assembly designed to cool server racks mounted under the roof vent.
In the picture you can see the Autovent adjustment knob poking out
behind the middle of the fan on the left. The fan is designed to fit a
19” equipment rack, so it was easy to install within the ceiling joists
under the roof vent. The controller monitors greenhouse air
temperate to control the fan.
The fan assembly is plugged into a ceiling mounted receptacle.
Because it is upside down I used a Twist-Lock receptacle to make sure
the plug does not fall out.
Thermal Storage – Stone Floor The floor of the greenhouse consists of several feet of pea stone. This
represents a large thermal mass. A stone floor by itself is not a very
effective storage medium because not much heat is transferred to and
from the stone. To better utilize the mass I mounted a squirrel cage
blower near the roof, connected to a pair of 3” PVC DWV pipes to
force air through two flexible perforated pipes embedded in the
stone. A centrifugal blower is a good choice for this task because
backpressure is high.
The controller monitors outside air temperate and turns the blower on
when temperate falls below the set point. This way the blower does
not run needlessly during warm weather. During the day warm air is
blown into the stone heating it up reducing the need to vent excess
heat. At night air blowing through the stone extracts heat to help
maintain greenhouse air temperature.

6
Thermal Storage – Water Barrels Six plastic barrels are lined up against the north wall of the
greenhouse. They are under the boards on the left of the picture.
One of the temperature channels is used to monitor barrel water
temperature. The water barrels are a passive thermal mass. The
controller simply monitors water temperature to provide an idea of
how much energy is being absorbed and released by the water.
Freeze Protection If air temperature cannot be maintained the controller turns on a fan
that blows warm air in from the basement. The fan assembly is
identical to the ceiling exhaust fan; however only a single fan is active
the other is disconnected and blocked off. The basement is heated so
this infuses the greenhouse with 70ish degree air. A filter keeps
insects from entering the house.
During the summer a small door covers the opening to keep high
temperate greenhouse air from infiltrating the basement. When
greenhouse temperature drops below the set point and if the door is
open the basement fan is turned on and the rock blower disabled. No
reason to warm up the rock floor if we are trying to prevent inside air
temperature from falling dangerously low.
The PLC monitors door state by reading a magnetically actuated
switch. If the fan door is closed the basement fan is not turned on, the PLC sends out a warning email,
and the rock blower is left running. If the door is closed the controller is unable to move warm air from
the basement to the greenhouse. Leaving the rock fan on is the best fallback strategy to reduce the
possibility of greenhouse freezing as warm air cannot be brought in from the basement. In addition to
sending a warning email the basement fan status LED flashes indicating the door is closed.

7
Impending Freeze Warning If these control strategies are unable to maintain adequate temperature the freeze warning light flashes
and a notification email is sent.
Integration of Greenhouse and Wood Heat Controller A freeze event is likely to occur in the wee dark hours of the morning when no one is logged into their
computer so some other alert method is needed. The success of the greenhouse project encouraged me
to design a second generation wood heat controller using another WebControl PLC. The wood heat
controller has an audible alarm that is trigged during high temperature conditions so it was natural to
use it for freeze notification. The 1-wire temperature sensors use three wires (power, ground and data).
I wired the in house temperatures sensors with 4-wire cable so was able to use the 4th wire to
communicate freeze warning to the wood heat controller. During a freeze event the controller pulls this
line low activating an optocoupler in the wood heat controller. This turns the controller on, if it was off,
and sounds the audible and visual alert.
House construction is extremely tight so running the fan to pump warm air into the greenhouse from
the basement risks depressurizing the house. As long as the wood heat controller is active so is the
fresh air fan bringing in outdoor make up air. To insure the wood heat controller is on when the
greenhouse basement fan is running the greenhouse controller pulses the freeze line for 200ms when
the fan is started and at 0 and 30 minutes past the hour if it is still on. This prevents the wood heat
controller idle timer from turning it off. The wood heat controller ignores this short pulse and does not
trigger the freeze warning.
Humidity Control In the initial design I neglected to consider the problem of excessive winter
humidity. With the greenhouse closed up humidity was 100% on some days
causing mold to grow on cold surfaces. To address the problem I added a small DC
fan on the East wall exhausting through a high quality metal dryer vent. The vent
flapper seals well preventing cold air from flowing back into the greenhouse. The
PLC includes a humidity sensor so I used that as primary fan control. The algorithm disables the fan if
outside temperature is high, no sense running the fan if the vent windows are open. The fan is also
disabled when inside temperature is very low to reduce the rate of temperature fall and minimize how
much air needs to be brought in by the basement fan.
The fan is a 4-11/16” box fan powered from the 9V 1A supply used by the controller. The fan is rated for
12V but works fine at 9 volts, moving less air and drawing about 500ma. A FET is used to switch fan
power.

8
Solar Batch Water Heater The greenhouse provided a convenient location to
install a solar batch water heater. Batch heaters are
simply water tanks heated directly by the sun.
Normally they are mounted in a sealed enclosure to
maximize temperature gain. I did not have enough
room for an enclosure so mounted a couple of 30
gallon tanks, painted black, as high as possible on the
back wall of the greenhouse. This is less efficient than
putting them in an insulated box but any increase in
water temperature reduces summer hot water cost.
Well water temperature varies between 45-55F during the year. The electric water heater is set to 120
degrees. Just reaching normal summer daytime air temperature of 80-90 degrees reduces energy
consumption by half. An advantage of this arrangement is during winter the tanks provide an
additional 60 gallons of thermal mass. It is interesting monitoring the temperature of the batch heater
tanks compared to the water barrels during the winter. Being located near the roof and having a better
ratio of surface area to mass they are more effective than the 55 gallon drums at capturing solar energy.
Domestic hot water is produced by a 55 gallon electric water heater located in the basement. Many
years ago I augmented it with heat from our wood stove. I plumbed an insulated storage tank into the
water heater cold water feed and installed a heat exchanger in the stove plumbed to the preheat tank
using a thermosiphon loop. Whenever the stove is in use it heats water in the preheat tank. As hot
water is used the “cold” water being feed into the electric water heater is warmer than the water
coming directly from the well thus saving electricity.
The solar batch heater acts as a second preheater. When hot water is used cold well water flows
through the two greenhouse tanks. Temperature rise depends on sun intensity and water usage. The
hot output is plumbed into the cold inlet of the wood stove preheat tank. Water from the wood stove
preheat tank flows into the electric water heater to bring it up to the desired temperature. The wood
stove tank can be bypassed in summer but it is pretty well insulated so being lazy I leave it in the system
during the summer. I’ve documented the entire solar wood water heating system here.
I was concerned the extra plumbing and tanks would impact hot water flow but that has not been a
problem.
PTRV A Pressure Temperature Relief Valve (PTRV) valve is plumbed into the “hot” tank. It
dumps water if the tank overheats or experiences excessive pressure. If water is
turned off to the greenhouse and the PTRV opens there is a risk of creating a partial
vacuum when it cools, potentially collapsing the tanks. A vacuum breaker is installed
on the pipe connecting the two tanks letting in air if the tanks are depressurized.

9
Cold Water Supply Since I needed to supply cold water to the batch heater it was a simple matter to extend
the cold water feed to a ¼ turn hose bib to water plants. To keep dirt from clogging the
stone we stretched filter fabric over the floor. This allows water to drain but prevents dirt
from getting into the rock.
Water Freeze Protection During heavy ice and snow storms we can experience extended power outages lasting several days.
Without electricity we lose well water and obviously the controller no longer functions. The system is
designed to be easy to drain. Pipes slope toward drain valves and the tanks can be emptied. So far we
have never had to drain the system. Even with a multiday power outage simply opening the basement
door is enough to prevent the greenhouse from freezing. The plants are not happy but so far have not
had any burst water pipes.
Three ball valves and two ¼ turn boiler drains, located in the basement, allow flexible control of the
batch heater. Additional valves, located in the greenhouse, are used to drain the tanks.
Mode 1 during summer the bypass valve is closed and the feed and return valves open. This
causes water to flow through the greenhouse tanks as hot water is used.
Mode 2 during winter the bypass valve is open as is the feed valve, the return valve is closed.
This bypasses the batch tanks but leaves water to the greenhouse turned on to water plants.
Mode 3 is used to drain the system. The bypass valve is open and feed and return valves closed.
Two boiler drains allow air into the feed and return lies to the greenhouse so they can be
purged. Valves in the greenhouse let air into the system and drain the tanks. The tanks are
higher than basement plumbing so they need to be emptied first before letting air into the
basement feed pipes or water will back up into the basement.
Lighting The PLC also does duty as the lighting controller. This allowed me to run
low voltage wiring to light switches located by each door. As a plus the
web interface allows lights to be turned on/off by remote control.
Pretty cool, how many greenhouse let you turn the lights on or off from
a web page? The light switches are SPDT momentary contact center off.
The controller latches the last switch state to turn lights on or off. Being
monetary contact allows an unlimited number of switches to be used in
parallel.
Two Leviton CFL fixtures are mounted on the ridge beam between the two roof pitches. The fixtures are
not waterproof so I was careful to mount them in the middle of the polycarbonate panels. For extra
water protection cut circular section of automotive gasket material and placed it between the fixture
and plastic electrical box. They are not intended as grow lights just to provide general purpose lighting.

10
Switched Receptacles There are thee duplex receptacles on the south wall and two on the north. I split the outlet so the left
side is constantly on and the right one is controlled by the PLC. This feature came in handy before I
modified the controller to directly power the humidity fan. Implemented humidity code to control the
outlets and plugged in a wall wart power supply to power the fan. At present the switched outlets are
controlled by the manual override toggle switch on the controller panel.
Sensors The controller supports multiple temperature sensors and a Honeywell solid state humidity sensor. In
addition two of the digital inputs are used to monitor the external entry door and basement fan door.
Temperature The controller supports 8 Maxim/Dallas 1-wire DS18B20 temperature
sensors. 1-wire is a single line wired OR bidirectional communication
protocol. Each device is serialized allowing multiple sensors over only
three connections: 5 volts, ground and data. The sensors output
temperature in digital format and are powered from the PLC’s 5v output.
Most of the sensors are mounted at the end of a flexible cable protected by a metal tip. The exception is
the two ambient air sensors (controller and display). They are located in a small ventilated chassis on the
South wall protected from direct sunlight. Currently 7 of the 8 channels are used:
1. Outside air
2. Inside air (a 2nd dedicated sensor drives the controller’s temperature display)
3. Water storage barrel
4. Not used
5. Well water at pressure tank
6. Solar batch preheater
7. Wood stove preheater
8. Electric water heater
With the exception of the solar batch heater the hot water temperature sensors are attached to the
outside of the respective tank. With the batch heater I had an unused fitting so was able to locate the
temperature sensor in direct contact with water. Temperature accuracy is affected by water usage.
Temperature reading is more accurate if water is following through the pipe. If water has not been used
for a while the reading is somewhere between tank internal temperature and ambient air temperate.
This is especially pronounced with the electric water heater as the sensor is almost 4” away from the
tank due to insulation.

11
Outside Air
The outside air sensor is located on the North wall of the house. This required running
a cable from the greenhouse at the front to the north wall at the back. Mounting was
an issue as I needed the probe to measure outside air temperature but not be easily
damaged. The ideal location for highest accuracy is several feet above the ground and
away from the building. That was impractical so the sensor is mounted only a couple of
feet above grade in the wall itself.
To protect the sensor I used a small plastic pet food dish. The sensor is mounted through a hole in the
center of the base. This allows air flow around the sensor while keeping it behind the edge of the
building.
Greenhouse Air
I wanted to display greenhouse temperate on the controller front
panel. The PLC cannot drive an external display; forcing me to use
two 1-wire temperature sensors for internal air temperature
monitoring. One feeds the PLC the other the front panel display.
Using separate sensors is not ideal but the close proximity insures
they accurately track one another.
The 1-wire protocol is open collector master slave. This allows both the PLC and display sensors to be
powered by the controller’s 5 volt supply. Only the PLC and display data signals need to be kept separate
and routed to the respective device.
The temperature sensors are located in a small ventilated box located on the south wall of the
greenhouse below the glazing. This keeps them out of direct sunlight for more accurate readings. The
humidity sensor is located in the same box as well as a terminal block in case we ever need to add a
sensor at that location.
Water Barrel
To track water barrel temperature I connected a 1-wire sensor and dropped it into one of the drums
through a hole in the bung cap.
End-to-End Domestic Hot Water
Four sensors are used to monitor the hot water system. These are not involved in greenhouse control
they simply provide readings at various locations of the hot water system. Sensor 5 monitors well
pressure tank, #6 greenhouse batch heater, #7 wood stove preheat tank, and #8 electric water heater.
Humidity The controller uses a Honeywell HIH-4000 sensor to measure relative humidity. This is
an analog device powered from the PLC’s 5V supply. The humidity sensor is mounted in
the same chassis used for the temperature sensors. Being analog I wanted to make sure
accuracy was not affected by digital noise so I ran separate power, ground, and data.

12
Door Monitoring Magnetic reed witches are used to monitor the status of the main entrance door and the basement fan
door.
Web Interface The WebControl web interface is pretty barebones but it gets the job done.
System Status page displays inputs and outputs as well as 8-varables used by the code. Being able to
display values facilitates troubling shooting. VAR1 displays basement fan run time in seconds since the
previous report. VAR 4 is high air temperate and VAR 5 low since the last report. The controller has
another 8 variables (RAM) accessible to user code but they are not displayable.
The screenshot is a winter day when the wood stove is operating. Temperature sensor 1 measures
outside air temperature. Sensor 2 is air temperature within the greenhouse and sensor 3 is the
temperature of one of the water barrels. The last four sensors monitor various locations of the hot
water supply. Sensor 5 is the well pressure tank; well water temperature varies little throughout the
year. Sensor 6 is the hot outlet of the greenhouse solar batch water heater. Temperature sensor 7 is the
wood stove thermosiphon storage tank and sensor 8 is the electric water heater. The water heater
thermostat is set to 120 F. Because the sensor is attached to the hot water outlet pipe, rather than being
immersed in water, the reading varies significantly depending if hot water has been used recently.

13
Email Alerts No automation system is complete without alarm notification of dangerous or improper operating
conditions. WebControl allows up to 8 preconfigured emails to be dispatched by user code.
Daily Status Email The controller’s web interface is pretty limited and does not include logging capability. I added code to
send out a morning and evening email. The body of the email includes digital input and output status
and current temperate sensor and humidity sensor readings. Emails are generated at 6AM and 6PM. The
firmware does not compensate for daylight savings time but in this case that is actually a plus since the
report occurs at the same “Sun” time throughout the year.
Of particular utility is VAR1 that reports how many seconds the basement fan has run since the previous
report, and VAR4 high and VAR5 low air temperature during the same period.
User Settings Report The General Setup screen is a convenient way to change set points
without the need to reload code.
UROM1 sets ceiling fan temperature
UROM2 sets rock fan outdoor temperature
UROM3 sets basement fan temperature
UROM4 sets humidity fan % relative humidity
To make setting more user friendly at power up and each time any of
the UROMx settings are changed the parameter checker is invoked and
an email sent indicating if values are correct and information about the
correct range and units.

14
Freeze Warning The point of having a greenhouse is to extend the growing season by keeping air temperature above
freezing. If the water, rock storage and basement augmentation functions are not adequate to maintain
air temperature the controller flashes a freeze warning LED on the front panel and sends a warning
email. A pushbutton on the controller resets the alarm. If the freeze warning is reset while air
temperature is still below the warning set point the LED is turned off for a couple of seconds and
another freeze warning sequence begun.
The freeze warning event is communicated to the wood heat controller, activating an audible and visual
alarm.
Basements Fan Door Warning When the controller needs to turn on the basement fan it reads the state of the fan door switch. If the
door is closed it flashes the basement fan status LED and sends a warning email.
Temperature Sensor Failure If one or more temperature sensors fail a notification email is sent. It takes several seconds at boot time
for the controller to initialize the temperate sensors. Testing is delayed when system powers up to
eliminate spurious fault notification. The 1-wire bus is a wired OR open collector scheme. It is sensitive
to noise ingress causing temporary failure of one or more sensors. To prevent unnecessary alerts sensor
fault notification is debounced. When the controller reports a failed sensor a counter is set to 100. If the
sensor is still bad after 100 passes through user code (about 5 seconds) the alert email is generated, if
not the counter is reset.
Once an alert has been sent sensors must return to the OK state to reset the warning. That way only a
single email is sent per failure event.

15
System Implementation The controller is mounted on the east wall near the rear of the greenhouse. The temperate and
humidity sensors are mounted on the south wall in a small ventilated enclosure. The Humidity control
exhaust fan is mounted to the immediate right of the controller.

16
The controller is built into an 11” square electrical box. I installed an aluminum separator between line
and low voltage compartment. The bottom section contains solid state relays to control AC loads.
Initially I used SSRs to control all loads but ran into a problem with the CFL ceiling lights. The CFLs draw
so little current the snubber circuit used to protect the SSR output passed enough current to cause the
lights to occasionally flash. The solution was to replace the ceiling light SSR with an EMR. I mounted a
small relay on a perf board cut to the same size as the SSR and wired a diode across the coil. The 7407
driver is able to control the relay directly so it made for a simple replacement. A flexible plastic shield
covers the relays preventing accidental contact with mains voltage.
A 9V 1A DC “wall wart” style switching power supply powers the system. The supply plugs into a
receptacle mounted on the divider protected by a fuse installed at the bottom of the cabinet.
The top portion has an 18-position terminal strip to connect low voltage field wiring; and an Ethernet
jack connecting the controller to our home network.
The controller, interface PCB, override switches, status LEDs and temperature display are mounted on
the hinged front panel. The humidity fan DC switching circuitry is mounted on small board attached to
the fan toggle switch and LED. This minimizes interconnect wiring between front panel and logic board
and kept high current fan load off the interface board.
WebControl PLC The heart of the system is a low cost web server and programmable
logic controller manufactured by CAI networks and available, like
many of the other items used in this project, from eBay vendors.
The controller was primarily designed to monitor and control
temperature in a data center environment, but its low cost and PLC
capability made it ideal for my purpose.
WebControl Features
1. 8 1-wire temperature sensors inputs
2. Humidity sensor input.
3. 8 digital outputs
4. 8 digital inputs
5. UTP Ethernet port
6. Web server
7. Real Time Clock (RTC) synced via Network Time Protocol (NTP)
8. Low power

17
Interface PCB I designed a simple interface board to provide external logic functions and ESD protection. The control
panel has toggle switches to select how the various outputs are controlled. Each output except lighting
can be set to: Off, On, or Auto. Normally switch overrides like this would be read by the controller and
processed in software. However since there are only 8 inputs and 8 outputs I implemented the switch
override function in hardwired logic.
I wanted the Freeze warning LED and Basement fan LED to flash when there is a problem. To eliminate
the need to create time dependent PLC code I implemented the flash function in hardware. The
controller has a status LED that flashes’ indicating the controller is alive. That signal is brought into the
interface board to flash the appropriate LEDs.
The other function of the interface board is to protect the controller from ESD damage. I would much
rather replace a SSI DIP TTL chip on the interface board then the entire controller. The protection
scheme is pretty basic. Digital inputs are feed through a series resistor then to a pull-up. The output of
the pull-up is clamped to Vcc and Ground by a pair of diodes. The 1-wire interface to the controller and
display are bidirectional so I used the clamp diodes but not the series or pull-up resistor. The humidity
sensor is run barefoot. Being an analog signal did not want to risk affecting accuracy. Outputs, except
freeze, are not protected as they do not leave the chassis.
Temperature Display I wanted to display air temperature locally, but the controller does
not have the ability to drive a display. I purchased a self-contained
LED thermometer module. I chose a unit that uses the same 1-wire
temperature sensor as the WebControl and located it in the same
box as the controller’s temperature and humidity sensors. Using two
sensors for the same reading is not ideal since tolerances may cause
measurement to may vary slightly but they are close enough for our purposes. As a plus the LED
provides a nice night light and confirmation the controller is powered up.
DC Power The 9V 1A wall wart style switching power supply is connected to the low voltage field wiring terminal
strip. It plugs into a receptacle located on the chassis separator bracket. 9 volts is feed to the: PLC, SSRs,
front panel LEDs, humidity fan, and the front panel temperature display. 5 volts, required by the sensors
and interface logic, is provided by a linear regulator on the PLC. I added a heat sink to the regulator as a
precaution for hot summer days. The PLC, interface PCB, SSRs, and LEDs draw 250 - 300ma from the 9
volt supply. The humidity fan draws 500ma. The switching supply is very efficient minimizing waste heat
dumped into the enclosure.

18
AC Power Greenhouse power is supplied by a dedicated 20 Amp 120 volt
circuit protected by a GFCI. This is an important safety consideration
given the close proximity of electricity and water. I choose to use a
GFCI circuit breaker rather than a GFCI receptacle because I wanted
to split each receptacle into a switched and unswitched side.
PVC conduit protects exposed wiring on the east and south walls.
Plastic conduit is inexpensive, does not rust, provides mechanical
and water protection of exposed wiring. The north wall between
basement and greenhouse is an insulated stud wall. Wiring in the
wall is NMC cable.
The National Electrical Code (NEC) requires protection when
receptacles are used in web locations. With the exception of the
twist-lock receptacle used to power the ceiling vent fan all outlets
have a plastic protective cover.
Sensor Cabling I used two Cat5e cables to interconnect the various sensors. The preferred topology for 1-wire devices is
a daisy chain. A daisy chain minimizes the negative effects of reflections due to the unterminated nature
of the bus. Temperature sensors are located both in the greenhouse and the house. Within the
greenhouse I looped the sensor cable to all locations that require temperature sensors or other inputs
then back to the controller. This allowed me to terminate both ends of the cable within the controller.
This provides several benefits. I terminated both ends of greenhouse cable’s power and ground
conductors effectively doubling the wire gauge, reducing voltage drop. Currently I’m only using 7 of the
8 loop cable conductors, having access to both ends of the cable means if I need to add additional inputs
or outputs I can cut the loop to allow switches and sensor to feed one end or the other. The loop also
provides some measure of fault tolerance.
Several temperature sensors are external to the greenhouse. The near end of the looped cable’s 1-wire
temperature data lead is terminated at the PLC and the distal end is extended into the house along with
power and ground, maintaining the optimum daisy chain configuration through both wire segments.
Used a 19-gauge 4-wire cable I had laying around for the house cable to connect the outside air temp,
well water temp, the wood stove preheat tank and electric water heater temp sensors. The 4th wire of
the house cable allows the greenhouse to signal the wood heat controller about freeze events.
Maxim/Dallas 1-wire application notes provide recommendations to deal with signaling problems over
long networks. Even though total cable length is about 35 meters the system operates flawlessly
without needing any of those tweaks. By 1-wire standards this is a medium sized network.

19
I needed more than 8 conductors for greenhouse sensors so ran a second Cat5e cable from the
controller to the sensor box. This cable provides point to point wiring for the display temperature sensor
and the humidity senor.
Two Cat5e cables provide dual Ethernet LAN drops, only one of which is being used. These cables
connect to the Ethernet patch panel within the house.
To-do List I’m very pleased with the results but as typical with projects have no shortage of ideas for future
modifications.
1) I plan to add another temperature sensor embedded into the stone floor to monitor its
temperature.
2) Better status communication with wood heat controller. Currently the wood heat controller
reports greenhouse controller health status based on the presence of 5V on the temp sensor
lead. The firmware I’m now using on both systems enables IP based communication between
the controllers. Taking advantage of this will improve heath reporting.
Conclusions This has been a fun project and has greatly improved the performance of our greenhouse.
For anyone considering this type of project it is important to think about life cycle issues. The
greenhouse structure and wiring have an extremely long life expectancy compared to the individual
electronic modules. Think about how to handle a module failure 5 or 10 years down the road. Perhaps it
is the packrat in me but given the inexpensive nature of the major components I’ve purchases spares
that can be placed in service without mechanical, electrical, or software modification in the event of
failure.

20
Appendix A Schematics
Chassis Wiring A 16-position DIP plug connects the interface board to sensor inputs and SSR DC control. Power and
ground use 22 AWG wire to minimize voltage drop. Temperature 5V is obtained from the PLC and used
to power the PLC and display temperature sensors. Power and ground for the humidity sensor is
connected directly to the PLC to minimize effects of digital noise.
A .5 amp fuse limits fault current to the 9 volt power supply.

21
Front Panel Wiring Front panel wiring picks up all the switches and LEDs in addition to the 1-wire temperature display
module. The switching circuitry for the humidity fan is located on a small perf board mounted to the
rear of the fan toggle switch and status LED. A FET low side switch is used to minimize fan voltage drop.
Fan is rated for 12 volts but operates fine at 9, with obviously reduced air flow.

22
PLC Wiring Two ribbon cables connect the PLC to the Interface board. A 16-pin header to header cable connects
analog and digital inputs. Note: the PLC number’s the header sequentially. Conventional practice is to
alternate pin numbers on ribbon cable headers so numbers are sequential across the cable. The other
cable terminates at small barrier strips. The flash lead is soldered to the flashing health LED on the PLC.
5V for temp sensors is picked up directly from the PLC temperature header and routed to the field
wiring terminal strip.

23
Interface – Logic The Interface board is the central interconnect between the various portions of the controller and
provides simple hardware logic and ESD protection. The PLC interface consists of a 16 and 20 pin header.
Front panel wiring terminates to a 20-pin header providing lots of spares. And lastly a 16-pin DIP plug
connects to the LV terminal board and SSR control.

24
Interface – Switch Conditioning This page shows switch conditioning and termination of unused spare gates.

25
Sensor Wiring The loop cable originates at the controller and travels along all four greenhouse walls then returns to
the controller. Loop wiring is routed through the light switches by each entrance door and connected to
the magnetic door switches. A four conductor cable connects the 1-wire PLC temperature sensors in the
house and provides freeze notification to the wood heat controller.
At various locations I installed 4-postion terminal bocks (old style telephone 42A
junction blocks) to facilitate adding additional temperature sensors.
The point to point cable originates at the controller, runs across the south wall of
the greenhouse and terminates at the ventilated chassis. The display temperature
and PLC humidity sensor use this cable.
A small ventilated chassis is located on the south wall. It houses temperature sensors for the PLC and
digital display, the humidity sensor and a 4-position terminal block to allow attachment of an additional
cabled temperature sensor.

26
Appendix B PLC Configuration Screenshots of various WebControl configuration pages.
Network Setup This page selects DHCP or static IP configuration. It also allows setting the NetBIOS name. Web access to
the controller can be unrestricted or require username/password login.
WebControl time can be set automatically via NTP or manually. The controller does not have a built in
battery backed real time clock, time must be set each time controller is powered up or firmware sets
default date/time. I run my own LAN based NTP time server so point the controller at that time server
rather than one on the Internet.
Pressing “Send” updates network setting and reboots the PLC. This is a handy way to reset the PLC
remotely even when not making any changes to network settings.

27
I/O Setup Individual outputs can be configured to allow PLC control and direct control from a browser. In most
cases PLC code will force the output to correct value even if web browser attempts to set or reset it but
if not explicit control can be determine on this page. The active polarity of the outputs is set from this
page.
Temperature Setup 1-wire devices are individually serialized. The controller detects temperature sensors at power up but
they must be manually assigned to a particular sensor ID and units of measure specified.

28
Email Setup Email can be set up to use any TCP/IP port but the unit does not support SSL. In addition to email this
page also configures HTTP GETs (not used in this example).
Up to eight email messages may be configured and each can be sent to a different address. In addition
to the subject line and message body the system automatically appends information from the System
Status page.
I noticed a problem setting message body with some web browsers (Firefox, chrome, IE10) the second
character of each line after the first is lost. Setting message body works fine using IE8.

29
Appendix C PLC code
Greenhouse Controller
T. Schmidt
*********** Change Log *********************
3/2/2015 Bypassed PLC series diode on terminal strip and disconnected 10Uf
cap on switched fan. Added heatsink to PLC 5V linear regulator.
2/3/2015 Changed VAR8 to RAM8 to free up VAR8 for debug. Freeze bit pulsing
at 0/30 minutes not working. Fixed bug, REALCOLD stops being called
once there is an increase in temp. Added call to FRZWINK from
ADDSECOND - this insures if fan is still running at 0/30 minutes
past the hour Freeze will get pulsed again.
1/29/2015 Added Freeze bit pulse at 0 & 30 minutes when basement fan running
to insure wood stove controller does not timeout during extreme
cold if fan runs longer than wood stove controller timeout.
1/23/2015 Added code to pulse Freeze bit for 200ms when basement fan started.
This wakes up wood stove controller to insure fresh air fan is on.
House is so tight GH basement fan tends to depressurize house.
1/6/2015 Fixed bug, rock fan not turned off when inside temp low and basement
fan running
12/30/2014 1) Changed UROM1-3 entry to degrees (from .1F) to make temp setting
more user friendly.
2) Reduced basement fan hysteresis to 1F (from 2F) to reduce fan run
time in cold weather. Fan will run more frequently but for shorter
period. This will also reduce high GH temp by 1F saving a few
house BTUs.
12/7/2014 Added debug email sent at power up. Looks like intermittent PS
problem. This is consistent with occasionally GH fail email from
Wood Stove cntrl.
Update 2/1/2015 - Occasional system reset caused by PS droop when
humidity fan turned on. Need to rework hardware to remove PLC power
diode to increase voltage to PLC and increase bulk capacitance
on 9V supply. Will add heatsink to 5V linear reg on PLC.
11/30/2014 Removed UROM bounds email inhibit on power up. Temp logger/basement
fan run time counter getting reset randomly again.
1/2/2014 Added basement fan run time logger. VAR1 reports number of seconds

30
basement fan on since last morning/evening email. Count is reset
when morning and evening email sent. Removed temperature logger
debug code. Fault no longer occurring - have no idea why.
11/25/2013 Changed VAR1 to VAR8 to see of possible FW bug resetting VAR1.
Manually set VAR1 to 1234 to detect reset.
11/22/2013 Low temp logger randomly being reset to current temp. Added debug
email when logger reset and changed powerup reg RAM8 to VAR3
to verify if powerup flag reset. Email logger shows that VAR1
used to manage email is being reset to 0 power up flag unaffected.
8/29/2013 Added validity check to freeze warning, must be low >3 sec.
7/7/2013 Added range check to UROM values, email sent after each value
change indicating in range or out of range.
indicating out of range or in range.
7/5/2013 1) Added power up init delay for temp sensor
2) Fixed bug if temp sensor bad at power up no email sent.
3) Fixed logger bug does not report min temp first cycle
after boot
4) Cleaned up humidity code
5) Replaced failed water drum temp sensor - T3
7/2/2013 Reinstalled controller
1) Using OP7 for humidity fan
2) Temp status fixed now testing all temp sensors
3) Changed logic state of freeze reset push button
7/1/2013 Modified hardware
1) Replaced freeze warning PB LS04 with 7407 to reuse inverter.
2) Added OP7 DC humidity fan control circuitry
3) Added freeze warning output to wood stove controller
4) Added TVS to 9v input
6/29/2013 WebControl PCB returned with updated firmware, 3.2.17d.
6/17/2013 Replaced light SSR with EMR to resolve problem with SSR
snubber causing CFLs to occasionally flash. Added gasket
to both ceiling CFLs to prevent water ingress.
3/21/2013 CAI Networks confirmed temp status bug. I submitted another
bug report developing wood heat controller. Same bug they
thought they fixed before. Confirmed temp status bits working
in FW version 3.2.17b.
1/5/2013 Email does not report min/max temperature correctly, always
reports current value. Unclear when email is sent relative to

31
user code request. Modified routine so temp reset to current
value is delayed Approx. 5 seconds after requesting email.
Looks like it takes about 1.5 seconds to send email. Assume
system code logs into SMTP server before creating email text
body.
Added Hi temp logging in addition to low temp.
Changed bad sensor debounce to minimize spurious email.
1/4/2013 Added low temperature logging to morning and evening email.
Lowest temp since last email reported in VAR5. Moved
12/5/2012 Added humidity control exhaust fan. Small DC 100 cfm muffin
fan exhausting through high quality dryer vent. Temporarily
used switched AC outlet channel. Need to update hardware in
summer with FET controlled DC Fan power to free up outlets
for other use.
10/30/2012 Installed
9/26/2012 Temp status does not report Temp sensors 7/8 correctly.
Submitted bug report to CAI Networks, stated 3.2.11 FW is a
year old and that bug is fixed in ver 3.2.12, current FW is
3.2.15. Cost $15 to upgrade. Choose not to upgrade at this
time.
6/25/2012 Code start
2/7/2012 Project start
*************** PCB Hardware/Firmware version ****************
Hardware: 2.2.2
Firmware: 3.2.17d
Customer loop executed every ~50ms (minimal test code) 65ms-ish (real code)
VAR and RAM initialized to 0 by system at power up
To reset PLC to power up state - update network settings (Send)
RAM location reset to 0 on code upload, VAR not affected
WebControl takes about 400ms to init I/O at power up
Per CAI Support Temp sensors take up to 2 sec to stabilize at power up
Email takes about 1.5 sec to send, no timeout if SMTP server does not respond
TTL inputs have 10k pulldown
Output buffers 10mA per output, 30mA total
A/D 10V full scale 10-bits
9V power consumption:
WebControl only 175ma (Live Ethernet serving web page)
WebControl + interface 220-250ma

32
Humidity fan: 500ma
***************** I/O Defs **********************
Analog Inputs
-------------
AIP1 - not used
AIP2 - not used
AIP3 - not used
Digital Inputs
--------------
IP1 - Light_on
IP2 - Light_off
IP3 - Ent_Dr_closed
IP4 - Bsmt_fan_dr_closed
IP5 - Spare_input
IP6 - /Freeze_pushbutton
IP7 - not used
IP8 - not used
Digital Outputs
---------------
OP1 - Rock_fan
OP2 - Ceiling_fan
OP3 - Outlets
OP4 - Basement_fan
OP5 - Light
OP6 - Freeze_warning
OP7 - Humidity_fan
OP8 - not used
Temperature Sensors
-------------------
T1 - Outside_air (house Northeast corner)
T2 - Inside_air (GH southwest corner)
T3 - Water_drum (north wall east of door)
T4 - not used
T5 - Well pressure tank
T6 - GH solar batch heater (east tank)
T7 - Wood stove water storage
T8 - Electric water heater
Temp Sensor status (1 = OK)
------------------
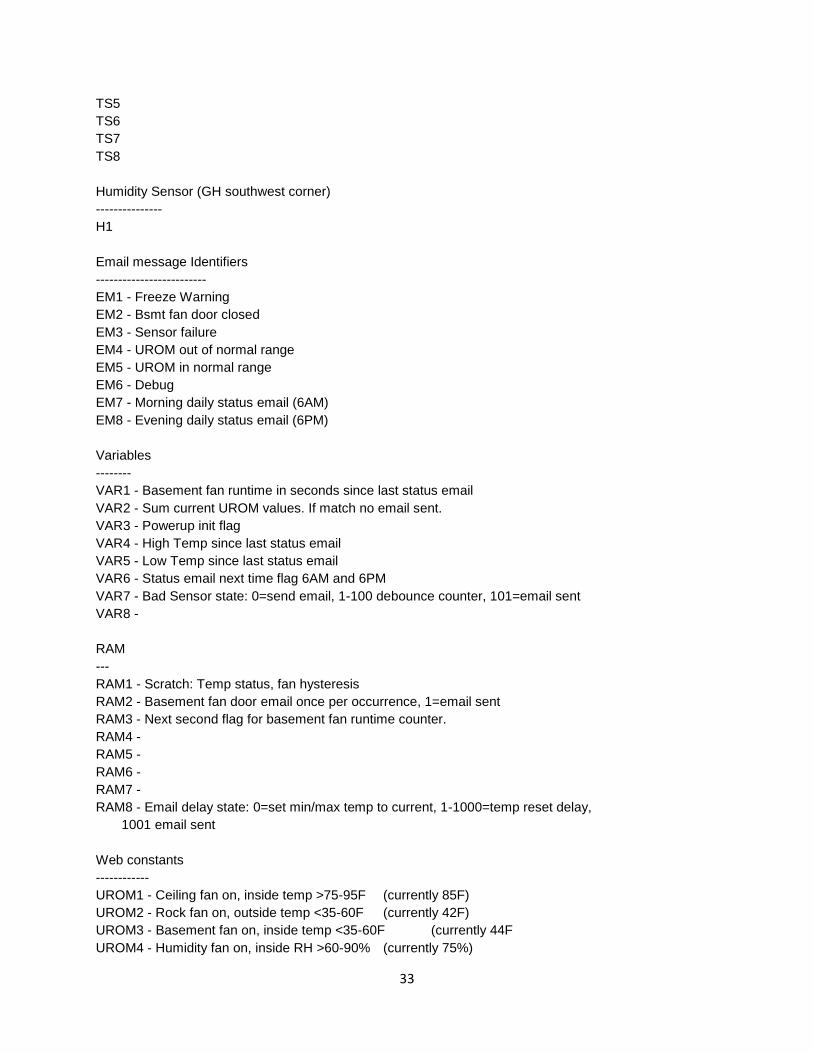
TS1
TS2
TS3
TS4
33
TS5
TS6
TS7
TS8
Humidity Sensor (GH southwest corner)
---------------
H1
Email message Identifiers
-------------------------
EM1 - Freeze Warning
EM2 - Bsmt fan door closed
EM3 - Sensor failure
EM4 - UROM out of normal range
EM5 - UROM in normal range
EM6 - Debug
EM7 - Morning daily status email (6AM)
EM8 - Evening daily status email (6PM)
Variables
--------
VAR1 - Basement fan runtime in seconds since last status email
VAR2 - Sum current UROM values. If match no email sent.
VAR3 - Powerup init flag
VAR4 - High Temp since last status email
VAR5 - Low Temp since last status email
VAR6 - Status email next time flag 6AM and 6PM
VAR7 - Bad Sensor state: 0=send email, 1-100 debounce counter, 101=email sent
VAR8 -
RAM
---
RAM1 - Scratch: Temp status, fan hysteresis
RAM2 - Basement fan door email once per occurrence, 1=email sent
RAM3 - Next second flag for basement fan runtime counter.
RAM4 -
RAM5 -
RAM6 -
RAM7 -
RAM8 - Email delay state: 0=set min/max temp to current, 1-1000=temp reset delay,
1001 email sent
Web constants
------------
UROM1 - Ceiling fan on, inside temp >75-95F (currently 85F)
UROM2 - Rock fan on, outside temp <35-60F (currently 42F)
UROM3 - Basement fan on, inside temp <35-60F (currently 44F
UROM4 - Humidity fan on, inside RH >60-90% (currently 75%)

34
**************************************************
GHINIT
Runs once at power up. Delay for temp sensors to stabile and sets VAR3 flag
RANGECHK
Tracks UROM values. Whenever value changes upper and lower bound for each is
tested and "in bound" or "out of bound" email sent. Runs at powerup and each
time UROMx value changed. Values are checked but FW does not override user
entered value.
NOTE: if one value is decreased by same amount another increased, sum does
not change so email is not sent.
LIGHT
Ceiling light control, latches last state of door pushbuttons
CEILING
Ceiling exhaust fan, on if inside air temp >UROM1
ROCK
Rock storage blower on when outside air temp <UROM2. Overridden if basement
fan on. No reason to attempt to store heat in rock floor if we are blowing
air in from the basement.
BSMT
Basement fan blows air in from basement if inside air temp is <UROM3. If fan
door is closed, LED blinks and email warning sent. VAR1 incremented each
second basement fan runs providing a cumulative total of run time. Count
is reset at morning and evening email. Accurate to +/- 1 second.
Pulses freeze bit for 200ms to wake up wood stove control each time fan is
started. This insures fresh air fan, connected to wood stove controller, is
running to prevent depressurization when basement air is pumped into greenhouse.
If fan is running at 0 and 30 minutes past the hour pulses freeze again to
make sure wood stove controller idle timer does not turn controller off.
FREEZE
If inside temp drops dangerously low, email sent and wood stove controller
activated to sound audible alert. Push button used to reset alarm. When
freeze is reset delay is invoked to cause LED to flash off momentarily if
reset while inside temp still too low.
HUMIDITY
If outside temp low enough and inside temp not too low and % humidity
exceeds URoM4 set point small exhaust fan on.
SENSOR

35
Monitors health status of 1-wire temp sensors, If sensor status bad for 100
passes through user code (VAR7) email sent. Reset if status returns to good.
EMSTATUS
Min/max temperature logged and basement fan run time. Status email sent
6AM and 6PM every day.
******************* Code *************************
START
TSTNE VAR3 1
CALLSUB GHINIT
CALLSUB RANGECHK
CALLSUB LIGHT
CALLSUB CEILING
TSTEQ OP4 0
CALLSUB ROCK
CALLSUB BSMT
CALLSUB FREEZE
CALLSUB HUMFAN
CALLSUB SENSOR
CALLSUB EMSTATUS
END
GHINIT:
SET VAR3 1
SET VAR7 100
DELAY 3000
RET
RANGECHK:
ADD UROM1 UROM2 RAM1
ADD UROM3 RAM1 RAM1
ADD UROM4 RAM1 RAM1
TSTEQ VAR2 RAM1
RET
SET VAR2 RAM1
TSTLT UROM1 75
GOTO BADUROM
TSTGT UROM1 95
GOTO BADUROM
TSTLT UROM2 35
GOTO BADUROM
TSTGT UROM2 60
GOTO BADUROM
TSTLT UROM3 35

36
GOTO BADUROM
TSTGT UROM3 60
GOTO BADUROM
TSTLT UROM4 60
GOTO BADUROM
TSTGT UROM4 90
GOTO BADUROM
EMAIL EM5
RET
BADUROM:
EMAIL EM4
RET
LIGHT:
TSTEQ IP1 1
SET OP5 1
TSTEQ IP2 1
SET OP5 0
RET
CEILING:
MUL UROM1 10 RAM1
TSTGE T2 RAM1
SET OP2 1
SUB RAM1 20 RAM1
TSTLE T2 RAM1
SET OP2 0
RET
ROCK:
MUL UROM2 10 RAM1
TSTLE T1 RAM1
SET OP1 1
ADD RAM1 20 RAM1
TSTGE T1 RAM1
SET OP1 0
RET
BSMT:
MUL UROM3 10 RAM1
TSTLE T2 RAM1
CALLSUB REALCOLD
TSTEQ OP4 1
CALLSUB ADDSECOND
ADD UROM3 1 RAM1
MUL RAM1 10 RAM1
TSTLT T2 RAM1

37
RET
SET OP4 0
SET RAM2 0
RET
REALCOLD:
TSTEQ IP4 1 OP1
NOP
TSTEQ IP4 0
CALLSUB FRZWINK
TSTEQ OP4 0
ADD CS 1 RAM3
TSTEQ IP4 0 OP4
RET
TSTEQ RAM2 0
EMAIL EM2
SET RAM2 1
RET
ADDSECOND:
CALLSUB FRZWINK
TSTNE CS RAM3
RET
INC VAR1
INC RAM3
TSTGE RAM3 60
SET RAM3 0
RET
FRZWINK:
TSTEQ OP6 1
RET
TSTEQ OP4 0
GOTO FRZWINK2
TSTEQ CM 0
GOTO FRZWINK1
TSTNE CM 30
RET
FRZWINK1:
TSTNE CS 0
RET
DELAY 800
FRZWINK2:

38
SET OP6 1
DELAY 200
SET OP6 0
RET
FREEZE:
TSTLE T2 360
CALLSUB NEWFREEZE
TSTEQ IP6 0
SET OP6 0
RET
NEWFREEZE:
TSTEQ OP6 1
RET
DELAY 3000
TSTGT T2 360
RET
SET OP6 1
EMAIL EM1
RET
HUMFAN:
TSTGE T1 700
GOTO HUMOFF
TSTEQ OP2 1
GOTO HUMOFF
ADD UROM3 5 RAM1
MUL RAM1 10 RAM1
TSTLE T2 RAM1
GOTO HUMOFF
SUB UROM4 2 RAM1
TSTLE H1 RAM1
GOTO HUMOFF
TSTGE H1 UROM4
SET OP7 1
RET
HUMOFF:
SET OP7 0
RET
SENSOR:
AND TS1 TS2 RAM1
AND TS3 RAM1 RAM1
AND TS5 RAM1 RAM1

39
AND TS6 RAM1 RAM1
AND TS7 RAM1 RAM1
AND TS8 RAM1 RAM1
BZ BADSENSOR
SET VAR7 100
RET
BADSENSOR:
TSTEQ VAR7 101
RET
DEC VAR7
TSTNE VAR7 0
RET
EMAIL EM3
SET VAR7 101
RET
EMSTATUS:
TSTEQ RAM8 0
GOTO NEWMINMAX
TSTEQ RAM8 1001
GOTO LOGGER
DEC RAM8
RET
NEWMINMAX:
SET RAM8 1001
SET VAR4 T2
SET VAR5 T2
SET VAR1 0
RET
LOGGER:
TSTGT T2 VAR4
SET VAR4 T2
TSTLT T2 VAR5
SET VAR5 T2
TSTEQ CH 6
GOTO MORNMAIL
TSTEQ CH 18
GOTO EVENMAIL
RET
MORNMAIL:
TSTEQ VAR6 18
RET

40
EMAIL EM7
SET VAR6 18
SET RAM8 1000
RET
EVENMAIL:
TSTEQ VAR6 6
RET
EMAIL EM8
SET VAR6 6
SET RAM8 1000
RET
******************* End **************************