homeowner technical training course - · pdf fileif the tank ball or flapper ... only use a...
TRANSCRIPT

Welcome! Today’s topic:
Small Home Repairs
November 14, 2015

Small Home Repairs Course
Presented by Monique Johnson
Environmental Green Solutions, LLC

Objective Educate homeowners on basic technical skills that
will help the homeowner understand daily operations of different functionalities around the home.
Basic technical skills include:
* Minor Plumbing
* Minor Electrical
* Minor HVAC - Heating, Ventilation, Air Conditioning

Basic Plumbing

Plumbing This objective will help homeowners understand the
functionality of their plumbing equipment and how to properly fix, install, and maintain minor plumbing issues.
Identify tools needed for minor repairs.

Tools and Supplies Pipe wrench
Crescent wrench
Flat and Phillips head screwdrivers
Plumber’s grease
Needle nose pliers
Teflon tape

Toilets How A Toilet Works: 1. Push the handle to release the flush valve.
This opens the connection between the tank and the bowl.
2. Water is “poured” quickly from the tank into the bowl.
3. Allowing the water in creates a siphon effect.
4. The siphon effect empties the bowl from the suction created.
5. Fresh water begins to fill the tank because the level indicator (or float) turns the supply valve on
6. When float reaches the predetermined level, it triggers the supply valve to shut off.

Old vs. New Tank Parts (Older Style) float ball (Newer Style) Fill Valve
Fill valve
Flapper
Overflow tube
Float ball
Flapper
Overflow tube Handle

Common Toilet Problems
Water runs continually
Water spills into overflow tube
Toilet does not flush completely
Tank is leaking
Water runs after flushing
Base of toilet is leaking
Toilet clogged
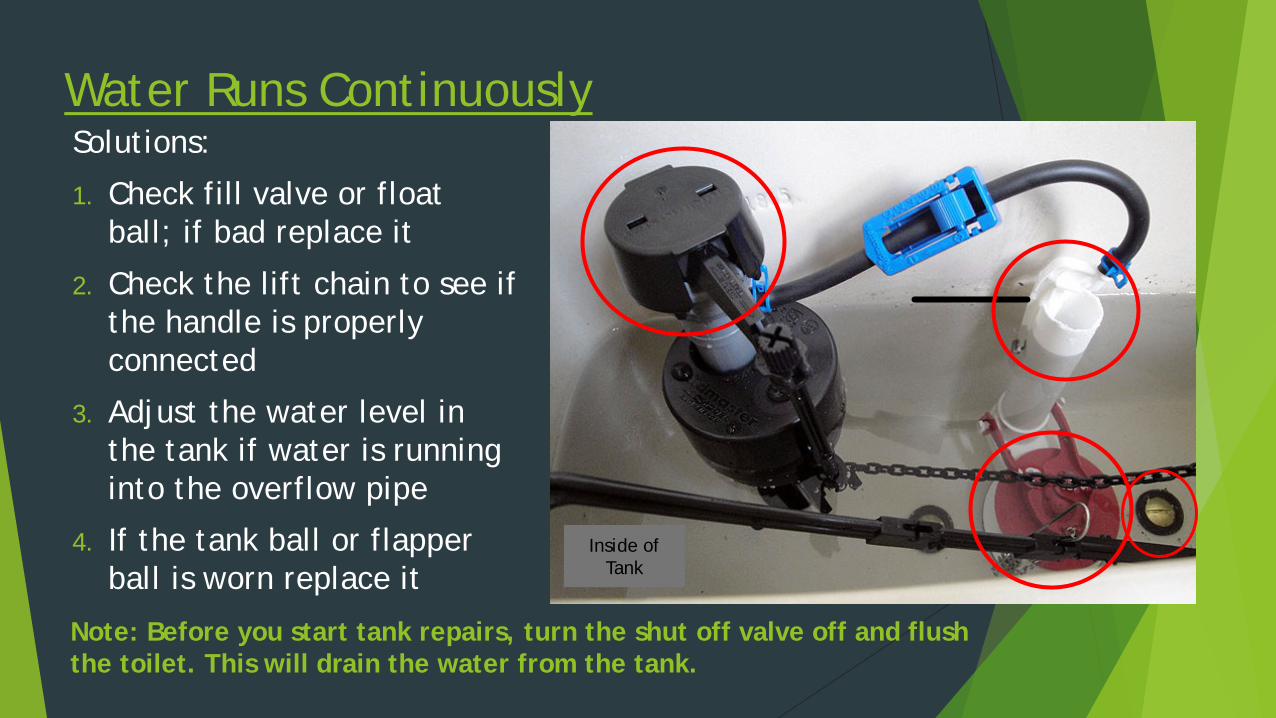
Water Runs Continuously Solutions:
1. Check fill valve or float ball; if bad replace it
2. Check the lift chain to see if the handle is properly connected
3. Adjust the water level in the tank if water is running into the overflow pipe
4. If the tank ball or flapper ball is worn replace it
Inside of Tank
Note: Before you start tank repairs, turn the shut off valve off and flush the toilet. This will drain the water from the tank.

Water Spills Into the Overflow Tube
1. Adjust the float arm clamp (by bending downward or upward) so that the water level is about ½” to 1” below the top of the over flow tube
2. Replace the float ball or fill valve if it has filled with water
Overflow tube
Factory predetermined
level
Above fill line

Toilet Does Not Flush Completely Solutions:
1. Adjust the lift chain to make sure there is not too much slack.
2. Raise the level ½” to 1” below the top of the overflow tube by bending the float arm upward.
3. Check flush handle to see if handle nut is tight.
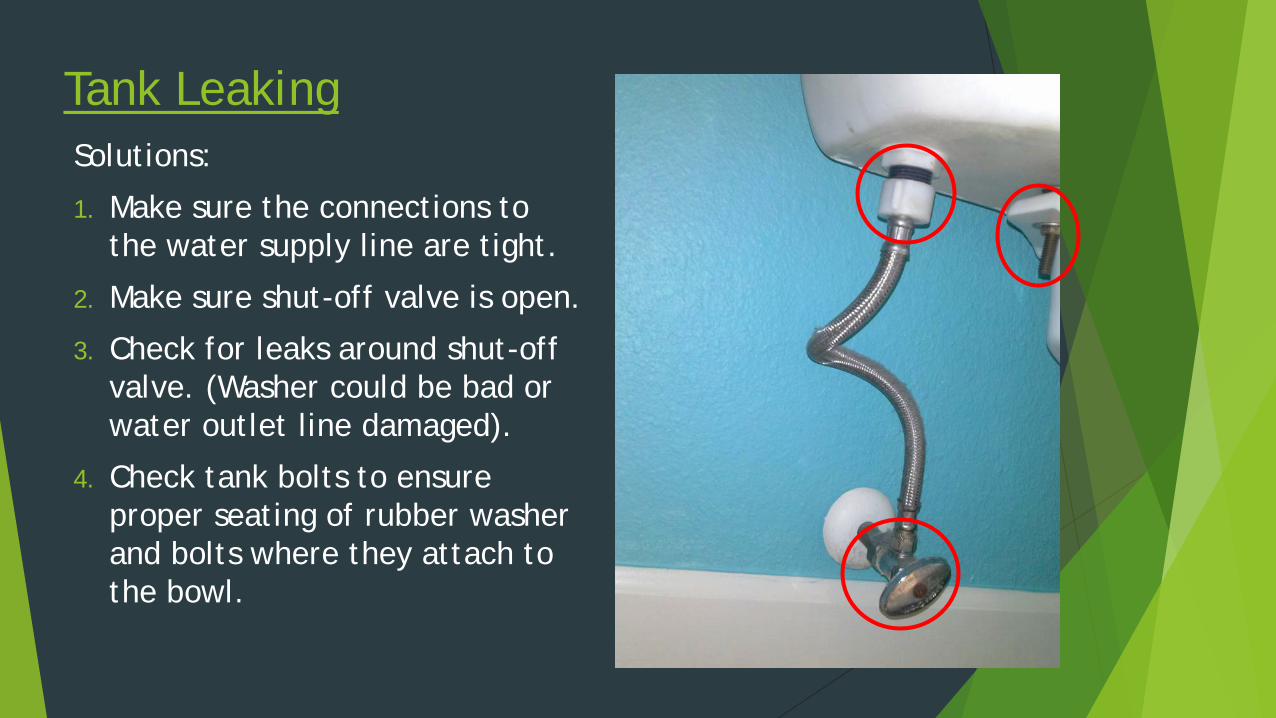
Tank Leaking Solutions:
1. Make sure the connections to the water supply line are tight.
2. Make sure shut-off valve is open.
3. Check for leaks around shut-off valve. (Washer could be bad or water outlet line damaged).
4. Check tank bolts to ensure proper seating of rubber washer and bolts where they attach to the bowl.

Water Runs After Flushing Solutions:
1. Check tank flapper to make sure that it is properly seated on flush valve. If flapper is worn replace it.
2. Adjust fill valve or float ball.
3. Check the tank water level.
Fill valve
Flapper
Fill tube

Base of Bowl Leaking Solutions:
1. Tighten the bolts at the base of the bowl.
2. Replace wax ring gasket under the bowl.
3. Toilet bowl needs to be realigned.(If you notice the bathroom floor is not level spacers will be required for proper alignment.)
Wax ring
Note: Always replace the wax ring when reinstalling a toilet.
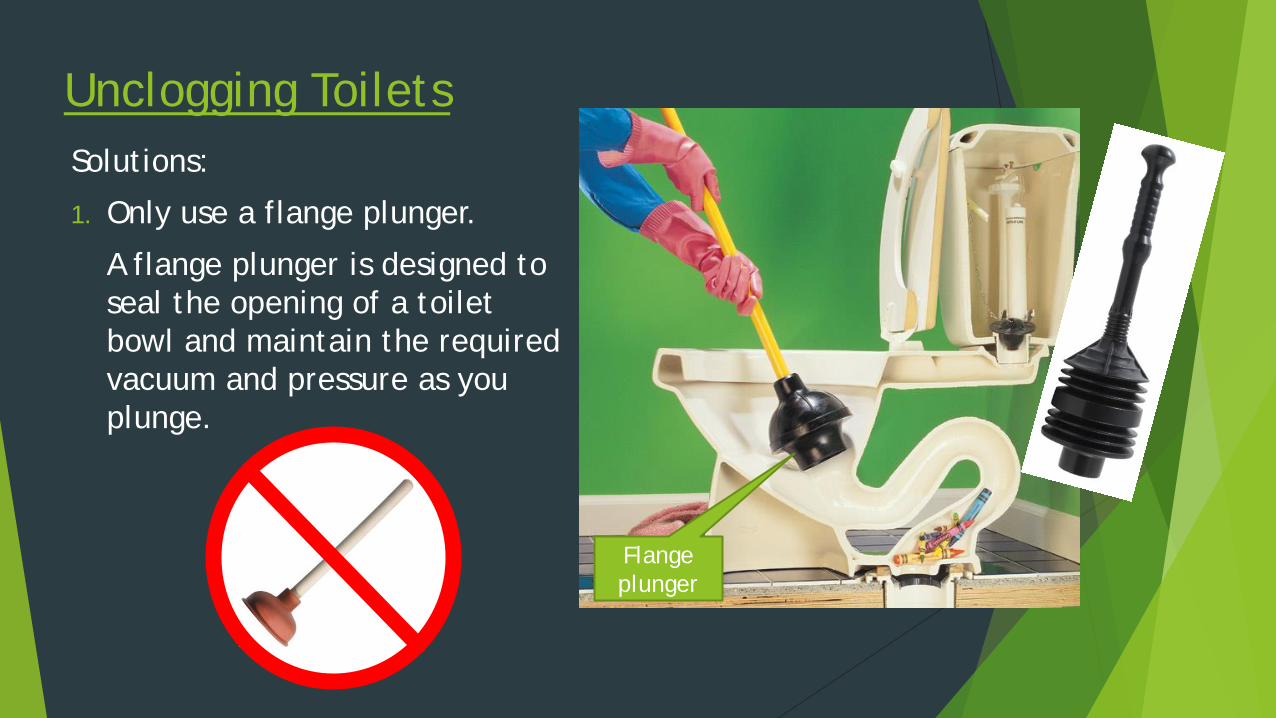
Unclogging Toilets Solutions:
1. Only use a flange plunger.
A flange plunger is designed to seal the opening of a toilet bowl and maintain the required vacuum and pressure as you plunge.
Flange plunger
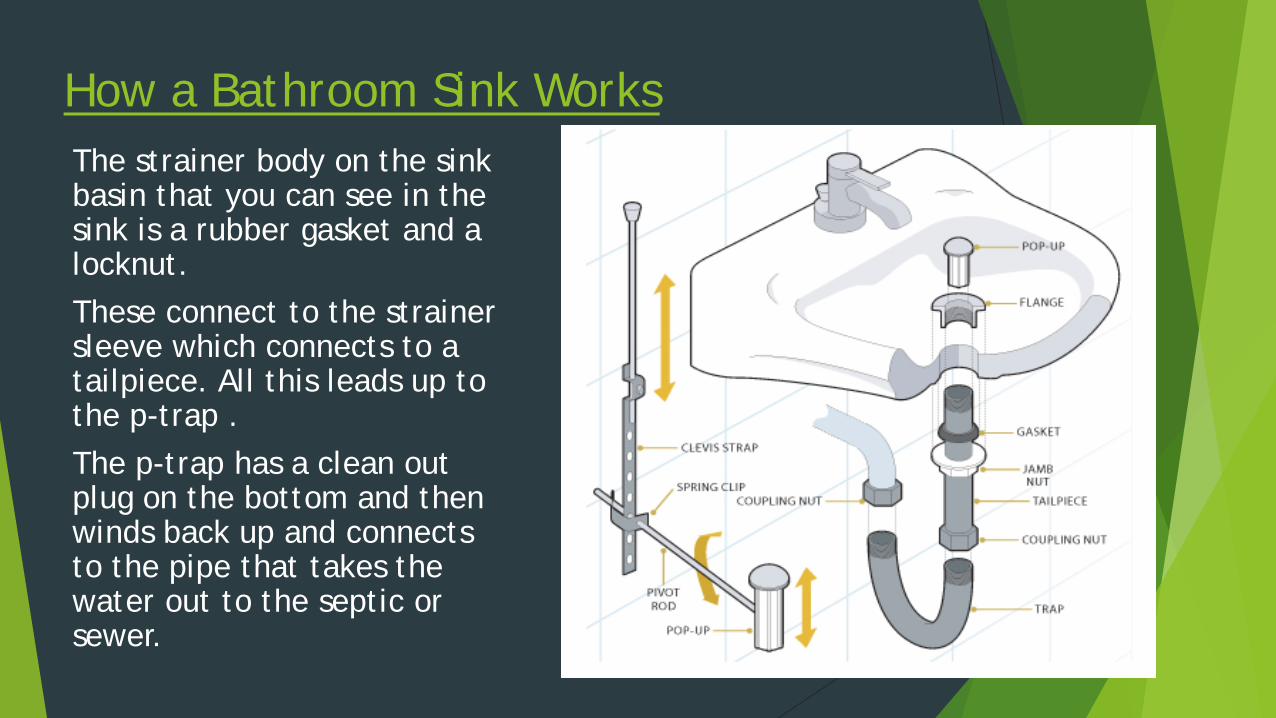
How a Bathroom Sink Works The strainer body on the sink basin that you can see in the sink is a rubber gasket and a locknut. These connect to the strainer sleeve which connects to a tailpiece. All this leads up to the p-trap . The p-trap has a clean out plug on the bottom and then winds back up and connects to the pipe that takes the water out to the septic or sewer.

Common Bathroom Sink Problems Faucets leaking
Missing or worn slip nut gasket
Clogged p-traps
Shut-off valve leaking
Worn or damaged pop-up assembly
Drain pipe leaking
Supply lines leaking
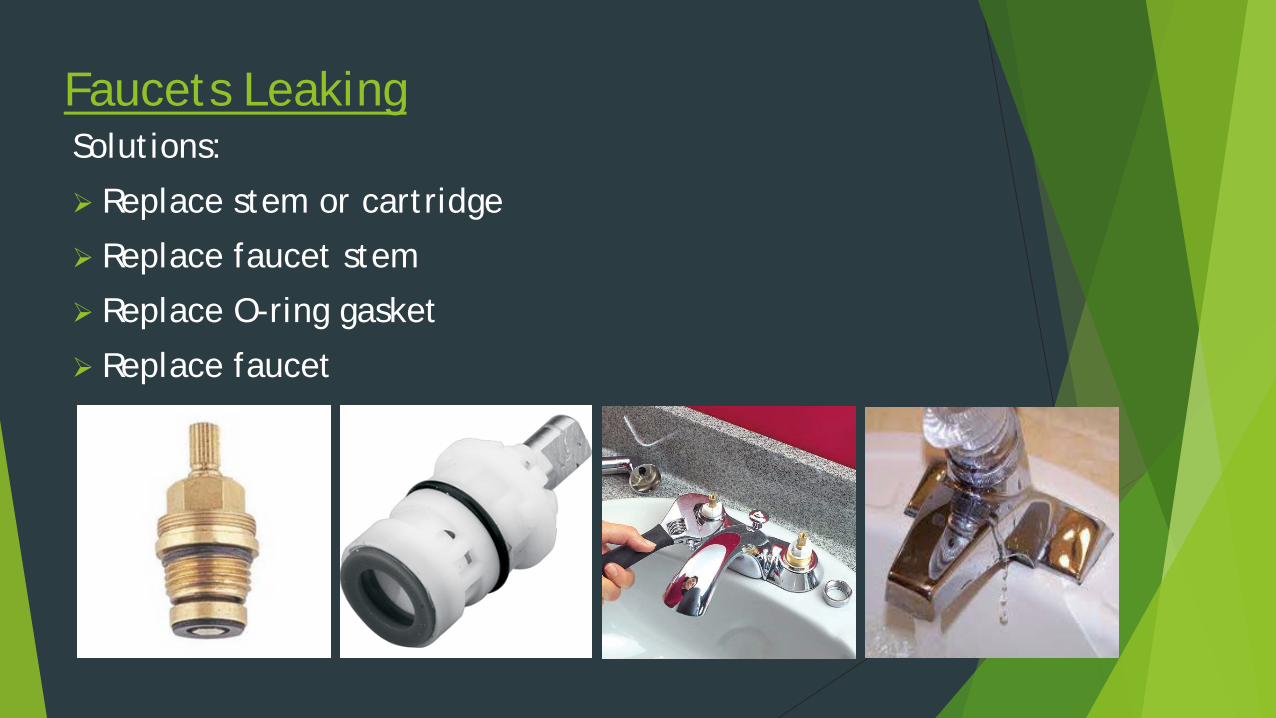
Faucets Leaking Solutions:
Replace stem or cartridge
Replace faucet stem
Replace O-ring gasket
Replace faucet

Missing or Worn Slip Nut Gasket Solutions:
Replace gasket
Tighten slip nut
Replace slip nut
Gasket
Slip nut

Clogged P-Traps Solutions:
Remove p-trap and clean out trap
Replace it
Install a pressure p-trap

Leaky Shut-Off Valves Solutions:
Tighten packing nut
Replace packing nut
Check water supply line
Safety: When working on water supply lines you must cut the main shut-off valve off first.
Valve #2
Valve #1
Packing nut
Shut off valves
Shut off valves

Leaky Supply Lines
Solutions:
Always check your connections
Tighten any line that feels loose
Replace it
Supply lines

Worn or Damaged Pop-Up Assembly Solutions:
Replace gasket
Replace tailpipe
Replace or repair pivot rod
Replace pop-up assembly
Replace spring clip
Replace clevis strap
Gasket Spring clip
Clevis strap
Tailpipe
Pivot rod
Pop-up assembly
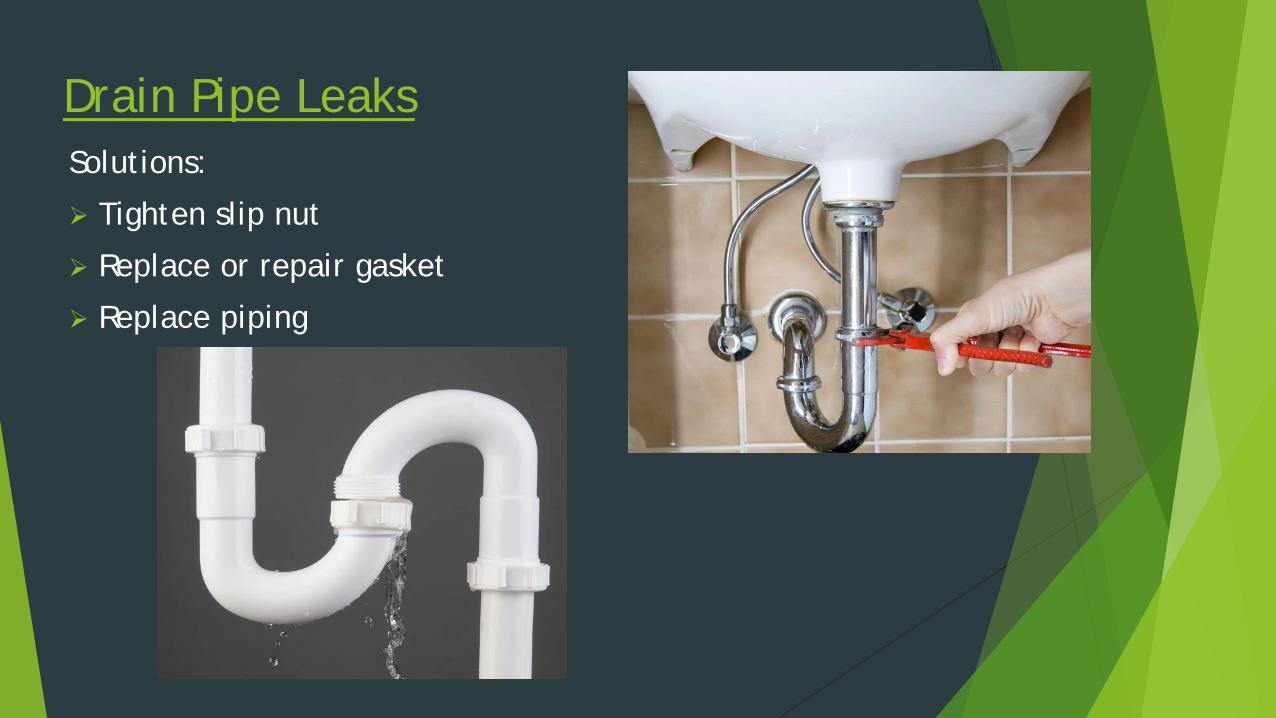
Drain Pipe Leaks Solutions:
Tighten slip nut
Replace or repair gasket
Replace piping

Basic Electrical

Electrical This objective will help
homeowners understand the functionality of their electrical equipment as well as how to properly fix, install, and maintain minor electrical issues.
Identify tools needed to fix minor repairs.
Safety: Always disconnect power before starting ANY electrical repairs

How Does Electrical Service Work? Electricity enters your home from the power company
via a 240v power line into your meter base outside the home.
The panel box that feeds from the meter base contains breakers (or fuses in older homes).
The circuit breakers divert the electricity along small wires running behind your walls, crawl space, and roof. This allows the forming of separate circuits around your house which deliver electricity to all the switches and power points.
Houses have multiple circuits to help the electrical current stay small, reducing the risk of overloading the circuits.
Fuses and circuit breakers automatically block incoming surges of electrical power over a safety limit. (A circuit breaker sometime can be simply switched back on.)
Panel box Meter base

Common Electrical Problems
Tripped GFCI (Ground Fault Circuit Interrupter)
Tripped breaker
No power to wall outlet
Lights flickering
Broken bulb in fixture
Broken or missing outlet plate cover
Broken or burned outlet

Tripped GFCI (Ground Fault Circuit Interrupter) 1. Reset set GFCI by pushing the reset button
2. Check breakers in your home panel box.
3. Replace it
Safety: Always turn power off before replacing any electrical equipment.
2
3
Reset button
Test button
1
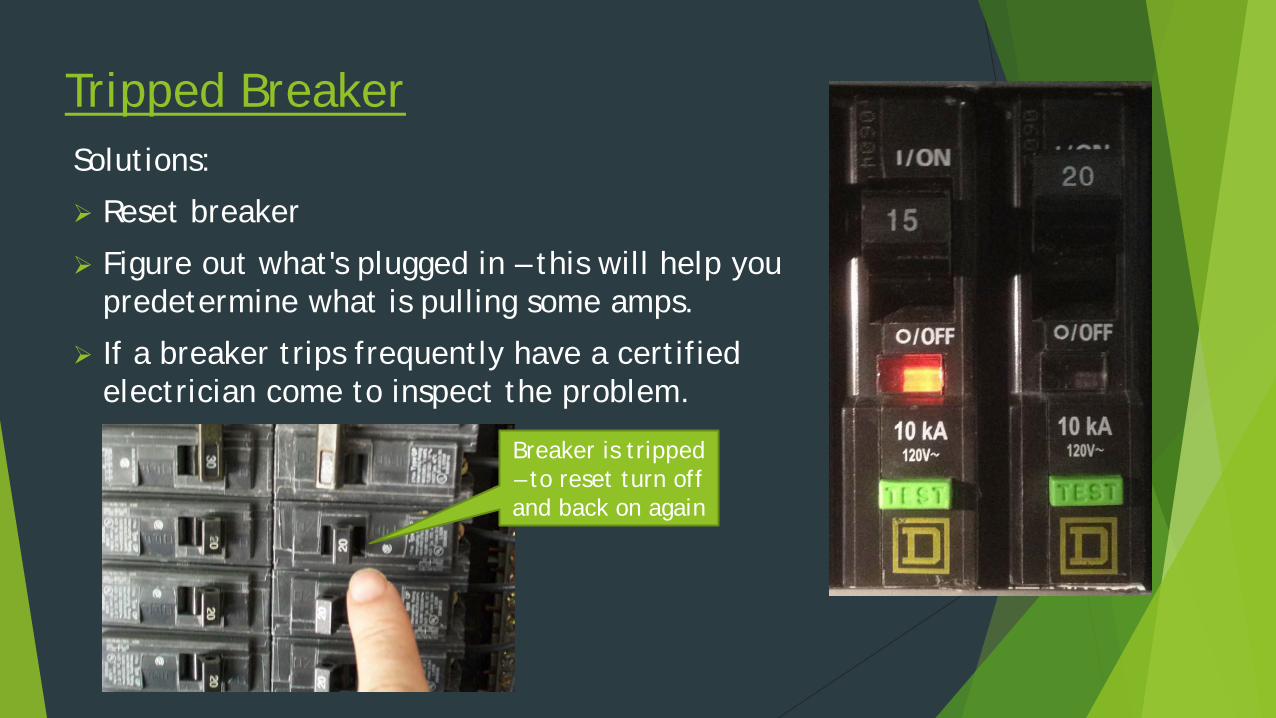
Tripped Breaker Solutions:
Reset breaker
Figure out what's plugged in – this will help you predetermine what is pulling some amps.
If a breaker trips frequently have a certified electrician come to inspect the problem.
Breaker is tripped – to reset turn off and back on again

Importance of Proper Labeling Go through panel box to figure
out which breaker is connected to electrical aspects of your house
Each breaker controls the different parts of the home’s electricity
Important to shut appropriate breaker off of electrical item being repaired, replaced, or installed
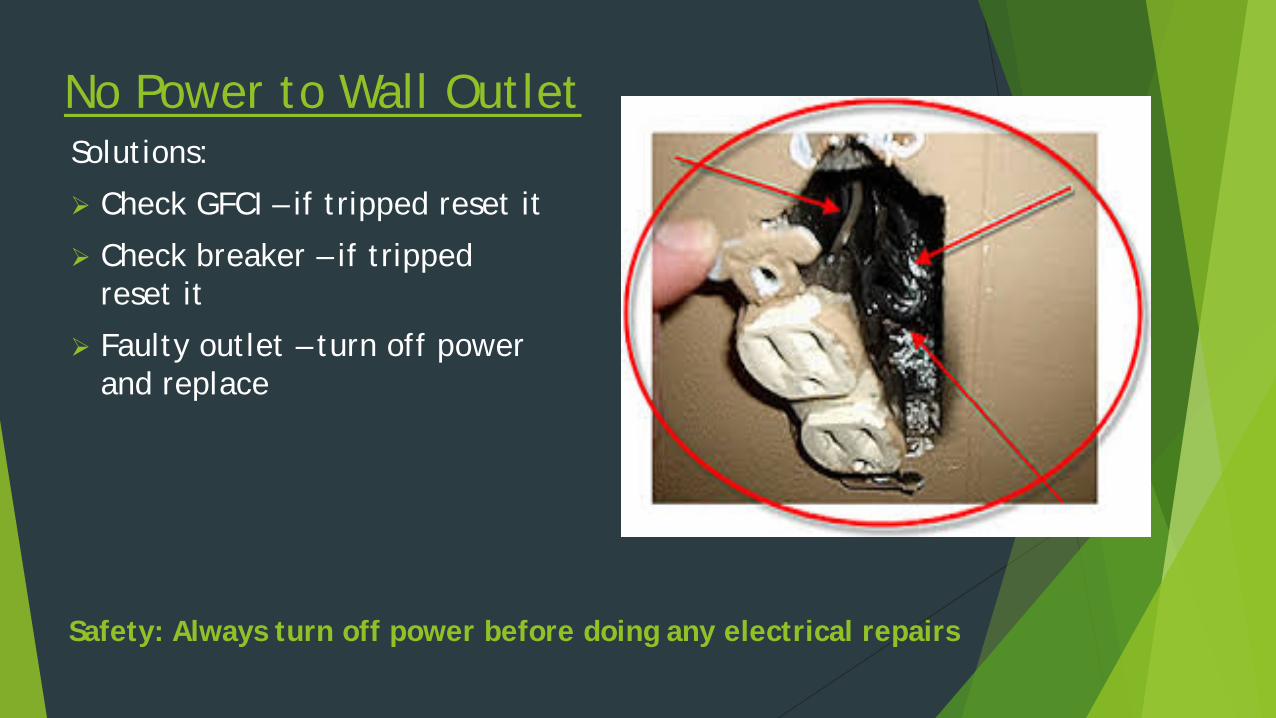
No Power to Wall Outlet Solutions:
Check GFCI – if tripped reset it
Check breaker – if tripped reset it
Faulty outlet – turn off power and replace
Safety: Always turn off power before doing any electrical repairs

Light Flickering
Solutions:
Replace bulb with recommended wattage
Check to make sure dimmer switches have dimmable bulbs
Check wiring to make sure everything is tight in wire nut and there are no burned wires
Safety: Always shut power off to the circuit when checking wires
Ground wires
Power source Hot wire
Neutral wire

Broken Bulb in Lighting Fixture
Solutions:
Turn power off to the circuit from the main panel box.
Use light bulb remover tool or needle nose plier to unscrew base from fixture.
Make sure you wear thick gloves – broken glass will cut you.
Safety: Always turn power to a fixture before working on it.

Missing or Broken Outlet Plate
Solutions:
Install new outlet plate
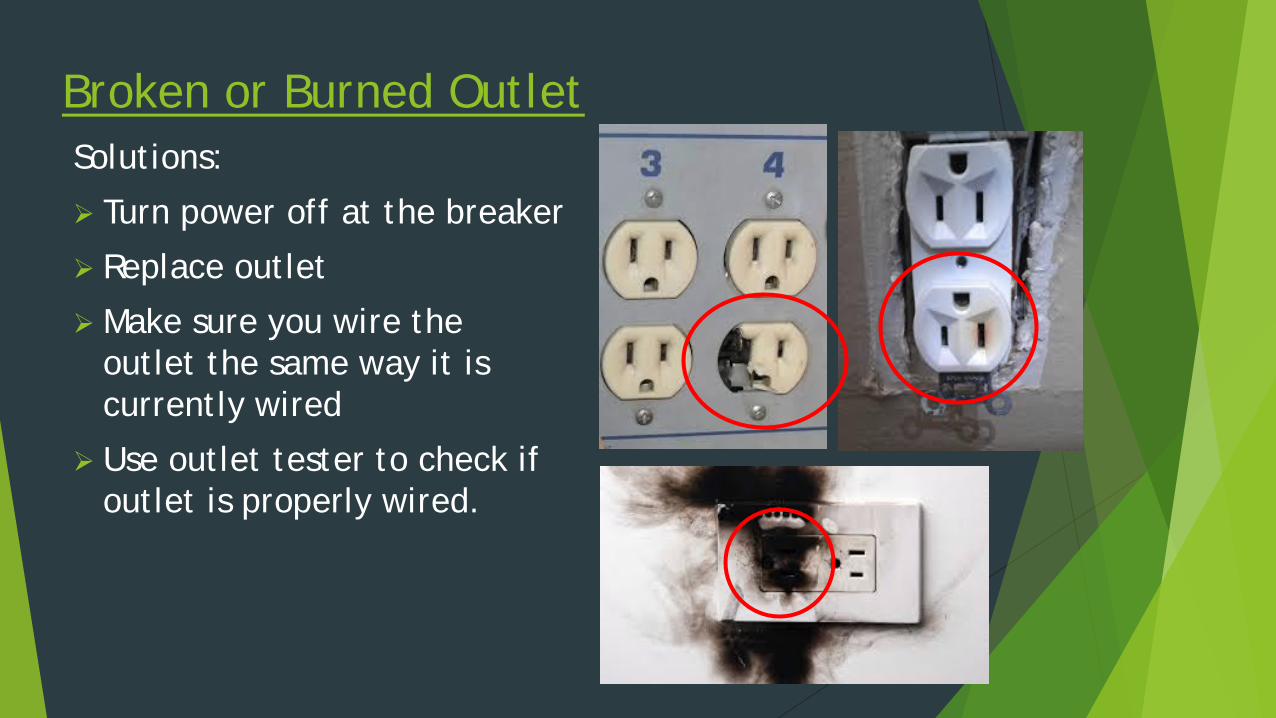
Broken or Burned Outlet Solutions:
Turn power off at the breaker
Replace outlet
Make sure you wire the outlet the same way it is currently wired
Use outlet tester to check if outlet is properly wired.

Basic HVAC (Heating, Ventilation, and Air Conditioning)
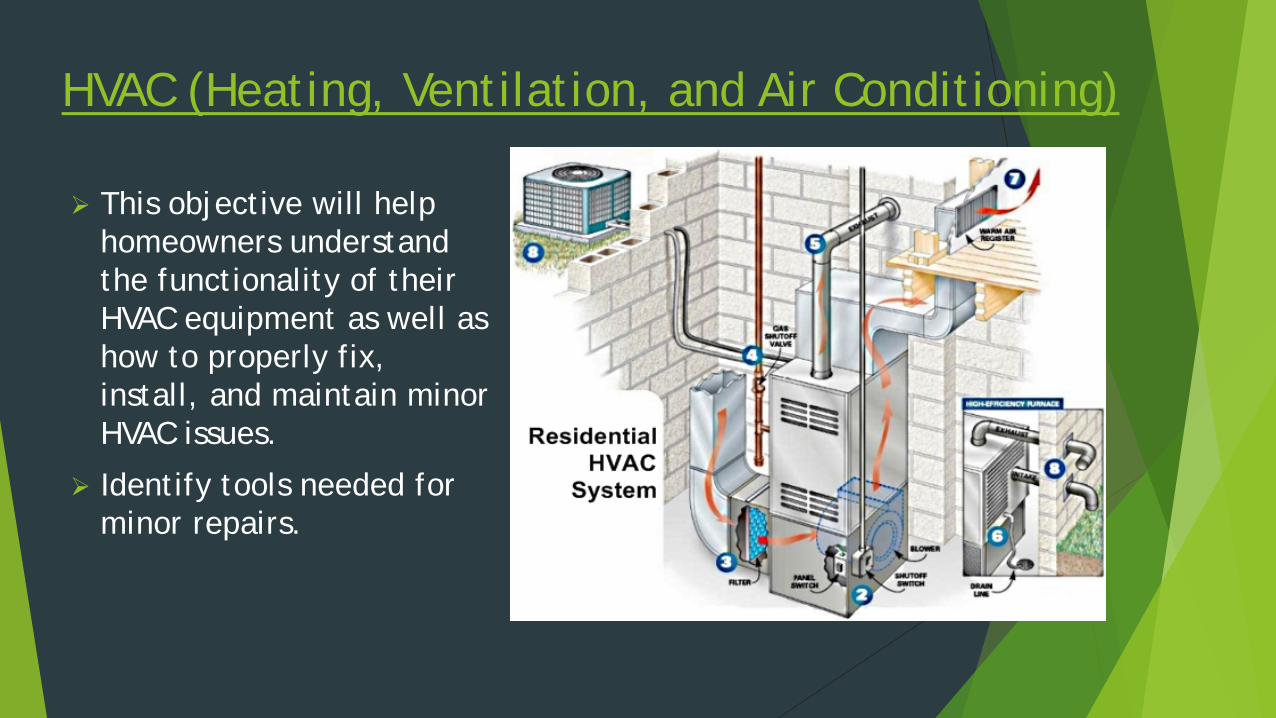
HVAC (Heating, Ventilation, and Air Conditioning)
This objective will help homeowners understand the functionality of their HVAC equipment as well as how to properly fix, install, and maintain minor HVAC issues.
Identify tools needed for minor repairs.

How Does a Heat Pump Work? • When you first turn your thermostat on to
heat the indoor unit fan comes on. • Once the indoor fan comes on the outdoor
unit comes on 5 sec later. • The indoor temperature will depend on
how comfortable you are trying to be. • If you are looking to warm your house
instantly raising the thermostat temperature 4 to 5 degrees higher will turn on your strip heater which is known as aux heat.
• If you are trying to knock the chill off raising the temperature 2 degree above the thermostat reading will cut your heat pump on.
• The air coming out the vents on will only be warm air.
Indoor Air Handler
Heat Pump Unit
Reversing valve
Compressor
wiring box
Indoor Fan
Transformer
Heat strips
Limit Switches

How Does a Furnace Work? A furnace heats the cool intake air
from your home and returns the heated air back to the home.
A heat exchanger is used to contain the burning fuel and exhaust. This will avoid circulating toxic fumes throughout your home. When burning the fuel source, much of the heat is absorbed by the heat exchanger.
The cool air intake absorbs the energy in the exchanger and returns the heated air to the home through the ventilation duct.

How Does a Furnace Work?
1. Pressure switch
2. Inducer draft fan motor
3. Gas valve
4. Burners
5. Gas line pipe
6. Air filter
7. Gas control board
8. Heat exchanger
3
2 1
4
6
7
5
8

Common HVAC Problems
Supply air has odor
Dirty air filter
HVAC system is noisy
Lack of preventive maintenance
Supply vents blocked
Condensate line blocked

Dirty Air Filters Solutions:
Change filters every 30 days (especially if you have pets)
Have your unit inspected seasonally

Dirty Condenser Coil Solutions:
Turn power off to unit.
Use a water hose with a nozzle and gently wash condenser coil down.

Unit Does Not Function Properly Solutions:
Preventive maintenance
Routine maintenance

Not Enough Air Flow
Solutions:
Air vent covers
Air vent deflectors

Conclusion
This training course is design to help homeowners understand the functions and basic skills needed to make minor repairs around the home
Our job is to educate homeowners on minor skilled repairs for their home which include: Plumbing, HVAC (Heating, Ventilation, and Air Conditioning), and Electrical.
After completing this course the homeowner will have a basic understanding of how things work in their home.

THANK YOU County of Henrico, Department of Community Revitalization
Richmond Metropolitan Habitat for Humanity
Environmental Green Solutions, LLC

Thank you for coming Upcoming workshops:
Saturday, February 6 - Home Improvements Saturday, March 5 – Landscaping and Curb Appeal