hosted pbx calling features and voice mail guide 2 of 27 hosted pbx ‐ calling features and voice...
TRANSCRIPT
Page 1 of 27
HostedPBX‐CallingFeaturesandVoiceMailGuide
Definition FairPoint Communications’ Hosted PBX is easy to use and manage. Hosted PBX is packed with a wide variety of useful standard, advanced and business group calling features, including voicemail. You’ll already be familiar with many of these features, while others will be new to you. Please use this guide to get the most out of our powerful, feature‐rich phone system. Also, refer to your desk phone guide for more information on programming and using the keys on your phone.
Standard Calling Features
1) Caller ID with Name
This feature provides the telephone number and associated name of the caller, along with the date and time of the incoming call. This information is displayed on the phone between the first and second rings. For external callers, the full number is displayed. For callers from within the business group the extension number may be displayed. When a user is on a call, caller ID works in conjunction with call waiting to allow the user to see the name and telephone number of the second incoming call.
Some phones will look up a received caller ID in the phone's directory and, if this number is present, provide the name that is present in the directory on the phone's display instead of the name received from the network. Refer to your phone user guide for more information on how to set up and use a directory.
2) Call Waiting
This feature allows a user to receive notification when their line is in use and another incoming call is placed to that line. The user will hear a tone and the phone screen will display the details of the second caller. To answer this second call, depending upon your phone set, select the OK key, Confirm key or Answer key, or press the line key which is flashing. Answering the second call will automatically place the first call on hold. You can toggle between the calls by placing the current call on hold and retrieving the other call. To cancel call waiting on a per call basis:
Page 2 of 27
HostedPBX‐CallingFeaturesandVoiceMailGuide1. Dial the access code (*70) and go off hook 2. When dial tone is heard, dial the number you want to reach
o For internal calls, dial the extension number (e.g. 834) o For external calls, dial the number as you would normally dial it from
your phone (e.g. 9‐555‐3456) Call waiting will automatically be re‐enabled at the completion of this call.
3) Caller ID Blocking Per‐call blocking allows a user to prevent their calling number and name from being presented to both internal and external called lines on a call‐by‐call basis. When activated, the option prevents the calling telephone number from being displayed on the called party’s caller ID display device. The user activates per‐call blocking by dialing the access code prior to placing a call. To block calling name and number on a per call basis:
1. Dial the activation access code (*67) followed by the number you want to reach o For internal calls, dial *67 plus the extension number (e.g. *67 834) o For external calls, dial *67 pus the number as you would normally dial it
from your phone (e.g. *67 9 555 3456) 2. Go off hook to place the call
Per‐line blocking allows a user to automatically prevent their calling name and number from being presented to both internal and external called lines for all calls. This option prevents the calling telephone number from being displayed on all caller ID display devices. The line may be unblocked on a per‐call basis by dialing the access code prior to placing a call. To unblock calling name and number on a per call basis:
1. Dial the activation access code (*82) followed by the number you want to reach o For internal calls, dial *82 plus the extension number (e.g. *82 834) o For external calls, dial *82 pus the number as you would normally dial it
from your phone (e.g. *82 9 555 3456) 2. Go off hook to place the call
Unless you specifically request blocking, Hosted PBX lines are provisioned allowing your calling name and number to be passed for display on caller ID devices. You can choose to block/unblock your number using the steps outlined here. You can also use CommPortal to change your blocking settings. For more information, see the CommPortal User Guide.
Page 3 of 27
HostedPBX‐CallingFeaturesandVoiceMailGuide
4) Call Forwarding
Your phone service supports a number of different types of call forwarding:
Immediate Call Forwarding – forwards all calls to a number of your choice
Busy Call Forwarding – forwards all calls that are received when you are already on the phone
No Answer Call Forwarding – forwards all calls when you do not answer them after a certain number of rings
If voicemail has been included with your service, your line will automatically forward to voicemail when you are on a call or can’t answer. You may override that setting using the telephone access codes shown in the table below.
Use your handset to enable/disable immediate, busy or no answer call forwarding by dialing the access code for the type of call forwarding you want to enable/disable.
Type of forwarding Enable Code Disable Code
Immediate *72 *73
Busy *90 *91
No Answer *92 *93
To activate call forwarding:
1. Dial the activation access code (e.g. *72) followed by the number you want to forward calls to
2. Go off hook to place the call 3. If the remote station doesn’t answer or is busy, repeat the activation process
(Steps 1 and 2) 4. On the second attempt the feature will be activated and confirmation tone
returned whether the called number answers or not 5. Hang up
When enabling call forwarding, the system will place a courtesy call to the number you are forwarding calls to. The system will only enable call forwarding if this courtesy call is answered or if you repeat the activation steps immediately. Immediate call forwarding overrides busy and no answer call forwarding. When immediate call forwarding is turned on, calls will not automatically forward to voice mail unless you have selected voicemail as the immediate call forwarding destination.
To deactivate call forwarding:
Page 4 of 27
HostedPBX‐CallingFeaturesandVoiceMailGuide1. Dial the deactivation access code (e.g.*73) 2. Go off hook 3. Confirmation tone is heard 4. Hang up
You may find it easier to configure call forwarding using CommPortal. See the CommPortal User Guide for more information.
5) Three‐Way Calling
This feature enables a user to establish voice connection involving the user and two other parties. The user is able to place an existing call on hold, call the telephone number of a third party, then connect all parties, creating a three‐way conference call. To activate three‐way calling:
1. During a call, press the Conference or Conf key – this places the current call on hold and returns dial tone
1. Dial the person you want to join your call, for example: o 4‐digit Centrex telephone number o Access # (for example 9) +7‐digit telephone number
2. Once the person has answered, press the Conference or Conf key again to connect all three parties
6) Call Transfer This feature allows a user to transfer any established call to another number inside or outside of their business group without the assistance of an attendant. Call transfer includes the functionality of consultation hold so the person transferring the call can confer privately with the recipient of the call before completing the transfer. To transfer a call:
1. During a call, press the key on your phone that has been designated for Transfer or Xfer – this places the current call on hold and returns dial tone
2. Dial the number of the person you want to transfer the call to, for example: o 4‐digit Centrex telephone number o Access # (for example 9) +7‐digit telephone number
3. If you want to transfer the call before the other person answers, press the Transfer or Xfer key again. Note: On some phones you will press the Blind key.
4. If you want to announce the caller: a. When the called party answers, announce the call b. Press the Transfer or Xfer key

Page 5 of 27
HostedPBX‐CallingFeaturesandVoiceMailGuidec. Hang up
7) Call Hold This feature allows a user to place a call on hold for any length of time, so the user can answer or receive other calls. To put a call on hold, simply press the Hold key. You may now replace the handset without cutting the caller off. You can also now make another call while the first call is on hold. To retrieve the call, press the line or pickup key. If you've made another call since you put the first call on hold, you must hang up that call or put it on hold before you can retrieve the first call. Use the arrow keys on your phone set to select the call to retrieve.
8) Speed Dial Speed dial allows a user to call a pre‐programmed seven or 10 digit number by dialing a code. This feature is available as single‐digit speed dial 8 or 2‐digit speed dial 30. In both cases, the list of numbers is created and controlled by the user. Note that service codes such as 411, 611 or 911 may not be programmed. To program or change speed dial 8:
1. Go off hook and hear dial tone 2. Dial the speed dial 8 access code (*74) followed immediately by the single digit
speed dial code you want to use plus the telephone number as it would be dialed from your phone (e.g. *74 2 9‐555‐9876)
3. Hear interrupted dial tone confirmation 4. Hang up 5. Repeat process to encode and store the remaining numbers
To use speed dial 8:
1. Dial the one‐digit code assigned to the number you wish to call 2. Go off hook
To program or change speed dial 30:
1. Go off hook and hear dial tone
Page 6 of 27
HostedPBX‐CallingFeaturesandVoiceMailGuide2. Dial the speed dial 30 access code (*75) followed immediately by the single digit
speed dial code you want to use plus the telephone number as it would be dialed from your phone (e.g. *75 22 9‐555‐9876)
3. Hear interrupted dial tone confirmation 4. Hang up 5. Repeat process to encode and store the remaining numbers
To use speed dial 30:
1. Dial the two‐digit code assigned to the number you wish to call 2. Go off hook
You may find it easier to configure speed dial using CommPortal. See the CommPortal User Guide for more information.
9) Busy Redial After making a call and hearing a busy signal, this feature allows the user to queue a callback request when that line is free. Busy redial automatically monitors and redials the telephone number of the most recent outgoing call. If the redialed telephone number is idle, the call completes immediately. If the redialed number is busy, the called line is monitored for a maximum of 30 minutes. When the called line becomes idle, a distinctive ringing signal alerts the user that the number is available and the call can be completed. The following types of calls cannot be automatically redialed:
Calls to toll‐free service numbers Calls to 900 service numbers Calls preceded by an interexchange carrier access code Calls made on an international direct distance dialed basis Calls to universal emergency number service (911)
Calls to directory assistance service
To use busy redial, after you have placed a call to a line that is busy: 1. Hang up the busy call 2. Go off hook again and receive dial tone 3. Dial the activation code (*66) 4. Hang up and the system will monitor the called line for up to 30 minutes 5. When the line is idle, you will hear a distinctive ring 6. Answer the call to be connected to your party
To deactivate busy redial within the first 30 minutes: 1. Dial the access code *(86) and go off hook
Page 7 of 27
HostedPBX‐CallingFeaturesandVoiceMailGuide2. Hear confirmation tone that busy redial has been canceled 3. Hang up
10) Call Return This feature allows a user to obtain information about the last incoming call, including number, date and time of call. Upon dialing the access code, the telephone number associated with the last incoming call is announced, if it is available from the network and the calling party has not blocked the calling information. The announced telephone number does not always identify the calling party. The service may allow a user to return the call automatically. Call return cannot return all calls for which it can announce a number. If the user selects to return the call and the line associated with the called number is busy, the call is queued until both lines are idle, up to 30 minutes; when both lines are idle, the user is notified by a distinctive ringing pattern. Once the user answers the distinctive ring, the network attempts to set up the call. The following types of calls cannot be returned:
Calls from PBX station lines
Calls from DID station lines
Calls from lines equipped with line blocking
Calls from lines which have activated per call blocking To use call return:
1. Go off hook and receive dial tone 2. Dial the activation access code (*69) 3. The system will announce the number, date and time of the last incoming call 4. Press 1 to return the call or hang up
To cancel call return during the 30 minute retry period:
1. Go off hook and receive dial tone 2. Dial the deactivation access code (*89) 3. Hear confirmation tone that call return has been canceled 4. Hang up
11) Call Trace This feature allows a user to trace the most recent incoming call immediately after terminating the call. Call trace allows users to record the details of any malicious or harassing incoming calls to their lines.
Page 8 of 27
HostedPBX‐CallingFeaturesandVoiceMailGuide The FairPoint Communications central office equipment records and stores the incoming call message detail (date, time and originating telephone number of the call) provided that the call was completed over a suitably equipped facility and the line has not received another call after the call to be traced was terminated. The results of the trace are not provided to the user directly, but are automatically reported to FairPoint Security where call details can be obtained by an appropriate law enforcement agency when the user files a complaint. To use call trace on an incoming call:
1. Hang up the call you want to trace 2. Pick up the handset and receive dial tone 3. Dial the activation access code (*57) 4. At the prompt, press 1 to trace the last incoming call or hang up 5. Call local law enforcement to report the harassing call and let them know you
activated call trace. Information about the call can only be released to an appropriate law enforcement agency.
This feature can also be configured on a soft key of your phone set.
Advanced Calling Features All advanced calling features are available to Business Advantage Plus and Business Advantage Premium users only. They are not available to Business Advantage users.
1) Distinctive Ringing This service allows users to create and manage a list of phone numbers for which incoming calls will ring with a distinctive tone or unique ringing pattern. Up to 10 numbers may be added to the selected calling numbers list. These numbers may be 10‐digit, 7‐digit or match a business group extension. An incoming call rings with a distinctive ring tone if the caller ID matches any number on this list. To configure distinctive ringing:
1. Dial the activation access code (*61) and go off hook 2. Hear the prompt telling you that the service is on or off 3. To enter a number, press #
a. Dial the number to be added and press the # key b. To add the last calling party, dial 01 and press the # key
4. To add more entries, repeat step 3 5. To remove entries, press *
Page 9 of 27
HostedPBX‐CallingFeaturesandVoiceMailGuidea. Dial the number to be removed and press the * key b. To remove all entries, dial 08 and press the * key c. To remove just the anonymous entries, dial 09 and press the *key
6. To delete more entries, repeat step 5 7. To hear entries on your list, press 1
a. The system will tell you the number of entries on your list b. The system will begin to speak the numbers c. To delete a number, dial 07 as soon as you hear the number
To turn on distinctive ringing:
1. Dial the activation access code (*61) and go off hook 2. Hear the prompt telling you that the service is off 3. Dial 3 to turn the service on 4. Hang up
To turn off distinctive ringing:
1. Dial the deactivation access code (*81) and go off hook 2. Hear the prompt telling you that the service is on 3. Dial 3 to turn the service off 4. Hang up
2) Selective Call Forwarding This feature allows a user to forward calls based on the incoming caller ID. Selective call forwarding lets a user to create and manage a list of up to 10 numbers. To set up or manage the list of numbers to forward:
1. Dial the activation access code (*63) and go off hook 2. Hear the prompt telling you that the service is on or off 3. To enter a number, press #
a. Dial the number to be added and press the # key b. To add the last calling party, dial 01 and press the # key
4. To add more entries, repeat step 3 5. To remove entries, press *
a. Dial the number to be removed and press the * key b. To remove all entries, dial 08 and press the * key c. To remove just the anonymous entries, dial 09 and press the *key
6. To delete more entries, repeat step 5 7. To hear entries on your list, press 1
a. The system will tell you the number of entries on your list b. The system will begin to speak the numbers
Page 10 of 27
HostedPBX‐CallingFeaturesandVoiceMailGuidec. To delete a number, dial 07 as soon as you hear the number
To turn on selective call forwarding:
1. Dial the activation access code (*63) and go off hook 2. Hear the prompt telling you that the service is off 3. Dial 3 to turn the service on 4. Dial the number to which you want your calls forwarded, followed by the # key 5. The system will repeat the number you have entered
a. Press 1 to accept b. Press 0 to re‐enter the number from step 4 c. When finished, hang up
To turn off selective call forwarding:
1. Dial the deactivation access code (*83) and go off hook 2. Hear the prompt telling you that the service is on 3. Dial 3 to turn the service off 4. Hang up
You can also use the VIP callers list in CommPortal to manage and forward callers based on the incoming caller ID. See the CommPortal User Guide for more information.
3) Anonymous Call Rejection
This feature allows a user to screen anonymous callers, letting the user decide whether to accept the call after hearing a recording of the caller's name. Callers hear a message that this line does not accept calls from unidentified numbers. They must record their name to continue with the call. To turn on anonymous call rejection, dial the activation code (*77). To turn off anonymous call rejection, dial the activation code (*87). This feature can also be set up and managed through CommPortal. For more information, see the CommPortal User Guide.
4) Do Not Disturb This feature allows a user to provide an announcement to their callers that they are not accepting calls right now. Callers are forwarded directly to this announcement without ringing the phone. Do not disturb works in conjunction with selective call acceptance so that designated callers can still get through.
Page 11 of 27
HostedPBX‐CallingFeaturesandVoiceMailGuide To turn on do not disturb:
1. Dial the activation access code (*78) and go off hook 2. Hear the prompt telling you that your do not disturb service is on
To turn off do not disturb
1. Dial the deactivation access code (*79) and go off hook 2. Hear the prompt telling you that your do not disturb service has been turned off
If you or your business group administrator have programmed a soft key on your desk phone for this feature, you can use that key to turn do not disturb on and off. When turned on using a soft key, callers will be sent directly to voicemail without ringing the phone. See your desk phone user guide to learn more about programming the soft keys on your desk phone. Finally, you can turn do not disturb on and off using the pop‐up menu in CommPortal Assistant on your computer or directly in CommPortal on the Call Manager tab. For more information, see the CommPortal User Guide. When do not disturb is turned on through CommPortal or CommPortal Assistant, callers will be sent directly to voicemail without ringing your phone.
5) Selective Call Acceptance This feature works in conjunction with do not disturb. It allows the user to set up rules to accept calls based on the incoming caller ID, so that only calls from specific numbers will ring the phone. To set up or manage the list of numbers to accept when do not disturb is turned on:
1. Dial the activation access code (*64) and go off hook 2. Hear the prompt telling you that the service is on or off 3. To enter a number, press #
a. Dial the number to be added and press the # key b. To add the last calling party, dial 01 and press the # key
4. To enter more numbers, repeat step 3 5. To remove entries, press *
a. Dial the number to be removed and press the * key b. To remove all entries, dial 08 and press the * key c. To remove just the anonymous entries, dial 09 and press the * key
6. To remove more entries, repeat step 5 7. To hear entries on your list, dial 1
a. The system will tell you the number of entries on your list b. The system will begin to speak the numbers

Page 12 of 27
HostedPBX‐CallingFeaturesandVoiceMailGuidec. To delete a number, dial 07 as soon as you hear the number
To turn on selective call acceptance
1. Dial the activation access code (*64) and go off hook 2. The system will tell you that the service is now off 3. Dial 3 to turn the service on 4. Hang up
To cancel selective call acceptance
1. Dial the deactivation access code (*84) and go off hook 2. The system will tell you that the service is now on 3. Dial 3 to turn the service off 4. Hang up
6) Selective Call Rejection Selective call rejection allows users to configure certain numbers from which they do not wish to take calls. Incoming calls from these numbers will be provided with an announcement telling the caller that their call has been rejected. To set up or manage the list of numbers to reject:
1. Dial the activation access code (*60) and go off hook 2. Hear the prompt telling you that the service is on or off 3. Hear the prompt telling you how many numbers you have on your list 4. To enter a number, press #
a. Dial the number to be added and press the # key b. To add the last calling party, dial 01 and press the # key
5. To enter more numbers, repeat step 4 6. To remove entries, press *
a. Dial the number to be removed and press the * key b. To remove all entries, dial 08 and press the * key c. To remove just the anonymous entries, dial 09 and press the * key
7. To remove more entries, repeat step 6 8. To hear entries on your list, dial 1
a. The system will tell you the number of entries on your list b. The system will speak the numbers c. To delete a number, dial 07 as soon as you hear the number
To turn on selective call rejection
1. Dial the activation access code (*60) and go off hook 2. Hear the prompt telling you that the service is off 3. Hear the number of entries on your list
Page 13 of 27
HostedPBX‐CallingFeaturesandVoiceMailGuide4. Dial 3 to turn the service on 5. Hang up
To turn off selective call rejection:
1. Dial the deactivation access code (*80) and go off hook 2. Hear the prompt telling you that the service is on 3. Hear the number of entries on your list 4. Dial 3 to turn the service off 5. Hang up.
You can also use the unwanted callers list in CommPortal to manage and reject callers based on the incoming caller ID. See the CommPortal User Guide for more information.
7) Call Jump
Call Jump allows a user to dial an access code during a call to transfer the call to another phone. Once the other phone is answered, the call is seamlessly transferred. The call “jumps” from one phone to another, mid call, without placing the caller on hold.
*93 Jump to alternate number – Use this key sequence to transfer a call to a pre‐configured alternate telephone number. This number is set up in CommPortal on the Settings tab under Calls.
*97 Jump to a wireless number – Use this key sequence to transfer a call to a pre‐configured wireless telephone number. This number is set up in CommPortal on the Settings tab under Calls.
*98 Jump to a 10‐digit number that follows this access code sequence – Use this key sequence to transfer a call to a telephone number that is entered at the time of the transfer. Please note, if your business uses music on hold, your caller will hear music until you complete the transfer.
Business Group Features
1) Intercom Dialing
Page 14 of 27
HostedPBX‐CallingFeaturesandVoiceMailGuideThis feature allows users to dial other extensions within the Hosted PBX business group using abbreviated dialing. The codes will likely be 3, 4, 5 or 7 digit numbers, depending upon the size of the business group and the phone numbers assigned. If you don’t know your business group intercom dialing plan, contact your business group administrator.
2) Call Pick‐Up This feature allows a user to answer an incoming call ringing on another line in a pre‐defined call pick‐up group within a business group. The user picks up his or her phone and dials an access code to answer the call. One or more call pick‐up groups (CPUG) may be established for a business group. To use call pick up:
1. Hear a line ringing (a member of your Call Pickup Group) 2. Pick up handset 3. Dial the access code (*11) 4. The call is routed to your line 5. If the call has already been answered, you will hear a busy signal
All extensions within the same call pick‐up group should be within hearing range. With call pick‐up, if more than one line is ringing, you cannot select which line to answer. The system will automatically direct the pick‐up to the call that came in first. The calling name and number of the incoming call will not be delivered to the extension that picks up the call. All lines in a multi‐line hunt group must be in the same call pick‐up group. A call waiting call, a call return call, and a reminder call cannot be “picked up” by another station via call pick‐up.
3) Directed Call Pickup Directed call pickup allows users to pick up a call that is ringing on a specific phone in a pre‐defined pick‐up group within the same business group. Users pick up their own phones, and dial an access code followed by the extension number of the line which is ringing. To use directed call pickup:
1. Hear a line in your call pick‐up group ringing 2. Go off hook
Page 15 of 27
HostedPBX‐CallingFeaturesandVoiceMailGuide3. Dial the access code (*12) 4. Dial the extension number of the line to be answered
o If the call has not yet been answered, the call is routed to your line o If the call has already been answered, you hear a busy signal
The calling name and number of the incoming call will not be delivered to the extension that picks up the call. A call waiting call, a call return call and a reminder call cannot be “picked up” by another station via directed call pick‐up. It can’t be used against a line with immediate call forwarding activated.
4) Call Park This feature allows a user to press a key on their phone to place a call on hold in a “park orbit” so that they or other users in the same business group can pick up the call later. The line is then free to make or receive other calls. Only one call at a time can be parked in each orbit. To park a call: If your phone has dedicated call park keys, when in a call press the key of the park orbit where you want the call parked. The call will now be parked and you may now replace the handset. The key(s) will indicate via a light or icon when a call is parked against each orbit. If your phone doesn't have dedicated call park keys:
1. Initiate call transfer by pressing the Transfer or the Xfer key 2. Dial the call park activation access code (*53) 3. Listen to the park orbit number where the call will be parked 4. Complete the call transfer by pressing Transfer or Xfer again
To retrieve a parked call: If your phone has dedicated call park keys, pick up the handset and press the key of the park orbit where the call is parked. If your phone doesn’t have dedicated call park keys:
1. Go off hook and hear dial tone 2. Dial the call retrieve activation access code (*54) followed by the park orbit
number (e.g. to retrieve a call parked on orbit 1, dial *541)
5) Distinctive Ring Internal/External
Page 16 of 27
HostedPBX‐CallingFeaturesandVoiceMailGuideThis feature provides users with a unique ringing pattern to allow them to distinguish between calls that come from within the business group and calls that come from outside the business group. Distinctive ring is set up as a permanent feature on the business group. To add or remove the feature, your business must place a service order request with FairPoint.
6) Short Codes Short Codes are business group wide speed dials. These are configured by the business group administrator using CommPortal and are available to dial from all business group lines. These codes can be up to seven digits in length. You will find a complete list of short codes created for your business group in CommPortal in the Contacts tab. See the CommPortal User Guide for more information.
7) Music on Hold
Music on hold is intended for business customers who want callers to hear music when put on hold by an extension. Music on hold is controlled by your business group administrator. There are currently five music selections available for Hosted PBX customers. Your Administrator can assign the same music to the entire business group or can selectively turn music on or off for individual extensions. Note that your callers will hear music on hold during a call transfer and while setting up a conference or 3‐way call, as well as when they are placed on hold. Callers will also hear music on hold when you use the call jump feature that allows you to enter a 10‐digit number to transfer the call. Callers will hear music on hold until the call transfer is complete.
8) Multi‐Line Hunt Group
A multi‐line hunt group (MLHG) allows sequential ringing of available phones for use in applications such as call centers. A MLHG consists of a number of lines within the business group, known as members. When a call comes into the hunt group, a hunt algorithm will decide which phone to ring. If this phone is busy or is not answered, the hunt algorithm will move on to another phone. Hunt groups can have a pilot number, which is a directory number associated with the MLHG. When this pilot number is called, the members of the MLHG are alerted in turn.
Page 17 of 27
HostedPBX‐CallingFeaturesandVoiceMailGuideAlternatively, a hunt group can be configured to hunt if any member of the hunt group is called directly using its DID number and doesn't answer. MLHGs can also be configured to enable queuing. If configured, calls will be queued when they come in to a MLHG whose members are all busy. These queued calls will receive music on hold if this feature is configured. This feature is configured for the business group by your business group administrator. For more information about configuring and using MLHGs, see the Business Group Administrator User Guide.
Voice Mail With voicemail from FairPoint, there’s no reason to ever miss a phone call again. Calls are answered whether you’re on the phone, online, away from your desk or simply too busy to pick up. You can check your messages using a touchtone or wireless phone. You may have a total of 50 messages (new as well as saved messages) in your mailbox at one time. The maximum length of each message is 2, 3 or 4 minutes depending upon the service you have. Business Advantage and Business Advantage Plus customers may save new messages for a maximum of 30 days. Business Advantage Premium customers may save their messages indefinitely. Voicemail is menu driven, so listen to the voice prompts and then press the keys on your phone to select which option you would like. Once you become familiar with the service there is no need to wait until the voice prompts have played before pressing a key – you can interrupt the announcements to speed up your experience.
1) Getting Started The first time you access your new mailbox, you must set it up using the following steps:
1. Access FairPoint Voicemail
When calling from your own phone, dial *99 and the system will recognize you.
When calling from a remote phone, dial your phone number. Once your greeting starts to play, press the * key.
2. Enter your starter PIN
Your starter PIN is 9234. Dial your starter PIN and press the # key. 3. Enter a new PIN
Page 18 of 27
HostedPBX‐CallingFeaturesandVoiceMailGuide When prompted, enter an easy‐to‐remember 4‐to‐8 digit number and press
the # key. The system will ask you to confirm by entering your new PIN again, followed by the # key. To keep this PIN, press the # key, or press 1 to create a new PIN.
You PIN cannot include: any part of your telephone (or mailbox) number or a series of the same
numbers (e.g. 33333) a sequence of numbers (e.g. 2345)
4. Record your name
When prompted, record your name and press the # key. The service will play it back to you. To accept the name recording, press the # key, or press 1 to re‐record your name.
5. Record your greeting
When prompted, you will have 45 seconds to record the greeting that callers will hear when you are not available. When you are finished, press the # key.
The service will play your greeting back to you. To accept the recording, press the # key, to change it, press 1.
That’s it! Your mailbox is now ready to use.
2) Reviewing Messages
When you have one or more unheard voice messages waiting, your phone will display a flashing light. You can dial into voice mail from your phone or pick up your message using CommPortal. To listen to messages from your phone:
1. Access voicemail
When calling from your own phone, dial *99 (or press the messages or voicemail key if your phone has one). The system will recognize you.
When calling from a remote phone, dial your phone number. Once your greeting starts to play, press the * key.
2. Dial your PIN
The system tells you how many messages you have new and saved. 3. To play your messages, press 1 from the Main Menu.
Business Advantage Plus and Business Advantage Premium customers o Press 1 again to hear voice messages o Press 3 to review fax messages
4. During the message playback you may: Press 1 to start playing the message again
Page 19 of 27
HostedPBX‐CallingFeaturesandVoiceMailGuidePress 2 to save the message Press 3 to delete the message Press 4 to reply to the message sender Press 5 to forward a copy of the message to someone else Press 6 to increase volume Press 7 to slow the message down Press 7, 7 to skip back 5 seconds Press 8 to pause and restart the message Press 9 to speed up the message Press 9, 9 to skip ahead 5 seconds Press 0 for helpful hints Press * to return to the main menu Press # to skip to the next message Press 2, 2 to mark a saved message as new
5. When the message ends you may: Press 1 to repeat the message Press 2 to save the message Press 3 to delete the message Press 4 to reply to the message sender Press 5 to forward a copy of the message to someone else Press # to leave message new and skip to the next message
3) Sending Messages
You may record and send messages to other voicemail subscribers on the system individually or as part of a group list. Once you have recorded your message, you can select from several delivery options. See information at the end of this section for a detailed description of each delivery option. To send a message to another voicemail user:
1. From the main menu, press 2 2. Enter a 10‐digit phone number or group list number and press the # key
a. Enter another phone or group list number and press the # key b. If you have no other numbers, press # c. To cancel, press the star key twice
3. Record your message after the tone, and press the # key a. To hear delivery options, press 1 b. To send your message, press #
4. If you choose delivery options: Press 1 to review your message Press 2 to mark your message urgent
Page 20 of 27
HostedPBX‐CallingFeaturesandVoiceMailGuidePress 3 to mark your message private Press 4 to re‐record your message Press 5 to request a delivery report Press 6 to request a read report Press 7 to add or remove recipients Press 9 to schedule this message for future delivery Press * to cancel Press # when you are ready to send your message
Send Message Delivery Options: Urgent – Urgent messages play before regular messages when heard through the telephone interface. They are listed with a red exclamation point icon in CommPortal. When delivered to email, they may be marked as sent with high importance. Private ‐ Private messages can’t be forwarded to anyone by the recipient through the voicemail system. They are listed with a gold key icon in CommPortal. If the recipient has their messages delivered to email, the email may indicate that is was sent privately. However, the message can be forwarded once it has been transferred from the voicemail system. Delivery Report– You will receive a confirmation message when your message has been delivered to the mailbox. Read Report – You will receive a confirmation message when your message has been heard. Future Delivery ‐ Allows you to choose a time and date for a message to be sent. The system allows you to record a message for delivery up to 365 days in advance. You will be prompted for the day, month, time, AM or PM for each message to be delivered. Each message recorded counts towards the maximum storage allowance in your mailbox until it is sent.
4) Greetings The Greetings menu provides you with the ability to record, select, and change your greetings, including the opportunity to change your name recording. You can select from several greeting options for your primary greeting and also record greetings that will be heard under different conditions. See information at the end of this section for a detailed description of each greeting option. To change your greeting using the telephone interface:
Page 21 of 27
HostedPBX‐CallingFeaturesandVoiceMailGuide
1. From the main menu, press 3 to go to the greetings menu 2. Choose a greeting option to work with
Press 1 for personal greetings Press 2 to record and schedule an extended absence greeting Press 3 to select a system greeting or record your name Press 5 for busy greeting Press 6 for record and schedule an out‐of‐hours greeting Press 9 for forward‐all‐calls to voicemail greeting
3. Follow the voice prompts for your selected greeting to record, turn on and/or schedule your greetings, as required
You can also manage your voice mail greetings using CommPortal. See the CommPortal User Guide for more information. Greeting Options: Personal Greeting – Often called your regular recorded greeting, you record this greeting for your callers to hear when other greetings are not in use. Once you have recorded a regular personal greeting, you may also record a personal greeting that only callers from within your business group will hear. Extended Absence Greeting* – Often called a “must hear” greeting; callers must listen to the whole greeting and cannot press # to skip directly to recording a message. This greeting can be set to announcement‐only so that callers will not be able to leave a message for you. System Greetings – You may opt to use one of the automated greetings provided by the system, rather than record a personal greeting in your own voice. A system greeting may include your recorded name, your number, or neither your name nor number. Busy Greeting – When you are on the phone, and call waiting is not enabled, your callers can hear this unique greeting. Out of Hours Greeting* – If you want your callers to hear a different greeting when your office is closed, record and schedule this special greeting. Forward all calls to VM Greeting* – When you will not be able to take calls for a while, you can forward all calls directly to voicemail either from your desk phone or through CommPortal. You may choose to record a special greeting for callers to hear when all calls are being forwarded to voicemail without ringing your phone.
Page 22 of 27
HostedPBX‐CallingFeaturesandVoiceMailGuideGreetings marked with asterisks are available only to Business Advantage Plus and Business Advantage Premium users.
5) Mailbox Settings
The Mailbox Settings menu provides you with the flexibility to customize your mailbox. You can establish group lists, set message preferences, change your PIN, change notification options, establish a default fax number, manage operator settings and manage advanced features To manage your mailbox settings using the telephone interface:
1. From the main menu, press 4 to go to the mailbox settings menu 2. Choose a setting to work with
Press 1 for group lists Press 2 to for hands free and time saver options Press 3 for security options Press 5 for notification settings Press 6 to manage additional settings
3. Follow the voice prompts to setup, manage, and change settings Mailbox Setting Options: Group Lists – Group Lists allow you to quickly send a message to a group of people all at once. From the Group Lists menu, you can edit existing group lists, add new group lists, and review existing group lists. Depending upon your service you may create up to 3 groups with a maximum of 50 members per list, 6 groups with a maximum of 100 members per list, or 10 groups with a maximum of 100 members per list. These lists may be created through the telephone user interface and through CommPortal Contacts for use in sending messages using the telephone user interface. Hands Free/Time Saver Options – The timesavers menu lets you set options that save time when you are listening to your messages. With the hands free feature, messages will start to play immediately upon login, without additional key presses. You can select only urgent messages to play immediately or for all messages to play immediately, without pressing any keys. If you press no keys, as each messages plays, the message will automatically be saved before continuing to the next message. Also, the time and date of each message is always recorded when someone leaves a message for you. Using the voicemail preferences feature, you can choose whether to hear the time and date of every message before the message plays.
Page 23 of 27
HostedPBX‐CallingFeaturesandVoiceMailGuideSecurity Options – You may change your voicemail PIN at any time using this option. In addition, you may choose to turn on fast login. When calling from your own phone, you will not be asked to enter your PIN when fast login is turned on. Notification Settings – You may set up your mailbox to send you notification of new messages in two ways: MWI (message waiting indication is automatically turned on when your service is established, but you can turn it off) or Email (to turn email notification to email on/off through the telephone user interface you must input an email address through the CommPortal first). You may also choose for the service to notify you of all or only urgent messages. Notifications may also be managed through CommPortal. Additional Settings – You may configure an operator number for your mailbox to allow your callers to “zero out” to an attendant, to your cell phone, or to another number. You can also configure a default fax number to more quickly retrieve fax messages.
6) Reminders
With reminders, you will never have to worry about remembering important occasions. The reminders feature allows you to record a message to be delivered to your telephone. You can schedule delivery up to 365 days into the future. You can schedule a one‐time reminder, a daily reminder, or a weekday reminder that will call your phone to deliver the message. To schedule a reminder:
1. From the main menu, press 5 to go to the reminder settings menu 2. Press 2 to add a new reminder 3. Record the reminder and press the # key
o If the reminder is okay, press 1 o To re‐record, press 2
4. Choose the type of reminder you want to deliver Press 1 for a one time reminder Press 2 for a recurring weekday reminder Press 3 for a recurring reminder every day
5. Follow the voice prompts to schedule the reminder. As needed, enter: o Month (1‐12) o Day (1‐31) o Hour (1‐12)
Page 24 of 27
HostedPBX‐CallingFeaturesandVoiceMailGuideo Minute (1‐59) o Press 1 for AM or press 2 for PM
At the scheduled time, the system will try to reach you four times to deliver the message. After the fourth try, the system will deposit the message in your mailbox.
7) Recovering Erased Messages
After you have erased a message, you can still play, restore, reply to and forward the message for up to 7 days. You can also permanently erase it. At any time while listening to your erased messages, you may use all of the same options as you use when playing back new or saved messages. To work with erased messages:
1. To play your erased messages, press 6 from the Main Menu Business Advantage Plus and Business Advantage Premium customers
o Press 1 again to hear erased voice messages o Press 3 to review erased fax messages
2. During the message playback you may: Press 1 to start playing the message again Press 2 to restore the message Press 3 to permanently delete the message Press 4 to reply to the message sender Press 5 to forward a copy of the message to someone else Press 6 to increase volume Press 7 to slow the message down Press 7, 7 to skip back 5 seconds Press 8 to pause and restart the message Press 9 to speed up the message Press 9, 9 to skip ahead 5 seconds Press 0 for helpful hints Press * to return to the main menu Press # to skip to the next message
3. When the message ends you may: Press 1 to repeat the message Press 2 to restore the message Press 3 to permanently delete the message Press 4 to reply to the message sender Press 5 to forward a copy of the message to someone else Press # to skip to the next message
Page 25 of 27
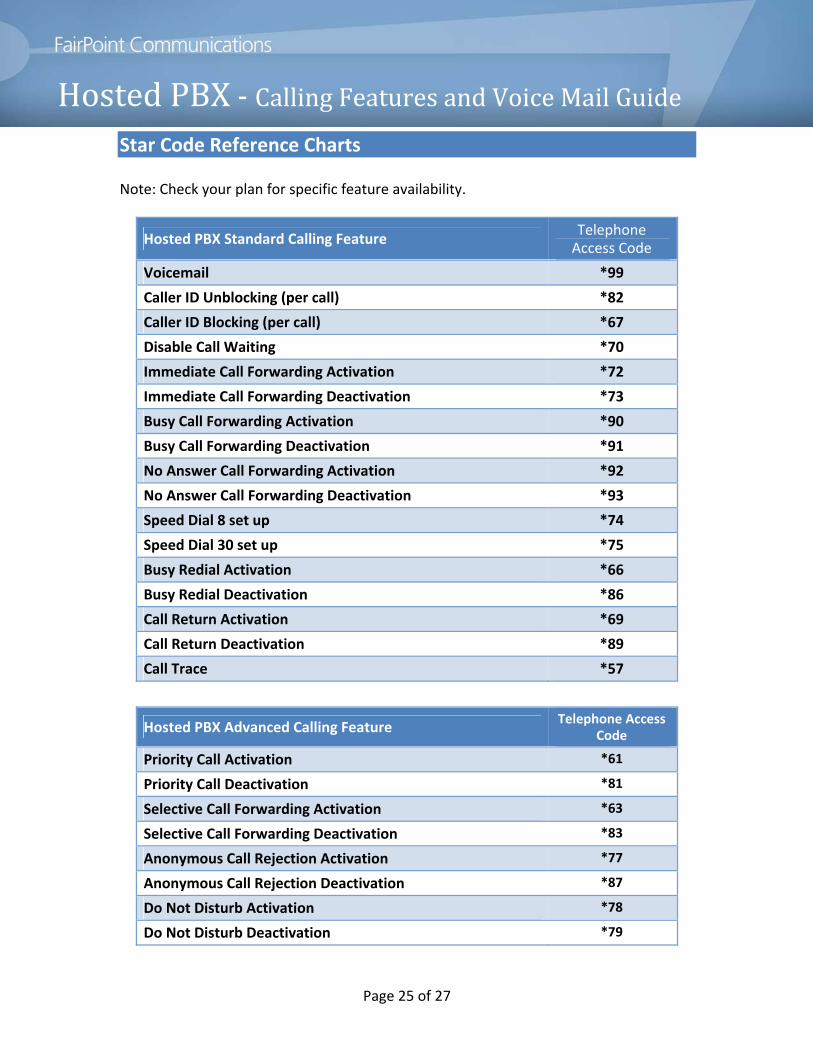
HostedPBX‐CallingFeaturesandVoiceMailGuideStar Code Reference Charts
Note: Check your plan for specific feature availability.
Hosted PBX Standard Calling Feature Telephone Access Code
Voicemail *99
Caller ID Unblocking (per call) *82
Caller ID Blocking (per call) *67
Disable Call Waiting *70
Immediate Call Forwarding Activation *72
Immediate Call Forwarding Deactivation *73
Busy Call Forwarding Activation *90
Busy Call Forwarding Deactivation *91
No Answer Call Forwarding Activation *92
No Answer Call Forwarding Deactivation *93
Speed Dial 8 set up *74
Speed Dial 30 set up *75
Busy Redial Activation *66
Busy Redial Deactivation *86
Call Return Activation *69
Call Return Deactivation *89
Call Trace *57
Hosted PBX Advanced Calling Feature Telephone Access
Code
Priority Call Activation *61
Priority Call Deactivation *81
Selective Call Forwarding Activation *63
Selective Call Forwarding Deactivation *83
Anonymous Call Rejection Activation *77
Anonymous Call Rejection Deactivation *87
Do Not Disturb Activation *78
Do Not Disturb Deactivation *79
Page 26 of 27
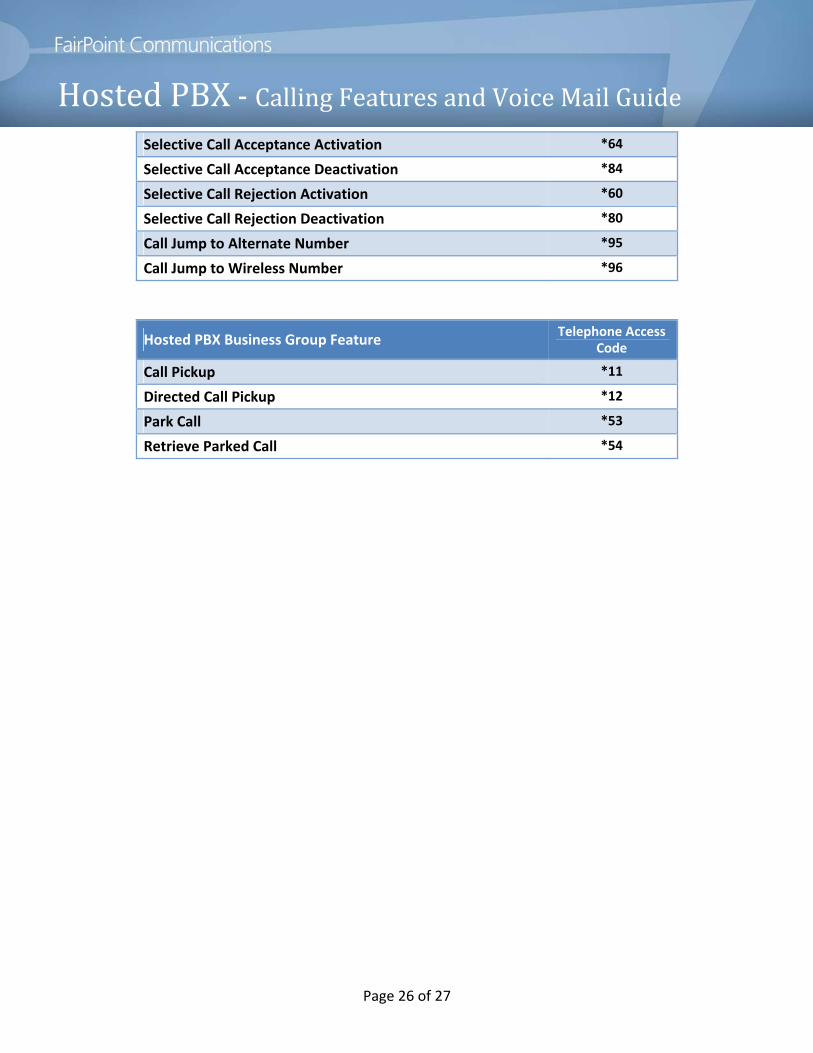
HostedPBX‐CallingFeaturesandVoiceMailGuideSelective Call Acceptance Activation *64
Selective Call Acceptance Deactivation *84
Selective Call Rejection Activation *60
Selective Call Rejection Deactivation *80
Call Jump to Alternate Number *95
Call Jump to Wireless Number *96
Hosted PBX Business Group Feature Telephone Access
Code
Call Pickup *11
Directed Call Pickup *12
Park Call *53
Retrieve Parked Call *54
Page 27 of 27
HostedPBX‐CallingFeaturesandVoiceMailGuideQuick Reference Information
For more information: www.fairpoint.com/hostedpbx CommPortal user login: open www.fairpoint.com/hostedpbx from any web browser. From here you can access a login URL specific to your location. For example, for Northern New
England the URL might be www.myphone.ptldme.fpviper.com CommPortal Admin login: open www.fairpoint.com/hostedpbx from any web browser. From here you can access a login URL specific to your location. For example, for Northern New
England the URL might be www.myphone.ptldme.fpviper.com/bg Conferencing Moderator web: open www.fairpoint.com/hostedpbx from any web browser. From here you can access a login URL specific to your location. For example, for Northern New England the URL might be www.conf.ptldme.fpviper.com Conferencing toll free number: 1‐855‐481‐0677