dial-office ip-pbx software - administrator guide version 4.1.0
DESCRIPTION
Dial-Office is a full-featured IP-PBX software solution for businesses of all sizes. Based entirely on the SIP standard platform, Dial-Office provides advanced business telephone features that were previously available only with costly proprietary PBX-based telephone systems. Operating within a wide range of gateways, IP phones, and ATAs, as well as with legacy TDM and IP networks, Dial-Office provides high voice quality and supplies end users with interactive tools that increase productivity, lower communication costs, and enhance customer service. If you’re new to Dial-Office, consult our Admin Guide, a rich source of info and tips to help you get the most out of your Dial-Office software.TRANSCRIPT

© 2013 by Dialexia Communications, Inc. All Rights Reserved
Dial-Office Administrator Guide

Dial-OfficeAdministrator Guide
Version 4.1.0Revision 1

Dial-Office is a registered trademark of Dialexia Communications, Inc. All Rights Reserved.
This document is supplied by Dialexia Communications, Inc for information purposes only to licensed users of theDial-Office software and is supplied on an “AS IS” basis, that is, without any warranties whatsoever, express orimplied.
Information in this document is subject to change without notice and does not represent any commitment on the partof Dialexia Communications, Inc.
The software described in this document is furnished under a license agreement and may be used only in accordancewith the terms of that license agreement. It is against the law to copy or use this software except as specificallyallowed in the license.
No part of this document may be reproduced, republished or retransmitted in any form or by any means whatsoever,whether electronically or mechanically, including, but not limited to, by way of photocopying, recording, informationrecording or through retrieval systems, without the express written permission of Dialexia Communications, Inc.
Dial-Office Administrator Guide
© 2013 by Dialexia Communications, Inc. All Rights Reserved

Dial-Office Administrator GuideII
© 2013 by Dialexia Communications, Inc. All Rights Reserved
Table of Contents
Chapter 1 Read this first! 1-2
................................................................................................................................... 1-2If you have just installed a new system
................................................................................................................................... 1-3For tasks you need to do only as required
................................................................................................................................... 1-6Dial-Office services
................................................................................................................................... 1-7Learning how to work with Dial-Office pages
.......................................................................................................................................................... 1-8Related icons
.......................................................................................................................................................... 1-9Paging through a list
.......................................................................................................................................................... 1-9Searching a list
.......................................................................................................................................................... 1-11Sorting a list
.......................................................................................................................................................... 1-12Hiding and redisplaying columns
................................................................................................................................... 1-13Related documentation
Chapter 2 Setting up the server 2-2
................................................................................................................................... 2-2Modifying server settings
.......................................................................................................................................................... 2-4Completing the fields on the General tab
......................................................................................................................................................... 2-4Configure general server settings
......................................................................................................................................................... 2-6Configure SMTP server settings
.......................................................................................................................................................... 2-7Completing the fields on the Call Controller tab
.......................................................................................................................................................... 2-10Completing the fields on the IVR Server tab
.......................................................................................................................................................... 2-12Completing the fields on the Voicemail Server tab
......................................................................................................................................................... 2-13Configure general Voicemail Server settings
......................................................................................................................................................... 2-14Customize email notification messages
.......................................................................................................................................................... 2-17Completing the fields on the Park Orbit tab
.......................................................................................................................................................... 2-18Completing the fields on the Conference tab
.......................................................................................................................................................... 2-19Configure Telephony services
.......................................................................................................................................................... 2-24Completing the fields on the QoS tab
Chapter 3 Setting up tenants and the IVR 3-2
................................................................................................................................... 3-2Setting up the main tenant
................................................................................................................................... 3-9Creating additional tenants
................................................................................................................................... 3-10Setting up the IVR
.......................................................................................................................................................... 3-12General Settings
.......................................................................................................................................................... 3-12Setting languages
.......................................................................................................................................................... 3-14Configuring menus
Chapter 4 Working with call permissionsand digit filters 4-2
................................................................................................................................... 4-3Working with call permissions
.......................................................................................................................................................... 4-3Adding a permission
.......................................................................................................................................................... 4-6Modifying a permission
.......................................................................................................................................................... 4-7Deleting a permission
................................................................................................................................... 4-8Working with digit filters
.......................................................................................................................................................... 4-8Adding a digit filter

IIIContents
© 2013 by Dialexia Communications, Inc. All Rights Reserved
.......................................................................................................................................................... 4-10Modifying a digit filter
.......................................................................................................................................................... 4-14Deleting a digit filter
Chapter 5 Working with gateways anddomains 5-2
................................................................................................................................... 5-3Adding a gateway or domain
................................................................................................................................... 5-9Modifying a gateway or domain
................................................................................................................................... 5-11Deleting a gateway or domain
Chapter 6 Adding and forwardingnumbers 6-2
................................................................................................................................... 6-2Adding numbers to the Numbers Pool
................................................................................................................................... 6-5Forwarding numbers
Chapter 7 Working with users 7-2
................................................................................................................................... 7-2Adding a user
.......................................................................................................................................................... 7-5Completing the fields on the General tab
.......................................................................................................................................................... 7-10Completing the fields on the Routing tab
.......................................................................................................................................................... 7-13Completing the fields on the Voice Mail tab
.......................................................................................................................................................... 7-14Completing the fields on the Presence Monitoring tab
.......................................................................................................................................................... 7-15Completing the fields on the Group Membership tab
................................................................................................................................... 7-17Modifying default user settings
................................................................................................................................... 7-18Deleting a user
................................................................................................................................... 7-19Exporting users
.......................................................................................................................................................... 7-20Modifying a user
Chapter 8 Working with user groups 8-2
................................................................................................................................... 8-2Adding a group
................................................................................................................................... 8-5Modifying a group
.......................................................................................................................................................... 8-6Adding members to a group
.......................................................................................................................................................... 8-7Deleting members from a group
................................................................................................................................... 8-8Deleting a group
Chapter 9 Working with park orbits 9-2
................................................................................................................................... 9-2Creating a new Park Orbit
................................................................................................................................... 9-4Modifying a Park Orbit
................................................................................................................................... 9-4Deleting a Park Orbit
................................................................................................................................... 9-5Monitor Parked Calls
Chapter 10 Working with web access 10-2
................................................................................................................................... 10-2Adding web access
................................................................................................................................... 10-5Updating a user’s web access password
................................................................................................................................... 10-6Deleting a user’s web access
................................................................................................................................... 10-7Configuring administrator login settings

Dial-Office Administrator GuideIV
© 2013 by Dialexia Communications, Inc. All Rights Reserved
................................................................................................................................... 10-9Monitoring web connection logs
.......................................................................................................................................................... 10-10Exporting web connection logs
.......................................................................................................................................................... 10-11Deleting web connection logs
Chapter 11 Provisioning devices 11-2
................................................................................................................................... 11-2Adding a device
................................................................................................................................... 11-4Assigning users to device lines
................................................................................................................................... 11-6Setting up a Device
.......................................................................................................................................................... 11-7Setting up Aastra devices
.......................................................................................................................................................... 11-9Setting up the ATCOM AT-510
.......................................................................................................................................................... 11-10Setting up the AudioCodes MP 202
.......................................................................................................................................................... 11-11Setting up Cisco devices
.......................................................................................................................................................... 11-14Setting up Grandstream devices
.......................................................................................................................................................... 11-15Setting up Linksys devices
.......................................................................................................................................................... 11-16Setting up the Mediatrix 2102
.......................................................................................................................................................... 11-19Setting up Polycom devices
................................................................................................................................... 11-20Deleting a device
Chapter 12 Working with conferences(license enabled) 12-2
................................................................................................................................... 12-2Creating a conference call
................................................................................................................................... 12-6Joining a conference call
................................................................................................................................... 12-6Displaying Online Users
................................................................................................................................... 12-6Displaying completed and canceled conference calls
Chapter 13 Working with Media Library 13-2
................................................................................................................................... 13-2Manage IVR Audio Files
................................................................................................................................... 13-4Manage Conference Greetings
................................................................................................................................... 13-6Manage Music on Hold
Chapter 14 Monitoring Calls 14-2
................................................................................................................................... 14-2Monitoring registered users
................................................................................................................................... 14-2Unregistering users
................................................................................................................................... 14-3Monitoring current calls
................................................................................................................................... 14-4Monitoring call records
................................................................................................................................... 14-5Deleting call records
................................................................................................................................... 14-7Exporting call records
................................................................................................................................... 14-8Playing back recorded calls
................................................................................................................................... 14-10Monitoring logs
................................................................................................................................... 14-11Deleting log records
Chapter 15 Ongoing maintenance 15-2
................................................................................................................................... 15-2Backing up the database

VContents
© 2013 by Dialexia Communications, Inc. All Rights Reserved
................................................................................................................................... 15-3Starting and stopping services
................................................................................................................................... 15-4Restarting Dial-Office
................................................................................................................................... 15-5Checking the version of your Dial-Office modules
................................................................................................................................... 15-6Ordering additional licenses
................................................................................................................................... 15-8Installing an upgrade
Index I-1

Chapter
1
Chapter 1 Read this first! 1-2
© 2013 by Dialexia Communications, Inc. All Rights Reserved
Chapter 1 Read this first!
Introduction
This guide is intended for Dial-Office administrators. It will walk you through the initial customization ofyour system, and help you make changes as required. It also describes the tasks you need to do on anongoing basis to maintain your system.
Dial-Office Overview
Dial-Office is a full-featured IP-PBX solution. Based entirely on the SIP standards platform, Dial-Officeprovides advanced features that were previously available only with costly proprietary PBX-basedtelephone systems. Moreover, since Dial-Office runs on VoIP technology, it seamlessly connectsremote branches of a given enterprise together.
Dial-Office can operate with gateways, IP-phones, and ATAs, as well as with legacy TDM and IPnetworks. It has many features including integrated voice mail, call conferencing, group paging, unifiedmessaging, and remote-worker support. Fully scalable, this IP-PBX provides high voice quality andsupplies end users with interactive tools that increase productivity, lower communication costs, andenhance customer service.
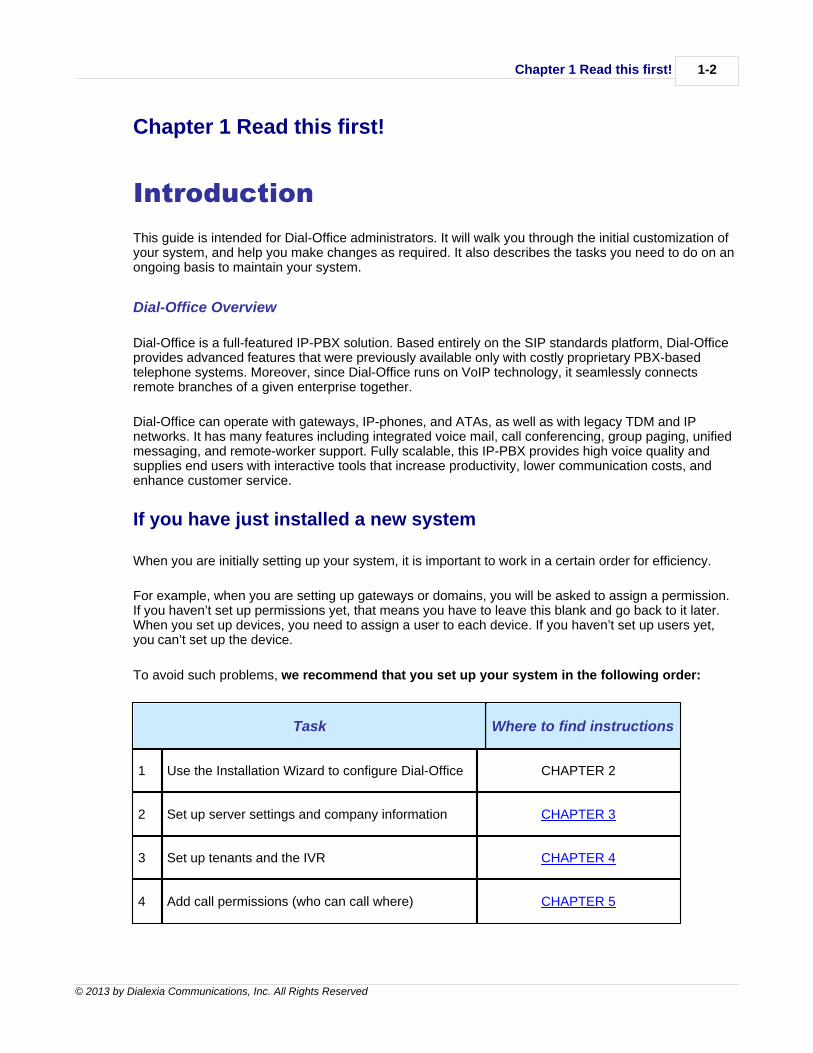
If you have just installed a new system
When you are initially setting up your system, it is important to work in a certain order for efficiency.
For example, when you are setting up gateways or domains, you will be asked to assign a permission.If you haven’t set up permissions yet, that means you have to leave this blank and go back to it later.When you set up devices, you need to assign a user to each device. If you haven’t set up users yet,you can’t set up the device.
To avoid such problems, we recommend that you set up your system in the following order:
Task Where to find instructions
1 Use the Installation Wizard to configure Dial-Office CHAPTER 2
2 Set up server settings and company information CHAPTER 3
3 Set up tenants and the IVR CHAPTER 4
4 Add call permissions (who can call where) CHAPTER 5

1-3
© 2013 by Dialexia Communications, Inc. All Rights Reserved
Task Where to find instructions
5 Add digit filters (adds digits to or removes digitsfrom the beginning of a phone number) - Optional
CHAPTER 5
6 Add the gateways and domains you require CHAPTER 6
7 Populate the Numbers Pool and define forwardingoptions for numbers
CHAPTER 7
8 Add users CHAPTER 8
9 Add groups (if using) CHAPTER 9
10 Create administrator and user web accounts anddefine administrator login settings
CHAPTER 10
11 Set up your devices CHAPTER 11
For tasks you need to do only as required
Check the list below for how to perform typical tasks. If you don’t find what you want in the list, use theindex or search features in the online help to find information relating to your task.
For example, if you need to add users you could search for “user” to locate the chapter that describesuser tasks.
Here are some typical examples of tasks that arise after the system is up and running.
Task Where to find instructions
Employees
You have a new user CHAPTER 8, Adding a user
CHAPTER 11, Assigning users to device linesOR
Appendix A, Device Configuration
Chapter 1 Read this first! 1-4
© 2013 by Dialexia Communications, Inc. All Rights Reserved
Task Where to find instructions
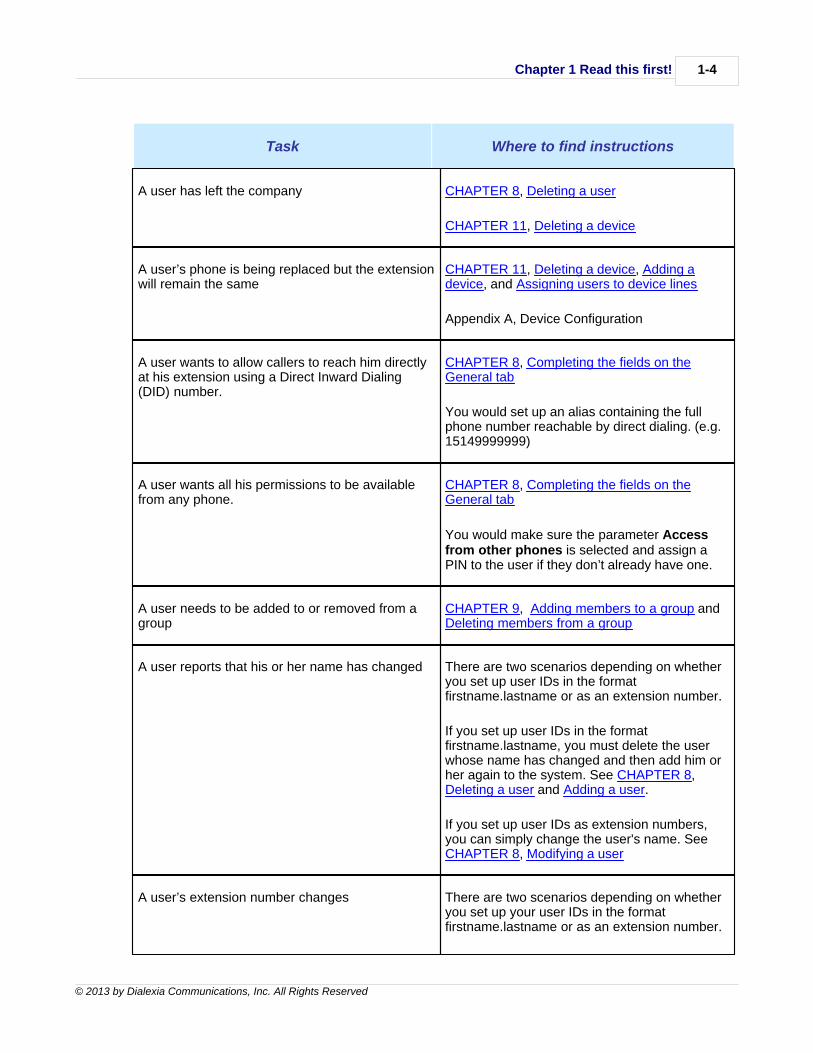
A user has left the company CHAPTER 8, Deleting a user
CHAPTER 11, Deleting a device
A user’s phone is being replaced but the extensionwill remain the same
CHAPTER 11, Deleting a device, Adding adevice, and Assigning users to device lines
Appendix A, Device Configuration
A user wants to allow callers to reach him directlyat his extension using a Direct Inward Dialing(DID) number.
CHAPTER 8, Completing the fields on theGeneral tab
You would set up an alias containing the fullphone number reachable by direct dialing. (e.g.15149999999)
A user wants all his permissions to be availablefrom any phone.
CHAPTER 8, Completing the fields on theGeneral tab
You would make sure the parameter Accessfrom other phones is selected and assign aPIN to the user if they don’t already have one.
A user needs to be added to or removed from agroup
CHAPTER 9, Adding members to a group andDeleting members from a group
A user reports that his or her name has changed There are two scenarios depending on whetheryou set up user IDs in the formatfirstname.lastname or as an extension number.
If you set up user IDs in the formatfirstname.lastname, you must delete the userwhose name has changed and then add him orher again to the system. See CHAPTER 8,Deleting a user and Adding a user.
If you set up user IDs as extension numbers,you can simply change the user's name. See CHAPTER 8, Modifying a user
A user’s extension number changes There are two scenarios depending on whetheryou set up your user IDs in the formatfirstname.lastname or as an extension number.

1-5
© 2013 by Dialexia Communications, Inc. All Rights Reserved
Task Where to find instructions
If you set up user IDs in the formatfirstname.lastname, you can simply change theextension number and reboot the phone. See CHAPTER 8, Completing the fields on theGeneral tab
If you set up user IDs as extension numbers,you must delete the user whose extension haschanged and then add him or her again to thesystem with the new extension number. See CHAPTER 8, Deleting a user as well as Addinga user. Then reassign the new extension to thesame device the user was using. See CHAPTER 11, Assigning users to device linesand Appendix A, Device Configuration
A user needs permission to make internationalcalls
CHAPTER 8, Completing the fields on theRouting tab
A user needs to have voice mail at his extension CHAPTER 8, Completing the fields on the VoiceMail tab
A user needs to reset his or her PIN code CHAPTER 8, Completing the fields on theGeneral tab
A user needs to reset his or her web password CHAPTER 10, Modifying a user’s web accesspassword
A user wants to have his or her web user namechanged
CHAPTER 10, Deleting a user’s web accessand Adding web access
Devices
You have 5 PAP2 devices that are fully occupiedand you need room for some new employees.Adding a new PAP2 device would be the solutionto support the new users.
CHAPTER 11, Adding a device and Assigningusers to device lines OR
Appendix A, Device Configuration
Filters for telephone numbers (digit filters)
You have a new provider for a certain type of calls. CHAPTER 5, Adding a digit filter

Chapter 1 Read this first! 1-6
© 2013 by Dialexia Communications, Inc. All Rights Reserved
Task Where to find instructions
As a result, everyone will be able to make longdistance calls. However, you must dial 999 beforethe phone number in order to use the provider
Holidays
You have to enter the dates that holidays will beobserved for the coming year so that the properHoliday Greeting message picks up
CHAPTER 4, Setting up the main tenant
Maintenance
You need an upgrade so you can have moreconcurrent or registered users at one time
CHAPTER 14, Ordering additional licenses andInstalling an upgrade
You have to provide the length of time that anyonespent talking to a particular phone number – forbilling purposes
CHAPTER 13, Exporting call records
The database needs to be backed up CHAPTER 14, Backing up the database
The system is not responding CHAPTER 14, Restarting Dial-Office
Dial-Office services
Dial-Office consists of a number of running services, each with a specific purpose, as described below:
Call Controller: Manages the SIP server.
IVR Manages the the Interactive Voice Response (IVR) system.
Voicemail Manages voicemail system.
Park Manages Park orbits server.
Alerter: Monitors Dial-Office, informing the administrator of any operationalissues that arise. Dial-Alerter can be set to send the administrator

1-7
© 2013 by Dialexia Communications, Inc. All Rights Reserved
an email when there is a problem.
Conference: Manages the conference module.
Paging: Enables groups of type Paging to work.
Web: Allows users to access Dial-Office through a web browser. Twotypes of web interfaces exist: the administrator interface and theuser interface.
I. For information on configuring Dial-Office's services, see Modifying server settings.
II. You can start or stop a service from the Maintenance page.
Learning how to work with Dial-Office pages
When you log in to Dial-Office as the administrator, the following page appears with a list of registeredusers:
Since many Dial-Office pages have the same format, we'll use this page as an example to show youwhat you can do:
· Clicking an icon at the top of the page causes related icons to appear in the row below.
· You can page through the list using the paging icons.
· You can search the list using the filter function.

Chapter 1 Read this first! 1-8
© 2013 by Dialexia Communications, Inc. All Rights Reserved
· You can sort the list by any heading.
· You can hide and redisplay columns of information.
Related icons
Clicking any of the icons at the top of the page causes related icons to appear in the row below. Thefigure below shows the icons that appear when you expand Users and Groups:
Icons that appear when you click Users
Icons that appear when you click Groups
The next figure shows the icons that appear when you expand Call Monitoring:
Icons that appear when you click Call Monitoring

1-9
© 2013 by Dialexia Communications, Inc. All Rights Reserved
Paging through a list
When many records are listed on a page, you can use the arrows circled below to scroll through thelist.
Paging through a list of records
Click to go to the first page in the list.
Click to go to the last page in the list.
Click to go to the next page in the list.
Click to go to the previous page in the list.
Searching a list
To quickly find a particular record in whatever list is being displayed, you can search for a record usingthe filter fields circled in the figure below.
Searching a list using the filter
To use the filter fields to search for a record:
1. Beside Filter By, click and choose one of the column headings.
For example, if you are in the Users page, the headings would be User ID, First Name, Last Name,Extension, Display Number, Display Name, Tenant, and Voice Mail Type. (The headings will varydepending on the page you are on.)
The system automatically inserts Like into the second box.

Chapter 1 Read this first! 1-10
© 2013 by Dialexia Communications, Inc. All Rights Reserved
2. If you want to change Like to another value, click and choose another value. Other possiblevalues are:
· Like
· Not Like
· =
· <=
· >=
· <>
3. Enter a value in the third box. This value is compared to the column heading in the first box basedon the comparison symbol you select in the second box.
Keep in mind that you can use the wildcard asterisk ( * ) to denote any number of unspecifiedcharacters. For example, to display all the extensions that start with the prefix 20, enter the value 20*.
4. Click .
Example - Filtering by a specific Name
The following figure shows a query carried out in the Users page after filtering by the first name ofJohn.
Filtering fields circled
When you click , the only records now appearing in the list will be users with a first name ofJohn, as shown below.
Results of a search

1-11
© 2013 by Dialexia Communications, Inc. All Rights Reserved
Redisplaying hidden records
To redisplay all records in the list after you have finished searching:
1. Beside Filter By, click and choose No Filtering.
Redisplaying all records
2. Click . All records will now be displayed.
Sorting a list
When a page first appears, all records are sorted in ascending or descending order based on aparticular column. For example the figure below shows the registered users in descending orderbased on the Expiration Date column.
Records are sorted in descending order based on the Expiration Date column
You can sort the list by another heading by clicking on it. In the figure below the records are sorted byPort.
Clicking another heading sorts the records in ascending order based on that heading

Chapter 1 Read this first! 1-12
© 2013 by Dialexia Communications, Inc. All Rights Reserved
Clicking the same heading again sorts the list into descending order, as shown below.
Clicking the same heading again sorts the list into descending order
Hiding and redisplaying columns
Each column heading has an icon beside it. You can hide any column by clicking the to the rightof its title as shown below.
Location of the icon
To hide the Expiration Date column, you would click the icon circled in the previous figure. Thepage now looks like the one in the figure below.
One column is hidden
To redisplay the hidden column, right-click anywhere in the heading row to display a menu as shownbelow.
Redisplaying the hidden column
The menu lists all column headings, with a check mark beside the ones that are currently displayed.Clicking a column heading without a check mark causes the column to be redisplayed, as shown in thefigure below.

1-13
© 2013 by Dialexia Communications, Inc. All Rights Reserved
Hidden column is redisplayed
Related documentation
In addition to this manual you may want to refer to the following documents found on the Dial-OfficeCD:
· Dial-Office Administrator Guide - Installation
· Dial-Office VoIP NAT/Firewall Recommendations
Chapter
2

2-2
© 2013 by Dialexia Communications, Inc. All Rights Reserved
Chapter 2 Setting up the server
Overview
If you used the Installation Wizard to configure basic settings for your system as described in CHAPTER 2, the fields you completed there will automatically be filled in for you.
What are server settings?
Server settings are where you define system information that controls how Dial-Office runs. Setting upthe server includes entering information such as:
· The server where Dial-Office is running.
· The mail server used by Dial-Office to send email messages.
· Call Controller, IVR Server, Voicemail Server and Conference settings.
Modifying server settings
This section describes how to set up:
· The server where Dial-Office is running.
· The mail server used by Dial-Office to send e-mail messages.
· Call Controller, IVR Server, Voicemail Server and Conference settings.
Upon clicking Settings and then Server Settings, the following page appears:

Chapter 2 Setting up the server 2-3
© 2013 by Dialexia Communications, Inc. All Rights Reserved
Edit Server page with the General tab expanded
The Edit Server page contains eleven tabs. They are described in the table below.
In the previous figure the General tab is expanded and the other eight tabs are collapsed. You canexpand a tab by clicking on it.
Description of tabs on the Edit Server page
Tab Description of contents
General Set up the IP addresses or DNS names ofDial-Office.
Call Controller Set up the Call Controller server.
IVR Server Set up the Auto Attendant system.
Voicemail Server Set up the Voice Mail system.
Park Orbit Server Set up the Park Server.
Conference Set up the conference module

2-4
© 2013 by Dialexia Communications, Inc. All Rights Reserved
Tab Description of contents
Telephony Services View and update Telephony Services code List.
QoS Change the quality of service parameters.
Product Information See all installed Dial-Office modules version andlicense details.
Dial-Alerter Set up the tool that monitors Dial-Office and reportsany operational issues that arise.
License Information See details about your license.
Installing an upgrade Request additional licenses.
Completing the fields on the General tab
The General tab contains two sections. The first section involves the setup of Dial-Office's Companyname, administrator email and TFTP server address. And the second section involves the SMTPserver setup.
Configure general server settings
We describe how to configure the general server settings and the SMTP server settings in thefollowing steps:
1. If the General tab is not already expanded as shown below, click the tab to expand it.

Chapter 2 Setting up the server 2-5
© 2013 by Dialexia Communications, Inc. All Rights Reserved
General server settings
2. Complete the fields on the General tab as described in the table below.
Shaded fields are optional. Unshaded fields are required.
Completing the server settings fields on the General tab
Field Name How to Complete
Company Name The name of your company
Administrator The email address of the person who is responsible for Dial-Office

2-6
© 2013 by Dialexia Communications, Inc. All Rights Reserved
Field Name How to Complete
Email administration at your company. This email will be used for notifications.
TFTP ServerAddress
The IP address of the server where you store configuration files for your SIPdevices.
Configure SMTP server settings
In addition to the general server settings, the General tab contains the SMTP server settings.
SMTP server settings
3. Complete the SMTP server settings as described in the table below.
Field Name How to Complete
SMTP Server The DNS name or IP address of the mail server you want to use.
SMTP Port The SMTP server's port. If you do not specify a port, Dial-Office uses 25 fornon-SSL connection and 465 for SSL connection.

Chapter 2 Setting up the server 2-7
© 2013 by Dialexia Communications, Inc. All Rights Reserved
Field Name How to Complete
Use SSL Select this check box to enable a Secure Socket Layer connection betweenDial-Office and the SMTP server. An SSL connection encrypts datatransmitted between the two servers, ensuring it remains secure from anyonewith malicious intentions who wants to "listen" in. Make sure the SMTP serveryou use supports SSL.
Useauthentication
Select this check box if the SMTP server requires authentication.
UserIf the SMTP server requires authentication, enter the user name andpassword here.
Password
4. Click .The general server settings and SMTP server settings get saved.
5. Restart your system for the settings to take effect.
Completing the fields on the Call Controller tab
The Call Controller tab enables you to set up the SIP Back to Back server. The back to back serverforwards requests to other servers.
1. Click the tab beside the General tab to expand it as shown below.

2-8
© 2013 by Dialexia Communications, Inc. All Rights Reserved
Edit Server page with Call Controller tab expanded
2. Complete the fields on the Call Controller tab as described in the table below.
Shaded fields are optional. Unshaded fields are required.
Completing the fields on the Call Controller tab
Field Name How to Complete
Host IP/Domain If the machine on which Dial-Office is running has a DNS name,type it here.
OR
If the machine on which Dial-Office is running does not have a DNSname, type its IP address.

Chapter 2 Setting up the server 2-9
© 2013 by Dialexia Communications, Inc. All Rights Reserved
Field Name How to Complete
NAT is Enabled Check this checkbox if Call Controller is located on a private serverand is behind a NAT/firewall. By selecting this option, Call Controllerwill handle NAT/Firewalls Traversal, which enables for exampleteleworkers to receive calls to their extensions when they areworking away from the office. For more information, refer to theDial-Office VoIP NAT/Firewall Recommendations guide found on theDial-Office CD.
NAT IP/Domain If NAT is Enabled is checked, enter the IP address of theNAT/firewall. Otherwise, this field is disabled.
Aliases The list of alternate IP addresses or DNS names. We recommendthat you complete them as follows.
If Host IP/Domain contains a DNS name:
• Add the corresponding IP address. Depending on your setup of theDial-Office server, this could either be a private or a public IPaddress.
• You can also enter any other DNS names or IP addressesassigned to Dial-Office.
If Host IP/Domain contains an IP address:
• Enter any other IP addresses or DNS names assigned toDial-Office.
Listening Port The port that Call Controller uses for listening to incoming SIPmessages. The default is 5060.
Protocol Choose UDP or TCP as the packet transport protocol. UDP isrelatively fast but unreliable. TCP is relatively slower but reliable. For now, we accept only UDP protocol.
“From” Email Address The sender name that you want to appear in the “From” field ofemails that Call Controller sends to the administrator in case of aproblem.
Realm Whenever the proxy server receives a request for authentication, ituses the contents of this field. We recommend that you use yourdomain name as the realm. Example: sip.mycompany.com

2-10
© 2013 by Dialexia Communications, Inc. All Rights Reserved
Field Name How to Complete
Registration GracePeriod
SIP devices register themselves automatically with the proxy serverat regular intervals. This field enables you to specify a grace periodso that if a device fails to register itself on schedule, due to heavyloads for example, it will not be unregistered until after the graceperiod is up.
Usually devices need to register every hour. If you leave the graceperiod set to the default of 600 seconds, the system will wait another10 minutes before unregistering the device.
Folder ContainingRecorded Calls
The location where you want Dial-Office to store recorded calls forusers and groups. (For more information about recording a user’sconversations, see Completing the fields on the General tab inCHAPTER 8. For more information about recording a group’sconversations, see Adding a group in CHAPTER 9.)
3. When you have finished, click .The Call Controller settings get saved.
4. Restart your system for the settings to take effect.
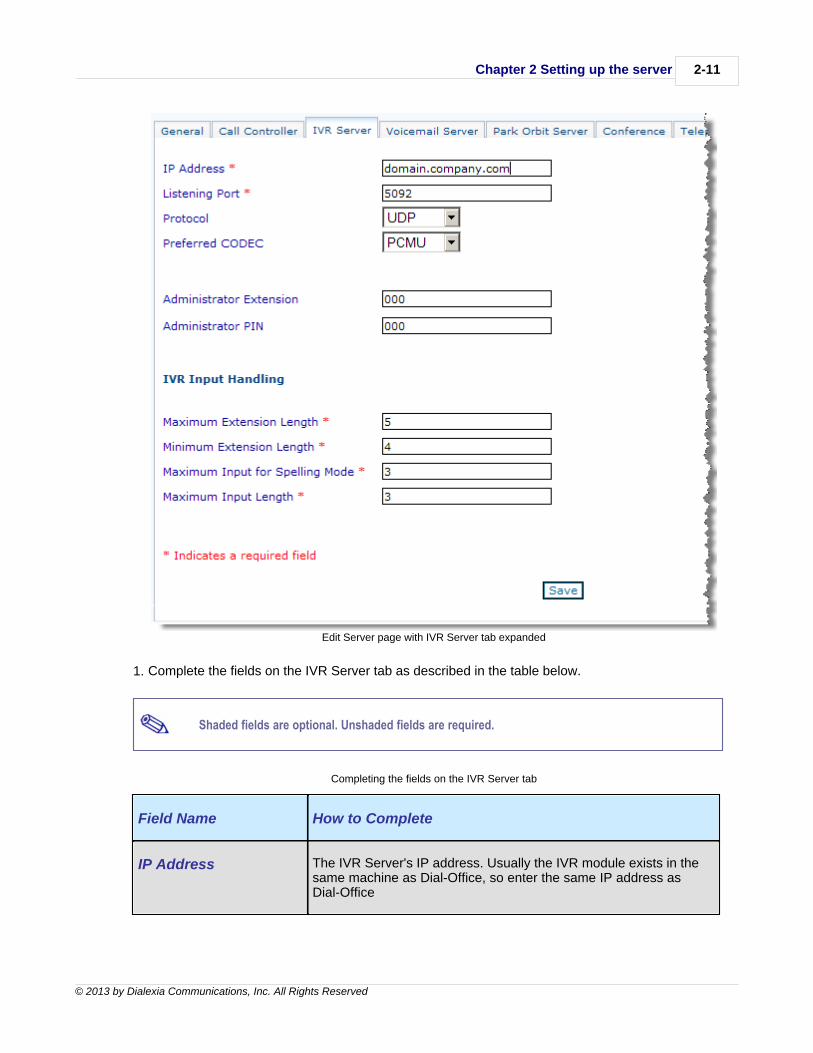
Completing the fields on the IVR Server tab
Use the IVR Server tab to configure IVR module, such as specify its IP address, port and inputshandling.
To configure IVR module settings, click the tab to expand it as shown below:
Chapter 2 Setting up the server 2-11
© 2013 by Dialexia Communications, Inc. All Rights Reserved
Edit Server page with IVR Server tab expanded
1. Complete the fields on the IVR Server tab as described in the table below.
Shaded fields are optional. Unshaded fields are required.
Completing the fields on the IVR Server tab
Field Name How to Complete
IP Address The IVR Server's IP address. Usually the IVR module exists in thesame machine as Dial-Office, so enter the same IP address asDial-Office

2-12
© 2013 by Dialexia Communications, Inc. All Rights Reserved
Field Name How to Complete
Listening Port This is the port on which IVR communicates with Call Controller.The default is 5092.
Protocol Choose UDP or TCP as the packet transport protocol. UDP isrelatively fast but unreliable. TCP is relatively slower but reliable.
Preferred CODEC (special license neededfor CODEC G729)
IVR's preferred CODEC.
If you select G729, - available only to licensed versions of Dial-Office– IVR Server uses this low-bandwidth CODEC with phones andgateways that support it. Otherwise, IVR can use PCMU. If youselect None, IVR System uses the preferred CODEC of the phoneor gateway.
IVR Input Handling
Maximum ExtensionLength
The maximum number of digits allowed in extension numbers.
Minimum ExtensionLength
The minimum number of digits allowed in extension numbers.
Maximum Input forSpelling Mode
The number of characters the caller inputs when accessing spellingmode. The system attempts to match the input to a name in thedirectory (usually the minimum is 3 characters).
Maximum Input Length This is the maximum number of digits that will be interpreted by IVR.When this number is reached, IVR will stop accepting digits andattempt to process the number.
2. When you have finished, click .The IVR Server settings get saved.
Completing the fields on the Voicemail Server tab
The Voicemail Server tab contains two sections:
· General Voicemail Server settings· E-mail notification messages

Chapter 2 Setting up the server 2-13
© 2013 by Dialexia Communications, Inc. All Rights Reserved
Configure general Voicemail Server settings
In the first section, you configure Voicemail Server's general settings, such as specify its IP address,ports and recording path.
Use the Voicemail Server tab to configure Voicemail module, such as specify its IP address, recordingpath and email notification messages.
1. Click the tab to expand it as shown below.
VoiceMail Server general settings
2. Complete the fields as described in the table below.
Shaded fields are optional. Unshaded fields are required.
Completing Voicemail Server's general settings
Field Name How to Complete
IP Address The Voicemail Server's IP address. Usually the Voicemail moduleexists in the same machine as Dial-Office, so enter the same IPaddress as Dial-Office.
Listening port This is the port on which Voicemail Server communicates with CallController. The default is 5090.
Protocol Choose UDP or TCP as the packet transport protocol. UDP isrelatively fast but unreliable. TCP is relatively slower but reliable.
Voicemail Notification The e-mail address used by Voicemail Server when sendingmessages to users notifying them that they have new voice mail.

2-14
© 2013 by Dialexia Communications, Inc. All Rights Reserved
Field Name How to Complete
Email "From" Address (This will only be used if you choose a voice mail type that includese-mail. For more information about voice mail types, see Completingthe fields on the Voice Mail tab.)
Non Unified VoiceMessages Folder
The location where you want Dial-Office to store voice-mail messagesfor users of non-unified voice-mail. (This will only be used if you selectNon-Unified as the voice mail type of a user. For more informationabout voice mail types, see Completing the fields on the Voice Mailtab.)
3. When you have finished, click .The Voicemail Server general settings get saved.
Customize email notification messages
In this section, you customize the e-mail notification messages that voicemail server sends to users aswell as to the Dial-Office administrator. To customize e-mail notification messages:
1. In the same page, click the icon beside Email Notification Messages to expand it.

Chapter 2 Setting up the server 2-15
© 2013 by Dialexia Communications, Inc. All Rights Reserved
E-mail notification messages
2. Customize the e-mail notification messages. The table below describes each type of message.

2-16
© 2013 by Dialexia Communications, Inc. All Rights Reserved
You can insert several types of variables into a message. For example, you can insert the codeassociated with the Telephony service Read Voicemail by inserting the variable 'Voice Mail Code'into a message.
Descriptions of e-mail notification messages
Message Description
Typical Message Enter the e-mail message body you want unified voice mail users toreceive when they get new voice mail.
Alert Message Enter the e-mail message body you want non-unified voice mail usersto receive when they get new voice mail.
Aborted Message Enter the e-mail message body you want voice mail users to receivewhen a caller hangs up within 3 seconds of leaving a voice message.
RecordedConversationMessage
Enter the e-mail message body you want users to receive when theyuse the Record Conversation service.
Admin ServiceWarning Message
Enter the e-mail message body you want the administrator to receivewhen a user exceeds 75% of his or her voice mail disk quota.
User Service WarningMessage
Enter the e-mail message body you want voice mail users to receivewhen they get new voice mail, but in the process their voice mail diskquota exceeds 75%.
Admin Service ErrorMessage
Enter the e-mail message body you want the administrator to receiveevery time a caller tries to leave a voice message to a user who hasused up all of his or her voice mail disk quota.
User Service ErrorMessage
Enter the e-mail message body you want voice mail users, who haveused up all of their voice mail disk quota, to receive every time callerstry to leave them a voice message.
Voicemail module allows a caller to finish recording amessage, even if the user exceeds his or her voice mail diskquota as the caller records the message.

Chapter 2 Setting up the server 2-17
© 2013 by Dialexia Communications, Inc. All Rights Reserved
3. When you have finished, click .The customized e-mail notification messages get saved.
Completing the fields on the Park Orbit tab
Use the Park Orbit tab to configure your Park module, such as specify its IP address, port andprotocol.
To configure you Park Orbit module settings, click the tab to expand it as shownbelow:
Edit Server page with Park Orbit tab expanded
1. Complete the fields on the Park Orbit tab as described in the table below.
Shaded fields are optional. Unshaded fields are required.
Completing the fields on the IVR Server tab
Field Name How to Complete
IP Address The Park Orbit's IP address. Usually the Park Orbit module exists inthe same machine as Dial-Office, so enter the same IP address asDial-Office.
Listening Port This is the port on which Park Orbit Server communicates with CallController. The default is 5072.
Protocol Choose UDP or TCP as the packet transport protocol. UDP isrelatively fast but unreliable. TCP is relatively slower but reliable.
2. When you have finished, click .

2-18
© 2013 by Dialexia Communications, Inc. All Rights Reserved
The Park Orbit settings get saved.
Completing the fields on the Conference tab
Use the Conference tab to configure your conference module, such as specify its IP address, port andrecording path. This module requires a special conference enabled Dial-Office license to function.
Configuring general parameters
The first part of configuring the conference module involves setting up its general parameters asdescribed in the following steps:
1. Click the tab to expand it as shown below.
Conference tab
2. Complete the fields on the Conference tab as described in the table below.

Chapter 2 Setting up the server 2-19
© 2013 by Dialexia Communications, Inc. All Rights Reserved
Shaded fields are optional. Unshaded fields are required.
Completing the fields on the Conference tab
Field Name How to Complete
Conference IP The conference module's IP address. Usually the conferencemodule exists in the same machine as Dial-Office, so enter the same IP address as Dial-Office.
Conference Port The conference module's port. If the conference module exists inthe same machine as Dial-Office, enter 5810.
Recording Path The location where you want Dial-Office to store recordedconference calls. For more information about recording conferencecalls, see Creating a conference call in CHAPTER 12.
Conference Number The list of conference access numbers. To add conferencenumbers, you must first add them to the Numbers Pool. Assignaccess numbers to conference calls so that external attendees canjoin in. To learn how to assign access numbers to conference calls,see Creating a conference call in CHAPTER 12.
Default Greeting FileName
For each language, English, French and Spanish, select the defaultGreeting file that you may have previously uploaded in MediaLibrary. These values represent the <Default> value that you canchoose as Greeting Audio File when adding or updating aconference.
3. When you have finished, click .The conference settings get saved.
Configure Telephony services
In the last section, you configure the telephony services. Services are usually options a user has whenmaking calls, such as recording a conversation or parking a call.
To configure the telephony services:
1. Click the tab to expand it.

2-20
© 2013 by Dialexia Communications, Inc. All Rights Reserved
Dial-Media services
2. Review the services. We recommend keeping them at their default codes. The table below explainseach star service (*).
Descriptions of the Telephony services
Service Description
Overhead Paging Users can dial the default code (*93) and then beginspeaking to broadcast a message over a loud speakersystem installed in the office. The loud speaker system mustbe connected to the Dial-Office server.
Record Conversation When a user dials the default code, plus a destinationnumber (e.g. *905145550100), Dial-Office records his or herconversation. Afterward, the recorded call appears in theuser’s voice mail box.
Note that users who do not have voice mail cannot use thisfeature.

Chapter 2 Setting up the server 2-21
© 2013 by Dialexia Communications, Inc. All Rights Reserved
Service Description
Conference A user can dial the default code (*88) to join an ongoingconference call.
Pickup Call A user can dial the default code (*20) to pick up a call froman IP phone to another.
Redial the last callednumber
A user can dial the default code (*39) to redial the last callednumber.
Per Call Block CallerID (Useful incompanies where theydecided not to blockCaller ID at a companylevel.)
The number that users can key in if they want to block CallerID information on a particular call. To invoke this service, auser dials *67 before the destination number.
If you want to change the default code, click to display awindow, then type the new code.
Activation CallForward On busy orno answer
When users dial the default code (*68) and followed by thetarget number, all user incoming calls will be forwarded tothis number on busy or no answer.
Activation CallForward
When users dial the default code (*72) and followed by thetarget number, all user incoming calls will be forwarded tothis number.
Deactivation CallForward
When users dial the default code (*73), Dial-Office systemdeactivate user call forwarding.
Activation Do NotDisturb
When users dial the default code (*78) and followed by thetarget number, all user incoming calls will be forwarded tothis number if Do Not Disturb status is on.
Deactivation Do NotDisturb
When users dial the default code (*73), Dial-Office systemdeactivate user call forwarding on Do Not Distrub.
Per Call Allow/EnableCaller ID (Useful incompanies where theydecided to block Caller
The number that users can key in if they want to allow theirCaller ID information to appear to called parties on a per callbasis. To invoke this service, a user dials *82 before thedestination number.

2-22
© 2013 by Dialexia Communications, Inc. All Rights Reserved
Service Description
ID at a company level.) If you want to change the default code, click to display awindow, then type the new code.
Deactivation CallForward On busy orno answer
When users dial the default code (*88), Dial-Office systemdeactivate user call forwarding on busy or no answer.
Restricted Calls This code is used internally by the system for PINauthentication.
The system uses this number when PIN authentication isenabled. For example, if long distance calls are restrictedand the user dials a long distance call, the IVR systemintervenes by appending *89 to the number and asking for aPIN. If the PIN is correct, the system processes the longdistance call.
For more information on PIN authentication, refer to CHAPTER 5.
Activation CallForward On busy
When users dial the default code (*90) and followed by thetarget number, all user incoming calls will be forwarded tothis number on busy line.
Deactivation CallForward On busy
When users dial the default code (*91), Dial-Office systemdeactivate user call forwarding on busy.
Activation CallForward On noanswer
When users dial the default code (*92) and followed by thetarget number, all user incoming calls will be forwarded tothis number on no answer.
Deactivation CallForward On noanswer
When users dial the default code (*93), Dial-Office systemdeactivate user call forwarding on no answer.
Park Call Parking a call is temporarily putting it on hold so you can pickit up at another phone. To park a call, a user dials * plus thedefault code plus an extension (e.g. *94201). As a result,Dial-Office parks the call at the extension.

Chapter 2 Setting up the server 2-23
© 2013 by Dialexia Communications, Inc. All Rights Reserved
Service Description
Example: A secretary receives an external call and wishes totransfer that call to an employee (with extension 201) who ison the phone. The secretary asks the caller to wait on the linewhile she parks the call for extension 201. Extension 201receives a Message Waiting Indicator (MWI) signalling aparked call. The caller hears music on hold until extension201 picks up the parked call.
Retrieve Parked Call Users can dial the default code (*95) to pick up a parked callfrom the extension where the call is waiting.
Read Voicemail Users can dial the default code (*98) to listen to their voicemail. A PIN code is required if the users enabled PINauthentication from their web accounts.
In addition, users can use the Read Voicemail service to:
· Record their name (announced to callers).· Record their personal greeting message. Note that each
type of status can have its own greeting message. A usermust record the greeting message of a particular statuswhile he or she is in that status.
· Change their availability status.· Change a tenant's greeting message and main menu
prompt. To do that, users need to know the administratorextension and PIN. Note that every alias of a tenant canhave its own greeting message and main menu prompt.
Leave Voicemail A user can dial the default code, plus another user'sextension (e.g. *99201) to leave a voice message directly inthat user's voice mail box. The user leaving the messagehears no ringing in the process.
3. To change the default code associated with a service, click beside the code.A window appears where you can type a different code.

2-24
© 2013 by Dialexia Communications, Inc. All Rights Reserved
4. Enter the new code and click .
Completing the fields on the QoS tab
The QoS tab enables you to change the defaults affecting voice quality in your network. Werecommend that you do not deviate from the suggested values.
To display the fields of the QoS tab:
· Click the tab to expand it as shown below.
Edit Server page with QoS tab expanded
The top section (DSCP fields) is for Layer 3 QoS. For details on standard values to enter here, see thefollowing RFCs: 2474, 2475, 2638, 2597, 2698 and 2859.

Chapter
3

3-2
© 2013 by Dialexia Communications, Inc. All Rights Reserved
Chapter 3 Setting up tenants and the IVR
Overview
After setting up the server we recommend that you set up the tenants and the IVR. Depending onyour license restrictions, you may or may not be able to create multiple tenants.
What is a tenant?
Dial-Office's IVR system supports multi-tenants. Each tenant can have its unique language settings,menu options, greeting messages, and customized sounds. For example, you can use a multi-tenantsetup if your company has multiple branches; each branch gets its own tenant.
Each user in Dial-Office is assigned to a tenant. By default, all users are assigned to the 'main' tenantunless you specifically assign them to other tenants.
What is the IVR?
Dial-Office has an interactive voice response system that can automatically answer calls and presentcallers with options, such as connect them to an extension or allow them to access spelling mode. Youcan configure this IVR - for example, you can set its language, modify its options, or upload to itcustomized greeting messages.
When you set up the IVR, you can use it in your existing tenant in the system.
Setting up the main tenant
By default, the main tenant exists in a new Dial-Office installation. Moreover, the main tenant alwayshas the main IVR Server Alias “*” assigned to it and mapped to the Default IVR. This means that whencallers dial the main alias of IVR Server, they hear the greeting message and menu prompt configuredfor the Default IVR.
You can also assign other aliases to the main tenant.
All new users are by default assigned to the main tenant unless you specifically assign them to othertenants. To learn how to assign users to other tenants, see Creating additional tenants.
Configuring the tenant settings
To set up the main tenant's settings:
1. Expand Auto Attendant and then click Tenants.The Tenants page appears, showing the main tenant as well as any other tenants you may have

Chapter 3 Setting up tenants and the IVR 3-3
© 2013 by Dialexia Communications, Inc. All Rights Reserved
created.
Tenants page
2. Double-click the main tenant.The Edit Tenant page appears, showing the tenant settings.
Edit Tenant page

3-4
© 2013 by Dialexia Communications, Inc. All Rights Reserved
Edit Tenant IVR Aliases

Chapter 3 Setting up tenants and the IVR 3-5
© 2013 by Dialexia Communications, Inc. All Rights Reserved
Edit tenant Office hours and Holidays
3. Complete the tenant's description, display number and display name. The table below containsdescriptions of these fields.
Completing the fields related to a tenant's settings
Field Name How to Complete
Description Enter a short description of the tenant.

3-6
© 2013 by Dialexia Communications, Inc. All Rights Reserved
Field Name How to Complete
Display Number Select a display number for the tenant.
If you have not assigned a display number to a user that belongs to thetenant, Dial-Office displays the tenant's display number to the user's calledparties. This display number only appears to called parties outside theDial-Office system, in another domain or in the PSTN, and not to internalusers. See Completing the fields on the General tab in CHAPTER 8 formore on the Display Number of a user.
Note that you can only select assigned numbers that exist in the NumbersPool.
Display Name Enter a display name for the tenant.
If you did not fill out the display name of a user that belongs to the tenant,Dial-Office displays the tenant's display name to the user's called parties. Thedisplay name only appears to called parties outside the Dial-Office system, inanother domain or in the PSTN. See Completing the fields on the Generaltab in CHAPTER 8 for more on the Display Name of a user.
4. Click . The new tenant settings get saved.
Configuring the IVR Aliases
To set up the IVR Aliases, click the tab.
For example, if you want external callers to reach the main tenant, add the triplet number, time andIVR name to the IVR aliases list:
1. Choose a number from the aliases list populated from the numbers pool
2. Select a time among the list of Office times. You can have four different managed time ranges -office hours, after hours, weekend, and holidays. You define these time ranges in the remaining steps.
3. Select an IVR
4. Click
5. Repeat steps 1 to 4 for more IVR aliases.
6. Click
Remember that by default, the main tenant always has the main alias of the IVR Server assigned to it

Chapter 3 Setting up tenants and the IVR 3-7
© 2013 by Dialexia Communications, Inc. All Rights Reserved
with the four predefined Office Times and Default as IVR.
Configuring the office hours and holidays
To set up the main tenant's office hours and holidays tab:
1. Click the tab to expand it.
Office hours and holidays tab expanded
2. Set the tenant's time zone.
Setting the time zone to Local gives the tenant the same time zone as that of the Dial-Office server.
3. Click .The new time zone setting gets saved.
4. Specify the tenant's office hours in one of two ways: by specifying a fixed daily schedule or a flexibledaily schedule.
Office Hours represents a specific time range during which callers normally dial the tenant. Thereexists four types of time ranges that you can manage for a tenant.
a. To specify a fixed daily schedule, select the first and last working days of the week and specify thebeginning and ending times of each day between these two working days.

3-8
© 2013 by Dialexia Communications, Inc. All Rights Reserved
Take note of the following:
· When someone calls the tenant between the first and last days of the week, and between thebeginning and ending times, the Office Hours managed time takes effect.
· When someone calls the tenant between the first and last days of the week, but outside theperiod between the beginning and ending times, the After Hours managed time takes effect.
· When someone calls the tenant after the last day of the week, the Weekend managed time takeseffect.
b. To specify a flexible daily schedule, click Daily Office Time and specify the office hours on aday-to-day basis.
Take note of the following:
· When someone calls the tenant between the specified From Time and To Time, the Office Hoursmanaged time takes effect.
· When someone calls the tenant after the To Time, and on a non-weekend day, the After Hoursmanaged time takes effect.
· When someone calls the tenant after the To Time, and on a weekend, the Weekend managed timetakes effect.
· When the From Time is not set on a particular day, the Weekend managed time takes effect fromthe To Time of the previous day.
5. Click .The tenant's office hours settings get saved.
In this section, you can specify which days of the year you want the Holidays managed time to takeeffect. The Holidays managed time overrides other managed times.
Configuring the holidays
6. Under Holidays, click .The Add Holiday window appears.
7. Complete the required fields by specifying the description, start date, and end date of the holiday.
Also, specify if the holiday repeats every year. Then click .
8. Repeat steps 8 and 9 for other holidays.

Chapter 3 Setting up tenants and the IVR 3-9
© 2013 by Dialexia Communications, Inc. All Rights Reserved
Configuring advanced settings
In this section you can set up the tenant Music On Hold Audio File.
When a user puts someone on hold, the latter hears music on hold being played by the IVR. As part ofa tenant's configuration, you can upload customized MOH audio files. When a user assigned to thetenant puts someone on hold, the latter hears the tenant's customized MOH audio file.
To set the tenant Music On Hold Audio File:
1. Click the tab to expand it.
2. Select one file from the Music On Hold drop-down list already uploaded from Media library.
3. Click .
At this point you have set up the tenant. To learn how to configure the tenant, such as set its languageand configure its menus, see Setting up the IVR.
Creating additional tenants
Depending on your Dial-Office license, you may or may not be able to create additional tenants. Whenyou have multiple tenants, each one has its own set of aliases that users can dial internally as well asfrom the PSTN (if these aliases represent DID numbers).
To set up additional tenants:
1. Expand Auto Attendant and then click Tenants.The Tenants page appears.
Tenants page
2. Click the Add Tenant icon .The Add Tenant page appears.

3-10
© 2013 by Dialexia Communications, Inc. All Rights Reserved
Add Tenant page
3. Configuring the tenant settings and IVR aliases. For descriptions of the applicable fields, see Settingup the main tenant.
By adding Alias and IVR to a tenant, only Office Hours time will be assigned by default.
4. Click . The new tenant gets added to the system.
To learn how to configure the tenant, such as set its language and configure its menus, see Setting upthe IVR.
Setting up the IVR
Dial-Office's interactive voice response system has an auto attendant that automatically answers

Chapter 3 Setting up tenants and the IVR 3-11
© 2013 by Dialexia Communications, Inc. All Rights Reserved
callers and presents them with multi-level menus. The IVR can be set independently and could beassigned to different tenants that exist in the system; each IVR gets its own set of languages, menusand customized greeting messages and sounds.
To set up the Default IVR's settings:
1. Expand Auto Attendant and then click IVR.The IVR page appears, showing the Default IVR as well as any other IVRs you may have created.
2. Double-click the Default IVR.The Edit IVR page appears, showing the IVR settings.
3.Add new Menu in Default IVR.
By default, the 'Default' IVR exists. To learn how to create other IVRs, see Creating additional IVRs.

3-12
© 2013 by Dialexia Communications, Inc. All Rights Reserved
General Settings
An IVR is a set of interrelated multi-language menus and sub menus.
From the general section we can manage these menus such as listing, adding, selecting and deletingmenus.
The drop-down menu lists all created menus plus the default non deletable menu ‘Main’. This Menu isconsidered as the auto attendant entry level. This means that Main Menu is the first IVR that answersthe callers.
Note that, there in only one menu per IVR named Main, all other listed menus are considered as submenus. You can have as many sub menus as desired.
To edit one menu for more customization, you have to select it from the drop-down menu list.
To add a new submenu:
1. Click on
2. A new row with menu name field will be shown
3. Enter the name of the new submenu
4. Click to be saved
5. The new submenu will be edited automatically
To delete one submenu other than the non deletable Main menu:
1- Select the sub menu
2- Click on
3- Confirm deletion
Note that, we cannot delete referenced sub menus. An error message will be shown in this case.
Setting languages
The first step in configuring the IVR involves selecting its languages. By default, an IVR has twolanguages namely English as Default and French. You can either change the default language fromEnglish to French.

Chapter 3 Setting up tenants and the IVR 3-13
© 2013 by Dialexia Communications, Inc. All Rights Reserved
To set the IVR's languages:
1. In the Edit IVR page, click the tab to expand it.
Setting up a tenant's languages
2. To add a new language, select a language to add and a corresponding digit and click
.A new language entry will be added with default Greeting file. You can change
this value by editing this language. To save this settings click .
3. To edit one language, click . The table below contains descriptions of language fields.
Field Name How to Complete
Language Language value, this field is static and cannot be changed.
Digit Select a language digit. Callers can select or switch to the languageby pressing its corresponding digit.
Default Select this language as default. By selecting it, callers will get thefirst greeting message and the following menus with this language ifthey didn’t change it.
If multiple languages are set, the IVR system will play all theselanguages with their corresponding digits. Caller than can select itspreferred language.

3-14
© 2013 by Dialexia Communications, Inc. All Rights Reserved
Field Name How to Complete
Greeting File Select one greeting audio file among the list previously uploaded inMedia Library. Out of box, each language offer two default choices :
<Default> : play default greeting Audio File
<None> : no greeting file will be played
Next to the edit button, four buttons will be shown:
: to apply changes. Note that, the changes will be saved just locally until you click
: to cancel changes and return to the last values.
: to delete this entry. The main language entry cannot be deleted.
: to upload a new greeting file easily without going back to Media Library. The audio file uploadedwill be added to the list and selected automatically.
Callers can press the digit corresponding to the secondary language only during playback of the greeting message. Once the main menu prompt starts playing, callers cannot change the language.
Configuring menus
The next step involves configuring the menus of the IVR.
To configure the menus of the IVR:
1.In the Edit IVR page, click tab to expand it and beside Menu Optionsfor, select the language whose menu you want to configure.
Selecting a Menu Options Language to configure
The tab displays the main menu of the language you selected.

Chapter 3 Setting up tenants and the IVR 3-15
© 2013 by Dialexia Communications, Inc. All Rights Reserved
Main menu of the selected managed time
The main menu contains a list of digits, their corresponding actions, as well as any associatedparameters as well as the action audio file. When callers dial the tenant's alias associated with thisIVR, they can press a digit key to trigger a particular action if it is enabled.
When the Prompted field is checked, IVR system will play the corresponding Audio File, otherwise itwill not.
Callers can press an event key only when the main menu prompt starts playing, not duringplayback of the greeting message.
2. To add a new action, click . A new green empty entry will be added at the bottom of the list.
Simply, select :
- a desired digit
- its corresponding action

3-16
© 2013 by Dialexia Communications, Inc. All Rights Reserved
- Any associated parameters
- A predefined or customized action audio file if provided.
- prompted value
- enabled value
Then click .
Action Description
Main Menu Use this option to connect callers to the main menu from asub menu.
Run Menu Use this option to connect callers to a sub menu or back tothe main menu from a sub menu.
This action has no default audio file.
Transfer Call Callers can choose this option to reach a user or groupautomatically. For example, a caller can press 8 to reach theHelp Desk. The system automatically dials the extensionspecified for the Help Desk.
This action has no default audio file.
Call Extension orGroup
This action allows callers who knows the destination numberto dial it manually after hearing the message; The call will bethen transferred to number dialed.
This action has no digit and no customized audio file.
Service Call Callers can select this option to reach one of the followingservice :
- Conference: Callers can select this option to join an onlineconference.
- Leave Voicemail: Callers can select this option to go directlyto someone’s voice mail without hearing any ringing. Afterpressing the digit key associated with this option, the systemprompts the caller to enter an extension. After entering an

Chapter 3 Setting up tenants and the IVR 3-17
© 2013 by Dialexia Communications, Inc. All Rights Reserved
Action Description
extension, the system immediately connects the caller to theextension's voice mail box to leave a message.
- Read Voicemail: Callers can select this option to go directlyto their voice mail. After pressing the digit key associated withthis option, the auto attendant prompts the caller to enter hisor her extension followed by the PIN. After authentication, thecaller gets access to his or her voice mail box.
Previous Menu Use this option to connect callers to the previous menu froma sub menu.
Access SpellingMode
Callers can select this option if they know the name but notthe extension of the person they want to reach. The systemprompts the caller to enter the first letters of the callee’s lastname.
If using the default greeting message, the auto attendantreads out the number associated with this option.
Call Operator Callers can select this option to reach an operator. You canspecify whose extension the operator refers to.
Repeat these steps for adding more actions.
3. To edit an action, click . The action entry will move to edition mode with blue color.
Make the necessary changes and click one of the following buttons next to the edit:
: to apply changes. Note that, the changes will be saved just locally until you save
: to cancel changes and return to the last values.
: to delete this entry
: to upload a new audio file easily without going back to Media Library. The audio file uploaded willbe added to the list and selected automatically.

3-18
© 2013 by Dialexia Communications, Inc. All Rights Reserved
Note that, all added and edited actions will be applied but not saved. To do so, click to save
actions for selected language only or to save actions to alllanguages.
I. To connect callers to the sub menu, add a digit key in the main menu that points to the submenu (use the Run Menu action). And to connect callers back to the main menu from the submenu, add a digit key in the sub menu that points back to the main menu.
II. A newly created sub menu does not have a default menu prompt. To learn how to upload acustomized menu prompt for a sub menu, see Uploading customized recordings.
Chapter
4

4-2
© 2013 by Dialexia Communications, Inc. All Rights Reserved
Chapter 4 Working with call permissions and digit filters
Overview
Before you start working with permissions and digit filters, you should:
- Set up the server as described in CHAPTER 3.
- Set up your server's tenants and IVR as described in CHAPTER 4.
We recommend that you set up permissions and digit filters before going on to the next chaptersbecause you will need to assign permissions and digit filters as you continue with subsequenttasks.
What are permissions?
Permissions are all about restricting who is allowed to call where. By default, all calls are restrictedexcept for inter-office, local, and 911 calls, which everyone is authorized to make.
By setting up a permission for each type of call – local calls, long distance calls, international calls,etc. – you are permitting some or all users to make this type of call.
Examples:
· You set up a permission for local calls and specify that it should automatically be given to all newusers. This allows everyone to make local calls.
· You set up a permission for long distance calls and specify that it should not automatically be givento new users. This means that no users will be able to make long distance calls unless youspecifically give them permission. (Giving permissions to individual users is described in CHAPTER8, Completing the fields on the Routing tab.)
What are digit filters?
A digit filter either adds digits to or removes digits from telephone numbers that users dial. It is optionalto use digit filters. Here are some examples that will illustrate the idea.
Examples:
· The provider for your long distance calls requires you to add several digits to the number beforerouting it to them.
· You want your users to dial "9" first when making any external calls; you can set up a digit filter to

Chapter 4 Working with call permissions and digit filters 4-3
© 2013 by Dialexia Communications, Inc. All Rights Reserved
remove one digit from all external calls.
· Incoming calls from a branch office may contain digits that identify another Dial-Office server. Thesystem will remove these digits before routing the call to the proper extension. This allows the sameextensions to be used in the main office and in a branch office.
· Outgoing calls may contain digits that identify an extension in a branch office. The system willremove these digits before routing the call to the proper extension. This allows the same extensionsto be used in the main office and in a branch office.
Working with call permissions
In this section we explain how to perform the following three actions with regards to permissions:
· Add permissions
· Modify permissions
· Delete permissions
Adding a permission
To add a permission:
1. Expand Dial-Plan and then click Permissions.The list of existing permissions appear.
Permissions page
When you complete the steps of the Installation Wizard, Dial-Office automatically creates fourpermissions: one for local calls, one for long distance calls, one for international calls, and the lastone for emergency calls.
2. Do one of the following:
a. Click the Add Permissions icon (circled in the previous figure).

4-4
© 2013 by Dialexia Communications, Inc. All Rights Reserved
OR
b. Position the cursor on one of the permissions in the list, right-click the mouse to display a menu,then click Add.
The following page appears:
Add Permission page
3. Complete the fields as described in the table below.
Shaded fields are optional. Unshaded fields are required.

Chapter 4 Working with call permissions and digit filters 4-5
© 2013 by Dialexia Communications, Inc. All Rights Reserved
Completing the fields on the Add Permission page
Field Name How to Complete
Name The name assigned to this permission.
e.g. Toll-free
Description Provides additional information to clarify the content of this permission.
e.g. 1-800, 1-866, 1-877, 1-888
Assign bydefault to newusers
If you select the check box beside this field, all new users will automaticallybe authorized to use this permission. If you do not select the check box, youmust authorize people individually to use this permission.
(Giving individual users permissions is described in CHAPTER 8,Completing the fields on the Routing tab.)
Enable PINAuthentication
If you click the check box beside this field, the system will require users toenter their PIN code before allowing them to complete the call.
DefaultGateway
This field is only selectable when the check box beside Assign by default to newusers is selected. It allows you to specify which gateway to use for thispermission.
Expression toadd
Type the expression and click .
The expression tells the system how to identify the type of call that thepermission is for. It consists of a prefix followed by an indicator of the numberof digits that follow the prefix. The indicator of the number of digits can beeither % or x.
Examples:
· 1800% (1800 is the prefix that identifies this permission; the % signmeans that any number of digits can follow the prefix.)
· 1866xxxxxxx (1866 is the prefix that identifies this permission; the sevenx's that follow it mean that seven digits must follow the prefix.)
Expression List This is a list of the expressions that identify the permission. To remove an
expression from the list, select it and then click .
4. When you have finished, click .

4-6
© 2013 by Dialexia Communications, Inc. All Rights Reserved
A confirmation window appears:
5. Click OK.The permission has now been created in the system. If any information was not valid, an errormessage appears instead.
Modifying a permission
To modify an existing permission:
1. Expand Dial-Plan and then click Permissions. The list of existing permissions appear.
List of permissions that already exist
2. Position the cursor on the name of the permission you want to modify.The whole row is highlighted when a permission is selected.
Use the 'Filter by' fields to search for the information you want. For details, see Searching a list inCHAPTER 1.
3. Do one of the following:
a. Double-click the permission.
OR
b. Right-click the mouse to display a menu and choose Edit.
The Edit Permission page appears:

Chapter 4 Working with call permissions and digit filters 4-7
© 2013 by Dialexia Communications, Inc. All Rights Reserved
Edit Permission page
4. Modify the necessary fields. For descriptions of the fields in this page, see Adding a permission.
5. When you have finished, click .The permission gets updated with the modified fields.
Deleting a permission
To delete a permission:
1. Expand Dial-Plan and then click Permissions.The list of existing permissions appear.
List of existing permissions
2. Position the cursor on the name of the permission you want to delete.The whole row is highlighted when a permission is selected.

4-8
© 2013 by Dialexia Communications, Inc. All Rights Reserved
3. Right-click the mouse to display a menu.
Right-clicking a line displays a menu
4. Click Delete.A confirmation window appears:
Confirmation window for deleting a permission
5. If you are sure you want to delete this permission, click OK.
Working with digit filters
In this section we explain how to perform the following three actions with regards to digit filters:
· Add digit filters
· Modify digit filters
· Delete digit filters
Adding a digit filter
To add a digit filter:
1. Expand Dial-Plan and then click Digits Filters.The list of existing digit filters appear.

Chapter 4 Working with call permissions and digit filters 4-9
© 2013 by Dialexia Communications, Inc. All Rights Reserved
Digit Filters page
2. Do one of the following:
a. Click the Add Digits Filters icon (circled in the previous figure).
OR
b. Position the cursor on one of the digit filters in the list, right-click the mouse to display a menu,then click Add.
The following page appears:
Add Digit Filter page
3. Complete the fields as described in the table below.
Shaded fields are optional. Unshaded fields are required.

4-10
© 2013 by Dialexia Communications, Inc. All Rights Reserved
Completing the fields on the Add Digit Filter page
Field Name How to Complete
Filter ID Each filter must have a unique Filter ID to identify it in the system. It cancontain both letters and numbers and can be up to 50 characters in length.No spaces are allowed.
Examples:
· Remove011· Add1416
Description Provides additional information about what the filter does.
Examples:
· Removes the prefix 011 from outbound calls.· Adds 1 + area code 416 to outbound calls.
Type Choose IN for inbound filters and OUT for outbound filters.
4. When you have finished, click .A confirmation window appears.
5. Click OK.The digit filter gets created in the system. If any information was not valid, an error messageappears instead.
Now that you have created a new digit filter, you have to add expressions to it as described in Modifying a digit filter.
Modifying a digit filter
A new digit filter won’t work until you add expressions as described in this section.
To modify a digit filter and add expressions to it:
1. Expand Dial-Plan and then click Digits Filters.The list of existing digit filters appear.

Chapter 4 Working with call permissions and digit filters 4-11
© 2013 by Dialexia Communications, Inc. All Rights Reserved
List of existing digit filters
2. Position the cursor on the name of the digit filter you want to modify.The whole row is highlighted when a digit filter is selected.
If you have a long list of digit filters, use the 'Filter by' fields to search for the one you want. Fordetails, see Searching a list in CHAPTER 1.
3. Do one of the following:
a. Right-click the mouse to display a menu and choose Edit.
OR
b. Double-click the digit filter.
The Edit Digit Filter page appears:
Edit Digit Filter page

4-12
© 2013 by Dialexia Communications, Inc. All Rights Reserved
4. Click .A window appears as shown below.
Window for entering filter expressions
5. Complete the fields as described in the table below.
Shaded fields are optional. Unshaded fields are required.
Completing the fields related to filter expressions
Field Name How to Complete
Expression Enter a string of digits followed by an indicator of the number of digits thatfollow. Dial-Office applies the fields Number of Digits to Remove and Prefixto Add to filtered numbers that correspond to the expression you enter here.Use the following examples as a guideline.
The indicator representing digits can either be % or x. You can alsouse strings of digits by themselves or just indicators by themselves.

Chapter 4 Working with call permissions and digit filters 4-13
© 2013 by Dialexia Communications, Inc. All Rights Reserved
Field Name How to Complete
Examples of expressions
· 00% - Represents a number that begins with 00 followed by any number ofdigits; the % sign means that any number of digits can follow 00.
· 514xxxxxxx - Represents a number that begins with 514 followed by sevendigits; having seven x's after 514 means that seven digits must follow thisprefix.
· 15146930001 - Represents the number 15146930001 only.
· % - Represents any number of digits.
· xxxxxxx - Represents a seven-digit string.
Number ofdigits toremove
Enter the number of digits you want the system to remove from the beginningof a filtered number. You can keep this field blank if you do not want toremove any digits.
Examples
· 1· 3
Prefix to add Enter the prefix you want the system to append to the beginning of a filterednumber. You can keep this field blank if you do not want to append a prefix.
Examples
· 1· 1514
Description Enter a description for the expression you are adding.
6. When you have finished, click .A confirmation window appears.
7. Click OK.The new expression gets added to the filter.
8. To add more expressions to the filter, repeat steps 4 to 7.
9. Click .
If you make a mistake and need to change an expression:
1. Delete the expression by clicking the beside it.

4-14
© 2013 by Dialexia Communications, Inc. All Rights Reserved
2. Then add the expression with the correct information.
Deleting a digit filter
To delete a digit filter that you do not require any more:
1. Expand Dial-Plan and then click Digits Filters.The list of existing digit filters appear.
List of existing digit filters
2. Position the cursor on the name of the digit filter you want to delete.The whole row is highlighted when a digit filter is selected.
3. Right-click the mouse to display a menu.
Right-clicking a digit filter displays a menu
4. Click Delete.A confirmation window appears:
Confirmation window for deleting a digit filter
5. If you are sure you want to delete this digit filter, click OK.

Chapter
5

5-2
© 2013 by Dialexia Communications, Inc. All Rights Reserved
Chapter 5 Working with gateways and domains
Overview
Before you start working with gateways or domains, you should set up:
- Calling permissions and digit filters as described in CHAPTER 5.
We recommend that you set up the above in advance so you can assign permissions and digitfilters to new gateways and domains as you set them up.
What are gateways and domains?
Gateways and SIP domains are bridges between the Dial-Office server, other SIP networks, and thePublic Switched Telephone Network (PSTN).
Gateways are hardware devices that control the voice traffic between your company network and thePSTN.
SIP domains are independent VoIP networks managed by wholesale call termination partners, alsocalled Internet Telephony Service Providers (ITSPs), that are generally used to make inexpensiveVoIP long distance calls. SIP domains can also be used to connect two Dial-Office installations andbypass the PSTN for calls between geographically separated company divisions.
How do you decide what gateways and domains to set up?
Peer-to-peer calls (call between extensions in the same Dial-Office network) do not requiregateways or domains. To call or receive calls from outside the Dial-Office network you require agateway or domain.
You need one gateway to connect to the PSTN. You need a domain to connect to other Dial-Officesystems within your company.

Chapter 5 Working with gateways and domains 5-3
© 2013 by Dialexia Communications, Inc. All Rights Reserved
Here are some examples:
Situation Should I set up a gateway or a domain?
I use Bell/AT&T for local calls on analog lines. You need to set up a gateway to the PSTN.
I have a provider who handles overseas calls. You need to set up a gateway to the provider’snetwork, which offers you a T1 connection.
We have a Dial-Office system in our head officein Montreal. We want our branch office in Torontoto be able to call Montreal numbers as localnumbers.
You need to set up a domain for the Torontooffice.
Adding a gateway or domain
To add a gateway or domain:
1. Expand Devices and then click Gateways/Domains.The list of existing gateways and domains appear.
Gateways/Domains page
When you complete the steps of the Installation Wizard, Dial-Office automatically creates a gateway,which appears in this page.
2. Do one of the following:
a. Click the Add Gateways/Domains icon (circled in the previous figure).

5-4
© 2013 by Dialexia Communications, Inc. All Rights Reserved
OR
b. Position the cursor on one of the gateways/domains in the list, right-click the mouse to display amenu, then click Add.
The following page appears:
Add Gateway/Domain page
3. Complete the fields as described in the table below.
Shaded fields are optional. Unshaded fields are required.

Chapter 5 Working with gateways and domains 5-5
© 2013 by Dialexia Communications, Inc. All Rights Reserved
Completing the fields on the Add Gateway/Domain page
Field Name How to Complete
Type Choose whether you are setting up a domain or a gateway.
Code Type a unique name to identify the new domain or gateway. No spaces areallowed.
Examples: LocalGW1, LDDomain-1, IntlGW1
Description Provides additional information to clarify the purpose of the domain orgateway.
Examples:
· LocalGW1 – Dialexia 1204 FXO using Bell lines.
· LDDomain-1 – using Level-3 domain.
Status Choose Active or Inactive. If you choose Inactive, this domain or gatewaywill not route incoming or outgoing calls.
Domain or IP The domain name or IP address of the gateway or domain you are setting up.
Port Type the port used by the gateway or domain you are setting up.The defaultvalue is 5060.
Protocol Choose UDP or TCP. Most SIP devices use UDP.
Call Direction Choose Incoming if the gateway will receive inbound calls, Outgoing if thegateway will send outbound calls, or BOTH if the gateway will do both.
Permissions (applicable only if creating a domain)
Permissions Choose a permission to associate with the domain for incoming calls.
Gateways Choose a gateway from the list. This gateway terminates incoming callsrouted from the domain being created.

5-6
© 2013 by Dialexia Communications, Inc. All Rights Reserved
Field Name How to Complete
Order Choose the order in which this gateway will be used if there is a choice of
more than one gateway for the same permission and click .
For example, if you have 2 gateways assigned to local calls, the gateway withorder 1 would be used first. If technical problems arise, the gateway withorder 2 would be used.
If you want to assign more than one permission to a gateway, complete the above three fields
again and click . To remove a permission from the list, select it, and click
.
Incoming Call Processing
AuthenticationMode
Dial-Office can authenticate incoming calls from the gateway or domain atthree different levels: through Trusted IPs, through User IDs and Passwords,and through the caller's From domain (from which a caller initiates a call).Choose one of:
NONE – There is no need for the source IP, from which the call is coming, toexist in the Trusted IPs list nor is it necessary for incoming calls to provide auser ID or password. Dial-Office compares the caller's From domain withwhatever is specified in the Domain or IP field - if there is a match, the call isprocessed. If there is no match, the call is processed only if it is destined to auser in the Dial-Office system and not if it is destined to the PSTN. Note thateven when there is a match, Dial-Office only processes an incoming calldestined to the PSTN after it verifies that there is a suitable permission.
SIP – There is no need for the source IP, from which the call is coming, toexist in the Trusted IPs list. Dial-Office compares the caller's From domainwith whatever is specified in the Domain or IP field - if there is a match,Dial-Office authenticates all incoming calls from the gateway or domainthrough a user ID and password that you specify in the In User Id and InPassword fields, respectively. However, if there is no match, the call isprocessed only if it is destined to a user in the Dial-Office system and not if itis destined to the PSTN.
IP – Dial-Office authenticates incoming calls through the IP addressesentered in the Trusted IPs list - if the source IP, from which the call iscoming, exists in that list, Dial-Office processes the call. Otherwise,Dial-Office compares the caller's From domain with whatever is specified inthe Domain or IP field - if there is a match, the call is processed. If there isno match, the call is processed only if it is destined to a user in the Dial-Officesystem and not if it is destined to the PSTN. You must always have at leastone IP address in the list if you are using IP authentication, even if it is thesame as the one specified in the Domain or IP field.
In User ID
In Password
Trusted IPs

Chapter 5 Working with gateways and domains 5-7
© 2013 by Dialexia Communications, Inc. All Rights Reserved
Field Name How to Complete
IP and SIP – Dial-Office authenticates incoming calls through the IPaddresses entered in the Trusted IPs list - if the source IP, from which thecall is coming, exists in that list, Dial-Office performs SIP authentication bychecking for a sent user ID and password that must match what you havespecified in the In User Id and In Password fields, respectively. If the sourceIP, from which the call is coming, does not exist in the Trusted IPs list,Dial-Office compares the caller's From domain with whatever is specified inthe Domain or IP field - if there is a match, Dial-Office performs SIPauthentication as described before. If there is no match, the call is processedonly if it is destined to a user in the Dial-Office system and not if it is destinedto the PSTN. You must always have at least one IP address in the list if youare using IP and SIP authentication, even if it is the same as the onespecified in the Domain or IP field.
I. Before Dial-Office processes any incoming calls destined to thePSTN, it verifies that there is a suitable permission (applicableonly to domains).
II. For the Contacts module in the PBX User web account tofunction, you must use either IP authentication or IP and SIPauthentication. In other words, the source IP, from which a calloriginates, must exist in the Trusted IPs list.
III. It is common to use IP authentication for gateways and SIPauthentication for domains.
Inbound Filter If you want to use a digit filter on inbound calls, select it from the list. Forexample, you might want to remove the long distance prefix from inboundcalls to the main office from a branch office before they get routed through alocal gateway.
Outgoing Call Processing
In certain configurations, Dial-Office will be challenged when trying to route calls to a gateway orSIP domain and you will be required to enter a user ID and password. This configuration is mainlyrequired when calls are routed to an ITSP for billing reasons.
Out User ID,
Out Password
Type the user ID and password provided to you by your ITSP for Dial-Office.
Outbound Filter If you want to use a digit filter on outbound calls, select it from the list. Forexample, you might want to add a prefix on calls being routed through a

5-8
© 2013 by Dialexia Communications, Inc. All Rights Reserved
Field Name How to Complete
long-distance service provider.
PreferredCODEC
If your ITSP has a preferred CODEC, specify it here.
ServerRegistrationRequired
Select this checkbox if your ITSP requires you to register Dial-Office on theirdomain. You will need to restart Dial-Office to instigate registration.
Server Alias If your ITSP has provided you with alias, type it here. Otherwise, leave thisfield blank.
Server Realm Sometimes, to provide an extra measure of security, ITSPs provide you witha realm as well as a user ID and password.
If your ITSP has provided you with a realm, type it here. Otherwise, leave thisfield blank.
SIP “Expires” The number of seconds after which the registration with the ITSP will expire.
Specify how often you want Dial-Office to send a REGISTER message to theITSP. The default is every hour.
Process*MovedTemporarily*
Some ITSPs are set to inform their clients if they are temporarily unavailableto process calls. When they receive calls from their clients, they reply with“Process Moved Temporarily”, which is a response that includes a redirectionto another location.
If your ITSP for Dial-Office provides this service, then select this check box.
4. When you have finished, click .A confirmation window appears:

Chapter 5 Working with gateways and domains 5-9
© 2013 by Dialexia Communications, Inc. All Rights Reserved
5. Click OK.The gateway or domain gets created in the system. If any information was not valid, an errormessage appears instead.
Modifying a gateway or domain
To modify a gateway or domain:
1. Expand Devices and then click Gateways/Domains.The list of existing gateways and domains appear.
Gateways/Domains page
2. Position the cursor on the name of the gateway/domain you want to modify.The whole row gets highlighted.
If you have a long list of gateways and domains, use the 'Filter by' fields to search for the one youwant. For details, see Searching a list in CHAPTER 1.
3. Do one of the following:
a. Double-click the gateway/domain.
OR
b. Right-click the mouse to display a menu and click Edit
The Edit Gateway/Domain page appears:

5-10
© 2013 by Dialexia Communications, Inc. All Rights Reserved
Edit Gateway/Domain page
4. Modify any information on the page. For descriptions of the fields in this page, see Adding agateway or domain.
5. When you have finished, click .A confirmation window appears:
6. Click OK.The gateway or domain gets updated with the modified fields.

Chapter 5 Working with gateways and domains 5-11
© 2013 by Dialexia Communications, Inc. All Rights Reserved
Deleting a gateway or domain
To delete a gateway/domain that you do not require any more:
1. Expand Devices and then click Gateways/Domains.The list of existing gateways and domains appear.
Gateways/Domains page
2. Position the cursor on the name of the gateway/domain you want to delete.The whole row gets highlighted.
3. Right-click the mouse to display a menu.
Right-clicking displays a menu
4. Click Delete.A confirmation window appears:
5-12
© 2013 by Dialexia Communications, Inc. All Rights Reserved
Confirmation window for deleting a gateway/domain
5. If you are sure you want to delete this gateway or domain, click OK.
When you delete a gateway or domain, you will lose the ability to route incoming or outgoing callsthrough it. Make sure that you have configured alternate gateways or domains before deletingolder ones, in order to avoid disrupting any call routing.

Chapter
6

6-2
© 2013 by Dialexia Communications, Inc. All Rights Reserved
Chapter 6 Adding and forwarding numbers
Overview
During Dial-Office's setup, you assign numbers to users, groups, or the IVR. Assigning numbers todifferent types of users ensures no conflicts arise. In addition, you have the choice of forwardingnumbers depending on when people call. In this chapter, you learn how to work with numbers inDial-Office and you get introduced to the Numbers Pool.
What is the Numbers Pool?
The Numbers Pool provides you with a central location to manage all the numbers in your Dial-Officeserver, in particular those used as aliases. It informs you which users and groups own which numbers.In addition, it informs you which numbers represent tenants and which numbers represent conferencenumbers. You can also use the Numbers Pool to keep track of each number's vendor.
Adding numbers to the Numbers Pool
In this section, we describe how to add numbers to the Numbers Pool. We also briefly outline therestrictions present in deleting numbers.
To populate the Numbers Pool:
1. Expand Dial-Plan and then click Numbers Pool.The list of numbers already in the Numbers Pool appears.
The Numbers Pool
2. Click the Add icon, circled in the preceding figure.The Add Pool Number page appears.

Chapter 6 Adding and forwarding numbers 6-3
© 2013 by Dialexia Communications, Inc. All Rights Reserved
Add Pool Number page
You can either add numbers to the Numbers Pool one at a time or generate a batch. Use the top partof the Add Pool Number page to add a single number and use the bottom part to generate a batchof numbers.
3. Use the following table to help you fill out the applicable fields.
Shaded fields are optional. Unshaded fields are required.
Completing the fields on the Add Pool Number page
Field Name How to Complete
Number,StartingNumber, and
Enter a single number in the Number field or a range of numbers in theStarting and Ending Number fields. If you enter a range, remember to makethe Starting and Ending Numbers equal in length.

6-4
© 2013 by Dialexia Communications, Inc. All Rights Reserved
Field Name How to Complete
Ending Number
Owner Select an owner from the pull-down list. You have the choice between usersand groups. The number you enter in the Number field becomes an alias to theowner you select. Callers can reach the owner at this number, as well as at theowner's main extension.
Numbers can also have tenants and the conference bridge as theirowners.
Vendor If the number represents a Direct Inward Dialing (DID) number, enter the nameof the ITSP vendor which you have purchased the DID from.
4. Click to create a single number or click to generate a batch of numbers.The added number or batch of numbers appear in the Numbers Pool.
5. To change the owner or vendor of an existing number, double-click it.
You cannot change the owner of a number representing the extension of a:
- User
- Group
6. To delete an existing number, right-click it to display a menu. Click Delete.
You cannot delete a number representing:
- A user's extension.
- A group's extension.

Chapter 6 Adding and forwarding numbers 6-5
© 2013 by Dialexia Communications, Inc. All Rights Reserved
- The Phone (Call Back Number) in the Edit Server page. See Completing the fields on the Generaltab in CHAPTER 3 to learn about the Phone (Call Back Number).
- A conference number.
Forwarding numbers
Dial-Office gives you the option of forwarding any assigned number in the Numbers Pool to a targetnumber. You can define forwarding options for fixed periods of the year, weekly periods, or dailyovernight periods.
To configure a number's forwarding options:
1.Expand Dial-Plan and then click Forwarding.The Forwarding page appears.
Forwarding page
2.Select a number, and click .The Add Forwarding page appears.

6-6
© 2013 by Dialexia Communications, Inc. All Rights Reserved
Add Forwarding page
3.Add forwarding options for one or more of the three types of periods.
Dial-Office applies the forwarding options in the following order of priority:
a. Fixed periodsb. Weekly periodsc. Daily overnight periods
The table below describes each type of period you can define forwarding options for.

Chapter 6 Adding and forwarding numbers 6-7
© 2013 by Dialexia Communications, Inc. All Rights Reserved
Descriptions of the three types of periods when defining forwarding options
Period
Description
FixedPeriod
A nonrecurring period during which any incoming calls to the number get forwarded to the target number.
Example
Behaviour: All incoming calls to the number 15142257650 received between 6:00PM on 01 January 2013 to 9:00PM on 30 June 2013 getforwarded to group 250.
WeeklyPeriod
Periods recurring every week during which any incoming calls to the number get forwarded to the target number.
Example
Behaviour: All incoming calls to the number 15142257650 received between 9:00AM Saturday to 3:00PM Sunday get forwarded to15142257600. This happens every week.
DailyOverni
Overnight periods recurring daily between the First Day and the Last Day. During each overnight period, incoming calls get forwarded tothe target number. The daily overnight periods repeat every week.

6-8
© 2013 by Dialexia Communications, Inc. All Rights Reserved
Period
Description
ghtPeriod
Example
Behaviour: All incoming calls to the number 15142257650 received between 12:00AM and 2:00AM the following day get forwarded togroup 255. This happens every day from Monday to Friday. It also happens every week.
In the Target field, you can enter a:
· User extension.· Group extension.· PSTN number.· User's voice mail box. To do that, enter the number string *99[extension of user]. For example,
assuming all defaults, entering *99201 forwards calls to the voice mail box of extension 201.
4.Once you have configured the forwarding options, click .The number's forwarding options get saved and immediately take effect. The Forwarding pagereappears.
5.To edit a number's forwarding options, click beside it.
6.To delete all of a number's forwarding options, click beside it.The forwarding options of the number get deleted, but the number itself does not get deleted.

Chapter
7

7-2
© 2013 by Dialexia Communications, Inc. All Rights Reserved
Chapter 7 Working with users
Overview
If you added users from an LDAP system using the Installation Wizard, the system will already haveadded their names and assigned an extension to each person. However, you still need to set upadditional information for each user.
Before you start adding users, you should set up:
- Permissions and digit filters as described in CHAPTER 5.
- Gateways/domains as described in CHAPTER 6.
- The Numbers Pool as described in CHAPTER 7.
Each user can have one or more telephone extensions, and the phone associated with each extensioncan be any of the following types:
· IP-Phone (e.g. AASTRA 480i, CISCO 7912, etc.)
· soft-phone (e.g. Dial-Com or Dial-Console)
· any SIP-based Analog Telephone Adapter (ATA) (e.g. Mediatrix 2102, 1104, 1124, SIPURA 2000,Grandstream 486, etc.)
Once you add a user you will use the information you specify to configure the user’s phone. For moreinformation about configuring phones, see CHAPTER 11 and Appendix A. The user will only appear onthe Registered Users page and be able to make a call after you have configured a phone for them.
Adding a user
Adding a user as described in this section does not enable them to make calls on the network. Youmust configure their device first so that they appear on the Registered Users page. For moreinformation about configuring devices, refer to CHAPTER 11 and Appendix A.
1. Expand Users and Groups and then click Users.A list of all the users appears.

Chapter 7 Working with users 7-3
© 2013 by Dialexia Communications, Inc. All Rights Reserved
Users page
2. Do one of the following:
a. Click the Add Users icon .
OR
b. Position the cursor on one of the users in the list, right-click the mouse to display a menu, thenclick Add.
The Add User page appears.

7-4
© 2013 by Dialexia Communications, Inc. All Rights Reserved
Add User page with General tab expanded
The Add User page contains five tabs. They are described in the table below.
Description of tabs on the Add User Page
Tab Description of contents
General Identifies who is assigned to the extension
Routing Identifies any calling restrictions or privileges that aperson may have
Voice Mail Identifies the type of voice mail, if any
Presence Monitoring Makes the person’s availability status viewable toother users

Chapter 7 Working with users 7-5
© 2013 by Dialexia Communications, Inc. All Rights Reserved
Tab Description of contents
Group Membership Adds the person to (or removes the person from) oneor more groups.
Completing the fields on the General tab
The General tab of the Add User page contains two sections, one involving the user's information,such as the user ID, extension, and PIN code, and the other section involving the user's parameters.
To complete a user's information and parameters:
1. If the General tab is not already expanded as shown in the previous figure, click the tab toexpand this it.The section involving the user information appears.
User information in General tab

7-6
© 2013 by Dialexia Communications, Inc. All Rights Reserved
2. Complete the user information as described in the table below.
Shaded fields are optional. Unshaded fields are required.
Completing the fields on the General tab
Field Name How to Complete
User ID Each user must have a unique User ID to identify them in the system. It cancontain letters, numbers, and periods, and can be up to 50 characters inlength. Ideally you can use the convention firstname.lastname.
Example: john.doe
Note: If you choose a User ID different from the Extension, make sure youenter that User ID as an Alias. Dial-Office automatically does that for you ifyou specify an alphanumeric User ID.
Extension This is the number of the person’s telephone extension. This number mustconform with IVR input handling configuration.
Example: 202
If the user has more than one extension, you can enter the others as aliases.
VoIP Password This is the SIP password. The system automatically puts the User ID into thisfield as the default, but you can change it to any combination of letters andnumbers up to 50 characters in length. The system uses the user ID andpassword to authenticate users before allowing them to register withDial-Office.
PIN Code This is the user's PIN code. It must start with the extension number of theuser. A user needs the the PIN Code to:
· Access his or her voice mail box using a phone.· Make PIN-restricted calls.· Make external calls through the IVR.
Example: 202xxxxxxx
Aliases If the user has multiple extensions, enter the other extensions here. Or if theuser has a Direct Inward Dialing (DID) number, enter it here.
If the Numbers Pool contains unowned numbers, you can select them from

Chapter 7 Working with users 7-7
© 2013 by Dialexia Communications, Inc. All Rights Reserved
Field Name How to Complete
the pull-down menu and add them as aliases. All the numbers that you addas aliases become owned by the user.
First Name Type the user’s first name.
Last Name Type the user’s last name.
Web User Name The system automatically puts the User ID into this field as the default, butyou can change it to any combination of letters and numbers up to 50characters in length. Along with the password, this user name is used toaccess the user’s web interface.
Web Password The system automatically puts the User ID into this field as the default, butyou can change it to any combination of letters and numbers up to 50characters in length. Along with the user name, this password is used toaccess the user’s web interface.
IVR Language Select the user's preferred IVR language. Your selection affects the languageplayed to the user when he or she accesses any of the Telephony services,such as when he or she checks for new voice mail.
Display Number Select a display number for the user. This number appears to called partieswhen they receive calls from the user. It appears only to called parties outsidethe Dial-Office system, in another domain or in the PSTN, and not to internalusers.
If you leave the Display Number field blank and the user makes a call tosomeone else outside the Dial-Office system, Dial-Office displays the displaynumber of the tenant you have assigned the user to. If the user's tenant doesnot have a display number, Dial-Office displays the company Phone (CallBack Number) to the called party.
Note that you can only select assigned numbers that exist in the NumbersPool. Also note that the user can change the Display Number from his or heruser web interface.
Display Name Enter a name that you want displayed to called parties when they receivecalls from the user. This Display Name appears only to called parties outsidethe Dial-Office system, in another domain or in the PSTN, and not to internalusers.
If you leave the Display Name field blank and the user makes a call tosomeone else outside the Dial-Office system, Dial-Office displays the display

7-8
© 2013 by Dialexia Communications, Inc. All Rights Reserved
Field Name How to Complete
name of the tenant you have assigned the user to. If the user's tenant doesnot have a display name, Dial-Office displays the SIP Display Name (of thecompany) to the called party.
3. Scroll down to Parameters.
User parameters in General tab
4. Use the table below as a reference when selecting the user's parameters.
Descriptions of user parameters
Parameter Description
Access fromother phones
Select this checkbox if you want the user to have permission to use the MakeExternal Calls feature of the auto attendant. The user will be required to entera PIN.
Block Caller-ID Select this checkbox if you do not want the user’s phone number to appearon Caller ID screens.
RecordConversation
Select this checkbox if you want to automatically record all incoming andoutgoing calls for a particular user. To listen to recorded calls, open theRecorded Calls page.
Show BLFDirectory
Select this checkbox to enable the user to check the availability of people inhis or her watch list through a BLF directory. Once enabled, the BLF directoryautomatically opens every time the user logs into his or her user web

Chapter 7 Working with users 7-9
© 2013 by Dialexia Communications, Inc. All Rights Reserved
Parameter Description
interface. To learn how to add people to a user's watch list, see Completingthe fields on the Presence Monitoring tab.
Try SingleDestinationFirst
When the user has multiple aliases and has a phone registered with eachalias, all the phones ring at the same time when a call comes in. However, ifyou select this checkbox, only the phone registered with the dialled aliasrings.
Disable CallForward toVoice Mail
Select this checkbox to prevent the user's calls from being forwarded to thevoice mail box of other users, in other words, so that when the user makescalls to other users in the system, the calls do not get forwarded to their voicemail box. Instead, the user gets the busy tone.
Disable Musicon hold
Select this checkbox to prevent music on hold from being played when theuser puts someone on hold.
Forward DNIS Applicable when the user has multiple aliases, but just one registered phone.Select this checkbox so that the user's registered phone receives SIPINVITES that identify the dialled alias. Otherwise, if you do not select thischeckbox, the user's phone receives SIP INVITES identifying the User IDonly, not the dialled alias.
Either way, the registered phone always receives incoming calls.
Editable VoIPPassword,Editable WebPassword,Editable PINCode
Use these parameters to control if users can change their VoIP passwords,web passwords, or PIN codes from their user web interfaces.
Editable SkipPINAuthentication
Select this checkbox to give users the option of avoiding having to enter theirPIN code when retrieving voice mail using their own registered phone.However, users always have to provide their PIN code when checking voicemail from other peoples' phones. Users configure this option from their userweb interface.
Editable SkipPIN on Deletion
Select this checkbox to give users the option of avoiding having to enter theirPIN code when deleting a voice message. Users configure this option fromtheir user web interface.

7-10
© 2013 by Dialexia Communications, Inc. All Rights Reserved
Parameter Description
Allow to CreateConference
Select this check to give users the ability to initiate conference calls. Ifselected, the user can initiate conference calls from his or her web interface.
Completing the fields on the Routing tab
In the Routing tab of the Add User page, you assign permissions to users. These permissions definewhich PSTN destinations users can call to. You also associate each permission with a gateway ordomain in the system. Finally, you have the choice of assigning digit filters at the user level.
To complete the fields on the Routing tab:
1. Click the tab to expand it as shown below.
Add User page with Routing tab expanded

Chapter 7 Working with users 7-11
© 2013 by Dialexia Communications, Inc. All Rights Reserved
There are two ways to set up a routing profile:
üBy copying another user’s profile.
ü From scratch
3. To set up a user by copying the routing profile of another user:
o Click beside Copy profile from user.
o Select the user whose profile you want to copy.
o Click .

7-12
© 2013 by Dialexia Communications, Inc. All Rights Reserved
o Click .
o Skip the remaining steps for the Routing tab since all of the fields will be automatically set like theuser you copied. In the example above, the new user will have the same profile as Roberto.
4. To set up a user’s routing profile from scratch:
o Choose a type of call from the permissions list.
o Choose the gateway or domain that handles that type of call.
o If you will be setting up more than one gateway or domain for the same type of permission,choose a value under Order. The number 1 has the highest priority. For example, if you assign twogateways for local calls, you can specify that the system should use LocalGW1 unless it is down,in which case it will use LocalGW2.
o Click .A new entry appears in the routing table.
o If you want to use PIN authentication, select the PIN field at the far right of the Routing Table. (ForPIN authentication to be enabled, you must also select Enable PIN Authentication on thePermissions page. See CHAPTER 5, Working with call permissions for details.)
You can remove a user’s permission by clicking it in the Routing Table and then clicking
. (This only deletes the user’s access to that type of call – it does notdelete the permission itself.)
o Repeat step 4 for each type of call you want to give the user permission to make.

Chapter 7 Working with users 7-13
© 2013 by Dialexia Communications, Inc. All Rights Reserved
5. You can assign digit filters at the individual user level in the Routing tab. To do that, click besideUser specific Filter and select a filter from the list.
I. You can also assign digit filters at the gateway/domain level.
II. Assigning digit filters at the user level causes the filtering to be applied before the user'spermissions are checked. Assigning digit filters at the Gateway/Domain level causes filtering tobe applied after the user's permissions are checked.
Completing the fields on the Voice Mail tab
The Voice Mail tab enables you to set up voice mail options for a user. To set up a user's voice options:
1. Click the tab to expand it as shown below.
Add User page with Voice Mail tab expanded
2. Complete the fields on the Voice Mail tab as described in the table below.
Completing the fields on the Voice Mail tab
Field Name How to Complete
Vmail Type If the user will not have voice mail, choose None. Otherwise, choose a type:
Unified – Voice mail is saved on an SMTP-based server, and is thereforeunified with the user's e-mail account. As such, voice mail can be accessedfrom the user's phone or from his or her e-mail account.
Non-Unified – Voice mail is saved in the Dial-Office voice mail folder.

7-14
© 2013 by Dialexia Communications, Inc. All Rights Reserved
Field Name How to Complete
Non-Unified with Email Alert – Voice mail is saved in the Dial-Office voice mailfolder and an email is sent.
Non-Unified with Email Alert and Voice Mail Attachment – Voice mail is savedin the Dial-Office voice mail folder and an email is sent. The voice message isattached to the email in .wav format. A copy of the voice message remains inthe Dial-Office server. The user can delete it either through his or her userweb interface or through the IVR.
Non-Unified with Email Alert and Voice Mail Attachment (no local copy) – Ane-mail alert is sent to the user. The e-mail alert contains the voice messageas an attachment in .wav format. The Dial-Office server does not howeverretain a copy of the voice message.
Email If the Vmail type is one that includes e-mail, specify the e-mail address here.
For a user to have the ability to create conference calls, he or shemust have a valid e-mail address.
Max Messages If you want to limit the number of voice messages that the user can store,type the maximum here.
Vmail DiskQuota
If you want to limit the amount of disk space a user’s voice messages canoccupy, type the number of KB here.
PlaybackMethod
Select in which order the IVR plays new voice messages to the user. Youhave the choice between starting with the most recent or the first onerecorded.
Unified Messaging Integration (for unified voice mail type only)
Email UserAccount
Enter the user's enterprise user name.
Email UserPassword
Enter the user's enterprise password.
Completing the fields on the Presence Monitoring tab
The Presence Monitoring tab enables you to set up a “watch list” for the user. The user can check the

Chapter 7 Working with users 7-15
© 2013 by Dialexia Communications, Inc. All Rights Reserved
availability of people in his or her watch list through a BLF directory accessible from the user webinterface.
To show the BLF directory to a user, select the parameter Show BLF Directory under the Generaltab.
To add users to the watch list:
1. Click the tab to expand it as shown below.
Add User page with Presence Monitoring tab expanded
2. In the Available Users list, select a person to be in the user’s watch list.
To select multiple people in the Available Users list, hold down the CTRL key as you click.
3. Click .That person now appears in the Users to Watch list.
4. To remove a person from the watch list, select their name below Users to Watch and click .
Completing the fields on the Group Membership tab
The Group Membership tab enables you to add the user to one or more groups that you have set up. Forinformation about setting up groups, see CHAPTER 9 Working with user groups.
To assign a user to one or more groups:
1. Click the tab to expand it as shown below.

7-16
© 2013 by Dialexia Communications, Inc. All Rights Reserved
Add User page with Group Membership tab expanded
2. In the Available Groups list, select the group you want the new user to belong to.
3. Click .That group now appears in the Assigned to Groups list. The user being created will now be part ofthat group.
4. To remove a person from a group, select the group’s name below Assigned to Groups and click
.
If you add the user to a group of type Hunt by Priority or Hunt by Round Robin, you will need toassign a priority number to the user in the group, which cannot be done from this page. You canonly do that by following the instructions in CHAPTER 9, Adding members to a group.
When you have finished completing the fields of all five tabs in the Add User page:
· Click at the bottom of the page.A confirmation window appears.
The user has now been created in the system. If any information was not valid, an error messageappears instead.

Chapter 7 Working with users 7-17
© 2013 by Dialexia Communications, Inc. All Rights Reserved
Modifying default user settings
From the Users page, you can access the default user settings. Configure these settings so that everytime you add a new user, Dial-Office automatically assigns it the default values you want.
To modify the default user settings:
1. Expand Users and Groups and then click Users.The Users page appears.
2. Click the Settings icon.
Location of the Settings icon in the Users page
A new window appears showing the default user settings.
Changing the default user settings
3. Make changes as necessary. For descriptions of each of the settings, see Adding a user.

7-18
© 2013 by Dialexia Communications, Inc. All Rights Reserved
4. Click .The new default user settings get saved and take effect the next time you add a new user.
Deleting a user
Deleting a user permanently removes the person’s access to the phone system. The person’s voicemessages and customized greetings will also be deleted. If you need to temporarily remove a person’saccess to the phone system, consider unregistering the person instead. See Unregistering users inCHAPTER 13 for details.
To delete a user:
1. Expand Users and Groups and then click Users.A list of all the users appears.
List of users
2. Position the cursor on the name of the person you want to delete.The whole row is highlighted when a person is selected.
3. Right-click the mouse to display a menu.
Right-clicking a line displays a menu
4. Click Delete.A confirmation window appears.

Chapter 7 Working with users 7-19
© 2013 by Dialexia Communications, Inc. All Rights Reserved
5. If you are sure you want to delete this user, click OK.
Exporting users
You can export the list of users that exist in your system to CSV (Comma Separated Values) format.To export your user list:
1. Expand Users and Groups and then click Users.The Users page appears.
Use the 'Filter by' fields to search for the users you want to export. For details, see Searching a listin CHAPTER 1.
2. Click the Export Users icon.
Location of the Export Users icon in the Users page
A new window opens with the list of users exported in CSV (Comma Separated Values) format.Here is an example of an exported list of users:

7-20
© 2013 by Dialexia Communications, Inc. All Rights Reserved
Exported users - an example
3. If you want to keep the data, you can use your browser to save the page, or copy the records andpaste them into a file.
Modifying a user
In this section we describe how to modify a user that already exists in the system:
1. Expand Users and Groups and then click Users.A list of all the users appears.
List of users
2. Position the cursor on the name of the person whose record you want to modify.The whole row is highlighted when a person is selected.
Use the 'Filter by' fields to search for the person you want. For details, see Searching a list inCHAPTER 1.
3. Do one of the following:
· Right-click the mouse to display a menu and click Edit.
OR
· Double-click the user.

Chapter 7 Working with users 7-21
© 2013 by Dialexia Communications, Inc. All Rights Reserved
The Edit User page appears with the General tab expanded:
Edit User page with General tab expanded
4. Click the the tab you want to change by clicking on it. Use the table below to decide which tab youwant to modify.
If you want to… Go to...
Add or remove the user from a group Completing the fieldson the GroupMembership tab
Change the people in the user’s watch list Completing the fieldson the PresenceMonitoring tab
Change the user’s voice mail settings Completing the fieldson the Voice Mail tab
7-22
© 2013 by Dialexia Communications, Inc. All Rights Reserved
If you want to… Go to...
Update the user’s permissions (the types of calls the usercan make – local, long distance, etc.)
Completing the fieldson the Routing tab
Update the gateway or domain the user is assigned to fora type of call
Completing the fieldson the Routing tab
Update the digit filter assigned to the user Completing the fieldson the Routing tab
Add or remove an extension for the user Completing the fieldson the General tab
Change the user’s name Completing the fieldson the General tab
Reset the user’s password Completing the fieldson the General tab
5. When you have finished making your changes, click .

Chapter
8

8-2
© 2013 by Dialexia Communications, Inc. All Rights Reserved
Chapter 8 Working with user groups
Overview
Before you start working with groups, you should set up your users as described in CHAPTER 8.
Dial-Office allows you to associate an extension number with a group of users instead of an individual.This is very useful when you want to make sure someone is available to answer certain calls. Forexample, you might want to do this for a Support line, a Sales line, or a Customer Service line, etc.
There are three ways to set up a group:
· Hunt by priority (forking)
· Hunt by Round Robin
· Paging
In this chapter we explain how to set up groups and we explain each of the three types of groups.
Adding a group
To add a group:
1. Expand Users and Groups and then click Groups.A list of all existing groups appear.
Groups page
2. Do one of the following:
a. Click the Add Groups icon .
OR
b. Position the cursor on one of the groups in the list, right-click the mouse to display a menu, thenclick Add.

Chapter 8 Working with user groups 8-3
© 2013 by Dialexia Communications, Inc. All Rights Reserved
The Add Group page appears.
Add Group page
3. Complete the fields as described in the table below.
Shaded fields are optional. Unshaded fields are required.
Completing the fields to create a group
Field Name How to Complete
ID Each group must have a unique ID to identify them in the system. It cancontain both letters and numbers and can be up to 50 characters in length. Nospaces are allowed.

8-4
© 2013 by Dialexia Communications, Inc. All Rights Reserved
Field Name How to Complete
Examples: Sales, Customer_Service
Extension This is the group’s extension number.
Description This is a description of the group.
No answer URL If no member of the group is available to take the call, it will be directed to anextension, a voicemail box or to an external telephone number that you typehere.
Examples: 201 (an extension), *99201 (voicemail box of extension 201), or15146660001 (an external telephone number)
Type Select the group's type. Three types exist:
Hunt by Priority (Forking) - Each user gets a priority (order) number withinthe group. The system tries the person with a priority of 0 first. If there is noanswer, the system will ring the person with a priority of 1 and so on. Eachsubsequent call behaves the same way.
Hunt by Round Robin - Each user gets a priority (order) number within thegroup. The system tries the person with a priority of 0 first. If there is noanswer, the system will ring the person with a priority of 1 and so on. For thenext call, the system tries the person with priority 1 first, and then the next onein priority and so on until reaching the person with priority 0 last. For the nextcall, the system tries the person with priority 2 first and continues on untiltrying the person with priority 1 last and so on. In summary, the systemrotates between which member of the group receives the call first.
Paging - The system will broadcast the caller’s voice on the telephonespeaker of every person in the group. The caller hears no ringing because themembers’ telephones answer the call right away. Members of this type ofgroup have to have phones with the auto-answer feature.
For paging to work, you must have the service Paging running. Tolearn how to start this service, see Starting and stopping services inCHAPTER 14.
Number ofRings
Enter how many times the phone of a member in the group rings before thesystem tries the next member in line.

Chapter 8 Working with user groups 8-5
© 2013 by Dialexia Communications, Inc. All Rights Reserved
Field Name How to Complete
RecordConversations
Select this checkbox to enable the recording of all calls to the group. To listento recorded calls, open the Recorded Calls page.
Aliases Add alternate extensions that reach the same group. Aliases can also containtelephone numbers that are directly accessible from outside the company -referred to as Direct Inward Dialing (DID) numbers.
If the Numbers Pool contains unowned numbers, you can select them fromthe pull-down menu and add them as aliases. All the numbers that you add asaliases become owned by the group.
4. Click .The following window appears.
5. Click OK.
Once you create a group, the next step is to add users to it. For details, see Modifying a group.
Modifying a group
In this section we describe how to modify a group that already exists in the system:
1. Expand Users and Groups and then click Groups.A list of the existing groups appear.
2. Position the cursor on the name of the group whose record you want to modify. The whole row ishighlighted when a group is selected.
If you have a long list of groups, use the 'Filter by' fields to search for the one you want. Fordetails, see Searching a list in CHAPTER 1.
3. Do one of the following:

8-6
© 2013 by Dialexia Communications, Inc. All Rights Reserved
· Right-click the mouse to display a menu and click Edit.
OR
· Double-click the group.The Edit Group page appears.
Edit Group page
4. Modify the necessary fields. For descriptions of a group's fields, see Adding a group.
5. When you have finished making your changes, click .
Adding members to a group
Once you have created a group, you can add members to it, remove members from it, change theextension, or change any of the attributes of the group. Notice that when you open the Edit Grouppage, there is a new section where you can add members to or remove members from the group.

Chapter 8 Working with user groups 8-7
© 2013 by Dialexia Communications, Inc. All Rights Reserved
Edit Group page allowing adding members
To add members to a group:
1. Below User, select the user to add to the group.
2. Below Order, select the order (priority level) of the user. (The order of the user affects in whichorder the user receives incoming calls. For details, see Adding a group.)
3. Below Status, select the user's status. Note that an inactive member of the group does not receivecalls dialled to the group but receives calls dialled to his or her extension.
4. Click .The user’s name appears in the list.
5. Repeat steps 1 to 4 to add more members to the group.
6. When you have finished, click .The group gets updated with the new list of members.
Deleting members from a group
If a group member is temporarily unavailable you can change the person’s status to Inactiveinstead of deleting them from the group. When they return, delete and add the person again torestore their status to Active.
To delete members from a group:
1. In the Members section of the Edit Group page, click the name of a user and then click
.The user gets removed from the list.

8-8
© 2013 by Dialexia Communications, Inc. All Rights Reserved
Removing a user from a group
2. Click at the bottom of the page.The following window appears as confirmation:
3. Click OK.
Deleting a group
Deleting a group permanently removes its extension number from the phone system. That extensionnumber will not be routed to group members any more.
If you only want to delete one or more members of a group, see Deleting members from agroup instead.
To delete a group:
1. Expand Users and Groups and then click Groups.A list of the existing groups appear.
2. Position the cursor on the name of the group you want to delete.The whole row is highlighted when a group is selected.
3. Right-click the mouse to display a menu.
Chapter 8 Working with user groups 8-9
© 2013 by Dialexia Communications, Inc. All Rights Reserved
Right-clicking a group displays a menu
4. Click Delete.A confirmation window appears.
5. If you are sure you want to delete the group, click OK.

Chapter
9

Chapter 9 Working with park orbits 9-2
© 2013 by Dialexia Communications, Inc. All Rights Reserved
Chapter 9 Working with park orbits
Overview
Before you start working with park orbits, you should set up your users as described in CHAPTER 8.
Parking a call is temporarily putting it on hold so you can retrieve it at another phone. Parked calls areplaced in a specific call queue named Park Orbit. Dial-Office system can support multiple instance ofPark Orbit.
Each Orbit is defined by a range of extension numbers and identified by its own extension.
To park a call, a user dials * plus the default park code plus the Park Orbit extension (e.g. *94201). Asa result, Dial-Office parks the call at this Park Orbit so extension members could retrieve this call. Toretrieve the parked call, users can dial * plus the default code (*95) plus the Park Orbit extension.
Example: A secretary receives an external call and wishes to transfer that call to the support teamgrouped in some Park Orbit (with extension 201). The secretary asks the caller to wait on the line whileshe parks the call for that Park Orbit. All its members receive a Message Waiting Indicator (MWI)signalling a parked call. The caller hears music on hold until one of the members retrieve the parkedcall.
Creating a new Park Orbit
To add a new Park Orbit:
1. Expand Users and Groups and then click Park Orbits. The Park Orbits page appears, showing allPark Orbit that you may have created.
2. Click the Add Park Orbit icon . The Add Park Orbit page appears.

9-3
© 2013 by Dialexia Communications, Inc. All Rights Reserved
3. Complete the Park Orbit’s id, extension, description and members. The table below containsdescriptions of these fields.
Completing the fields related to a park orbit's settings
Field Name How to Complete
Id Each park orbit must have a unique ID toidentify them in the system. It can containboth letters and numbers and can be up to50 characters in length. No spaces areallowed.
Examples: Sales, support
Extension This is the park orbit’s extension number.
Description Enter a short description of the park orbit.
Music On Hold Audio File Select one of audio file to be played when

Chapter 9 Working with park orbits 9-4
© 2013 by Dialexia Communications, Inc. All Rights Reserved
the call is parked. You can upload a newMOH File from Media library
Members Add Park Orbit members from theextensions dropdown list. Only thesemembers could retrieve this park orbit.
4. Click . The new park orbit gets saved.
Modifying a Park Orbit
In this section we describe how to modify a park orbit that already exists in the system:
1. Expand Users and Groups and then click Park Orbits.
A list of the existing park orbits appear.
2. Position the cursor on the name of the park orbit whose record you want to modify. The whole row ishighlighted when a park orbit is selected.
If you have a long list of park orbits, use the 'Filter by' fields to search for the one you want. Fordetails, see Searching a list in CHAPTER 1.
3. Do one of the following:
Right-click the mouse to display a menu and click Edit.
OR
Double-click the park orbit.The Edit Park Orbit page appears.
4. Modify the necessary fields. For descriptions of a park orbit's fields, see Adding a Park Orbit.
5. When you have finished making your changes, click .
Deleting a Park Orbit
Deleting a park orbit permanently removes its extension number from the phone system. You cannotpark calls to that extension any more.

9-5
© 2013 by Dialexia Communications, Inc. All Rights Reserved
To delete a park orbit:
1. Expand Users and Groups and then click Park Orbit.A list of the existing park orbits appear.
2. Position the cursor on the name of the park orbit you want to delete.The whole row is highlighted when a park orbit is selected.
3. Right-click the mouse to display a menu.
Right-clicking a group displays a menu
4. Click Delete.A confirmation window appears.
5. If you are sure you want to delete the park orbit, click OK.
Monitor Parked Calls
To monitor all parked calls:
Expand Monitoring and then click Parked Calls.
The Parked Calls page appears, showing all parked calls in the system with their Ids, the date whenthe calls is parked and also who parked the calls.

Chapter 9 Working with park orbits 9-6
© 2013 by Dialexia Communications, Inc. All Rights Reserved

Chapter
10

Chapter 10 Working with web access 10-2
© 2013 by Dialexia Communications, Inc. All Rights Reserved
Chapter 10 Working with web access
Overview
Before you start setting up web access for users, you should set up:
- Users as described in CHAPTER 8
What is web access?
Web access allows users with different roles to log into the web interface of Dial-Office. For example,users with the PBX User role can log into Dial-Office's web interface and view their accountinformation, voice mail, etc. This enables them to do these tasks from a web browser that connects tothe Dial-Office server.
There are two different types of roles:
· PBX User - Has access to a user's general information, call logs, authentication settings, companydirectory, voice mail settings, contacts, presence settings, and forwarding settings.
· Administrator - Manages user accounts, views call activities in the entire Dial-Office system,performs system setup and maintenance, creates groups, and sets up dial plans.
When you add a user, the system automatically copies the User ID into the web user name andpassword fields, so the default is to automatically set up web access as you set up the user. Each newuser receives web access with PBX User role.
Adding web access
Typically, you would set up web access at the same time as you set up users. If you didn’t do that, youcan also add web access using the following steps:
1. Expand Manage Web Access and then click List Users.The list of existing web accounts appear.

10-3
© 2013 by Dialexia Communications, Inc. All Rights Reserved
List Users page
The 'manager' web account exists by default in new installations of Dial-Office.
2. Do one of the following:
a. Click the Add Web Access icon .
OR
b. Position the cursor on one of the users in the list, right-click the mouse to display a menu, thenclick Add.
The following page appears:

Chapter 10 Working with web access 10-4
© 2013 by Dialexia Communications, Inc. All Rights Reserved
Add a Web User page
3. Complete the fields as described in the table below.
Description of tabs on the Add a Web User Page
Field Name How to Complete
User name Each user must have a unique User name to log in to the Dial-Office Webinterface. It can contain both letters and numbers and can be up to 50characters in length. Ideally you can use the convention firstname.lastname.
Example: john.doe
Password The web password for the user name to log into the Dial-Office Webinterface. (You should recommend that users change their password whenthey sign in to the Dial-Office web interface.)
RoleSelect the type of role. You have the choice between PBX User andAdministrator.

10-5
© 2013 by Dialexia Communications, Inc. All Rights Reserved
Field Name How to Complete
You can have multiple administrator web accounts.
User ID For PBX User as the role, select the User ID that you want associated withthe web account.
4. Click .A confirmation window appears.
5. Click OK.The web account gets created in the system.
Updating a user’s web access password
Use these steps to reset a web user’s password. You cannot change any other fields. If you need tochange something other than the password, delete the web user account and then recreate it.
Administrators can update the passwords of other web accounts including other administrators,except for the 'manager' web account. Only the 'manager' web account can update its ownpassword.
To update the password of a web account:
1. Expand Manage Web Access and then click List Users.The list of existing web accounts appear.
List of users with web access
2. Position the cursor on the user name whose password you want to update.The whole row gets highlighted.

Chapter 10 Working with web access 10-6
© 2013 by Dialexia Communications, Inc. All Rights Reserved
Use the 'Filter by' fields to search for the person you want. For details, see Searching a list inCHAPTER 1.
3. Do one of the following:
· Right-click the mouse to display a menu and click Edit.
OR
· Double-click the user name.
The Edit Web User page appears:
Edit Web User page
4. Type the new password and click .
Deleting a user’s web access
The 'manager' web account cannot be deleted.
To delete a web account:
1. Expand Manage Web Access and then click List Users.The list of existing web accounts appear.

10-7
© 2013 by Dialexia Communications, Inc. All Rights Reserved
List of users with web access
2. Position the cursor on the user name that you want to delete.The whole row gets highlighted.
3. Right-click the mouse to display a menu.
Right-clicking displays a menu
4. Click Delete.A confirmation window appears:
5. If you are sure you want to delete the web account, click OK.
Configuring administrator login settings
Dial-Office gives you the option of having four different administrator login settings. Configure thesesettings when you have multiple administrator web accounts in your system.

Chapter 10 Working with web access 10-8
© 2013 by Dialexia Communications, Inc. All Rights Reserved
Only the 'manager' web account can configure the administrator login settings.
To configure the administrator login settings:
1. Expand Manage Web Access and then click List Users.The list of existing web accounts appear.
List Users page
2. Click the Settings icon .The Settings window opens.
Administrator login settings
3. Select a setting. The table below contains descriptions of each type of setting.
Descriptions of the administrator login settings
Administrator Login Setting Description
Already logged inadministrator prevents
An already logged in administrator must log out or have hissession timed out in order for another administrator to log in.

10-9
© 2013 by Dialexia Communications, Inc. All Rights Reserved
Administrator Login Setting Description
other administrators except'manager' from logging in
However, if the 'manager' administrator logs in, the alreadylogged in administrator gets forced out.
Already logged inadministrator preventsother administrators fromlogging in
An already logged in administrator must log out or have hissession timed out in order for another administrator to log in.Even if the 'manager' administrator tries to log in, he cannot forceout the administrator already logged in.
Newly logged inadministrator terminatesexisting administratorsession except 'manager'session
An already logged in administrator gets forced out when anotheradministrator logs in. However, an already logged in 'manager'administrator prevents other administrators from logging in.
Allow multiple concurrentadministrator logins
The system allows multiple administrators to log in at the sametime. As such, if multiple administrators are concurrently loggedin, they must be careful when making changes to the system notto interfere with one another.
4. Click .
Monitoring web connection logs
The Connection Logs page is a repository of the actions performed by web users. It helps theadministrator monitor web activities for security and to trace actions.
To display the web connection logs:
· Expand Manage Web Access and then click Connection Logs.A list of all web connection logs appear.

Chapter 10 Working with web access 10-10
© 2013 by Dialexia Communications, Inc. All Rights Reserved
List of web connection logs
This list shows each action performed via web access as well as the time, user responsible, and theuser’s role. The list automatically refreshes every 60 seconds.
Use the 'Filter by' fields to search for the person you want. For details, see Searching a list inCHAPTER 1.
Exporting web connection logs
To export the web connection logs:
1. Expand Manage Web Access and then click Connection Logs.A list of all web connection logs appear.
Use the 'Filter by' fields to search for the connection logs you want to export. For details, seeSearching a list in CHAPTER 1.
2. Click the Export Web logs icon.
Location of Export Web logs icon
A new window opens with the list of connection logs exported in CSV (Comma Separated Values)format. Here is an example of an exported list of web connection logs:

10-11
© 2013 by Dialexia Communications, Inc. All Rights Reserved
Exported web connection logs - an example
3. If you want to keep the data, you can use your browser to save the page, or copy the records andpaste them into a file.
Deleting web connection logs
You should delete web connection logs from time to time to release space in the system. When webconnection logs get deleted, they are deleted permanently and cannot be recovered. We thereforerecommend that you perform a database backup before deleting records. (See Backing up thedatabase in CHAPTER 14 for details.)
To delete the web connection logs:
1. Expand Manage Web Access and then click Connection Logs.A list of all web connection logs appear.
2. Click the Clear Logs icon.
Location of Clear Logs icon
A confirmation window appears.

Chapter 10 Working with web access 10-12
© 2013 by Dialexia Communications, Inc. All Rights Reserved
3. Click OK.All web connection logs that exist in the system get permanently deleted.

Chapter
11

Chapter 11 Provisioning devices 11-2
© 2013 by Dialexia Communications, Inc. All Rights Reserved
Chapter 11 Provisioning devices
Overview
Before you start working with devices, you should set up:
- Users as described in CHAPTER 8
We recommend that you set up users prior to setting up devices because you need the userinformation to set up a device.
You can get devices automatically configured by Dial-Office or you can configure them manually.For automatic configuration through provisioning, follow the steps in this chapter. However, fordevices which Dial-Office cannot provision, you have to configure them manually. For informationabout manual configurations, refer to APPENDIX A.
What do the devices in the Devices page represent? They can represent:
· An analog telephone adapter (ATA), which interfaces between an analog phone and Dial-Office. Itallows you to use Plain Old Telephone Systems (POTS) with an IP-PBX such as Dial-Office.
· An IP phone, which can connect directly to Dial-Office.
Provisioning is the automatic configuration of devices. Provisioning devices involves entering the IPaddress of Dial-Office into them so that when the devices reboot they automatically acquire theirconfiguration from Dial-Office.
Each device is given a unique identifier (referred to as a MAC address) by the manufacturer. The MACaddress appears on the back of the device. You must add its MAC address to the Dial-Office systembefore you can provision the device. You can then assign the device to one or more users (dependingon the number of lines it has).
You can set up a device to get provisioned by Dial-Office in three stages. The first stage involves adding the device to the Devices page. The second stage involves assigning users to the device'slines. And the final stage involves setting up the device to read its provisioning information from Dial-Office.
Adding a device
To add a device to the Phones/Adapters page:
1. Expand Devices and then click Phones/Adapters.The Phones/Adapters page, containing any existing entries, appears.

11-3
© 2013 by Dialexia Communications, Inc. All Rights Reserved
Devices page
Devices are identified by their MAC address and device type.
2. Do one of the following:
a. Click the Add Device icon .
OR
b. Position the cursor on one of the devices already in the list, right-click the mouse to display amenu, then click Add.
The following page appears:
Add Device page
3. Complete the fields as described in the table below.

Chapter 11 Provisioning devices 11-4
© 2013 by Dialexia Communications, Inc. All Rights Reserved
Completing the fields on the Add Device page
Field Name How to Complete
MAC Address Enter the device's MAC address.
The MAC address of a device usually appears on its back.
Type Select the type of device.
Dial-Office can only provision devices in this list.
4. When you have finished, click .A confirmation window appears:
5. Click OK.The device gets added to your system. If any information was not valid, an error message appearsinstead.
Assigning users to device lines
Once you have added a device to the Phones/Adapters page, you can now specify who will use itslines.
To assign users to a device:
1. Expand Devices and then click Phones/Adapters.The Devices page, containing any existing entries, appears.
Devices page

11-5
© 2013 by Dialexia Communications, Inc. All Rights Reserved
2. Position the cursor on the device you want to assign users to.The whole row gets highlighted.
If you have a long list of devices, use the 'Filter by' fields to search for the one you want. Fordetails, see Searching a list in CHAPTER 1.
3. Do one of the following:
· Double-click the device.
OR
· Right-click the mouse to display a menu and choose Edit.
The Edit Device page appears:
Edit Device page
4. Click beside Select a user and choose someone from the list that appears.
5. Click beside Line num. and choose which line the person gets assigned.

Chapter 11 Provisioning devices 11-6
© 2013 by Dialexia Communications, Inc. All Rights Reserved
6. Click .A confirmation window appears:
Confirmation message for assigning a user to adevice
7. Click OK.The user gets assigned to the line number you selected.
8. Repeat steps 4 to 7 for each person you want to assign to this device.
Setting up a Device
Finally, you have to set up the device to get provisioned by Dial-Office. When you do that, Dial-Officeautomatically registers the users that you have assigned to the device. Note that Dial-Office provisionsdevices every time they reboot.
You can set up many difference types of devices, including:
· Linksys devices (by Cisco)
· Cisco IP Phones
· Aastra IP Phones
· Polycom IP Phones
· AudioCodes MP 202 adapter
· Grandstream devices
· ATCOM AT-510 IP Phone
· Mediatrix devices

11-7
© 2013 by Dialexia Communications, Inc. All Rights Reserved
Setting up Aastra devices
Dial-Office can provision several different types of Aastra devices. They all follow the same setupprocedure as described in the following steps:
1. Log into the device's web interface as an administrator. By default, Aastra devices have admin asthe administrator username and 22222 as the password.The System Information page appears.
2. In the left pane, under Operation, click Reset.
3. Beside Restore To Factory Defaults, click Restore.The Aastra device returns to its factory default.
4. Restart the device and log back into its web interface as an administrator.
5. In the left pane, under Advanced Settings, click Configuration Server.The configuration server settings appear.

Chapter 11 Provisioning devices 11-8
© 2013 by Dialexia Communications, Inc. All Rights Reserved
Configuration server settings of the Aastra 480i CT
6. In the Download Protocol list, click HTTP.
7. In the HTTP Server box, enter the Dial-Office Server IP address or the DNS name.
8. In the HTTP Path box, enter aastra.
9. Save your new settings and restart the device.
When an Aastra device is provisioned by Dial-Office, the Name field in the Company Informationpage is displayed in the device's phone screen.

11-9
© 2013 by Dialexia Communications, Inc. All Rights Reserved
Setting up the ATCOM AT-510
You can set up the ATCOM AT-510 IP phone to get provisioned by Dial-Office. Follow the stepsbelow:
1. Log into the device's web interface as an administrator. By default, the AT-510 has admin as bothits username and password.The running status appears.
2. In the left pane, click Config Manager.
3. Under Clear Configuration, click Clear.The device returns to its factory default.
4. Restart the device and log back into its web interface.
5. In the left pane, click Update, and then click Auto Provisioning.The auto provisioning settings appear.
ATCOM AT-510 auto provisioning settings
6. In the Server Address box, enter Dial-Office_IP_address/atcom where Dial-Office_IP_addressrepresents your server's IP address (for example, 192.168.0.22/atcom).
7. In the Protocol Type list, click HTTP.
8. In the Update Mode list, click Update after reboot.
9. Click Apply and then restart the device.

Chapter 11 Provisioning devices 11-10
© 2013 by Dialexia Communications, Inc. All Rights Reserved
After restarting, the device gets provisioned by Dial-Office.
Setting up the AudioCodes MP 202
You can set up the AudioCodes MP 202 analog telephone adapter to get provisioned by Dial-Office.Follow the steps below:
1. Log into the device's web interface.The Quick Setup page appears.
2. In the left pane, click Advanced.The advanced options appear.
3. Click MP202 Firmware Upgrade.The firmware upgrade options appear.
AudioCodes MP 202 firmware upgrade options
4. Under Configuration File Update, click Automatically check for new configuration file after thesystem restarts.
5. In the Remote Configuration File URL box, enter http://<Dial-Office_IP_Address>/pr/cfg_<MAC>.For example, if the private IP address of Dial-Office was 192.168.0.163, you would enter http://192.168.0.163/pr/cfg_<MAC>.
Note that in order to save your new configuration, you have to complete the Upgrade From theInternet area, although it has no effect on the device's provisioning. We suggest completing the

11-11
© 2013 by Dialexia Communications, Inc. All Rights Reserved
required fields as shown in the preceding figure. In the URL box, you can enter http://<Dial-Office_IP_Address>/pr/firmware.rmt.
6. Click OK.
7. In the left pane, click Advanced.
8. Click Restart.The device restarts, and after a few minutes, gets provisioned by Dial-Office.
Setting up Cisco devices
Cisco IP phones are provisioned by Dial-Office in conjunction with a TFTP server. Set up a TFTPserver somewhere in your network and ensure that it is always readily accessible.
Cisco IP phones that are provisioned by Dial-Office must have an appropriate firmware version thatis SIP-enabled. Dialexia recommends using the latest firmware versions available from Cisco.
To set up a Cisco device to be provisioned by Dial-Office:
1. Verify that the firmware version installed on your Cisco IP phone is the same as the one specified inthe Cisco configuration files on the Dial-Office server. If it is an older version, then upgrade theCisco IP phone with the firmware version that corresponds with the one specified on the Dial-Officeserver. The latest firmware can be acquired from your Cisco IP phone provider. Alternatively, youcan just change the appropriate field/tag in the configuration files on the Dial-Office server to matchthe firmware version already installed on your Cisco IP phone. The Cisco configuration files arefound in the IAD_Pre_Config folder in the Dial-Office installation path. Use the following table as areference. Remember to exercise utmost care when modifying these configuration files.
Cisco IP phonemodel number
Name ofconfiguration file
Name of field/tag Example offirmware version
7960 Cisco_79(46)0_All.cnf image_versionimage_version:P0S3-08-6-00
7941 SEP-MAC.cnf.xml loadInformation<loadInformation>SIP41.8-0-2SR1S</loadInformation>
2. On the Dial-Office administrator interface click Settings and then click Server Settings.
3. Enter the IP address of the TFTP server in the field TFTP Server Address as shown in thefollowing figure.

Chapter 11 Provisioning devices 11-12
© 2013 by Dialexia Communications, Inc. All Rights Reserved
Make sure that the TFTP server is running and that its IP address is provided by the DHCP server thatis issuing the Cisco phone's IP address.
4. Assign users to the Cisco IP phone from the Devices page. Follow the instructions described inAssigning users to device lines. Do not reboot the phone yet.
5. Click as shown below to create the configuration files that will be used by the Cisco IPphone to register with Dial-Office. You can either generate the configuration files for just oneparticular phone or for all Cisco phones added to the Devices page.

11-13
© 2013 by Dialexia Communications, Inc. All Rights Reserved
Generating configuration files for Cisco devices
6. Reboot the Cisco IP phone.
Whenever you change any parameters that belong to a user, such as the user’s extension, VoIPpassword, etc., then you must regenerate the configuration file for the Cisco IP phone assigned tothat user. Then reboot the phone.
Whenever you change the Dial-Office system parameters mentioned below, you must regeneratethe configuration files for all Cisco phones and then reboot each one of them:
· Host IP/Domain
· Call Controller port
· Code representing the Read Voicemail service (under the Telephony Services tab)
· DSCP for Media (under the QoS tab)

Chapter 11 Provisioning devices 11-14
© 2013 by Dialexia Communications, Inc. All Rights Reserved
Setting up Grandstream devices
Dial-Office can provision several different types of Grandstream devices. They all follow the samesetup procedure.
To set up a Grandstream device to get provisioned by Dial-Office:
1. Log into the device's web interface as an administrator. Grandstream devices have admin as theirdefault administrator password.The Advanced Settings page appears.
2. Scroll down to the Firmware Upgrade and Provisioning area.
Firmware Upgrade and Provisioning area of the Advanced Settings page of a Grandstream device
3. In both the Firmware Server Path and Config Server Path boxes, enter Dial-Office_IP_address/gs where Dial-Office_IP_address represents your server's IP address (for example, 192.168.0.159/gs)
4. Scroll down to the bottom of the page and click Update.
5. Click Reboot.The device restarts, and after a few minutes, gets provisioned by Dial-Office.

11-15
© 2013 by Dialexia Communications, Inc. All Rights Reserved
Setting up Linksys devices
Dial-Office can provision four different types of Linksys devices. The table below shows which of thesetypes your PBX supports and how many lines your PBX can provision for each device.
Supported Linksys devices and how many lines Dial-Office can provision
Supported device How many lines Dial-Officecan provision
Additional information
Linksys 2102 2
Dial-Office provisions this devicewith two VoIP lines, althoughone of them can also function asa fax line.
Linksys 3102 1 This device has a second line,which you can configure fromthe device's web interface.
Linksys SPA942 4 NA
Linksys PAP2 2 NA
To set up a Linksys device to get provisioned by Dial-Office:
1. From the device's web interface, log in as an administrator.
2. Switch to the advanced view.
3. Click Provisioning.The provisioning options appear.

Chapter 11 Provisioning devices 11-16
© 2013 by Dialexia Communications, Inc. All Rights Reserved
4. Beside Provision Enable, click Yes.
5. In the Profile Rule box, enter http://Dial-Office_IP_address/prov/profile.xml?action=pap2&mac=$MAU. For example,http://192.168.0.136/prov/profile.xml?action=pap2&mac=$MAU.
6. Save your new settings and restart the device.The device restarts, and after a few minutes, gets provisioned by Dial-Office.
Setting up the Mediatrix 2102
You can set up the Mediatrix 2102 to get provisioned by Dial-Office in two steps. The first stepinvolves reverting the Mediatrix 2102 back to its default factory settings. The second step requires youto specify the configuration file source.
Reverting to the default factory settings
Before attempting to configure the Mediatrix 2102, we recommend that you to restore its factorysettings. To revert the Mediatrix 2102 back to its factory settings:
1. Power the device off by removing its power supply.

11-17
© 2013 by Dialexia Communications, Inc. All Rights Reserved
2. Insert an unbent paper clip into the Default Settings hole at the back of the device. Whiledepressing the button inside the Default Settings hole, power up the device.
Do not stop depressing the button until all four LEDs stop blinking and remain lit.
3. Remove the paper clip.The device restarts and reverts back to its factory default settings.
Specifying the configuration file source
After restoring the device's factory settings, you must modify its configuration file settings. To modifythe configuration file settings of the Mediatrix 2102 so that it gets provisioned by Dial-Office:
1. Log into the device's web interface as the root administrator. You can access the rootadministrator's web interface through the port 8080 and with the username root and password 5678.Some general information about the device appears.
2. Click the Management menu, and then click Configuration File.The configuration file settings appear.

Chapter 11 Provisioning devices 11-18
© 2013 by Dialexia Communications, Inc. All Rights Reserved
Mediatrix 2102 configuration file settings
3. Under General, beside Configuration File Server Source, click Static.
4. In the Configuration File Server Host box, enter the IP address of your Dial-Office server.

11-19
© 2013 by Dialexia Communications, Inc. All Rights Reserved
5. In the Configuration File Server Port box, enter 80.
6. Beside Configuration File Transfer Protocol, click HTTP.
7. In the Configuration File Path box, enter med/2102.
8. In the Specific Configuration File Name box, enter %mac%.
9. Click Submit.The device saves the new configuration file settings.
10.On the Management menu, click Reboot.The Reboot page appears.
11.Click Reboot.The device reboots, and after a few minutes, gets provisioned by Dial-Office.
Setting up Polycom devices
You can set up several types of Polycom IP phones to get automatically provisioned by Dial-Office.They all follow the same setup procedure.
To set up a Polycom IP phone to get provisioned by Dial-Office:
1. On the phone, press the Menu key.
2. Using the phone's arrow keys, move through the menu options and choose Settings.
3. Choose Advanced.
4. Enter the phone's password. Polycom phones usually come with a default password of 456.
5. Choose Admin Settings.
6. Choose Network Configuration.
7. Using the phone's arrow keys, move through the menu options and choose Server Menu.
8. Beside Server Type, choose HTTP.
9. Beside Server Address, type the Dial-Office IP address followed by /polycom (for example,192.168.0.136/polycom).
10.Press Exit a couple of times until you have the option to save your current configuration. ChooseSave Config.
11.Reboot the phone.

Chapter 11 Provisioning devices 11-20
© 2013 by Dialexia Communications, Inc. All Rights Reserved
Deleting a device
The steps in this section delete the device from the system. Any users still assigned to the devicewill no longer have service, so make sure you move users to other devices before deleting a device.
To delete a device from the Phones/Adapaters page:
1. Expand Devices and then click Phones/Adapaters.The Phones/Adapaters page, containing any existing entries, appears.
Devices page
2. Position the cursor on the device you want to delete.The whole row gets highlighted.
3. Right-click the mouse to display a menu.
Right-clicking displays a menu
4. Click Delete.A confirmation window appears:

11-21
© 2013 by Dialexia Communications, Inc. All Rights Reserved
Confirmation window for deleting a device
5. If you are sure you want to delete this device, click OK.

Chapter
12

12-2
© 2013 by Dialexia Communications, Inc. All Rights Reserved
Chapter 12 Working with conferences (license enabled)
Overview
Before you start setting up conference calls, you must fill out:
- Your company's information as described in CHAPTER 3. Also, make sure you have set up theSMTP server settings.
The Conference module is license enabled. To enquire about this module, contact us either bye-mail at [email protected] or by phone at 1-514-693-8500 extension 300.
Through Dial-Office's Conference module, users can participate in ongoing conference calls andspeak with multiple people at the same time. You can initiate conference calls and invite internal andexternal users to them. You have the choice of creating permanent conference calls or conferencecalls with a fixed duration.
Users can also initiate conference calls if you give them permission to do so. To learn how to giveusers permission to create conference calls, see Completing the fields on the General tab.
Creating a conference call
From the Conferences page, you can create permanent conference calls as well as conference callswith a fixed duration. When you create a new conference call, Dial-Office automatically sends e-mailinvitations to the conference attendees.
To set up a conference call:
1. Expand Conference and click Conferences.The Conferences page appears.
Conferences page
2. Click .The Add Conference page appears.

Chapter 12 Working with conferences (license enabled) 12-3
© 2013 by Dialexia Communications, Inc. All Rights Reserved
Add Conference page
3. Use the table below to help you fill out the applicable fields.
Field Name Description
Description Enter a short description of the conference call. This description

12-4
© 2013 by Dialexia Communications, Inc. All Rights Reserved
Field Name Description
appears in the e-mail invitation sent to the conference attendees.
Title Enter a title for the conference call. The title can contain both lettersand numbers but not spaces or special characters.
Language Select the conference call's language. The IVR uses this languagewith all conference attendees.
Access Number Select an access number only if you intend to have external attendees. External attendees can dial this access number to join theconference call. You can use the same access number for multipleconference calls.
To make access numbers available for selection, add them to the listof conference numbers in the Conference tab of the Server Settingspage.
Organizer Email Enter the Email of the conference Organiser. This Email is used fornotification as the Sender.
By default, Administrator Email is used in this field.
Permanent Conference Select this check box if you want the conference call to remain onlineindefinitely.
Duration (minutes) Enter the duration, in minutes, for non-permanent conference calls.
Start Date and Time Enter the start date and time for non-permanent conference calls.
Invite to Conference Invite users to the conference call. You can invite internal users orexternal ones. Either way, you must enter a user's name and e-mailaddress, because when you create the conference call, Dial-Officesends an e-mail message to each user with instructions on how tojoin the conference call.
Advanced Options
Record Conference
Select this check box to record the conference call. To listen torecorded conference calls, open the Recorded Calls page.

Chapter 12 Working with conferences (license enabled) 12-5
© 2013 by Dialexia Communications, Inc. All Rights Reserved
Field Name Description
Recording of permanent conference calls begins when thefirst user joins in and ends when the last user leaves.
Greeting Audio File Select one greeting audio file among the list previously uploaded inMedia Library. This greeting will be played when we call theconference access number.
Out of box, Dial-Office offer two default choices :
<Default> : play default greeting Audio File
<None> : no greeting file will be played
As internal conference only Default choice is allowed.
Max. Announcements During the conference call, the IVR makes an announcement everytime a user joins or leaves the conference call, and all attendeeshear this announcement. Enter the maximum number ofannouncements you want the IVR to make during the conferencecall. Or enter 0 to disable announcements.
Warning Time (seconds) The IVR can make an announcement warning users that theduration of the conference call has neared its end. Enter how muchtime, in seconds, this warning message sounds before the end of theconference call. Or enter 0 to disable this warning message.
4. Once you have completed all the required fields, click .The conference call gets created and the attendees receive their invitations by e-mail.
You can also perform other operations in the Conferences page.
· To update a scheduled or online conference call, position the cursor on the conference ID, right-click
the mouse to display a menu, and click Edit. Make the necessary changes, and click .
Note that some fields will be disabled when the conference status is Online like: title, language,record,...
· To cancel a scheduled or online conference call, position the cursor on the conference ID, right-clickthe mouse to display a menu, and click Cancel.
When you update or cancel a conference call, Dial-Office automatically sends an e-mail notifying

12-6
© 2013 by Dialexia Communications, Inc. All Rights Reserved
the attendees of the changes.
Joining a conference call
When you create a new conference call, or update an existing one, Dial-Office automatically sends e-mail notifications to the conference attendees. An e-mail notification contains information on theconference call, such as its date, duration, and access number. In addition, the e-mail notificationcontains a conference PIN code which the recipient needs to join the conference call.
An attendee can join an online conference call using one of the following methods:
· Dialing *88 from his or her phone extension and then entering the conference PIN code.
· Calling the conference call's access number from an external phone and then entering theconference PIN code.
· Calling the IVR, pressing the Conference Bridge event key, and then entering the conference PINcode. To learn how to add the Conference Bridge event key to your company's auto attendantsettings, see Configuring menus.
Displaying Online Users
The Online Users page shows all internal and external online attendees connected to conferences.
To display the list of online users:
Expand Conference and click Online Users.The Conference History page appears, showing all the completed and canceled conference calls.
Conference History
Displaying completed and canceled conference calls
The Conference History page shows completed conference calls as well as canceled ones.
To display the list of completed and canceled conference calls:
1. Expand Conference and click Conference History..The Conference History page appears, showing all the completed and canceled conference calls.

Chapter 12 Working with conferences (license enabled) 12-7
© 2013 by Dialexia Communications, Inc. All Rights Reserved
Conference History
2. To delete an entry, position the cursor on the conference ID, right-click the mouse to display amenu, and click Delete.

Chapter
13

Chapter 13 Working with Media Library 13-2
© 2013 by Dialexia Communications, Inc. All Rights Reserved
Chapter 13 Working with Media Library
Overview
The Dial-Office administrator interface gives you the ability to manage audio files needed for somemodules in one page. In this section, you learn how to upload, play and delete these audio files.
What is a Media Library?
Media Library is unique place in Dial-Office where you can manage all audio files and greetings suchas IVR greetings, IVR prompts, conference greetings and Music on Hold.
From Media Library Explorer, you can:
- List all uploaded audio files and their corresponding information details
- Upload a new audio File
- Delete an audio file
- Play an audio file
Manage IVR Audio Files
When users call the auto attendant, they hear the default greeting message followed by the menuactions. You can, however, upload customized greeting messages and menu actions prompts. In fact,each IVR can have a customized greeting message. Moreover, each menu action can have acustomized prompt which we called IVR Prompt.
We explain how to upload customized IVR greetings or prompts in the following steps:

13-3
© 2013 by Dialexia Communications, Inc. All Rights Reserved
1. In the Media Library page, go to Media Explorer and click the icon beside IVR Greetings or IVRPrompts folder to expand it
.
2. Expand the IVR Name and click on the language media folder . A list of files, if exist, will beshown in the right window named ‘Audio Files’. For example, if you want to upload a Greeting IVRfor Default IVR and English as language, you have to select ‘English’ media Folder according to thescreenshot bellow.
3. The Audio Files Window will list all audio files that contain this folder with their name, type, size andduration.

Chapter 13 Working with Media Library 13-4
© 2013 by Dialexia Communications, Inc. All Rights Reserved
4. Now you can upload a new audio file by clicking on button. Navigate to the customized
audio file and click . The customized greeting file gets uploaded to the specified folder.Note that the audio file uploaded will not be assigned to the IVR, it will just be saved in the library soas to be selected from Edit IVR page.
Record conference greeting messages in .wav format with the following specification:
qCCIT u-Law 8.000 kHz, 8-Bit, mono format.
5. Repeat the previous steps for other IVR types, names and languages.
Remember that the previous steps are the same for both IVR Greetings and IVR Prompts.
6. To play an existing customized audio file, from the audio files list click button beside the file youwant to play. The default .wav player of your computer opens and plays the audio file.
7. To delete an existing customized audio file, from the audio files list click its corresponding button.The audio file gets deleted if it is not assigned.
When using a multilingual auto attendant, you must record and upload customized greetingmessages and menu prompts for both languages and not just one.
Manage Conference Greetings
When users call the conference access number, they hear the default greeting message. As the IVRgreeting, you can customize it by uploading a new conference greeting and assign it to the conference.
To upload customized conference greeting:

13-5
© 2013 by Dialexia Communications, Inc. All Rights Reserved
1. In the Media Library page, go to Media Explorer and click the icon beside Conference Greetingsto expand it then click on the language media folder . The Audio Files window will list all audiofiles that contain this folder with their name, type, size and duration.
2. Now you can upload a new conference greeting file by clicking on button. Navigate to
the customized audio file and click . The customized greeting file gets uploaded to thespecified folder.
Note that the audio file uploaded will not be automatically assigned to the conference; it will just besaved in the library so as to be selected from Edit Conference page.
Record conference greeting messages in .wav format with the following specification:
qCCIT u-Law 8.000 kHz, 8-Bit, mono format.
3. Repeat the previous steps for other languages.

Chapter 13 Working with Media Library 13-6
© 2013 by Dialexia Communications, Inc. All Rights Reserved
1. To play an existing customized audio file, from the audio files list click button beside the file youwant to play. The default .wav player of your computer opens and plays the audio file.
2. To delete an existing customized greeting, from the audio files list click its corresponding button.The customized greeting gets deleted if it is not assigned.
Manage Music on Hold
When users call the conference access number, they hear the default greeting message. As the IVRgreeting, you can customize it by uploading a new conference greeting and assign it to the conference.
Out of box, Dial-Office System offers an undeletable default Music on Hold, named ‘default’.
To upload customized conference greeting:
When a user puts someone on hold, the latter hears music on hold being played by the IVR. As part ofa tenant's configuration, you can select one of the uploaded MOH audio files. When a user assigned tothe tenant puts someone on hold, the latter hears the tenant's customized MOH audio file.
To populate the MOH audio lists, you have to upload a customized MOH file by following these steps :
1. In the Media Library page page, click the icon beside the Music On Hold.

13-7
© 2013 by Dialexia Communications, Inc. All Rights Reserved
2. Click on button. Navigate to the customized Music On Hold file and click . TheMOH file gets uploaded to the specified folder.
Note that the audio file uploaded will not be assigned to any tenant; it will just be saved in the library soas to be selected from Edit Tenant page.
Record conference greeting messages in .wav format with the following specification:
qCCIT u-Law 8.000 kHz, 8-Bit, mono format.
3. Repeat the previous steps for other MOH files.
4. To play an existing MOH file, from the audio files list click button beside the file you want to play.The default .wav player of your computer opens and plays the audio file.
5. To delete an existing MOH file, from the audio files list click its corresponding button. Thecustomized greeting gets permanently deleted if it is not assigned.

Chapter
14

14-2
© 2013 by Dialexia Communications, Inc. All Rights Reserved
Chapter 14 Monitoring Calls
Overview
The Dial-Office administrator interface gives you the ability to monitor your users and the calls theymake. In this section, you learn how to monitor registered users, unregister them, monitor currentcalls and call records, play back recorded calls, and monitor SIP logs.
Monitoring registered users
The Registered Users page lists users who have been completely set up to use the Dial-Officesystem. This page is especially useful when:
· You have just set up a new user. If the user appears on this page, their phone is ready to use.
· A user calls to report a problem with his or her phone. If the user appears on this page, the problemis likely with the phone and not the network.
· You want to know how many users are registered.
To open the Registered Users page:
· Expand Call Monitoring and then click Registered Users.A list of all registered users appear.
List of registered users
Use the fields beside 'Filter by' to search for the person you want. For details, see Searching a listin CHAPTER 1.
Unregistering users
Unregistering a user makes their telephone service temporarily unavailable. You would unregister auser if you need to change the IP address assigned to their device. You would then reboot the user’sdevice so that it reregisters with its new IP address.

Chapter 14 Monitoring Calls 14-3
© 2013 by Dialexia Communications, Inc. All Rights Reserved
To unregister a user:
1. Expand Call Monitoring and then click Registered Users.A list of all registered users appear.
List of registered users
2. Position the cursor on the name of the user to unregister.The whole row is highlighted when a group is selected.
Use the 'Filter by' fields to search for the person you want. For details, see Searching a list inCHAPTER 1.
3. Right-click the mouse to display a menu.
Right-clicking a line displays a menu
4. Click Unregister.A confirmation window appears.
Confirmation window for unregistering a user
5. If you are sure you want to unregister the user, click OK.
Monitoring current calls
The Current Calls page lists all calls in progress. This page is especially useful when:

14-4
© 2013 by Dialexia Communications, Inc. All Rights Reserved
· You have set up a new user. You can call the new user’s extension and check whether the callappears in the list.
· You have changed the Server Settings. You can register a phone and make a few calls to checkwhether they appear in this list.
· You need to restart the system but don’t want to cut off any calls in progress. You would normally goto this page and wait until no users are making calls before restarting the whole system.
To monitor current calls:
· Expand Call Monitoring and then click Current Calls.A list of all current calls appear.
List of current calls
Use the 'Filter by' fields to search for the person you want. For details, see Searching a list inCHAPTER 1.
Monitoring call records
The Call Records page lists the date and time of all calls, the caller, the number called, the duration ofthe call, and the reason the call was disconnected. This page is especially useful when:
· You want to check for disconnected calls when investigating a problem.
· You want to check how long a person spent talking to a particular number.
· You want to export the call records to a file for further processing and analysis. (Some companiesfind this useful for customer billing or service level review, or for outsourcing to third party companieswho convert the data into useful reports.)
To monitor call records:
· Expand Call Monitoring and then click Call Records.A list of all call records appear.

Chapter 14 Monitoring Calls 14-5
© 2013 by Dialexia Communications, Inc. All Rights Reserved
List of call records
Use the 'Filter by' fields to search for the person you want. For details, see Searching a list inCHAPTER 1.
Deleting call records
You should delete call records from time to time to release space in the system. You can choose adate and delete all records prior to that date. The records are deleted permanently. We recommendthat you perform a database backup before deleting records. (See Backing up the database inCHAPTER 14 for details.)
To delete call records:
1. Expand Monitoring and then click Call Records.A list of all call records appear.

14-6
© 2013 by Dialexia Communications, Inc. All Rights Reserved
2. Click the Delete logs icon, circled in the figure below.
Location of Delete Logs icon
The Delete Call Records page appears.
3. Type the date of the earliest record you want to keep OR click the calendar icon and choose a datefrom the calendar.

Chapter 14 Monitoring Calls 14-7
© 2013 by Dialexia Communications, Inc. All Rights Reserved
4. Click . A confirmation window appears.
5. Click OK.The selected records are permanently deleted and cannot be recovered.
Exporting call records
In addition to monitoring call records and deleting them, you can also export them in CSV (CommaSeparated Values) format. To export call records:
1. Expand Call Monitoring and then click Call Records.A list of all call records appear.
Use the 'Filter by' fields to search for the call records you want. For details, see Searching a list inCHAPTER 1.
2. Click the Export Call Records icon, circled in the figure below.
Location of Export Call Records icon
3. Chose call records filter options

14-8
© 2013 by Dialexia Communications, Inc. All Rights Reserved
A new window opens with the list of call records exported in CSV (Comma Separated Values) format.Here is an example of an exported list of call records:
Exported call records - an example
4. If you want to keep the data, you can use your browser to save the page, or copy the records andpaste them into a file.
Playing back recorded calls
You can listen to recorded user calls, recorded group calls, and recorded conference calls from the Recorded Calls page. To listen to recorded calls:
1. Expand Call Monitoring and then click Recorded Calls.A list of all the recorded user and group calls appear. The list shows which users and groups therecorded calls belong to, as well as their recorded dates, the callers and callees involved, the call

Chapter 14 Monitoring Calls 14-9
© 2013 by Dialexia Communications, Inc. All Rights Reserved
types and the call duration.
Recorded user calls
Recorded user calls
2. To listen to a particular call, position the cursor on the call's date, and click the mouse button once.Your computer's default WAV player starts and plays back the recorded call.
3. To delete a recorded call, use one of the following three ways:
a. Select the check box for all the users, and click . All the recorded calls getdeleted.
b. Select the check box that corresponds to a particular user, and click . Allrecorded calls of that user get deleted.
c. Select individual recorded calls, and click . Only the selected recorded callsget deleted.

14-10
© 2013 by Dialexia Communications, Inc. All Rights Reserved
4. Beside Recorded Conversations for, select Conference Calls.A list of all the recorded conference calls appear. The list shows who initiated the recordedconference calls, as well as their recorded dates, titles and durations.
Recorded conference calls
5. To listen to a particular call, position the cursor on the call's date, and click the mouse button once.Your computer's default WAV player starts and plays back the recorded call.
6. To delete a recorded conference call, use one of the three ways described in step 3.
Monitoring logs
The Logs page lists the details of SIP events, including the time the event occurred, whether the eventwas generated by Call Controller or IVR server, and the destination number of calls that did not gothrough. Error messages appear in the Event Description column when something is wrong. (e.g.Registration failed: No response)
To monitor SIP logs:
· Expand Call Monitoring and then click Logs.A list of all logs appear.
List of SIP logs
This page lists SIP events, as well as the time they occurred. Events can be generated by CallController, IVR server or by calls that had problems going through. Calls that do not go through couldbe due to having an invalid destination number format, an invalid SIP password, or an invalid PIN.Their call IDs can be displayed by right-clicking anywhere on the column headings and checking CallID.

Chapter 14 Monitoring Calls 14-11
© 2013 by Dialexia Communications, Inc. All Rights Reserved
Use the 'Filter by' fields to search for the person you want. For details, see Searching a list inCHAPTER 1.
Deleting log records
You should delete log records from time to time to release space in the system. You can choose adate and delete all records prior to that date. The records are deleted permanently. We recommendthat you perform a database backup before deleting records. (See Backing up the database inCHAPTER 14 for details.)
To delete logs:
1. Expand Call Monitoring and then click Logs.A list of all logs appear.
2. Click the Delete Logs icon, circled in the next figure.
Location of Delete Logs icon
The Delete Logs page appears.
Selecting a date to delete SIP logs
3. Type the date of the earliest log you want to keep OR click the calendar icon and choose a datefrom the calendar.
4. Click .A confirmation window appears.
5. Click OK.The selected logs are permanently deleted.

Chapter
15

Chapter 15 Ongoing maintenance 15-2
© 2013 by Dialexia Communications, Inc. All Rights Reserved
Chapter 15 Ongoing maintenance
Overview
This chapter describes what you need to do to maintain the Dial-Office system. Tasks you should doinclude:
· Backing up the database
· Starting and stopping services
· Restarting Dial-Office
· Checking the version of your Dial-Office modules
· Ordering additional licenses
· Installing an upgrade
Backing up the database
This section describes how to make a backup of your Dial-Office database. The backup will be storedin this path:
[Your install path]\Dialexia\Dial-Office\database
Note that this feature is only available for the Windows version of Dial-Office and is not available forthe Linux version.
1. Expand Maintenance and then click Database Backup as shown below.The Database Backup page appears.

15-3
© 2013 by Dialexia Communications, Inc. All Rights Reserved
Database backup page
2. If required, change the name of the backup file. (The default name contains the date and time of thebackup.)
3. Click .A message appears while the backup is being processed and then a confirmation messageappears.
4. Click OK.
Starting and stopping services
Through the Maintenance page, you can start or stop the Dial-Office services one by one. By default,when you have just started up the Dial-Office server, all the services appear running.
Start and stop a service if:
· It stops functioning as expected.
· You update its settings, such as with Call Controller and Alerter.

Chapter 15 Ongoing maintenance 15-4
© 2013 by Dialexia Communications, Inc. All Rights Reserved
· You do not intend to use it (that way you reduce system overload).
To start or stop a service:
1. Expand Maintenance and then click Server Maintenance.The Server Maintenance page appears.
Maintenance page
2. Use the or buttons to start or stop a service, respectively.
Restarting Dial-Office
Also through the Maintenance page, you can restart the Dial-Office server. You need to restartDial-Office if you:
· Change the general server settings or the SMTP server settings.
· Change the Call Controller settings.
· Upgrade Dial-Office.
To restart the Dial-Office server:
1. Expand Maintenance and then click Server Maintenance.The Server Maintenance page appears.
2. Scroll down to Restart System.

15-5
© 2013 by Dialexia Communications, Inc. All Rights Reserved
Restarting Dial-Office
3. Type an explanation for why you are restarting the system.
4. Click .A confirmation message appears.
Confirmation window for restarting the system
5. If you are sure you want to restart the system, click OK.Another message appears indicating the the system has begun to restart.
6. Click OK.
Checking the version of your Dial-Office modules
The Product Information tab on the Edit Server page enables you to check the version of theDial-Office modules such as Controller, IVR, Voicemail, Web and so on.
1. Expand Settings and then click Server Settings.

Chapter 15 Ongoing maintenance 15-6
© 2013 by Dialexia Communications, Inc. All Rights Reserved
2. Click the tab to expand it as shown below.
Edit Server page with Database tab expanded
Ordering additional licenses
The License Information tab on the Edit Server page shows information about the license under whichDial-Office is running. The duration of the license is shown, as well as the maximum number ofsessions and registrations allowed. If the license supports the conference module, information aboutits limitations also appears. From the License Information tab, you can request an upgrade or renewthe Dial-Office license.
The table below describes the main fields of the License Information tab.
Descriptions of the main fields of the License Information tab
Field Description
Maximum Sessions The maximum number of concurrent calls allowed by the system.
MaximumRegistrations
The maximum number of registered users allowed on the system.
Conference Enabled Indicates if the conference module is enabled or not.
MaximumConferences
The maximum number of ongoing conference calls allowed by thesystem.
Maximum Participants The maximum number of attendees for all conference calls

15-7
© 2013 by Dialexia Communications, Inc. All Rights Reserved
Field Description
combined.
Maximum Tenant The maximum number of tenants allowed by the system.
To display the Dial-Office license information:
1. Expand Settings and then click Server Settings.
2. Click the icon beside the License Information tab to expand it.Information about your license is shown.
Edit Server page with License Information tab expanded
3. To request an upgrade or renew the license of Dial-Office, click Request for upgrade.The system launches the default mail client so you can compose an e-mail message to Dialexiarequesting an upgrade to the license as shown below.

Chapter 15 Ongoing maintenance 15-8
© 2013 by Dialexia Communications, Inc. All Rights Reserved
Email to request additional sessions
4. Type your name, the MAC address of the Dial-Office server, and the number of sessions to beadded to the license (the Product Name and Product Key are automatically filled in).
5. Click Send to send the e-mail message to Dialexia.
Installing an upgrade
When Dialexia receives your request for an upgrade, we send you a License file and a Signature file,which you need to save on your system. Then you will use the License Upgrade tab on the EditServer tab to upload the files and make your upgrade go into effect.
1. Expand Settings and then click Server Settings.
2. Click the tab to expand it as shown below.
Edit Server page with License Upgrade tab expanded
3. Beside File License, click and navigate to the location where the upgraded License file(license.xml) is stored.
4. Beside Signature File, click and navigate to the location where the upgraded Signaturefile (sig.dat) is stored.
5. Click .
6. Restart your Dial-Office server for the upgrade to take effect.

Dial-Office Administrator GuideI-1
© 2013 by Dialexia Communications, Inc. All Rights Reserved
Index- A -Aastra 11-7
Access from other phones 7-8
Access number 12-3, 12-4, 12-5, 12-6
Administrator extension and PIN 2-13
Administrator login settings 10-7
Administrator role 10-2
After hours 3-14
Aliases
Group aliases 8-3
In the Numbers Pool 6-3
User aliases 7-6
Analog Telephone Adapter (ATA) 7-2, 11-2
Announcements in a conference 12-4
ATCOM AT-510 11-9
AudioCodes MP 202 11-10
Authentication mode 5-6
Auto attendant
background 3-2
setup 3-10
Auto attendant media file format 13-4, 13-5, 13-7
Auto attendent options 3-15
- B -Billing 14-4
BLF directory 7-8, 7-14
Block caller ID 7-8
Branch office 4-2, 5-3
Browsing the Dial-Office interface 1-7
- C -Call Detailed Records (CDRs) 15-5
Call duration 14-4
Call records
deleting 14-5
exporting 14-7
monitoring 14-4
Cisco 11-11
Columns (hiding and redisplaying) 1-12
Conference 3-15
allowing user to create 7-8
code 2-19
creating 12-2
history 12-6
how to join 12-6
number 2-19
overview 12-2
tab (for configuring) 2-18
Connection Logs page 10-9
CSV 7-19, 10-10, 14-7
Current calls page 13-6, 14-3
- D -Daily overnight periods 6-7
Database version 15-5
Default user settings 7-17
Devices
automatic configuration (provisioning) 11-2
Devices, example 1-5
Dial-Alerter 1-6
Dial-Conference 1-6
Dial-Manager 1-6
Dial-Manager configuration 2-8, 2-11, 2-17
Dial-Manager From Email address 2-8, 2-11, 2-17
Dial-Manager IP 2-5
Dial-Manager tab 2-7, 2-10, 2-17
Dial-Media 1-6
Dial-Media general settings 2-13
Dial-Media services and properties 2-19
Dial-Media tab 2-12
Dial-Office CD 1-13
Dial-Office Installation Manual 1-13
Dial-Office services 1-6
Dial-Paging 1-6
Dial-Relay 1-6
Dial-Web 1-6
Digit Filters
Adding 4-8
Assignment at Gateway/Domain level (incoming) 5-6
Assignment at Gateway/Domain level (outgoing) 5-7
Assignment at user level 7-13
Background with examples 4-2
Deleting 4-14
Examples 1-5
Expressions 4-12
Index I-2
© 2013 by Dialexia Communications, Inc. All Rights Reserved
Direct Inward Dialing (DID) 7-6
Disconnect cause 14-4
Display Name 3-6, 7-7
Display Number 3-6, 7-7
Domains
Authentication mode 5-6
Configuration 5-5
Definition 5-2
Examples 5-3
Inbound filter 5-6
ITSP 5-7
Outbound filter 5-7
Process moved temporarily 5-7
Server registration 5-7
Trusted IPs 5-6
- E -E-mail address of a user 7-13
E-mail invitation 12-3, 12-4, 12-5
E-mail notification messages 2-14
Event Description column 14-10
Exporting
call records 14-7
users 7-19
web connection logs 10-10
Extension
Of a Group 8-3
Of a User 7-6
- F -Filter by 1-9
Fixed periods 6-7
Forking 8-4
Format of conference greetings 13-4, 13-5, 13-7
Forwarding 6-5
- G -Gateway IP address 5-5
Gateway name 5-5
Gateways
Authentication mode 5-6
Configuration 5-5
Definition 5-2
Examples 5-3
Inbound filter 5-6
ITSP 5-7
Outbound filter 5-7
Process moved temporarily 5-7
Trusted IPs 5-6
General tab 2-4
Grandstream 11-14
Groups
Adding 8-2, 9-2, 9-4, 9-5
Adding members to 7-15, 8-6
Background 8-2, 9-2
Deleting 8-8, 9-4
Inactive member 8-7
Types 8-4
- H -Hidden records 1-11
Holidays 3-7, 3-14
Hunt by priority 8-4
Hunt by round robin 8-4
- I -Inbound filter 5-6
Incoming Routing 5-6
Initial setup 1-2
Installation Manual 1-13
Interactive Voice Response (IVR) system 1-6
Internet Telephony Service Providers (ITSP) 5-2,5-7
IP authentication 5-6
IP-Phone 7-2, 11-2
Iteration 3-15
IVR language
of a tenant 3-12
of a user 7-6
IVR media file format 13-4, 13-5, 13-7
- L -Language
of a tenant 3-12
of a user 7-6
Leave voicemail
service 2-23
through auto attendant 3-15

Dial-Office Administrator GuideI-3
© 2013 by Dialexia Communications, Inc. All Rights Reserved
License file 15-8
License Information 15-6
License Upgrade page 15-8
Request for upgrade 15-7
Linksys devices 11-15
- M -MAC address 11-4
Mail server address 2-6
Main alias 2-13
Main menu
setting up 3-14
Maintenance
Ongoing 15-2
Only as required 1-6
Maintenance page 15-3, 15-4
Make external call 7-8
Managed time ranges 3-7, 3-14
manager administrator 10-8
Mediatrix 2102 11-16
Menu 3-14
Music on hold
enabling 2-8, 2-11, 2-17
- N -No answer URL 8-3
Non-unified voice mail type 7-13
Numbers Pool 6-2
- O -Office hours 3-7, 3-14
Operator 3-15
Outbound filter 5-7
Outgoing Routing 5-7
Overhead paging 2-20
- P -Paging 8-4
Paging through a list 1-9
Park call 2-20
PBX User role 10-2
Permissions
Adding 4-3
Assigning 4-5, 7-10
Background with examples 4-2
Deleting 4-7
PIN Authentication 4-5, 7-10
Pick up parked call 2-20
PIN Authentication 4-5, 7-10
PIN Code 7-6
PIN code of a conference 12-6
Playback method 7-13
Polycom 11-19
Presence Monitoring 7-14
Primary Domain/IP 2-5
Process moved temporarily 5-7
Provisioning 11-2
Aastra 11-7
ATCOM AT-510 11-9
AudioCodes MP 202 11-10
Cisco 11-11
Grandstream 11-14
Linksys devices 11-15
Mediatrix 2102 11-16
Polycom 11-19
Proxy server 1-6
Proxy Server settings 2-7, 2-10, 2-17
Public Switched Telephone Network (PSTN) 5-2
- Q -Quality of Service 2-24
- R -Read voicemail
service 2-23
through auto attendant 3-15
Realm 2-8, 2-11, 2-17
Record conversation
For conferences 12-4
For groups 8-3
For users 7-8
Through the IVR 2-20
Recorded calls folder
for conference calls 2-19
Recorded calls, playback 14-8
Registered users 13-2, 14-2
Registrations, maximum 15-6
Related icons 1-8

Index I-4
© 2013 by Dialexia Communications, Inc. All Rights Reserved
Replay main menu 3-15
Restarting services 15-3
Restarting system (manually) 15-4
Roles 10-2
Routing profile 7-10
- S -Scrolling through a list 1-9
Searching a list 1-9
Example 1-10
Hidden records 1-11
Searching for a record 1-9
Server registration 5-7
Server settings 2-2
Conference tab 2-18
Dial-Manager tab 2-7, 2-10, 2-17
Dial-Media tab 2-12
General tab 2-4
Proxy server settings 2-7, 2-10, 2-17
QoS tab 2-24
Services of Dial-Media 2-19
Services of Dial-Office 1-6
Sessions, maximum 15-6
Signature file 15-8
SIP authentication 5-6
SIP events 14-10
SIP logs
deleting 14-11
monitoring 14-10
SIP password 7-6
SMTP server settings 2-6
Softphone 7-2
Sorting a list 1-11
Spelling mode 3-15
SSL 2-6
- T -T1 connection 5-3
Tasks
Only as required 1-3
Regular and from time to time 15-2
Teleworkers 1-6
Tenant
background 3-2
creating additional ones 3-9
language 3-12
menus 3-14
setup 3-2
TFTP Server Address 2-5
Time ranges 3-14
Time zone 3-7
Transfer Announcement 2-19
Trusted IPs 5-6
- U -Unified voice mail type 7-13
User ID 7-6
User specific filter 7-13
Users
Adding 7-2
Background 7-2
Default settings 7-17
Deleting 7-18
Everyday tasks 1-3
Exporting 7-19
More Everyday tasks 7-21, 7-22
Users to Watch 7-14
- V -Vendor 6-3
Voicemail
Configuration 7-13
Leave voicemail 2-23
Read voicemail 2-23
Types 7-13
VoIP NAT/Firewall recommendations 1-13
VoIP password 7-6
- W -Warning time 12-4
Watchdog 1-6
Web interface 1-6, 10-2
Web Password 7-6, 10-4
Web User name 7-6, 10-4
Web users 10-9
Weekend 3-14
Weekly periods 6-7