how-to #10: add bluetooth le control to rolling robot #10 add bluetooth le control to rolling robot...
TRANSCRIPT

How-To #10 Add Bluetooth LE Control to Rolling Robot | 281
HT
The robot built in Lesson 15 and operated with an infrared remote control in Lesson 18 can be up-graded for control with a smartphone running either Apple's IOS or Google's Android operating systems. This upgrade takes advantage of Bluetooth Low Energy (Bluetooth LE), a 2010 addition to the Bluetooth standard. More can be learned about Bluetooth, including technical specifica-tions, at https://www.bluetooth.com/.
Adding Bluetooth LE to the robot comes with several advantages over infrared control. Among these are:
• Much crisper responsiveness of robots because of reduced signal interference, even when dozens of robots are being operated simultaneously.
• Ability to take advantage of smartphone sensors, including the accelerometer. For example, a robot or devices on it may be controlled by simply tilting the phone.
• Robots respond to button "pushes" in a more natural way. The robot moves while the but-ton is being touched and stops instantly when the button is released.
• A path is opened for student-written IOS and Android applications.
About Bluetooth LE DevicesThis How-To describes how to use either of the two Bluetooth LE devices made by the Adafruit company and available for purchase from them and from our own LearnCSE.com store. The de-vices are:
Bluefruit LE SPI Friend communicates with the robot's Arduino™ via hardware Serial Peripheral Interface.
Bluefruit LE UART Friend communicates with the robot's Arduino™ via a software serial port.
The devices sell for the same price and, for our purposes, provide the same service—receipt of text data from the smartphone that is then used to control the robot. There are, however, two import-ant differences:
1. The two devices are wired differently.
2. A few lines of program code need to be added to manage communications. These lines are different for each of the devices.
Once wired and configured for the proper communication protocol, the devices are identical in how they are accessed and how their data is used.
How-To #10: Add Bluetooth LE Control to Rolling Robot

282 | Learn to Program in ArduinoTM C: 18 Lessons, from setup() to robots
MaterialsQuan-
tity Part Image Notes CatalogNumber
1 Complete Rolling Robot From Lesson 15 or Lesson 18 5101
1 Bluetooth LE Receiver Either UART or SPI Bluefruit LE Friend
3140 or 3141
1 Smartphone Android or Apple IOS
User supplied
7 Jumper wires Male – Male 3105
Procedure:The following steps will result in an Adafruit Bluetooth LE (low-energy) device being used to con-trol the rolling robot of Lesson 15 from a smartphone. The smartphone application itself is from Adafruit (Adafruit.com) and may be found in the IOS and Android app stores.
Wiring1. Determine which Bluefruit LE Friend you are working with. The images in Figure HT10-1 are
taken from the Adafruit website:
Figure HT10-1. Bluefruit LE UART Friend and Bluefruit LE SPI Friend

How-To #10 Add Bluetooth LE Control to Rolling Robot | 283
HT
These two boards perform similar functions but communicate with the Arduino™ via different protocols.
UART: Universal Asynchronous Receiver / Transmitter is an integrated circuit for serial communication of data between a computer and a device. In our case the computer is an Arduino,™ and the device is the Adafruit Bluefruit LE UART Friend. While the definition assumes an integrated circuit is managing this communication, the process can also be emulated in software running on the Arduino.™ The former is called hardware UART; the latter software UART.
SPI: Serial Peripheral Interface, a protocol for exchange of data between two electronic devices one bit at a time. One device is declared the master, the other the slave. In our case the master device is the Arduino,™ with the Bluefruit LE SPI Friend the slave. The Arduino™ includes electronics specifically for managing this interface, but it can also be emulated in software run-ning on the Arduino.™ The former is called hardware SPI, the latter software SPI.
2. Solder the male headers to the underside of the BT device as shown in Figure HT10-2. This is a three-step process:
Steps BT LE UART BT LE SPI
Locate device and male header
Insert short side of male pins into underside ofdevice
Solder
Figure HT10-2. Soldering male headers to BT device

284 | Learn to Program in ArduinoTM C: 18 Lessons, from setup() to robots
3. Using jumper wires, connect your BT device to your Arduino.™ A standard-sized solderless breadboard works well.
Figure HT10-3. Robot Wiring for Bluefruit LE UART Friend

How-To #10 Add Bluetooth LE Control to Rolling Robot | 285
HT
Figure HT10-4. Robot Wiring for Bluefruit LE SPI Friend
Library4. Download and install the Adafruit library Adafruit_BluefruitLE_nRF51.
a. Download the zip file by visiting https://learn.adafruit.com/introducing-the-adafruit-bluefruit-le-uart-friend/software and clicking the green download button.
b. Unzip the file. When you do, it will create a folder named Adafruit_BluefruitLE_nRF51_master.
c. Rename the folder Adafruit_BluefruitLE_nRF51.
d. Move this folder to the libraries folder of your Arduino™ folder.
5. If you have the Arduino™ IDE running, close all open instances.
6. Connect the Arduino™ to the computer with the USB cable.

286 | Learn to Program in ArduinoTM C: 18 Lessons, from setup() to robots
7. Start the Arduino™ IDE.
Install Adafruit Bluefruit Connect on smartphone or tablet8. This is a free application that is used to connect to the Bluetooth device. It may be found and
downloaded from the app stores for Apple's IOS and Google's Android operating systems.
Update Bluefruit LE device firmware
Important
This is an absolutely essential step. Many features of the Adafruit Bluefruit LE library will not function without doing this. Fortunately, the process is simple.
9. Apply power to the Arduino™ to which the Bluefruit device is connected. The red indicator LED will begin to flash.
10. Open the Adafruit Bluefruit application on the smartphone or tablet. A list of detected de-vices will appear. A new Bluefruit LE device will appear in a box labeled Bluefruit LE.
11. Select the device by touching the rectangle. If a firmware update is required, a notice will appear. If this happens, follow the steps to install the update.
Caution
This firmware update comes from a GitHub project. Sometimes Internet-fil-tered systems, often including those found in public schools, will block access to GitHub. If this happens, the update will appear to happen quickly when, in fact, no update has occured at all. If you have any reason to suspect the up-date was not installed, connect to the phone service's Internet access instead of WiFi and try again.
Test connectivity with BTLETerminal12. Download the BTLETerminal.zip file from LearnCSE.com. This file may be found in the
Sketches menu on the right side of the Learn to Program page and the How-To page.13. Unzip this file into the Arduino™ folder so that BTLETerminal appears as an Arduino™
sketch.
Figure HT10-5. File structure of BTLETerminal sketch after being unzipped

How-To #10 Add Bluetooth LE Control to Rolling Robot | 287
HT
14. Using File -> Sketchbook open BTLETerminal. The Arduino™ IDE should look something like Figure HT10-6.
Figure HT10-6. BTLETerminal sketch opened in ArduinoTM
Notice the sketch has two tabs—BTLETerminal and BluefruitConfig.h. BTLETerminal sets up communication with the Bluefruit device and the Arduino.™ The latter, meanwhile, identifies op-tions and pin assignments for the Bluefruit devices.
15. Verify the pin assignments and constants in BluefruitConfig.h. An error here can prevent successful communication between the Bluefruit LE device and the Arduino.™ The definitions should be:

288 | Learn to Program in ArduinoTM C: 18 Lessons, from setup() to robots
// COMMON SETTINGS// ------------------------------------------------------------------------// These settings are used in both SW UART, HW UART and SPI mode// ------------------------------------------------------------------------#define BUFSIZE 128 // Size of the read buffer for incoming data#define VERBOSE_MODE true // If set to 'true' enables debug output#define BLE_READPACKET_TIMEOUT 500 // Timeout in ms waiting to read a response
// SOFTWARE UART SETTINGS// ------------------------------------------------------------------------// The following macros declare the pins that will be used for 'SW' serial.// You should use this option if you are connecting the UART Friend to an UNO// ------------------------------------------------------------------------#define BLUEFRUIT_SWUART_RXD_PIN 9 // Required for software serial!#define BLUEFRUIT_SWUART_TXD_PIN 10 // Required for software serial!#define BLUEFRUIT_UART_CTS_PIN 11 // Required for software serial!#define BLUEFRUIT_UART_RTS_PIN -1 // Optional, set to -1 if unused
// HARDWARE UART SETTINGS// ------------------------------------------------------------------------// The following macros declare the HW serial port you are using. Uncomment// this line if you are connecting the BLE to Leonardo/Micro or Flora// ------------------------------------------------------------------------#ifdef Serial1 // this makes it not complain on compilation if there's no Serial1 #define BLUEFRUIT_HWSERIAL_NAME Serial1#endif
// SHARED UART SETTINGS// ------------------------------------------------------------------------// The following sets the optional Mode pin, its recommended but not required// ------------------------------------------------------------------------#define BLUEFRUIT_UART_MODE_PIN 12 // Set to -1 if unused
// SHARED SPI SETTINGS// ------------------------------------------------------------------------// The following macros declare the pins to use for HW and SW SPI communication.// SCK, MISO and MOSI should be connected to the HW SPI pins on the Uno when// using HW SPI. This should be used with nRF51822 based Bluefruit LE modules// that use SPI (Bluefruit LE SPI Friend).// ------------------------------------------------------------------------#define BLUEFRUIT_SPI_CS 8#define BLUEFRUIT_SPI_IRQ 7#define BLUEFRUIT_SPI_RST -1 // Optional but recommended, set to -1 if unused
// SOFTWARE SPI SETTINGS// ------------------------------------------------------------------------// The following macros declare the pins to use for SW SPI communication.// This should be used with nRF51822 based Bluefruit LE modules that use SPI// (Bluefruit LE SPI Friend).// ------------------------------------------------------------------------#define BLUEFRUIT_SPI_SCK 13#define BLUEFRUIT_SPI_MISO 12#define BLUEFRUIT_SPI_MOSI 11
16. Upload the sketch to the Arduino.™

How-To #10 Add Bluetooth LE Control to Rolling Robot | 289
HT
17. After uploading, open the Serial Monitor. Change the data rate to 115200 baud. Something like the screen shown in Figure HT10-7 should appear.
Figure HT10-7. Output of sketch on Serial Monitor
18. Select the type of Bluefruit LE device you're connecting to by commenting and uncomment-ing some programming statements near the beginning of the sketch.
Adafruit Bluefruit LE devices are capable of four different communications protocols. Of these we can use two with the Arduino™ Uno.
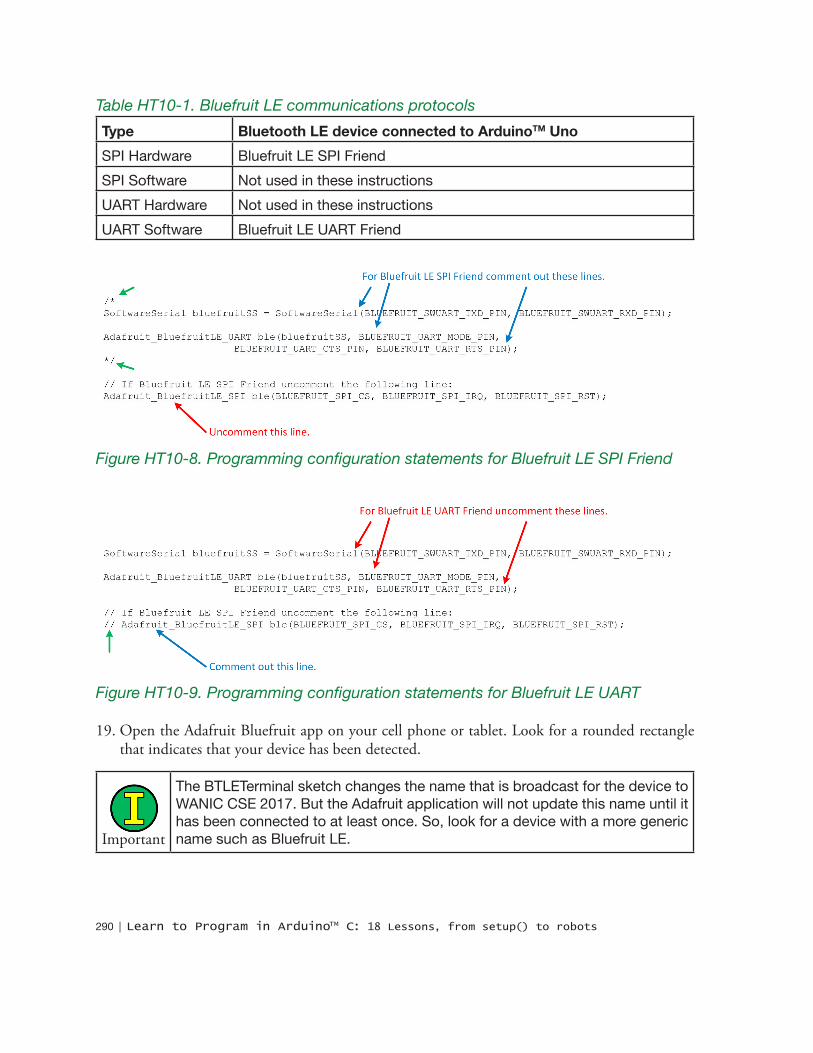
290 | Learn to Program in ArduinoTM C: 18 Lessons, from setup() to robots
Table HT10-1. Bluefruit LE communications protocolsType Bluetooth LE device connected to ArduinoTM UnoSPI Hardware Bluefruit LE SPI FriendSPI Software Not used in these instructionsUART Hardware Not used in these instructionsUART Software Bluefruit LE UART Friend
Figure HT10-8. Programming configuration statements for Bluefruit LE SPI Friend
Figure HT10-9. Programming configuration statements for Bluefruit LE UART
19. Open the Adafruit Bluefruit app on your cell phone or tablet. Look for a rounded rectangle that indicates that your device has been detected.
Important
The BTLETerminal sketch changes the name that is broadcast for the device to WANIC CSE 2017. But the Adafruit application will not update this name until it has been connected to at least once. So, look for a device with a more generic name such as Bluefruit LE.

How-To #10 Add Bluetooth LE Control to Rolling Robot | 291
HT
20. Connect to your device. It may appear as one of the three options shown in Figure HT10-10 or even something else:
Figure HT10-10. Bluetooth devices as they appear on Adafruit cell phone app
Once connected, the Serial Monitor updates, as shown in Figure HT10-11.
Figure HT10-11. Confirmation of connection as appears on Serial Monitor

292 | Learn to Program in ArduinoTM C: 18 Lessons, from setup() to robots
21. From the list of modules that appear in the Adafruit Bluefruit app after a connection is made, select UART. Verify the connection by sending text to the device. The text should appear in the Serial Monitor.
22. Enter text in the top field of the Serial Monitor, then click Send. That text should appear in the UART application.
Congratulations! You have established text communication between the robot and a smart phone / tablet.
Configure for RobotBTLERobotNameAndPINSetup is a sketch that allows you to personalize the Bluefruit LE device to make it easier to identify in a list of Bluetooth LE devices and for you to require entry of a four-digit PIN before turning over control of the robot.
23. In the same manner as used for the BTLETerminal sketch, download and install the BTLERobotNameAndPINSetup sketch.
24. Open the sketch via File -> Sketchbook. Verify that two file tabs are visible: BTLERobotNameAndPINSetup and BluefruitConfig.h.
25. Verify the constants in BluefruitConfig.h. These should be the same as in BluefruitConfig.h in the BFLETerminal sketch.
26. Make certain the Bluefruit LE device is properly connected to the Arduino™ and the Arduino™ to the computer.
27. Select the communications protocol in BTLERobotNameAndPINSetup for software UART for a Bluefruit LE UART Friend or hardware SPI for Bluefruit LE SPI Friend.
28. Upload the sketch, open the Serial Monitor, and follow the instructions that appear.
Control Robot29. In the same manner as used for the BTLETerminal sketch, download and install the
BTLERobotControl sketch.
30. Open the sketch via File -> Sketchbook. Verify that three file tabs are visible: BTLERobotControl, BluefruitConfig.h, and RobotControl.

How-To #10 Add Bluetooth LE Control to Rolling Robot | 293
HT
Figure HT10-12. BTLERobotControl sketch
31. Select the communications protocol appropriate for the type of board.
32. Upload to the Arduino.™
33. Open the Adafruit Bluefruit LE app and connect to the Bluefruit device.
34. If a PIN has been set, go to the UART module and enter it.
Important
The UART module will neither prompt for nor confirm the PIN entry. But if the ArduinoTM is connected to a computer with the Serial Monitor open, both a prompt and confirmation will appear there.

294 | Learn to Program in ArduinoTM C: 18 Lessons, from setup() to robots
35. Return to the modules and select Controller.
36. From the Controller module, select the Control Pad. The robot should respond to touching the arrows on the controller.