how to create a poster using microsoft office powerpoint© (2007/2010) to create your own...
TRANSCRIPT

HOW TO CREATE A POSTER USING Microsoft Office
PowerPoint© (2007/2010) AN ONLINE TUTORIAL

Why Create and Use a Poster? When you create a poster you provide:
A source of information; a way to increase the profile of your research; A conversation starter; it will help you engage with colleagues in conversation about your research; Advertise your research; it will help you get your main points across to as many people as possible; It allows you to highlight the main outcomes of your research;
A Poster Can also be used to: Promote your department or MSVU sponsored event!

Poster Size
The first and most important step to creating a poster is to find out what space you have been allocated for your poster; contact the person or organization responsible for the poster session you will be attending to double check what size your poster should be.

Setting Poster Size Go to: Design/Page Set-up/Slides sized for: choose
custom under drop down menu. Place the dimensions of the size you want your poster to be in the width and height requirements. In regards to the Orientation choose landscape or portrait. This is the first step in developing your poster, choosing the size and dimensions provides the means for you to determine the space available as well as to make future decisions with regards to font sizes.*if you adjust the size after, then all of
your formatting will shift*
IMPORTANT: the maximum allowable width or height depending on layout is 38” on the printer in the
Maritime Data Centre.


HINT: Use a measuring tape to map out the size you would like to use for your poster. On your computer screen, the actual size of your poster can be deceiving and of course is scaled down. By mapping out the size you want your poster to be with measuring tape you can gain a scope of what your poster size will actually be.
Hint: If your poster dimensions are too big (e.g. landscape - 36” height, 80” width), reduce the dimensions under custom to 50% of the size you want (e.g. landscape - 18”height, 40”width). The size can be doubled when it goes to the printer. (Keep in mind, if you do this, this same scaling applies to font sizes as well.)

Slide Design/Templates Creating a PowerPoint poster is different than actually
developing a presentation, however the same principles still apply.
For a presentation, slide designs and templates are chosen. This determines where text is placed as well as the visual look of your presentation. For a poster, you can apply the same templates if you choose or you can simply work with a blank poster and inject colors as need be.
To choose a template, Go to: Design and choose which template you like. Remember, if you choose a template make sure it is not too busy or it will dominate your poster.
To work with a blank poster with no template, Go to: Home/ Layout and choose the blank slide. Your canvas is clean and you choose the placement of your text.


Background The background you choose for your poster is entirely
up to you. You may want to simply use white and insert color through the text and text boxes or you may want to choose one simple color for the background.
To choose background color go to: Design/Background and go to shape fill then choose the color which you would like to have. Go to the box with the colors and choose your preferred color. If you want to view more variety, Go to: More Colors and chose custom.


Remember, the darker the background the lighter your text will be in order to show through and vice versa. Another option in choosing the background for your poster is to, Go to: Design/Background Styles/Format Background. Click on the box with the background color and choose fill. In here you can choose to have texture or patterns. Be careful in choosing these because they may dominant your poster and look to busy.
The first choice, Gradient is an interesting one. You can choose to have a background with multiple layered colors. You can choose two colors which you would like your poster to be in, as well as the shading scheme of how those colors appear in the background. Also, among the options is preset. These are preset color schemes. Browse the different schemes to see if one appeals to you.
Hint: Too many colors can be distracting and can take away from the content of the poster.


Poster Title Every poster needs a title... what is the title of your
poster? To insert your title, Go to: Insert/Text Box. A box will appear on your blank poster — simply type in your title name. Also, you may need to include authors and/or their university logos on the poster if this is for an academic presentation. The title can be moved with the cursor to the top of the poster. Like Word, choose your title justification, font and font size.
HINT: Choose a font that is clear and easy to read like Arial or Times New Roman. The size is purely at your discretion. The maximum font in the PowerPoint drop-down menu is 96, however, you can make the font size bigger by highlighting the words, right click, choose font and under size, manually type in a larger font size.
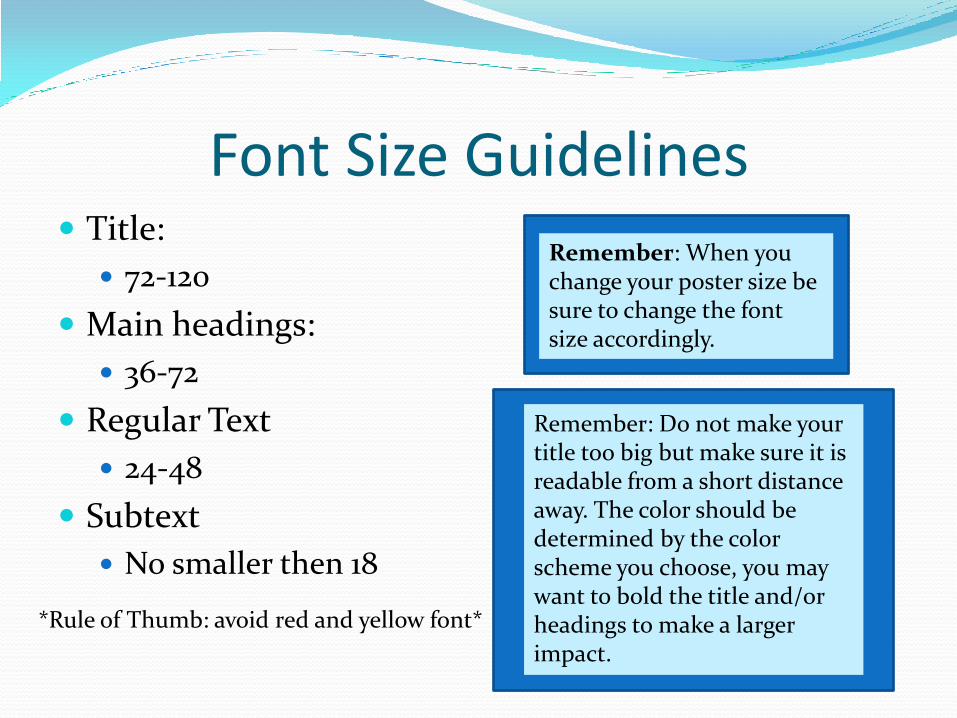
Font Size Guidelines Title:
72-120
Main headings:
36-72
Regular Text
24-48
Subtext
No smaller then 18
Remember: When you change your poster size be sure to change the font size accordingly.
Remember: Do not make your title too big but make sure it is readable from a short distance away. The color should be determined by the color scheme you choose, you may want to bold the title and/or headings to make a larger impact.
*Rule of Thumb: avoid red and yellow font*

Text/Pictures/Diagrams The flow of the poster is essential. Your poster must be
appropriate for your audience with regard to language and content. Although you have the opportunity to be creative with your poster and your ideas, make sure your message is not lost. The poster should flow from one concept or idea to another in a manner which builds upon the knowledge you are trying to pass along. For example, if you did a poster on a research study you would first begin with the introduction/ rationale, followed by the methods, analysis, results and discussion. The introduction would be your first visual cue at the top of the poster and the discussion your last visual cue at the end corner.
HINT: Do a layout sketch of your poster on a piece of paper. Use your paper to determine where you would like to place different items of text, etc. This will give you a visual aid when beginning to insert text and diagrams, as well as present an opportunity to ensure the poster presentation flows.

Example of Poster Layout

HINT: Turning on rulers and gridlines is important for the appearance and alignment of your poster; to turn them on go to: view and select gridlines
and rulers.

Presentation of Material There are various ways of presenting text in a poster,
here are a few options:
Insert a text box, Go to: Insert/Text Box and the box will appear; type in the text you would like to have and move the box to where you would like to place it according to your drawing scheme. Choose the font size and color you would like to make for your text depending upon your poster size/color scheme.


Presentation of Material Cont’ Insert a text box with color, Go to: Insert/Text Box and the
box will appear, type in the text you would like to have and move it to where you would like to place it according to your drawing scheme. To make your text box one color, highlight your text box and right click. Go to: Format Text Box. Under Colors and Lines you can choose what color you would like your text box to be, if you want a border you can choose the style and size. If you choose a black background for your text box, white font is the best for making your text appear. Under Format Text Box you can also manually adjust the size of your text box, under size manually type in width and height. This is also a great feature to check when comparing text boxes to make sure they are the same size/shape.

Once you have your text box right click for formatting box

Presentation of Material Cont’ Another option is to create a layering effect. Do this by
inserting text boxes over one another.
you can create a diagonal effect by making the box (not text box) a solid color, say black, you can add another text box over it, say red, and create a visual look for your poster. The text color can be of your choice. If you do use this option, you need to insert the boxes separately and then move and angle them to fit your layering scheme. The text needs to be inputted in the top text box — this is key.
Another option is to layer the boxes on top of one another. Once again, your box and text box need to be inserted separately and angled and sized accordingly. Go to: Format Text Box. In Colors and Lines you can choose what color you would like your text box to be, if you want a border you can choose the style and size. For your box, right click and Go to: Format Auto Shape. Like your text box, you can choose a color and border of your liking.


Presentation of Material Cont’ Making oval text boxes. Under View, Toolbars, make
sure Drawing and Formatting are clicked on. Go to: Drawing Toolbar and click on oval. To insert content, just highlight figure and type – you can change color, add border, etc. To change the shape of oval or other auto shapes, simply highlight and extend corners.
HINT: When putting text in your text box, make sure to not over do it. Too much text can be overwhelming , cluttered and wordy. If you are using bullets, make sure they are the same size, shape and color. All text should be the same font depending on its position: title, content or bullets.

Inserting Pictures and Charts To insert a picture/graphic Go to: Insert/Picture/ClipArt
or From File. Remember, your graphic will need to be sized accordingly to fit with the size of your poster.
If you would like to insert a table or chart, Go to: Insert/Table or Chart. A chart or table may be used to demonstrate data which you may have.
You may also want to insert a diagram. A diagram is a good way of demonstrating a hierarchical structure; perhaps of an organization or may be simply used to demonstrate a process. To input a diagram, Go to: Insert/Diagram and choose the diagram that best suits your needs.

Inserting Pictures and Charts Cont’ To insert a picture: Go to: Insert/ Picture. From here, you can choose
to insert a clip art picture, or a picture of your own (photograph, other .jpeg, .gif files).
HINT: Stretching the graphic after it’s inserted may distort the original graphic (View/Toolbars/ Drawing). To avoid this, you can increase or decrease the size of the graphic by highlighting the graphic and then put your cursor on one of the four corners, with left clicker pushed in, drag mouse to increase/decrease size of graphic. Another option is to highlight graphic, right click, choose format picture, under size, make sure “lock aspect ratio” and “relative to original picture size” have a check mark beside them. Then under scale or size and rotate, use up/down arrows to increase or decrease size. Use Zoom feature under View/Zoom to check if your graphic is distorted
Zoom to 100% to check for distortion Check copyright on any photos you use; don’t assume that images on
Google are public property!

Before You Print Your Poster...
Check all of your spacing and clarity of images used by zooming to 100%.
Have someone proof read your text.

Printing a Preview of Your Poster
Go to: File/Print Preview and choose scale to fit paper. This will allow you to print your poster on an 8 X 11 paper for review.
If you do not choose scale to fit paper, your poster will not print properly

And Finally… Printing Your Poster at the MDC
1. Carefully review your poster, to ensure it is “print ready”. E-mail the electronic file to [email protected] at least five days in advance of when you require the final version.
2. Once received, the MDC Staff will provide an estimate of the cost, if
requested. 3. MDC Staff will review the file.
If it meets "print-ready" requirements, a small-scale proof will be provided. You will be required to view and sign the proof before full-scale printing will proceed
If your file does not meet "print-ready" requirements, staff will return the file to you with suggestions.
4. Once finalized, the MDC Staff will print your poster and advise when it is
ready. We request that you arrange for pick-up at the MDC, as we do not offer delivery service.
5. When you collect your poster, you will be asked to pay for the poster.