how to grade a webstudy...
TRANSCRIPT

How To Grade WebStudy Assignments Page 1 of 9 Revised October 2013 © WebStudy, Inc.
How To Grade a WebStudy Assignment
There are multiple pages where you can enter grades for Assignments:
1. the Assignment Lightning Grader page
2. the All Class Gradebook page
3. the Individual Student Grade Report page
4. the Assignment Class Overview page.
Instructions for navigating to each of these pages are included in the steps outlined to enter grades on
each page.
There are also “breadcrumb “ links at the top of each page. From left to right, they show the pages you
have navigated through to get to the current page. You can click on any of these breadcrumb links to go
to the page indicated by the link name.
For example in the sample breadcrumb list shown below, clicking the icon takes you to your
Welcome page, clicking COURSE DASHBOARD takes you to the course front page for this course, etc.
The last item in the list identifies the page you are currently on.
To Enter Grades on the Assignment Lightning Grader page
There are two ways to navigate to the Assignment Lightning Grader page:
1. If there are new submissions to be graded for a particular assignment since the last time you
logged in to a course, then you will see a link to that assignment under the Assignments heading
in the Dashboard area on the course frontpage. Clicking that link will open the Assignment
Lightning Grader page displaying the first student whose assignment awaits grading.
2. You can click on the Assignments tab, and then click the “Open” button to the left of the
assignment name. This takes you to the Assignment Class Overview page. From there, if a
student has submitted an assignment, you can click the “Open” button to the left of the
student’s name to open the Assignment Lightning Grader page displaying that student’s
submission.
On the ASSIGNMENT LIGHTNING GRADER page you can access an individual student’s submission
and/or attachment(s), and enter PLUS PTS., MINUS PTS., FINAL GRADE, and COMMENTS.
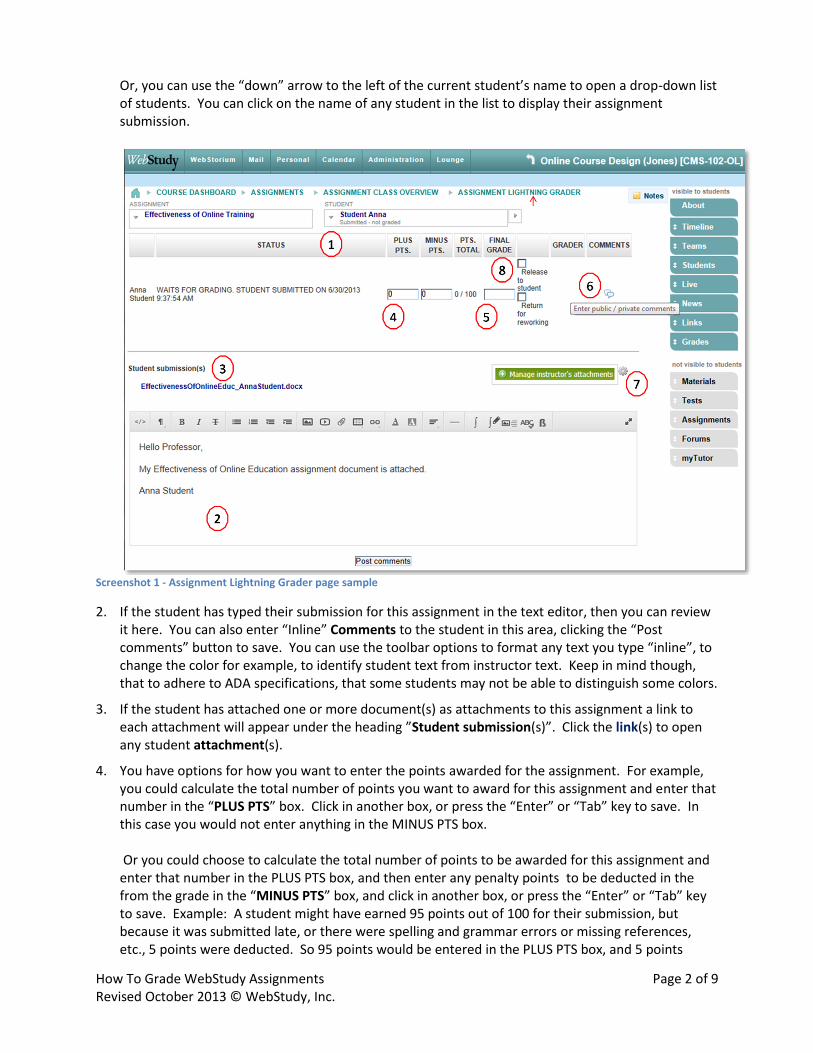
1. Navigation on the Assignment Lightning Grader page: Using the STUDENT drop-down list, you can move through the students, displaying their submission for grading and comments one at a time. Under the heading STUDENT you can use the “next” arrow to the right of the current student’s name to move to the next student to be graded.
How To Grade WebStudy Assignments Page 2 of 9 Revised October 2013 © WebStudy, Inc.
Or, you can use the “down” arrow to the left of the current student’s name to open a drop-down list of students. You can click on the name of any student in the list to display their assignment submission.
Screenshot 1 - Assignment Lightning Grader page sample
2. If the student has typed their submission for this assignment in the text editor, then you can review it here. You can also enter “Inline” Comments to the student in this area, clicking the “Post comments” button to save. You can use the toolbar options to format any text you type “inline”, to change the color for example, to identify student text from instructor text. Keep in mind though, that to adhere to ADA specifications, that some students may not be able to distinguish some colors.
3. If the student has attached one or more document(s) as attachments to this assignment a link to each attachment will appear under the heading ”Student submission(s)”. Click the link(s) to open any student attachment(s).
4. You have options for how you want to enter the points awarded for the assignment. For example, you could calculate the total number of points you want to award for this assignment and enter that number in the “PLUS PTS” box. Click in another box, or press the “Enter” or “Tab” key to save. In this case you would not enter anything in the MINUS PTS box. Or you could choose to calculate the total number of points to be awarded for this assignment and enter that number in the PLUS PTS box, and then enter any penalty points to be deducted in the from the grade in the “MINUS PTS” box, and click in another box, or press the “Enter” or “Tab” key to save. Example: A student might have earned 95 points out of 100 for their submission, but because it was submitted late, or there were spelling and grammar errors or missing references, etc., 5 points were deducted. So 95 points would be entered in the PLUS PTS box, and 5 points
How To Grade WebStudy Assignments Page 3 of 9 Revised October 2013 © WebStudy, Inc.
would be entered in the MINUS PTS box, so that the student clearly understands how the total was calculated.
5. Some schools use pre-defined Grading Systems to automatically assign letter grades corresponding to preset point ranges. In this case, the letter grade will automatically appear in the FINAL GRADE box. If a Grading System is not being used, the instructor can optionally enter a character letter or number in the FINAL GRADE box. This is a character field, so digits entered here are not treated as a numeric value and will not be included in the total point calculation. It is the values entered in the PLUS PTS and MINUS PTS boxes that are used to calculate the total points for the assignment.
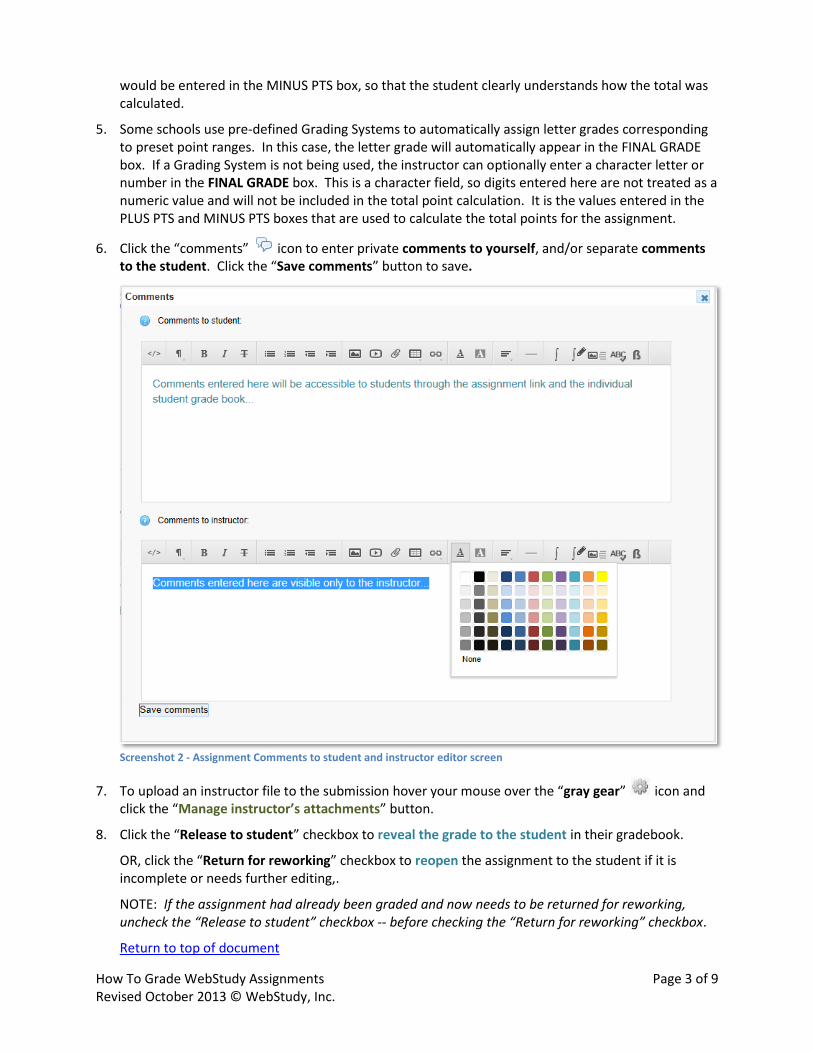
6. Click the “comments” icon to enter private comments to yourself, and/or separate comments to the student. Click the “Save comments” button to save.
Screenshot 2 - Assignment Comments to student and instructor editor screen
7. To upload an instructor file to the submission hover your mouse over the “gray gear” icon and click the “Manage instructor’s attachments” button.
8. Click the “Release to student” checkbox to reveal the grade to the student in their gradebook.
OR, click the “Return for reworking” checkbox to reopen the assignment to the student if it is incomplete or needs further editing,.
NOTE: If the assignment had already been graded and now needs to be returned for reworking, uncheck the “Release to student” checkbox -- before checking the “Return for reworking” checkbox.
Return to top of document

How To Grade WebStudy Assignments Page 4 of 9 Revised October 2013 © WebStudy, Inc.
To Enter Grades in the All Class Gradebook page
Click on the Grades tab to display the default GRADES page that opens when you are logged on as an instructor. Students cannot access this page. When they click on the Grades tab they see only their own individual Student Grade Report. On the GRADES page -- All Class Gradebook (ACGB) view -- you can enter + pts and –pts, a letter grade,
and comments, and Release to student or Return for reworking.
Screenshot 3 - GRADES page (aka All Class Gradebook) showing an Assignment selected to grade
1. Click on a gradable item for a particular student to open the entry area. Click on another item, or press the “Esc” key to cancel selection without making a change.
2. Click the top box to enter/edit a letter grade. Press “Tab” or “Enter” to save each entry.
3. You have options for how you want to enter the points awarded for the assignment. For example, you could calculate the total number of points you want to award for this assignment and enter that number in the “+ pts” box. In this case you would not enter anything in the “- pts” box. Or you could choose to calculate the total number of points to be awarded for this assignment and enter that number in the “+ pts box, and then enter any penalty points to be deducted from the grade in the “- pts” box. Example: A student might have earned 95 points out of 100 for their submission, but because it was submitted late, or there were spelling and grammar errors or missing references, etc., 5 points were deducted. So 95 points would be entered in the + pts box, and 5
How To Grade WebStudy Assignments Page 5 of 9 Revised October 2013 © WebStudy, Inc.
points would be entered in the - pts box, so that the student clearly understands how the total was calculated.
4. Click the “comment” icon (in the lower left corner of the active grading area) to enter private notes to yourself, and/or comments on this assignment to the student. The comment box could be used to explain any points entered in the –pts box for example.
5. Click the “submission” icon (in lower right corner) to Open the Assignment Class Overview page.
6. If the assignment is not complete or requires editing, you can click the “Return for reworking” checkbox to return access to the student.
7. Click the “Release to student” checkbox to display the grade for this assignment in the student’s individual Grade Report. NOTE: If the assignment had already been graded and now needs to be returned for reworking, uncheck the “Release to student” checkbox -- before checking the “Return for reworking” checkbox.
Return to top of document
To Enter Grades on an individual Student Grade Report page
To navigate to an individual student grade report, click on the Grades tab to open the All Class
Gradebook view, then scroll to the student you wish to view, and click on the “Open gradebook” button
beneath the student’s name.
On an individual Student Grade Report page you can enter pts +, pts -, comments and/or a letter
grade, for any gradable item.
1. Click the “grade” button to the right of any gradable item to open the “Grade window” box shown
open below:

How To Grade WebStudy Assignments Page 6 of 9 Revised October 2013 © WebStudy, Inc.
Screenshot 4 - Individual Student Grade Report showing Grade Window in Instructor view
2. You have options for how you want to enter the points awarded for the assignment. For example, you could calculate the total number of points you want to award for this assignment and enter that number in the “pts +” box. In this case you would not enter anything in the “pts -” box. Or you could choose to calculate the total number of points to be awarded for this assignment and enter that number in the “pts +” box, and then enter any penalty points to be deducted from the grade in the “pts -” box. Example: A student might have earned 95 points out of 100 for their submission, but because it was submitted late, or there were spelling and grammar errors or missing references, etc., 5 points were deducted. So 95 points would be entered in the pts +box, and 5 points would be entered in the pts - box, so that the student clearly understands how the total was calculated.
3. Click in the “Your personal notes” box to enter private notes to yourself regarding this assignment.
4. Click in the “Comments to students” box to enter comments to the student regarding this assignment.
5. Click in the “grade” box to optionally add a letter grade if you are not using a Grading System to automatically assign it.
6. Make sure the “auto grade?” checkbox is checked if you want to release the grade to the student.
7. Click the GRADE button to save any changes. OR, click the red “x” in the upper right corner to close without saving.

How To Grade WebStudy Assignments Page 7 of 9 Revised October 2013 © WebStudy, Inc.
Return to top of document
To Enter Grades on the Assignment Class Overview page
To navigate to the Assignment Class Overview page, click the Assignments tab, and then click the
“Open” button to the left of the assignment name. This takes you to the Assignment Class Overview
page. From there, if a student has submitted an assignment, you can click the “Open” button to the left
of the student’s name to open the Assignment Lightning Grader page displaying that student’s
submission.
On the ASSIGNMENT CLASS OVERVIEW page you can scroll down and enter PLUS PTS., MINUS PTS.,
FINAL GRADE, and/or COMMENTS for any student(s) for this assignment.
Some instructors grade and release the grade to the student immediately. Some instructors like to
grade all the students first, and then release all the grades to all the students at the same time. You can
release the grades to all students at once from this page by clicking the “Release all” button on this
page.
Screenshot 5 - Assignment Class Overview page
1. You have options for how you want to enter the points awarded for the assignment. For example, you could calculate the total number of points you want to award for this assignment and enter that number in the “PLUS PTS” box. Click in another box, or press the “Enter” or “Tab” key to save. In this case you would not enter anything in the MINUS PTS box.
How To Grade WebStudy Assignments Page 8 of 9 Revised October 2013 © WebStudy, Inc.
Or you could choose to calculate the total number of points to be awarded for this assignment and enter that number in the PLUS PTS box, and then enter any penalty points to be deducted in the from the grade in the “MINUS PTS” box, and click in another box, or press the “Enter” or “Tab” key to save. Example: A student might have earned 95 points out of 100 for their submission, but because it was submitted late, or there were spelling and grammar errors or missing references, etc., 5 points were deducted. So 95 points would be entered in the PLUS PTS box, and 5 points would be entered in the MINUS PTS box, so that the student clearly understands how the total was calculated.
2. Some schools use pre-defined Grading Systems to automatically assign letter grades corresponding to preset point ranges. In this case, the letter grade will automatically appear in the FINAL GRADE box. If a Grading System is not being used, the instructor can optionally enter a character letter or number in the FINAL GRADE box. This is a character field, so digits entered here are not treated as a numeric value and will not be included in the total point calculation. It is the values entered in the PLUS PTS and MINUS PTS boxes that are used to calculate the total points for the assignment.
3. Click the “comments” icon to enter private comments to yourself, and/or separate comments to the student. Optionally use the editor toolbar to format the text. Click the “Save comments” button to save. Shown in Screenshot 2 on page 3.
4. Click the “Release to student” checkbox to reveal the grade to the student in their gradebook.
5. OR, click the “Return for reworking” checkbox to reopen the assignment to the student if it is incomplete or needs further editing,.
6. NOTE: If the assignment had already been graded and now needs to be returned for reworking, uncheck the “Release to student” checkbox -- before checking the “Return for reworking” checkbox.
See next page for other options on this page.
How To Grade WebStudy Assignments Page 9 of 9 Revised October 2013 © WebStudy, Inc.
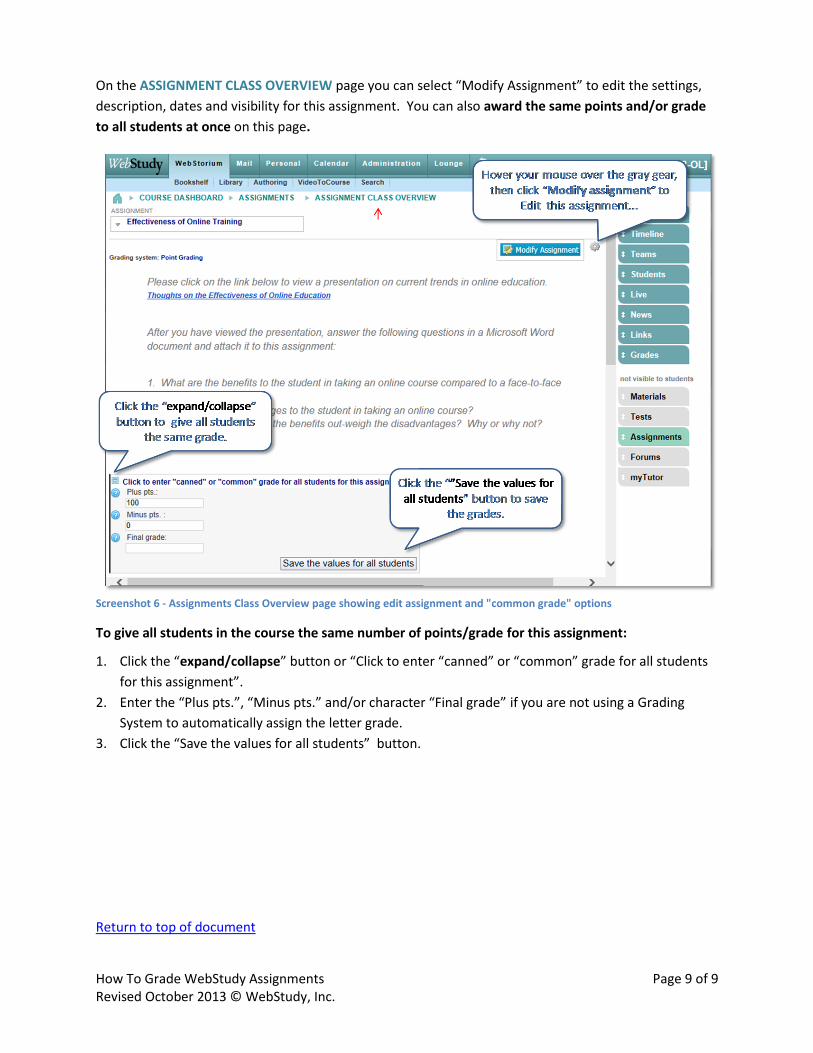
On the ASSIGNMENT CLASS OVERVIEW page you can select “Modify Assignment” to edit the settings,
description, dates and visibility for this assignment. You can also award the same points and/or grade
to all students at once on this page.
Screenshot 6 - Assignments Class Overview page showing edit assignment and "common grade" options
To give all students in the course the same number of points/grade for this assignment:
1. Click the “expand/collapse” button or “Click to enter “canned” or “common” grade for all students
for this assignment”.
2. Enter the “Plus pts.”, “Minus pts.” and/or character “Final grade” if you are not using a Grading
System to automatically assign the letter grade.
3. Click the “Save the values for all students” button.
Return to top of document