how to install mazda toolbox? - mazda infotainmentinfotainment.mazdahandsfree.com/files/en-us/mazda...
TRANSCRIPT

HOW-TO GUIDE: How to install Mazda Toolbox? For Windows HOW-TO GUIDE: How to install Mazda Toolbox? For OSX (Mac) HOW-TO GUIDE: How to start using Mazda Toolbox? For Windows HOW-TO GUIDE: How to start using Mazda Toolbox? For OSX (Mac) HOW-TO GUIDE: How to identify and register your Infotainment System with MazdaToolbox? HOW-TO GUIDE: How to get my free map update in Mazda Toolbox? For Windows HOW-TO GUIDE: How to get my free map update in Mazda Toolbox? For OSX (Mac) HOW-TO GUIDE: How to make or restore a backup of the navigation system? For Windows HOW-TO GUIDE: How to make or restore a backup of the navigation system? For OSX(Mac)

HOW-TO GUIDE: How to install Mazda Toolbox? For Windows Before downloading the installer from the Downloads page, please make sure thatyour PC meets minimum technical requirements (operating system, enough free spaceon your local hard disk).Installation of Mazda Toolbox is quick and easy. After downloading the installer file, simplydouble-click the file to start the installation.
First you need to select the language of the Installation Wizard.
During the installation process follow the instructions on the screen and click Next:
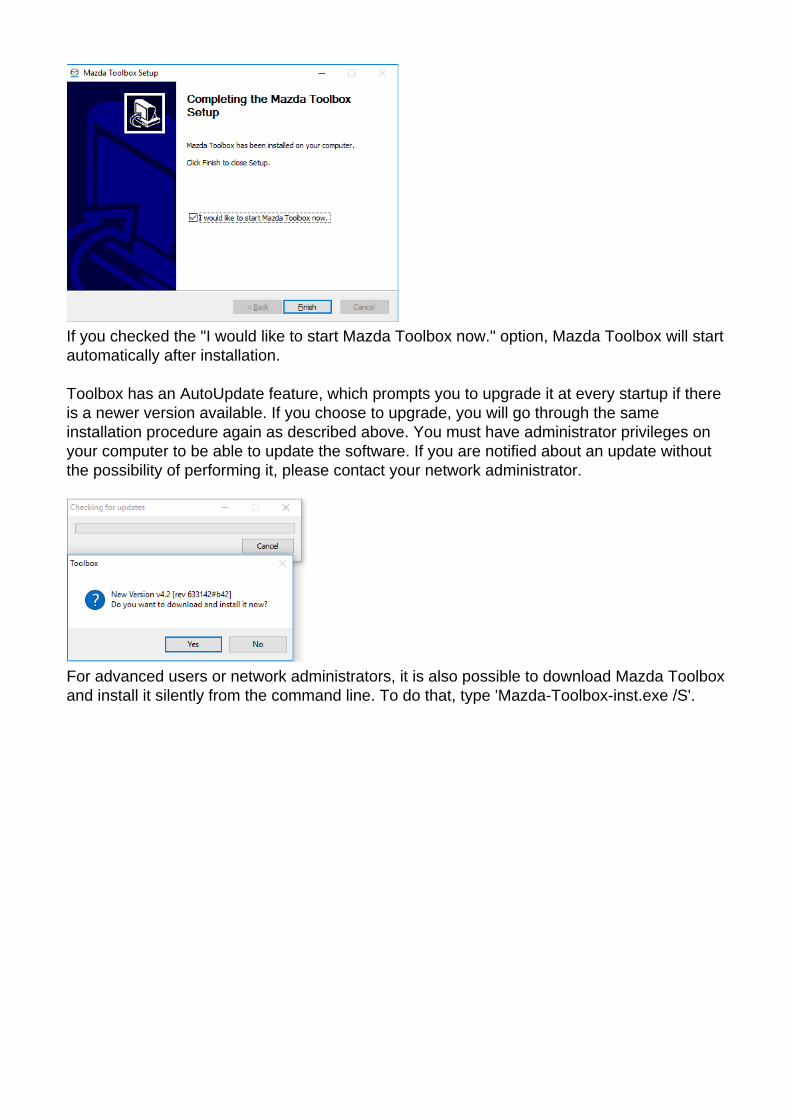
If you checked the "I would like to start Mazda Toolbox now." option, Mazda Toolbox will startautomatically after installation. Toolbox has an AutoUpdate feature, which prompts you to upgrade it at every startup if thereis a newer version available. If you choose to upgrade, you will go through the sameinstallation procedure again as described above. You must have administrator privileges onyour computer to be able to update the software. If you are notified about an update withoutthe possibility of performing it, please contact your network administrator.
For advanced users or network administrators, it is also possible to download Mazda Toolboxand install it silently from the command line. To do that, type 'Mazda-Toolbox-inst.exe /S'.

1.
2.
3.
4.
5.
HOW-TO GUIDE: How to install Mazda Toolbox? For OSX (Mac) Before downloading the installer from the Downloads page, please make sure thatyour PC meets minimum technical requirements (operating system, enough free spaceon your local hard disk).
If your computer meets the requirements, click on the “Download for OSX”button.
You will find the downloaded installer file in the “Downloads” folder. Simply clickon it to start the installation process.
Click on “Continue”…
…and click on “Install”
You will be required to type in your user name and password. When it is done,click on “Install Software”.

6.
7.
When the installation is successfully finished, close the window.
To start OSX Mazda Toolbox click on the “Mazda Toolbox” icon in the“Applications” folder or start it from the Launchpad. Every time you start the OSX Mazda Toolbox, it will automatically check for updates. Ifa newer version is available, it will be offered automatically. We recommend you toalways update to the latest version.

---
HOW-TO GUIDE: How to start using Mazda Toolbox? For Windows This Guide explains the very first steps of using Toolbox: how to connect yourInfotainment System to your PC and how to log in with your username and password.After Mazda Toolbox has been started, you can see a welcome screen that informs you thatthere is currently no SD card connected to the computer.
At this point, please connect the infotainment system’s SD card to your PC.Please also make sure that
your PC is connected to the internet,the Navigation had been already launched in your vehicle, and thatyour SD card has enough free space for the updates you would like to install. You willsee the amount of available free space on the left side of the screen, once Toolbox hasrecognized the card.
Connecting the SD cardPlease insert your SD card to the SD card-reader slot of your computer. When the SD cardhas been successfully connected, Mazda Toolbox shows a temporary screen to let you knowit is in the process of recognizing the card. This can take several minutes.
Once Mazda Toolbox has recognized the SD card, you will be prompted to log in if youalready have a registered user account, or, alternatively, to register a new user account.You also have the possibility to reset your password, in case you already have a registeredaccount but you do not remember the corresponding password.
Login In order to log in, please provide your email address and your password, the click on Login.If the entered data is correct, you can access the Home screen of Mazda Toolbox.
RegisterIf you would like to register a new user account, please click on the Register button. First, you will be prompted to enter an email address that will be linked to your account.Please make sure to provide a valid email address, as it will be necessary in case you have

forgotten your password and you want to reset it.
After entering the email address and clicking on Next, you will be prompted to enter apassword, then re-enter it in the following field in order to confirm it.
Then, please click Next to proceed to the following step, where you can choose your countryof residence. After selecting your country, again, click Next to proceed.
On the following screen, you will see the Terms and Conditions. Please read the informationdisplayed on this page carefully, then click Agree to proceed.
On the following screen, you can subscribe to the newsletter to receive notifications aboutupdates, special offers and other announcements. You can tick the checkbox to subscribe, orleave it unticked if you do not wish to subscribe. Once you have made your choice, click Next to proceed.
The following screen informs you about your successful registration. By clicking on Continue, you will get to the Home screen, which is the main menu of Mazda Toolbox.
Note that if you are eligible for free updates, at this point, the Mazda Toolbox willautomatically display the available updates for you, and you have the possibility to installthem right away by clicking on the Install button. Home screen After you have successfully registered a new account and logged in, you will see the MazdaToolbox home screen. On the Home screen, you have four possibilities.

Clicking on the Available updates button shows you the updates that are available for yourinfotainment system. The Buy content button enables you to buy additional map updates or connected servicesfor your infotainment system. With the Redeem a code button, you can redeem a scratch code that enables you todownload the latest contents for your infotainment system. In the Settings menu, you can see and edit details of your user account, and you canmanage, backup and restore the contents of your infotainment system.

---
HOW-TO GUIDE: How to start using Mazda Toolbox? For OSX (Mac) This Guide explains the very first steps of using Toolbox: how to connect yourInfotainment System to your Mac and how to log in with your username and password.After Mazda Toolbox has been started, you can see a welcome screen that informs you thatthere is currently no SD card connected to the computer.
At this point, please connect the infotainment system’s SD card to your Mac.Please also make sure that
your Mac is connected to the internet,the Navigation had been already launched in your vehicle, and thatyour SD card has enough free space for the updates you would like to install. You willsee the amount of available free space on the left side of the screen, once Toolbox hasrecognized the card.
Connecting the SD cardPlease insert your SD card to the SD card-reader slot of your computer. When the SD cardhas been successfully connected, Mazda Toolbox shows a temporary screen to let you knowit is in the process of recognizing the card. This can take several minutes.
Once Mazda Toolbox has recognized the SD card, you will be prompted to log in if youalready have a registered user account, or, alternatively, to register a new user account.You also have the possibility to reset your password, in case you already have a registeredaccount but you do not remember the corresponding password.
Login In order to log in, please provide your email address and your password, the click on Login.If the entered data is correct, you can access the Home screen of Mazda Toolbox.
RegisterIf you would like to register a new user account, please click on the Register button. First, you will be prompted to enter an email address that will be linked to your account.

Please make sure to provide a valid email address, as it will be necessary in case you haveforgotten your password and you want to reset it.
After entering the email address and clicking on Next, you will be prompted to enter apassword, then re-enter it in the following field in order to confirm it.
Then, please click Next to proceed to the following step, where you can choose your countryof residence. After selecting your country, again, click Next to proceed.
On the following screen, you will see the Terms and Conditions. Please read the informationdisplayed on this page carefully, then click Agree to proceed.
On the following screen, you can subscribe to the newsletter to receive notifications aboutupdates, special offers and other announcements. You can tick the checkbox to subscribe, orleave it unticked if you do not wish to subscribe. Once you have made your choice, click Next to proceed.
The following screen informs you about your successful registration. By clicking on Continue, you will get to the Home screen, which is the main menu of Mazda Toolbox.
Note that if you are eligible for free updates, at this point, the Mazda Toolbox willautomatically display the available updates for you, and you have the possibility to installthem right away by clicking on the Install button. Home screen After you have successfully registered a new account and logged in, you will see the MazdaToolbox home screen.

On the Home screen, you have four possibilities. Clicking on the Available updates button shows you the updates that are available for yourinfotainment system. The Buy content button enables you to buy additional map updates or connected servicesfor your infotainment system. With the Redeem a code button, you can redeem a scratch code that enables you todownload the latest contents for your infotainment system. In the Settings menu, you can see and edit details of your user account, and you canmanage, backup and restore the contents of your infotainment system.

HOW-TO GUIDE: How to identify and register your Infotainment System with MazdaToolbox? This Guide is really short, because you have nothing to do, Toolbox will automaticallyidentify the system and register it to your Mazda-na.Naviextras.com user profile.If you have followed the instructions of the "How to start using Mazda Toolbox?" Guide, andsuccessfully connected your SD card and then logged in, then your system is alreadyidentified and registered into your Mazda-na.Naviextras.com user profile.If you previously added your system type on Mazda-na.Naviextras.com site to your userprofile, it is now overwritten by the automatic registration of Mazda Toolbox.

1.
2.
3.
4.
5.
6.
HOW-TO GUIDE: How to get my free map update in Mazda Toolbox? For Windows You can get your free map update easily and start using it in your car immediately.
Remove the SD card from the SD slot in your vehicle and insert it into your PC.
Toolbox will recognize your connected SD card automatically. Please note that thisprocess may take several minutes.
Once your SD card has been recognized, you can log in with your existing useraccount, or register a new account, if you do not yet have one.
After successfully logging in, if there are free map updates available, you will beautomatically offered to download them. If you would like to start the installation, clickon the Install button.
Before installing the free update, it is strongly recommended that you backup thecontents of your device, therefore Toolbox offers you the possibility to do so. Pleasechoose a name so that you can identify the backup later, then click on Backup tocreate it. Note that this process can take several minutes.
When the backup has been created, please wait until the files for the free update aredownloaded and are transferred to your SD card.

7.
8.
When the installation is done, you can exit the Toolbox with the Exit button, or return tothe main menu with the Home button.
Finally, remove your SD card and insert it into the SD card slot in your vehicle. Nofurther action is needed. As you start your navigation system, it will use the updatedcontents found on the SD card.

1.
2.
3.
4.
5.
6.
HOW-TO GUIDE: How to get my free map update in Mazda Toolbox? For OSX (Mac) You can get your free map update easily and start using it in your car immediately.
Remove the SD card from the SD slot in your vehicle and insert it into your Mac.
Toolbox will recognize your connected SD card automatically. Please note that thisprocess may take several minutes.
Once your SD card has been recognized, you can log in with your existing useraccount, or register a new account, if you do not yet have one.
After successfully logging in, if there are free map updates available, you will beautomatically offered to download them. If you would like to start the installation, clickon the Install button.
Before installing the free update, it is strongly recommended that you backup thecontents of your device, therefore Toolbox offers you the possibility to do so. Pleasechoose a name so that you can identify the backup later, then click on Backup tocreate it. Note that this process can take several minutes.
When the backup has been created, please wait until the files for the free update aredownloaded and are transferred to your SD card.

7.
8.
When the installation is done, you can exit the Toolbox with the Exit button, or return tothe main menu with the Home button.
Finally, remove your SD card and insert it into the SD card slot in your vehicle. Nofurther action is needed. As you start your navigation system, it will use the updatedcontents found on the SD card.

1.2.
3.
4.
5.
6.
7.
8.
HOW-TO GUIDE: How to make or restore a backup of the navigation system? For Windows From time to time, it is useful to make a bIn order to create a backup, please follow theinstructions described below.ackup of the contents of your navigation system to avoidlosing all or some of your data in case of a hardware error or accidental data loss. Thisguide explains how to make a backup of your navigation system and how to restore abackup if it becomes necessary.It is suggested to make a backup in at least the following cases: - right after you acquire your system; - before using Mazda Toolbox to update your navigation software and its content; - after updating your system. In order to create a backup, please follow the instructions described below.
As a first step, please start Mazda Toolbox.Once Toolbox is started, please insert your infotainment system’s SD card into thecard reader slot of your computer. The Mazda Toolbox will recognize the SD card.
Once the SD card has been recognized by Mazda Toolbox, please log in with yourexisting user account, or register a new user account.
Once logged in, please click on the >Settings button on the Home screen.
In the Settings menu, please click on the Manage button.
In the Manage menu, please click on the Backup your device button.
Enter a name for your backup, so that you will be able to identify it later on.
Please wait until Mazda Toolbox is creating the backup. This can take several minutes.After the backup is finished successfully, click on the Home button to return to the main

1.2.
3.
4.
5.
6.
7.
8.
9.
menu of Mazda Toolbox. In order to restore a backup that was created previously, please follow the instructionsdescribed below.
Start Mazda Toolbox.Once Toolbox is started, please insert your infotainment system’s SD card into thecard reader slot of your computer. The Mazda Toolbox will recognize the SD card.
Once the SD card has been recognized by Mazda Toolbox, please log in with yourexisting user account, or register a new user account.
On the Home screen, please click on the Settings button.
In the Settings menu, please click on the Manage button.
In the Manage menu, click on the Restore button.
Choose a backup from the list, and click on Restore. Note that you can restore yourdevice only if you have previously created a backup.
Please wait until the download and install process is finished. This can take severalminutes.
When the restore process is finished, click on Home to return to the main menu.

1.
2.
3.
4.
5.
6.
7.
HOW-TO GUIDE: How to make or restore a backup of the navigation system? For OSX(Mac) From time to time, it is useful to make a bIn order to create a backup, please follow theinstructions described below.ackup of the contents of your navigation system to avoidlosing all or some of your data in case of a hardware error or accidental data loss. Thisguide explains how to make a backup of your navigation system and how to restore abackup if it becomes necessary.It is suggested to make a backup in at least the following cases: - right after you acquire your system; - before using Mazda Toolbox to update your navigation software and its content; - after updating your system. In order to create a backup, please follow the instructions described below.
As a first step, please start Mazda Toolbox, either by clicking on the “Mazda Toolbox”icon in the “Applications” folder, or by starting it from the Launchpad.Once Toolbox is started, please insert your infotainment system’s SD card into thecard reader slot of your computer. The Mazda Toolbox will recognize the SD card.
Once the SD card has been recognized by Mazda Toolbox, please log in with yourexisting user account, or register a new user account.
Once logged in, please click on the >Settings button on the Home screen.
In the Settings menu, please click on the Manage button.
In the Manage menu, please click on the Backup your device button.
Enter a name for your backup, so that you will be able to identify it later on.

8.
1.
2.
3.
4.
5.
6.
7.
8.
Please wait until Mazda Toolbox is creating the backup. This can take several minutes.After the backup is finished successfully, click on the Home button to return to the mainmenu of Mazda Toolbox. In order to restore a backup that was created previously, please follow the instructionsdescribed below.
Start Mazda Toolbox, either by clicking on the “Mazda Toolbox” icon in the“Applications” folder, or by starting it from the Launchpad.Once Toolbox is started, please insert your infotainment system’s SD card into thecard reader slot of your computer. The Mazda Toolbox will recognize the SD card.
Once the SD card has been recognized by Mazda Toolbox, please log in with yourexisting user account, or register a new user account.
On the Home screen, please click on the Settings button.
In the Settings menu, please click on the Manage button.
In the Manage menu, click on the Restore button.
Choose a backup from the list, and click on Restore. Note that you can restore yourdevice only if you have previously created a backup.
Please wait until the download and install process is finished. This can take several

9.
minutes.
When the restore process is finished, click on Home to return to the main menu.