how to update older presentations to this new template 1. open the presentation you want to apply a...
TRANSCRIPT

How to Update Older Presentations to This New Template
1. Open the presentation you want to apply a different design to.
2. On the top Menu bar, click “Format”, and then click “Slide Design.”
3. Find and select the design template from the templates available for use, and then click “Apply.”
4. Depending on how they were created, some slides may not display properly, so be sure to review each page.

Title: Arial Bold 30 pt.
Presenter’s Name: Arial Narrow Bold 24 pt.Presenter’s Title: Arial Narrow 20 pt.

Section Title: Arial Bold 30 pt.
Title: Times Bold 32 pt.; Title Case
Body: Arial narrow bold 24 pt.; bullet: Webdings; sentence case– Sub-bullets: Arial Narrow 20 pt.; Bullet: Webdings;
Second sub-bullet Third sub-bullet

Subtitle: Arial bold italic 28 pt.; sentence style
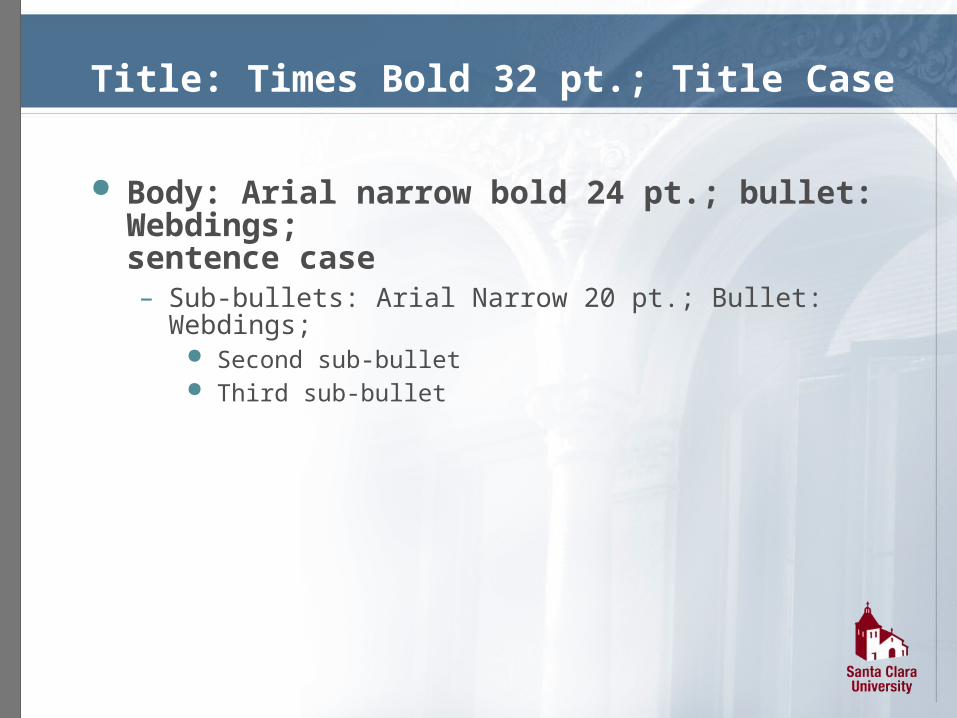
Title: Times Bold 32 pt.; Title Case
Body: Arial narrow bold 24 pt.; bullet: Webdings; sentence case– Sub-bullets: Arial Narrow 20 pt.; Bullet: Webdings;
Second sub-bullet Third sub-bullet

Bullet Format
Use “smart” quotes
Fiscal years should be formatted as FY ’01
Highlight in this color for overheads
Hyperlink: www.scu.edu
Correct dashes used: -, –, —

Chart Example
Source: Placeholder for notes, etc. 14 pt..
0
10
20
30
40
50
60
70
80
1st Qtr 2nd Qtr 3rd Qtr 4th Qtr
One Two Three Four

Pie Chart Example
35%
20%
20%
25%
1st Qtr
2nd Qtr
3rd Qtr
4th Qtr
Source: Placeholder for notes, etc. 14 pt..

Table Example
1st Qtr 2nd Qtr 3rd Qtr 4th Qtr
Secure 1
Secure 2
Secure 3
Secure 4
Secure 5
Secure 6
Secure 7
Source: Placeholder for notes, etc. 14 pt..

Small Label
Large Label
Small Label
Text with Graphic on Right
Body: Arial narrow bold 24 pt.; bullet: Webdings; sentence case– Sub-bullets: Arial Narrow 20 pt.;
Bullet: Webdings; Second sub-bullet Third sub-bullet

Sample Quote
“When a billion wireless phones wake up in the next few years, a distributed architecture will be the only way people will be able to receive the information they need.”
AnonymousTitleCompany
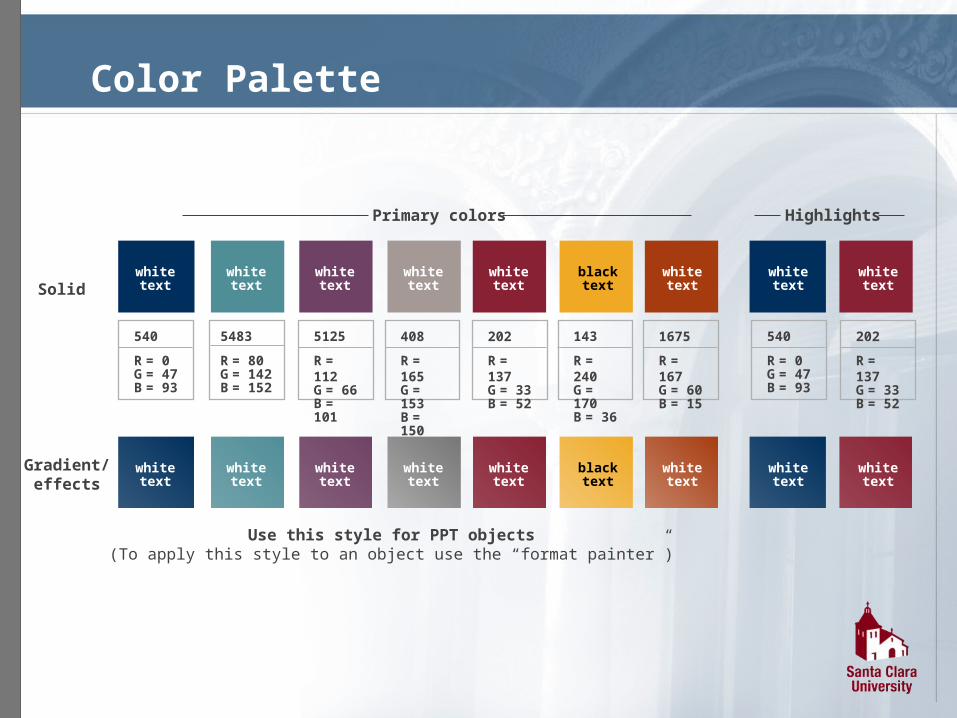
202
R = 137G= 33B = 52
540
R = 0G= 47B = 93
5125
R = 112G= 66B = 101
5483
R = 80G= 142B = 152
408
R = 165G= 153B = 150
143
R = 240G= 170B = 36
Color Palette
Gradient/effects
Use this style for PPT objects(To apply this style to an object use the “format painter”)
Primary colors
Solid
Highlights
1675
R = 167G= 60B = 15
540
R = 0G= 47B = 93
202
R = 137G= 33B = 52
whitetext
whitetext
whitetext
whitetext
whitetext
blacktext
whitetext
whitetext
whitetext
whitetext
whitetext
whitetext
whitetext
whitetext
blacktext
whitetext
whitetext
whitetext

SCU Black Logos

SCU Red Logos

Graphic Elements

How To Apply Different Styles To Objects
Click on the “Format Painter”.If you do not see it then select
“View/Toolbars/Standard” from the top menu bar
(To apply a style to more than one object double click the “Format Painter” and then
click on the object you want to change. When done click once more on the
“Format Painter” to turn it off.)
Select the object with the style and color you
want to use
Click on the object you want to apply the new
style and color
Step 1 Step 2 Step 3 Final Result
Depending on the object the 3D effect may look different
Use this way if you see a color you want to use from the “Graphics Elements” slide

How To Apply Different Colors To Objects
Step 1 Step 2 Step 3 Final Result
Right mouse click on the object you want
to change and select “Format AutoShape”
from the pop-up
Click on the “Color” pop-up and select
“Fill Effects”
Use this way if you don’t see a color you want to use from the “Graphics Elements” slide
Select“More Colors”
Step 4
Select the new color you want and
click “OK”

Slide Transitions
All slides: “wipe right”

Out-of-Bounds
Graphics and text should not extend into this red area