how to use exchange online email and calendar to use exchange online email and... · the exchange...
TRANSCRIPT

How to use Exchange Online Email and Calendar

Table of Contents Office 365 Outlook ........................................................................................................................................ 2
What is Exchange online ........................................................................................................................... 2
How to use e-mail ..................................................................................................................................... 2
How to send E-mail ................................................................................................................................... 4
How to use the Carbon Copy (cc) ............................................................................................................. 6
How to use Blind Carbon Copy (Bcc)......................................................................................................... 7
How to create signature ........................................................................................................................... 9
How to auto reply (out of office) ............................................................................................................ 12
Using clutter ............................................................................................................................................ 14
How to attach files in email .................................................................................................................... 15
Create contact ......................................................................................................................................... 17
Create new folder ................................................................................................................................... 19
Using the search functions ...................................................................................................................... 20
How to create Groups ............................................................................................................................. 21
Conversation in Groups .......................................................................................................................... 23
How to leave group ................................................................................................................................. 25
How to add members ............................................................................................................................. 26
Office 365 Calendar .................................................................................................................................... 28
WHAT IS CALENDAR FOR MICROSOFT 365? ........................................................................................... 28
ADD SCHEDULE AT THE CALENDAR ........................................................................................................ 29
CREATE GROUP TO SHARE CALENDARS .................................................................................................. 33
SEARCH FUNCTION ................................................................................................................................. 40
DELETE SCHEDULE AT THE CALENDAR .................................................................................................... 41

OFFICE 365 OUTLOOK What is Exchange online Electronic mail use to share information between users over electronic network using the
internet. The exchange online Email is similar to Outlook but with improves and better
capabilities.
How to use e-mail 1) Open the Office 365 log in site
2) Enter your account and password on the text box to sign in
2

3) Click on the mail menu button
3

How to send E-mail The folders menu consists of several list of sub folders. The inbox folder is where all the incoming
mail get stored. Clutter is an email sorting tool. Sent item folder is the collection of all the mail
that has been sent. Delete item is where the trash file is stored. To send an email to recipients:
1) Click the New button
2) Press the ‘To:’ field button
3) Select the recipients that you want to send to then click send
1
2
3

How to use the Carbon Copy (cc) The carbon copy (cc) is use to send mail to more than one recipients. If the message is intended
for one person but is also relevant to other people as well then Cc is the best way to send mail.
1) Press the ‘Cc’: field, Select the recipients that you want to send to (as in this case user 11)
2) Click send button to send the mail. The Cc: field will send the mail to user 11 along with user
10 and user 17
1
2

How to use Blind Carbon Copy (Bcc) Blind carbon copy hides the address from the people in the 'To' and 'Bcc' box. The Bcc enable
privacy and prevents spams and virus.
1) Press the Bcc to open the ‘Bcc:’ field
1

2) Select the recipients that you want to send to (as in this example user 3 and user 14)
3) Click Send. The other users will not be able to know that user 3 and user 14 also receives the
mail.
2
3
3

How to create signature You may create a signature for your email messages. Your signature can be added automatically
to all outgoing messages, or you can choose to add your email signature only to specific messages.
1) Select the options button on the right top hand corner.
1

2) Select the mail button
3) Select Email signature
2
3

4) Type in your name on the text box. Select the tick box if you want your assign your signature
automatically.
4
4

How to auto reply (out of office)
Auto Reply let people who send you email messages know that you're not available. It let people who
send you email know that you won’t be responding to their messages immediately. After automatic replies
are turned on, they’ll be sent once to each sender.
1) Select the Automatic replies
1

2) Select and tick the send automatic replies and choose the best course of options that suits your
needs.
2
2

Using clutter Clutter is an Email sorting tool that moves your low priority messages out of your Inbox so you can easily
scan for important messages. You have the options to enable or disable clutter
1) Select mail on the option menu
2) Select clutter. You may select and tick the box to enable or disable clutter.
1
2 2

How to attach files in email In online exchange you may send mail by attaching files in forms of images, audio and animation. Note:
The maximum files are 35 pix. Please use one drive for large data.
1) Select Attach to open the files that you intend to send
2) Select the documents that you want to attach (as in this example test.docx)
1
2

3) You have the options to attach as a one drive file or as a copy
3

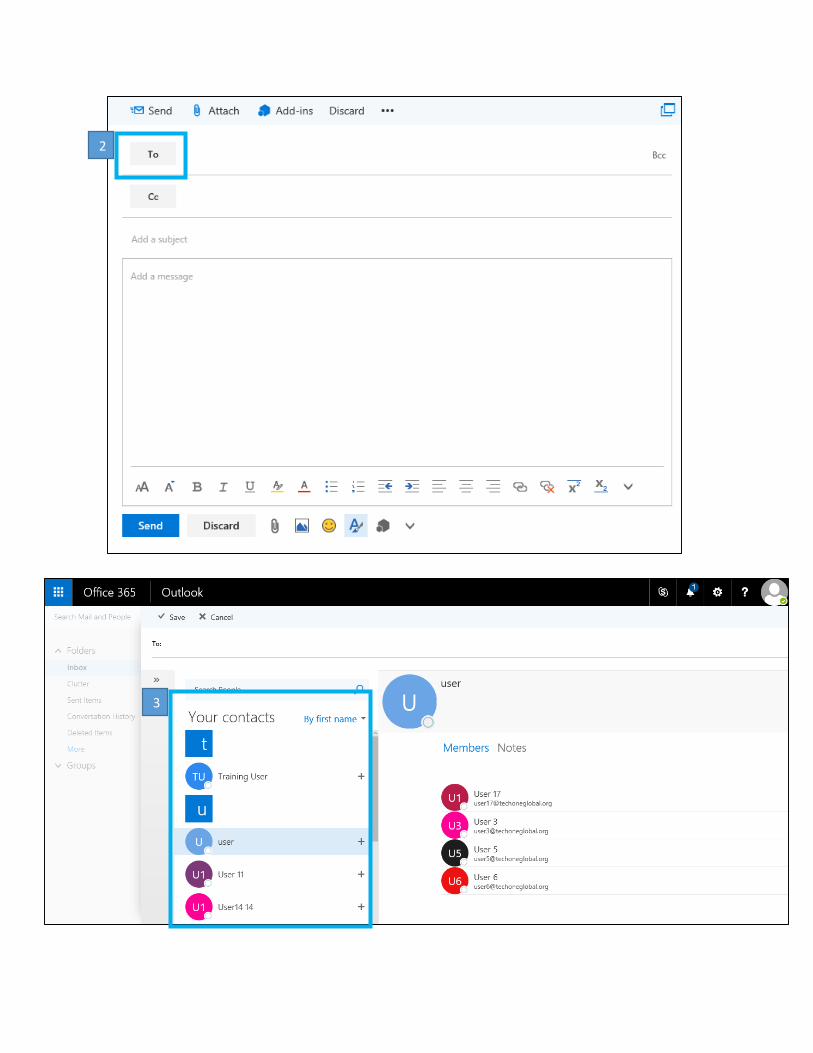
Create contact You may create contacts in the address book. Once you’ve saved someone as a contact, you can type the
first few letters of their name into an email, and Outlook will fill in their email address for you. This enables
much faster search. Contacts only can be seen by owners whereas group directory may be seen by others.
1) Click the menu button on the top left-hand corner to list down the drop down menu. Select People
2) Select New to create new contacts
1
1
2
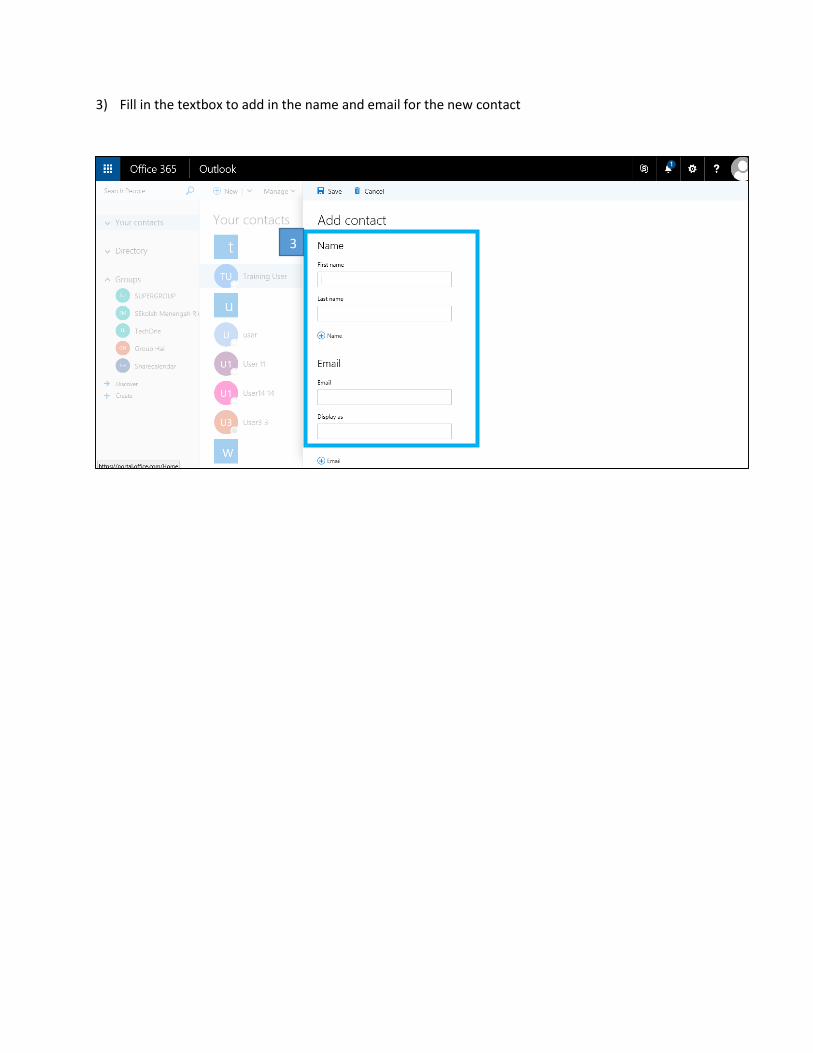
3) Fill in the textbox to add in the name and email for the new contact
3
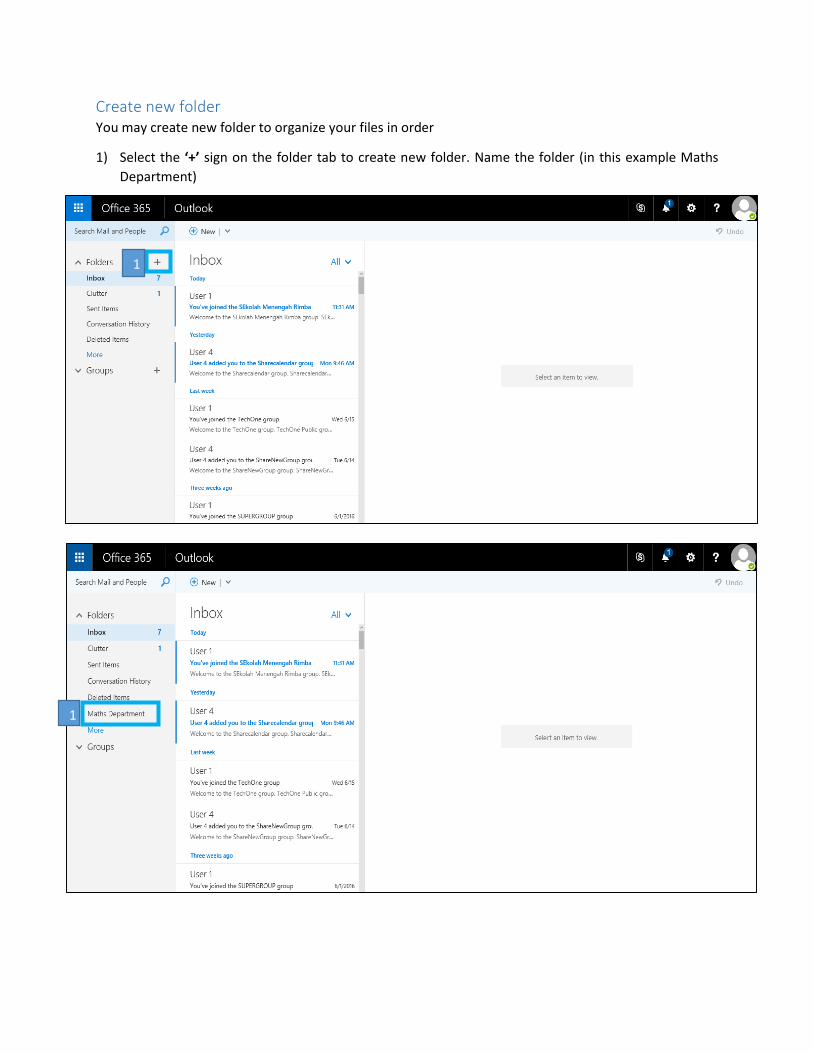
Create new folder You may create new folder to organize your files in order
1) Select the ‘+’ sign on the folder tab to create new folder. Name the folder (in this example Maths
Department)
1
1

Using the search functions Search function is used to search any keywords being written in the text box.
1) Type keywords in the text box as in this example ‘contact’
2) You may use the filter options to minimize your search
1
2

How to create Groups Groups enable collaboration among people. It allows people to work as a team.
1) Select the ‘+’ symbols on groups tab
2) Fill in the Name, Description, Privacy settings and language then click create.
3) You may choose the contact person that you want to add in the group
4) The new groups will be automatically added on the group list
2
2
4
1
2

3
4

Conversation in Groups You may have conversation between recipients in the groups. This is suitable if you need to be replied on
time
1) Select on the new conversation
1

2) You may write on the text box to start your conversation then click send
2

How to leave group You may leave the group if you do not intend to be part of the group anymore
1) Select the Join command to open the list then click leave group
1

How to add members You may add several recipients to you group.
1) Select members on the top right hand corner
2) Select the Add members to add new recipients
1
2

3) Enter the name of the recipients on the text box (as in this example user 2 and user 1) then click
save
4) The new user is added to this group
3
4
4
4

OFFICE 365 CALENDAR WHAT IS CALENDAR FOR MICROSOFT 365? Save date schedule, for reminder and notify. Add meeting, appointment and other event to your
calendar in Outlook Web App track and share with others.
What teachers need in the Calendar?
Holiday date
Exam date
Meeting date
Report date
Graduation date
Event date.
Birthday date
Personnel date.
Where we can find the Calendar button in the Microsoft 365?
Press at the menu site, then will show the button of the calendar.
What are the function in the Calendar Microsoft 365? And how to use each function describe?
1. Add Schedule
2. Delete Schedule
3. Create own calendars
4. Create group to share calendars
5. Share calendars.
6. How to add member in the group.
7. Search function.

Interface office 365 Calendar.
1
3
2
4
Description
1. Drop down menu
New for add new schedule (meeting, appointment etc.)
Add calendars
Share (with other member inside and outside organization)
2. Search Function
3. Categories of calendars
4. Categories of groups
5. The different view for calendar
5

ADD SCHEDULE AT THE CALENDAR Press New drop down then click Calendar event to add new schedule.
The outcome of new schedule, fill in the detail of your schedule.
Description
1. Add the title for the event
2. Add location for the event
3. Add room – list room in the directory
4. Choose a start time and duration, and adjust the time of reminder notification if you need to.
5. Show as list, choose how you want the appointment to appear on your calendar: Free, Etc.
6. You can fill in all detail description of the event
1 7
5
6
3 2
4
8

7. To add other member to share the calendars.
8. To save, discard, attach and add-link the calendar.
*There is another way to make add new schedule in calendar which is double click the date box inside
the calendar.
Notification and reminder by office 365 Calendar.
1
Description
1. The reminder will be pop up before the event happen.

CREATE OWN ANOTHER CALENDAR AND SECONDARY CALENDAR
To create your own calendar in My Calendar on the left side there is category name My Calendars then
just press the Plus (+) sign, then there will be textbox to fill in to add new own calendar.
Description
1. The category of My Calendar group
2. The plus (+) sign to add new own calendar
3. The text box to fill in the new calendar that you can to create
*For additional the other Calendar is an optional to use it.
2 1
3

CREATE GROUP TO SHARE CALENDARS
What is group share calendars in Microsoft 365?
To get start to create new group just press the Plus (+) button at the left side Group then you need to fill
in some detail.
Description
1. The group category that is available on the list
2. The Plus (+) to add new group on the list
3. Discover is you can join other group calendar, and create is another way to create calendar.
1 2
3

On the Right side there will be pop up to fill in detail of the new group.
Description
1. After you fill in all the detail then you press the create button to conform the new group.
2. Discover is undo to create new group.
3. Fill in the name for the new group with unique name.
4. The ID will automatically fill in with the name.
5. The description and detail of the group.
6. Privacy there is two option which is public and private
Public – anyone can see what’s inside
Private – only approved members can see what’s inside 7. Language to use. 8. To subscribe new members so they receive group conversation and calendar event in their
inbox. Otherwise, they’ll only see them in the group inbox.
Then after you fill in all the detail of the group you can add member
that you want to add. To be safe at the text box “Enter the name of a
person or group” fill in the email instead eg. [email protected].
1
3
4
5
6
7
2
8

Result after adding user into the group in calendar.

After you already created the new group, then if you want to add new member in the group press the
menu button then Click People.
Press the menu the choose People to add member.
Press the group that you want to add new member. Press the Add member.

Choose the new member to add in the group.
The result after adding the new members.

Go home button> click email.
Once the new user added to the group then will notify the user by email

The view of share calendar with other user.
Different section within the calendar. To see this function, you need to click the calendar section where
it is at the right side of the screen. In addition, you can set different color for each event by pressing
right click at the calendar section.

SEARCH FUNCTION
Make easy way to find your meeting or appointment in the calendar.

DELETE SCHEDULE AT THE CALENDAR To remove the meeting and appointment in the calendar.
Right click the meeting at the calendar that you want to delete. There are two option which is edit and
delete. Press delete to remove the meeting or appointment at the calendar.
Confirmation to delete will be ask by the applications.